Kia Rio / Rio Hatchback (2022 year). Manual in english - page 19
Maintenance
EXPLANATION OF SCHEDULED MAINTENANCE ITEMS
Engine oil and filter
Fuel filter (for gasoline)
Fuel lines, fuel hoses and con-
nections
The engine oil and filter should be
Kia gasoline vehicles are equipped
changed at the intervals specified in
with a lifetime fuel filter that inte-
Check the fuel lines, fuel hoses and
the maintenance schedule. If the
grates with the fuel tank. Regular
connections for leakage and dam-
vehicle is being driven in severe con-
maintenance or replacement is not
age. Have an authorized Kia dealer
ditions, more frequent oil and filter
needed but depends on fuel quality. If
replace any damaged or leaking
changes are required.
there are some important safety mat-
parts immediately.
ters like fuel flow restriction, surging,
loss of power, hard starting problem,
Drive belts
Fuel tank and fuel cap
etc., fuel filter inspection or replace is
Inspect all drive belts for evidence of
needed.
The fuel tank and fuel cap should be
cuts, cracks, excessive wear or oil
inspected at the intervals specified in
The fuel filter be inspected or
saturation, and replace if necessary.
the maintenance schedule. Make
replaced by an authorized Kia dealer.
Drive belts should be checked peri-
sure that a new fuel tank and fuel
odically for proper tension and
cap is installed correctly.
adjusted as necessary.
7
15
Maintenance
Vacuum crankcase ventilation
Air cleaner filter
Coolant
hoses
A Genuine Kia air cleaner filter is rec-
The coolant should be changed at
Inspect the surface of hoses for evi-
ommended when the filter is replaced.
the intervals specified in the mainte-
dence of heat and/or mechanical
nance schedule.
damage. Hard and brittle rubber,
Spark plugs
cracking, tears, cuts, abrasions, and
Intelligent Variable
excessive swelling indicate deterio-
Make sure to install new spark plugs
Transmission (IVT) fluid
ration. Particular attention should be
of the correct heat range.
The Intelligent Variable Transmission
paid to examine those hose surfaces
When assembling parts, be sure to
(IVT) fluid should not be checked
nearest to high heat sources, such
wipe the inside and outside of the
under normal usage conditions.
as the exhaust manifold.
boot bottom of the ignition coil and
Inspect the hose routing to assure
the insulator of the spark plug with a
But in severe conditions, the fluid
that the hoses do not come in con-
soft cloth to prevent contamination of
should be changed at an authorized
tact with any heat source, sharp
the spark plug insulator.
Kia dealer in accordance to the
scheduled maintenance at the begin-
edges or moving component which
ning of this chapter.
might cause heat damage or
Valve clearance (if equipped)
mechanical wear. Inspect all hose
connections, such as clamps and
Inspect excessive valve noise and/or
(Refer to “Maintenance Under Severe
couplings, to make sure they are
engine vibration and adjust if neces-
Usage Conditions” this chapter.)
secure, and that no leaks are pres-
sary. An authorized Kia dealer
ent. Hoses should be replaced
should perform the operation.
immediately if there is any evidence
of deterioration or damage.
Cooling system
Check the cooling system compo-
nents, such as the radiator, coolant
reservoir, hoses and connections for
leakage and damage. Replace any
damaged parts.
7
16
Maintenance
✽ NOTICE
Brake hoses and lines
CAUTION
The
Intelligent
Variable
Visually check for proper installation,
Use only specified Intelligent
Transmission
(IVT) fluid color is
chafing, cracks, deterioration and
Variable Transmission
(IVT)
amber. As the vehicle is driven, the
any leakage. Replace any deteriorat-
fluid. The use of non-specified
Intelligent Variable Transmission
ed or damaged parts immediately.
fluid (even marked as compati-
(IVT) fluid will begin to look darker.
ble with genuine) could result
This is normal, and you should not
in shift quality deterioration
judge the need to replace the fluid
and vibrations, and eventually,
based upon the changed color.
transmission failure.
(Refer to “Recommended lubri-
cants and capacities” in chapter
8.)
OBD078066
7
17
Maintenance
✽ NOTICE - NHTSA Safety
(Continued)
Brake fluid
Corrosion Alert
1. Wash the undercarriage of your
Check the brake fluid level in the
vehicle regularly throughout the
NHTSA has warned all vehicle own-
brake fluid reservoir. The level should
winter and do a thorough washing
ers of all brands that they must main-
be between the “MIN” and “MAX”
in the spring to remove road salt
tain their vehicles in a manner which
marks on the side of the reservoir.
and other de-icing chemicals.
will prevent brake hose and brake line
Use only hydraulic brake fluid con-
2. Monitor the brake system for
failures due to corrosion when such
forming to DOT 4 specification.
signs of corrosion by having regu-
vehicles are exposed to winter road
lar professional inspections and
salt and related chemicals. While seri-
watching for signs of problems,
Parking brake
ous corrosion conditions typically only
including loss of brake fluid,
manifest themselves as safety issues
Inspect the parking brake system
unusual leaks and soft or spongy
after 7 years of vehicle use, the corro-
including the parking brake lever and
feel in the brake pedal.
sion process starts immediately and
cables.
3. Replace the entire brake pipe
thus underbody cleaning maintenance
assembly if you find severe corro-
must commence from your vehicle's
sion that causes scaling or flaking
first exposure to road salts and chem-
of brake components.
icals. NHTSA urges vehicle owners to
take the following steps to prevent
corrosion:
(Continued)
7
18
Maintenance
Brake discs, pads and calipers
Steering gear box, linkage &
boots/lower arm ball joint
Check the pads for excessive wear,
discs for run out and wear, and
With the vehicle stopped and engine
calipers for fluid leakage.
off, check for excessive free-play in
the steering wheel.
Exhaust pipe and muffler
Check the linkage for bends or dam-
age. Check the dust boots and ball
Visually inspect the exhaust pipes,
joints for deterioration, cracks, or
muffler and hangers for cracks, dete-
damage. Replace any damaged
rioration, or damage. Start the
parts.
engine and listen carefully for any
exhaust gas leakage. Tighten con-
Drive shafts and boots
nections or replace parts as neces-
sary.
Check the drive shafts, boots and
clamps for cracks, deterioration, or
damage. Replace any damaged
Suspension mounting bolts
parts and, if necessary, repack the
Check the suspension connections
grease.
for looseness or damage. Retighten
to the specified torque.
Air conditioning refrigerant
Check the air conditioning lines and
connections for leakage and damage.
7
19
Maintenance
CHECKING FLUID LEVELS
When checking engine oil, engine
coolant, brake fluid, and washer fluid,
always be sure to clean the area
around any filler plug, drain plug, or
dipstick before checking or draining
any lubricant or fluid. This is espe-
cially important in dusty or sandy
areas and when the vehicle is used
on unpaved roads. Cleaning the plug
and dipstick areas will prevent dirt
and grit from entering the engine and
other mechanisms that could be
damaged.
7
20
Maintenance
ENGINE OIL
Checking the engine oil level
■ Smartstream G1.6
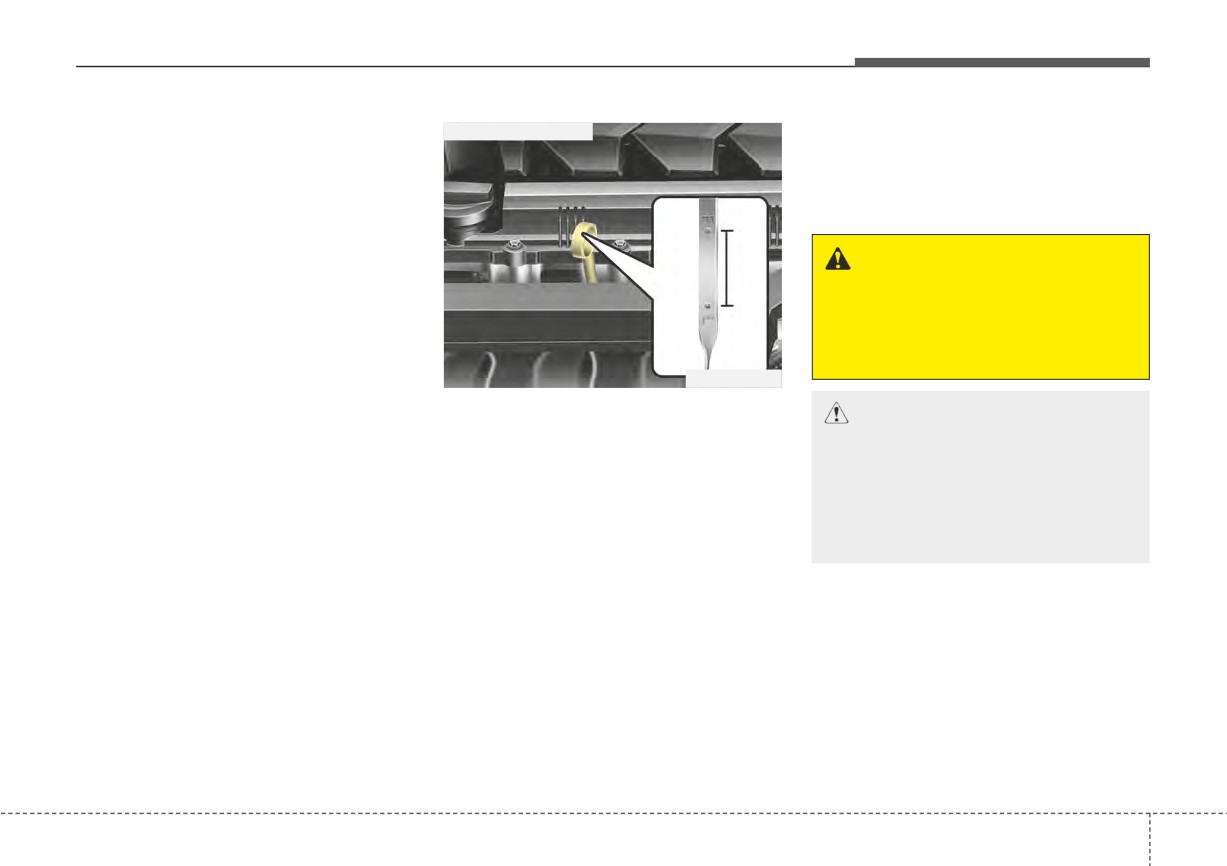
5. Pull the dipstick out again and
check the level. Check if the oil
Engine oil is used for lubricating,
level is between the F-L line, and if
cooling, and operating various
it is below the L line, add enough
hydraulic components in the engine.
oil to bring the level to F line.
Engine oil consumption while driving
is normal, and it is necessary to
WARNING - Radiator hose
check and refill the engine oil regu-
Be very careful not to touch the
larly. Also, check and refill the oil
radiator hose when checking or
level within the recommended main-
adding the engine oil as it may
tenance schedule to prevent deterio-
be hot enough to burn you.
ration of oil performance.
OSC078048N
Check the engine oil following the
1. Be sure the
vehicle
is on level
below procedure.
CAUTION
ground.
When you wipe the oil level
2. Start the engine and allow it to
gauge, you should wipe it with a
reach normal operating tempera-
ture.
clean cloth.
3. Turn the engine off, remove the oil
When mixed with debris, it can
filler cap and pull the dipstick out.
cause engine damage.
Wait for 15 minutes for the oil to
return to the oil pan.
4. Wipe the dipstick clean and re-
insert it fully.
7
21
Maintenance
■ Smartstream G1.6
•
Do not spill engine oil when adding
Changing the engine oil and
or changing engine oil. Wipe off
filter
spilled oil immediately.
Have engine oil and filter changed by
•
The engine oil consumption may
an authorized Kia dealer according
increase while you break in a new
to the Maintenance Schedule at the
vehicle and it will be stabilized after
beginning of this chapter.
driving 4,000 miles (6,000 km).
•
If the maintenance schedule to
•
The engine oil consumption can be
replace engine oil is exceeded, the
affected by driving habits, climate
engine oil performance may deteri-
conditions, traffic conditions, oil
orate, and the engine condition
quality, etc. Therefore, it is recom-
may be affected. Therefore,
OSC071049N
mended that you inspect the
replace the engine oil according to
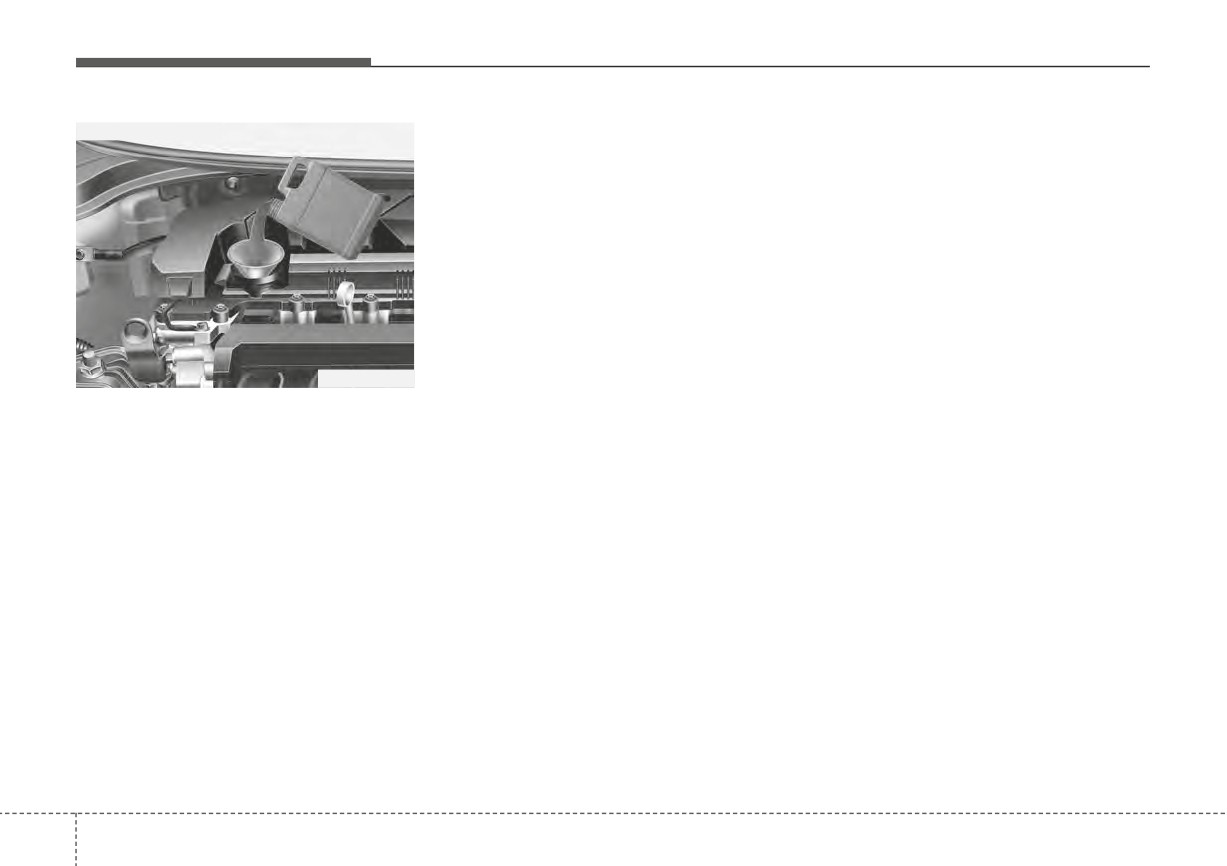
Use a funnel to help prevent oil
engine oil level regularly and refill it
the maintenance schedule.
from being spilled on engine com-
if necessary.
•
To keep the engine in optimal con-
ponents.
•
The engine oil change interval is
dition, use the recommended
set for the purpose of preventing oil
engine oil and filter. If the recom-
deterioration, and is not related to
Use only the specified engine oil.
mended engine oil and filter are
(Refer to “Recommended lubricants
the amount of oil consumption; so,
not used replace it according to the
check and refill the amount of the
and capacities” in chapter 8.)
maintenance schedule under
oil regularly.
severe usage conditions.
•
The purpose of the maintenance
schedule for engine oil replace-
ment is to prevent oil deterioration
and it is irrelevant to oil consump-
tion. Check and refill engine oil reg-
ularly.
7
22
Maintenance
WARNING - Used engine
oil
Used engine oil may cause irrita-
tion or cancer of the skin if left in
contact with the skin for pro-
longed periods of time. Always
protect your skin by washing
your hands thoroughly with
soap and warm water as soon as
possible after handling used oil.
Do not leave used engine oil
within the reach of children.
CAUTION
The engine oil is very hot imme-
diately after the vehicle has
been driven and can cause
burns during replacement.
Replace the engine oil after the
engine oil has cooled down.
7
23
Maintenance
ENGINE COOLANT
The high-pressure cooling system
Checking the coolant level
•
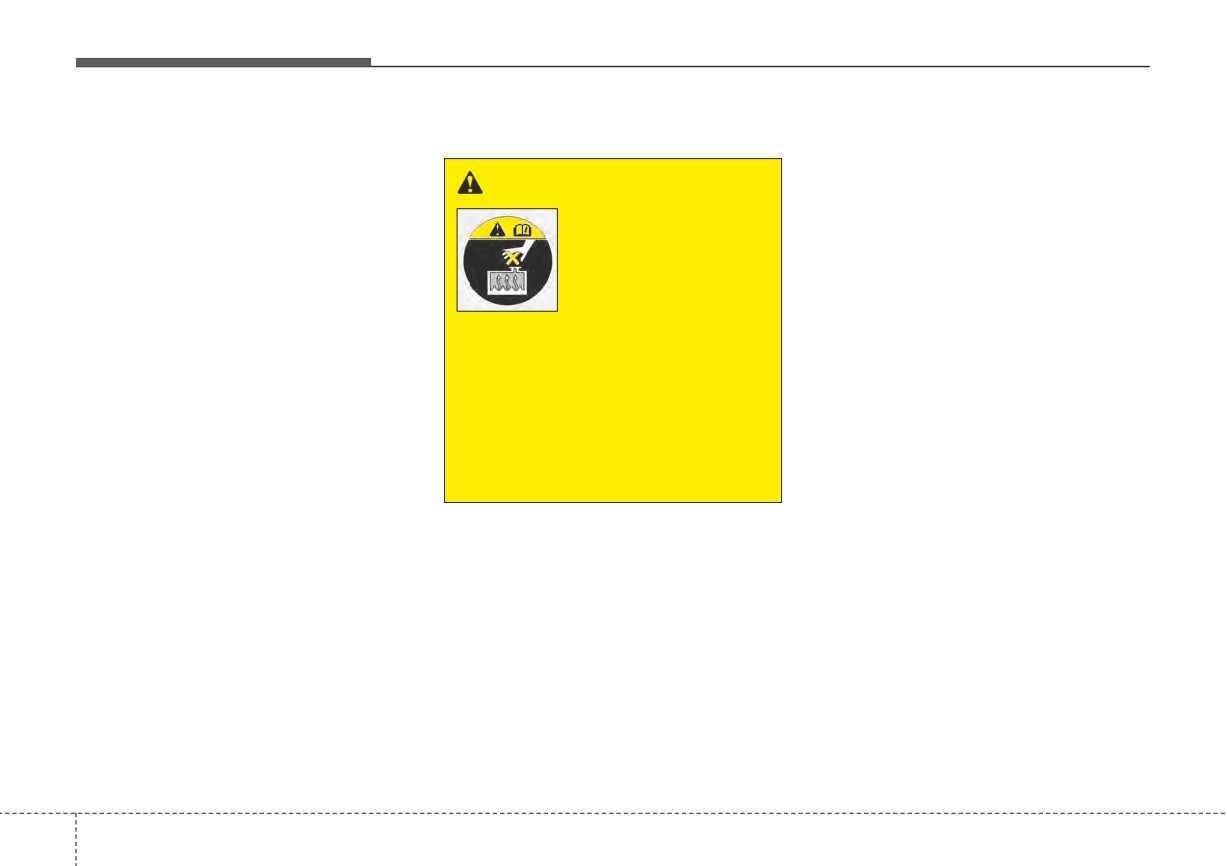
Turn the engine off and wait until it
has a reservoir filled with year round
cools down. Use extreme care
antifreeze coolant. The reservoir is
when removing the radiator cap.
WARNING
filled at the factory.
Wrap a thick towel around it, and
Removing radiator
turn it counterclockwise slowly to
Check the antifreeze protection and
cap
the first stop. Step back while the
coolant level at least once a year: at
pressure is released from the cool-
the beginning of the winter season,
ing system.
and before traveling to a colder cli-
mate.
When you are sure all the pressure
Never attempt to remove the
has been released, press down on
radiator cap while the engine is
the cap, using a thick towel, and
operating or hot. Doing so
continue turning counterclockwise
might lead to cooling system
to remove it.
and engine damage and could
•
Even if the engine is not operating,
result in serious personal injury
do not remove the radiator cap or
from escaping hot coolant or
the drain plug while the engine and
steam.
radiator are hot. Hot coolant and
steam may still blow out under
pressure, causing serious injury.
7
24
Maintenance
Recommended engine coolant
WARNING - Cooling fan
•
When adding coolant, use only
deionized water or soft water for
your vehicle and never mix hard
water in the coolant filled at the fac-
tory. An improper coolant mixture
can result in serious malfunction or
Use caution when working near
engine damage.
the blade of the cooling fan. The
•
The engine in your vehicle has alu-
electric motor (cooling fan) is
minum engine parts and must be
controlled by engine coolant
protected by an ethylene-glycol
temperature, refrigerant pres-
OSC077016N
with phosphate based coolant to
sure and vehicle speed. it may
Check the condition and connections
prevent corrosion and freezing.
sometimes operate even when
of all cooling system hoses and
•
DO NOT USE alcohol or methanol
the engine is not running.
heater hoses. Replace any swollen
coolant or mix them with the spec-
or deteriorated hoses.
ified coolant.
The coolant level should be filled
•
Do not use a solution that contains
between F and L marks on the side
more than 60% antifreeze or less
of the coolant reservoir when the
than
35% antifreeze. This would
engine is cool.
reduce the effectiveness of the
If the coolant level is low, add enough
solution.
specified coolant to provide protec-
tion against freezing and corrosion.
✽ NOTICE
Bring the level to F, but do not over-
fill. If frequent additions are required,
Make sure that the coolant cap is
see an authorized Kia dealer for a
properly closed after refilling the
cooling system inspection.
coolant. Otherwise the engine could
overheat while driving.
7
25
Maintenance
For mixture percentage, refer to the
Changing the coolant
following table.
Have the coolant changed by an
authorized Kia dealer according to
Mixture Percentage
Ambient
the Maintenance Schedule at the
(volume)
Temperature
beginning of this chapter.
Antifreeze
Water
5°F (-15°C)
35
65
-13°F (-25°C)
40
60
CAUTION
-31°F (-35°C)
50
50
Put a thick cloth or fabric
-49°F (-45°C)
60
40
around the radiator cap before
refilling the coolant in order to
OSC070160N
prevent the coolant from over-
flowing into engine parts such
as the alternator.
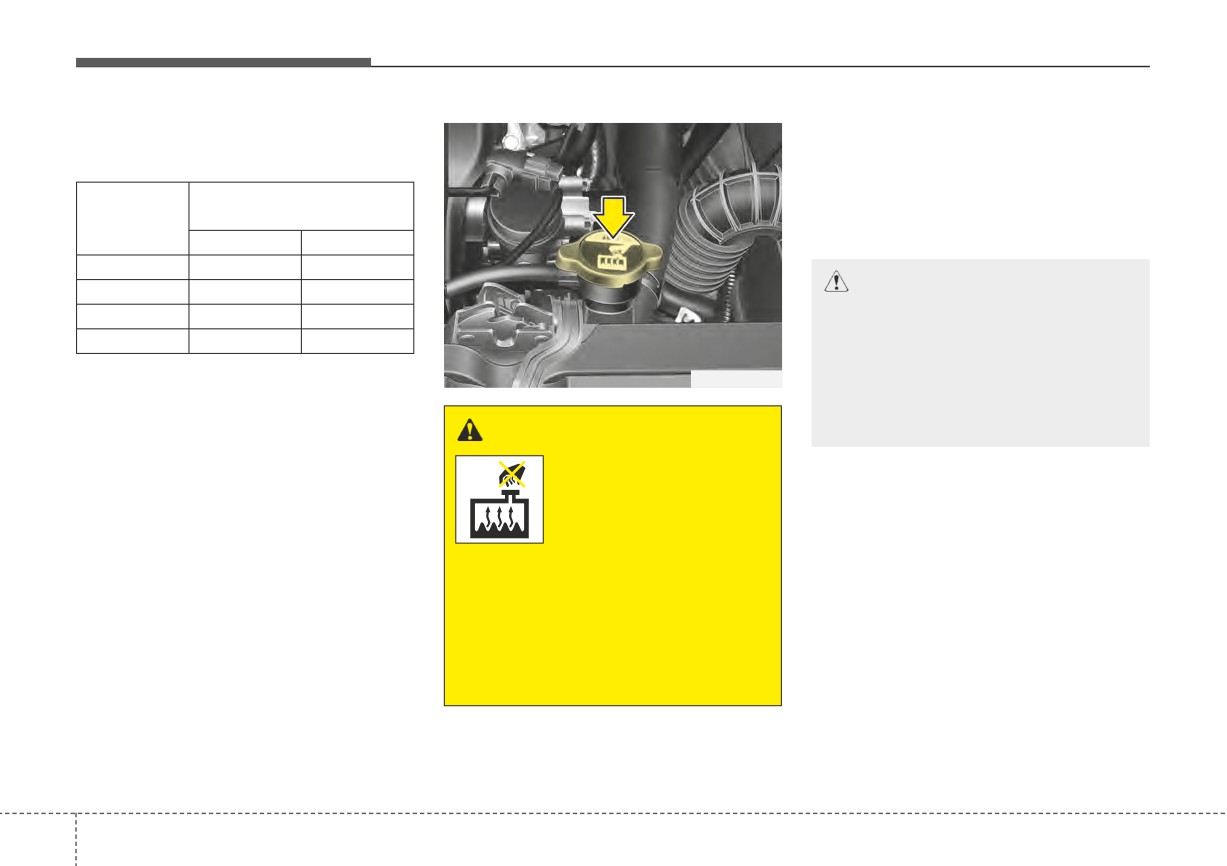
WARNING
Radiator cap
Do not remove the radiator cap
when the engine and radiator
are hot. Scalding hot coolant
and steam may blow out under
pressure which may result in
serious injury.
7
26
Maintenance
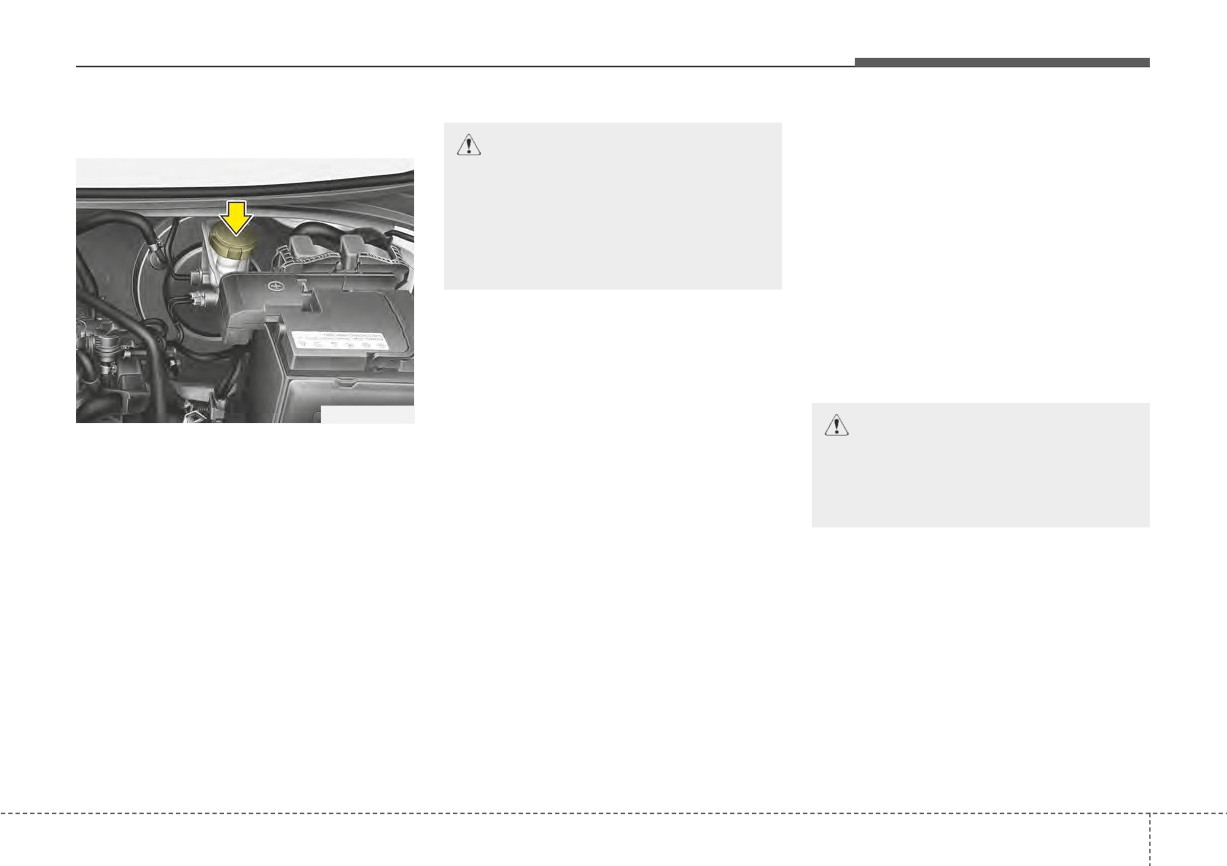
BRAKE FLUID (IF EQUIPPED)
Checking the brake fluid level
In the event the brake system
CAUTION
- Proper fluid
requires frequent additions of fluid,
Only use brake fluid in brake
the vehicle should be inspected by
system. Small amounts of
an authorized Kia dealer.
improper fluids (such as engine
When changing and adding brake
oil) can cause damage to the
fluid, handle it carefully. Do not let it
brake system.
come in contact with your eyes. If
brake fluid should come in contact
with your eyes, immediately flush
If the level is low, add fluid until you
them with a large quantity of fresh
reach the MAX (Maximum) level. The
tap water. Have your eyes examined
level will fall with accumulated
by a doctor as soon as possible.
mileage. This is a normal condition
OYB076013
associated with the wear of brake lin-
CAUTION - brake fluid
ings. If the fluid level is excessively
Check the fluid level in the reservoir
low, have the brake system checked
Do not allow brake fluid to con-
periodically. The fluid level should be
by an authorized Kia dealer.
tact the vehicle's body paint, as
between the MAX (Maximum) and
paint damage will result.
MIN (Minimum) marks on the side of
the reservoir.
Use only the specified brake fluid.
Before removing the reservoir cap
(Refer to “Recommended lubricants
Brake fluid which has been exposed
and capacities” in chapter 8.)
to open air for an extended time
and adding brake fluid, clean the
area around the reservoir cap thor-
should never be used as its quality
cannot be guaranteed. It should be
oughly to prevent brake fluid contam-
Never mix different types of fluid.
ination.
disposed of properly.
7
27
Maintenance
CAUTION
To maintain your vehicle’s best
brake and ABS/ESC perform-
ance, use Kia genuine brake
fluid as in the specification.
(Classification : FMVSS116 DOT-
4)
7
28
Maintenance
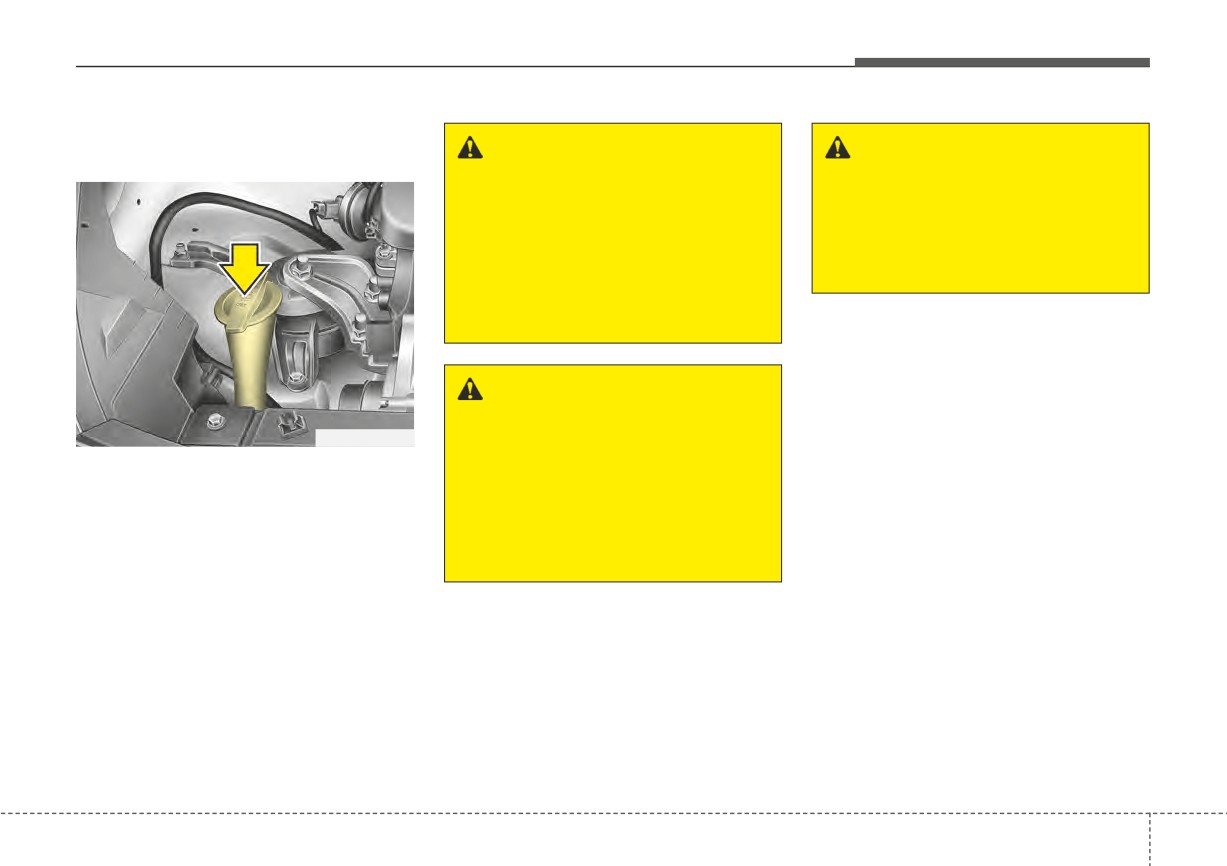
WASHER FLUID
Checking the washer fluid
level
WARNING - Flammable
WARNING - Windshield
fluid
fluid
Do not allow the washer fluid to
Do not drink the windshield
come in contact with open
washer fluid. The windshield
flames or sparks. The windshield
washer fluid is poisonous to
washer fluid reservoir is flamma-
humans and animals.
ble under certain circumstances.
This can result in a fire.
WARNING - Coolant
• Do not use radiator coolant or
OSC077019N
antifreeze in the washer fluid
reservoir.
The reservoir is translucent so that
you can check the level with a quick
• Radiator coolant can severely
visual inspection.
obscure visibility when sprayed
Check the fluid level in the washer
on the windshield and may
cause loss of vehicle control.
fluid reservoir and add fluid if neces-
sary. In warm climates, plain water
may be used if washer fluid is not
available. However, use washer sol-
vent with antifreeze characteristics in
cold climates to prevent freezing.
7
29
Maintenance
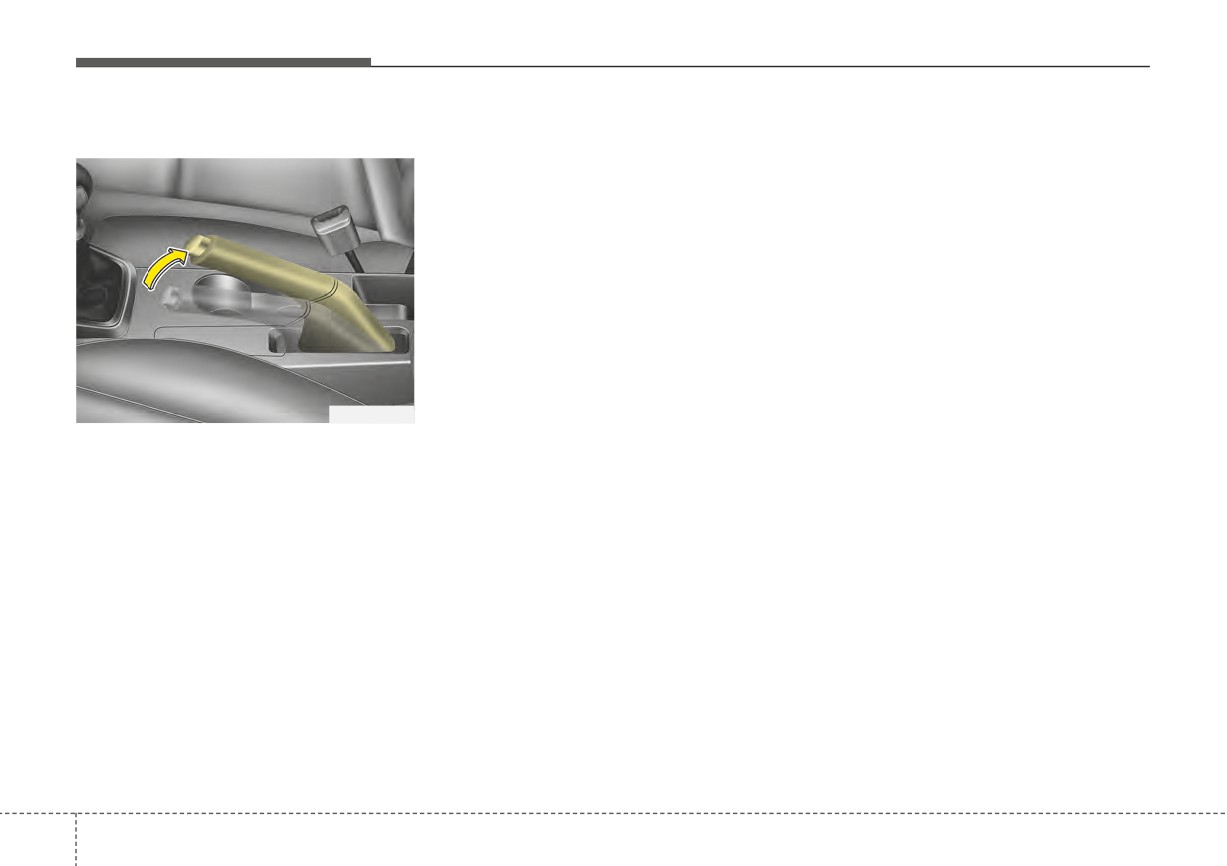
PARKING BRAKE
Checking the parking brake
OYB076016
Check the stroke of the parking
brake by counting the number of
“clicks’’ heard while fully applying it
from the released position. Also, the
parking brake alone should securely
hold the vehicle on a fairly steep
grade. If the stroke is more or less
than specified, have the parking
brake adjusted by an authorized Kia
dealer.
Stroke : 5~7 “clicks’’ at a force of 44
lbs (20 kg, 196 N).
7
30
Maintenance
AIR CLEANER
Filter replacement
OYB076020
OYB076021
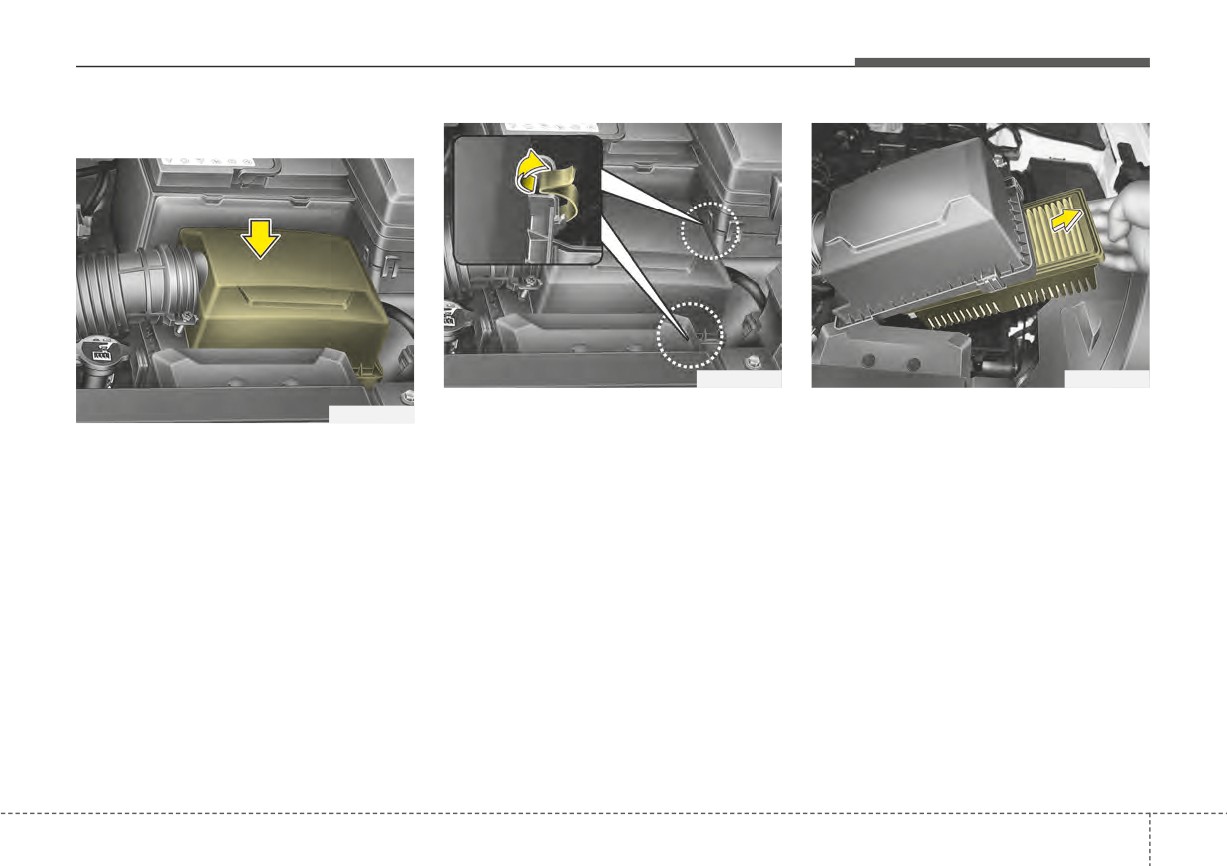
1. Loosen the air cleaner cover
2. Wipe the inside of the air cleaner.
OYB076018
attaching clips and open the cover.
3. Replace the air cleaner filter.
It must be replaced when necessary,
and should not be washed.
4. Lock the cover with the cover
attaching clips.
You can clean the filter when inspect-
ing the air cleaner compartment.
Clean the filter by using compressed
air.
7
31
Maintenance
Replace the filter according to the
Maintenance Schedule.
CAUTION - Air filter
maintenance
If the vehicle is operated in extreme-
ly dusty or sandy areas, replace the
• Do not drive with the air clean-
element more often than the usual
er removed; this will result in
recommended intervals.
(Refer to
excessive engine wear.
“Maintenance under severe usage
• When removing the air cleaner
conditions” in this chapter.)
filter, be careful that dust or
dirt does not enter the air
intake, or damage may result.
• Use a Kia genuine part. Use of
a non-genuine part could
damage the air flow sensor.
7
32
Maintenance
CLIMATE CONTROL AIR FILTER
Filter inspection
The climate control air filter should
be replaced according to the
Maintenance Schedule. If the vehicle
is operated in severely air-polluted
cities or on dusty rough roads for a
long period, it should be inspected
more frequently and replaced earlier.
When you replace the climate control
air filter, replace it performing the fol-
lowing procedure, and be careful to
avoid damaging other components.
OYB076022
OYB076023
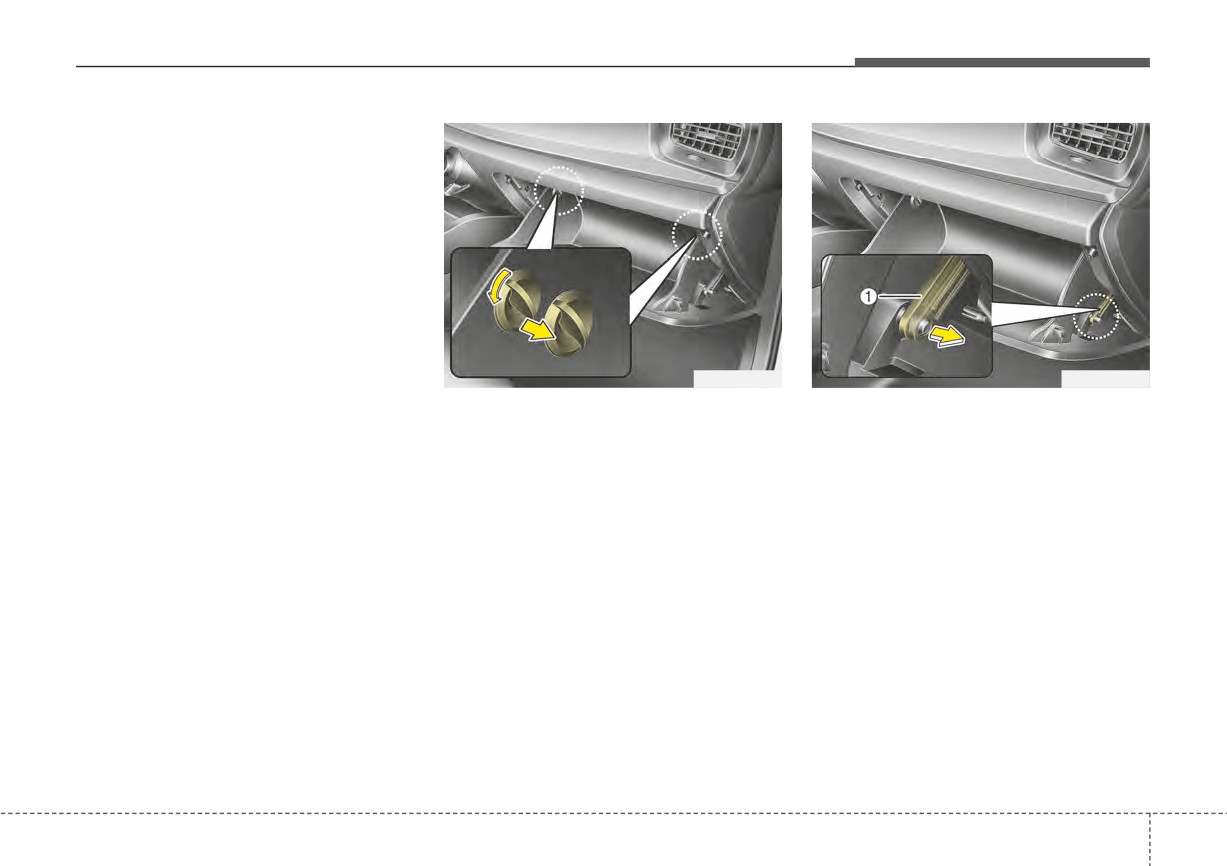
1. Open the glove box and remove
2. With the glove box open, pull the
the stoppers on both sides.
support strap (1).
7
33
Maintenance
OSC076007
OQL075021
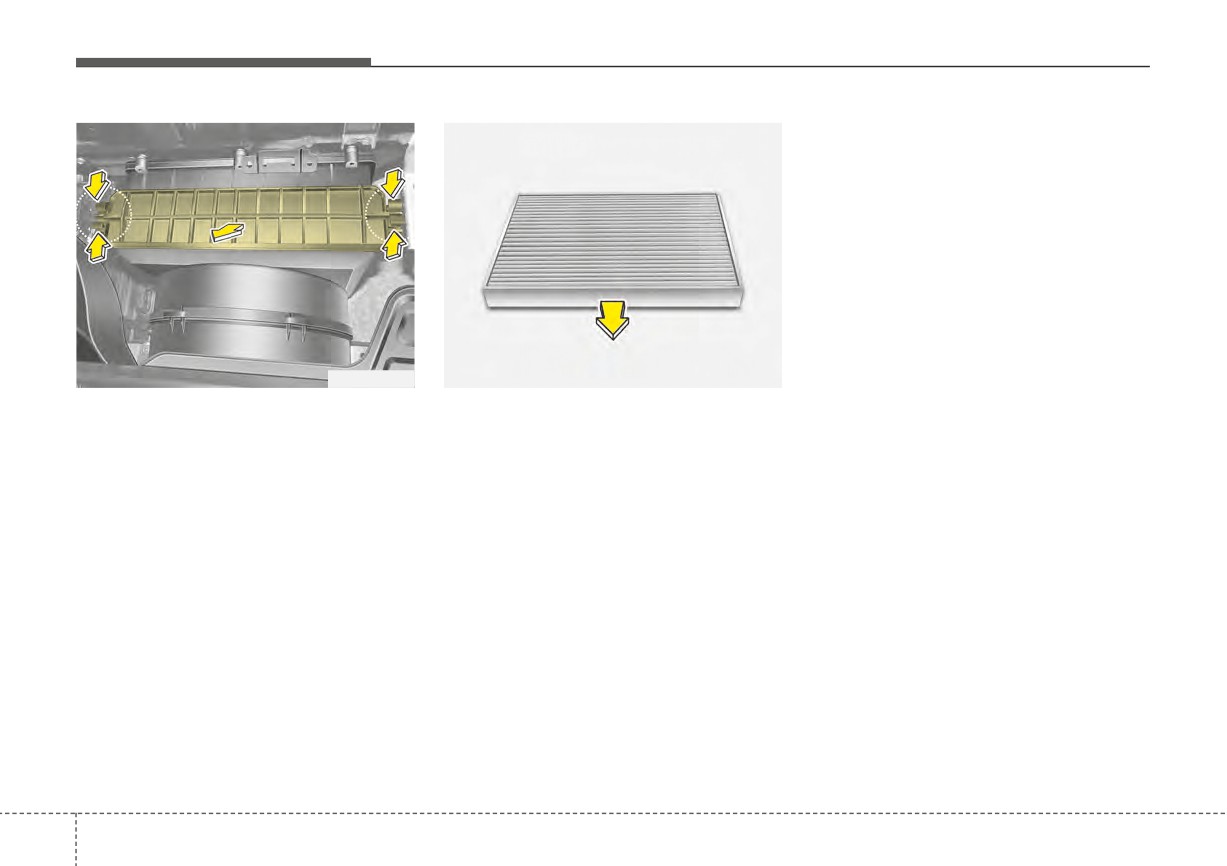
3. Remove the climate control air fil-
4. Replace the climate control air fil-
ter cover while pressing the lock
ter.
on both sides of the cover.
5. Reassemble in the reverse order
of disassembly.
When replacing the climate control
air filter, install it properly. Otherwise,
the system may produce noise, and
the effectiveness of the filter may be
reduced.
7
34
Maintenance
WIPER BLADES
Blade inspection
Contamination of either the wind-
Blade replacement
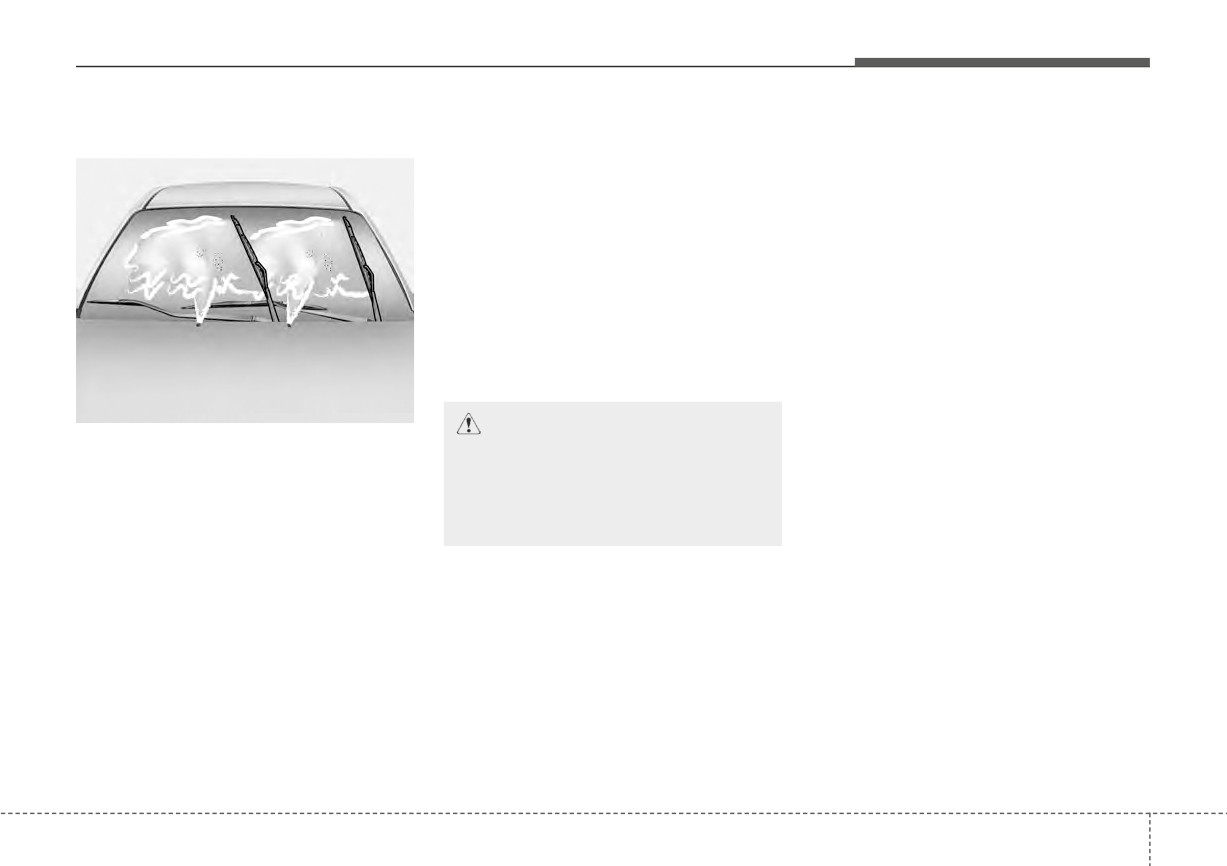
shield or the wiper blades with for-
When the wipers no longer clean
eign matter can reduce the effective-
adequately, the blades may be worn
ness of the windshield wipers.
or cracked, and require replacement.
Common sources of contamination
are insects, tree sap, and hot wax
To prevent damage to the wiper arms
or other components, do not attempt
treatments used by some commer-
cial car washes. If the blades are not
to move the wipers manually.
wiping properly, clean both the win-
Aftermarket wiper blades may result
dow and the blades with a good
in wiper malfunction and/or failure. It
cleaner or mild detergent, and rinse
is recommended to use certified Kia
thoroughly with clean water.
parts.
1JBA5122
CAUTION - Wiper blades
Commercial hot waxes
applied by
To prevent damage to the wiper
automatic car washes have been
blades, do not use gasoline,
known to make the windshield diffi-
kerosene, paint thinner, or other
cult to clean.
solvents on or near them.
7
35
Maintenance
Front windshield wiper blade
CAUTION - Wiper arms
Do not allow the wiper arm to
fall against the windshield,
since it may chip or crack the
windshield.
1JBA7037
1LDA5023
Type A
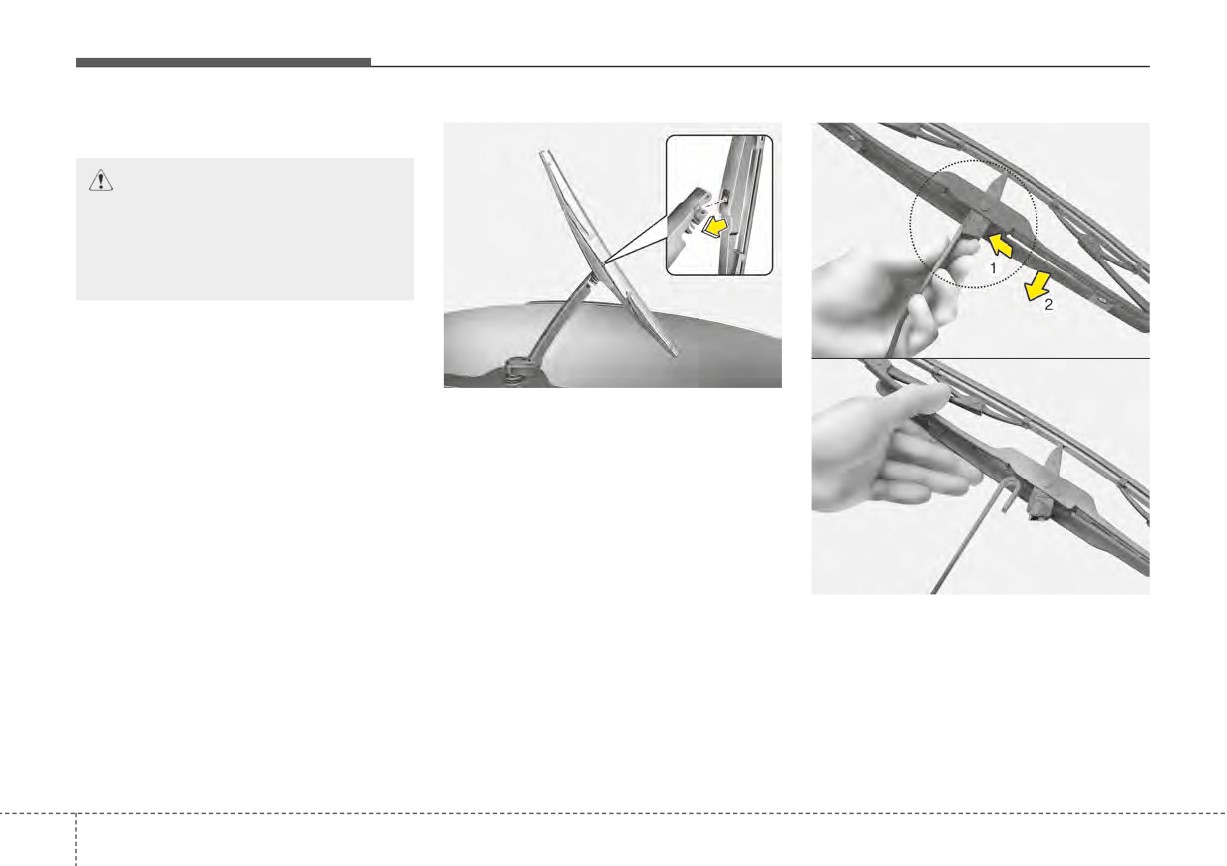
1. Raise the wiper arm and turn the
wiper blade assembly to expose
the plastic locking clip.
1JBA7038
2. Compress the clip (1) and slide
the blade assembly downward (2).
3. Lift it off the arm.
4. Install the blade assembly in the
reverse order of removal.
7
36