Kia Rio / Rio Hatchback (2022 year). Manual in english - page 17
What to do in an emergency
IF THE ENGINE WILL NOT START
If the engine doesn't turn over
If engine turns over normally
or turns over slowly
WARNING - Push/
but does not start
pull start
1. If your vehicle has an intelligent
1. Check fuel level.
Do not push or pull the vehicle
variable transmission, be sure the
2. With the ignition switch in the
shift lever is in N (Neutral) or P
to start it. Push or pull starting
LOCK position, check all connec-
may cause the catalytic con-
(Park) and the emergency brake is
tors at the ignition coil and spark
set.
verter to overload and create a
plugs. Reconnect any that may be
fire hazard.
2. Check the battery connections to
disconnected or loose.
be sure they are clean and tight.
3. Check the fuel line in the engine
3. Turn on the interior light. If the light
compartment.
dims or goes out when you oper-
4. If the engine still does not start,
ate the starter, the battery is dis-
call an authorized Kia dealer or
charged.
seek other qualified assistance.
4. Check the starter connections to
be sure they are securely tight-
ened.
5. Do not push or pull the vehicle to
start it. See instructions for “Jump
starting”.
6
4
What to do in an emergency
EMERGENCY STARTING
Jumper Cables
CAUTION - 12 volt battery
WARNING - Battery
Use only a 12-volt jumper sys-
Keep all flames or sparks away
tem. You can damage a 12-volt
from the battery. The battery
starting motor, ignition system,
produces hydrogen gas which
and other electrical parts
will explode if exposed to flame
(-)
(+)
beyond repair by use of a 24-
or sparks.
(-)
volt power supply
(either two
Discharged battery
12-volt batteries in series or a
(+)
24-volt motor generator set).
WARNING - Sulfuric acid
Booster battery
risk
1VQA4001
When jump starting your vehicle
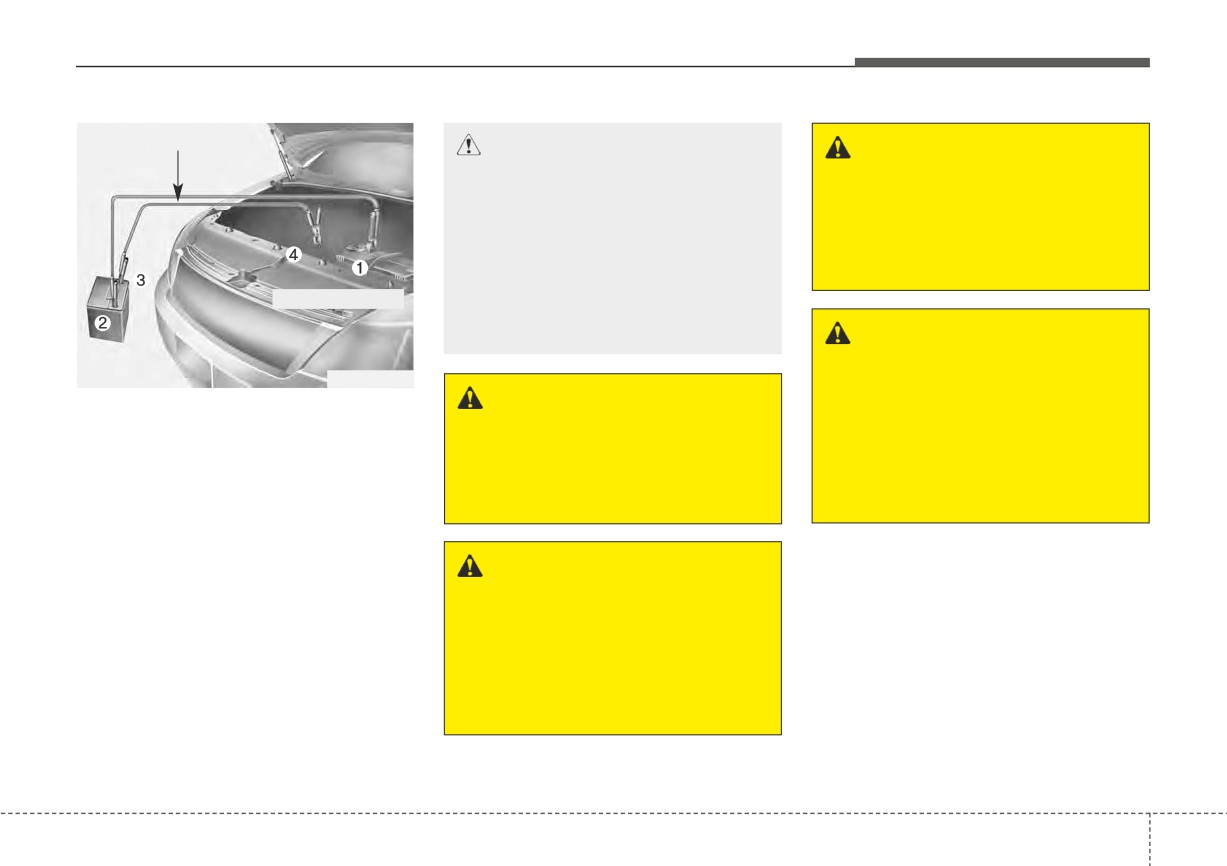
Connect cables in numerical order
WARNING - Battery
be careful not to get acid on
and disconnect in reverse order.
Never attempt to check the elec-
yourself, your clothing or on the
trolyte level of the battery as
vehicle. Automobile batteries
this may cause the battery to
contain sulfuric acid. This is poi-
Jump starting
rupture or explode.
sonous and highly corrosive.
Jump starting can be dangerous if
done incorrectly. Therefore, to avoid
harm to yourself or damage to your
WARNING - Frozen
vehicle or battery, follow these jump
batteries
starting procedures. If in doubt, we
strongly recommend that you have a
Do not attempt to jump start the
competent technician or towing serv-
vehicle if the discharged battery
ice jump start your vehicle.
is frozen or if the electrolyte
level is low, as the battery may
rupture or explode.
6
5
What to do in an emergency
Jump starting procedure
Do not allow the jumper cables to
Push-starting
contact anything except the cor-
1. Make sure the booster battery is
Vehicles equipped with intelligent
rect battery terminals or the cor-
12-volt and that its negative termi-
variable transmission cannot be
rect ground. Do not lean over the
nal is grounded.
push-started.
battery when making connections.
2. If the booster battery is in another
Follow the directions in this section
vehicle, do not allow the vehicles
for jump-starting.
to come in contact.
WARNING - Battery
3. Turn off all unnecessary electrical
cables
WARNING - Tow starting
loads.
Do not connect the jumper cable
vehicle
4. Connect the jumper cables in the
from the negative terminal of the
Never tow a vehicle to start it.
exact sequence shown in the illus-
booster battery to the negative
When the engine starts, the
tration. First connect one end of a
terminal of the discharged bat-
vehicle can suddenly surge for-
jumper cable to the positive termi-
tery. This can cause the dis-
ward and could cause a colli-
nal of the discharged battery (1),
charged battery to overheat and
sion with the tow vehicle.
then connect the other end to the
crack, releasing battery acid.
positive terminal of the booster
Make sure to connect one end of
battery (2).
the jumper cable to the negative
Proceed to connect one end of the
terminal of the booster battery,
other jumper cable to the negative
and the other end to a metallic
terminal of the booster battery (3),
point, far away from the battery.
then the other end to a solid, sta-
tionary, metallic point (for example,
5. Start the engine of the vehicle with
the engine lifting bracket) away
the booster battery and let it run at
from the battery (4). Do not con-
2,000 rpm, then start the engine of
nect it to or near any part that
the vehicle with the discharged
moves when the engine is
battery.
cranked.
If the cause of your battery discharg-
ing is not apparent, you should have
your vehicle checked by an author-
ized Kia dealer.
6 6
What to do in an emergency
IF THE ENGINE OVERHEATS
If your temperature gauge indicates
4. Check to see if the water pump
overheating, you will experience a
drive belt is missing. If it is not
WARNING - Radiator cap
loss of power, or hear loud pinging or
missing, check to see that it is
Do not remove the radiator cap
knocking, the engine is probably too
tight. If the drive belt seems to be
when the engine is hot. This can
hot. If this happens, you should:
satisfactory, check for coolant
allow coolant to be blown out of
leaking from the radiator, hoses or
the opening and cause serious
under the vehicle. (If the air condi-
burns.
1. Pull off the road and stop as soon
tioning had been in use, it is nor-
as it is safe to do so.
mal for cold water to be draining
2. Place the shift lever in P
from it when you stop).
6. If you cannot find the cause of the
(Intelligent Variable Transmission)
overheating, wait until the engine
and set the parking brake. If the air
temperature has returned to nor-
conditioning is on, turn it off.
WARNING - Under the
mal. Then, if coolant has been lost,
hood
3. If engine coolant is running out
carefully add coolant to the reser-
under the vehicle or steam is com-
While the engine is running,
voir to bring the fluid level in the
ing out from underneath the hood,
keep hair, hands and clothing
reservoir up to the halfway mark.
stop the engine. Do not open the
away from moving parts such
7. Proceed with caution, keeping
hood until the
coolant has
as the fan and drive belts.
alert for further signs of overheat-
stopped running or the steaming
ing. If overheating happens again,
has stopped. If there is no visible
5. If the water pump drive belt is bro-
call an authorized Kia dealer for
loss of engine coolant and no
ken or engine coolant leaks, stop
assistance.
steam, leave the engine running
the engine immediately and call
Serious loss of coolant indicates
and check to be sure the engine
the nearest authorized Kia dealer
there is a leak in the cooling system
cooling fan is operating. If the fan
for assistance.
and this should be checked as soon
is not running, turn the engine off.
as possible by an authorized Kia
dealer.
6
7
What to do in an emergency
TIRE PRESSURE MONITORING SYSTEM (TPMS - TYPE A)
As an added safety feature, your
Your vehicle has also been equipped
vehicle has been equipped with a tire
with a TPMS malfunction indicator to
pressure monitoring system (TPMS)
indicate when the system is not oper-
that illuminates a low tire pressure
ating properly. The TPMS malfunction
telltale when one or more of your
indicator is combined with the low tire
tires is significantly under-inflated.
pressure telltale. When the system
Accordingly, when the low tire pres-
detects a malfunction, the telltale will
sure telltale illuminates, you should
flash for approximately one minute
stop and check your tires as soon as
and then remain continuously illumi-
possible, and inflate them to the
nated. This sequence will continue
proper pressure. Driving on a signifi-
upon subsequent vehicle start-ups as
cantly under-inflated tire causes the
long as the malfunction exists. When
OSC061001N
tire to overheat and can lead to tire
the malfunction indicator is illuminat-
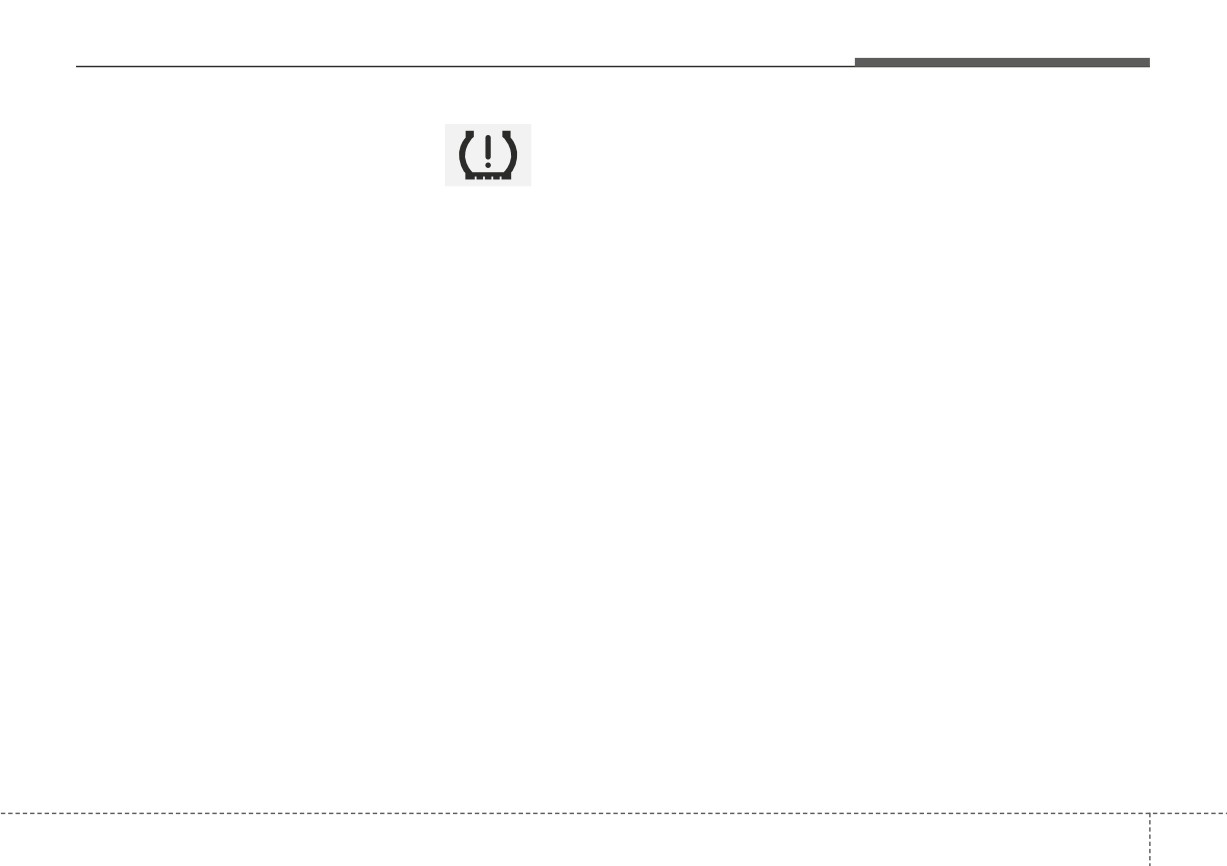
(1) Low tire pressure telltale/
failure. Under-inflation also reduces
ed, the system may not be able to
TPMS malfunction indicator
fuel efficiency and tire tread life, and
detect or signal low tire pressure as
Each tire, including the spare (if pro-
may affect the vehicle’s handling and
intended. TPMS malfunctions may
vided), should be checked monthly
stopping ability.
occur for a variety of reasons, includ-
when cold and inflated to the inflation
ing the installation of replacement or
pressure recommended by the vehi-
alternate tires or wheels on the vehi-
Please note that the TPMS is not a
cle manufacturer on the vehicle plac-
cle that prevent the TPMS from func-
substitute for proper tire maintenance,
ard or tire inflation pressure label. (If
tioning properly. Always check the
and it is the driver’s responsibility to
your vehicle has tires of a different
TPMS malfunction telltale after
maintain correct tire pressure, even if
size than the size indicated on the
replacing one or more tires or wheels
under-inflation has not reached the
vehicle placard or tire inflation pres-
on your vehicle to ensure that the
level to trigger illumination of the
sure label, you should determine the
replacement or alternate tires and
TPMS low tire pressure telltale.
proper tire inflation pressure for
wheels allow the TPMS to continue to
those tires.)
function properly.
6
8
What to do in an emergency
✽ NOTICE
Low tire pressure
In winter or cold weather, the low tire
telltale
pressure telltale may be illuminated if
If the TPMS indicator does not illu-
the tire pressure was adjusted to the
minate for 3 seconds when the igni-
recommended tire inflation pressure
tion switch is turned to the ON posi-
When the tire pressure monitoring
in warm weather. It does not mean
tion or engine is running, or if it
system warning indicator is illuminat-
your TPMS is malfunctioning
comes on after blinking for approxi-
ed, one or more of your tires is sig-
because the decreased temperature
mately one minute, take your car to
nificantly under-inflated.
leads to a proportional lowering of
your nearest authorized Kia dealer
If the telltale illuminates, immediately
tire pressure.
and have the system checked.
reduce your speed, avoid hard cor-
When you drive your vehicle from a
nering and anticipate increased stop-
warm area to a cold area or from a
ping distances. You should stop and
cold area to a warm area, or the out-
check your tires as soon as possible.
side temperature is greatly higher or
Inflate the tires to the proper pres-
lower, you should check the tire infla-
sure as indicated on the vehicle’s
tion pressure and adjust the tires to
placard or tire inflation pressure label
the recommended tire inflation pres-
located on the driver’s side center pil-
sure.
lar outer panel. If you cannot reach a
When filling tires with more air, con-
service station or if the tire cannot
ditions to turn off the low tire pres-
hold the newly added air, replace the
sure telltale may not be met. This is
low pressure tire with the spare tire.
because a tire inflator has a margin
Then the Low Tire Pressure telltale
of error in performance. The low tire
may flash for approximately one
pressure telltale will be turned off if
minute and then remain continuously
the tire pressure is above the recom-
illuminated after restarting and about
mended tire inflation pressure.
20 minutes of continuous driving
before you have the low pressure tire
repaired and replaced on the vehicle.
6
9
What to do in an emergency
TPMS (Tire Pressure
The TPMS malfunction indicator may
WARNING - Low
Monitoring System)
illuminate if snow chains or some
pressure
malfunction indicator
separately purchased devices such
damage
as notebook computers, mobile
charger, remote starter, navigation
Do not drive on low pressure
The TPMS malfunction indicator will
etc. are used in the vehicle. This can
tires. Significantly low tire pres-
illuminate after it blinks for approxi-
interfere with normal operation of the
sure can cause the tires to over-
mately one minute when there is a
Tire Pressure
Monitoring
System
heat and fail making the vehicle
problem with the Tire Pressure
(TPMS).
unstable resulting in increased
Monitoring System. If the system is
braking distances and a loss of
able to correctly detect an Under-
vehicle control.
inflation warning at the same time as
system failure then it will illuminate
the TPMS malfunction indicator.
Have the system checked by an
authorized Kia dealer as soon as
possible to determine the cause of
the problem.
The TPMS malfunction indicator may
be illuminated if the vehicle is moving
around electric power supply cables
or radio transmitters such as at
police stations, government and pub-
lic offices, broadcasting stations, mil-
itary installations, airports, or trans-
mitting towers, etc. This can interfere
with normal operation of the Tire
Pressure
Monitoring
System
(TPMS).
6
10
What to do in an emergency
Changing a tire with TPMS
Even if you replace the low pressure
If an original mounted tire is replaced
tire with the spare tire, the Low Tire
with the spare tire, the TPMS sensor
If you have a flat tire, the Low Tire
Pressure telltale will blink or remain
on the replaced spare wheel should
Pressure will come on. Have the flat
on until the low pressure tire is
be initiated and the TPMS sensor on
tire repaired by an authorized Kia
repaired and placed on the vehicle.
the original mounted wheel should
dealer as soon as possible or replace
After you replace the low pressure
be deactivated. If the TPMS sensor
the flat tire with the spare tire.
tire with the TPMS spare tire, the
on the original mounted wheel locat-
Low Tire Pressure telltale may blink
ed in the spare tire carrier still acti-
CAUTION - Repair Agents
or illuminate after a few minutes
vates, the tire pressure monitoring
because the TPMS sensor mounted
system may not operate properly.
Never use a puncture-repairing
on the spare wheel is not initiated.
Have the tire with TPMS serviced or
agent not approved by Kia to
replaced by an authorized Kia deal-
repair and/or inflate a low pres-
Once the low pressure tire is reinflat-
er.
sure tire. The tire sealant not
ed to the recommended pressure
approved by Kia may damage
and installed on the vehicle or the
the tire pressure sensor.
TPMS sensor mounted on the
replaced spare wheel is initiated by
an authorized Kia dealer, the TPMS
Each wheel is equipped with a tire
malfunction indicator and the low tire
pressure sensor mounted inside the
pressure telltale will extinguish within
tire behind the valve stem. You must
a few minutes of driving.
use TPMS specific wheels. It is rec-
If the indicator is not extinguished
ommended that you always have
your tires serviced by an authorized
after a few minutes of driving, please
visit an authorized Kia dealer.
Kia dealer.
6 11
What to do in an emergency
You may not be able to identify a low
✽ NOTICE
This device complies with Part 15
tire by simply looking at it. Always
of the FCC rules.
Tampering with, modifying, or dis-
use a good quality tire pressure
abling the Tire Pressure Monitoring
Operation is subject to the following
gauge to measure the tire's inflation
System (TPMS) components may
two conditions:
pressure. Please note that a tire that
interfere with the system's ability to
1.This device may not cause harmful
is hot (from being driven) will have a
warn the driver of low tire pressure
interference, and
higher pressure measurement than a
conditions and/or TPMS malfunc-
tire that is cold.
2.This device must accept any inter-
tions. Tampering with, modifying,
ference received, including inter-
A cold tire means the vehicle has
or disabling the Tire Pressure
ference that may cause undesired
been sitting for 3 hours and driven for
Monitoring System (TPMS) compo-
operation.
less than 1 mile (1.6 km) in that 3
nents may void the warranty
for
hour period.
that portion of the vehicle.
Allow the tire to cool before measur-
ing the inflation pressure. Always be
sure the tire is cold before inflating to
the recommended pressure.
The TPMS cannot alert you to severe
and sudden tire damage caused by
external factors such as nails or road
debris.
If you feel any vehicle instability,
immediately take your foot off the
accelerator, apply the brakes gradu-
ally and with light force, and slowly
move to a safe position off the road.
6
12
What to do in an emergency
TIRE PRESSURE MONITORING SYSTEM (TPMS - TYPE B, IF EQUIPPED)
Check tire pressure
✽ NOTICE
• The tire pressure may change due
to factors such as parking condi-
tion, driving style, and altitude
above sea level.
• Low tire pressure warning may
sound when a tire’s pressure unit is
equal or higher than nearby tires.
This is a normal occurrence, which
is due to the change in tire pressure
OSC061001N
along with tire temperature.
OSC060038N
• You can check the tire pressure in
the information mode on the clus-
ter.
- Refer to “User settings mode” in
chapter 4.
• If tire pressure is not displayed
OSC060037N
when the vehicle is stopped, “Drive
(1) Low tire pressure telltale /
to display” message displays. After
TPMS malfunction indicator
driving, check the tire pressure.
(2) Low tire pressure position telltale
• You can change the tire pressure
(Shown on the LCD display)
unit in the user settings mode on
the cluster.
- psi, kpa, bar (Refer to “User set-
tings mode” in chapter 4).
6 13
What to do in an emergency
Each tire, including the spare (if pro-
Please note that the TPMS is not a
Always check the TPMS malfunction
vided), should be checked monthly
substitute for proper tire maintenance,
telltale after replacing one or more
when cold and inflated to the inflation
and it is the driver’s responsibility to
tires or wheels on your vehicle to
pressure recommended by the vehi-
maintain correct tire pressure, even if
ensure that the replacement or alter-
cle manufacturer on the vehicle plac-
under-inflation has not reached the
nate tires and wheels allow the TPMS
ard or tire inflation pressure label. (If
level to trigger illumination of the
to continue to function properly.
your vehicle has tires of a different
TPMS low tire pressure telltale.
size than the size indicated on the
Your vehicle has also been equipped
vehicle placard or tire inflation pres-
with a TPMS malfunction indicator to
sure label, you should determine the
indicate when the system is not
proper tire inflation pressure for
operating properly. The TPMS mal-
those tires.)
function indicator is combined with
As an added safety feature, your
the low tire pressure telltale. When
vehicle has been equipped with a tire
the system detects a malfunction,
pressure monitoring system (TPMS)
the telltale will flash for approximate-
that illuminates a low tire pressure
ly one minute and then remain con-
telltale when one or more of your
tinuously illuminated. This sequence
tires is significantly under-inflated.
will continue upon subsequent vehi-
Accordingly, when the low tire pres-
cle start-ups as long as the malfunc-
sure telltale illuminates, you should
tion exists. When the malfunction
stop and check your tires as soon as
indicator is illuminated, the system
possible, and inflate them to the
may not be able to detect or signal
proper pressure. Driving on a signifi-
low tire pressure as intended. TPMS
cantly under-inflated tire causes the
malfunctions may occur for a variety
tire to overheat and can lead to tire
of reasons, including the installation
failure. Under-inflation also reduces
of replacement or alternate tires or
fuel efficiency and tire tread life, and
wheels on the vehicle that prevent
may affect the vehicle’s handling and
the TPMS from functioning properly.
stopping ability.
6
14
What to do in an emergency
✽ NOTICE
Low tire pressure
Inflate the tires to the proper pres-
telltale
sure as indicated on the vehicle’s
If the TPMS, Low Tire Pressure
placard or tire inflation pressure label
indicator does not illuminate for 3
located on the driver’s side center pil-
seconds when the ignition switch is
Low tire pressure position tell-
lar outer panel. If you cannot reach a
turned to the ON position or engine
tale
service station or if the tire cannot
is running, or if they remain illumi-
hold the newly added air, replace the
nated after coming on for approxi-
low pressure tire with the spare tire.
mately 3 seconds, take your vehicle
to your nearest authorized Kia deal-
Then the TPMS malfunction indicator
er and have the system checked.
and the Low Tire Pressure telltale
may turn on and illuminate after
restarting and about 20 minutes of
continuous driving before you have
the low pressure tire repaired and
replaced on the vehicle.
In winter or cold weather, the low tire
pressure telltale may be illuminated if
OSC060038N
the tire pressure was adjusted to the
recommended tire inflation pressure
When the tire
pressure monitoring
in warm weather. It does not mean
system warning indicators are illumi-
your TPMS is malfunctioning
nated, one or more of your tires is
because the decreased temperature
significantly under-inflated.
leads to a proportional lowering of
If the telltale illuminates, immediately
tire pressure.
reduce your speed, avoid hard cor-
nering and anticipate increased stop-
ping distances. You should stop and
check your tires as soon as possible.
6
15
What to do in an emergency
When you drive your vehicle from a
TPMS (Tire Pressure
•
The TPMS malfunction indicator
warm area to a cold area or from a cold
Monitoring System)
may be illuminated if the vehicle is
area to a warm area, or the outside
malfunction indicator
moving around electric power sup-
temperature is greatly higher or lower,
ply cables or radios transmitters
you should check the tire inflation pres-
such as at police stations, govern-
The low tire pressure telltale will illu-
sure and adjust the tires to the recom-
ment and public offices, broadcast-
minate after it blinks for approximate-
mended tire inflation pressure.
ing stations, military installations,
ly one minute when there is a prob-
airports, or transmitting towers,
lem with the Tire Pressure
etc. This can interfere with normal
WARNING - Low pressure
Monitoring System. If the system is
operation of the Tire Pressure
damage
able to correctly detect an underinfla-
Monitoring System (TPMS).
tion warning at the same time as sys-
Do not drive on low pressure
•
The TPMS malfunction indicator
tem failure then it will illuminate both
tires. Significantly low tire pres-
may be illuminated if snow chains
the TPMS malfunction and low tire
sure can cause the tires to over-
are used or some separate elec-
pressure position telltales e.g. if
heat and fail making the vehicle
tronic devices such as notebook
Front Left sensor fails, the TPMS
unstable resulting in increased
computer, mobile charger, remote
malfunction indicator illuminates, but
braking distances and a loss of
starter or navigation etc., are used
if the Front Right, Rear Left, or Rear
vehicle control.
in the vehicle. This can interfere
Right tire is under-inflated, the low
with normal operation of the Tire
tire pressure position telltales may
Pressure Monitoring System
CAUTION
illuminate together with the TPMS
(TPMS).
malfunction indicator.
When filling tires with more air,
conditions to turn off the low tire
Have the system checked by an
pressure telltale may not be met.
authorized Kia dealer as soon as
This is because a tire inflator
possible to determine the cause of
has a margin of error in perform-
the problem.
ance. The low tire pressure tell-
tale will be turned off if the tire
pressure is above the recom-
mended tire inflation pressure.
6
16
What to do in an emergency
Changing a tire with TPMS
Even if you replace the low pressure
If an original mounted tire is replaced
tire with the spare tire, the Low Tire
with the spare tire, the TPMS sensor
If you have a flat tire, the Low Tire
Pressure telltale will remain on until
on the replaced spare wheel should
Pressure telltale will come on. Have
the low pressure tire is repaired and
be initiated and the TPMS sensor on
the flat tire repaired by an authorized
placed on the vehicle.
the original mounted wheel should be
Kia dealer as soon as possible or
deactivated. If the TPMS sensor on
replace the flat tire with the spare tire.
After you replace the low pressure
the original mounted wheel located in
tire with the spare tire, the TPMS
the spare tire carrier still activates,
malfunction indicator may illuminate
CAUTION
- Repair Agents
the tire pressure monitoring system
after a few minutes because the
may not operate properly. Have the
Never use a puncture-repairing
TPMS sensor mounted on the spare
tire with TPMS serviced or replaced
agent not approved by Kia to
wheel is not initiated.
by an authorized Kia dealer.
repair and/or inflate a low pres-
Once the low pressure tire is inflated
sure tire. The sealant not
again to the recommended pressure
approved by Kia may damage
and installed on the vehicle or the
the tire pressure sensor.
TPMS sensor mounted on the
replaced spare wheel is initiated by
an authorized Kia dealer, the TPMS
Each wheel is equipped with a tire
pressure sensor mounted inside the
malfunction indicator and the low tire
pressure telltale will turn off within a
tire behind the valve stem. You must
use TPMS specific wheels. It is rec-
few minutes of driving.
ommended that you always have
If the indicator has not disappeared
your tires serviced by an authorized
after a few minutes of driving, please
Kia dealer.
visit an authorized Kia dealer.
6
17
What to do in an emergency
You may not be able to identify a low
• The TPMS cannot alert you to
This device complies with Part 15
tire by simply looking at it. Always
severe and sudden tire damage
of the FCC rules.
use a good quality tire pressure
caused by external factors such as
Operation is subject to the following
gauge to measure the tire's inflation
nails or road debris.
two conditions:
pressure. Please note that a tire that
• If you feel any vehicle instability,
1. This device may not cause harm-
is hot (from being driven) will have a
immediately take your foot off the
ful interference, and
higher pressure measurement than a
accelerator, apply the brakes grad-
tire that is cold (from sitting station-
2. This device must accept any inter-
ually and with light force, and slow-
ary for at least 3 hours and driven
ference received, including inter-
ly move to a safe position off the
less than 1 mile (1.6 km) during that
ference that may cause undesired
road.
3 hour period).
operation.
Allow the tire to cool before measur-
✽ NOTICE - Protecting TPMS
ing the inflation pressure. Always be
sure the tire is cold before inflating to
Tampering with, modifying, or dis-
the recommended pressure.
abling the Tire Pressure Monitoring
System (TPMS) components may
A cold tire means the vehicle has
interfere with the system's ability to
been sitting for 3 hours and driven for
warn the driver of low tire pressure
less than 1 mile (1.6 km) in that 3
conditions and/or TPMS malfunc-
hour period.
tions. Tampering with, modifying,
Never use tire sealant if your vehicle
or disabling the Tire Pressure
is equipped with a Tire Pressure
Monitoring System (TPMS) compo-
Monitoring System. The liquid
nents may void the warranty for
sealant can damage the tire pres-
that portion of the vehicle.
sure sensors.
6
18
What to do in an emergency
IF YOU HAVE A FLAT TIRE (WITH SPARE TIRE, IF EQUIPPED)
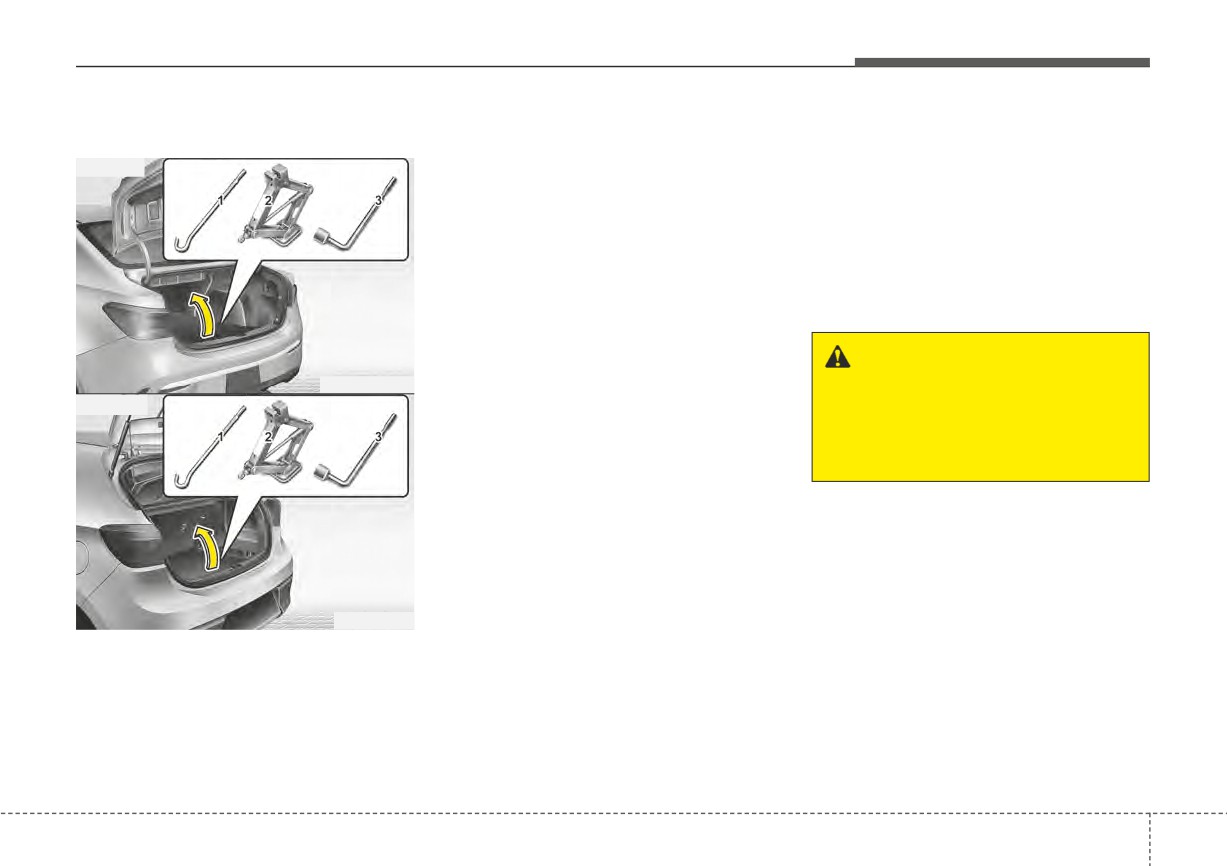
Jack and tools
Remove the luggage under tray out Jacking instructions
of the way to reach the equipment.
The jack is provided for emergency
■ 4 door
(1) Jack handle
tire changing only.
(2) Jack
To prevent the jack from “rattling”
while the vehicle is in motion, store it
(3) Wheel lug nut wrench
properly.
Follow jacking instructions to reduce
the possibility of personal injury.
WARNING - Changing
OSC060007N
tires
■ 5 door
Never attempt vehicle repairs in
the traffic lanes of a public road
or highway.
OYB066003
The spare tire, jack, jack handle and
wheel lug nut wrench are stored in
the luggage compartment.
6
19
What to do in an emergency
Always move the vehicle completely
Do not allow anyone to remain in the
Removing and storing the
off the road and onto the shoulder
vehicle while it is on the jack.
spare tire
before trying to change a tire. The
Make sure any children present are
jack should be used on firm level
in a secure place away from the road
ground. If you cannot find a firm level
and from the vehicle to be raised with
place off the road, call a towing serv-
the jack.
ice company for assistance.
Be sure to use the correct front and
WARNING -Running vehi-
rear jacking positions on the vehicle;
cle on jack
never use the bumpers or any other
Do not start or run the engine of
part of the vehicle for jack support.
the vehicle while the vehicle is
on the jack as this may cause
WARNING - Tire Jack
the vehicle to fall off the jack.
OQL065031
Do not place any portion of your
body under a vehicle that is only
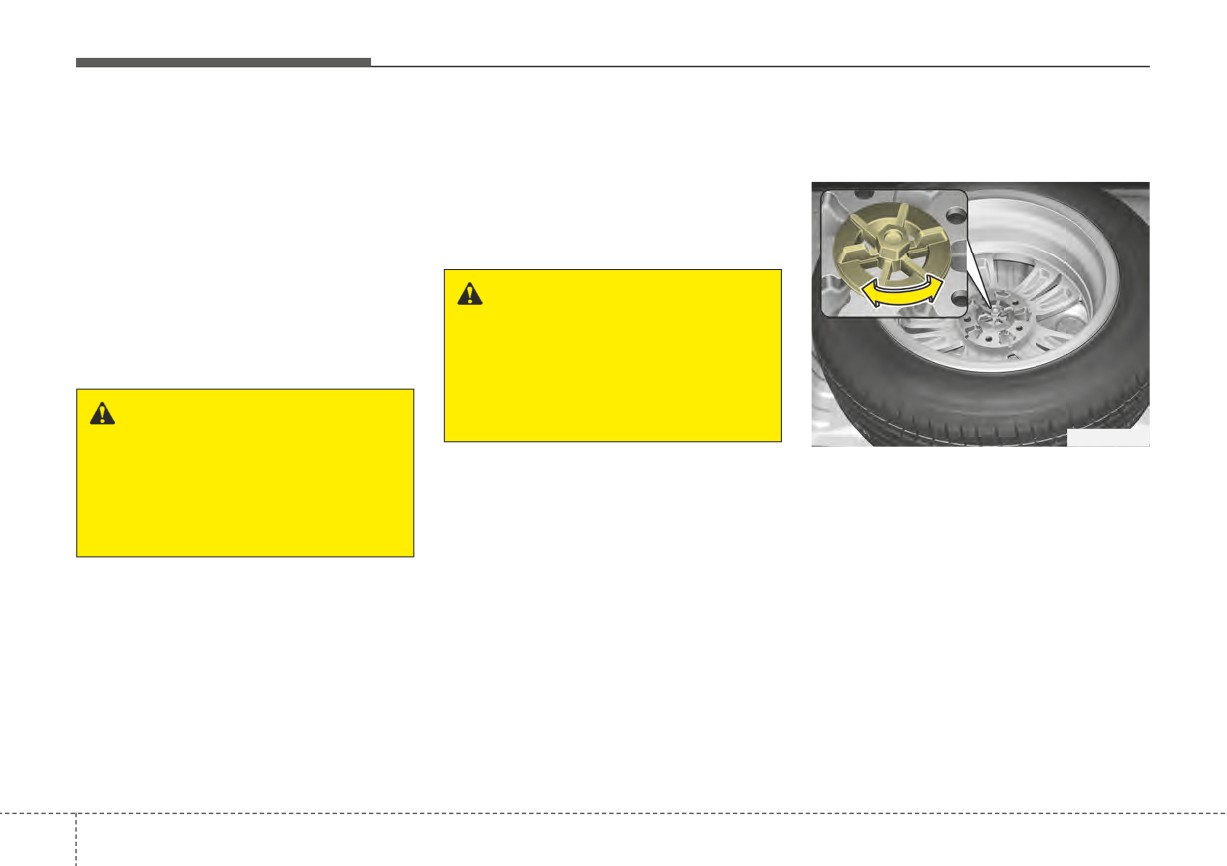
Turn the tire hold-down wing bolt
supported by a jack since the
counterclockwise to remove the
vehicle can easily roll off the
spare tire.
jack. Use vehicle support stands.
Store the tire in the reverse order of
removal.
To prevent the spare tire and tools
from “rattling” while the vehicle is in
motion, store them properly.
6
20
What to do in an emergency
Changing tires
OQL065032
OSC061047N
If it is hard to loosen the tire hold-
4. Remove the wheel lug nut wrench,
OSC061046N
down wing bolt by hand, you can
jack, jack handle, and spare tire
loosen it easily using the jack handle.
1. Park on a level surface and apply
from the vehicle.
the parking brake firmly.
1. Put the jack handle (1) inside of
5. Block both the front and rear of the
the tire hold-down wing bolt.
2. Shift the shift lever into P (Park) for
wheel that is diagonally opposite
Intelligent Variable Transmission.
the jack position.
2. Turn the tire hold-down wing bolt
counterclockwise with the jack
3. Activate the hazard warning flash-
handle.
ers.
6
21
What to do in an emergency
WARNING - Changing a
tire
• To prevent vehicle movement
while changing a tire, always
set the parking brake fully,
and always chock the wheel
diagonally opposite the wheel
being changed.
• We recommend that the
OYB061005L
wheels of the vehicle be
chocked, and that no person
OSC061048N
remain in a vehicle that is
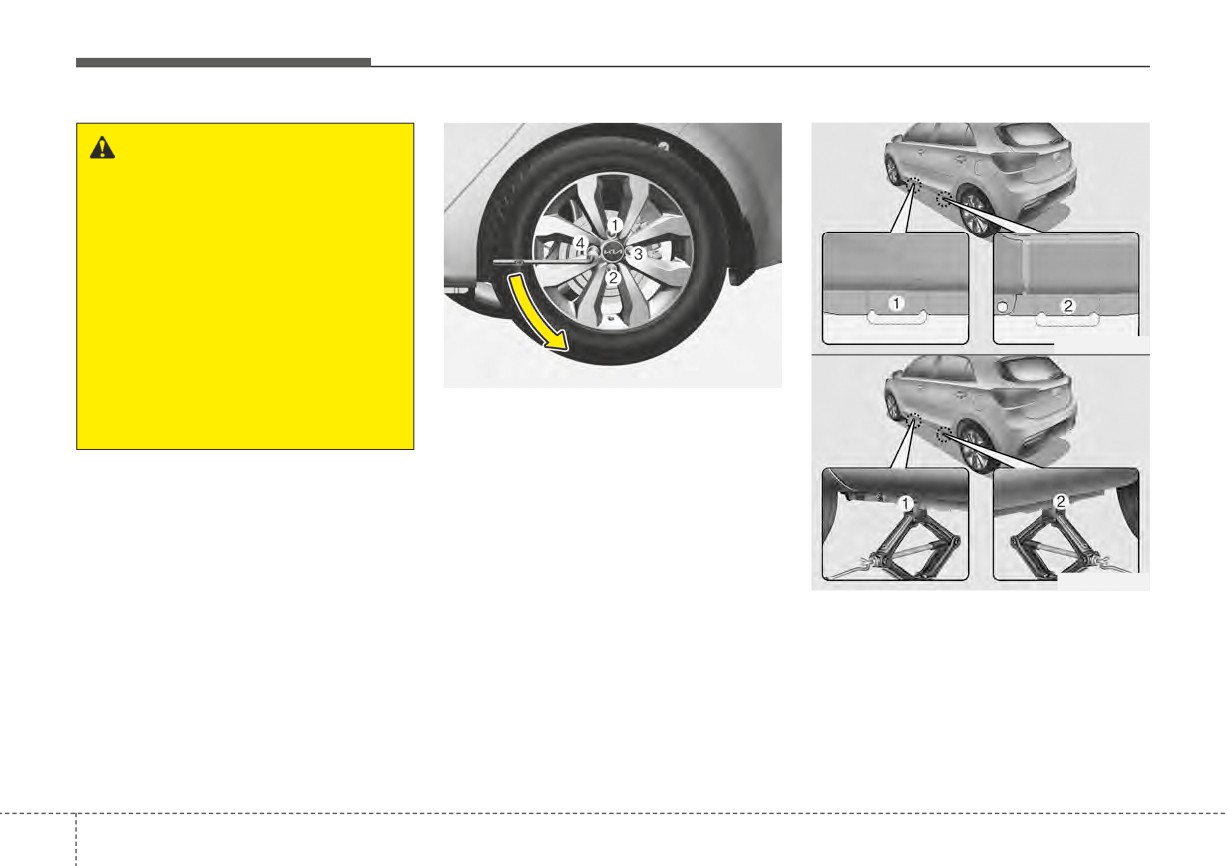
6. Loosen the wheel lug nuts coun-
being jacked.
terclockwise one turn each, but do
not remove any nut until the tire
has been raised off the ground.
OYB061006L
7. Place the jack at the front (1) or
rear (2) jacking position closest to
the tire you are changing. Place
the jack at the designated loca-
tions under the frame. The jacking
positions are plates welded to the
frame with two tabs and a raised
dot to index with the jack.
6
22
What to do in an emergency
9. Loosen the wheel nuts and
WARNING - Jack location
remove them with your fingers.
To reduce the possibility of
Slide the wheel off the studs and
lay it flat so it cannot roll away. To
injury, be sure to use only the
jack provided with the vehicle in
put the wheel on the hub, pick up
the spare tire, line up the holes
the correct jack position; never
use any other part of the vehicle
with the studs and slide the wheel
onto them. If this is difficult, tip the
for jack support.
wheel slightly and get the top hole
in the wheel lined up with the top
stud. Then jiggle the wheel back
and forth until the wheel can be
OSC061049N
slid over the other studs.
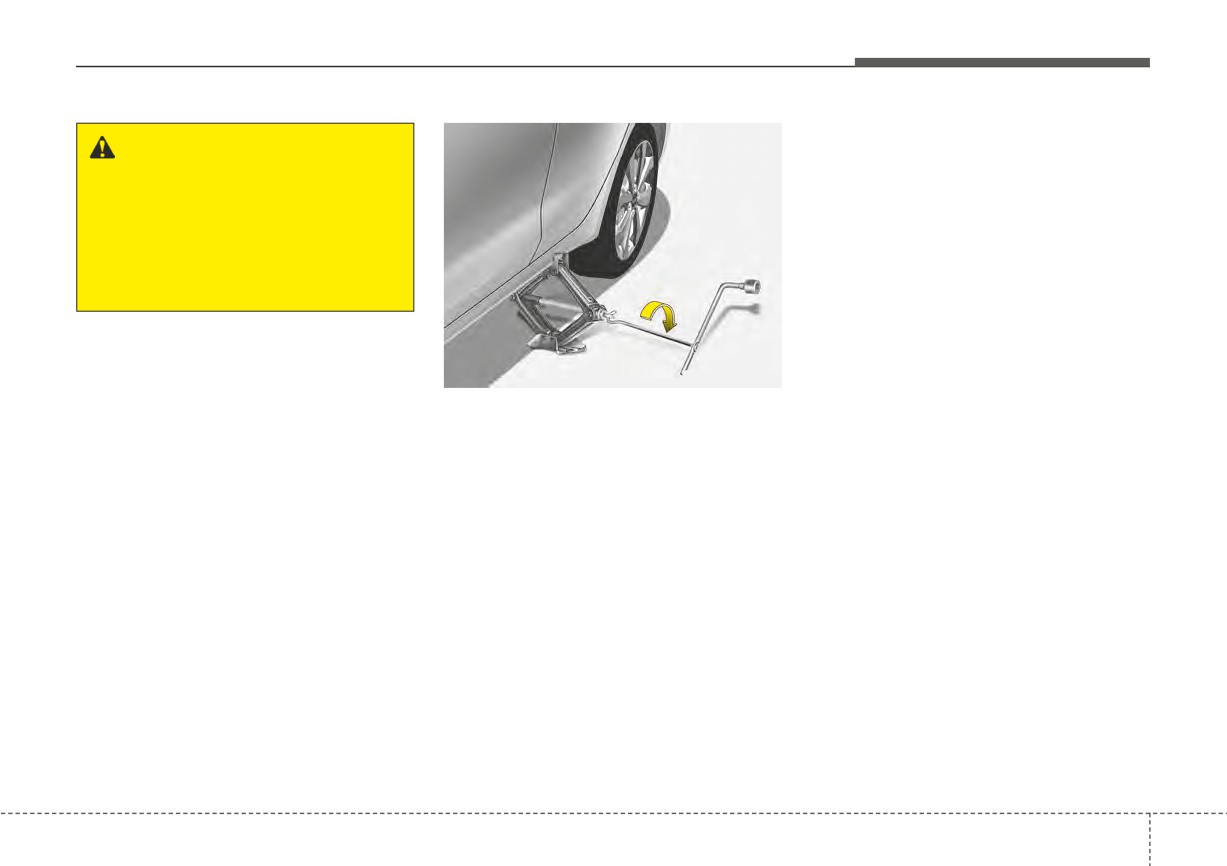
8. Insert the jack handle into the jack
Wheels and wheel covers may have
and turn it clockwise, raising the
sharp edges. Handle them carefully
vehicle until the tire just clears the
to avoid possible injury. Before put-
ground. This measurement is
ting the wheel into place, be sure
approximately
1 in
(30 mm).
that there is nothing on the hub or
Before removing the wheel lug
wheel (such as mud, tar, gravel, etc.)
nuts, make sure the vehicle is sta-
that prevents the wheel from fitting
ble and that there is no chance for
solidly against the hub.
movement or slippage.
6
23
What to do in an emergency
If you have a tire gauge, remove the
WARNING - Installing a
valve cap and check the air pressure.
wheel
If the pressure is lower than recom-
mended, drive slowly to the nearest
Make sure the wheel makes
service station and inflate to the cor-
good contact with the hub when
rect pressure. If it is too high, adjust it
installed. If the contact of the
until it is correct. Always reinstall the
mounting surface between the
valve cap after checking or adjusting
wheel and hub is not good, the
the tire pressure. If the cap is not
wheel nuts could come loose
replaced, air may leak from the tire. If
and cause the loss of a wheel.
you lose a valve cap, buy another and
Loss of a wheel may result in
install it as soon as possible.
loss of control of the vehicle.
OSC061050N
After you have changed wheels,
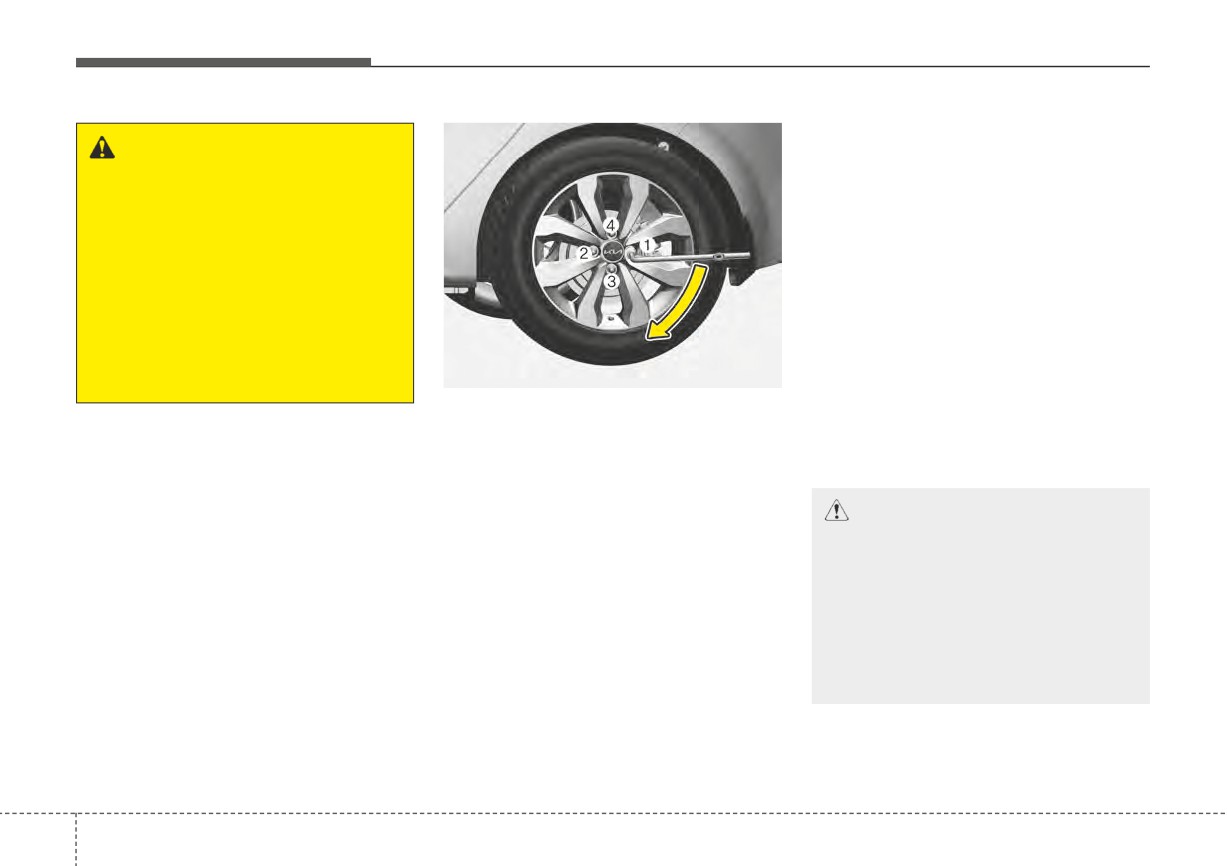
Then position the wrench as shown in
always secure the flat tire in its place
the drawing and tighten the wheel
10. To install the wheel, hold it on the
and return the jack and tools to their
nuts. Be sure the socket is seated
studs, put the wheel nuts on the
proper storage locations.
completely over the nut. Do not stand
studs and tighten them finger
on the wrench handle or use an exten-
tight. Jiggle the tire to be sure it is
sion pipe over the wrench handle.
CAUTION
completely seated, then tighten
Go around the wheel tightening every
When replacing the tires, after
the nuts as much as possible
nut following the numerical sequence
driving for about 30 miles (50
with your fingers again.
shown in the image until they are tight.
km), tighten the wheel nuts to
11. Lower the vehicle to the ground
Then double-check each nut for tight-
check that there is no looseness.
by turning the wheel nut wrench
ness. After changing the wheels, have
Recheck and tighten the wheel
counterclockwise.
an authorized Kia dealer tighten the
nuts again after driving for
wheel nuts to their proper torque as
about 620 miles (1,000 km).
soon as possible.
Wheel nut tightening torque:
Steel wheel & aluminium alloy wheel:
79 ~ 94 lbf·ft (11 ~ 13 kgf·m)
6
24
What to do in an emergency
Important - use of compact spare
CAUTION
- Replacing lug
WARNING - Wheel studs
tire (if equipped)
nuts
Do not drive your vehicle with
Your vehicle is equipped with a com-
Make certain during wheel
damaged wheel studs. If the
pact spare tire. This compact spare
removal that the same nuts that
studs are damaged, they may
tire takes up less space than a regu-
were removed are reinstalled -
lose their ability to retain the
lar-size tire. This tire is smaller than a
or, if replaced, that nuts with
wheel. This could lead to the
conventional tire and is designed for
metric threads and the same
loss of the wheel and a collision.
temporary use only.
chamfer configuration are used.
You should drive carefully when the
Your vehicle has metric threads
compact spare is in use. The com-
on the wheel studs and nuts.
To prevent the jack, jack handle,
pact spare should be replaced by the
Installation of a non-metric
wheel lug nut wrench and spare tire
proper conventional tire and rim at
thread nut on a metric stud will
from rattling while the vehicle is in
the first opportunity.
not secure the wheel to the hub
motion, store them properly.
The operation of this vehicle is not
properly and will damage the
Check the inflation pressures as
recommended with more than one
stud so that it must be replaced.
soon as possible after installing the
compact spare tire in use at the
spare tire. Adjust it to the specified
same time.
pressure, if necessary. Refer to
Note that most lug nuts do not have
“Tires and wheels” in chapter 7.
metric threads. Be sure to use
extreme care in checking for thread
style before installing aftermarket lug
nuts or wheels. If in doubt, consult an
authorized Kia dealer.
6
25