Toyota C-HR (2019 year). Manual - part 5
 

  Index      Toyota     Toyota C-HR - service manual 2019 year in english


Search            


Content   ..  3  4  5  6   ..


Toyota C-HR (2019 year). Manual - part 5


65

1-2. Child safety

1

Fo
r safety and securi

ty

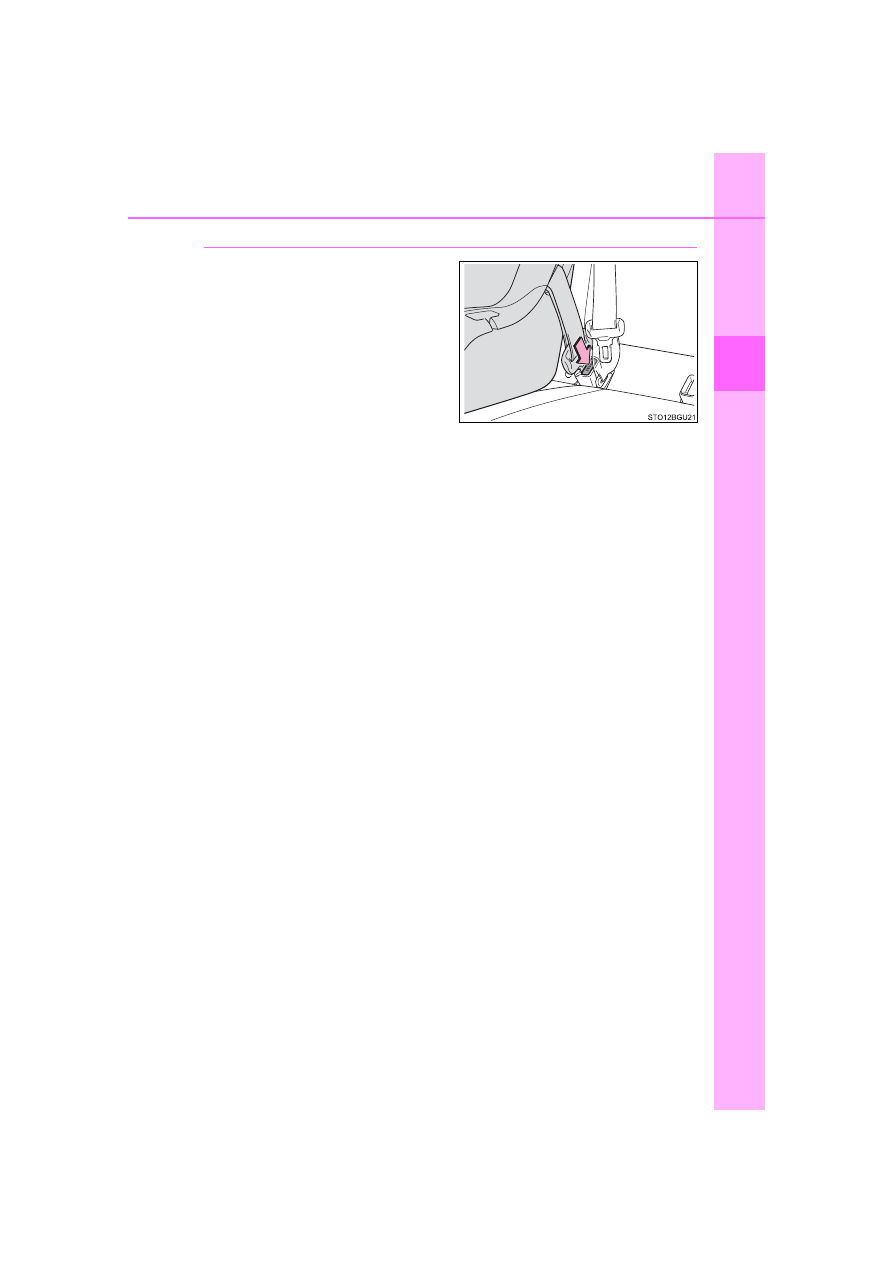
Removing a child restraint system installed with a seat belt

Press the buckle release button
and fully retract the seat belt.

When  releasing  the  buckle,  the
child  restraint  system  may
spring up due to the rebound of
the  seat  cushion.  Release  the
buckle  while  holding  down  the
child restraint system.
Since the seat belt automatically
reels itself, slowly return it to the
stowing position.

66

1-2. Child safety

WARNING

When installing a child restraint system
Observe the following precautions.
Failure to do so may result in death or serious injury.

Do not allow children to play with the seat belt. If the seat belt becomes
twisted around a child’s neck, it may lead to choking or other serious inju-
ries that could result in death.
If  this  occurs  and  the  buckle  cannot  be  unfastened,  scissors  should  be
used to cut the belt.

Ensure that the belt and plate are securely locked and the seat belt is not
twisted.

Shake the child restraint system left and right, and forward and backward
to ensure that it has been securely installed.

After securing a child restraint system, never adjust the seat.

When a booster seat is installed, always ensure that the shoulder belt is
positioned  across  the  center  of  the  child’s  shoulder.  The  belt  should  be
kept away from the child’s neck, but not so that it could fall off the child’s
shoulder.

Follow  all  installation  instructions  provided  by  the  child  restraint  system
manufacturer.

When securing some types of child restraint systems in rear seats, it may
not be possible to properly use the seat belts in positions next to the child
restraint without interfering with it or affecting seat belt effectiveness. Be
sure your seat belt fits snugly across your shoulder and low on your hips. If
it  does  not,  or  if  it  interferes  with  the  child  restraint,  move  to  a  different
position. Failure to do so may result in death or serious injury.

When installing a booster seat
To prevent the belt from going into ALR lock mode, do not fully extend the
shoulder belt. ALR mode causes the belt to tighten only. This could cause
injury or discomfort to the child. (

P. 28)

Do not use a seat belt extender
If a seat belt extender is used when installing a child restraint system, the
seat belt will not securely hold the child restraint system, which could cause
death or serious injury to the child or other passengers in the event of sud-
den braking, sudden swerving or an accident.

67

1-2. Child safety

1

Fo
r safety and securi

ty

Child restraint LATCH anchors
LATCH  anchors  are  provided
for  the  rear  outboard  seats.
(Buttons displaying the location
of  the  anchors  are  attached  to
the seats.)

When installing in the rear outboard seats
Install  the  child  restraint  system  in  accordance  to  the  operation
manual enclosed with the child restraint system.

If  the  head  restraint  interferes  with  the  child  restraint  system
installation and the head restraint can be removed, remove the
head restraint. (

P. 138)

Flip  up  and  fold  the  cover,
and  fix  it  with  the  hook-and-
loop fastener.

Child restraint system fixed with a child restraint LATCH anchor

1

2

68

1-2. Child safety

With flexible lower attachments

Latch the hooks of the lower
straps  onto  the  LATCH
anchors.
For owners in Canada:
The  symbol  on  a  child
restraint system indicates the
presence of a lower connec-
tor system.

With rigid lower attachments

Latch  the  buckles  onto  the
LATCH anchors.
For owners in Canada:
The  symbol  on  a  child
restraint system indicates the
presence of a lower connec-
tor system.

Canada only

3

Canada only

3

69

1-2. Child safety

1

Fo
r safety and securi

ty

If  the  child  restraint  has  a  top  tether  strap,  follow  the  child
restraint manufacturer’s operation manual regarding the installa-
tion, using the top tether strap to latch onto the top tether strap
anchor. (

P. 70)

After installing the child restraint system, rock it back and forth to
ensure that it is installed securely. (

P. 66)

When installing in the rear center seat
There  are  no  LATCH  anchors  behind  the  rear  center  seat.  How-
ever, the inboard LATCH anchors of the outboard seats, which are
16.1 in. (410 mm) apart, can be used if the child restraint system
manufacturer’s  instructions  permit  use  of  those  anchors  with  the
anchor spacing stated.
Child  restraint  systems  with  rigid  lower  attachments  cannot  be
installed in the center seat. This type of child restraint system can
only be installed in the outboard seat.

Laws and regulations pertaining to anchors
The LATCH system conforms to FMVSS225 or CMVSS210.2.
Child  restraint  systems  conforming  to  FMVSS213  or  CMVSS213  specifica-
tions can be used.
This vehicle is designed to conform to SAE J1819.

4

5

70

1-2. Child safety

Anchor brackets (for top tether strap)
Anchor brackets are provided for each rear seat. 
Use  anchor  brackets  when  fix-
ing the top tether strap.

WARNING

When installing a child restraint system
Observe the following precautions.
Failure to do so may result in death or serious injury.

When using the LATCH anchors, be sure that there are no foreign objects
around the anchors and that the seat belt is not caught behind the child
restraint system.

Follow  all  installation  instructions  provided  by  the  child  restraint  system
manufacturer.

Never attach two child restraint system attachments to the same anchor. In
a  collision,  one  anchor  may  not  be  strong  enough  to  hold  two  child
restraint system attachments and may break. 
If the LATCH anchors are already in use, use the seat belt to install a child
restraint system in the center seat.

When securing some types of child restraint systems in rear seats, it may
not be possible to properly use the seat belts in positions next to the child
restraint without interfering with it or affecting seat belt effectiveness. Be
sure your seat belt fits snugly across your shoulder and low on your hips. If
it  does  not,  or  if  it  interferes  with  the  child  restraint,  move  to  a  different
position. Failure to do so may result in death or serious injury.

If the seat is adjusted, reconfirm the security of the child restraint system.

Using an anchor bracket (for top tether strap)

71

1-2. Child safety

1

Fo
r safety and securi

ty

Fixing the top tether strap to the anchor bracket
Install  the  child  restraint  system  in  accordance  to  the  operation
manual enclosed with the child restraint system.

Rear outboard seats

Remove the head restraint.
(

P. 138)

Latch  the  hook  onto  the
anchor  bracket  and  tighten
the top tether strap.

Make sure the top tether strap is
securely latched. (

P. 66)

If the head restraint does not
interfere  with  the  child
restraint  system  installation,
install the head restraint.

1

Top tether strap

Hook

2

3

72

1-2. Child safety

Rear center seat

Adjust  the  head  restraint  to
the upmost position.

If  the  head  restraint  interferes
with your child restraint system,
and  the  head  restraint  can  be
removed,  remove  the  head
restraint. (

P. 138)

Latch  the  hook  onto  the
anchor  bracket  and  tighten
the top tether strap.

Make sure the top tether strap is
securely latched.
When 

installing 

the 

child

restraint  system  with  the  head
restraint being raised, be sure to
have  the  top  tether  strap  pass
underneath the head restraint.

1

Top tether strap

Hook

2

73

1-2. Child safety

1

Fo
r safety and securi

ty

Laws and regulations pertaining to anchors
The LATCH system conforms to FMVSS225 or CMVSS210.2.
Child  restraint  systems  conforming  to  FMVSS213  or  CMVSS213  specifica-
tions can be used.
This vehicle is designed to conform to SAE J1819.

WARNING

When installing a child restraint system
Observe the following precautions.
Failure to do so may result in death or serious injury.

Firmly attach the top tether strap and make sure that the belt is not twisted.

Do  not  attach  the  top  tether  strap  to  anything  other  than  the  anchor
bracket.

After securing a child restraint system, never adjust the seat.

Follow  all  installation  instructions  provided  by  the  child  restraint  system
manufacturer.

Rear center seat: When installing the child restraint system with the head
restraint being raised, after the  head restraint  has been raised  and then
the anchor bracket has been fixed, do not lower the head restraint.

74

1-3. Theft deterrent system

Engine immobilizer system

Vehicles without a smart key sys-
tem:
The  indicator  light  flashes  after
the  key  has  been  removed  from
the  engine  switch  to  indicate  that
the system is operating.
The  indicator  light  stops  flashing
after the registered key has been
inserted into the engine switch to
indicate that the system has been
canceled.
Vehicles with a smart key system:
The indicator light flashes after the engine switch has been turned off
to indicate that the system is operating. 
The  indicator  light  stops  flashing  after  the  engine  switch  has  been
turned  to ACCESSORY  or  IGNITION  ON  mode  to  indicate  that  the
system has been canceled.

The vehicle’s keys have built-in transponder chips that prevent
the engine from starting if a key has not been previously regis-
tered in the vehicle’s on-board computer. 
Never leave the keys inside the vehicle when you leave the vehi-
cle.
This system is designed to help prevent vehicle theft but does
not guarantee absolute security against all vehicle thefts.

75

1-3. Theft deterrent system

1

Fo
r safety and securi

ty

System maintenance
The vehicle has a maintenance-free type engine immobilizer system.

Conditions that may cause the system to malfunction

If the grip portion of the key is in contact with a metallic object

If the key is in close proximity to or touching a key to the security system
(key with a built-in transponder chip) of another vehicle

Certifications for the engine immobilizer system

For vehicles sold in the U.S.A.

For vehicles sold in Canada

76

1-3. Theft deterrent system

For vehicles sold in the U.S.A.

For vehicles sold in Canada

77

1-3. Theft deterrent system

1

Fo
r safety and securi

ty

For vehicles sold in the U.S.A.

For vehicles sold in Canada

NOTICE

To ensure the system operates correctly
Do  not  modify  or  remove  the  system.  If  modified  or  removed,  the  proper
operation of the system cannot be guaranteed.

78

1-3. Theft deterrent system

Theft prevention labels

These  labels  are  attached  to  the
vehicle  to  reduce  vehicle  theft  by
facilitating  the  tracing  and  recov-
ery  of  parts  from  stolen  vehicles.
Do not remove under the penalty
of law.

79

Instrument cluster

2

2.

Instrument cluster
Warning lights and 

indicators .......................... 80

Gauges and meters ............ 88
Multi-information display ..... 91
Fuel consumption 

information ........................ 99

80

2. Instrument cluster

Warning lights and indicators

The units used on the meters and some indicators may differ depending on
the target region.

The warning lights and indicators on the instrument cluster and
center panel inform the driver of the status of the vehicle’s vari-
ous systems. 
For  the  purpose  of  explanation,  the  following  illustration  dis-
plays all warning lights and indicators illuminated.


Content   ..  3  4  5  6   ..