Seat Tarraco (2023 year). Manual in english - page 4
 

  Index      Manuals     Seat Tarraco (2023 year). Manual in english


Search            copyright infringement  


Content      ..     2      3      4      5     ..


Seat Tarraco (2023 year). Manual in english - page 4


Steering wheel

107

Multifunction steering wheel

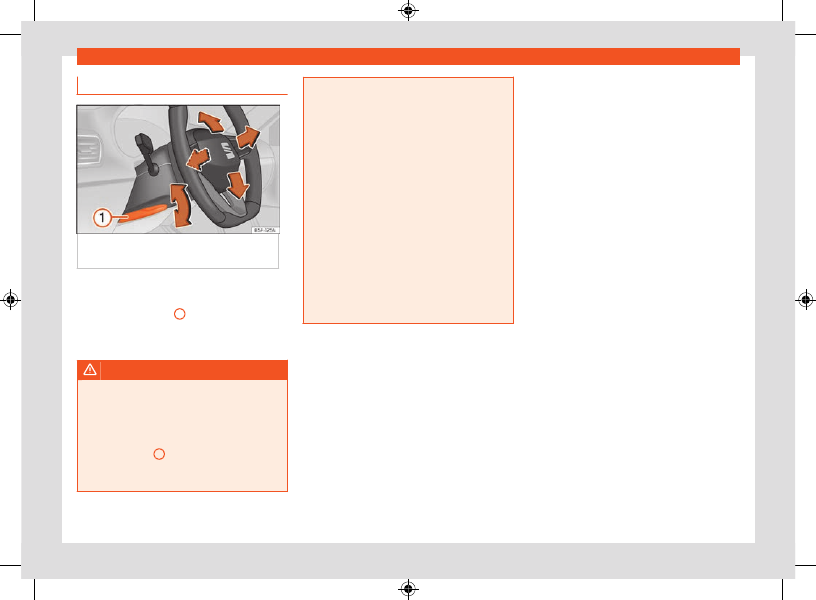
Steering wheel position adjustment

Fig. 86 

 Lever in the lower left side of the

steering column.

Adjust the steering wheel before your trip and
only when the vehicle is stationary.

Pull lever 

››› 

Fig. 86


1

 down, move the steer-

ing wheel to the desired position and lift the
lever back up until it locks.

WARNING

Incorrect use of the steering wheel adjust-
ment function and an incorrect adjustment
of the steering wheel can result in severe or
fatal injury.

After adjusting the steering column, push

lever 

››› 

Fig. 86


1

 firmly upwards so that the

steering wheel does not accidentally change
position while driving.

Never adjust the steering wheel while the

vehicle is in motion. If you need to adjust the
steering wheel while the vehicle is in motion,
stop safely and make the proper adjustment.

The adjusted steering wheel should be fac-

ing your chest and not your face so as not to
hinder the driver's front airbag protection in
the event of an accident.

When driving, always hold the steering

wheel with both hands on the outside of the
ring at the 9 o'clock and 3 o'clock positions
to reduce injuries when the driver's front air-
bag deploys.

Never hold the steering wheel at the 12

o'clock position or in any other manner (e.g.
in the centre of the steering wheel). In such
cases, if the driver's airbag deploys, you
may sustain injuries to your arms, hands and
head.

CarManuals2.com

108

Seats and head restraints

1

2

3

4

Seats and head re-
straints

Front seats

Introduction

WARNING

Always read and observe the informa-
tion and safety advice given in chapter 

››› 

page 39, 

Correct sitting position of vehi-

cle occupants

.

WARNING

Incorrect seat adjustment may lead to acci-
dents and severe injuries.

Only adjust the seats when the vehicle

is stationary, as the seats could move unex-
pectedly while the vehicle is in motion and
you could lose control of the vehicle. Further-
more, an incorrect position is adopted when
adjusting the seat.

Adjust the height, position and inclination

of the front seats only when their movement
area is empty.

Make sure there are no objects in that area.

Make sure that the movement and locking

areas of the seats are clean.

WARNING

Incorrectly using upholstery and seat cov-
ers might cause an accidental activation of
the electrical seat adjustment system and
make it move unexpectedly while driving.
This might cause loss of control of the vehi-
cle and thus accidents or injuries. Moreover,
the electrical components of the front seats
might be damaged.

Never attach or place seat upholstery or

covers on the electric controls.

Never use upholstery or seat covers that

have not been explicitly authorised for the
seats of the vehicle.

NOTICE

Objects with sharp edges can damage the
seats.

Do not rub the seats with sharp objects.

Sharp objects, such as zips and rivets on
clothing or belts, can damage surfaces.
Open Velcro fasteners can also cause dam-
age.

Manual adjustment of the front seats

Fig. 87 

Front seats: manual seat adjustment.

Pull the lever to move the seat forwards or
backwards. The seat must engage when
the lever is released!
Move the lever up or down to adjust the
seat height; several times if necessary.
Without placing force on the seat backrest,
turn the wheel to adjust the backrest.
To adjust the lumbar support, move the
lever until the required position is achieved.

CarManuals2.com

Seats and head restraints

109

Front seats

1)

Valid for vehicles fitted with the Infotainment Connect System.

A

B

C

Electric adjustment of the front seats

Fig. 88 

 Driver's seat: electric seat adjustment.

Adjust the lumbar support: press the button
according to the desired position.
Seat forwards/backwards: press the button
forwards/backwards.
Seat up/down: Press the rear part of the
button up/down. To adjust the angle of the
seat cushion, press the front of the button
up/down.
Backrest further upright/further reclined:
press the button forwards/backwards.

The position will be saved automatically in the
SEAT Connect Active user when the ignition is
switched off

1)

.

WARNING

If the electric front seats are used negli-
gently or without paying due attention, it can
cause serious injury.

The front seats can also be electrically ad-

justed when the ignition is switched off. Never
leave a child or any other person who may
need help in the vehicle.

In the event of an emergency, electrical

adjustment can be stopped by pressing any
control.

NOTICE

To avoid damaging the electrical compo-
nents of the seats, please refrain from kneel-
ing on the seat or applying sharp pressure at
a single point to the seat cushion and back-
rest.

Note

It may not be possible to electrically adjust

the seat if the vehicle battery is very low.

If the engine is started while the seats are

being electrically adjusted, the adjustment
will stop.

Note

When changing user a warning will be shown
on the infotainment system's screen during
the time that the seat is moving to the saved
position. This movement can be stopped by
pressing the stop button on the screen.

Adjusting or folding the backrest of
the front passenger seat

Fig. 89 

Passenger backrest: folding the

passenger backrest forward.

CarManuals2.com

110

Seats and head restraints

1)

In the FR version with sports seats, the backrest cannot be lowered.

Fig. 90 

Unlocking the folding backrest of the

front passenger seat

Adjusting the inclination of the front passen-
ger seat backrest

Move the lever in the direction of the arrow 

››› 

Fig. 89


1

 and adjust the backrest to the

desired position.

Folding the backrest of the front passenger
seat forward

1)

Remove any objects from the front passenger

seat cushion 

››› 

.

Move the passenger seat to its lowest posi-

tion.

Move the front passenger seat back as far as

possible.

Lower the head restraint properly.

Unlock the backrest of the front passenger

seat in the direction of the arrow 

1

.

Fold the backrest of the front passenger seat

forwards in the direction of the arrow 

2

 until it

is horizontal.

Once folded down, the backrest has to be

locked safely.
When carrying objects on the folded down
backrest of the passenger seat, the front airbag
of this seat must be disabled 

››› 

page 52

.

Lifting the backrest of the front passenger
seat

When lifting the passenger backrest, make

sure there are no objects or body parts within
the hinge movement area.

Lift the backrest of the front passenger seat

by first unlocking it again 

››› 

Fig. 90

.

Lift the backrest of the seat in an upright posi-

tion.

Once it is raised again, the backrest must be

correctly engaged.

WARNING

Serious injuries can be caused if the passen-
ger seat backrest is lowered or lifted without
due care and attention.

Only fold and lift the backrest of the front

passenger seat when the vehicle is station-
ary.

When folding down the passenger seat, al-

ways make sure there are no people or ani-
mals in the backrest area.

While the passenger backrest is down, the

front airbag must always be disabled and
the 


 warning lamp must be

on.

When moving the passenger backrest up

and down, keep your hands, fingers, feet and
other body parts out of the operating area of
the hinges and the locking mechanism of the
seat.

Mats or other objects can be caught in the

hinges of the backrest of the front passenger
seat. This would cause the backrest not to be
locked in an upright position when lifting it.

Once the backrest is up, it must be cor-

rectly engaged in an upright position. Other-
wise, it could move unexpectedly and cause
severe injuries.

CarManuals2.com

Seats and head restraints

111

Rear seats

WARNING

When folding down the passenger backrest,
its anchor points and hinges are left uncov-
ered and may cause severe injuries in the
event of a sudden brake or accident.

When the passenger seat backrest is low-

ered nobody else can travel in the corre-
sponding seats (not even a child).

When the passenger seat backrest is low-

ered, the only permitted seat is the rear seat
behind the driver seat. This also applies to
children travelling on a child seat.

Rear seats

Adjusting the rear seat

Fig. 91 

Under the bench of the rear seat:

adjustment lever.

Fig. 92 

Rear seat backrest adjustment.

The rear seat is asymmetrical and each part
can be adjusted separately.

Adjusting the rear seat

 Pull the right or left lever upwards in the

direction of the arro

››› 

Fig. 91

, and move

the corresponding part of the seat forward or
backwards.

Release the lever and lock the seat, moving it

slightly to the front or the back.

Adjusting the rear seat backrest

Press the right or left backrest of the seat with

one hand and, at the same time, pull the corre-
sponding cord with the other 

››› 

Fig. 92


1

.

Move the backrest with your hand to the de-

sired position; there will be some resistance 

2

Release the cord and lock the backrest, mov-

ing it slightly to the front or the back.

WARNING

Incorrect backrest adjustment may lead to
accidents and severe injuries.

Only adjust the rear seat when the vehicle

is stationary; otherwise, it could move unex-
pectedly while the vehicle is in motion. Fur-
thermore, an incorrect position is adopted
when adjusting the seat.

Adjust the rear seat only when its move-

ment area is empty.

NOTICE

When moving the rear seat horizontally,

objects in the luggage compartment might
cause damages.

When the seat is in its frontmost position,

objects can be stored between the seat and
the luggage compartment. Before moving
the seat backwards, remove any objects in
this area.

CarManuals2.com

112

Seats and head restraints

Folding down and raising the rear
seat backrest

Fig. 93 

Folding down and lifting the rear seat

backrest

The rear seat backrest is split and each part
be lowered separately to extend the luggage
compartment.

Folding the backrest forwards

Fully lower the rear headrests 

››› 

page 113

.

Move the rear seat to its rearmost position.

Pull the cord 

››› 

Fig. 93

 forward in the direc-

tion of the arrow while holding the seat back-
rest and move it forward slowly 

››› 

.

Press the backrest down with your hand until

it locks.

Converting the table to a seat

Unlock the seat backrest with the cord. The

backrest disengages from its position.

Without letting go of the cord, lift the back-

rest.

Make sure that the seat belt is not trapped.

Press the backrest firmly into the lock until it

engages 

››› 

.

The backrest must be properly engaged.

If necessary, adjust the backrest.

If necessary, adjust the head restraint.

WARNING

Serious injuries can be caused if the rear
seat backrest is lowered or lifted without due
care and attention.

Never lower or lift the rear seat backrest

while driving.

 Do no trap or damage the seat belt when

raising the rear seat backrest.

When lowering or lifting the rear seat back-

rest, keep your hands, fingers, feet and other
body parts out of its path.

For the rear seat belts to offer the nec-

essary protection all the parts of the rear
backrest must be properly engaged. This
is particularly important in the case of the
centre rear seat. If someone is seated in a
seat whose backrest is not properly engaged

they will fly forward, along with the backrest,
during an accident or a sudden driving or
braking manoeuvre.

A red mark on button 

2

 warns that the rear

backrest is not engaged. Always check that
the red marking is not visible when the back-
rest is in the upright position.

When the rear seat backrest is lowered or

is not properly engaged nobody else can
travel in the corresponding seats (not even
a child).

NOTICE

Serious damage can be caused to the vehi-
cle and other objects if the rear seat back-
rest is lowered or lifted without due care and
attention.

Before lowering the rear seat backrest, al-

ways adjust the front seats so that neither
the head restraints nor the cushions of the
rear backrest can hit them.

Headrest

Introduction

The possibilities for the adjustment and disas-
sembly of the headrests are described below.
Always make sure that the seats are correctly
adjusted 

››› 

page 39

.

CarManuals2.com

Seats and head restraints

113

Headrest

All seats are equipped with a head restraint.
The rear headrests have been designed exclu-
sively for the corresponding seat of the second
or third row. Therefore, never mount them on
any other seat.

Correct adjustment of head restraint

Adjust the headrest so that its upper edge is
at the same level as the top of your head and
under no circumstances below eye level. Keep
the back of your head always as close to the
head restraint as possible.
In vehicles with horizontally adjustable head re-
straints on the front seats, move the head re-
straint as close as possible to the back of the
head.

Adjusting the head restraint for short people

Lower the head restraint completely, even if
your head is below its upper edge. In the low-
est position, there may be a small distance be-
tween the head restraint and the backrest.

Adjusting the head restraint for tall people

Push the head restraint up as far as it will go.

WARNING

If travelling with the head restraints removed
or improperly adjusted, the risk of severe or
fatal injuries in the event of accidents and
sudden braking or manoeuvres increases.

Always travel with the head restraint cor-

rectly installed and adjusted.

To decrease the risk of cervical injuries in

the event of an accident, adjust the head
restraint correctly based on your height, al-
ways making sure that its upper edge is at
the same height as the top of the head, but
never below eye level. Keep the back of your
head always as close to the head restraint as
possible and centred.

Never adjust the head restraint while the

vehicle is in motion.

Under no circumstances should the rear

passengers travel while the head restraints
are in the non-use position.

NOTICE

When assembling and disassembling the
head restraints, do not let them meet the top
lining of the vehicle, the back rest of the front
seat or other parts of the vehicles. If not, this
could damage the vehicle.

Adjusting the headrests

Fig. 94 

Front seat: adjusting the head

restraint.

CarManuals2.com

114

Seats and head restraints

Fig. 95 

Rear headrest: adjusting the headrest.

Adjusting the height of the head restraints

Move the headrest up or down in the direction

of the corresponding arrow. Regarding the rear
headrest, to both raise and lower, press the but-
ton 

››› 

Fig. 94


1

; for the rear headrests it is

only necessary to press the button 

››› 

Fig. 95

1

 to lower them 

››› 

 in 

Introduction

 on

page 113

.

The headrest must lock correctly in one posi-

tion.

Adjusting the front head restraints horizon-
tally

 Move the head restraint forward or back in

the direction of the corresponding arrow while
pressing the button 

››› 

Fig. 94


1

.

 The headrest must lock correctly in one posi-

tion.

Removing and fitting the headrests

Fig. 96 

Front head restraint: removal.

Fig. 97 

Rear head restraint: removal.

Removing the front head restraints

 Lower the head restraint if necessary.

To unlock it, look for the rabbet on the bottom

of the backrest and press in the direction of the
arrow 

››› 

Fig. 96


1

.

Remove the head restraint in the direction of

the arrow 

2

.

Fitting the front head restraints

 Place the head restraint in the correct posi-

tion on the guides of the corresponding back-
rest and insert it.

Press the head restraint downwards until the

bars lock.

Adjust the head restraint according to the in-

structions on the correct position of the seat.

CarManuals2.com

Seats and head restraints

115

Seat functions

Removing the headrests from the second
row of seats

 If necessary, adjust the backrest of the seat

so the head restraint can be removed.

Push the head restraint up as far as it will go 

››› 

 in 

Introduction

 on page 113

.

Remove the head restraint completely while

pressing button 

››› 

Fig. 97


1

.

Installing the headrests of the second row of
seats

 Unlock the rear seat backrest and fold it for-

ward slightly 

››› 

page 111

.

Place the head restraint in the correct posi-

tion on the guides of the corresponding back-
rest and insert it.

 Lower the head restraint while pressing but-

ton 

1

.

Raise the rear seat backrest and lock it.

WARNING

Remove the rear headrests only when it is
necessary to fit a child seat. After removing a
child seat, refit the headrest immediately.

Note

The headrests of the third row of seats can-
not be removed.

Seat functions

Memory function

Fig. 98 

On the outer side of the driver seat:

memory buttons.

Memory buttons

Individual settings for the corresponding seat
can be stored with the memory buttons. Addi-
tionally, settings for the exterior mirrors can be
saved with the memory buttons of the driver
seat.
The settings will also be saved in the key or in
the user of the online services, depending on
the version.

Save the settings of the driver seat and the
exterior mirrors while driving forward

 Apply the electronic parking brake.

Move the gearshift to the neutral position.

Switch the ignition on.

Adjust the driver seat and the exterior mirrors.

Press   for longer than 1 second 

››› 

Fig. 98

.

Press the memory button in which to store the

settings within approx. 10 seconds. A warning
sound will confirm they have been stored.

Storing the passenger rear view mirror set-
tings while driving in reverse

 Apply the electronic parking brake.

Move the gearshift to the neutral position.

Switch the ignition on.

Press the required memory button.

Select reverse gear.

Adjust the front passenger exterior mirror so

that you can see, for example, the kerb edge
well.

The new position of the mirror will be stored

automatically and allocated to the vehicle key
that was used to unlock the vehicle.

Activating settings

 With the vehicle stopped and the ignition

switched on, press and hold the correspond-
ing memory button until the saved position is
reached.

OR:

 With the ignition switched off and the

driver's door open, briefly press the corre-
sponding button.
The front passenger side exterior mirror auto-
matically changes from the position stored for
reversing as soon as the vehicle moves forward

CarManuals2.com

116

Seats and head restraints

at a speed of at least 15 km/h (10 mph) or when
the gear selection lever is changed to a position
other than 

R


››› 

page 130

.

Initialising the seat position memory

The position memory system must be restar-
ted if, for example, the driver seat has been
changed.
Restarting deletes all memories and assign-
ments for the seat with position memory. The
memory keys can then be programmed again.

Open the driver door and do not get into the

vehicle.

Operating the seat settings from outside the

vehicle.

Tilt the backrest fully forward.

Release the control to set the angle and then

press again until an audible warning is heard.

WARNING

Adjust the memory function only when the
vehicle is stationary.

Note

If the driver door is opened approx. 10 mi-
nutes after the vehicle was unlocked or later,
the driver seat and the exterior mirrors do not
move automatically.

Front centre armrest

Fig. 99 

Front centre armrest

To 

raise

 the armrest, pull it fully up in the direc-

tion of the arrow 

››› 

Fig. 99

 up or step by step

depending on the desired opening.
To 

lower

 the armrest, first lift it to its highest

position. Then lower it down.

To move the armrest horizontally, move it for-
war

››› 

Fig. 99

 or backward as much as possi-

ble in the direction of the corresponding arrow.

WARNING

The front centre armrest may obstruct the
driver's arm movements, which could cause
an accident and severe injuries.

Keep the storage compartments of the

centre armrest closed at all times while the
vehicle is in motion.

Never let anyone sit on the centre arm-

rest while the vehicle is in motion, not even
a child. This position is incorrect and may
cause severe injuries.

Rear centre armrest

Fig. 100 

Folding rear centre armrest.

There might be a folding armrest in the rear
centre seat.

To 

lower

 the armrest, pull the cord in the di-

rection of the arro

››› 

Fig. 100

.

To 

raise

 the armrest, push it up in the opposite

direction to the arrow and press it as far as it
will go into the seat backrest.
When the centre armrest is down, do not allow
anybody to travel in the centre seat of the rear
bench.

CarManuals2.com

Seats and head restraints

117

Seat functions

WARNING

To decrease the risk of injuries while driv-
ing, the rear centre armrest must always be
raised.

When the centre armrest is down, nobody

may travel in the centre rear seat, not even a
child. An incorrect sitting position may cause
severe injuries.

Access aid for the third row of seats

Fig. 101 

Second seat row: accessibility

controls.

The convenient entry function makes it easier to
access the third row of seats.

Folding down the backrest and moving the
second row seat

 Remove any objects located in the footwell

of the second row of seats 

››› 

.

Pull the release lever in the direction of the

arrow 

››› 

Fig. 101

.

Fold down the backrest of the seat and move

the seat forward.

Enter the vehicle or leave the vehicle care-

fully 

››› 

.

Folding down the second row backrest

 Move the rear seat to its rearmost position.

Pull the lever 

››› 

Fig. 101

 and push the back-

rest backwards until it is in a vertical position.
The entire seat folds down 

››› 

.

 The rear seat must be correctly engaged 

››› 

.

WARNING

If the convenient entry function is used negli-
gently or without due care, this may cause
accidents and serious injury.

Never use the convenient entry function

when the vehicle is in motion.

Avoid trapping or damaging the seat belt

when folding the rear seats back.

When moving the backrests up and down,

keep your hands, fingers, feet and other
body parts out of the operating area of the
hinges and the locking mechanism of the
seats.

Mats or other objects can be caught in

the hinges of the seat backrests or the seats
themselves. This would cause the backrests
and benches not to lock correctly when mov-
ing the seats to the vertical position.

For the rear seat belts to offer the neces-

sary protection all the parts of the rear back-
rest must be properly engaged vertically. If
someone is seated in a seat whose backrest
is not properly engaged they will be thrown
forwards, along with the backrest, during an
accident or a sudden driving or braking ma-
noeuvre.

When a rear seat or its backrest is folded

down or not correctly engaged, do not let
anyone use that seat, not even a child.

When going in and out of the vehicle, never

lean on or grab the tilted seat of the second
row.

WARNING

If all the seats on the second row are equip-
ped with child seats, in the event of an acci-
dent the seats of the second row cannot be
pushed forwards from the third. People trav-
elling in the third row will not be able to leave
the vehicle or help themselves in the event of
an emergency.

CarManuals2.com

118

Seats and head restraints

Whenever there are people in the third row,

do not install child seats on all the second
row seats at the same time.

NOTICE

Before lowering and raising the rear seat
backrest, adjust the front seats so that nei-
ther the head restraints nor the cushions of
the rear backrest can hit them.

NOTICE

Any objects located in the footwell of the
second row of seats may be damaged on
folding the rear seat forwards. Before folding
down the seats, remove the objects.

Unlock the seat backrest with the
cord.

Fig. 102 

In the luggage compartment: levers

to unlock the rear backrest.

 Lower the head restraint properly.

Open the rear lid.

Pull the remote release lever of the left 

››› 

Fig. 102


1

 or right 

2

 parts of the back-

rest in the direction of the arrow. The released
part of the rear seat backrest is folded auto-
matically down and forwards.

If this occurs, close the rear lid.

CarManuals2.com

Lights

119

Vehicle lighting

Lights

Vehicle lighting

Control lamps

Lights up yellow

There is a total or partial failure of the
exterior lighting.

Lights up yellow

Rear fog light on.

Lights up green

Left or right turn signal. The control
lamp flashes twice as fast when a

turn signal is faulty.

Hazard warning lights on 

››› 

page 65

.

Lights up green

Trailer turn signals

Lights up blue

 Main beam on or flasher

activated 

››› 

page 121

.

Lights up blue

The Light Assist system is on 

››› 

page 122

.

Lights control

Fig. 103 

Instrument panel: light panel.

Turning on the lights

Turn on the ignition and turn the light switch to

the desired position 

››› 

Fig. 103

:

Automatic control of dipped beam head-

lights and daytime running lights.

Side lights and daytime running lights on.

Dipped beam switched on.

Daylight running lights switched on.

Turning off the lights

Turn off the ignition and turn the light switch to

the desired position:

Lights off.

The “Coming home”, “Leaving home” and

Welcome lights may be switched on.

Side light or parking light on both sides
on.

Dipped beam headlight off.

The driver is personally responsible for the cor-
rect use and adjustment of the lights in all situa-
tions.

Side lights

When the side light   is switched on, the side
lights in both headlights, certain areas of the
rear light clusters, the number plate light and
the button lights on the instrument cluster turn
on. The automatic dipped beam activates as of
a speed of approx. 10 km/h (6 mph).

Automatic dipped beam headlight control

When the light control is in position 

, the

vehicle's lighting and the lighting of the instru-
ments and controls turn on and off under the
following conditions:

The light sensor has detected darkness.

The wiper has been on for some time.

CarManuals2.com

120

Lights

The automatic dipped beam is only an auxili-
ary function and cannot always identify all sit-
uations that may arise during driving with suffi-
cient precision.

Cornering light function

The 

cornering

 light function is an additional

function to the dipped beam headlights to im-
prove lighting of the side of the road when tak-
ing a sharp turn at low speed.
When the dipped beam is on, a static cornering
light comes on when driving at speeds below
about 40 km/h (25 mph) or on very tight bends.

If the steering wheel is turned or the turn sig-

nal is switched on, the front fog light gradually
turns on. After the turn, the 

cornering

 light func-

tion is gradually switched off.

When engaging reverse gear, both front fog

lights turn on.

Daytime running lights

Daytime running lights can increase vehicle vis-
ibility when driving during the day.
The daytime running lights switch on every time
the ignition is switched on, if the switch is in
positions   or 

, according to the level of

exterior lighting.

Motorway light

The function is connected and disconnected
via the corresponding Infotainment system
menu.


Activation:

 when going above 110 km/h

(68 mph) for more than 10 seconds, the dipped
beam raises slightly to increase the driver's visi-
bility distance.

Deactivation:

 when reducing the speed of

the vehicle below 100 km/h (62 mph), the dip-
ped beam immediately returns to its normal po-
sition.

Audible warnings to advise the driver that
the lights have not been switched off

If the ignition is not connected and the driver
door is open, an audible warning signal is heard
in the following cases: this will remind you to
turn the light off.

When the parking light is on 

››› 

page 121

.

When the light switch is in position   or  .

If the exit lighting is switched on (“Coming
Home” function), when you leave the vehicle
there will be no audio warning to warn you that
the lights are still on.

WARNING

If the road is not well lit and other road users
cannot see the vehicle well enough or at all,
accidents may occur.

The automatic dipped beam control (

)

only switches on the dipped beam when
there are no changes in brightness, and not,
for example when it is foggy.

WARNING

The side lights or daytime running lights
are not bright enough to illuminate the road
ahead and to ensure that other road users
are able to see you.

Always use your dipped beam head lights if

it is raining or if visibility is poor.

Never drive with daytime lights if the road

is not well lit due to weather or lighting con-
ditions.

On vehicles with rear lights with bulbs,

when activating the daytime running light
the rear lights are not switched on. A vehicle
which does not have the rear lights on may
not be visible to other drivers in the darkness,
in the case of heavy rain or in conditions of
poor visibility.

WARNING

If the headlights are set too high and not
used correctly, there is a risk of dazzling or
distracting other road users. This could result
in a serious accident.

Always make sure that the headlights are

correctly adjusted.

CarManuals2.com

Lights

121

Vehicle lighting

1

2

3

4

Note

The legal requirements regarding the use

of vehicle lights in each country must be ob-
served.

The dipped beam headlights will only work

with the ignition on. The side lights come on
automatically when the ignition is turned off.

Fog lights

Fig. 104 

Instrument panel: light panel.

The warning lamps   or   also show, on the
light switch or instrument panel, when the fog
lights are on.
The fog lights can be switched on with the light
control in position  ,   or 

 when the igni-

tion is switched on:

Turn on the fog lights  :

 pull the light switch

to its first position 

››› 

Fig. 104


1

.

Switching on the rear fog light  :

 pull the

light switch fully out 

2

.

To switch off the fog lights, press the light

switch or turn it to position  .

Note

The rear fog light can dazzle drivers behind
you. You should use the rear fog light only
when visibility is very poor.

Turn signal and main beam lever

Fig. 105 

Turn signal and main beam lever.

More the lever to the required position:

Right turn light or right-hand parking light
(ignition switched off).
Left turn light or left-hand parking light (ig-
nition switched off).

Turning on the main beam. The control
lamp   lights up on the instrument cluster.
The headlight flasher turns on when the
lever is pulled. The control lamp   lights up
on the instrument cluster.

Place the lever in rest position to turn off the
corresponding function.

Convenience turn signals

When the ignition is switched on, move the lever
as far as possible upwards or downwards and
release the lever. The turn signal will flash three
times.
To switch off the convenience turn signal early,
immediately move the lever in the opposite di-
rection until you feel resistance and release it.
The convenience turn signals are switched on
and off in the infotainment system using the
function button 

 > Settings > Lighting

> Lighting assistant > Convenience
turn signals

.

Parking light 

The parking lights will only work with the igni-
tion off. If said light is on, an audible warning will
sound while the driver door is open.

Switch the ignition off.

Move the turn signal lever up or down.

When the parking light is switched on, the front
side light and the tail light on the corresponding
side of the vehicle turn on.

CarManuals2.com

122

Lights

Parking light on both sides

Switch the ignition off.

Place the light switch in position  .

Lock the vehicle from the outside.

In doing so, only the side lights of both head-
lights light up, and additionally the tail lights will
do so partially.

WARNING

Improper or lack of use of the turn signals,
or forgetting to deactivate them can confuse
other road users. This could result in a seri-
ous accident.

Always give warning when you are going to

change lane, overtake or when turning, acti-
vating the turn signal in good time.

As soon as you have finished changing

lane, overtaking or turning, switch the turn
signal off.

WARNING

Incorrect use of the headlights may cause
accidents and serious injury, as the main
beam may distract or dazzle other drivers.

Note

When you turn the ignition off without hav-

ing turned the turn signals off, an acoustic
signal sounds while the driver door is open.
This is intended as a reminder to switch off
the turn signal, unless you wish to leave the
parking light on.

If the convenience turn signals are oper-

ating (three flashes) and the other conven-
ience turn signals are switched on, the active
part stops flashing and only flashes once in
the new part selected.

The turn signal only works when the igni-

tion is switched on. The hazard warning lights
also work when the ignition is switched off.

The main beam headlights can only be

switched on if the dipped beam headlights
are already on.

If a trailer turn signal malfunctions, the

control lamp will stop flashing (trailer turn
signals) and the vehicle turn signal will flash
at double speed.

In cold or damp weather conditions, the

headlights, tail lights and turn signals may
mist up inside temporarily. This is normal and
in no way effects the useful life of the vehicle
lighting system.

The parking light does not activate auto-

matically if the left- or right-hand turn signal
is left on and the ignition is disconnected.

Main beam assist (Light Assist)

The main beam assist automatically prevents
glare from vehicles moving in the opposite di-
rection or ahead in the same direction. In addi-
tion, the main beam assist detects illuminated
areas and disconnects the main beam head-
light when passing, e.g. by populated areas.
Within its limitations, the assist system automat-
ically connects or disconnects the main beam
headlight depending on the environmental and
traffic conditions, as well as the speed 

››› 

.

 Switching on the main beam assist

Turn on the ignition and turn the light switch to

position 

.

From the base position, press the turn sig-

nal and main beam headlights lever forwards 

››› 

Fig. 105


3

.

When the main beam assist is switched on,
the control lamp   on the instrument cluster
screen turns on. When the main beam is on, the
blue main beam control lamp   on the instru-
ment cluster switches on.

Switching the main beam assist off

Turn the headlight switch to a position other

than 

.

EITHER:

 if main beam assist is on, pull the turn

signal light and main beam headlights lever
back 

››› 

Fig. 105


4

.

CarManuals2.com

Lights

123

Vehicle lighting

OR:

 if the main beam assistant is on, but the

main beam 

does not

 turn on, press the turn

signal and main beam lever forwards to turn
the main beam on manually. Pull the turn signal
and main beam lever back to switch off the
main beam manually, if necessary.

 OR:

 switch off the ignition.

System limitations

In the following cases, the main beam headlight
must be switched off manually because the
main beam assist will not disconnect it on time
or disconnect it at all:

On roads with insufficient lighting with very

reflective signs

If road users are insufficiently lit up, e.g. pe-

destrians or cyclists.

On closed curves, when the traffic in the

opposite direction is partially hidden, on pro-
nounced slopes or inclinations.

On roads with traffic in the opposite direction

and with a central reservation barrier where the
driver can see over it e.g. lorry drivers.

In the event of fog, snow or heavy rain

In the event of dust or sand storms

If the windscreen is damaged in the camera's

field of vision.

If the camera's field of vision is misted up, dirty

or covered by a sticker, snow or ice.

If the camera is damaged or if the power sup-

ply has been cut off.

WARNING

The convenience features of the main beam
assist should not encourage the taking of
risks. The system is not a replacement for
driver concentration.

You are always in control of the main beam

and adapting it to the light, visibility and
traffic conditions.

It is possible that the main beam headlight

control does not recognise all driving situa-
tions and is limited under certain circumstan-
ces.

When the field of vision of the camera is

dirty, covered or damaged, operation of the
main beam control may be affected. This
also applies when changes are made to the
vehicle lighting system, for example, if addi-
tional headlights are installed.

NOTICE

To avoid affecting the operation of the sys-
tem, take the following points into considera-
tion:

Clean the field of vision of the camera reg-

ularly and make sure it is free of snow and
ice.

Do not cover the field of vision of the cam-

era.

Check that the windscreen is not damaged

in the area of the field of vision of the cam-
era.

Note

The headlight flasher can be turned on and

off manually at any time with the turn signal
and main beam lever 

››› 

page 121

.

If there are objects that radiate light in the

camera's area of influence, e.g. a portable
navigation system, this may affect the oper-
ation of the main beam assist system.

“Coming home” and “Leaving home”
function (exterior orientation light-
ing)

The “Coming home” and “Leaving home” func-
tion lights up the vehicle’s immediate surround-
ings when getting into and out of it in the dark.
This light is automatically controlled by a light
sensor.

Turning on the “Coming home” light

Unlocks the vehicle (if the light switch is in

position 

 and the light sensor detects dark-

ness).

Turning off the “Coming home” light

It turns off automatically once the lights off

delay time has elapsed.

OR

: lock the vehicle.

OR:

 rotate the light switch to position  .

OR

: switch on the ignition.

CarManuals2.com

124

Lights

Turning on the “Leaving home” light

Switch the ignition off.

The “Leaving Home” light turns on if the light
control is in position 

 and the light sensor

detects darkness.
The lights-off delay countdown starts when the
last door or rear lid of the vehicle is closed.

Turning off the “Leaving home” light

It switches off automatically after the set

lights-off delay time has elapsed.

EITHER:

 it is automatically deactivated if, 30

seconds after the function has been activated,
any vehicle door or the rear lid is still open.

OR:

 rotate the light switch to position  .

OR

: switch on the ignition.

Welcome light

The welcome light is a light located on the exte-
rior mirrors facing the ground which is switched
on or off if the lights control is in the 

 posi-

tion and the “Coming Home” or “Leaving Home”
function is switched on or off.

“Coming home” and “Leaving home” set-
tings

The duration of the lights-off delay can be set
in the vehicle settings menu of the infotainment
system, where the function can also be activa-
ted and deactivated 

››› 

page 37

.

Dynamic headlight range control

The headlight range is automatically adjusted
according to the vehicle load status when they
are switched on.

WARNING

If the dynamic headlight range control fails
or does not work properly, the headlights
could dazzle and distract other road users.
This could cause accidents and lead to seri-
ous injuries.

Immediately go to a specialist workshop

and have the headlight range control system
checked.

Driving abroad

The light beam of the dipped beam lights is
asymmetric: the side of the road on which you
are driving is lit more intensely.
When a car that is manufactured in a country
that drives on the right travels to a country that
drives on the left (or vice versa), it is normally
necessary to cover part of the headlight bulbs
with stickers or to change the adjustment of the
headlights to avoid dazzling other drivers.
In such cases, the regulations specify certain
light values that must be complied with for des-
ignated points of the light distribution. This is
known as “Tourist light”.

The light distribution of the headlights allows
the specific “tourist light” values to be met
without the need for stickers or changes being
made to the settings.

Note

“Tourist light” is only allowed temporarily. If
you are planning a long stay in a country that
drives on the other side, you should take the
vehicle to an Authorised Technical Service to
change the headlights.

Interior lights

Lighting of the instrument cluster,
displays and controls

The brightness of the instrument and control
lighting can be adjusted in the infotainment
system:

Select 

 > Settings > Lighting >

Vehicle interior lighting

OR


 >

Interior settings > Lighting > In-
strument cluster

.

The set intensity automatically adapts to
changes in ambient brightness in the vehicle.
When the automatic dipped beam light 
is turned on, a sensor automatically turns the
dipped beam light on or off, as well as the in-
strument and control lighting, depending on the
ambient brightness.

CarManuals2.com

Lights

125

Interior lights

In some cases, e.g. when driving through a tun-
nel without the automatic dipped beam light

 function switched on, the instrument clus-

ter lighting may even switch off. The objective
of this function is to provide the driver with a
visual indication that he or she should activate
the dipped beam. If your vehicle is fitted with
a digital instrument cluster, the message 

Turn

on the lights

 will be displayed on the in-

strument cluster.

Interior and reading lights

Fig. 106 

Detail of headliner: front interior

lighting.

Turning the rear interior lights on or off.

Door contact connection. The interior
lights come on automatically when you
unlock the vehicle, open a door or discon-

nect the ignition. The light goes out a few

seconds after closing all the doors, when
locking the vehicle or connecting the igni-
tion.

Turning the reading light on and off

The light controls may vary depending on the
vehicle version.

Glove compartment and luggage compart-
ment lighting

When opening and closing the glove compart-
ment on the front passenger side and the rear
lid, the respective light will automatically switch
on and off.

Footwell lighting

The lights in the footwell area below the dash
(driver and front passenger sides) will switch on
when the doors are opened and will decrease
in brightness while driving. This brightness can
be adjusted through the infotainment system
menu using the function button 

 > Set-

tings > Lighting > Interior light-
ing

.

Background lighting

The background lighting lights up the area of
the centre console and the footwell area and,
depending on the version, the front door panels
as well.

The brightness and colour of the background
lighting can be adjusted in the infotainment
menu using the function button 

 > Set-

tings > Background lighting

OR 

 >

Background lighting

.

Note

The reading lights go out when the vehicle
is closed and locked or after a few minutes
of turning the ignition off. This prevents the
battery from discharging.

CarManuals2.com

126

Visibility

Visibility

Windscreen wiper and rear
window wiper systems

Window washer lever

Fig. 107 

Operating the windscreen wiper and

rear wiper.

More the lever to the required position:

0

 Windscreen wipers off.

1

 Intermittent wiping of the windscreen

activates the rain sensor. The intermittent
wiping of the windscreen depends on the
speed at which you are driving. The faster
the speed, the more frequent the wiping.

2

 Slow wipe.

3

 Continuous wipe.

4

 Short wipe. Pressing the lever for longer

accelerates the wiping.

5

 Pull the lever to switch on the auto-

matic windscreen washer/wiper. The Cli-
matronic switches on air recirculation for

approx. 30 seconds to prevent the smell of
windscreen washer fluid from entering the
vehicle interior.

6

 Switches on the intermittent rear win-

dow wipe. The wiper operates at intervals
of approx. 6 seconds.

7

 Pressing and holding the lever turns on

the automatic rear window washer/wiper.

A

 A Control for adjusting the duration of

the wiping intervals (vehicles without rain
and light sensors) or the sensitivity of the

rain sensor.

WARNING

If insufficient antifreeze is added to the
washer fluid, it could freeze on the glass and
impair visibility.

In cold conditions you should not use the

wash/wipe system unless you have warmed
the windscreen with the heating and venti-
lation system. The windscreen washer fluid
could otherwise freeze on the windscreen
and obscure your view of the road.

WARNING

The use of worn or dirty wiper blades re-
duces visibility and increases the risk of seri-
ous accidents and injuries.

Replace the wiper blades whenever they

are in poor condition or worn out and
no longer clean the windows sufficiently 

››› 

page 319

.

NOTICE

Before driving off and before switching on the
ignition, check the following aspects of the
wiper blades and the wiper motor to prevent
damage to the glass:

The wiper lever is in the neutral position.

You have removed or cleared any snow and

ice from the wiper blades and windows.

You have carefully removed any wiper

blades that may have frozen from the win-
dow. SEAT recommends a de-icer spray for
this operation.

NOTICE

Do not turn on the wiper until the glass is dry.
Using the wipers while dry can damage the
glass.

CarManuals2.com

Visibility

127

Windscreen wiper and rear window wiper systems

0

Note

When the vehicle stops while the wiper is

on, the wiper switches to operating tempora-
rily at the next lower wiping level.

If the driver’s or passenger door is opened

when the vehicle is stationary, the wipers re-
turn to the starting position and are switched
off. If the door is closed or the wiper lever is
moved within a few seconds, the wiper turns
on again.

In winter, the service position of the wipers

can be useful to make it easier to lift the wip-
ers off the windscreen when the vehicle is
going to be left stationary 

››› 

page 319

.

Wiper functions

Automatic rear window wipe

The rear wiper switches on automatically when
the wiper is switched on and reverse gear is en-
gaged. The automatic rear window wiper acti-
vation when engaging reverse gear can be ac-
tivated and deactivated in the infotainment sys-
tem, in the vehicle settings menu 

››› 

page 37

.

Heated windscreen washer nozzles

The heating defrosts any windscreen washer
nozzles that have frozen. The heat output is
automatically adjusted according to the ambi-
ent temperature when the ignition is switched

on. The heater only defrosts the nozzles, but
not the flexible pipes through which the washer
fluid passes.

Note

The windscreen will be wiped again approx-
imately 5 seconds after the windscreen
washer has been activated, provided the ve-
hicle is moving (“drip” function). If you acti-
vate the wipers less than 3 seconds after the
“drip” function, a new wash sequence will
begin without performing the last wipe. For
the “drip” function to work again, you have to
turn the ignition off and then on again.

Note

The wiper will try to wipe away any obsta-
cles that are on the windscreen. The wiper
will stop moving if the obstacle is still block-
ing its path. Remove the obstacle and switch
on the wiper again.

Rain and light sensor

Fig. 108 

Windscreen wipers lever: adjust the

rain sensor 

A

 .

Fig. 109 

Rain sensor sensitive surface

The rain sensor controls the frequency of the
windscreen wiper intervals, depending on the
amount of rain 

››› 

.

Push the lever to the desired position 

››› 

Fig. 108

.

Rain sensor off.

CarManuals2.com

128

Visibility

1

A

Rain sensor on; automatic wipe if neces-
sary.
Setting sensitivity level of rain sensor:
– Set control to the right: high sensitivity.
– Set control to the left: low sensitivity.

When the ignition is switched off and then back
on, the rain sensor stays on and starts operat-
ing again when the windscreen wipers are in
position 

››› 

Fig. 108


1

 and the vehicle is travel-

ling at more than 16 km/h (10 mph).

Abnormal operation of the rain and light
sensor

The possible causes of anomalies and errone-
ous interpretations 

in the sensitive surface area


››› 

Fig. 109

 of the rain sensor are, among oth-

ers:

Damaged wipers

: a film of water on the

damaged blades may lengthen the activation
time, reduce the washing intervals or result in a
fast and continuous wipe.

Insects

: the impact of insects may cause the

wiper to activate.

Salt on the road

: in winter, salt spread on

the roads may cause an excessively long wipe
when the windscreen is almost dry.

Dirt

: dry dust, wax, coating on glass (Lotus

effect) or traces of detergent (car wash) may
reduce the effectiveness of the rain sensor or
make it react more slowly, later or not at all.

Regularly clean the sensitive surface of the rain
sensor 

››› 

Fig. 109

 (arrow) and check for possi-

ble damage to the wiper blades.

Windscreen crack

: the impact of a stone will

trigger a single wipe cycle with the rain sensor
on. Next the rain sensor detects the reduction in
the sensitive surface area and adapts accord-
ingly. The behaviour of the sensor will vary with
the size of the damage caused by the stone.

WARNING

The rain sensor may not detect enough rain
to switch on the wipers.

If necessary, switch on the wipers man-

ually when water on the windscreen ob-
structs visibility.

Note

To remove wax and coatings, we recom-

mend a window cleaner containing alcohol.

Do not put stickers on the windscreen in

front of the rain sensor. This may cause sen-
sor disruption or faults.

Mirrors

General safety instructions

The exterior and interior mirrors allow the driver
to observe vehicles driving behind and adapt
his or her driving behaviour accordingly.

For safe driving, it is important for the driver
to adjust the exterior mirrors and interior mirror
correctly before setting off.
When looking through the exterior mirrors and
the interior mirror, it is not possible to see the
entire area behind and to the sides of the vehi-
cle. These areas outside the field of view are
known as the blind spot. Other road users and
objects may be in the blind spot.

WARNING

Adjusting the exterior mirrors and interior
mirror while driving can distract the driver.
This could cause accidents and lead to seri-
ous injuries

Only adjust the exterior mirrors and interior

mirror when the vehicle is stationary.

When parking, changing lanes, overtaking

or turning, always keep a close eye on your
surroundings, as other road users or objects
may also be in the blind spot.

Always make sure that the mirrors are ad-

justed correctly and that visibility to the rear
is not reduced by ice, snow, fogging or other
objects.

CarManuals2.com

Visibility

129

Mirrors

WARNING

A failure to accurately estimate the distance
to vehicles driving behind can lead to serious
accidents and injuries.

Curved (convex or aspherical) mirrors in-

crease the field of view and objects in them
appear smaller and further away.

Curved mirrors do not allow you to pre-

cisely calculate the distance to vehicles
driving behind, so using them when changing
lanes could cause serious accidents and in-
juries.

If possible, use the interior mirror to pre-

cisely calculate the distance to vehicles
driving behind you, or to other objects.

Always make sure you have sufficient visi-

bility to the rear.

WARNING

The automatic anti-dazzle mirrors contain an
electrolyte fluid which could leak if the mirror
is broken.

If it gets out, the electrolyte fluid can

irritate the skin, eyes and respiratory or-
gans, particularly in the case of people with
asthma or similar diseases. Immediately in-
hale enough fresh air and get out of the vehi-
cle, or open all windows and doors if this is
not possible.

If the electrolytic fluid comes into contact

with your eyes or skin, immediately rinse the
affected area with plenty of water for at
least 15 minutes and seek medical advice.

If the fluid comes into contact with foot-

wear or clothing, rinse immediately with
plenty of water for at least 15 minutes.
Clean thoroughly before using the footwear
or clothing in question again.

If the electrolytic fluid is swallowed, imme-

diately rinse the mouth with plenty of water
for at least 15 minutes. Do not induce vomit-
ing unless advised by a doctor. Immediately
seek medical attention.

NOTICE

Electrolyte fluid may leak if the automatic
anti-dazzle mirror is broken. This liquid at-
tacks plastic surfaces. Therefore, it should
be cleaned as fast as possible with a damp
sponge or similar.

Interior mirror

Rear view mirror with automatic anti-dazzle
function

When the ignition is switched on, the sensors in
the mirror measure the light falling on it from
behind and in front.
The interior mirror automatically darkens based
on the measured values.

If the light falling onto the sensors is blocked or
interrupted, e.g. by a sunshade blind or hanging
objects, the automatic anti-dazzle interior mir-
ror does not work or does not work properly.
Similarly, the use of portable navigation devi-
ces attached to the windscreen or close to the
automatic anti-dazzle interior mirror can affect
the operation of the sensors 

››› 

.

The automatic anti-dazzle function is deactiva-
ted in certain situations, e.g. when reverse gear
is engaged.

WARNING

Light from screens of portable navigation
devices can cause malfunctions of the au-
tomatic anti-dazzle interior mirror and may
cause serious accidents and injuries.

Abnormal operation of the automatic anti-

dazzle function may result in it being impos-
sible to use the interior mirror to precisely
calculate the distance to vehicles driving be-
hind, or to other objects.

CarManuals2.com

130

Visibility

1)

Regulation in right-hand drive vehicles is symmetrical

 / 

Adjusting the exterior mirrors

Fig. 110 

Detail of the driver door: control for

the exterior mirror.

Turn the control to the corresponding position.

Moving the control to the desired position
adjusts the mirrors on the driver's side ( ,
left) and on the passenger's side ( , right)

in the desired direction.

Depending on the equipment fitted on
the vehicle, the mirrors may be heated ac-
cording to the outside temperature.

Folding the mirrors 

››› 

.

The exterior mirror cannot be adjusted and
all functions are deactivated.

Activating exterior mirror functions

The following exterior mirror functions can
be activated and deactivated in the vehi-
cle settings menu of the infotainment system 

››› 

page 37

.

Synchronized regulation of the exterior mir-
rors

The synchronised mirror setting simultaneously
adjusts the right hand exterior mirror when the
left mirror is adjusted

Turn the control to position 

1)

.

Adjust the left-hand exterior mirror. The right

exterior mirror will be adjusted at the same time
(synchronised).

If necessary, correct the setting of the right

hand mirror: turn the control to position 

1)

.

Fold the rearview mirrors when locking the
vehicle

When the vehicle is locked or unlocked from
the outside, the exterior mirrors can be folded in
or out automatically, depending on the equip-
ment. For this purpose, the rotary control has to
be in position  ,  ,  , or  .
If the rotary control of the electric exterior mir-
rors is in the folded position, the exterior mirrors
remain folded.

Memory function

The memory buttons 

››› 

page 115

 can be used

to save and turn on settings for the exterior mir-
rors.
The settings will also be saved in the key or in
the user of the online services.

Saving the passenger rear view mirror set-
tings for reversing

Switch the ignition on.

In the infotainment system, select 

 >

Settings > Mirrors and wipers >

Mirrors > Lower in reverse gear


››› 

page 37

.

 Select the R 

1)

 position on the control.

Select reverse gear.

Adjust the front passenger exterior mirror so

that you can see, for example, the kerb area
well.

Release the reverse gear.

The adjusted position for the rear view mirror

is stored.

Activating the passenger side exterior mirror
settings for reversing

Turn the exterior mirror control knob to posi-

tion 

1)

.

CarManuals2.com

Visibility

131

Sun protection

Engage reverse gear with the ignition

switched on. The right-hand exterior rear-view
mirror will move to the saved position.
The passenger side exterior mirror leaves the
saved reversing position when the vehicle is
travelling faster than approx. 15 km/h (9 mph),
or if the control is turned from position   to an-
other position.

WARNING

Fold and unfold the exterior mirror, taking
care to avoid injuries.

 Only fold or unfold the exterior mirror

when there is no-one in the way of the mirror.

When moving the mirror, take care not to

trap fingers between the mirror and the mir-
ror bracket.

NOTICE

Before washing the vehicle in an automatic

car wash, please make sure to fold the ex-
terior mirrors in to prevent them from being
damaged.

The electrically folding exterior mirrors

must only be operated electrically, not by
hand, and this could damage their electric
drive.

For the sake of the environment

Do not leave the exterior mirror heating on
for longer than necessary. Otherwise it cau-
ses unnecessary energy consumption.

Note

If the electrical adjustment should fail to op-
erate, both of the mirrors can be adjusted
by hand by lightly pressing the edge of the
mirror glass.

Sun protection

Sun blind

Fig. 111 

Sun visor

Options for adjusting driver and front pas-
senger sun visors

Lower the sun visor towards the windscreen.

The sun visor can be pulled out of its mount-

ing and turned towards the door 

››› 

Fig. 111


1

.

Swing the sun visor towards the door, longitu-

dinally backwards.
There is a vanity mirror on the sun visor, with
a cover. When the cover is opened 

2

 a light

comes on.
The lamp goes out when the vanity mirror cover
is closed or the sun visor is pushed back up.

WARNING

Folded sun blinds can reduce visibility.

Always store sun blinds and visors in their

housing when not in use.

Note

The light above the sun visor automatically
switches off after a few minutes in certain
conditions. This prevents the battery from
discharging.

CarManuals2.com

132

Air conditioning

1)

Valid for hybrid vehicles.

Air conditioning

Heating, ventilation and
cooling

Introduction

Depending on the vehicle’s equipment, several
systems may have been fitted:

 The 

manual air conditioning system

 heats,

cools and dehumidifies the air.

The 

Climatronic

 is an automatic air condi-

tioner that heats, cools and dehumidifies the
air.

With the Climatronic’s automatic mode it is
possible to automatically regulate the air tem-
perature, distribution and flow to achieve opti-
mal thermal comfort.
To switch a specific function on, press the ap-
propriate button. Press the button again to
switch off the function.
The illuminated LEDs next to the buttons indi-
cate that the function is switched on.
In the air conditioning settings in the info-
tainment system, the yellow function buttons
indicate that the function is switched on 

››› 

page 137

.

Economic use of the air conditioning

When the air conditioning is switched on, the
compressor consumes engine power and has
influence on fuel consumption.
The air conditioning operates most effectively
with the windows and the sunroof closed. How-
ever, if the passenger compartment has heated
up after standing in the sun for some time, the
air inside can be cooled more quickly by briefly
opening the windows and the sunroof.

Refrigerated glove box

When the vent is open, cold air flows into the
glove box. If the inside of the vehicle is cooled
by the air conditioning system, the cold air can
be directed towards the inside of the glove box.

Passenger recognition function

1)

The front passenger recognition function turns
down the air conditioning in these areas if no
occupation is detected in them, with the aim of
reducing the vehicle’s energy consumption.
When the ignition is switched on, the vehicle
recognises whether a person is sitting in a seat
in the vehicle with a seatbelt fastened.
The turning down of the air conditioning is indi-
cated as follows:


Front passenger area

: on the front passen-

ger temperature setting, which will display 
instead of the selected temperature.

Rear area:

 On the rear temperature setting,

where 

 will be displayed instead of the selec-

ted temperature.

Dust and pollen filter

The dust and pollen filter with its activated
charcoal cartridge serves as a barrier against
impurities in the air taken into the vehicle inte-
rior.
The dust and pollen filter must be changed reg-
ularly so that air conditioner performance is not
adversely affected.
If the filter loses efficiency prematurely due to
use in areas with very high levels of air pollu-
tion, the filter must be changed more frequently
than stated in the Service Schedule.

Air vents

To ensure proper heating, cooling and ventila-
tion in the vehicle interior, the air vents must
remain open.
There are other additional, non-adjustable air
vents in the instrument panel, in the footwells
and in the rear area of the passenger compart-
ment.

CarManuals2.com

Air conditioning

133

Heating, ventilation and cooling

WARNING

Reduced visibility through the windows in-
creases the risk of serious accidents.

Always ensure that all windows are free of

ice and snow, and that they are not fogged,
so as to maintain good visibility of everything
outside.

Only drive when you have good visibility.

Always ensure that you use the air condi-

tioner and heated rear window to maintain
good visibility.

Never leave the air recirculation on for a

long period of time. If the cooling system
is switched off and air recirculation mode
switched on, the windows can mist over very
quickly, considerably limiting visibility.

Switch air recirculation mode off when it is

not required.

NOTICE

Food, medicines and other objects sensitive
to heat or cold may be damaged or made
unsuitable for use by the air coming from the
vents.

Never place food, medicines or other tem-

perature-sensitive objects close to the air
vents.

Note

When the cooling system is turned off, air

coming from the outside will not be dried. To
prevent fogging of the windows, SEAT recom-
mends leaving the cooling system turned on.
To do this, press the function button 

. The

icon should light up.

The maximum heat output required to de-

frost windows as quickly as possible is only
available when the engine has reached its
normal running temperature.

Keep the air intake slots in front of the

windscreen free of snow, ice and leaves to
ensure heating and cooling are not impaired,
and to prevent the windows from misting
over.

The air from the vents flows through the ve-

hicle interior and is extracted by slots in the
luggage compartment designed for this pur-
pose. Therefore, you should avoid obstruct-
ing these slots with any kind of object.

It is advisable to turn on the air condition-

ing at least once a month, to lubricate the
system gaskets and prevent leaks. If a de-
crease in the cooling capacity is detected,
a Technical Service should be consulted to
check the system.

When the engine is under extreme strain,

switch off the compressor for a moment.

CarManuals2.com

134

Air conditioning

Climatronic controls and functions

Fig. 112 

In the centre console: Climatronic control

panel.

Some functions and buttons, as well as the air
conditioning for the rear seats, are only availa-
ble depending on the vehicle equipment.

Touch zones 

1

 and 

2

The temperature of the right and left sides can
be adjusted separately using the adjusters. The
selected temperature is shown on the display of
the climate control panel.
To set the Climatronic temperature to +22 °C
(+72 °F), the centre of the touch control must be
pressed briefly. To adjust the maximum cooling
or heating power, briefly press and hold either
end of the touch control (red or blue zone).

In this mode, the system automatically
regulates the interior temperature, fan
speed and air distribution for optimal

thermal comfort. The 

 mode will deac-

tivate as soon as manual changes are
made to the fan speed, air distribution,
windscreen demisting or air recirculation.
The fan power in automatic mode can be
selected using the air conditioning profile in
the air conditioning settings of the infotain-
ment system 

››› 

page 137

.

Switches the cooling system on or off.
The cooling mode cools and dehumidi-
fies the air.

Adjust the fan power.

Synchronizes the driver’s temperature
settings to the passenger side and rear
zone.

Upper arrow: The airflow is directed at
the windscreen.
Central arrow: The airflow is directed to-

wards the chest

Lower arrow: The airflow is directed to-
wards the footwell.

The defrost/demisting function removes
ice and fog from the windscreen. The air
is dehumidified and the fan is set high.

Open the air conditioning settings in the

infotainment system 

››› 

page 137

.

The climate control operation and settings
menu will be displayed in the infotainment
system screen.

The heated rear window only works when
the engine is running and switches off
automatically after a maximum of 10 mi-

nutes. It should be switched off as soon as
the glass is demisted. By saving electrical
power you can also save fuel.

CarManuals2.com

Air conditioning

135

Heating, ventilation and cooling

To avoid possible damage to the battery,
an automatic temporary disconnection of
this function is possible, coming back on
when normal operating conditions are re-
established.

Switches the air recirculation mode on
and off 

››› 

page 137

.

Switches seat heating on and off 

››› 

page 138

.

Switches the auxiliary heater on or off 

››› 

page 141

.

Switch off the air conditioning system.

Air Conditioning settings in Infotainment

Open the auxiliary heater menu in the air con-
ditioning settings in the infotainment system 

››› 

page 137

.

The Air Care Climatronic allergen filter can re-
duce the amount of harmful substances that
get inside, including allergens 

››› 

page 137

.

Windscreen heating 

Switches the heated windscreen on and off
with the engine running 

››› 

page 140

.

Steering wheel heating 

Switches steering wheel heating on and off 

››› 

page 139

.

CarManuals2.com

136

Air conditioning

Manual air conditioning controls

Fig. 113 

In the centre console: manual air

conditioning control panel.

Cooling mode 

Press the button to switch on or off the cooling
system.

Temperature 

1

Turn the control to adjust the temperature.

Fan 

Turning the regulator 

2

 sets the fan power.

At level 0 the fan and manual air conditioning
are disconnected. Level 6 is the maximum.

Air distribution

Turning regulator 

3

 distributes the air to the

desired zone:

The airflow is directed towards the chest

The airflow is directed towards the chest
and the footwell area.

The airflow is directed towards the foot-
well.
The airflow is directed towards the wind-
screen and the footwell area.

Defrost/demist function.

 The air flow

is directed towards the windscreen.Air re-
circulation is automatically deactivated

or not activated in the first place. Increase
the fan power to clear the windscreen of
condensation as soon as possible. To de-
humidify the air, the cooling system will au-
tomatically switch on.

Maximum cooling power 

When the regulator is in position   air recircu-
lation and the cooling system switch on auto-
matically. Set the air distribution to position 
to achieve thermal comfort in the shortest pos-
sible time.

Rear window heating 

This only works when the engine is running and
switches off automatically after a maximum of
10 minutes.
It should be switched off as soon as the glass
is demisted. By saving electrical power you can
also save fuel.
To avoid possible damage to the battery,
an automatic temporary disconnection of this
function is possible, coming back on when nor-
mal operating conditions are re-established.

CarManuals2.com

Air conditioning

137

Heating, ventilation and cooling

1)

Valid for the front and rear air conditioning control unit.

Air recirculation 

››› 

page 137

Seat heating 


››› 

page 138

Switching off

Press the   button or manually set the fan to  .

Setting the temperature on the info-
tainment system

The air conditioning settings in the infotainment
system are available in the Climatronic. De-
pending on the vehicle equipment.

Open the air conditioning menu

 Press the 

 button on the Climatronic con-

trol panel.
The current air conditioning settings are dis-
played at the top of the screen. The current air
conditioning settings are displayed at the top of
the screen.

Arrow colour representation

The colour represented by the arrows does not
indicate the outlet temperature of the air, but
the requested temperature depending on the
surrounding conditions.

General settings submenu

Sets the following functions:

 Automatic air recirculation mode 

››› 

page 137

.

Automatic front window heating 

››› 

page 140

.

Presets submenu

Sets the cooling system to automatic or man-
ual mode, or switches off the air conditioning.

Air conditioning profile

Adjust fan power in automatic mode

1)

.

Rear controls

Fig. 114 

To the rear of the centre console:

Climatronic rear seat temperature controls.

Temperature selection

 Press buttons 

1

 and 

2


››› 

Fig. 114

 to adjust

the temperature of the rear zone.
Setting the temperature on the infotainment
system

Open the air conditioning settings in the info-

tainment system.

Press the function button for the rear seat.

Press the function buttons to set the tempera-

ture.

Note

When function button 

 is active in the In-

fotainment System, the rear controls do not
work.

Air recirculation 

Air recirculation mode prevents the ambient air
from entering the interior.
When the outside temperature is very high,
selecting manual air recirculation mode for a
short period refreshes the vehicle interior more
quickly.
For safety reasons, air recirculation is switched
off in the following situations:

CarManuals2.com

138

Air conditioning

When the button   is pressed or the air dis-

tributor is turned to 

.

When a sensor detects that the vehicle's win-

dows could mist up.

Switching the manual air recirculation mode
on and off

Press the 

 button to switch manual air re-

circulation on or off.

Climatronic automatic air recirculation
mode

With the automatic air recirculation mode ac-
tivated, the entry of fresh air into the cabin in-
terior is enabled. If the system detects a high
concentration of hazardous substances in the
ambient air, air recirculation mode is switched
on automatically. When the level of impurities
drops to within a normal range, recirculation
mode is switched off.
The system is unable to detect unpleasant
smells.
The air recirculation will 

not

 connect automati-

cally in versions without humidity sensor and in
the following external conditions:

 The outside temperature is lower than +3°C

(+38°F).

The cooling system is switched off and the

outside temperature is below +10°C (+50°F).

The cooling system is switched off, the out-

side temperature is below +15°C (+59°F) and
the windscreen wipers are switched on.

Air Care Climatronic with allergen filter

The Air Care Climatronic allergen filter can
reduce the amount of harmful substances, in-
cluding allergens, that get inside.
If the Air Care option is switched on, the air con-
ditioning’s air recirculation mode is maximised
until there is a risk of the windows misting up
due to humidity inside the vehicle and the out-
side temperature, in models without a humidity
sensor.

 Open the air conditioning settings in the info-

tainment system 

››› 

page 137

.

 Switch the Air Care function on or off using

Air Care active

WARNING

Stuffy or used air will increase fatigue and
reduce driver concentration possibly result-
ing in a serious accident.

Never leave the fresh air fan turned off or

use the air recirculation for long periods of
time; the air in the vehicle interior will not be
refreshed.

NOTICE

In vehicles with an air conditioner, do not
smoke when air recirculation is switched on.
The smoke may be deposited on the cool-
ing evaporator and on the active combina-
tion filter and cause permanent unpleasant
odours.

Note

When the outside temperature is very high,
briefly switching on the air recirculation
mode helps to cool the vehicle interior more
quickly.

Seat heating

With the engine running, the front seats and
side rear seats can be electrically heated to
three power levels.

Control seat heating

Press   or   on the control panel to turn on

the seat heating at maximum power.

Press the   or   button repeatedly to adjust it

to the required level.

To turn off seat heating, press   or   several

times until no LEDs are lit.
If the ignition is switched on again in approx.
the next 10 minutes, the driver seat heating is
automatically turned on to the level set the last
time.

CarManuals2.com


Content      ..     2      3      4      5     ..