Seat Tarraco (2023 year). Manual in english - page 2
 

  Index      Manuals     Seat Tarraco (2023 year). Manual in english


Search            copyright infringement  


Content      ..      1      2      3      ..


Seat Tarraco (2023 year). Manual in english - page 2


Safety

43

Seat belts

Depending on the version of the model, when
the ignition is switched on, the status display of
the belts 

››› 

Fig. 22

 informs the driver on the in-

strument panel display whether the occupants
of the rear seats have their seat belts fastened.

Depending on the seat occupancy and the sta-
tus of the seat belts, the following symbols light
up in different colours:

The white symbol indicates that the cor-
responding seat is empty.

A green symbol indicates that the seat is
occupied and the occupant is wearing the
seat belt.
A red symbol indicates that the seat is oc-
cupied and the occupant is not wearing
the seat belt.

If a rear seat occupant unfastens his/her seat
belt while driving, the   symbol lights up per-
manently in red for that seat. In addition, the
red warning light   flashes on the instrument
cluster screen. If you drive faster than approx.
25 km/h (15 mph), an audio signal sounds for a
few seconds.

If a seat belt is fastened or unfastened while
driving in some of the rear seats, the seat belt
status is displayed for approximately 30 sec-
onds.

Head-on collisions and the laws of
physics

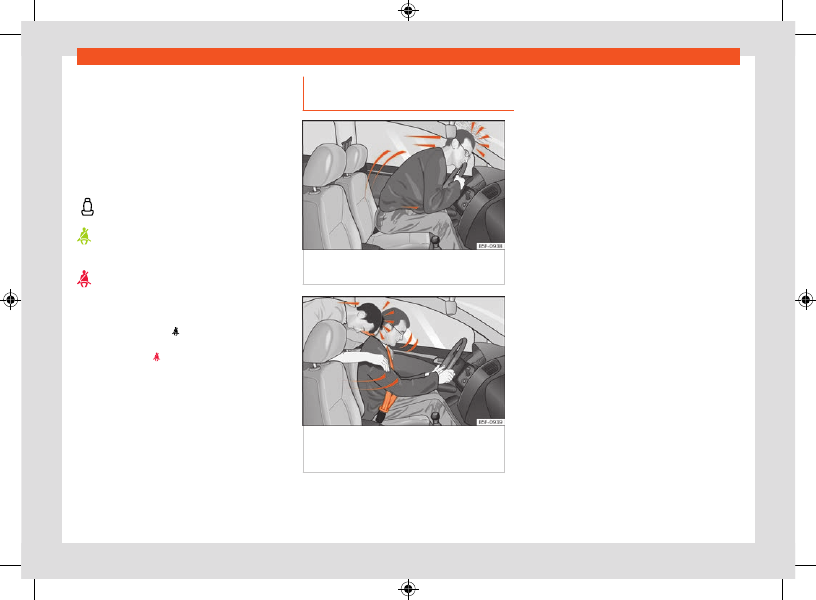
Fig. 23 

A driver not wearing a seat belt may be

thrown forward violently.

Fig. 24 

Any rear seat occupants not wearing

a seat belt may be thrown forward violently,
hitting the driver who is wearing the seat belt.

The effects of the laws of physics in the case of
a head-on collision are easy to explain: the mo-
ment a vehicle starts moving, a type of energy
called “kinetic energy” starts acting on both the
vehicle and its passengers.
The amount of “kinetic energy” depends on the
speed of the vehicle and on the weight of the
vehicle and of its passengers. The higher they
are, the more energy there is to be “absorbed”
in the event of an accident.
The most significant factor, however, is the
speed of the vehicle. If the speed doubles from
25 km/h (15 mph) to 50 km/h (30 mph), for
example, the corresponding kinetic energy is
multiplied by four.
Given that the passengers of the vehicle in our
example do not have their seat belts fastened,
in the event of a collision the entire amount of
the passengers' kinetic energy will be only ab-
sorbed by the mentioned impact.
Even at speeds of 30 km/h (19 mph) to 50 km/h
(30 mph), the forces acting on bodies in a colli-
sion can easily exceed one tonne (1000 kg). At
greater speed these forces are even higher.
Vehicle occupants not wearing seat belts are
not “attached” to the vehicle. In a head-on col-
lision, they will move forward at the same speed
their vehicle was travelling just before the im-
pact. This example applies not only to head-on
collisions, but to all accidents and collisions.
Even at low speeds the forces acting on the
body in a collision are so great that it is not pos-
sible to brace oneself with one's hands. In the

CarManuals2.com

44

Safety

event of a head-on collision, vehicle occupants
not wearing a seat belt will be thrown uncon-
trollably forward and will collide, for example,
against the steering wheel, instrument panel or
windscreen 

››› 

Fig. 23

.

It is also important for rear passengers to wear
seat belts properly, as they could otherwise be
thrown forward violently through the vehicle in-
terior in an accident. If a rear seat occupant
is not wearing a seat belt, they are not only en-
dangering themselves but also the occupants
of the front seats 

››› 

Fig. 24

.

Fastening and unfastening the seat
belt

Fig. 25 

Insert the latch plate of the seat belt

into the buckle.

Fig. 26 

 Release the seat belt's latch plate.

Properly worn seat belts hold the vehicle occu-
pants in the position that most protects them
in the event of an accident or sudden braking 

››› 

.

Fastening the seat belt

Fasten your seat belt before each trip.

Adjust the front seat and head restraint cor-

rectly 

››› 

page 39

.

Engage the seat backrest of the rear seat in

an upright position 

››› 

.

Pull the latch plate and place the belt web-

bing evenly across your chest and lap. Do 

not

twist the seat belt when doing so 

››› 

.

Insert the buckle plate in the buckle of the

correct seat 

››› 

Fig. 25

.

Pull the belt to ensure that the latch plate is

securely engaged in the buckle.

Releasing the seat belt

Only unfasten the seat belt when the vehicle
has come to a standstill 

››› 

.

Press the red button on the buckle 

››› 

Fig. 26

.

The latch plate is released from the buckle.

Guide the belt back by hand so that it rolls up

easily and the trim will not be damaged.

WARNING

The seat belt cannot offer its full protec-

tion unless the seat backrest is in an upright
position and the seat belt is worn correctly,
according to your size.

Unbuckling your seat belt while the vehicle

is in motion can cause severe or fatal injuries
in the event of an accident or sudden brak-
ing.

The seat belt itself, or a loose seat belt,

can cause severe injuries if the belt moves
from hard areas of the body to soft areas
(e.g. the stomach).

CarManuals2.com

Safety

45

Seat belts

Correct position of the seat belt

Fig. 27 

Correct seat belt and headrest

positions, viewed from front and the side.

Fig. 28 

Position of seat belt during pregnancy.

Seat belts offer their maximum protection in
the event of an accident and reduce the risk
of sustaining severe or fatal injuries only when
they are properly positioned. Furthermore, if the
webbing is correctly positioned, the seat belt

will hold the vehicle occupants in the optimum
position to ensure the airbag provides the max-
imum protection. The seat belt must therefore
always be worn and the webbing correctly
positioned.
Incorrectly worn seat belts can cause severe or
even fatal injuries 

››› 

page 39, 

Correct sitting

position of vehicle occupants

.

The shoulder part of the seat belt must lie

on the centre of the shoulder, never across the
neck or the arm, under the arm or behind the
shoulder.

The lap part of the seat belt must lie across

the pelvis, never across the stomach.

The seat belt must lie flat and fit comfortably.

Pull the belt tight if necessary to take up any
slack.
In the case of 

pregnant women

, the seat belt

should pass uniformly over the chest and as
low as possible through the pelvic area with the
strap flat so it does not press down on the ab-
domen; in addition, it must be used throughout
the entire pregnancy 

››› 

Fig. 28

.

Adapting the position of the belt webbing to
your size

The seat belt can be adapted using the follow-
ing equipment:

Front seat belts with height adjustment.

Front seat height adjustment.

WARNING

An incorrectly worn seat belt web can cause
severe or fatal injuries in the event of an acci-
dent.

The shoulder part of the seat belt must lie

on the centre of the shoulder, never across
the neck or the arm.

The seat belt must lie flat and fit comforta-

bly on the torso

The lap part of the seat belt must lie across

the pelvis, never across the stomach. The
seat belt must lie flat and fit comfortably on
the pelvis Pull the belt tight if necessary to
take up any slack.

In the case of pregnant women, the ab-

dominal strap of the seat belt should pass
as low as possible across the pelvic area,
resting flat and “surrounding” the abdomen 

››› 

Fig. 28

.

 Do not twist the seat belt while it is fas-

tened.

Once the seat belt is positioned correctly,

don't pull it away from your body with your
hand.

Do not lie the seat belt across rigid or frag-

ile objects, e.g. glasses, pens or keys.

Never use seat belt clips, retaining rings or

similar instruments to alter the position of the
belt webbing.

CarManuals2.com

46

Safety

1)

Only if fitted with the PreCrash System.

Note

If your physical constitution prevents you
from maintaining the correct position of the
belt webbing, contact a specialised work-
shop for help with any special devices to en-
sure the optimum protection of the seat belt
and airbag. SEAT recommends taking your
car in for technical service.

Seat belt height adjustment

Fig. 29 

Near the front seats: seat belt height

regulator.

Using the height adjusters for the front seats
and the outer seats of the second row, the po-
sition of the seat belts can be adjusted in the
shoulder area according to the height of the
occupant:

Keep the guide device pressed down in the

direction of the arro

››› 

Fig. 29

.

Move the guide device up or down until the

seat belt lies over the centre of your shoulder 

››› 

page 45

.

Release the guide device.

Pull the belt sharply to check that the device

is engaged securely.

WARNING

Never adjust the belt height while the vehicle
is in motion.

Automatic retractor, tensioner and
belt force limiter

Vehicle seat belts are part of the vehicle’s
safety system 

››› 

page 39

. This system has the

following important functions:

Automatic belt retractor

The seat belt shoulder straps on the driver's
and front passenger seats, as well as those on
the rear side seats (and, depending on equip-
ment, also the seat belt of the central rear
seat) are fitted with automatic retractors. This
device ensures complete freedom of movement
when the shoulder strap is pulled gently or
during normal driving. However, during sudden

braking, when driving in the mountains, around
bends and when accelerating, the retractor
locks the seat belt if it extends rapidly.
In critical driving situations, e.g. in the event
of emergency braking or in the case of over-
steer and understeer, the proactive occupant
protection can tension the front seat belts auto-
matically if they are worn

1)

. The two belts are

loosened again if an accident does not happen
or when the critical situation passes. Proactive
occupant protection is ready to operate again 

››› 

page 47

.

Seat belt tensioner

The seat belts on the front seats and, depend-
ing on the equipment, side rear seats are fitted
with tensioners.
The tensioners are activated by sensors in the
event of severe head-on, side and rear colli-
sions, and tension the seat belts in a direction
opposite their extension.
If the seat belt is slack, the tensioner tightens
it. This cushions the movement of occupants
forwards towards the impact.
The belt pre-tensioners work in combination
with the airbag system. In case of overturn, the
pre-tensioners do not activate unless the head
airbags are deployed.
When activated, a fine powder may be re-
leased. This is completely normal and it is not
an indication of fire in the vehicle.

CarManuals2.com

Safety

47

PreCrash system

1)

Only if fitted with the PreCrash System.

Reversible belt tensioning (proactive occu-
pant protection)

A reversible tensioning of the seat belts may
occur in certain driving situations 

››› 

page 47

.

For example:

in the event of sudden brakes

in the event of oversteering or understeering

 in the event of minor collisions

Belt force limiter

Depending on the equipment and the country
in question, in the event of an accident, the seat
belt force limiter reduces the force the seat belt
exerts on the body.

Note

After certain driving situations, the reversi-

ble belt tensioners may be left permanently
tensioned

1)

. In this case, to loosen the belt, it

must be removed manually while the vehicle
is stationary and then replaced correctly.

The relevant safety requirements must be

observed if the vehicle or any components of
the system are to be scrapped. Specialised
workshops are aware of these requirements.

Maintenance and disposal of seat
belt tensioners

The belt tensioners are components of the seat
belts that are installed in the seats of your
vehicle. If you work on the belt tensioners or
remove and install parts of the system when
performing other repair work, the seat belt may
be damaged. The consequence may be that,
in the event of an accident, the belt tensioners
function incorrectly or may not function at all.
So that the effectiveness of the seat belt ten-
sioner is not reduced and that removed parts
do not cause any injuries or environmental pol-
lution, regulations, which are known to the spe-
cialised workshops, must be observed.

WARNING

Improper handling and home repairs to seat
belts, automatic retractors and belt tension-
ers may increase the risk of serious or fa-
tal injuries. The tensioners may not activate,
even though they should, or they may acti-
vate unexpectedly.

Never repair, adjust, or disassemble and

reassemble seat belt components or ten-
sioners. Always have this work carried out by
a specialist workshop.

Seat belts, tensioners and their automatic

retractors cannot be repaired and have to be
replaced.

For the sake of the environment

Airbag modules and belt tensioners may
contain perchlorate.

Observe the legal requirements for their dis-
posal.

PreCrash system

How it works

The PreCrash system is an assistance system
that actives a series of measures to protect the
occupants of the vehicles in potentially risky
situations, but which cannot prevent a collision.
It only works completely if no special driving
profile is selected and if there are no operating
anomalies.

Basic features

Depending on the legal provisions of the coun-
try and the features of the vehicle, in critical
situations (e.g. in certain cases of emergency
braking or loss of control of the vehicle by the
driver) the following functions can be activated
separately or at the same time when the vehi-
cle is travelling faster than approximately 30
km/h (20 mph).

Reversible tensioning of front seat belts that

are fastened.

Operation of the hazard warning lights.

CarManuals2.com

48

Safety

Automatic closing of the windows until they

are just cracked open and, depending on the
equipment, of the sunroof.

In the event of overturning, depending on the

equipment, activation of the belt tensioners.
Depending on how critical the driving situation
is, the belts are either tightened individually, or
both belts at the same time.

In addition to Front Assist

In vehicles with Front Assist 

››› 

page 196

, within

the limits of the system, information is assessed
on the risk of collision with the vehicle in front.
The functions of the PreCrash system may also
be activated if there is a high likelihood of a
rear-end collision, or during the activation of
Front Assist.

In addition to Side Assist

In vehicles with lane assist 

››› 

page 205

, within

the limitations of each system, information is
assessed on the risk of collision with traffic to
the rear of the vehicle. If a rear-end collision
is highly likely, the functions of the PreCrash
system may also be activated. In this situation,
the hazard warning lights are turned on with a
higher frequency of flashes.

In addition to the Emergency Assist system

In vehicles with emergency assist, driver status
information is assessed within the limitations of
this system. The following PreCrash systems
may be activated if a lack of activity is detec-
ted:

Reversible seat belt tensioning of the driver's

seat belt.

 Automatic closing of the windows until they

are just cracked open and, depending on the
equipment, of the sunroof.

Activation of the PreCrash system

The PreCrash system can be partially deac-
tivated by deactivating the traction and/or
stability control, depending on the equip-
ment. When these vehicle safety controls are
switched on (by default, every time the ignition
is turned on), the system is fully activated.

Driving profile selection settings

In vehicles with driving profile selection, Pre-
Crash adapts to suit the special vehicle
configuration of the corresponding profile 

››› 

page 173

.

Limited operation

The PreCrash system is not available or only
has limited availability in the following situa-
tions:

When the TCS and/or ESC is off.

 When driving in reverse.

When the airbag control unit is not operating

properly.

When there is a fault in the system itself, in the

ESC or in the Front Assist.

Troubleshooting

If the PreCrash is not working correctly, the
message 

System unavailable

 or 

System

with limited functions

 is shown perma-

nently on the instrument cluster screen. Get the
system checked by a SEAT Official Service.

WARNING

The PreCrash system cannot overcome the
limits imposed by the laws of physics; it only
works within the limits of the system. Risks
that compromise safety are never justified by
the use of this system. The system is not a re-
placement for driver awareness and cannot
prevent a collision.

 Adapt your speed and safe distance to

the vehicle in front of you at all times to suit
the visibility, weather, road and traffic condi-
tions.

The system is not always able to recognise

objects.

The system may not react to people or

animals or objects that cross length-wise or
that are hard to detect.

CarManuals2.com

Safety

49

Airbag system

 Metallic objects (e.g. fences) or other ele-

ments of the public road or adverse weather
conditions can hinder its operation and thus
its ability to detect collision risk.

 Never ignore the warning lamps that light

up or the messages shown on the dashboard.

WARNING

Distracting the driver in any way can lead to
an accident and cause injuries.

Never change settings on the Infotainment

System while driving.

Airbag system

Why is it so important to wear a seat
belt and to sit correctly?

For the inflating airbags to achieve the best
protection, the seat belt must always be worn
properly and the correct sitting position must
be assumed.
The airbag system is not a substitute for seat
belts, but it is an integral part of the vehicle's
overall passive safety system. Please bear in
mind that the airbag system can only work ef-
fectively when the vehicle occupants are wear-
ing their seat belts correctly and have adjus-
ted the head restraints properly. Therefore, it is
most important to properly wear the seat belts

at all times, not only because this is required by
law in most countries, but also for your safety 

››› 

page 41, 

Seat belts

.

The airbag inflates in a matter of seconds, so if
you are not properly seated when the airbag is
triggered, you may sustain fatal injuries. There-
fore, it is essential that all vehicle occupants as-
sume a correct sitting position while travelling.
Sharp braking before an accident may cause a
passenger not wearing a seat belt to be thrown
forward into the area of the deploying airbag.
In this case, the inflating airbag may inflict criti-
cal or fatal injuries on the occupant. This also
applies to children.
Always maintain the greatest possible distance
between yourself and the front airbag. This
way, the front airbags can completely deploy
when triggered, providing their maximum pro-
tection.
The most important factors for triggering the
airbag are the type of accident, the angle of
impact and the vehicle speed.
Whether or not the airbags are activated de-
pends primarily on the vehicle deceleration
rate resulting from the collision and detected
by the control unit. If the vehicle deceleration
occurring during the collision and measured by
the control unit remains below the specified
reference values, the front, side and/or curtain
airbags will not be triggered. Take into account
that the visible damage in a vehicle involved

in an accident, no matter how serious, is not a
determining factor for the airbags to have been
activated.

WARNING

Wearing the seat belt incorrectly or assum-
ing an incorrect sitting position can lead to
critical or fatal injuries

All vehicle occupants, including children,

who are not properly belted can sustain criti-
cal or fatal injuries if the airbag is triggered.
Children up to 12 years old should always
travel on the rear seat. Never transport chil-
dren in the vehicle if they are not restrained
or the restraint system is not appropriate for
their age, size or weight.

To reduce the risk of injury from an inflating

airbag, always wear the seat belt properly 

››› 

page 41

.

Description of the airbag system

The airbag system offers additional protection
for the occupants in combination with the seat
belts.

The airbag system comprises the following
modules (as per vehicle equipment):

Electronic control unit

 Front airbags for driver and passenger

Knee airbag for the driver

Side airbags

CarManuals2.com

50

Safety

 Head airbag

Airbag control lamp   on the instrument

panel 

››› 

page 51

Key-operated switch for front passenger air-

bag

Control lamp for disabled/enabled status of

the front passenger airbag.
The airbag system operation is monitored elec-
tronically. The airbag control lamp will illumi-
nate for a few seconds every time the ignition is
switched on (self-diagnosis).

There is a fault in the system if the control
lamp  :

does not light up when the ignition is switched

on 

››› 

page 51

,

turns off after 4 seconds after the ignition is

switched on,

turns off and then lights up again after the

ignition is switched on,

illuminates or flashes while the vehicle is mov-

ing.

The airbag system is not triggered if:

the ignition is switched off

there is a minor frontal collision

there is a minor side collision

there is a rear-end collision

in the event of the vehicle overturning if the

dynamic characteristics measured by the con-
trol unit are too low,

 the impact speed is lower than the reference

value programmed in the control unit.

WARNING

The seat belts and airbags can only pro-

vide maximum protection if the occupants
are seated correctly 

››› 

page 39

.

 If a fault has occurred in the airbag sys-

tem, have the system checked immediately
by a specialised workshop. Otherwise there
is a danger that during a collision, the system
may fail to trigger, or not trigger correctly.

Airbag activation

The airbags deploy extremely rapidly, within
thousands of a second, to provide additional
protection in the event of an accident. A fine
dust may develop when the airbag deploys.
This is normal and it is not an indication of fire in
the vehicle.
The airbag system is only ready to function
when the ignition is on.
In special accidents instances, several airbags
may activate at the same time.
In the event of minor head-on and side colli-
sions, rear-end collisions, overturning or rollover
of the vehicle, airbags 

do not activate

.

Airbags only activate if the vehicle overturns in
the hybrid plug-in version of the vehicle.

Activation factors

The conditions that lead to the airbag system
activating in each situation cannot be general-
ised. Some factors play an important role, such
as the properties of the object the vehicle hits
(hard/soft), angle of impact, vehicle speed, etc.
Deceleration trajectory is key for airbag activa-
tion.
The control unit analyses the collision trajec-
tory and activates the respective restraint sys-
tem.
If the deceleration rate is below the predefined
reference value in the control unit the airbags
will not be triggered, even though the accident
may cause extensive damage to the car.

The following airbags are triggered in seri-
ous head-on collisions:

Driver airbag.

Front passenger front airbag

Knee airbag for the driver.

The following airbags are triggered in seri-
ous side-on collisions:

Curtain (head) airbag on the side of the acci-

dent.

Front side airbag on the side of the accident.

CarManuals2.com

Safety

51

Airbag system

In an accident with airbag activation:

 the interior lights switch on (if the interior light

switch is in the courtesy light position);

the hazard warning lights switch on;

all doors are unlocked;

the fuel supply to the engine is cut;

in hybrid vehicles, the high voltage system is

switched off;

an emergency call is started.

Airbag system control lamps

Lights up on the instrument cluster

Fault in the airbag system and seat belt
tensioners. Have the system checked im-

mediately by a specialised workshop.

It lights up on the dash panel

Front passenger front airbag deactivated.
Check if the airbag should be kept deacti-
vated.

OR:

 Fault in the airbag system. Have the

system checked immediately by a special-
ised workshop.

It lights up on the dash panel

Front passenger front airbag activated. The
control lamp turns off automatically 60
seconds after the ignition is switched on.

Several warning and control lamps light up for
a few seconds when the ignition is switched
on, signalling that the function is being verified.
They will switch off after a few seconds.
If the airbag and seat belt tensioner system
control lamp   remains on or flashes, it indi-
cates a malfunction in the airbag and seat
belt tensioner system 

››› 

 . Have the system

checked immediately by a specialised work-
shop.
If the front passenger airbag has been deacti-
vated, the warning lamp 

 remains lit in the

middle of the dash panel to remind you that
the airbag is deactivated. If, with the front pas-
senger airbag deactivated, this lamp 

does not

remain lit

 or if it is lit along with the control

lamp   on the instrument panel, there is a fault
in the airbag system 

››› 

. If the control lamp

is flashing, there is a fault in the disabling of the
airbag system 

››› 

. Have the system checked

immediately by a specialised workshop.

WARNING

In the event of a fault in the airbag and seat
belt tensioner system, the airbags and seat
belts may not trigger correctly, may fail to
trigger or may even trigger unexpectedly.

The vehicle occupants run the risk of sus-

taining severe or fatal injuries. Have the sys-
tem checked immediately by a specialised
workshop.

Do not mount a child seat in the front pas-

senger seat or remove the mounted child
seat! The front passenger front airbag may
deploy during an accident in spite of the
fault.

NOTICE

Always pay attention to any lit control lamps
and to the corresponding descriptions and
instructions to avoid damage to the vehicle
or harm to the occupants.

Front airbags

Fig. 30 

Driver’s airbag in the steering wheel.

CarManuals2.com

52

Safety

Fig. 31 

Front passenger airbag located in dash

panel.

The driver's front airbag is housed in the steer-
ing wheel and that of the front passenger, on
the dash panel. Airbags are identified by the
word “AIRBAG”.
The airbag covers open and remain attached
to the steering wheel and instrument panel
when the driver and front passenger air-
bags are triggered, respectively 

››› 

Fig. 30

 , 

››› 

Fig. 31

.

In conjunction with the seat belts, the front
airbag system gives the front occupants addi-
tional protection for the head and chest in the
event of a severe frontal collision 

››› 

.

In addition, in certain head-on collisions, the
head airbag is triggered on both sides of the
vehicle.
Their special design allows the controlled es-
cape of the propellant gas when an occupant
puts pressure on the bag. Thus, the head and

chest are protected by the airbag. After the
collision, the airbag deflates sufficiently to al-
low visibility.

WARNING

The deployment space between the front

passengers and the airbags must not in any
case be occupied by other passenger, pets
and objects.

The airbags provide protection for just one

accident; replace them once they have de-
ployed.

It is also important not to attach any

objects such as cup holders or telephone
mountings to the surfaces covering the air-
bag units.

Activate and deactivate front pas-
senger front airbag

Fig. 32 

Switch for activating and deactivating

the front passenger airbag.

Fig. 33 

Dashboard: control lamp for

deactivated front passenger airbag in centre
console.

Deactivate the front passenger front airbag
only if you have to use a rear-facing child seat
in the front passenger seat.
SEAT recommends fitting the child seat in the
rear seat to avoid having to deactivate the front
passenger airbag.
When the front passenger airbag is 

deactiva-

ted

, this means that only the front passenger

front airbag is deactivated. All the other airbags
in the vehicle remain activated.

Deactivate and activate the front passenger
front airbag

Switch the ignition off.

Open the passenger side door.

Remove the key shaft from the vehicle key.

CarManuals2.com

Safety

53

Airbag system

1)

Depending on the equipment, also in the event of a rollover.

Insert the key blade into the slot provided

in the front passenger airbag disconnection
switch 

››› 

Fig. 32

. About 3/4 of the key should

enter; this is as far as it will go.

Turn the key gently to change its position to

 (deactivate) or to   (activate). If you have

difficulty, ensure that you have inserted the key
as far as it will go.

Close the front passenger door.

When deactivating the airbag, switch the ig-

nition on and check that the control lamp 
remains lit 

››› 

Fig. 33

.

When reactivating the airbag, check that

when the ignition is switched on, the 

 con-

trol lamp does not light up and the  

 lamp

lights up for 60 seconds and then turns off.

WARNING

The driver of the vehicle is responsible for

disabling or switching on the airbag.

Always switch off the ignition before disa-

bling the front passenger airbag! Failure to
do so could result in a fault in the airbag de-
activation system.

Never leave the key in the airbag disabling

switch as it could get damaged or enable or
disable the airbag during driving.

If for any reason an airbag is deactivated,

reactivate it as soon as possible so that it
can fulfil its protective function.

Side airbags

Fig. 34 

Side airbag in driver's seat.

The side airbags are located in the front seat
backrests 

››› 

Fig. 34

.

Its location is marked with the word “AIRBAG” on
the upper part of the back of the seats or on the
lower coverings with the word AIRBAG in relief.
In conjunction with the seat belts, the side air-
bag system provides additional protection for
the upper body in the event of a severe side
collision 

››› 

.

1)

In a side collision, the side airbags reduce the
risk of injury to passengers to the areas of the
body facing the impact. In addition to their nor-
mal protection, the seat belts also hold the

passengers in the event of a side collision; this
is how these airbags provide maximum protec-
tion.

WARNING

If you do not wear a seat belt, if you lean

forward, or are not seated correctly while the
vehicle is in motion, you are at a greater risk
of injury if the side airbag system is triggered
in an accident.

In order for the side airbags to provide

their maximum protection, the prescribed sit-
ting position must always be maintained with
seat belts fastened while travelling.

In a side-on collision the side airbags will

not work if the sensors do not correctly
measure the pressure increase on the inte-
rior of the doors, due to air escaping through
the areas with holes or openings in the door
panel.

Never drive if the interior door panels have

been removed or if the panels have not been
correctly fitted.

Occupants of the outer seats must never

carry any objects or pets in the deployment
space between them and the airbags, or al-
low children or other passengers to travel
in this position. It is also important not to at-
tach any accessories (such as cup holders)
to the doors. This would impair the protection
offered by the side airbags.

CarManuals2.com

54

Safety

The built-in coat hooks should be used only

for lightweight clothing. Do not leave any
heavy or sharp-edged objects in the pock-
ets.

Great forces, such as hard blows or kicks,

must not be exerted upon the backrest bol-
ster because the system may be damaged.
In this case, the side airbags would not be
triggered.

Under no circumstances should protective

covers be fitted over seats with side airbags
unless the covers have been approved for
use in your vehicle. Because the airbag de-
ploys from the side of the backrest, the use
of conventional seat covers would obstruct
the side airbag, seriously reducing the air-
bag's effectiveness.

Any damage to the original seat upholstery

or around the seams of the side airbag units
must be repaired immediately by a special-
ised workshop.

The airbags provide protection for just one

accident; replace them once they have de-
ployed.

Any work on the side airbag system or re-

moval and installation of the airbag compo-
nents for other repairs (such as removal of
the front seat) should only be performed by a
specialised workshop. Otherwise, faults may
occur during the airbag system operation.

Head-protection airbags

Fig. 35 

Location and deployment area of the

head-protection airbag.

Head-protection airbags are on both sides of
the passenger compartment, above the doors 

››› 

Fig. 35

 and their location is indicated with

the word “AIRBAG”.

In conjunction with the seat belts, the head-
protection airbag system gives the vehicle oc-
cupants additional protection for the head and
upper body in the event of a severe side colli-
sion 

››› 

.

The framed area is covered by the head-pro-
tection airbag when it is deployed (deployment
area) 

››› 

Fig. 35

. Therefore, objects should

never be placed or mounted in this area 

››› 

.

In the event of a side collision the curtain airbag
is triggered on the impact side of the vehicle.

The head-protection airbags reduce the risk of
injury to passengers in the front and rear side
seats facing the impact.

WARNING

In order for the head-protection airbags

to provide their maximum protection, the pre-
scribed sitting position must always be main-
tained with seat belts fastened while travel-
ling.

For safety reasons, the curtain airbag must

be disabled in those vehicles fitted with a
screen dividing the interior of the vehicle.
See your technical service to make this ad-
justment.

There must be no other persons, animals

or objects between the occupants of the
outer seats and the deployment space of the
head-protection airbags so that the head-
protection airbag can deploy completely
without restriction and provide the greatest
possible protection. Therefore, sun blinds
which have not been expressly approved for
use in your vehicle may not be attached to
the side windows.

The built-in coat hooks should be used only

for lightweight clothing. Do not leave any
heavy or sharp-edged objects in the pock-
ets. Please, do not hang the clothes on coat
hangers.

The airbags provide protection for just one

accident; replace them once they have de-
ployed.

CarManuals2.com

Safety

55

Transporting children safely

Any work on the head-protection airbag

system or removal and installation of the air-
bag components for other repairs (such as
removal of the roof lining) should only be
performed by a specialised workshop. Oth-
erwise, faults may occur during the airbag
system operation.

The side and head airbags are managed

through sensors located in the interior of the
front doors. To ensure the correct operation
of the side and curtain airbags neither the
doors nor the door panels should be modi-
fied in any way (e.g. fitting loudspeakers). If
the front door is damaged, the airbag system
may not work correctly. All work carried out
on the front door must be done in a special-
ised workshop.

Knee airbag

Fig. 36 

On the driver side: location of airbag

for knees.

Fig. 37 

On the driver side: action radius of

airbag for knees.

The knee airbag is located on the driver side
below the dash panel 

››› 

Fig. 36

. Airbags are

identified by the word “AIRBAG”.

The framed area (deployment area) 

››› 

Fig. 37

is covered by the knee airbag when it is de-
ployed. Objects should never be placed or
mounted in this area.

WARNING

 The knee airbag is deployed in front of the

driver's knees. Always keep the deployment
areas of the knee airbags free.

Never not fix objects to the cover or in the

deployment area of the knee airbag.

Adjust the driver's seat so that there is a

distance of at least 10 cm (4 inches) between
your knees and the location of the this air-

bag. If your physical constitution prevents
you from meeting these requirements, make
sure you contact a specialised workshop.

Transporting children
safely

Introduction

For safety reasons, as we have learned from
accident statistics, we recommend that chil-
dren under 12 years of age travel in the rear
seats. Depending on their age, height and
weight, children travelling in rear seats must use
a child seat or a seat belt. For safety reasons,
the child seat should be installed in the rear
seat, behind the front passenger seat or in the
centre back seat.
The laws of physics involved and the forces
acting in a collision apply also to children 

››› 

page 43

. But unlike adults, children do not

have fully developed muscle and bone struc-
tures. This means that children are subject to a
greater risk of injury.
To reduce the risk of injuries, children must al-
ways use special child restraint systems when
travelling in the vehicle.
We recommend the use of child safety
products from the Original Accessories Pro-
gramme, which includes systems for all ages
made by “Peke” (not for all countries) (see
www.seat.com).

CarManuals2.com

56

Safety

These systems have been especially designed
and approved, complying with the ECE-R44.
regulation.
SEAT recommends securing the child seats
shown on the website as described below:

Child seats in the opposite direction of travel

(group 0+): ISOFIX and support peg (ROMER
BABY SAFE PLUS SHR II + ISOFIX BASE / PEKE G0
I-SIZE + I-SIZE BASE).

Child seats in the direction of travel (group

1): ISOFIX and Top Tether (ROMER DUO PLUS +
TOP TETHER / PEKE G1 TRIFIX I-SIZE).

Forward facing child seats (group 2): safety

belt and ISOFIX (ROMER BRITAX KIDFIX2 S).

Child seats directed towards the front of the

vehicle (group 3): safety belt (TAKATA MAXI).

Follow the manufacturer's instructions and ob-
serve any statutory requirements when instal-
ling and using child seats. Always read and
note 

››› 

page 57

.

We recommend you always carry the man-
ufacturer's Child Seat Instruction Manual to-
gether with the on-board documentation.

Child seats group classification

Fig. 38 

 Examples of child seats.

Use only child seats that are officially approved
and suitable for the child.
These seats are subject to the ECE-R44 or
ECE-R129 standards. ECE-R stands for: Eco-
nomic Commission for Europe Regulation.

Child seats by weight group

The child seats are grouped into 5 categories:

Age group

Weight of the child

Group 0

Up to 10 kg

Group 0+

Up to 13 kg

Group 1

From 9 to 18 kg

Group 2

From 15 to 25 kg

Group 3

From 22 to 36 kg

Child seats that have been tested and ap-
proved under the ECE R44 or ECE-R129 stand-
ards bear the ECE-R44 or ECE-R129 test marks
on the seat (the letter E in a circle with the test
number below it).
Follow the manufacturer's instructions and ob-
serve any statutory requirements when instal-
ling and using child seats.
We recommend you to always include the
manufacturer's Child Seat Instruction Manual
together with the on-board documentation.
SEAT recommends you use child seats from the

Original Accessories Catalogue

. These child

seats have been designed and tested for use in
our vehicles. You can find the right child seat for
your model and age group at our dealers.

Child seats by approval category

Child seats may have the approval category
of universal, semi-universal, vehicle specific (all
according to the ECE-R44 standard) or i-Size
(according to the ECE-R129 standard).

Universal

: child seats with universal approval

can be installed in all vehicles. There is no need
to consult any list of models. In the case of
universal approval for ISOFIX, the child seat is
additionally provided with a Top Tether belt.

Semi-universal

: semi-universal approval, in

addition to the standard requirements of univer-
sal approval, requires safety devices to lock
the child seat, which require additional test-

CarManuals2.com

Safety

57

Transporting children safely

1)

Compliance with current national legislation and the manufacturer's instructions is required when using or installing child seats.

ing. Child seats with semi-universal approval
include a list of vehicle models for which they
can be installed.

Vehicle-specific

: vehicle-specific approval

requires a dynamic test of the child seat for
each vehicle model separately. Child seats
with vehicle-specific approval also include a list
of vehicle models for which they can be instal-
led.

i-Size

: child seats with i-Size approval must

meet the requirements prescribed in the ECE-
R 129 standard in relation to installation and
safety. Child seat manufacturers can tell you
which seats have i-Size approval for this vehi-
cle.

Fitting and using child seats

Fig. 39 

Airbag sticker: on the passenger side

sunshade blind.

Fig. 40 

Airbag sticker: on the rear frame of the

passenger side door.

Warnings about fitting a child seat

Take the following general warnings into ac-
count if you are going to fit a child seat. They
are valid for all child seats regardless of their
attachment system.

Please read and follow the child seat manu-

facturer's operating instructions.

The child seat should preferably be fitted to

the rear seat behind the front passenger seat
so that the child can exit the vehicle on the
pavement side.

Set the height of the seat belt such that it

adapts to the child seat naturally, without twist-
ing. The lowest position of the seat belt height
regulator must be used with rear-facing child
seats.

To correctly use a child seat in the back, the

front backrest must be adjusted so that there
is no contact with the child seat in the back in
the case that it goes opposite to the direction
of the car. In the case of front facing restraint
systems, the front backrest must be adjusted so
that there is no contact with the child's feet.

For a correct assembly of the child's seat on

the rear seats, adjust or dismount the headrest,
in order to prevent contact with the seat.

If a semi-universal type chair is to be installed,

in which the method of attachment to the car
is through the seat belt and support bracket,
it should never be installed in the central rear
seat as the ground clearance is lower than in
other places and the support bracket will not
allow the seat to remain sufficiently stable.

When fitting a child seat on the front passen-

ger seat, the seat must be moved backwards
as far as possible and placed in the highest
position. The backrest must also be put in a
vertical position

1)

.

Important information about the front pas-
senger front airbag

A sticker with important information about the
passenger airbag is located on the passenger's
sunshade blind and/or on the passenger side
door frame 

››› 

Fig. 39

.

Read and always observe the safety informa-
tion included in the following chapters:

CarManuals2.com

58

Safety

Safety distance with respect to the passen-

ger airbag 

››› 

page 49

.

Objects between the passenger and the pas-

senger side airbag 

››› 

 in 

Front airbags

 on

page 52

.

The passenger side front airbag, when enabled,
is a serious risk for a child that is facing back-
ward since the airbag can strike the seat with
such force that it can cause serious or fatal inju-
ries. Children up to 12 years old should always
travel on the rear seat.
Therefore we strongly recommend you to trans-
port children on the rear seats. This is the safest
location in the vehicle. Alternatively, the front
passenger airbag can be disabled with a key-
operated switch 

››› 

page 52

. When transport-

ing children, use a child seat suitable for the
age and size of each chil

››› 

page 56

.

WARNING

If a child seat is secured to the front pas-

senger seat, the risk to the child of sustaining
critical or fatal injuries in the event of an ac-
cident increases.

An inflating front passenger airbag can

strike the rear-facing child seat and project
it with great force against the door, the roof
or the backrest.

Never install a child seat facing back-

wards on the front passenger seat unless
the front passenger front airbag has been
disabled. Risk of potentially fatal injuries to

the child! However, if necessary, the front
passenger front airbag must be deactivated 

››› 

page 52

 . If the passenger seat has

a height adjustment option, move it to the
highest, most upright position. If you have a
fixed seat, do not install any child restraint
system in this location.

For those vehicles that do not include a key

lock switch to deactivate the airbag, the ve-
hicle must be taken to a technical service. Do
not forget to reconnect the airbag when an
adult wants to sit in the front passenger seat.

Never allow a child to be transported in a

vehicle without being properly secured, or
to stand up or kneel on a seat while travel-
ling. In an accident, the child could be flung
through the vehicle, causing possibly fatal
injuries to themselves and to the other vehi-
cle occupants.

Never leave a child alone in the child seat

or in the vehicle.

Children who are less than 1.50 m tall must

not wear a normal seat belt without a child
seat, as this could cause injuries to the ab-
dominal and neck areas during a sudden
braking manoeuvre or in an accident.

When a child seat is mounted in the rear

seats, the door child-proof lock should be
activated 

››› 

page 95

.

Attachment systems

Depending on the country, different attach-
ment systems are used for safely installing child
seats.

Attachment systems overview

ISOFIX

: ISOFIX is a standardised attachment

system allowing quick and safe attachment of
child seats in the vehicle. ISOFIX attachment es-
tablishes a rigid connection between the child
seat and the car body.
The child seat has two rigid attachment clips,
called connectors. These connectors are fit-
ted into the ISOFIX attachment rings found be-
tween the seat cushion and the backrest of
the vehicle's back seat (on the sides). ISOFIX
attachment systems are used mainly in Europe 

››› 

page 59

. If necessary, ISOFIX attachment

may have to be supplemented with a Top
Tether belt or a support bracket.

Automatic three-point seat belt

. Whenever

possible, it is preferable to attach the child
seats with the ISOFIX system rather than at-
taching them with an automatic three-point
seat belt 

››› 

page 63

.

Additional attachment:

Top Tether

: the Top Tether belt is guided over

the back of the rear seat and attached to an
anchor point with a hook. Anchor points are lo-
cated at the back of the rear seat backrest on

CarManuals2.com

Safety

59

Transporting children safely

the luggage compartment side 

››› 

page 62

.

The rings for retaining the Top Tether belt are
marked with an anchor symbol.

Support bracket

: some child seats rest on

the floor of the vehicle with a support bracket.
The support bracket prevents the child seat
from tipping forward in the event of impact.
Child seats fitted with a support bracket should
only be used in the passenger seat and side
rear seats 

››› 

. For the assembly of this type

of seat you should also consult the list of ap-
proved vehicles for this assembly, available in
the instructions for child restraint systems.

Recommended systems for attaching child
seats

SEAT recommends attaching child seats as fol-
lows:

Baby carriers or child seats in the opposite

direction of travel

: ISOFIX and support bracket

or i-Size.

Child seats in the direction of travel

: ISOFIX

and Top Tether.

WARNING

Incorrect use of the support bracket can
cause serious or fatal injury.

Make sure the support bracket is correctly

and safely installed.

When the base of the child seat is sup-

porting the child’s weight, the support foot
should not hang in the air or be supplemen-

ted with objects. In addition, make sure that
the base of the child seat is always suppor-
ted by the surface of the vehicle's seat. The
support leg of the child seat should not raise
the base of the child seat off the surface of
the vehicle's seat.

Securing the child seat with the ISO-
FIX or i-Size system

The marking of ISOFIX or i-Size anchor points
depends on the equipment and the country in
question.
See the following tables to understand the
compatibility of the ISOFIX/i-Size systems in the
vehicle:

CarManuals2.com

60

Safety

Vehicle ISOFIX positions

Weight group

Size class

a)

Electrical

equipment

Front passenger seat

Second row of seats

Third row of

seats

b)

airbag enabled

airbag disabled

side

centre

Baby carrier

F

ISO/L1

X

X

X

X

X

G

ISO/L2

X

X

X

X

X

Group 0 to 10 kg

E

ISO/R1

X

IL

IL

X

X

Group 0+ to 13 kg

E

ISO/R1

X

IL

IL

X

X

D

ISO/R2

X

IL

IL

X

X

C

SO/R3

X

IL

IL

X

X

Group I 9 to 18 kg

D

ISO/R2

X

IL

IL

X

X

C

ISO/R3

X

IL

IL

X

X

B

ISO/F2

X

IL, IUF

IL, IUF

X

X

B1

ISO/F2X

X

IL, IUF

IL, IUF

X

X

A

ISO/F3

X

IL, IUF

IL, IUF

X

X

Group II 15 to 25 kg

---

---

X

IL

IL

X

X

Group III 22 to 36 kg

---

---

X

IL

IL

X

X

IUF: Suitable for forward-facing ISOFIX universal child restraint systems approved for use in this weight group.
IL: It is suitable for certain ISOFIX child restraint systems (CRS) that can be for the specific vehicle, restricted or semi-universal categories. Take the child seat
manufacturer's vehicle list into account.
X: ISOFIX position not suitable for ISOFIX child restraint systems for this weight group or size class.

a)

 The indication of class according to size corresponds to the authorised bodyweight for the child seat. In child seats with universal or semi-universal approval, the

class according to size is indicated on the ECE approval label. The indication of class according to size is stated on the corresponding child seat.

b)

 Third row not available for all versions.

CarManuals2.com

Safety

61

Transporting children safely

Vehicle i-Size positions

Front passenger seat

Second row of seats

Third row of seats

a)

airbag enabled

airbag disabled

side

centre

X

i-U

i-U

X

X

i-U: Position suitable for forward- or rear-facing i-Size child restraint systems with universal certification.
X: Position not suitable for i-Size child restraint systems.

a)

 Third row not available for all versions.

Securing the child seat with the ISOFIX or
i-Size system

Fig. 41 

Rear seat: location of the ISOFIX or

i-Size securing rings.

Fig. 42 

Front passenger seat: location of the

i-Size fastening rings.

Fig. 43 

Rear seats: fitting a child seat with the

ISOFIX system.

You must follow the child seat manufacturer's
instructions.
The location of the ISOFIX or i-Size anchor
points is indicated by a symbol 

››› 

Fig. 41

 , 

››› 

Fig. 42

. In some vehicles, the rings are se-

cured to the seat frame and, in others, they are
secured to the rear floor.

CarManuals2.com

62

Safety

Press the child seat onto the ISOFIX or iSize

retaining rings until it is heard to engage se-
curely 

››› 

Fig. 43

. If the child seat is equipped

with Top Tether anchor points, secure it to the
correspondent ring 

››› 

page 62

. Follow the

child seat manufacturer’s instructions.

Pull on both sides of the child seat to ensure

that it is properly anchored.
Child seats with the ISOFIX or i-Size and Top
Tether attachment system can be purchased
from technical services.

WARNING

The securing rings are designed only for use
with ISOFIX or i-Size and Top Tether system
child seats.

Never secure other child seats that do not

have ISOFIX, i-Size or Top Tether systems, or
safety belts or any other objects to the se-
curing rings – as this can result in potentially
fatal injuries to the child.

Ensure that the child seat is correctly se-

cured to the ISOFIX or i-Size rings and the Top
Tether.

Top Tether securing belts

Fig. 44 

Rear seats: adjustment and assembly

according to the Top Tether belt.

Fig. 45 

Passenger seat: adjustment and

assembly according to the Top Tether belt.

Fig. 46 

Rear part of the second row of rear

seats: securing rings for the Top Tether strap.

Fig. 47 

Rear of front passenger seat backrest:

Top Tether strap anchor.

Child seats with a Top Tether system are fitted
with an additional strap for fastening to an an-
chor point in the vehicle. This anchor point is
located on the rear of the rear seat backrest
and of the front passenger seat backrest (iden-
tified with the symbol 

) and provides better

retention.

CarManuals2.com

Safety

63

Transporting children safely

The objective of this system is to reduce for-
ward movements of the child seat in a head-on
collision, to reduce the risk of injuries that may
be caused to the child’s head by impacting
against any element of the inside of the vehicle.

Using the Top Tether in rear-facing mounted
seats

Currently, there are very few rear-facing child
safety seats that have Top Tether. Please care-
fully read and follow the seat manufacturer in-
structions to learn the proper way to install the
Top Tether strap.

Securing the retainer strap

Follow the manufacturer's instructions to de-

ploy the child seat Top Tether retaining strap.

Position the belt under the headrest (accord-

ing to the instructions of the seat itself, lift or
remove the headrest if necessary) 

››› 

Fig. 44

 , 

››› 

Fig. 45

.

Slide the strap and secure it properly with the

anchor on the rear seat backrest 

››› 

Fig. 46

 , 

››› 

Fig. 47

.

Firmly tighten the strap following the manu-

facturer's instructions.

Releasing the retaining strap

Loosen the strap following the manufacturer's

instructions.

Push the lock and release it from the anchor-

ing support.

WARNING

An undue installation of the safety seat will
increase the risk of injury in the event of a
crash.

Never tie the retainer strap to a hook in the

luggage compartment.

Never secure or tie luggage or other items

to the lower anchorages (ISOFIX) or the up-
per ones (Top Tether).

WARNING

Child restraint anchors are designed to sup-
port the loads of properly adjusted child
restraint systems. Under no circumstances
should they be used to attach adult seat
belts, harnesses or other items or equipment
to the vehicle.

Fitting a child seat using the seat
belt

If you want to fit a universal approval category
(U) child seat in your vehicle, you must check
that the seat is approved for your vehicle.
You will find any necessary information on the
child seat’s orange ECE approval label.
The following table shows the different fitting
options.

CarManuals2.com

64

Safety

Weight group

Front passenger seat

a)

Second row of seats

Third row of seats

b)

Airbag enabled

Airbag deactivated

c)

side

centre

d)

Group 0 to 10 kg

X

U

U

U

U

Group 0+ to 13 kg

X

U

U

U

U

Group I 9 to 18 kg

X

U

U

U

U

Group II 15 to 25 kg

X

UF

UF

UF

UF

Group III 22 to 36 kg

X

UF

UF

UF

UF

X: Not compatible for the installation of seats install chairs in this configuration.
U: Suitable for universal restraint systems for use in this weight group.
UF: Acceptable for front-facing universal-category child restraint systems approved for this mass group.

a)

 Compliance with current national legislation and the manufacturer's instructions is required when using or installing child seats.

b)

 Third row not available for all versions.

c)

 Seats 

without

 height adjustment should be placed in their rearmost position. Seats 

with

 height adjustment should be placed in their rearmost and highest

position.

d)

 For semi-universal chairs where the securing system is the car safety belt and the support bracket, do not use them in the centre rear seat or the third row.

CarManuals2.com

Safety

65

In case of emergency

Fitting a child seat using the seat belt

Fig. 48 

On rear seats: installing a child seat.

Set the height of the seat belt such that it

adapts to the child seat naturally, without twist-
ing. The lowest position of the seat belt height
regulator must be used with rear-facing child
seats.

Put the seat belt in place and pass it through

the child seat according to the instructions of
the child seat manufacturer.

Make sure that the seat belt is not twisted.

Insert the latch plate into the seat's buckle

until you hear the engagement click.

WARNING

When travelling, children must be secured in
the vehicle with a restraint system suitable
for age, weight and size.

Always read and observe information and

warnings concerning the use of child seats 

››› 

page 57

.

In case of emergency

Hazard warning lights

Fig. 49 

Dashboard: switch for hazard warning

lights.

The hazard warning lights are used to draw the
attention of other road users to your vehicle in
emergencies.
If your vehicle is stationary:

1. Park the vehicle at a safe distance from

road traffic.

2. Press the button to switch on the hazard

warning lights 

››› 

.

3. Apply the electronic parking brake.
4. Stop the engine.
5. Engage 1st gear in vehicles with a manual

gearbox, or set the gear selector to the

P

 position in vehicles with automatic trans-

mission.

6. Follow the legal provisions of each country

(reflective vest, warning triangles, light bea-
con, etc.).

7. Always carry the key with you when leaving

the vehicle.

All turn signals flash simultaneously when the
hazard warning lights are switched on. The two
turn signal turn signal lamps     and the turn
signal lamp in the switch   will flash at the
same time. The simultaneous hazard warning
lights also work when the ignition is switched
off.
While the hazard warning lights are on, you can
signal a direction or lane change, e.g. during
towing, by operating the turn signal lever. The
hazard warning lights remain switched off dur-
ing this time.

Emergency braking warning

If the vehicle brakes suddenly and continuously
at a speed of more than 80 km/h (50 mph), the
brake light flashes several times per second to

CarManuals2.com

66

Safety

warn the vehicles driving behind. If you continue
braking, the hazard warning lights will come
on automatically when the vehicle comes to a
standstill. They switch off automatically when
the vehicle starts to move again.

WARNING

The risk of an accident increases if your

vehicle breaks down. Always use the hazard
warning lights and a warning triangle (or
light beacon, depending on the country) to
draw the attention of other road users to
your stationary vehicle.

Never leave anybody inside the vehicle,

particularly children or anybody who may
need help. This is especially important when
the doors are locked. Individuals locked in
the vehicle can be exposed to very high or
very low temperatures.

Due to the high temperatures that the cat-

alytic converter can reach, never park in
an area where the catalytic converter could
come into contact with highly inflammable
materials, for example dry grass or spilt pet-
rol. This could start a fire.

Note

The 12-volt vehicle battery will run down

if the hazard warning lights are left on for a
long time (even if the ignition is switched off).

The use of the hazard warning lights de-

scribed here is subject to the relevant statu-
tory requirements.

Behaviour in the event of an accident
or fire

Actions to take in the event of a fire or acci-
dent

For your own safety and that of other passen-
gers, the following points should be observed in
the order given 

››› 

:

Switch off the engine.

If possible, switch on the hazard warning

lights 

››› 

page 65

.

Follow the legal provisions of each country

(reflective vest, warning triangles, light beacon,
etc.).

If necessary, get any people out of the haz-

ard area and apply first aid.

Notify the emergency services.

Wait at a safe distance from the scene of the

accident for the emergency services to arrive.

In case of fire, do not attempt to extinguish

the fire yourself or remain near the vehicle.

WARNING

For your own safety, do not ignore this impor-
tant check list, otherwise accidents and seri-
ous injuries could occur.

Always complete the operations on the

check list and always bear in mind the gen-
eral safety measures.

WARNING

In the event of fire, an explosion may occur
and substances harmful to health may be re-
leased, which can cause serious injury.

Never stay near the burning vehicle.

Emergency call service

Fig. 50 

On the roof console: controls for voice

services

Depending on the equipment, an emergency
call system may be located on the roof con-
sole.
The following voice services can be run by
pressing the buttons  ,   and   

››› 

Fig. 50

:

information call

assistance call

emergency call service.

A built-in control unit establishes the connec-
tion.
When a voice service is activated, a connection
is established with a phone line.

CarManuals2.com

Safety

67

In case of emergency

1)

Only available in certain countries.

Control lamp

There is a control lamp on the control 

››› 

Fig. 50

 (arrow). It shows the following sta-

tuses:

Off:

 the eCall service is not available.

Flashes in red, approx. 20 seconds after

swing on the ignition:

 the eCall service is de-

activated.

 Lights up red:

 system failure. The eCall serv-

ice is available with certain restrictions. SEAT
suggests going to a specialised workshop.

Lights up green:

 the eCall service is availa-

ble. The system works correctly.

Flashes green:

 There is an ongoing voice

connection.

 Emergency call service

1)

The automatic emergency call is only activated
if the ignition is switched on.
If the airbags or, if applicable, the seatbelt ten-
sioners are triggered, a connection is automat-
ically established with the emergency coordi-
nation centre. The automatic emergency call

cannot

 be interrupted by pressing the button


1

.

If the emergency coordination centre's ques-
tions are not answered, the corresponding as-
sistance measures are implemented.

The person on the other end of the line uses
the language of the country in which you are
driving.

Starting an emergency call manually

Press and hold the emergency call button

for a few seconds 

1

. The emergency call is

activated and a voice connection is established
with the emergency coordination centre.
If you press the emergency call button inadver-
tently, hang up the call immediately:

Press the emergency call button again until

the control light stays green.

Integrated battery

The integrated battery ensures that the emer-
gency call system (eCall) remains available for
some time even if the 12-volt battery has been
disconnected or has failed.
If the integrated battery discharges or is de-
fective, a message stating this is displayed on
the instrument cluster display. Go to a special-
ised workshop and ask for the battery to be
replaced.

EDR data transmission 

››› 

page 377

When an emergency call is made, the legally
required data is transmitted to the emergency
coordination centre so that the necessary as-
sistance measures can be determined.

Vehicle location data is continuously overwrit-
ten. This means that the vehicle is not subject to
permanent monitoring.
The data related to the emergency call is only
processed to ensure the correct operation of
the emergency call system (eCall). The system
will automatically delete the data related to the
call a few hours after the call is activated.
The sent data includes:

The vehicle's current position at the time the

emergency call is activated.

Vehicle identification number (VIN)

Type of vehicle and type of drive.

Type of activation (automatic or manual).

Type of call.

Direction in which the vehicle was travelling

at the time the emergency call was activated.

Moment of the collision.

Estimated number of vehicle occupants.

Situations in which the emergency call serv-
ice may be restricted

The emergency call is made from an area

with weak or no mobile and GPS signal, as well
as e.g. tunnels, between very tall buildings, ga-
rages, underground walkways, mountains and
valleys.

CarManuals2.com

68

Safety

1)

Only available in certain countries.

The components of the vehicle required for

the emergency phone call are damaged or do
not get enough power.

In some countries, the emergency call service

may not be available and depending on the
location of the vehicle, the control lamp LEDs,
and even the operation of the different types of
calls, could have a specific behaviour.

 Assistance call

1)

With the breakdown call you can directly re-
quest specialised help in the event of a break-
down.
Parallel to the voice call, some vehicle data is
transmitted, e.g. your current location.

 Information call

1)

With a information call, a call is placed to the
customer care service of SEAT. S.A.

Note

Breakdown service and information calls

can incur an additional cost on your tele-
phone bill.

The operation of the eCall system, which is

required by law, may be limited if an infotain-
ment system is retrofitted.

CarManuals2.com

High-voltage battery

69

Safety instructions

High-voltage battery

Safety instructions

Introduction

Valid for: hybrid vehicles

WARNING

The vehicle’s high-voltage network and the
high-voltage battery are hazardous and can
cause burns and other injuries, including fa-
tal electric shocks.

It should always be assumed that the high-

voltage battery is fully charged and that all
of its components are live. This may also be
the case when the ignition is switched off.

 Never touch the high-voltage cables, the

high-voltage battery or its poles, or allow
them to come into contact with jewellery or
other metal objects, especially if the high-
voltage cables, the high-voltage battery or
its poles are damaged.

Never take it upon yourself to perform any

type of work on the high-voltage network, on
the high-voltage cables or the high-voltage
battery.

 Never open or perform maintenance or

repairs on components or parts of the high
voltage network, or disconnect them from
this network.

Never damage, modify or remove the or-

ange high voltage cables or disconnect them
from the high voltage network.

 Never open, modify or remove the cover

from the high-voltage battery.

Work on the high-voltage system, as well

as on any systems that may be indirectly in-
fluenced by it, should only be carried out by
specialized personnel with the correspond-
ing qualifications and training.

Work in the immediate vicinity of high-volt-

age cables and high-voltage components
with tools that are sharp, give off shavings or
that have heat sources, such as hot air, ther-
mal bonding or welding work, may only be
performed after disconnecting the voltage.
The high voltage should only be disconnec-
ted by specialized personnel with the corre-
sponding qualifications and training.

All SEAT guidelines and standards must be

followed when performing any work on the
high-voltage system and the high-voltage
battery.

 The gases that are emitted or leaked from

the high-voltage battery may be toxic or
flammable.

Damage to the vehicle or high voltage bat-

tery could cause an immediate or delayed
leak of toxic gases. The emitted gases could
also cause a fire. Do not inhale the gases.

Never touch the liquids that spill from the

high voltage battery and do not touch the
emitted gases, particularly if the battery is
damaged.

In the event of a fire, leave the danger area

and call the fire department.

Always inform the fire fighters and the

emergency service that the vehicle is fitted
with a high-voltage battery.

WARNING

If works are performed on the high-voltage
system and on the high-voltage components
in an inappropriate manner, this may lead
to faults in the operation, accidents and inju-
ries.

 Work on the high-voltage system must

only be performed by authorized specialized
services with the corresponding permit.

NOTICE

If the vehicle suffers an accident or collision
with an obstacle, the high-voltage battery
must be checked by specialized personnel
with the corresponding qualifications and
training.

NOTICE

If the 12-volt vehicle battery has been dis-
connected, discharged or replaced, there is
a chance that the combustion engine may
not initially turn off automatically after mov-
ing off. If this situation lasts for several days,
contact a qualified specialized workshop.
SEAT recommends visiting a SEAT partner for
this.

CarManuals2.com

70

High-voltage battery

1

2

3

4

5

6

High voltage warning lettering

Valid for: hybrid vehicles

Fig. 51 

Warning lettering.

Fig. 52 

High-voltage battery warning lettering.

Warning lettering on the vehicle

The following parts of the vehicle can be
identified with the depicted warning lettering 

››› 

Fig. 51

››› 

Fig. 52

:

Covers and lids behind which live high-volt-

age components are located.

All the high-voltage components, including

the high-voltage battery.

Under the front bonnet.

The warning lettering 

››› 

Fig. 51

   and   indi-

cate high electrical voltage.
The components of the high voltage system
can become very hot and should not be
touched 

››› 

Fig. 51

  .

››› 

Fig. 52

High voltage can cause serious injury or
even death. Never touch the battery poles
with bare fingers, tools, jewellery or other
metal objects.
The high-voltage battery contains hazard-
ous liquid and solid substances. Emitted
gases can cause severe burns and blind-
ness. Suitable eye protection and protec-
tive clothing must always be worn when
working on the high voltage battery to pre-
vent battery fluid coming into contact with
the skin and eyes. If the battery fluid comes
into contact with the skin or eyes, the af-
fected areas should be rinsed with clean
running water for at least 15 minutes, and
then a doctor should be consulted immedi-
ately.
The high-voltage battery may burn. The
high-voltage battery should never be ex-
posed to fire, sparks or naked flame. The
high voltage battery must always be han-
dled with care to avoid damage and fluid
leakages.
The high-voltage battery should always be
kept out of the reach of children.
You will find further information and warn-
ings in the usage instructions and workshop
documentation.
Incorrect handling of the high-voltage bat-
tery can cause serious injuries or death.
Never disassemble the high voltage battery
or remove its cover.

CarManuals2.com

High-voltage battery

71

Charging the high-voltage battery

7

Maintenance work on the high-voltage
battery must only be performed by spe-
cialized personnel with the corresponding
qualifications and training. Never modify
the high-voltage battery. When the high-
voltage battery is open, ensure it does not
come into contact with water or other liq-
uids. Liquids may cause short circuits, elec-
trical shocks and burns.

Conservation of the high-
voltage battery

Conservation instructions

Valid for: hybrid vehicles

Reliability and capacity of the high-voltage
battery

In principle, lithium ion batteries are subject to
ageing and wear and tear throughout their use-
ful life due to their physical and chemical char-
acteristics. Correct handling of the high-volt-
age battery makes an essential contribution to
keeping it in a reliable state in the long term
and to achieving high battery capacity and
range. Therefore, it is extremely important to re-
spect the following conservation instructions for
the high voltage battery. These maintenance
instructions are essential for maintaining the ve-
hicle's value over time.

Please also observe the applicable SEAT war-
ranty conditions for the high-voltage battery.

Conservation instructions

SEAT recommends the following conservation
instructions:

If possible, charge the high-voltage battery

when a low charge level is displayed on the
instrument cluster, or when the electric range is
lo

››› 

page 19

.

It is advisable to not charging the high-volt-

age battery when only a short trip has been
made in full electric mode.

As much as possible avoid fully discharging

the high-voltage battery, such as by leaving
the vehicle parked for a prolonged time with a
low load level. The charge level must not drop
below 20 % for long periods of time 

››› 

.

 When the high-voltage battery has been

charged to 100 %, start driving immediately if
possible.

Vehicle parking times

If there is a frost, do not park the vehicle for

several hours with a charge level of lower than
40 % 

››› 

.

If you plan to leave your vehicle stationary for

prolonged periods of time, park with a charge
level of at least 30 %. This situation occurs, for
example, when you leave your vehicle at the
airport before a trip.

Do not expose the vehicle to outside temper-

atures below -30 °C or above 60 °C for more
than 24 hours.

To improve comfort and performance, make

sparse use of the stationary air conditioning
(depending on the equipment), particularly in
temperatures lower than -15 °C 

››› 

page 146

.

NOTICE

The high-voltage battery must not be used
as a stationary power supply. This can cause
irreversible damage to the high-voltage bat-
tery.

NOTICE

If the vehicle is parked for a long time with
the high-voltage battery discharged, it may
no longer be possible to charge the bat-
tery or start the vehicle. Irreversible damage
could be caused to the high voltage battery
in the long term.

Charge the high-voltage battery at regular

intervals.

Charging the high-voltage
battery

Introduction

Valid for: hybrid vehicles

CarManuals2.com

72

High-voltage battery

Check that the driving mode is deactivated and
that the charging cable and infrastructure are
in perfect condition.

Types of charging

The following charging types are possible for
the vehicle:

Charging with alternating current (AC) at

a public or home charging station (Mode 3
charging)


››› 

page 73

:

Charges at high power. The maximum achieva-
ble charging power depends on the charging
station and charging cable that is used and the
performance of the vehicle's charger.

Charging with alternating current (AC)

at a household socket (Mode 2 charging)


››› 

page 73

:

The electrical installation of the house must
have been checked and be in perfect working
order 

››› 

. You must plan for a longer charg-

ing time, e.g. overnight.

Charging with direct current (DC) at a fast

charging station (Mode 4 charging):

Direct current charging 

is not compatible

 with

this vehicle.

Protection against current leakage

The vehicle is fitted with a direct current (DC)
leakage protection device. This prevents any
current leakage that may occur during charg-
ing from reaching the house's electrically in-
stallation through the charging cable.

WARNING

If the battery is charged in an inappropri-
ate manner, if no consideration is given to
the appropriate safety measures or the high-
voltage battery is used in an inadequate
manner, this could lead to short circuits,
electrical shocks, explosions, fires, burns and
serious injuries, even death.

Always respect the stipulated order of the

operations to avoid the risk of suffering an
electric shock or serious injuries due to the
residual energy in the charging accumulator.

Please observe the safety and handling

instructions of the charging cable supplied
with the vehicle 

››› 

page 78

.

When charging, only use power sockets

that are appropriately fitted, have been
checked and are not damaged, as well as
electrical installations that are in perfect
working order. Duly qualified technicians
should check the power sockets and the
electrical installation on a regular basis.

Never charge the vehicle in places where

there is a danger of explosion. The com-
ponents of the charging cable can cause
sparks and, therefore, may ignite flammable
fumes or explosives.

Always protect the connectors from mois-

ture and from water and other fluids getting
inside directly.

For safety reasons, never perform other

works on the vehicle while charging.

Always complete the charging process be-

fore unplugging the connector from the elec-
trical network. Otherwise the charging cable
and the electrical installation may also be
damaged.

Note

To charge the high-voltage battery using

alternating current (AC), SEAT recommends
using a home charging station or another
type of charging station and charging with
maximum charging power. These charging
options are more efficient than using a do-
mestic power socket.

Please note the technical data on your ve-

hicle's charging power. For more information,
please contact a SEAT dealer.

The high-voltage battery can only be

charged at charging stations that meet the
requirements of the country in questions and
at least one of the following standards:

IEC 61851 and IEC 62196 (Europe)

In the event of very low or very high tem-

peratures, it may only be possible to charge
the high-voltage battery in a limited manner.

Identification of compatible charg-
ing infrastructure

Valid for: hybrid vehicles

CarManuals2.com

High-voltage battery

73

Charging the high-voltage battery

1

2

3

Fig. 53 

Identification of alternating current

(AC) and type 2 connector.

Fig. 54 

 Identification of direct current (DC)

and the vehicle's CCS connector

Compatibility between vehicles and charg-
ing infrastructure

The following indicators according to the
EN 17186 standard provide information about
whether the infrastructure's charging connec-
tors are suitable for the vehicle 

››› 

.

Indicators 

››› 

Fig. 53

In the vehicle
At the charging station

Indicators 

››› 

Fig. 54

Voltage up to 500 volts
Voltage of up to 1000 volts.

The indicators are located on the vehicle's
charging socket, on components of the lo-
cal charging infrastructure (charging station,
socket) and on the charging cable. The indica-
tors refer to charging connection standards ac-
cording to IEC 62196.

WARNING

Charging the vehicle at unverified electrical
installations can cause serious injury and
damage.

If there is no indicator or if the charging in-

frastructure is unknown, an electrical instal-
lation expert should be consulted first.

Charging with alternating current
(AC)

Valid for: hybrid vehicles

Fig. 55 

Behind the battery charging cover on

the front left-hand side: Charging socket

››› 

Fig. 55

Charging process display
Charging socket
Charging buttons

The battery charger installed in the vehicle
converts alternating current from the public
supply into direct current.

AC charging station or socket cable

: The vehi-

cle’s high-voltage battery can be charged us-
ing alternating current (AC) through the corre-
sponding charging socket 

2

.

Connecting the charging cable

Firstly, connect the charging cable to the

socket, or public or home charging station.
Next, fully unwind it.

CarManuals2.com

74

High-voltage battery

Charging cable for domestic power sock-

ets

: The protection device performs a self-test 

››› 

page 80

.

With the vehicle unlocked, the battery charg-

ing cover opens when it is pressed 

››› 

Fig. 55

.

Plug the charging connector into the charg-

ing socket. Check that the charging connector
is fully plugged in.
The connector locks automatically.
The LED (charging process display) on the
charging socket lights up 

1

. The indicator

lamp  lights up on the instrument cluster dis-
play.
You can set the charging as required in the info-
tainment system 

››› 

page 77

.

Automatic start of the charging process

If programmed charging is not activated, the
charging process starts immediately. The exter-
nal charging infrastructure must be active.
Most public charging stations require authenti-
cation to start the process. It is important to ver-
ify that the authentication has been performed
correctly, otherwise it could cause a system
malfunction.

During the charging

The indicator lamp   flashes green on the in-
strument cluster.

The charging process indicator on the charging
socket flashes green 

1

. The charging connec-

tor is locked.
If the charging process indicator lights up red,
there is a fault 

››› 

page 74

.

Interrupt the charging process

The charging process can be interrupted:

 Unlock the vehicle.

Press the immediate charge button   

››› 

Fig. 59


1

 . The charging connector remains

locked.

Unlock the vehicle to unlock the charging

connector. The charging process can continue
by pressing the immediate charge button again

.

To restart the charging process just press the
function button to start the charging process.

After charging

When the high-voltage battery is fully charged,
the charging process display on the charging
socket lights up green.

Unlock the vehicle.

Unplug the charging connector from the

charging socket within 30 seconds.

Disconnect the charging cable from the

power supply and replace the protective cap.

Close the charging cover and make sure you

hear it click into place.

First charge and charging after a long time

If the high-voltage battery is new or has
not been charged for a long time, the maxi-
mum charge level of the battery can only be
reached after several charging processes. This
is for technical reasons and is not a vehicle
malfunction.
If the vehicle is not used for a long period of
time, the high-voltage battery must be charged
at least once every four months.

Note

If you leave the charging cable connected
after charging, the vehicle's electrical con-
sumers will not drain the high-voltage bat-
tery.

Charging process display

Valid for: hybrid vehicles

CarManuals2.com


Content      ..      1      2      3      ..