Seat Tarraco (2023 year). Manual in english - page 1
 

  Index      Manuals     Seat Tarraco (2023 year). Manual in english


Search            copyright infringement  


Content      ..      1       2         ..


Seat Tarraco (2023 year). Manual in english - page 1


Driver information

11

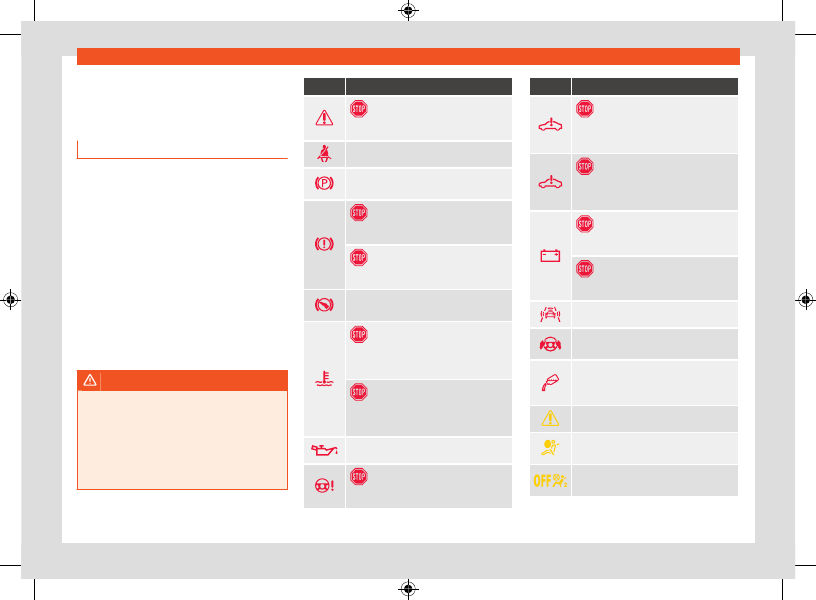
Control lamps

Driver information

Control lamps

Control and warning lamps

The warning and control lights can be lit indi-
vidually or in combination and serve as a warn-
ing, to indicate the presence of an anomaly or
to warn of the activation of certain functions.
Some turn on when the ignition is switched on
and have to be switched off after a certain pe-
riod of time.
Depending on the model, additional text mes-
sages may be viewed on the instrument panel
display. These may be purely informative or
they may be advising of the need for action.
Depending upon the equipment fitted in the
vehicle, instead of a warning lamp, sometimes
a symbol may be displayed on the instrument
panel.

WARNING

If the warning lamps and messages are ig-
nored, faults may occur in the vehicle, it may
stall in traffic, or accidents and serious inju-
ries may occur.

Never ignore warning lamps or text mes-

sages.

Stop the vehicle safely as soon as possible.

Symbol Meaning

 Stop driving!

Central warning lamp 

››› 

page 25

Fasten your seat belt 

››› 

page 42

Electronic parking brake on 

››› 

page 210

 Stop driving!

Fault in the brake system 

››› 

page 176

 Stop driving

Brake fluid level low 

››› 

page 338

Take control of the vehicle and be ready
to brake! 

››› 

page 189

 Stop driving!

Fault in the motor coolant system 

››› 

page 20

 Stop driving!

Fault in the high-voltage system coolant
fluid system 

››› 

page 20

Engine oil pressure 

››› 

page 343

 Stop driving!

Steering anomaly 

››› 

page 172

Symbol Meaning

 Stop driving!

Fault in the high voltage system 

››› 

page 75

 Stop driving!

Fault in the electric drive system 

››› 

page 159

 Stop driving!

12 volt battery 

››› 

page 347

 Stop driving!

Alternator fault 

››› 

page 346

Collision warning 

››› 

page 197

Take control of the steering immediately 

››› 

page 204

AdBlue level® too low, 

OR

 fault in

the SCR system 

››› 

page 315

››› 

page 315

Central warning lamp 

››› 

page 25

Fault in the airbag system or the seat
belt tensioners 

››› 

page 51

Front passenger front airbag off 

››› 

page 51

CarManuals2.com

12

Driver information

Symbol Meaning

Front passenger airbag on 

››› 

page 51

Please check brake pad 

››› 

page 177

Lights up:

 fault in the electronic stability

control (ESC) 

››› 

page 179

Flashing:

 Electronic stability control

(ESC) or Traction Control regulating 

››› 

page 179

TCS manually deactivated, ESC in
“Sport” mode or ECS manually deacti-
vated 

››› 

page 178

ABS fault 

››› 

page 179

Travel assist unavailable 

››› 

page 203

Fault in the vehicle's lighting 

››› 

page 119

Fault in the emissions control system 

››› 

page 317

Particulate filter clogged 

››› 

page 317

Diesel engine preheating; 

OR

diesel engine management fault 

››› 

page 317

Petrol engine management fault 

››› 

page 317

Symbol Meaning

Rear fog light on 

››› 

page 119

Fuel tank almost empt

››› 

page 19

Engine oil level 

››› 

page 343

Presence of water in diesel. 

››› 

page 19

Steering anomaly 

››› 

page 173

Fault in the tyre pressure loss indicator 

››› 

page 363

 ¡Stop driving!

Low tyre pressur

››› 

page 363

Fault in the electric drive system 

››› 

page 159

Electric drive system power limits 

››› 

page 159

Electronic engine sound fault 

››› 

page 159

Collision warning deactivated 

››› 

page 198

Cruise control fault (GRA) 

››› 

page 187

Speed limiter not available 

››› 

page 188

Symbol Meaning

Gearbox fault 

››› 

page 170

››› 

page 170

Adaptive cruise control (ACC) not avail-
able 

››› 

page 193

Emergency Assist unavailable 

››› 

page 205

Lane Assist not availabl

››› 

page 201

Emergency Assist regulating 

››› 

page 204

Lane Assist (lane keeping system) regu-
lating 

››› 

page 200

Side Assist (lane change assistance
system) not availabl

››› 

page 184

Rear cross traffic alert (RCTA) not avail-
able 

››› 

page 184

Battery / 12V power supply 

››› 

page 347

AdBlue level® low, 

OR

 fault in the SCR

system 

››› 

page 315

››› 

page 315

Auto Hold activated 

››› 

page 211

Turn signal

››› 

page 119

Trailer turn signal

››› 

page 119

Cruise control (GRA) 

››› 

page 185

CarManuals2.com

Driver information

13

Instrument panel

Symbol Meaning

Speed limiter activ

››› 

page 187

Lane Assist (lane keeping system) ac-
tive

››› 

page 200

Press the brake pedal 

››› 

page 170

Travel Assist active 

››› 

page 202

Adaptive Cruise Control (ACC) reg-
ulating, no vehicle detected ahead 

››› 

page 190

Adaptive Cruise Control (ACC) reg-
ulating, vehicle detected ahead 

››› 

page 190

Vehicle charging 

››› 

page 74

Main beam on or flasher on 

››› 

page 119

The speed limiter is not active 

››› 

page 187

Start-Stop system activated 

››› 

page 161

Start-Stop system unavailable 

››› 

page 161

Hill descent control (HDC) 

››› 

page 171

Exterior temperature below +4 °C
(+39 °F) 

››› 

page 22

Symbol Meaning

Main beam assist activ

››› 

page 122

Take control of the steering 

››› 

page 203

Distance warning 

››› 

page 196

Electric mode driving not available 

››› 

page 161

Reference to information in the on-
board documentation 

››› 

page 25

Remove foot from accelerator 

››› 

page 29

Service intervals display 

››› 

page 31

Instrument panel

Introduction

After switching the engine on with a 12-volt
battery that is heavily discharged or newly
changed some system settings (such as the
time, the date, the personalised comfort set-
tings and the programming) might be altered or
deleted. Check and correct these settings once
the battery is sufficiently charged.

WARNING

Any distraction may lead to an accident, with
the risk of injury.

Do not operate the instrument panel con-

trols when driving.

To reduce the risk of accident and injury,

only make adjustments to the instructions
on the instrument panel display and to the
instructions on the Infotainment system dis-
play when the vehicle is stationary.

CarManuals2.com

14

Driver information

1)

Not available for PHEV hybrid vehicles.

Basic version digital instrument cluster

Fig. 3 

Basic version digital instrument cluster: Main

view.

Upper zone:

 Time, selected driving profile, rev

counter, outside temperature. 

Lower zone:

 total

km (miles) or speed set with the cruise control
or ACC, range.

A

Main display:

 speed in digital format and

road signs.

B

Secondary indications:

 driving data

(average speed and fuel consumption, dis-
tance travelled, etc.)

C

Secondary indications:

 radio, media,

phone, navigation indications.

1

Engine coolant temperature indicator 

››› 

page 20

.

2

Gear engaged and gear or selector lever
position recommendation.

3

Selected driving assistant.

4

Fuel gauge 

››› 

page 18

.


The Basic

1)

 version digital instrument cluster is a

digital instrument cluster with a high resolution
colour TFT display.
Other content can be displayed by selecting
different views, e.g. 

Rev counter

, and different

displays in the main display area and in the
secondary display areas.

Instrument cluster operation

The digital instrument cluster can only be con-
trolled from the buttons on the multi-function
steering wheel. The functions of the buttons on
the multifunction steering wheel depend on the
equipment.
As long as a priority 1 warning is active, it will not
be possible to access any menu 

››› 

page 25

.

Some warnings can be confirmed and hidden
with the button   of the multifunction steering
wheel.

CarManuals2.com

Driver information

15

Instrument panel

Instrument cluster views

To switch between the different views press the

 button on the multifunction steering wheel.

The following views can be displayed:


Main:

 Digital speedometer with secondary

indications.

Speed:

 Classic representation of the speed-

ometer as a circular instrument with secondary
indications in the centre of the dial.

Rev counter:

 Classic representation of the rev

counter as a circular instrument with secondary
indications in the centre of the dial.
The amount and content of the information dis-
played may vary depending on the equipment.

Note

After switching off the ignition, a display
appears showing vehicle status information,
such as distance travelled.

Select secondary indications in the “Main” view
The secondary indications 

B

 or 

C

 can be in-

dividually configured or hidden. Proceed as fol-
lows to select the secondary indications:
1. Use the keys 

 and 

 to select the right

B

 or left 

C

 secondary indications area.

2. Use the thumbwheel on the multifunction

steering wheel to select the desired secon-
dary indication.

3. Confirm your selection by pressing the 

button.

Selecting secondary indications in the “Speed”
or “Rev counter” views
1. Use the thumbwheel on the multifunction

steering wheel to select the desired secon-
dary indication.

2. Confirm the selection by pressing  .

Note

If when switching on the ignition warnings
are shown about existing faults, it might not
be possible to change the settings or show
the information as described. If the fault
continues, visit a duly qualified specialised
workshop. SEAT recommends visiting a SEAT
dealership.

CarManuals2.com

16

Driver information

SEAT Digital Cockpit

Fig. 4 

SEAT Digital Cockpit on the instrument

panel (classic view).

1

Engine coolant temperature display.


››› 

page 20

2

Revolution counter

. Revolutions per mi-

nute the engine is running 

››› 

page 18

.

3

Gear engaged or position of the selec-
tor lever.

4

Screen display


››› 

page 21

.

5

Speedometer

6

Digital speed display

7

Fuel gauge


››› 

page 18

.

8

Information Profile


››› 

page 17

.

CarManuals2.com

Driver information

17

Instrument panel

Fig. 5 

Hybrid vehicles: SEAT Digital Cockpit on the

instrument panel (classic view).

1

Battery charge level indicator


››› 

page 19

2

Rev counter and Powermeter

. Revolu-

tions per minute the engine is running 

››› 

page 21

.

3

Gear engaged or position of the selec-
tor lever

4

Screen display


››› 

page 21

.

5

Speedometer

6

Digital speed display

7

Fuel gauge


››› 

page 18

.

The SEAT Digital Cockpit is a digital instrument
cluster with a high resolution colour TFT dis-
play. It has a 3 views accessible using the but-
ton 

 of the multifunction steering wheel. By

selecting different information profiles, indica-
tions other than the classic circular instruments
can be displayed, such as navigation data,
multimedia information or travel data.
The 3 views are:

Classic

Dynamic

Navigation

All views will display information on the screen
about audio, phone, travel data, vehicle status,
navigation and driving aids.
In all views the information displayed in 

Infor-

mation profiles

 can be customised 

››› 

Fig. 4

8

.

Information profiles

Use the infotainment system menu 

 > Se-

lection > Digital Cockpit

 to choose be-

tween the different options for viewing informa-
tion to be displayed in the SEAT Digital Cockpit.

Classic View

The revolutions per minute and speedome-
ter needles appear along the entire length 

››› 

Fig. 4

.

CarManuals2.com

18

Driver information

1)

Pre-set information depending on the selected “Driving mode”.

View 1, 2, 3 or AUTOMATIC

1)

Personalisation of the information that appears
in the SEAT Digital Cockpit. Only 2 of these
items of information can be displayed at the
same time, but the user chooses which to dis-
play, and in what order, by moving the finger
vertically over the dials.
Depending on the version, the Views can be
memorised by exiting the menu or keeping the

View

 button pressed.


Consumption.

 Graphic representation of the

current consumption and digital display of the
average consumption.

Audio.

 Digital display of the current audio

playback.

Altitude.

 Digital display of the current altitude

above sea level.

Compass.

 Digital display of the compass.

Destination arrival information.

 Digital dis-

play of the remaining travelling time, distance
to the destination and the estimated time of
arrival.

Range.

 Digital display of the remaining range.

Travelling time.

Route guidance.

Journey.

 Digital display of the distance trav-

elled.

Assist systems.

 Graphic representation of

different assistance systems.

Road signs.

 Display of traffic signs detected.

Navigation.

 Graphical representation of the

navigation with arrows.
It may vary based on the features, the number
and the contents of the selectable information
profiles.

Revolution counter

The rev counter indicates the number of engine
revolutions per minute.
Together with the gear-change indicator, the
rev counter offers you the possibility of using
the engine of your vehicle at a suitable speed.
The beginning of the red zone of the rev counter
indicates the maximum speed in any gear after
running-in and with the engine hot. However,
it is advisable to move the selector lever to 

D

or lift your foot off the accelerator before the
needle reaches the red zone 

››› 

.

We recommend that you avoid high revs and
that you follow the recommendations on the
gear-change indicator. See the additional infor-
mation in 

››› 

page 148, 

Selecting the optimal

gear

.

NOTICE

 To prevent damage to the engine, the rev

counter needle should only remain in the red
zone for a short period of time.

When the engine is cold, avoid high revs

and heavy acceleration and do not make the
engine work hard.

For the sake of the environment

Changing up a gear early will help you to
save fuel and minimise emissions and engine
noise.

Fuel gauge

Fig. 6 

Basic instrument cluster: fuel gauge.

CarManuals2.com

Driver information

19

Instrument panel

Fig. 7 

SEAT Digital Cockpit instrument cluster:

fuel gauge.

Control lamps

Its lights up yellow. Fuel tank almost
empty. The fuel reserve level has been
reached 

››› 

. Refuel as soon as you

have the opportunity.
When the fuel level is very low, the lower
diode also flashes red.

Its lights up yellow. Presence of water
in diesel. Turn off the engine and seek
professional assistance.

The display only works when the ignition is
switched on.
The fuel range is displayed on the instrument
panel.
You can consult the tank capacity of your vehi-
cle in 

››› 

page 384

.

WARNING

When driving with low fuel, the vehicle may
stall in traffic and cause accidents and se-
vere injuries.

If the fuel tank level is too low, fuel could

reach the engine irregularly, particularly
when driving up or down slopes.

The steering system and the assistant sys-

tems and brakes do not work when the en-
gine is running irregularly or switches off due
to lack of fuel or an irregular supply thereof.

SEAT recommends always refuelling when

the tank is approximately one quarter full, to
prevent the vehicle from stopping due to a
lack of fuel.

NOTICE

Never run the fuel tank completely dry. An
irregular fuel supply can cause misfiring and
unburnt fuel could enter the exhaust system.
The catalytic converter or the particulate fil-
ter may get damaged!

Note

The small arrow on the fuel gauge next to the
fuel pump symbol points out towards the side
of the vehicle with the fuel tank flap.

Battery level indicator

 Valid for: hybrid vehicles

Fig. 8 

Instrument cluster: battery level

indicator.

The small arrow next to the battery symbol on
the fuel gauge indicates which side of the vehi-
cle the charging cover is on.

NOTICE

Never drive with the tank completely

empty. Under certain circumstances, the en-
ergy stored in the high-voltage battery may
not be sufficient to reach the nearest service
station.

When the outside temperature is very

low, and therefore the high-voltage battery
is very cold, difficulties may arise in start-
ing the internal combustion engine and the
range in the electric driving mode may be
reduced.

CarManuals2.com

20

Driver information

A

B

C

Coolant temperature indicator.

Fig. 9 

Basic digital instrument cluster: engine

coolant temperature display.

Fig. 10 

SEAT Digital Cockpit digital instrument

cluster: engine coolant temperature indicator.

Cold zone.

 The engine has not reached

operating temperature yet. Avoid high en-
gine speeds and stressing the engine if it
has not reached operating temperature.

Normal zone.

 At high outside temperatures

and when making the engine work hard,
the diodes may continue lighting up and
reach the upper zone. This is no cause for
concern, provided the control lamp does
not light up  .

Warning area.

 When the engine is working

hard, especially at high outside tempera-
tures, the diodes may light up in the warn-
ing area.

The coolant temperature gauge only works
when the ignition is switched on.

Control and warning lamps

Fault in the engine coolant system

The LED flashes red.

Engine coolant

The lamp lights up red.
The motor coolant temperature is too high
or the motor coolant level is too low.


Stop driving!

 Stop the vehicle at the next

opportunity and in a safe place.

 Switch off the engine and let it cool down.

Check the coolant level in the coolant expan-

sion tank 

››› 

page 336

.

If the warning lamp does not go out even
though the motor coolant level is correct, do
not continue to drive or leave the motor running.
Seek specialist assistance.

Control and warning lamps (valid for hybrid
vehicles)

to-

gether

with

Fault in the high-voltage cooling
circuit

The warning lamps flash red.

Engine coolant

The lamp lights up red.
Engine or high-voltage system coolant
level too low, engine or high-voltage sys-
tem coolant temperature too high.


Stop driving!

 Stop the vehicle at the next

opportunity and in a safe place.

 Switch off the engine and let it cool down.

Check the coolant level in the coolant expan-

sion tank 

››› 

page 336

.

Check the coolant level in the high-voltage

cooling circuit 

››› 

page 335

. If the level is too

low 

DO NOT add coolant

. Seek specialist as-

sistance immediately.
If the warning lamp does not go out even
though the motor coolant level is correct, do
not continue to drive or leave the motor running.
Seek specialist assistance.

CarManuals2.com

Driver information

21

Instrument panel

Green
Blue

A

B

C

NOTICE

To ensure a long useful life for the engine,

avoid high revs, driving at high speed and
making the engine work hard for approxi-
mately the first 15 minutes when the engine
is cold. The phase until the engine is warm
also depends on the outside temperature. If
necessary, use the engine oil temperature as
a guide 

››› 

page 23

.

Additional lights and other accessories in

front of the air inlet reduce the cooling effect
of the coolant. At high outside temperatures
and high engine loads, there is a risk of the
engine overheating.

The front spoiler also ensures proper distri-

bution of the cooling air when the vehicle is
moving. If the spoiler is damaged this can
reduce the cooling effect, which could cause
the engine to overheat. Seek specialist assis-
tance.

Power meter

 Valid for: hybrid vehicles

Fig. 11 

Digital instrument cluster: Power meter

The lower left hand side of the rev counter has
two colour coded areas:

Charge:

 Energy recovery zone.

Power %:

 Electric traction zone. Indicates

the percentage of power used and the
maximum amount of power currently avail-
able.

The power meter shows the usage level of the
electric drive. The power meter bar shows the
current usage level.

A finer coloured border indicates how much the
propulsion can currently be used. Depending
on the selected driving program and the cur-
rent availability of electrical power, the boun-
daries of the different colours can vary.
The following displays can be seen on the
Power meter: 

››› 

Fig. 11

,.

The vehicle recovers electrical energy.
e-Mode electric driving.
The combustion engine must be running.
With the Boost function, the vehicle drives
for a short period of time with maximum
power from both the electric motor and the
combustion engine.

Status display

Possible indications on the instrument panel
display

The instrument cluster can display a variety of
information, superimposed according to the ve-
hicle's equipment:

Doors, bonnet and rear lid open

Warning and information messages

Odometer

Time 

››› 

page 30

Indications of the radio and navigation sys-

tem

Indications of the phone

Outside temperature

CarManuals2.com

22

Driver information

1)

Valid for the basic digital instrument cluster.

Compass indication

Selector lever positions

Gear-change recommendation

Combined range (hybrid vehicles)

Display of travel data (multifunction display)

and menus for different settings 

››› 

page 23

Service interval display 

››› 

page 30

Speed warning

Speed warning for winter tyres

Start-Stop system status display 

››› 

page 161

Signs detected by the traffic signal detection

system 

››› 

page 27

Indication of active cylinder management

status (ACT®) 

››› 

page 148

Low consumption driving 

Assistant systems display

Personalization: greeting 

››› 

page 244

Engine oil temperature

Indication of radiator fan operation with en-

gine stopped

1)

Doors, bonnet and rear lid open

When the vehicle is unlocked and while driving,
the instrument panel display shows if any of the
doors, the bonnet or rear lid are opened and, in
some cases, it is also indicated by an audible
warning.

Selector lever positions

The current position of the selector lever is
shown on the side of the lever and on the in-
strument panel display. When the lever is in the

D/S

 position or in the Tiptronic position, in some

cases, the gear engaged in each case is shown
on the instrument panel display .

Outside temperature indicator

If the outside temperature is lower than approxi-
mately +4 °C (+39 °F), the “ice crystal symbol”
also lights up  . This symbol remains lit until
the outside temperature exceeds +6 °C (+43 °F) 

››› 

.

In the following situations, the displayed exte-
rior temperature may be higher than the actual
temperature due to the heat emitted by the
motor:

When the vehicle is stationary.

When driving very slowly.

Gear-change recommendation

While driving, the instrument panel of certain
vehicles may indicate a gear recommendation
for saving fuel 

››› 

page 148

.

Odometer

The 

odometer

 records the total distance travel-

led by the vehicle.

The 

partial odometer

 (

trip

) shows the dis-

tance travelled since the last time it was reset
to zero.

Set the odometer to zero via the Infotainment

system or the multifunction steering wheel 

››› 

page 23

.

Combined operating range display   (hy-
brid vehicles)

The value shown is calculated and updated ac-
cording to the driving style. Therefore, the range
can vary even when the fuel tank is full and the
high-voltage battery is fully charged.
Range can be increased by reducing or switch-
ing off comfort consumers, e.g. air conditioning
or seat heating.

Speed warning for winter tyres

If the maximum set speed is exceeded, this is
displayed on the instrument cluster display.
The speed warning can be set in the infotain-
ment system (

 > Settings > Tyres

;

OR


 > Exterior settings > Tyres

››› 

page 36

.

Compass indication

Depending on the equipment, when the ignition
is on, the instrument panel display indicates the
direction in which you are driving with a symbol,
e.g. NW for Northwest.

CarManuals2.com

Driver information

23

Instrument panel

1)

Valid for the basic digital instrument cluster.

When the Infotainment system is on and there is
no route guidance active, the graphic represen-
tation of a compass is also shown.

Low consumption driving 

Depending on the equipment, when driving, the

 display appears on the instrument panel

when the vehicle is in low consumption status
due to active cylinder management (ACT®) 

››› 

page 148

.

Radiator fan operation indication

1)

This indication is displayed after switching off
the ignition when the radiator fan is still running.
The operating time of the radiator fan can de-
pend on:

Exhaust gas treatment, e.g. during regenera-

tion of the particulate filter.

Active brake cooling after descending a

slope.

Dissipation of heat from the engine after high

stress, e.g. after a very long drive.

Destination information

1)

If route guidance is enabled, the expected
travel time and the distance to the destination
are displayed.

Navigation indications

1)

If route guidance is activated, the direction of
travel is shown by arrows.

WARNING

Even when the outside temperature is higher
than freezing temperature, some roads and
bridges could be frozen.

The “ice crystal symbol” indicates that

there may be a risk of freezing.

At outside temperatures above +4 °C

(+39 °F), there may be ice even when the “ice
crystal symbol” is not on.

The outside temperature sensor takes a

guideline measurement.

Note

There are different instrument panels and

therefore the versions and instructions on
the display may vary. In the case of dis-
plays without warning or information texts,
faults are indicated exclusively by the con-
trol warning lamps.

Some settings can be saved in the user ac-

counts of the personalization function and
can therefore be changed automatically
when switching user accounts 

››› 

page 244

.

Some indications on the instrument panel

screen may be concealed by a sudden
event, e.g. an incoming call.

Depending on the equipment, some set-

tings and instructions can be carried out
or displayed on the infotainment system as
well.

If there are several warnings at the same

time, the symbols will be displayed one after
the other for a few seconds. The symbols will
stay on until you remove the cause.

 If when switching on the ignition warnings

are shown about existing faults, it might not
be possible to change the settings or show
the information as described. In this case, go
to a specialised workshop and request a re-
pair.

Driving data indicator

The driving data display shows a range of driv-
ing data and consumption values.

Change from one display to another

 Turn the right thumbwheel of the multifunc-

tion steering wheel 

››› 

page 32

.

CarManuals2.com

24

Driver information

1)

This will show all data on the display at the same time: distance travelled, average consumption, average speed and autonomy.

2)

Valid for the SEAT Digital Cockpit.

3)

Not available in all countries.

Changing memory

While in 

Driving data > General in-

formation

 press   on the multi-function

steering wheel to switch between the 3 memo-
ries

1)

:

Since start:

 The memory is deleted if

the journey is interrupted for more than 2
hours.

Since refuel:

 Display and storage of

the journey data and the consumption val-
ues collected. When refuelling, the memory
is deleted.

Long-term:

 This memory contains travel

data up to a maximum of 19 hours and
59 minutes or 99 hours and 59 minutes, or
up to a maximum of 1999.9 km or 9999.9
km. When one of these values is exceeded
(varies depending on the version of the in-
strument panel), the memory is deleted.

Delete journey data presets

 Select the memory that you wish to erase.

Keep the   button on the multi-function

steering wheel pressed for approximately 2
seconds.

Select the instructions

In the Infotainment system, in the menu Vehicle
settings, you can display different travel data 

››› 

page 37

.

Current consumption:

 The current fuel

consumption display operates throughout
the journey, in litres/100 km; and with the
engine running and the vehicle stopped, in
litres/hour.

Average consumption:

 The average

fuel consumption is displayed after driving
for approximately 300 metres.

Travelling time:

 This indicates the

hours (h) and minutes (min) since the igni-
tion was switched on.

Range:

2)

 Approximate distance in km that

can still be travelled if the same driving
style is maintained.

AdBlue range or  :

 Approximate dis-

tance in km that can still be travelled with
the current level of the AdBlue® tank with
the same driving style. The indication ap-
pears from a range of less than 2400 km
and cannot be deactivated.

3)

Distance travelled:

 Distance covered

in km (m) after switching on the ignition.

Average speed:

 The average speed will

be shown after driving for approximately
100 metres.

Digital speed:

 Current speed dis-

played in digital format.

Eco tips:

 Recommendations messages

are shown to reduce consumption through
good driving practices, e.g. 

Air condi-

tioning on: close the window

.

Boost/Torque:

 Indicates the power and

torque of the combustion engine (does not
indicate electric mode).

Setting a speed warning

 Select the display Warning at --- km/h or

Warning at --- mph.

 Press the   button on the multi-function

steering wheel to memorise the current speed
and activate the warning.

Activate:

 set the desired speed within 5 sec-

onds by rotating the wheel on the multi-func-
tion steering wheel. Next, press the   button
again or wait for a few seconds. The speed is
stored and the warning activated.

Deactivate:

 press the   button. The stored

speed is deleted. The warning can be set for
speeds of between 30 and 250 km/h (18 and
155 mph).

CarManuals2.com

Driver information

25

Instrument panel

Oil temperature display

The engine reaches its operating temperature
when, under normal driving conditions, the
oil temperature is between 

80°C

 (176°F) and

120°C

 (248°F). If a great effort is required from

the engine and the outside temperature is high,
the engine oil temperature may increase. This
does not present any problem as long as the
warning lamps 

 or 


››› 

page 343

 do not

appear on the display.

Warning and information messages

The system runs a check on certain com-
ponents and functions when the ignition is
switched on and while the vehicle is moving.
Faults are displayed on the instrument cluster
display as red and yellow warning symbols 

››› 

page 11

 accompanied by messages and,

depending on the case, even an audible warn-
ing. The representation of the messages and
symbols may vary depending on the version of
the instrument panel.
Existing faults can also be checked man-
ually. To do this, open the 

Vehicle status


››› 

page 32

 menu.

 Priority 1 warning (in red)

The symbol lights up or flashes (in part ac-
companied by audible warnings).   

Stop driv-

ing!

 Danger! Check the fault and eliminate

the cause. If necessary, seek professional assis-
tance.

 Priority 2 warning (in yellow)

The symbol lights up or flashes (in part accom-
panied by audible warnings). Operating faults
or the lack of operating fluids can cause dam-
age to the vehicle or a fault. Check the faulty
function as soon as possible. If necessary, seek
professional assistance.

 Reference to information in the owner's

manual

Further information on any warnings can be
found in the owner's manual.

Information message

It provides information about processes in the
vehicle.

Driver alert system (break recom-
mendation)

Fig. 12 

On the screen of the instrument panel:

fatigue detection.

The driver alert system informs the driver when
it deduces tiredness due to his/her behaviour at
the wheel.

Function and operation

Fatigue detection determines the driving be-
haviour of the driver when starting a journey,
making a calculation of tiredness. This is con-
stantly compared with the current driving be-
haviour. If the system detects that the driver is
tired, an audible warning is given with a sound
and an optical warning is shown with a sym-
bol and supplementary message on the instru-
ment cluster screen 

››› 

Fig. 12

. The message

on the instrument panel display is shown for

CarManuals2.com

26

Driver information

approximately 5 seconds, and depending on
the case, is repeated. The system stores the last
message displayed.
The warning on the instrument cluster display
can be hidden as follows:

Press the   button on the multifunction steer-

ing wheel.
The message can be recovered on the instru-
ment cluster display using the multifunction dis-
play 

››› 

page 23

.

Conditions of operation

Driving behaviour is only calculated on speeds
above about 65 km/h (40 mph) up to around
200 km/h (125 mph).

Activating and deactivating

Fatigue detection can be activated or deacti-
vated in the infotainment system using the func-
tion button 

 Driver assistance > Fatigue de-

tector

.

The driver alert system is always switched on
when the ignition is switched on 

››› 

page 37

.

System limitations

The Fatigue detection has certain limitations in-
herent to the system. The following conditions
can limit the Fatigue detection or prevent it from
functioning.

At speeds below 60 km/h (40 mph).

At speeds above 200 km/h (125 mph)

When cornering

In sections with roadworks.

On roads in poor condition

In unfavourable weather conditions

When a sporty driving style is employed

In the event of a serious distraction to the

driver
Fatigue detection will be restored when the ve-
hicle is stopped for more than 15 minutes, when
the ignition is switched off or when the driver
has unbuckled their seat belt and opened the
door.
In the event of slow driving during a long period
of time (below 60 km/h, 40 mph) the system
automatically re-establishes the tiredness cal-
culation. When driving at a faster speed the
driving behaviour will be recalculated.

WARNING

The smart technology of the driver alert sys-
tem cannot overcome the limits imposed by
the laws of physics and only works within the
limits of the system. Do not let the comfort
afforded by the Fatigue detection system
tempt you into taking any risks when driving.
Take regular breaks, sufficient in length when
making long journeys.

The driver always assumes the responsibil-

ity of driving to their full capacity.

Never drive if you are tired.

The system does not detect the tiredness

of the driver in all circumstances. Consult the
information in the section 

››› 

page 26, 

Con-

ditions of operation

.

In some situations, the system may incor-

rectly interpret an intended driving manoeu-
vre as driver tiredness.

No warning is given in the event of the ef-

fect called microsleep!

Please observe the indications on the in-

strument panel and act as is necessary.

Note

Fatigue detection has been developed for

driving on motorways and well paved roads
only.

If there is a fault in the system, have it

checked by a specialised workshop.

CarManuals2.com

Driver information

27

Instrument panel

Road signs detection system

Fig. 13 

On the instrument panel display:

examples of speed limits or overtaking
prohibitions with their respective additional
signs.

The dynamic road signs display records stand-
ard road signs using a camera fitted to the base
of the interior mirror, and provides information
about speed limits, overtaking prohibitions and
warning signs that it recognises.

Within its limitations, the system also displays
a additional sign to indicate aspects such as
temporary prohibitions. Even on routes without
signs, the system can, if necessary, display the
applicable speed limits.
The dynamic road sign display system is acti-
vated whenever the ignition is switched on.
The traffic sign detection system does not work
in all countries. Keep this in mind when travel-
ling abroad.

Shown on the display

In Germany, on motorways and vehicle roads,
besides speed limits and overtaking provisions
the system also displays the end of prohibition
signs. The valid speed limit at the time in other
countries is always shown.
The road signs detected by the system are
displayed on the instrument cluster display 

››› 

Fig. 13

 and, depending on the navigation

system fitted in the vehicle, in the infotainment
system as well .

Road sign detection system messages:

There are no road signs available

The system is in its start-up phase.

OR:

 the camera has not recognized any man-

datory or prohibitive signs.

Error: Dynamic road sign display

There is a fault in the system. Have the system

checked by a specialised workshop.

Speed warning is currently unavail-
able

The speed warning function of the road sign

detection system is faulty. Have the system
checked by a specialised workshop.

Dynamic road sign display: Clean
the windscreen!

The windscreen is dirty in the camera area

or the camera’s visibility is impaired by weather
conditions. Clean the windscreen.

Dynamic road sign display: Cur-
rently restricted

The navigation system is not transmitting

data. Check if the navigation system has upda-
ted maps.

OR

: the vehicle is in a region not included on

the navigation system's map.

No data available

The traffic sign detection system does not

work in the current country.

Activate and deactivate the road sign dis-
play on the instrument panel

The permanent traffic sign view on the instru-
ment cluster can be switched on or off in the
infotainment system using the function button

 Driver assistance > Road sign detection

.

CarManuals2.com

28

Driver information

Display of traffic signs

After checking and evaluating the information
from the camera, the navigation system and
the current vehicle data, the system displays up
to three current road signs 

››› 

Fig. 13

   with

their additional signs.

First:

 The sign that is currently valid for the

driver is shown in the left side of the screen For
example, a maximum speed limit of 130 km/h
(100 mph) 

››› 

Fig. 13

  .

Second:

 A sign valid only in certain circum-

stances, e.g. 100 km/h (60 mph) is shown sec-
ond, together with the additional rain sign.

Additional sign:

 Displays the circumstances

(rain, times of day, fog, etc.) under which the
displayed speed limit is in force.

 Third:

 Thirdly, a sign prohibiting overtaking

is partially displayed. If there is no conditional
speed limit and overtaking is prohibited, the
latter sign will be displayed in second place 

››› 

Fig. 13

  .

The warning sign display is not available in all
countries and the system may not be able to
detect all existing warning signs.

Speed warning

If the system detects that the permitted speed
is exceeded, it may warn the driver with a
“gong” and visually with a message on the
dash panel display.

The speed warning can be set or deacti-
vated completely in the menu 

 Driver

assistance > Road sign detection


››› 

page 37

. The speed warning can be set

to a value of 0, 5 or 10 km/h (0, 3 or 5 mph)
above the permitted speed.

Trailer mode

In vehicles equipped with a towing bracket de-
vice from the factory and a trailer that is electri-
cally connected to the vehicle, it is possible to
activate or deactivate the display of specific
traffic signs for vehicles with trailer, such as
speed limits or overtaking prohibitions.
It can be activated or deactivated in the info-
tainment system using the function button 

Driver assistance > Trailer assist


››› 

page 37

.

For trailer mode, the display of speed limits ap-
plicable to the type of trailer or to the legal pro-
visions can be adjusted. The speed is adjusted
in steps of 10 km/h (5 mph) within the range
between 60 and 130 km/h (40 and 80 mph). If
it is adjusted to a speed greater than that which
is permitted in the country in question for driving
with a trailer, the system automatically displays
the usual speed limits, e.g. in Germany 80 km/h
(50 mph).
If the speed warning for the trailer is deactiva-
ted, the system displays the speed limits as if
there were no trailer hitched.

Limited operation

The traffic sign detection system has certain
limitations. The following cases may lead the
system to operate with limitations or not at all:

In the case of poor visibility, e.g. in snow, rain,

fog or intense mist.

In cases of dazzling, e.g. caused by head-on

traffic or by the sun.

When driving at high speeds.

If the camera is covered or dirty.

If the traffic signs are partially or totally ob-

structed, e.g. by trees, snow, dirt or other vehi-
cles.

In the case of traffic signs that do not fulfil the

regulations.

In the case of damaged or bent traffic signs.

In the case of variable messages on over-

head or gantry signs (LED-based variable traf-
fic signs or other lighting units).

If the maps on the navigation system are not

up-to-date.

In the case of adhesives affixed to vehicles

that depict traffic signs, e.g. speed limits on lor-
ries.

CarManuals2.com

Driver information

29

Instrument panel

WARNING

The technology in the traffic sign detection
system cannot change the limits imposed by
the laws of physics and only works within the
system's limits. Do not let the extra conven-
ience afforded by the traffic sign detection
system tempt you into taking any risks when
driving. The system is not a replacement for
driver awareness.

Adapt your speed and driving style to

suit visibility, weather, road and traffic condi-
tions.

Poor visibility, darkness, snow, rain and fog

may lead to the system failing to display
traffic signs or not displaying them correctly.

If the camera's field of vision is dirty, cov-

ered or damaged, system operation may be
impaired.

WARNING

The driving recommendations and traffic in-
dications shown on the traffic sign detection
system may differ from the actual current
traffic situation.

The system may not detect or correctly

show all the traffic signs.

Traffic signs and traffic regulations have

priority over the recommendations and dis-
plays provided by the system.

Note

To avoid affecting the correct operation of
the system, take the following points into
consideration:

Regularly clean the area of vision of the

camera and keep it in a clean state, without
snow or ice.

Do not cover the field of vision of the cam-

era.

Always replace damaged or worn blades

when required to avoid lines on the camera's
field of vision.

Check that the windscreen is not damaged

in the area of the camera's field of vision.

 The use of outdated maps on the naviga-

tion system may cause the system to show
traffic signs incorrectly.

In the waypoints mode of the navigation

system, the traffic sign detection system is
only partly available.

Eco-efficient driving assistance

Fig. 14 

Eco-efficient driving assistance

indication (schematic representation).

Eco-efficient driving assistance helps you drive
with care and with low energy consumption by
following instructions superimposed in the digi-
tal cockpit, depending on the situation.
When you approach places such as a junction,
a roundabout or a section of road with a speed
limit, the symbol   is displayed along with an
event in the digital cockpit 

››› 

Fig. 14

.

As soon as you follow the indication and
take your foot off the accelerator, the vehicle
adapts, based on the selected driving profile
and distance to the incident, brake energy re-
cuperation and speed.
Eco-efficient driving assistance uses the trip
data from the infotainment system and the sen-
sors of some assist systems. If no destination
guidance is active, the most likely route is used.

CarManuals2.com

30

Driver information

Pressing the accelerator can cancel the inter-
vention of the assistance at any time.
Eco-efficient driving assistance can be
switched on and off in the infotainment system,
in the assistance system settings 

››› 

page 37

.

Eco-efficient driving assistance is temporarily
switched off if:

The gear selector is in the 

S

 position.

The 

Sport

 driving program is used.

Driving with adaptive cruise control (ACC) or

cruise control (GRA).
When these conditions no longer exist, the as-
sistance is reactivated if it is switched on in the
assist system settings.
Eco-efficient driving assistance is available de-
pending on the equipment, although not in all
countries.

WARNING

The system is not a replacement for driver
awareness.

Adapt your speed and driving style at all

times to suit visibility, weather, road and
traffic conditions.

Traffic signs on the road and traffic regula-

tions have priority over eco-driving notes.

Note

The appearance of the symbols may vary

slightly depending on the equipment and
model. System updates may modify or ex-
pand the symbols.

When the system is switched on, eco-ef-

ficient driving assistance can also increase
recuperation without any indication being
displayed. This can occur in situations such
as when the accelerator pedal is released
when a vehicle is driving in front. In this case,
energy recuperation is adapted match the
speed of the vehicle in front without any indi-
cation being displayed.

Time and date

Setting the time on the infotainment system

Press   

>   Settings


››› 

page 33

.

Select the menu option 

Date and time

.

Service Menu

In the Service menu various settings can be ad-
justed depending on the features.

Open the Service menu

Select the 

Range

 information profile while in

the 

Driving data

 menu, and keep the   key

pressed on the multifunction steering wheel for
approximately 4 seconds. When it is released,
the 

Service

 menu will be displayed.

Now you can browse through the menu using
the keys on the multifunction steering wheel as
usual.

Restart the service interval display

Select the 

Service

 menu and follow the in-

structions on the screen of the instrument
panel.

Restart the oil service

Select the 

Reset Oil service

 menu and

follow the instructions on the instrument panel
display.

Identifying letters on engine (LDM)

Select the menu 

Engine code

. The identifying

letters of the engine will be shown on the instru-
ment cluster display at the bottom left.

Service intervals

The service interval display appears on the in-
strument cluster screen and in the infotainment
system.

There are different versions of instrument pan-
els and infotainment systems, so the versions
and instructions on the screens may vary.
SEAT distinguishes between services with en-
gine oil change (e.g. Oil change service) and
services without engine oil change (e.g. Inspec-
tion).

CarManuals2.com

Driver information

31

Instrument panel

In vehicles with 

Services established by time

or mileage

, the service intervals are already

pre-defined.
In vehicles with 

LongLife Service

, the intervals

are determined individually. Thanks to techno-
logical progress, maintenance work has been
greatly reduced. The oil only needs to be
changed when the vehicle requires it. To calcu-
late this variation (max. 2 years), the vehicle's
conditions of use and individual driving styles
are considered. The advance warning first ap-
pears 20 days before the date established
for the corresponding service. The kilometres
(miles) remaining until the next service are al-
ways rounded up to the nearest 100 km (miles)
and the time is given in complete days. The
current service message cannot be viewed until
500 km after the last service. Prior to this, only
lines are visible on the display.

Inspection reminder

If a service or an inspection has to be carried
out soon, a 

service reminder

 will be displayed

when the ignition is switched on.
The figure displayed are the kilometres that
can still be travelled or the time until the next
service.

Service due

When 

it is time for a service

 or an 

inspection

,

an audio warning will sound when the ignition
is switched on, and a spanner symbol may ap-

pear for a few seconds on the instrument clus-
ter display  , along with one of the following
messages.

Service now!

Please have your vehicle inspected

Oil change service due!

Oil change service and inspection

due!

Consult a service notification

With the ignition switched on, the engine off
and the vehicle at a standstill, the current serv-
ice notification can be read:

Check the date of the current service on the
infotainment system

Press the function button 

 Data > Set-

tings > Service

OR


 > Vehicle sta-

tus

.

Checking the date on the digital instrument
panel:

The date of the service can only be read

through the 

Service


››› 

page 30

 menu.

Resetting service interval display

If the service was 

not

 carried out by a SEAT

dealership, the display can be reset as follows:

 The service interval display can only be reset

through the 

Service


››› 

page 30

 menu.

Do not

 restart the indicator between the

service intervals, otherwise the information dis-
played will be incorrect.
If the oil change service is reset manually, the
service interval display changes to a fixed serv-
ice interval, also in vehicles with 

Flexible oil

change service

.

Note

The service message disappears after a

few seconds, when the engine is started or
when the   button is pressed on the multi-
function steering wheel.

In vehicles with the LongLife system in

which the battery has been disconnected for
a long period of time, it is not possible to cal-
culate the date of the next service. Therefore
the service interval display may not be cor-
rect. In this case, bear in mind the maximum
service intervals permitted 

››› 

page 367

.

If you reset the display manually, the next

service interval will be indicated as in vehi-
cles with fixed service intervals. For this rea-
son we recommend that the service interval
display be reset by an authorised dealer.

CarManuals2.com

32

Driver information

Instrument cluster opera-
tion

Introduction

With the ignition switched on, it is possible to
read the different functions of the display by
scrolling through the menus.
In vehicles with multifunction steering wheel,
the multifunction display can only be operated
with the steering wheel buttons.
Some menu options can only be read when the
vehicle is at a standstill.

Instrument panel menus

The number of menus and information items
available will depend on the vehicle’s electron-
ics and features.

Vehicle status 

››› 

page 25

.

 Driving data 

››› 

page 23

.

Assist systems.

Front Assist On/Off 

››› 

page 196

ACC (only display) 

››› 

page 188

Lane Assist On/Off 

››› 

page 199

Side Assist On/Off 

››› 

page 205

 Navigation.

Audio.

Telephone.

WARNING

Distracting the driver in any way can lead to
an accident and cause injuries.

Never use the menus on the instrument

panel display while the vehicle is in motion.

NOTICE

After charging or changing the 12-volt bat-
tery, check the system settings. If the power
supply is interrupted, the system settings
might be incorrect or deleted.

Operation using the multifunction
steering wheel

Fig. 15 

Right side of multifunction steering

wheel: buttons to the menus and informative
indications on the instrument panel (depending
on the version).

As long as a priority 1 

››› 

page 25

 warning is ac-

tive, it will not be possible to access any menu.
Some warnings can be confirmed and hidden
with the button   of the multifunction steering
wheel 

››› 

Fig. 15

.

Select a menu or an informative display

 Switch the ignition on.

Customisation option: select a user.

If a message or vehicle symbol is displayed,

press the button   

››› 

Fig. 15

; several times if

necessary.

To change menus, use buttons 

 or 

.

To open the menu or the information dis-

played, press the button   or wait a few sec-
onds until the menu or the informative display
opens automatically.

Changing menu settings

 In the menu displayed, turn the right thumb-

wheel of the multifunction steering wheel until
the desired option of the menu is highlighted.
The option appears framed.

Press the button   to make the required mod-

ifications. A mark indicates that the system or
function is activated.

Back to menu selection

 Press the button 

 or 

.

CarManuals2.com

Driver information

33

Infotainment system operation and displays

Infotainment system opera-
tion and displays

Introduction

The infotainment system brings together impor-
tant vehicle functions and systems into a single
central control unit, e.g. air conditioning, menu
settings, radio equipment and the navigation
system.
The actual number of menus available and the
name of the various options will depend on the
vehicle’s electronics and equipment.

General operating information

General information on the operation of the in-
fotainment system, as well as on the warning
and safety instructions that must be taken into
account, is found in 

››› 

page 256

.

How to move through the different menus
and select them

Switch the ignition on.

If the infotainment system is off, switch it on.

The different menus are selected directly on

the touch screen using texts, icons or buttons.
If the box is checked  , the function is activa-
ted.
Pressing the menu button   will always take
you to the last menu used.

Any changes made using the settings menus
are automatically saved on closing those me-
nus

Scroll bar

: Some menus and functions show

more content above or below those displayed
on the screen at that time, for example, long
lists of settings. Press on the scroll bar and pull
up or down.

Tutorial

The first time you connect the Infotainment sys-
tem, a system tutorial will open with a brief de-
scription of the main functions and how to use
it.

Help

In the 

Help

 menu can be found more informa-

tion and tips for using the infotainment system.

WARNING

Any distraction may lead to an accident, with
the risk of injury. Operating the Infotainment
system while driving could distract you from
traffic.

Note

After starting the engine with a 12-volt bat-
tery that is heavily discharged or recently
replaced, some system settings such as
time, date, personalised comfort settings,
programming and user accounts might be al-

tered or deleted. Check and correct these
settings when the battery is sufficiently
charged.

CarManuals2.com

34

Driver information

A

B

C

D

E

F

G

Explanation of the function buttons

Fig. 16 

Schematic diagram: Overview of the

possible function buttons on the screen.

Top part of the screen

Current time.
Driving profile and navigation informa-
tion.

 If the user has an active route, both

the time and the distance to the destination
are displayed. If there is no active route,
the driving profile is displayed. On vehicles
with no available driving profile, the current
address is displayed whenever there is no
active route.

Air conditioning information.

 In vehicles

with heated steering wheels or windscreen
heating, the corresponding icon is dis-
played when these functions are enabled.
If not, the current outside temperature is
displayed.

Telephone information.

 Information re-

garding your mobile device is displayed:
available network signal strength, estab-
lished Bluetooth connection, unanswered
calls, new messages, battery status, etc.

System customisation based on user
and notifications.

 Some settings can be

saved in the user accounts of the per-
sonalization function and can therefore
be changed automatically when switching
user accounts.

Bottom part of the screen

Valid for the infotainment system: Connect Sys-
tem

.

Main menu display mode:

: main menu with the 6 main functions

divided into 2 screens (3 + 3, customisable
by the user by pressing on the function).

: main menu in tile mode (all functions of

the Infotainment system).
Direct accesses to the functions of the In-
fotainment system (up to 10 functions, 5 +
5, customisable by the user). By pressing
on the icon, you can select/deselect the
functions in question.

CarManuals2.com

Driver information

35

Infotainment system operation and displays

A

B

C

D

E

Don't show again

Start

End

Initial configuration wizard

Fig. 17 

Schematic diagram: Initial configuration

wizard

The initial configuration wizard will help you to
set up your Infotainment system the first time
you switch it on.
Whenever you switch on the infotainment sys-
tem, the initial setup screen will be displayed 

››› 

Fig. 17

 if any parameters have not been set

(marked with “ ”) or if the 

Don't show again

function button has not been pressed.
Function buttons:

Press to set day and time.
Press to search and store to memory the
radio stations that have the best reception
at that moment.
Press to go to the Online Media settings.
Press to link your mobile phone to the Info-
tainment system.

Press to select your home address using
your current position or by manually enter-
ing an address.

Disables the possibility of

changing the settings of the Infotainment
system. If you wish to perform the initial
configuration, you must access through

Help

.

Starts up the Configuration Wizard.

Once one or more settings have been ap-

plied, press to finalise the setup in the main
menu of the wizard.
Closes the Configuration Wizard.

CarManuals2.com

36

Driver information

Vehicle information

Fig. 18 

Schematic diagram: Vehicle information

and status

Pressing 

 Vehicle > Selection

 in the

main menu opens the vehicle info menu with
the following submenus:


Digital Cockpit:

 The different options for

displaying the information that will appear in
the Digital Cockpit are shown 

››› 

page 16

.

Driving data:

 The average consumption,

average speed, distance travelled, trip dura-
tion and autonomy are shown. It has 3 memo-
ries: “Since start”, “Long-term” and “Since refu-
elling”.

Vehicle status:

 The warnings regarding

faults, incidents, memorisation of the tyre pres-
sure or information of the next inspection serv-
ice are displayed.

e-Info:

 Shows the electric range and power

flow. 

››› 

page 159

CarManuals2.com

Driver information

37

Infotainment system operation and displays

Assist systems and vehicle settings

Fig. 19 

Schematic diagram: Assist systems and

vehicle settings

Clicking on 

 Driver assistance

 from the

main menu opens the menu of vehicle assis-
tants and settings.
The number of assist systems and settings de-
pend on the version and the country in ques-
tion.

Automatic parking brake activation 

››› 

page 210

.

Parking assistants 

››› 

page 212

Trailer Assist 

››› 

page 233

Activate / deactivate ESC, stabilisation sys-

tems and brake assist 

››› 

page 177

.

Switch the Start-Stop system on / off 

››› 

page 161

Adaptive cruise control (ACC) 

››› 

page 188

.

Lane Assist (lane departure warning system) 

››› 

page 199

.

Emergency brake assistance system (Front

Assist) 

››› 

page 196

.

Fatigue detection 

››› 

page 25

Detection of road signs 

››› 

page 27

Side assist 

››› 

page 205

CarManuals2.com

38

Safety

1)

Depending on the version/market.

Safety

Safe driving

Safety first!

WARNING

This manual contains important informa-

tion about the operation of the vehicle, both
for the driver and the passengers. The other
sections of the on-board documentation also
contain further information that you should
be aware of for your own safety and for the
safety of your passengers.

Ensure that the on-board documentation is

kept in the vehicle at all times. This is espe-
cially important when lending or selling the
vehicle to another person.

Before driving

For your own safety and the safety of your
passengers, always note the following points
before every trip:

Make sure that the vehicle's lights and turn

signals are working properly.

Check tyre pressure.

Ensure that all windows provide a clear and

good view of the surroundings.

Make sure all luggage is secured 

››› 

page 288

.

Make sure that no objects can interfere with

the pedals.

Adjust front seat, head restraint and mirrors

properly according to your size.

Ensure that the passengers in the rear seats

always have the head restraints in the in-use
position 

››› 

page 112

.

Instruct passengers to adjust the head re-

straints according to their height.

Protect children with appropriate child seats

and properly applied seat belts 

››› 

page 55

.

 Assume the correct sitting position. Instruct

your passengers also to assume a proper sit-
ting position 

››› 

page 39

.

Fasten your seat belt securely. Instruct your

passengers also to fasten their seat belts prop-
erly 

››› 

page 41

.

Factors influencing safety

As a driver, you are responsible for yourself and
your passengers.

Always pay attention to traffic and do not get

distracted by passengers or telephone calls.

Never drive when your driving ability is im-

paired (e.g. by medication, alcohol, drugs).

Observe traffic laws and speed limits.

Always reduce your speed as appropriate for

road, traffic and weather conditions.

When travelling long distances, take breaks

regularly - at least every two hours.

If possible, avoid driving when you are tired or

stressed.

WARNING

Driving under the influence of alcohol, drugs,
medication or narcotics may result in severe
accidents and even loss of life.

Alcohol, drugs, medication and narcotics

may significantly alter perception, affect re-
action times and safety while driving, which
could result in the loss of control of the vehi-
cle.

Safety equipment

Never put your safety or the safety of your pas-
sengers in danger. In the event of an accident,
the safety equipment may reduce the risk of
injury. The following points cover part of the
safety equipment in your SEAT

1)

:

Optimised seat belts for all seats.

Seat belt tensioners on the driver, front pas-

senger and rear side seats.

Seat belt force limiters on the driver, front

passenger and rear side seats.

CarManuals2.com

Safety

39

Correct sitting position of vehicle occupants

Red warning lamp   and, if applicable, seat

belt status indication.

Belt height adjustment for the front seats.

Front airbags for driver and passenger.

Side airbags for driver and passenger.

Head airbags on both sides of the vehicle.

Knee airbag.

Yellow airbag control lamp  .

Yellow warning lamp 


 on

the centre console.

Yellow warning lamp 


 on

the centre console.

Control units and sensors.

Optimised and height-adjustable headrests.

Adjustable steering column.

ISOFIX/i-Size anchor points for child seats.

Child seat top tether attachment points.

The safety equipment mentioned above works
together to provide you and your passengers
with the best possible protection in the event
of an accident. However, these safety systems
can only be effective if you and your passen-
gers are sitting in a correct position and use this
equipment properly.

Safety is everybody's business.

Correct sitting position of
vehicle occupants

Correct position on the seat

Fig. 20 

The correct distance between the

driver and the steering wheel must be at least
25 cm (10 inches).

The correct sitting positions for the driver and
passengers are shown below.
If your physical constitution prevents you from
maintaining the correct sitting position, contact
a specialised workshop for help with any spe-
cial devices. The seat belt and airbag can only
provide optimum protection if a correct sitting
position is adopted. SEAT recommends taking
your car in for technical service.

For your own safety and to reduce the risk of
injury in the event of an accident or sudden
braking or manoeuvre, SEAT recommend the
following positions:

Valid for all vehicle occupants:

Adjust the headrest so that its upper edge is

at the same level as the top of your head, or as
close as possible to the same level as the top of
your head and under no circumstances below
eye level . Keep the back of your neck as close
as possible to the headrest.

Short people must fully lower the headrest

completely, even if your head is below its upper
edge.

Tall people must fully raise the headrest.

Always keep your feet in the footwell while

the vehicle is in motion.

Adjust and fasten your seat belt correctly 

››› 

page 41

.

The following also applies to the driver:

Given that the vehicle is equipped with ad-

justable headrests, move the headrest as close
as possible to the rear of the head.

Move the seat backrest to an almost upright

position so that your back rests completely
against it.

CarManuals2.com

40

Safety

Adjust the steering wheel so that it is at a

distance of at least 25 cm (10 inches) from the
sternum 

››› 

Fig. 20

 and can hold it with both

hands on the sides, on the outside, with the
arms slightly flexed.

The steering wheel must always point to-

wards the chest and never towards the face.

 Adjust the seat lengthwise so that you can

fully step on the pedals with your knees slightly
bent and there is a distance between the knee
area and the instrument panel of at least 10 cm
(4 inches).

Adjust the height of the seat so that you can

reach the top of the steering wheel.

Always keep both feet in the footwell so that

you have the vehicle under control at all times.

For the passenger, the following applies:

Given that the vehicle is equipped with ad-

justable headrests, move the headrest as close
as possible to the rear of the head.

Move the seat backrest to an almost upright

position so that your back rests completely
against it.

Move the seat as far back as possible (mini-

mum 25 cm between the chest and the instru-
ment panel check translation). If you are sitting
closer than 25 cm, the airbag system cannot
protect you properly.

Number of seats

The vehicle has 

5

 or 

7

 seats, depending on the

features. All seats are equipped with a safety
belt.
Check the official documentation for the num-
ber of occupants approved for your vehicle.

No one taller than 1.60 m should sit on the
third row of seats.

5 seats

7 seats

Seats in the front

2

2

Seats in the sec-
ond row

3

3

Seats in the third
row

2

WARNING

Sitting in an incorrect position may increase
the risk of severe or lethal injuries in the
event of sudden braking or manoeuvring, in
case of collision or accident and if the air-
bags deploy.

Before starting the car, all passengers

must be sitting in a correct position and stay
like that for the entire journey. This also ap-
plies to a correct use of the seat belt.

The maximum amount of people in the ve-

hicle is the same as the amount of seats with
seat belts.

For children, always use a protection sys-

tem that is approved and suited for their
weight and height 

››› 

page 55

.

While driving, always keep your feet in the

footwell. Never place them over the seat or
the dash panel, for example, or outside the
window. Otherwise the airbag and seat belt
may offer insufficient protection and also in-
crease the risk of injury in the event of an
accident.

WARNING

If people taller than 1.60 m travel in the third
row of seats, they may receive severe head
injuries in the event of an accident.

 Never transport anyone taller than 1.60 m

on the third row of seats.

When closing the rear lid, always be mind-

ful of the passengers of the rearmost seats.

Risks of sitting in an incorrect posi-
tion

If seat belts are worn incorrectly or not at all,
the risk of severe or lethal injuries increases.
Seat belts can provide optimal protection only
if the belt web is properly worn. Incorrect sitting
positions substantially reduce the protective
function of seat belts and, therefore, increase
the risk of severe or even lethal injuries. The risk
of severe or fatal injuries is especially height-
ened when a deploying airbag strikes a vehicle

CarManuals2.com

Safety

41

Seat belts

occupant who has assumed an incorrect sitting
position. The driver is responsible for all people,
particularly children, inside the vehicle.
The following list contains examples of incor-
rect sitting positions that could be dangerous
for all vehicle occupants.

When the vehicle is in motion:

Never stand in the vehicle.

Never stand on the seats.

Never kneel on the seats.

Never tilt your seat backrest too far to the

rear.

Never lean against the instrument panel.

 Never lie on the rear seats.

Never sit on the front edge of a seat.

Never sit sideways.

Never lean out of a window.

Never put your feet out of a window.

Never put your feet on the instrument panel.

Never place your feet on the bench or on the

backrest of the seat.

Never travel in a footwell.

Never sit on the armrests.

Never travel without wearing the seat belt.

Never travel in the luggage compartment.

WARNING

Sitting in an incorrect position increases the
risk of severe or fatal injuries in the event
of accidents and sudden braking or manoeu-
vres.

All occupants must sit correctly during the

journey and wear the seat belt correctly.

Occupants of the vehicle that are not sit-

ting correctly, not wearing the seat belt or
are not at a proper distance of the airbag risk
suffering very serious or lethal injuries, espe-
cially if the airbags deploy and strike them.

Seat belts

Introduction

Fig. 21 

Drivers with properly worn seat belts

will not be thrown forward in the event of
sudden braking.

Properly worn seat belts hold the occupants
in the proper position. They also help prevent
uncontrolled movements that may result in seri-
ous injury and reduce the risk of being thrown
out of the vehicle in case of an accident.
Vehicle occupants wearing their seat belts cor-
rectly benefit greatly from the ability of the
belts to absorb kinetic energy. In addition, the
front part of your vehicle and other passive
safety features (such as the airbag system) are
designed to absorb the kinetic energy released
in a collision. Taken together, all these features
reduce the releasing kinetic energy and conse-
quently, the risk of injury. This is why it is so
important to fasten seat belts before every trip,
even when "just driving around the corner".
Ensure that your passengers wear their seat
belts as well. Accident statistics have shown
that wearing seat belts is an effective means of
substantially reducing the risk of injury and im-
proving the chances of survival when involved
in a serious accident. Furthermore, properly
worn seat belts improve the protection provi-
ded by airbags in the event of an accident. For
this reason, wearing a seat belt is required by
law in most countries.
Although your vehicle is equipped with airbags,
the seat belts must be fastened and worn. The
front airbags, for example, are only triggered in
some cases of head-on collision. The front air-
bags will not be triggered during minor frontal
or side collisions, rear-end collisions, overturns
or accidents in which the airbag trigger thresh-
old value in the control unit is not exceeded.

CarManuals2.com

42

Safety

Important safety instructions for the use of
seat belts

Always wear the seat belt as described in this

section.

Ensure that the seat belts can be fastened at

all times and are not damaged.

WARNING

If seat belts are worn incorrectly or not at

all, the risk of severe injuries increases. The
optimal protection from seat belts can be
achieved only if you use them properly.

Never allow two passengers (even chil-

dren) to share the same seat belt.

Never unbuckle a seat belt while the vehi-

cle is in motion. Risk of fatal injury.

The seat belt should never lie on hard or

fragile objects (such as glasses or pens, etc.)
because this can cause injuries.

Do not allow the seat belt to be damaged

or jammed, or to rub on any sharp edges.

Never wear the seat belt under the arm or

in any other incorrect position.

Bulky and unfastened clothing (such as an

overcoat over a sweater) impairs the proper
fit and function of the seat belts, reducing
their capacity to protect.

The slot in the seat belt buckle must not be

blocked with paper or other objects, as this
can prevent the latch plate from engaging
securely.

 Never use seat belt clips, fastening rings or

similar items to alter the position of the belt
webbing.

Frayed or torn seat belts or damage to

the connections, belt retractors or parts of
the buckle could cause severe injuries in the
event of an accident. Therefore, you must
check the condition of all seat belts at regu-
lar intervals.

Seat belts which have been worn in an ac-

cident and have been stretched must be re-
placed by a specialised workshop. Renewal
may be necessary even if there is no ap-
parent damage. The belt anchorage should
also be checked.

Do not attempt to repair a damaged seat

belt yourself. The seat belts must not be re-
moved or modified in any way.

The belts must be kept clean, otherwise

the retractors may not work properly.

Seat belt buckled indication

It lights up red

The driver or passenger has not fastened
the seat belt.

The control lamp   lights up to remind the
driver to fasten their seat belt.
Before starting the vehicle:

Fasten your seat belt securely.

Instruct your passengers to fasten their seat

belts properly before driving off.

Protect children by using a child seat ac-

cording to the child's height and weight 

››› 

page 55

.

When starting to drive, if the vehicle's speed
exceeds approx. 25 km/h (15 mph) and the seat
belts are not fastened or are unfastened while
driving, a warning sound will be heard for a few
seconds. In addition, the warning lamp   on the
instrument cluster display flashes.

The lamp   goes out when the driver and pas-
senger seat belts are fastened with the ignition
switched on.

Rear seat belts fastened display

Fig. 22 

Instrument cluster: indication of the

status of the rear seat seat belts.

CarManuals2.com


Content      ..      1       2         ..


//////////////////////////