Seat Ateca (2023 year). Manual in english - page 5
 

  Index      Manuals     Seat Ateca (2023 year). Manual in english


Search            copyright infringement  


Content      ..     3      4      5      6     ..


Seat Ateca (2023 year). Manual in english - page 5


Driving

139

Manual gearbox

Manual gearbox

Changing gears

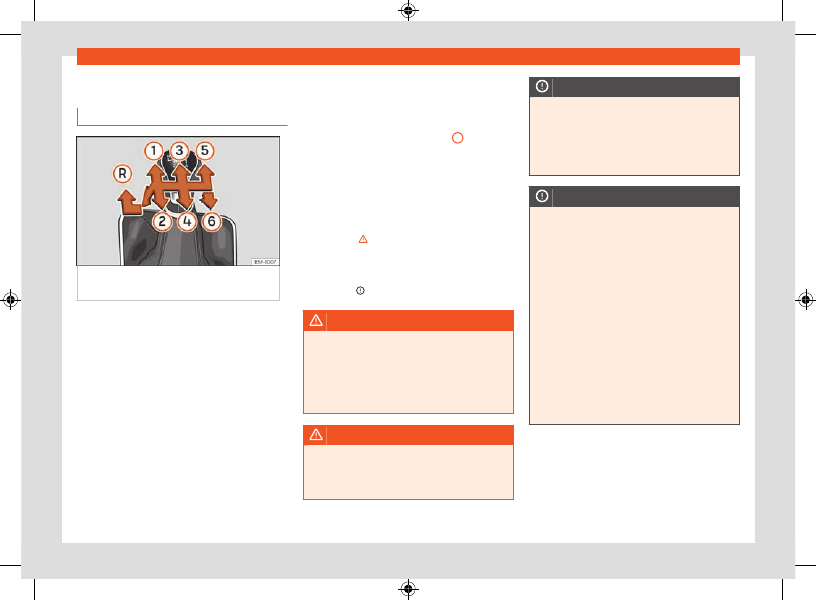
Fig. 100 

Gear shift pattern of a 5 or 6-speed

manual gearbox.

Gear positions are indicated on the gear lever 

››› 

Fig. 100

.

Depress the clutch and keep your foot as far

as it will go.

Move the gear lever to the desired position.

Release the clutch.

Engaging reverse gear

Only engage reverse gear when the vehicle is
stopped.

 Depress the clutch and keep your foot as far

as it will go.

With the gear lever in neutral, push it down,

move it all the way to the left and then forwards
to select reverse gear 

››› 

Fig. 100


R

.

Release the clutch.

Changing to lower gears

When driving, you should always change down
through the gears progressively, i.e. to the gear
immediately below when engine RPM is not
tool high 

››› 

. Skipping one or several gears

when changing down through the gears at high
speed or high RPM can cause damage to the
clutch and gearbox, even if the clutch is de-
pressed 

››› 

.

WARNING

If the engine is running, the vehicle starts
moving as soon as a gear is engaged and the
clutch pedal is released. This also happens if
the electronic parking brake is switched on.

Never engage reverse gear while the vehi-

cle is in motion.

WARNING

Changing down through the gears incor-
rectly by selecting a gear that is too low
can lead to loss of control of the vehicle and
cause accidents and serious injuries.

NOTICE

Engaging a gear that is too low when driving
at high speed or at high engine RPM can
cause considerable damage to the clutch
and gearbox. This can happen even if the
clutch pedal is kept depressed and the gear
is not engaged.

NOTICE

Consider the following to avoid damage and
premature wear:

Do not rest your hand on the gear lever

while driving. The pressure exerted by the
hand is transmitted to the gearbox forks.

Do not rest your foot on the clutch pedal;

even if the pressure seems insignificant, it
can cause premature wear of the clutch disc.
Use the footrest when not changing gears.

Make sure the vehicle is completely stop-

ped before engaging reverse gear.

When changing gears, always fully de-

press the clutch.

Do not “ride” the clutch with the engine

running when the vehicle is stopped on an
uphill slope.

CarManuals2.com

140

Driving

DSG automatic transmis-
sion

Introduction

Your vehicle is equipped with an electronically
controlled manual gearbox. Torque between
the engine and the gearbox is transmitted via
two independent clutches. They replace the
torque converter found on conventional auto-
matic gearboxes and allow for smooth, uninter-
rupted acceleration of the vehicle.
The 

Tiptronic

 system allows the driver to

change gears 

manually


››› 

page 141, 

Chang-

ing gear in Tiptronic mode

.

Gear selector positions

Fig. 101 

Selector lever lock.

The selector lever position is shown when the
corresponding sign lights up. With the selector
lever in the manual gearbox positions 

M

D

 and

S

, the engaged gear is also shown on the dis-

play.

 - Parking lock

When the lever is put in this position, the drive
wheels are locked. The lever should only be put
in 

P

 when the vehicle is stationary 

››› 

.

To put the lever in 

P

 or take it out of 

P

 , the

locking button must be pressed and held and
the brake pedal pressed simultaneously.

 – Reverse gear

Reverse gear must be engaged only when the
vehicle is stationary and the engine is idling 

››› 

.

To move the lever to position 

R

, the lock button

must be pressed and held while pressing the
brake pedal at the same time. The reverse lights
come on when the lever is in the 

R

 position with

the ignition on.

 – Neutral

In this position, the gear is in neutral.
Press the brake pedal to move the lever from

N

 to 

D/S

 when the vehicle is stationary or at

speeds below 3 km/h (2 mph) 

››› 

.

 – Permanent forward drive position

The lever in the 

D/S

 position enables the gears

to be operated in normal mode (

D

) or sport

mode (

S

). To select Sport mode 

S

, move the

lever backwards. Pushing the lever again will
select normal mode 

D

. The selected driving

mode is shown on the instrument panel display.
In 

normal mode

 (

D

), the gearbox selects the

best gear ratio. This depends on the engine
load, the road speed and the dynamic gear
control programme (DCP).

Sport mode

 (

S

) should be selected for a sporty

driving style. This setting makes use of the en-
gine's maximum power output. When acceler-
ating the gear shifts will be noticeable.
Under certain circumstances (e.g. on mountain
roads) it can be advantageous to switch tip-
tronic mode 

››› 

page 141

, to adapt the gears

to suit the road conditions.

Selector lever lock

In 

P

 or 

N

, the lever lock prevents a gear range

from being engaged, and prevents the vehicle
from moving off accidentally.
To release the gear lever lock, press and hold
the brake pedal with the ignition on. At the
same time, press the lever lock in the direction
of the arro

››› 

Fig. 101

.

As a reminder to the driver, when the lever is in
positions P or N the following indication will be
shown on the screen:

CarManuals2.com

Driving

141

DSG automatic transmission

When stationary, apply foot brake
while selecting a gear.

The lever is not locked if it is moved quickly
through position 

N

 (e.g. when shifting from 

R

to 

D

). This makes it possible, for instance, to

“rock the vehicle backwards and forwards” if it
is stuck in snow or mud. The lever lock engages
automatically if the brake pedal is not pressed
and the lever is in position 

N

 for more than

about one second at a speed of less than 5
km/h (3 mph).

WARNING

 Take care not to press the accelerator

pedal when the vehicle is stopped. The vehi-
cle could start moving immediately (in some
cases even if the parking brake is engaged)
resulting in the risk of an accident.

Never move the lever to R or P when driving.

Failure to follow this instruction could result
in an accident or failure.

With the lever in any position (except P),

the foot brake must be pushed down when-
ever the engine is running. This is because an
automatic gearbox still transmits power even
at idling speed.

 While you are selecting a gear and the ve-

hicle is stopped with the engine running, do
not accelerate. Failure to follow this instruc-
tion could result in an accident.

As a driver you should never leave your ve-

hicle if the engine is running and a gear is
engaged. Switch on the electronic parking
brake and select the parking lock (P).

Note

If the lever is moved accidentally to N when

driving, release the accelerator and let the
engine speed drop to idling before selecting
gear range D or S again.

Should the power supply to the lever be in-

terrupted in position P, it will not be possible
to move the lever. If this should happen the
manual release can be used 

››› 

page 145

.

Note

If the lever lock does not engage, there is a

fault. The transmission is interrupted to pre-
vent the vehicle from accidentally moving.
Follow the procedure below in order for the
lever lock to engage again:

With a 6-speed gearbox: press the brake

pedal and release it again.

With a 7-speed gearbox: press the brake

pedal. Move the lever to position P or N and
subsequently engage a gear.

 If a gear has been selected, the vehicle

does not move forwards or back. Proceed to
the next mode:

 When the vehicle does not move in

the required direction, the system may not
have the gear range correctly engaged.
Press the brake pedal and engage the gear
range again.

If the vehicle still does not move in the re-

quired direction, there is a system malfunc-
tion. Seek specialist assistance and have
the system checked.

Changing gear in Tiptronic mode

Fig. 102 

Lever in the Tiptronic position

CarManuals2.com

142

Driving

Fig. 103 

Steering wheel: automatic gearbox

levers

Tiptronic gives the driver the option to change
gears manually.
When you change to the Tiptronic programme,
the vehicle remains in the currently selected
gear. This is possible as long as the system is
not changing gear automatically due to a traf-
fic situation.

Using Tiptronic with the selector lever

It is possible to change to Tiptronic mode, both
when the vehicle is stopped and while driving.

Starting from the 

D/S

 position, move the lever

to the right. The instrument panel will show
whether the lever is in manual or Tiptronic
mode (e.g. 

M4

).

 Move the lever forwards 

+

 or backwards 

to change up or down a gear 

››› 

Fig. 102

.

To exit Tiptronic mode, move the lever to the

left.

Using Tiptronic with the steering wheel pad-
dles

The gearshift paddles can be used when the
selector lever is in the 

D/S

 or 

M

 (Tiptronic) posi-

tions.

 Press the 

+

 gear shift paddle to change up

a gear 

››› 

Fig. 103

.

Press the 

 gear shift paddle to change

down a gear.

To exit the Tiptronic mode, pull the right-hand

lever towards the steering wheel for approxi-
mately 1 second or move the lever to the left.
If the paddles are not operated for some time
and the lever is not in the Tiptronic selection
position, it will automatically exit from Tiptronic
mode.

NOTICE

When accelerating, if a higher gear is

not selected, it will automatically change
shortly before reaching the maximum per-
mitted RPM.

Also, if a lower gear is selected, the system

will not change until it detects that the en-
gine will not reach its maximum RPM.

Driving with an automatic gearbox

The gearbox changes gear ratios automati-
cally as the vehicle moves.

The engine can only start with the selector
lever in position 

P

 or 

N

. At low temperatures

(below -10 °C), the engine can only start with
the selector lever in position 

P

.

Driving down hills

Under certain circumstances it may be advan-
tageous to use the Tiptronic mode to select the
gear manually according to driving conditions 

››› 

.

Stop/Park

On level ground, just use the lever to engage
position 

P

. On slopes you should first apply the

parking brake and then set the lever to 

P.

 This

makes it easier to remove the lever from posi-
tion 

P

 when starting.

If the driver door is opened and the lever is not
in position 

P

, the vehicle could move. The fol-

lowing warning is displayed on the instrument
panel: 

 Gear change: selector lever

in the drive position!.

 Additionally, a

buzzer will sound.

Stopping on a downhill

Always

 apply the brake pedal firmly to prevent

the vehicle from moving; if necessary, apply the
electronic parking brak

››› 

.

Do not

 accelerate while a range of gears is en-

gaged to prevent the car from rolling downhill 

››› 

.

CarManuals2.com

Driving

143

DSG automatic transmission

1)

Vehicles without a driver information system:

 the warning lamp flashes slowly. 

Vehicles with a driver information system:

 the warning lamp remains on.

Starting off uphill with the Auto Hold function

 Once you have engaged a gear, take your

foot off the brake pedal and gently press the
accelerator.

Starting off uphill without the Auto Hold
function

 Pull on the electronic parking brake button.

Once you have engaged a gear, gently press

the accelerator and pull on the electronic park-
ing brake button.

WARNING

Observe the safety warnings 

››› 

 in 

Gear

selector positions

 on page 141

.

Never allow the brake to rub and do not use

the brake pedal too often or for long periods,
as the brakes can overheat. This reduces
the braking power, increases the braking dis-
tance or even causes a brake system fault.

If you have to stop on a hill, keep the vehi-

cle’s brakes applied with the brake pedal or
parking brake.

NOTICE

If you stop the vehicle on a gradient, do not

attempt to stop it from rolling by depressing
the accelerator when a gear has been selec-
ted. This could cause overheating and dam-
age the automatic gearbox.

If you allow the vehicle to roll with the lever

in position N and the engine off, the auto-
matic gearbox will be damaged by lack of
lubrication.

In certain driving situations or traffic condi-

tions, the gears could overheat and be dam-
aged! If the warning lamp   lights up, stop
the vehicle as soon as you can and wait for
the gearbox to cool 

››› 

page 145

.

If the gearbox operates with the backup

programme, take the vehicle to a specialised
workshop and have the fault repaired with-
out delay.

Kick-down

The kick-down device provides maximum ac-
celeration when the gear selector lever is in the
positions 

D

S

 or in Tiptronic mode.

When the accelerator pedal is pressed right
down, the automatic gearbox will shift down
to a lower gear, depending on road speed
and engine speed. This takes advantage of the
maximum acceleration of the vehicle 

››› 

.

The upshift to the next higher gear is delayed
until the engine reaches maximum rpm.

WARNING

Please note that if the road surface is slip-
pery or wet, the kickdown feature could
cause the driving wheels to spin, which could
result in skidding.

Launch-control program

The Launch-control programme enables maxi-
mum acceleration from a standstill.

Condition:

 the engine must have reached oper-

ating temperature and the steering wheel must
not be turned.
The engine speed for Launch-control is differ-
ent for petrol and diesel engines.
To use the Launch-control it is necessary to
disconnect the traction control (TCS) using the
infotainment system menu 

››› 

page 35

. The

warning lamp   will stay switched on or will
flash slowly depending on whether or not the
vehicle has a driver information system.
On vehicles with the driver information system,
the ESC lamp lights up permanently and the
corresponding text message 

Stability con-

trol deactivated

 (temporary) appears on

the instrument panel to indicate the deactiva-
tion status.

With the engine running, switch off traction

control (TCS) 

››› 

page 153

1)

.

CarManuals2.com

144

Driving

Press the brake pedal with your left foot and

hold it down for at least one second.

Turn the selector lever to the 

S

 or Tiptronic

position, or else select the 

sport

 driving mode

from the Drive Profile.

With your right foot, press the accelerator

down to the full throttle or kick-down posi-
tion. The engine speed will stabilise at about

3,200

 rpm (petrol engine) or about 

2,000

 rpm

(diesel engine).

Take your left foot off the brake pedal. The

vehicle starts with maximum acceleration.

WARNING

 Always adapt your driving style to the

traffic conditions.

Only use the Launch control programme

when road and traffic conditions permit, and
make sure your manner of driving and accel-
erating the vehicle does not inconvenience
or endanger other road users.

Make sure that the ESC remains switched

on. Please note that when the TCS and ESC
are deactivated, the wheels may start to
spin, causing the vehicle to lose grip. Acci-
dent hazard!

After moving off, the ESC “sport” mode

should be deactivated by briefly pressing the

 button.

Note

After using the Launch control programme,

the temperature in the gearbox may have in-
creased considerably. In this case, the pro-
gram may be out of service for a few minutes.
The program may be used again once the
cooling phase is complete.

Accelerating with the Launch control pro-

gramme places a heavy load on all parts of
the vehicle. This can result in increased wear
and tear.

Inertia mode

The inertia mode allows you to travel certain
distances without using the accelerator, which
saves fuel. Plan ahead and use the inertia
mode to let the vehicle roll.

Activation of the inertia mode

Condition: lever in position 

D

, slopes of

less than 12% and speeds between 20 and
130 km/h (12 and 80 mph).

 Gently take your foot off the accelerator.

The indication will be shown on the instrument
panel  , the engaged gear and current con-
sumption will disappear and the word 

Inertia

will appear.
The gears will automatically disengage and the
vehicle will roll freely, without the effect of the
engine brake. While the vehicle rolls, the engine
runs at idling speed.

Stopping inertia mode

Press the brake or the accelerator pedal.

To take advantage of the engine's inertia mode,
simply remove your foot from the accelerator.
Applying both the 

inertia mode

 (= prolonged

section with less energy) and 

inertia discon-

nection

 (= shorter section without the need for

fuel) facilitates improved fuel consumption and
emission balance.
If the vehicle has 

SEAT Drive Profile


››› 

page 148

, the inertia mode can be acti-

vated in 

Normal

Eco

 and 

Individual

 modes.

In 

Eco

 mode, it is activated whenever the op-

erating conditions are met, regardless of the
smoothness with which the foot is removed
from the accelerator.

WARNING

If the inertia mode has been switched on,

take into account, when approaching an ob-
stacle, that the vehicle will not decelerate in
the usual manner: risk of accident!

 When using inertia mode while travelling

down hills, the vehicle can increase speed:
risk of accident!

If other users drive your vehicle, warn them

about inertia mode.

CarManuals2.com

Driving

145

DSG automatic transmission

NOTICE

The driver message Inertia is only displayed
with the current consumption. In inertia mode
the gear will no longer be displayed (for ex-
ample D or E will appear instead of D7 or E7).

NOTICE

The inertia mode will be automatically dis-
connected on gradients steeper than 15%.

Note

In the case of the TDI and 2.0l TSI engines,
the inertia mode will only work in the Eco
driving mode.

Troubleshooting

 The engine does not start

The indicator lamp lights up green.
The brake is not depressed, e.g. when trying to
change the gear selector lever.

 To select a gear range, press the brake

pedal.

 Selector lever lock

The control lamp flashes green.
The selector lever locking button is not en-
gaged. The vehicle is prevented from moving
forwards. Engage the selector lever lock.

Indications on the instrument cluster display:

Clutch

 Clutch overheated! Please stop!

The clutch has overheated and could be

damaged. Stop and wait for the gearbox to
cool with the engine at idling speed and the
selector lever in position 

P

. When the warning

lamp and the driver message switch off, have
the fault corrected by a specialised workshop
without delay. If they do not turn off, do not
continue driving. Seek specialist assistance.

Faults in the gearbox

 Gearbox: Fault! Stop the vehi-

cle and place the lever in the P

 There is a fault in the gearbox. Stop the vehi-

cle in a safe place and do not continue driving.
Seek specialist assistance.

 Gearbox: System fault! You may

continue driving

 Have the fault corrected by a specialised

workshop without delay.

 Gearbox: System fault! You can

continue driving with restrictions.
Reverse gear disabled

Take the vehicle to a specialised workshop

and have the fault repaired.

 Gearbox: System fault! You can

continue driving in D until switch-
ing off the engine

Park the vehicle in a safe place. Seek special-

ist assistance.

 Gearbox: too hot. Adapt your

driving accordingly

Continue driving at moderate speeds. When

the warning lamp switches off, you can con-
tinue driving in a normal manner.

 Gearbox: press the brake and

engage a gear again

If the warning was caused by the temperature

of the gearbox, this driver message will be dis-
played when the gearbox has cooled again.

Back-up programme

If all the gear positions are shown over a light
background on the instrument cluster, there is
a system fault and the automatic gearbox will
operate with the backup programme. It is still
possible to drive the vehicle, however, at low
speeds and within a selected range of gears.

Driving in reverse gear may not be possible

.

CarManuals2.com

146

Driving

Manual release of the selector lever

Fig. 104 

Selector lever: manual release from

position P.

In the event of a power failure when starting
(e.g. discharged battery), the lever will remain
locked in position 

P

. To move it to position 

N

to move the vehicle, there is an emergency re-
lease device under the centre console, on the
right side. Releasing the selector lever requires
a certain degree of practical skill.

Removing the cover from the selector lever:

 Connect the electronic parking brake 

››› 

.

Carefully pull the corners of the selector lever

boot and twist it upwards over the lever handle.

Releasing the selector lever:

 Using the flat part of a screwdriver, press the

yellow tab sideways and keep it pressed down 

››› 

Fig. 104

.

Press the lock button on the selector

lever and move it to position 

N

.

After completing the emergency release, re-

attach the selector lever boot to the gearbox
console.

WARNING

Do not move the lever from position P if the
parking brake is not firmly engaged. If you
still think the car could move, press the brake
pedal. Danger! The vehicle could move in an
unforeseen way and cause an accident or
serious injury.

Driving on slopes

Hill Hold Control (HHC)

When driving up a slope or driving in 

Offroad

with the lever in position 

D/S

, stopping the vehi-

cle switches on the hill hold control.
When the brake pedal is released, the assistant
keeps the vehicle’s brakes applied for a few
seconds to give the driver time to press the ac-
celerator pedal and continue driving.

downhill assistant

Downhill speed control is activated when the
gear lever is in the 

D/S

 position and the brake is

applied. An appropriate lower gear is engaged.

The assistant attempts to maintain the speed
at which the vehicle was travelling when the
brake was applied, within logical limits. It may
be necessary to correct the speed by pressing
the brake.
The assistant can only change down as far as
3rd gear. It is possible that on very steep slopes
you may have to switch to tiptronic mode and
thus manually change down to 2nd or 1st gear
to take advantage of engine braking and take
the load off the brake system.
Downhill speed control is deactivated as soon
as the road levels out again or you press the
accelerator pedal.
On vehicles with a cruise control system 

››› 

page 159

, downhill speed control is activa-

ted when you set a cruising speed.

WARNING

The downhill speed control cannot defy the
laws of physics. Therefore, speed cannot be
maintained constant in all situations. Always
be prepared to use the brakes!

Hill Descent Control (HDC)

 Valid for vehicles: 4Drive all-wheel drive

Hill Descent Control limits the speed on steep
descents by automatically braking all four
wheels, both when moving forward and in re-
verse. As the anti-lock brake system remains
active, it prevents the wheels from locking.

CarManuals2.com

Driving

147

Steering

In vehicles with manual transmission, the Hill
Descent Control adapts the theoretical speed
without slowing the engine below its idling
speed.

Control lamps

It lights up white.
Hill Descent Control is active.
It lights up grey.
Hill Descent Control is not active. The
system is switched on, but is not adjust-

ing.

After starting the descent of a slope below
30 km/h (18 mph), speed is limited to a min-
imum of 2 km/h (1 mph) and a maximum of
30 km/h (18 mph). When appropriate, the driver
may increase or decrease the speed within the
limit by pressing the accelerator or the brake.
At this point the function is interrupted and, if
necessary, it is then reactivated.
Even so, it is imperative that the surface guaran-
tees sufficient adhesion. For this reason, the Hill
Descent Control will not fulfil its function when,
for example, descending a slope with a frozen
or slippery surface.
Hill Descent Control is available when the dash
panel display shows the message  .
Hill Descent Control automatically intervenes if
the following conditions are met:

 The vehicle engine is running.

The 

Offroad

 driving profile has been selec-

ted 

››› 

page 149

. Driving at a speed below

30 km/h (18 mph) (the message   is shown on
the dash panel display).

The slope of the descent is at least 10% when

driving forward and 9% when driving in reverse.

The brake and the accelerator are not

pressed.
Hill Descent Control is deactivated on pressing
the brake and the accelerator or if the slope
is below 5%. The function can be switched off
manually in the infotainment system using the

 > HDC

 function button.

WARNING

Always be ready to brake. Otherwise, an ac-
cident could occur and cause injury.

 Hill Descent Control is only an auxiliary

system that in some situations may not suffi-
ciently brake the vehicle when going down a
slope.

The speed of the vehicle may increase de-

spite the intervention of Hill Descent Control.

Steering

Information relating to different vehi-
cle processes.

To make the vehicle more difficult to steal, al-
ways lock the steering before leaving the it.

Steering

On vehicles with electromechanical steering,
the power steering automatically adjusts ac-
cording to the driving speed, the steering wheel
torque and the orientation of the wheels. The
power steering only works when the engine is
running.
If the power steering does not work properly or
does not work at all, you will have to use much
more strength than usual to turn the steering
wheel.

Progressive steering

Depending on the vehicle’s features, it may or
may not incorporate a progressive steering sys-
tem.
In 

city traffic

 you do not need to turn so much

on parking, manoeuvring or in very tight turns.
On 

roads or motorway

, progressive steering

transmits, for example, in bends, a sportier,
more direct and noticeably more dynamic driv-
ing sensation.

Steering assist

This help assists the driver in critical situations. It
recommends turning the steering wheel to per-
form a corrective manoeuvre (counter-steer-
ing), turning slightly to avoid skidding 

››› 

.

CarManuals2.com

148

Driving

WARNING

Steering assist helps the driver in critical sit-
uations. The driver is the person who has to
control the vehicle's steering at all times.

Troubleshooting

 Steering fault

The warning lamp lights up red.
There is a fault in the power steering.


Stop driving!

 Seek specialist assistance.

Do not allow the vehicle to be towed on its

own wheels.

 Steering fault

The control lamp lights up or flashes yellow.
The steering is stiffer or reacts more sensitively
than usual.
The control lamp 

lights up and remains lit

:

Restart the engine and drive slowly for a short

distance. Contact a specialist workshop if the
control lamp remains on.

OR:

 the 12-volt battery was disconnected

and reconnected. Drive slowly for a short dis-
tance.
The control lamp 

flashes

:

Turn the steering wheel slightly from one side

to the other.

Turn off the ignition and turn it on again.

Consider the warnings shown on the instru-

ment cluster display.

If the control lamp continues flashing after

the ignition has been switched on, do not con-
tinue driving. Seek specialist assistance.

SEAT Drive Profiles

Introduction

The driver can use the drive profiles to adapt
various features of the vehicle's systems to
the current driving situation, the desired driving
comfort and an economical driving style. Some
of the systems that can be adapted are the
suspension, steering, engine and air condition-
ing.
Depending on the vehicle’s equipment, various
drive profiles can be selected. The degree of in-
fluence of the vehicle's systems on the different
drive profiles depends on the vehicle’s equip-
ment.

Engine

Depending on the profile selected, the engine
responds more quickly or smoothly to the ac-
celerator being pressed. When the 

Eco

 profile is

selected, the Start-stop function is activated.
In vehicles with automatic transmission, the
gear change timing is changed to put the
changes at higher or lower revolutions. The 

Eco

profile activates the Inertia function, thereby re-

ducing consumption. The rest of the driving pro-
files will activate the inertia use function when
the gear selector lever is not in the 

S

 position,

depending on how the accelerator pedal is re-
leased 

››› 

page 144

. When the vehicle is turned

on again, the function is activated by default to
reduce consumption.
With manual transmission, the 

ECO

 profile

changes the gear change recommendations to
facilitate more efficient driving.

Adaptive chassis control (DCC)

The DCC continuously adapts the damping of
the suspension system to the characteristics
of the road surface and the driving situation
(speed, acceleration and steering wheel angle)
according to the selected driving profile. In the
event of a fault in the DCC, the following mes-
sage is displayed on the instrument cluster dis-
play> 

Fault: damping adjustment

.

Steering

The operation of the power steering is modified
and adapted to the selected profile to offer the
best behaviour for each situation.

Air conditioning

Climatronic can operate in 

Eco

 mode, espe-

cially restricting fuel consumption.

CarManuals2.com

Driving

149

SEAT Drive Profiles

Adaptive Cruise Control (ACC)

Depending on the driving profile, the perform-
ance of the ACC to allow adaptation to a
speed that is more sporty or fuel consumption-
friendly.

Electronic Stability Control (ESC)

In the 

Offroad

 and 

Snow

 driving profiles, the

ESC adjusts to adapt to the characteristics of
the terrain.

PreCrash system

The PreCrash system adapts according to the
selected configuration 

››› 

page 45

.

Hill descent control assistant

This assistant can be activated or deactivated
in the 

Offroad

 profile. Hill Descent Control lim-

its the speed on steep descents by automati-
cally braking all four wheels, both when moving
forward and in reverse.

Hill Start Assist

It is possible to activate or deactivate this assis-
tant in the 

Offroad

 profile.

Selecting a driving profile

Fig. 105 

Centre console: Driving Experience

button.

The drive profile can be selected when the igni-
tion is switched on and the vehicle is stationary
or moving 

››› 

.

Selecting a driving profile

Turn the Driving Experience Button to select

the desired driving profile 

››› 

Fig. 105

.

Displaying the drive profile information

To display more information on the selected

drive profile, press 

Information

 in the info-

tainment system.

WARNING

Adjusting the driving profile while driving can
distract attention from traffic and cause ac-
cidents.

Always drive as carefully and responsibly

as possible.

Characteristics of driving profiles

The icon of the selected profile is displayed on
the Infotainment System screen. The selector
indicates the selected profile using a LED light.

Driving pro-
file

Characteristics

Places the vehicle in a low state
of consumption, facilitating a
fuel-saving driving style that is re-
spectful to the environment.

Normal

Offers a balanced driving experi-
ence, suitable for everyday use.

Sport

Provides a complete dynamic
performance in the vehicle, ena-
bling the user a more sporty driv-
ing style.

Individual

It allows you to personalise the
configuration. The functions that
can be adjusted depend on the
equipment fitted in the vehicle.

CarManuals2.com

150

Driving

Driving pro-
file

Characteristics

Offroad

a)

Maintains optimal off-road driv-
ing by allowing the personalisa-
tion of the vehicle’s configuration
parameters.

Snow

a)

It adjusts the vehicle's behaviour
for driving on slippery road surfa-
ces, optimising grip and manoeu-
vrability.

a)

 Only for 4Drive models.

WARNING

Your speed and driving style must always
be adjusted to visibility, weather, and traffic
conditions.

Note

Regardless of the driving profile selected

when the ignition is switched off, all systems
will start up Normal mode. To select another
driving profile use the rotary (Driving Experi-
ence button).

Use of the Eco profile is not recommended

when driving with a trailer.

Braking system

Information about the brakes

During the first 200 to 300 km, 

new brake

pads

 do not provide maximum braking power

and still have to “settle” 

››› 

When running

in the brake pads, the emergency braking
distance is longer

 than after they have been

run in. During the run-in, avoid sharp braking
and situations that place a lot of demand on
the brakes, e.g. driving too close to another ve-
hicle.

Brake pad wear

 depends to a large extent on

the conditions in which the vehicle is used, and
driving style. If the vehicle is frequently used in
city traffic and for short distances, or for sporty
driving, brake pad thickness should be checked
regularly at a specialist workshop.
Driving with 

wet brakes

, e.g. after driving

through water, in heavy rain or after washing
the vehicle, braking performance may be af-
fected by wet brake discs, or even frozen discs
in winter. The driver should be ready to brake
harder.
If 

the brake discs and pads have a layer

of salt on them

, the braking performance is

reduced and the braking distance increases.
When driving on salted roads without braking
for some time, the layer of salt should be re-
moved by carefully applying the brakes a few
times 

››› 

.

Corrosion

 on the brake discs and 

dirt

 on the

brake pads increase if the vehicle is left unused
for a long time, if it is not driven for many kilo-
metres. If corrosion is present, it is recommen-
ded to clean the discs and pads by braking
hard several times while driving at high speed.
Make sure that you do not endanger any other
vehicles or road users 

››› 

.

WARNING

Driving with worn brake pads or a defective
brake system can lead to accidents and seri-
ous injuries.

If you suspect that the brake pads are worn

or that the brake system is faulty, have the
brake pads checked immediately by a spe-
cialist workshop and replaced if they are
worn.

WARNING

The braking performance of new brake pads
is not optimal.

During the first 300 km, new brake pads do

not provide maximum braking power and still
have to “settle”. This can be counteracted by
applying more pressure to the brake pedal.

When brake pads are new, drive with extra

care to reduce the risk of accidents, serious
injury or loss of control of the vehicle.

Only perform hard braking to clean the

brake system when permitted by the traffic
situation. Do not endanger the occupants of
other vehicles. Accident hazard!

CarManuals2.com

Driving

151

Brake assist systems

When running in new brake pads, do not

drive too close to other vehicles or cause sit-
uations that would require the brakes to be
applied heavily.

WARNING

When the brakes overheat, their braking per-
formance drops and the braking distance in-
creases.

When driving downhill, particular demand

is placed on the brakes and they heat up
very quickly.

Before a long steep slope, reduce speed

and change down into a lower gear or range.
Therefore, using the engine brake relieves
the brakes.

If you wish to retrofit a front spoiler, inte-

gral trim or other accessories, ensure that
the air inlet around the brakes is not reduced,
as otherwise the brake system could over-
heat. Please also note the information on
brake fluid 

››› 

page 306

.

WARNING

Wet, frozen or salt-covered brakes take lon-
ger to brake and increases the braking dis-
tance.

 Test the brakes carefully.

Always dry the brakes and free them from

ice and salt by braking repeatedly, if permit-
ted by visibility, weather, road surface and
traffic conditions.

WARNING

When braking manoeuvres are started auto-
matically, the brake pedal may move auto-
matically in the application direction. Do not
put your foot under the brake pedal. Risk of
injury!

Note

Never let the brakes “drag” by leaving your
foot on the pedal when it is not necessary
to brake. This can cause the brakes to over-
heat, resulting in increased brake travel and
wear. Please consider the important notes on
brake fluid 

››› 

page 306

.

Note

Regularly check the thickness of the brake
pads visually through the holes in the rims
or from the underside of the vehicle. If nec-
essary, the wheels should be removed for
a more thorough inspection. SEAT recom-
mends visiting a SEAT dealership for this.

Troubleshooting

 Defect in the brake system

The warning lamp lights up red. A message
may also be displayed.


Stop driving!

Inform a specialist workshop and request a

brake system inspection.

 Brake pad wear indicator

The control lamp switches on yellow.
The front brake pads are worn.

Contact a specialised workshop immediately.

Get 

all

 the brake pads inspected and replace

if necessary.

Brake assist systems

Information relating to brake assist
systems

Brake assist systems can help the driver in crit-
ical driving or braking situations. The driver is
responsible for driving safely 

››› 

.

When the brake assist systems are regulating
the brakes, the brake pedal may move or make
noises. Even so, continue to brake with the nec-
essary force and control the trajectory of the
vehicle if necessary.
Depending on the equipment, the ESC and TCS
settings may be changed in the vehicle.

The ESC, ABS and TCS can only operate cor-

rectly if the four wheels are fitted with the stipu-
lated tyres 

››› 

.

If a fault occurs in the ABS, the ESC, TCS and

EDS also cease to function.

CarManuals2.com

152

Driving

Electronic Stability Control (ESC)

The ESC helps to reduce the risk of skidding
and to improve stability in certain driving situa-
tions 

››› 

.

Traction control (TCS)

The TCS reduces the driving force on skidding
wheels and adapts this force to suit the road
surface conditions. The TCS facilitates starting,
acceleration and hill climbing 

››› 

.

Electronic brake pressure distribution (EBV)

Electronic brake force distribution (EBV) regu-
lates the braking force between the front and
rear axles. Excessive braking of the rear axle is
avoided and the vehicle remains stable during
the braking operation.

Anti-lock braking system (ABS),

The ABS can prevent the wheels from locking
up under braking until shortly before the vehicle
comes to a stop, and helps the driver maintain
control of the steering and the vehicle 

››› 

.

Brake assist (BAS)

Brake assist (BAS) can help to reduce the brak-
ing distance. Brake Assist increases the pressure
exerted by the driver when the brake pedal is
depressed quickly in an emergency.

Electronic differential lock (EDS and XDS)

The EDS automatically brakes skidding wheels
and transmits the driving force to the other driv-
ing wheels.
The XDS improves traction by applying the
brakes to keep the vehicle in its lane.

Multi-collision brake

The multi-collision brake automatically triggers
braking if the airbag control unit detects a colli-
sion in the event of an accident.
Automatic braking requirements:

The driver is not pressing the accelerator

pedal.

Tractor-trailer sway mitigation

If the vehicle is pulling a trailer, it will control the
following: tractor-trailers tend to sway. When
the swaying of the trailer is felt by the vehicle
and detected by the ESC, it will automatically
brake the towing vehicle within the limits of the
system and mitigate the sway. Tractor-trailer
sway mitigation is not available in all countries 

››› 

page 273

.

WARNING

Smart brake assist technology cannot over-
come the limits imposed by the laws of phys-
ics and only works within the limits of the sys-
tems. Driving at high speed on icy, slippery
or wed road surfaces can cause a loss of
control of the vehicle and serious injury to
the driver and passengers.

Adapt your speed and driving style at all

times to suit visibility, weather, road and
traffic conditions. Never take any risk that
compromises safety.

Brake assist systems cannot prevent an ac-

cident if you are driving too close to other
vehicles.

Always use suitable tyres. Driving stability

depends on tyre grip.

WARNING

The efficiency of the ESC can be significantly
reduced if components or systems that af-
fect the driving dynamics are not properly
maintained or are not working properly. This
can particularly occur if changes are made
to the suspension or unauthorised rim/tyre
combinations are used.

Ensure that vehicle conversions and modi-

fications are only made by specialised work-
shops.

Always use suitable tyres. Driving stability

depends on tyre grip.

CarManuals2.com

Driving

153

Brake assist systems

1)

Only for 4Drive models.

WARNING

When driving without a brake servo or with
restricted brake servo functions, the braking
distance can increase considerably and can
cause accidents and serious injuries.

If the brake servo is not working, the brake

pedal has to be pressed harder, as the brak-
ing distance increases due to the lack of as-
sistance from the servo brake.

Connecting and disconnecting the
ESC and TCS

The ESC is switched on automatically when the
engine is started, and only works when the en-
gine is running and includes the ABS, EDS and
TCS systems.
The TCS function should only be switched off in
situations in which traction is insufficient.
Depending on the finishes and versions, there is
the possibility of disconnecting only the TCS or
activating the ESC in “Sport” mode.

Disconnecting and connecting the TCS

 The TCS can be activated or deactivated

in the infotainment system using the function
button 

 > Driver assistance > ESC Menu


››› 

page 35

.

When the TC is switched off, the control lamp 
lights up on the instrument cluster.

Disconnecting and connecting the ESC in
“Sport” mode

The ECS in “Sport” mode can be activated

or deactivated in the infotainment system using
the function button 

 > Driver assistance >

ESC Menu


››› 

page 35

.

When “Sport” mode is connected, the interven-
tions of the ESC to stabilise the vehicle, and the
traction control (TCS) interventions are limited.
In vehicles with 4-wheel drive, the TCS is dis-
connected completely . In addition, the control
lamp   lights up on the instrument cluster.

ESC in “Offroad” mode

1)

Turn the (Driving Experience button) to se-
lect the 

Offroad

 profile to be switched on 

››› 

page 149

. The interventions of the TCS, as

well as of the EDS and the ABS system adapt to
irregular terrain.
In the following exceptional situations it may
make sense to activate the Offroad mode to
allow the wheels to spin:

 When “swinging” the vehicle to get it unstuck.

Driving in deep snow or on loose surfaces.

When driving on rough terrain with much of

the car's weight is lifted off the wheels (axle
articulation).

Steep descents with braking on unpaved ter-

rain.

For your safety we recommend that you turn
off the Offroad mode when it is not absolutely
necessary.
To 

disconnect

 the 

Offroad

 mode, select a dif-

ferent driving mode.

ESC in “Snow” mode

1)

Use the rotary (Driving Experience button) to
select the 

Snow

 profile to be switched on 

››› 

page 149

. Traction control system (TCS)

interventions adjust to the adhesion of snowy
roads.
To 

disconnect

 the 

Snow

 mode, select a differ-

ent driving mode.

WARNING

The ESC Sport mode should be activated
only when traffic conditions and the ability
of the driver allow it. Danger of skidding!

With ESC in Sport mode, the stabilising

function will be limited to allow for a sportier
drive. The vehicle may skid.

CarManuals2.com

154

Driving

WARNING

You should only activate the Offroad Mode
or disable the TCS if the experience of the
driver and traffic conditions allow it. Danger
of skidding!

With the Offroad mode activated, the sta-

bilisation function is limited. In particular, if
the road is too smooth and slippery, the driv-
ing wheels could spin and the vehicle could
skid.

Note

If the TCS is disconnected or “Sport” mode
is selected, the cruise control system will be
switched off.

Troubleshooting

 The ABS does not work properly or does

not work at all

The control lamp switches on yellow.

 Contact a specialised workshop. The vehi-

cle’s brakes still work without the ABS.

 The ESC or TCS is regulating

The control lamp flashes yellow.

 ESC fault

The control lamp switches on yellow. The ESC
has been switched off.
There is a fault or defect.

Turn off the ignition and turn it on again.

If possible, drive for a short distance at 15-20

km/h (9-12 mph).

If the control lamp   is still on, go to a speci-

alised workshop.

The brake assist systems make noises

When the described brake assist systems inter-
vene, you may hear noises.

WARNING

When the ignition is switched on, the sta-

tus of the brake system and the brake assist
functions are automatically checked. The
control lamps on the instrument cluster light
up briefly and then go out. Any indicator
lamp that remains on indicates a fault. Seek
qualified technical assistance immediately.

If the brake system warning light   comes

on together with the   control lamp, the ABS
regulation function may not work and the
rear wheels may lock relatively quickly when
braking. This can lead to loss of control of
the vehicle! If possible, slow down and drive
slowly and carefully to the nearest specialist
workshop to have the brake system inspec-
ted. During this journey, avoid heavy braking
and any sudden manoeuvres.

If the control lamp   does not go out, or

comes on while driving, it means that the ABS
is not working properly. The vehicle can only
be stopped using normal braking (without
ABS). In this case the protective ABS func-
tion will not be available. Go to a specialised
workshop as soon as possible.

CarManuals2.com

Assistant systems

155

General notes

Assistant systems

General notes

Safety advice

WARNING

Responsibility for driving rests with the

driver at all times. The drive assist systems
are not a replacement for driver attention.
Focus all your attention on driving and be
prepared to intervene at all times.

Use the drive assist systems only when

conditions allow. The driving style must al-
ways be suitable for the weather, visibility,
road and traffic conditions.

In order for drive assist systems to react

correctly, sensors and cameras must oper-
ate without limitations. Please read the notes
on sensors and cameras in this chapter.

Note

Keep in mind the specific rules of each

country, especially when it comes to driving,
formation of an emergency corridor, braking
distance, speed, parking position, wheel po-
sition, etc. The driver is solely responsible for
always complying with the specific regula-
tions of each country.

The area in front of and around the radar

sensor should not be covered with adhesives,
additional headlights or similar items, as this

could have a negative impact on the oper-
ation of the assistants. If the vehicle is not
properly repaired or structural modifications
are made to it, the operation of the assistants
may be affected.

The repair and adjustment of sensors and

cameras requires special knowledge and
tools. It is recommended to visit a SEAT deal-
ership for this purpose.

System limits

WARNING

Drive assist systems can not overcome the

laws of physics. Depending on the circum-
stances, a collision may not be avoidable.

Warnings, notices and indicator lamps

may not be displayed on time, or may be
displayed incorrectly, e.g. if a vehicle ap-
proaches too quickly.

Corrective interventions by drive assist

systems (e.g. interventions in the steering or
brakes) may be insufficient or may never oc-
cur, depending on the circumstances. As a
driver, you must be prepared to act at all
times.

Note

Due to the system's detection limits in

the surroundings, the systems may not give
warnings or intervene on time, or they might
do so even if it is not desired. In addition, the
auxiliary systems may incorrectly interpret a
manoeuvre and, as a result, warn the driver in
an unexpected manner.

When the towing mode is selected, some

assist systems may react with limitations, in
an unusual way or may not be available.
Keep in mind the instructions relating to the
towing mode.

Button for the assistant systems

Fig. 106 

On the turn light and main

beam lever: key for driver assistance systems
(depending on the version).

CarManuals2.com

156

Assistant systems

Fig. 107 

Left side of the multifunction steering

wheel: button for driver assistance systems
(depending on the version).

Depending on the equipment, the button for the
driver assistance systems is located on the turn
signal and main beam lever or on the multifunc-
tion steering wheel. This button can be used
to switch the driver assistance systems in the

Assistants

 menu on and off.

Press the 

 button to open the 

Assis-

tants

 menu.

Select the assistance system in question and

turn it off or on. A mark indicates that assistant
system is switched on.

Next, confirm the selection by pressing the 

button on the multifunction steering wheel.
The assistant systems can also be switched on
and off in the infotainment system, in the vehi-
cle settings menu 

››› 

page 35

.

Drive assist sensors and
cameras

Front radar

Fig. 108 

On the front bumper: radar sensor.

Fig. 109 

Detection area.

A radar sensor may be fitted to the front
bumper of the vehicle 

››› 

Fig. 108

. The front

radar detects any objects in its detection zone 

››› 

Fig. 109

 and provides support for the follow-

ing functions:

Front Assist 

››› 

page 169

.

Adaptive Cruise Control (ACC) 

››› 

page 162

.

The radar can have a range of up to 120m
(400ft) depending on road and weather condi-
tions.

WARNING

The visibility of the radar sensor can be

impaired by dirt or environmental influences
such as rain, fog, snow, mud, dust, insects
etc. In this case the Front Assist and ACC
functions may stop working. The instrument
panel displays the following message: 

No

sensor vision!

 And the Front Assist un-

available or ACC unavailable warning lights
come on.

Clean the sensor area on the bumper as

indicated in 

››› 

page 338, 

Cleaning the ex-

terior

. When the radar sensor starts correctly

detecting again, the message disappears
from the screen and the functions become
available again.

CarManuals2.com

Assistant systems

157

Drive assist sensors and cameras

NOTICE

If the radar sensor is dirty or poorly adjus-

ted, the Front Assist system may give unnec-
essary warnings and apply the brakes inap-
propriately.

The operation of the radar can be affected

by strong reflections of the emitted signal.
This may occur, for example, in an enclosed
car park or due to the presence of metallic
objects (e.g. guard rails or sheets used in
road works).

The sensor may not be adjusted correctly

if it receives an impact. This may compro-
mise the system's efficacy or disconnect it. If
you have the feeling that the radar sensor is
damaged or adjusted incorrectly, switch off
the Front Assist and ACC functions to avoid
any damage. If this occurs have it adjusted.

Front camera

Fig. 110 

On the windscreen: field of vision of

the Lane Assist system camera.

Depending on the equipment, the vehicle may
be fitted with a front camera on the front wind-
screen. This camera detects lane boundaries
(lines) to provide support for the following func-
tions:

Lane Assist 

››› 

page 173

.

Travel Assist 

››› 

page 175

.

Emergency assist 

››› 

page 177

.

NOTICE

To avoid affecting the operation of the sys-
tems, take the following points into consider-
ation:

Clean the field of vision of the camera reg-

ularly and make sure it is free of snow and
ice.

Do not cover the field of vision of the cam-

era.

Check that the windscreen is not damaged

in the area of the camera's field of vision.

Rear radar

Fig. 111 

Rear view of the vehicle: radar sensor

areas.

CarManuals2.com

158

Assistant systems

Fig. 112 

Sensor detection zones.

The radar sensors are located on the left and
right of the bumper and are not visible from the
outside 

››› 

Fig. 111

. The sensors monitor both

the blind spot and traffic behind the vehicle 

››› 

Fig. 112

.

They support the following functions:

Lane departure warning (Side Assist) 

››› 

page 179

.

Rear cross traffic alert (RCTA) 

››› 

page 208

.

Automatic deactivation of supported func-
tions

The rear radar sensors deactivate automati-
cally when, among other reasons, one of the
sensors is detected to be permanently covered.
This may be the case if, for example, there is a
layer of snow or ice over one of the sensors.
The relevant text message will appear in the
instrument panel display.

Control lamps

Side Assist (lane change assistance sys-
tem) function not available

Rear cross traffic alert (RCTA) function
not available.

NOTICE

The radar sensors on the rear bumper may

be damaged or shifted in the event of a colli-
sion, for example, when entering or exiting a
parking space. This may result in the system
disconnecting itself, or at least possibly hav-
ing its functionality diminished.

In order to ensure that the radar sensors

work properly, keep the rear bumper free of
snow and ice and do not cover it.

 The rear bumper should only be painted

with paint authorised by SEAT. The lane de-
parture warning's functions may be limited or
work incorrectly if other paints are used.

The visibility of radar sensors may be af-

fected due to leaves, snow, strong haze or
dirt, among others. Clean the area in front of
the sensors.

Never use auto lane changing or the rear

cross traffic alert if the radar sensors are
dirty.

Radar operation may also be affected if

objects such as bicycle racks or luggage
racks interfere with the visibility of the ra-
dars.

Ultrasound sensors

The bumpers are fitted with ultrasound sensors
to perform the following functions:

Park Assist 

››› 

page 193

.

Park assist plus 

››› 

page 188

.

Rear park assist 

››› 

page 191

.

NOTICE

Damage to the radiator grille, bumper,

wheel arch and vehicle underbody can mod-
ify the orientation of the sensors. This can af-
fect the parking aid function. Have the func-
tion checked by a specialised workshop.

A number plate or number plate holder

with dimensions that exceed the space for
the number plate, or a cured or deformed
number plate can cause false detections or a
loss of visibility for the sensors.

Note

In order to guarantee good operation, keep

the sensors clean, free of snow and ice, and
do not cover them with stickers or other ob-
jects.

If you use high-pressure or vapour equip-

ment for cleaning, do not apply it directly,
unless you do so very briefly, and always
keep a distance of more than 10 cm away.

CarManuals2.com

Assistant systems

159

Cruise control system

Fitting certain accessories to the front of

the vehicle, such as a plate holder with ad-
vertising, may interfere with the operation of
the Park Assist.

Area View system

Fig. 113 

On the rear lid handle: top view

system.

Depending on your vehicle’s equipment, it can
be fitted with 1 or 4 cameras that provide sup-
port to the following functions:

Top View Camera 

››› 

page 202

.

Rear View Camera 

››› 

page 200

.

WARNING

Fitting a number plate frame may interfere
with the view shown on the screen, as it may
reduce the camera’s field of vision.

NOTICE

In order to guarantee good system opera-

tion, keep the cameras clean, free of snow
or ice, and do not cover them with stickers
or other objects. The camera can be cleaned
by operating the wiper.

Never use abrasive cleaning products to

clean the camera lens.

Do not use hot or warm water to remove

ice or snow from the camera lens. Doing so
could damage the camera.

Cruise control system

Introduction

The cruise control system (GRA) helps maintain
a constant speed set by you.

Speed range

The cruise control system is available when
driving in forward gear at a speed of over ap-
prox. 20 km/h (15 mph).

Temporarily switching off the cruise control

The saved speed can be exceeded at any time,
e.g. for overtaking. The cruise control is suspen-
ded during acceleration and is then resumed
with the saved speed.

Status display

When the cruise control system is switched on,
the instrument cluster display shows the saved
speed and the system status:

It lights up grey.
The cruise control system is switched on,
but regulation is not active.

It lights up green.
The cruise control system is switched on
and regulation is active.

If there is no speed saved, the instrument clus-
ter display shows ––– instead of speed.

Changing gears

As soon as the clutch pedal is depressed, regu-
lation is suspended and resumes once the gear
change has been made.

WARNING

If it is impossible to drive with sufficient brak-
ing distance and at a constant speed, using
the cruise control system may cause acci-
dents and serious injuries may occur.

 Do not use Travel Assist when visibility is

bad, on steep roads, on windy roads or in
slippery circumstances (such as snow, ice,
rain or loose gravel), or on flooded roads.

 Only use the cruise control system on

paved roads with a firm surface.

CarManuals2.com

160

Assistant systems

 Adapt your speed and safety distance to

the vehicle in front of you at all times to suit
the visibility, weather, road and traffic condi-
tions.

 After use, always switch off the speed lim-

iter to prevent the speed being regulated
against your wishes.

It is dangerous to use a set speed which

is too high for the prevailing road, traffic or
weather conditions.

Operating the cruise control

Fig. 114 

On the multifunction steering wheel:

cruise control operation buttons.

Connecting

 Press the   button.

There is no speed saved and regulation is not
yet operating.

Start regulation

 While driving, press the button  .

The cruise control system saves and regulates
the current speed.

Adjusting the speed

While the GRA is set, the stored speed can be
adjusted:

+ 1 km/h (1 mph)
- 1 km/h (1 mph)
+ 10 km/h (5 mph)
- 10 km/h (5 mph)

The cruise control system only operates the ac-
celeration, 

it does not brake

 the vehicle.

Interrupting the adjustment

 Briefly press the button   or press the brake

pedal.
The speed is stored.

Reinstating the cruise control

 Press the 

 button.

The cruise control system resumes the saved
speed and regulates it.

Switching off

 Press and hold the button  .

The cruise control system switches off and the
saved speed is deleted.

Switching off the speed limiter

 Press the   button.

 Select the speed limiter on the instrument

cluster display.
The cruise control system is switched off.

Troubleshooting

 Cruise control fault

The control lamp switches on yellow.
Abnormal operation. Switch off the cruise con-
trol system and take the vehicle to a specialist
workshop.

The adjustment is interrupted unexpectedly

 If the clutch pedal is pressed for a long time.

The vehicle has exceeded the saved speed

for a long time.

No forward gear has been selected.

A brake assistance system has intervened,

e.g. TCS or ESC.

Front Assist has braked the vehicle.

If the fault continues, disconnect the Emer-

gency Assist and consult a specialised work-
shop.

CarManuals2.com

Assistant systems

161

Speed limiter

Speed limiter

Introduction

The speed limited helps the driver not to ex-
ceed a set speed.

Speed range

The speed limiter helps avoid exceeding a pro-
grammed speed, from 30 km/h (20 mph) ap-
prox. and faster.

By selecting the speed limiter

The speed limitation can be interrupted at any
time by depressing the accelerator pedal fully,
beyond the point of resistance. As soon as the
saved speed is exceeded, the green indicator
light flashes and an audible warning signal may
sound. The speed is stored.
The limiter is reactivated automatically after re-
turning to less than the set speed.

Status display

When the speed limiter is switched on, the
instrument cluster display shows the saved
speed and the system status:

It lights up grey

The speed limiter is switched on but reg-
ulation is not active.

Lights up green

The speed limiter is switched on and ac-
tive.

WARNING

After use, always switch off the speed limiter
to prevent the speed being regulated against
your wishes.

The speed limiter does not relieve the

driver of their responsibility to drive at the
appropriate speed. Do not drive at high
speed if not necessary.

Using the speed limiter under adverse

weather conditions is dangerous and can
cause serious accidents, e.g. aquaplaning,
snow, ice, leaves, etc. Only use the speed
limiter when the status of the road and the
weather conditions allow it.

Operating the speed limiter

Fig. 115 

On the multifunction steering wheel:

buttons to control the speed limiter.

Connecting

Press the   button.

It does not take effect yet.

Start regulation

While driving, press the button 

.

The current speed is saved as a limit speed.

Adjusting the speed

The programmed speed can be set:

+ 1 km/h (1 mph)
- 1 km/h (1 mph)
+ 10 km/h (5 mph)
- 10 km/h (5 mph)

CarManuals2.com

162

Assistant systems

Interrupting the adjustment

Press the   button.

The speed is stored.

Reinstating the cruise control

Press the 

 button.

The limiter will re-activate as soon as the vehi-
cle is moving at a speed lower than the saved
one.

Switching off

Press and hold the button  .

The speed limiter switches off and the speed is
deleted.

Switch to another driver assistance system

Press the   button.

Observe the corresponding message on the

instrument cluster display. The speed limiter is
switched off.

Troubleshooting

The speed limiter is not available

The control lamp switches on yellow.

Malfunctions Switch off the speed limiter and

go to a specialist workshop.

The adjustment is interrupted unexpectedly

You have switched off the Electronic Stabiliza-

tion Control (ESC).

The brakes have overheated. Wait for the

brakes to cool down and check the operation
again.

If the fault continues, consult a specialised

workshop.
For safety reasons, the speed limiter only
switches off fully whenever the driver stops
pressing the accelerator pedal or switches the
system off manually.

ACC - Adaptive Cruise Con-
trol

Introduction

Adaptive Cruise Control (ACC) maintains a
constant speed set by the driver. When ap-
proaching another vehicle in front, the ACC de-
tects it and adapts the speed automatically,
maintaining a distance set by the driver.

Does my vehicle have ACC?

Your vehicle has ACC if it has the ACC func-
tion buttons on the multifunction steering wheel 

››› 

page 90

, or if it has the configuration menu

in the infotainment system.

Speed range

ACC regulates at speeds between 30 and
210 km/h (20 and 130 mph).
If the vehicle is fitted with an automatic gear-
box, the ACC can bring the vehicle to a stand-
still if a vehicle in front of it stops.
If your vehicle is fitted with a manual gearbox,
you must pay attention to speed and gear
changes. The ACC is deactivated if the speed is
too low (less than 30 km/h) of the engine RPM
is too low or high.

Driving with ACC

You can override the ACC at any time. Braking
interrupts the ACC. If you accelerate, regulation
is interrupted during acceleration and then re-
sumed.

Driver intervention prompt

ACC is subject to certain limitations inher-
ent to the system. This means that the
driver will have to control the speed and

distance from other vehicles in certain sit-
uations. In this case, the instrument cluster
display 

will tell you to intervene

 by ap-

plying the brake, and an audio warning will
be played.

Radar sensors

The ACC uses the front radar technology. Read
its maintenance instructions and information
about its limitations 

››› 

page 155

.

CarManuals2.com

Assistant systems

163

ACC - Adaptive Cruise Control

1

2

WARNING

The ACC’s technology cannot overcome the
system's inherent limitations or change the
laws of physics. If used negligently or invol-
untarily, it may cause serious accidents and
injuries. The system is not a replacement for
driver awareness.

Always be prepared to brake or accelerate.

If you press the accelerator pedal the ACC

will stop working. Therefore, it will not brake
or request any braking intervention.

Adapt your speed and safe distance to the

vehicle in front of you at all times to suit visi-
bility, weather, road and traffic conditions.

Do not use the ACC in poor visibility, or on

roads that are steep, with lots of curves or
slippery.

Never use ACC when driving off-road or on

unpaved roads.

The system does not react in time to sta-

tionary obstacles (such as a traffic jam
queue). React soon enough to avoid a haz-
ardous situation.

The system does not react to people, an-

imals or vehicles that are crossing or ap-
proaching in the opposite direction.

If you are driving with a spare wheel fitted,

the ACC system could automatically switch
off. Switch off the system when starting off.

Brake immediately if the ACC does not

slow down enough.

Brake immediately when a driver interven-

tion instruction is displayed on the instru-
ment cluster screen.

If the vehicle continues to move involuntar-

ily after a driver intervention prompt, brake
the vehicle.

Note

If the ACC does not work as described in
this chapter, do not use it until it has been
checked by a specialised workshop. Visiting
a SEAT dealership is recommended.

ACC operation

Fig. 116 

On the instrument panel display: ACC

active.

Fig. 117 

On the multifunction steering wheel:

buttons for operating the ACC.

››› 

Fig. 116

Vehicle ahead detected. It will light up if the
distance to the vehicle is adjusted.
Selected distance level 2.

This information can be displayed on the cen-
tral panel of the 

Assistants

 view, or in the left

hand information profile 

››› 

page 16

. If these

views are not selected, it will be automatically
displayed in the lower central part of the instru-
ment cluster in a simplified manner.
The set speed will be displayed next to the
function status indicator.

Connecting

Press the   button on the multifunction

steering wheel 

››› 

Fig. 117

.

The ACC does not regulate anything yet
(standby).

CarManuals2.com

164

Assistant systems

Start regulation

Activating the ACC system also automatically
activates the ESC and traction control (TCS).

To start regulation, press the button 


››› 

Fig. 117

.

The ACC sets the current speed, or the closest
speed within the valid range (30-210 km/h), as
the cruise speed.

Vehicles with automatic transmission:

 the gear

lever must be in the 

D

S

 or 

M

.

With manual transmission:

 the gear lever must

be in any gear except first and reverse, and the
speed must be higher than approximately 30
km/h (18 mph).
Depending on the driving situation, the follow-
ing indicator lamps come on:

Lights up green

ACC connected, no vehicle detected in
front.

Lights up green

ACC connected, vehicle detected in
front.

When the ACC is in standby, the indicator
lamps light up grey.

Setting speed

To program the speed, press the   or   

››› 

Fig. 117

 buttons to the desired speed. The

speed is adjusted at intervals of 10 km/h (5
mph).

While the ACC is active, you can press the 
button to increase the desired speed by 1 km/h
(1 mph). You can then press 

 to decrease it

by 1 km/h (1 mph).

Setting your distance level

The distance can be set to one of five levels,
from very short to very long:

Press the button   and then the button   or   

››› 

Fig. 117

.

Alternatively, press the button   as many

times as necessary to set the desired distance.
Keep in mind each country’s regulations on
minimum braking distances.

Suspend regulation (standby)

Briefly press the button   

››› 

Fig. 117

 or press

the brake pedal.
The ACC indicator lamp is grey; the speed and
distance are saved.
If the ESC or TCS is switched off, the ACC is
automatically interrupted.

Reinstating the cruise control

Press the 

 button. The ACC regulates to

the last speed and distance setting.

OR

: Press the button 

 to regulate to the

current speed.

Switching off

Press and hold the button  . The set speed is

cleared.

Exceeding the speed regulated by the ACC

While driving with the ACC switched on, the
driver can increase speed by pressing the ac-
celerator pedal. ACC regulation is suspended
until you release the accelerator pedal 

››› 

.

Set the default distance setting

In the Infotainment system, you can pre-select
the distance level when connecting the ACC
from:

Very short, Short, Medium, Long and Very long

using the Infotainment system: 

 Driver assis-

tance > ACC


››› 

page 35

.

Changing the driving profile

In vehicles with the SEAT Drive Profile

, the se-

lected driving profile can have an influence on
the ACC’s acceleration and braking behaviour 

››› 

page 148

.

In vehicles without SEAT Drive Profile

, the be-

haviour of the ACC can also be affected if any
of the following drive profiles are selected in
the infotainment system in 

Drive assist

. ACC

settings will be the same as those in the SEAT
Drive Profile.

CarManuals2.com

Assistant systems

165

ACC - Adaptive Cruise Control

1)

Or on the left, in countries that drive on the left hand side of the road.

WARNING

Before driving off, check that the road is
clear. The radar sensor may not detect ob-
stacles on the road. This could cause an ac-
cident and serious injuries. If necessary, ap-
ply the brake.

NOTICE

If you increase speed using the accelerator
pedal, the ACC may not be able to safely
adjust the speed of the distance due to the
limitations of the system.

Be prepared to react if required by the sit-

uation.

Special driving situations

Fig. 118 

On the instrument panel display: ACC

active, vehicle detected on the left.

Be aware of the limitations and warnings
described at the beginning of this chapter 

››› 

page 162, 

Introduction

.

Avoid undertaking on the right

1)

If a vehicle is detected in the left lane that is
travelling at a speed slower than that set by the
driver, it will brake the vehicle within the comfort
limits of the system to avoid passing it on the
right 

››› 

Fig. 118

.

You can cancel this regulation by changing the
set speed or by pressing the accelerator pedal.
The function works at speeds over 80 km/h
(50 mph). It may not be available in certain
countries.

Overtaking

When the turn signal is switched on for over-
taking, the ACC reduces the distance from the
vehicle in front to help with the overtaking ma-
noeuvre. The set cruising speed will not be ex-
ceeded.
The function works at speeds over 80 km/h
(50 mph). It may not be available in certain
countries.

Stop&Go function

Valid for vehicles with an automatic gearbox

The ACC can bring the vehicle to a standstill if
the vehicle in front stops.

The ACC remains active and the message 

ACC

ready to start

 is displayed on the instru-

ment cluster for a few seconds. You can extend
or reactivate this warning by pressing the but-
ton 

 or by grabbing the wheel if your vehicle

is fitted with Travel Assist. During this time, the
vehicle will move off again if the vehicle in front
moves forwards.
To move off when the message 

ACC ready to

start

 is not longer displayed, once the vehicle

in front has moved off:

Press the accelerator pedal.

OR

: press the 

 button on the multifunction

steering wheel.
The ACC is deactivated in the following cases:

The stopping phase lasts for several minutes.

When a vehicle door is opened.

WARNING

If the message 

ACC ready to start

 is

displayed on the instrument cluster display
and the vehicle in front moves off, your vehi-
cle will move off automatically. In this case,
any obstacles in the road may not be detec-
ted. This may cause serious accidents and
injuries.

Always check the road before moving off,

and apply the vehicle brakes yourself if nec-
essary.

CarManuals2.com

166

Assistant systems

ACC system limitations

Fig. 119 

 Vehicle on a bend.   Motorcyclist

ahead, out of range of the radar sensor.

Fig. 120 

   Vehicle changing lanes.   One

vehicle turning and another stationary.

The limits of the ACC system mean that it is not
appropriate in all situations.
SEAT does not recommend using the function in
the following cases 

››› 

:

Heavy rain, snow or fog.

When going through tunnels.

In sections with roadworks.

On routes with curves, e.g. on mountain roads.

On off-road routes.

In covered car parks.

On roads with embedded metal objects such

as train or tram tracks.

On roads with loose gravel.

Pay special attention when using ACC in the
following situations:

On curves

The ACC may not detect the vehicle in front
on a curve, or may regulate the distance from
vehicles in other lanes 

››› 

Fig. 119

  .

Vehicles outside the sensor zone

In the following situations the ACC may not re-
act, or may react slowly or inappropriately:

Vehicles that are not aligned while driving or

that are outside the sensor's detection area,
such as motorcycles 

››› 

Fig. 119

  .

Vehicles that move into your lane, a short dis-

tance from your vehicle 

››› 

Fig. 120

  .

Vehicles with loads or accessories that pro-

trude from the sides, rear or roof.

Objects that are not detected

The ACC function only detects and reacts to
vehicles moving in the same direction. There-
fore it does not detect:

People

Animals

Vehicles travelling in the opposite direction or

crossing the road.

Other stationary obstacles

CarManuals2.com

Assistant systems

167

Predictive speed adjustment

The ACC does not react to stationary vehicles.
If, for example, a vehicle detected by the ACC
turns or moves over and there is a stationary
vehicle in front of it, the ACC will not react to
the second vehicle 

››› 

Fig. 120

  .

WARNING

Using the ACC in the above situations can
cause serious accidents and injuries, and
you could break the law.

Troubleshooting

ACC not available

The indicator lamp lights up yellow:

The radar sensor is dirty or adjusted in-

correctly. Take into account the warnings
described at the beginning of this chapter 

››› 

page 156

There is a fault or a defect. Turn off the vehi-

cle's ignition and turn it on again after a few
minutes.

If the problem persists, consult a specialised

workshop.

The ACC does not work as expected

Make sure that the conditions are met for the

radar sensor to operate properly 

››› 

page 156

.

If the brakes overheat, regulation stops au-

tomatically. Wait for them to cool down and
check the operation again.

Unusual noises during automatic ACC brak-

ing are normal and do not indicate any anoma-
lies.

The following conditions may lead the ACC
not to react:

The accelerator or brake is depressed.

No gear is engaged or the vehicle is in gear 

R

.

The vehicle is reversing.

ESC is operating.

The driver is not wearing his/her seat belt.

The RPM is too high or too low.

A vehicle brake light is faulty.

A trailer brake light is faulty.

The parking brake is applied.

Driving on an excessive slope.

Predictive speed adjust-
ment

Introduction

The predictive speed adjustment adapts the
speed to the speed limitations detected and
to the road layout (curves, crossings, round-
abouts, etc.).
Predictive speed adjustment is an additional
function of the ACC 

››› 

page 162

 and uses the

traffic signal detection system 

››› 

page 24

 and

the navigation data of the infotainment system.
Predictive speed adjustment is available de-
pending on the equipment, although not in all
countries.

WARNING

The predictive speed adjustment smart tech-
nology cannot overcome the limits imposed
by the laws of physics and it only works
within the limits of the system. Never allow
the enhanced convenience of this function
induce you to take any risk that compromises
safety. If used negligently or involuntarily,
it may cause serious accidents and injuries.
The system is not a replacement for driver
awareness.

Always adapt your speed to suit visibility,

weather, road and traffic conditions.

Always pay attention to traffic and always

keep the vehicle environment in mind.

CarManuals2.com

168

Assistant systems

Always be prepared to adjust the speed

yourself. If the traffic sign recognition sys-
tem is not working properly or the navigation
data is not updated, the speed may change
unexpectedly and suddenly or may not be
suitable for the current traffic situation. In
addition, the speed adjusted by the system
may not suit your driving style.

Always be prepared to adjust the speed

yourself. If you drive without any active gui-
ded route, if you leave the route calculated
by the navigation system or if the position of
the vehicle cannot be determined correctly
because the GPS does not provide accurate
data, the speed may change unexpectedly
and suddenly or may not adapt to the cur-
rent traffic situation.

Always use up to date navigation data.

Always take into account the maximum

permitted speed. In the case of speed limita-
tions that are not included in the navigation
data, the maximum permitted speed may be
exceeded.

Note

Also note the information related to the ACC
relevant to safety 

››› 

page 162

.

Limitations of the predictive speed
adjustment

In addition to the limitations of the road sign de-
tection system 

››› 

page 24

 and the limitations

of the ACC, predictive speed adjustment has
the following limitations inherent to the system:

Predictive speed adjustment only recognises

traffic signals that show a speed limitation. The
predictive speed adjustment does not take into
account, above all, the rules on priority of pas-
sage or traffic lights.

Traffic signs that indirectly show a speed re-

striction, e.g. signs at the entrance to towns,
are only recognised on the basis of navigation
data.

On roads that are not included in the naviga-

tion data, or that are included with little accu-
racy, predictive speed adjustment is not availa-
ble.

If a speed limitation is notified based on the

navigation data without it being detected by
the traffic signal detection system, the indica-
ted speed will be adjusted to the speed that
was saved the last time.

Predictive speed adjustment is not available

for speed limitations below approx. 20 km/h
(approx. 15 mph). In this case, a relevant mes-
sage is displayed on the instrument panel
screen.

Activating the predictive speed ad-
justment

In the infotainment system, in the assist services
menu, you can individually adjust the type of
incident the vehicle should react t

››› 

page 35

:

Response to road layout.

Response at permitted speeds.

Driving with the predictive speed ad-
justment

Connect the ACC 

››› 

page 163

.

Set the distance and speed.

Activate the predictive speed adjustment.

As soon as the system recognises a speed limi-
tation or a relevant road layout during the route,
a warning will appear on the instrument panel
display. This warning will indicate the reason
and the speed to which the vehicle will adjust
due to said limitation.

Adjustment due to a speed limitation.

Adjustment due to a road layout.

In the event of adjustment due to a speed lim-
itation, the detected speed will be saved as
the new desired speed. In the event of adjust-
ment due to the road layout, the vehicle will

CarManuals2.com

Assistant systems

169

emergency brake assistance system (Front Assist)

accelerate again after leaving the reason for
the adjustment behind and the speed will be
adjustment to that which has been saved.
The speeds indicated for curves depend on the
driving profile

››› 

page 148

.

Interrupting speed adjustment

During the warning, press the button 

.

During the regulation, press the button 

.

Adjust the announced speed

The announced speed can only be adjusted in
the event of adjustment due to a speed limita-
tion.

Multifunction steering wheel:

+ 1 km/h (1 mph), only while the ACC is
adjusting
- 1 km/h (1 mph), only while the ACC is ad-
justing
+ 10 km/h (5 mph)

- 10 km/h (5 mph)

If you adjust the indicated speed excessively,
the predictive speed adjustment is interrupted.

Note

When a speed limitation is recognised, the

predictive speed adjustment also adapts the
saved speed even if the ACC is switched off.
However, it will not adjust.

If the speed of travel considerably exceeds

the speed limit detected by the traffic signal
detection system, a relevant warning is dis-
played in the instrument panel display.

In the event of joining a highway without

speed limitation, the recommended speed is
automatically saved as the desired speed. If
a higher speed has previously been saved for
a motorway without a speed limit, this is used
instead of the recommended speed.

Troubleshooting

A message is displayed indicating that pre-
dictive speed adjustment is not currently
available or not in your country.

If this message is displayed for a long time

and predictive speed adjustment is available in
your country, contact a specialised workshop.

Note

Depending on the anomaly in question, ad-
ditional information may be displayed in 

Ve-

hicle status


››› 

page 34

.

emergency brake assis-
tance system (Front Assist)

Introduction

The objective of the system is to prevent head-
on collisions against objects that may be in the
vehicle’s path or minimise the consequences of
such impacts.
The function is designed to avoid collisions
against:

Parked vehicles.

Vehicles, pedestrians and cyclists that are

travelling in the same lane and direction.

Pedestrians and cyclists who transversely

cross the vehicle path.
Front Assist detects the aforementioned objects
using a radar sensor at the front of the vehicle 

››› 

page 156

.

Depending on several factors and how critical
the situation is, the system operates in a stag-
gered manner.
First informing the driver, and if there is no or
insufficient reaction, then activating an autono-
mous emergency braking as indicated by the
conditions that will be discussed in the follow-
ing points.
The system operation can be cancelled if the
clutch pedal is pressed or the steering wheel is
turned firmly.

CarManuals2.com

170

Assistant systems

WARNING

Front Assist is a driving assistance function

that can never replace the driver’s attention.

Front Assist cannot change the laws of

physics or replace the driver in terms of
keeping control of the vehicle and reacting
to a possible emergency situation.

Following a Front Assist emergency warn-

ing, pay immediate attention to the situation
and try to avoid the collision where appropri-
ate.

Always adapt your speed and distance

away from the vehicle in front of you at
all times to suit visibility, weather, road and
traffic conditions.

The Front Assist alone cannot avoid acci-

dents and serious injuries.

The Front Assist does not react to animals

or vehicles crossing your path or approach-
ing head-on down the same lane.

The Front Assist does not react to pedes-

trians walking head-on in the same lane.

 If the Front Assist does not work as descri-

bed in this chapter (e.g. it repeatedly inter-
venes unnecessarily), switch it off. Have the
system checked by a specialised workshop.
SEAT recommends visiting a SEAT dealer-
ship.

Note

When Front Assist is connected, the indica-
tions of other functions on the screen may be
hidden.

Warning levels and brake assist

Fig. 121 

On the instrument panel display:

advance warning indications.

Front Assist is active from 5 km/h (3 mph). De-
pending on different conditions (vehicle speed,
speed and type of object recognised, etc.),
some of the stages described below are omit-
ted to optimise the performance of the system.

Safety distance warning

If the system detects that you are driving too
close to the vehicle in front, it will warn the
driver with this indication on the instrument
panel display 

.

The timing of the warning varies depending
on driver behaviour, vehicle speed and relative
speed between both.

Advance warning

If the system detects a possible collision with
the vehicle in front, it alerts the driver by means
of an audible warning and an indication on the
instrument panel display   

››› 

Fig. 121

.

The warning moment varies depending on the
traffic situation and driver behaviour. At the
same time, the vehicle will prepare for a possi-
ble emergency braking 

››› 

page 171

.

When Front Assist is connected, the indications
of other functions on the screen may be hidden.

Critical warning

If the driver fails to react to the 

advance warn-

ing

, the system may actively intervene in the

brakes and generate a brief jolt to warn the
driver of the imminent danger of a collision.

Automatic braking

If the driver also fails to react to the 

critical

warning

, the system may initiate independent

emergency braking by progressively increasing
the braking in accordance with the criticality of
the situation.

CarManuals2.com


Content      ..     3      4      5      6     ..