Renault Zoe (2023 year). Manual in english - page 6

FUSES (2/2)
Allocation of fuses
(the presence of certain fuse depends on the vehicle equipment level)
Symbol
Allocation
Use the fuse allocation label in the
H
Windscreen washer
storage compartment to identify the
fuses.
Multimedia accessories socket, multimedia
î
Certain fuses should only be re-
screen
placed by a qualified professional.
Front cigarette lighter, front and rear second row
These fuses are not listed on the
Æ
accessories socket
label.
Only change the fuses represented
Ì
Horn
on the label.
Heated rear view mirrors
×
Brake lights, passenger compartment central unit
Check the fuse in question
Passenger compartment centre unit, rear wiper,
and replace it, if neces-
rear fog light
sary, by a fuse of the same
rating.
Direction indicator lights, hazard warning lights,
If a fuse is fitted where the rating is
D
too high, it may cause the electrical
high level brake lights
circuit to overheat (risk of fire) in the
event of an item of equipment using
Electric window
an excessive amount of current.
5.18
CarManuals2.co
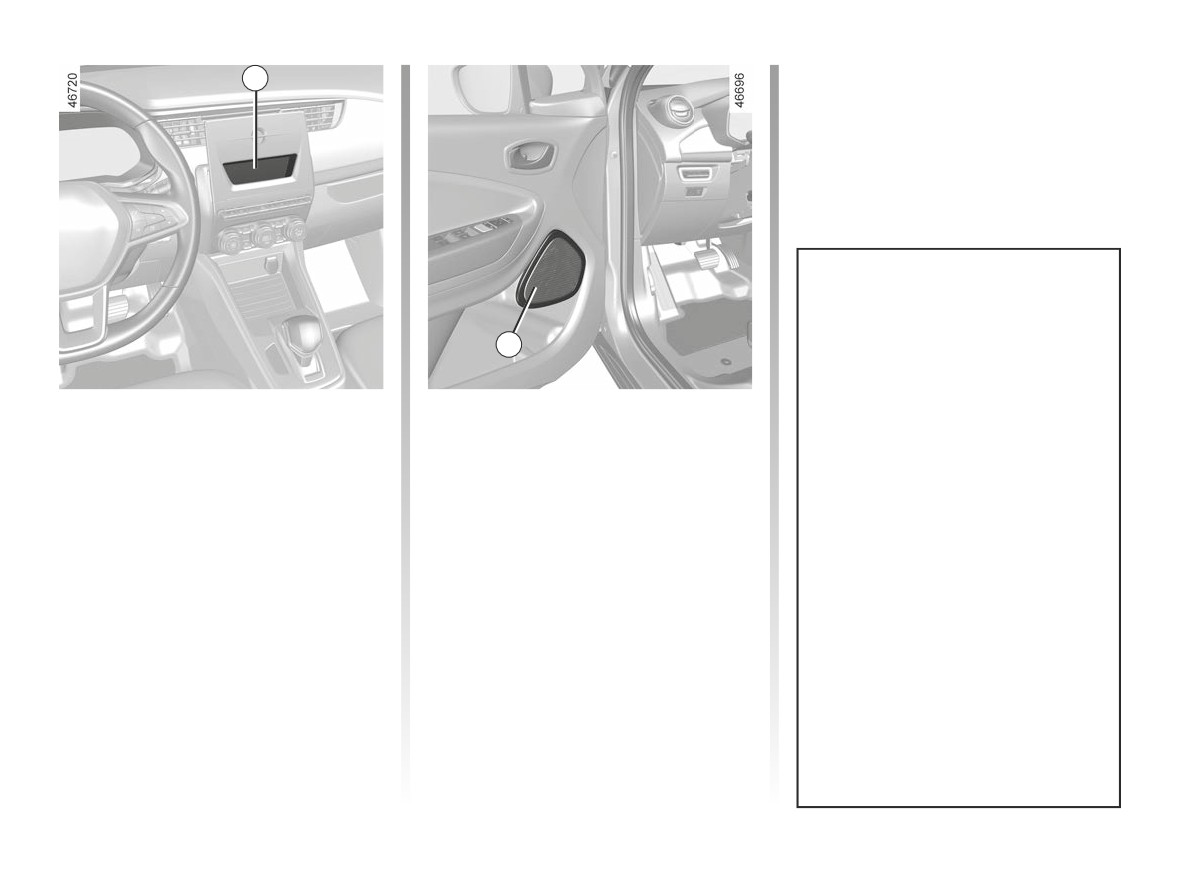
FITTING A RADIO
1
2
-
In all cases, it is very important to
follow the manufacturer’s instruc-
tions carefully.
Radio location 1
Door speakers 2
-
The specifications of the brack-
Unclip the blanking cover. The aerial, +
To install any equipment, please con-
ets and wires (available from our
and - supply and speaker wire connec-
sult an authorised dealer.
network) vary depending on the
tions are located behind it.
equipment level of your vehicle
and the type of radio. Consult an
approved Dealer to find out the
correct part number.
-
No work may be carried out on
the vehicle’s electrical or radio
circuits, except by approved
dealers: an incorrectly connected
system may result in damage
being caused to the electrical
equipment and/or the compo-
nents connected to it.
5.19
CarManuals2.co

ACCESSORIES
Electrical and electronic accessories
Before installing this type of accessory (particularly for transmitters/receivers: frequency bandwidth, power level, po-
sition of the aerial, etc.), make sure it is compatible with your vehicle. You can get advice from an authorised dealer.
Before connecting an accessory to a socket, please ensure that you do not exceed the maximum power authorised for
the socket ➥ 3.15, ➥ 5.20. Fire hazard.
No work may be carried out on the vehicle’s electrical or radio circuits, except by approved Dealers: an incorrectly connected
system may result in damage being caused to the electrical equipment and/or the components connected to it.
If the vehicle is fitted with any aftermarket electrical equipment, make sure that the installation is correctly protected by a fuse.
Establish the rating and position of this fuse.
Using the diagnostic socket
The use of electronic accessories on the diagnostic socket may cause serious disturbance to the vehicle’s electronic systems.
For your safety we recommend that you use only electronic accessories approved by the manufacturer, consult an Approved
Dealer. Serious accident risk.
Fitting after-market accessories
If you wish to install accessories on the vehicle: please contact an authorised dealer. Also, to ensure the correct operation of
your vehicle, and to avoid any risk to your safety, we recommend that you use only accessories specifically designed for your
vehicle, which are the only accessories for which the manufacturer will provide a warranty.
If you are using an anti-theft device, only attach it to the brake pedal.
Obstructions to the driver
On the driver’s side, only use mats suitable for the vehicle, attached with the pre-fitted components, and check the fitting reg-
ularly. Do not lay one mat on top of another. There is a risk of wedging the pedals
5.20
CarManuals2.co
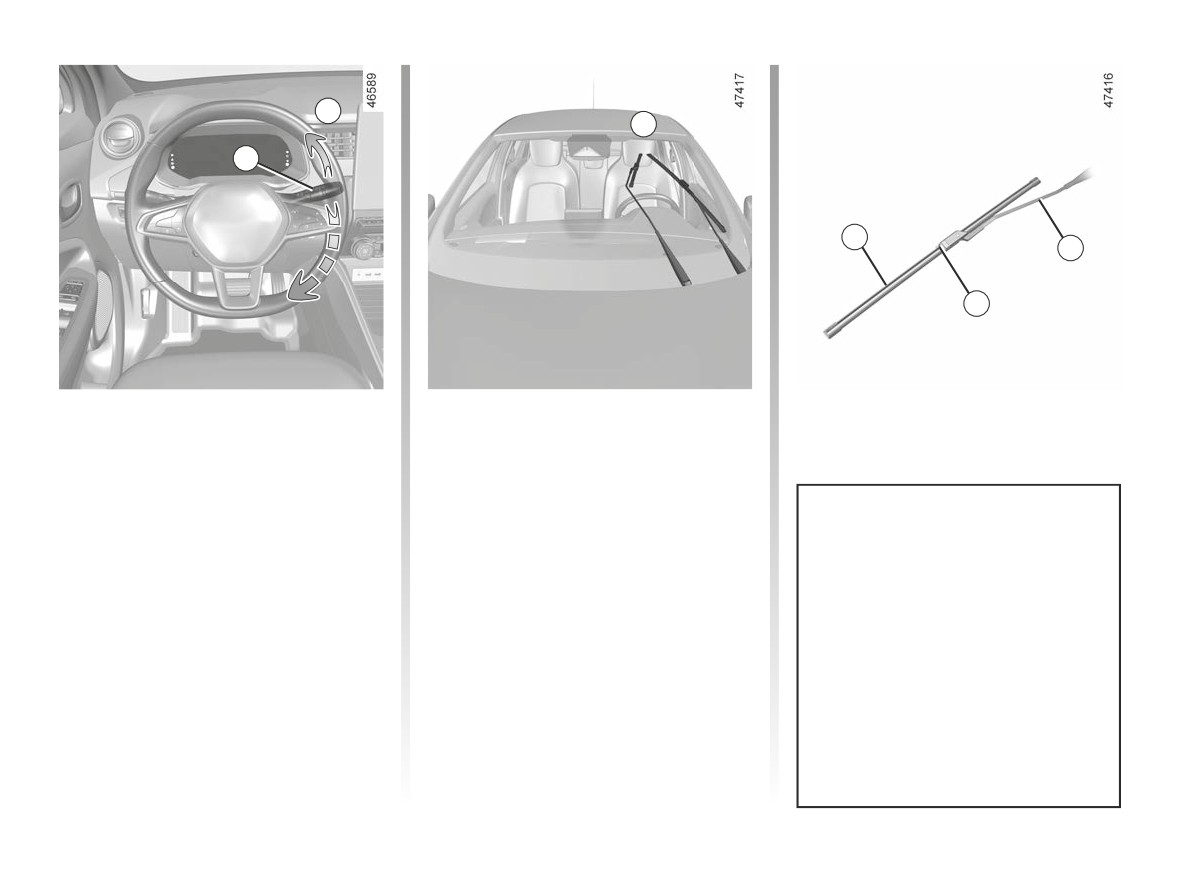
WINDSCREEN WIPER BLADES (1/2)
A
B
1
2
3
4
Replacing windscreen wiper
To refit
blades 2
To refit the wiper blade 2, insert it in its
housing in the arm 3, then clip it until
To replace the wipers, first put them in
you hear a click. Make sure that the
the service position B.
blade is correctly locked in position.
With the ignition on and the engine
To return the blades to lowered posi-
Keep monitoring the condition of the
stopped:
tion, make sure that the blades are
wiper blades. How long they last de-
- lower the windscreen wiper stalk
folded down onto the windscreen then
pends on you:
fully (fast continuous wipe position).
set the 1 stalk to position A (single
The wiper arms stop in a position B
- clean the blades and the wind-
sweep): the windscreen wiper blades
away from the bonnet;
screen regularly with soapy
will fold into the bonnet when the igni-
water;
- press the button 4 firmly then remove
tion is switched on.
the blade upwards.
- do not use them when the wind-
screen is dry;
- free them from the windscreen
when they have not been used
for a long time.
5.21
CarManuals2.co
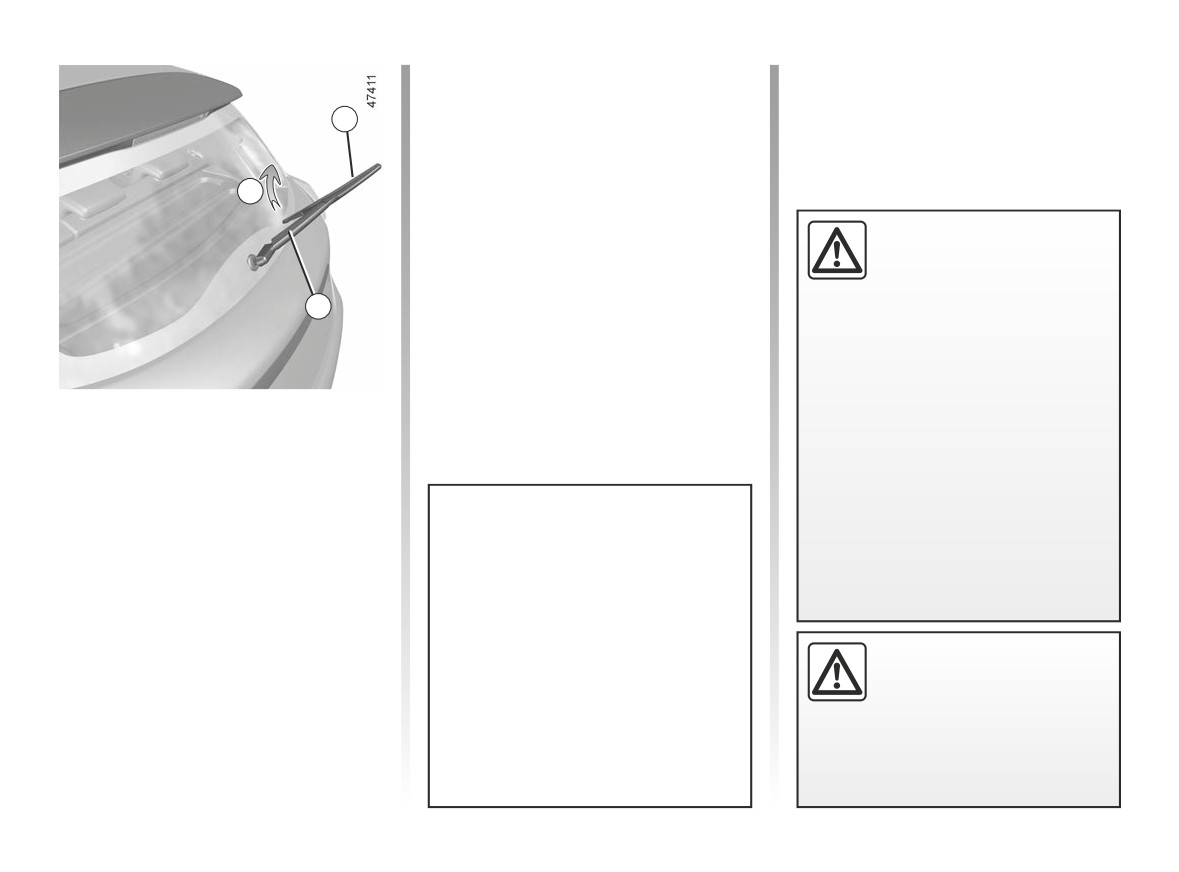
WINDSCREEN WIPER BLADES (2/2)
To refit
To refit the wiper blade, proceed in re-
5
verse order to removal. Make sure that
the blade is correctly locked in position.
C
- In frosty weather, make
sure that the wiper blades
are not stuck by ice
(to
avoid the risk of the motor
6
overheating).
- Check the condition of the wiper
blades.
They should be replaced as soon
Rear screen wiper blade 5
as they become less efficient: ap-
proximately once a year.
Stalk in stop position (deactivated):
When changing the blade, when it
-
lift the wiper arm 6;
has been removed, do not let the
-
pivot the rear screen wiper blade 5
wiper arm fall against the window:
(C movement) until it unclips;
risk of breaking the window.
Keep monitoring the condition of the
-
release rear screen wiper blade 5 by
wiper blades. How long they last de-
pulling on it.
pends on you:
- clean the blades and the wind-
screen regularly with soapy
water;
Before changing the rear
- do not use them when the wind-
wiper blade, make sure the
screen is dry;
stalk is in the stop position
(deactivated).
- free them from the windscreen
when they have not been used
Risk of injury.
for a long time.
5.22
CarManuals2.co
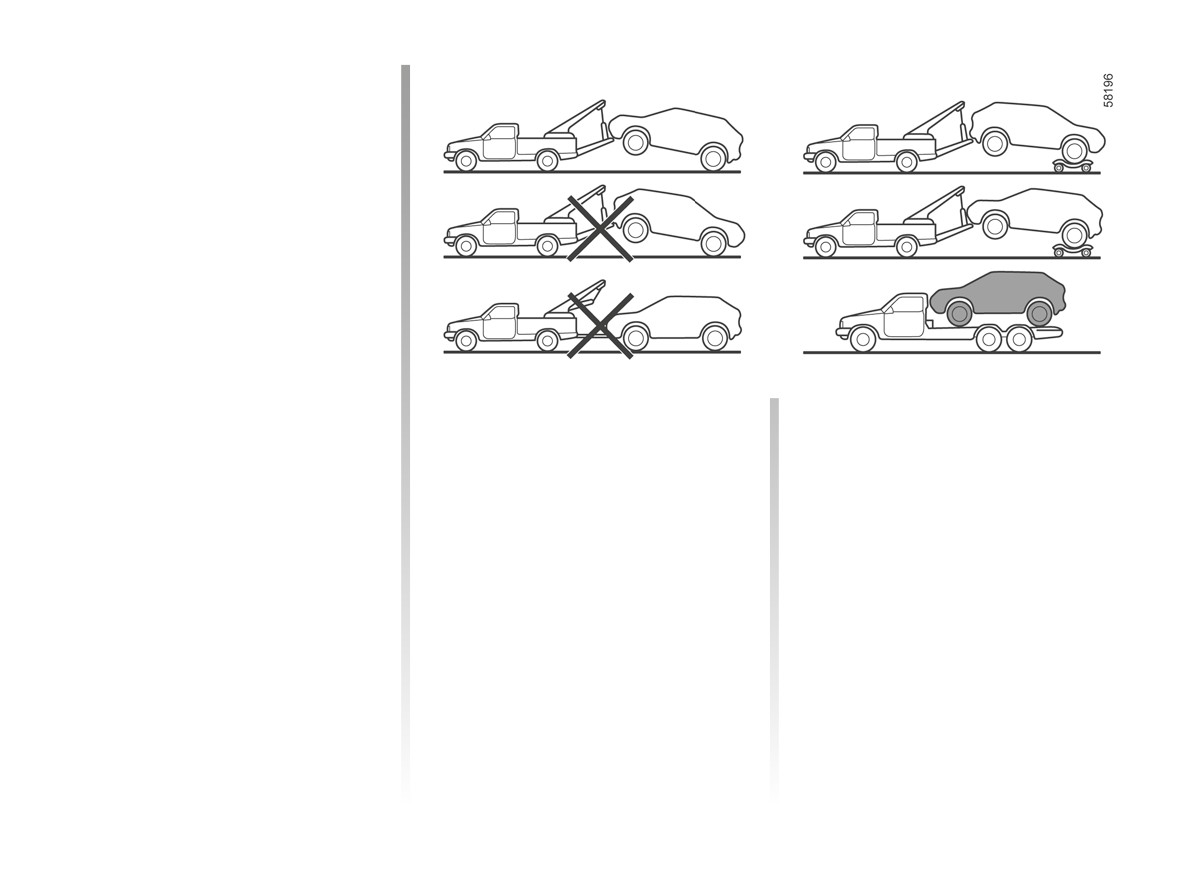
TOWING, BREAKDOWN (1/3)
Choice of breakdown service
In the event of an energy fault
In the event of a full discharge of the
traction battery, towing with the front
wheels raised or onboard a flat-bed
truck is permitted.
All other cases
Only towing on a flatbed truck is per-
mitted.
Towing the vehicle
Towing on a flatbed truck
Only exceptionally, in cases of power
Breakdown recovery must be per-
failure (complete discharge of the trac-
formed on a flat surface under all cir-
tion battery), can you tow your vehicle
cumstances except where the vehicle
with the front wheels raised.
is immobilised following a full discharge
of the traction battery.
Before any towing or recovery opera-
tion, unlock the steering column: with
the card in the passenger compart-
ment, engage the gear selection lever
in position N then press the engine start
button for approximately two seconds.
5.23
CarManuals2.co
TOWING, BREAKDOWN (2/3)
Before towing, unlock the steering
column: with the card in the passenger
compartment, engage the gear lever in
position N, then press the engine start
button for approximately two seconds.
The column is unlocked, the acces-
sory functions are supplied: the vehi-
cle lights can be used (hazard warn-
2
ing lights, brake lights etc.). The towed
vehicle’s lights must be switched on at
night.
1
The speed specified by current legis-
lation for towing must always be ob-
served.
Once you have finished towing, press
In the event of an energy
the engine start button twice (risk of
fault: towing
running down the 12 V battery).
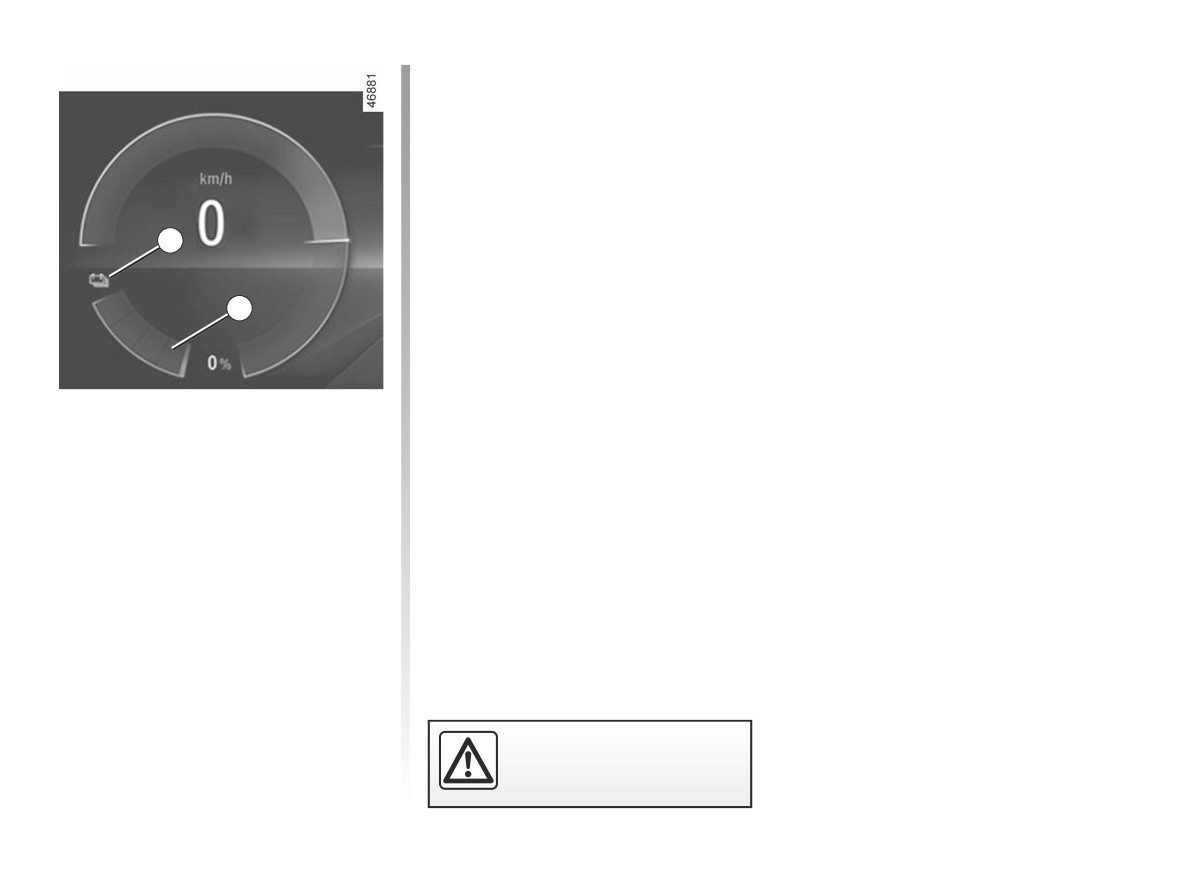
In the event of a fully discharged trac-
tion battery:
- warning light
2
flashes in
yellow;
- the indicator 1 shows an empty bat-
tery.
It is possible to recover on a flatbed
truck or tow the vehicle using the tow
eye, following the instructions below.
When the engine is stopped,
power-assisted steering is
no longer operational.
5.24
CarManuals2.co
TOWING, BREAKDOWN (3/3)
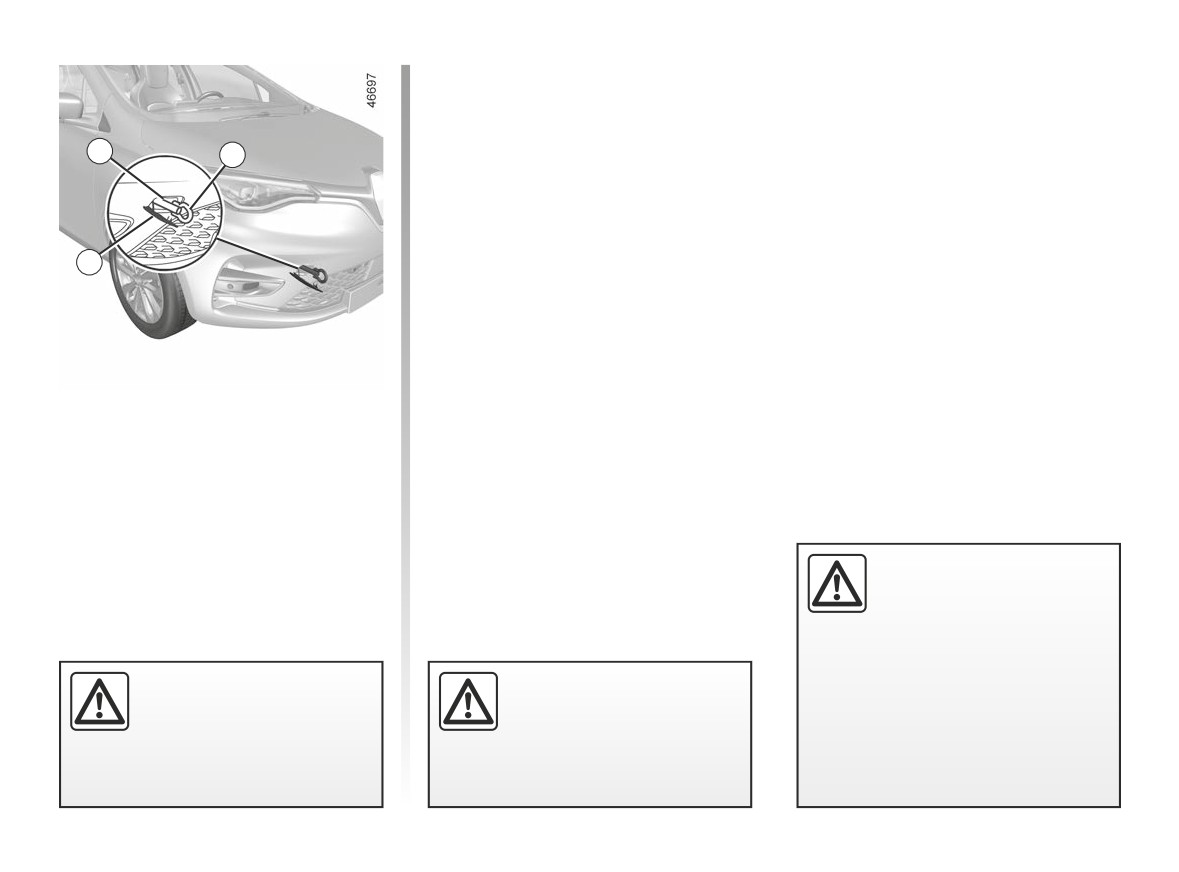
Unclip the cover 5 by inserting a flat-
blade screwdriver or similar under the
cover.
Tighten the towing hitch 4 fully: first
3
4
by hand until it stops then finish by lock-
ing it with the lever.
Only use tow ring 4 and the lever lo-
cated under the luggage compartment
carpet in the tool kit ➥ 5.2.
5
Note: please do not use a damaged
towing eye.
Access to the towing point
Only use the front towing point 3.
This towing point may only be used for
towing: never use it for lifting the vehi-
cle directly or indirectly.
Do not leave the tools unse-
cured inside the vehicle as
they may come loose under
braking.
After use, check that all the tools
are correctly clipped into the tool kit,
Leave the card in the vehi-
Ensure that the towing eye
then, depending on the vehicle, po-
cle during towing.
is bolted correctly.
sition it correctly in its housing.
Risk of the steering
Risk of losing the towed
Risk of injury.
column locking.
object.
5.25
CarManuals2.co

OPERATING FAULTS (1/5)
The following advice will enable you to carry out quick, temporary repairs. For safety reasons you should always contact
an approved dealer as soon as possible.
FAULTS
POSSIBLE CAUSES
WHAT TO DO
Impossible to charge the traction bat-
The outdoor temperature is lower
Recharge your vehicle in a more suitable
tery.
than -26°C.
environment. If necessary ➥ 5.23.
The charging flap warning light flashes
red.
No electrical current in the wall
Check your installation (circuit breaker, pro-
socket or poor connection of cable
grammer, etc.).
to domestic socket.
Check the connections (charging socket,
etc.) ➥ 1.8.
The cord is defective.
Please see an authorised dealer to replace
it.
Impossible to charge the traction bat-
The charging cord is not correctly
Plug the charging cable correctly in to the
tery.
locked to the vehicle.
vehicle. ➥ 1.8.
The charging flap warning light flashes
blue.
The programmable air conditioning
One of the usage conditions is not
➥ 3.11.
fails to work.
complied with (the traction battery
is not charged, etc).
5.26
CarManuals2.co

OPERATING FAULTS (2/5)
The following advice will enable you to carry out quick, temporary repairs. For safety reasons you should always contact
an approved dealer as soon as possible.
FAULTS
POSSIBLE CAUSES
WHAT TO DO
The steering column remains locked.
Steering wheel locked.
Move the steering wheel while pressing the
engine start button ➥ 2.2.
Steering becomes heavy.
Assistance overheating.
Drive carefully at reduced speed, be aware
of the level of force in the steering wheel
needed to turn the wheels.
Fault with the electric assistance
Consult an authorised dealer.
motor. Fault in the assistance
system.
5.27
CarManuals2.co

OPERATING FAULTS (3/5)
FAULTS
POSSIBLE CAUSES
WHAT TO DO
The card does not lock or unlock
Card battery is flat.
Replace the battery or have it replaced. You will
the doors.
still be able to lock, unlock, and start your vehicle.
➥ 1.32 and ➥ 2.2.
Use of appliances operating on
Stop using the devices or use the key that is built
the same frequency as the remote
into the card ➥ 1.8.
control (mobile phone, etc.).
Vehicle located in a high electro-
Use the key that is built into the card ➥ 1.8.
magnetic radiation zone. Secondary
12 V battery discharged.
Desynchronisation of the card.
Unlock the driver’s door by inserting the key in-
tegrated in the card into the door lock ➥ 1.32 then
place the card in the placement area
➥ 2.2 and
press the START button to synchronise the card.
The message “Place card close
The card battery is flat or the card
Check the card battery status or place the card in
START and push” appears on the
is out of synch.
the placement area ➥ 2.2 provided for this pur-
instrument panel
pose.
5.28
CarManuals2.co

OPERATING FAULTS (4/5)
Electrical equipment
POSSIBLE CAUSES
ACTION REQUIRED
Vibrations.
Tyres not inflated to correct pressures, Check the tyre pressures. If this is not the
incorrectly balanced or damaged.
problem, have them checked by an ap-
proved Dealer.
The wipers do not work.
Wiper blades stuck.
Free the blades before using the wipers.
Broken windscreen wiper fuse.
Consult an approved dealer.
Blown rear screen wiper fuse (intermit- Replace the fuse or have it replaced
tent, permanently stopped).
➥ 5.17.
Motor fault.
Consult an approved dealer.
The wiper does not stop.
Faulty electrical controls.
Consult an approved dealer.
Direction indicators flashing more quickly. Blown bulb.
Replace the bulb or have it replaced.
The indicators are
On one side only: Blown bulb.
Replace the bulb or have it replaced.
not working.
On both sides:
- blown fuse;
Replace the fuse or have it replaced
➥ 5.17.
- faulty flasher unit.
Needs replacing: please see an autho-
rised dealer.
5.29
CarManuals2.co

OPERATING FAULTS (5/5)
Electrical equipment
POSSIBLE CAUSES
ACTION REQUIRED
The headlights
Only one:
- blown bulb;
Replace the bulb or have it replaced.
are not working.
- disconnected wire or incorrectly-posi- Check and reconnect the wire or the con-
tioned connector.
nector.
Both:
the circuit is fused.
Check and replace if necessary.
The headlights do not switch off.
Faulty electrical controls.
Consult an approved dealer.
Traces of condensation in the headlights Traces of condensation may be due to
or rear lights.
a natural phenomenon caused by varia-
tions in temperature and humidity.
The traces will disappear slowly once the
lights are switched on.
5.30
CarManuals2.co

Section 6: technical specifications
Vehicle identification plates
6.2
Technical Information for the emergency services
6.3
Engine identification
6.4
Weights
6.5
Dimensions
6.6
Replacement parts and repairs
6.7
Service sheets
6.8
Anticorrosion check
6.14
6.1
CarManuals2.co
VEHICLE IDENTIFICATION PLATES
A
1
2
A
3
4
5
9
6
7
8
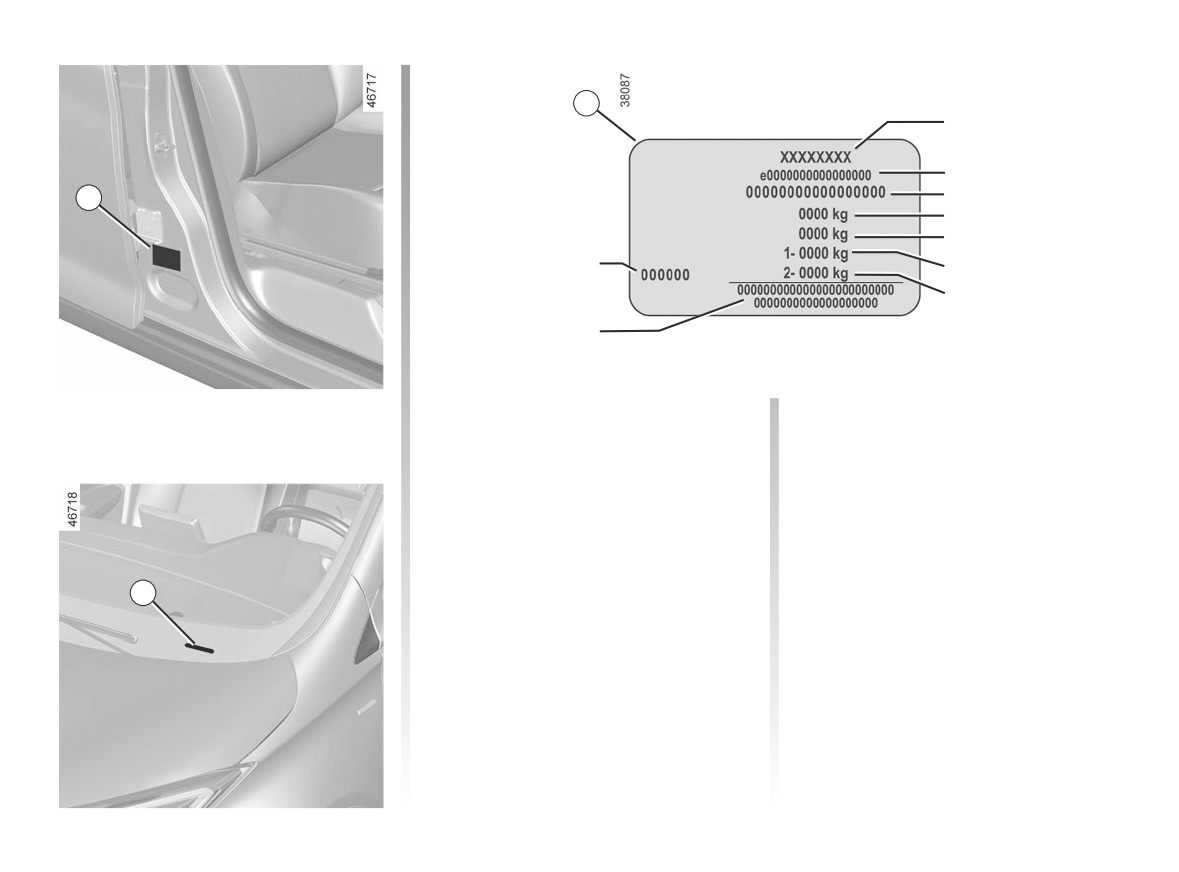
The information shown on the ve-
4
MMAC (Maximum Authorised
hicle identification plate should be
Mass).
quoted on all correspondence or
orders.
5
MTR (Gross Train Weight: vehicle
fully loaded, with trailer).
Vehicle identification plate A
6
MMTA (Maximum Permissible
1
Manufacturer name.
Weight) front axle.
B
2
EC design number or approval
7
MMTA rear axle.
number.
8
Reserved for related or additional
3
Identification number.
entries.
Depending on the vehicle, this
information is also given on
9
Paint reference (colour code).
marking B.
6.2
CarManuals2.co
TECHNICAL INFORMATION FOR THE EMERGENCY SERVICES
A
A
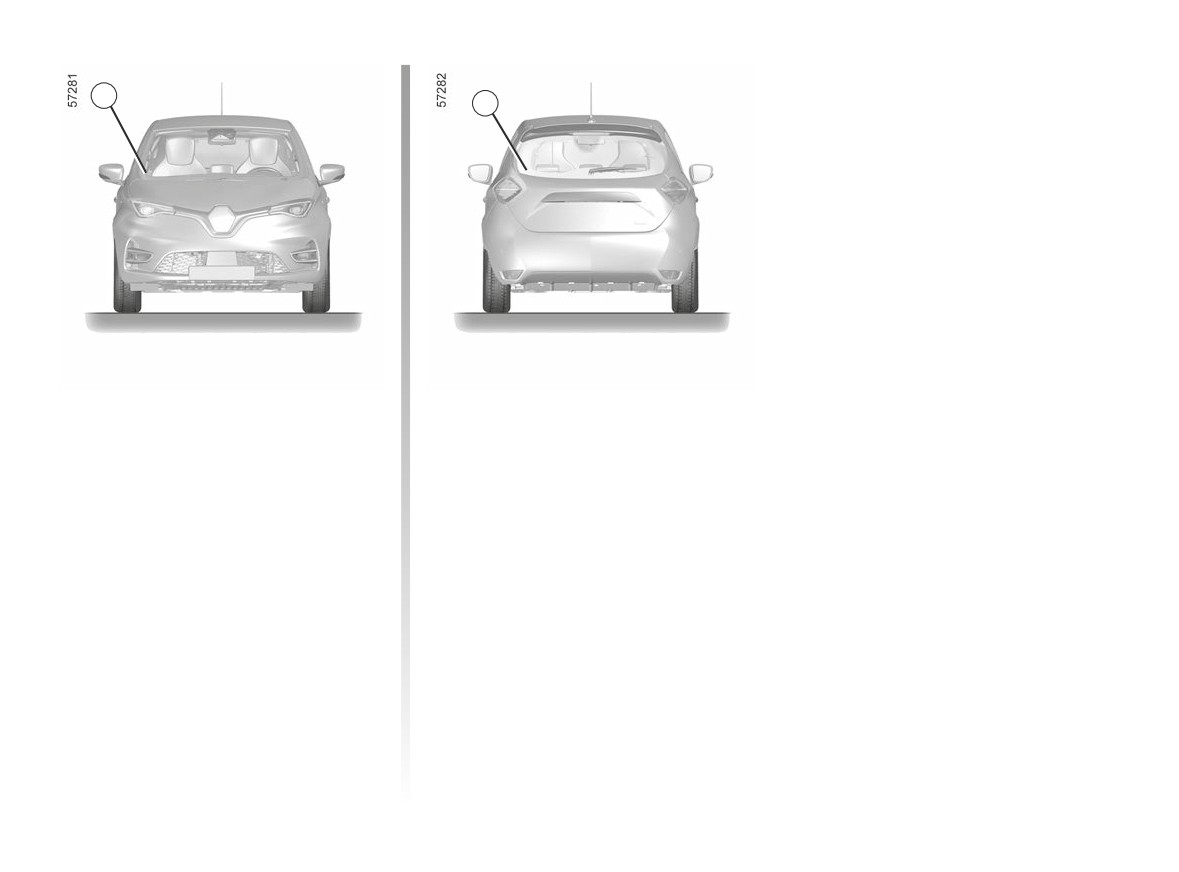
The QR Code on the A label allows
emergency workers using a tablet or
smartphone to immediately access the
technical information useful for working
on the vehicle in the event of an acci-
dent.
Ensure that the A label is always visible
and present on the windscreen as well
as the rear screen.
Any modification or damage would
prevent access to the information.
6.3
CarManuals2.co
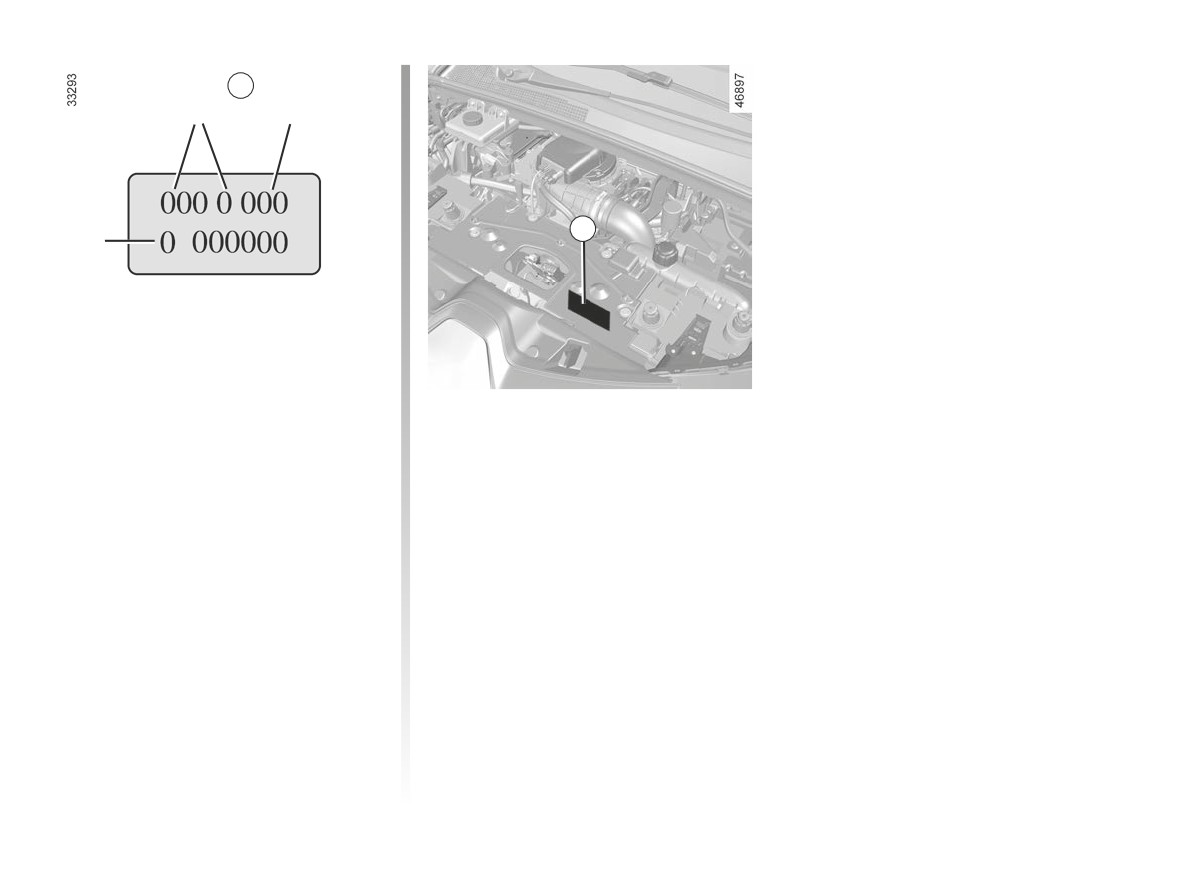
ENGINE IDENTIFICATION
A
1
2
A
3
Please quote the engine identifica-
Engine specification
tion information in area A in all cor-
Engine type: 5AGEN3
respondence or orders.
(Location varies depending on engine)
1
Engine type.
2
Engine suffix.
3
Engine serial number.
6.4
CarManuals2.co

WEIGHTS (in kg)
The weights indicated for a basic vehicle without options: they vary depending on your vehicle’s equipment. Consult
your approved Dealer.
Maximum Authorised Mass (MMAC)
Weights indicated on the vehicle identification plate ➥ 6.2.
Gross Train Weight (MTR)
Braked Trailer Weight
Prohibited
Unbraked Trailer Weight
Prohibited
Permissible nose weight
Prohibited
Permissible load on the roof with the carrying device
Prohibited
6.5
CarManuals2.co
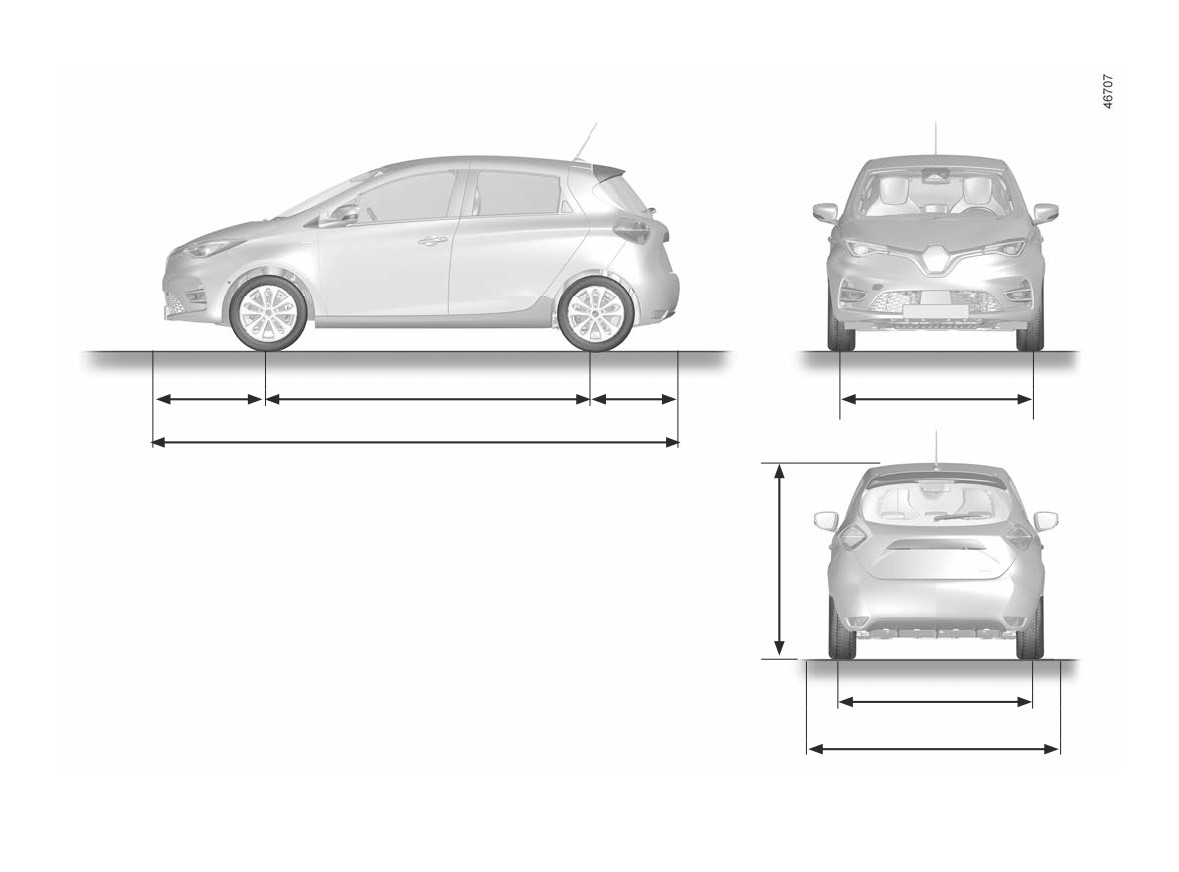
DIMENSIONS (in metres)
0,839
2,588
0,657
1,511
4,084
1,562*
1,510
1,945
* Unladen
6.6
CarManuals2.co

REPLACEMENT PARTS AND REPAIRS
Original parts are based on strict specifications and are subject to highly-specialised tests. Therefore, they are of at least the same
level of quality as the parts fitted originally.
If you always fit genuine replacement parts to your vehicle, you will ensure that it performs well. Furthermore, repairs carried out
within the manufacturer’s Network using original parts are guaranteed according to the conditions set out on the reverse of the
repair order.
6.7
CarManuals2.co

SERVICE SHEETS (1/6)
VIN:
Date:
Miles (Km):
Invoice number:
Comments/miscellaneous
Type of operation:
Stamp
Service
□
□
Anti-corrosion check:
OK □ Not OK* □
*See specific page
Date:
Miles (Km):
Invoice number:
Comments/miscellaneous
Type of operation:
Stamp
Service
□
□
Anti-corrosion check:
OK □ Not OK* □
*See specific page
Date:
Miles (Km):
Invoice number:
Comments/miscellaneous
Type of operation:
Stamp
Service
□
□
Anti-corrosion check:
OK □ Not OK* □
*See specific page
6.8
CarManuals2.co

SERVICE SHEETS (2/6)
VIN:
Date:
Miles (Km):
Invoice number:
Comments/miscellaneous
Type of operation:
Stamp
Service
□
□
Anti-corrosion check:
OK □ Not OK* □
*See specific page
Date:
Miles (Km):
Invoice number:
Comments/miscellaneous
Type of operation:
Stamp
Service
□
□
Anti-corrosion check:
OK □ Not OK* □
*See specific page
Date:
Miles (Km):
Invoice number:
Comments/miscellaneous
Type of operation:
Stamp
Service
□
□
Anti-corrosion check:
OK □ Not OK* □
*See specific page
6.9
CarManuals2.co

SERVICE SHEETS (3/6)
VIN:
Date:
Miles (Km):
Invoice number:
Comments/miscellaneous
Type of operation:
Stamp
Service
□
□
Anti-corrosion check:
OK □ Not OK* □
*See specific page
Date:
Miles (Km):
Invoice number:
Comments/miscellaneous
Type of operation:
Stamp
Service
□
□
Anti-corrosion check:
OK □ Not OK* □
*See specific page
Date:
Miles (Km):
Invoice number:
Comments/miscellaneous
Type of operation:
Stamp
Service
□
□
Anti-corrosion check:
OK □ Not OK* □
*See specific page
6.10
CarManuals2.co

SERVICE SHEETS (4/6)
VIN:
Date:
Miles (Km):
Invoice number:
Comments/miscellaneous
Type of operation:
Stamp
Service
□
□
Anti-corrosion check:
OK □ Not OK* □
*See specific page
Date:
Miles (Km):
Invoice number:
Comments/miscellaneous
Type of operation:
Stamp
Service
□
□
Anti-corrosion check:
OK □ Not OK* □
*See specific page
Date:
Miles (Km):
Invoice number:
Comments/miscellaneous
Type of operation:
Stamp
Service
□
□
Anti-corrosion check:
OK □ Not OK* □
*See specific page
6.11
CarManuals2.co

SERVICE SHEETS (5/6)
VIN:
Date:
Miles (Km):
Invoice number:
Comments/miscellaneous
Type of operation:
Stamp
Service
□
□
Anti-corrosion check:
OK □ Not OK* □
*See specific page
Date:
Miles (Km):
Invoice number:
Comments/miscellaneous
Type of operation:
Stamp
Service
□
□
Anti-corrosion check:
OK □ Not OK* □
*See specific page
Date:
Miles (Km):
Invoice number:
Comments/miscellaneous
Type of operation:
Stamp
Service
□
□
Anti-corrosion check:
OK □ Not OK* □
*See specific page
6.12
CarManuals2.co

SERVICE SHEETS (6/6)
VIN:
Date:
Miles (Km):
Invoice number:
Comments/miscellaneous
Type of operation:
Stamp
Service
□
□
Anti-corrosion check:
OK □ Not OK* □
*See specific page
Date:
Miles (Km):
Invoice number:
Comments/miscellaneous
Type of operation:
Stamp
Service
□
□
Anti-corrosion check:
OK □ Not OK* □
*See specific page
Date:
Miles (Km):
Invoice number:
Comments/miscellaneous
Type of operation:
Stamp
Service
□
□
Anti-corrosion check:
OK □ Not OK* □
*See specific page
6.13
CarManuals2.co

ANTICORROSION CHECK (1/5)
If the continuation of the warranty is subject to repair, it is indicated below.
VIN:
Corrosion repair operation to be carried
Stamp
out:
Date of repair:
Repair to be carried out:
Stamp
Date of repair:
Repair to be carried out:
Stamp
Date of repair:
6.14
CarManuals2.co

ANTICORROSION CHECK (2/5)
If the continuation of the warranty is subject to repair, it is indicated below.
VIN:
Corrosion repair operation to be carried
Stamp
out:
Date of repair:
Repair to be carried out:
Stamp
Date of repair:
Repair to be carried out:
Stamp
Date of repair:
6.15
CarManuals2.co

ANTICORROSION CHECK (3/5)
If the continuation of the warranty is subject to repair, it is indicated below.
VIN:
Corrosion repair operation to be carried
Stamp
out:
Date of repair:
Repair to be carried out:
Stamp
Date of repair:
Repair to be carried out:
Stamp
Date of repair:
6.16
CarManuals2.co

ANTICORROSION CHECK (4/5)
If the continuation of the warranty is subject to repair, it is indicated below.
VIN:
Corrosion repair operation to be carried
Stamp
out:
Date of repair:
Repair to be carried out:
Stamp
Date of repair:
Repair to be carried out:
Stamp
Date of repair:
6.17
CarManuals2.co

ANTICORROSION CHECK (5/5)
If the continuation of the warranty is subject to repair, it is indicated below.
VIN:
Corrosion repair operation to be carried
Stamp
out:
Date of repair:
Repair to be carried out:
Stamp
Date of repair:
Repair to be carried out:
Stamp
Date of repair:
6.18
CarManuals2.co