Renault Megane (2023 year). Manual in english - page 3
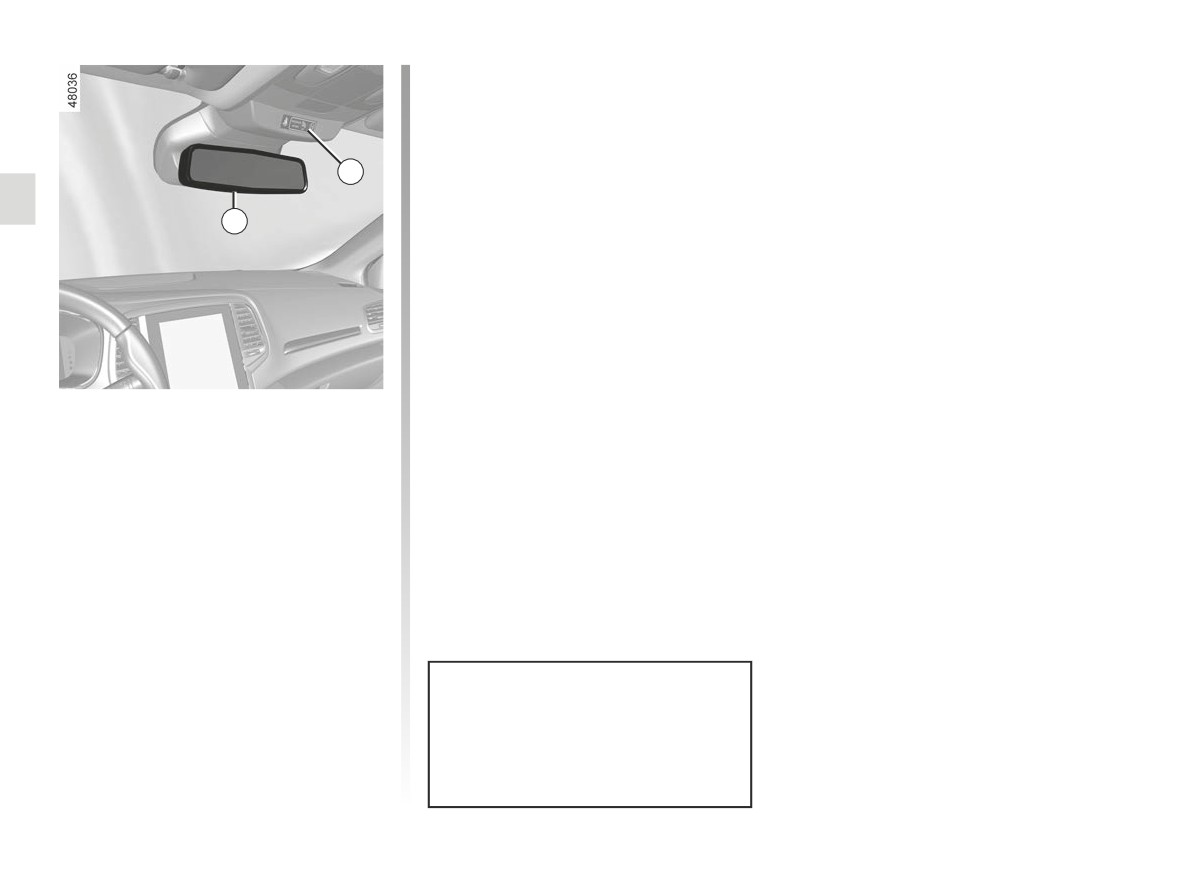
REAR VIEW MIRRORS (2/2)
5
4
Interior rear view mirror
Rear view mirror with lever 4
When driving at night, to avoid being
dazzled by the headlights of the vehicle
behind, depress the little lever located
behind rear view mirror 4.
Rear view mirror without lever 4
The rear-view mirror automatically
darkens when you are being followed
by a vehicle using main beam head-
lights or in very bright lighting.
The front passenger airbag acti-
vation/deactivation information is
shown on the display 5 ➥ 1.58.
1.100
CarManuals2.co
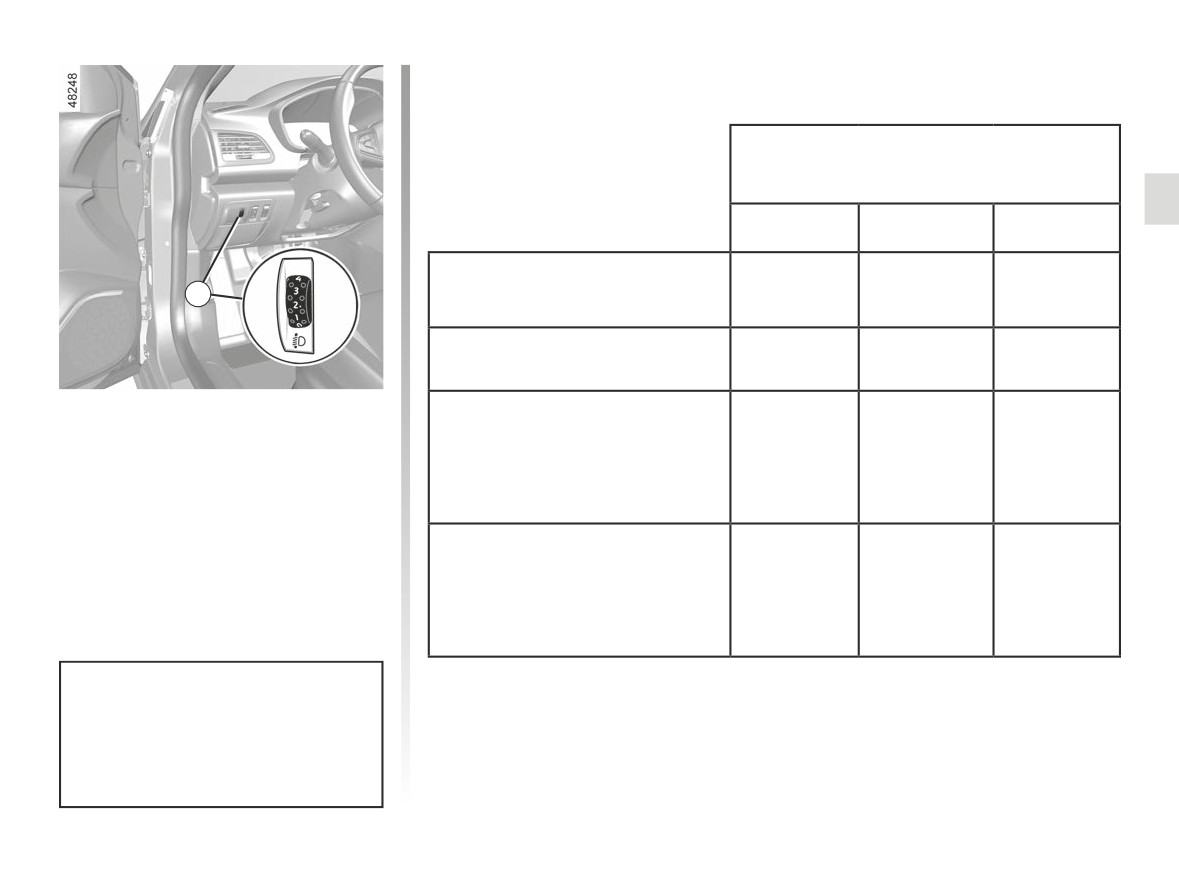
HEADLIGHT BEAM ADJUSTMENT
Examples of positions for adjusting
control A according to the load
5 doors
Estate
4 doors
Driver alone or with front
A
0
0
0
passenger
All seats occupied
1
1
1
On vehicles fitted with this function,
control A allows you to adjust the height
Driver with passengers and
of the beams according to the load.
luggage (or load) reaching the
3
3
3
maximum permissible all-up
Turn control A downwards to lower the
weight
headlights and upwards to raise them.
Driver without passengers and
luggage (or load) reaching the
3 or 4*
4
4
maximum permissible all-up
weight
* depending on the vehicle
For vehicles not fitted with a con-
trol A, the headlight adjustment is
automatic, depending on the vehi-
The table below gives some examples. In all cases, adjust control A according to
cle load.
the vehicle load so that the road can be seen and other drivers are not dazzled.
1.101
CarManuals2.co
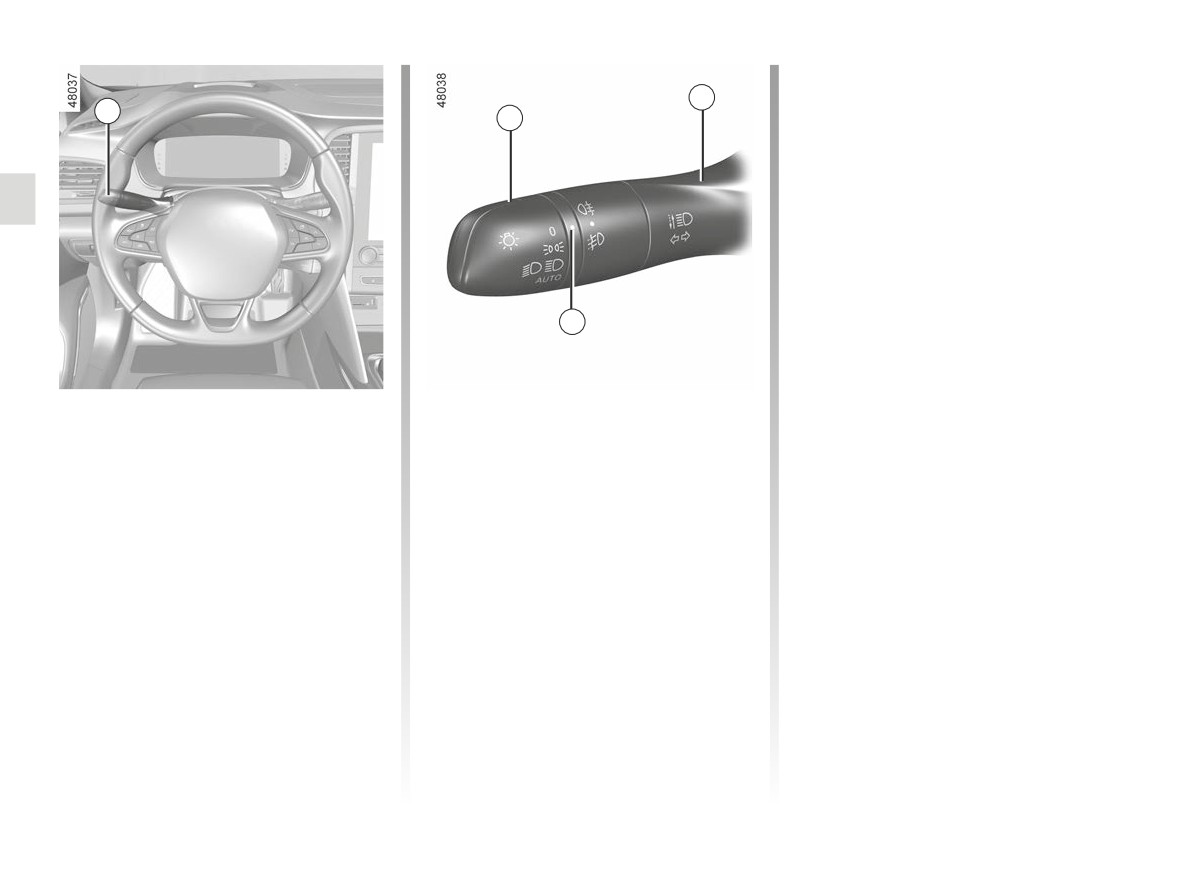
EXTERIOR LIGHTING AND SIGNALS (1/6)
Depending on the vehicle, the dipped
1
beam headlights will appear automati-
1
cally after several sweeps of the wind-
2
screen wiper blades.
3
Side lights
Dipped beam
š
k
headlights
Turn ring 2 until the symbol is
Manual operation
opposite mark 3.
This indicator light on the instrument
Turn ring 2 until the symbol is opposite
panel comes on.
mark 3. This indicator light on the in-
strument panel comes on.
Daytime running lights
Automatic operation
function
(depending on the vehicle)
The daytime running lights come on
Turn ring 2 until the AUTO symbol is op-
automatically with no action on stalk 1
posite mark 3: with the engine running,
when the engine is started, and they go
the dipped beam headlights switch on
off once the engine is switched off.
or off automatically depending on the
brightness of the light outside, without
any action on stalk 1.
1.102
CarManuals2.co
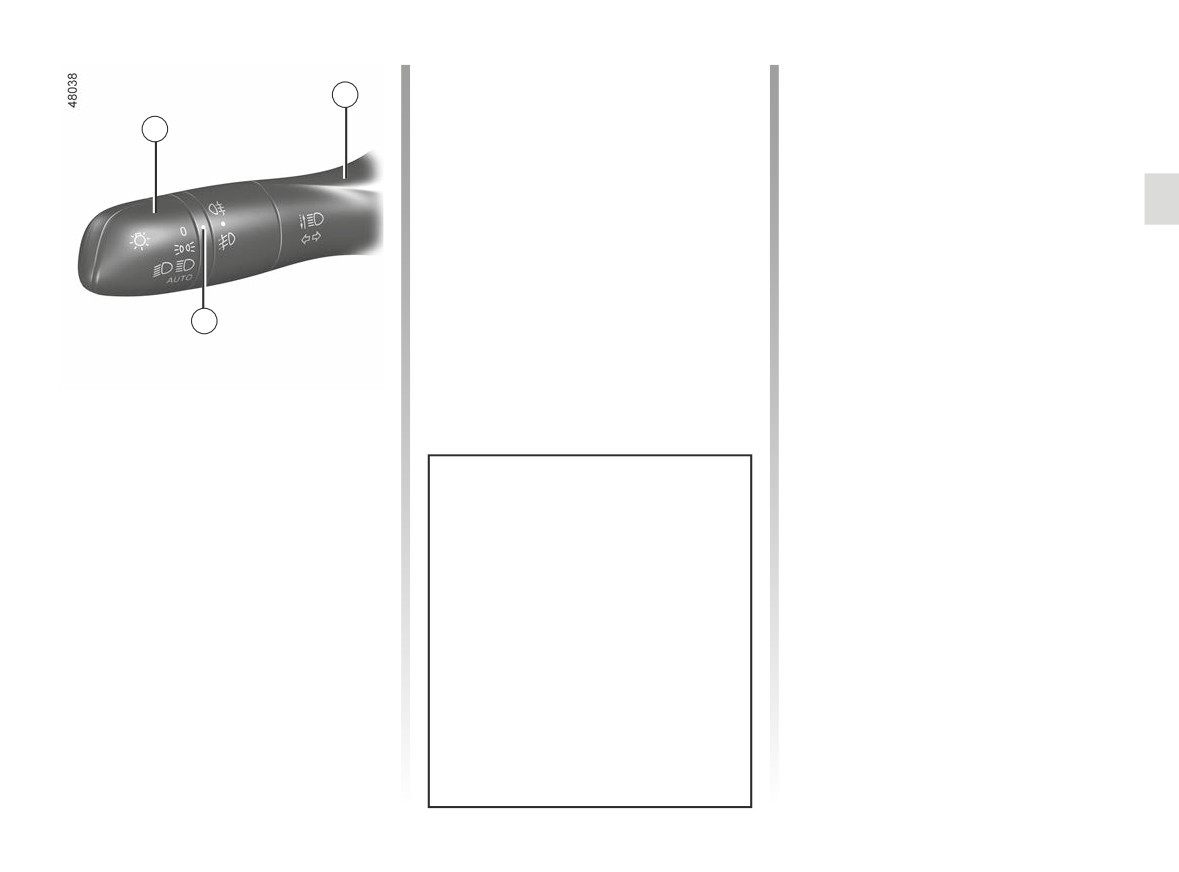
EXTERIOR LIGHTING AND SIGNALS (2/6)
During deactivation of the main beam
The main beam headlights come on au-
1
headlights, the dipped beam headlights
tomatically if:
return to their original position.
- exterior light is weak;
2
- no other vehicles or lighting are de-
tected;
Automatic main beam
- the vehicle speed is above approxi-
headlights
mately 25 mph (40 km/h).
Depending on the vehicle, this system
If any of the above conditions are not
switches the main beam headlights on
fulfilled, the system switches to dipped
and off automatically. It uses a camera
beam headlights.
located behind the interior rear-view
Note: make sure the windscreen is not
mirror to detect vehicles that are being
3
obscured (dirt, mud, snow, condensa-
followed and those coming in the oppo-
tion etc.).
site direction.
Main beam headlights
á
With the engine running and
the dipped beam headlights lit, push
stalk 1. This indicator light on the instru-
ment panel comes on.
The system may encounter difficul-
To return to the dipped headlight posi-
ties under certain conditions, inclu-
tion, pull stalk 1 towards you again.
ding:
- extreme weather conditions (rain,
snow, fog, etc.);
- obstruction in front of the wind-
screen or camera;
- when a following or oncoming ve-
hicle has weak or hidden lighting;
- incorrect settings for the front
headlights;
- reflective systems;
- ...
1.103
CarManuals2.co
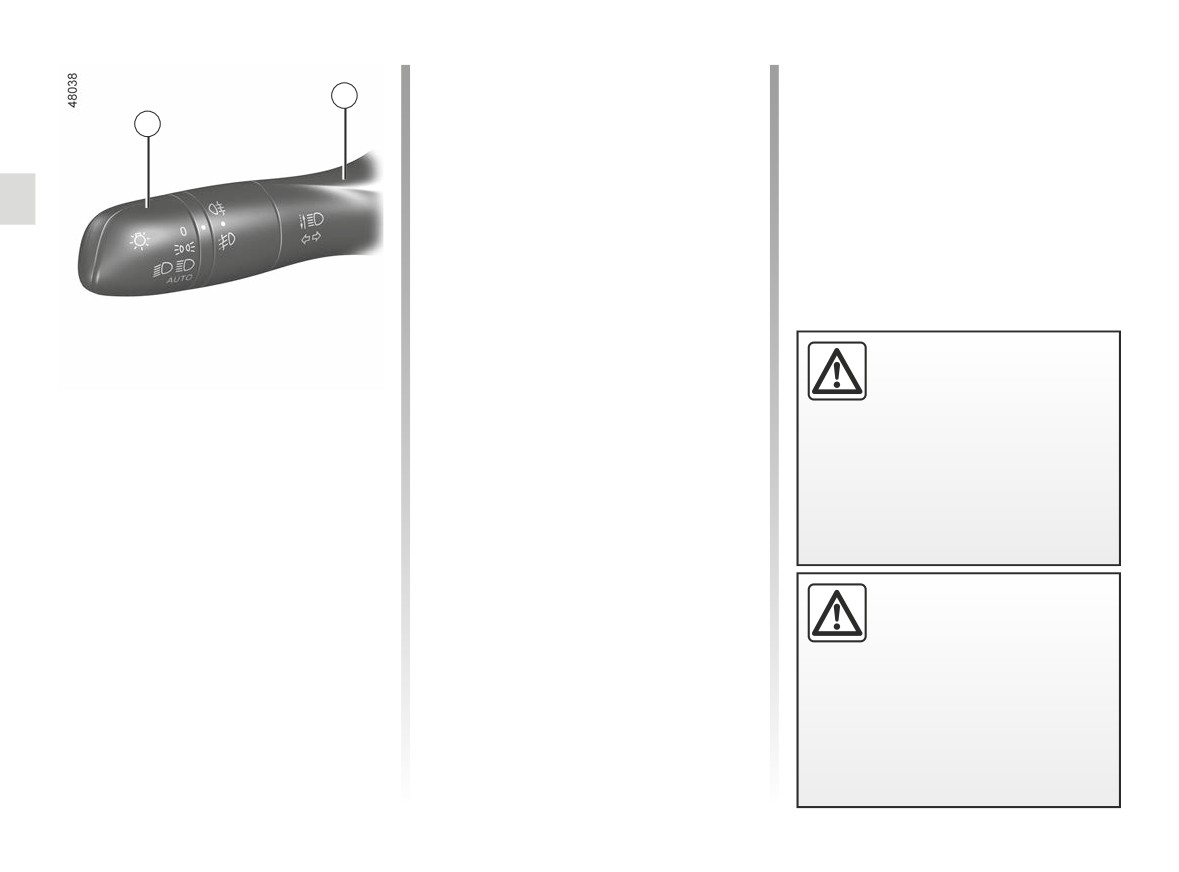
EXTERIOR LIGHTING AND SIGNALS (3/6)
To deactivate automatic main beam
1
headlights:
2
- pull stalk 1;
- or turn ring 2 to a position other than
AUTO.
Warning light
goes out on the in-
strument panel.
Note: make sure the windscreen is not
obscured (dirt, mud, snow, condensa-
tion, etc.).
Operating faults
Using the portable naviga-
When the message “Check Automatic
tion system at night in the
Lighting” appears on the instrument
windscreen area below the
Automatic main beam
panel, the system is deactivated.
camera may disturb the op-
headlights (continued)
Consult an approved dealer.
eration of the “automatic main beam
headlights” system (risk of reflection
on the windscreen).
Activation/deactivation
To activate the automatic main beam
headlights:
- turn the ring 2 until the AUTO symbol
is opposite the mark 3;
The “automatic main beam
- push the stalk 1.
headlights” system should
under no circumstances be
used to replace driver atten-
Warning light
comes on the in-
tion and responsibility with regard
strument panel.
to vehicle lighting and adapting to
light, visibility and traffic conditions.
1.104
CarManuals2.co
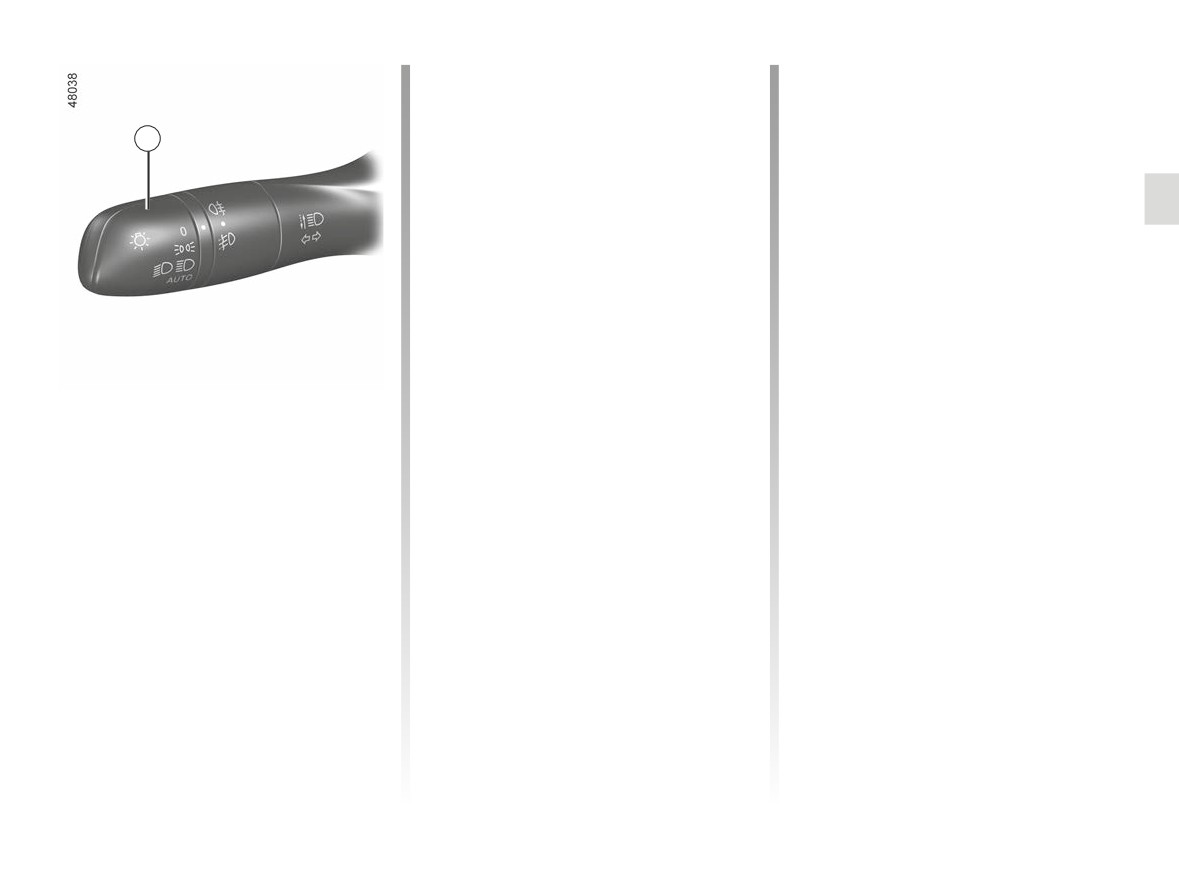
EXTERIOR LIGHTING AND SIGNALS (4/6)
Lights-on reminder buzzer
Welcome and goodbye
If the lights are on after the engine is
function
switched off, a warning beep sounds
(depending on the vehicle)
2
when the driver’s door is opened to
Once the function is activated, the day-
warn you that the lights are still on.
time running lights and the rear side
lights will light up automatically upon
detection of the card or when the vehi-
Operating faults
cle is unlocked.
When the message “WARNING: Check
They switch off automatically:
Lighting” with warning light
- approximately one minute after light-
is displayed and warning light k
ing up;
flashes on the instrument panel, this in-
- when starting the engine based on
dicates that there is a lighting fault.
the position of the lighting stalk;
Consult an authorised dealer.
or
Switching off the lights
- upon locking the vehicle.
The lights will go out automatically
when the engine is switched off, the
Activating/deactivating the function
driver’s door is opened or the vehicle
For activation or deactivation of the ex-
is locked. In this case, the next time
ternal welcome, refer to the multimedia
the engine is started the lights will be
instructions.
switched back on according to the posi-
tion of the ring 2.
Select “ON” or “OFF”.
Note: if the fog lights are lit, the lights
are not switched off automatically.
1.105
CarManuals2.co
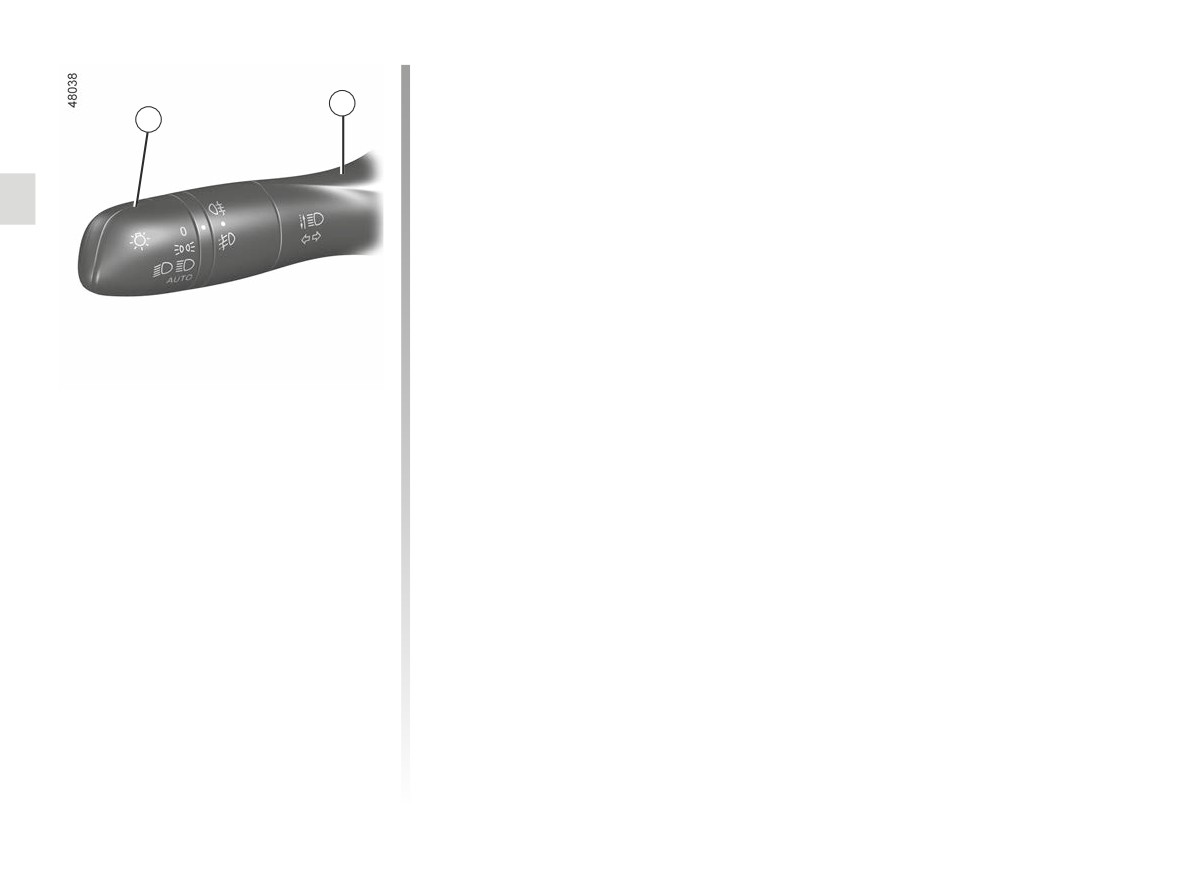
EXTERIOR LIGHTING AND SIGNALS (5/6)
With the engine lights switched off,
the 2 ring in AUTO, pull the lever 1 to-
1
wards you: the side lights and dipped
2
beam headlights will switch on for ap-
proximately 30 seconds along with the
š
and k
warning lights on the
instrument panel.
To increase this duration, you may pull
the stalk up to four times (total time re-
stricted to approximately two minutes).
The message “Follow-me home for _
_ _” along with the time the lights will
be on for is displayed on the instrument
panel to confirm this action. You can
then lock your vehicle.
“See-me-home lighting”
To switch off the lights before they go
function
out automatically, turn ring 2 to any po-
sition, then return it to position AUTO.
This function enables you to briefly
switch on the side lights and dipped
beam headlights (e.g. to provide light
when opening a gate).
1.106
CarManuals2.co
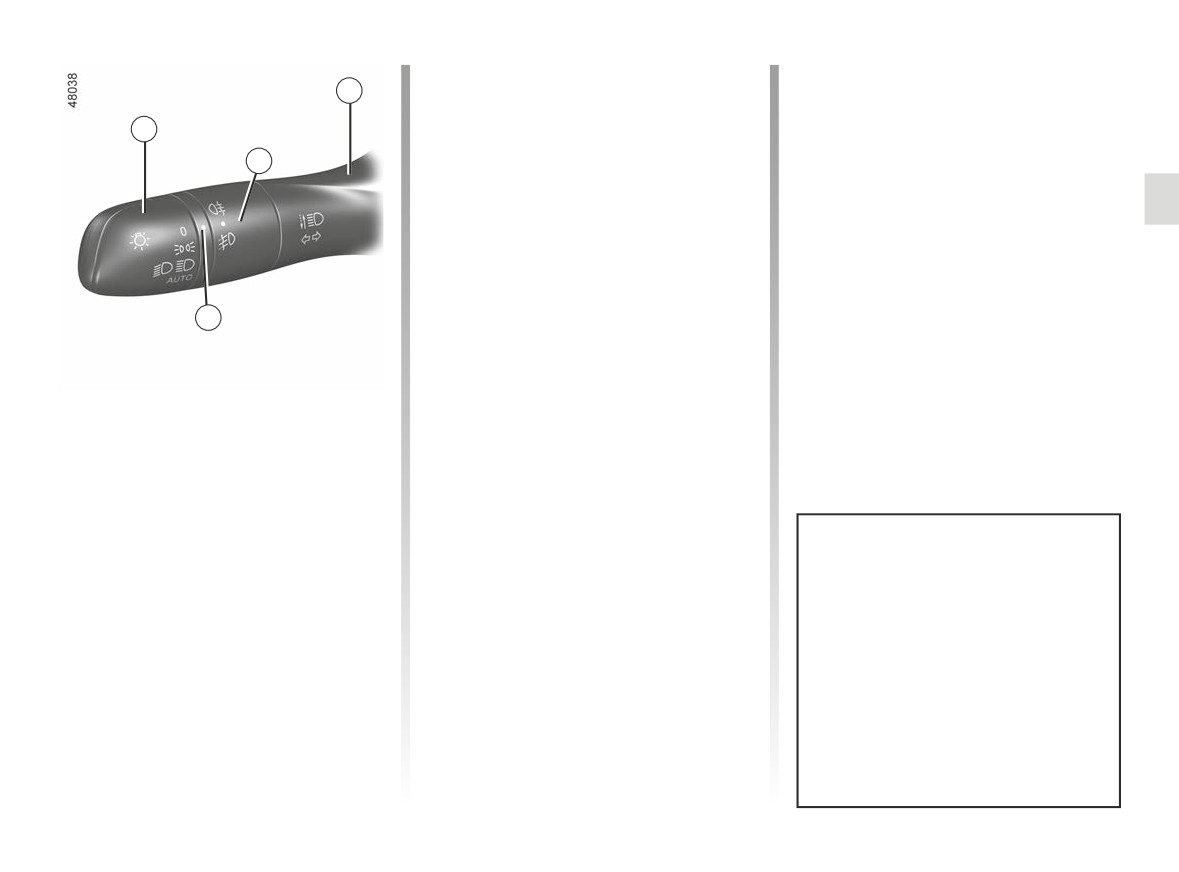
EXTERIOR LIGHTING AND SIGNALS (6/6)
Rear fog lights
Switching off the lights
1
Turn centre ring 4 on the stalk
Turn the centre ring 4again until the 3
until the symbol faces mark 3, then re-
symbol is opposite the symbol for the
2
lease it.
fog lights. The corresponding indicator
4
light on the instrument panel goes out.
Operation of the fog lights depends on
the exterior lighting selected, and an in-
The rear fog lights switch off when the
dicator light will light up on the instru-
exterior lights are switched off.
ment panel.
Do not forget to switch off the fog lights
when they are no longer needed, to
avoid inconveniencing other road
3
users.
Front fog lights
g
Turn centre ring
4 on the
stalk 1 until the symbol faces mark 3,
then release it.
Operation of the fog lights depends on
the exterior lighting position selected,
and an indicator light will light up on the
When driving in fog or snow, or
instrument panel.
when transporting objects which are
higher than the roof, the headlights
do not come on automatically.
Switching on the fog lights remains
the responsibility of the driver: the
indicator lights on the instrument
panel inform you whether the fog
lights are lit (indicator light on) or not
(indicator light not on).
1.107
CarManuals2.co
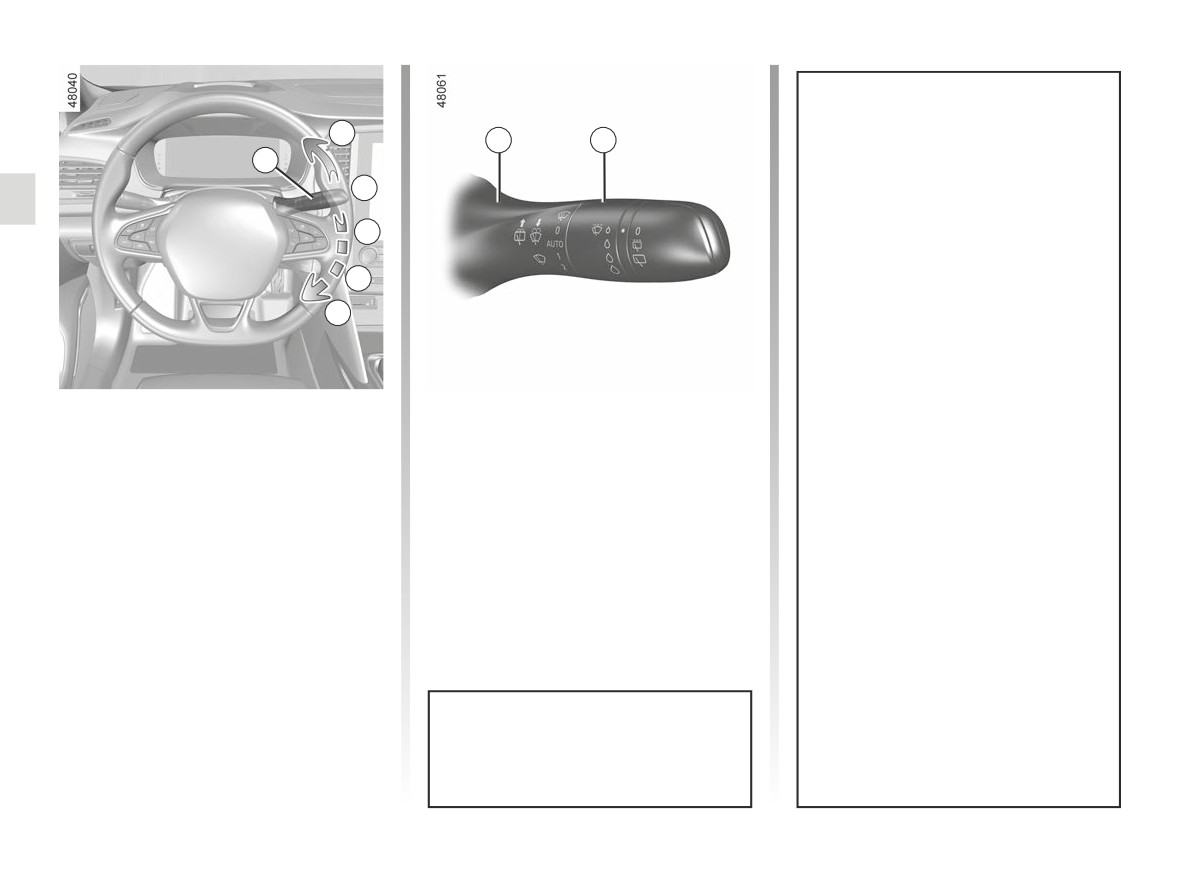
WINDSCREEN WASH, WIPE (1/6)
A
1
2
1
B
Efficiency of a wiper blade
Check the condition of the wiper
C
blades. How long they last depends
on you:
D
- it must remain clean: clean the
blade and the screen regularly
E
with soapy water;
- do not use it when the screen is
dry;
- free it from the screen when it has
Vehicle fitted with intermittent
Special note
not been used for a long time.
windscreen wipers
When driving the vehicle, the wiping
In all cases, replace it as soon as
speed slows down whenever the vehi-
it begins to lose efficiency: approxi-
A
single sweep
cle stops.
mately once a year. ➥ 5.37.
A short push will trigger one sweep
They will go from a fast continuous
of the wipers.
speed to a slow continuous speed. As
B
stop
Precaution for using the
soon as the vehicle moves, the wipers
C
intermittent wiping
wipers
return to the speed that was initially se-
The wipers will pause for several
lected.
- in freezing or snowy weather,
seconds between sweeps. It is
clear the screen before starting
possible to change the time be-
If stalk 1 is operated, it overrides and
the wipers (risk of motor over-
tween sweeps by turning ring 2.
cancels the automatic function.
heating);
D
slow continuous wiping
- ensure that no objects are ob-
E
fast continuous wiping
structing the travel of the blade.
Positions A, C and D are accessible
with the ignition on. Position E is
accessible only when the engine is
running.
1.108
CarManuals2.co
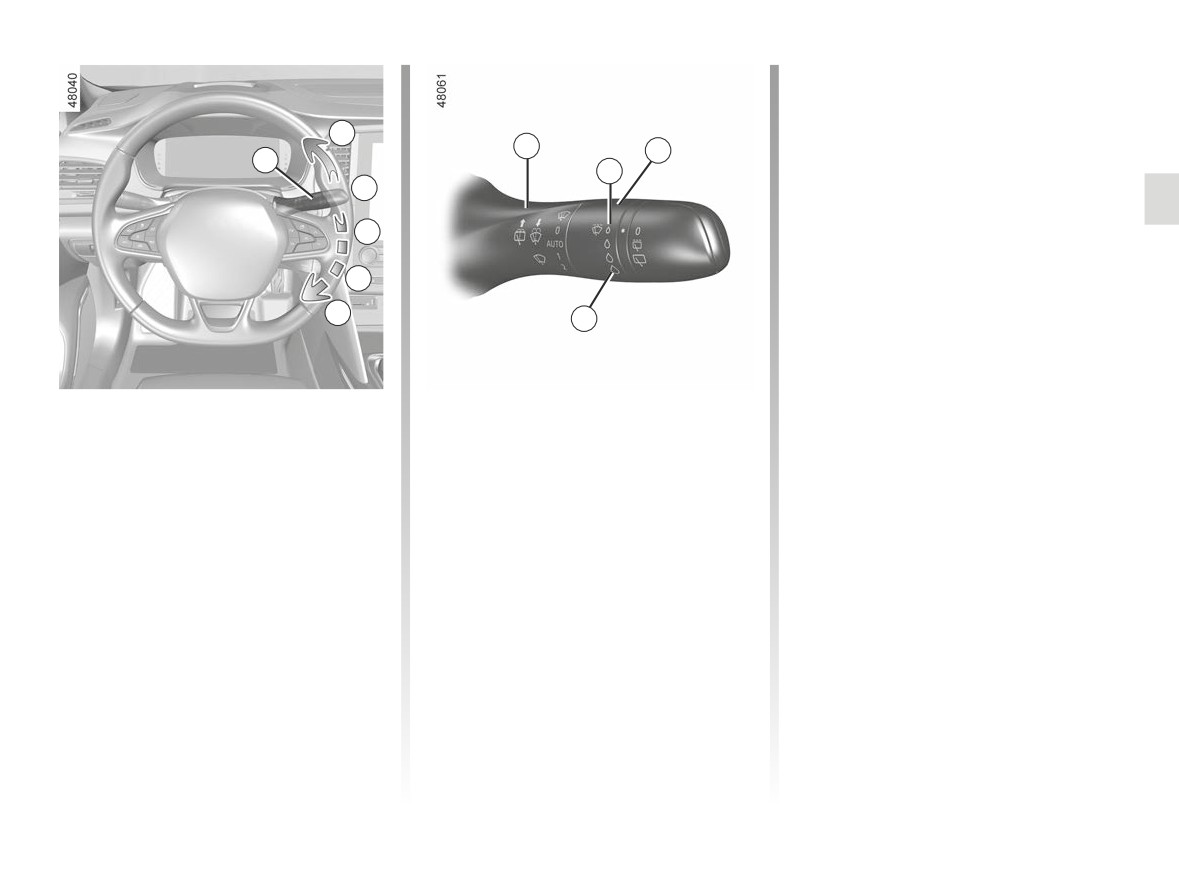
WINDSCREEN WASH, WIPE (2/6)
When activating automatic wiping or
when increasing sensitivity, one sweep
of the blades is performed.
A
1
Note:
2
1
F
-
the rain sensor is only intended as a
B
driving aid. In the event of reduced
visibility, the driver should manually
C
activate the wipers. In foggy weather
or during snowfalls, wiping is not au-
D
tomatically triggered and remains
under the driver’s control;
E
G
-
in the event of temperatures below
zero, automatic wiping is not acti-
vated when the vehicle is started. It
is automatically activated as soon as
Vehicle fitted with front
C
automatic wiper function
the vehicle exceeds a certain speed
windscreen wiper rain sensor
When this position is selected, the
(approximately 5 mph (8 km/h));
system detects water on the wind-
The rain sensor is located on the winds-
-
do not activate automatic wiping in
screen and triggers the wipers at a
creen, in front of the interior rear-view
dry weather;
suitable wiping speed. It is possi-
mirror.
ble to change the triggering thresh-
-
fully de-ice the windscreen before
old and the time sweeps by turn-
activating automatic wiping;
A single sweep
ing ring 2:
A short push will trigger one sweep
-
when washing the vehicle under a
- F: minimum sensitivity;
roller type car wash, return the ring 1
of the wipers.
to the B position to deactivate auto-
- G: maximum sensitivity.
B stop
matic wiping.
The higher the sensitivity, the quicker
the wipers will react and the faster the
wipe.
1.109
CarManuals2.co
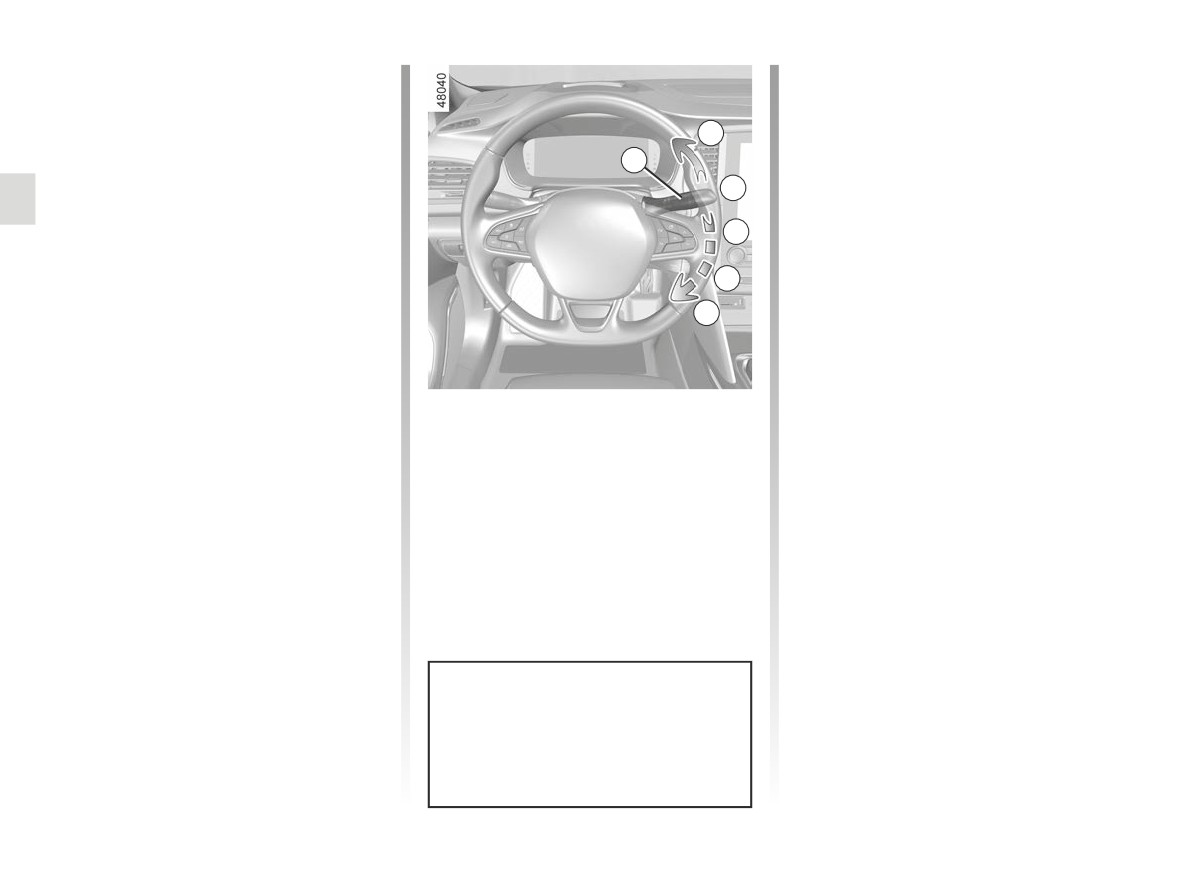
WINDSCREEN WASH, WIPE (3/6)
Operating fault
Special note
In the event of a malfunction of the au-
When driving the vehicle, the wiping
tomatic wiping, the wiper is set to inter-
speed slows down whenever the vehi-
A
mittent wiping.
cle stops.
1
Call an approved Dealer.
For example, fast wiping speed will
B
slow to normal wiping speed.
The operation of the rain sensor may
be interrupted in the event of:
As soon as the vehicle moves off,
C
wiping will return to the speed originally
-
damaged windscreen wipers; a film
selected.
of water or traces left by a blade in
D
the sensor’s detection zone may in-
If stalk 1 is operated, it overrides and
crease the response time of the au-
E
cancels the automatic function.
tomatic wiper, or increase the wiping
frequency;
Precautions
-
a windscreen with any chip or crack
- In the event of ice, check whether the
level with the sensor, or a windscreen
D
slow continuous wiping
blades are stuck to the windscreen
covered in dust, dirt, insects, ice, the
before operating the wiping mecha-
use of washing wax and water-repel-
E
fast continuous wiping
nism. If you activate the wipers while
lent chemicals; the windscreen wiper
the blades are stuck down with ice,
will be less sensitive or may even not
you may risk damaging both the
react at all.
blade and the wiper motor.
- Do not activate the wipers on a dry
screen. This will lead to premature
wear or damage to the blades.
Positions A and D are accessible
with the ignition on.
Positions C and E are accessible
only with the engine running.
1.110
CarManuals2.co

WINDSCREEN WASH, WIPE (4/6)
Specific front wiper position
Note: after replacement, to reposition
the blades correctly, make sure the
(service position)
blades are resting on the windscreen,
This position enables the blades to be
switch on the ignition and activate the
lifted to remove them from the winds-
wiper control.
creen.
It may be useful to:
- to clean the blades;
- to release the blades from the wind-
screen in winter;
In the event of obstacles on the
- replace the blades ➥ 5.37.
windscreen (dirt, snow, ice etc.),
clean the windscreen (including the
With the ignition on and the engine off,
central area located behind the inte-
lower the windscreen wiper stalk fully
rior rear view mirror) before starting
(fast continuous wipe position). The
the wipers (risk of motor overheat-
wiper arms stop in a position away from
ing).
the bonnet.
If an object is preventing a blade
To return the blades to position, make
from moving, it may stop function-
sure they have been placed on the
ing.
windscreen, then move the stalk to po-
sition B (stop) with the ignition on.
Remove the obstacle and reactivate
the wiper using the wiper stalk.
Before switching on the ignition,
place the wipers on the windscreen.
Otherwise, there may a risk of damage
to the bonnet or the wipers when they
Before any action involving
are switched on.
the windscreen
(washing
the vehicle,
de-icing,
cleaning the windscreen,
etc.) return stalk
1 to position B
(stop).
Risk of injury and/or damage.
1.111
CarManuals2.co
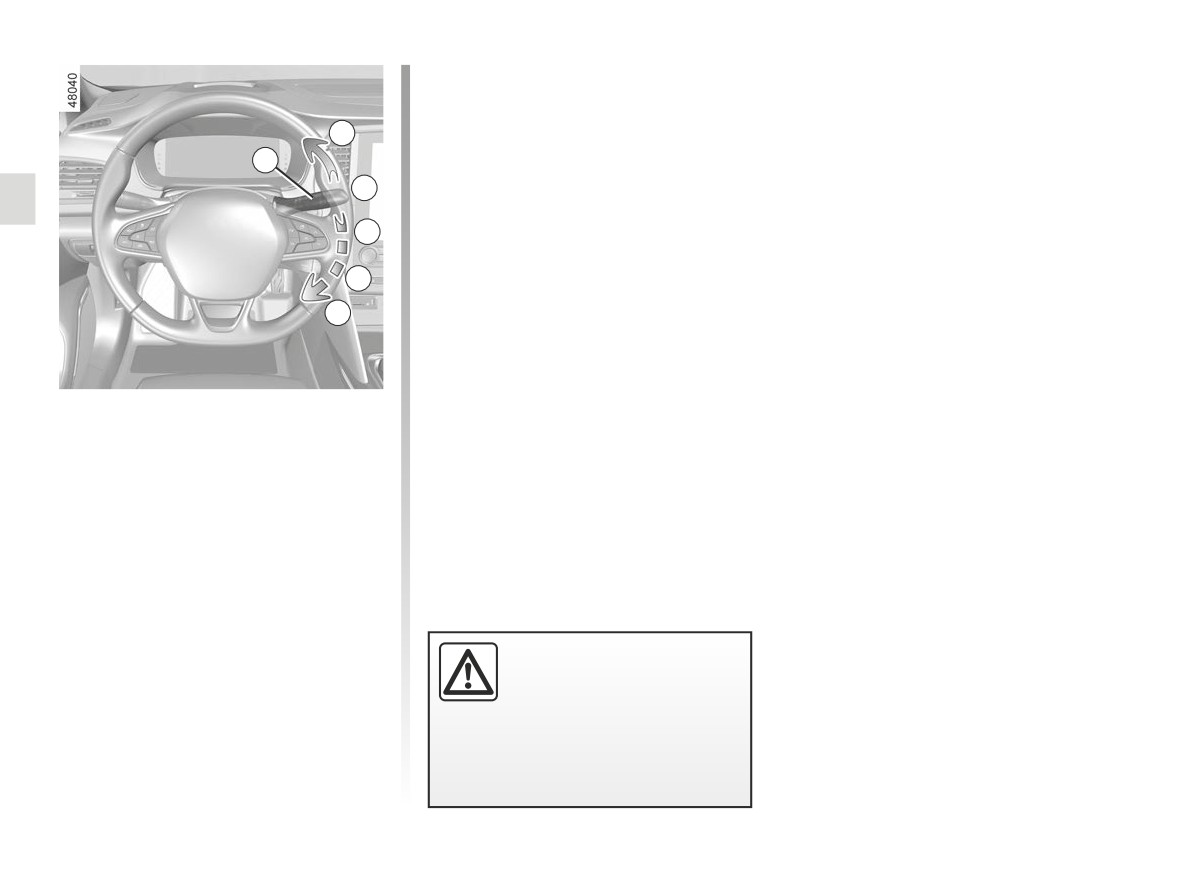
WINDSCREEN WASH, WIPE (5/6)
Note: in temperatures below zero, the
washer liquid may freeze on the wind-
screen, reducing visibility. Heat the
A
windscreen using the demister control
before cleaning.
1
B
C
D
E
Windscreen washer
With the ignition on, pull stalk 1 then
release.
A brief pull will trigger a single sweep
of the wipers, in addition to the wind-
screen washer.
A longer pull will trigger three sweeps
of the wipers followed, a few seconds
later, by a fourth, in addition to the wind-
screen washer.
When working in the engine
compartment, ensure that
the windscreen wiper stalk
is in position B (stop).
Risk of injury.
1.112
CarManuals2.co
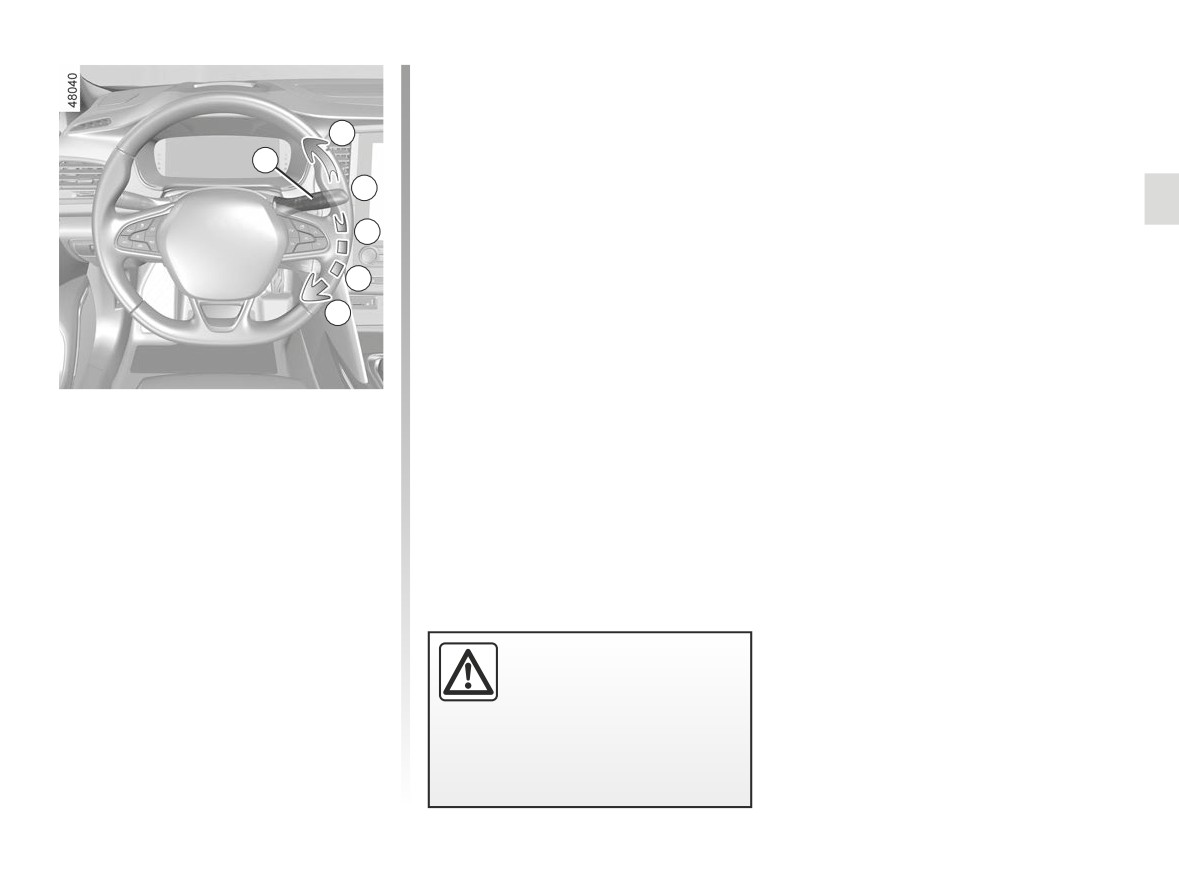
WINDSCREEN WASH, WIPE (6/6)
Note: to ensure the headlight wash-
ers operate correctly in winter, remove
snow from the jet trims and de-ice the
A
jet trims using an aerosol de-icer.
1
You are recommended to regularly
B
remove dirt encrusted on the headlight
glass.
C
When the minimum windscreen washer
fluid level is reached, the headlight
D
washer system may be deprimed.
Fill the windscreen washer fluid and
E
then activate the windscreen washer,
with the engine running, to reprime
the system.
Headlight washers
Headlights on
On equipped vehicles, hold stalk 1
pulled towards you for about 2 sec-
onds - the headlight washers and wind-
screen washers will be activated at the
same time.
The headlight washers are also acti-
vated after three prolonged movements
on the front windscreen washer control.
When working in the engine
compartment, ensure that
the windscreen wiper stalk
is in position B (stop).
Risk of injury.
1.113
CarManuals2.co
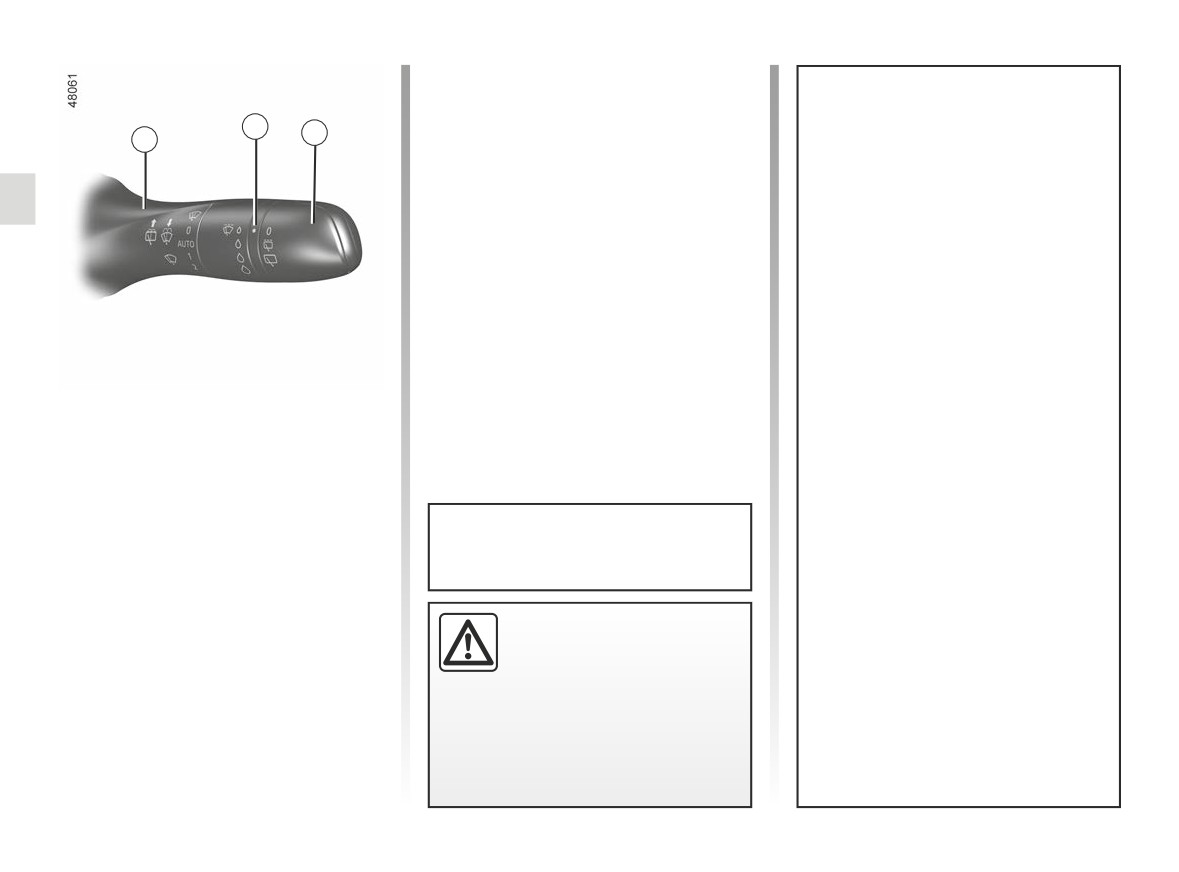
REAR SCREEN WASH, WIPE (1/2)
To stop the operation, pivot ring 3 again.
Note: when washing using a roller
2
type car wash, return the ring 3 on the
3
1
stalk 1 to the stop position to deactivate
automatic wiping.
Follow usage recommendations.
Efficiency of a wiper blade
Check the condition of the wiper
blades. How long they last depends
on you:
- it must remain clean: clean the
blade and the screen regularly
with soapy water;
- do not use it when the screen is
dry;
- free it from the screen when it has
Rear screen wiper
not been used for a long time.
Y
With the ignition on, rotate the
In all cases, replace it as soon as
ring 3 on the lever 1 until the symbol is
it begins to lose efficiency: approxi-
opposite the reference point 2:
mately once a year. ➥ 5.37.
- stop;
- intermittent wiping.
Do not use the wiper arm to open or
Precautions for using the
The blade will pause for several
close the tailgate.
wipers
seconds between sweeps. Wiping
- In freezing or snowy weather,
frequency varies with vehicle
clear the screen before starting
speed;
Before any action involving
the wipers (risk of motor over-
the rear screen (washing
– slow continuous wiping.
heating);
the vehicle, de-icing, clean-
- ensure that no objects are ob-
ing, etc.) return stalk 1 to
structing the travel of the blade.
the stop position.
Risk of injury and/or damage.
1.114
CarManuals2.co
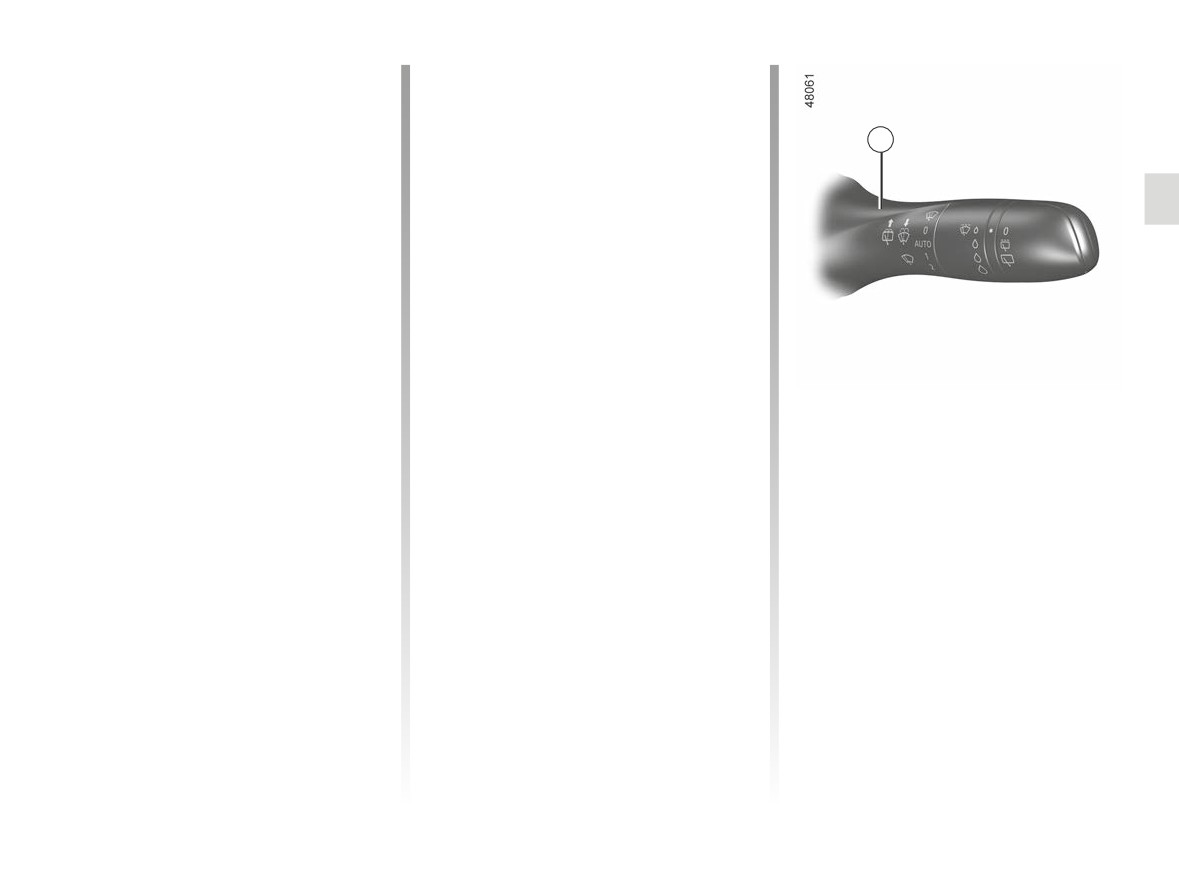
REAR SCREEN WASH, WIPE (2/2)
Activation/deactivation of the rear
In the event of obstacles present on the
screen wiper
rear window (dirt, snow, etc.), the wiper
will try to sweep away all the obstacles.
Engaging reverse gear triggers inter-
If an obstacle prevents the blade from
mittent wiping (if the front wipers are in
1
moving, it can be stopped. Remove the
operation). If your vehicle is equipped
obstacle, wait for around 30 seconds
with a vehicle settings customisation
and reactivate the wiper using the wiper
menu, you can opt to activate or deacti-
stalk.
vate this function. ➥ 1.92.
For vehicles not fitted with a settings
Precautions
customisation menu, you can have this
- In the event of ice, check that the
function deactivated by an authorised
blades are not stuck to the wind-
dealer.
screen before operating the wipers.
If you activate the wiper while the
blade is blocked by ice, you risk
damaging both the blade and the
wiping motor.
Rear screen wash/wipe
p
- Do not operate the wipers on a dry
With the ignition on, push and
screen. This will lead to the prema-
hold stalk 1, then release.
ture wear or damage to the blades.
A longer action will trigger three sweeps
of the wipers followed, a few seconds
later, by a fourth, in addition to the wind-
screen washer.
1.115
CarManuals2.co
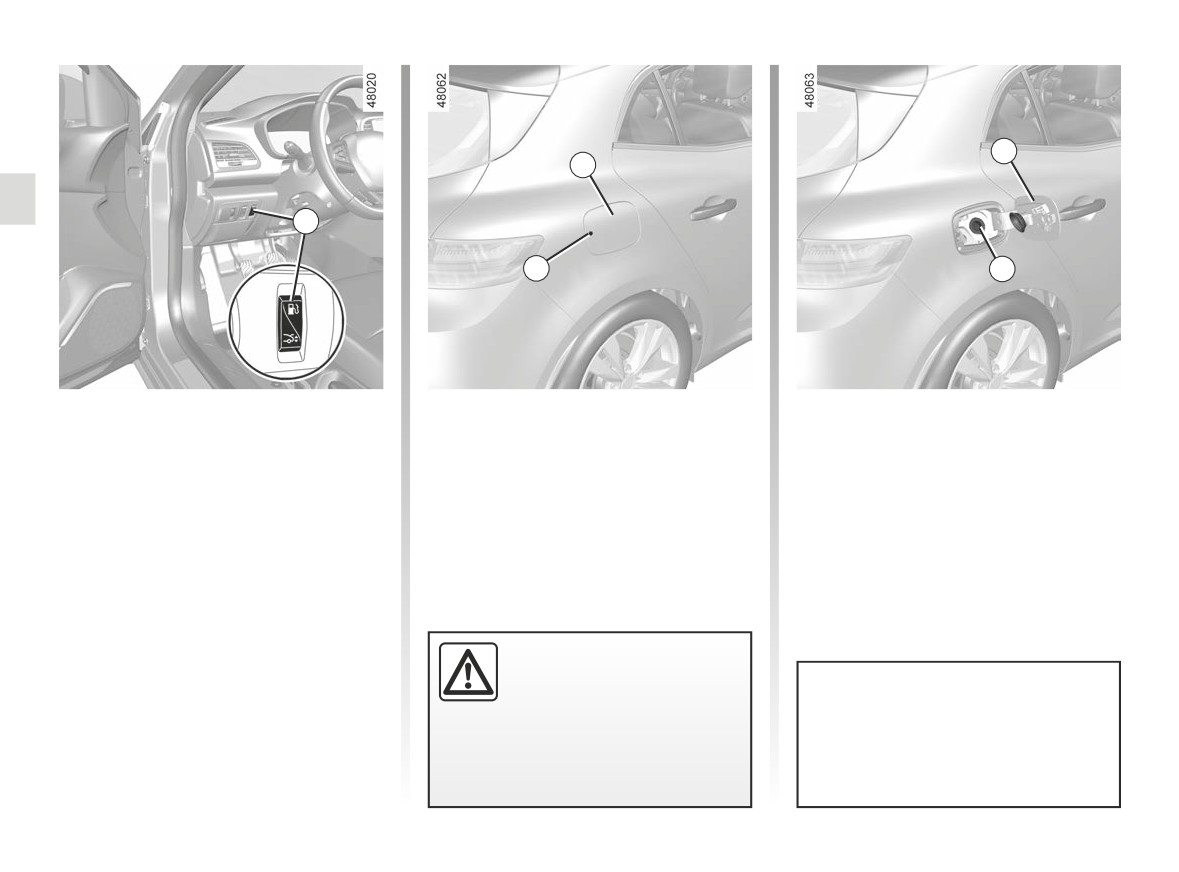
FUEL TANK (1/3)
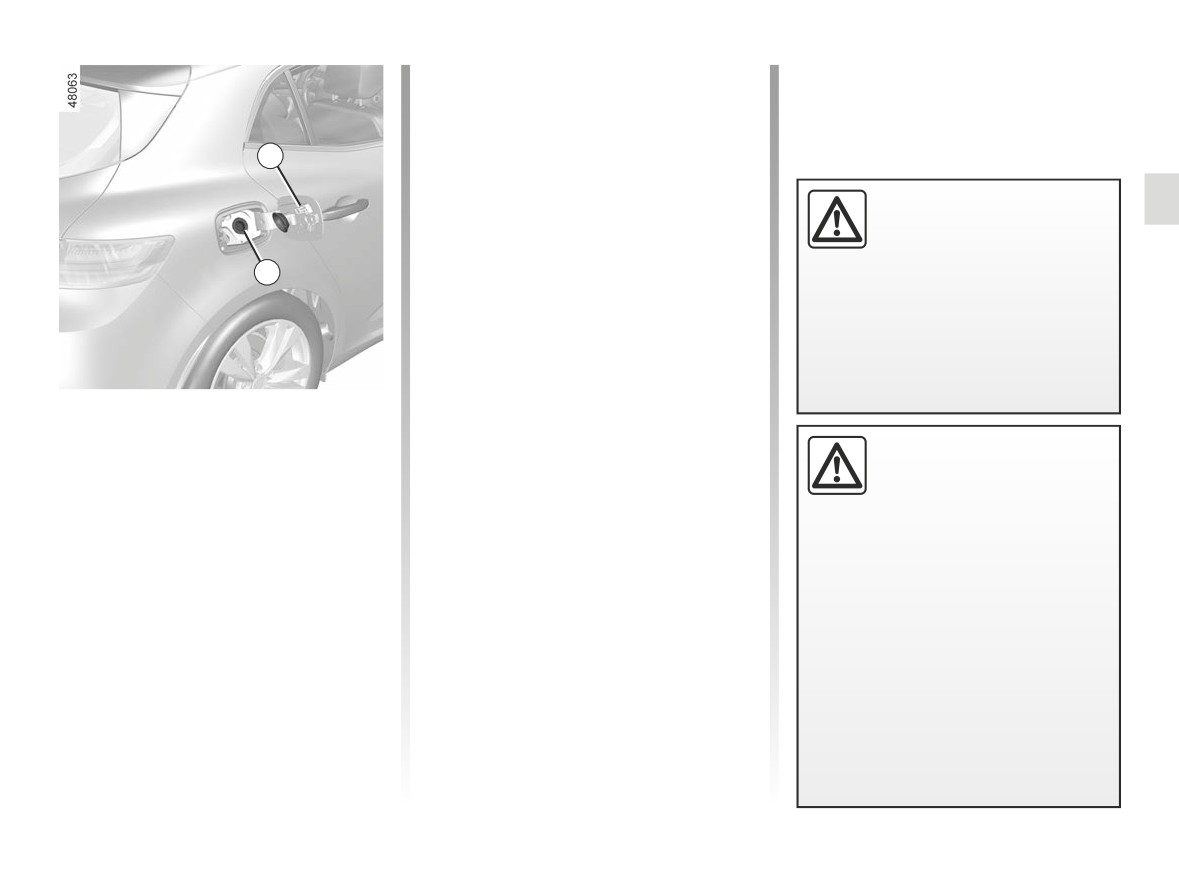
2
2
1
A
3
Useable tank capacity:
For details on filling the fuel tank, refer
Fuel grade
to the information on “Filling with fuel”
- About 11 gallons (50 litres) for
Use a high-grade fuel that complies
on the next page.
petrol versions;
with the legislation in force in each
To close it, press on the fuel filler flap by
country and which must comply with
- about 10.78 gallons (49 litres) for
hand, as far as it will go.
the specifications given on the label on
four door diesel versions;
the cover 2. ➥ 6.9.
- about 9.90 gallons (45 litres) for
five-door and estate diesel versions.
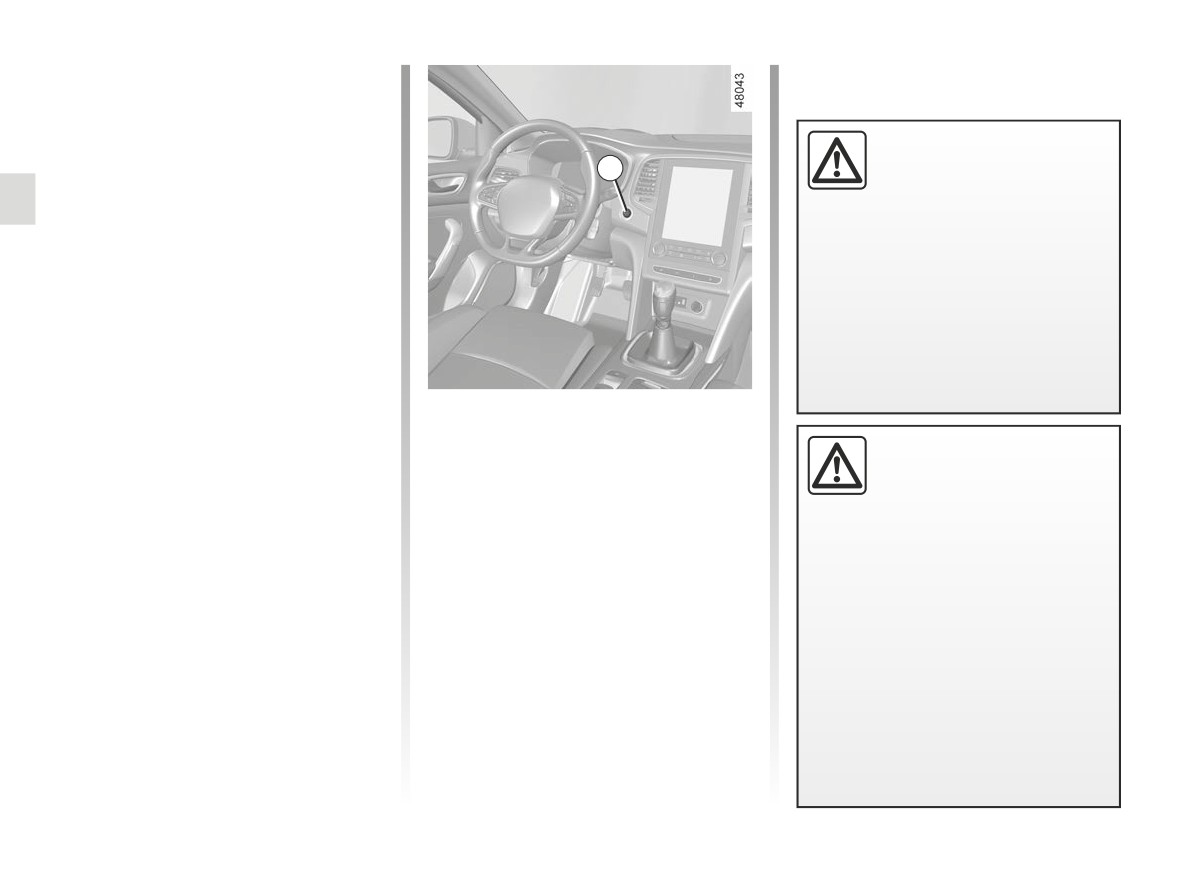
With the vehicle unlocked, to open
cover 2, press area A then release or,
depending on the vehicle, press the
control on the dashboard1. The cover 2
Never press valve 3 with
opens.
your fingers.
Valve 3 is integrated into the filler pipe.
Do not wash the filler
Fuel types that conform to European
area with a high-pressure
standards with which the engines of
washer.
vehicles sold in Europe are compat-
ible: refer to the table ➥ 6.9.
1.116
CarManuals2.co
FUEL TANK (2/3)
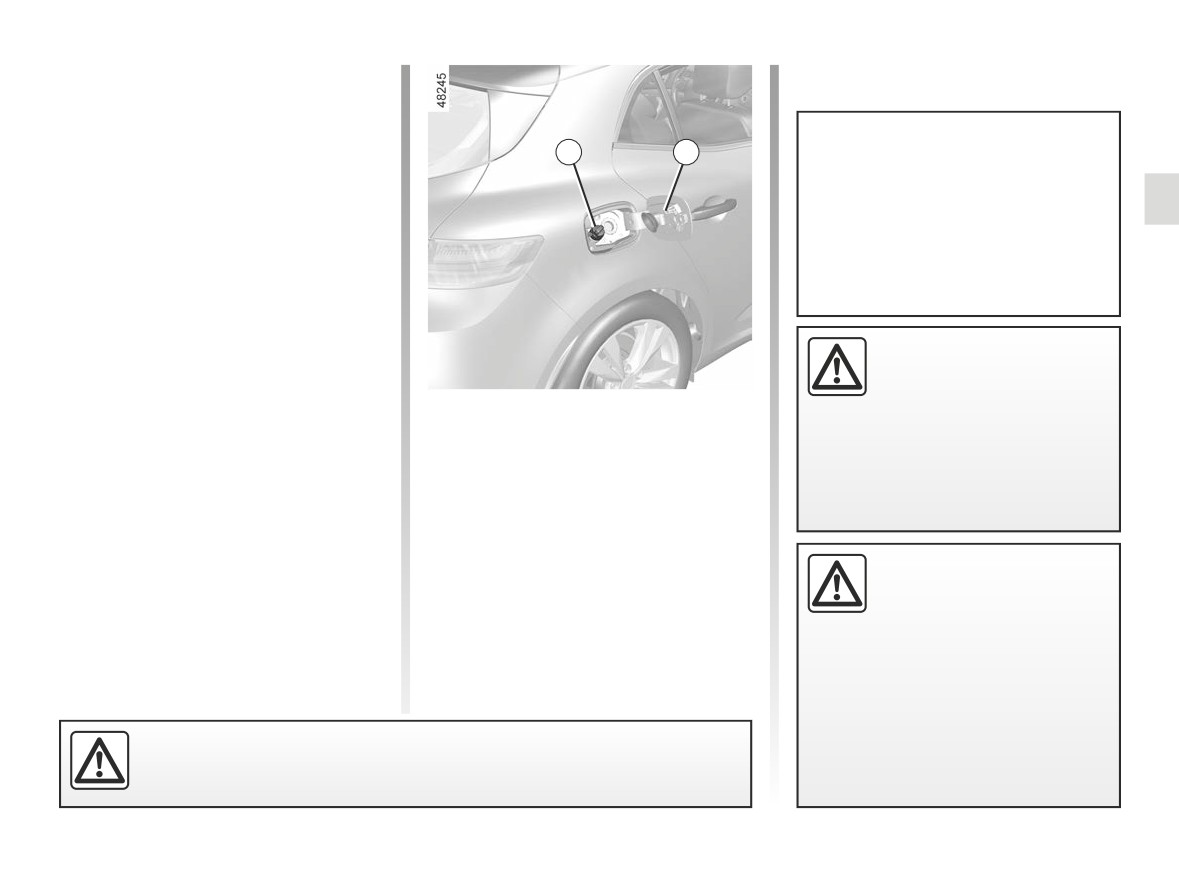
Filling with fuel
With the ignition off, insert the nozzle to
open valve 3 and insert it fully before
turning it on to fill the fuel tank (risk of
2
splashing).
Keep the nozzle in this position through-
To fill up with fuel, the
out the entire filling operation.
engine must be stopped
When the pump cuts out automatically
(and not only on standby
at the end of the filling procedure, a
in the case of vehicles
3
maximum of two further filling attempts
equipped with the Stop and Start
may be made, as there must be suffi-
function): you must switch off the ig-
cient space in the fuel tank to allow for
nition ➥ 2.4 ➥ 2.5.
expansion.
Make sure that no water enters the fuel
Fire hazard.
tank during filling. The valve 3 and its
surround must remain clean.
Diesel versions
It is essential to use diesel fuel that
Petrol versions
Do not mix even small
conforms with the information given on
Using leaded petrol will damage the
amounts of petrol
(un-
the label inside cover 2.
antipollution system and may lead to
leaded or E85) with diesel.
a loss of warranty. To ensure that the
Do not use ethanol-based
fuel tank is not filled with leaded petrol,
fuel if your vehicle is not compatible
Petrol versions
the fuel tank filler neck consists of a re-
with this fuel.
It is essential to use unleaded petrol.
strictor fitted with a safety system which
Do not add reagent to the fuel -
The octane rating (RON) must comply
only allows a nozzle for unleaded
otherwise you risk damaging the
with the information given on the label
petrol to be used (at the pump).
engine ➥ 1.119.
on the cover 2. ➥ 6.9.
If you wish to add an additive to the
fuel, use a product approved by our
Technical Department.
Consult an approved dealer.
1.117
CarManuals2.co
FUEL TANK (3/3)
Running out of fuel on diesel
versions
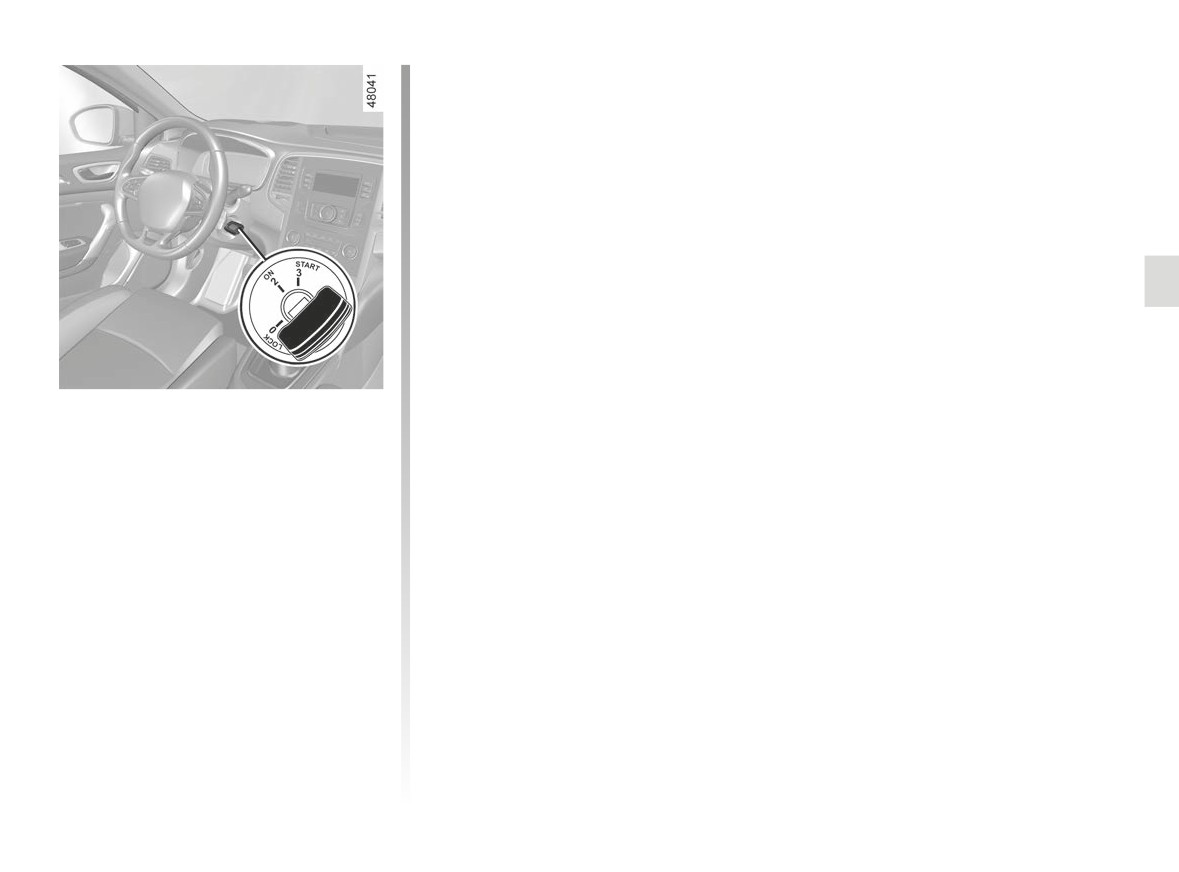
Vehicles with key/remote control
No modifications what-
- Set the ignition key to the “ON” posi-
soever are permitted on
4
tion 2 ➥ 2.3 and wait a few minutes
any part of the fuel supply
before starting to enable the fuel cir-
system
(electronic units,
cuit to be primed;
wiring, fuel circuit, injectors, pro-
– turn the key to position “START"3. If
tective covers, etc.) as this may be
the engine does not start, repeat the
dangerous (unless undertaken by
procedure.
qualified Network personnel).
- If the engine does not start after sev-
eral attempts, please contact an au-
thorised dealer.
Vehicles with card
With the card in the passenger com-
Persistent smell of
partment, press the start button 4 with-
out pressing any of the pedals. Wait a
fuel
few minutes before starting. This will
If you notice a persistent
enable the fuel circuit to be primed. If
smell of fuel you should:
the engine does not start, repeat the
- stop the vehicle as soon as traf-
procedure.
fic conditions allow and switch off
If the engine does not start after several
the ignition;
attempts, please contact an authorised
- switch on the hazard warning
dealer.
lights and ask your passengers
to leave the vehicle and to keep
away from traffic;
- contact an approved Dealer.
1.118
CarManuals2.co
REAGENT TANK (1/4)
Please ensure that you comply with the
legislation of your country. It is impor-
tant to remember that failure to respect
regulations in force could lead to legal
action being taken against the vehicle
1
A
To fill up with reagent, the engine
owner.
must be stopped (and not only on
standby in the case of vehicles
equipped with the Stop and Start
Operating principle
function): you must switch off the
The reagent is intended for diesel en-
engine ignition ➥ 2.4 ➥ 2.5.
gines fitted with the SCR (selective cat-
alytic reduction) system.
Using a reagent reduces the quantity of
nitrogen oxides in exhaust gases.
If the
“XXX MILES (XXX
Reagent consumption in real time de-
KM) Failure Top up AdBlue”
pends on vehicle usage conditions, the
warning message appears,
equipment fitted, and driving style.
Filling
fill the reagent tank and
refer to the filling instructions.
Capacity
of
the
tank:
3.52
gal
Reagent quality
(16 litres) approximately.
Risk of immobilisation of the ve-
Use only reagents which conform
hicle.
With the ignition switched off, open the
to standard ISO 22241 and in accor-
cover A, then unscrew the cap 1.
dance with the mark on the tank filler
cap.
Note: Ammonium hydroxide vapour
may escape from the cap opening
Filler cap: this is specific.
when the tank temperature is high.
If you have to replace it,
make sure it is identical to
the original cap. Contact
an approved Dealer. Do not wash
the filler area with a high pressure
washer.
The reagent must not come into contact with eyes or skin. If it does, wash
the affected area with plenty of cold water. If necessary, consult a doctor.
1.119
CarManuals2.co

REAGENT TANK (2/4)
Filling (continued)
If the reagent overflows, or contami-
nates any paintwork, clean the affected
The tank can be filled at the pump. With
area quickly with plenty of cold water
the ignition off, insert the nozzle and
and a soft cloth.
insert it fully before turning it on to fill
the fuel tank (risk of splashing). Keep
Note: If the reagent crystallises, use a
the nozzle in this position throughout
soft sponge.
After filling the reagent tank, check
the entire filling operation.
that the cap and cover are closed,
In extreme cold weather conditions
start the engine and WAIT 10 sec-
When the pump cuts out automatically
In frosty weather conditions, the rea-
onds with the vehicle stationary,
at the end of the filling procedure, a
gent tank should be refilled when the
engine running before setting off
maximum of two further filling attempts
again.
may be made, as there must be suffi-
indicator and the message “Top
If this operation is not carried out,
cient space in the fuel tank to allow for
up AdBlue before 1200 km” appear on
the filling of the tank will not be
expansion.
the instrument panel.
taken into account automatically
In other filling cases, it is essential to
Special cases
until after several dozens of minutes
read the information shown on the rea-
of driving.
The reagent fluid freezes below about
gent container (e.g. the can or bottle).
The message “--- Top up AdBlue”
-10°C.
and/or the warning lights will con-
In these conditions, do not attempt fill-
tinue to appear until the filling has
Precautions for use
ing when the fluid is frozen. In the event
been taken into account by the
When filling:
of needing to top up or fill the tank
system.
- handle the reagent with care. They
with reagent (
on), park the ve-
can damage clothes, shoes, body-
hicle in a hotter location if possible so
work components etc.;
that the reagent becomes liquid again.
Otherwise, have a qualified profes-
- make sure that no water enters the
sional top up or fill up with reagent fluid.
fuel tank.
No work whatsoever is
permitted on any part of
the system. To prevent
damage, only qualified per-
sonnel from our network may work
on the system.
1.120
CarManuals2.co

REAGENT TANK (3/4)
Maintenance/Range
The information displayed on the instrument panel may be accompanied by a beep.
Indicator
Message
What to do?
lights
When the message is displayed when the ignition is switched
on, you have less than 1,488 miles (2,400 km) range.
-
“Top Up AdBlue before 2400 km”
Refill, or have an Approved Dealer refill the reagent in the
tank.
When the message is displayed when the ignition is switched
on, you have between 744 miles (1,200 km) and 496 miles
“Top up AdBlue before 1200 km”
(800 km) range.
appears.
Refill, or have an Approved Dealer refill the reagent in the
tank.
The message is displayed when the ignition is switched on and
is repeated:
- Approximately every 62 miles (100 km), you have between
“XXX MILES (XXX KM) Failure Top up
about 496 miles (800 km) and 124 miles (200 km) range;
appears.
AdBlue”
- Approximately every 31 miles (50 km), you have less than
124 miles (200 km) range.
In any event, fill or have an Approved Dealer fill the reagent
tank as soon as possible.
The engine will not start.
“0 MILES (0 KM) Failure Top up AdBlue”
flashes
To restart, you must fill the reagent tank yourself.
1.121
CarManuals2.co

REAGENT TANK (4/4)
System fault
When the indicator lights light up, this may be accompanied by a beep.
Indicator lights
Message
Readings
“Check anti-pollution system”
Indicates a fault in the system. Contact your approved
“AdBlue quality to check”
dealer as soon as possible.
“AdBlue injection to check”
Indicates a system fault and that in less than
496 miles (800 km) it will become impossible to
restart the vehicle.
These warnings are repeated:
- every 62 miles (100 km) until there are between
“XXX MILES (XXX KM) Failure antipollu-
500 miles (800 km) and 124 miles (200 km) re-
tion”
maining until the vehicle cannot be restarted;
- Every 31 miles (50 km) when there is less than
124 miles (200 km) left before the vehicle cannot
be restarted.
Contact your approved dealer as soon as possible.
Indicates that after the ignition is switched off the ve-
“0 KM Failure antipollution”
hicle will not restart. Call an approved Dealer.
1.122
CarManuals2.co

Section 2: Driving
Running in
2.2
Ignition switch
2.3
Starting, stopping the engine
2.4
Stop and start function
2.8
Special features of petrol and diesel versions
2.12
Gear lever, Handbrake
2.16
Electronic parking brake
2.17
“AUTOHOLD” function
2.21
Driving advice, Eco-driving
2.22
Maintenance and antipollution advice
2.30
Environment
2.31
Tyre pressure warning and monitoring system
2.32
Driver correction devices and aids
2.43
Lane departure warning
2.49
Lane keeping assist
2.54
Blind spot warning
2.60
Safe distance alert
2.67
Active emergency braking
2.71
Fatigue detection warning
2.79
Detection of road signs
2.81
Speed limiter
2.85
Cruise control
2.89
Adaptive cruise control
2.94
Highway and Traffic Jam Companion
2.108
Parking distance control
2.124
Reversing camera
2.130
Parking exit warning
2.133
Assisted parking
2.137
Automatic gearbox
2.142
Emergency call
2.145
2.1
CarManuals2.co

RUNNING IN
Petrol version
Diesel version
For the first 600 miles (1,000 km), do
For the first 930 miles (1,500 km), do
not exceed 78 mph (130 km/h) in the
not exceed 80 mph (130 km/h) in the
highest gear, or 3,000 to 3,500 rpm.
highest gear, or 2,500 rpm.
You may only expect top performance
After completing this mileage you may
from your vehicle after approximately
drive faster, although you may only
1,800 miles (3,000 km).
expect top performance after approxi-
mately 3,600 miles (6,000 km).
Note: for a new vehicle in the running-in
phase: the coolant level may be higher
During the running in period, do not ac-
than the “MAXI” mark on the tank, then
celerate hard while the engine is still
drop to between the levels “MINI” and
cold and do not let the engine over-rev.
“MAXI”. This does not present a risk.
Note: for a new vehicle in the running-in
Service intervals: refer to the
phase: the coolant level may be higher
Maintenance Document for your vehi-
than the “MAXI” mark on the tank, then
cle.
drop to between the levels “MINI” and
“MAXI”. This does not present a risk.
Service intervals: refer to the
Maintenance Document for your vehi-
cle.
2.2
CarManuals2.co
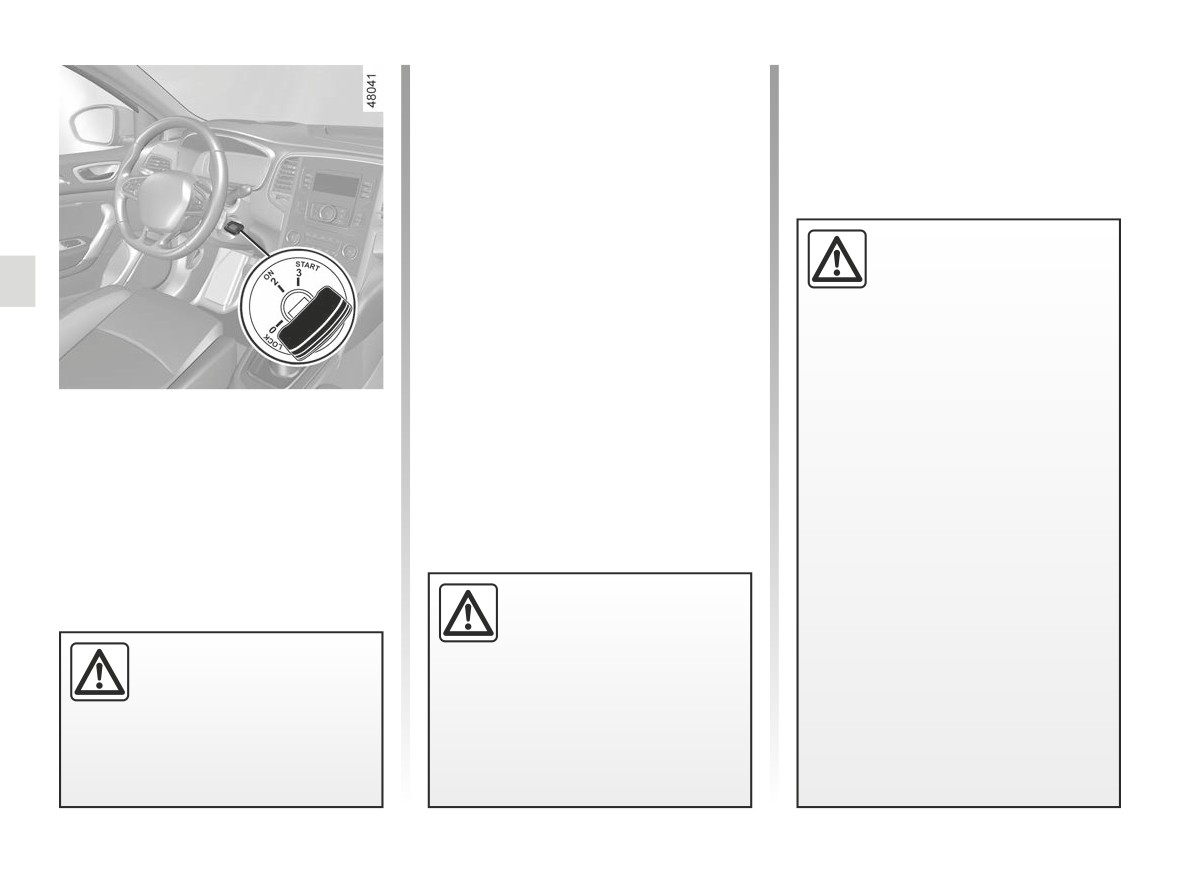
IGNITION SWITCH: vehicle with key
“ON" 2 position
The ignition is switched on:
Accessories (radio etc.) can be used.
“START" 3 position
If the engine fails to start at the first
attempt, the key must be turned back
before the starter can be activated
again. Release the key as soon as the
engine starts.
Note: on diesel versions, several sec-
onds may pass between turning the
key and the engine starting to allow for
engine preheating.
Ignition switch
“LOCK 0 position
To lock: remove the key and turn the
steering wheel until the steering column
locks.
To unlock: turn the key and the steering
wheel slightly.
2.3
CarManuals2.co
STARTING, STOPPING THE ENGINE: vehicle with key
Diesel versions
Stopping the engine
É
With the engine idling, turn the key
- Turn the ignition key to the “ON" po-
back to the “LOCK" position 0.
sition 2 and hold this position until
the engine preheating light goes off;
- turn the key to the “START" position
3 without depressing the acceler-
ator pedal;
Driver’s responsibility
- release the key as soon as the
when parking or stopping
engine starts.
the vehicle
Never leave an animal,
Special note: if starting the engine
child or adult who is not self-suffi-
when the outdoor temperature is very
cient alone in your vehicle, even for
low (below - 10 ° C): hold down the
a short time.
clutch pedal until the engine starts.
Starting the engine
They may pose a risk to themselves
or to others by starting the engine,
Petrol versions
activating equipment such as the
electric windows or locking the
- Activate the starter without acceler-
doors, for example.
ating;
Also, in hot and/or sunny weather,
- release the key as soon as the
please remember that the tempera-
engine starts.
ture inside the passenger compart-
ment increases very quickly.
Never switch off the igni-
RISK OF DEATH OR SERIOUS
tion before the vehicle has
INJURY.
stopped completely. Once
Never start your vehicle
the engine has stopped, the
while freewheeling on a
brake servo, power-assisted steer-
gradient. Risk of non-ac-
ing, etc. and the passive safety de-
tivation of power-assisted
vices such as air bags and preten-
steering.
sioners will no longer operate.
There is a risk of accidents.
2.4
CarManuals2.co
STARTING, STOPPING THE ENGINE: vehicle with card (1/3)
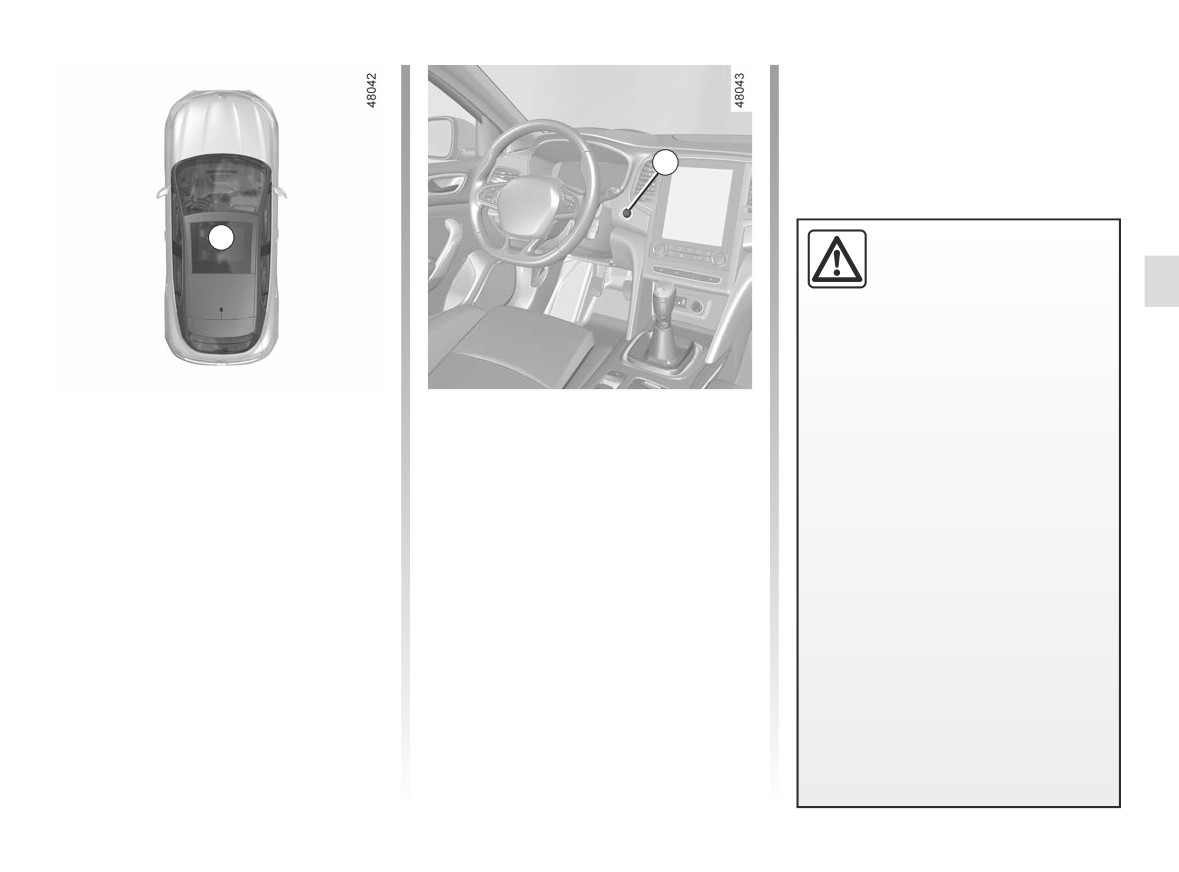
“Hands-free” starting with
the tailgate open
In this case, the card should not be lo-
cated in the luggage compartment, to
2
prevent the risk of loss.
1
Driver’s responsibility
when parking or stopping
the vehicle
Never leave an animal,
child or adult who is not self-suffi-
cient alone in your vehicle, even for
a short time.
Conditions for starting the
Special features
They may pose a risk to themselves
or to others by starting the engine,
engine
- If one of starting conditions is not ap-
activating equipment such as the
plied, the message “Press Brake +
The card must be inserted in detection
electric windows or locking the
START” or “Press Clutch + Start” or
zone 1.
doors, for example.
“Select Gearbox Position “P” is dis-
To start:
played on the instrument panel;
Also, in hot and/or sunny weather,
please remember that the tempera-
- vehicles with an automatic gearbox,
- in some cases, it will be necessary
ture inside the passenger compart-
place the lever in position P, depress
to move the steering wheel whilst
ment increases very quickly.
the brake pedal and press button 2;
pressing the start button 2 to help
unlock the steering column; the
RISK OF DEATH OR SERIOUS
- on vehicles with a manual gearbox,
message “Turn Steering Wheel +
INJURY.
press the brake or clutch pedal and
press button 2. If a gear is engaged,
START” will warn you of this;
also press the clutch pedal.
2.5
CarManuals2.co
STARTING, STOPPING THE ENGINE: vehicle with card (2/3)
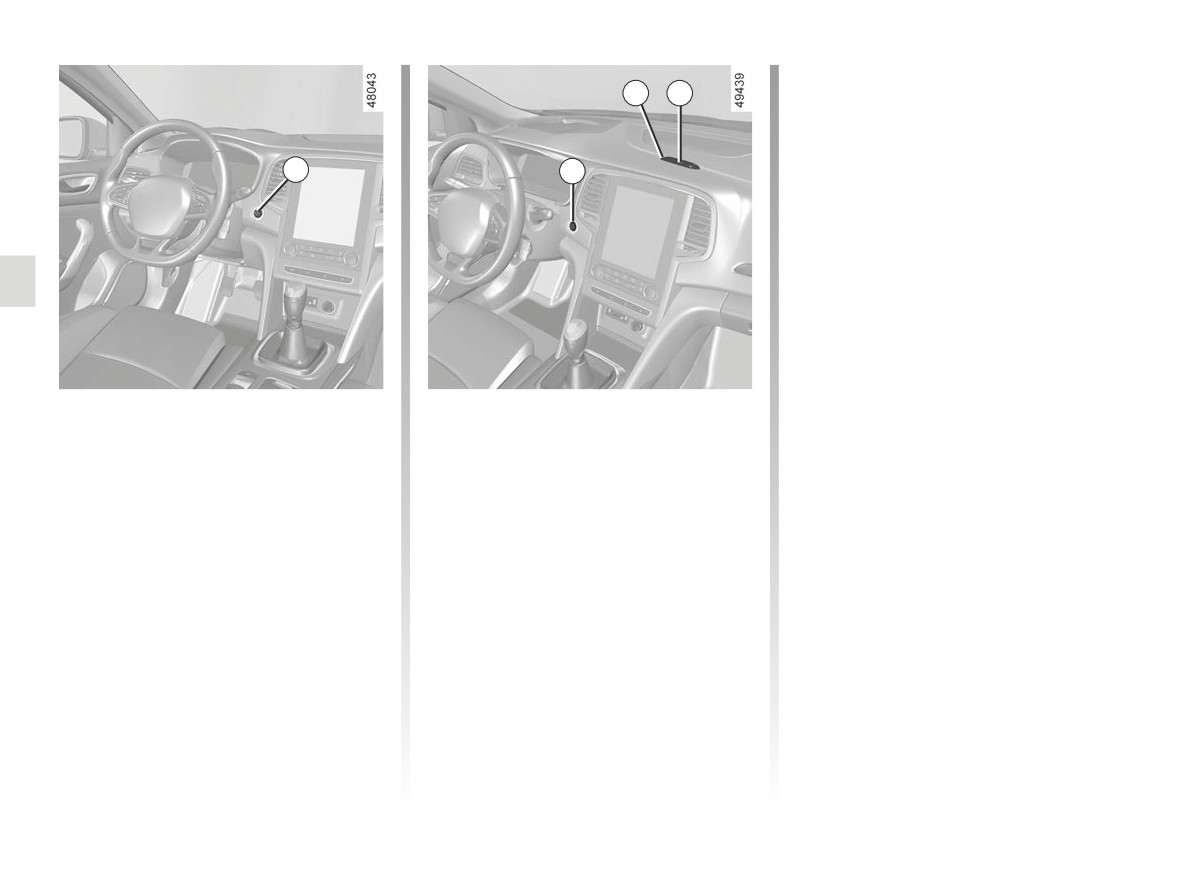
Press the brake or clutch pedal, then
3
4
place the card 3 (button side) during
approximately two seconds on the
placement area 4.
Press the 2 button to start the vehicle.
2
2
The message goes out.
Accessories function
Operating faults
(switching on the ignition)
In certain cases, the hands-free card
Once you have gained access to your
may not work:
vehicle, you may use some of its func-
- when the card battery is drained etc.
tions (radio, navigation, wipers, etc.).
- near to appliances operating on the
same frequency as the card (moni-
To use the other functions, with the
tor, mobile phone, video game,
card in the passenger compartment,
etc.);
press the 2 button without pressing the
- vehicle located in a high electro-
pedals.
magnetic radiation zone.
The message “Place card on zone +
START” appears on the instrument
panel.
2.6
CarManuals2.co
STARTING, STOPPING THE ENGINE: vehicle with card (3/3)
If the card is no longer in the passen-
When you leave your vehi-
ger compartment or if the card’s is
cle, especially if you have
worn out, when the vehicle is station-
your card with you, check
ary and you try to switch the engine off,
that the engine is com-
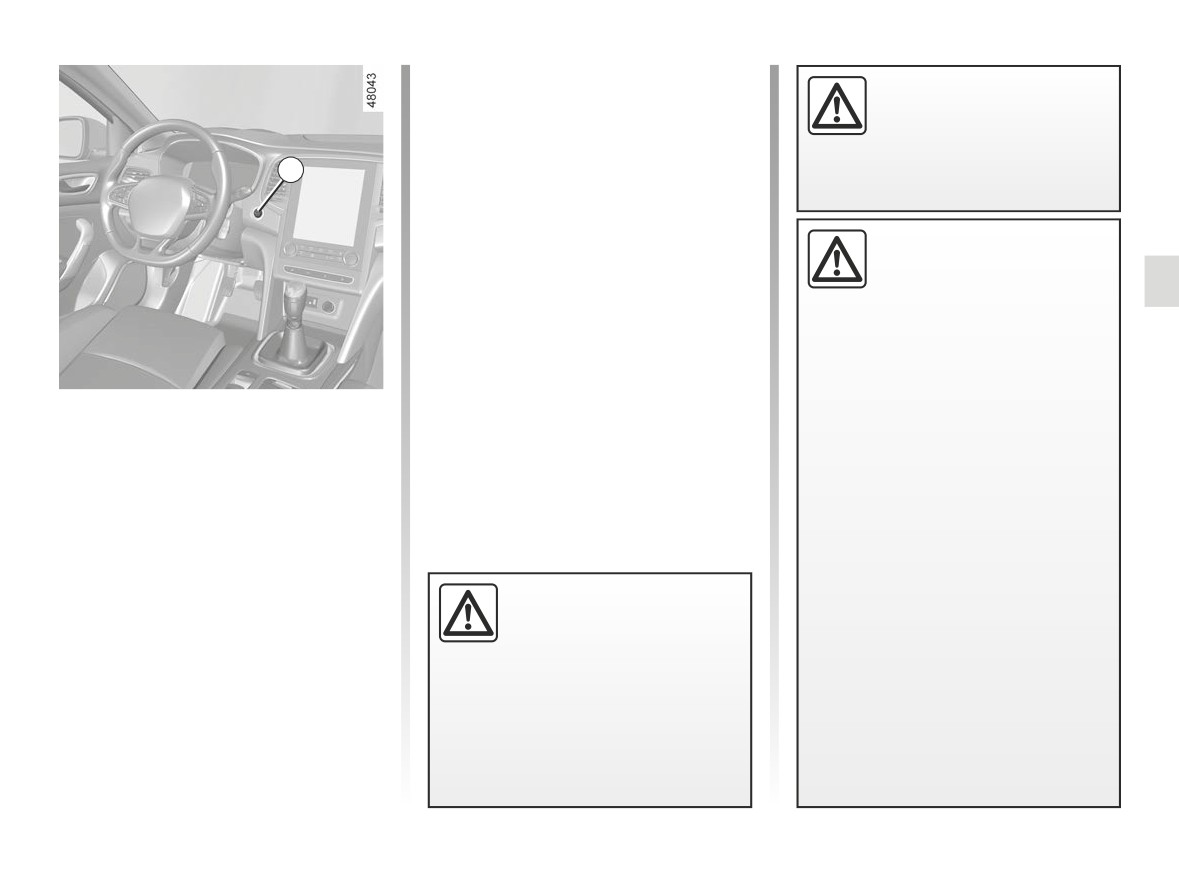
the message “Keycard absent : press/
2
pletely switched off.
hold START” appears on the instrument
panel: press button 2 for longer than
three seconds. If the card is no longer
in the passenger compartment, make
Driver’s responsibility
sure you can retrieve it before press-
when parking or stopping
ing and holding the button. Without the
the vehicle
hands-free card, you will not be able to
Never leave an animal,
restart the vehicle.
child or adult who is not self-suffi-
With the engine switched off, any ac-
cient alone in your vehicle, even for
cessories being used (radio, etc.) will
a short time.
continue to function for approximately
Conditions for stopping the
They may pose a risk to themselves
10 minutes.
or to others by starting the engine,
engine
When the driver’s door is opened, the
activating equipment such as the
The vehicle must stationary, with the
accessories stop working.
electric windows or locking the
lever positioned in N or P for vehicles
doors, for example.
with an automatic transmission.
Also, in hot and/or sunny weather,
With the card in the vehicle, press
please remember that the tempera-
button 2: the engine stops. The steer-
ture inside the passenger compart-
ing column is locked when the driver’s
ment increases very quickly.
door is opened or the vehicle is locked.
Never switch off the igni-
RISK OF DEATH OR SERIOUS
tion before the vehicle has
INJURY.
stopped completely. Once
the engine has stopped, the
brake servo, power-assisted steer-
ing, etc., and the passive safety de-
vices such as the airbags and pre-
tensioners will no longer operate.
2.7
CarManuals2.co
FUNCTION STOP AND START (1/4)
This system enables a reduced fuel
and
The vehicle equipment remain opera-
consumption and lower greenhouse
- when the vehicle speed is zero
tional while the engine is stopped.
gas emissions. The system is acti-
during approximately one second or,
When the engine switches to standby,
vated automatically when the vehicle
depending on the vehicle, as soon
the steering assistance may no longer
is started. During driving, the system
as the vehicle speed is below ap-
be operational.
stops the engine (standby) when the
proximately 3 mph (5 km/h).
vehicle comes to a stop or is moving at
In this case it becomes operational
The engine remains on standby if posi-
a slow speed (traffic jam, traffic lights
again when the engine is no longer on
tion P is selected, or if position N is se-
etc.), depending on the vehicle.
standby or the speed exceeds approxi-
lected with the handbrake engaged and
mately 1 mph (1 km/h) (downhill, slope
the brake pedal released.
etc.).
Conditions for engine
For vehicles equipped with manual
standby
gearboxes:
If the engine is put in
The vehicle has set off from where it
- the gearbox is in neutral;
standby, the electronic
was parked;
parking brake (depending
If the
warning light flashes
For vehicles equipped with auto-
on the vehicle) is not ap-
while the vehicle is stopped and the
matic gearboxes:
plied automatically.
message “Shift to neutral” appears
– the gearbox is in position D, Mor N;
on the instrument panel, this indi-
and
cates that you need to shift the gear
– the brake pedal is depressed (suffi-
lever to neutral;
Keep your vehicle station-
ciently hard);
and
ary when the engine is
- the clutch pedal is released;
If the
warning light flashes
on standby (shown by the
and
while the vehicle is stopped and the
- the vehicle speed is less than ap-
warning light
on the
message “Press brake pedal” ap-
proximately 3 mph (5 km/h).
instrument panel).
pears on the instrument panel, this
indicates that the brake pedal is not
For all vehicles:
sufficiently pressed;
Warning light
on the instru-
and
ment panel is lit when the engine is on
- the accelerator pedal is not de-
The engine MUST be
standby.
pressed;
stopped (not put in standby)
before leaving the vehicle.
➥ 2.4 ➥ 2.5.
2.8
CarManuals2.co

FUNCTION STOP AND START (2/4)
Preventing the engine from
Conditions for coming out of
standing by
engine standby
In certain situations, such as negotiat-
For vehicles equipped with auto-
ing a crossroads for instance, it is pos-
matic gearboxes:
sible (with the system activated) to keep
-
when the driver’s door is opened;
the engine running so as to be ready to
or
move off quickly.
-
when the driver’s seat belt is unfas-
For vehicles equipped with au-
tened;
tomatic gearboxes and when the
or
engine standby is performed only
-
the brake pedal is released and posi-
when the vehicle stopped:
tion D or M engaged (depending on
the vehicle);
Keep the vehicle stationary without
or
pressing too hard on the brake pedal.
-
the brake pedal is released in gear
For vehicles equipped with manual
position N with the handbrake off;
gearboxes:
or
Keep the clutch pedal pressed right
-
the brake pedal is pressed again in
down.
gear position P or N engaged with
the handbrake applied;
or
-
the vehicle is in gear position R;
or
-
the accelerator pedal is depressed;
or
To fill up with fuel, the
-
depending on the vehicle, in manual
engine must be stopped
mode (M), the gear change paddles
(and not only on standby
are activated ➥ 2.142.
in the case of vehicles
“AUTOHOLD"
function
activated
equipped with the Stop and Start
➥ 2.21, the brake pedal may be
function): you must switch off the ig-
released and the engine standby
nition ➥ 2.4 ➥ 2.5.
maintained.
Fire hazard.
Press the accelerator pedal to exit
vehicle standby.
2.9
CarManuals2.co

FUNCTION STOP AND START (3/4)
For vehicles equipped with manual
Conditions preventing the
- the gradient is too steep for vehicles
gearboxes:
fitted with an automatic gearbox;
standby of the engine
- when opening the driver’s door, with-
- the “Clear view” function is activated
Certain conditions prevent the system
out any gear engaged and the clutch
➥ 3.8;
from using the engine standby function,
pedal released;
including when:
- the engine temperature is too low;
or
-
the driver’s door is not closed;
- the emission control system is being
- when unfastening the driver’s seat
regenerated;
belt, without any gear engaged and
–
the driver’s seatbelt is not fastened;
the clutch pedal released;
- ...
–
reverse gear is engaged;
or
–
the bonnet is not locked;
Warning light
is displayed on the
- the gearbox is in neutral and the
instrument panel. This notifies you that
–
the outdoor temperature is too low or
clutch pedal is slightly depressed;
engine standby is not available.
too high;
or
-
the battery is not sufficiently charged;
The
warning light may appear
- the engine is in gear and the clutch
along with a message on the instru-
pedal is pressed right down.
–
the difference between the vehicle
ment panel:
interior temperature and the auto-
Special note: depending on the vehi-
- “Optimising Battery Recharge” to pri-
matic climate control instruction is
cle, if you switch off the ignition when
oritise battery charging;
too high;
the engine is on standby, the warning
- “Prioritising Thermal Comfort” to pri-
-
parking distance control is in opera-
oritise air conditioning;
light Ä
is displayed for a few sec-
tion;
- “Prioritising running engine” to priori-
onds on the instrument panel.
tise engine operations.
-
the altitude is too high;
For vehicles equipped with a
manual gearbox:
the restart may be interrupted if the
Deactivate the Stop and
clutch pedal is released too quickly
Start function for any opera-
while a gear is engaged.
tion performed in the engine
compartment.
2.10
CarManuals2.co
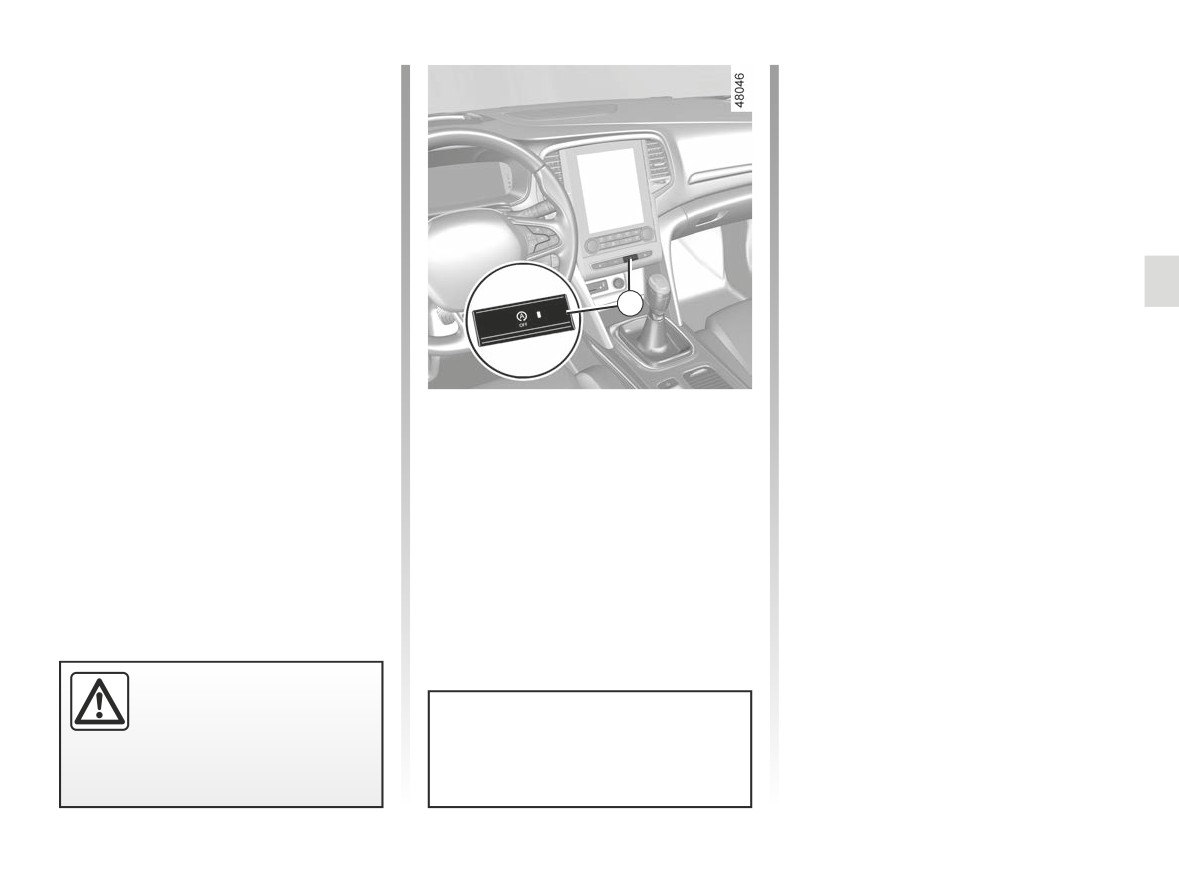
FUNCTION STOP AND START (4/4)
Special feature of the automatic
Deactivating, activating the
engine re-start
function
Under certain conditions, the engine
Press 1 to deactivate the function. The
can restart on its own in order to guar-
message “Stop & Start deactivated”
antee your safety and comfort.
appears on the instrument panel and
This can occur especially when:
the 1 switch warning light illuminates.
- the outdoor temperature is too low or
Pressing again will reactivate the
too high;
system. The message “Stop & Start
Activated” appears on the instrument
- the “Clear view” function is activated
panel and the 1 switch warning light
➥ 3.8;
goes out.
1
- the battery is not sufficiently charged;
The system is automatically reactivated
- the vehicle speed is above 3 mph
each time the vehicle is started using
(5 km/h) (downhill slope, etc.);
the start button. ➥ 2.4 ➥ 2.5.
- repeated pressing on the brake
pedal or braking system require-
Operating faults
ment;
The
warning light may appear
along with a message on the instru-
If the message “Check Stop & Start”
- ...
ment panel:
appears on the instrument panel and
- “Optimising Battery Recharge” to pri-
the 1 switch warning light illuminates,
The
warning light is displayed on
oritise battery charging;
this indicates that the system is deac-
the instrument panel to notify you of au-
- “Prioritising Thermal Comfort” to pri-
tivated.
tomatic engine restarting.
oritise air conditioning;
Please consult an authorised dealer.
- “Prioritising running engine” to priori-
tise engine operations.
The engine MUST be
stopped (not put in standby)
before leaving the vehicle.
Note: With the engine on standby,
➥ 2.4 ➥ 2.5.
press switch 1 to automatically re-
start the engine.
2.11
CarManuals2.co

SPECIAL FEATURES OF PETROL VERSIONS (1/2)
The following operating conditions:
If you notice any of the above operating
faults, have the necessary repairs car-
- driving for long periods when the low
ried out as soon as possible by an ap-
fuel level warning light is lit;
proved Dealer.
- using leaded petrol;
These faults may be avoided by regu-
- using lubricant or fuel additives
larly taking your vehicle to an approved
which are not approved,
Dealer at the intervals specified in the
or operating faults such as:
Maintenance document.
- faulty ignition system, running out of
fuel or disconnected spark plugs re-
Starting problems
sulting in the engine misfiring or cut-
To avoid damaging the catalytic con-
ting out when driving;
verter or the starter, and to prevent pre-
- loss of power,
mature wearing of the battery, do not
keep trying to start the engine (using
as they may cause the catalytic con-
the start button, or by pushing or towing
verter to overheat and thus reduce its
the vehicle) without having identified
efficiency, or damage it irreparably
and corrected the starting fault.
and cause heat damage to the vehi-
cle.
If the fault cannot be identified, do not
keep trying to start the engine, but con-
tact an approved Dealer.
Do not park the vehicle or
run the engine in locations
where combustible sub-
stances or materials such as
grass or leaves can come into con-
tact with the hot exhaust system.
2.12
CarManuals2.co

SPECIAL FEATURES OF PETROL VERSIONS (2/2)
Particle filter
Note: the indicator light may go out
If the filter becomes saturated, the
after 20 minutes if the driving condi-
warning light and, depending
The particle filter is used in the treat-
tions required to clean the filter are not
ment of exhaust gases from petrol en-
fully met.
on the vehicle, the
warning light
gines.
will appear on the instrument panel, ac-
Depending on the vehicle, the warning
If the vehicle is stopped before the
companied by the message “Check in-
warning light disappears you will have
jection”. In this case, please consult an
light
displayed on the instrument
to restart the process from the begin-
Authorised Dealer.
panel indicates that the filter is becom-
ning.
ing clogged and requires cleaning. To
If the® warning light and, depend-
clean it, when the
warning light
ing on the vehicle, the
warning
appears, and as traffic conditions and
light appears, accompanied by the
speed limits allow, drive at between
“Engine failure hazard” message, stop
about 31 mph (50 km/h) and 68 mph
the vehicle, switch off the engine and
(110 km/h) until the light goes out.
contact an Approved Dealer.
After between approximately 5 and
20 minutes, the warning light should go
out.
Warning light
®
re-
quires you to stop immedi-
ately, for your own safety,
as soon as traffic conditions
allow. Switch off the engine and do
not restart it. Contact an approved
Dealer.
2.13
CarManuals2.co
SPECIAL FEATURES OF DIESEL VERSIONS (1/2)
Diesel engine speed
Precautions to be taken in
Diesel engines are fitted with an injec-
winter
A
tion pump which prevents the engine
To avoid any faults in icy weather:
speed being exceeded irrespective of
-
ensure that the battery is always fully
the gear selected.
charged;
If the message “Check Anti- Pollution
1
-
always keep the diesel tank rela-
System” is displayed along with warn-
tively full to avoid water vapour con-
ing lights Ä
densing in it and accumulating at the
authorised dealer immediately.
bottom of the tank.
When driving, depending on the fuel
grade used, it is possible that white
smoke may be emitted.
This is due to the exhaust particle filter
being cleaned automatically, and does
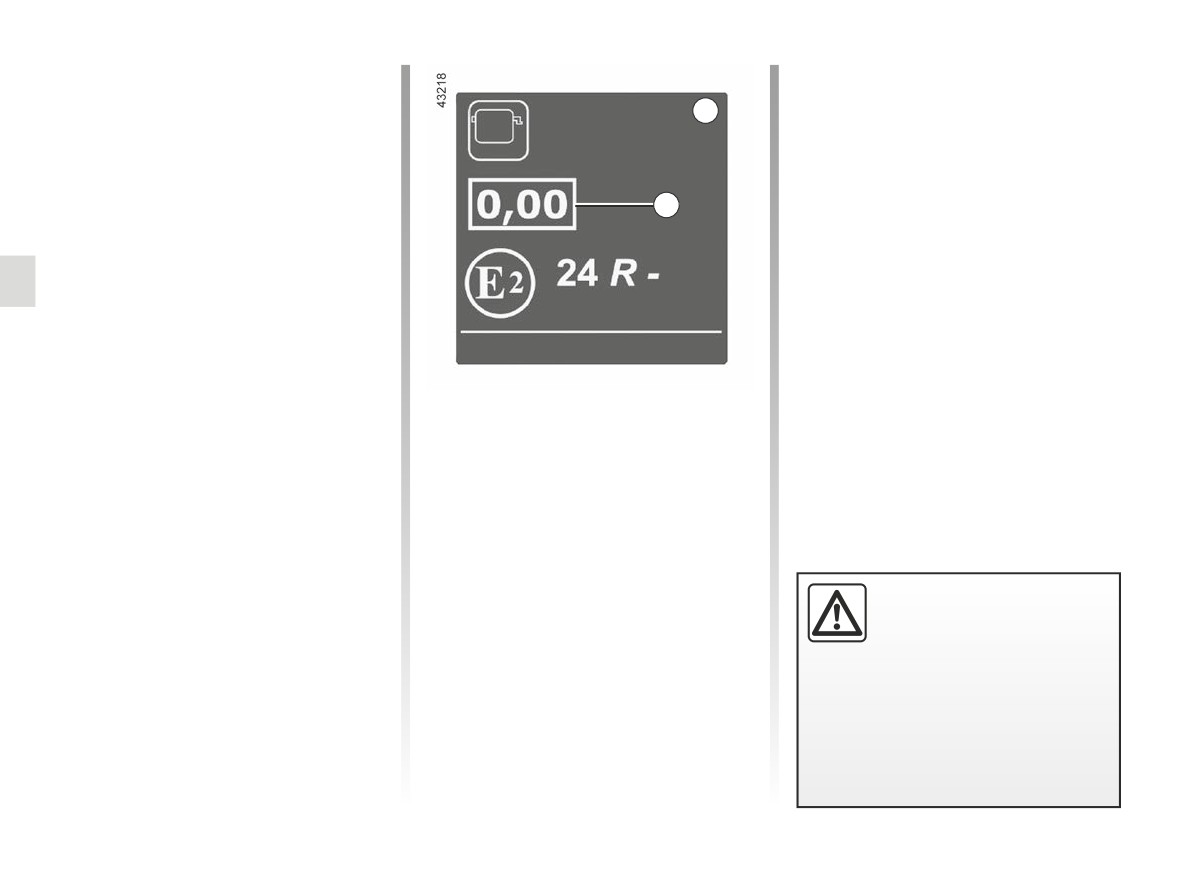
Engine smoke opacity label
not affect the way the vehicle runs.
You can find the information 1 on the
label A stuck in the engine compart-
Running out of fuel
ment or, depending on the vehicle, on
After the tank has been filled follow-
the vehicle identification plate ➥ 6.2.
ing a complete draining of fuel, the
1 Diesel exhaust emissions.
fuel system must be reprimed: ➥ 1.116
before restarting the engine.
Do not park the vehicle or
run the engine in locations
where combustible sub-
stances or materials such as
grass or leaves can come into con-
tact with the hot exhaust system.
2.14
CarManuals2.co

SPECIAL FEATURES OF DIESEL VERSIONS (2/2)
Particle filter
Note: the warning light may reappear
If the filter becomes saturated, the
if the driving conditions are not fully
warning light and, depending
The particle filter is used in the treat-
met with regard to cleaning the filter. If
ment of exhaust gases from diesel en-
the vehicle is stopped or if the engine
on the vehicle, the
warning light
gines.
speed drops below 2,000 rpm before
will appear on the instrument panel, ac-
Depending on the vehicle, the warning
the warning light goes out, the opera-
companied by the message “Check in-
tion may need to be repeated.
jection”. In this case, please consult an
light
displayed on the instrument
Authorised Dealer.
panel indicates that the filter is becom-
ing clogged and requires cleaning.
If the
®
warning light and, de-
To do this, when the
warning
pending on the vehicle, the
light is displayed, continue driving ac-
warning light appears, accompanied by
cording to traffic conditions and ob-
the “WARNING: Engine Failure Risk”
serve the speed limit until the warning
message, stop the vehicle, switch off
lights disappears. If possible, do not let
the engine and contact an Approved
the engine speed drop below 2000 rpm.
Dealer.
The warning light should go out after 10
to 20 minutes. ➥ 1.72.
The display of the
on the instru-
ment panel may be accompanied by an
increase in engine speed and operation
of the cooling system in order to clean
the particle filter.
Warning light
®
re-
quires you to stop immedi-
ately, for your own safety,
as soon as traffic conditions
allow. Switch off the engine and do
To facilitate the particle filter re-
not restart it. Contact an approved
generation, carry out a long driving
Dealer.
phase (at least 20 minutes) on main
roads every 124 miles (200 km).
2.15
CarManuals2.co
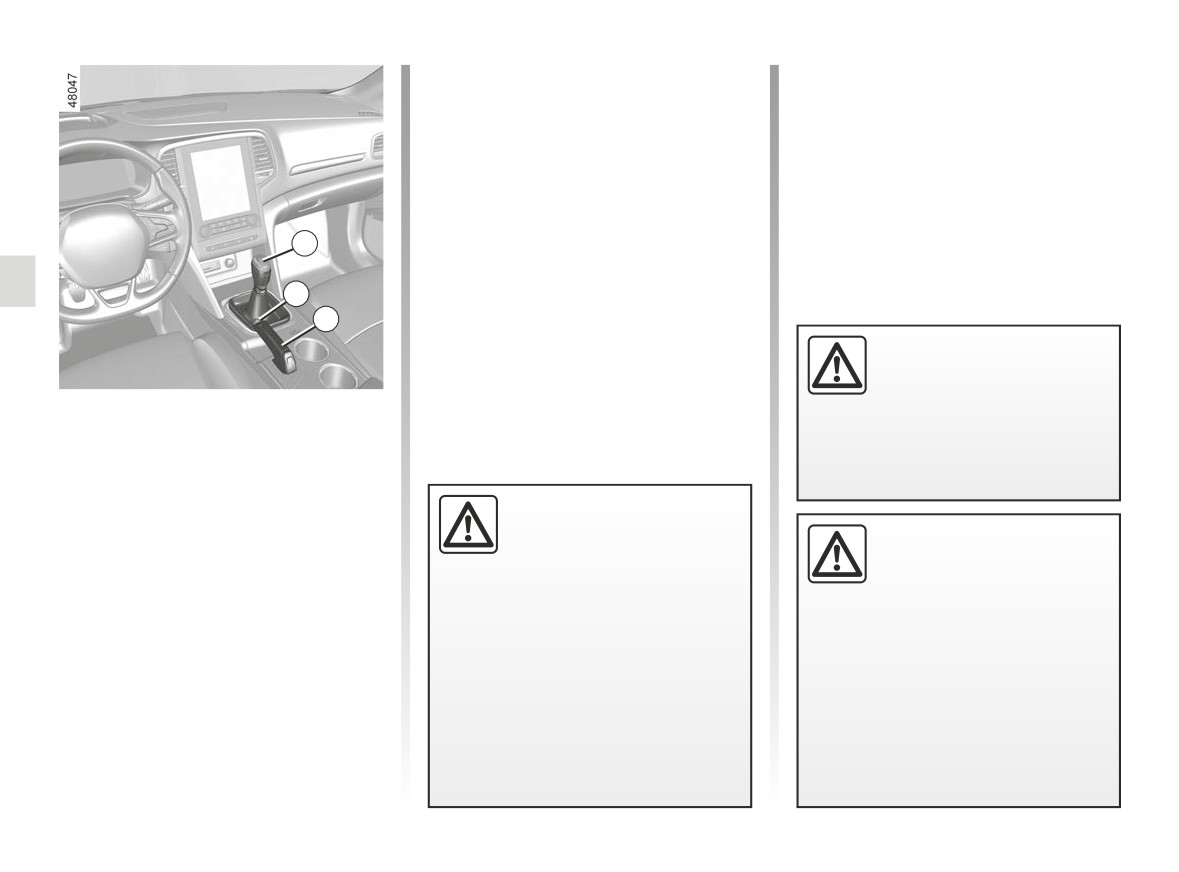
GEAR LEVER, HANDBRAKE
Handbrake
To apply:
Pull lever 3 upwards. Check that the
To release:
vehicle is immobilised. The warning
Pull the lever
3 up slightly, press
light }
on the instrument panel will
button 2 and then lower the lever to the
come on.
floor.
The red warning light
}
on the in-
1
strument panel will remain on, accom-
panied by the message “Parking Brake
2
ON” and a beep if you are driving with
an incorrectly released handbrake.
3
Make sure that the hand-
brake is properly released
when driving (red indicator
Gear lever
light off), otherwise over-
heating, or even damage, may
Vehicles with manual gearbox: refer
occur.
to the grid on the gear lever knob 1.
Vehicles with an automatic gearbox:
➥ 2.142.
An impact to the under-
side of the vehicle while
When stationary, and de-
Selecting reverse gear
manoeuvring
(e.g.: strik-
pending on the slope and/or
ing a post, raised kerb or
The reversing lights will come on as
vehicle load, it may be nec-
other street furniture) may result in
soon as reverse gear is selected with
essary to pull up the hand-
damage to the vehicle (e.g.: defor-
the ignition on.
brake at least two extra notches and
mation of an axle).
engage a gear (1st or reverse gear)
To avoid any risk of accident, have
for vehicles with a manual gearbox
your vehicle checked by an ap-
or position P for vehicles with an au-
proved Dealer.
tomatic gearbox.
2.16
CarManuals2.co
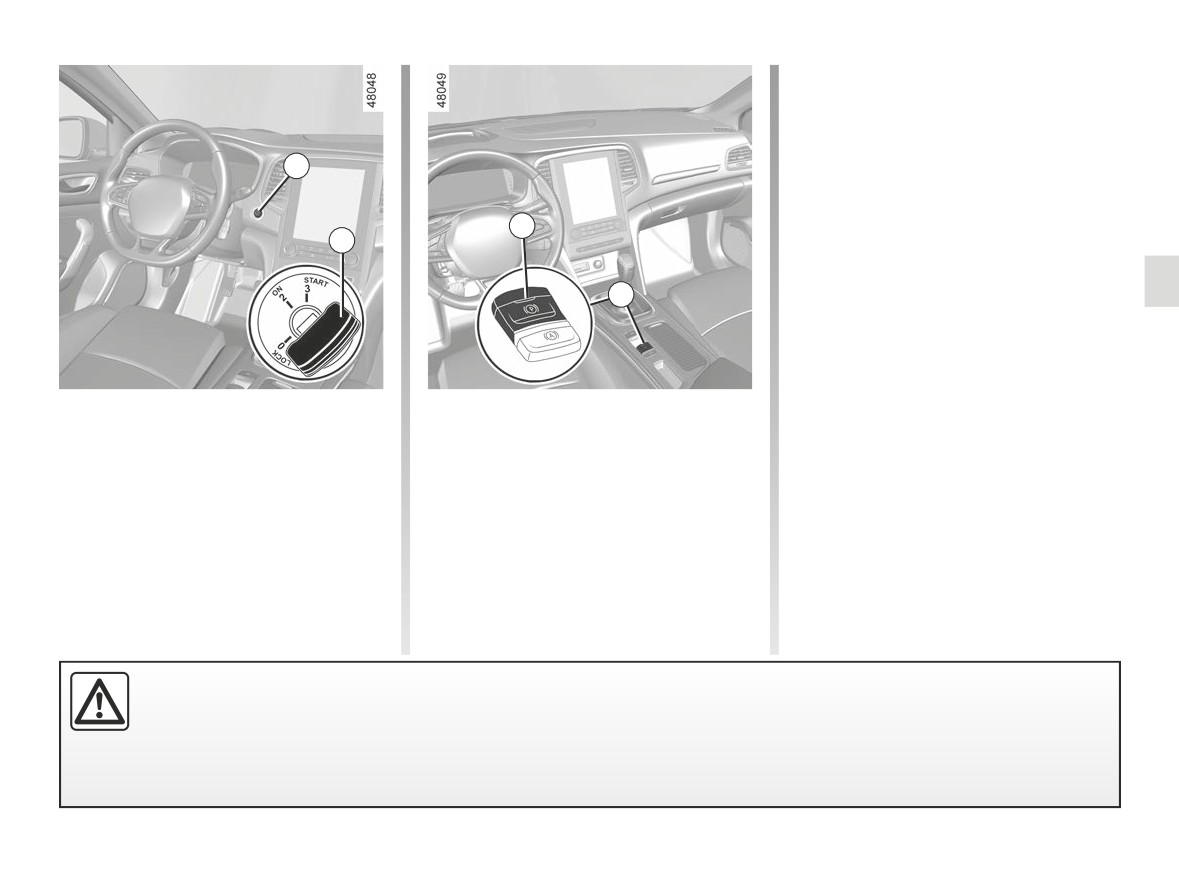
ELECTRONIC PARKING BRAKE (1/4)
In all other instances, for example the
engine has stalled or is in standby
due to the Stop and Start function
➥ 2.8, the electronic parking brake is
not applied automatically.
1
Manual mode must be used.
For certain country-specific model ver-
4
sions, the assisted brake application
2
function is not activated. Refer to the
information on “Manual operation”.
3
To confirm that the electronic parking
brake is applied, the message “Parking
brake on” and warning light
}
on the instrument panel and warning
Assisted operation
or
light 4 on the switch 3 light up.
-
when the driver’s seat belt is un-
After the engine is switched off, indi-
Applying the electronic parking
fastened;
cator light 4 goes out several minutes
brake
or
after the assisted parking brake has
-
when the driver’s door is opened;
With the vehicle stationary, the elec-
been applied and indicator light }
tronic parking brake can be used to im-
or
goes out when the vehicle is locked.
mobilise the vehicle:
–
for vehicles fitted with an automatic
- by pressing the engine start/stop
gearbox, when position P is en-
button 1 or by turning the ignition
gaged.
key 2 to the “ON” 2 position;
The electronic parking brake can be used to immobilise the vehicle. Before leaving the vehicle, check that the elec-
tronic parking brake is fully applied. Warning light 4 on switch 3 and warning light }
on the instrument panel illu-
minate to show that the parking brake is applied but switch off when the doors are locked. Depending on the vehicle,
a sticker is located on the upper section of the windscreen to remind you of this.
2.17
CarManuals2.co
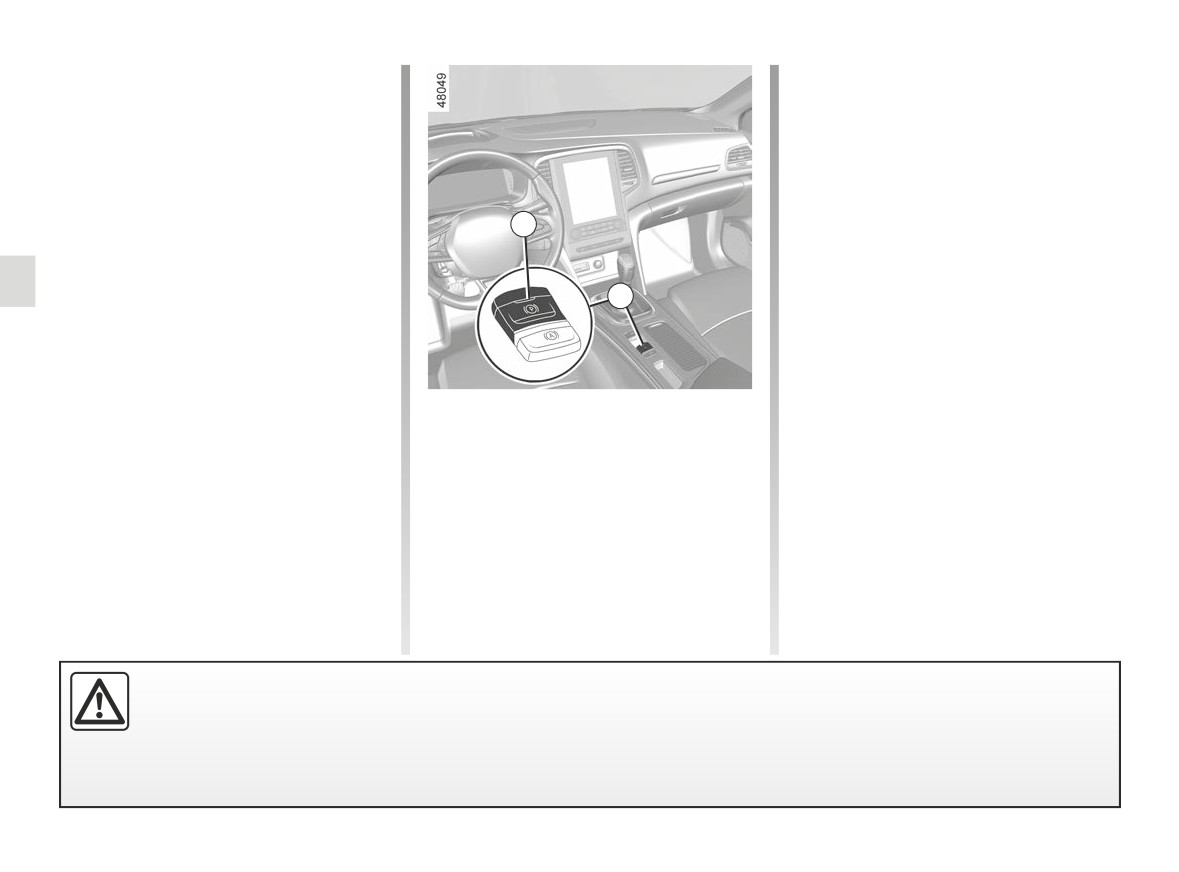
ELECTRONIC PARKING BRAKE (2/4)
Assisted operation
Manual operation
(continued)
You can apply the electronic parking
Note: in some situations (electronic
brake manually.
parking brake failure, manual release of
Manually applying the electronic
the parking brake, etc.), a beep sounds
parking brake
and the message “Apply parking brake”
appears on the instrument panel to
Pull switch 3: warning light 4 on the
4
warn you that the electronic parking
brake has been released.
switch and the }
warning light on
the instrument panel light up.
- with the engine running: when the
3
driver’s door is opened;
- with the engine switched off (eg.
when the engine stalls): when a front
door is opened.
In this case, pull and release switch 3 to
Assisted release of the parking
apply the assisted parking brake.
brake
The parking brake is released:
- once the vehicle starts to accelerate;
or
- on vehicles equipped with an auto-
matic gearbox, when shifting from P
position.
The electronic parking brake can be used to immobilise the vehicle. Before leaving the vehicle, check that the elec-
tronic parking brake is fully applied. Warning light 4 on switch 3 and warning light }
on the instrument panel illu-
minate to show that the parking brake is applied but switch off when the doors are locked. Depending on the vehicle,
a sticker is located on the upper section of the windscreen to remind you of this.
2.18
CarManuals2.co
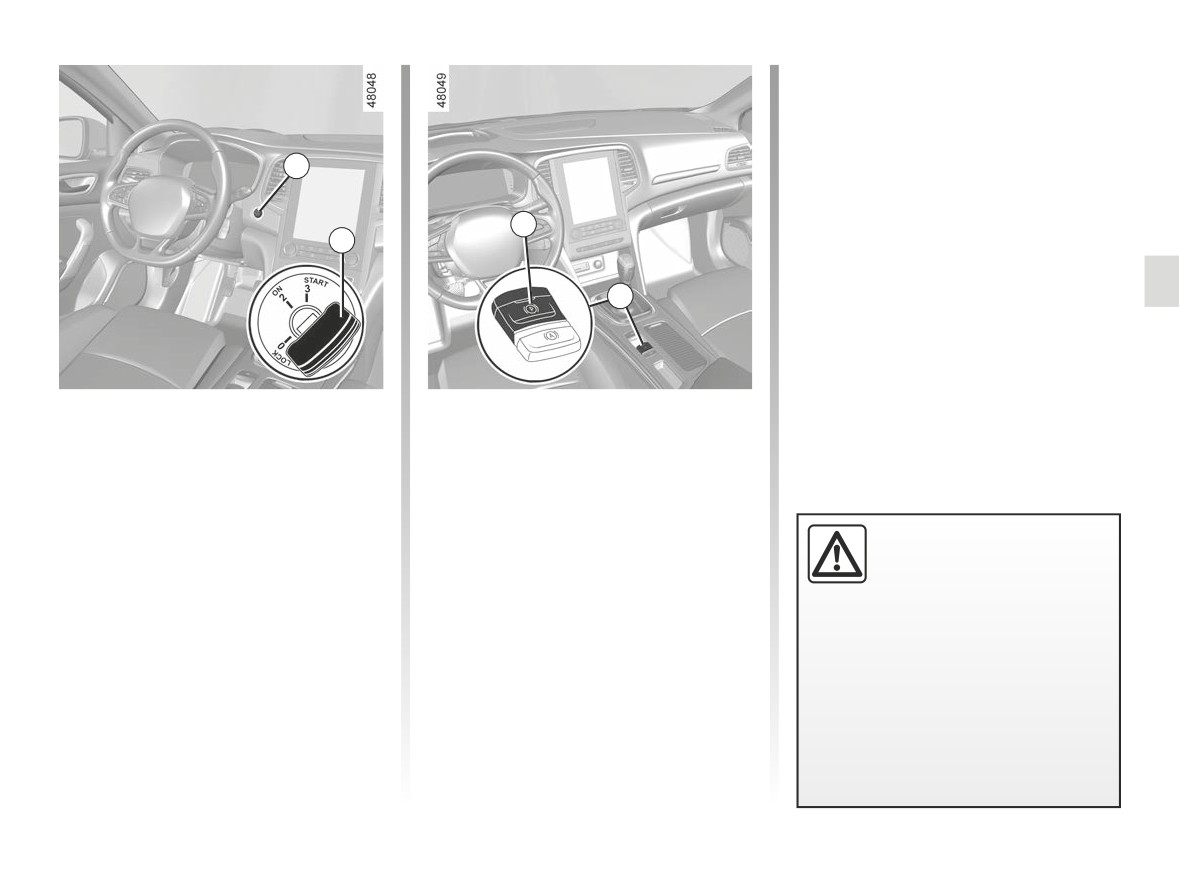
ELECTRONIC PARKING BRAKE (3/4)
To park the vehicle without applying the
electronic parking brake (if there is a
risk of freezing, for example):
-
engage any gear or the P position:
1
the drive wheels will be mechanically
locked by the driveshaft;
-
switch off the engine by pressing the
4
engine start/stop button 1 or by turn-
2
ing the ignition key 2;
-
release the driver’s seat belt;
–
open the driver’s door;
3
–
manually release the electronic park-
ing brake (please see the previously
described information on “Manually
releasing the electronic parking
brake”).
Manually releasing the electronic
Brief stop
parking brake
To apply the electronic parking brake
Press switch 1 without pressing the
manually (when stopping at a red light,
pedals or, depending on the vehicle,
or stopping when the engine is running,
turning the key 2 to the “ON” position 2
etc.): pull and release the switch 3.
to switch on the ignition.
The brake is released as soon as the
If the driver’s seat belt is
Press the brake pedal then press
vehicle is started up again.
unfastened before the ve-
switch 3: indicator light 4 on the switch
hicle has come to a com-
plete standstill, ensure the
and indicator light }
displayed on
Special cases
parking brake has been properly
the instrument panel go out.
To park on a slope or while towing a
trailer, for example, pull switch 3 for
applied: warning light }
on the
a few seconds to gain the maximum
instrument panel light up to confirm
braking.
this.
Risk of loss of immobilisation.
2.19
CarManuals2.co

ELECTRONIC PARKING BRAKE (4/4)
Versions with an automatic
Operating faults
If the “WARNING: Electric
gearbox
System” or “Check battery”
-
or
“WARNING: Braking
For safety reasons, automatic release
light illuminates on the instrument
System” message appears,
is deactivated when the driver’s door
panel accompanied by the “Check
you must immobilise the vehicle by
is open or not shut properly and the
parking brake” message and, in
selecting first gear (on a manual
engine is running (in order to prevent
some cases, the }
warning
gearbox), engaging P position (au-
the vehicle from moving without the
light.
tomatic gearbox) or by pulling the
driver).
Please contact an authorised dealer
switch 3 for approximately 10 sec-
The “Release Parking Brake Manually”
as soon as possible.
onds.
message appears on the instrument
-
If there is an assisted parking brake
If the conditions and the slope re-
panel when the driver depresses the
quire it, chock the wheels of the ve-
accelerator.
fault, the warning light® comes
hicle.
on, along with the message “Braking
system fault”, a beep and, in some
Risk of loss of immobilisation of
the vehicle.
cases, the warning light }
Contact an authorised dealer.
This means that you must stop as
soon as traffic conditions allow.
Never leave your vehicle
If no lights or sounds are ap-
without moving the selec-
parent, this indicates a fault
tor lever to position P and
in the instrument panel. This
switching off the engine.
indicates that it is essential
It is therefore essential to
This is because when the vehicle is
to stop immediately (as soon as traf-
immobilise the vehicle by
stationary with the engine running
fic conditions allow). Ensure that the
engaging first gear (manual
and a gear engaged, the vehicle
vehicle is correctly immobilised and
gearbox) or position P (au-
may begin to move.
contact an approved Dealer.
tomatic gearbox). If the slope re-
quires it, chock the vehicle.
There is a risk of accidents.
2.20
CarManuals2.co
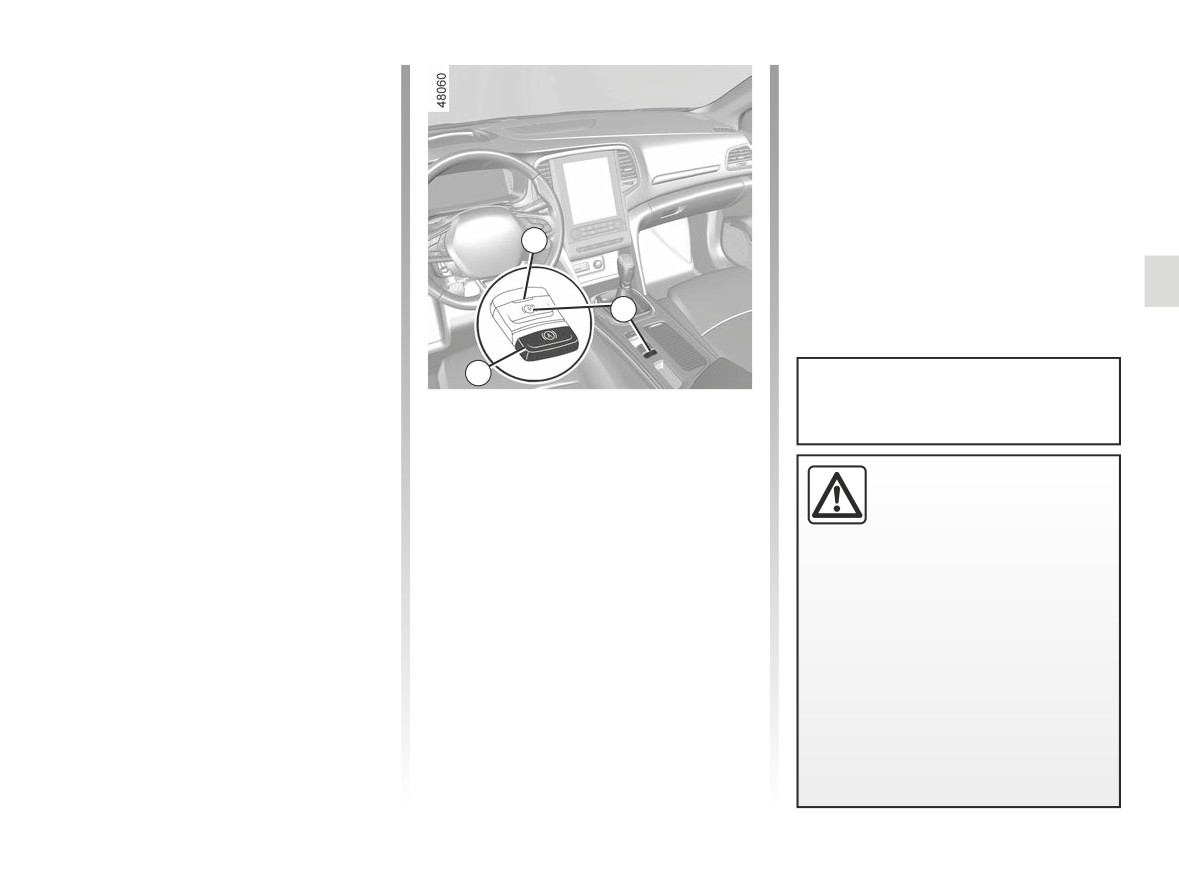
“AUTOHOLD" FUNCTION
Vehicle stopped (e.g. at a red light, an
Conditions for interrupting the
intersection, a traffic jam, etc.), the func-
braking force
tion ensures braking force even when
The following conditions must be met:
the driver releases the brake pedal.
- the driver accelerates sufficiently
The braking force is released as soon
with a gear engaged;
as the driver accelerates sufficiently
or
with a gear engaged.
- the driver disables the function.
1
Activation
Warning light
goes out on the in-
Press the switch 3.
strument panel.
The switch warning light 3 illuminates
to confirm that the function is activated.
2
Deactivation
3
Upon each start-up, the function
Press the brake pedal and 3 switch si-
Conditions for maintaining the
continues the mode set at the time
multaneously.
braking force
the engine was last switched off.
The switch warning light 3 turns off,
confirming that the function is deacti-
The following conditions must be met:
vated.
- the seat belt for the driver is fas-
The electronic parking
If the braking force is maintained, the
tened;
brake can be used to im-
parking brake is applied automatically
and
mobilise the vehicle. Before
when:
- the electronic parking brake is re-
leaving the vehicle, check
- the driver exits the vehicle;
leased;
that the electronic parking brake
or
and
is fully applied. Warning light 1 on
- the vehicle is immobilised for more
- the vehicle is not stationary on a very
than approximately three minutes.
switch 2 and warning light }
on
steep slope.
the instrument panel illuminate to
The maintained braking force is con-
show that the parking brake is ap-
plied but switch off when the doors
firmed by the
warning light on
are locked. Depending on the vehi-
the instrument panel.
cle, a sticker is located on the upper
section of the windscreen to remind
you of this.
2.21
CarManuals2.co

DRIVING ADVICE, ECO-DRIVING (1/8)
Fuel consumption is accredited in ac-
Depending on the vehicle, you will have
Free-wheel function
cordance with a standard regulatory
various functions which enable you to
On vehicles fitted with an automatic
method.
lower your fuel consumption:
gearbox (depending on the vehicle),
Identical for all manufacturers, this ena-
- the rev counter;
during deceleration phases (driver’s
bles vehicles to be compared with one
foot fully off the accelerator pedal),
- gear change indicator;
another.
switching to freewheeling (automatic
- the free-wheel function;
neutral) decreases engine braking and
Consumption in real time depends on
- the driving style indicator;
allows you to move farther without ac-
vehicle usage conditions, the equip-
celerating in order to save fuel.
ment fitted and the user’s driving style.
- Eco acceleration indicator;
To optimise fuel consumption, please
- the journey record and eco-driving
Warning light
appears on the in-
refer to the following advice.
advice via the multimedia screen;
strument panel:
- ECO mode;
- in grey when the vehicle is not in
free-wheel mode;
– the Stop and Start function ➥ 2.8.
- in green or white, depending on the
vehicle, when the vehicle is in free-
wheel mode (automatic neutral).
2.22
CarManuals2.co
DRIVING ADVICE, ECO-DRIVING (2/8)
A
B
C
1
1
1
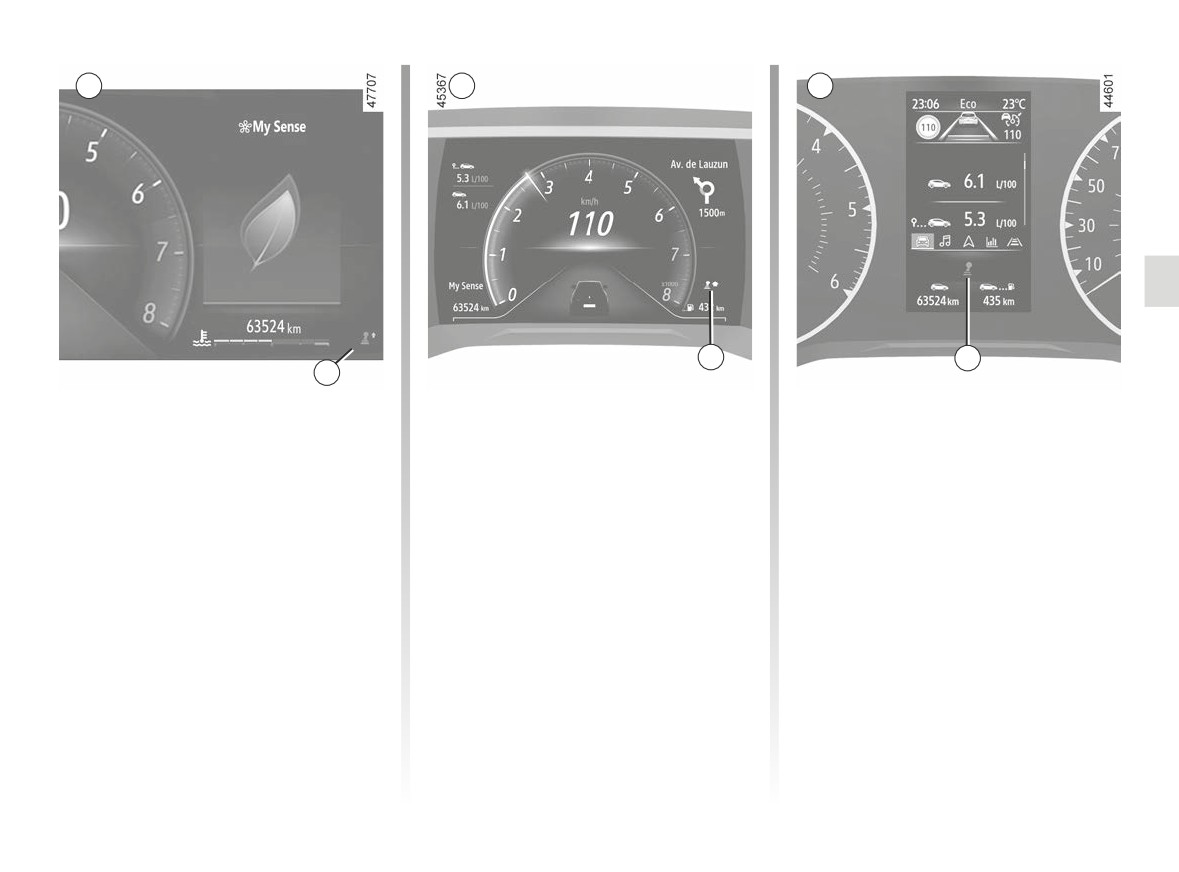
On the instrument panel A, B
Gear change indicator 1
or C
Depending on the vehicle, to obtain op-
timum consumption levels, a warning
Depending on the vehicle, the informa-
light on the instrument panel lets you
tion display can be organised and cus-
know the best time to move up or down
tomised based on the instrument panel
a gear:
customisation style selected from the
multimedia screen.
shift up a gear;
downshift a gear.
If you regularly follow this indicator, you
will reduce your vehicle’s fuel consump-
tion.
2.23
CarManuals2.co
DRIVING ADVICE, ECO-DRIVING (3/8)
A
B
2
C
2
2
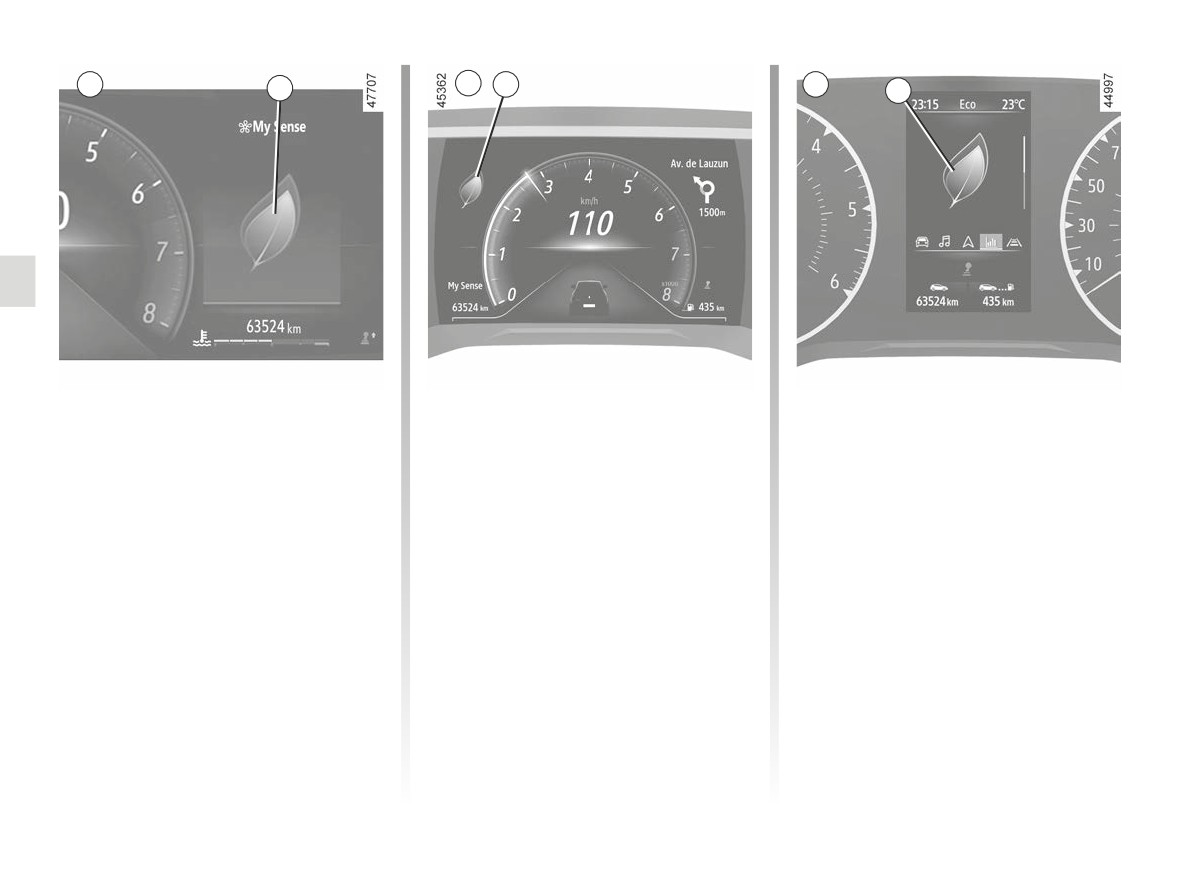
Driving style indicator 2
Informs you about the driving style
adopted in real time. This is shown by
indicator light 2.
The more petals displayed on 2, the
more your driving is flexible and eco-
nomical.
If you regularly monitor this indicator,
you will reduce your vehicle’s fuel con-
sumption.
Please refer to the multimedia instruc-
tions for further information.
2.24
CarManuals2.co
DRIVING ADVICE, ECO DRIVING (4/8)
3
3
3
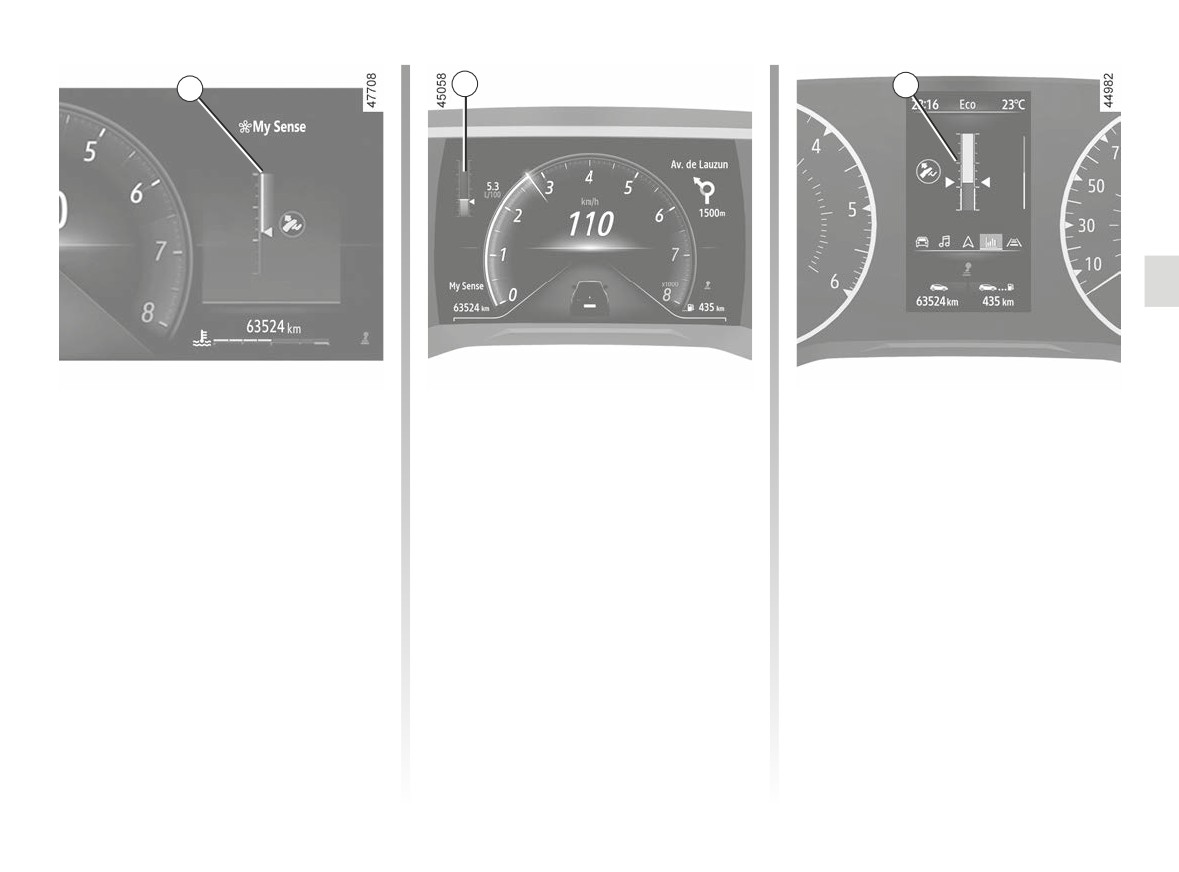
Acceleration indicator Eco 3
This informs you in real time whether
you are accelerating moderately or
strongly.
This is shown by the 3 warning light:
- green: acceleration is moderate and
correct;
- white: acceleration is too high;
- grey: acceleration is high.
Note: it is not possible to simultane-
ously display the driving style indica-
tor 2 and the Eco acceleration indica-
tor 3.
2.25
CarManuals2.co
DRIVING ADVICE, ECO DRIVING (5/8)
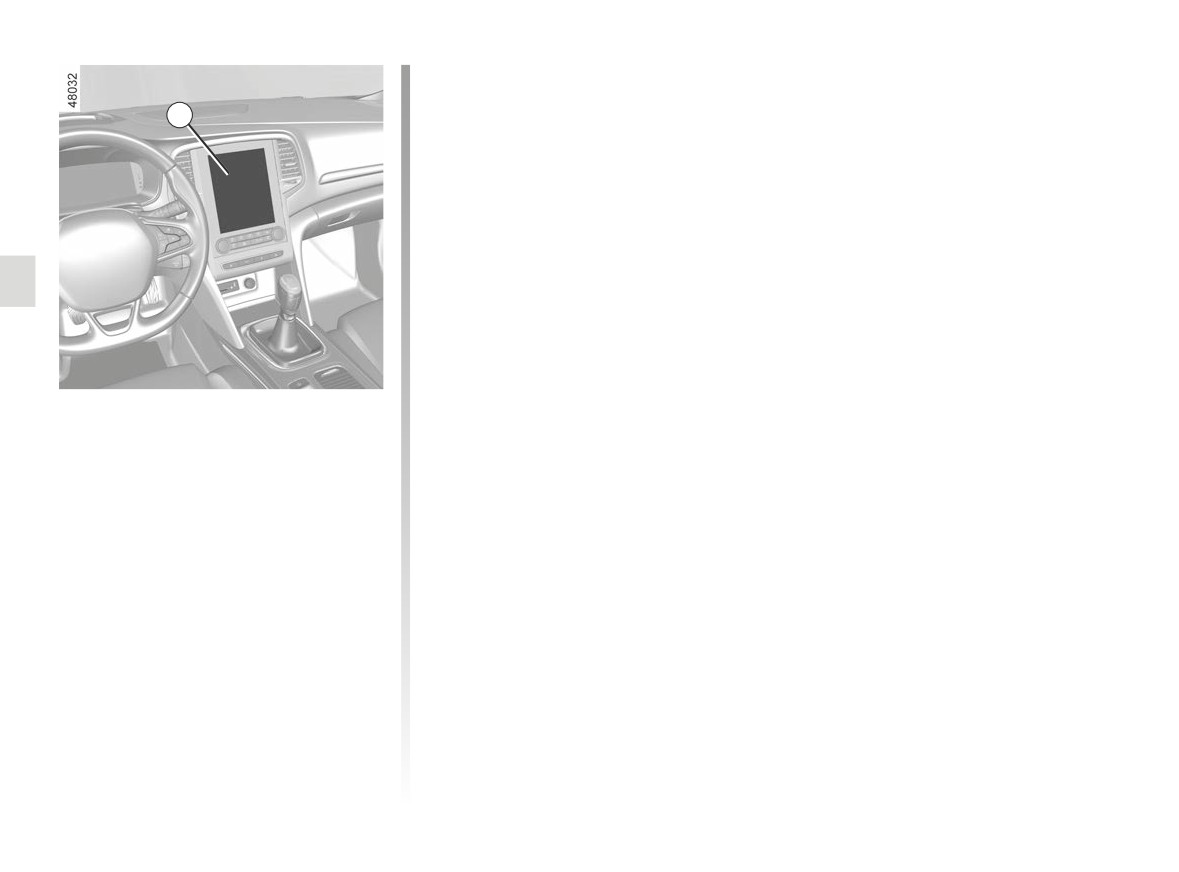
An overall rating from 0 to 100 is dis-
played to let you assess your eco driv-
4
ing performance.
The higher the rating, the lower the fuel
consumption.
Eco advice is given to help improve
your performance.
With your favourite journeys saved,
you can compare your performance
between trips and the performance of
other vehicle users.
Please refer to the multimedia instruc-
tions for further information.
On the multimedia screen
Journey record
Once the engine is switched off, you
will see “Journey record” displayed on
the multimedia screen 4, enabling you
to view information on your last journey.
This indicates:
- the general score;
- score evolution;
- distance without fuel consumption.
2.26
CarManuals2.co
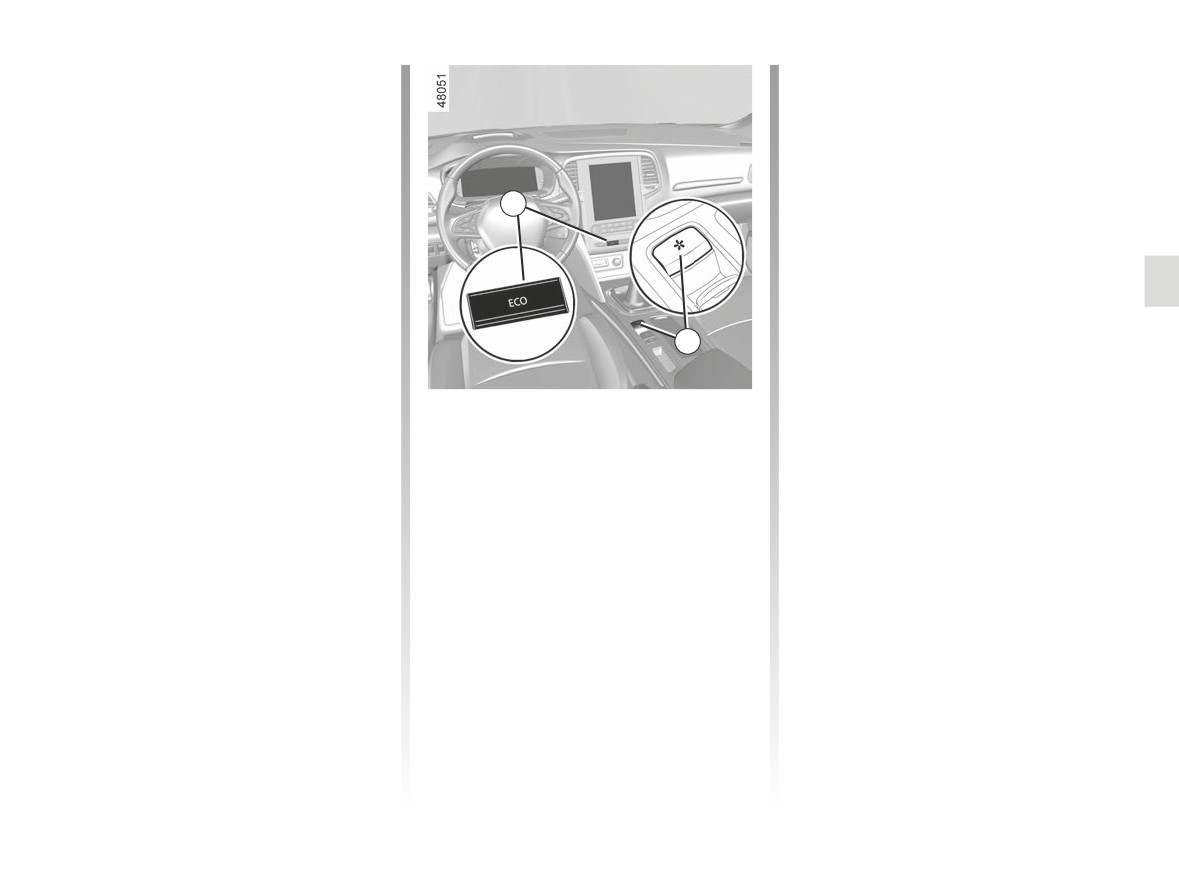
DRIVING ADVICE, ECO-DRIVING (6/8)
ECO mode
While driving, it is possible to exit the
ECO mode temporarily in order to im-
ECO mode is a function which opti-
prove engine performance.
mises fuel consumption.
To do this, press the accelerator pedal
It affects certain driving operations (ac-
firmly and fully.
celeration, shifting gears, cruise con-
trol, deceleration etc.).
ECO mode is reactivated when you
5
take pressure off the accelerator pedal.
Limiting acceleration enables low fuel
consumption in urban and surrounding
Disabling the function
areas.
Depending on the vehicle, the function
can be deactivated either:
- by pressing switch 5;
6
- by the central control 6 ➥ 3.2.
Activating the function
The warning light
goes out on
the instrument panel to confirm deac-
The function can be activated:
tivation.
- by pressing switch 5;
- by the central control 6 ➥ 3.2 ;
- from the multimedia screen (refer to
the multimedia instructions).
The warning light
comes on on
the instrument panel to confirm activa-
tion.
2.27
CarManuals2.co