Renault Megane (2018 year). Manual - part 7
 

  Index      Renault     Renault Megane - service manual 2018 year in english


Search            


Content   ..  5  6  7  8   ..


Renault Megane (2018 year). Manual - part 7


1.98

WINDSCREEN WASH, WIPE 

(3/6)

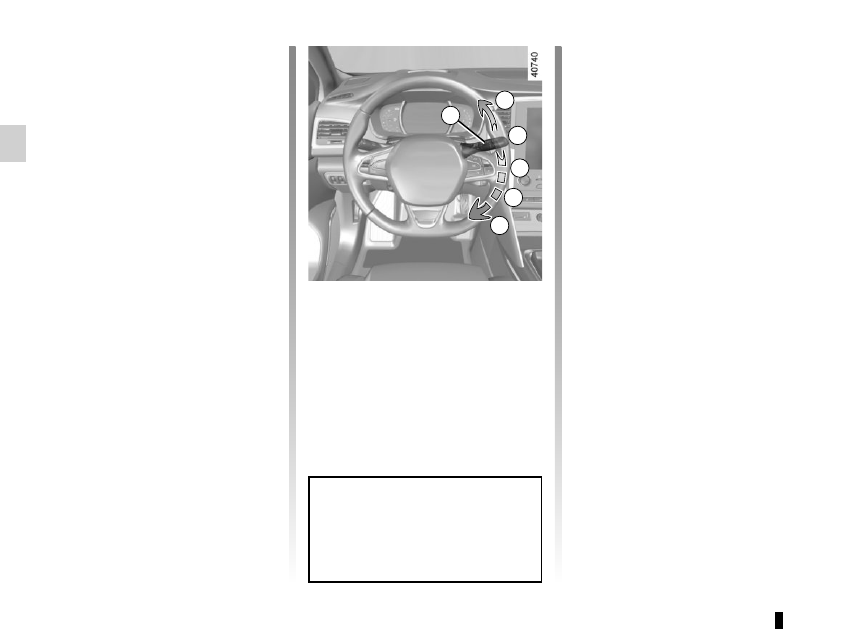
  D  slow continuous wiping

  E  fast continuous wiping

Operating fault
In the event of a malfunction of the au-

tomatic wiping, the wiper is set to inter-

mittent wiping. Contact an authorised 

dealer.
The operation of the rain sensor can be 

disturbed in the event of:
–  

damaged wiper blades; a screen 

of water or traces left by a blade in 

the sensor’s detection zone may in-

crease the response time of the au-

tomatic wiper, or increase the wiping 

frequency;

–  

a windscreen with any chip or crack 

level with the sensor, or a wind-

screen covered in dust, dirt, insects, 

ice, the use of washing wax and 

water-repellent chemicals; the auto-

matic wiping will be less sensitive, or 

even unresponsive.

Special note
When driving the vehicle
, the wiping 

speed slows down whenever the vehi-

cle stops. For example, fast wiping 

speed will slow to normal wiping speed. 

As soon as the vehicle moves off, 

wiping will return to the speed originally 

selected.

If stalk 1 is operated, it overrides and 

cancels the automatic function.

Precautions
–  

In the event of ice, check whether the 

blades are stuck to the windscreen 

before operating the wiping mecha-

nism. If you activate the wipers while 

the blades are stuck down with ice, 

you may risk damaging both the 

blade and the wiper motor.

–  

Do not activate the wipers on a dry 

screen. This will lead to the prema-

ture wear or damage to the blades.

Positions  A and D are accessible 

with the ignition on. Positions C 

and E are accessible only with the 

engine running.

1

A

B

C

D

E

1.99

WINDSCREEN WASH, WIPE 

(4/6)

Specific front wiper position 

(service position)

This position enables the blades to be 

lifted to remove them from the winds-

creen.
It may be useful to:

–  to clean the blades;

–  to release the blades from the winds-

creen in winter;

– replace the blades (refer to the 

“Wiper blades: replacement” para-

graph in Section 5).

With the ignition on and the engine off, 

lower the windscreen wiper stalk fully 

(fast continuous wipe position). The 

wiper arms stop in a position away from 

the bonnet.
To return the blades to position, make 

sure they have been placed on the 

windscreen, then move the stalk to po-

sition B (stop) with the ignition on.
Before switching on the ignition, 

place the wipers on the windscreen. 

Otherwise, there may a risk of damage 

to the bonnet or the wipers when they 

are switched on.

In the event of obstacles on the 

windscreen (dirt, snow, ice etc.), 

clean the windscreen (including the 

central area located behind the inte-

rior rear view mirror) before starting 

the wipers (risk of motor overheat-

ing).
If an object is preventing a blade 

from moving, it may stop functio-

ning. Remove the obstacle and 

reactivate the wiper using the wiper 

stalk.

Before any action involving 

the windscreen (washing 

the vehicle, de-icing, 

cleaning the windscreen, 

etc.) return stalk 1 to position B 

(stop).
Risk of injury and/or damage.

Note: after replacement, to reposition 

the blades correctly, make sure the 

blades are resting on the windscreen, 

switch on the ignition and activate the 

wiper control.

1.100

WINDSCREEN WASH, WIPE 

(5/6)

Windscreen washer

With the ignition on, pull stalk 1 then 

release.
A brief pull will trigger a single sweep 

of the wipers, in addition to the wind-

screen washer.
A longer pull will trigger three sweeps 

of the wipers followed, a few seconds 

later, by a fourth, in addition to the wind-

screen washer.

When working in the engine 

compartment, ensure that 

the windscreen wiper stalk 

is in position B (stop).

Risk of injury.

1

A

B

C

D

E

Note: in temperatures below zero, the 

washer liquid may freeze on the wind-

screen, reducing visibility. Heat the 

windscreen using the demister control 

before cleaning.

1.101

WINDSCREEN WASH, WIPE 

(6/6)

Headlight washers

Headlights on

On equipped vehicles, hold stalk 1 

pulled towards you for about 2 seconds 

- the headlight washers and winds-

creen washers will be activated at the 

same time.

The headlight washers are also activa-

ted after three prolonged movements 

on the front windscreen washer control.

When working in the engine 

compartment, ensure that 

the windscreen wiper stalk 

is in position B (stop).

Risk of injury.

1

A

B

C

D

E

Note: to ensure the headlight wash-

ers operate correctly in winter, remove 

snow from the jet trims and de-ice the 

jet trims using an aerosol de-icer.
You are recommended to regularly 

remove dirt encrusted on the headlight 

glass.
When the minimum windscreen washer 

fluid level is reached, the headlight 

washer system may be deprimed.
Fill the windscreen washer fluid and 

then activate the windscreen washer, 

with the engine running, to reprime 

the system.

1.102

To stop the operation, pivot ring 3 again.
Note: when washing using a roller 

type car wash, return the ring 3 on the 

stalk 1 to the stop position to deactivate 

automatic wiping.

Follow usage recommendations.

REAR SCREEN WASH, WIPE 

(1/2)

1

3

Do not use the wiper arm to open or 

close the tailgate.

Y

Rear screen wiper

With the ignition on, turn ring 3 

on stalk 1 to align the symbol with 

mark 2.
  stop;
– intermittent wiping.

The blade will pause for several 

seconds between sweeps. Wiping 

frequency varies with vehicle 

speed;

  slow continuous wiping.

2

Before any action involving 

the rear screen (washing 

the vehicle, de-icing, clean-

ing, etc.) return stalk 1 to 

the stop position.
Risk of injury and/or damage.

Efficiency of a wiper blade

Check the condition of the wiper 

blades. How long they last depends 

on you:
–  it must remain clean: clean the 

blade and the screen regularly 

with soapy water;

–  do not use it when the screen is 

dry;

–  free it from the screen when it has 

not been used for a long time.

In all cases, replace it as soon as 

it begins to lose efficiency: approx-

imately once a year. Refer to the 

“Wiper blades: replacement” para-

graph in Section 5.

Precaution for using the 

wipers

– in freezing or snowy weather, 

clear the screen before starting 

the wipers (risk of motor over-

heating);

–  ensure that no objects are ob-

structing the travel of the blade.

1.103

REAR SCREEN WASH, WIPE 

(2/2)

In the event of obstacles present on the 

rear window (dirt, snow, etc.), the wiper 

will try to sweep away all the obstacles. 

If an obstacle prevents the blade from 

moving, it can be stopped. Remove the 

obstacle, wait for around 30 seconds 

and reactivate the wiper using the wiper 

stalk.

Precautions
–  

If the weather is icy, check that the 

blade is not stuck to the windscreen 

before operating the wipers. If you 

activate the wiper while the blade is 

blocked by ice, you risk damaging 

both the blade and the wiping motor.

–  

Do not operate the wipers on a dry 

screen. This will lead to the prema-

ture wear or damage to the blades.

Activation/deactivation of the rear 

screen wiper 
Engaging reverse gear triggers inter-

mittent wiping (if the front wipers are in 

operation). If your vehicle is fitted with 

a vehicle settings customisation menu, 

you can opt to activate or deactivate 

this function. To do this, refer to the in-

formation on the “Vehicle settings cus-

tomisation menu” in Section 1; “Rear 

wiping in reverse gear”.
For vehicles not fitted with a settings 

customisation menu, you can have this 

function deactivated by an authorised 

dealer.

p

Rear screen wash/wipe

With the ignition on, push and 

hold stalk 1, then release.
A longer action will trigger three sweeps 

of the wipers followed, a few seconds 

later, by a fourth, in addition to the wind-

screen washer.

1

1.104

For details on filling the fuel tank, refer 

to the information on “Filling with fuel”.
To close it, press on the fuel filler flap by 

hand, as far as it will go.

FUEL TANK 

(1/3)

Useable fuel tank capacity:
– About 11 gallons (50 litres) for 

petrol versions;

– about 10.78 gallons (49 litres) for 

four door diesel versions;

– about 9.90 gallons (45 litres) for 

five-door and estate diesel versions.

With the vehicle unlocked, to open 

cover 2, press area A then release or, 

depending on the vehicle, press the 

control on the dashboard1. The cover 2 

opens.
Valve 3 is integrated into the filler pipe.

Fuel grade

Use a high-grade fuel that complies 

with the legislation in force in each 

country and which must comply with 

the specifications given on the label on 

the cover 2. Refer to the information on 

“Engine specifications” in Section 6.

Never press valve 3 with 

your fingers.
Do not wash the filler 

area with a high-pressure 

washer.

2

A

1

2

3

1.105

FUEL TANK 

(2/3)

Filling with fuel

With the ignition off, insert the nozzle to 

open valve 3 and insert it fully before 

turning it on to fill the fuel tank (risk of 

splashing).
Keep the nozzle in this position through-

out the entire filling operation.
When the pump cuts out automatically 

at the end of the filling procedure, a 

maximum of two further filling attempts 

may be made, as there must be suffi-

cient space in the fuel tank to allow for 

expansion.
Make sure that no water enters the fuel 

tank during filling. The valve 3 and its 

surround must remain clean.

Vehicle fitted with the Stop and 

Start function
To fill up with fuel, the engine must 

be stopped (and not on standby): 

stop the engine (Please See 

“Starting, stopping the engine” in 

Section 2).

Petrol versions
Using leaded petrol will damage the 

antipollution system and may lead to a 

loss of warranty.
To ensure that the fuel tank is not filled 

with leaded petrol, the fuel tank filler 

neck consists of a restrictor fitted with 

a safety system which only allows 

a nozzle for unleaded petrol to be 

used (at the pump).

Diesel versions

It is essential to use diesel fuel that 

conforms with the information given on 

the label inside cover 2.

Petrol versions

It is essential to use unleaded petrol. 

The octane rating (RON) must comply 

with the information given on the label 

on the cover 2. Refer to the information 

on engine specifications in Section 6.

Do not mix even small 

amounts of petrol (un-

leaded or E85) with diesel.

Do not use ethanol-based 

fuel if your vehicle is not compatible 

with this fuel.

Do not add additive to the fuel –

otherwise you risk damaging the 

engine.

2

3

1.106

Persistent smell of 

fuel

If you notice a persistent 

smell of fuel you should:

–  stop the vehicle as soon as traf-

fic conditions allow and switch off 

the ignition;

– switch on the hazard warning 

lights and ask your passengers 

to leave the vehicle and to keep 

away from traffic;

–  contact an approved Dealer.

Vehicles with RENAULT card
With the card RENAULT in the pas-

senger compartment, press the start 

button  4 without pressing any of the 

pedals. Wait a few minutes before start-

ing. This will enable the fuel circuit to 

be primed. If the engine does not start, 

repeat the procedure.
If the engine does not start after several 

attempts, please contact an authorised 

dealer.

No modifications what-

soever are permitted on 

any part of the fuel supply 

system (electronic units, 

wiring, fuel circuit, injectors, pro-

tective covers, etc.) as this may be 

dangerous (unless undertaken by 

qualified Network personnel).

4

FUEL TANK 

(3/3)

Running out of fuel on diesel 

versions

Vehicles with key/remote control
–  Put the ignition key in the “ON2po-

sition (please see the information on 

the "Ignition switch" in Section 2) and 

wait for a few minutes before start-

ing, to enable the fuel circuit to be 

primed;

–  turn the key to position “START"3. If 

the engine does not start, repeat the 

procedure.

–  If the engine does not start after sev-

eral attempts, please contact an au-

thorised dealer.

2.1

Section 2: Driving

(Advice on use relating to fuel economy and the environment)

Running in . . . . . . . . . . . . . . . . . . . . . . . . . . . . . . . . . . . . . . . . . . . . . . . . . . . . . . . . . . . . . . . . . . . . .  

2.2

Ignition switch . . . . . . . . . . . . . . . . . . . . . . . . . . . . . . . . . . . . . . . . . . . . . . . . . . . . . . . . . . . . . . . . . .  

2.3

Starting, stopping the engine: vehicle with key/remote control unit . . . . . . . . . . . . . . . . . . . . . . . . . .  

2.4

Starting - Stopping the engine: vehicle with RENAULT card . . . . . . . . . . . . . . . . . . . . . . . . . . . . . . .  

2.5

Standing start procedure . . . . . . . . . . . . . . . . . . . . . . . . . . . . . . . . . . . . . . . . . . . . . . . . . . . . . . . . . .  

2.8

Stop and Start function . . . . . . . . . . . . . . . . . . . . . . . . . . . . . . . . . . . . . . . . . . . . . . . . . . . . . . . . . . .   2.10

Special features of petrol versions  . . . . . . . . . . . . . . . . . . . . . . . . . . . . . . . . . . . . . . . . . . . . . . . . . .   2.14

Special features of diesel versions . . . . . . . . . . . . . . . . . . . . . . . . . . . . . . . . . . . . . . . . . . . . . . . . . .   2.15

Gear lever/Handbrake . . . . . . . . . . . . . . . . . . . . . . . . . . . . . . . . . . . . . . . . . . . . . . . . . . . . . . . . . . . .   2.16

Electronic parking brake . . . . . . . . . . . . . . . . . . . . . . . . . . . . . . . . . . . . . . . . . . . . . . . . . . . . . . . . . .   2.17

Driving advice, Eco-driving . . . . . . . . . . . . . . . . . . . . . . . . . . . . . . . . . . . . . . . . . . . . . . . . . . . . . . . .   2.20

Maintenance and antipollution advice . . . . . . . . . . . . . . . . . . . . . . . . . . . . . . . . . . . . . . . . . . . . . . . .   2.25

Environment  . . . . . . . . . . . . . . . . . . . . . . . . . . . . . . . . . . . . . . . . . . . . . . . . . . . . . . . . . . . . . . . . . . .   2.26

Tyre pressure monitoring system  . . . . . . . . . . . . . . . . . . . . . . . . . . . . . . . . . . . . . . . . . . . . . . . . . . .   2.27

Driver correction devices/aids . . . . . . . . . . . . . . . . . . . . . . . . . . . . . . . . . . . . . . . . . . . . . . . . . . . . . .   2.30

Lane departure warning. . . . . . . . . . . . . . . . . . . . . . . . . . . . . . . . . . . . . . . . . . . . . . . . . . . . . . . . . . .   2.40

Blind spot warning . . . . . . . . . . . . . . . . . . . . . . . . . . . . . . . . . . . . . . . . . . . . . . . . . . . . . . . . . . . . . . .   2.43

Safe distance alert . . . . . . . . . . . . . . . . . . . . . . . . . . . . . . . . . . . . . . . . . . . . . . . . . . . . . . . . . . . . . . .   2.47

Fatigue detection warning . . . . . . . . . . . . . . . . . . . . . . . . . . . . . . . . . . . . . . . . . . . . . . . . . . . . . . . . .   2.49

Speed limiter . . . . . . . . . . . . . . . . . . . . . . . . . . . . . . . . . . . . . . . . . . . . . . . . . . . . . . . . . . . . . . . . . . .   2.51

Speeding alert . . . . . . . . . . . . . . . . . . . . . . . . . . . . . . . . . . . . . . . . . . . . . . . . . . . . . . . . . . . . . . . . . .   2.54

Cruise control  . . . . . . . . . . . . . . . . . . . . . . . . . . . . . . . . . . . . . . . . . . . . . . . . . . . . . . . . . . . . . . . . . .   2.57

Adaptive cruise control  . . . . . . . . . . . . . . . . . . . . . . . . . . . . . . . . . . . . . . . . . . . . . . . . . . . . . . . . . . .   2.61

Parking distance control  . . . . . . . . . . . . . . . . . . . . . . . . . . . . . . . . . . . . . . . . . . . . . . . . . . . . . . . . . .   2.68

Reversing camera . . . . . . . . . . . . . . . . . . . . . . . . . . . . . . . . . . . . . . . . . . . . . . . . . . . . . . . . . . . . . . .   2.73

Assisted parking  . . . . . . . . . . . . . . . . . . . . . . . . . . . . . . . . . . . . . . . . . . . . . . . . . . . . . . . . . . . . . . . .   2.75

Automatic gearbox. . . . . . . . . . . . . . . . . . . . . . . . . . . . . . . . . . . . . . . . . . . . . . . . . . . . . . . . . . . . . . .   2.79

2.2

RUNNING IN

Petrol version

For the first 600 miles (1,000 km), do 

not exceed 78 mph (130 km/h) in the 

highest gear, or 3,000 to 3,500 rpm.
You may only expect top performance 

from your vehicle after approximately 

1,800 miles (3,000 km).
Service intervals: refer to the 

Maintenance Document for your vehi-

cle.

Diesel version

For the first 1,000 miles (1,500 km),  

do not exceed 80 mph (130 km/h) in 

the highest gear, or 2,500 rpm. After 

completing this mileage you may drive 

faster, although you may only expect 

top performance after approximately 

3,600 miles (6,000 km).
During the running in period, do not ac-

celerate hard while the engine is still 

cold and do not let the engine over-rev.
Service intervals: refer to the 

Maintenance Document for your vehi-

cle.

2.3

“ON" 2 position
The ignition is switched on:
Accessories (radio etc.) can be used.

“START" 3 position
If the engine fails to start at the first 

attempt, the key must be turned back 

before the starter can be activated 

again. Release the key as soon as the 

engine starts.
Note: on diesel versions, several sec-

onds may pass between turning the 

key and the engine starting to allow for 

engine preheating.

Ignition switch

“LOCK 0 position
To lock: remove the key and turn the 

steering wheel until the steering column 

locks.
To unlock: turn the key and the steering 

wheel slightly.

IGNITION SWITCH: vehicle with key

2.4

STARTING, STOPPING THE ENGINE: vehicle with key

Starting the engine

Petrol versions
–  

Activate the starter without acceler-

ating;

–  

release the key as soon as the 

engine starts.

É

Diesel versions   


–  

Turn the ignition key to the “ON" po-

sition 2 and hold this position until 

the engine preheating light goes off;

–  

turn the key to the “START" position 

without depressing the acceler-

ator pedal;

–  

release the key as soon as the 

engine starts.

Special note: if starting the engine 

when the outdoor temperature is very 

low (below - 10 ° C): hold down the 

clutch pedal until the engine starts.

Never start your vehicle 

while freewheeling on a 

gradient. Risk of non-ac-

tivation of power-assisted 

steering.
There is a risk of accidents.

Never switch off the igni-

tion before the vehicle has 

stopped completely. Once 

the engine has stopped, the 

brake servo, power-assisted steer-

ing, etc. and the passive safety de-

vices such as air bags and preten-

sioners will no longer operate.

Stopping the engine

With the engine idling, turn the key 

back to the “LOCK" position 0.

Driver’s responsibility 

when parking or stopping 

the vehicle
Never leave an animal, 

child or adult who is not self-suffi-

cient alone in your vehicle, even for 

a short time.
They may pose a risk to themselves 

or to others by starting the engine, 

activating equipment such as the 

electric windows or locking the 

doors, for example.
Also, in hot and/or sunny weather, 

please remember that the tempera-

ture inside the passenger compart-

ment increases very quickly.
RISK OF DEATH OR SERIOUS 

INJURY.

2.5

STARTING, STOPPING THE ENGINE: vehicle with RENAULT 

card (1/3)

Conditions for starting the 

engine

The RENAULT card must be inserted in 

detection zone 1.
To start:
–  vehicles with an automatic gearbox, 

place the lever in position P, depress 

the brake pedal   and press button 2;

–  vehicles with a manual gearbox, de-

press the brake or clutch pedal and 

press button 2. If a gear is engaged, 

the vehicle may only be started by 

depressing the clutch pedal.

“Hands-free” starting with 

the tailgate open

In this case, the RENAULT card should 

not be located in the boot, to avoid any 

risk of loss.

2

1

Special features
–  If one of starting conditions is not ap-

plied, the message “Press brake + 

START” or “Press clutch + START” 

or “Select P” is displayed on the in-

strument panel;

–  in some cases, it will be necessary 

to move the steering wheel whilst 

pressing the start button 2 to help 

unlock the steering column; the mes-

sage “Turn steering wheel + START” 

will warn you of this;

Driver’s responsibility 

when parking or stopping 

the vehicle
Never leave an animal, 

child or adult who is not self-suffi-

cient alone in your vehicle, even for 

a short time.
They may pose a risk to themselves 

or to others by starting the engine, 

activating equipment such as the 

electric windows or locking the 

doors, for example.
Also, in hot and/or sunny weather, 

please remember that the tempera-

ture inside the passenger compart-

ment increases very quickly.
RISK OF DEATH OR SERIOUS 

INJURY.

2.6

STARTING, STOPPING THE ENGINE: vehicle with RENAULT 

card (2/3)

Press the brake or clutch pedal, then 

place the RENAULT 3 card (logo side) 

for around 2 seconds in contact with. 
–  the start button 2 in left-hand drive 

vehicles;

or
– the symbol 4 in right-hand drive vehi-

cles.

Press button  to start the vehicle. The 

message goes out.

2

Accessories function

(switching on the ignition)
Once you have gained access to your 

vehicle, you may use some of its func-

tions (radio, navigation, wipers, etc.).
To use the other functions, with the 

RENAULT card in the passenger com-

partment, press button 2 without press-

ing the pedals.

3

Operating faults

In certain cases, the RENAULT  “hands-

free” card may not work:

–  when the RENAULT card battery is 

drained, etc.;

–  near to appliances operating on the 

same frequency as the card (moni-

tor, mobile phone, video game, 

etc.);

–  vehicle located in a high electro-

magnetic radiation zone.

The message “Place card close START 

and push” or depending on the vehicle 

“Place card near symbol + START” ap-

pears on the instrument panel.

4

2.7

STARTING, STOPPING THE ENGINE: vehicle with RENAULT 

card (3/3)

If the RENAULT card is no longer in the 

passenger compartment when you try 

to switch the engine off, the message 

“No keycard Press and hold” appears 

on the instrument panel: press the 

button 2 for longer than two seconds. 

If the card is no longer in the passen-

ger compartment, make sure you can 

retrieve it before pressing and holding 

the button. Without the card  RENAULT 

, you will not be able to start.
With the engine switched off, any ac-

cessories being used (radio, etc.) will 

continue to function for approximately 

10 minutes.
When the driver’s door is opened, the 

accessories stop working.

Conditions for stopping the 

engine

The vehicle must stationary, with the 

lever positioned in N or P for vehicles 

with an automatic transmission.
With the RENAULT card in the vehicle, 

press the 2 button: the engine will stop. 

The steering column is locked when the 

driver’s door is opened or the vehicle 

is locked.

When you leave your vehi-

cle, especially if you have 

your RENAULT card with 

you, check that the engine 

is completely switched off.

2

Driver’s responsibility 

when parking or stopping 

the vehicle
Never leave an animal, 

child or adult who is not self-suffi-

cient alone in your vehicle, even for 

a short time.
They may pose a risk to themselves 

or to others by starting the engine, 

activating equipment such as the 

electric windows or locking the 

doors, for example.
Also, in hot and/or sunny weather, 

please remember that the tempera-

ture inside the passenger compart-

ment increases very quickly.
RISK OF DEATH OR SERIOUS 

INJURY.

Never switch off the igni-

tion before the vehicle has 

stopped completely. Once 

the engine has stopped, the 

brake servo, power-assisted steer-

ing, etc. and the passive safety de-

vices such as air bags and preten-

sioners will no longer operate.


Content   ..  5  6  7  8   ..