Peugeot Partner Tepee (2017 year). Manual - part 6
 

  Index      Peugeot     Peugeot Partner Tepee - service manual 2017 year in english


Search            copyright infringement  


Content   ..  4  5  6  7   ..


Peugeot Partner Tepee (2017 year). Manual - part 6


 79

EASE OF USE and COMFORT

4

Partner2VP_en_Chap04_Ergonomie_ed02-2016

Seats

Partner2VP_en_Chap04_Ergonomie_ed02-2016

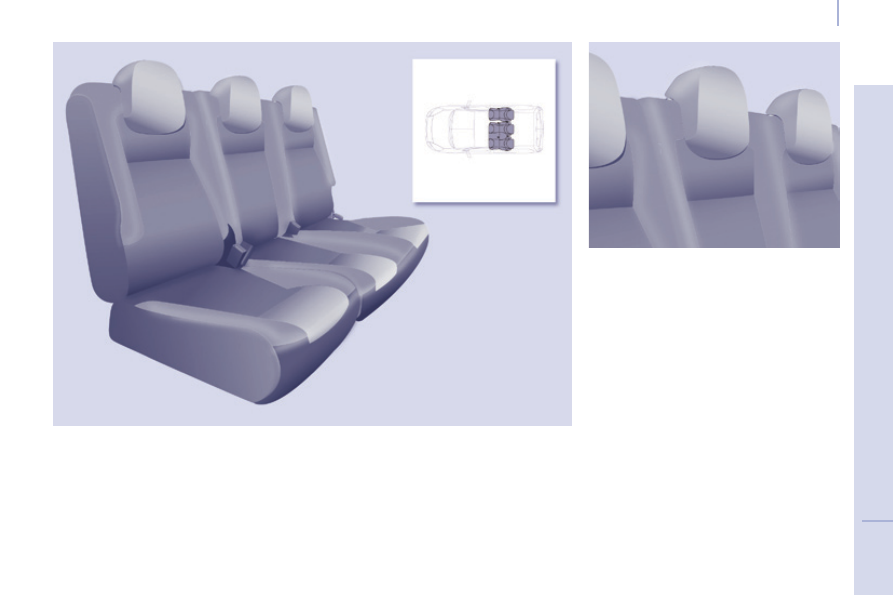
REAR BENCH SEAT

Each 1/3 - 2/3 section can be fully 
folded, then removed individually.

Head restraint

The 1/3 - 2/3 split rear bench seat is fitted 

with "comma" shape head restraints.

High position: lift and raise the head 
restraint.
Low position: press on the head 
restraint to lower it.
To remove the head restraint, after 
raising it press the tab and lift the head 
restraint.
To install the head restraint, engage 
the rods of the head restraint in the 
holes keeping it in line with the seat 
back.

80

Partner2VP_en_Chap04_Ergonomie_ed02-2016

Seats

Partner2VP_en_Chap04_Ergonomie_ed02-2016

Fully folded position

Example of operations for the 
1/3 section. They are identical for the 
2/3 section.

Raise the grey control bar, located 
at the rear of the seat cushion.

Tilt the entire seat forward.

Putting back in place

Check that the seat is locked 

on the floor securely when it is 

returned to the sitting position.

Place the head restraints in the low 
position.

If necessary, move the front seats 
forward.

Press the grey control located on 
the upper part of the seat backrest.

Fold the seat backrest onto the 
seat cushion.

Tilt the entire seat rearwards until it 
locks into place.
Raise the seat backrest.
The seat is locked correctly when the 
control (at the top of the seat back) is 
no longer visible.

 81

EASE OF USE and COMFORT

4

Partner2VP_en_Chap04_Ergonomie_ed02-2016

Seats

Partner2VP_en_Chap04_Ergonomie_ed02-2016

Removing the bench seat

Refitting the bench seat

Refer to the "Fully folded position", 
described previously.

To return the bench seat 
(1/3 section and/or 2/3 section) to 
the "passenger carrying" position, 

refer to the "Fully folded position" 
described previously.

Tilt the entire seat rearwards by 
approximately 45°.

Lift the bench seat 

vertically to the 

limit of the anchorages.

Straighten bench seat by tilting it 
forwards then lift it.

If necessary, move the front seats 
forward.

Place the bench seat (1/3 section and/or 
2/3 section) in the fully folded position.

Offer up the bench seat (1/3 section 
and/or 2/3 section) vertically.

Place the hooks between the two 
bars.

Fold the bench seat rearwards.

82

Partner2VP_en_Chap04_Ergonomie_ed02-2016

Seats

Partner2VP_en_Chap04_Ergonomie_ed02-2016

REAR SEATS (5 SEAT VERSION)

Head restraint

Each seat can be removed individually.
Each time a seat is returned to the 
sitting position or after removing then 

refitting a seat, check that it is locked 

on the floor securely.

The three independent rear seats 

are fitted with "comma" shape head 

restraints.
The back of the centre seat, folded 
onto the seat cushion, has a shell 
which serves as a table with cup 
holder.

High position: lift and raise the head 
restraint.
Low position: press on the head 
restraint to lower it.
To remove the head restraint, after 
raising it press the tab and lift the head 
restraint.
To install the head restraint, engage 
the rods of the head restraint in the 
holes keeping it in line with the seat 
back.

 83

EASE OF USE and COMFORT

4

Partner2VP_en_Chap04_Ergonomie_ed02-2016

Seats

Partner2VP_en_Chap04_Ergonomie_ed02-2016

Adjusting the angle of the seat backrest

Placing the seat back in the 

table position

Returning the seat back to the sitting position

Placing the seat in the fully 

folded position

Returning the seat to its original position

Operate the control and adjust the 
angle of the seat backrest.

Pull the control to fold the seat back 
onto the seat cushion.

Do not place hard or heavy objects 
on the table. They could become 
dangerous projectiles in the event of 
sharp braking or impact.

Release the seat back by pulling 
the control, then return it to its 
original position.

When returning the seat backrest to 
the sitting position, ensure that it is 
locked securely.

Pull the control to place the seat 
back in the table position.

Raise the bar located behind the 
seat to release the rear anchoring 
points.

Tilt the entire seat forwards, until it 
locks.

Push the red control.

-  Fold back the seat to fix the rear 

anchoring points.

Raise the seat backrest by pulling 
the control.

Check that the seat has correctly 
locked into place.

Before unfolding the seat, check 
that no object is obstructing the 
anchorage points or preventing 
correct locking of the seats.

84

Partner2VP_en_Chap04_Ergonomie_ed02-2016

Seats

Partner2VP_en_Chap04_Ergonomie_ed02-2016

Removing the seat

If necessary, move the front 
seats forward and lower the head 
restraint.

Place the seat in the fully folded 
position.

Good practice

Following the various operations:

do not remove a head restraint 

without storing it and fix it to a 

support,

ensure that the passengers can 
always access the seat belts and 
fasten them easily,

passengers must never take 
their seat without adjusting and 
fastening their seat belt.

Refer to the "Fully folded position" 
described previously.

Press the red lever to release the 
front feet.

Tilt the entire seat rearwards by 
approximately 45° without releasing 
the lever.

Release the lever.

Lift the seat 

vertically to the limit of 

the anchorages.

Straighten the seat by tilting it 
forwards then lift it.

Refitting the seat

Tilt the seat forward by 45°.

Place the hooks between the 
two bars.

-  Fold back the seat to fix the rear 

anchoring points.

Pull the control to return the seat 
back to its initial position.

Raise the head restraint.

Before unfolding the seat, check 
that no object is obstructing the 
anchorage points or preventing 
correct locking of the seats.

 85

EASE OF USE and COMFORT

4

Partner2VP_en_Chap04_Ergonomie_ed02-2016

Seats

Partner2VP_en_Chap04_Ergonomie_ed02-2016

Head restraint

This is of the "comma" shape type.
High position: press the tab, lift and 
raise the head restraint.
Low position: push the tab and press 
the top of the head restraint to lower it.
To remove the head restraint: place it 
in the high position, lift it, then remove 
it.
Store it inside the vehicle, securing it 

firmly.
To install the head restraint: engage 
the rods of the head restraint in the 
holes keeping it in line with the seat 
back.

Each seat can be removed and must 

be replaced in the specified position, 

indicated by a symbol on its label.

The seats of row 2 and row 3 are 
independent and adjustable.

REAR SEATS (7 SEAT VERSION)

86

Partner2VP_en_Chap04_Ergonomie_ed02-2016

Seats

Partner2VP_en_Chap04_Ergonomie_ed02-2016

Left-hand outer seat

Types of Row 2 seat

Types of Row 3 seat

Centre seat

Right-hand outer seat

Right-hand outer seat

Left-hand outer seat

 87

EASE OF USE and COMFORT

4

Partner2VP_en_Chap04_Ergonomie_ed02-2016

Seats

Partner2VP_en_Chap04_Ergonomie_ed02-2016

Adjusting the angle of the seat backrest

Operate the control and adjust the 
angle.

Placing the seat backrest in the 

table position

Lower the head restraint fully.

Operate the control to fold the seat 
back onto the seat cushion.

Returning the seat backrest to the 

sitting position

Release the seat backrest by 
pulling the control, then return it to 
its original position.

Ensure that it has correctly locked 
into place.

Placing the seat in the fully folded 

position

Place the seat in the table position.

Pull the red strap, located behind 
the seat, to release the feet of the 
seat from their anchorage on the 

floor.

Tilt the entire seat forwards.

Row 2 seat adjustments

Returning the seat to its original 

position

Unfold the entire seat.

Before folding the seat, ensure 
that:

in row 3, no passenger's 
foot is at one of the seat 

anchorages on the floor,

the seat is locked securely on 

the floor,

the seat belt is available for 
the passenger.

88

Partner2VP_en_Chap04_Ergonomie_ed02-2016

Seats

Partner2VP_en_Chap04_Ergonomie_ed02-2016

Row 3 seat adjustments

Placing the seat backrest in the 

table position

Lower the head restraint fully.

Operate the control to fold the seat 
backrest onto the seat cushion.

Returning the seat backrest to the 

sitting position

Release the seat backrest by 
pulling the control, then return it to 
its original position.

Check that it has correctly locked in 
place.

Returning the seat to its original 

position

Push the red control.

Unfold the entire seat.

Placing the seat in the fully folded 

position

Place the seat in the table position.

-  Raise the bar fitted with a red 

strap, located behind the seat, to 
release feet of the seat from their 

anchorage on the floor.

Tilt the entire seat forwards.

Ensure that:

the seat is locked securely on 

the floor,

the seat belt is available for 
the passenger.

 89

EASE OF USE and COMFORT

4

Partner2VP_en_Chap04_Ergonomie_ed02-2016

Seats

Partner2VP_en_Chap04_Ergonomie_ed02-2016

Entering, exiting from Row 3

Entering

Place the row 2 seat in the table 
position.

Exiting

Lower the head restraint fully.

Operate the yellow control, located 
on the back of the row 2 seat 
backrest.

Fold the seat backrest to the table 
position.

Ensure that the centre seat belt is 
stowed correctly in its housing in 
the headlining.

Tilt it to the fully folded position to 
allow access.

Pull the red strap to place the seat 
in the fully folded position.

Tilt the entire seat forwards.

Exit via the side door.

Before folding it back, ensure that 
the feet of the passenger in row 3 
are not obstructing the row 2 seat 
anchoring points.

90

Partner2VP_en_Chap04_Ergonomie_ed02-2016

Seats

Partner2VP_en_Chap04_Ergonomie_ed02-2016

Removing a seat

If necessary, move the front seats 
forward.

Lower the head restraint.

Place the seat in the fully folded 
position.

Tilt the entire seat forwards then  
lift it.

Refitting the seat
The label on the seat indicates the 
position in which it must be installed.

Place the hooks of the front feet 
between the two bars.

-  Fold back the seat to fix the rear 

anchoring points.

Operate the control to raise the 
seat back to its initial position.

Raise the head restraint.

Ensure that no object or foot of a 
passenger seated in the rear is 
obstructing the anchorage points 
or preventing correct locking of 
the seat.

Operating the Row 2 seats

 91

EASE OF USE and COMFORT

4

Partner2VP_en_Chap04_Ergonomie_ed02-2016

Seats

Partner2VP_en_Chap04_Ergonomie_ed02-2016

Operating the Row 3 seats

Removing the seat

Lower the head restraint.

Place the seat in the fully folded 
position.

Tilt the entire seat forwards.

On each side, take hold of the 
uprights of the folded seat, tilting it 
forward slightly, and lift it.

Refitting the seat
The label on the seat indicates the 
position in which it must be installed.

Place the hooks of the front feet 
between the two bars.

Ensure that no object or foot is 
obstructing the rear anchorage 
points and that the seat belt is 
positioned correctly and available 
for use.

-  Fold back the seat to fix its rear 

anchoring feet.

Operate the control to raise the 
seat back to its initial position.

Raise the head restraint.

Good practice

Following the various operations:

do not remove a head restraint 
without stowing it; secure it inside 
the vehicle,

ensure that the passengers can 
always access the seat belts and 
fasten them easily,

passengers must never take 
their seat without adjusting and 
fastening their seat belt.

a passenger seated in row 3 must 
ensure that he does not obstruct 
the row 2 seat anchorage points,

a passenger seated in row 3 must 
not have the seat in front of them in 
row 2 in the folded position; this is 
in case the seat could tip towards 
the passenger unexpectedly and 
injure them.

Do not place hard or heavy objects on 
the seat backs forming a table, they 
could become dangerous projectiles in 
the event or sharp braking or impact.

92

Partner2VP_en_Chap04_Ergonomie_ed02-2016

Seats

Partner2VP_en_Chap04_Ergonomie_ed02-2016

MODULARITY AND DIFFERENT SEAT CONFIGURATIONS
5 seat layouts

 93

EASE OF USE and COMFORT

4

Partner2VP_en_Chap04_Ergonomie_ed02-2016

Seats

Partner2VP_en_Chap04_Ergonomie_ed02-2016

7 seat layouts

The various operations 
must be carried out while 
stationary.

94

Partner2VP_en_Chap04_Ergonomie_ed02-2016

Practical information

Partner2VP_en_Chap04_Ergonomie_ed02-2016

FRONT FITTINGS

1. Lower glove box

This may or may not be fitted with a lid.

Upper storage compartment

This is located on the dashboard, 
behind the steering wheel.
A recess makes lifting of the lid easier 
when opening. Guide it to its rest 
position.
To close, guide the lid then press the 
centre gently.
Any liquid which could spill risks 
causing an electrical short circuit and 

therefore a potential fire.

3. Side storage compartment

4. Bag hook

Only hang flexible bags which are not 

too heavy on this hook.

2.  Storage pocket and bottle 

holder (1.5 L)


Content   ..  4  5  6  7   ..