Peugeot Partner Tepee (2017 year). Manual - part 7
 

  Index      Peugeot     Peugeot Partner Tepee - service manual 2017 year in english


Search            copyright infringement  


Content   ..  5  6  7  8   ..


Peugeot Partner Tepee (2017 year). Manual - part 7


 95

EASE OF USE and COMFORT

4

Partner2VP_en_Chap04_Ergonomie_ed02-2016

Practical information

Partner2VP_en_Chap04_Ergonomie_ed02-2016

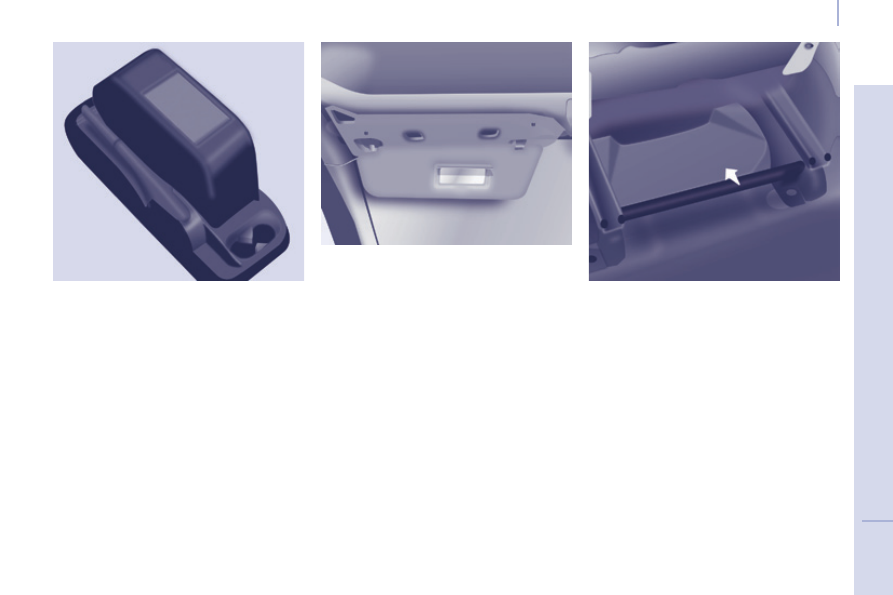
Overhead storage unit

This is located above the sun visors 
and can accommodate various objects 

(a jumper, file, gloves...).
The openings concealed by the sun 
visors allow you to see and access the 
objects stored in the overhead storage 
unit.
The maximum weight permitted in the 
overhead storage unit is 5 Kg.
Do not place objects in this storage 
unit which could present a risk to the 
occupants.

Central storage console

This console offers an appreciable 
additional storage area: it can be 
removed and clips onto a base which 
also incorporates two cup holders at 
the rear.
Ensure that the object (bottle, can...) 
placed in the cup holder is retained 
securely and does not risk being 
dislodged while driving.
Any liquid which could spill presents 
a risk of damage on contact with the 
instrument panel and centre console 
controls.
Take care.

Sun visor

To prevent dazzle from ahead, fold the 
sun visor down.
A pocket is provided in the driver's sun 
visor for storing toll cards, tickets, ...

Storage compartment under 

seats

Storage compartments are available, 

with or without lid, in the floor under the 

front seats.
To gain access to them, move the seat 
forward. The lid must be lifted from the 
rear of the seat.

96

Partner2VP_en_Chap04_Ergonomie_ed02-2016

Practical information

Partner2VP_en_Chap04_Ergonomie_ed02-2016

SEATING AREA FITTINGS

Floor boxes

Two boxes are available, located under 
the rear passenger footwells.
To open them, slide your fingers into 

the recess and lift the lid.

Aircraft style tables

To put the table in place, pull it 
upwards and fold it down.
As a safety precaution, above a high 
pressure, the table is designed to 
unhook.
To put it back in place, with the table 
vertical, engage one side then the 
other, forcing slightly.
Do not place hard or heavy objects 
on the table. They could become 
dangerous projectiles in the event of 
sharp braking or impact.
A bag hook is provided on the side of 
each table.

Side blinds

Side blinds may be available on the 
sliding side doors.
Pull the side blind by the tab to install 
it.
To avoid damaging the blind when 
opening the door, check that the tab is 
hooked securely.

Always guide the blind slowly 
using the tab, both when raising 
and when lowering.

 97

EASE OF USE and COMFORT

4

Partner2VP_en_Chap04_Ergonomie_ed02-2016

Practical information

Partner2VP_en_Chap04_Ergonomie_ed02-2016

ZENITH ROOF

The multifunction roof extends the 
overhead storage unit. It consists of 
the following components:

Storage compartments

Storage compartments are provided 
on each side of the roof. The maximum 
authorised load is 6 kg.
The translucent base assists with 

finding objects stored inside.
Do not store objects which could 
present a risk to the occupants.

Courtesy lamp

The operation of the courtesy lamp is 
identical to that of the front courtesy lamp.

Refer to chapter 4 "Practical 
information", "Courtesy lamps" 
section.

98

Partner2VP_en_Chap04_Ergonomie_ed02-2016

Practical information

Partner2VP_en_Chap04_Ergonomie_ed02-2016

From inside

From outside

Rear box

This roof box can be accessed from 
the rear seats and the boot.
From the rear seats, slide the flaps 

to open.

Vents

A 3-position control allows you to 

adjust the air flow through the vents.

The vents are also fitted with a scented 

air freshener.

From the boot, place your thumb on the 
recess then pull the handle to open.

Open carefully to prevent objects 
stored in this interior roof box from 
falling out.

The maximum authorised load is 10 kg.

 99

EASE OF USE and COMFORT

4

Partner2VP_en_Chap04_Ergonomie_ed02-2016

Practical information

Partner2VP_en_Chap04_Ergonomie_ed02-2016

SCENTED AIR FRESHENER

The scented air freshener diffuses 
a fragrance in the passenger 
compartment from the roof console 
vents.

Adjusting the flow

Turn the chromed button to adjust the 
diffusion:

to the left to decrease,

to the right to increase.

To stop the diffusion, turn the chromed 
button fully to the left.

Removing the scented air 

freshener

Press the button down while turning 
it a quarter of a turn to the left to 
the stop.

Remove the scented air freshener 
from the roof console.

Replace the cartridge.

100

Partner2VP_en_Chap04_Ergonomie_ed02-2016

Practical information

Partner2VP_en_Chap04_Ergonomie_ed02-2016

Replacing a cartridge

The scented air freshener refill consists 

of a cartridge 

B and its sealing case C.

-  Remove the protective film 

D.

Place the head of the cartridge 

B 

on the button 

A of the scented air 

freshener.

Turn it a quarter of a turn to lock it 
on the button and remove the case.

Insert the scented air freshener in 
its location.

You can change the cartridges at any 
time and store cartridges which have 
already been started in their original 
case.
The scented air freshener button 

A is 

independent of the cartridge.
The cartridges are supplied without the 
button 

A.

Inserting the scented air freshener

After fitting or changing the cartridge:

Put the scented air freshener back 
in place in its location.

Turn it a quarter of a turn to the 
right.

Good practice

As a safety precaution, only use the 
cartridges provided for this purpose. 
Do not dismantle the cartridges.
Keep the cartridge sealing cases 
which are used as packaging when the 
cartridges are not in use.
Never try to refill the cartridges with 

fragrances other than those available 
from PEUGEOT dealers.
Keep out of reach of children and 
animals. Avoid contact with the skin 
and eyes. If swallowed, consult a 
doctor and show him the packaging or 
product label.

The scented air freshener button 

A can 

only be fixed on the multifunction roof 

console with a cartridge.
Therefore, always retain button 

A and 

a cartridge.
The cartridges are available from 
PEUGEOT dealers.

 101

EASE OF USE and COMFORT

4

Partner2VP_en_Chap04_Ergonomie_ed02-2016

Practical information

Partner2VP_en_Chap04_Ergonomie_ed02-2016

ZENITH ROOF BARS

The maximum authorised weight on 
each roof bar is 35 kg.

In all cases, the load must rest on 
the non-slip bands provided for this 
purpose and must not touch the roof or 
the glazing of the roof.

Recommendations for loading the 

roof
This procedure requires the use of 
a spanner supplied with the tools for 
changing a wheel.

These two longitudinal Zenith roof bars 
can be removed.

Chapter 9, "Changing a wheel" 
section.

Open the protective covers.

Slacken the four screws using the 
spanner and remove them.

Turn the bars 90° placing the 
hollow parts towards the front.

-  Refit the the 4 screws and tighten 

them using the spanner.

Close the protective covers.

Use the strap passages 

A only to 

secure the load firmly.

102

Partner2VP_en_Chap04_Ergonomie_ed02-2016

Practical information

Partner2VP_en_Chap04_Ergonomie_ed02-2016

ExTERIOR ROOF BARS

If you install transverse bars on these bars, refer to the weight values indicated 
by the manufacturer but do not exceed: 75 kg.

 103

EASE OF USE and COMFORT

4

Partner2VP_en_Chap04_Ergonomie_ed02-2016

Practical information

Partner2VP_en_Chap04_Ergonomie_ed02-2016

Automatic switching on/off
The front courtesy lamp comes on 
when the key is removed from the 
ignition, when the vehicle is unlocked, 
when one of the front doors is opened 
and for location of the vehicle using the 
remote control.
It goes off gradually after the ignition 
is switched on and when the vehicle is 
locked.

Front seats: comes on when 
one of the front doors is 
opened.

These are switched on and off by 
means of a manual switch, with 
the ignition on.

Rear seats: comes on when 
one of the rear doors is 
opened.
If the doors remain open for 
a few minutes, the courtesy 
lamps go off.

Permanently off.

Permanently on, ignition on.

Front courtesy lamp

COURTESY LAMPS

Rear courtesy lamp

Front individual reading lamps

104

Partner2VP_en_Chap04_Ergonomie_ed02-2016

Practical information

Partner2VP_en_Chap04_Ergonomie_ed02-2016

LOAD SPACE COVER (5 SEAT VERSION)

This rigid shelf conceals the objects 
stored in the boot.

Removing
Fold the load space cover.
Detach it from the notches 

A and B 

pulling it towards you.
Raise it and remove the assembly.

Refitting
Place the load space cover in front 
of 

A and B.

Push it forwards to insert the lugs in 
the notches.
Unfold and clip into the notches 

C.

Folding
From the boot, fold the half-shelf, 
raising it to detach it from the notch 

C.

Storing (according to version)
A location is provided in the back of the 
rear seats to accommodate the load 
space cover folded onto itself.
Slide it vertically between the side 
guides located at mid seat back height.
Insert the hinge first, with the free flaps 

turned upwards.

This rigid load space cover can 
form a shelf. However, as a safety 
measure, do not place objects 

on it which could become dangerous 
projectiles in the event of sharp braking 
or rear impact.

 105

EASE OF USE and COMFORT

4

Partner2VP_en_Chap04_Ergonomie_ed02-2016

Practical information

Partner2VP_en_Chap04_Ergonomie_ed02-2016

12 volt socket (120 W max)

It is advisable to limit the use of this 
socket to avoid discharging the battery.

Protective net

Open the cover located in the hook 
support.
Fix the top of the net in the notches, 

having first turned the bar 1/4 of a turn.
Ensure that the end of the bar engages 
correctly in the metal part of its 
location.
Fix the straps in the locations provided 

on the floor.
Tighten the net using the straps.

Stowing rings

Use these rings to secure loads on the 

floor.

The connection of an electrical 
device not approved by 
PEUGEOT, such as a USB 

charger, may adversely affect the 
operation of vehicle electrical systems, 
causing faults such as poor telephone 
reception or interference with displays 
in the screens.

106

Partner2VP_en_Chap04_Ergonomie_ed02-2016

Practical information

Partner2VP_en_Chap04_Ergonomie_ed02-2016

REAR FITTINGS  

(7 SEAT VERSION)

Cup holder

Any liquid carried in a cup (mug or 
other) on board which could spill, 
presents a risk.
Take care.

12 volt socket (120 W max)

It is advisable to limit the use of this 
socket to avoid discharging the battery.

Stowing rings

Use the stowing rings on the floor to 

secure and retain your loads firmly.
The seat belt anchorages must not be 
used for this purpose.

 It is recommended that the load 
is immobilised by securing it 

firmly using the stowing rings on 

the floor.

 107

EASE OF USE and COMFORT

4

Partner2VP_en_Chap04_Ergonomie_ed02-2016

Practical information

Partner2VP_en_Chap04_Ergonomie_ed02-2016

Storage flaps

Raise the corresponding flap.

Next to the boot sill, the recess is 
intended to receive the roller tube 
containing the load space cover.

Seat belts

Ensure that the centre seat belt has 
reeled in correctly to its carrier in the 
roof.
Prevent the row 3 seat belt buckles 
from knocking by raising them as close 
as possible to the anchorages in the 
roof.
The seat belt buckle attachment rings 
on each side of the boot must not be 
used to retain loads.

108

Partner2VP_en_Chap04_Ergonomie_ed02-2016

Practical information

Partner2VP_en_Chap04_Ergonomie_ed02-2016

BLIND, LOAD SPACE COVER

Position the load space screen so as to 

present the rear load space cover flaps 

towards you.
Engage the left-hand lug of the roller in 
the support 

A.

The load space cover is the roller blind 
type. Take care not to place heavy 
objects on the load space cover when 
unreeled.

Compress then place the right-hand 
lug facing the support 

B.

Release to engage the roller in its 
support.
Unroll the load space cover to the rear 
side pillars.
Engage the ends in the rear notches to 
keep it taut.

To install it
Place the row 3 seats in the fully folded 
position.
Raise the storage flap at the boot sill.
Take hold of the roller in the centre and 
compress it towards the left-hand pillar.
Raise the assembly.

 109

EASE OF USE and COMFORT

4

Partner2VP_en_Chap04_Ergonomie_ed02-2016

Practical information

Partner2VP_en_Chap04_Ergonomie_ed02-2016

To remove it
From the boot, pull the load space 
cover towards you to release it from the 
side pillars.
Guide the load space cover as it rolls 
up.
Remove the clips of the three flaps from 

the base of each row 2 head restraint.
Compress the roller to the left to remove 
it from the support 

B.

Raise it and pivot it forwards.

To store it
Store it in the recess at the boot sill, 

with the two rear flaps uppermost.
First, compress the load space screen 
to the left.
Release.
Arrange the two flaps and close the 

storage flap.

The roller is fitted with three flaps 

permitting concealment of the 
boot, whether the row 2 seats 
are in the normal position or the 
comfort position.

Each flap has two clips which are 

hooked on the base of each head 
restraint.

11

0

Partner2VP_en_Chap04_Ergonomie_ed02-2016

Mirrors and windows

Partner2VP_en_Chap04_Ergonomie_ed02-2016

Adjusting electric door mirrors

Move the control to the right or to 
the left to select the corresponding 
mirror.

Move the control in all four 
directions to adjust.

Return the control to the central 
position.

MIRRORS

Heated mirrors

Adjusting manual door mirrors

Forced folding

If the mirror casing has come out of 
its initial location, with the vehicle 
stationary reposition the mirror casing 
manually or use the electric folding 
control.

Press the heated rear screen 
button.

Move the lever in all four directions to 
adjust.
When the vehicle is parked, the door 
mirrors can be folded back manually.
The mirrors are not equipped with 
automatic heating.

Electric folding / unfolding

The mirrors can be folded or unfolded 
electrically from the inside, with the 
vehicle parked and the ignition on:

Place the control in the central 
position.

Turn the control downwards.

The mirrors that have electric folding/
unfolding can be heated.


Content   ..  5  6  7  8   ..