Peugeot Partner Tepee (2017 year). Manual - part 4
 

  Index      Peugeot     Peugeot Partner Tepee - service manual 2017 year in english


Search            copyright infringement  


Content   ..  2  3  4  5   ..


Peugeot Partner Tepee (2017 year). Manual - part 4


47

READY

 T

O GO

3

Partner2VP_en_Chap03_Pret-a-partir_ed02-2016

Instruments and controls

Partner2VP_en_Chap03_Pret-a-partir_ed02-2016

SERVICE INDICATOR

This programmes service intervals 
according to the use of the vehicle.

More than 1 000 miles/km before the 

next service is due

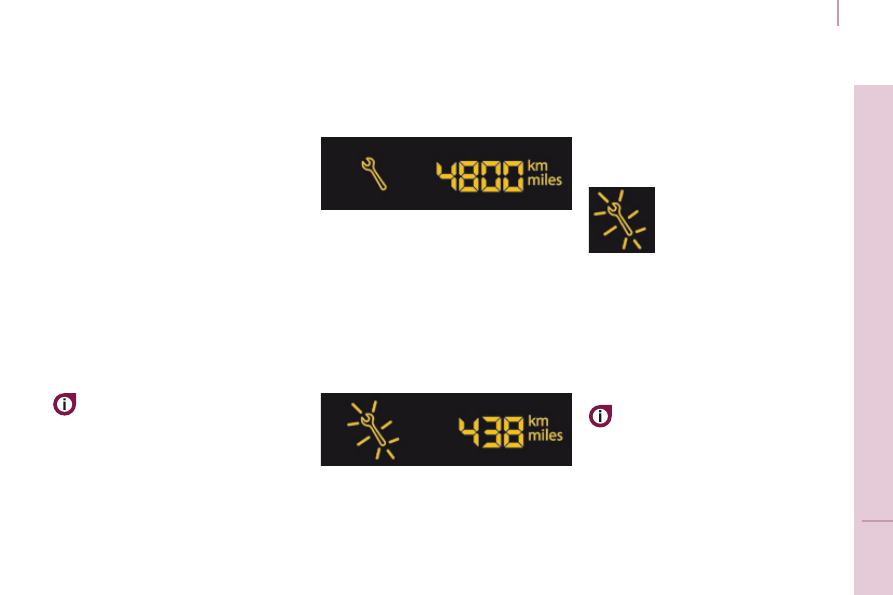
Example: 4 800 miles/km remain 

before the next service is due. When 
the ignition is switched on and for a 
few seconds, the screen shows:

A few seconds after the ignition is 
switched on, the oil level is displayed 
(depending on version), then the total 
distance recorder resumes normal 
operation showing the total and trip 
distances.

Less than 1 000 miles/km before the 

next service is due
Each time the ignition is switched on and for a 

few seconds, the spanner flashes and the number 

of miles/kilometres remaining is displayed:

A few seconds after the ignition is 
switched on, the oil level is displayed 
(depending on version), then the total 
distance recorder resumes normal 
operation and the spanner remains on. 
This indicates that a service should be 
carried out shortly.

Service overdue

Operation
A few moments after the ignition 
has been switched on, the spanner 
indicating a service operation comes 
on; the display for the total distance 

recorder gives (in round figures) the 

distance remaining before the next 
service.
The points at which a service is due 
are calculated from the last indicator 
zero reset.
The point at which a service is due is 
determined by two parameters:

the distance travelled,

the time which has elapsed since 
the last service.

The distance remaining before the 
next service may be weighted by 
the time factor, depending on the 
type of driving.

With the engine running the spanner 
remains on until the service has been 
carried out.
For BlueHDi Diesel versions, this 

alert is also accompanied by the fixed 

illumination of the Service warning 
lamp, on switching on the ignition.

Each time the ignition 
is switched on and for a 
few seconds, the spanner 

flashes and the excess 

distance is displayed.

For BlueHDi Diesel versions, the 
spanner can also come on early, 
according the level of deterioration 

of the engine oil. Deterioration of the 
engine oil depends on the conditions of 
use of the vehicle.

48

Partner2VP_en_Chap03_Pret-a-partir_ed02-2016

Instruments and controls

Partner2VP_en_Chap03_Pret-a-partir_ed02-2016

Trip recorder zero  

reset button

After this operation, if you wish 
to disconnect the battery, lock 
the vehicle and wait for at least 

five minutes, otherwise the zero re-set 

will not be registered.

Engine oil level indicator

Depending on your vehicle's engine, 
when the ignition is switched on, 
the engine oil level is indicated for 
a few seconds, after the service 
information.

Oil level  

correct

Low oil level
Flashing of 

"OIL"

linked with the 
service warning lamp, 
accompanied by an 

audible signal and a message in the 
screen, indicates a low oil level which 
could damage the engine.
If the low oil level is confirmed by a 

check using the dipstick, it is essential 
that the level is topped up.

Oil level gauge fault
Flashing of 

"OIL--"  

indicates a 
malfunction of the 
engine oil level 

indicator. Contact a PEUGEOT dealer 

or a qualified workshop.

The level read will only be correct 
if the vehicle is on level ground 
and the engine has been off for 
more than 30 minutes.

Dipstick

A = maximum, never exceed 

this level as a surplus of oil 
may damage the engine.
Contact a PEUGEOT dealer 

or a qualified workshop 

without delay.
B = minimum, top up the level 

via the oil filler cap, using the 

grade of oil suited to your 
engine.

Lighting dimmer

With the ignition on, press 
the button until the zeros 
appear.

With the lighting on, 
press the button to vary 
the brightness of the 
instruments and controls. 
When the lighting 
reaches the minimum (or 

maximum) setting, release the button 
then press it again to increase (or 
reduce) the brightness.
As soon as the lighting is of the 
required brightness, release the button.

Zero reset

Your PEUGEOT dealer or a qualified 

workshop carries out this operation 
after each service.
However, if you carry out the service 
yourself, the re-set procedure is as 
follows:

switch off the ignition,

press and hold the trip recorder 
reset button,

switch on the ignition.

The display begins a countdown.
When the display shows 

"=0", release 

the button; the spanner disappears.

49

READY

 T

O GO

3

Partner2VP_en_Chap03_Pret-a-partir_ed02-2016

Gearbox and steering wheel

Partner2VP_en_Chap03_Pret-a-partir_ed02-2016

MANUAL GEARBOx

5-speed

6-speed

To change gear easily, always depress 
the clutch pedal fully.
To prevent the mat from becoming 
caught under the pedal:

ensure that the mat is positioned 

and secured correctly on the floor,

-  never fit one mat on top of another.
When driving, avoid leaving your hand 
on the gear knob as the force exerted, 
even if slight, may wear the internal 
components of the gearbox over time.

Changing into 5

th

 or 6

th

 gear

To engage the gear correctly, move the 
gear lever fully to the right.

Engaging reverse gear

The lever should be moved slowly 
to reduce noise.

To engage reverse gear, wait until the 
vehicle has come to a complete stop.

STEERING WHEEL ADJUSTMENT

When the vehicle is stationary, 
release the steering wheel adjustment 
mechanism by pulling the lever.
Adjust the steering wheel for height 
and reach, then lock the mechanism by 
pushing the lever fully forward.

In the 6-speed configuration, raise the 

collar below the gear knob.

50

Partner2VP_en_Chap03_Pret-a-partir_ed02-2016

Gearbox and steering wheel

Partner2VP_en_Chap03_Pret-a-partir_ed02-2016

The information appears 
in the instrument panel 
in the form of an arrow. It 
may be accompanied by a 
recommended gear.

The system adapts its gear 
change recommendation 
according to the driving conditions 

(slope, load, ...) and the demands 
of the driver (power, acceleration, 
braking, ...).
The system never suggests:
-  engaging first gear,

engaging reverse gear.

With an electronic gearbox, the system 
is only active in manual mode.

GEAR SHIFT INDICATOR

Depending on the driving situation and 
your vehicle's equipment, the system 
may advise you to skip one (or more) 
gear(s). You can follow this instruction 
without engaging the intermediate 
gears.
The gear engagement 
recommendations must not be 
considered compulsory. This is 

because the configuration of the road, 

the traffic density and safety remain 

determining factors when choosing 
the best gear. Therefore, the driver 
remains responsible for deciding 
whether or not to follow the indications 
given.
This function cannot be deactivated.

System which reduces fuel 
consumption by recommending the 
most appropriate gear.

51

READY

 T

O GO

3

Partner2VP_en_Chap03_Pret-a-partir_ed02-2016

Gearbox and steering wheel

Partner2VP_en_Chap03_Pret-a-partir_ed02-2016

6-SPEED ELECTRONIC GEARBOx

automatic mode: gear selector in 
position 

A.

manual mode: gear selector in 
position 

M.

For safety:
It is only possible to come out 

of position 

N if the brake pedal is 

pressed.
The change from position 

A (driving in 

automatic mode) to position 

M (driving 

in manual mode) or vice versa can be 
made at any time. The warning lamp 

A 

goes off in the instrument panel.

Mode selection

Moving off

To start the engine, the gear 
selector must be in position 

N.

-  Press firmly on the brake pedal.

Operate the starter.

When the engine is running, place 
the gear selector on 

RA or M as 

desired.

Release the brake pedal and 
accelerate.

If the gear selector is not in position 

N

and/or if the brake pedal is not 
pressed, the engine will not start. 
Repeat the above procedure.

Reverse gear

Engaging reverse gear

Move the gear selector to 

R.

Only attempt to select reverse gear 

when the vehicle is stationary.

Neutral

Changing to neutral

Move the gear selector to 

N. If the 

vehicle is moving, do not select this 
position even momentarily.

52

Partner2VP_en_Chap03_Pret-a-partir_ed02-2016

Gearbox and steering wheel

Partner2VP_en_Chap03_Pret-a-partir_ed02-2016

Acceleration

For optimum acceleration (e.g. to 
overtake another vehicle), simply 
press the pedal beyond the point of 
resistance at the end of its travel, by 

pressing down firmly.

Vehicle stationary, with the 

engine running

In the event of a prolonged stop with 
the engine running, the gearbox 
changes automatically to neutral 

N.

Stopping the vehicle

Before stopping the engine, put the 
gear selector in position 

N.

In all cases, it is essential to apply 
the parking brake. Check that the 
parking brake warning lamp is on in the 
instrument panel.

Before doing anything in the 
engine compartment, check that 
the gear selector is in neutral 

N.

Changing gear

In situations of high engine speeds 
(heavy acceleration), a change 
up will not occur unless the driver 

operates the electronic gearbox control 
paddle.

Pull on the "

+" control 

paddle to change up.
Pull on the "

-" control 

paddle to change  
down.

If the vehicle stops or reduces 
speed (for example when 
approaching a stop sign), 
the gearbox changes down 

automatically, to first gear if 

needed.

It is not necessary to release the 
accelerator completely during gear 
changes.

A gear change instruction is 
accepted only if the engine speed 
permits.

For safety reasons, depending on 
the engine speed, a change down 
may be performed automatically.

Manual mode

Changing to manual mode

Move the gear selector to 

M.

Automatic mode

Changing to automatic 

mode

Move the gear selector to 

A.

The gearbox then operates in 
automatic mode, without any action on 
your part.
It constantly selects the gear that is 
best suited to the following conditions:

driving style,

-  road profile,

optimum fuel consumption.

53

READY

 T

O GO

3

Partner2VP_en_Chap03_Pret-a-partir_ed02-2016

Stop & Start

Partner2VP_en_Chap03_Pret-a-partir_ed02-2016

STOP & START

The Stop & Start system puts the 
engine temporarily on standby - STOP 

mode - during stops in the traffic (red 

lights, traffic jams, or other...).
The engine restarts 
automatically - START mode - as soon 
as you want to move off.
The restart takes place instantly, 
quickly and silently.
Perfect for urban use, the Stop & Start 
system reduces fuel consumption and 
exhaust emissions as well as the noise 
level when stationary.

Operation

Going into engine STOP mode

The 

"ECO" warning lamp 

comes on in the instrument 
panel and the engine goes 
into standby:

with a manual gearbox, at speeds 

below 12 mph (20 km/h), when you 
put the gear lever into neutral and 
release the clutch pedal,

with a 6-speed electronic 

gearbox, at speeds below 5 mph 

(8 km/h), when you press the brake 
pedal or put the gear lever into 
position 

N.

If your vehicle is fitted with the system, 

a time counter calculates the sum of 
the periods in STOP mode during a 
journey. It rests itself to zero every time 
the ignition is switched on with the key.

With a 6-speed electronic 
gearbox, for your comfort during 
parking manoeuvres, STOP mode 

is not available for a few seconds after 
coming out of reverse gear.
STOP mode does not affect the 
functionality of the vehicle, such as 
braking, power steering, for example.

Never refuel with the engine in 
STOP mode; you must switch off 
the ignition with the key.

Special cases: STOP mode 

unavailable
STOP mode is not invoked when:

the vehicle is on a steep slope 
(rising or falling),

the driver's door is open,

the driver's seat belt is not 
fastened,

the vehicle has not exceeded 
6 mph (10 km/h) since the last 
engine start using the key,

the engine is needed to maintain 
a comfortable temperature in the 
passenger compartment,

demisting is on,

some special conditions (battery 
charge, engine temperature, 
braking assistance, ambient 
temperature...) where the engine 
is needed to assure control of a 
system.

In this case, the 

"ECO" 

warning lamp flashes for a 

few seconds, then goes off.

This operation is perfectly normal.

54

Partner2VP_en_Chap03_Pret-a-partir_ed02-2016

Stop & Start

Partner2VP_en_Chap03_Pret-a-partir_ed02-2016

Going into engine START mode

The 

"ECO" warning lamp 

goes off and the engine 
starts:

with a manual gearbox, when you 

fully depress the clutch pedal,

with a 6-speed electronic 

gearbox:

●  gear lever in position 

A or M

when you release the brake 
pedal,

●  or gear lever in position 

N and 

the brake pedal released, when 
you move the gear lever to 
position 

A or M,

●  or when you engage reverse 

gear.

With a manual gearbox in STOP 
mode, if a gear is engaged without 
fully depressing the clutch pedal, a 
warning lamp comes on or a message 
is displayed asking you to depress the 
clutch pedal to restart the engine.

Special cases: START invoked 

automatically
For your safety and comfort, START is 
invoked automatically when:

you open the driver's door,

you unfasten the driver's seat belt,

In this case the 

"ECO" 

warning lamp flashes for few 

seconds, then goes off.

This operation is perfectly normal.

Deactivation

In certain circumstances, such as the need 
to maintain a comfortable temperature in 
the passenger compartment, it may be 
preferable to deactivate Stop & Start.

At any time, press the 

"ECO 

OFF" switch to deactivate the 

system.

This is confirmed by the switch warning 

lamp coming on accompanied by a 
message in the screen.
If the system has been deactivated 
in STOP mode, the engine restarts 
immediately.

Reactivation

Press the 

"ECO OFF" switch again.

The system is active again; this is 

confirmed by the switch warning 

lamp going off and a message in the 
instrument panel.

The system is reactivated 
automatically at every new start 
using the key.

Operating fault

In the event of a malfunction 
with the system, the 

"ECO 

OFF" switch warning lamp 

flashes, then comes on 

continuously.

This system requires a specific 

battery with a special specification 

and technology (reference 

numbers available from a PEUGEOT 

dealer or a qualified workshop).
Fitting a battery not listed by 
PEUGEOT introduces the risk of 
malfunction of the system.

Have it checked by a PEUGEOT 

dealer or a qualified workshop.
In the event of a fault in STOP mode, 
the vehicle may stall. All of the warning 
lamps in the instrument panel come 
on. It is then necessary to switch off 
the ignition and start the engine again 
using the key.

the speed of the vehicle exceeds 
15 mph (25 km/h) with a manual 
gearbox or 7 mph (11 km/h) with the 
6-speed electronic gearbox system,

some special conditions (battery 
charge, engine temperature, braking 
assistance, ambient temperature...) 
where the engine is needed to 
assure control of a system.

55

READY

 T

O GO

3

Partner2VP_en_Chap03_Pret-a-partir_ed02-2016

Stop & Start

Partner2VP_en_Chap03_Pret-a-partir_ed02-2016

The Stop & Start system 

requires a battery of specific 

characteristics. All work on this 

type of battery must be done only 

by a PEUGEOT dealer or a qualified 

workshop.
For more information on the 12 V 
battery, refer to "Battery" in section 8.

Good practice when stopping

Good practice when starting

Diesel pre-heating warning 

lamp
If the temperature is high 
enough, the warning lamp 
comes on for less than 
one second, you can start 
without waiting.

In cold weather, wait for this warning 
lamp to go off then operate the starter 
(Starting position) until the engine 
starts.

Door or bonnet open warning lamp
If this comes on, a door or 
the bonnet is not closed 
correctly, check!

Minimise engine and gearbox wear
When switching off the ignition, let the 
engine run for a few seconds to allow 
the turbocharger (Diesel engine) to 
return to idle.
Do not press the accelerator when 
switching off the ignition.
There is no need to engage a gear 
after parking the vehicle.

STARTING AND STOPPING

Running and accessories position.
To unlock the steering, turn the 
steering wheel gently while turning the 
key, without forcing. In this position, 
certain accessories can be used.

Starting position.
The starter is operated, the engine 
turns over, release the key.

STOP position: steering lock.
The ignition is off. Turn the steering 
wheel until the steering locks. Remove 
the key.

Opening the bonnet
Before doing anything under the 
bonnet, deactivate the Stop & Start 
system to avoid the risk of injury 
related to an automatic change to 
START mode.

Driving on flooded roads

Before driving through a flooded road, 

it is strongly recommended that you 
deactivate the Stop & Start system.
For more advice on driving, particularly 

on flooded roads, refer to the 

corresponding section.

56

Partner2VP_en_Chap03_Pret-a-partir_ed02-2016

Starting and switching off

Partner2VP_en_Chap03_Pret-a-partir_ed02-2016

HILL START ASSIST

This system (also called HHC - Hill 
Holder Control), linked to the dynamic 
stability control system, makes hill 
starts easier and is activated in the 
following conditions:

the vehicle must be stationary, 
engine running, foot on the brake,

the gradient of the road must be 
steeper than 5%,

uphill, the gearbox must be in 
neutral or in a gear other than 
reverse,

downhill, reverse gear must be 
engaged.

The Hill Start Assist system is a driving 
aid. It is not an automatic vehicle 
parking function or an automatic 
parking brake.

Operation

With the brake pedal and clutch pedal 
pressed, from the time you release 
the brake pedal, without using the 
parking brake, you have approximately 
2 seconds to move off before the 
vehicle starts to roll back.
During the moving off phase, the 
function is deactivated automatically, 
gradually releasing the braking 
pressure. During this phase, the 
characteristic noise of mechanical 
release of the brakes may be heard, 
indicating the imminent movement of 
the vehicle.

Operating fault

Hill start assist is deactivated in the 
following situations:

when the clutch pedal is released,

when the parking brake is applied,

when the engine is switched off,

when the engine stalls.

If a malfunction of the system 
occurs, this warning lamp 
comes on accompanied 
by an audible signal and 

confirmed by a message in 

the screen. Have the system checked 

by a PEUGEOT dealer or a qualified 

workshop.

57

READY

 T

O GO

3

Partner2VP_en_Chap03_Pret-a-partir_ed02-2016

Starting and switching off

Partner2VP_en_Chap03_Pret-a-partir_ed02-2016

DRIVING RECOMMENDATIONS

Observe the driving regulations and 

remain vigilant whatever the traffic 

conditions.
Pay close attention to the traffic and 

keep your hands on the wheel so that 
you are ready to react at any time to 
any eventuality.
As a safety precaution, the driver 
must only carry out actions requiring 
sustained attention when the vehicle is 
stationary.
On a long journey, a break every two 
hours is strongly recommended.
In difficult weather, drive smoothly, 

anticipate the need to brake and 
increase the distance from other 
vehicles.

Driving on flooded roads

We strongly advise against driving 

on flooded roads, as this could cause 

serious damage to the engine or 
gearbox, as well as to the electrical 
systems of your vehicle.

If you are obliged to drive through 
water:

check that the depth of water does 
not exceed 15 cm, taking account 
of waves that might be generated 
by other users,

deactivate the Stop & Start system,

drive as slowly as possible without 
stalling. In all cases, do not exceed 
6 mph (10 km/h),

do not stop and do not switch off 
the engine.

On leaving the flooded road, as soon 

as circumstances allow, make several 
light brake applications to dry the brake 
discs and pads.
If in doubt on the state of your vehicle, 
contact a PEUGEOT dealer or a 

qualified workshop.

Never drive with the parking brake 
applied - Risk of overheating and 
damage to the braking system!

Risk of fire!
As the exhaust system of your vehicle 
is very hot, even several minutes after 
switching off the engine, do not park 
or leave the engine running over areas 

where inflammable substances and 

materials are present: grass, leaves, 
etc.

Never leave a vehicle 
unsupervised with the engine 
running. If you have to leave 

your vehicle with the engine running, 
apply the parking brake and put the 
gearbox into neutral or position 

N or P

depending on the type of gearbox.

Important!

58

Steering mounted controls

Partner2VP_en_Chap04_Ergonomie_ed02-2016

DIRECTION INDICATORS

"Motorway" function

Press the control up or down to flash 

the corresponding direction indicator 
three times.

LIGHTING

Left: downwards passing the 

point of resistance.
Right: upwards passing the 

point of resistance.

Front and rear lighting

Lighting off

Automatic illumination of 
headlamps

Sidelamps

Dipped beam (green)

Dipped beam/main beam change
Pull the stalk fully towards you.

Lighting-on audible warning
On switching off the ignition, all of the 
lamps turn off, except dipped beam if 
automatic guide-me-home lighting has 
been activated.

 Checking by means of the 
indicator lamps in the instrument 
panel is described in the 
"Instruments and controls" section 
of chapter 3.

Direction indicators

Selection is by turning this 
ring.

Main beam (blue)

To activate the lighting 
control, turn this ring to 
the lighting off position 

"0" 

then to the selection of 
your choice.

On opening the driver's door, there is 
an audible warning if you have left the 
lighting on.

 59

Steering mounted controls

EASE OF USE and COMFORT

4

Partner2VP_en_Chap04_Ergonomie_ed02-2016

LED DAYTIME RUNNING LAMPS

Rear foglamps (amber, 
2nd rotation of the ring 
forwards).

Front foglamps (green, 
1st rotation of the ring 
forwards).

Rotate this ring forwards 
to switch on and 
rearwards to switch off.
Their state is confirmed by 

the warning lamps in the 
instrument panel.

Do not forget to switch them off 
when they are no longer needed.

Operation of the automatic illumination 
of headlamps switches off the rear 
foglamps, but the front foglamps 
remain on.

To switch off the front and 
rear foglamps, turn the 
ring rearwards twice in 
succession.

Automatic illumination of headlamps

In foggy weather or in snow, 
the sunshine sensor may detect 

sufficient light.

As a consequence, the lighting 
will not come on automatically. If 
necessary, you must switch on the 

dipped beam headlamps manually.

Do not cover the sunshine sensor 
located on the windscreen, behind 
the mirror. It is used for the automatic 
illumination of headlamps and for the 
automatic rain sensitive wipers.
Activation

The sidelamps 
and dipped beam 
headlamps switch 
on automatically if 
the light is poor, or 

during operation of the windscreen 
wipers. They switch off as soon as the 
light becomes bright enough or the 
windscreen wipers stop.

On starting the vehicle, in daylight the 
LED daytime running lamps come on 
automatically.
If the sidelamps and headlamps are 
switched on manually or automatically, 
the daytime running lamps go off.

Programming

For countries where exterior lighting by 
day is not a legal requirement, you can 
activate or deactivate the function via 

the configuration menu.

If the user does not operate any 
equipment for 30 minutes, the 
Economy mode engages to avoid 
discharging the battery. Electrical 
functions are put on standby and the 

battery warning lamp flashes.
Sidelamp operation is not affected by 
Economy mode.

In clear weather or in rain, both day 
and night, rear foglamps dazzle and 
their use is prohibited.

Refer to chapter 8, 
"Battery section".

Front and rear foglamps
They operate with the sidelamps and 
dipped beam headlamps.

Turn the ring to the 

AUTO position. 

The activation of this function is 
accompanied by a message in the 
screen.
Deactivation
Turn the ring forwards or rearwards. 
The deactivation of this function is 
accompanied by a message in the 
screen.

This function is not compatible with 
daytime running lamps.

60

Steering mounted controls

Partner2VP_en_Chap04_Ergonomie_ed02-2016

If the sunshine sensor 

does not function correctly

the lighting comes on 
accompanied by the service 
warning lamp, an audible 

signal and a message in the screen.
Contact a PEUGEOT dealer or a 

qualified workshop.

Guide-me-home lighting

Keeping the dipped beam headlamps 
on temporarily with the ignition off, 
makes the driver's exit easier when the 
light is poor.

HEADLAMP BEAM

The beam setting must be adjusted to 
suit the load in the vehicle.
0 - No load.

1 - Partial load.

2 - Average load.

3 - Maximum authorised load.

Manual operation

-  With the ignition off, "flash" the 

headlamps within one minute after 
switching off the ignition.

The guide-me-home lighting switches 
off automatically after a set time.

Automatic operation

Refer to chapter 10, "Screen 
menu map" section.

Initial setting is position 0.

Activate the function via the 

vehicle configuration menu.

Programming
The system is activated or deactivated 

in the vehicle configuration menu.
The system is activated by default.

Switching off
The system does not operate:

below a certain angle of rotation of 
the steering wheel,

above 25 mph (40 km/h),

when reverse gear is engaged.

Switching on
This function starts:

when the corresponding direction 
indicator is switched on,

or

from a certain angle of rotation of 
the steering wheel.

With dipped or main beam headlamps, 
this function makes use of the beam 
from a front foglamp to illuminate the 
inside of a bend, when the vehicle 
speed is below 25 mph (approximately 
40 km/h) (urban driving, winding road, 
intersections, parking manoeuvres...).

CORNERING LIGHTING

Travelling abroad
If using your vehicle in a country 

that drives on the other side of the 
road, the headlamps must be adjusted 
to avoid dazzling on-coming drivers.
Contact a PEUGEOT dealer or a 

qualified workshop.

The function is deactivated temporarily 
when you use the manual lighting 
control stalk.

 61

Steering mounted controls

EASE OF USE and COMFORT

4

Partner2VP_en_Chap04_Ergonomie_ed02-2016

2  Fast wipe (heavy rain).

1  Normal wipe (moderate rain).

l  Intermittent wipe.

0 Off.
â  Single wipe
 

(press downwards).

In the 

Intermittent position, the wiping 

speed is in proportion to the vehicle 
speed.

WIPERS

Manual wiping

Whenever the ignition has been 
switched off for more than one minute, 
with the windscreen wiper stalk in 
position 2, 1 or I, the stalk must be 
reactivated.

Move the stalk to any position.

Return it to the desired position.

Do not cover the rain sensor, 
located in the centre of the 
windscreen, behind the mirror.

Activation
Press the control downwards. 
Activation of the function is 
accompanied by a message in 
the screen.

Deactivation
Place the windscreen wipers stalk in 
position 

I1 or 2.

Deactivation of the function is 
accompanied by a message in the 
screen.
In the event of malfunction of the 
automatic windscreen wipers, the 
windscreen wipers will operate in 
intermittent mode.
Contact a PEUGEOT dealer or a 

qualified workshop to have the system 

checked.

In the 

AUTO position, the windscreen 

wipers operate automatically and 
adapt their speed to the intensity of the 
rainfall.
When not in 

AUTO mode, for the 

other positions, refer to the manual 
windscreen wipers section.

The automatic rain sensitive 
windscreen wipers function must 
be reactivated by pressing the stalk 
downwards, if the ignition has been 
switched off for more than one minute.

When using an automatic car 
wash, switch off the ignition to 
avoid triggering the automatic 
wiping.

In winter, it is advisable to wait for the 
windscreen to completely clear of ice 
before operating the automatic wipers.

Automatic wipers

62

Steering mounted controls

Partner2VP_en_Chap04_Ergonomie_ed02-2016

Screenwash

Pull the stalk towards you, the wash-
wipe is accompanied by a timed sweep 
of the wipers.

Turn the ring past the first 

position: the rear screenwash 
then the rear wiper operates 

for a fixed time.

In winter, in the event of a 
considerable amount of snow 
or ice, switch on the heated 

rear screen. Once the screen is 
clear, remove the snow or ice which 
has accumulated on the rear wiper 
blade. You can then operate the rear 
windscreen wiper.

To top up the level, refer to the 
"Levels" section of chapter 7.

Special position of the 

windscreen wipers

In the minute following switching 
off of the ignition, any action on the 
stalk positions the wipers against the 
windscreen uprights.
This action enables you to position 
the wiper blades for winter parking, 
cleaning or replacement.

Refer to the "Changing a windscreen 
wiper blade" section of chapter 8.

To park the wipers in their normal 
position after this has been done, 
switch on the ignition and move 
the stalk.

Turn the ring to the first 

position.

Rear wiper

Rear screenwash


Content   ..  2  3  4  5   ..