Peugeot Expert Dag (2006 year). Manual - part 4
 

  Index      Peugeot     Peugeot Expert Dag - service manual 2006 year in english


Search            copyright infringement  


Content   ..  2  3  4  5   ..


Peugeot Expert Dag (2006 year). Manual - part 4


47

-

Never  drive  with  the  head 

restraints  removed,  they 

must  be  in  place  and  cor-

rectly adjusted.

Installation

From the rear:


check that there is nothing ob-

structing  the  mountings  and 

preventing  correct  locking  of 

the feet of the bench seat,

 lift the bench seat using the hand-

les 

C,

 place the bench seat in the vehi-

cle from the rear,

 place the front feet in their fixings

D on the floor,

 operate  control 

B  to  check  that 

the rear feet are not locked,

 tilt the folded bench seat towards 

the  rear;  the  rear  feet  lock  auto-

matically,

 pull strap 

A to unlock the back of 

the bench seat,

 raise the back of the bench seat.

Check  that  the  bench  seat  is 

secured  correctly  (see  section 

"Securing the bench seat").

REAR HEAD RESTRAINTS

The  rear  head  restraints  can  be  re-

moved and have two positions:

-  high, position for use

-  low, storage position

To  raise  or  lower  a  head  restraint, 

pull it forwards sliding it at the same 

time.

To remove it, place it in the high posi-

tion, push the lug and pull it forwards 

and upwards.

To refit it, engage the head restraint

rods  in  the  holes  taking  care  to  re-

main  in  the  centreline  of  the  seat 

back.

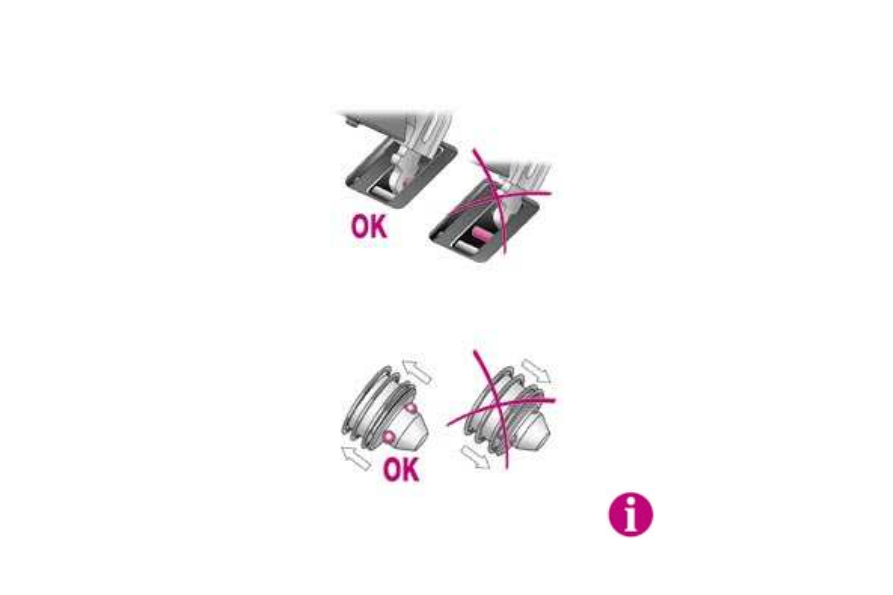
SECURING THE BENCH SEAT

Correct securing of the front feet

Correct securing of the rear feet

Seats and bench seats

48 -

SEAT BELTS

Front seat belts

The  front  seats,  driver's  seat,  one-

seat passenger seat and side seat of 

the  passenger  bench  seat,  are  fitted

with pre-tensioners and force limiters.

Height adjustment:

 to lower the hooking point: press 

and  slide  the  control 

1  down-

wards,

 to  raise  the  hooking  point:  slide 

the control 

upwards.

Front seat belts with pre-

tensioner and force limiter

Safety in the event of frontal impacts 

has  been  improved  by  the  introduc-

tion of pre-tensioning seat belts with 

force limiter for the front seats. 

Depending on the seriousness of the 

impact,  the  pre-tensioning  system 

instantly  tightens  the  seat  belts  and 

pulls them against the bodies of the 

occupants.

The  pre-tensioning  seat  belts  are 

armed when the ignition is on.

The  force  limiter  reduces  the  pres-

sure of the seat belt on the body of 

the  occupant  in  the  event  of  an  ac-

cident.

The front centre seat of the two-seat 

passenger  bench  seat  is  fitted with

an  integral  three-point  inertia  reel 

seat belt.

Locking:

 pull the strap, then insert the end 

into the buckle,

 check that the seat belt is fastened 

correctly by pulling the strap.

2nd and 3rd row rear side seat 

belts

The 2nd row rear side seat and the 

rear  side  seats  of  the  two  or  three 

seat bench seats are each fitted with

a three-point inertia reel seat belt.

Note:  a  strap-guide*  can  be  fitted

for the 2nd row rear side seat of the 

two-seat  bench  seat  for  the  comfort 

of children or individuals of short stat-

ure.

*  Available as an accessory.

The  passenger  must  use  the  raised 

buckle, located between the driver's 

seat  and  the  centre  seat,  to  attach 

his seat belt.

Seats and bench seats

49

-

2nd and 3rd row rear centre 

seat belts

The  rear  centre  seats  of  the  two  or 

three seat bench seats have an inte-

gral three-point inertia reel seat belt.

Wherever  you  are  seated 

in  the  vehicle,  always  fas-

ten your seat belt, even for 

short journeys.

Do not invert the seat belt buckles as 

they will not fulfil their role fully.

If  the  seats  have  armrests*,  the  lap 

part  of  the  seat  belt  must  always 

pass under the armrest.

The  seat  belts  are  fitted with an in-

ertia reel permitting automatic adjust-

ment of the length of the strap to your 

size. The seat belt is stored automat-

ically when not in use.

Before and after use, ensure that the 

seat belt is rolled up correctly.

The lower part of the strap must be 

positioned as low as possible on the 

pelvis.

The upper part must be positioned in 

the hollow of the shoulder.

The  inertia  reels  are  fitted with an 

automatic  locking  device  which 

comes  into  operation  in  the  event 

of a collision or emergency braking. 

You can release the device by pulling 

rapidly on the strap and releasing it.

In order to be effective, a seat belt:

-  must  be  tightened  as  close  to  the 

body as possible,

-  must restrain one adult only,

-  must not bear any trace of cuts or 

fraying,

-  must be pulled in front of you with a 

smooth movement, checking that it 

does not twist,

-  must not be transformed or modified

to avoid altering its performance.

In  accordance  with  current  safety 

regulations,  all  repairs  and  checks 

must be carried out by a PEUGEOT 

dealer who guarantees that the work 

is carried out correctly.

Have your seat belts checked regu-

larly,  or  if  the  straps  show  signs  of 

damage, by a PEUGEOT dealer.

Clean the seat belt straps with soapy 

water  or  a  textile  cleaning  product, 

sold by PEUGEOT dealers.

After folding or moving a seat or rear 

bench seat, ensure that the seat belt 

is positioned and rolled up correctly.

*  According to model.

Recommendations for children:

-  use a suitable child seat if the pas-

senger is less than 12 years old or 

shorter than one metre fifty,

-  do not use the strap-guide* when a 

child seat is installed,

-  never use the same seat belt to se-

cure more than one person,

-  never allow a child to travel on your 

lap.

Depending  on  the  nature  and  se-

riousness of the impacts, the pre-

tensioning  device  may  be  triggered 

before  and  independently  of  the  air 

bags.

In all cases, the air bag warning light 

comes on.

Following  an  impact,  have  the  seat 

belts  system  checked,  and  if  neces-

sary replaced, by a PEUGEOT dealer.

Seats and bench seats

50 -

GENERAL POINTS RELATING 

TO CHILD SEATS

Although  one  of  PEUGEOT’s  main 

criteria when designing your vehicle, 

the  safety  of  your  children  also  de-

pends on you.

For  maximum  safety,  please  follow 

these precautions:

-  since 1992, and in accordance with 

Directive  2000/3, 

all  children  un-

der the age of 12 must travel in 

approved  child  seats*  suited  to 

their weight, on seats fitted with a

seat belt or ISOFIX mountings**.

-

  statistically,  the  safest  seats  in 

your  vehicle  for  the  transpor-

tation  of  children  are  the  rear 

seats,

a  child  weighing  less  than  9  kg 

must  travel  in  the  "rearwards-

facing" position both in the front 

and in the rear.

PEUGEOT  recommends  that  chil-

dren should travel in the 

rear seats 

of your vehicle:

"rearwards-facing" up to the age 

of 2,

"forwards-facing" over the age of 2.

INSTALLING A CHILD SEAT 

USING A THREE POINT 

SEAT BELT

"Forwards-facing"

When  a  "forwards-facing"  child  seat 

is  installed  on  the 

front  passenger 

seat, adjust the vehicle's seat to the 

intermediate  longitudinal  position 

with the seat back upright and leave 

the passenger air bag armed**.

*  According  to  current  legislation  in 

the country.

** According to model.

"Rearwards-facing"

When a "rearwards-facing" child seat 

is  installed  on  the 

front  passenger 

seat, it is essential that the passen-

ger air bag** is disarmed. Otherwise, 

the  child  would  risk  being  seri-

ously injured or killed if the air bag 

were to inflate.

Intermediate 

longitudinal position

Seats and bench seats

51

-

CHILD SEATS RECOMMENDED BY PEUGEOT

PEUGEOT offers a complete range of recommended child seats which are se-

cured using a 

three point seat belt:

Group 0: from birth to 10 kg

Group 0+: from birth to 13 kg

L1

"BRITAX 

Babysure" 

(E11 0344117)

Installed in the 

rear-facing 

position.

L2

"ROMER 

Baby-Safe" 

(E1 03301146)

Installed in the 

rear-facing 

position.

Groups 1, 2 and 3: from 9 to 36 kg

L3

"KIDDY Life"

(E1 03301135)

For the safety of young children 

(from 9 to 18 kg), PEUGEOT 

recommends use of the restraining 

cushion.

Groups 2 and 3: from 15 to 36 kg

L4

"RECARO Start"

(E1 03301108).

L5

"KLIPPAN 

Optima"

(E17 030007)

From the age of 

6 years (approximately 

22 kg), the booster is 

used on its own.

The  child  seats  function  

is  shared  by  the  entire  

PEUGEOT  range.  How-

ever, each individual model 

has its own special features. 

On the Expert, the passenger air bag 

disarming switch is not available and 

therefore  a  "rearwards-facing"  child 

seat 

MUST NOT be fitted on the front

passenger seat.

Seats and bench seats

52 -

Seat

Weight of the child and indicative age 

Under 13 kg 

(groups 0 

(a) and 0+)  

Up to 1 year approx

From 9 to 18 kg 

(group 1)  

1 to 3 years approx

From 15 to 25 kg 

(group 2)  

3 to 6 years approx

From 22 to 36 kg 

(group 3)  

6 to 10 years approx

1st 

row

Front passenger 

seat

(seat with front air bag)

(seat without front air bag)

U (b)

U (b)

Front bench 

seat, side seat

(seat with front air bag)

U (seat without front air bag)

U

U

Front bench 

seat, centre seat

X

L3

L3, L4, L5

L3, L4, L5

2nd 

row

Side individual 

seat

U

U

U

U

Side seat on  

2-seat bench 

seat

L1

L3

L3, L4, L5

L3, L4, L5

Centre seat on 

2-seat bench 

seat

X

L3

L3, L4, L5

L3, L4, L5

Side seats on  

3-seat bench 

seat

L1

L3

L3, L4, L5

L3, L4, L5

Centre seat on 

3-seat bench 

seat

X

L3

L3, L4, L5

L3, L4, L5

3rd 

row

Side seats on  

3-seat bench 

seat 

X

L3

L3, L4, L5

L3, L4, L5

Centre seat on 

3-seat bench 

seat

X

L3

L3, L4, L5

L3, L4, L5

Seats and bench seats

53

-

INSTALLING CHILD SEATS 

ATTACHED USING 

THE SEAT BELT

In  accordance  with  the  European 

regulation (Directive 2000/3), this ta-

ble indicates the options for installing 

child seats secured using a seat belt 

and  universally  approved  in  accord-

ance with the weight of the child and 

the seat in the vehicle.

a:  consult  the  legislation  in  force 

in  your  country  before  installing 

your child on this seat.

b:  adjust  the  front  passenger  seat 

to  the  intermediate  longitudinal 

position.

U:  seat  suitable  for  the  installation 

of  a  universally  approved  child 

seat  secured  using  a  seat  belt, 

"rear facing" and/or "forward fac-

ing".

L- : only  the  child  seats  indicated 

can be installed on the seat con-

cerned (according to country).

X:  seat which is not suitable for the 

installation of a child seat of the 

weight group indicated.

Seats and bench seats

54 -

ADVICE ON CHILD 

SEATS

The  incorrect  installation  of  a  child 

seat  in  a  vehicle  compromises  the 

child's  protection  in  the  event  of  an 

accident.

Remember  to  fasten  the  seat  belts 

or  the  child  seat  harnesses 

keep-

ing the slack in relation to the child's 

body 

to a minimum, even for short 

journeys.

For  optimum  installation  of  the  "for-

ward  facing"  child  seat,  ensure  that 

the back of the child seat is in contact 

with  the  back  of  the  vehicle's  seat 

and that the head restraint does not 

cause any discomfort.

If  the  head  restraint  has  to  be  re-

moved,  ensure  that  it  is  stored  or  

attached  securely  to  prevent  it  from 

being  thrown  around  the  vehicle  in 

the event of sharp braking.

Children under the age of 10 must not 

travel in the "forward facing" position 

on  the  front  passenger  seat,  unless 

the  rear  seats  are  already  occupied 

by other children, cannot be used or 

are absent.

Disarm the passenger air bag* when 

a "rear facing" child seat is installed 

on the front seat. Otherwise, the child 

would risk being seriously injured or 

killed if the air bag were to inflate.

As a safety precaution, do not leave:

-  one or more children alone and un-

supervised in a vehicle,

-  a  child  or  an  animal  in  a  vehicle 

which  is  exposed  to  the  sun,  with 

the windows closed,

-  the keys within reach of children in-

side the vehicle.

To prevent accidental opening of the 

doors, use the "Child lock"*.

Take  care  not  to  open  the  rear  win-

dows by more than one third*.

To  protect  young  children  from  the 

rays of the sun, fit side blinds on the

rear windows.

*  According to version.

Installing a booster seat

The chest part of the seat belt must 

be positioned on the child's shoulder 

without touching the neck.

Ensure  that  the  lap  part  of  the  seat 

belt passes correctly over the child's 

thighs.

PEUGEOT  recommends  the  use  of 

a booster seat which has a back, fit-

ted with a seat belt guide at shoulder 

level.

Seats and bench seats

Access and starting

56 -

THE KEYS

The keys allow you to switch on the 

ignition and to independently operate 

the  locks  on  the  doors  and  the  fuel 

tank cap.

Central locking

From one of the two front doors, the 

keys allow you to lock and unlock the 

front,  side  and  rear  doors.  If  one  of 

the doors is open, the central locking 

does not work.

The  remote  control  performs  the 

same functions at a distance.

Changing the battery of the 

remote control

If  the  direction  indicators  do  not 

come on when the button is pressed, 

change the battery.

To do this, remove the screw and un-

clip the casing using a coin at the ring 

(CR 1620/3 volt battery).

If  the  remote  control  does  not  work 

after the battery has been changed, 

reprogram the remote control.

The remote control

Locking

Press button 

A to lock the vehicle. 

This is confirmed by fixed lighting of

the  direction  indicators  for  approxi-

mately two seconds.

Unlocking

Press button 

to unlock the vehicle.

This is confirmed by rapid flashing of

the direction indicators.

Key in ignition

A buzzer sounds on opening the driv-

er's door, if the key has been left in 

the ignition.

Programming the remote 

control

 

Switch off the ignition.

 

Switch the ignition on again.

 

Press button 

A immediately for a 

few seconds.

 

Switch off the ignition and remove 

the remote control key from the ig-

nition lock. The remote control is 

now working again.

57

Access and starting -

ELECTRONIC ENGINE 

IMMOBILISER

This  locks  the  engine  management 

system  as  soon  as  the  ignition  has 

been switched off and therefore pre-

vents starting of the vehicle by any-

one who does not have the key.

The  ignition  key  has  an  electronic 

chip which has a special code. When 

the ignition is switched on, the code is 

recognised and starting is possible.

CONFIDENTIAL CARD

This  is  given  to  you  on  delivery  of 

your vehicle with the duplicate keys.

It  contains  the  identification code

necessary  for  any  work  carried  out 

by a PEUGEOT dealer on the elec-

tronic immobiliser system. This code 

is hidden by a film, which should be

removed only if necessary.

Keep  your  card  in  a  safe  place, 

never inside the vehicle. 

When undertaking a long trip or jour-

ney, however, it is advisable to take 

it  with  you  along  with  your  personal 

papers.

Make a careful note of the 

number  of  each  key.  This 

number is coded on the la-

bel attached to the key. 

If  the  keys  are  lost,  your 

PEUGEOT dealer can rapidly supply 

you with new keys.

The high frequency remote control is 

a sensitive system; do not operate it 

while it is in your pocket as there is a 

possibility that it may unlock the vehi-

cle, without you being aware of it.

The remote control does not operate 

when the key is in the ignition, even 

when the ignition is switched off, ex-

cept for reprogramming.

Driving  with  the  doors  locked  may 

make access to the passenger com-

partment by the emergency services 

more difficult in an emergency.

As a safety precaution (with children 

on board), remove the key from the 

ignition when you leave the vehicle, 

even for a short time.

Do not repeatedly press the buttons 

of your remote control out of range of 

your vehicle.

You  run  the  risk  of  stopping  it  from 

working and the remote control would 

have to be reprogrammed.

When purchasing a second-hand ve-

hicle:

-  ensure that you are given the confi-

dential card;

-  have the key codes memorised by 

a PEUGEOT dealer, to ensure that 

the  keys  in  your  possession  are 

the  only  ones  which  can  start  the 

vehicle.

Do not make any modifications to the

electronic  engine  immobiliser  sys-

tem.

If  the  system  does  not  function 

correctly, contact a PEUGEOT deal-

er as soon as possible.

57

Access and starting -

ELECTRONIC ENGINE 

IMMOBILISER

This  locks  the  engine  management 

system  as  soon  as  the  ignition  has 

been switched off and therefore pre-

vents starting of the vehicle by any-

one who does not have the key.

The  ignition  key  has  an  electronic 

chip which has a special code. When 

the ignition is switched on, the code is 

recognised and starting is possible.

CONFIDENTIAL CARD

This  is  given  to  you  on  delivery  of 

your vehicle with the duplicate keys.

It  contains  the  identification code

necessary  for  any  work  carried  out 

by a PEUGEOT dealer on the elec-

tronic immobiliser system. This code 

is hidden by a film, which should be

removed only if necessary.

Keep  your  card  in  a  safe  place, 

never inside the vehicle. 

When undertaking a long trip or jour-

ney, however, it is advisable to take 

it  with  you  along  with  your  personal 

papers.

Make a careful note of the 

number  of  each  key.  This 

number is coded on the la-

bel attached to the key. 

If  the  keys  are  lost,  your 

PEUGEOT dealer can rapidly supply 

you with new keys.

The high frequency remote control is 

a sensitive system; do not operate it 

while it is in your pocket as there is a 

possibility that it may unlock the vehi-

cle, without you being aware of it.

The remote control does not operate 

when the key is in the ignition, even 

when the ignition is switched off, ex-

cept for reprogramming.

Driving  with  the  doors  locked  may 

make access to the passenger com-

partment by the emergency services 

more difficult in an emergency.

As a safety precaution (with children 

on board), remove the key from the 

ignition when you leave the vehicle, 

even for a short time.

Do not repeatedly press the buttons 

of your remote control out of range of 

your vehicle.

You  run  the  risk  of  stopping  it  from 

working and the remote control would 

have to be reprogrammed.

When purchasing a second-hand ve-

hicle:

-  ensure that you are given the confi-

dential card;

-  have the key codes memorised by 

a PEUGEOT dealer, to ensure that 

the  keys  in  your  possession  are 

the  only  ones  which  can  start  the 

vehicle.

Do not make any modifications to the

electronic  engine  immobiliser  sys-

tem.

If  the  system  does  not  function 

correctly, contact a PEUGEOT deal-

er as soon as possible.

Access and starting

58 -

FRONT DOORS AND SLIDING 

SIDE DOOR

Opening the doors from outside 

(front and side doors)

Opening the doors from inside 

(front doors)

The front door opening controls permit 

complete unlocking of the vehicle.

Locking/Unlocking from  

the inside
Front door

To lock, lower button 

A.

To unlock and open, lift button 

A and 

pull the handle towards you.

The opening/closing control of one of 

the front doors permits complete un-

locking/locking of the vehicle.

Sliding side door

The side door opening/closing control 

only controls the door concerned.

To lock, push down button 

B.

To  unlock  and  open,  raise  button 

B 

and pull the handle towards the rear.

Note:  the  sliding  side  door  can  be 

secured in the fully open position. To 

release  it,  pull  the  handle  firmly to-

wards the front and slide the door.

Side door child lock

This  prevents  opening  of  the  side 

door from the inside.
 

Turn  the  control  a  quarter  turn 

using the ignition key.

59

Access and starting -

HINGED REAR DOORS

Opening the doors from outside

To open, pull the rear right door handle 

towards you and open the rear left door 

by pulling the lever on the inside.

Locking/Unlocking from inside 

(Van)

To unlock and open, pull the handle 

towards you.

To open the other door, push lever 

A.

Note: when closing from the inside, 

close the vehicle's left-hand door first

ensuring that lever 

A is in the vertical 

position  then  close  the  right-hand 

door.

Opening the hinged rear doors  

to 180°

To  open  the  rear  doors  to  180°, 

release  the  check  strap 

B  towards 

you when the door is partially open.

When  closing  the  door,  the  check 

strap  hooks  itself  in  place  again 

automatically.

Opening the doors from inside

Each  opening  control  only  unlocks 

the door concerned.

Access and starting

60 -

OPENING THE BONNET

Inside  the  vehicle:  pull  the  handle 

on  the  left-hand  side,  under  the 

fascia.

BONNET STRUT

Secure  the  strut  to  hold  the  bonnet 

open.

Before  closing  the  bonnet,  replace 

the strut in its housing.

To close

Lower  the  bonnet  and  release  it  at 

the  end  of  its  travel.  Check  that  the 

bonnet is locked.

Outside  the  vehicle:  lift  the  catch 

and raise the bonnet.

61

Access and starting -

FILLING WITH FUEL

The  engine  must  be  switched  off 

when filling with fuel.

 Insert  the  key  then  turn  it  to  the 

left.

 Remove the cap.

An indication on the cap reminds you 

which type of fuel to use.

When you fill your tank, do not con-

tinue  after  the  third  cut-off  of  the 

pump. This could cause your vehicle 

to malfunction.

The capacity of the tank is approx-

imately 80 litres.

 After filling the tank, lock the cap.

Low fuel level

When  the  minimum 

fuel level in the tank is 

reached,  this  warning 

light comes on.

You  have  enough  fuel  remaining 

to drive for approximately 30 miles 

(50 km). 

Ensure  that  the  right-hand 

sliding  side  door  is  not 

opened while you are filling

with fuel.

The key cannot be removed 

from the lock until the cap has been 

replaced on the fuel tank.

If  the  tank  is  filled with fuel which

does  not  conform  to  your  vehicle's 

engine,  it  is  essential  that  the  fuel 

tank  is  drained  before  the  engine  is 

switched on.

Visibility

62 -

In  good  or  rainy  weather, 

both  day  and  night,  the 

front fog lamps and the rear 

fog  lamp  are  dazzling  and 

are prohibited.

Do not forget to switch them 

off when they are no longer needed.

THE LIGHTS STALK

Front and rear lights

Selection  is  by  turning  ring 

A.  The 

status  is  confirmed by the indicator

light on the instrument panel.

Lights off

Side lights 

Dipped/main  beam 

headlamps

Dipped/Main beam change

Pull the stalk fully towards you.

Lights on buzzer

With the ignition off, when the driver's 

door  is  opened,  a  buzzer  sounds  if 

you have left your lights on.

Front fog lamps and rear fog 

lamp

Rotate the ring forwards to switch on 

and backwards to switch off. The sta-

tus is confirmed by the indicator light

on the instrument panel.

Fog lamps off

Vehicles fitted with a rear fog

lamp (ring B)

Rear fog lamp

This  operates  with  the  dipped/main 

beam headlamps.

The front fog lamps operate with the 

side  lights,  the  dipped  headlamps 

and the main beam headlamps.

Front  and  rear  fog 

lamps  (2nd  notch  of 

the ring forwards). 

Front fog lamps (first notch

of the ring forwards)

Vehicles fitted with front fog lamps

and a rear fog lamp (ring C)

Direction indicators (flashers)

Left: downwards.

Right: upwards. 


Content   ..  2  3  4  5   ..