Peugeot 1007 (2008 year). Manual - part 11
 

  Index      Peugeot     Peugeot 1007 - service manual 2008 year in english


Search            


Content   ..  9  10  11  12   ..


Peugeot 1007 (2008 year). Manual - part 11


2

2

3

3

S
O
S

SOURC E

MODE

BAND

ESC

2

abc

5

jkl

8

tuv

3

def

6

mno

9

wxyz

1

4

ghi

7

pqrs

0

#

MENU

LIST

TA PT Y

DARK

ESC

LIST

MENU

ESC

MENU

LIST

6

6

ESC

MENU

LIST

ESC

MENU

LIST

ESC

MENU

LIST

4

4

ESC

MENU

LIST

55

1

1

154

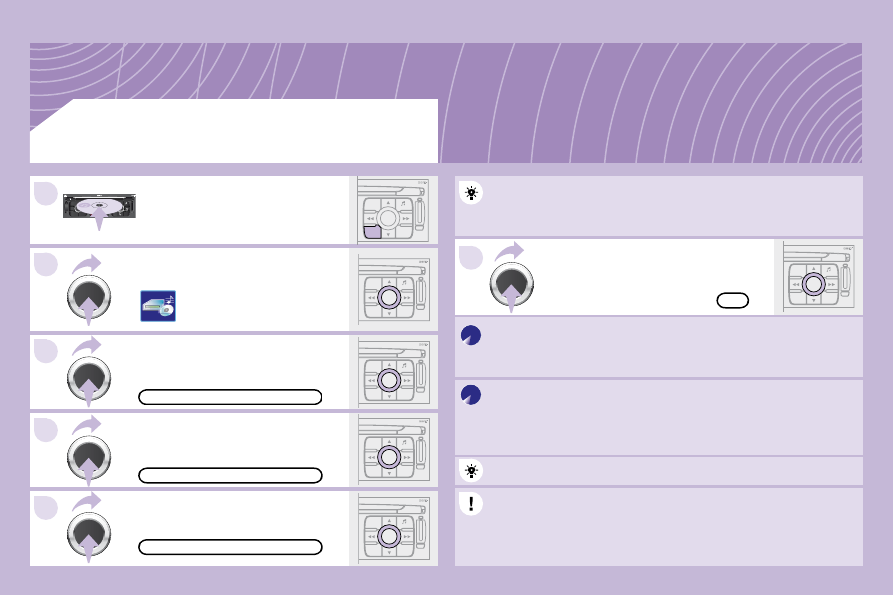
COPY CD TO JUKEBOX

COMPLETE CD

CREATE ALBUM

OK

 Select COPY CD TO JUKEBOX and 

press the dial to confi rm. 

 Select COMPLETE CD to copy 
the entire CD and press the dial to 

confi rm. 

 Select CREATE ALBUM and press 

the dial to confi rm. 

 The AUTO CREATION tab automatically copies the CD by default 
into an album of the type "album n°...". 

 The audio or MP3 CD is copied onto the hard disc. Copying may 
take approximately 20 minutes depending on the duration of the CD. 
During this copying phase, it is not possible to listen to the albums 
previously recorded on the hard disc or the CDs. 

 Select the letters one by one and select 

OK to confi rm. 

 If it is not an MP3 CD, the Jukebox automatically compresses 
the CD in MP3 format. The compression may take approximately 
20 minutes depending on the duration of the CD. During this 
compression phase, it is possible to listen to the CD or to albums 
previously recorded on the hard disc. 

 A long press on the SOURCE button starts the copying of the CD. 

 When copying an MP3 CD, the Jukebox only retains the last album 

level. It is not possible to copy fi les from the Jukebox to a CD. 

 The STOP THE CD COPY action does not delete the fi les which 
have already been transferred onto the jukebox hard disc. 

 Select AUDIO FUNCTIONS and press 

the dial to confi rm. 

 Insert a CD or an MP3 compilation 
and press the MENU button. 

 JUKEBOX FUNCTION 

 COPYING A CD ONTO THE HARD DISC 

ESC

MENU

LIST

ESC

MENU

LIST

6

6

7

7

55

ESC

LIST

MENU

MENU

ESC

MENU

LIST

2

2

3

3

4

4

1

1

ESC

MENU

LIST

ESC

MENU

LIST

ESC

MENU

LIST

ESC

MENU

LIST

155

JUKEBOX

RENAME

JUKEBOX MANAGEMENT

  JUKEBOX FUNCTION 

 Press the MENU button. 

 Select AUDIO FUNCTIONS and 

press the dial to confi rm. 

 Select the JUKEBOX function and 

press the dial to confi rm. 

 Select the JUKEBOX MANAGEMENT 

function and press the dial to confi rm. 

 Select the album to be renamed and 

press the dial to confi rm. 

 Select the RENAME tab and press the 

dial to confi rm. 

 Turn the dial and select the letters of 

the album title one by one confi rming 
each time by pressing the dial. 

 Use the alphanumeric keypad to enter the letters of the album title 
one by one. 

  RENAMING AN ALBUM 

8

8

SOU R CE

1

2

2

ESC

MENU

LIST

LIST

ESC

MENU

LIST

S

O

S

SOU R CE

MODE

B AND

T

P T

A

Y

DARK

SOU R CE

ESC

MENU

LIST

LIST

ESC

MENU

LIST

3

3

156

DELETE

OK

  JUKEBOX FUNCTION 

 Press the SOURCE button several 
times in succession and select the 
JUKEBOX function. 

 Press the LIST button. 

 Turn the dial to select the fi les. 

 Press the ESC button to return to the fi rst fi le level.   

JUKEBOX

 Select OK and press the dial to 

confi rm. 

 To rename the tracks of an album, follow the same procedure, 
selecting the tracks to be renamed. 
 Use the ESC button to exit from the list of tracks. 

 Select the DELETE function to delete an album or a 
track from the Jukebox.   

  LISTENING TO THE JUKEBOX 

ESC

MENU

LIST

MENU

ESC

LIST

MENU

1

1

2

2

ESC

MENU

LIST

ESC

MENU

LIST

3

3

4

4

ESC

MENU

LIST

5

ESC

MENU

LIST

ESC

MENU

LIST

157

 You can connect video equipment (camcorder, digital camera, DVD player...) to the three audio/video 
sockets, located in the glove box. 

 Turn the dial and select the VIDEO 
function. 

 After connecting the video equipment, 
press the MENU button. 

 Turn the dial and select the 
ACTIVATE VIDEO MODE function to 
activate/deactivate the video. 

 Press the dial to confi rm the selection. 

 Press the dial to confi rm the selection. 

 Pressing the "SOURCE" button several times in succession permits 
the selection of an audio source other than that of the video. 

 Pressing the "MODE" or "DARK" button disconnects the displaying 
of the video. 

 Turn the dial and select the VIDEO 
PARAMETERS function to set the 
display format, the brightness, the 
contrast and the colours. 

 Press the dial to confi rm the selection. 

         VIDEO MENU 

 Videos can only be displayed when stationary. 

VIDEO PARAMETERS

ACTIVATE VIDEO MODE

1

1

SOU R CE

2

2

S

O

S

SOU R CE

MODE

B AND

T

P T

A

Y

DARK

SOU R CE

2

abc

5

jkl

8

tuv

3

def

6

mno

9

wxyz

1

4

ghi

7

pqrs

0

#

D

2

abc

5

jkl

8

tuv

3

def

6

mno

9

wxyz

1

4

ghi

r

7

pq s

0

#

S

O

S

SOU R CE

MODE

B AND

T

P T

A

Y

DARK

SOU R CE

SOU R CE

ESC

MENU

LIST

1

3

3

2

2

158

 Press the MENU button then select the CONFIGURATION function, 
then SOUNDS, then ACTIVATE AUXILIARY SOURCE to activate 
the auxiliary input of the RT4 GPS audio/telephone. 

 Connect the portable equipment (MP3 

player…) to the audio sockets (white and 

red, RCA type) located in the glove box 
using a JACK/RCA audio cable. 

 Press the SOURCE button several 
times in succession and select AUX. 

 CD CHANGER 

 Insert one or more CDs in the 
changer. 
 Press the SOURCE button several 
times in succession and select CD 
CHANGER. 

 Press one of the buttons on the 
alphanumeric keypad to select the 
corresponding CD. 

 Press one of the buttons to select a 
track on the CD. 

 The displaying and management of the commands takes place via 
the portable equipment. 

 It is not possible to copy the fi les onto the hard disc from the auxiliary 
input.  

 It is not possible to copy the fi les onto the hard disc from the CD 
changer.  

 USING THE AUXILIARY INPUT (AUX) 

  JACK/RCA AUDIO CABLE NOT SUPPLIED 

  PLAYING A CD (NOT MP3 COMPATIBLE) 

2

abc

5

jkl

8

tuv

3

def

6

mno

9

wxyz

1

4

ghi

7

pqrs

0

#

ESC

MENU

LIST

ESC

MENU

LIST

ESC

MENU

LIST

2

abc

5

jkl

8

tuv

3

def

6

mno

9

wxyz

1

4

ghi

7

pqrs

0

#

2

abc

5

jkl

8

tuv

3

def

6

mno

9

wxyz

1

4

ghi

r

7

pq s

0

#

D

2

abc

5

jkl

8

tuv

3

def

6

mno

9

wxyz

1

4

ghi

r

7

pq s

0

#

1

1

2

2

3

3

1

1

2

2

06

159

 TELEPHONE 

  INSTALLING YOUR SIM CARD  

  ENTERING THE PIN CODE 

 Access the slot by pressing the button 
using the tip of a pen. 

 Install the SIM card 
in the holder and 
then insert it in the 
slot. 

 To remove the SIM card, repeat step 1. 

 Your SIM card must be installed and removed with the RT4 GPS 
audio/telephone switched off and the ignition off.   

 Enter the PIN code on the keypad. 

 Confi rm the PIN code by pressing 
button #. 

PIN CODE

 When entering your PIN code, tick the STORE PIN tab to gain 
access to the telephone without having to enter this code when it is 
used subsequently.  

2

abc

5

jkl

8

tuv

3

def

6

mno

9

wxyz

1

4

ghi

7

pqrs

0

#

ESC

MENU

LIST

ESC

MENU

LIST

2

abc

5

jkl

8

tuv

3

def

6

mno

9

wxyz

1

4

ghi

r

7

pq s

0

#

D

2

abc

5

jkl

8

tuv

3

def

6

mno

9

wxyz

1

4

ghi

r

7

pq s

0

#

D

2

abc

5

jkl

8

tuv

3

def

6

mno

9

wxyz

1

4

ghi

r

7

pq s

0

#

1

1

2

2

3

3

4

4

55

6

6

D

2

abc

5

jkl

8

tuv

3

def

6

mno

9

wxyz

1

4

ghi

r

7

pq s

0

#

D

2

abc

5

jkl

8

tuv

3

def

6

mno

9

wxyz

1

4

ghi

r

7

pq s

0

#

D

2

abc

5

jkl

8

tuv

3

def

6

mno

9

wxyz

1

4

ghi

r

7

pq s

0

#

06

160

 TELEPHONE 

  CALLING A CONTACT 

 Turn the dial and select the DIAL 
function. 

 Press the PICK UP button to display 
the superimposed telephone menu. 

 Press the dial to confi rm the selection. 

 Dial the telephone number of your 
contact using the alphanumeric 
keypad. 

 Press the PICK UP button to call the 
number dialled. 

 Press the HANG UP button to end 
the call.  

  ACCEPTING OR REFUSING A CALL 

 Press the PICK UP button to accept 
a call. 

 Press the HANG UP button to refuse 
a call. 

DIAL

 Press the end of the steering wheel stalk for more 
than 2 seconds to access the telephone menu: 
calls log, directory, voice mailbox.  

S
O
S

S
O
S

SOURC E

MODE

BAND

T PT

A

Y

DARK

D

2

abc

5

jkl

8

tuv

3

def

6

mno

9

wxyz

1

4

ghi

r

7

pq s

0

#

ESC

MENU

LIST

ESC

MENU

LIST

161

  EMERGENCY CALL 

  *    On condition that the PEUGEOT Emergency contract has been signed. This is free 

and of unlimited duration. Contact a PEUGEOT dealer.  

 In an emergency, press the SOS 
button until an audible signal is 
heard and a CONFIRMATION/
CANCELLATION screen is displayed 

(if valid SIM card inserted). 
 A call is made to the emergency 

services (112). 
 In certain countries * , this emergency 
call is made directly by the PEUGEOT 
Emergency team which locates the 
vehicle and alerts the appropriate 
emergency services as quickly as 
possible. 

PEUGEOT ASSISTANCE

CUSTOMER CONTACT CENTRE

 When the PEUGEOT Emergency contract has been signed, it 
is recommended that an initial call is made to the PEUGEOT 
Emergency team.  

 CONSULTING THE SERVICES 

 Press the LION button to gain access 
to the PEUGEOT services * . 

 Select CUSTOMER CONTACT 
CENTRE to request any information 
about the PEUGEOT marque. 

 Select PEUGEOT ASSISTANCE to 
make a breakdown assistance call. 

  *    These services and options are subject to conditions and availability.  

07

162

 RADIO: selection of the previous stored station. 
 MP3/JUKEBOX: selection of the previous directory. 
 CD CHANGER: selection of the previous CD. 
 Selection of the previous item on a menu. 

 RADIO: selection of the next stored station. 
 MP3/JUKEBOX: selection of the next directory. 
 CD CHANGER: selection of the next CD. 
 Selection of the next item on a menu. 

 RADIO: automatic search for a higher frequency. 
 CD/MP3/JUKEBOX/CD CHANGER: selection of the 
next track. 
   CD/CD CHANGER: continuous press: fast forwards 
play. 

 RADIO: automatic search for a lower frequency. 
 CD/MP3/JUKEBOX/CD CHANGER: selection of the 
previous track. 
 CD/CD CHANGER: continuous press: fast backwards play. 

   -   Change of sound source. 

  -   Confi rmation of a selection. 
  -   Pick up/Hang up the telephone. 
  -   Press for more than 2 seconds: 

access to the telephone menu.  

 Volume increase. 

 Volume decrease. 

         CONTROL SHORT-CUTS 

 STEERING WHEEL CONTROLS 

 Mute: by pressing the volume 
increase and decrease 
buttons simultaneously. 

 The sound is restored by 
pressing one of the two 
volume buttons. 

MENU

ESC

LIST

MENU

2

2

1

1

163

 Press the end of the lights stalk to start the voice 
recognition. 
 Say the words one by one and wait for the audible 

confi rmation signal between each word. 
 The list which follows is exhaustive.  

         VOICE COMMANDS 

 To display the list of available voice commands, press 
the end of the lights stalk to start the voice recognition, 
then say HELP or WHAT CAN I SAY. 

 For the same operation, press and 
hold the MENU button and select the 
function VOICE COMMANDS LIST. 

VOICE COMMANDS LIST

  LEVEL 1  

 display 

 call 
 changer 

 guide to 
 traffi c info 

 CD player/jukebox 

 navigation 
 stop/resume 

 radio 

 SMS/message 

 telephone 

  LEVEL 2 

 audio 
 guidance 
 navigation 
 trip computer 
 telephone 

 description 
 disc number 
 previous/next disc 
 random play 
 list 
 track number 
 previous/next track 
 repeat 
 scan 

 description 
 display 
 read 

 random play 
 list 
 track number 
 previous/next track 

 directory (MP3 CD) 

 scan 

 directory 
 show 

 zoom out/in 

 autostore 
 list 
 memory 
 previous/next 

 display 
 read 

 voice mailbox 
 last number 
 voice message service 
 directory 

   LEVEL 3  

 1 … 20 

 1 ... 20 

 previous/next 
 repeat 

 destination 
 description 
 vehicle 

 1 … 6 

 description 

  DISPLAYING THE LIST AND USING THEM 

ESC

LIST

MENU

ESC

MENU

LIST

ESC

MENU

LIST

ESC

MENU

LIST

ESC

MENU

LIST

MENU

ESC

MENU

LIST

ESC

MENU

LIST

1

1

2

2

3

3

4

4

55

6

6

7

7

8

8

ESC

MENU

LIST

08

164

       CONFIGURATION 

  ADJUSTING THE DATE AND TIME 

 Press the MENU button. 

 Turn the dial and select the 
CONFIGURATION function. 

 Press the dial to confi rm the selection. 

 Turn the dial and select the DISPLAY 
CONFIGURATION function. 

 Adjust the parameters one by one 

confi rming by pressing the dial. Next 
select the OK tab on the display then 

confi rm.  

 Press the dial to confi rm the selection. 

DISPLAY CONFIGURATION

ADJUST THE DATE AND TIME

OK

 Press the dial to confi rm the selection. 

 Turn the dial and select the ADJUST 
THE DATE AND TIME function. 

1

2

3

3

2

1

4

4

2

3

4

3

3

4

4

4

3

3

3

2

3

4

4

4

4

4

4

2

2

3

3

3

3

3

2

3

3

3

4

4

4

09

1

2

3

3

3

4

4

4

4

4

4

4

5

5

5

5

165

  MAIN FUNCTION 

           DISPLAY FLOW CHARTS 

  CHOICE A 

  choice A1  

  choice A2   

  CHOICE B...   

  SELECT DESTINATION 

  enter an address  

 country: 

 town: 

 road: 

 N°/_: 

 curr. loc 

 Archive 

 POI 

 near 

 on the route 

 around current place 

 search by name 

  GPS coordinates  

  directory  

  previous destinations   

  JOURNEY LEGS AND ROUTE 

  add a stage  

 enter an address 

 directory 

 previous destinations 

  order/delete journey legs  

  divert route  

  chosen destination   

  GUIDANCE OPTIONS 

  defi ne calculation criteria  

 fastest 

 shortest 

 distance/time 

 with tolls 

 with ferry 

 traffi c info 

  set speech synthesis  

  activate/deactivate road names  

  map data base description  

  delete last destinations  

  STOP/RESUME GUIDANCE    

  MAP 

  NAVIGATION - GUIDANCE 

  MAP ORIENTATION 

  vehicle direction  

  north direction  

  3D view   

  MAP DETAILS 

  administration and safety  

 town halls, town centre 

 universities, colleges 

 hospitals 

  hotels, restaurants and shops  

 hotels 

 restaurants 

 vineyards 

4

4

4

4

4

4

4

4

3

4

4

4

4

3

3

4

4

1

2

3

4

4

4

3

4

4

4

4

4

1

2

3

3

3

3

3

3

3

3

2

3

2

2

3

3

3

3

2

2

4

4

2

4

4

3

3

4

4

4

3

3

2

2

166

  DISPLAY MAP 

  full screen map  

  map in window   

  MOVE THE MAP   

  TRAFFIC INFORMATION 

  READ MESSAGES  

  FILTER TRAFFIC INFORMATION 

  geographic fi lter  

 around the vehicle 

 around location 

 on the route 

  road information  

 traffi c information 

 road closure 

 size limit 

 road condition 

 weather and visibility 

  urban/city information  

 parking 

 public transport 

 demonstrations  

CONFIGURE MESSAGE ANNOUNCEMENT

  read messages  

  new message display   

     SELECT TMC STATION 

  automatic TMC  

  manual TMC  

  list of TMC stations    

  AUDIO FUNCTIONS 

  RADIO FAVOURITES 

  enter a frequency  

  activate/deactivate RDS mode  

  activate/deactivate regional mode  

  display/hide radio text   

  CD, JUKEBOX FAVOURITES 

  activate/deactivate Introscan (SCN)  

  activate/deactivate Random mode (RDM)  

  activate/deactivate Repeat (RPT)  

  activate/deactivate display of CD info   

  STOP THE COPY  

COPY CD TO JUKEBOX

  copy complete cd  

 business centres 

 supermarkets, shopping 

  culture, tourism and shows  

 tourism 

 culture and museums 

 casinos and nightlife 

 cinemas and theatres 

 shows and exhibitions 

  sports and open air centres  

 sports centres 

 golf courses 

 skating rinks, bowling alleys 

 winter sports resorts 

 parks, gardens 

 theme parks 

  transport and automobile  

 airports, ports 

 stations, bus stations 

 vehicle rental 

 lay-bys, car parks 

 service stations, garages  

4

3

4

5

5

5

5

4

4

4

3

4

3

4

4

3

3

3

3

2

5

5

1

2

3

4

3

3

3

3

3

2

3

3

3

2

4

4

2

4

3

4

4

4

3

4

4

3

3

4

4

4

4

4

4

5

5

5

5

2

3

5

5

5

3

167


multiple selection  

  current album  

  current track   

  JUKEBOX 

  jukebox management  

  jukebox confi guration  

 hi-fi  (320 kbps) 

 high (192 kbps) 

 normal (128 kbps) 

  delete jukebox data   

  PLAYLIST MANAGEMENT   

  TELEMATICS 

  CALL 

  call list  

  dial  

  directory  

  mailbox  

  services  

 customer contact centre 

 PEUGEOT assistance 

 messages received  

  DIRECTORY 

  managing directory fi les  

 consult or modify a fi le 

 add a fi le 

 delete a fi le 

 delete all fi les 

  confi gure directory  

 select a directory 

 name directory 

 select starting directory 

  fi le transfer  

 exchange by infrared 

 send all records 

 send one record 

 receive by infrared 

 exchange with SIM card 

 send all records to SIM 

 send one record to SIM 

 receive all SIM fi les 

 receive a SIM fi le  

  TEXT MESSAGES (SMS) 

  read received text messages  

  send a text message  

  write a text message  

  delete list of text messages   

  TELEPHONE FUNCTIONS 

  network  

 network search mode 

 automatic mode 

 manual mode 

 networks available 

  length of calls  

 zero reset 

  manage PIN code  

 activate/deactivate 

 save PIN number 

 modify PIN code 

  call options  

 confi gure calls 

 display my number 

 automatic reply after x ring(s) 

 ring options 

 for voice calls 

 for text messages (SMS)   

1

2

3

3

3

3

2

3

3

4

4

1

3

2

3

1

2

3

3

2

2

2

1

2

2

2

1

1

MENU

4

3

2

2

3

3

6

1

168

Each audio source (Radio, CD, MP3, 
Jukebox, CD changer) has its own 
separate settings.

text message ring

call diversion to mailbox n°

delete calls log

CONFIGURATION

DISPLAY CONFIGURATION

choose colour

adjust luminosity

set date and time

select units

SOUND

voice commands setting

speech synthesis setting

guidance instructions volume

other message volume

select female/male voice

activate/deactivate auxiliary source

SELECT LANGUAGE

Press the MENU button for more 
than 2 seconds to gain access to 

the next flow chart.

ALERT LOG

STATUS OF FUNCTIONS*

RESET TYRE PRESS. DETEC. SYS.*

VOICE COMMANDS LIST

AUDIO/TELEPHONE DIAGNOSTICS

GPS COVERAGE

UNIT BACKUP POWER

UNIT DESCRIPTION

NAVIGATION DEMONSTRATION

SERVICES CONFIGURATION

Press the Music button several 
times in succession to access 
the following settings.

MUSICAL AMBIENCE

BASS

TREBLE

LOUDNESS CORRECTION

FR-RR BALANCE

LH-RH BALANCE

AUTO VOLUME CORRECTION

Flow chart version 7.0

DEFINE VEHICLE PARAMETERS*

VIDEO

ACTIVATE VIDEO MODE

VIDEO PARAMETERS

display formats

adjust luminosity

set colours

set contrasts

VEHICLE DIAGNOSTICS

*  The parameters vary according to vehicle  

(refer to the "Multifunction displays" chapter).

180

 The table below groups together the answers to the most frequently asked questions concerning the RD4 audio equipment and the RT4 audio/telephone. 

 QUESTION 

 SOLUTION 

 RESPONSE 

 There is a difference in 
sound quality between 
the different audio 
sources (radio, CD, CD 

changer...). 

 Check that the audio settings (Volume, Bass, 

Treble, Ambience, Loudness) are adapted to 
the sources listened to. It is advisable to set 
the AUDIO functions (Bass, Treble, Front-Rear 

Balance, Left-Right Balance) to the middle 
position, select the musical ambience "None" 
and set the loudness correction to the "Active" 
position in CD mode or to the "Inactive" position 
in radio mode. 

 For optimum sound quality, the audio settings (Volume, Bass, Treble, 

Ambience, Loudness) can be adapted to the different sound sources, 
which may result in audible differences when changing source (radio, CD, 

CD changer...). 

 The CD is ejected 
automatically or is not 
played by the player. 

   -   Check that the CD is inserted in the player the 

right way up. 

  -   Check the condition of the CD: the CD cannot 

be played if it is too damaged. 

  -   Check the content in the case of a recorded 

CD: consult the advice in the Audio section. 

  -   The audio equipment's CD player does not 

play DVDs. 

  -   Due to inadequate quality, certain recorded 

CDs will not be played by the audio system. 

  -   The CD changer does not play MP3 CDs.  

 The CD is inserted upside down, is unplayable, does not contain any audio 
data or contains an audio format which the player cannot play. 
 The CD is protected by an anti-pirating protection system which is not 
recognised by the audio equipment. 

 FREQUENTLY ASKED QUESTIONS 

 The CD player sound 
is poor. 

 The CD used is scratched or of poor quality. 

 Insert good quality CDs and store them in 
suitable conditions. 

 The audio equipment settings (bass, treble, ambiences) are unsuitable. 

 Set the treble or bass level to 0, without selecting 
an ambience. 


Content   ..  9  10  11  12   ..