Peugeot 1007 (2008 year). Manual - part 4
 

  Index      Peugeot     Peugeot 1007 - service manual 2008 year in english


Search            


Content   ..  2  3  4  5   ..


Peugeot 1007 (2008 year). Manual - part 4


3

52

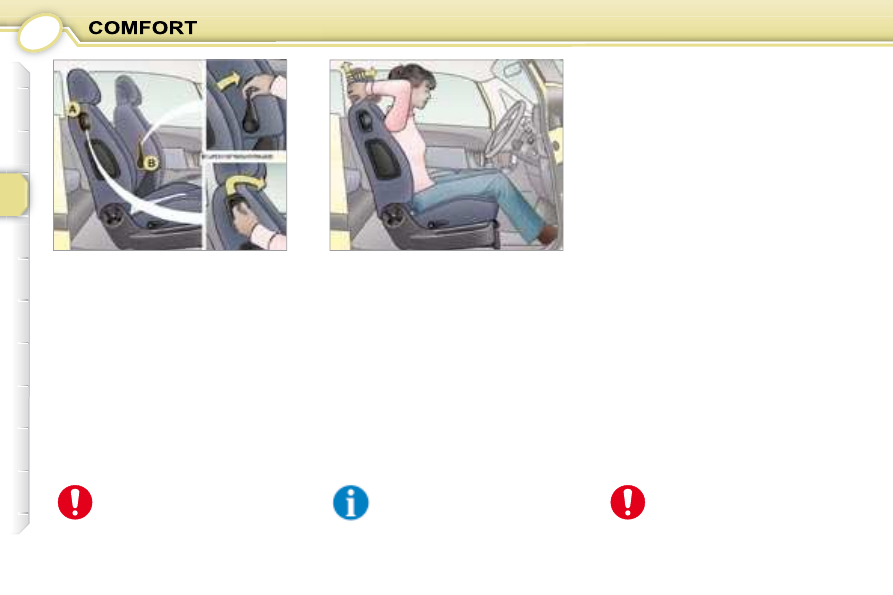
  4 - Access to the rear seats 
 If  necessary,  detach  the  seat  belt 
from the handle and position it along 
the door pillar. 
 Lift  the  control   A   with  one  hand 
and  guide  the  movement  of  the 
seat 

forwards 

with 

your 

other 

hand  (keeping  the  control  in  the 
raised position). 
 The  driver  has  a  courtesy  handle 
 B ,  located  on  the  inner  side  of  the 
passenger seat, to enable him to tilt 
the seat to allow a child into the rear, 
for example. 
 When it is put back in place, the seat 
returns to its initial position. 

  5 -  Head restraint height and 

angle adjustment 

 To  raise  the  head  restraint,  pull  it 
upwards. 
 To  lower  it,  it  is  necessary  to  push 
simultaneously: 
   -  

the button, located on the left 
guide at the base of the head 
restraint frame, 

  -  

the head restraint downwards.  

 No  person  or  object  should 
prevent the seat from return-

ing  to  its  initial  position;  the 

return to this position is nec-
essary  in  order  for  it  to  be 
secured.  

 The  head  restraint  is  fi tted  with  a 

frame  which  has  notches  which 

prevent  it  from  lowering;  this  is  an 

impact safety device. 

 Never  drive  with  the  head 

restraints removed; they must 

be  in  place  and  correctly 
adjusted.  

  The  adjustment  is  correct 
when  the  upper  edge  of 
the  head  restraint  is  level 
with the top of the head.
  

 To  adjust  the  angle  of  the  head 
restraint, tilt it. 
 To  remove  it,  press  the  lug  and  pull 
it upwards. 

3

53

  6 - Storage drawer 
 Your  vehicle  has  a  storage  drawer 
under each seat. 
 To open it, lift it and pull. 
 To remove it, bring it to the end of its 
travel,  press  the  ends  of  the  slides 
and lift it, then pull it fully. 
 To  put  it  back  in  place,  at  the  end 
of  its  travel,  press  on  the  top  of  the 
drawer to secure it. 

  7 -  Placing the passenger seat in 

the table position 

 Use one of the two red controls at the 
base, on each side of the seat. 
 To place the seat in the table position, 
lift  this  control  with  one  hand  and 
guide  the  seat  back  to  the  table 
position with your other hand. 
 To  return  the  seat  to  its  upright 
position, 

carry 

out 

exactly 

the 

same  operations  in  reverse  order 
(always raise the red control). 

  As  a  safety  precaution,  a 
passenger  sitting  in  the  rear 
of the vehicle must not place 
his  feet  on  the  front  seat 
when  placed  in  the  table 
position.   

 Do not place objects weigh-
ing  more  than  1  kg  in  the 
drawers.  

3

54

 REAR SEATS 

  Seat back angle adjustment 

 Tilt the control  C  and adjust the angle 
to the comfort or loading position. 
 Release the control to lock.  

  Folding/Placing in the 
"fully folded" position 

 Place  the  head  restraint  in  the  low 
position. 
 Position the seat belt buckle as close 
as possible to the strap return. 
  Move  the  seat  as  far  back  as 
possible
   using  the  bar   A   or  the 
handle  B . 
 Fold  the  seat  back  onto  the  seat 
cushion tilting control  C  fully. 
  Note:   you  can  lock  the  seat  back  in 
this position by pressing on it. 
 Push  the  control   D   upwards  to 
release the rear feet. 
 Place  the  seat  in  the  "fully  folded" 
position. 
 When driving, the seat is retained in 
this position by the side strut. 

  Table position 

 Place  the  head  restraint  in  the  low 
position. 
 Fold  the  seat  back  onto  the  seat 
cushion tilting control  C  fully. 
  Note:   you  can  lock  the  seat  back  in 
this position by pressing on it.  

  Forwards-backwards adjustment 

 Lift  the  bar   A   and  slide  the  seat 
 forwards or backwards. 
 From the boot, you can press the red 
handle  B  and slide the seat forwards 
or backwards. 
 This manoeuvre makes folding of the 
seat when loading the boot easier.  

3

55

 Never  drive  with  the  head 
restraints 

removed, 

they 

must be in place and  correctly 
adjusted. 

  Locked  

  Released   

 In  order  to  ensure  that  the 
seat  covers  have  a  long 
service  life,  do  not  leave 
the seat in the table or "fully 

folded" position after loading. 
 Avoid  placing  luggage  on  the  seats 
when they are in the table position.  

 REAR HEAD RESTRAINTS 

 The  rear  head  restraints  can  be 

 removed and have two positions; 
   -  

high, position for use 

  -  

low, storage position  

  Repositioning the seat 

 Press the control  D  upwards to check 
that the rear feet are released. 
 Tilt the folded seat rearwards. 
 The rear feet are secured automatically. 
 Check  that  the  seat  is  secured 
correctly. 
 Raise the seat back, releasing it fi rst 

by pulling the control  C . 

 To  raise  a  head  restraint,  pull  it 
upwards. 
 To  lower  it,  press  the  lug  then  the 
head restraint. 
 To  remove  it,  place  it  in  the  high 
position,  push  the  lug  and  pull  it 
upwards. 
 To refi t it, engage the head restraint 

rods in the holes taking care to remain 
in the centreline of the seat back. 

3

56

     SEAT MODULARITY AND 
THE VARIOUS SEAT 
CONFIGURATIONS 

 The design of your vehicle and of its 

seats offers several confi gurations. 

  Examples of various  arrangements 
combining  convenience  and  con-
viviality:
  

 It  is  imperative  that  the 
 various 

operations 

which 

lead  to  modifi cation  of  the 

existing  confi guration  are 

carried out when stationary. 

3

57

3

58

 Although  one  of   PEUGEOT’s   main 
criteria when designing your vehicle, 
the  safety  of  your  children  also 
depends on you. 

  INSTALLING A CHILD SEAT 
USING A THREE POINT SEAT 
BELT 

  Intermediate longitudinal 

position   

  *   

The  rules  for  transporting  chil-

dren are specifi c to each country. 

Consult the current legislation in 
your country.  

         GENERAL POINTS RELATING 
TO CHILD SEATS 

  "Forwards-facing" 
 When  a  "forwards-facing"  child  seat 
is  installed  on  the   front  passenger 
seat
 , adjust the vehicle’s seat to the 
intermediate 

longitudinal 

position 

with the seat back upright and leave 
the passenger air bag armed.  

  "Rearwards-facing" 

 When  a  "rearwards-facing" 
child  seat  is  installed  on  the 
 front  passenger  seat ,  it  is 
essential that the passenger 

air  bag  is  disarmed.  Otherwise,   the 
child  would  risk  being  seriously 
injured or killed if the air bag were 

to infl ate.   

 For maximum safety, please 
follow these precautions: 

   -  

in  accordance  with  Directive 
2003/20,   all  children  under 
the age of 12 or less than one 

metre  fi fty  tall  must  travel  in 

approved  child  seats  suited 
to  their  weight

 ,  on  seats  fi tted 

with  a  seat  belt  or  ISOFIX 
mountings * , 

  -  

 statistically,  the  safest  seats 
in  your  vehicle  for  the  trans-
portation  of  children  are  the 
rear seats,
  

  -  

 a child weighing less than 9 kg 
must travel in the "rearwards-
facing"  position  both  in  the 
front and in the rear.
   

  PEUGEOT    recommends   that  chil-
dren  should  travel  in  the   rear  seats  
of your vehicle: 
   -  

 "rearwards-facing"   up  to  the 
age of 2, 

  -  

 "forwards-facing"  over the age 
of 2.  

3

61

 ADVICE ON CHILD 
SEATS 

  Installing a booster seat 
 The  chest  part  of  the  seat  belt  must 
be positioned on the child’s shoulder 
without touching the neck. 
 Ensure  that  the  lap  part  of  the  seat 
belt passes correctly over the child’s 
thighs. 
  PEUGEOT   recommends  the  use  of 
a  booster  seat  which  has  a  back, 

 fi tted  with  a  seat  belt  guide  at 

shoulder level. 

 As a safety precaution, do not leave: 
   -  

one or more children alone and 
unsupervised in a vehicle, 

  -  

a child or an animal in a vehicle 
which is exposed to the sun, 
with the windows closed, 

  -  

the keys within reach of children 
inside the vehicle.  

 To  protect  young  children  from  the 

rays of the sun, fi t side blinds on the 

rear windows.   

 Children under the age of 10 must not 
travel in the "forward facing" position 
on  the  front  passenger  seat,  unless 
the  rear  seats  are  already  occupied 
by other children, cannot be used or 
are absent. 
 Disarm  the  passenger  air  bag  when 
a  "rear  facing"  child  seat  is  installed 
on the front seat. 
 Otherwise, the child would risk  being 
seriously  injured  or  killed  if  the  air 

bag were to infl ate.  

 The  incorrect  installation  of  a  child 
seat  in  a  vehicle  compromises  the 
child’s  protection  in  the  event  of  an 
accident. 
 Remember to fasten the seat belts or 
the  child  seat  harness   keeping  the 
slack
  in relation to the child’s body  to 
a minimum
 , even for short journeys. 
 For  optimum  installation  of  the 
"forward  facing"  child  seat,  ensure 
that  the  back  of  the  child  seat  is  in 
contact with the back of the vehicle’s 
seat and that the head restraint does 
not cause any discomfort. 
 If  the  head  restraint  has  to  be 
removed,  ensure  that  it  is  stored  or 
attached  securely  to  prevent  it  from 
being  thrown  around  the  vehicle  in 
the event of sharp braking. 

3

59

  CHILD SEATS RECOMMENDED BY  PEUGEOT  

  PEUGEOT   offers  a  complete  range  of  recommended  child  seats  which  are 
 secured using a three point seat belt : 

   Passenger air bag OFF   

   Group 0: from birth to 10 kg  

Group 0+: from birth to 13 kg   


   L1    

"ROMER Baby-Safe Plus"  

Installed in the rear-facing position        

   Groups 1, 2 and 3: from 9 to 36 kg   


   L2     

"KIDDY Life"  

For the safety of young children 

(from 9 to 18 kg),  PEUGEOT  

recommends use of the restraining 

cushion.  

   Groups 2 and 3: from 15 to 36 kg   


   L3    

"RECARO Start"  


   L4     

"KLIPPAN Optima"  

From the age 

of 6 years 

(approximately 22 kg), 
the booster is used on 

its own.  

3

60

 INSTALLING CHILD SEATS SECURED USING THE SEAT BELT 

 In accordance with European regulations, this table indicates the options for the installation of child seats secured using the 
seat belt and universally approved in accordance with the weight of the child and the seat in the vehicle. 

  U :  seat suitable for the installation of a child seat secured using the seat belt and universally approved "rear facing" and/or 

"forward facing". 

 Child seats fi tted with a support which rests on the fl oor of the vehicle must not be installed in the rear. 

   Weight of the child/indicative age   

   Seat   

   Below 13 kg    

(groups 0 ( a ) and 0+)  

Up to 1 year approx  

   From 9 to 18 kg    

(group 1)  

 From 1 to 3 years approx  

   From 15 to 25 kg    

(group 2)  

 From 3 to 6 years approx  

   From 22 to 36 kg    

(group 3)

 From 6 to 10 years approx    

 Front passenger 
seat (b) 

   U   

   U   

   U (c)   

   U (c)   

 Rear seat 

   U (d)   

   U   

   U (c)   

   U (c)   

 (a)  Group 0: from birth to 10 kg. 
 (b)  Consult the legislation in force in your country before installing your child on this seat. 
 (c)  Vehicle seat in the intermediate longitudinal position. 
 (d)  Vehicle seat in the most rearward position. 

3

62

  "ISOFIX" MOUNTINGS 

 Your  vehicle  has  been  approved  in 
accordance  with  the   new  ISOFIX 
regulation
 . 
 The 

seats * , 

represented 

below, 

are   fi tted  with  regulation  ISOFIX 

 mountings: 

 These are three rings for each seat: 

 This 

ISOFIX 

mounting 

system 

 guarantees  you  fast,  reliable  and 

safe  fi tting  of  the  child  seat  in  your 

vehicle. 
 The   ISOFIX  child  seats

   are  fi tted 

with  two  locks  which  are  secured 
easily on these lower rings  A . 
 Some  also  have  an   upper  strap  
which is attached to the upper ring  B . 

   -  

two  lower  rings   A ,  located 
 between  the  vehicle  seat  back 
and 

cushion, 

indicated 

by 

a  label, 

  -  

an  upper  ring   B ,  referred  to  as 
the   TOP  TETHER ,  indicated  by 
a label.  

 To attach this strap, raise the 
vehicle  seat’s  head  restraint 
then pass the hook between 

its  rods.  Then  fi x  the  hook 

on  the  upper  ring   B   and  tighten  the 
upper strap. 

 The incorrect installation of a 
child seat in a vehicle compro-
mises the child’s protection in 
the event of an accident. 

 For information regarding the ISOFIX 
child seats which can be installed in 
your  vehicle,  consult  the  summary 
table  for  the  location  of  the  ISOFIX 
child seats. 
 Child seats fi tted with a support which 

rests on the fl oor of the vehicle must 

not be installed in the rear  

  *   

According to version.  

3

63

 This child seat can also be used on seats which are not fi tted with ISOFIX mountings. 
 In this case, it must be attached to the vehicle seat using the three point seat belt. 
  

Follow the instructions for fi tting the child seat given in the seat manufacturer’s installation guide.    

   ISOFIX RÖMER Duo Plus  (size category  B1 )  

   Group 1: from 9 to 18 kg   


  Installed in the forward facing position.  

 Fitted with an upper strap to be secured on the ISOFIX upper ring,  

referred to as the TOP TETHER.  

Three seat body angles: sitting, reclining, lying.  

   ISOFIX CHILD SEAT RECOMMENDED BY  PEUGEOT  AND APPROVED FOR YOUR VEHICLE 

3

64

 SUMMARY TABLE FOR THE INSTALLATION OF ISOFIX CHILD SEATS 

 In  accordance  with  European  regulations,  this  table  indicates  the  options  for  the  installation  of  ISOFIX  child  seats  on  the 

vehicle seats fi tted with ISOFIX mountings. 
 In the case of the universal and semi-universal ISOFIX child seats, the child seat’s ISOFIX size category, determined by a 
letter from  A  to  G , is indicated on the child seat next to the ISOFIX logo. 

  IUF:   seat suitable for the installation 

of  an   I

 sofi x   U niversal  seat, 

F orward  facing"  and  secured 
using  the  "Top  Tether"  upper 
strap. 

  *   

The  ISOFIX  infant  car  seat  is 

fi xed  to  the  lower  rings  of  an 

ISOFIX  seat  and  occupies  the 
two rear seats.  

  IL-SU:   seat suitable for the installation 

an   I

 sofi x   S emi- U niversal  seat 

which is: 

   -  

"rear  facing"  fi tted  with  a  "Top 

Tether" upper strap, 

  -  

an infant car seat which is  secured 
using the "Top Tether" upper strap.  

 Child seats fi tted with a support which rests on the fl oor of the vehicle must not be installed on the rear seats. 

   Weight of the child /indicative age    

   Less than 10 kg  

(group 0)   

Up to approx. 

6 months  

   Less than 10 kg   

(group 0)  

Less than 13 kg   

(group 0+)    

Up to approx. 1 year  

   From 9 to 18 kg  

(group 1)    

From 1 to 3 years approx  

   Type of ISOFIX child seat   

   Infant car seat *    

   "rear facing"   

   "rear facing"   

   "forward facing"   

   ISOFIX size category   

F

G

C

D

E

C

D

A

B

B1

Universal and semi-universal   

ISOFIX child seats   

which can be installed on the 

rear seats

IL-SU

IL-SU

IL-SU

IUF

IL-SU

 For  the  securing  of  the  "Top   Tether" 

upper strap, refer to the "Isofi x Mountings" 

section. 

3

65

           "CAMELEO" INTERIOR 

 The  Cameleo  concept  is  based 
on  a  range  of  very  different  kits 
which   enable  you  to  transform  the 
 passenger  compartment  into  one 
which is unique and attractive. 
 They consist of the following 18 items: 
   -  

two coverings  1  on the fascia, 

  -  

four trims  2  for the side and centre 
vents, 

  -  

two trims  3  for the door panels, 

  -  

four trims  4  for the seat cushions, 

  -  

four trims  5  for the seat backs, 

  -  

two  trims   6   for  the  rear  side 
 storage compartment covers.  

 For  safety  reasons,  you  must 
not drive until you have installed 
a kit completely. 

 Kits consisting of four vent trims are 
also available. 

 The removal and fi tting of the items 

in this kit does not require any tools. 

3

66

  1 - Fascia coverings 

  Removal 
      Pull  one  of  the  four  corners  of 

the old fascia covering to detach 
the velcro.   

  Fitting 
   

   Position the new covering fl at on 

the fascia. 

     Press  on  the  four  corners  to 

attach the velcro securely.    

  2 - Vent trims 

  Removal 
      Turn an eighth of a turn to  remove 

the old trim.   

  Fitting 
      Position  the  new  trim  on  the 

vent. 

     Turn  an  eighth  of  a  turn  to  the 

notch to fi x the new trim.    

  3 - Door panel trims 

  Removal 
      Pull at the two notches to unclip 

it fully. 

     Remove the old trim.   

  Fitting 
      Position the new trim on the door 

starting at the top. 

     Press  on  the  edges  to  clip  it 

securely.    

3

67

  4 - Seat cushion trims  

  Fitting 
      Position the new trim on the seat 

cushion or on the seat back. 

     Engage  the  zip  pull,  located  at 

the  base  of  the  seat  cushion  or 
seat back. 

     Guide the zip pull along the three 

sides of the seat cushion or seat 
back. 

     Position  the  velcro  on  the  last 

side  of  the  seat  cushion  or  seat 
back trim.  

  On  the  rear  seats,  take  care  to 
 position  the  velcro  correctly  so 
that the ISOFIX mountings are not 
covered.
  
      Fold down the zip pull tab in 

the seat cushion or seat back 
location.    

  6 -  Rear side storage 

compartment cover trims 

  Removal 
      Remove the tab from the zip pull, 

located  at  the  base  of  the  seat 
cushion or seat back. 

     Guide the zip pull along the three 

sides of the seat cushion or seat 
back. 

     Remove the zip pull. 
     Pull on the last side to detach the 

velcro, then remove the old seat 
cushion or seat back trim.   

  Removal 
      Open the cover to 45°. 
     Unclip the lug located under the 

cover. 

     Remove the old cover trim.   

  Refi tting 
      Open the cover to 45°. 
     Position the new trim on the cover 

by means of the two notches. 

     Tilt the trim on the cover. 
     Clip  the  lug  located  under  the 

cover.    

 Some  Cameleo  seat  trims 
can  be  dry  cleaned.  Please 
ask  a   PEUGEOT   dealer  for 
details. 

  5 - Seat back trims 

 Follow  these  instructions  starting, 
for  each  seat,  with  the  complete 

seat  cushion  removal  and  fi tting 

 operations, then repeat them for the 
seat back. 


Content   ..  2  3  4  5   ..