Peugeot 208 (2017 year). Manual - part 7
 

  Index      Peugeot     Peugeot 208 - service manual 2017 year in english


Search            


Content   ..  5  6  7  8   ..


Peugeot 208 (2017 year). Manual - part 7


95

5

Safety

Installing a child seat attached with the seat belt

In accordance with European regulations, this table indicates the options for installing child seats secured using the seat belt and universally approved 
(a) in relation to the weight of the child and the seat in the vehicle.

 Weight of the child / indicative age

Seat

 Under 13 kg

(groups 0 (b) 

and 0+)

Up to about 1 year 

old

9-18 kg

(group 1)

From about 1 to 

3 years old

 15-25 kg

(group 2)

From about 3 to 

6 years old

 22-36 kg

(group 3)

From about 6 to 

10 years old

Front passenger 

seat (c), (e)

With height 

adjustment

U(R)

U(R)

U(R)

U(R)

Without height 

adjustment

U*

U*

U*

U*

Outer rear seats (d)

U

U

U

U

Centre rear seat (d)

U (f)

(f)

U

U

96

Safety

Remove and stow the head restraint 
before installing a child seat with backrest 
on a passenger seat. Refit the head 
restraint once the child seat has been 
removed.

U:

seat suitable for the installation of a 
child seat secured using the seat belt 
and universally approved for "rearward 
facing" and/or "forward facing" use.

U(R): as for U, the vehicle seat must be 

adjusted to the highest and fully back 
position.

U*:

as for U, straightening the backrest.

(a)

Universal child seat: child seat that can 
be installed in all vehicles using the seat 
belt.

(b)

Group 0: from birth to 10 kg. Infant car 
seats and "car cots" cannot be installed 
on the front passenger seat.

(c)

Refer to the current legislation in your 
country before installing your child on 
this seat.

(d)

To install a child seat at the rear, 
rearward or forward facing, move the 
front seat forward, then adjust the 
backrest to an upright position to allow 
enough room for the child seat and the 
child's legs.

(e)

When a "rearward facing" child seat is 
installed in the front passenger seat, the 
passenger airbag must be deactivated. 
Otherwise, the child would risk being 
seriously injured or killed if the airbag 
were deployed.
When a "forward facing" child seat is 
installed on the front passenger seat, 
the passenger's airbag must remain 
activated.

(f)

A child seat with support leg must never 
be installed on this passenger seat.

97

5

Safety

"ISOFIX" mountings

Your vehicle has been approved in accordance 
with the latest ISOFIX regulations.
The seats, shown below, are fitted with ISOFIX 
compliant mountings:

There are three rings for each seat:

This arrangement reduces forward tipping of 
the child seat in the event of a front impact.
This ISOFIX mounting system provides fast, 
reliable and safe fitting of the child seat in your 
vehicle.
ISOFIX child seats are fitted with two latches 
which are secured on the two rings A.
Some seats also have an upper strap which is 
attached to ring B.

F  pass the strap of the child seat over the seat 

backrest, centring it between the openings 
for the head restraint rods,

F  fix the hook of the upper strap to ring B,
F  tighten the upper strap.

When fitting an ISOFIX child seat to the 
left-hand rear position of the bench seat, 
before fitting the seat, first move the 
centre rear seat belt towards the middle 
of the vehicle, so as to avoid interference 
with the operation of the seat belt.

The incorrect installation of a child seat 
in a vehicle compromises the child's 
protection in the event of an accident.
Strictly follow the fitting instructions 
provided in the user guide supplied with 
the child seat.

For information on the possibilities for 
installing ISOFIX child seats in your 
vehicle, refer to the summary table.

-  two rings A, located between the vehicle's 

seat backrest and cushion, indicated by a 
marking,

-  a ring B, behind the seat, indicated by a 

marking, called Top Tether, for securing the 
upper strap.

To secure the child seat to the TOP TETHER:
F  remove and stow the head restraint before 

installing the child seat in this position (refit 
it once the child seat has been removed),

98

Safety

"RÖMER Baby-Safe Plus and its ISOFIX 

base"

(size category: E)

Group 0+: from birth to 13 kg

Installed rearward facing using an ISOFIX 

base which is attached to the rings A.

The base has a support leg, height 

adjustable, which rests on the vehicle's floor.

This child seat can also be secured with a 

seat belt. In this case, only the shell is used 

and must be attached to the vehicle seat 

using the three-point seat belt.

"FAIR G 0/1 S and its RWF B ISOFIX base" 

(size category: C)

Group 0+ and 1: from birth to 18 kg

Installed in the rearward facing position.

Is installed using an ISOFIX base attached to 

the rings A.

6 seat body angles.

Use the type B ISOFIX base: rearward 

facing (RWF).

This child seat can also be used in a forward 

facing position on seating positions not 

equipped with ISOFIX mountings.

In this case, the child seat body must be 

attached to the seat of the vehicle by the 

three point seat belt.

ISOFIX child seats recommended 
by PEUGEOT

PEUGEOT offers a range of ISOFIX child seats 
recommended and type approved for your 
vehicle.

Also consult the installation notes from the 
child seat’s manufacturer to find out how 
to install and remove the seat.

99

5

Safety

"RÖMER Duo Plus ISOFIX"  

(size category: B1)

Group 1: from 9 to 18 kg

Installed only in the forward facing position.

Attaches to rings A and ring B, referred to as 

the Top Tether, using an upper strap.

3 seat body angles: sitting, reclining and lying 

down.

This child seat can also be used on seats not 

equipped with ISOFIX mountings.

In this case, it must be secured to the 

vehicle's seat by the three-point seat belt.

Adjust the front seat of the vehicle so that the 

child's feet do not touch the backrest.

"Baby P2C Midi and its ISOFIX base"

(size categories: D, C, A, B, B1)

Group 1: from 9 to 18 kg

Installed rearward facing using an ISOFIX 

base which is attached to the rings A.

The base has a support leg, height 

adjustable, which rests on the vehicle's floor.

This child seat can also be used forward 

facing.

This child seat cannot be secured with a 

seat belt.

We recommend that you use the seat in the 

rearward facing position up to the age of 

3 years.

100

Safety

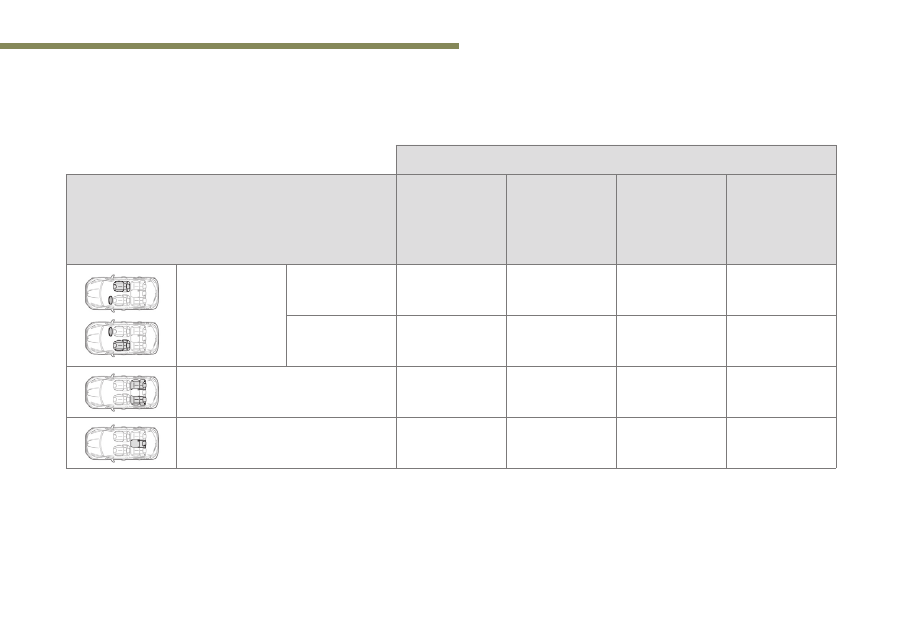
Summary table of locations for ISOFIX child seats

In line with European regulations, this table indicates the options for installing ISOFIX child seats on the vehicle seats fitted with ISOFIX mountings.
In the case of universal and semi-universal ISOFIX child seats, the ISOFIX size category, determined by a letter from A to G, is indicated on the child 
seat next to the ISOFIX logo.

Weight of the child / indicative age

Under 10 kg

(group 0)

Up to about 

6 months

Under 10 kg 

(group 0)

Under 13 kg

(group 0+)

Up to about 1 year

9-18 kg

(group 1)

From about 1 to 3 years old

Type of ISOFIX child seat

Cot

Rearward facing

Rearward facing

Forward facing

ISOFIX size category

F

G

C

D

E

C

D

A

B

B1

Front passenger seat

Not ISOFIX

Side rear seats

X

IL-SU*

IL-SU

IL-SU*

IL-SU

IUF

IL-SU

Centre rear seat

Not ISOFIX

*  vehicle seat in a special position: move the seats in front of the child seat forward.

101

5

Safety

IUF:

seat suitable for the installation of 
an Isofix Universal seat, "Forward 
facing", secured using the upper strap.

IL-SU:

seat suitable for the installation of 
an Isofix Semi-Universal seat which 
is either:

"rearward facing" fitted with an 
upper strap or a support leg,

"forward facing" fitted with a 
support leg,

a cot fitted with an upper strap 
or a support leg.

For securing the upper strap, refer to 
the "ISOFIX Mountings" section.

X:

seat not suitable for the installation 
of a child seat of the weight group 
indicated.

Remove and stow the head restraint 
before installing a child seat with backrest 
on a passenger seat.
Refit the head restraint once the child seat 
has been removed.

102

Safety

Advice

The incorrect installation of a child seat in a 
vehicle compromises the child's protection in 
the event of an accident.
Check that there is no seat belt or seat belt 
buckle under the child seat as this could 
make it unstable.
Remember to fasten the seat belts or the 
child seat harnesses keeping the slack 
relative to the child's body to a minimum, 
even for short journeys.
When installing a child seat using the seat 
belt, ensure that the seat belt is tightened 
correctly on the child seat and that it secures 
the child seat firmly on the seat of your 
vehicle. If your passenger seat is adjustable, 
move it forwards if necessary.
At rear seating positions, always leave 
sufficient space between the front seat and:
-  a "rearward facing" child seat,
-  the feet of a child seated in a "forward 

facing" child seat.

For this, move the seat forward and if 
necessary straighten its backrest too.

For optimal installation of the "forward facing" 
child seat, verify that its backrest is as close 
as possible to the backrest of the vehicle 
seat, if possible in contact with it.
The head restraint must be removed before 
installing a child seat with a backrest on a 
passenger seat.
Ensure that the head restraint is stored or 
attached securely to prevent it from being 
thrown around the vehicle in the event of 
sharp braking. Refit the head restraint once 
the child seat has been removed.

Children in front
The legislation on carrying children on the 
front passenger seat is specific to each 
country. Refer to the legislation in force in 
your country.
Deactivate the passenger's front airbag when 
a rearward facing child seat is installed on the 
front passenger seat.
Otherwise, the child risks being seriously 
injured or killed if the airbag is deployed.

Installing a booster seat
The chest part of the seat belt must be 
positioned on the child's shoulder without 
touching the neck.
Ensure that the lap part of the seat belt 
passes correctly over the child's thighs.
PEUGEOT recommends using a booster seat 
with a backrest, equipped with a belt guide at 
shoulder level.

As a safety precaution, do not leave:
-  a child or children alone and unattended in 

a vehicle,

-  a child or an animal in a vehicle exposed 

to the sun, with the windows closed,

-  the keys within the reach of children inside 

the vehicle.

To prevent accidental opening of the doors 
and rear windows, use the child lock.
Take care not to open the rear windows by 
more than one third.
To protect young children from the rays of the 
sun, fit side blinds on the rear windows.

103

5

Safety

Deactivation

F  With the ignition on, press this button again.
The indicator lamp in the button goes off, 
accompanied by a message to confirm 
deactivation.
This indicator lamp remains off while the child 
lock is switched off.

Any other state of the indicator lamp 
indicates a fault with the electric child 
locks.
Have it checked by a PEUGEOT dealer or 
a qualified workshop.

This system is independent and in no 
circumstances does it take the place of 
the central locking control.
Check the status of the child lock each 
time you switch on the ignition.
Always remove the key from the ignition 
when leaving the vehicle, even for a short 
time.

Child lock

Manual system

Mechanical system to prevent opening of a rear 
door using its interior control.
The control is located on the edge of each rear 
door.

Locking

F  Using the ignition key, turn the red control 

as far as it will go:
-  to the left on the left-hand rear door,
-  to the right on the right-hand rear door.

Release

F  Using the ignition key, turn the red control 

as far as it will go:
-  to the right on the left-hand rear door,
-  to the left on the right-hand rear door.

Electrical system

Electric system, with the control located at the 
front, for locking the rear doors so that they 
cannot be opened using their interior controls.

Activation

F  With the ignition on, press this button.
The indicator lamp in the button comes on, 
accompanied by a message confirming 
activation.
This indicator lamp remains on all the time that 
the child lock is activated
It is still possible to open the doors from the 
outside and operate the rear electric windows 
from the driver's control panel.

104

Driving

Eco-driving

Eco-driving is a range of everyday practices 
that allow the motorist to optimise their fuel 
consumption and CO

2

 emissions.

Optimise the use of your gearbox

With a manual gearbox, move off gently and 
change up without waiting. During acceleration 
change up early.

With an automatic or electronic gearbox, 
give preference to automatic mode and avoid 
pressing the accelerator pedal heavily or 
suddenly.

The gear shift indicator invites you to engage 
the most suitable gear: as soon as the 
indication is displayed in the instrument panel, 
follow it straight away.
For vehicles fitted with an electronic or 
automatic gearbox, this indicator appears only 
in manual mode.

Drive smoothly

Maintain a safe distance between vehicles, use 
engine braking rather than the brake pedal, 
and press the accelerator progressively. These 
practices contribute towards a reduction in fuel 
consumption and CO

2

 emissions and also help 

reduce the background traffic noise.

If your vehicle has cruise control, make use of 
the system at speeds above 25 mph (40 km/h) 
when the traffic is flowing well.

Control the use of your electrical 
equipment

Before moving off, if the passenger 
compartment is too warm, ventilate it by 
opening the windows and air vents before using 
the air conditioning.
Above 30 mph (50 km/h), close the windows 
and leave the air vents open.
Consider using equipment that can help keep 
the temperature in the passenger compartment 
down (sunroof and window blinds, etc.).
Unless it has automatic regulation, switch off 
the air conditioning as soon as the desired 
temperature has been reached.
Switch off the demisting and defrosting 
controls, if not automatic.
Switch off the heated seat as soon as possible.

Switch off the headlamps and front foglamps 
when the ambient light level does not require 
their use.

Avoid running the engine before moving off, 
particularly in winter; your vehicle will warm up 
much faster while driving.

As a passenger, if you avoid connecting your 
multimedia devices (film, music, video game 
etc.), you will contribute towards limiting the 
consumption of electrical energy, and so of 
fuel.
Disconnect your portable devices before 
leaving the vehicle.

Limit the causes of excess 
consumption

Spread loads throughout the vehicle; place the 
heaviest items in the bottom of the boot, as 
close as possible to the rear seats.
Limit the loads carried in the vehicle and 
reduce wind resistance (roof bars, roof rack, 
bicycle carrier, trailer, etc.). Use a roof box in 
preference.
Remove roof bars and roof racks after use.

At the end of winter, remove snow tyres and 
refit your summer tyres.

105

6

Driving

Observe the recommendations 
on maintenance

Check the tyre pressures regularly, when cold, 
referring to the label in the door aperture, 
driver's side.
Carry out this check in particular:
-  before a long journey,
-  at each change of season,
-  after a long period out of use.
Do not forget the spare wheel and the tyres on 
any trailer or caravan.

Have your vehicle serviced regularly (engine 
oil, oil filter, air filter, cabin filter, etc.) and 
observe the schedule of operations in the 
manufacturer's service schedule.

With a BlueHDi Diesel engine, if the SCR 
system is faulty, your vehicle becomes 
polluting. Visit as soon as possible a 
PEUGEOT or a qualified workshop to make 
your vehicle’s level of nitrogen oxide emissions 
compliant to the standard.

When filling the tank, do not continue after the 
3

rd

 cut-off of the nozzle to avoid overflow.

At the wheel of your new vehicle, it is only after 
the first 1,800 miles (3,000 kilometres) that you 
will see the fuel consumption settle down to a 
consistent average.

Driving recommendations

Observe the driving regulations and remain 
vigilant whatever the traffic conditions.
Pay close attention to the traffic and keep your 
hands on the wheel so that you are ready to 
react at any time to any eventuality.
As a safety measure, the driver should only 
carry out any operations that require close 
attention when the vehicle is stationary.
On a long journey, a break every two hours is 
strongly recommended.
In bad weather, drive smoothly, anticipate the 
need to brake and increase the distance from 
other vehicles.

Never leave the engine running in 
an enclosed area without adequate 
ventilation: internal combustion engines 
emit toxic exhaust gases, such as carbon 
monoxide. There is a risk of poisoning and 
death!
In very severe wintry conditions 
(temperatures below -23°C), to guarantee 
correct operation and the longevity of 
the mechanical elements of your vehicle, 
engine and gearbox, the engine must be 
left running for 4 minutes before driving.

106

Driving

Important!

Never drive with the parking brake applied 
– Risk of overheating and damage to the 
braking system!
As the exhaust system of your vehicle 
is very hot, even several minutes after 
switching off the engine, never park or run 
the engine on inflammable surfaces (dry 
grass, fallen leaves, etc.): Risk of fire!

Never leave a vehicle unsupervised with 
the engine running. If you have to leave 
your vehicle with the engine running, apply 
the parking brake and put the gearbox into 
neutral or position N or P, depending on 
the type of gearbox.

Driving on flooded roads

We strongly advise against driving on flooded 
roads, as this could cause serious damage 
to the engine or gearbox, as well as to the 
electrical systems of your vehicle.

In case of towing

Driving with a trailer places greater 
demands on the towing vehicle and 
requires extra care from the driver.

Distribution of loads

F  Distribute the load in the trailer so that the 

heaviest items are as close as possible to 
the axle and the nose weight approaches 
the maximum permitted without exceeding 
it.

Air density decreases with altitude, thus 
reducing engine performance. The maximum 
towed load must be reduced by 10% for every 
1,000 metres of altitude.

Please respect the maximum towable 
weights.

If you are obliged to drive through water:
-  check that the depth of water does not 

exceed 15 cm, taking account of waves that 
might be generated by other users,

-  deactivate the Stop & Start system,
-  drive as slowly as possible without stalling. 

In all cases, do not exceed 6 mph (10 km/h),

-  do not stop and do not switch off the engine.
On leaving the flooded road, as soon as 
circumstances allow, make several light brake 
applications to dry the brake discs and pads.

If in doubt about the state of your vehicle, 
contact a PEUGEOT dealer or a qualified 
workshop.

107

6

Driving

F  Take into account the increased sensitivity 

to wind.

Cooling

Towing a trailer on a slope increases the 
temperature of the coolant.
As the fan is electrically controlled, its cooling 
capacity is not dependent on the engine speed.
F  To lower the engine speed, reduce your 

speed.

The maximum towable load on an incline 
depends on the gradient and the exterior 
temperature.
In all cases, keep a check on the coolant 
temperature.

F  If this warning lamp and the 

STOP warning lamp come on, 
stop the vehicle and switch off 
the engine as soon as possible.

New vehicle
Do not pull a trailer before having driven at 
least 600 miles (1,000 kilometres).

Braking

Towing a trailer increases the braking distance.
To avoid overheating of the brakes, the use of 
engine braking is recommended.

Tyres

F  Check the tyre pressures of the towing 

vehicle and of the trailer, observing the 
recommended pressures.

Lighting

F  Check the electrical lighting and signalling 

on the trailer and the headlamp beam height 
of your vehicle.

For more information on Adjusting the 
headlamp beam height
, refer to the 
corresponding section.

The rear parking sensors will be 
deactivated automatically to avoid the 
audible signal if a genuine PEUGEOT 
towbar is used.

If the exterior temperature is high, it is 
recommended that the engine be allowed 
to idle for 1 to 2 minutes after the vehicle 
comes to a stop, to facilitate its cooling.

Side wind

108

Driving

Starting – Switching off 
the engine

Ignition switch

1.

Stop position.

2.

Ignition on position.

3.

Starting position.

Avoid attaching heavy objects to the key 
or the remote control, which would weigh 
down on its blade in the ignition switch 
and could cause a malfunction.

Starting

F  Insert the key into the ignition switch.
The system recognises the starting code.

With a manual gearbox, place the gear 
selector in neutral then fully depress the clutch 
pedal.

With an electronic gearbox, place the gear 
selector at N then press the brake pedal firmly.

With an automatic gearbox, place the gear 
selector at P or N then press the brake pedal 
firmly.

F  Unlock the steering column by 

simultaneously turning the steering and the 
key.

109

6

Driving

In some cases, you may have to apply 
some force to turn the steering (if the 
wheels are on lock against a kerb, for 
example).

F  Turn the key towards the dashboard to 

position 3 (Starting).

F  When the engine starts, release the key.

Electronic immobiliser

The original key contains a coded electronic 
chip. When the ignition is switched on, starting 
is only possible if the code is detected and 
recognised.
This protection against theft locks the engine 
management system a few moments after the 
ignition is switched off and prevents starting of 
the engine following a break-in.

In the event of a fault, you are 
informed by lighting of this warning 
lamp in the instrument panel, an 
audible signal and a message in the 
screen.

In this case, your vehicle will not start; contact 
a PEUGEOT dealer as soon as possible.

Switching off

F  Stop the vehicle.
F  Turn the key towards you to position 

(Stop).

F  Remove the key from the ignition switch.
F  To lock the steering column, turn the 

steering until it locks.

Coasting
For safety reasons, do not free-wheel.
Otherwise, some vehicle functions will no 
longer be active.

To facilitate unlocking of the steering 
column, the front wheels should be 
straight before switching off the engine.

Switching off the engine leads to a loss of 
braking assistance.

Key left in
If the key has been left in the ignition 
switch at position 2 (Ignition on), the 
ignition will be switched off automatically 
after one hour.
To switch the ignition back on, turn the key 
to position 1 (Stop), then back to position 
2 (Ignition on).

110

Driving

Parking brake

Releasing

F  Pull the parking brake lever up slightly, 

press the release button then lower the 
lever fully.

When the vehicle is being driven, 
if this warning lamp and the 
STOP warning lamp come on, 
accompanied by an audible signal 
and a message on the screen, this 
indicates that the parking brake 
is still on or has not been fully 
released. Remember to fully lower 
the parking brake lever.

Applying

F  Pull the lever up to immobilise your vehicle.

When parking on a steep slope, direct 
your wheels against the kerb, apply the 
parking brake, engage a gear opposite 
to the direction the vehicle is facing and 
switch off the ignition.
On return to the vehicle, remember that 
a gear had been engaged before starting 
the engine.

If excessive travel or a loss of 
effectiveness of this system is noticed, 
the parking brake must be checked, even 
between two services.
Checks of this safety-related system must 
be carried by a PEUGEOT dealer or a 
qualified workshop.


Content   ..  5  6  7  8   ..