Nissan Qashqai (2007-2010). Manual - part 851
 

  Index      Nissan     Nissan Qashqai - service and repair manual 2007 - 2010 year


Search            copyright infringement  


Content   ..  849  850  851  852   ..


Nissan Qashqai (2007-2010). Manual - part 851


AIR CONDITIONER FILTER

VTL-69

< ON-VEHICLE MAINTENANCE >

[MANUAL AIR CONDITIONER]

C

D

E

F

G

H

J

K

L

M

A

B

VTL

N

O

P

AIR CONDITIONER FILTER

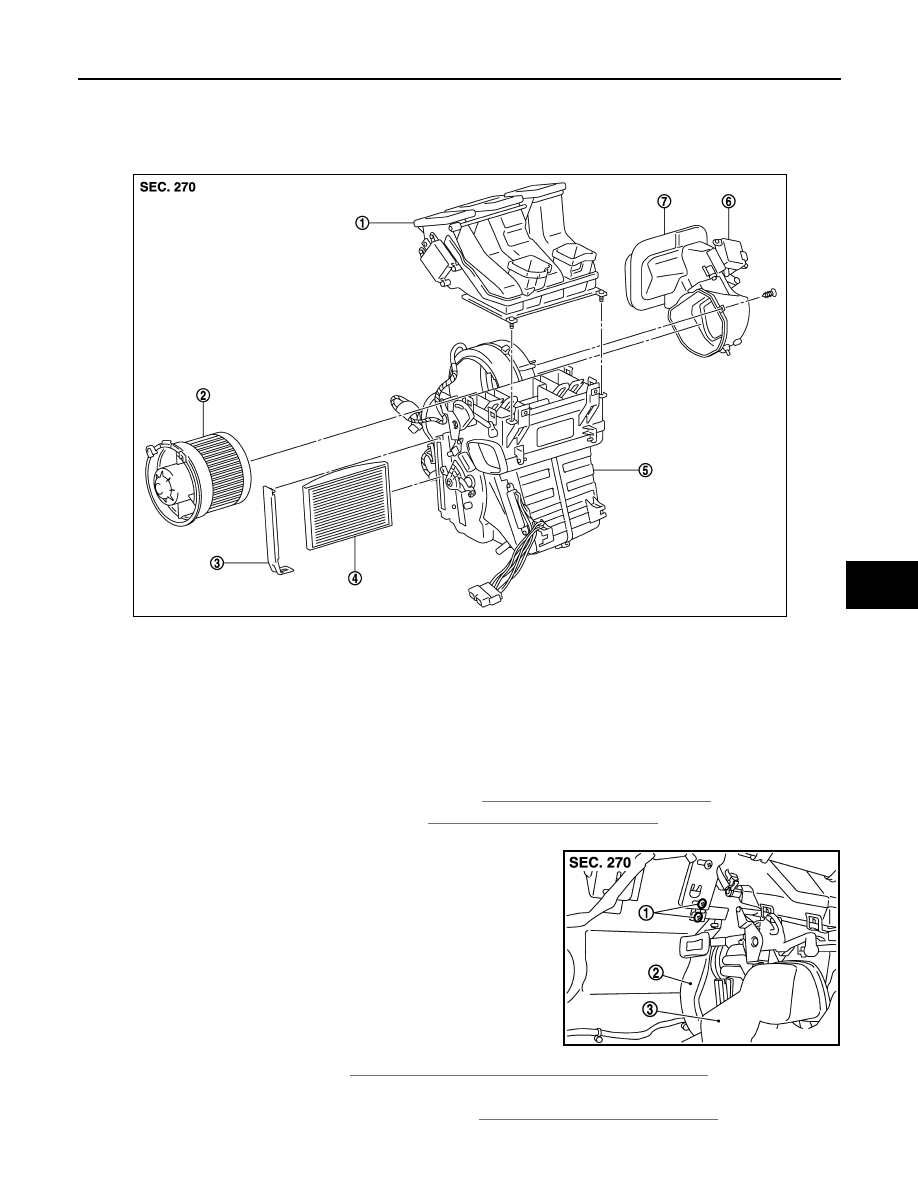
Exploded View

INFOID:0000000001093827

Removal and Installation

INFOID:0000000001093828

REMOVAL

1.

Remove passenger Lower instrument panel. Refer to 

IP-12, "Removal and Installation"

.

2.

Remove glove box assembly (RHD). Refer to 

IP-12, "Removal and Installation"

.

3.

Remove glove box air duct (RHD).
• Remove fixing screw (1)
• Pull outside to remove air duct (2)

4.

Remove LH foot duct (3). Refer to 

VTL-48, "FOOT DUCTS : Removal and Installation"

.

5.

Remove LH Lower instrument panel, (LHD)

6.

Remove accelerator pedal assembly (LHD). Refer to 

ACC-3, "Removal and Installation"

1.

Hi-Level ventilation door unit assem-
bly

2.

Blower motor assembly

3.

Filter cover

4.

In-cabin microfilter

5.

Blower unit

6.

Intake door motor

7.

Intake door unit assembly

E1IIA0002GB

E1IIA0021ZZ

VTL-70

< ON-VEHICLE MAINTENANCE >

[MANUAL AIR CONDITIONER]

AIR CONDITIONER FILTER

7.

Remove clutch and brake pedal assembly (LHD). Refer to 

CL-8, "Removal and Installation"

 (Clutch

pedal), 

BR-17, "Removal and Installation"

 (Brake pedal).

8.

 Remove filter cover (1) then remove air conditioner filter (2).

INSTALLATION

Installation is basically the reverse order of removal.

Replacement

INFOID:0000000001093829

Replace air conditioner filter.
Refer to 

MA-7, "Periodic Maintenance"

.

When replacing filter, affix a caution label inside the glove box.

E1IIA0003ZZ

PRESET SWITCH

VTL-71

< ON-VEHICLE REPAIR >

[MANUAL AIR CONDITIONER]

C

D

E

F

G

H

J

K

L

M

A

B

VTL

N

O

P

ON-VEHICLE REPAIR

PRESET SWITCH

Exploded View

INFOID:0000000001093830

Removal and Installation

INFOID:0000000001093831

REMOVAL

Refer to 

IP-12, "Removal and Installation"

.

INSTALLATION

Installation is basically the reverse order of removal.

1.

Preset switch

2.

Preset switch fixing screw

3.

Cluster lid D

4.

Power socket

5.

Button

E1IIA0004ZZ

VTL-72

< ON-VEHICLE REPAIR >

[MANUAL AIR CONDITIONER]

HEATER CONTROL PANEL

HEATER CONTROL PANEL

Exploded View

INFOID:0000000001093832

Removal and Installation

INFOID:0000000001093833

REMOVAL

1.

Remove cluster lid D. Refer to 

IP-12, "Removal and Installation"

.

2.

Remove cluster lid C. Refer to 

IP-12, "Removal and Installation"

.

3.

Remove glove box (RHD). Refer to 

IP-12, "Removal and Installation"

.

4.

Remove RH foot duct (RHD). Refer to 

VTL-94, "FOOT DUCTS : Removal and Installation"

.

5.

Remove cables fixing metal clips (2), then remove cables (1)
from heater assembly.

6.

Remove heater control fixing screws from instrument panel,
then pull manual heater control assembly, and disconnect har-
ness connector (A), and hand heater control cables (B).

7.

Remove heater control assembly.

INSTALLATION

1.

Heater control panel

2.

Preset switch fixing screw

3.

Cluster lid D

4.

Power socket

5.

Button

E1IIA0004ZZ

E1IIA0020ZZ

E1IIA0033ZZ


Content   ..  849  850  851  852   ..