Nissan Qashqai (2007-2010). Manual - part 842
HEATER & COOLING UNIT ASSEMBLY
VTL-33
< ON-VEHICLE REPAIR >
[AUTOMATIC AIR CONDITIONER]
C
D
E
F
G
H
J
K
L
M
A
B
VTL
N
O
P
1.
Use a refrigerant collecting equipment (for HFC-134a) to discharge the refrigerant.
2.
Drain engine coolant from cooling system. Refer to
(K9K).
3.
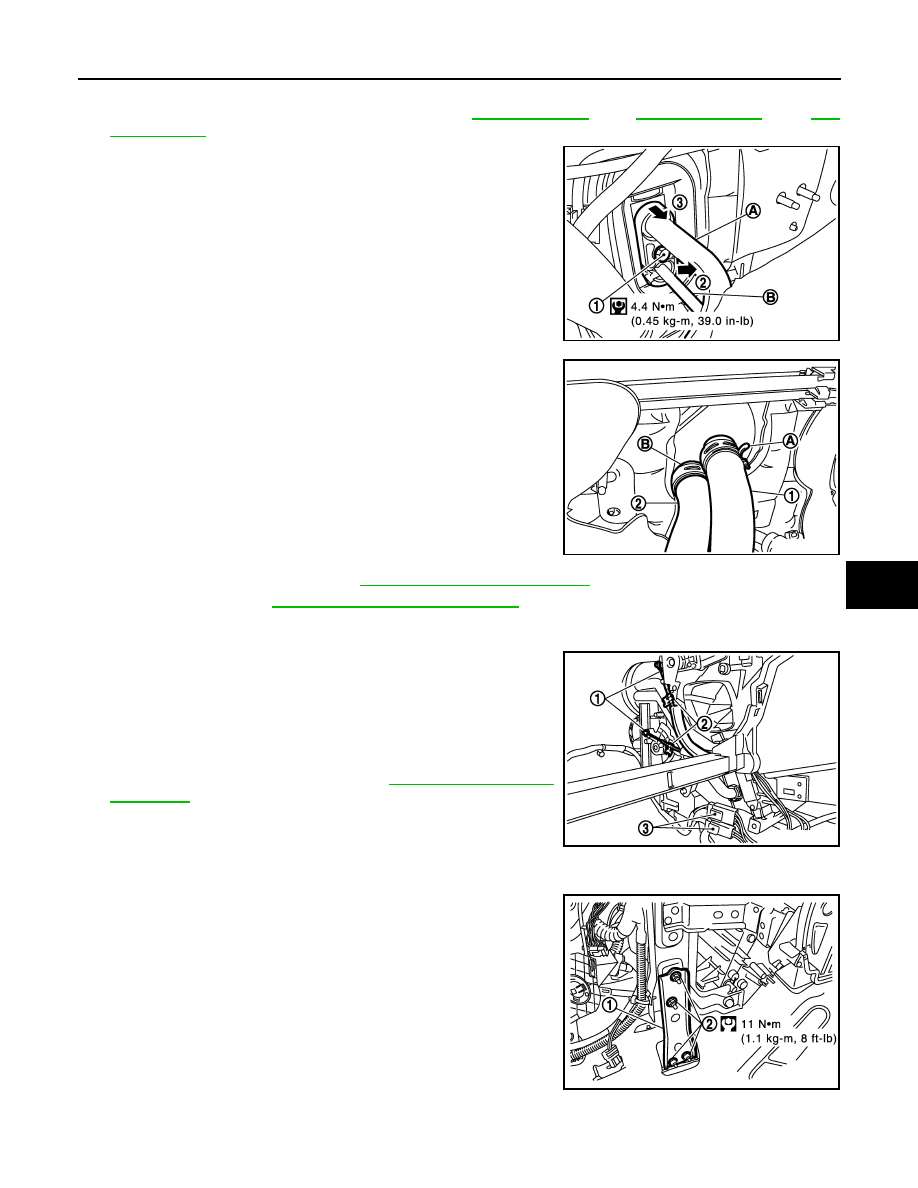
Remove pipe bracket fixing bolt (1), then, disconnect high-pres-
sure pipe (B) and low-pressure pipe (A) from expansion valve as
shown.
CAUTION:
Cap or wrap the joint of low-pressure pipe 1 and low-pres-
sure pipe 2 with suitable material such as vinyl tape to
avoid the entry of air.
4.
Remove clamp (A), then disconnect heater hoses (1) and then
remove clamp (B), to remove heater hose (2).
5.
Remove Instrument Panel. Refer to
IP-12, "Removal and Installation"
6.
Remove BCM.Refer to
BCS-64, "Removal and Installation"
• Remove fixing screws.
• Remove harness connectors.
7.
Disconnect heater connectors (3), then remove heater connec-
tor and bracket.
8.
Disconnect blower motor connector.
9.
Remove heater control cable retainers (2) and cables (1) from
heater and cooling unit.
10. Remove foot duct, RH.
11. Remove power steering C/U. Refer to
.
12. Disconnect intake door motor connector and blower motor con-
nector.
13. Remove center air duct.
14. Remove blower intake motor connector and remove harness fixing clip.
15. Remove instrument stay (1).
16. Remove fixing nuts (2).
17. Remove heater draining hose.
E1IIA0011GB
E1IIA0012ZZ
E1IIA0020ZZ
E1IIA0013GB