Mitsubishi ASX (2018 year). Manual - part 11
 

  Index      Mitsubishi     Mitsubishi ASX - service manual 2018 year in english


Search            


Content   ..  9  10  11  12   ..


Mitsubishi ASX (2018 year). Manual - part 11


Fog lamp switch

E00506700034

Front fog lamp switch*

E00508300702

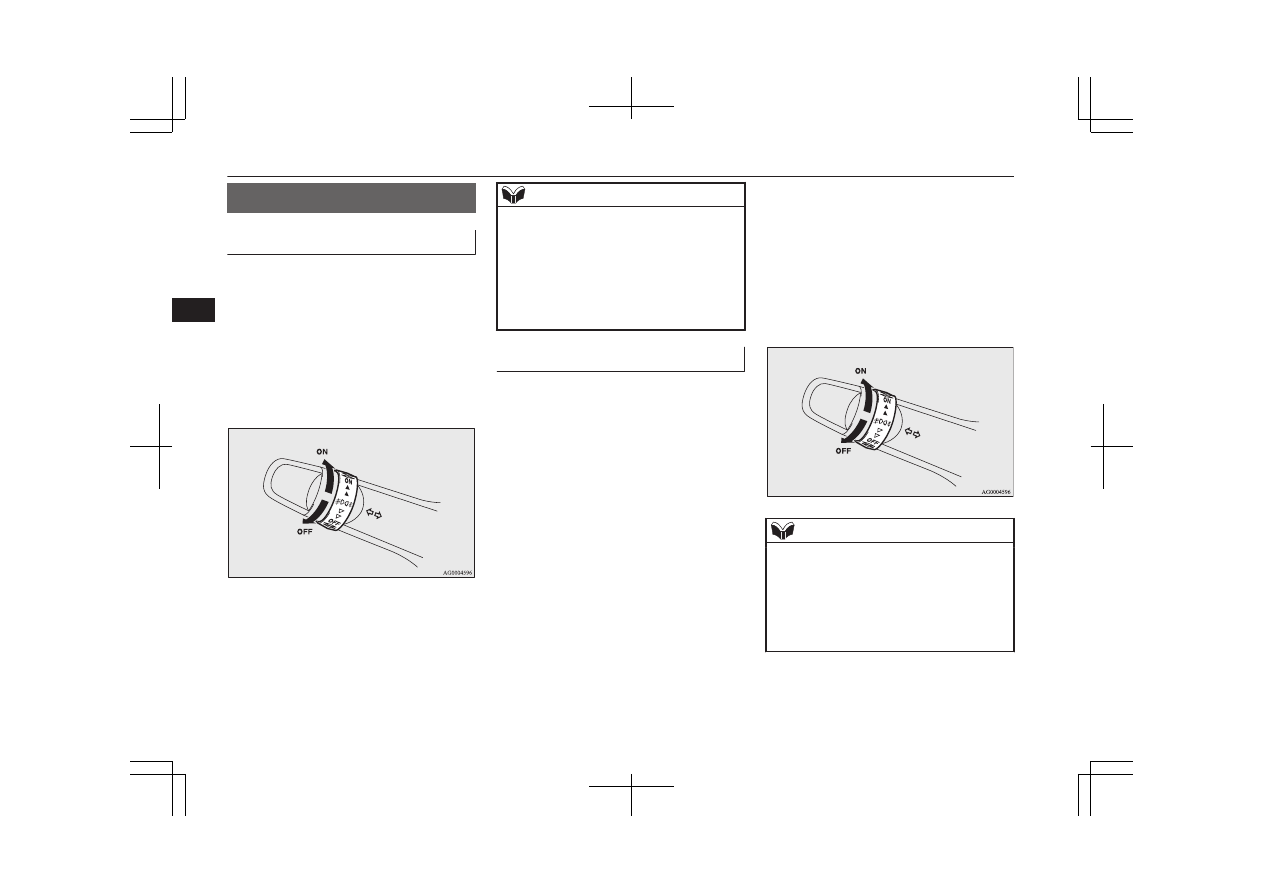
The  front  fog  lamps  can  be  operated  while
the headlamps or tail lamps are on. Turn the
knob  in  the  “ON”  direction  to  turn  on  the
front fog lamps. An indication lamp in the in-
strument cluster will also come on. Turn the
knob  in  the  “OFF”  direction  to  turn  off  the
front fog lamps. The knob will automatically
return  to  its  original  position  when  you  re-
lease it.

NOTE

l

The front fog lamps are automatically turned
off  when  the  headlamps  or  tail  lamps  are
turned  off.  To  turn  the  front  fog  lamps  on
again,  turn  the  knob  in  the  “ON”  direction
after turning on the headlamps or tail lamps.

l

Do not use fog lamps except in conditions of
fog,  otherwise  excessive  lamp  glare  may
temporarily blind oncoming vehicle drivers.

Rear fog lamp switch

E00508400572

The rear fog lamp can be operated when the
headlamps or front fog lamps (if so equipped)
turn on.
An  indication  lamp  in  the  instrument  cluster
comes  on  when  the  rear  fog  lamp  is  turned
on.
 
[Vehicle without front fog lamps]
Turn the knob once in the “ON” direction to
turn on the rear fog lamp. To turn the rear fog
lamp off, turn the knob once in the “OFF” di-
rection. The knob will automatically return to
its original position when you release it.
 
[Vehicle with front fog lamps]

Turn the knob once in the “ON” direction to
turn  on  the  front  fog  lamps.  Turn  the  knob
once  more  in  the  “ON”  direction  to  turn  on
the rear fog lamp. To turn the rear fog lamp
off,  turn  the  knob  once  in  the  “OFF”  direc-
tion. Turn the knob once more in the “OFF”
direction to turn off the front fog lamps. The
knob will automatically return to its original
position when you release it.

NOTE

l

The rear fog lamp is automatically turned off
when the headlamps or front fog lamps (if so
equipped) are turned off.

l

To turn the rear fog lamp on again, turn the
knob once in the “ON” direction after turn-
ing on the headlamps. (Vehicle without front
fog lamps)

Fog lamp switch

5-58

OGAE18E1

Instruments and controls

5

NOTE

l

To turn the rear fog lamp on again, turn the
knob twice in the “ON” direction after turn-
ing  on  the  headlamps.  (Vehicle  with  front
fog lamps)

Wiper and washer switch

E00507101218

CAUTION

l

If  the  washer  is  used  in  cold  weather,  the
washer  fluid  sprayed  against  the  glass  may
freeze,  which  may  hinder  visibility.  Warm
the  glass  with  the  defroster  or  rear  window
demister before using the washer.

Windscreen wipers

E00516900648

NOTE

l

To  ensure  a  clear  rearward  view,  the  rear
window  wiper  will  automatically  perform
several continuous operations if the gearshift
lever  or  the  selector  lever  is  put  in  the  “R”
position while the windscreen wipers are op-
erating.
Refer  to  “Rear  window  wiper  and  washer”
on page 5-63.

Except  for  vehicles  equipped

with rain sensor

The windscreen wipers can be operated with
the  ignition  switch  or  the  operation  mode  is
in ON or ACC.
If the blades are frozen to the windscreen or
rear window, do not operate the wipers until
the  ice  has  melted  and  the  blades  are  freed,
otherwise the wiper motor may be damaged.

MIST
-

Misting function
The wipers will operate once.

OFF- Off
INT-

Intermittent (Speed sensitive)

LO-

Slow

HI-

Fast

To adjust intermittent intervals
With the lever in the “INT” (speed-sensitive)
position, the intermittent intervals can be ad-
justed by turning the knob (A).

1- Fast
2- Slow

NOTE

l

The  speed-sensitive-operation  function  of
the windscreen wipers can be deactivated.
For further information, we recommend you
to  consult  a  MITSUBISHI  MOTORS  Au-
thorized Service Point.

Misting function
The  misting  function  can  be  operated  with
the  ignition  switch  or  the  operation  mode  is
in ON or ACC.

Wiper and washer switch

5-59

OGAE18E1

Instruments and controls

5

The wipers will operate once if the wiper lev-
er  is  raised  to  the  “MIST”  position  and  re-
leased.  This  operation  is  useful  when  it  is
drizzling, etc. The wipers will continue to op-
erate  while  the  lever  is  held  in  the  “MIST”
position.

Vehicles with rain sensor

E00517001702

The windscreen wipers can be operated with
the  ignition  switch  or  the  operation  mode  is
in ON or ACC.

If the blades are frozen to the windscreen or
rear window, do not operate the wipers until
the  ice  has  melted  and  the  blades  are  freed,
otherwise the wiper motor may be damaged.

MIST- Misting function

The wipers will operate once.

OFF-

Off

AU-
TO-

Auto-wiper control
Rain sensor
The wipers will automatically oper-
ate depending on the degree of wet-
ness on the windscreen.

LO-

Slow

HI-

Fast

Rain sensor
Can only be used when the ignition switch or
the operation mode is in ON.

If  the  lever  is  put  in  the  “AUTO”  position,
the  rain  sensor  (A)  will  detect  the  extent  of
rain (or snow, other moisture, dust, etc.) and
the wipers will operate automatically.
Keep  the  lever  in  the  “OFF”  position  if  the
windscreen is dirty and the weather is dry.
Wiper  operation  under  these  conditions  can
scratch the windscreen and damage the wip-
ers.

CAUTION

l

With  the  ignition  switch  or  the  operation
mode in ON and lever in the “AUTO” posi-
tion,  the  wipers  may  automatically  operate
in the situations described below.
If  your  hands  get  trapped,  you  could  suffer
injuries or the wipers could malfunction. Be
sure  to  turn  the  ignition  switch  to  the
“LOCK” position or put the operation mode
in OFF, or move lever to the “OFF” position
to deactivate the rain sensor.

Wiper and washer switch

5-60

OGAE18E1

Instruments and controls

5

CAUTION

When  cleaning  the  outside  surface  of  the
windscreen,  if  you  touch  on  top  of  the
rain sensor.

When  cleaning  the  outside  surface  of  the
windscreen,  if  you  wipe  with  a  cloth  on
top of the rain sensor.

When using an automatic car wash.

A  physical  shock  is  applied  to  the  wind-
screen.

A  physical  shock  is  applied  to  the  rain
sensor.

NOTE

l

To  protect  the  rubber  parts  of  the  wipers,
this  operation  of  the  wipers  does  not  take
place even if the lever is put in the “AUTO”
position  when  the  vehicle  is  stationary  and
the  ambient  temperature  is  about  0  °C  or
lower.

l

Do not cover the sensor by affixing a sticker
or label to the windscreen. Also, do not put
any  water-repellent  coating  on  the  wind-
screen. The rain sensor would not be able to
detect  the  extent  of  rain,  and  the  wipers
might stop working normally.

l

In  the  following  cases,  the  rain  sensor  may
be malfunctioning.
For further information, we recommend you
to  consult  a  MITSUBISHI  MOTORS  Au-
thorized Service Point.

When the wipers operate at a constant in-
terval  despite  changes  in  the  extent  of
rain.

NOTE

When  the  wipers  do  not  operate  even
though it is raining.

l

The wipers may automatically operate when
things such as insects or foreign objects are
affixed to the windscreen on top of the rain
sensor  or  when  the  windscreen  is  frozen.
Objects  affixed  to  the  windscreen  will  stop
the  wipers  when  the  wipers  cannot  remove
them. To operate the wipers again, move the
lever in the “LO” or “HI” position.
Also,  the  wipers  may  operate  automatically
due  to  strong  direct  sunlight  or  electromag-
netic  wave.  To  stop  the  wipers,  place  the
lever in the “OFF” position.

l

Contact  a  MITSUBISHI  MOTORS  Author-
ized Service Point when replacing the wind-
screen  or  reinforcing  the  glass  around  the
sensor.

To adjust the sensitivity of the rain sensor.
With  the  lever  in  the  “AUTO”  (rain  sensor)
position, it is possible to adjust the sensitivity
of the rain sensor by turning the knob (B).

“+”- Higher sensitivity to rain
“-”- Lower sensitivity to rain

NOTE

l

It is possible to activate the following func-
tions.

Automatic  operation  (rain  droplet  sensi-
tive) can be changed to intermittent opera-
tion (vehicle-speed sensitive).

Automatic  operation  (rain  droplet  sensi-
tive) can be changed to intermittent opera-
tion (except vehicle-speed sensitive).

For further information, we recommend you
to  consult  a  MITSUBISHI  MOTORS  Au-
thorized Service Point.

Wiper and washer switch

5-61

OGAE18E1

Instruments and controls

5

Misting function
Move the lever in the direction of the arrow
and release, to operate the wipers once.
Use  this  function  when  you  are  driving  in
mist or drizzle.
The  wipers  will  operate  once  if  the  lever  is
raised  to  the  “MIST”  position  and  released
when  the  ignition  switch  or  the  operation
mode is in the “ON” or “ACC” position. The
wipers will continue to operate while the lev-
er is held in the “MIST” position.

The  wipers  will  operate  once  if  the  lever  is
moved to the “AUTO” position and the knob
(C) is turned in the “+” direction when the ig-
nition  switch  is  in  the  “ON”  position  or  the
operation mode is in ON.

Windscreen washer*

E00507202724

The windscreen washer can be operated with
the  ignition  switch  or  the  operation  mode  in
ON or ACC.
The  washer  fluid  will  be  sprayed  onto  the
windscreen by pulling the lever towards you.
When the wipers are not in operation or in in-
termittent  operation,  by  pulling  the  lever  to-
wards  you,  the  wipers  will  operate  several
times while the washer fluid is being sprayed.
Except  for  vehicles  for  Russia,  Kazakhstan,
Moldova  and  Ukraine,  then  about  6  seconds
later, wipers operate once more.

On vehicles equipped with a headlamp wash-
er, while the headlamps are on, the headlamp
washer  will  operate  once  together  with  the
windscreen washer.
Also, except for vehicles for Russia, Kazakh-
stan, Moldova and Ukraine, by releasing the
lever  soon  after  pulling  it  towards  you,  the
washer  fluids  will  be  sprayed  several  times
while the wipers are operating several times.
(Comfort washer) Then about 6 seconds later,
wipers operate once more.
Comfort washer will stop operating with any
operation of the lever.

CAUTION

l

If  the  washer  is  used  in  cold  weather,  the
washer  fluid  sprayed  against  the  glass  may
freeze  resulting  in  poor  visibility.  Heat  the
glass  with  the  defroster  or  demister  before
using the washer.

Wiper and washer switch

5-62

OGAE18E1

Instruments and controls

5

NOTE

l

It is possible to modify functions as follows:

Causing the wiper never to operate when
washer fluid is sprayed.

Except  for  vehicles  for  Russia,  Kazakh-
stan,  Moldova  and  Ukraine,  deactivating
the comfort washer.

Except  for  vehicles  for  Russia,  Kazakh-
stan,  Moldova  and  Ukraine,  deactivating
the function that operates the wipers once
more about 6 seconds later.

Vehicles  for  Russia,  Kazakhstan,  Moldo-
va  and  Ukraine,  activating  the  comfort
washer.

Vehicles  for  Russia,  Kazakhstan,  Moldo-
va  and  Ukraine,  the  wipers  can  be  set  to
operate again after about 6 seconds.

For further information, we recommend you
to  consult  a  MITSUBISHI  MOTORS  Au-
thorized Service Point.

Rear window wiper and wash-

er

E00507301340

The  rear  window  wiper  and  washer  switch
can  be  operated  with  the  ignition  switch  or
the operation mode in ON or ACC.

INT- The wiper operates continuously

for several seconds then oper-
ates intermittently at intervals of
about every 8 seconds

OFF- Off

 -

The washer fluid will be sprayed
onto the rear window when the
knob is turned fully in either di-
rection.
The wipers operate automatical-
ly several times while the wash-
er fluid is being sprayed.

NOTE

l

The  rear  window  wiper  will  automatically
perform several continuous operations if the
gearshift lever or the selector lever is put in
the  “R”  position  while  the  windscreen  wip-
ers  or  the  rear  window  wiper  is  operating.
(automatic operation mode).
After the automatic operation, the rear win-
dow wiper will stop operating if the knob is
in  the  “OFF”  position.  If  the  knob  is  in  the
“INT”  position,  the  rear  window  wiper  will
return to the intermittent operation.
It is possible to set the rear window wiper to
perform  the  automatic  operation  only  if  the
gearshift lever or the selector lever is put in
the “R” position while the rear window wip-
er  is  operating  with  the  knob  in  the  “INT”
position.
For further information, we recommend you
to  consult  a  MITSUBISHI  MOTORS  Au-
thorized Service Point.

l

If the knob is in the “OFF” position, turn the
knob to the “INT” position twice quickly to
operate the rear window wiper continuously.
(continuous operation mode)
Turn the knob to the “OFF” position to stop
the rear window wiper continuous operation.

l

The interval for intermittent operation can be
adjusted.
For further information, we recommend you
to  consult  a  MITSUBISHI  MOTORS  Au-
thorized Service Point.

Wiper and washer switch

5-63

OGAE18E1

Instruments and controls

5

Headlamp washer switch*

E00510101717

The  headlamp  washer  can  be  operated  with
the  ignition  switch  or  the  operation  mode  in
ON or ACC and the lamp switch at the “

position.
 
Push  the  button  once  and  the  washer  fluid
will be sprayed on to the headlamps.

NOTE

l

If the ignition switch or the operation mode
is in ON or ACC and the headlamps are on,
the headlamp washer operates together with
the  windscreen  washer  the  first  time  the
windscreen washer lever is pulled.

Precautions to observe when

using wipers and washers

E00507601444

l

If  the  moving  wipers  become  blocked
partway through a sweep by ice or other
deposits  on  the  glass,  the  wipers  may
temporarily stop operating to prevent the
motor  from  overheating.  In  this  case,
park the vehicle in a safe place, turn the
ignition  switch  to  the  “LOCK”  position
or  put  the  operation  mode  in  OFF,  and
then remove the ice or other deposits.
The wipers will start operating again af-
ter  the  wiper  motor  cools  down,  so
check that the wipers operate before us-
ing them.

l

Do not use the wipers when the glass is
dry.
They  may  scratch  the  glass  surface  and
the blades wear out prematurely.

l

Before using the wipers in cold weather,
check  that  the  wiper  blades  are  not  fro-
zen onto the glass. The motor may burn
out if the wipers are used with the blades
frozen onto the glass.

l

Avoid using the washer continuously for
more  than  20  seconds.  Do  not  operate
the  washer  when  the  fluid  reservoir  is
empty.
Otherwise, the motor may burn out.

l

Periodically  check  the  level  of  washer
fluid  in  the  reservoir  and  refill  if  re-
quired.
During  cold  weather,  add  a  recommen-
ded  washer  solution  that  will  not  freeze
in the washer reservoir. Failure to do so
could  result  in  loss  of  washer  function
and  frost  damage  to  the  system  compo-
nents.

Rear window demister
switch

E00507901186

The rear window demister switch can be op-
erated when the engine is running.
Push  the  switch  to  turn  on  the  rear  window
demister.  It  will  be  turned  off  automatically
in about 20 minutes. To turn off the demister
within  about  20  minutes,  push  the  switch
again.

Rear window demister switch

5-64

OGAE18E1

Instruments and controls

5

The indication lamp (A) will illuminate while
the demister is on.

NOTE

l

When  the  rear  window  demister  switch  is
pressed,  the  outside  rear-view  mirrors  are
defogged or defrosted. Refer to “Heated mir-
ror” on page 6-12.

l

The demister switch is not to melt snow but
to clear mist.
Remove  snow  before  use  of  the  demister
switch.

l

When  cleaning  the  inside  of  the  rear  win-
dow, use a soft cloth and wipe gently along
the heater wires, being careful not to damage
the wires.

l

Do  not  allow  objects  to  touch  the  inside  of
the  rear  window  glass,  damaged  or  broken
wires may result.

Horn switch

E00508000682

Press  the  steering  wheel  on  or  around  the
“ ” mark.

Horn switch

5-65

OGAE18E1

Instruments and controls

5


OGAE18E1

Economical driving............................................................................. 6-02
Driving, alcohol and drugs..................................................................6-03
Safe driving techniques.......................................................................6-03
Running-in recommendations............................................................. 6-04
Parking brake...................................................................................... 6-06
Parking................................................................................................ 6-07
Steering wheel height and reach adjustment.......................................6-08
Inside rear-view mirror....................................................................... 6-08
Outside rear-view mirrors................................................................... 6-10
Ignition switch.....................................................................................6-12
Steering wheel lock.............................................................................6-13
Starting................................................................................................ 6-14
Diesel particulate filter (DPF)*...........................................................6-17
Turbocharger operation*.....................................................................6-18
Auto Stop & Go (AS&G) system*..................................................... 6-19
Manual transmission*......................................................................... 6-23
Automatic transmission INVECS-II 6A/T (Intelligent &

Innovative Vehicle Electronic Control System II)*....................... 6-26

Automatic transmission INVECS-III 6CVT (Intelligent &

Innovative Vehicle Electronic Control System III)*...................... 6-32

Electronically controlled 4WD system*............................................. 6-39
4-wheel drive operation...................................................................... 6-41
Inspection and maintenance following rough road operation.............6-43
Cautions on handling of 4-wheel drive vehicles.................................6-44
Braking................................................................................................6-44
Hill start assist*...................................................................................6-46
Brake assist system............................................................................. 6-47
Emergency stop signal system*.......................................................... 6-48
Anti-lock brake system (ABS)............................................................6-48

Electric power steering system (EPS).................................................6-50
Active stability control (ASC)*.......................................................... 6-51
Cruise control*....................................................................................6-54
Forward Collision Mitigation system (FCM)*................................... 6-59
Lane Departure Warning (LDW)*......................................................6-68
Tyre pressure monitoring system (TPMS)*........................................6-71
Reversing sensor system*................................................................... 6-77
Rear-view camera*............................................................................. 6-81
Cargo loads......................................................................................... 6-84
Trailer towing......................................................................................6-85

Starting and driving


OGAE18E1

6

Economical driving

E00600102624

For economical driving, there are some tech-
nical  requirements  that  have  to  be  met.  The
prerequisite  for  low  fuel  consumption  is  a
properly adjusted engine. In order to achieve
longer  life  of  the  vehicle  and  the  most  eco-
nomical  operation,  we  recommend  you  to
have the vehicle checked at regular intervals
in accordance with the service standards.
Fuel economy and generation of exhaust gas
and  noise  are  highly  influenced  by  personal
driving habits as well as the particular operat-
ing  conditions.  The  following  points  should
be  observed  in  order  to  minimize  wear  of
brakes, tyres and engine as well as to reduce
environmental pollution.

Accelerating and decelerating

Drive according to the traffic conditions and
avoid  sudden  starts,  sudden  acceleration  and
sudden  braking,  as  they  will  increase  fuel
consumption.

Shifting

Shift only at an appropriate speed and engine
speed.  Always  use  the  highest  shift  position
possible.

Selecting the 4WD drive mode

(4WD vehicles)

The  drive  mode-selector  should  be  set  to
“2WD”  when  driving  on  normal  roads  and
express  ways  to  obtain  best  possible  fuel
economy.

City traffic

Frequent  starting  and  stopping  increases  the
average  fuel  consumption.  Use  roads  with
smooth traffic flow whenever possible. When
driving  on  congested  roads,  avoid  use  of  a
low shift position at high engine speeds.

Idling

The  vehicle  consumes  fuel  even  during
idling. Avoid extended idling whenever pos-
sible.

Speed

At  higher  vehicle  speed,  more  fuel  is  con-
sumed.  Avoid  driving  at  full  speed.  Even  a
slight  release  of  the  accelerator  pedal  will
save a significant amount of fuel.

Tyre inflation pressure

Check  the  tyre  inflation  pressures  at  regular
intervals. Low tyre inflation pressure increa-
ses  road  resistance  and  fuel  consumption.  In
addition,  low  tyre  pressures  adversely  affect
tyre wear and driving stability.

Cargo loads

Do not drive with unnecessary articles in the
luggage compartment. Especially during city
driving  where  frequent  starting  and  stopping
is necessary, the increased weight of the ve-
hicle will greatly affect fuel consumption. Al-
so avoid driving with unnecessary luggage or
carriers, etc., on the roof; the increased air re-
sistance will increase fuel consumption.

Cold engine starting

Starting  of  a  cold  engine  consumes  more
fuel.
Unnecessary fuel consumption is also caused
by  keeping  a  hot  engine  running.  After  the
engine  is  started,  commence  driving  as  soon
as possible.

Air conditioning

The use of the air conditioning will increase
the fuel consumption.

Economical driving

6-02

OGAE18E1

Starting and driving

6

Driving, alcohol and drugs

E00600200070

Driving  after  drinking  alcohol  is  one  of  the
most frequent causes of accidents.
Your  driving  ability  can  be  seriously  im-
paired even with blood alcohol levels far be-
low  the  legal  minimum.  If  you  have  been
drinking, don’t drive. Ride with a designated
non-drinking driver, call a cab or a friend, or
use public transportation.
Drinking coffee or taking a cold shower will
not make you sober.
Similarly,  prescription  and  nonprescription
drugs affect your alertness, perception and re-
action  time.  Consult  with  your  doctor  or
pharmacist before driving while under the in-
fluence of any of these medications.

WARNING

l

NEVER DRINK AND DRIVE.
Your  perceptions  are  less  accurate,  your
reflexes  are  slower  and  your  judgment  is
impaired.

Safe driving techniques

E00600300446

Driving  safety  and  protection  against  injury
cannot be fully ensured. However, we recom-
mend that you pay extra attention to the fol-
lowing:

Seat belts

Before  starting  the  vehicle,  make  sure  that
you  and  your  passengers  have  fastened  your
seat belts.

Floor mats

WARNING

l

Keep  floor  mats  clear  of  the  pedals  by
correctly laying floor mats that are suita-
ble for the vehicle.
To  prevent  the  floor  mats  from  slipping
out of position, securely retain them using
the hook etc.
Note that laying a floor mat over a pedal
or laying one floor mat on top of another
can obstruct pedal operation and lead to a
serious accident.

Carrying children in the vehi-

cle

l

Never  leave  your  vehicle  unattended
with the key and children inside the ve-
hicle.  Children  may  play  with  the  driv-
ing controls and this could lead to an ac-
cident.

l

Make  sure  that  infants  and  small  chil-
dren  are  properly  restrained  in  accord-
ance  with  the  laws  and  regulations,  and
for  maximum  protection  in  case  of  an
accident.

l

Prevent children from playing in the lug-
gage compartment. It is quite dangerous
to allow them to play there while the ve-
hicle is moving.

Loading luggage

When loading luggage, be careful not to load
above  the  height  of  seats.  This  is  dangerous
not only because rearward vision will be ob-
structed, but also the luggage may be projec-
ted  into  the  passenger  compartment  under
hard braking.

Driving, alcohol and drugs

6-03

OGAE18E1

Starting and driving

6

Running-in recommendations

E00600404201

During the running-in period for the first 1,000 km (620 miles) it is advisable to drive your new vehicle using the following precautions as a
guideline to aid long life as well as future economy and performance.

l

Do not race the engine at high speeds.

l

Avoid rapid starting, accelerating, braking and prolonged high-speed running.

l

Keep to the running-in speed limit shown below.
Please note that the legal speed limits displayed must be adhered to.

l

Do not exceed loading limits.

l

Refrain from towing a trailer.

Vehicles with M/T

Shift point

Speed limit

Petrol-powered vehicles

Diesel-powered vehicles

1600 models

2000 models

1

st

 gear

30 km/h (19 mph)

30 km/h (19 mph)

20 km/h (12 mph)

2

nd

 gear

60 km/h (37 mph)

65 km/h (40 mph)

45 km/h (28 mph)

3

rd

 gear

90 km/h (56 mph)

95 km/h (59 mph)

70 km/h (43 mph)

4

th

 gear

120 km/h (74 mph)

120 km/h (74 mph)

95 km/h (59 mph)

5

th

 gear

120 km/h (74 mph)

125 km/h (78 mph)

120 km/h (74 mph)

6

th

 gear

-

-

120 km/h (74 mph)

Running-in recommendations

6-04

OGAE18E1

Starting and driving

6

Vehicles with A/T

Shift point

Speed limit

1

st

 gear

15 km/h (9 mph)

2

nd

 gear

35 km/h (22 mph)

3

rd

 gear

60 km/h (37 mph)

4

th

 gear

80 km/h (50 mph)

5

th

 gear

110 km/h (68 mph)

6

th

 gear

125 km/h (78 mph)

Vehicles with CVT

Shift point

Speed limit

“D” (DRIVE)

120 km/h (74 mph)

In sports mode

1

st

 position

30 km/h (19 mph)

2

nd

 position

50 km/h (30 mph)

3

rd

 position

70 km/h (43 mph)

4

th

 position

90 km/h (56 mph)

5

th

 position

120 km/h (74 mph)

6

th

 position

120 km/h (74 mph)


Running-in recommendations

6-05

OGAE18E1

Starting and driving

6

Parking brake

E00600502833

To  park  the  vehicle,  first  bring  it  to  a  com-
plete stop, fully apply the parking brake lever
sufficiently to hold the vehicle.

To apply

1- Firmly depress and hold the brake pedal,

then  pull  the  lever  up  without  pushing
the button at the end of hand grip.

CAUTION

l

When you intend to apply the parking brake,
firmly press the brake pedal to bring the ve-
hicle  to  a  complete  stop  before  pulling  the
parking brake lever.
Pulling the parking brake lever with the ve-
hicle  moving  could  make  the  rear  wheels
lock  up,  thereby  making  the  vehicle  unsta-
ble.  It  could  also  make  the  parking  brake
malfunction.

NOTE

l

Apply  sufficient  force  to  the  parking  brake
lever to hold the vehicle stationary after the
foot brake is released.

l

If the parking brake does not hold the vehi-
cle stationary after the foot brake is released,
have your vehicle checked immediately.

To release

1- Firmly depress and hold the brake pedal,

then pull the lever up slightly.

2- Push the button at the end of hand grip.
3- Lower the lever fully.

Parking brake

6-06

OGAE18E1

Starting and driving

6

CAUTION

l

Before  driving,  be  sure  that  the  parking
brake  is  fully  released  and  brake  warning
lamp is off.
If you drive without the parking brake fully
released, the warning display will appear on
the information screen in the multi-informa-
tion display.
If  a  vehicle  is  driven  without  releasing  the
parking brake, the brake will be overheated,
resulting in ineffective braking and possible
brake failure.

Warning lamp

Warning display type 1

Warning display type 2

CAUTION

l

If  the  brake  warning  lamp  does  not  extin-
guish  when  the  parking  brake  is  fully  re-
leased,  the  brake  system  may  be  behaving
abnormal.
Have your vehicle checked immediately.
For  details,  refer  to  “Brake  warning  lamp”
on page 5-47.

Parking

E00600601664

To park the vehicle, fully engage the parking
brake, and then move the gearshift lever to 1

st

or “R” (Reverse) position for vehicles equip-
ped with M/T, or set the selector lever to “P”
(PARK)  position  for  vehicles  equipped  with
A/T or CVT.

Parking on a hill

To  prevent  the  vehicle  from  rolling,  follow
these procedures:

Parking on a downhill slope

Turn  the  front  wheels  towards  the  kerb  and
move the vehicle forward until the kerb side
wheel gently touches the kerb.
On  vehicles  equipped  with  M/T,  apply  the
parking  brake  and  place  the  gearshift  lever
into the “R” (Reverse) position.

On vehicles equipped with A/T, CVT, apply
the parking brake and place the selector lever
into the “P” (PARK) position.
If necessary, apply chocks to wheels.

Parking on an uphill slope

Turn  the  front  wheels  away  from  the  kerb
and move the vehicle back until the kerb side
wheel gently touches the kerb.
On  vehicles  equipped  with  M/T,  apply  the
parking  brake  and  place  the  gearshift  lever
into the 1

st 

position.

On vehicles equipped with A/T, CVT, apply
the parking brake and place the selector lever
into the “P” (PARK) position.
If necessary, apply chocks to wheels.

NOTE

l

If your vehicle is equipped with A/T, CVT,
be  sure  to  apply  the  parking  brake  before
moving selector lever to the “P” (PARK) po-
sition. If you move the selector lever to the
“P”  (PARK)  position  before  applying  the
parking  brake,  it  may  be  difficult  to  disen-
gage the selector lever from the “P” (PARK)
position when next you drive the vehicle, re-
quiring  application  of  a  strong  force  to  the
selector lever to move from the “P” (PARK)
position.

Parking

6-07

OGAE18E1

Starting and driving

6


Content   ..  9  10  11  12   ..