Mitsubishi ASX (2018 year). Manual - part 12
 

  Index      Mitsubishi     Mitsubishi ASX - service manual 2018 year in english


Search            


Content   ..  10  11  12  13   ..


Mitsubishi ASX (2018 year). Manual - part 12


Parking with the engine run-

ning

Never  leave  the  engine  running  while  you
take  a  short  sleep/rest.  Also,  never  leave  the
engine running in a closed or poorly ventila-
ted place.

WARNING

l

Leaving  the  engine  running  carries  the
riskof  injury  or  death  from  accidentally
moving  the  gearshift  lever  (M/T)  or  the
selector  lever  (A/T  or  CVT)  or  the  accu-
mulation  of  toxic  exhaust  fumes  in  the
passenger compartment.

Where you park

WARNING

l

Do  not  park  your  vehicle  in  areas  where
combustible  materials  such  as  dry  grass
or  leaves  can  come  in  contact  with  a  hot
exhaust, since a fire could occur.

Do not keep the steering wheel

fully turned for a long time

More  effort  could  be  required  to  turn  the
steering wheel.
Refer  to  “Electric  power  steering  system
(EPS)” on page 6-50.

When leaving the vehicle

Always carry the key and lock all doors and
the tailgate when leaving the vehicle unatten-
ded.
Always try to park your vehicle in a well lit
area.

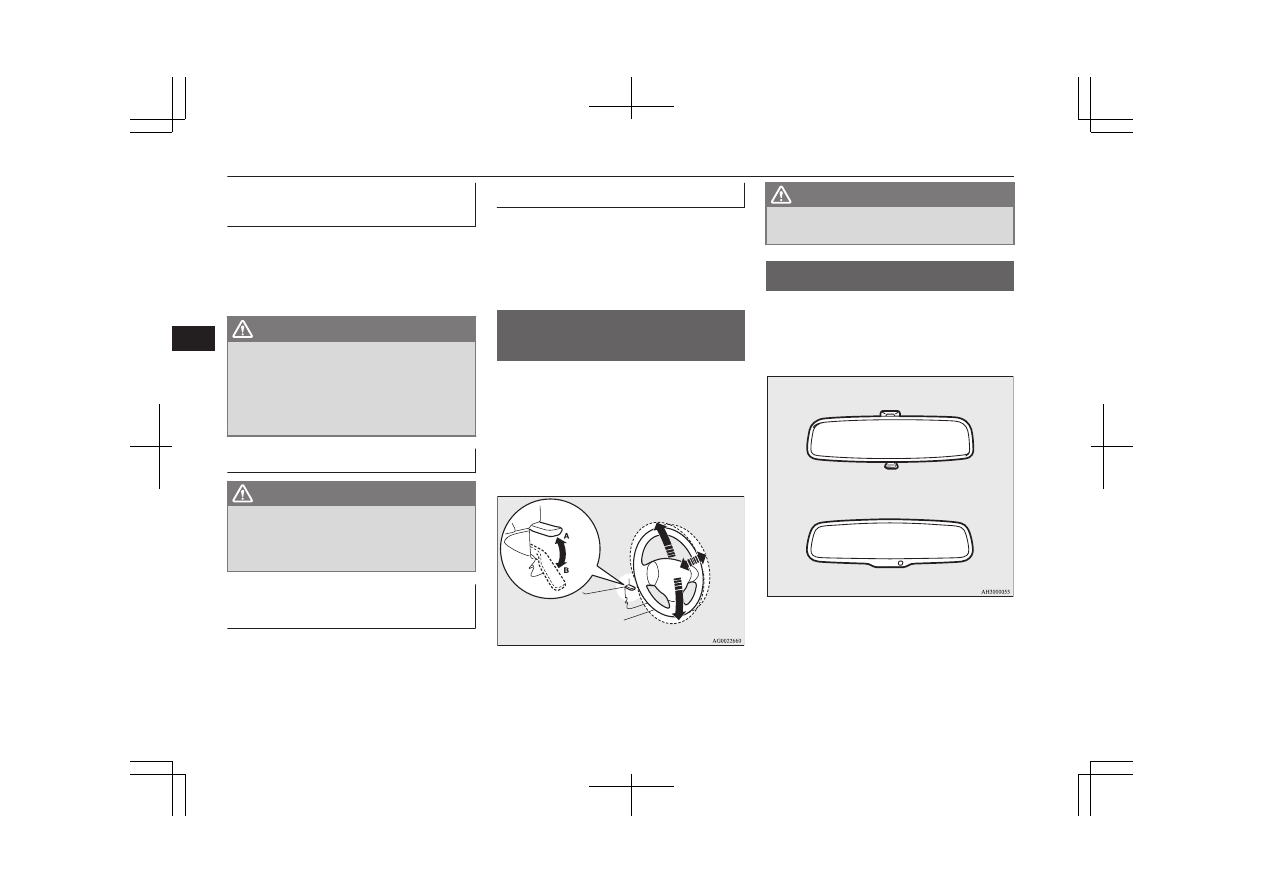
Steering wheel height and
reach adjustment

E00600700512

1. Release  the  lever  while  holding  the

steering wheel up.

2. Adjust the steering wheel to the desired

position.

3. Securely lock the steering wheel by pull-

ing the lever fully upward.

A- Locked

B- Release

WARNING

l

Do  not  attempt  to  adjust  the  steering
wheel while you are driving the vehicle.

Inside rear-view mirror

E00600801998

Adjust  the  rear-view  mirror  only  after  mak-
ing any seat adjustments so you have a clear
view to the rear of the vehicle.

Type 1

Type 2

Steering wheel height and reach adjustment

6-08

OGAE18E1

Starting and driving

6

WARNING

l

Do  not  attempt  to  adjust  the  rear-view
mirror while driving. This can be danger-
ous.
Always adjust the mirror before driving.

Adjust the rear-view mirror to maximize the
view through the rear window.

To adjust the vertical mirror

position

It is possible to move the mirror up and down
to adjust its position.

To adjust the mirror position

It is possible to move the mirror up/down and
left/right to adjust its position.

To reduce the glare

Type 1

The lever (A) at the bottom of the mirror can
be  used  to  adjust  the  mirror  to  reduce  the
glare from the headlamps of vehicles behind
you during night driving.

1- Normal
2- Anti-glare

Inside rear-view mirror

6-09

OGAE18E1

Starting and driving

6

Type 2

When  the  headlamps  of  the  vehicles  behind
you  are  very  bright,  the  reflection  factor  of
the rear-view mirror is automatically changed
to reduce the glare.

When  the  ignition  switch  is  turned  to  the
“ON” position or the operation mode is put in
ON, the reflection factor of the mirror is au-
tomatically changed.

NOTE

l

Do not hang items on, or spray glass cleaner
on  the  sensor  (1),  as  reduced  sensitivity
could result.

Outside rear-view mirrors

E00600900628

To adjust the mirror position

E00601000642

The outside rear-view mirrors can be operat-
ed when the ignition switch or the operation
mode is in ON or ACC.

WARNING

l

Do  not  attempt  to  adjust  the  rear-view
mirrors  while  driving.  This  can  be  dan-
gerous.
Always adjust the mirrors before driving.

l

Your vehicle is equipped with convex type
mirrors.
Please  take  into  consideration,  that  ob-
jects you see in the mirror will look small-
er  and  farther  away  compared  to  a  nor-
mal flat mirror.
Do  not  use  this  mirror  to  estimate  dis-
tance of following vehicles when changing
lanes.

1. Place  the  lever  (A)  to  the  same  side  as

the mirror whose adjustment is desired.

Except for vehicles equipped with the mirror
retractor switch

Vehicles equipped with the mirror retractor switch

L- Left outside mirror adjustment
R- Right outside mirror adjustment

2. Press the switch (B) to the left, right, up

or down to adjust the mirror position.

1- Up
2- Down
3- Right
4- Left

3. Return the lever (A) back to the middle

position (•).

Outside rear-view mirrors

6-10

OGAE18E1

Starting and driving

6

Retracting and extending the

outside mirrors

E00601100715

The  outside  mirror  can  be  folded  in  towards
the  side  window  to  prevent  damage  when
parking in narrow areas.

CAUTION

l

Do not drive the vehicle with the mirror fol-
ded in.
The lack of rearward visibility normally pro-
vided  by  the  mirror  could  lead  to  an  acci-
dent.

[Except  for  vehicles  equipped  with  the
mirror retractor switch]
Push the mirror towards the back of the vehi-
cle with your hand to retract it in. When ex-
tending  the  mirror,  pull  it  out  towards  the
front  of  the  vehicle  until  it  clicks  to  lock  in
place.

[For vehicles equipped with the mirror re-
tractor switch]

Retracting  and  extending  the

mirrors  using  the  mirror  re-

tractor switch

With  the  ignition  switch  or  the  operation
mode in ON or ACC, push the mirror retrac-
tor switch to retract the mirrors.
Push  it  again  to  extend  the  mirrors  to  their
original positions.
After  turning  the  ignition  switch  to  the
“LOCK”  position  or  putting  the  operation
mode in OFF, it is possible to retract and ex-
tend  the  mirrors  using  the  mirror  retractor
switch for about 30 seconds.

CAUTION

l

It  is  possible  to  retract  and  extend  the  mir-
rors by hand. After retracting a mirror using
the  mirror  retractor  switch,  however,  you
should  extend  it  by  using  the  switch  again,
not  by  hand.  If  you  extended  the  mirror  by
hand  after  retracting  it  using  the  switch,  it
would not properly lock in position. As a re-
sult,  it  could  move  because  of  the  wind  or
vibration while you are driving, taking away
your rearward visibility.

NOTE

l

Be  careful  not  to  get  your  hands  trapped
while a mirror is moving.

l

If you move a mirror by hand or it moves af-
ter hitting a person or object, you may not be
able to return it to its original position using
the  mirror  retractor  switch.  If  this  happens,
push the mirror retractor switch to place the
mirror in its retracted position and then push
the  switch  again  to  return  the  mirror  to  its
original position.

l

When freezing has occurred and mirrors fail
to  operate  as  intended,  please  refrain  from
repeated  pushing  of  the  retractor  switch  as
this action can result in burn-out of the mir-
ror motor circuits.

Retracting  and  extending  the

mirrors  without  using  the  mir-

ror retractor switch

[Vehicles with keyless entry system]

Outside rear-view mirrors

6-11

OGAE18E1

Starting and driving

6

The  mirrors  automatically  retract  or  extend
when the doors are locked or unlocked using
the remote control switches of the keyless en-
try system.
Refer  to  “Keyless  entry  system”  on  page
3-04.
[Vehicles  equipped  with  keyless  operation
system]
The  mirrors  automatically  retract  or  extend
when the doors are locked or unlocked using
the remote control switches or the keyless op-
eration function of the keyless operation sys-
tem.
Refer to “Keyless operation system: To oper-
ate using the keyless operation function, Key-
less entry system” on pages 3-10 and 3-22.

NOTE

l

Functions  can  be  modified  as  stated  below.
Consult  a  MITSUBISHI  MOTORS  Author-
ized Service Point.

Automatically extend when the following
operation is performed.
[Except  vehicles  equipped  with  keyless
operation system]
Turn  the  ignition  switch  to  the  “ON”  or
“ACC” position.
[Vehicles equipped with keyless operation
system]
Put the operation mode in ON or ACC.

NOTE

Automatically  retract  when  the  driver’s
door  is  opened  after  turning  the  ignition
switch to the “LOCK” position or putting
the operation mode in OFF.

Automatically  extend  when  the  vehicle
speed reaches 30 km/h (19 mph).

Deactivate  the  automatic  extension  func-
tion.

Heated mirror

E00601200497

To  demist  or  defrost  the  outside  rear-view
mirrors,  press  the  rear  window  demister
switch.
The indication lamp (A) will illuminate while
the demister is on.
The heater will be turned off automatically in
about 20 minutes.

Ignition switch

E00601401845

[For vehicles equipped with keyless opera-
tion system]
For  information  on  operations  for  vehicles
equipped  with  the  keyless  operation  system,
refer  to  “Keyless  operation  system:  Engine
switch” on page 3-13.

[Except for vehicles equipped with keyless
operation system]

LOCK

The engine is stopped and the steering wheel
locked. The key can only be inserted and re-
moved in this position.

ACC

The  engine  is  stopped,  but  the  audio  system
and other electric devices can be operated.

Ignition switch

6-12

OGAE18E1

Starting and driving

6

ON

The  engine  is  running,  and  all  the  vehicle’s
electrical devices can be operated.

START

The  starter  motor  operates.  After  the  engine
has  started,  release  the  key  and  it  will  auto-
matically return to the “ON” position.

NOTE

l

Your vehicle is equipped with an electronic
immobilizer.
To start the engine, the ID code transmitted
by  the  transponder  inside  the  key  must
match the code registered in the immobilizer
computer.
Refer to “Electronic immobilizer (Anti-theft
starting system)” on page 3-03.

ACC power auto-cutout func-

tion

E00620300224

After  about  30  minutes  has  elapsed  with  the
ignition  switch  in  the  “ACC”  position,  the
function automatically cuts out the power for
the  audio  system  and  other  electric  devices
that can be operated with that position.
When  the  ignition  switch  is  turned  from  the
“ACC” position, the power is supplied again
to those devices.

NOTE

l

It is possible to modify functions as follows:

The  time  until  the  power  cuts  out  can  be
changed to approximately 60 minutes.

The ACC power auto-cutout function can
be deactivated.
For details, we recommend you to consult
a  MITSUBISHI  MOTORS  Authorized
Service Point.

To remove the key

E00620400528

1. Set the selector lever to the “P” (PARK)

position (A/T or CVT).

2. Push  the  key  in  at  the  “ACC”  position

and keep it depressed until it is turned to
the “LOCK” position and remove it.

CAUTION

l

Do not remove the ignition key from the ig-
nition  switch  while  driving.  The  steering
wheel  will  be  locked,  causing  loss  of  con-
trol.

l

If  the  engine  is  stopped  while  driving,  the
brake servomechanism will cease to function
and braking efficiency will deteriorate. Also,
the  power  steering  system  will  not  function
and  it  will  require  greater  manual  effort  to
operate the steering.

l

Do  not  leave  the  key  in  the  “ON”  position
for a long time when the engine is not run-
ning,  doing  so  will  cause  the  battery  to  be
discharged.

l

Do not turn the key to the “START” position
while the engine is running. Doing so could
damage the starter motor.

Steering wheel lock

E00601500676

[For vehicles equipped with keyless opera-
tion system]
For  information  on  operations  for  vehicles
equipped  with  the  keyless  operation  system,
refer  to  “Keyless  operation  system:  Steering
wheel lock” on page 3-16.

[Except for vehicles equipped with keyless
operation system]

To lock

Remove the key at the “LOCK” position.

Steering wheel lock

6-13

OGAE18E1

Starting and driving

6

Turn the steering wheel until it is locked.

To unlock

Turn  the  key  to  the  “ACC”  position  while
moving  the  steering  wheel  slightly  right  and
left.

CAUTION

l

Remove the key when leaving the vehicle.
In  some  countries,  it  is  prohibited  to  leave
the key in the vehicle when parked.

Starting

E00620601598

Tips for starting

l

Do not operate the starter motor continu-
ously  longer  than  10  seconds;  doing  so
could run down the battery. If the engine
does  not  start,  turn  the  ignition  switch
back  to  “LOCK”,  wait  a  few  seconds,
and  then  try  again.  Trying  repeatedly
with  the  starter  motor  still  turning  will
damage the starter mechanism.

WARNING

l

Never run the engine in a closed or poorly
ventilated area any longer than is needed
to move your vehicle in or out of the area.
Carbon monoxide gases are odourless and
can be fatal.

CAUTION

l

Never attempt to start the engine by pushing
or pulling the vehicle.

l

Do not run the engine at high revolutions or
drive the vehicle at high speed until the en-
gine has had a chance to warm up.

l

Release  the  ignition  key  as  soon  as  the  en-
gine starts to avoid damaging the starter mo-
tor.

Starting the engine (petrol-

powered vehicles)

E00620701977

[For vehicles equipped with keyless opera-
tion system]
For  information  on  operations  for  vehicles
equipped  with  the  keyless  operation  system,
refer to “Keyless operation system: Starting”
on page 3-18.
 
[Except vehicles equipped with keyless op-
eration system]
The starting procedure is as follows:

1. Insert the ignition key and fasten the seat

belt.

2. Make sure the parking brake is applied.
3. Press  and  hold  the  brake  pedal  down

firmly with your right foot.

4. Fully depress the clutch pedal (M/T).
5. On  vehicles  equipped  with  M/T,  place

the  gearshift  lever  in  the  “N”  (Neutral)
position.

Starting

6-14

OGAE18E1

Starting and driving

6

On  vehicles  equipped  with  CVT,  make
sure  the  selector  lever  is  in  the  “P”
(PARK) position.

Vehicles with CVT

Vehicles with M/T

NOTE

l

On  vehicles  with  CVT,  the  starter  will  not
operate unless the selector lever is in the “P”
(PARK) or “N” (NEUTRAL) position.
For  safety  reasons,  start  the  engine  in  the
“P”  (Park)  position  so  that  the  wheels  are
locked.

6. After  turning  the  ignition  key  to  the

“ON”  position,  make  certain  that  all
warning  lamps  are  functioning  properly
before starting the engine.

7. Turn  the  ignition  key  to  the  “START”

position without depressing the accelera-
tor pedal, and release it when the engine
starts.

NOTE

l

Minor noises may be heard on engine start-
up.  These  will  disappear  as  the  engine
warms up.

When  it  is  difficult  to  start  the

engine

After  several  attempts,  you  may  experience
that the engine still does not start.

1. Make sure that all electric devices, such

as  lamps,  air  conditioning  blower  and
rear window demister, are turned off.

2. While depressing the brake pedal (CVT)

or  the  clutch  pedal  (M/T),  press  the  ac-
celerator pedal halfway and hold it there,
then crank the engine. Release the accel-
erator  pedal,  immediately  after  the  en-
gine starts.

3. If  the  engine  still  will  not  start,  the  en-

gine  could  be  flooded  with  too  much
petrol. While depressing the brake pedal
(CVT)  or  the  clutch  pedal  (M/T),  push
the  accelerator  pedal  all  the  way  down
and  hold  it  there,  then  crank  the  engine
for  5  to  6  seconds.  Return  the  ignition
switch  to  the  “LOCK”  position  and  re-
lease  the  accelerator  pedal.  Wait  a  few
seconds, and then crank the engine again
for  5  to  6  seconds  while  depressing  the
brake  pedal  (CVT)  or  the  clutch  pedal
(M/T),  but  do  not  push  the  accelerator
pedal.  Release  the  ignition  switch  if  the
engine starts. If the engine fails to start,
repeat  these  procedures.  If  the  engine
still will not start, we recommend you to
have the vehicle checked.

Starting the engine (diesel-

powered vehicles)

E00625501462

[For vehicles equipped with keyless opera-
tion system]
For  information  on  operations  for  vehicles
equipped  with  the  keyless  operation  system,
refer to “Keyless operation system: Starting”
on page 3-19.
[Except vehicles equipped with keyless op-
eration system]

1. Insert the ignition key and fasten the seat

belt.

2. Make sure the parking brake is applied.

Starting

6-15

OGAE18E1

Starting and driving

6

3. Press  and  hold  the  brake  pedal  down

firmly with your right foot.

4. Fully depress the clutch pedal (M/T).
5. On  vehicles  equipped  with  M/T,  place

the  gearshift  lever  in  the  “N”  (Neutral)
position.
On  vehicles  equipped  with  A/T,  make
sure  the  selector  lever  is  in  the  “P”
(Park) position.

Vehicles with M/T

Vehicles with A/T

6. Turn the ignition key to the “ON” posi-

tion.
The  diesel  preheat  indication  lamp  will
first  illuminate,  and  then  after  a  short
time go out, indicating that preheating is
completed.

NOTE

l

If the engine is cold, the diesel preheat indi-
cation lamp is on for a longer time.

NOTE

l

When the engine has not been started within
about 5 seconds after the diesel preheat indi-
cation lamp went out, return the ignition key
to the “LOCK” position. Then, turn the key
to  the  “ON”  position  to  preheat  the  engine
again.

l

When the engine is warm, the diesel preheat
indication lamp does not come on even if the
ignition key is placed in the “ON” position.
Start  the  engine  by  turning  the  ignition  key
right to the “START” position.

7. Turn  the  ignition  key  to  the  “START”

position without depressing the accelera-
tor pedal, and release it when the engine
starts.

NOTE

l

Minor noises may be heard on engine start-
up.  These  will  disappear  as  the  engine
warms up.

NOTE

l

For diesel-powered vehicles, if the tempera-
ture  inside  the  engine  compartment  is  high,
the cooling fans (A) will continue to operate
for some time even if the engine is stopped.
Therefore,  the  operation  sound  of  the  cool-
ing fans may be heard even after the engine
is  stopped.  This  sound  is  normal  and  does
not indicate a malfunction.
After  operating  for  a  period  of  time,  the
cooling fans will stop automatically.

*: Front of the vehicle

Fuel injection amount learning

process (diesel-powered 2200

models)

E00627901079

To keep exhaust emissions and engine noise
low, the engine very occasionally performs a
learning  process  for  the  fuel  injection
amount.

Starting

6-16

OGAE18E1

Starting and driving

6

The  engine  sounds  slightly  different  from
usual  while  the  learning  process  is  taking
place.  The  change  in  the  engine  sound  does
not indicate a fault.

Diesel particulate filter
(DPF)*

E00619801330

The diesel particulate filter (DPF) is a device
that  captures  most  of  the  particulate  matter
(PM)  in  the  exhaust  emissions  of  the  diesel
engine.  The  DPF  automatically  burns  away
trapped  PM  during  vehicle  operation.  Under
certain driving conditions, however, the DPF
is not able to burn away all of the trapped PM
and, as a result, an excessive amount of PM
accumulates inside it.

WARNING

l

The DPF reaches very high temperatures.
Do  not  park  your  vehicle  in  areas  where
combustible  materials  such  as  dry  grass
or  leaves  can  come  in  contact  with  a  hot
exhaust system since a fire could occur.

CAUTION

l

Do not use any type of fuel or engine oil that
is  not  specified  for  your  vehicle.  Also,  do
not use any moisture-removing agent or oth-
er fuel additive. Such substances could have
a detrimental effect on the DPF.
Refer  to  “Fuel  selection”  on  page  2-02  and
“Engine oil” on page 10-05.

NOTE

l

To minimize the likelihood of excessive ac-
cumulation  of  PM,  try  to  avoid  driving  for
long  periods  at  low  speeds  and  repeatedly
driving short distances.

l

The  engine  sounds  slightly  different  than
usual  while  the  DPF  automatically  burns
away trapped PM. The change in the engine
sound does not indicate a fault.

DPF warning display

Type 1

Type 2

The  DPF  warning  display  illuminates  in  the
event of an abnormality in the DPF system.

If the DPF warning display il-

luminates during vehicle oper-

ation

Steady illumination of the DPF warning dis-
play shows that the DPF has not been able to
burn away all of the trapped PM and that, as
a result, an excessive amount of PM has ac-
cumulated  inside  it.  To  enable  the  DPF  to
burn away the PM, try to drive the vehicle as
follows:
[Except for diesel-powered 1600 models]

Diesel particulate filter (DPF)*

6-17

OGAE18E1

Starting and driving

6

l

With  the  bar  graph  of  engine  coolant
temperature display stabilized in roughly
the  middle  of  the  scale,  drive  for  about
20 minutes at a speed of at least 40 km/h
(25 mph).

[Diesel-powered 1600 models]

l

As  soon  as  traffic  conditions  allow,  re-
generate  the  filter  by  driving  at  a  speed
of  over  60  km/h  (37  mph)  until  the
warning display goes out.

If  the  DPF  warning  display  subsequently
stays  on,  contact  a  MITSUBISHI  MOTORS
Authorized Service Point.

CAUTION

l

You  do  not  have  to  continuously  drive  ex-
actly  as  indicated  above.  Always  strive  to
drive  safely  in  accordance  with  road  condi-
tions.

If the DPF warning display and

check engine warning lamp il-

luminate at the same time dur-

ing vehicle operation

Warning lamp

Warning display type 1

Warning display type 2

If  an  abnormal  condition  occurs  in  the  DPF
system,  the  DPF  warning  display  and  check
engine  warning  lamp  illuminate.  Have  the
system  inspected  by  a  MITSUBISHI
MOTORS Authorized Service Point.

CAUTION

l

Continuing  to  drive  with  the  DPF  warning
display and check engine warning lamp illu-
minating  could  result  in  engine  trouble  and
DPF damage.

Turbocharger operation*

E00611200083

CAUTION

l

Do not run the engine at high speeds (for ex-
ample, by revving it or by accelerating rap-
idly) immediately after starting it.

l

Do  not  stop  the  engine  immediately  after
high-speed or uphill driving. First allow the
engine  to  idle  to  give  the  turbocharger  a
chance to cool down.

Turbocharger operation*

6-18

OGAE18E1

Starting and driving

6

Turbocharger

The  turbocharger  increases  engine  power  by
pushing large amounts of air into the engine’s
cylinders.  The  finned  parts  inside  the  turbo-
charger turn at extremely high speeds and are
subjected  to  extremely  high  temperatures.
They are lubricated and cooled by engine oil.
If the engine oil is not replaced at the speci-
fied intervals, the bearings may seize or emit
abnormal noise.

1- Air compressor
2- Compressed air
3- Cylinder
4- Turbo fin
5- Turbine
6- Exhaust gas

Auto Stop & Go (AS&G)
system*

E00627401133

The  Auto  Stop  &  Go  (AS&G)  system  auto-
matically  stops  and  restarts  the  engine  with-
out  operating  the  ignition  switch  or  the  en-
gine switch when the vehicle is stopped, such
as at a traffic light or in a traffic jam, to re-
duce exhaust gases and increase fuel efficien-
cy.

CAUTION

l

If the vehicle will be stopped for a long time
or  if  you  will  leave  the  vehicle  unattended,
turn the ignition switch to the “LOCK” posi-
tion and press the engine switch to stop the
engine.

NOTE

l

If the Auto Stop & Go (AS&G) system does
not operate or it operates less frequently, the
battery  capacity  may  have  decreased.  Have
your  vehicle  inspected  by  a  MITSUBISHI
MOTORS Authorized Service Point.

Automatically stopping the en-

gine

E00627501323

The AS&G system is automatically activated
when  the  ignition  switch  is  turned  to  the
“ON” position or the operation mode is put in
ON.
You  can  deactivate  the  system  by  pressing
the “AS&G OFF” switch.
Refer to “To deactivate” on page 6-22.

1. Stop the vehicle.

While  depressing  the  brake  pedal,  fully
depress  the  clutch  pedal  and  place  the
gearshift lever in the “N” (Neutral) posi-
tion.

Vehicles with 5M/T 

Vehicles with 6M/T 

Auto Stop & Go (AS&G) system*

6-19

OGAE18E1

Starting and driving

6

2. Release  the  clutch  pedal.  The  “ ”  dis-

play/indicator  will  turn  on  and  the  en-
gine will stop automatically.

Type 1

Type 2

NOTE

l

When  the  engine  is  automatically  stopped,
changes will occur in the driving operations.
Pay closel attention to the following.

The  brake  booster  becomes  inoperative
and  the  pedal  effort  will  increase.  If  the
vehicle  is  moving,  press  down  the  brake
pedal harder than usual.

The electric power steering system (EPS)
becomes  inoperative  and  it  will  become
harder to turn the steering wheel.

CAUTION

l

Observe the following precautions when the
engine  is  stopped  automatically.  Otherwise,
an  unexpected  accident  might  occur  when
the engine restarts automatically.

Do  not  depress  the  accelerator  pedal  to
race the engine while the vehicle is stop-
ped  (regardless  of  whether  the  engine  is
running or stopped).
Otherwise,  an  unexpected  accident  might
occur  when  the  engine  restarts  automati-
cally.

When the engine is automatically stopped,
do not attempt to exit the vehicle.
Because  the  engine  restarts  automatically
when  the  driver’s  seat  belt  is  unfastened
or  the  driver’s  door  is  opened,  an  unex-
pected accident might occur when the ve-
hicle starts moving.

Do not move the gearshift lever to a posi-
tion other than the “N” (Neutral) position.
If  the  gearshift  lever  is  moved  to  a  posi-
tion other than the “N” (Neutral) position,
the  “ ”  display/indicator  blinks  and  the
buzzer sounds.
If the gearshift lever is returned to the “N”
(Neutral)  position,  the  display/indicator
stops blinking and the buzzer stops sound-
ing. The engine will not restart if the gear-
shift  lever  is  in  a  position  other  than  the
“N” (Neutral) position.

NOTE

l

In the following cases, the Auto Stop & Go
(AS&G) system will not operate and the en-
gine  will  not  stop  automatically  even  if  the
vehicle is stopped.

Driver’s seat belt is not fastened.

Driver’s door is open.

Bonnet is open.

After  the  engine  restarts  automatically,
the  vehicle  speed  has  not  exceeded  ap-
proximately 5 km/h (3 mph).

Brake booster vacuum pressure is low be-
cause the brake pedal is depressed repeat-
edly or depressed harder than usual.

After  the  engine  starts,  approximately  30
seconds or more have not elapsed.

After  the  engine  restarts  automatically
and the vehicle stops again within 10 sec-
onds.

Engine coolant temperature is low.

Ambient temperature is low.

Air conditioning is operating and passen-
ger  compartment  has  not  sufficiently
cooled.

Mode selection dial is set to the demister
position.
Refer  to  “Demisting  of  the  windscreen
and  door  windows:  For  quick  demisting”
on page 7-09.

When  the  air  conditioning  is  operated  in
AUTO mode where the temperature con-
trol dial is set to the max. hot or the max.
cool position (for vehicles with automatic
air conditioning).

Auto Stop & Go (AS&G) system*

6-20

OGAE18E1

Starting and driving

6

NOTE

Electric power consumption is high, such
as when the rear window demister or oth-
er  electrical  components  are  operating  or
the blower speed is set to a high setting.

Battery voltage or battery performance is
low.

Check engine warning lamp is illuminated
or the “ ” display/indicator is blinking.

l

Do  not  rest  your  foot  on  the  clutch  pedal
while driving because this will cause detec-
tion  of  clutch  pedal  malfunction  and  blink-
ing  of  Auto  Stop  &  Go  (AS&G)  OFF  dis-
play/indicator,  and  the  Auto  Stop  &  Go
(AS&G) system will not operate.

l

If the Auto Stop & Go (AS&G) system oper-
ates  while  the  air  conditioning  is  operating,
both  the  engine  and  the  air  conditioning
compressor  will  stop.  Therefore,  the  wind-
screen  and  door  windows  may  mist  up  be-
cause only the blower will operate.
If the windscreen and door windows mist up,
set the mode selection dial to “

” to restart

the engine.
→ “Mode selection dial” on page 7-03

l

If the windscreen and door windows mist up
every time the engine stops, it is recommen-
ded  to  deactivate  the  Auto  Stop  &  Go
(AS&G) system by pressing the “Auto Stop
& Go (AS&G) OFF” switch.
→ “To deactivate” on page 6-22

l

If  the  air  conditioning  is  operating,  set  the
temperature  control  dial  higher  to  lengthen
the time that the engine is stopped automati-
cally.

Automatically restarting the

engine

E00627601252

Depress  the  clutch  pedal  while  the  gearshift
lever  is  in  the  “N”  (Neutral)  position.  The
“ ”  display/indicator  in  the  meter  turns  off
and the engine restarts automatically.

Type 2

Type 1

NOTE

l

If  the  engine  does  not  restart  automatically
or if the engine stalls, the oil pressure warn-
ing  lamp,  charge  warning  lamp,  and  check
engine warning lamp will illuminate.
If  this  occurs,  the  engine  will  not  restart
even  if  the  clutch  pedal  is  depressed  again.
While  depressing  the  brake  pedal,  fully  de-
press  the  clutch  pedal  and  turn  the  ignition
switch to the “START” position or press the
engine switch to start the engine.
For  details,  refer  to  “Starting  and  stopping
the  engine”  on  page  3-17  
or  “Starting”  on
page 6-14.

CAUTION

l

In the following cases, the engine will restart
automatically even if the engine was stopped
by the Auto Stop & Go (AS&G) system. Pay
attention,  otherwise  an  unexpected  accident
might occur when the engine restarts.

Vehicle speed is 3 km/h (2 mph) or higher
when coasting down a slope.

Brake booster vacuum pressure is low be-
cause the brake pedal is depressed repeat-
edly or depressed harder than usual.

Engine coolant temperature is low.

When  the  air  conditioning  is  operated  by
pressing the air conditioning switch.

When  the  preset  temperature  of  the  air
conditioning is changed significantly.

Auto Stop & Go (AS&G) system*

6-21

OGAE18E1

Starting and driving

6

CAUTION

When  the  air  conditioning  is  operated  in
AUTO mode where the temperature con-
trol dial is set to the max. hot or the max.
cool position (for vehicles with automatic
air conditioning).

When the air conditioning is ON, the pas-
senger compartment temperature rises and
the  air  conditioning  compressor  operates
to lower the temperature.

Mode selection dial is set to the demister
position.
Refer  to  “Demisting  of  the  windscreen
and  door  windows:  For  quick  demisting”
on page 7-09.

Electric power consumption is high, such
as when the rear window demister or oth-
er  electrical  components  are  operating  or
the blower speed is set to a high setting.

Driver’s seat belt is unfastened.

Driver’s door is open.

NOTE

l

If  the  “Auto  Stop  &  Go  (AS&G)  OFF”
switch is pressed to deactivate the Auto Stop
&  Go  (AS&G)  system  while  the  engine  is
stopped  automatically,  the  engine  will  not
restart automatically even if the clutch pedal
is depressed.

NOTE

l

If  the  bonnet  is  opened  when  the  engine  is
automatically  stopped,  the  “ ”  display/  in-
dicator will blink, the buzzer will sound, and
the engine will not restart automatically. To
restart  the  engine,  fully  depress  the  clutch
pedal while depressing the brake pedal, and
then  turn  the  ignition  switch  to  the
“START”  position  or  press  the  engine
switch.  For  details,  refer  to  “Starting  and
stopping the engine” on page 3-17 
or “Start-
ing” on page 6-14.

l

When  the  engine  restarts  automatically,  the
audio  volume  may  temporarily  decrease.
This does not indicate a malfunction.

l

When  the  engine  is  stopped  automatically,
the air conditioning may temporarily change
the air volume.
This does not indicate a malfunction.

To deactivate

E00627701194

The Auto Stop & Go (AS&G) system is auto-
matically  activated  when  the  ignition  switch
is turned to the “ON” position. You can deac-
tivate the system by pressing the “Auto Stop
& Go (AS&G) OFF” switch.
When the Auto Stop & Go (AS&G) system is
deactivated,  the  “ ”  display/indicator  will
turn on.

To  reactivate  the  Auto  Stop  &  Go  (AS&G)
system, press the “Auto Stop & Go (AS&G)
OFF”  switch;  the  display/indicator  will  turn
off.

Type 1

Type 2

NOTE

l

This display/indicator will also turn on for a
few  seconds  when  the  ignition  switch  is
turned to the “ON” position or the operation
mode is put in ON.

If the   display/indicator

blinks while driving

E00627801108

If  the  “ ”  display/indicator  blinks,  the  Auto
Stop & Go (AS&G) system is malfunctioning
and will not operate.

Auto Stop & Go (AS&G) system*

6-22

OGAE18E1

Starting and driving

6

We  recommend  you  to  consult  a
MITSUBISHI MOTORS Authorized Service
Point.

Manual transmission*

E00602002164

The  shift  pattern  is  shown  on  the  gearshift
lever  knob.  To  start  off,  depress  the  clutch
pedal  all  the  way  down  and  shift  into  1

st

  or

“R”  (Reverse)  position.  Then  gradually  re-
lease  the  clutch  pedal  while  depressing  the
accelerator pedal.

Vehicles with 5M/T

Vehicles with 6M/T

CAUTION

l

Do  not  put  the  gearshift  lever  into  the  re-
verse  position  while  the  vehicle  is  moving
forward.  Doing  so  could  damage  the  trans-
mission.

CAUTION

l

Do  not  rest  your  foot  on  the  clutch  pedal
while  driving  as  this  will  cause  premature
clutch wear or damage.

l

Do not coast in the “N” (Neutral) position.

l

Do not use the gearshift lever as a hand rest,
because this can result in premature wear of
the transmission shift forks.

NOTE

l

During  cold  weather,  shifting  may  be  diffi-
cult  until  the  transmission  lubricant  has
warmed up. This is normal and not harmful
to the transmission.

l

If  it  is  hard  to  shift  into  1

st

,  depress  the

clutch pedal again; the shift will then be eas-
ier to make.

l

The  gearshift  indicator  (if  so  equipped)
shows  recommended  gearshift  points  for
fuel-efficient driving. It shows a “

” when

an  upshift  is  recommended,  and  it  shows  a

” when a downshift is recommended.

Type 1

Type 2

Moving the gearshift lever to

the “R” (Reverse) position

E00615401312

Vehicles equipped with 5M/T

To shift into the “R” (Reverse) position from
5

th

 gear, move the gearshift lever to the “N”

(Neutral)  position,  and  then  move  it  to  the
“R” (Reverse) position.

Vehicles equipped with 6M/T

Pull up the pull-ring (A), then move the gear-
shift lever to the “R” (Reverse) position with
the pull-ring still pulled.

Manual transmission*

6-23

OGAE18E1

Starting and driving

6


Content   ..  10  11  12  13   ..