Lexus UX 300e (2023 year). Manual in english - page 3
 

  Index      Manuals     Lexus UX 300e (2023 year). Manual in english


Search            copyright infringement  


Content      ..     1      2      3      4      ..


Lexus UX 300e (2023 year). Manual in english - page 3


93

2

2-2. Charging

El

ect
ric V
eh

icle

 sy

st

em

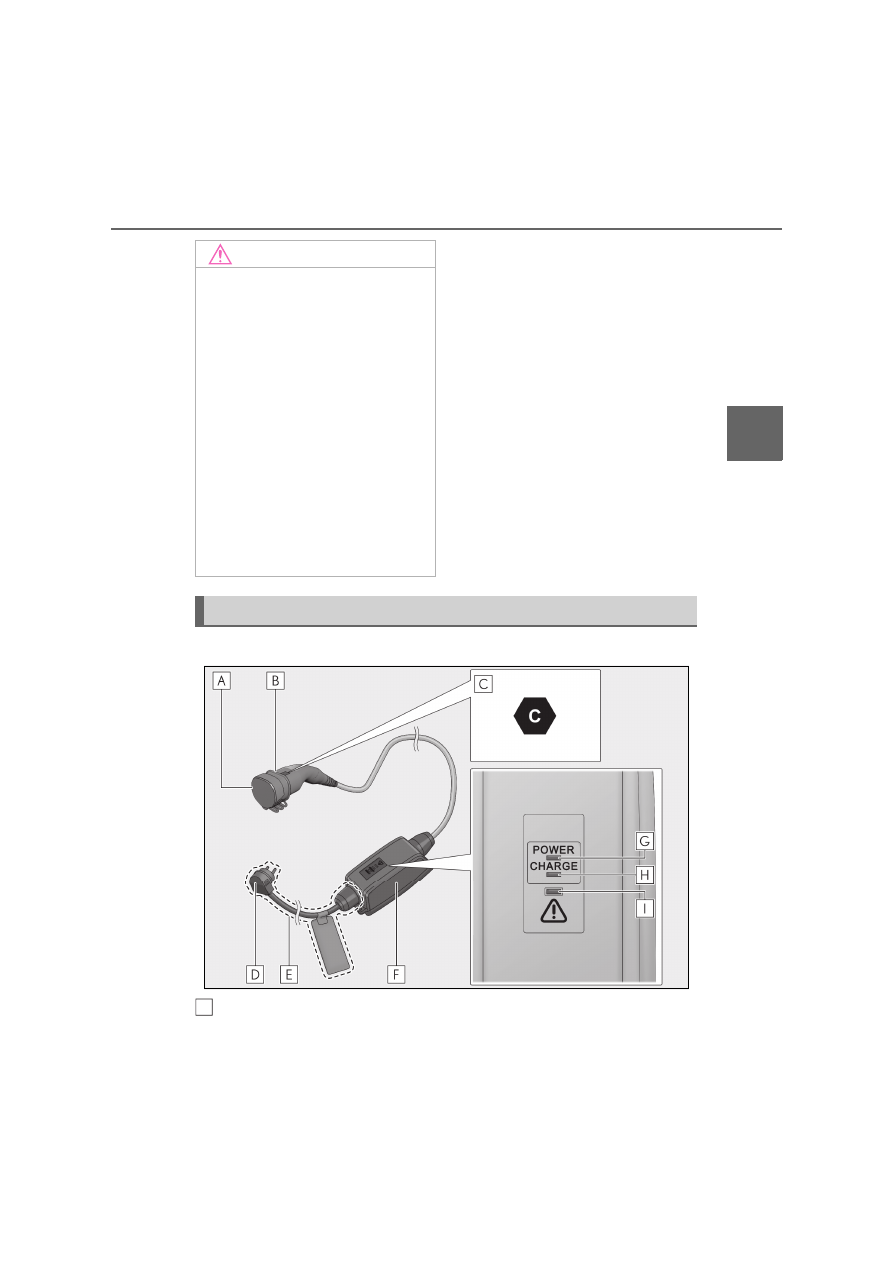
Mode 2 AC charging cable

AC charging connector cap

NOTICE

Q

Handling the AC charging cable and 

related parts

P.116

Q

Precautions for when the ambient 

temperature is low

In low temperatures, the AC charging 

cable and plug-cord may become hard. 

Therefore, make sure not to apply exces-

sive force when they are hard. If exces-

sive force is applied to the hardened AC 

charging cable and plug-cord, they may 

be damaged.

Q

Precautions for when using the plug-

cord

Do not use the plug-cord to do anything 

other than AC charging, as doing so may 

damage it.

AC charging cable components

A
94

2-2. Charging

AC charging connector

Identification label

Plug

Plug-cord

CCID (Charging Circuit Interrupting Device)

Power indicator (

P.97)

Charging indicator (CCID) (

P.97)

Error warning indicator (

P.97)

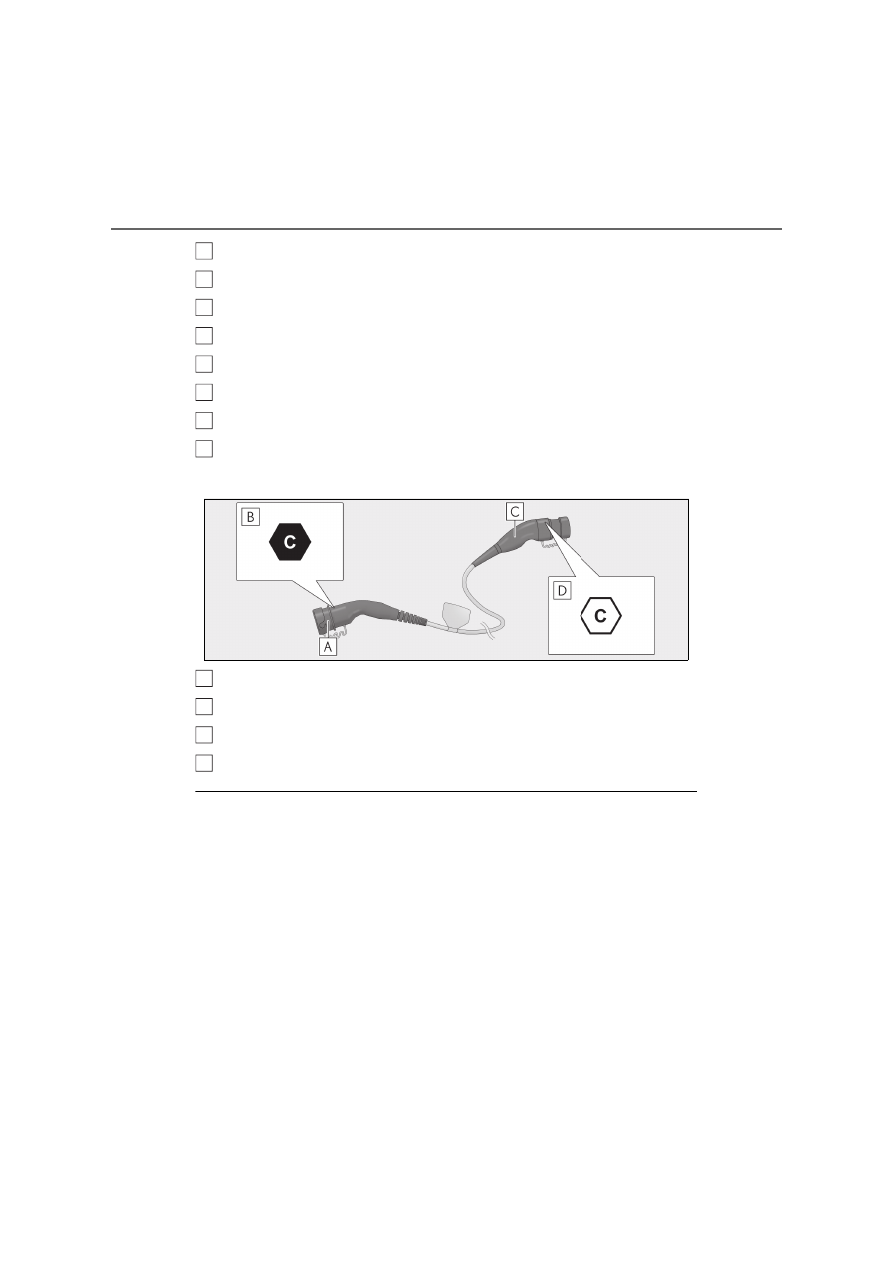
Mode 3 AC charging cable (if equipped)

Charging connector (vehicle side)

Identification label (on the charging connector)

Charging plug (charger side)

Identification label (on the charging plug)

Q

AC charging cable types

The following charging modes are categorized according to the availability of a charging 

control device, which detects malfunctions such as electrical leakages, and its location 

(whether it is attached to the charger or AC charging cable). The type of AC charging 

cable that can be used differs according to the charging mode

B
C
D

E
F

G

H

I

A
B
C
D

95

2

2-2. Charging

El

ect
ric V
eh

icle

 sy

st

em

Q

Caution labels/identification labels

Caution labels/identification labels are attached to the vehicle, AC charging cable and 

charger to inform the user of which device they should use.
The meaning of the each caution label/identification label is as follows:

Charging mode

Outline

Mode 1

A charging method which does not use charging control to detect 
electrical leakages between an external power source and the vehi-
cle. Does not apply to this vehicle.

Mode 2

A charging method which connects the vehicle to an external power 
source through a AC charging cable equipped with a CCID 
(Charging Circuit Interrupting Device).
Applies to charging through most household sockets.

Mode 3

A charging method which charges from a charger (such as at a pub-
lic charging station) equipped with charging control to detect elec-
trical leakages. Control to detect electrical leakages is implemented 
on the charger side. Therefore, a CCID (Charging Circuit Interrupt-
ing Device) is not equipped to the AC charging cable.
Not all chargers are equipped with AC charging cables. If there is no 
AC charging cable available, use the Mode 3 AC charging cable 
equipped to this vehicle. (if equipped)

Caution 

label/identifi-

cation label

Supply 

type

Standard

Configuration

Type of acces-

sory

Voltage range

AC

EN 62196-2

TYPE 2

Charging 

port lid

Charging 

connector

AC

EN 62196-2

TYPE 2

Charging 

plug

Charger

96

2-2. Charging

This product must be grounded. In 
case of malfunction or break down, 
grounding provides a path of least 
resistance for electric current to 
reduce the risk of electric shock. This 
product is equipped with a grounding 
conductor and a grounding plug. The 
grounding plug must be plugged into 
an appropriate socket that is properly 
installed and grounded in accordance 
with all local codes and ordinances.

The CCID (Charging Circuit Inter-
rupting Device) has the following 
safety features.

Q

Electrical leakage detection func-
tion

If electrical leakage is detected during 
charging, the power source will auto-
matically be isolated, therefore help-
ing prevent an electrical fire or shock.

If the power source is isolated, the error 
warning indicator will flash. If the power 
source is isolated: 

P.97

Q

Automatic check function

The automatic check function is per-
formed before charging begins to 
check for problems in the operation of 
the electrical leakage detection func-
tion.

If a malfunction of the electrical leakage 
detection function is detected as a result of 
the check, the error warning indicator will 
flash. (

P.97)

DC

EN 62196-3

FF

Charging 

port lid

Charging 

connector

50V to 500V

DC

EN 62196-3

AA

Charging 

port lid

Charging 

connector

50V to 500V

Caution 

label/identifi-

cation label

Supply 

type

Standard

Configuration

Type of acces-

sory

Voltage range

Grounding (Mode 2 AC 
charging cable)

WARNING

Q

Grounding precautions

O

Improper connection of the grounding 

conductor increases the risk of electric 

shock.

Check with a qualified electrician or 

serviceman if you are in doubt as to 

whether the product is properly 

grounded.

O

Do not modify the grounding plug pro-

vided with the product. If it does not fit 

the socket, have a proper socket 

installed by a qualified electrician.

Safety functions (Mode 2 AC 
charging cable)

97

2

2-2. Charging

El

ect
ric V
eh

icle

 sy

st

em

Q

Temperature detection function

The plug has a temperature detection 
function. While charging, if heat is gen-
erated due to the plug being loose in 
the electrical socket, etc., this function 
cancels charging to reduce generation 
of heat.

Q

Current supply control function

This function prevents the flow of cur-
rent if the plug of the AC charging 
cable is connected to an electrical 
socket, but the AC charging connec-
tor is not connected to the vehicle.

Q

Indicator operation

Three indicators are used to indicate 

the following conditions.

Power indicator

Illuminates when electricity is flowing to the 
CCID (Charging Circuit Interrupting 
Device).

Charging indicator (CCID)

Illuminates when charging is in progress.

Error warning indicator

Flashes when electrical leakage is 
detected or a malfunction occurs in the 
CCID (Charging Circuit Interrupting 
Device).

Q

If a malfunction, etc., is detected during charging

If a malfunction, etc., is detected during charging, the indicators on the CCID 
(Charging Circuit Interrupting Device) will operate as follows to indicate the 
respective conditions.

If the error warning indicator illuminates or flashes, unplug the AC charging cable from the 
electrical socket and then reconnect it and check if the error warning indicator remains off.
If the error warning indicator illuminates or begins flashing again, perform the appropriate 
correction procedure in the table.

CCID (Charging Circuit Inter-
rupting Device) indicators 
(Mode 2 AC charging cable)

A

B

C

98

2-2. Charging

Status

Power indicator

Error warning 

indicator

Details/Correction procedure

Charging sys-
tem malfunction

Not illuminated

Not illuminated 
or illuminated

Charging may have been inter-
rupted due to electrical leakage 
being detected, or the AC 
charging cable may be malfunc-
tioning.

Contact any authorized Lexus 
retailer or Lexus authorized 
repairer, or any reliable 
repairer

Illuminated

Flashes

Plug tempera-
ture detection 
malfunction

Flashes

Flashes

The temperature detection por-
tion of the plug may be malfunc-
tioning.

Contact any authorized Lexus 
retailer or Lexus authorized 
repairer, or any reliable 
repairer

Excessively high 
plug tempera-
ture

Flashes

Not illuminated

The plug may not be properly con-
nected to the electrical socket.

Check that the plug is securely 
connected to the electrical 
socket.

AC charging 
cable life span 
notice

Illuminated

Flashes

The number of times that the AC 
charging cable has been used is 
nearing the end of the charging 
cable’s usable life span.

Contact any authorized Lexus 
retailer or Lexus authorized 
repairer, or any reliable 
repairer

AC charging 
cable life span 
over

Illuminated

Illuminated

The maximum number of times 
that the AC charging cable can be 
used has reached.

Contact any authorized Lexus 
retailer or Lexus authorized 
repairer, or any reliable 
repairer

99

2

2-2. Charging

El

ect
ric V
eh

icle

 sy

st

em

The plug-cord can be replaced using 
the following procedure.

1

Prepare the AC charging cable 
(

P.93) and the replacement 

plug-cord.

2

Pull out the release key.

Make sure that the pulled out release key is 

not lost.

3

Remove the plug-cord connector 
cap.

4

Insert the release key into the 
release slot of the CCID (Charging 
Circuit Interrupting Device).

Insert the release key in the direction 

shown in the illustration.

Replacing the plug-cord (Mode 
2 AC charging cable) (if 
equipped)

100

2-2. Charging

5

With the release key fully inserted 
into the release slot of the CCID 
(Charging Circuit Interrupting 
Device), turn the plug-cord con-
nector nut of the plug-cord to 
remove the cord.

After the plug-cord is removed, remove 

the release key.
Do not leave the vehicle alone with the 

plug-cord removed. If the plug-cord is not 

installed, water or other foreign matter 

may enter the CCID (Charging Circuit 

Interrupting Device), resulting in a mal-

function.

6

Align the protrusion of the CCID 
(Charging Circuit Interrupting 
Device), with the groove of the 
plug-cord, insert the plug-cord into 
the CCID (Charging Circuit Inter-
rupting Device), and then turn the 
plug-cord connector nut of the 
plug-cord to install it.

Make sure that there are no foreign 

objects attached to the connection before 

installing the plug-cord. Remove any for-

eign objects if they are attached. Other-

wise, water or other foreign matter may 

enter the CCID (Charging Circuit Inter-

rupting Device), resulting in a malfunction.
Turn the plug-cord connector nut of the 

plug-cord in the opposite direction of 

removal until a click sound is heard and the 

plug-cord is secured.

7

Install the plug-cord connector cap 
and release key to the plug-cord 
that has been removed.

Securely install the release key to the plug-

cord connector cap to prevent it from 

being lost. Also, make sure that the release 

key does not fall out of the plug-cord con-

nector cap accidentally.
Store the plug-cord in a safe, clean and dry 

place.

WARNING

Q

When replacing the plug-cord (if 

equipped)

Check the following points regularly.
Failure to do so may cause an unex-

pected accident, resulting in death or 

serious injury.

O

Do not replace the plug-cord with wet 

hands.

Also, do not replace in a place that is 

rainy or wet.

O

Do not replace the plug-cord when 

the plug and/or charging connector 

are connected.

O

Check whether there are any local 

EV-charging regulations in place, and 

adhere to them.

O

Do not leave the CCID (Charging 

Circuit Interrupting Device) with the 

plug-cord removed.

101

2

2-2. Charging

El

ect
ric V
eh

icle

 sy

st

em

For safety, inspect the AC charging 
cable on a routine basis.

WARNING

O

Make sure that there are no foreign 

objects attached to the connection 

when installing the plug-cord to the 

CCID (Charging Circuit Interrupting 

Device).

O

When replacing the plug-cord, firmly 

turn the nut of the plug-cord until a 

click sound can be heard.

O

Do not replace the plug cord in Nor-

way.

NOTICE

Q

Precautions for the plug-cord (if 

equipped)

Do not use the plug-cord for any use 

other than charging this vehicle. Doing 

so may cause the plug-cord to be dam-

aged.

Inspecting the AC charging 
cable

WARNING

Q

Routine inspection

Check the following points regularly.
Failure to do so may cause an unex-

pected accident, resulting in death or 

serious injury.

O

The AC charging cable, plug, AC 

charging connector, CCID (Charging 

Circuit Interrupting Device), etc., have 

not been damaged

O

The electrical socket to be used is not 

damaged

O

The plug can be securely inserted into 

the electrical socket

O

The plug does not get extremely hot 

during use

O

The prongs of the plug are not bent or 

damaged

O

The plug is not dirty

Disconnect the plug from the electrical 

socket before inspecting it. If any abnor-

malities are found in the AC charging 

cable as a result of the inspection, imme-

diately stop using and contact any autho-

rized Lexus retailer or Lexus authorized 

repairer, or any reliable repairer.

Q

Maintaining the AC charging cable

When the AC charging cable is dirty, 

clean it with a damp cloth which has been 

firmly wringed out, and then dry it with a 

dry cloth. Never spray the AC charging 

cable directly with water. If it is cleaned 

under running water, fire or electric 

shock may occur during charging, possi-

bly resulting in death or serious injury.

Q

When not using the AC charging 

cable for a long time

Disconnect the plug from the electrical 

socket. Dirt and dust could accumulate 

on the plug or the electrical socket, pos-

sibly causing overheating which could 

lead to a fire.
Also, keep the cable in a place free from 

moisture.

102

2-2. Charging

Q

Rating

Voltage (Un): 220 V - 240 V ~

Frequency: 

Current: 10 A

Residual operating current (

): 6 mA

Ambient temperature: -30°C to 55°C

IP67

Q

Warning symbols

Appendix (Mode 2 AC charging cable)

This device is for use with electric vehicles. (This device does not 
require ventilation)

Do not attempt to disassemble or repair the AC charging cable, 
charging connector, plug or CCID (Charging Circuit Interrupting 
Device).

There may be a risk of electrical shock when using this device 
improperly.

If the plug, charging connector or CCID (Charging Circuit Inter-
rupting Device) is abnormally hot during use, unplug it immedi-
ately.

Connecting the AC charging cable to an extension cord is strictly 
prohibited.

Do not connect the device to a socket that is loose, worn, or bro-
ken. Ensure the plug fits the socket tightly.

103

2

2-2. Charging

El

ect
ric V
eh

icle

 sy

st

em

When the plug is used with a rain-tight socket for outdoor use, pro-
tect the plug and socket from rain and snow by using a rain-tight 
cover.

Do not immerse the plug or cord in water or other liquid. Do not 
expose the plug to rain and snow.

To reduce the risk of electric shock, connect only to a properly 
grounding type socket.

Do not hang the CCID (Charging Circuit Interrupting Device) on 
the plug. Ensure the CCID (Charging Circuit Interrupting Device) 
is supported.

Do not subject the AC charging cable, charging connector, plug or 
CCID (Charging Circuit Interrupting Device) to strong force or 
impact.

Do not place heavy objects on the AC charging cable, charging 
connector, plug or CCID (Charging Circuit Interrupting Device).

Do not use this device if the AC charging cable is frayed, has bro-
ken insulation, or any other signs of damage.

104

2-2. Charging

Q

Caution symbols

Q

Information symbols

Do not wind the power cord or AC charging cable around the 
CCID (Charging Circuit Interrupting Device) or charging connec-
tor.

This device may not operate if used with IT or other unearthed sys-
tems such as an isolated winding generator or isolating trans-
former.

This device has a non-switched protective conductor.

Do not use this device at an altitude over 4000 meter.

105

2

2-2. Charging

El

ect
ric V
eh

icle

 sy

st

em

P.90

Q

Connecting

Insert the AC charging connector into 
the AC charging inlet to connect it.

The AC charging connector will be locked 
automatically when it is connected to the 
AC charging inlet.

Q

Disconnecting

1

Unlock the AC charging connec-
tor by unlocking the doors. 
(

P.178)

2

Pull the AC charging connector 
straight out.

Q

AC charging connector lock function

O

If the AC charging connector is con-

nected and disconnected repeatedly, the 

AC charging connector lock function 

may temporarily not work to protect the 

system. In this case, wait a short time 

before connecting the AC charging con-

nector to the AC charging inlet again.

O

The AC charging connector lock func-

tion does not guarantee to prevent theft 

of the AC charging cable and is not nec-

essarily effective for all the situations.

O

If the AC charging connector is locked 

with the doors unlocked, the AC 

charging connector can be unlocked 

with the following procedures:

• Using wireless remote control: Press the 

unlock button to unlock the doors. 

(

P.178)

• Using smart entry & start system: After 

locking the doors once, unlock them 

again. (

P.178)

Q

Security feature

If an AC charging connector is not discon-

nected within approximately 30 seconds 

after the AC charging connector is 

unlocked, the security feature automatically 

locks the AC charging connector again.

Q

When the AC charging connector can-

not be connected to the AC charging 

inlet

Check that the connector lock pin is not 

extended.
If the connector lock pin is extended, the 

Locking and unlocking the 
AC charging port lid and AC 
charging connector

The AC charging connector will be 
locked when it is connected to the 
AC charging inlet, preventing the 
AC charging cable from being dis-
connected while charging.

Opening the AC charging port 
lid

Connecting and disconnecting 
the AC charging connector

106

2-2. Charging

AC charging connector is locked.
Unlock the doors to unlock the AC 

charging connector and check that the 

connector lock pin retracts.

Q

If the AC charging connector cannot be 

unlocked using the normal procedure

Use the following procedure to unlock the 

AC charging connector if the AC charging 

connector cannot be removed after 

unlocking the doors.
Only use the emergency release lever 
when the AC charging connector cannot 
be unlocked using other methods.

1

Remove the cover inside the luggage 

compartment by inserting a flathead 

screwdriver.

2

Pull the emergency release lever in the 
direction shown in the illustration.

*

The AC charging connector is unlocked 

and can be removed.

*

: Move the emergency release lever only 

in the direction shown in the illustration. 
Even if a click sound is heard after begin-
ning operation, do not stop pulling the 
emergency release lever until it cannot 
be moved. If the emergency release lever 
is moved in any other direction, it may be 
damaged.

3

Return the emergency release lever to 

its original position until a click sound is 

heard.

This procedure is a temporary correction 

procedure for emergency use only. If the 

problem persists, have the vehicle 

inspected by any authorized Lexus retailer 

or Lexus authorized repairer, or any reli-

able repairer immediately.

WARNING

Q

When connecting the AC charging 

connector to the charging inlet

Be careful not to touch the AC charging 

port lid lock portion.
When the AC charging connector lock 

operates, the AC charging port lid lock 

pin will also operate.
The AC charging port lid lock pin may hit 

a hand, resulting in injury.

107

2

2-2. Charging

El

ect
ric V
eh

icle

 sy

st

em

Connect the AC charging cable to 
an AC 220 V - 240 V electrical 
socket with a Residual Current Cir-
cuit-Breaker (RCCB) and a circuit 
breaker. Use of an electrical socket 
on dedicated 13 A circuit is strongly 
recommended to ensure the AC 
charging cable will operate prop-
erly.

Connecting the AC charging cable 
to an electrical socket on a dedi-
cated circuit is strongly recom-
mended. If the AC charging cable is 
connected to an electrical socket on 
a shared circuit, the use of other 
electrical appliances on the circuit 
may cause the circuit breaker to 
trip.

*

NOTICE

Q

When locking the AC charging con-

nector

Observe the following precautions. Fail-

ure to do so may cause a malfunction in 

the AC charging connector lock func-

tion.

O

Check that the AC charging connec-

tor to be used is compatible with this 

vehicle. If an incompatible or damaged 

AC charging connector is connected, 

it may not be locked.

O

Do not apply excessive force to the 

AC charging connector when the AC 

charging connector is locked. When 

removing the AC charging connector, 

make sure to unlock the AC charging 

connector.

Power sources that can be 
used (AC charging)

An external power source that ful-
fills the following criteria is neces-
sary for charging this vehicle.
Confirm this before charging.

WARNING

Q

Warnings for electrical faults

Make sure to observe the precautions in 

this Owner’s Manual when charging the 

vehicle.
Failure to use a power source that fulfills 

the requirements, or failure to observe 

the regulations while charging could lead 

to an accident, possibly resulting in death 

or serious injury.

Power sources

108

2-2. Charging

Ensure that a Residual Current Cir-
cuit-Breaker (RCCB) is installed in 
the circuit. If it is not, have it installed 
by a duly qualified professional.

When charging outdoors, make 
sure to connect the plug to a rain-
tight socket that is certified for out-
door use. Checking Residual 
Current Circuit-Breaker (RCCB) 
operation before its use is recom-
mended.

Check whether there are any local 
EV-charging regulations in the 
country where you reside that need 
to be observed.

*

: For detailed information, consult an 

electrician.

Q

Charging environment

To ensure safe charging, the following 

equipment is recommended.

O

Raintight socket

When charging outdoors, connect the plug 
to a raintight socket, and ensure that they 
are not sprayed directly with water while 
the plug is connected.

O

Dedicated circuit

• To reduce the risk of fire, connect the AC 

charging cable to an at least 13 A branch 

circuit with an overcurrent protection.

• To reduce the risk of electric shock when 

handling the AC charging cable, connect 

it to an electrical socket on a circuit with a 

Residual Current Circuit-Breaker 

(RCCB).

O

Remote switch

Allows the electricity from the socket to be 
interrupted by operating a switch, thus 
allowing safe removal and insertion of the 
plug on rainy days.

WARNING

Q

Power source precautions

Observe the following precautions.
If you do not follow them, fire, electrical 

shock or damage may occur, possibly 

resulting in death or serious injury.

O

Make sure to only connect the AC 

charging cable to an electrical socket 

with a ground terminal.

O

Connect the AC charging cable to an 

AC 220 V - 240 V electrical socket 

on a circuit with a Residual Current 

Circuit-Breaker (RCCB) and circuit 

breaker which meet local regulations. 

Use of an electrical socket on dedi-

cated 13 A circuit is strongly recom-

mended.

O

Do not connect the AC charging 

cable to a power strip, multiple electri-

cal socket adapter or conversion plug.

O

Connecting the AC charging cable to 

an extension cord is strictly prohibited. 

The extension cord may overheat and 

the leakage detection function of the 

CCID (Charging Circuit Interrupting 

Device) may not operate correctly.

O

Do not connect to a branch electrical 

socket.

O

Make sure to connect the AC 

charging connector and AC charging 

inlet directly. Do not connect a con-

version plug or extension cord 

between the AC charging connector 

and AC charging inlet.

109

2

2-2. Charging

El

ect
ric V
eh

icle

 sy

st

em

This is a charging method used when 
charging from an AC electrical socket 
(220 V-240 V) with the AC charging 
cable equipped to the vehicle or 
charging at a public charging station.

The charging start time (or departure time) 
and day can be set to carry out charging 

using the schedule at the desired date and 
time. (

P.129)

This is a charging method using a DC 
charger conforming to CHAdeMO

*


standards at a public charging station. 
Compared to AC charging, the trac-
tion battery can be charged in a short 
time.

*

: CHAdeMO is a trade name of DC 

charging method that the CHAdeMO 
Association is proposing.

The time required to charge the traction battery differs according to the charging 
voltage and charging current.

*1

: Even if charged with the AC charger at a public charging station, when the upper limit is 

set to “16A” or “8A” with “Charging Current” settings, the vehicle is charged at that cur-
rent. (

P.120)

*2

: The time required for charging to complete depends on conditions such as the remain-

ing charge of the traction battery, the outside temperature and the charger specifica-
tions.

Charging methods

The following methods can be used 
to charge the traction battery.

AC charging (

P.116)

DC charging (

P.125)

Estimated charging time

Connected 

power source

Charger

AC charging cable

DC 

charging

*6

AC charging

Charging 
voltage

AC 220 V-

240 V

AC 220 V-

240 V

AC 220 V-

240 V

AC 220 V-

240 V

Charging 
current

*1

Max. 125 A

32 A

16 A

8 A

10 A

Estimated 
charging 
time

*2, 3

Approxi-

mately 50 

minutes

*4

or 

80 minutes

*5

Approxi-

mately 6 

hours 30 

minutes

Approxi-

mately 12 

hours

Approxi-

mately 24 

hours

Approxi-

mately 19 

hours

110

2-2. Charging

*3

: When using “My Room Mode”, the time required for charging to complete may 

become longer than normal or the charging may not be completed.

*4

: It is the time required for charging to complete approximately 75% of the maximum 

charge capacity.

*5

: It is the time required for charging to complete the maximum charge capacity.

*6

: Depending on the type of the DC charger, the charging time displayed on the DC char-

ger may be longer than normal.

Q

Charging time may increase when

In the following situations, charging time 

may become longer than normal:

O

When the ambient temperature is hot or 

cold.

O

When the vehicle is consuming a lot of 

electricity, for example, when the head-

lights have been left on, etc.

O

When using My Room Mode.

O

When a power outage occurs during 

charging.

O

When the power supply is interrupted.

O

When the voltage of the external power 

source drops.

O

When the charge level of the 12-volt bat-

tery is low, such as when the vehicle has 

not been started or charged for a long 

period of time.

O

When selecting “Charging Current” set-

tings “16A” or “8A”.

O

When the traction battery heater oper-

ates.

O

When the traction battery cooler is oper-

ated before charging. (

P.111)

O

When there is a problem with the termi-

nal connections of the electrical socket.

O

When the traction battery temperature 

becomes high immediately after high-

load driving.

O

When adjusting the power supply with 

the charger.

O

When frequently and repeatedly using 

DC charging.

This vehicle includes several functions 
that are linked with charging.

Q

My Room Mode (

P.139)

When the charging cable is connected 
to the vehicle, electrical components 
such as the air conditioning system and 
audio system can be used by the 
power supply from an external power 
source

*

.

*

: Depending on the situation, electricity of 

the traction battery may be consumed.

Q

Traction battery heater

When the outside temperature is low 
and the charging cable is connected to 
the vehicle, this function automatically 
warms the traction battery until it 
reaches or exceeds a certain tempera-
ture.

The operation of this function is 
stopped automatically when the 
charging cable is disconnected or if 
the charging cable is left connected 
to the vehicle for approximately 3 
days.

When the charging schedule is used 
(

P.129), this function will operate 

according to the schedule settings.

Charging-linked functions

111

2

2-2. Charging

El

ect
ric V
eh

icle

 sy

st

em

Q

Traction battery warming control

This control operates after the 
charging cable remains connected to 
the vehicle for approximately 3 days 
and the traction battery heater auto-
matically stops. It automatically insu-
lates the traction battery in extremely 
low temperatures.

This control stops 31 days after the 
charging cable is connected, even if 
it is still connected to the vehicle.

When this control operates, 
charging schedule settings are 
ignored and charging starts imme-
diately.

Q

Traction battery cooler

When the traction battery is hot and 
the AC charging cable is connected to 
the vehicle, this function cools the trac-
tion battery to protect it before AC 
charging is performed.
The function may operate when con-
tinuously driving at high speeds such as 
driving on highways or freeways, or 
during DC charging.

Q

Traction battery heater

O

Traction battery heater may operate 

when charging is not being performed.

O

When Traction battery heater is operat-

ing, the charging indicator will illuminate.

O

When Traction battery heater is operat-

ing during charging, the charging may 

take longer than normal.

O

The remaining charge of the traction bat-

tery declines when the traction battery 

heater operates, it might be necessary to 

recharge the traction battery again in 

order to supplement the remaining 

charge.

Q

Traction battery cooler

O

For AC charging: Traction battery cooler 

settings can be changed on the multi-

information display. (

P.111)

O

The AC charging indicator will illuminate 

when the traction battery cooler is on 

standby or operating.

O

When the charge level of the traction 

battery is low, the traction battery cooler 

may not operate, even if the temperature 

of the traction battery is high.

O

When the following conditions are met 

while the traction battery cooler is oper-

ating, the cooling operation will stop.

• The hood is opened

• The power switch is turned to ACC or 

ON.

• The shift position is changed to any posi-

tion other than P

• The Remote Air Conditioning System is 

operated (

P.355)

• “Charge Now” is turned on (

P.135)

• The remaining charge of the traction bat-

tery drops below a certain amount

O

The traction battery cooler operates 

using power supplied by the traction bat-

tery and an external power source.

• While the traction battery cooler is oper-

ating, the charge of the traction battery 

will increase and decrease within a cer-

tain range, and will not increase as during 

AC charging.

• When the traction battery cooler oper-

ates, charger will recognize it as the bat-

tery being charged. If this function 

operates while a charger which charges 

a charging fee is connected to the vehi-

cle, AC charging fees will apply.

Q

Changing of the traction battery cooler 

setting

1

Press 

 or 

 of the meter control 

switches and select 

 on the multi-

information display.

2

Press 

 or 

 of the meter control 

switches and select “Vehicle Settings”, 

and then press “OK”.

112

2-2. Charging

3

Press 

 or 

 of the meter control 

switches and select “Charging Set-

tings”, and then press “OK”.

4

Press 

 or 

 of the meter control 

switches and select “Battery Cooler”, 

and then press “OK”.

5

Select “On” or “Off”, and then press 

“OK”.

When selecting “Off”, the traction battery 

output may be restricted depending on the 

driving situation.

To enable the use of Electric Vehicle, 
we recommend systematically 
charging the vehicle.

Before leaving home 
In order to use the Electric Vehicle, 
charge the traction battery at home 
before leaving.

The charging schedule function (

P.129) 

can be used to set the system to automati-
cally fully charge the traction battery 
before your desired departure time. It is 
also possible to set the air conditioning to 
make the interior in a comfortable state 

Charging tips

This section explains methods for 
using the charging function of this 
vehicle and checking information 
related to charging.

Systematically charging

A

113

2

2-2. Charging

El

ect
ric V
eh

icle

 sy

st

em

before your desired departure time.

On the way to the destination or at 
the destination 
When the remaining charge of the 
traction battery gets low, recharge 
the battery at the nearest charging 
station.

When using DC charging, the charging 
can be done in approximately 50 minutes 
up until approximately 75% of the maxi-
mum charge capacity. (

P.109)

After returning home 
In order to drive the next time, 
charge the traction battery.

Settings the charging schedule allows you 
to charge the traction battery at the 
desired time such as late at night or early in 
the morning. Furthermore, the charging 
schedule can be set to automatically 
charge the traction battery every day or at 
the same time on certain days. (

P.129)

Information related to charging is dis-
played on the multi-information dis-
play.

Q

While charging

When any door is opened during 

charging, the current charging condi-
tion and estimated time

*

 until charging 

completed can be checked on the 
multi-information display.
The time until charging completed may 
not be displayed if the charging current 
to the traction battery becomes 
smaller and the charging time 
becomes longer.

*

: During DC charging, the estimated time 

will not be displayed.

Q

After charging is complete

After charging is complete, when a 
door is opened while the power switch 
is off, a message detailing the results of 
the charging is displayed. Also, a mes-
sage is displayed if an operation that 
cannot be performed or a situation that 
charging cannot be performed occurs 
during charging is performed.

When a message is displayed, follow the 
instructions displayed on the multi-infor-
mation display. (

P.150)

Checking information related to 
charging

B

C

114

2-2. Charging

Q

Charging current

The maximum current for the AC charging 

is 32 A. However, the charging current 

may become smaller than 32 A depending 

on the maximum current of the AC char-

ger.

Q

Safety functions

O

The EV system will not start while the 

charging cable is connected to the vehi-

cle, even if the power switch is operated.

O

If the charging cable is connected while 

the “READY” indicator is illuminated, the 

EV system will stop automatically and 

driving will not be possible.

O

When the charging cable is connected to 

the vehicle, the shift position cannot be 

changed from P to other positions.

This vehicle has been designed to 
allow charging from an external power 
source using an AC charging cable for 
exclusive use with standard household 
AC outlets.
However, the vehicle differs greatly 
from standard household electrical 
goods in the following ways, and incor-
rect usage could cause a fire or elec-
tric shock, possibly leading to death or 
serious injury.

When charging, a large amount of 
current will flow for a long time. 
(

P.109)

Depending on the charging envi-
ronment, charging may be per-
formed outdoors.

To perform charging correctly, read the 
precautions and then follow the charging 

Things to know before 
charging

Make sure to read the following 
precautions before connecting the 
charging cable to the vehicle and 
charging the traction battery.

WARNING

Q

Caution when charging

People with implantable cardiac pace-

makers or cardiac resynchronization 

therapy-pacemakers should not 

approach the vehicle while charging is 

being performed. If it is necessary to 

approach the vehicle, ask someone else 

to do so.

O

Do not approach the onboard traction 

battery charger, or charging cable 

while charging is being performed. 

Charging may affect the operation of 

pacemakers.

O

Do not remain in the vehicle while 

charging is being performed. 

Charging may affect the operation of 

pacemakers.

O

Do not enter the vehicle, even to 

remove things from the luggage com-

partment while charging is being per-

formed. 

Charging may affect the operation of 

pacemakers.

Q

When the charging cable is con-

nected to the vehicle

Do not operate the shift position.
In the unlikely event that the charging 

cable has been damaged, the shift posi-

tion may change from P to other posi-

tions, it may cause the vehicle to move 

unexpectedly, possibly leading to an 

accident.

Charging precautions

115

2

2-2. Charging

El

ect
ric V
eh

icle

 sy

st

em

procedures. Charging should only be per-
formed by adults which properly under-
stand the charging procedures.

Do not allow children to use the 
charging cable without supervision.
Also, keep the charging cable out of 
reach of infants.

When charging with a charger, 
make sure to follow the correct pro-
cedures for using each charger.

When charging using a public 
charging station, check the setting 
of the charging schedule function.

• If the charging schedule is set to “On”, 

make sure to set it to “Off” or “Charge 
Now” function to “On” before using a 
public charging station. (

P.135)

• If the charging schedule is set to “On”, 

charging will not start even if the AC 
charging cable is connected. Also, 
charging fee may occur due to the con-
nection of the AC charging cable.

Before performing charging make 
sure that the following conditions are 
met:

The parking brake is set. (

P.234)

The headlights the emergency flash-
ers and interior lights, etc., are 
switched off.

If any of these lights are turned on, power 
will be consumed by these features and 
charging may take longer than normal.

The power switch is OFF. 
(

P.224)

Before performing charging, make 
sure that each part of the AC charging 
cable is in good condition. (

P.92)

Q

If the AC charging connector and DC 

charging connector are used at the 

same time

AC charging and DC charging cannot be 

conducted simultaneously.
If the two connectors have been connected 

to the vehicle, the battery will only be 

charged through either one of the charging 

modes that has started first. However, the 

battery will not be recharged with the other 

method even after the first mode is com-

pleted. To start the other mode, disconnect 

the charging connector and then perform 

the charging operation again.

Q

Capacity reduction of the traction bat-

tery

The capacity of the traction battery will 

decline gradually when the traction battery 

is in use. The rate at which it declines will dif-

fer in accordance with environmental con-

ditions and the way in which the vehicle is 

used. Observing the following can help 

suppress the decline in the traction battery 

capacity.

O

Avoid parking the vehicle in high tem-

perature areas, under direct sunlight 

when the traction battery is fully charged.

O

Avoid accelerating and decelerating fre-

quently and suddenly.

O

Avoid frequent driving at high speed.

O

Use the charging schedule function as 

much as possible in order to fully charged 

the traction battery before starting off. 

(

P.129)

O

Avoid frequent DC charging

Also, if the capacity of the traction battery 
capacity reduces, the distance that can be 
driven decreases. However, vehicle perfor-

Confirm the following before 
charging

Inspecting the AC charging 
cable

116

2-2. Charging

mance does not significantly become 
worse.

Q

When the remaining charge of the trac-

tion battery is low after charging

In the following situations, the remaining 

charge of the traction battery after charging 

completes may be less than normal in order 

to protect the traction battery (the driving 

range after the battery is fully charged may 
be shorter).

*

O

Charging is performed when the outside 

temperature is low or high

O

Charging is performed immediately after 

high-load driving or in extreme heat

In any other situation, if the remaining 
charge of the traction battery is significantly 
lower than normal after charging com-
pletes, have the vehicle inspected by any 
authorized Lexus retailer or Lexus autho-
rized repairer, or any reliable repairer.

*

: When this occurs, even if the remaining 

charge display of the traction battery 
shows that it is fully charged, the remain-
ing charge rapidly decreases faster than 
normal.

How to use AC charging

This section explains the AC 
charging procedure for the trac-
tion battery with the equipped AC 
charging cable.
When using a public charging sta-
tion, make sure to check the opera-
tion instructions of the AC charger.
When the charging schedule is reg-
istered, make sure “Charge Now” 
is turned on before charging. 
(

P.135)

NOTICE

Q

Handling the AC charging cable and 

related parts

To prevent damage to the AC charging 

cable and related parts, observe the fol-

lowing precautions.

O

When canceling charging or when 

charging is completed, disconnect the 

AC charging connector before dis-

connecting the plug from the electrical 

socket.

O

When disconnecting the AC charging 

connector, make sure that it is 

unlocked.

O

Do not forcefully pull the AC charging 

connector cap or AC charging inlet 

cap.

O

Do not apply a vibration to the AC 

charging connector while charging. 

Charging may be stopped.

O

Do not insert anything but an AC 

charging connector into the AC 

charging inlet.

117

2

2-2. Charging

El

ect
ric V
eh

icle

 sy

st

em

P.114

1

Prepare the AC charging cable.

When using the Mode 2 AC 
charging cable

2

Insert the plug of the AC charging 
cable into the electrical socket of 
the external power source.

Make sure to hold the body of the plug and 

insert it firmly into the electrical socket. If 

the electrical socket is equipped with a 

remote switch, turn it on.
Check that the power indicator on the 

CCID (Charging Circuit Interrupting 

Device) is illuminated.
(If it is not illuminated, refer to P.143)
In order to reduce the load on the electri-

cal socket and plug, when inserting the 

plug, use a string, etc., to hang the CCID 

(Charging Circuit Interrupting Device) on 

a hook or equivalent.
The CCID (Charging Circuit Interrupting 

Device) can be hung by using the hole in 

the back. Do not attach the CCID 

(Charging Circuit Interrupting Device) to 

the wall with screws.

NOTICE

O

When inserting the plug into or dis-

connecting the plug from the electrical 

socket, make sure to hold the body of 

the plug.

O

Do not damage the AC charging inlet 

cap with a sharp object.

O

Do not forcefully pull the AC charging 

cable if it is caught or entangled. If the 

cable is entangled, disentangle it 

before using.

O

Do not attempt to disassemble or 

repair the AC charging inlet. Failure to 

do so may cause an unexpected acci-

dent, resulting in serious injury. Please 

contact any authorized Lexus retailer 

or Lexus authorized repairer, or any 

reliable repairer for repair and 

replacement.

Confirm the following before 
charging

When charging

118

2-2. Charging

When using the Mode 3 AC 
charging cable (if equipped)

2

Remove the cap of the charging 
plug and then connect the charging 
plug to the charger.

When connecting the charging plug into 

the charger, make sure that the identifica-

tion symbols are the same.
Make sure to hold the body of the charging 

plug and insert it firmly and fully into the 

charger.
Follow the instructions of the charger for 

details regarding how to connect the AC 

charging cable and how to start charging. 

Depending on the charger, it may be nec-

essary to receive authorization to use it. 

For details, refer to the information of the 

charger.

3

Unlock AC charging port lid by 
unlocking the doors. (

P.178)

4

Open the AC charging port lid 
(right side of the vehicle). (

P.89)

The AC charging inlet light will illuminate.

5

Remove the AC charging inlet cap 
and secure it as shown in the illus-
tration.

6

Remove the AC charging connec-
tor cap and secure it to the cable.

7

Make sure to hold the body of the 
AC charging connector and insert 

119

2

2-2. Charging

El

ect
ric V
eh

icle

 sy

st

em

it firmly and fully into the AC 
charging inlet.

When connecting the AC charging con-

nector into the AC charging inlet, make 

sure that the identification symbols are the 

same.
When the AC charging connector is 

inserted straight as far as possible, it will 

automatically lock. Check that the AC 

charging indicator illuminates. If the AC 

charging indicator does not illuminate, the 
AC charging connector is not locked.

*

*

: If the AC charging connector is not 

firmly inserted, locking operation will be 
performed several times.

8

Confirm that the AC charging indi-
cator is illuminated.

Charging will not start if the AC charging 

indicator does not illuminate when the AC 

charging connector is inserted. (

P.143)

Charging will not start if the AC charging 

connector is not locked. However, 

depending on the type of the charger of 

the public charging station, the AC 

charging connector will not be locked if 

the operation to start the charging is not 

performed.
If the AC charging indicator flashes, the 

charging schedule has been registered. 

(

P.120)

If the error warning indicator on the CCID 

(Charging Circuit Interrupting Device) 

flashes when the AC charging cable is 

connected, check P.97 and follow the cor-

rection procedure.
The AC charging indicator will turn off 

when charging is completed.

The AC charging indicator will also turn off 

when charging is stopped for some reason 

before completion. In this case, refer to 

P.143

Q

During AC charging

O

The charging starting time may differ 

depending on vehicle conditions, but it 

does not indicate a malfunction.

O

The surface of the CCID (Charging Cir-

cuit Interrupting Device) may become 

hot, but it does not indicate a malfunction.

O

Depending on radio wave conditions, 

interference may be heard on the radio.

O

The current charging condition and the 

estimated time until charging completed 

can be checked on the multi-information 

display when a door is opened during 

AC charging. (

P.113)

O

The surrounding area of the onboard 

traction battery charger in the motor 

compartment may become hot during 

charging/after charging.

120

2-2. Charging

Q

If the AC charging indicator flashes 

after the AC charging connector is con-

nected

The charging schedule is registered and the 

charging cannot be performed. To cancel 

the charging schedule and start charging 

immediately, perform any of the following:

O

Turn “Charge Now” to “On”. (

P.135)

O

While the AC charging indicator is flash-

ing, remove and reconnect the AC 

charging connector within 5 seconds.

Q

When using a AC charger with authen-

tication function at public charging sta-

tion

If the doors are unlocked during AC 

charging, the AC charging connector will 

be unlocked and the charging will be 

stopped. In that case, the AC charger 

authentication will be canceled and the 

charging may not be able to restart. Recon-

nect the AC charging connector and per-

form the AC charger authentication.

Q

When not using the vehicle for an 

extended period of time

P.79

Q

Charging time

P.109

Q

Charging time may increase when

P.110

Q

Safety functions

Charging will not start when the AC 

charging connector is not locked. If the AC 

charging indicator does not illuminate even 

when the AC charging connector is 

inserted, remove and reinsert the AC 

charging connector, and check that the AC 

charging indicator illuminates.

Q

When the AC charging connector can-

not be connected to the AC charging 

inlet

P.105

Q

Changing the “Charging Current” set-

tings

1

Press 

 or 

 of the meter control 

switches and select 

 on the multi-

information display.

2

Press 

 or 

 of the meter control 

switches and select “Vehicle Settings”, 

and then press “OK”.

3

Press 

 or 

 of the meter control 

switches and select “Charging Settings” 

and then press “OK”.

4

Press 

 or 

 of the meter control 

switches and select “Charging Cur-

rent”, and then press “OK”.

5

Select “MAX”, “16A” or “8A”, and then 

press “OK”.

The maximum current is restricted to the 
selected upper limit value of 16A/8A

*


when charging. If the house breaker is 

tripped when charging even with the upper 

limit of the electric current changed, check 

that the connected power supply satisfies 

the required conditions to the charger.

*

: When charging current is restricted, the 

time until the charge completed 
becomes longer.

Q

Changing the “Charging Limit” settings

The selected upper limit value is common to 

AC charging and DC charging.

1

Press 

 or 

 of the meter control 

switches and select 

 on the multi-

information display.

2

Press 

 or 

 of the meter control 

switches and select “Vehicle Settings”, 

and then press “OK”.

3

Press 

 or 

 of the meter control 

switches and select “Charging Settings” 

and then press “OK”.

4

Press 

 or 

 of the meter control 

switches and select “Charging Limit”, 

and then press “OK”.

121

2

2-2. Charging

El

ect
ric V
eh

icle

 sy

st

em

5

Select “Full” or “90%” and then press 

“OK”.

When “90%” is selected, the upper limit of 

the charge capacity will be restricted not to 

exceed 90%.
If the setting is changed during DC 

charging, charging may stop due to the 

operation of the DC charger timer and the 

traction battery cannot be fully charged.

WARNING

Q

Caution when using AC charging

Observe the following precautions.
Failure to do so may cause an unex-

pected accident, resulting in death or 

serious injury.

O

Connect the AC charging cable to a 

power source suitable for charging. 

(

P.107)

O

Make sure that the AC charging 

cable, plug and electrical socket are 

free of foreign matter and not 

deformed or damaged.

O

Before charging, check that the AC 

charging inlet does not have deforma-

tions, damage, corrosion, dirt and dust, 

or other foreign materials such as 

snow or ice attached to it. If anything is 

attached to the inlet, be sure to com-

pletely remove the material before 

connecting the AC charging connec-

tor.

O

Mode 3 AC charging cable: Before 

inserting the charging plug into the 

charger, make sure there is no dirt or 

dust on the terminal areas. If there is 

dirt or dust on these areas, remove it 

completely before inserting the 

charging plug.

O

Do not let the terminals of the AC 

charging inlet get wet.

O

Only use electrical sockets where the 

plug can be securely inserted.

O

Do not charge with the AC charging 

cable bundled or coiled up otherwise it 

may overheat.

O

Do not touch the terminals of the AC 

charging connector or AC charging 

inlet with sharp metal objects (needles 

etc.) or hands, or short them with for-

eign objects.

O

When charging outdoors, make sure 

to connect the plug to a raintight 

socket that is certified for outdoor use.

Ensure the raintight cover closes com-

pletely. If the raintight cover cannot be 

closed, replace a new one.

O

When using a AC charger, follow the 

charging handling method to cancel 

the charging.

O

If the AC charging cable or any 

related parts become hot or emit any 

smoke, strange smells or noise, stop 

charging immediately.

O

Do not connect the plug of the AC 

charging cable if the electrical socket 

is submerged in water or snow.

O

When charging during rain or snow, 

do not pull out or insert the plug with 

wet hands. Also, do not get the electri-

cal socket and plug wet.

O

Do not charge the traction battery 

when there is a possibility of lightning.

O

Be careful not to get the AC charging 

cable caught in a side door or the back 

door.

O

Do not drive over or park on the AC 

charging cable, plug, AC charging 

connector and CCID (Charging Cir-

cuit Interrupting Device).

O

Firmly insert the plug of the AC 

charging cable into an electrical 

socket.

O

Do not use an extension cord or con-

version plugs.

122

2-2. Charging

WARNING

O

Close the hood when using AC 

charging. The cooling fans may sud-

denly start to run. Keep hands and 

clothing (especially a tie, a scarf or a 

muffler) away from the fans. Failure to 

do so may cause the hands or clothing 

to be caught, resulting in serious injury.

O

After connecting the AC charging 

cable, confirm that it is not wound 

around anything.

O

If the power indicator on the CCID 

(Charging Circuit Interrupting 

Device) does not illuminate after plug-

ging the AC charging cable into the 

socket, unplug it immediately.

Q

When connecting the AC charging 

connector

Follow the handling procedures of the 

AC charging cable to connect the AC 

charging connector. If the connector is 

not connected properly, the system can-

not recognize the connection, and it may 

be possible to start the EV system. After 

charging is completed, make sure to 

remove the AC charging connector 

from the AC charging inlet before start-

ing the EV system.
If the vehicle is started off with the con-

nector still connected, it could lead to an 

accident, possibly resulting in death or 

serious injury.

Q

If the error warning indicator on the 

CCID (Charging Circuit Interrupting 

Device) illuminates or flashes during 

charging

Electrical leakage may have been 

detected in the power source circuit or 

the AC charging cable or CCID 

(Charging Circuit Interrupting Device) 

may be malfunctioning. Refer to P.97 

and follow the correction procedure. If 

the error warning indicator does not turn 

off even after performing the correction 

procedure, immediately stop charging, 

disconnect the AC charging cable and 

contact any authorized Lexus retailer or 

Lexus authorized repairer, or any reli-

able repairer. Continuing to charge the 

traction battery in this condition may lead 

to an accident, possibly resulting in seri-

ous injury.

Q

Onboard traction battery charger

The onboard traction battery charger is 

located in the motor compartment. 

Make sure to observe the following pre-

cautions regarding the onboard traction 

battery charger. Failure to do so may 

result in death or serious injury such as 

burns and electric shocks.

O

The onboard traction battery charger 

may become hot during charging. Do 

not touch the onboard traction battery 

charger, as doing so may result in 

burns.

O

Do not disassemble, repair or modify 

the onboard traction battery charger. 

When the onboard traction battery 

charger needs to be repaired, contact 

any authorized Lexus retailer or Lexus 

authorized repairer, or any reliable 

repairer.

NOTICE

Q

When charging

Do not insert the plug of the AC 

charging cable into the AC charging 

inlet, as doing so may damage the AC 

charging inlet.

123

2

2-2. Charging

El

ect
ric V
eh

icle

 sy

st

em

To prevent electrical shock, be sure to 
remove by the following procedures.

1

Unlock the AC charging connec-
tor by unlocking the doors. 
(

P.178)

The AC charging inlet light will illuminate.
If the AC charging connector is unlocked 

during charging (while the AC charging 

indicator is illuminated), AC charging will 

be interrupted.

2

Make sure to hold the body of the 
AC charging connector and pull it 
towards you.

3

Install the AC charging connector 
cap.

4

Install the AC charging inlet cap 
and close the AC charging port lid.

Align the horizontal sections of the cap 

and inlet, and then insert the cap straight 

into the inlet.

NOTICE

Q

Using an electric generator

Do not use an electric generator as a 

power source for charging. If used, the 

supplied voltage may be insufficient for 

charging, charging may be unstable, 

and/or the error warning indicator on 

the CCID (Charging Circuit Interrupting 

Device) of the AC charging cable may 

flash.

Q

Usable temperature range

O

Do not charge if the outside tempera-

ture is -30°C (-22°F) or below, as it is 

likely that charging will take longer.

O

Do not leave the vehicle or the AC 

charging cable in areas where the out-

side temperature is lower than -40°C 

(-40°F).

Q

Charging environment

Due to the environment in which the 

power equipment is located, charging 

may be unstable due to noise, the voltage 

may be insufficient, and the error warn-

ing indicator on the CCID (Charging 

Circuit Interrupting Device) of the AC 

charging cable may flash.

Q

Traction battery charge

When charging, if the supplied power is 

low and the traction battery heater or 

another high current function operates, 

the driving range may be temporarily 

decreased.

After charging

124

2-2. Charging

When using the Mode 2 AC 
charging cable

5

Disconnect the plug of the AC 
charging cable from the electrical 
socket when the AC charging 
cable will not be used for a long 
period of time.

Hold the body of the plug when discon-

necting it.
Make sure to put the cable away immedi-

ately after disconnecting it. (

P.124)

When the plug is left connected to the 

electrical socket, inspect the plug and 

electrical socket once a month to check if 

dirt and dust has accumulated.

When using the Mode 3 AC 
charging cable (if equipped)

5

After removing the charging plug 
from the charger, install the cap to 
the charging plug.

Make sure to hold the body of the charging 

plug when removing it.
Make sure to put the cable away immedi-

ately after disconnecting it. (

P.124)

Q

When the outside temperature is low or 

high

The needle of the SOC (State of Charge) 

gauge (

P.161) may drop slightly when the 

power switch is changed to ON, even if 

charging has been completed and the trac-

tion battery is fully charged. However, this 

does not indicate a malfunction.

Q

When removing the AC charging con-

nector

Unlock the doors using the smart entry & 

start system or wireless remote control to 

unlock the AC charging connector, make 

sure that the lock is released, and then pull 

the AC charging connector towards you.

WARNING

Q

After charging

Disconnect the plug from the electrical 

socket if the AC charging cable will not 

be used for a long time.
Dirt and dust may accumulate on the 

plug or electrical socket, which could 

cause a malfunction or fire, possibly lead-

ing to death or serious injury.

NOTICE

Q

After charging

O

Store the AC charging cable out of 

reach of infants and children.

O

After disconnecting the AC charging 

connector from the AC charging inlet, 

make sure to install the AC charging 

inlet cap and AC charging connector 

cap, and close the AC charging port 

lid. 

If either of these caps is not installed, 

water or foreign matter may enter the 

AC charging inlet and cause the vehi-

cle to malfunction.

O

After disconnecting the plug of the 

AC charging cable from the electrical 

socket, keep the AC charging cable in 

a safe place free from moisture, dirt 

and dust. The AC charging cable or 

plug may be damaged if stepped on or 

driven over by a vehicle.


Content      ..     1      2      3      4      ..