Lexus RZ (2023 year). Manual in english - page 15
 

  Index      Manuals     Lexus RZ (2023 year). Manual in english


Search            copyright infringement  


Content      ..     13      14      15      16     ..


Lexus RZ (2023 year). Manual in english - page 15


473

8

8-5. Tire maintenance

Ma
inte
na

nc

e and care

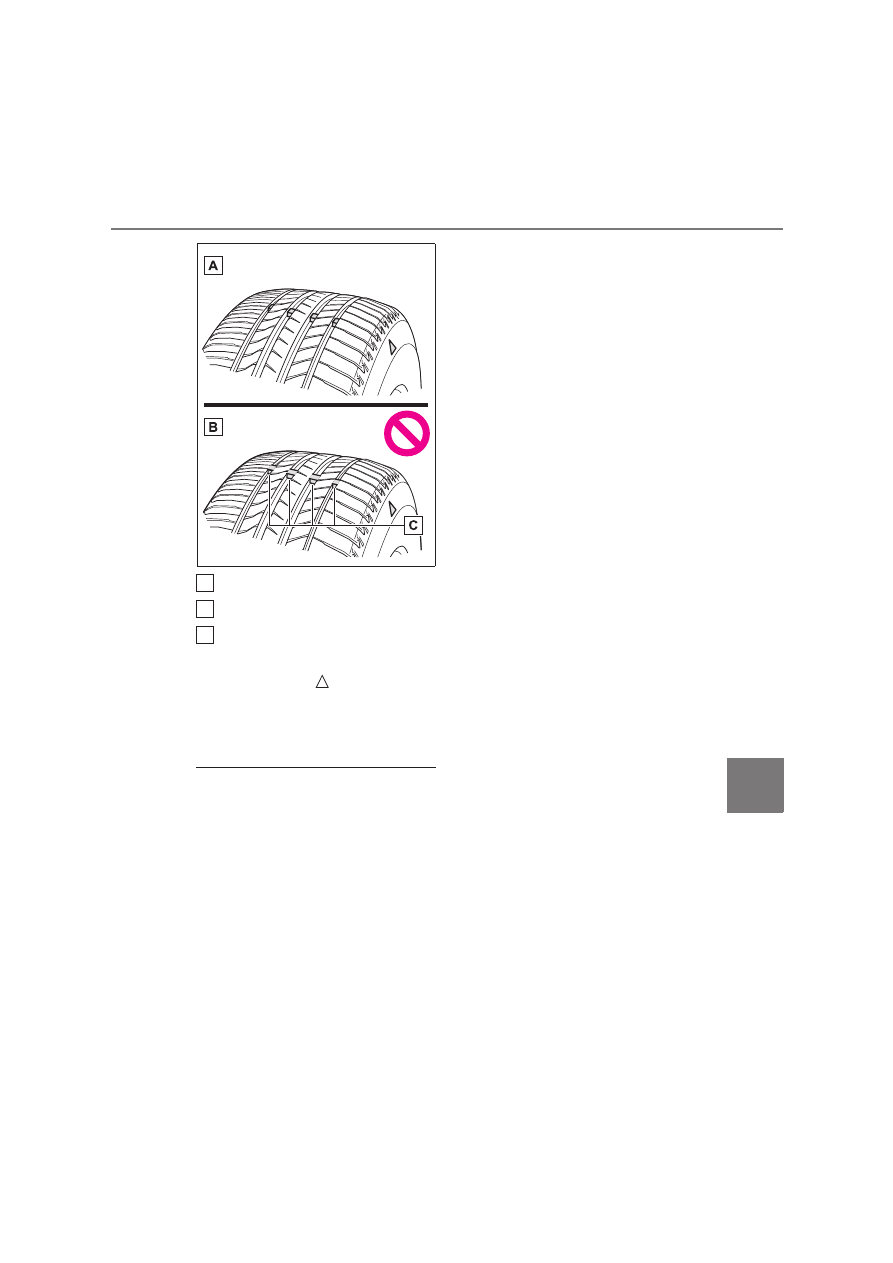
New tread
Worn tread
Treadwear indicator

The location of treadwear indicators is 
shown by a “TWI” or 

 mark, etc., 

molded into the sidewall of each tire.
Replace the tires if the treadwear indica-
tors are showing on a tire.

When to replace your vehicle’s tires

Tires should be replaced if:

The treadwear indicators are showing on 

a tire.

You have tire damage such as cuts, splits, 

cracks deep enough to expose the fabric, 

and bulges indicating internal damage.

A tire goes flat repeatedly or cannot be 

properly repaired due to the size or loca-

tion of a cut or other damage.

If you are not sure, consult with any autho-
rized Lexus retailer or Lexus authorized 
repairer, or any reliable repairer.

Tire life

Any tire over 6 years old must be checked 

by a qualified technician even if it has sel-

dom or never been used or damage is not 

obvious.

If the tread on snow tires wears down 

below 4 mm (0.16 in.)

The effectiveness of the tires as snow tires is 

lost.

A
B
C

474

8-5. Tire maintenance

The tire pressure warning system of 
this vehicle adopts a 2-type warning 
system. (

P.504)

Multi-information display (vehicles 
without a head-up display)

Multi-information display (vehicles 
with a head-up display)

Center display

When “Adjust Pressure” is dis-
played (Normal Warning)

A warning with the tire pressure warning 
light and warning buzzer when there is an 
unknown level of low tire pressure with the 
appearance of the tire due to natural air 
leakage as well as the pressure lowering 
due to changes in the pressure according 
to the outside temperature.

When “Immediately Check tyre 
when Safe” is displayed (Emergency 
Warning)

A warning with the tire pressure warning 
light and warning buzzer when there is a 
known level of low tire pressure with the 
appearance of the tire due to pressure sud-
denly lowering.
However, the system may not be able to 
detect sudden tire ruptures (bursting, etc.).

The tire pressure detected by the 
tire pressure warning system can be 
displayed on the center display. 
(

P.261)

Routine tire inflation pressure checks

The tire pressure warning system does not 

replace routine tire inflation pressure 

checks.
Make sure to check tire inflation pressure as 

part of your routine of daily vehicle checks.

Operation of the tire pres-
sure warning system

Your vehicle is equipped with a tire 
pressure warning system that uses 
tire pressure warning valves and 
transmitters to detect low tire infla-
tion pressure before serious prob-
lems arise.

475

8

8-5. Tire maintenance

Ma
inte
na

nc

e and care

Tire inflation pressure

It may take a few minutes to display the 

tire inflation pressure after the power 

switch is turned to ON.

It may also take a few minutes to display the 
tire inflation pressure after inflation pres-
sure has been adjusted.

Tire inflation pressure changes with tem-

perature. The displayed values may also 

be different from the values measured 

using a tire pressure gauge.

Situations in which the tire pressure 

warning system may not operate prop-

erly

In the following cases, the tire pressure 

warning system may not operate prop-

erly.

• If non-genuine Lexus wheels are used.

• A tire has been replaced with a tire that is 

not an OE (Original Equipment) tire.

• A tire has been replaced with a tire that is 

not of the specified size.

• Tire chains, etc. are equipped.

• If a window tint that affects the radio wave 

signals is installed.

• If there is a lot of snow or ice on the vehi-

cle, particularly around the wheels or 

wheel housings

• If the tire inflation pressure is extremely 

higher than the specified level.

• If tires not equipped with tire pressure 

warning valves and transmitters are used.

• If the ID code on the tire pressure warn-

ing valves and transmitters is not regis-

tered in the tire pressure warning 

computer.

Performance may be affected in the fol-

lowing situations.

• Near a TV tower, electric power plant, 

gas station, radio station, large display, 

airport or other facility that generates 

strong radio waves or electrical noise.

• When carrying a portable radio, cellular 

phone, cordless phone or other wireless 

communication device.

If tire position information is not correctly 
displayed due to the radio wave conditions, 
the display may be corrected by changing 

the location of the vehicle as the radio 
wave conditions may change.

When the vehicle is parked, the time 

taken for the warning to start or go off 

could be extended.

When tire inflation pressure declines rap-

idly for example when a tire has burst, the 

warning may not operate.

Installing tire pressure warning 
valves and transmitters

NOTICE

Repairing or replacing tires, wheels, 

tire pressure warning valves, trans-

mitters and tire valve caps

When removing or fitting the wheels, 

tires or the tire pressure warning 

valves and transmitters, contact any 

authorized Lexus retailer or Lexus 

authorized repairer, or any reliable 

repairer as the tire pressure warning 

valves and transmitters may be dam-

aged if not handled correctly.

Make sure to install the tire valve caps. 

If the tire valve caps are not installed, 

water could enter the tire pressure 

warning valves, corrode the valve, and 

cause sticking and air leaks.

When replacing tire valve caps, do not 

use tire valve caps other than those 

specified. The cap may become stuck.

To avoid damage to the tire pressure 

warning valves and transmitters

When a tire is repaired with liquid seal-

ants, the tire pressure warning valve and 

transmitter may not operate properly. If a 

liquid sealant is used, contact any author-

ized Lexus retailer or Lexus authorized 

repairer, or any reliable repairer or other 

qualified service shop as soon as possi-

ble. Make sure to replace the tire pres-

sure warning valve and transmitter when 

replacing the tire.

476

8-5. Tire maintenance

When replacing tires or wheels, tire 
pressure warning valves and transmit-
ters must also be installed.
When new tire pressure warning 
valves and transmitters are installed, 
new ID codes must be registered in the 
tire pressure warning computer 
(

P.479)

When replacing the tires and wheels

If the ID code of the tire pressure warning 

valve and transmitter is not registered, the 

tire pressure warning system will not work 

properly.
In this case, after driving for about 10 min-

utes, the tire pressure warning light blinks 

for 1 minute and stays on to indicate a sys-

tem malfunction.

Wheel position registration can be 
performed by oneself. Wheel position 
registration is performed by driving 
forward with moderate left and right 
turns. However, depending on the driv-
ing conditions and driving environ-
ment, registration may take some time 
to complete.

1

Park the vehicle in a safe place, turn 
the power switch off and wait 15 
minutes or more.

2

Start the EV system.

The wheel position registration procedure 

cannot be performed while the vehicle is 

moving.

3

Select 

 on the center display.

4

Select “Vehicle customise”.

5

Select “Tyre pressure”.

6

Select “Tyre rotation”.

7

Select “Continue”.

A message indicating that wheel position 

registration is being performed will be dis-

played on the multi-information display. 

“---” will be displayed for the tire inflation 

pressure of each tire and wheel position 

registration will begin.

8

Drive straight (with occasional left 
and right turns) at approximately 
40 km/h (25 mph) or more for 
approximately 10 to 30 minutes.

When wheel position registration is com-

plete, a message indicating that registra-

tion has been completed and the inflation 

pressure of each tire will be displayed on 

the multi-information display.
Even if it is not possible to drive continu-

ously at approximately 40 km/h (25 mph) 

or more, registration can be completed by 

driving for a long time. However, if registra-

tion does not complete after driving for 1 

hour or more, park the vehicle in a safe 

place and leave it with the power switch in 

ON for approximately 15 minutes or more, 

and then perform the driving procedure 

again.

When performing wheel position regis-

tration

Normally, wheel position registration can 

be completed within approximately 30 

minutes.

Wheel position registration is performed 

while driving at a vehicle speed of 

approximately 40 km/h (25 mph) or 

more.

Wheel position registration procedure

If the power switch is turned off while reg-

istering the wheel position, the next time 

the power switch is turned to ON, the 

Registration of the position of 
each wheel

It is necessary to register the posi-
tion of each wheel after performing 
a tire rotation.

477

8

8-5. Tire maintenance

Ma
inte
na

nc

e and care

wheel position registration will resume 

and it will not be necessary to restart the 

procedure.

While the position of each wheel is being 

determined and the inflation pressures 

are not being displayed, if the inflation 

pressure of a tire drops, the tire pressure 

warning light will come on.

If the wheel position cannot be regis-

tered easily

In the following situations, wheel position 

registration may take longer than usual to 

be completed or may not be possible.

• Vehicle is not driven at approximately 40 

km/h (25 mph) or more

• Vehicle is driven on unpaved roads
If wheel position registration does not 
complete after driving for 1 hour or more, 
park the vehicle in a safe place for approxi-
mately 15 minutes and then drive the vehi-
cle again.

If the vehicle is reversed during wheel 

position registration, all data collected 

until then will be cleared. Perform driving 

again.

In the following situations, it will be nec-
essary to perform the tire inflation 
pressure setting procedure of the tire 
pressure warning system.

When the specified tire inflation 
pressure has changed, such as due 
to carried load, etc.

When the tire inflation pressure is 
changed such as when the tire size 
is changed.

If the tire inflation pressure has been 
adjusted to the specified level, perform 
the tire inflation setting procedure by 
selecting specified inflation pressure 

on the center display. (

P.483)

When the tire inflation pressure is to be 
other than specified, such as when tires 
other than the specified size are used, 
etc., set the tire inflation pressure using 
the current pressure. Make sure to 
adjust the tire inflation pressure of each 
tire to the appropriate level before per-
forming tire pressure setting. The tire 
pressure warning system operates 
based on this tire inflation pressure.

1

Start the EV system.

The tire inflation pressure cannot be set 

while the vehicle is moving.

2

Select 

 on the center display.

3

Select “Vehicle customise”.

4

Select “Tyre pressure”.

5

Select “Set indicated air pressure” 
and then select the desired front 
and rear tire pressures. (

P.483)

6

Select “OK”.

The tire pressure warning light will slowly 

blink 3 times.

After setting the tire inflation pressure, a 

message indicating that setting has been 

Setting the tire pressure

Setting by selecting a specified 
tire inflation pressure

478

8-5. Tire maintenance

completed will be displayed on the 

multi-information display.

If the tire inflation pressure cannot be 

set easily

If the tire pressure warning light does not 

blink 3 times when starting the tire infla-

tion pressure setting procedure, the pro-

cedure may not have started. Perform the 

procedure again from the beginning.

If tire inflation pressure setting procedure 

cannot be completed after performing 

the above procedure, contact any 

authorized Lexus retailer or Lexus 

authorized repairer, or any reliable 

repairer.

1

Adjust the tire inflation pressure of 
each tire to the appropriate level.

Make sure to adjust the tire inflation pres-

sure with the tires cold.

2

Start the EV system.

The tire inflation pressure cannot be set 

while the vehicle is moving.

3

Select 

 on the center display.

4

Select “Vehicle customise”.

5

Select “Tyre pressure”.

6

Select “Set current air pressure”.

7

Select “Continue”.

The tire pressure warning light will slowly 

blink 3 times and a message indicating that 

tire inflation pressure is being set will be 

displayed on the multi-information display.

After setting the tire inflation pressure, a 

message indicating that setting has been 

completed will be displayed on the 

multi-information display.

Warning performance of the tire pres-

sure warning system

When performing the tire pressure set-

ting using the current tire inflation pres-

sure, the warning timing of the tire 

pressure warning system will vary 

according to the conditions under which 

tire pressure setting was performed. 

Therefore, a warning may be output even 

if the tire inflation pressure drops slightly 

or if the tire inflation pressure increases 

above that when the tire inflation pres-

sure was set.

Make sure to perform the tire pressure 

setting procedure after adjusting the tire 

inflation pressure. Also, make sure the 

tires are cold before performing the tire 

pressure setting procedure or adjusting 

the tire inflation pressure.

Tire inflation pressure setting proce-

dure

If the power switch is turned off while set-

ting the tire inflation pressure, the next 

time the power switch is turned to ON, 

the setting procedure will resume and it 

will not be necessary to restart the proce-

dure.

If the tire inflation pressure setting proce-

dure is started unnecessarily, adjust the 

Setting using the current tire 
inflation pressure

WARNING

Make sure to adjust the tire inflation 

pressure of each tire to the appropriate 

level before performing tire pressure set-

ting. Otherwise, the tire pressure warn-

ing light may not illuminate even if the tire 

inflation pressure drops or may illuminate 

even though the tire inflation pressure is 

normal.

479

8

8-5. Tire maintenance

Ma
inte
na

nc

e and care

tire inflation pressure to the specified 

level with the tires cold and then perform 

setting by selecting a specified tire infla-

tion pressure, or perform the tire inflation 

pressure setting procedure with the cur-

rent tire inflation pressure.

If the tire inflation pressure cannot be 

set easily

Normally, the tire inflation pressure set-

ting procedure can be completed in 2 or 

3 minutes.

If the tire pressure warning light does not 

blink 3 times when starting the tire infla-

tion pressure setting procedure, the pro-

cedure may not have started. Perform the 

procedure again from the beginning.

If tire inflation pressure setting procedure 

cannot be completed after performing 

the above procedure, contact any 

authorized Lexus retailer or Lexus 

authorized repairer, or any reliable 

repairer.

The tire pressure warning valve and 
transmitter is equipped with a unique 
ID code. When new tire pressure 
warning valves and transmitters are 
installed, new ID codes must be regis-
tered in the tire pressure warning com-
puter.

ID codes can be registered by your-
self, but depending on the driving 
conditions and driving environ-
ment, registration may take some 
time to complete.

When using a wheel set which all of 
the ID codes have already been reg-
istered, the wheel set can be 
changed in a short amount of time. 
(

P.481)

Before performing ID code registra-

tion, make sure that no wheels with tire 
pressure warning valve and transmit-
ters installed are near the vehicle.

1

Park the vehicle in a safe place, turn 
the power switch off and wait 15 
minutes or more.

2

Start the EV system.

The ID code registration procedure cannot 

be performed while the vehicle is moving.

3

Select 

 on the center display.

4

Select “Vehicle customise”.

5

Select “Tyre pressure”.

6

Check if the desired wheel set (“Set 
1” or “Set 2”) is displayed.

ID codes will be registered to the displayed 

wheel set.
To change the wheel set to be registered, 

select the displayed set, and then select the 

wheel set you wish to register.
If ID codes have already been registered 

for that wheel set, the tire pressure warning 

light will slowly blink 3 times, and a mes-

sage indicating that change is occurring 

will be displayed on the multi-information 

display.

7

Select “New tyre registration”.

8

Select “Continue”.

The tire pressure warning light will slowly 

blink 3 times and a message indicating that 

ID code registration is being performed 

will be displayed on the multi-information 

Registering ID codes

480

8-5. Tire maintenance

display. Wheel set changing will be 

canceled and registration will begin.
When registration is being performed, the 

tire pressure warning light will blink for 

approximately 1 minute then illuminate and 

“---” will be displayed for the inflation pres-

sure of each tire on the multi-information 

display.

If the tire pressure warning light does not 

blink 3 times when starting ID code regis-

tration procedure, the procedure may not 

have started. Perform the procedure again 

from the beginning.

9

Drive straight (with occasional left 
and right turns) at approximately 
40 km/h (25 mph) or more for 
approximately 10 to 30 minutes.

When registration is complete, the tire 

pressure warning light will turn off and a 

message indicating that registration has 

been completed will be displayed on the 

multi-information display.
Registration may take longer than normal 

to complete if the vehicle speed cannot be 

maintained at approximately 40 km/h (25 

mph) or more. If registration cannot be 

completed after driving for 1 hour or more, 

perform the registration procedure again 

from the beginning.

When registering ID codes

Normally, wheel position registration can 

be completed within approximately 30 

minutes.

ID code registration is performed while 

driving at a vehicle speed of approxi-

mately 40 km/h (25 mph) or more.

If ID codes are not registered easily

In the following situations, ID code regis-

tration may take longer than usual to be 

completed or may not be possible.

• When the vehicle has not been parked 

for approximately 15 minutes or more 

before being driven

• Vehicle is not driven at approximately 40 

km/h (25 mph) or more

• Vehicle is driven on unpaved roads

• Vehicle is driven near other vehicles and 

system cannot recognize tire pressure 

warning valve and transmitters of your 

vehicle over those of other vehicles

• Wheel with tire pressure warning valve 

and transmitter installed is inside or near 

the vehicle

If the vehicle is reversed during registra-

tion, all data collected until then will be 

cleared. Perform driving again.

If registration does not complete after 

driving for 1 hour or more, perform the ID 

code registration procedure again from 

the beginning.

If the ID codes cannot be registered even 

when performing the above procedure, 

contact any authorized Lexus retailer or 

Lexus authorized repairer, or any reliable 

repairer.

10

If the tire inflation pressure of the 
wheel set installed differs from that 
of the previous set, it will be neces-
sary to perform the tire inflation 
pressure setting procedure of the 
tire pressure warning system. 
(

P.477)

If the specified tire inflation pressure is the 

same, it will not be necessary to perform 

the tire inflation pressure setting proce-

dure.

To cancel ID code registration after it 

Canceling ID code registration

481

8

8-5. Tire maintenance

Ma
inte
na

nc

e and care

has been started, select “New tyre reg-
istration” again on the center display.
If ID code registration has been 
canceled, the tire pressure warning 
light will turn off.
If the warning light does not turn off, ID 
code registration may not have been 
cancelled correctly. To cancel registra-
tion, select “New tyre registration” 
again on the center display.

The wheel set can be changed only 
if a second wheel set has been regis-
tered to the system. If a second 
wheel set has not been registered, 
“Set 2(Unregistered)” will be dis-
played and it will not be possible to 
change to the selected wheel set.

ID codes can be registered by yourself. 
(

P.479)

Only a change between both regis-
tered wheel set is possible, mixing 
between these wheel sets is not sup-
ported.

While registering ID codes, it may 
not be possible to change between 
wheel sets normally. Cancel regis-
tration before changing between 
wheel sets. (

P.480)

1

Install the desired wheel set.

2

Select 

 on the center display.

3

Select “Vehicle customise”.

4

Select “Tyre pressure”.

5

Select the wheel set (“Set 1” or “Set 
2”) displayed for the set selection 
setting.

6

Select the wheel set you wish to 
register, and then select “OK”.

The tire pressure warning light will slowly 

blink 3 times, a message indicating that 

change is occurring will be displayed, and 

the wheel set change will begin.
Wheel set change will begin and the tire 

pressure warning light will blink for 1 min-

ute and then illuminate. Also, while the 

change is being performed, “---” will be 

displayed for the tire inflation pressure of 

each tire on the multi-information display.

After approximately 2 minutes, the wheel 

set change will complete, the tire pressure 

warning light will turn off, and a completion 

message will be displayed on the 

multi-information display.
If changing does not complete after 

approximately 4 minutes, a message indi-

cating that the change could not be com-

pleted will be displayed.
Check which wheel set is installed and per-

form the change procedure again from the 

beginning.

7

If the specified tire inflation pres-
sure of the wheel set installed dif-

Selecting wheel set

Your vehicle is equipped with a tire 
pressure warning system with a 
function to register two sets of ID 
codes. This allows for registration of 
a second wheel set, for example a 
winter set.

482

8-5. Tire maintenance

fers from that of the previous set, it 
will be necessary to perform the 
tire inflation pressure setting proce-
dure of the tire pressure warning 
system. (

P.477)

If the specified tire inflation pressure is the 

same, it will not be necessary to perform 

the tire inflation pressure setting proce-

dure.

8

Register the position of each wheel. 
(

P.476)

Checking tire inflation pres-
sure

Make sure to maintain proper tire 
inflation pressure. Tire inflation 
pressure should be checked at least 
once per month. However, Lexus 
recommends that tire inflation 
pressure be checked once every 
two weeks.

WARNING

In order to ensure the performance of 

the tires, maintain proper tire inflation 

pressure.

If the tires are not properly inflated, the 

following may occur:

Excessive wear

Uneven wear

Poor handling

Possibility of blowouts resulting from 

overheated tires

Air leaking from between tire and 

wheel

Wheel deformation and/or tire dam-

age

Greater possibility of tire damage 

while driving (due to road hazards, 

expansion joints, sharp edges in the 

road, etc.)

NOTICE

After inspecting and adjusting tire infla-

tion pressure, make sure to install the tire 

valve caps.

483

8

8-5. Tire maintenance

Ma
inte
na

nc

e and care

Driving with incorrect tire inflation 
pressure may result in the following:

Reduced electricity consumption 
efficiency

Reduced driving comfort and poor 
handling

Reduced tire life due to wear

Reduced safety

Damage to the drive train

If a tire needs frequent inflating, have it 
checked by any authorized Lexus 
retailer or Lexus authorized repairer, 
or any reliable repairer.

Instructions for checking tire inflation 

pressure

When checking tire inflation pressure, 

observe the following:

Check only when the tires are cold.

If your vehicle has been parked for at least 
3 hours or has not been driven for more 
than 1.5 km or 1 mile, you will get an accu-
rate cold tire inflation pressure reading.

Always use a tire pressure gauge.

It is difficult to judge if a tire is properly 
inflated based only on its appearance.

It is normal for the tire inflation pressure 

to be higher after driving as heat is gen-

erated in the tire. Do not reduce tire infla-

tion pressure after driving.

Passengers and luggage weight should 

be placed so that the vehicle is balanced.

The recommended cold tire inflation 
pressure and tire size are displayed on 
the tire and loading information label. 
(

P.594)

Left-hand drive vehicles

Right-hand drive vehicles

NOTICE

If a valve cap is not installed, dirt or mois-

ture may get into the valve and cause an 

air leak, resulting in decreased tire infla-

tion pressure.

Checking the specified tire infla-
tion pressure

484

8-5. Tire maintenance

Lifting the vehicle with a 
floor jack

When using a floor jack, follow the 
instructions in the manual provided 
with the jack and perform the oper-
ation safely.When raising your vehi-
cle with a floor jack, position the 
jack correctly.Improper placement 
may damage your vehicle or cause 
injury.

Front jack point position

Rear jack point position

485

8

8-5. Tire maintenance

Ma
inte
na

nc

e and care

To equalize tire wear and help extend 
tire life, Lexus recommends that you 
rotate your tires approximately at the 
following intervals:
Rotate the tires every 5000 km 
(3000 miles)
Rotate the tires as shown in the illustra-
tion.
Make sure to perform wheel position 
registration procedure after rotating 
the tires. (

P.476)

Front

When replacing wheels, care should 
be taken to ensure that they are equiv-
alent to those removed in load capac-
ity, diameter, rim width and inset

*

.

Replacement wheels are available at 
any authorized Lexus retailer or Lexus 
authorized repairer, or any reliable 
repairer.

*

: Conventionally referred to as offset.

Lexus does not recommend using the 
following:

Wheels of different sizes or types

Used wheels

Bent wheels that have been straight-
ened

When replacing wheels

The wheels of your vehicle are equipped 

with tire pressure warning valves and trans-

mitters that allow the tire pressure warning 

system to provide advance warning in the 

event of a loss in tire inflation pressure.
Whenever wheels are replaced, tire pres-

sure warning valves and transmitters must 

be installed. (

P.475)

Rotating the tires

A

Wheels

If a wheel is bent, cracked or heavily 
corroded, it should be replaced. 
Otherwise, the tire may separate 
from the wheel, causing a loss of 
handling control.

Wheel selection

486

8-5. Tire maintenance

Observe the following precautions 
when handling the aluminum wheels.

Use only Lexus wheel bolts and 
wrenches designed for use with 
your aluminum wheels.

When rotating, repairing or chang-
ing your tires, check that the wheel 
bolts are still tight after driving 1000 
km (621 miles).

Be careful not to damage the alumi-
num wheels when using tire chains.

Use only Lexus genuine balance 
weights or equivalent and a plastic 

WARNING

When replacing wheels

Do not use wheels that are a different 

size from those recommended in the 

Owner’s Manual, as this may result in a 

loss of handling control.

Never use an inner tube in a leaking 

wheel which is designed for a tubeless 

tire. Doing so may result in an acci-

dent, causing death or serious injury.

Use the correct wheel bolts for the 

wheels to be installed.

For details, contact any authorized Lexus 
retailer or Lexus authorized repairer, or 
any reliable repairer.

Wheel bolts

Observe the following precautions to 

reduce the risk of death or serious injury:

Do not over tighten.

Never use oil or grease on the wheel 

bolts. Oil and grease may cause the 

wheel bolts to be excessively tight-

ened, leading to bolt or disc wheel 

damage. In addition, the oil or grease 

can cause the wheel bolts to loosen 

and the wheel may fall off, causing a 

serious accident. Remove any oil or 

grease from the wheel bolts.

If there are any cracks or deformations 

in the wheel bolts, or if the surface 

treatment becomes worn, have the 

wheel bolts replaced at any authorized 

Lexus retailer or Lexus authorized 

repairer, or any reliable repairer. Fail-

ure to follow these precautions could 

cause the wheel bolts to loosen and 

the tire to fall off, resulting in death or 

serious injury.

Use of defective wheels prohibited

Do not use cracked or deformed wheels.

Doing so could cause the tire to leak air 

during driving, possibly causing an acci-

dent.

NOTICE

Replacing tire pressure warning 

valves and transmitters

Because tire repair or replacement 

may affect the tire pressure warning 

valves and transmitters, make sure to 

have tires serviced by any authorized 

Lexus retailer or Lexus authorized 

repairer, or any reliable repairer or 

other qualified service shop. In addi-

tion, make sure to purchase your tire 

pressure warning valves and transmit-

ters at any authorized Lexus retailer or 

Lexus authorized repairer, or any relia-

ble repairer.

Ensure that only genuine Lexus wheels 

are used on your vehicle.

Tire pressure warning valves and trans-
mitters may not work properly with 
non-genuine wheels.

Aluminum wheel precautions

487

8

8-5. Tire maintenance

Ma
inte
na

nc

e and care

or rubber hammer when balancing 
your wheels.

Before lifting the vehicle with a jack, 
perform the following.

1

Stop the vehicle in a safe place on a 
hard, flat surface.

2

Set the parking brake.

3

Change the shift position to P.

4

Stop the EV system.

Jack and tools

As your vehicle is equipped with an emer-

gency tire puncture repair kit, the following 

tools for replacing a tire are not included 

with your vehicle. They can be purchased at 

any authorized Lexus retailer or Lexus 

authorized repairer, or any reliable repairer.

Jack

Jack handle

Replacing the tire

When replacing the tires yourself, 
prepare the necessary tools and a 
jack.

This vehicle uses wheel bolts.

When using wheels that were 
installed when the vehicle was 
shipped from the factory, special-
ized Lexus genuine wheel bolts 
must be used.

If necessary tire replacement 
seems difficult to perform, contact 
any authorized Lexus retailer or 
Lexus authorized repairer, or any 
reliable repairer.

Preparation for lifting the vehicle 
with a jack

488

8-5. Tire maintenance

Wheel bolt socket

Guide pin

Wheel bolt wrench

Tool bag (if equipped)

• Jack (if equipped)
• Jack handle (if equipped)
• Wheel bolt wrench (if equipped)

Towing eyelet
Guide pin (if equipped)
Wheel bolt socket (if equipped)

Storage position of the tools and jack

WARNING

Improper use of the tire jack may cause the vehicle to fall. Therefore, observe the follow-

ing precautions.

Do not use the tire jack for any purpose other than replacing tires or installing and 

removing tire chains.

Only use the tire jack that comes with this vehicle for replacing a flat tire. Do not use it 

on other vehicles, and do not use other tire jacks for replacing tires on this vehicle.

A

B
C
D

489

8

8-5. Tire maintenance

Ma
inte
na

nc

e and care

1

Remove the deck board.

2

Take out the jack from the tool bag.

1

Chock the tires.

Wheel chock position

Flat tire: Front left

Place the wheel chock behind the rear 
right tire.

Flat tire: Front right

Place the wheel chock behind the rear left 
tire.

Flat tire: Rear left

Place the wheel chock in front of the front 
right tire.

Flat tire: Rear right

Place the wheel chock in front of the front 
left tire.

2

Using a wheel bolt wrench, slightly 
loosen the wheel bolts (approxi-
mately one turn).

3

Turn the tire jack portion   by 
hand and place the top of the jack 

Taking out the jack

Removing a tire

WARNING

Precautions for replacing a tire

Do not try to remove the wheel orna-

ment by hand.

Take due care in handling the ornament 
to avoid unexpected personal injury.

Do not touch the disc wheels or the 

area around the brakes immediately 

after the vehicle has been driven.

After the vehicle has been driven the disc 
wheels and the area around the brakes 
will be extremely hot. Touching these 
areas with hands, feet or other body 
parts while changing a tire, etc., may 
result in burns.

Setting the power back door when 

replacing the tires (vehicles with 

power back door)

When replacing a tire, make sure to disa-

ble the power back door. If not disabled, 

the power back door may operate unin-

tentionally, and hands or fingers may be 

caught and injured. (

P.606)

490

8-5. Tire maintenance

in the position shown in the illustra-
tion.

Front

Rear

4

Install the wheel bolt socket to the 
jack handle.

5

Raise the vehicle until the tire is 
slightly raised off the ground.

WARNING

Make sure the jack is positioned properly 

in the jack point.

WARNING

Observe the following precautions when 

using the jack.

Do not put any part of your body under 

the vehicle while it is supported by the 

jack.

Do not start the EV system or drive the 

vehicle while the vehicle is supported 

by the jack.

Do not raise the vehicle while some-

one is inside.

491

8

8-5. Tire maintenance

Ma
inte
na

nc

e and care

6

Remove the uppermost wheel bolt 
and install the guide pin   by 
hand.

Turn the guide pin clockwise to tighten it 

until it stops.

7

Remove the remaining wheel bolts 
and the tire.

When resting the tire on the ground, place 

the tire so that the wheel design faces up, 

to avoid scratching the wheel surface.

1

Remove any dirt or foreign matter 
from the wheel contact surfaces 
and wheel bolts.

If foreign matter is not removed, the wheel 

bolts may loosen while the vehicle is in 

motion, and the wheel may come off.

2

Align a wheel bolt hole on the tire 
with the guide pin, and set the tire 
on the guide pin.

Align the center hole of the wheel with the 

center of the hub and securely set the tire 

so that the wheel and hub contact surfaces 

WARNING

When raising the vehicle, do not put an 

object on or under the jack.

Do not raise the vehicle to a height 

greater than that required to replace 

the tire.

Use a jack stand if it is necessary to get 

under the vehicle.

WARNING

When removing or installing a tire, make 

sure to use the guide pin.

Also, the guide pin is made of resin. It 

may be damaged if the wheel is placed 
anywhere other than 

 or if a large 

amount of force is applied to the guide 

pin.

Installing the tire

492

8-5. Tire maintenance

are touching.

3

Loosely tighten each wheel bolt by 
hand or using a wheel bolt socket 

.

Do not use the wheel bolt socket for any-

thing other than loosely tightening the 

wheel bolts by hand.

WARNING

When removing or installing a tire, make 

sure to use the guide pin.

Also, the guide pin is made of resin. It 

may be damaged if the wheel is placed 
anywhere other than 

 or if a large 

amount of force is applied to the guide 

pin.

WARNING

Observe the following precautions. Fail-

ure to do so may lead to the wheel bolts 

loosening and the tire falling off.

The contact surfaces of the wheel bolt 

and wheel are designed specifically to 

fit together. When using wheels that 

were installed when the vehicle was 

shipped from the factory, use special-

ized Lexus genuine wheel bolts. Do 

not use wheel bolts designed for other 

models, model years or types even if 

they are Lexus genuine parts. If the 

vehicle does not have wheels that were 

installed to the vehicle when it was 

shipped from the factory, the fac-

tory-installed wheel bolts may not be 

appropriate for the wheel. Contact 

either the retailer where the wheels 

were purchased or the manufacturer 

of the wheels for proper installation 

advice.

493

8

8-5. Tire maintenance

Ma
inte
na

nc

e and care

4

Remove the guide pin and loosely 
tighten the wheel bolt as in step 

3

.

5

Lower the vehicle.

6

Securely tighten the wheel bolts 
two or three times in the order 
shown in the illustration using a 
wheel bolt wrench.

Tightening torque: 140 N•m (14.3 kgf•m, 

103 ft•lbf)

7

Stow the jack and all tools.

WARNING

Never apply oil or grease to the wheel 

bolts or their contact surface on the 
wheel .

Doing so may cause the wheel bolts to 
be tightened excessively, leading to dam-
age to the wheel bolts, the threaded por-
tion the wheel bolts install to 

, or the 

wheel.
Remove any oil or grease that has 
adhered when installing the wheel bolts.

If a wheel bolt hole in a wheel or the 

threads of a wheel bolt or the wheel 

hub are deformed, cracked, rusty or 

otherwise damaged, have the vehicle 

inspected by any authorized Lexus 

retailer or Lexus authorized repairer, 

or any reliable repairer.

Do not install the wheel ornament if it is 

damaged, as it may fly off the wheel 

while the vehicle is being driven.

WARNING

When lowering the vehicle, make sure 

that no one is near the vehicle. If there 

are people nearby, warn them vocally 

before lowering the vehicle.

WARNING

When tightening the wheel bolts, do not 

tighten them excessively. Doing so may 

cause the wheel bolts, the threads of the 

wheel hub, or the wheel to be damaged.

494

8-5. Tire maintenance

WARNING

After using the tools and jack, before 

driving, make sure that the tools and 

jack are securely stored. Failure to do 

so may result in injury during a collision 

or sudden braking.

After replacing a tire, check the tight-

ening torque as soon as possible.

If you cannot confirm the tightening 
torque yourself, have the vehicle 
inspected at any authorized Lexus 
retailer or Lexus authorized repairer, or 
any reliable repairer.

NOTICE

When removing or fitting the wheels, 

tires or the tire pressure warning valves 

and transmitters, contact any authorized 

Lexus retailer or Lexus authorized 

repairer, or any reliable repairer as the 

tire pressure warning valves and trans-

mitters may be damaged if not handled 

correctly.

9

495

9

When trouble

 ar

ises

When trouble arises

.

9-1. What to do if a problem occurs 

while driving

What to do if a problem occurs 

while driving .............................

497

9-2. If a warning is indicated on the 

meter

If a warning light turns on/flashes

........................................................

500

If a warning message is displayed

.........................................................

510

9-3. If the EV system will not start

When the EV system cannot be 

started even though the correct 
starting procedure is being fol-
lowed............................................

531

When the interior lights or head-

lights are dim and the EV system 
cannot be started ...................

533

When the interior lights or head-

lights do not illuminate and the 
EV system cannot be started
........................................................

538

When the horn sounds at a low 

volume and the EV system can-
not be started...........................

538

When the horn does not sound 

and the EV system cannot be 
started.........................................

539

9-4. If a tire is flat

Repairing a tire with the emer-

gency tire puncture repair kit
........................................................

540

9-5. If a door cannot be opened or 

locked

If a key has been lost.................

551

When the doors/windows cannot 

be operated using an electronic 
key.................................................

551

If a door cannot be opened using 

the door opener switch .......

559

If the rear doors cannot be 

opened from the inside.........

561

If the back door cannot be 

opened ........................................

561

9-6. If the EV system cannot be used 

normally

If the charging port lid cannot be 

opened .......................................

563

If AC charging cannot be per-

formed normally.....................

564

If DC charging cannot be per-

formed normally.....................

566

If the charging connector cannot 

be disconnected from the charg-
ing inlet.......................................

570

If the charging schedule function 

does not operate normally

.........................................................

571

9-7. If an indicator on an interior fea-

ture illuminates or flashes

When the wireless charger opera-

tion indicator light (on the charg-
ing tray) flashes.......................

573

496


9-8. If the vehicle cannot move

When a EV system warning mes-

sage is displayed and the vehicle 
does not move.........................

575

If the transmission makes abnormal 

sounds.........................................

575

Towing with a tow truck..........

576

Using a flatbed truck................

577

Towing with another vehicle

........................................................

578

Getting unstuck from mud, sand, or 

snow.............................................

580

9-9. If you think something is wrong

If a vehicle abnormality is found

........................................................

582

If abnormal sounds are emitted 

from the vehicle ......................

582

If the vehicle behaves abnormally

........................................................

583

9-10. Items to check before contacting a 

dealership

The steering wheel cannot be 

turned after the EV system is 
stopped ......................................

584

If the windows do not open or close 

by operating the power window 
switches......................................

584

The power switch is turned off auto-

matically .....................................

585

If your vehicle overheats........

586

If electrical components cannot be 

used or do not operate when a 
switch is operated..................

588

If a light does not illuminate...

589

497

9

9-1. What to do if a problem occurs while driving

When trouble

 ar

ises

9-1.What to do if a problem occurs while driving

Press the switch.
All the turn signal lights will flash. To 
turn them off, press the switch once 
again.

Emergency flashers

If the emergency flashers are used for a 

long time with the EV system stopped 

(while the “READY” indicator is not illu-

minated), the 12-volt battery may 

become discharged.

If any of the SRS airbags deploy (inflate) 

or in the event of a strong rear impact, the 

emergency flashers will turn on automati-

cally.

The emergency flashers will turn off auto-
matically after operating for approximately 
20 minutes. To manually turn the emer-
gency flashers off, press the switch twice. 
(The emergency flashers may not turn on 

automatically depending on the force of 
the impact and conditions of the collision.)

1

Steadily step on the brake pedal 
with both feet and firmly depress it.

Do not pump the brake pedal repeatedly 

as this will increase the effort required to 

slow the vehicle.

2

Change the shift position to N.

If the shift position is changed to N:

After slowing down, stop the vehicle in a 
safe place by the road.
Stop the EV system.

If the shift position cannot be 
changed to N:

Keep depressing the brake pedal with both 
feet to reduce vehicle speed as much as 
possible.
To stop the EV system, press and hold the 
power switch for 2 consecutive seconds or 
more, or press it briefly 3 times or more in 
succession.

What to do if a problem 
occurs while driving

Using the emergency flashers to 
warn other drivers

Use the emergency flashers to 
inform other drivers of the pres-
ence of your vehicle when it is 
stopped on the road, such as if the 
vehicle has broken down.

Stopping the vehicle in an emer-
gency

Stop the vehicle using the following 
procedure only in an emergency, 
such as if it becomes impossible to 
stop the vehicle in the normal way:

WARNING

If the EV system has to be stopped 

while driving

Power assist for the steering wheel will 

be lost, making the steering wheel heav-

ier to turn. Decelerate as much as possi-

ble before stopping the EV system.

498

9-1. What to do if a problem occurs while driving

3

Stop the vehicle in a safe place by 
the road.

Remain calm and follow the following.

If the door can be opened, open the 
door and exit the vehicle.

If the door cannot be opened, open 
the window using the power window 
switch and ensure an escape route.

If the window can be opened, exit 
the vehicle through the window.

If the door and window cannot be 
opened due to the rising water, 

remain calm, wait until the water 
level inside the vehicle rises to the 
point that the water pressure inside 
of the vehicle equals the water pres-
sure outside of the vehicle and then 
open the door after waiting for the 
rising water to enter the vehicle, and 
exit the vehicle.

When the outside water level exceeds half 
the height of the door, the door cannot be 
opened from the inside due to water pres-
sure.

Water level exceeds the floor

When the water level exceeds the floor and 

time has passed, the electrical equipment 

will get damaged, the power windows will 

not operate, the motor stop, and the vehicle 

may not be able to get moving.

Using an emergency escape hammer

*1

Laminated glass

*2

 is used in the windshield 

and the windows on this vehicle. Laminated 

glass cannot be shattered with an emer-
gency hammer

*1

.

*1

: Contact your Lexus dealer or 

aftermarket accessory manufacturer 
for further information about an emer-
gency hammer.

*2

: If equipped

How to distinguish laminated glass

When looking from the cross-sectional 

view point, laminated glass is two sheets of 

glass pasted together.

Laminated glass

WARNING

To restart the EV system after perform-

ing an emergency shutdown, press the 

power switch.

If the vehicle is submerged or 
water on the road is rising

This vehicle is not designed to be 
able to drive on roads that are 
deeply flooded with water. Do not 
drive on roads where the roads may 
be submerged or the water may be 
rising. It is dangerous to remain in 
the vehicle, if it anticipated that the 
vehicle will be flooded or set a drift.

A

499

9

9-1. What to do if a problem occurs while driving

When trouble

 ar

ises

Tempered glass

WARNING

Caution while driving

Do not drive on roads where the roads 

may be submerged or the water may be 

rising. Otherwise the vehicle may be 

damaged and cannot move, as well as 

become flooded and set a drift, which 

may lead to death.

Operation of emergency shut off 
system

When a certain level of impact is 
detected by the impact sensors, the 
emergency shut off system turns off 
the EV system and blocks the high 
voltage current. If the emergency 
shut off system activates, your vehi-
cle will not be able to be restarted. 
To restart the EV system, contact 
any authorized Lexus retailer or 
Lexus authorized repairer, or any 
reliable repairer.

B

500

9-2. If a warning is indicated on the meter

9-2.If a warning is indicated on the meter

Warning buzzer

In some cases, the buzzer may not be heard due to being in a noisy location or audio sound.

If a warning light turns on/flashes

Calmly perform the following actions if any of the warning lights comes on or 
flashes. If a light comes on or flashes, but then goes off, this does not necessar-
ily indicate a malfunction in the system. However, if this continues to occur, 
have the vehicle inspected by any authorized Lexus retailer or Lexus author-
ized repairer, or any reliable repairer.

Brake system warning light (warning buzzer)

Condition

Cause / Remedy

(red)

Indicates that:

The brake fluid level is low; or

The brake system is malfunctioning

Immediately stop the vehicle in a safe place and contact any 
authorized Lexus retailer or Lexus authorized repairer, or any reli-
able repairer. Continuing to drive the vehicle may be dangerous.

WARNING

If both the ABS and the brake system warning lights remain on, stop your vehicle in a safe 

place immediately and contact any authorized Lexus retailer or Lexus authorized 

repairer, or any reliable repairer.

The vehicle will become extremely unstable during braking, and the ABS system may fail, 

which could cause an accident resulting in death or serious injury.

Brake system warning light (warning buzzer)

Condition

Cause / Remedy

(yellow)

Indicates a malfunction in:

The regenerative braking system;

The electronically controlled brake system; or

The electric parking brake

Have the vehicle checked by any authorized Lexus retailer or 
Lexus authorized repairer, or any reliable repairer immediately.

501

9

9-2. If a warning is indicated on the meter

When trouble

 ar

ises

WARNING

If both the ABS and the brake system warning lights remain on, stop your vehicle in a safe 

place immediately and contact any authorized Lexus retailer or Lexus authorized 

repairer, or any reliable repairer.

The vehicle will become extremely unstable during braking, and the ABS system may fail, 

which could cause an accident resulting in death or serious injury.

Charging system warning light (warning buzzer)

Condition

Cause / Remedy

This light illumi-

nates on the 

multi-informa-

tion display.

Indicates a malfunction in the vehicle’s charging system

Immediately stop the vehicle in a safe place and contact any 
authorized Lexus retailer or Lexus authorized repairer, or any reli-
able repairer.

Traction battery charge warning light (warning buzzer)

Condition

Cause / Remedy

(yellow)

Indicates that the remaining charge of the traction battery is low and 
charging is required
When the outside temperature is low, this light may turn on earlier than 
usual to urge the driver to charge the traction battery early.

Charge the traction battery. (

P.50, 55)

SRS warning light

Condition

Cause / Remedy

Indicates a malfunction in:

The SRS airbag system; or

The seat belt pretensioner system

Have the vehicle checked by any authorized Lexus retailer or 
Lexus authorized repairer, or any reliable repairer immediately.

502

9-2. If a warning is indicated on the meter

ABS warning light (warning buzzer)

Condition

Cause / Remedy

Indicates a malfunction in:

The ABS; or

The brake assist system

Have the vehicle checked by any authorized Lexus retailer or 
Lexus authorized repairer, or any reliable repairer immediately.

WARNING

If both the ABS and the brake system warning lights remain on, stop your vehicle in a safe 

place immediately and contact any authorized Lexus retailer or Lexus authorized 

repairer, or any reliable repairer.

The vehicle will become extremely unstable during braking, and the ABS system may fail, 

which could cause an accident resulting in death or serious injury.

Inappropriate pedal operation warning light (warning buzzer)

Condition

Cause / Remedy

This light illumi-

nates on the 

multi-informa-

tion display.

When a buzzer sounds:
Indicates a malfunction in:

The Brake Override System

The Drive-Start Control

Have the vehicle checked by any authorized Lexus retailer or 
Lexus authorized repairer, or any reliable repairer immediately.

When a buzzer sounds:
Indicates that the shift position was changed and Drive-Start Control 
was operated while depressing the accelerator pedal.

Momentarily release the accelerator pedal.

When a buzzer sounds:
PKSB (Parking Support Brake) has operated

Follow the instructions displayed on the multi-information display.

When a buzzer does not sound:
Indicates that the accelerator and brake pedals are being depressed 
simultaneously, and the Brake Override System is operating.

Release the accelerator pedal and depress the brake pedal.

503

9

9-2. If a warning is indicated on the meter

When trouble

 ar

ises

Electric power steering system warning light (warning buzzer)

When the 12-volt battery charge becomes insufficient or the voltage temporarily drops, the 

electric power steering system warning light may come on and the warning buzzer may 

sound.

Driver’s and front passenger’s seat belt warning buzzer

The driver’s and front passenger’s seat belt warning buzzer sounds to alert the driver and 

front passenger that his or her seat belt is not fastened. If the seat belt is unfastened, the 

buzzer sounds intermittently for a certain period of time after the vehicle reaches a certain 

speed.

Front passenger detection sensor, seat belt reminder and warning buzzer

If luggage is placed on the front passenger seat, the front passenger detection sensor may 

cause the warning light to flash and the warning buzzer to sound even if a passenger is not 

sitting in the seat.

If a cushion is placed on the seat, the sensor may not detect a passenger, and the warning 

light may not operate properly.

Electric power steering system warning light (warning buzzer)

Condition

Cause / Remedy

(red/yellow)

Indicates a malfunction in the EPS (Electric Power Steering) system

Have the vehicle checked by any authorized Lexus retailer or 
Lexus authorized repairer, or any reliable repairer immediately.

WARNING

When the electric power steering system warning light comes on yellow, the assist to the 

power steering is restricted. When the light comes on red, the assist to the power steering 

is lost and handling operations of the steering wheel become extremely heavy.

When steering wheel operations are heavier than usual, grip the steering wheel firmly 

and operate it using more force than usual.

Driver’s and front passenger’s seat belt reminder light (warning buzzer)

Condition

Cause / Remedy

Warns the driver and/or front passenger to fasten their seat belts

Fasten the seat belt.

If the front passenger’s seat is occupied, the front passenger’s seat belt 
also needs to be fastened to make the warning light (warning buzzer) 
turn off.

504

9-2. If a warning is indicated on the meter

Rear passengers’ seat belt warning buzzer

The rear passengers’ seat belt warning buzzer sounds to alert the rear passenger that his or 

her seat belt is not fastened. If the seat belt is unfastened, the buzzer sounds intermittently 

for a certain period of time after the vehicle reaches a certain speed.

If the tire pressure warning light comes on

Inspect the tires to check if a tire is punctured.

Rear passengers’ seat belt reminder light (warning buzzer)

Condition

Cause / Remedy

(Vehicles with-

out a head-up 

display)

(Vehicles with a 

head-up display)

Warns the rear passengers to fasten their seat belts

Fasten the seat belt.

Tire pressure warning light (warning buzzer)

Condition

Cause / Remedy

When the light comes on after blinking for approximately 1 minute:
Malfunction in the tire pressure warning system

Have the system checked by any authorized Lexus retailer or 
Lexus authorized repairer, or any reliable repairer.

When the light comes on:
Low tire inflation pressure from natural causes

After the temperature of the tires has lowered sufficiently, check 
the inflation pressure of each tire and adjust them to the specified 
level.

When the light comes on:
Low tire inflation pressure from flat tire

Immediately stop the vehicle in a safe place and perform the nec-
essary actions (

P.504)


Content      ..     13      14      15      16     ..