Harley Davidson 2009 Goldwing GL1800 Navigation Supplement. Manual - page 7
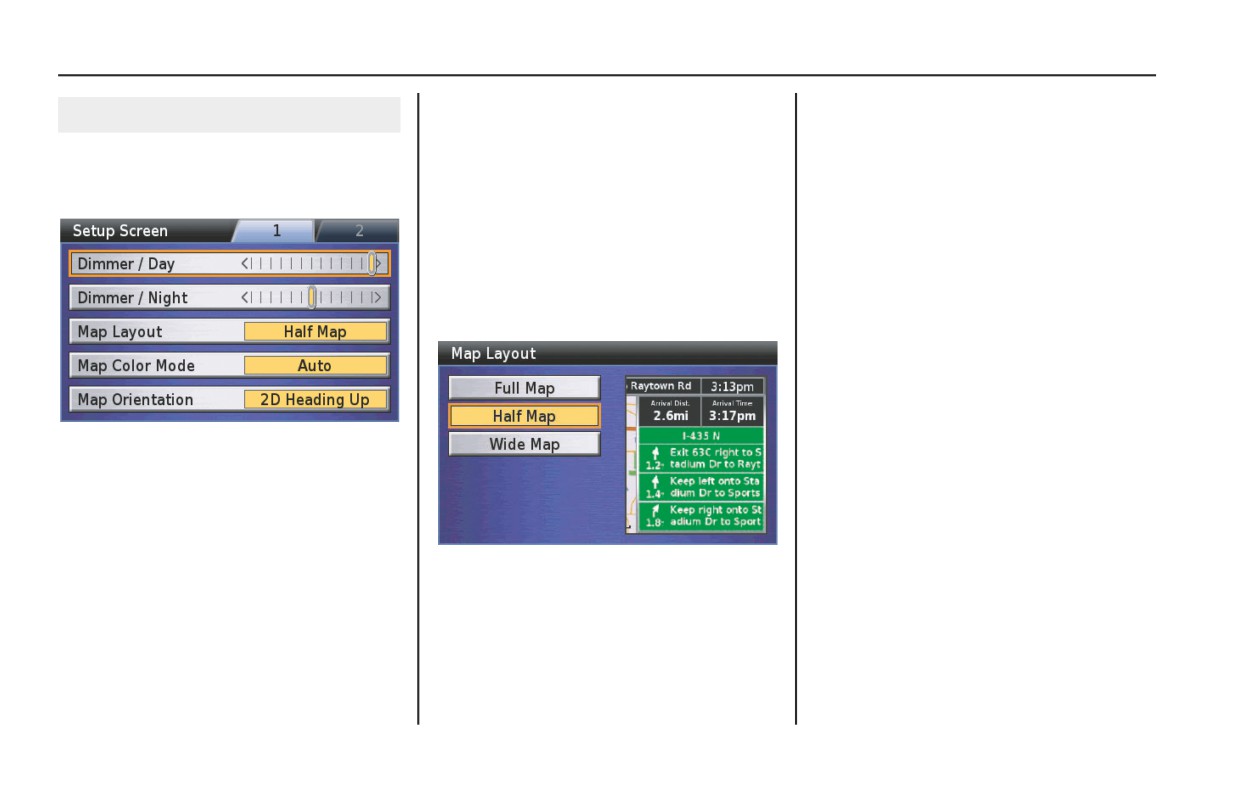
Setup Screen 1
Dimmer / Night
There are three map options:
Setup Screen 1
For a dimmer night display, select a
• The Full Map fills the screen with no
On the Setup / Info menu, highlight Setup
segment to the left. For a brighter night
detail shown.
Screen and press ENT. The Setup Screen 1
display, select a segment to the right.
• The Half Map appears on half of the
appears.
The default setting for night display is
screen with two details related to time
Half Brightness.
and distance as well as the next three
route maneuvers.
Map Layout
• The Wide Map appears on three-
Move the highlight to the Map Layout
quarters of the screen with three
field and press ENT. The Map Layout
details related to time and distance.
screen appears.
NOTE:
For more information about map
layouts, see page 46.
On the Map Layout screen, highlight
your choice and press ENT. Your choice
Dimmer / Day
will appear in the Map Layout field on
For a dimmer daylight display, select a
the Setup Screen 1 screen.
segment to the left. For a brighter
display, select a segment to the right.
The default setting for daylight is Full
Brightness.
Setup / Info
139
Setup Screen 1
Map Orientation
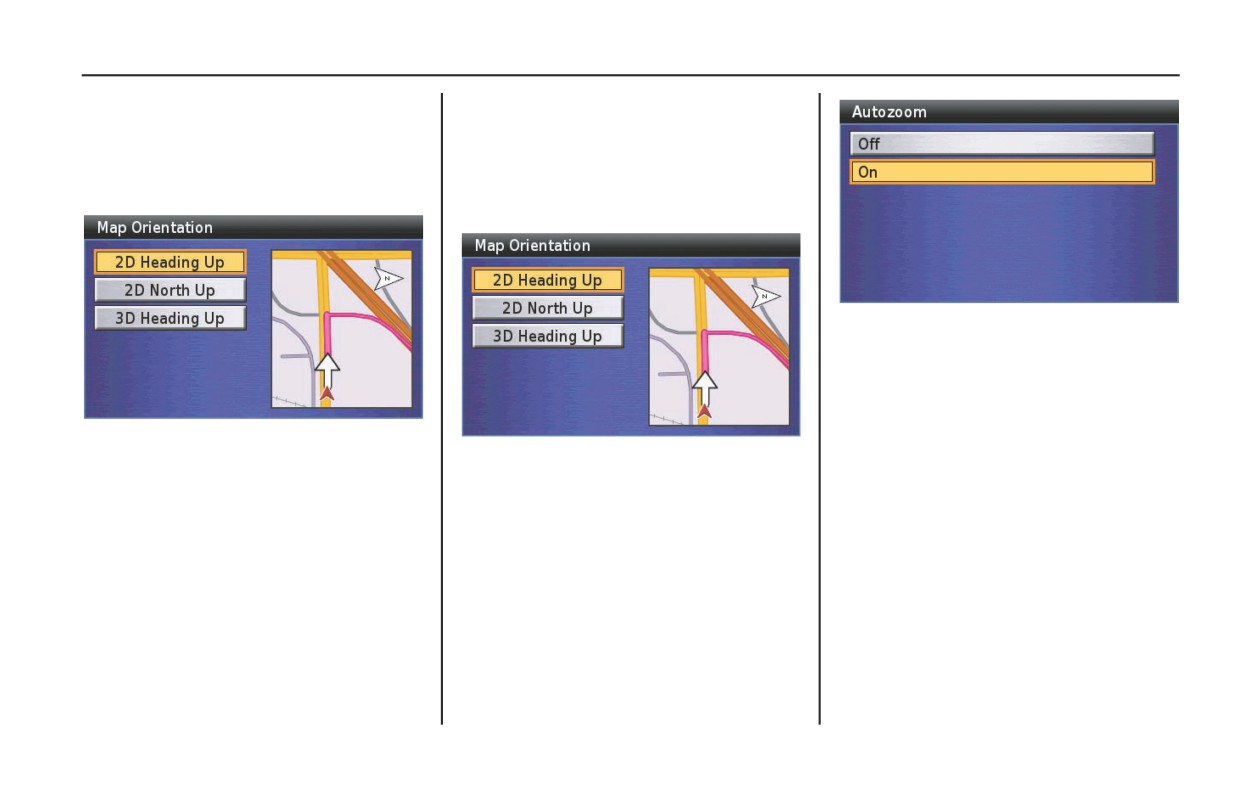
Selecting 2D Heading Up
Move the highlight to the Map
This option rotates the map so that the
Orientation field on the Setup Screen 1,
direction you are heading always points
and press ENT. The Map Orientation
toward the top of the screen. An “N”
screen appears.
arrow in the upper right of the screen
indicates where north is.
Highlight your choice and press ENT.
NOTE:
For information about Auto zoom, see
page 53.
There are three options. The default is
2D Heading Up will appear in the Map
2D Heading Up.
Highlight 2D Heading Up and press
Orientation field on the Setup Screen 1
ENT.
screen.
140
Setup / Info
Setup Screen 1
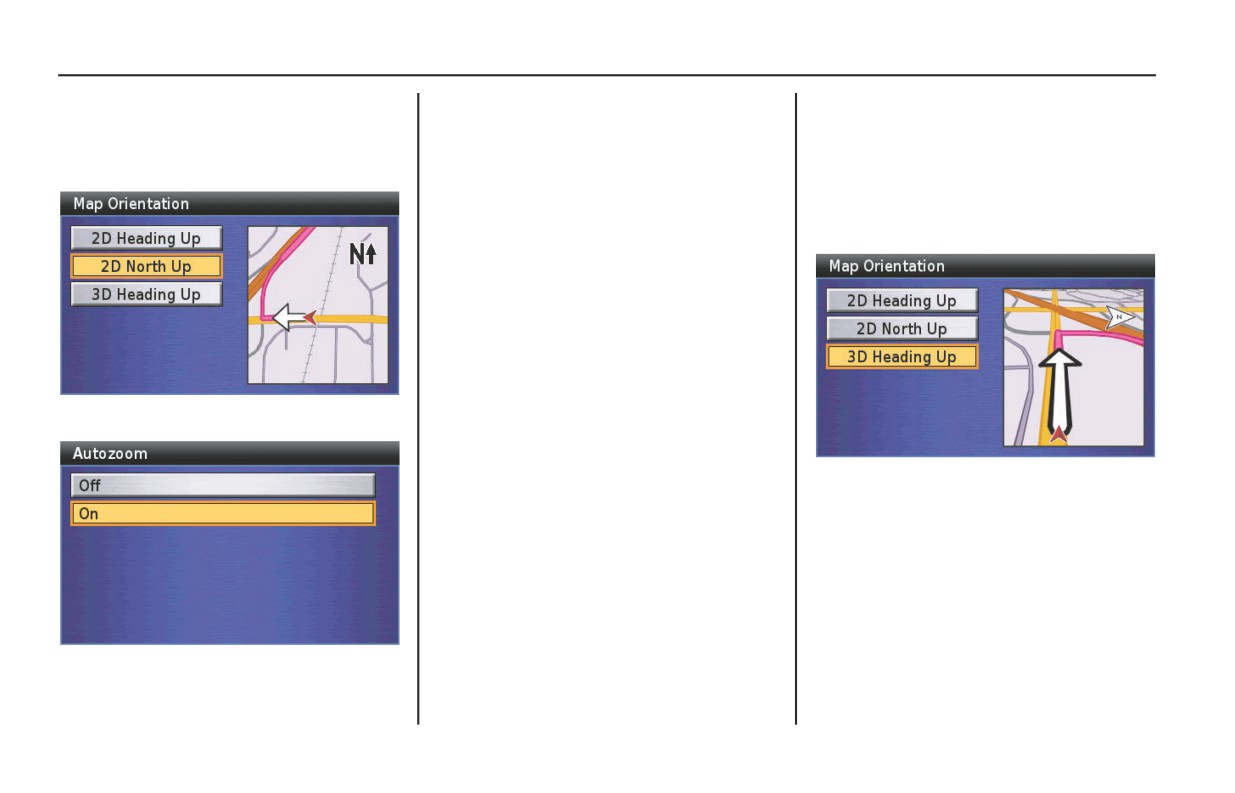
Selecting 2D North Up
NOTE:
Selecting 3D Heading Up
This option fixes the display with north
For information about Auto zoom, see
This option displays the map in 3
always positioned at the top of the
page 53.
dimensions (3D), with the direction you
screen.
are heading always pointed toward the
2D North Up will appear in the Map
top of the screen. An “N” arrow in the
Orientation field on the Setup Screen 1
upper right of the screen indicates where
screen.
north is.
Highlight 2D North Up and press ENT.
Highlight 3D Heading Up and press
ENT. 3D Heading Up will appear in the
Map Orientation field on the Setup
Screen 1 screen.
Highlight your choice and press ENT.
Setup / Info
141
Setup Screen 1
Map Color Mode
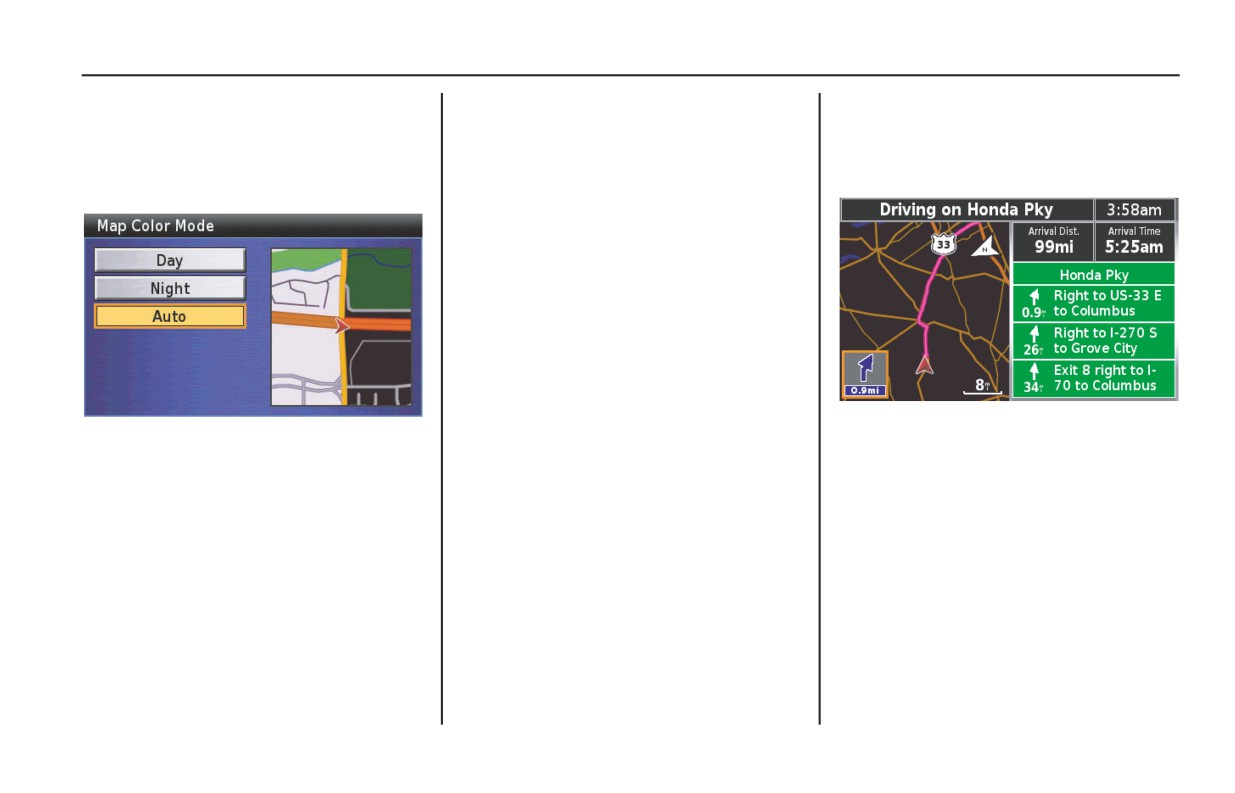
You have three color mode choices:
NOTE:
The “Night” mode or the “Auto” mode
Move the highlight to the Map Color
• The Day option offers higher intensity
after sunset provides a black background
Mode field on the Setup Screen 1, and
for easier viewing during daylight
as shown below.
press ENT. The Map Color Mode screen
hours.
appears.
• The Night option offers lower
intensity and a black background for
easier viewing at night.
• The Auto option automatically
switches between the day and night
modes based on the time of day and
GPS sunrise/sunset data. This is the
default setting.
Tip:
To activate the Navi System, press either
the DISP or MAP button. Press DISP
For more information about the night
again for the multi-information display.
screen, see page 49.
On the Map Color Mode screen,
highlight your choice and press ENT.
Your choice will appear in the Map
Color Mode field on the Setup Screen 1
screen.
142
Setup / Info
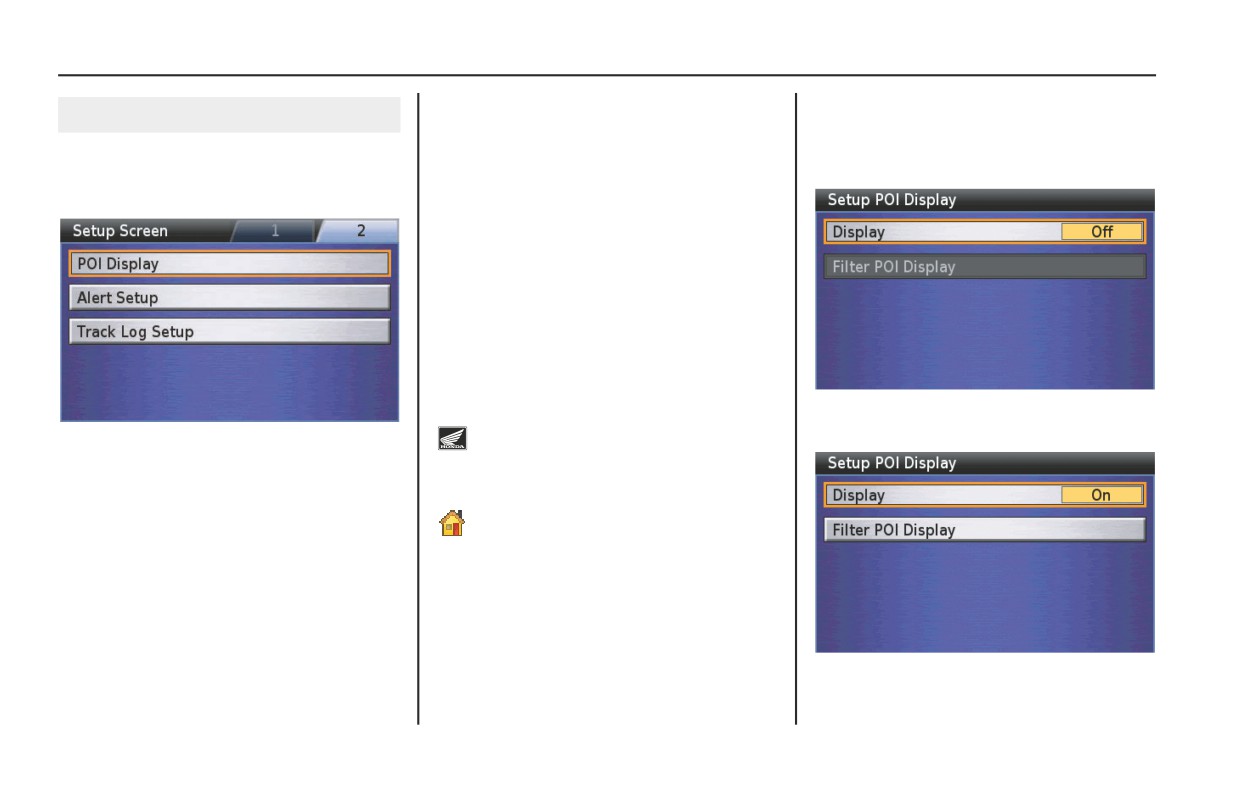
Setup Screen 2
POI Display
Turning on POI Icons on the Map
Setup Screen 2
The default is Off. If the option is On,
If you want to show POI icons on the
POI (point of interest) icons will appear
map, highlight POI Display on the Setup
To move to screen 2, highlight the 2 tab
when the map scale is 0.2 mile or
Screen 2 screen and press ENT.
at the top of the Setup Screen 1, and
press ENT. The Setup Screen 2 appears.
smaller.
NOTE:
The POI icon of the location you stored
as Favorite will be displayed on the 120
miles or smaller map scale.
There are two other icons that are not
part of the POI Icon option. They appear
whether the option is on or off.
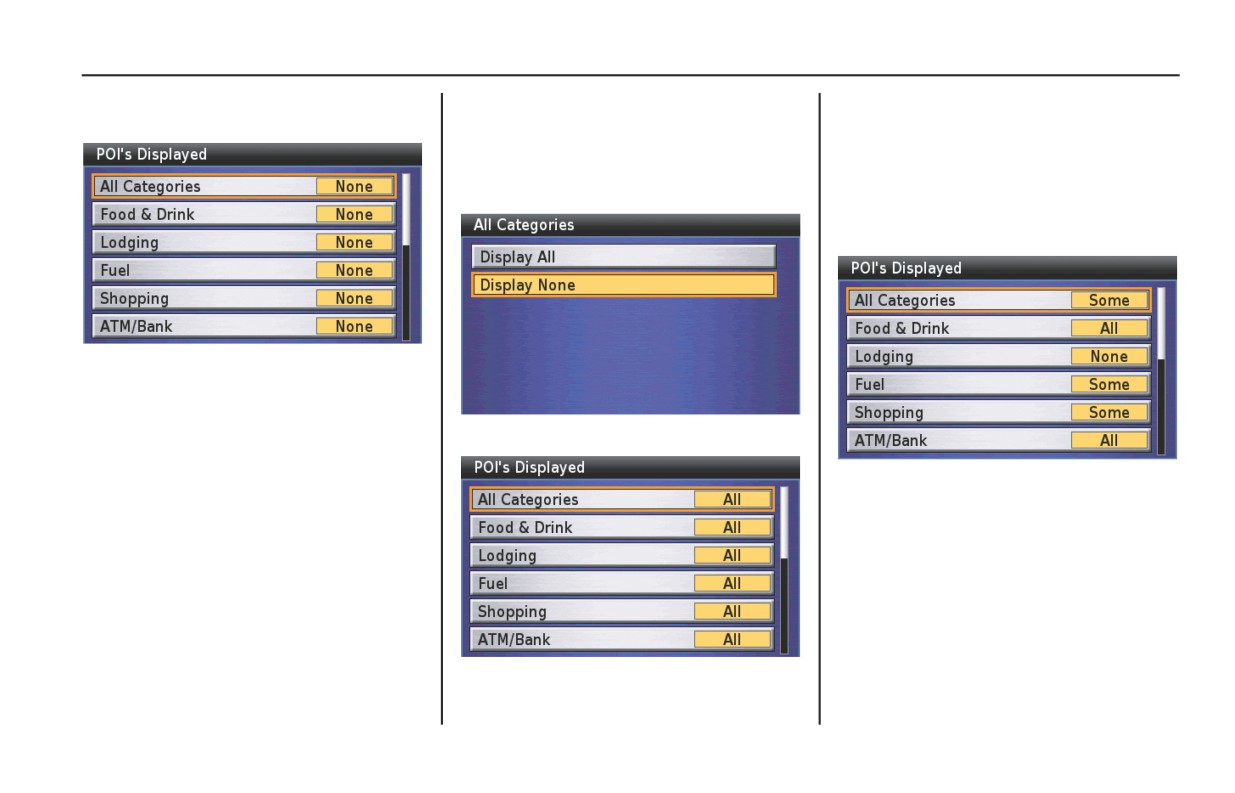
Highlight Display and press ENT to turn
Honda motorcycle dealer (wing)
on POI Display.
icons remain visible until you zoom
out past the 8 miles map scale.
The Home icon appears if you have
designated a Home location (for
120 miles or smaller map scale).
(cont’d)
Setup / Info
143
Setup Screen 2
Highlight Filter POI Display and press
When Displaying All POI icons on
When Displaying Your Desired POI
ENT. The POI category menu appears.
the Map
icons
If you want to show all POI icons on the
If you want to show your desired POI
map, highlight All Categories and press
icons, highlight your desired categories
ENT.
and press ENT. If subcategories are
displayed, highlight your desired item
and press ENT.
All items are selected by default.
Highlight Display All and press ENT.
The yellow field indicates selection.
Press the BACK button to return to the
Setup POI Display screen.
144
Setup / Info
Setup Screen 2
The icons will appear on all maps,
whether you are riding a route or not.
The points of interest are loaded in the
system and you cannot add any locations
to the database or control when the icons
appear. To get more information for a
POI that interests you, stop your
motorcycle and press any directional
arrow on the right fairing panel to bring
up the White Arrow Point Locator. Move
the locator to the POI icon. The POI’s
name will appear. To bring up a Point
Review Screen for the location, press
ENT.
Setup / Info
145
Setup Screen 2
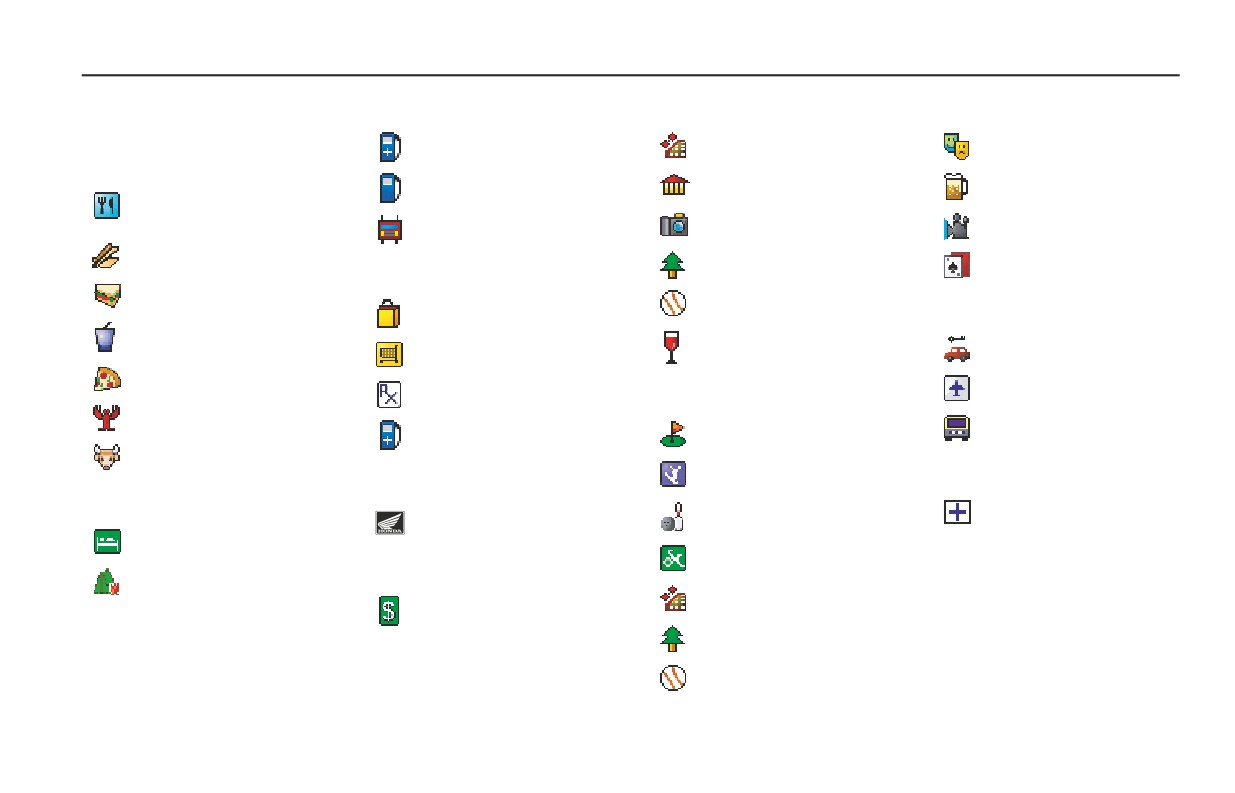
POI (Point of Interest)
Fuel
Attraction
Entertainment
Icons
Convenience
Amusement/Theme Park
Live Theater
Food & Drink
Museum/Historical, Hall/
Auto Fuel
Bar/Nightclub
American, Barbecue,
Auditorium
Spanish/Mexican, French,
etc.
Truck Stop
Landmark
Movie Theater
Asian, Chinese
Park/Garden
Casino
Shopping
Deli/Bakery, Café/Diner
Department, General
Arena/Track
Merchandise, Apparel
Transportation
Fast Food
Grocery, Shopping
Winery
Auto Rental
Center
Italian
Pharmacy/Chemist
Air Transportation
Recreation
Seafood
Ground Transportation
Convenience
Golf Course
Steak/Grill
Skiing Center/Resort
Hospital
Honda Motorcycle Dealer
Lodging
Hospital
Bowling Center
Honda Motorcycle Dealer
Hotel/Motel, Bed &
Breakfast Inn
Sports/Fitness Center
ATM/Bank
Campground/RV Park
Amusement/Theme Park
ATM/Bank
Park/Garden
Arena/Track
146
Setup / Info
Setup Screen 2
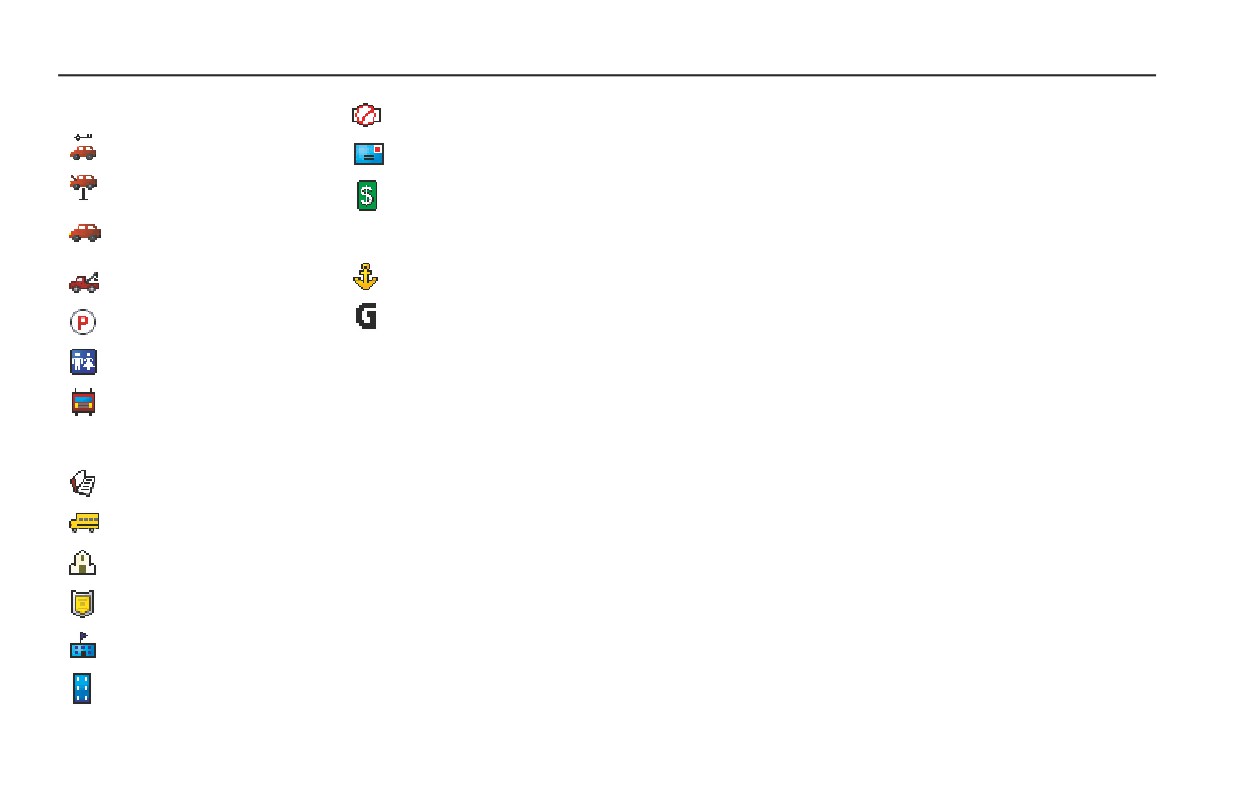
Auto Services
Border Crossing
Auto Rental
Post Office
Auto Repair
Bank/ATM
Dealer/Auto Parts,
Automobile Club, Car
Others
Wash
Marina/Repair & Storage
Wrecker Service
Garmin Dealer
Parking
Rest Area/Tourist Info
Truck Stop
Community
Library
School
Place of Worship
Police Station
City Hall
Court House, Community
Center
Setup / Info
147
Setup Screen 2
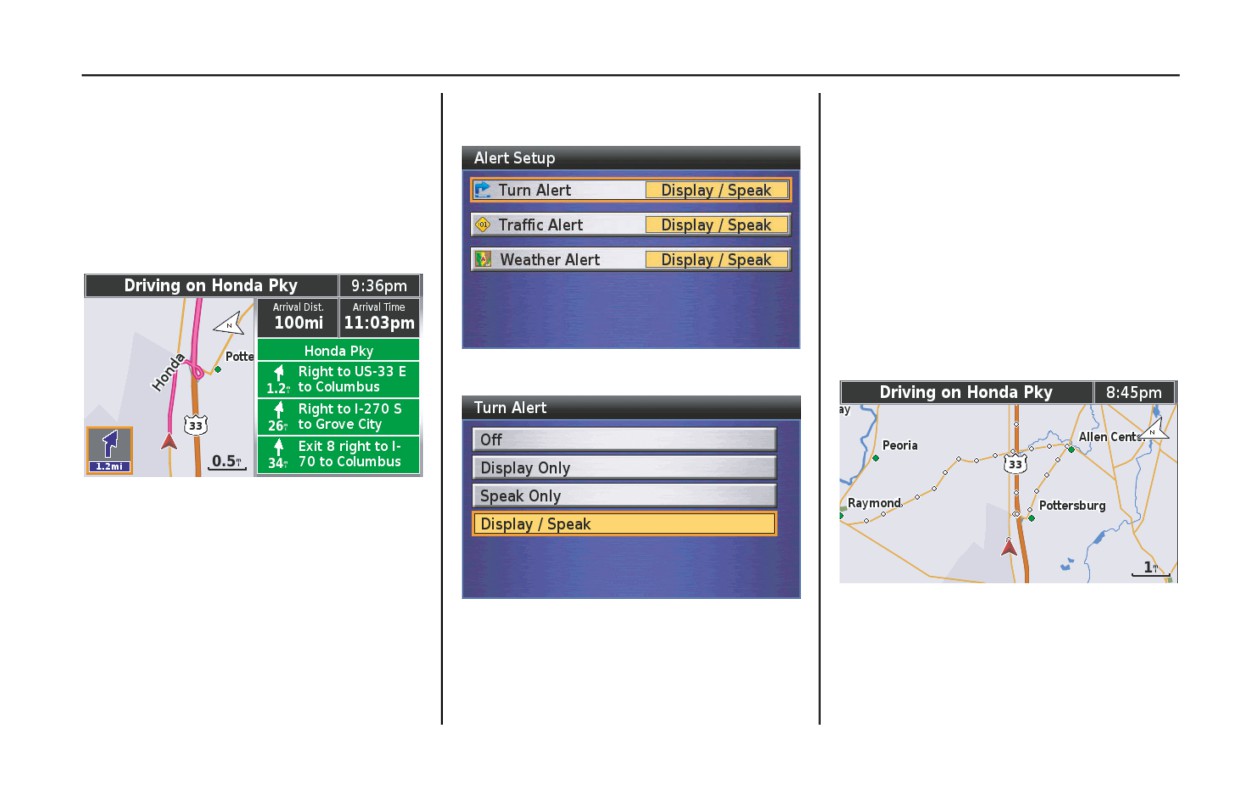
Alert Setup
To change this option, highlight Alert
Track Log Setup
Setup and press ENT.
The system notifies you of urgent
The option creates a visual log of where
conditions with the alert icon and voice
you have ridden by spreading
guidance (default setting). The alert icon
“breadcrumbs” (up to 10,240 white
will appear in the lower left corner of the
diamonds) every 275 yards (250 meters),
screen. You can select the notification
depending on the scale of your map
method, such as with voice only, with
display. These breadcrumbs appear,
icon only, etc.
whether or not there is a route in the
system, for any map scale up to and
including 3 miles. If the system spreads
the maximum number of breadcrumbs,
the first created will disappear as the
latest breadcrumb appears.
Highlight your choice and press ENT.
NOTE:
For more information about the alert
icon, see page 51.
To turn this option on, highlight Track
Highlight your choice and press ENT.
Log Setup and press ENT.
Press the BACK button to return to the
Setup Screen 2 screen.
148
Setup / Info
Setup Screen 2
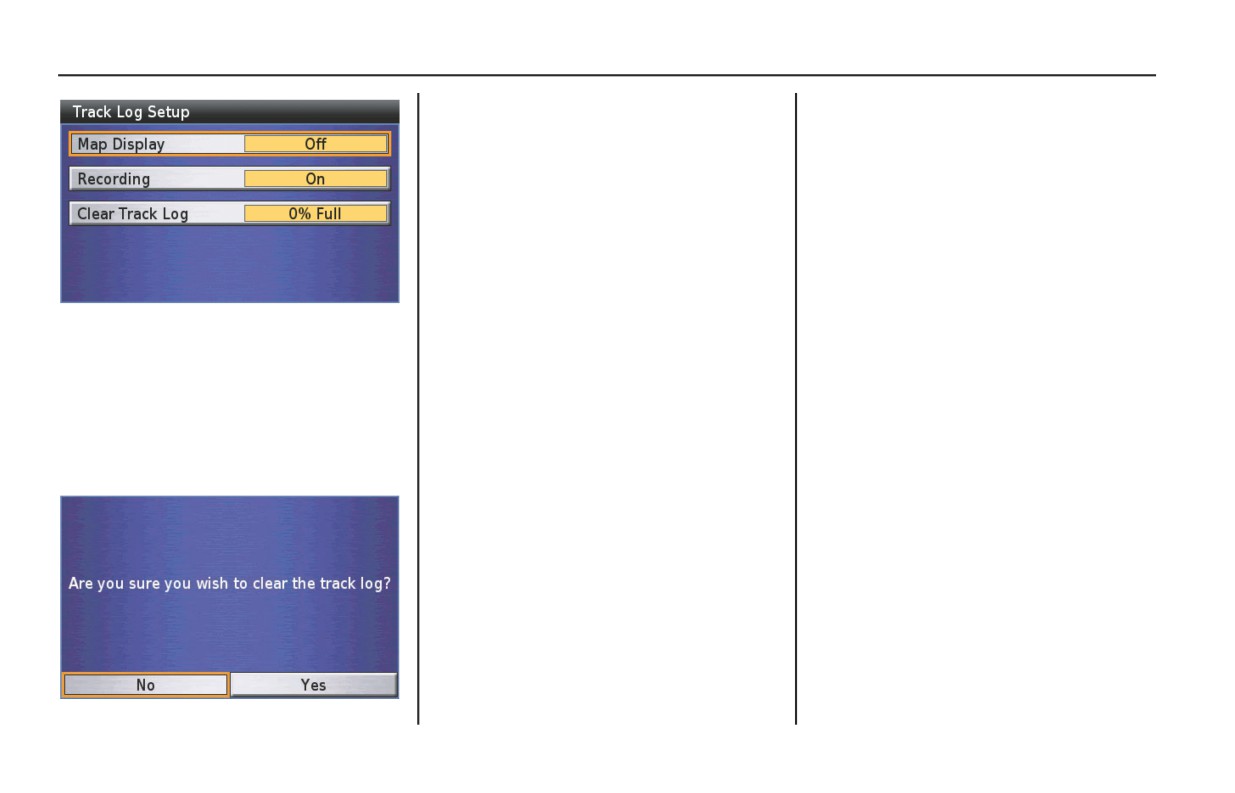
Highlight Yes and press ENT. If you
clear the track log from the system with
Recording option On, new breadcrumbs
will appear as you continue - regardless
of whether or not you have a route in the
system.
When you complete your selections for
Setup Screen 2, press the BACK button
to return to the Setup / Info menu.
To record your track log, highlight
Recording and press ENT. To display the
breadcrumb on the map, highlight Map
Display and press ENT
To clear the breadcrumbs from the
system, highlight Clear Track Log and
press ENT.
Setup / Info
149
Setup System 1
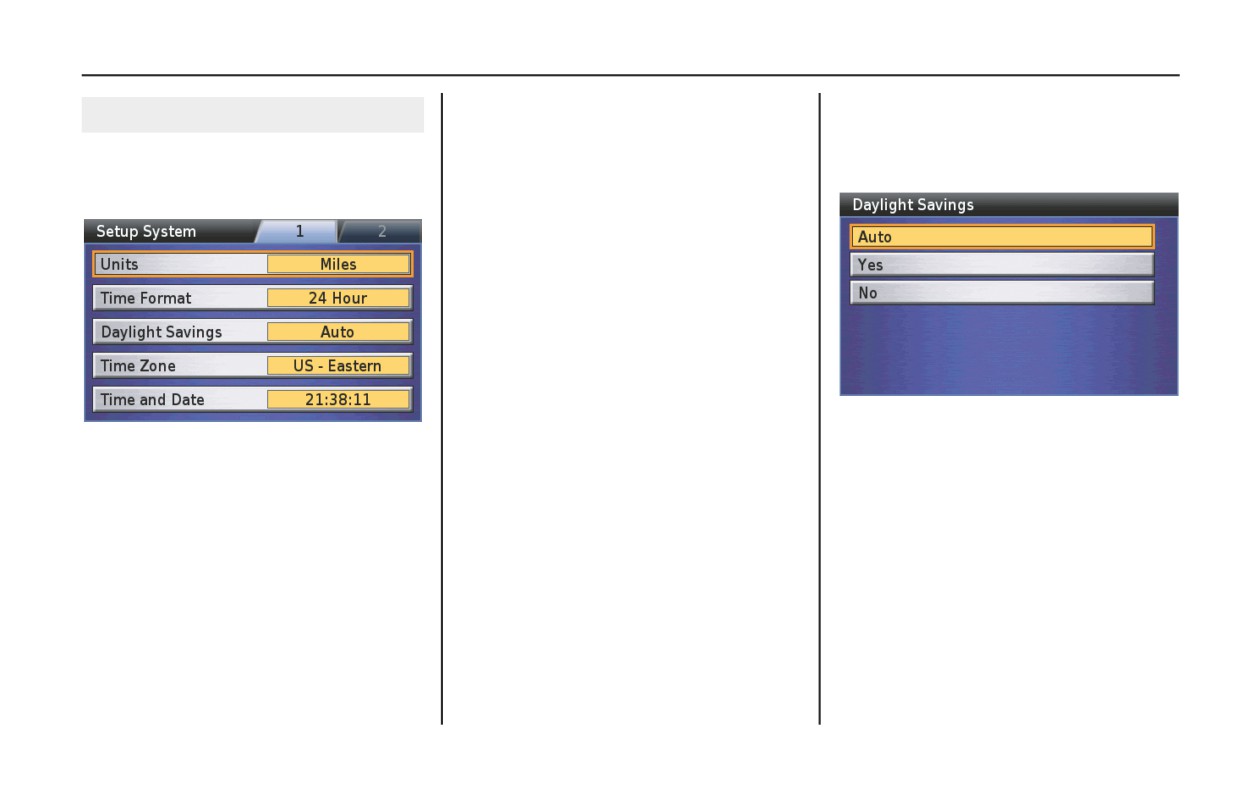
Units
Daylight Savings
Setup System 1
The default is Mile. To select KM,
The default is Auto. To change the
On the Setup / Info menu, highlight Setup
highlight Units and press ENT. The KM
selection, highlight Daylight Savings and
System and press ENT. The Setup System
option will appear on the Units field.
press ENT.
1 screen appears.
Time Format
The default is 12 Hour (am and pm)
display. To select 24 Hour (military)
time, highlight Time Format and press
ENT. The 24 Hour option will appear on
the Time Format field.
The Auto option will automatically
adjust for time changes in the spring and
fall. The Yes option voids the automatic
time change for daylight saving time.
The No option keeps the time standard.
Highlight your desired option and press
ENT.
150
Setup / Info
Setup System 1
Time Zone
Time and Date
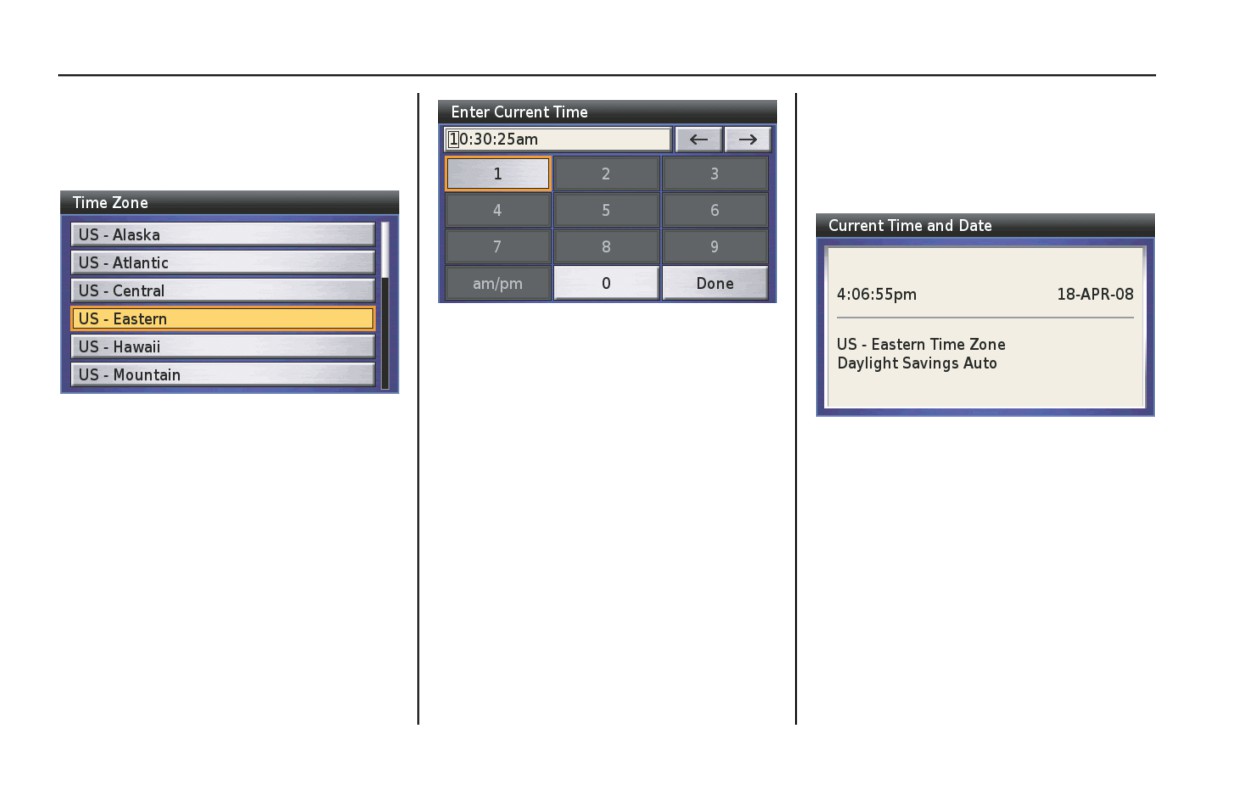
The default is US-Eastern. To change the
You can check the time, date, time zone
selection, highlight Time Zone and press
setting, and daylight saving setting. Press
ENT.
the BACK button to return to the Setup
System 2 screen.
NOTE:
If “24 Hour” is set on the “Time
Format,” the am/pm buton is not
available.
Highlight your time zone and press ENT.
The Other selection allows you to enter
Use the keyboard to enter the time.
any local time that is not covered by the
NOTE:
other choices.
For information about keyboard screen,
see page 64.
When you are finished, highlight Done
and press ENT.
Setup / Info
151
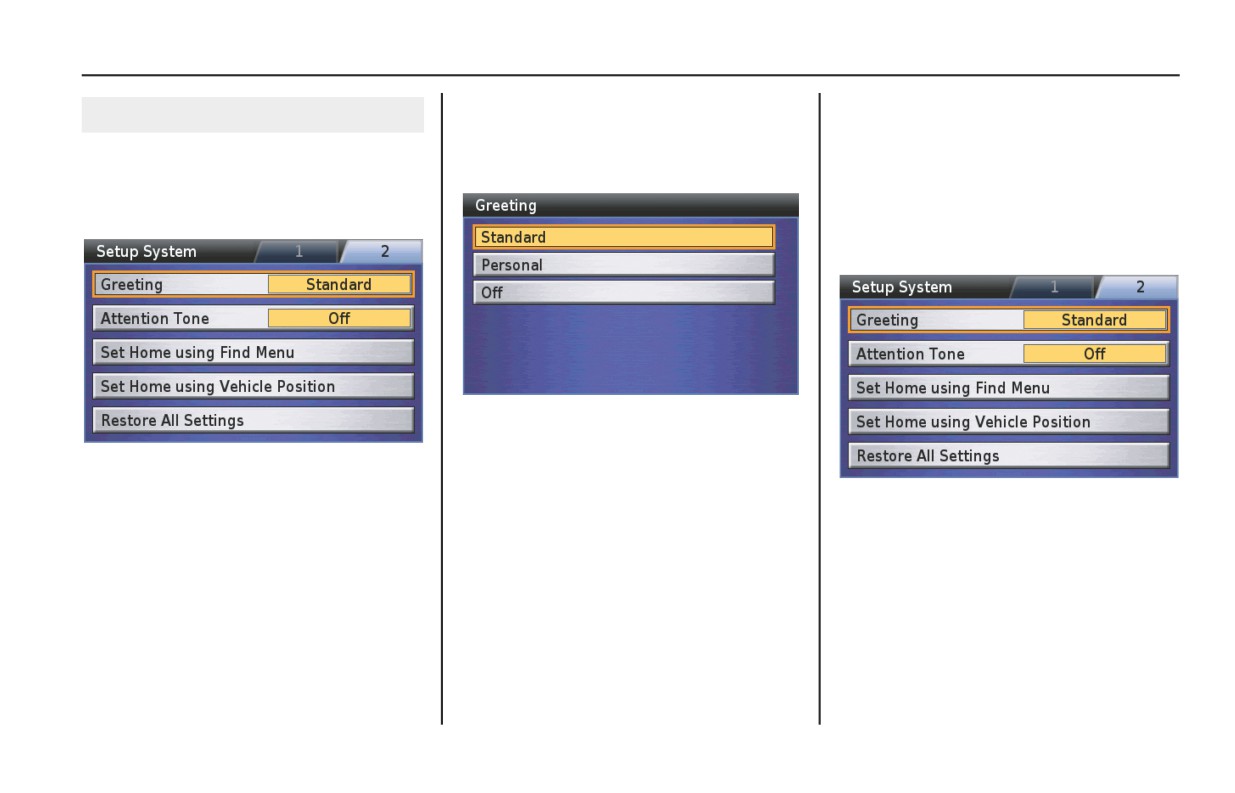
Setup System 2
Greating
Selecting Standard Greeting
Setup System 2
You can select the greeting screen that
The default for the opening/ending
appears when you turn the ignition on.
greeting is the Standard greeting, which
To move to screen 2, highlight the 2 tab
Highlight Greeting and press ENT.
shows the Goldwing logo and then fades
at the top of the Setup System 1 screen,
out. The same logo appears as the
and press ENT. The Setup System 2
closing greeting.
screen appears.
Highlight Standard and Press ENT.
Your choice will appear in the Greeting
field on the Setup System 2 screen. To
return to the Setup / Info menu, press the
BACK button.
152
Setup / Info
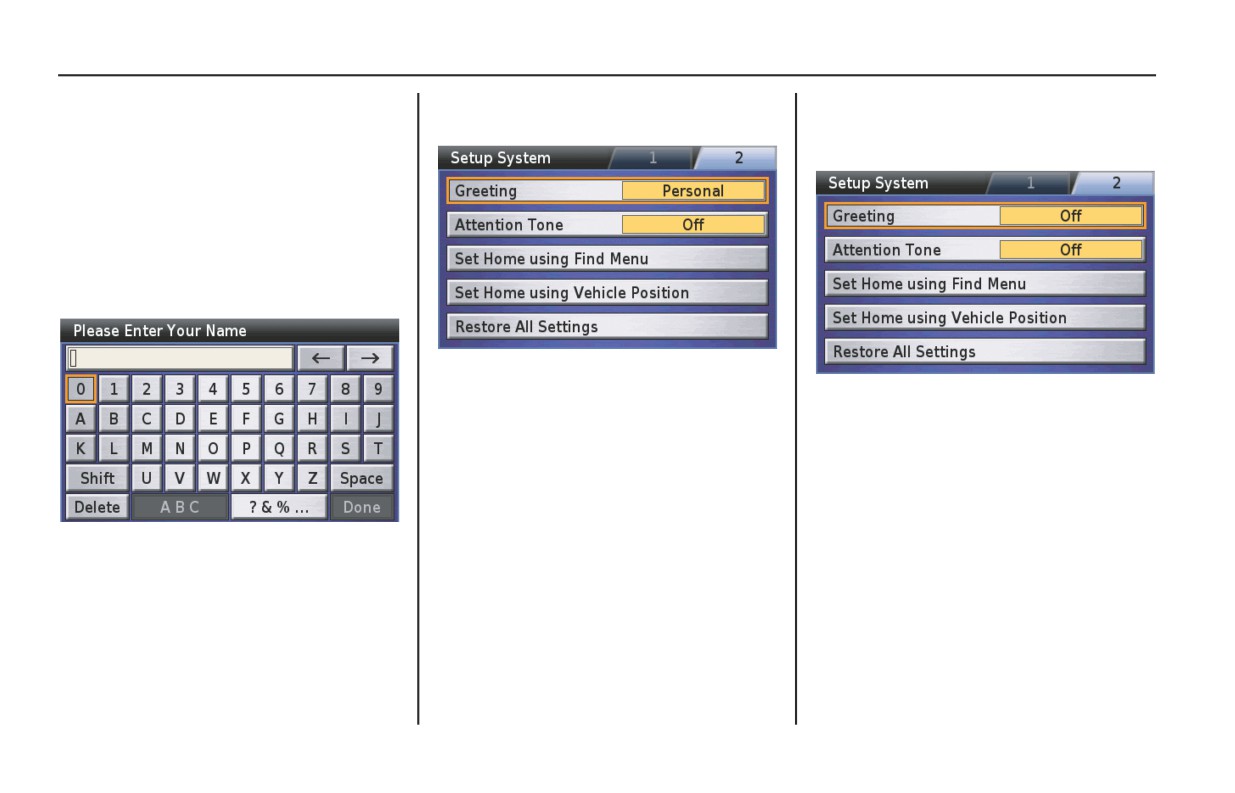
Setup System 2
Selecting Personal Greeting
After typing, highlight Done and press
Selecting Off (No Greeting)
The opening greeting includes the
ENT.
If you do not want an opening greeting,
Goldwing logo screen followed by a
highlight Off and press ENT.
screen that reads: Hello! followed by the
text you enter. The closing greeting will
be See You! followed by the text you
enter.
To choose the customized greeting,
highlight Personal, and press ENT.
Your choice will appear in the Greeting
field on the Setup System 1 screen. To
Your choice will appear in the Greeting
return to the Setup / Info menu, press the
field on the Setup System 2 screen. To
BACK button. The next time you start
return to the Setup / Info menu, press the
the Navigation System, you will see a
BACK button.
two-screen sequence: the Goldwing logo
followed by a second screen that says
NOTE:
Hello! with the text you entered. When
“Off” only affects the opening greeting.
you exit the system, you will see a screen
You will still see the standard closing.
Use the keyboard to type your name or
that says: See you! followed by the text
phrase you want to appear below Hello!
you entered.
in the customized greeting.
NOTE:
For more information about the
keyboard screen, see page 64.
Setup / Info
153
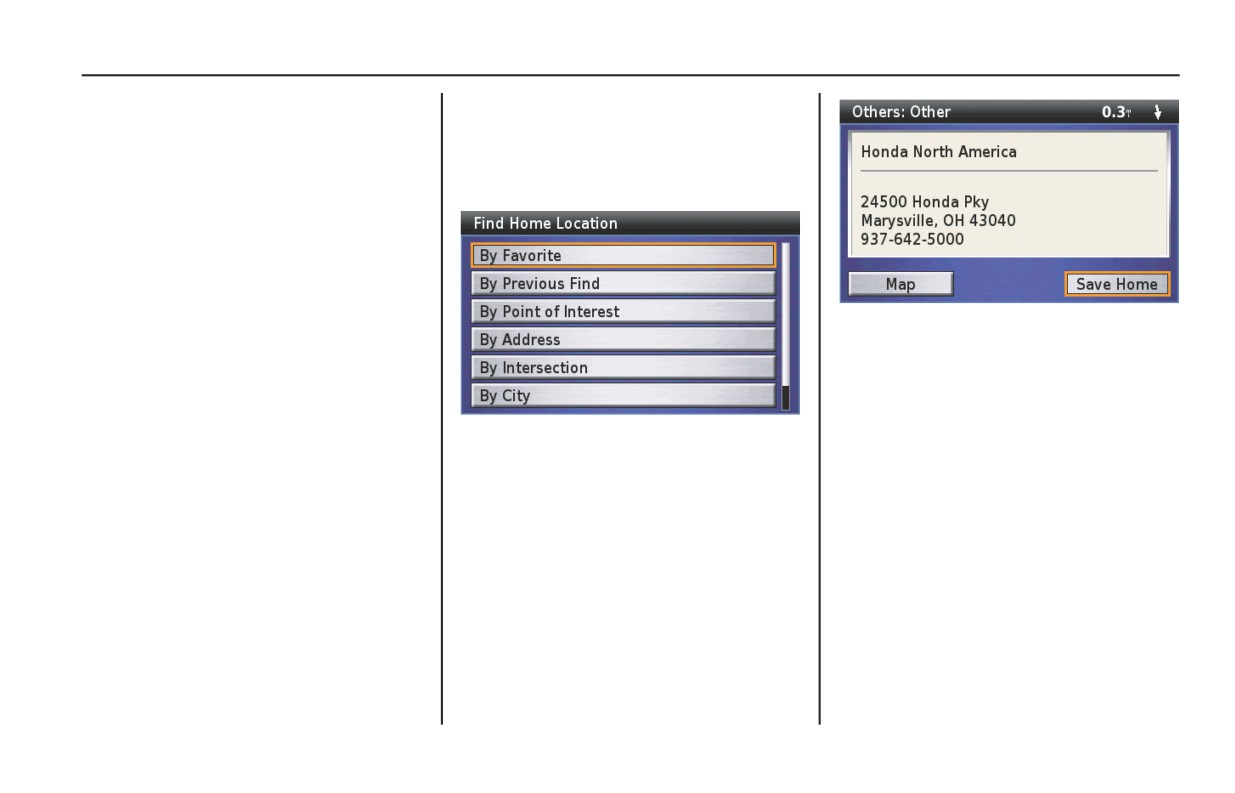
Setup System 2
Attention Tone
Set Home using Find Menu
If this option is set to On (default is Off),
If you want to designate a location from
the attention tone sounds before voice
the Find menu, highlight Set Home using
prompts. Highlight Attention Tone and
Find Menu and press ENT. The Find
press ENT to turn the attention tone on
Home Location menu appears.
or off.
With Save Home highlighted, press
ENT. The display returns to the Setup
System 2 screen.
NOTE:
Your new “Home” designation will be
The Find Home Location menu offers
listed in “Favorite Places.”
the seven Find menu functions. For the
following procedure, see Find
Destination on page 81. The Point
Review Screen then appears.
154
Setup / Info
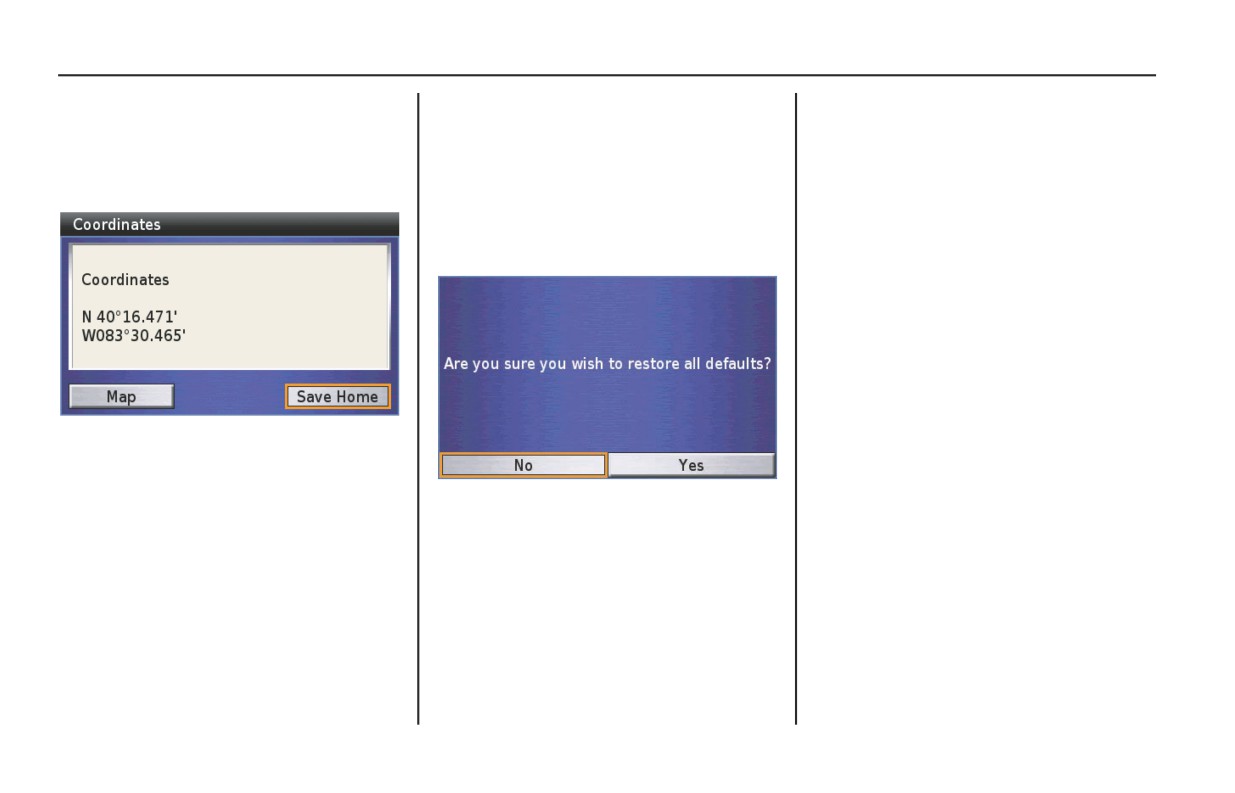
Setup System 2
Set Home using Vehicle Position
Restore All Settings
NOTE:
If you want to designate your current
The Restore All Settings option lets you
Executing the Restore All Settings option
location as Home, highlight Set Home
return the system to initial default
deletes the “Home” location stored in
using Vehicle Position and press ENT.
settings selected by the factory. (See the
the system.
The Point Review Screen appears.
table on page 156.)
Highlight Restore All Settings and press
ENT. The following screen appears.
With Save Home highlighted, press
ENT. The display returns to Setup
System 2 screen.
The screen will ask you to confirm your
NOTE:
request. Highlight Yes and, press ENT to
Your new “Home” designation will be
restore all settings.
listed in “Favorite Places.”
Setup / Info
155
Setup System 2
Factory Default Settings
Setup Screen
FEATURE
DESCRIPTION
DEFAULT
Dimmer / Day
For daytime screen viewing.
Full Brightness
Dimmer / Night
For nighttime screen viewing.
Half Brightness
Map Layout
Three map layout choices.
Half Map
Map Color Mode
Background color for daylight map display/screen mode.
Auto
Map Orientation
Three map orientation choices.
2D Heading Up
POI (Point of Interest)
If the map scale is 0.2 mile smaller, point of interest icons appear on the map screen.
Off
Display
Alert Setup
Three alert notification choices.
Display/Speak
Track Log Setup
Creates log of your journey by spreading “breadcrumbs” every 275 yards (250 meters),
Map Display : Off
depending on the map scale. If on, breadcrumbs appear whether or not there is a route in
Recording : On
the system.
156
Setup / Info
Setup System 2
Setup System
FEATURE
DESCRIPTION
DEFAULT
Units
Distance measurement (miles or kilometers).
Mile
Time Format
12 hour (am/pm) or 24 hour (military).
12 Hour
Daylight Savings
Automatically adjusts for standard/daylight savings time changes.
Auto
Time Zone
Allows you to change time zone.
US-Eastern
Greeting
Three options including no greeting.
Standard
Attention Tone
Turns the attention tone on or off that sounds before voice prompts
Off
Setup Voice
FEATURE
DESCRIPTION
DEFAULT
Voice
Allows you to select the type of voices for the route guidance and prompts.
American English-Jill
(TTS)
Setup / Info
157
Setup Voice
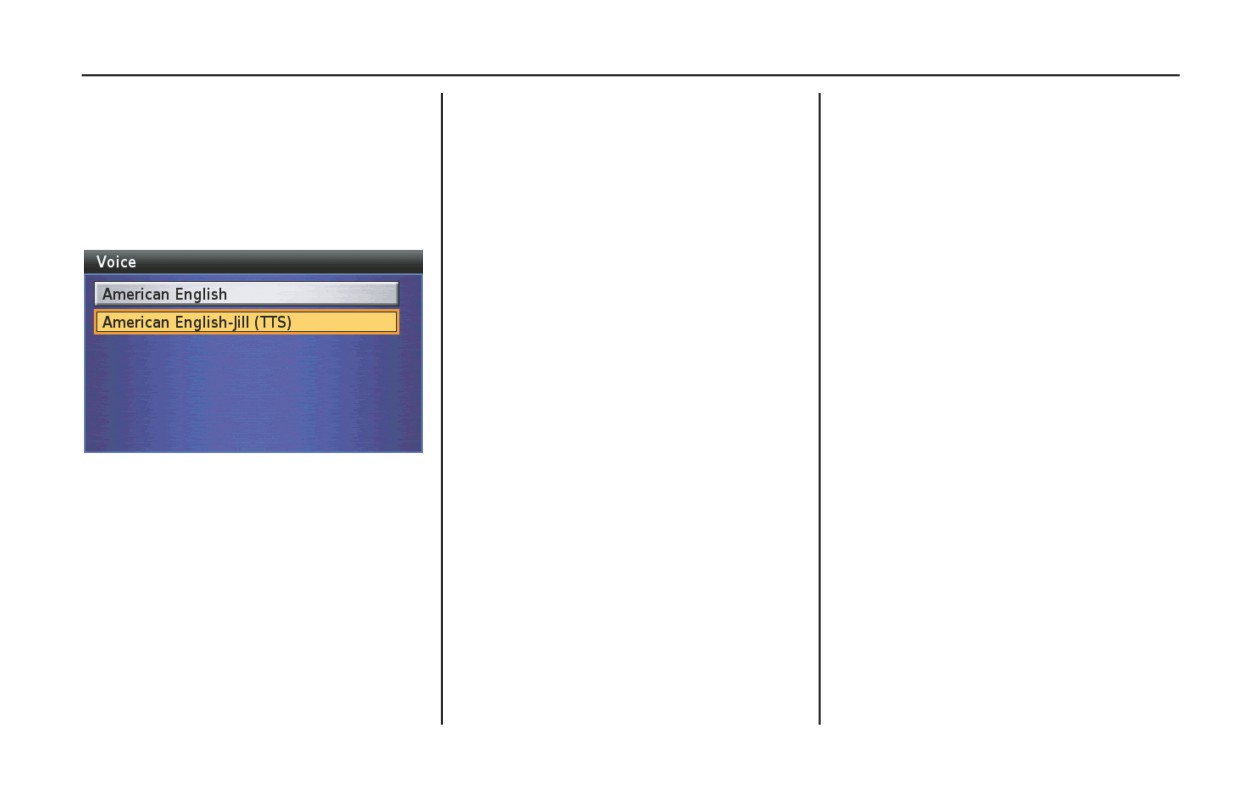
The Setup Voice option allows you to select
the type of voices from the pre-recorded
voice or text-to speech (TTS) voice.
On the Setup / Info menu, highlight Setup
Voice and press ENT. The following
screen appears.
American English is pre-recorded voices,
which have a limited vocabulary and do
not speak names of locations or streets.
American English-Jill (TTS) is a text-to-
speech voice, which will read and speak
the same words that are displayed on the
screen. The voices have an extensive
vocabulary, and they pronounce the
street names as you approach turns. To
change the voice setting, highlight your
choice and press ENT. The screen will
return to the Setup / Info menu.
158
Setup / Info
Info Screens
Info Screens
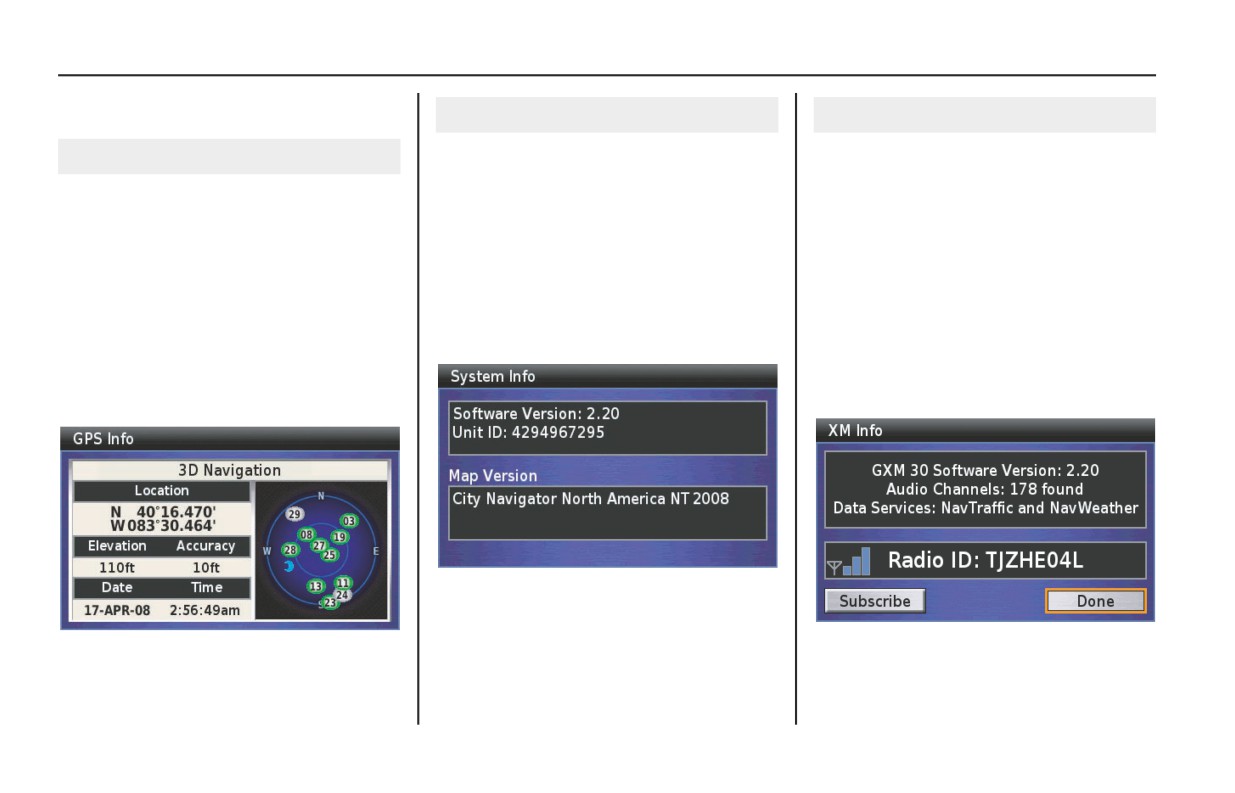
System Info
XM Info
The System Info option identifies the
The XM Info option identifies the
GPS Info
software operating your Navigation
software, available audio channels, and
The GPS Info option lets you check your
System and provides the software ID
data services used in your Navigation
GPS status, shows the position of the
number. In addition, the version of map
System, and provides the radio ID
satellites to which the system is
software loaded in the system appears at
number.
connected, displays the time and date,
the bottom of the screen.
shows your current coordinates, and
NOTE:
indicates the accuracy range of the GPS
On the Setup / Info menu, highlight Info/
XM service only available in the 48
signal.
System and press ENT. The following
contiguous United States.
screen appears.
On the Setup / Info menu, highlight XM
On the Setup / Info menu, highlight GPS
Info and press ENT. The following
Info and press ENT. The following
screen appears.
screen appears.
After checking the information, press the
BACK button to return to the Setup / Info
menu.
Press the BACK button to return to the
Setup / Info menu.
(cont’d)
Setup / Info
159
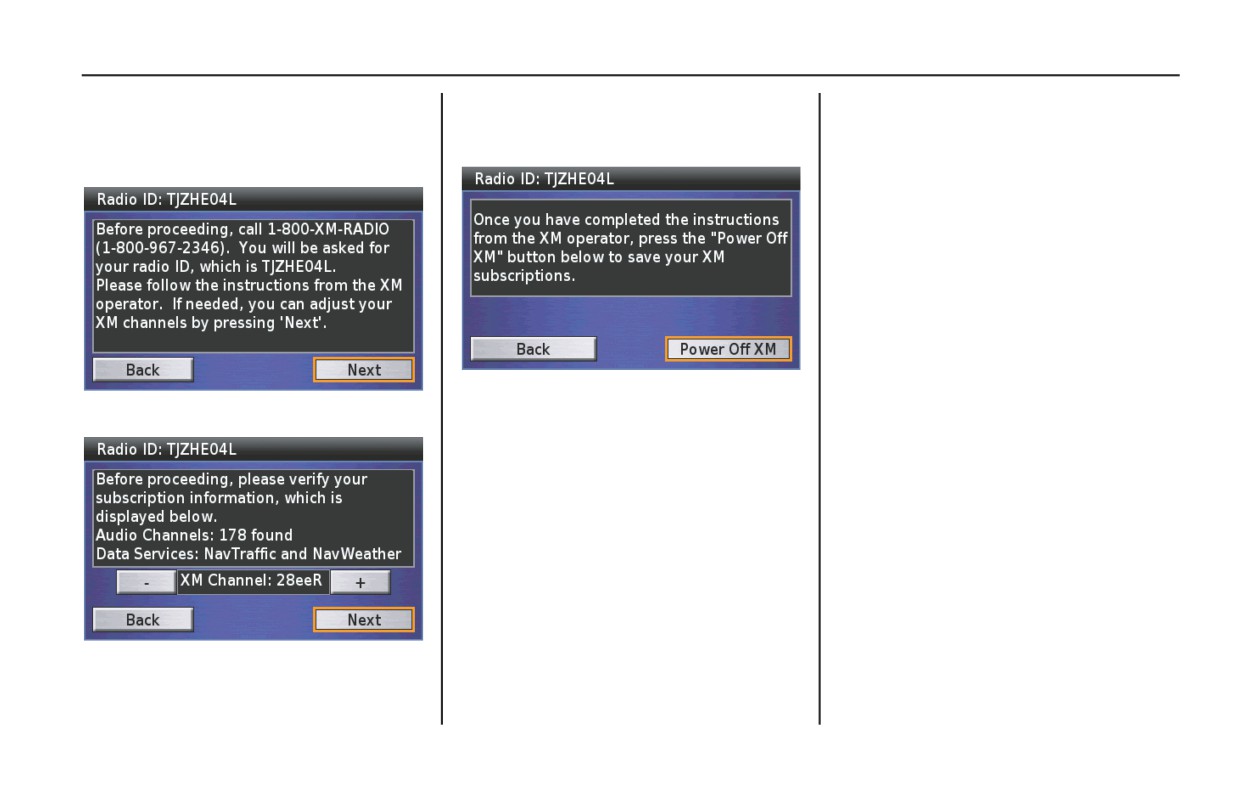
Info Screens
You need to activate your XM
Highlight - or +, and press ENT to
subscription before you use the XM
change the channel. After selecting
features. Highlight Subscribe and press
channel, highlight Next and press ENT.
ENT.
Highlight Power Off XM and press ENT.
Highlight Next and press ENT.
160
Setup / Info