Honda GL1800 Goldwing. Owners Manual - page 6
Tires
A permanent repair, such as an internal plug patch, can be made if a tire has only
a small puncture in the tread area. With such a repair, you should not exceed
50 mph (80 km/h) for the first 24 hours, or 80 mph (130 km/h) at any time
thereafter. In addition, you may not be able to safely carry as much weight. If
you choose to have a tire repaired, be sure the repair work is performed by a
professional and that the wheel is balanced before you ride.
If you have a tire professionally repaired at a non-Honda facility, we
recommend that you have the work checked by your Honda dealer.
Tire Replacement
Saf ety Precautions
Refer to
on page142
The tires that came on your motorcycle were designed to match the performance
capabilities of your motorcycle and provide the best combination of handling,
braking, durability, and comfort.
When replacing, use the original equipment tires or equivalent tires of the same
size, construction, speed rating, and load range as the originals.
Installing improper tires on your
motorcycle can affect handling
and stability. This can cause a
crash in which you can be
seriously hurt or killed.
Always use the size and type of
tires recommended in this
owner’s manual.
194
Servicing Your Honda
Tires
The recommended tires for your motorcycle are:
front
DUNLOP D250F
130/70R18M/C 63H
BRIDGESTONE G709 RADIAL
rear
DUNLOP D250
180/60R16M/C 74H
BRIDGESTONE G704 RADIAL
type
radial, tubeless
Whenever you replace a tire, remember:
Have the wheel balanced after the tire is installed.
Have the tire replaced by your Honda dealer.
Important Safety Reminders
Do not install a tube inside a tubeless tire on this motorcycle. Excessive heat
build-up can cause the tube to burst.
Use only tubeless tires on this motorcycle. The rims are designed for tubeless
tires, and during hard acceleration or braking, a tube-type tire could slip on
the rim and cause the tire to rapidly deflate.
Do not install car tires on this motorcycle. During installation the tire may
separate from the rim with enough force to cause serious injury or death.
When replacing tires, use only the recommended tires as shown above and on
the tire information label. Use of other tires on the model equipped with ABS
may impair proper ABS function. The ABS computer works by comparing
wheel speed.
Non-recommended tires can affect wheel speed and may confuse the ABS
computer.
If you ever replace a wheel, make sure that the wheel’s specifications match
those of the original wheels.
Be sure you use only TPMS-specific wheels. Not using TPMS-specific
wheels can cause an air leak, a tire pressure monitoring system failure, or both.
Replacement wheels are available at your Honda dealer.
Servicing Your Honda
195
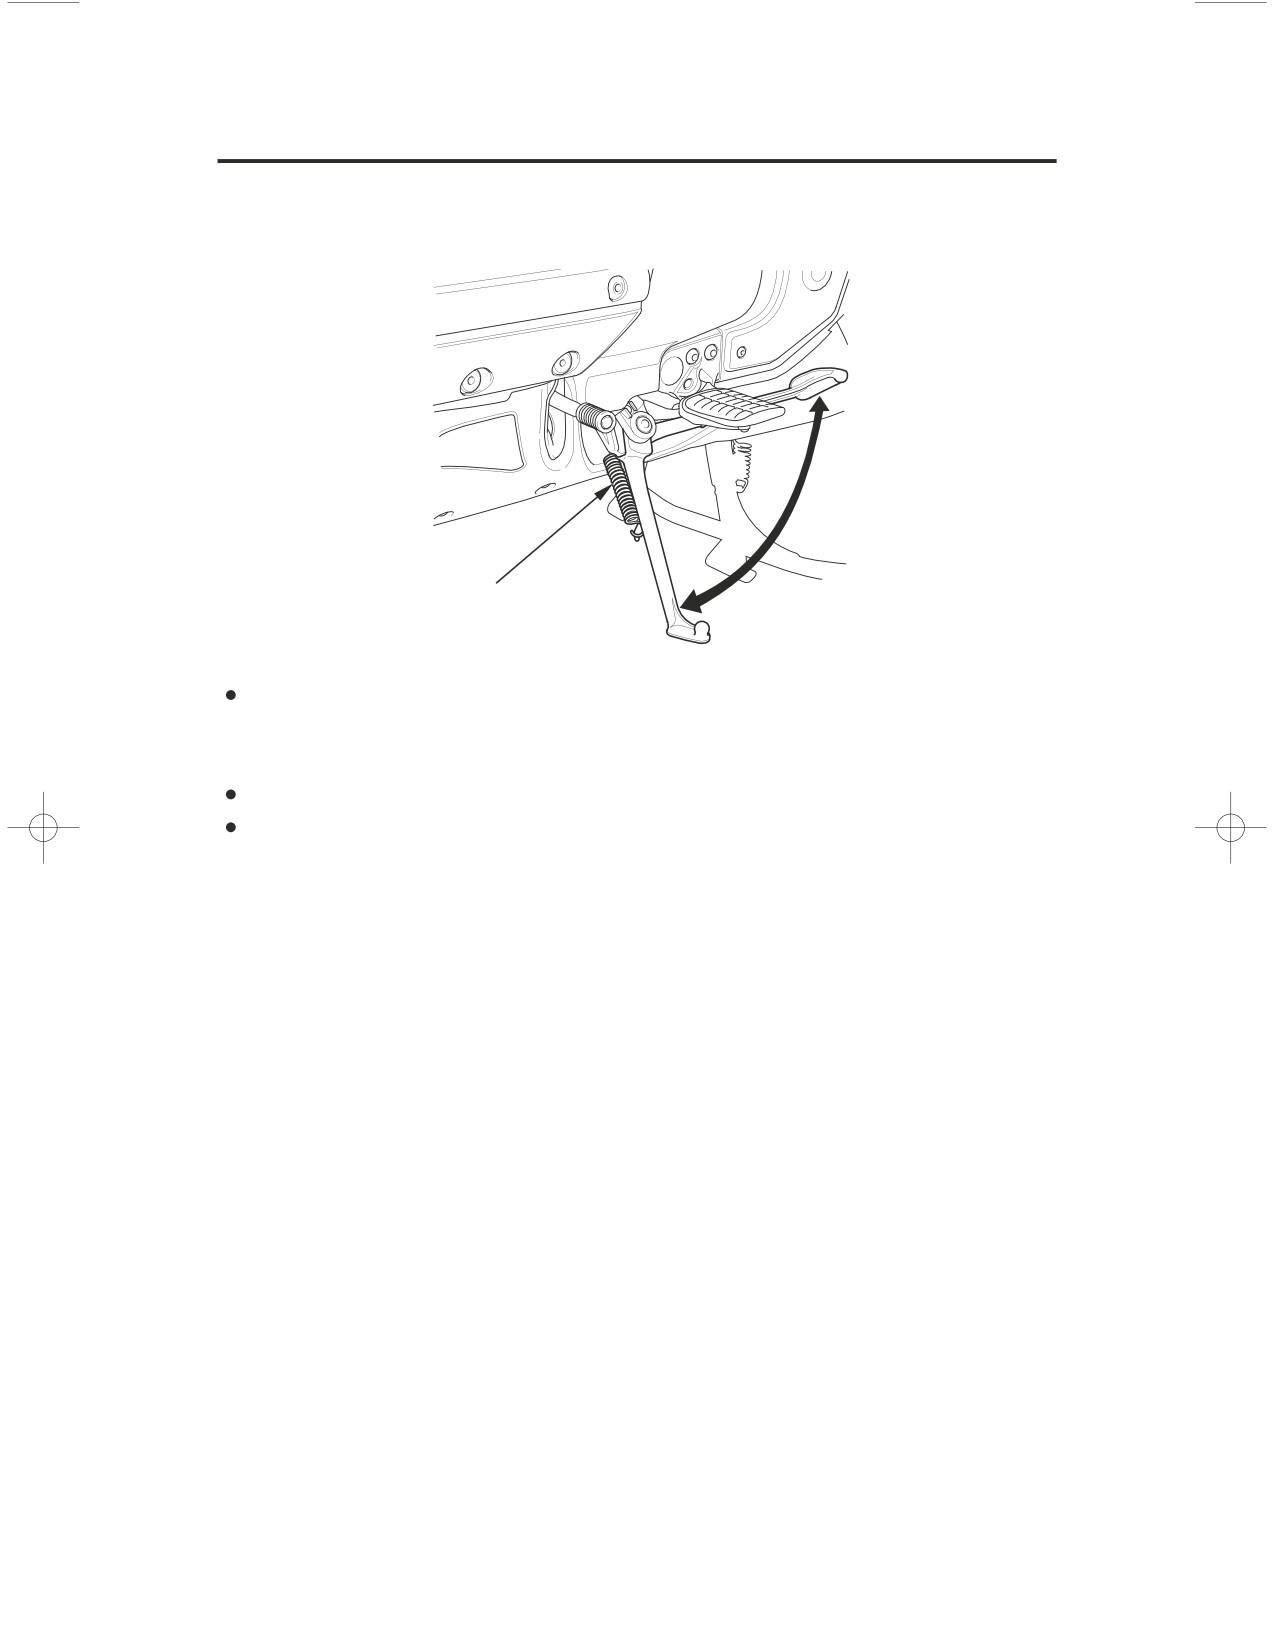
Side Stand
Refer to Saf ety Precautions on page142
LEFT SIDE
stand spring
Check that the side stand assembly is working properly. If the side stand is
stiff or squeaky, clean the pivot area and lubricate the pivot bolt with clean
grease.
Check the side stand spring for damage or loss of tension.
Check the side stand ignition cut-off system:
1. Sit on the motorcycle and put the transmission in neutral.
2. Raise the side stand.
3. Start the engine.
4. Pull the clutch lever in.
5. Shift the transmission into gear.
6. Lower the side stand all the way.
The engine should stop as you lower the side stand. If the engine doesn’t stop,
see your Honda dealer for service.
196
Servicing Your Honda
Battery
Your motorcycle has a maintenance-free type battery. You do not have to check
the battery electrolyte level or add distilled water as you would with a
conventional-type battery.
Your battery is a maintenance-f ree type and can be permanently damaged if
the cap strip is removed.
Electrical accessories use current from the battery, even when the ignition is
OFF. Limited operation also allows the battery to discharge. If you have
electrical accessories on your motorcycle or do not ride frequently, we
recommend that you charge the battery frequently (see Battery Charging,
page
200
).
If you do not expect to ride your motorcycle for at least two weeks, we
recommend you remove the battery, or at least disconnect the battery cables
(negative cable first).
If you plan to store your motorcycle, see
Battery Storage,
page
198
If your battery seems weak and/or is leaking electrolyte (causing slow starting or
other electrical problems), see your Honda dealer.
WARNING:
Battery posts, terminals and related accessories contain lead and
lead compounds. Wash your hands after handling.
Servicing Your Honda
197
Battery
Battery Storage
Saf ety Precautions
Refer to
on page142
If you plan to store your motorcycle, we recommend you remove the battery and
store it where it can be charged at least every 30 days to maintain its service life.
If you do not remove the battery, we recommend disconnecting the battery
cables (negative cable first).
You will get the best storage results from removing the battery and slow
(trickle) charging it every 30 days (see
Battery Charging,
page
200
).
Before you remove the battery, be sure to read all the information that follows,
as well as the information on the battery label.
The battery gives off explosive
hydrogen gas during normal
operation.
A spark or flame can cause the
battery to explode with enough
force to kill or seriously hurt you.
Wear protective clothing and a
face shield, or have a skilled
mechanic do the battery
maintenance.
198
Servicing Your Honda
Battery
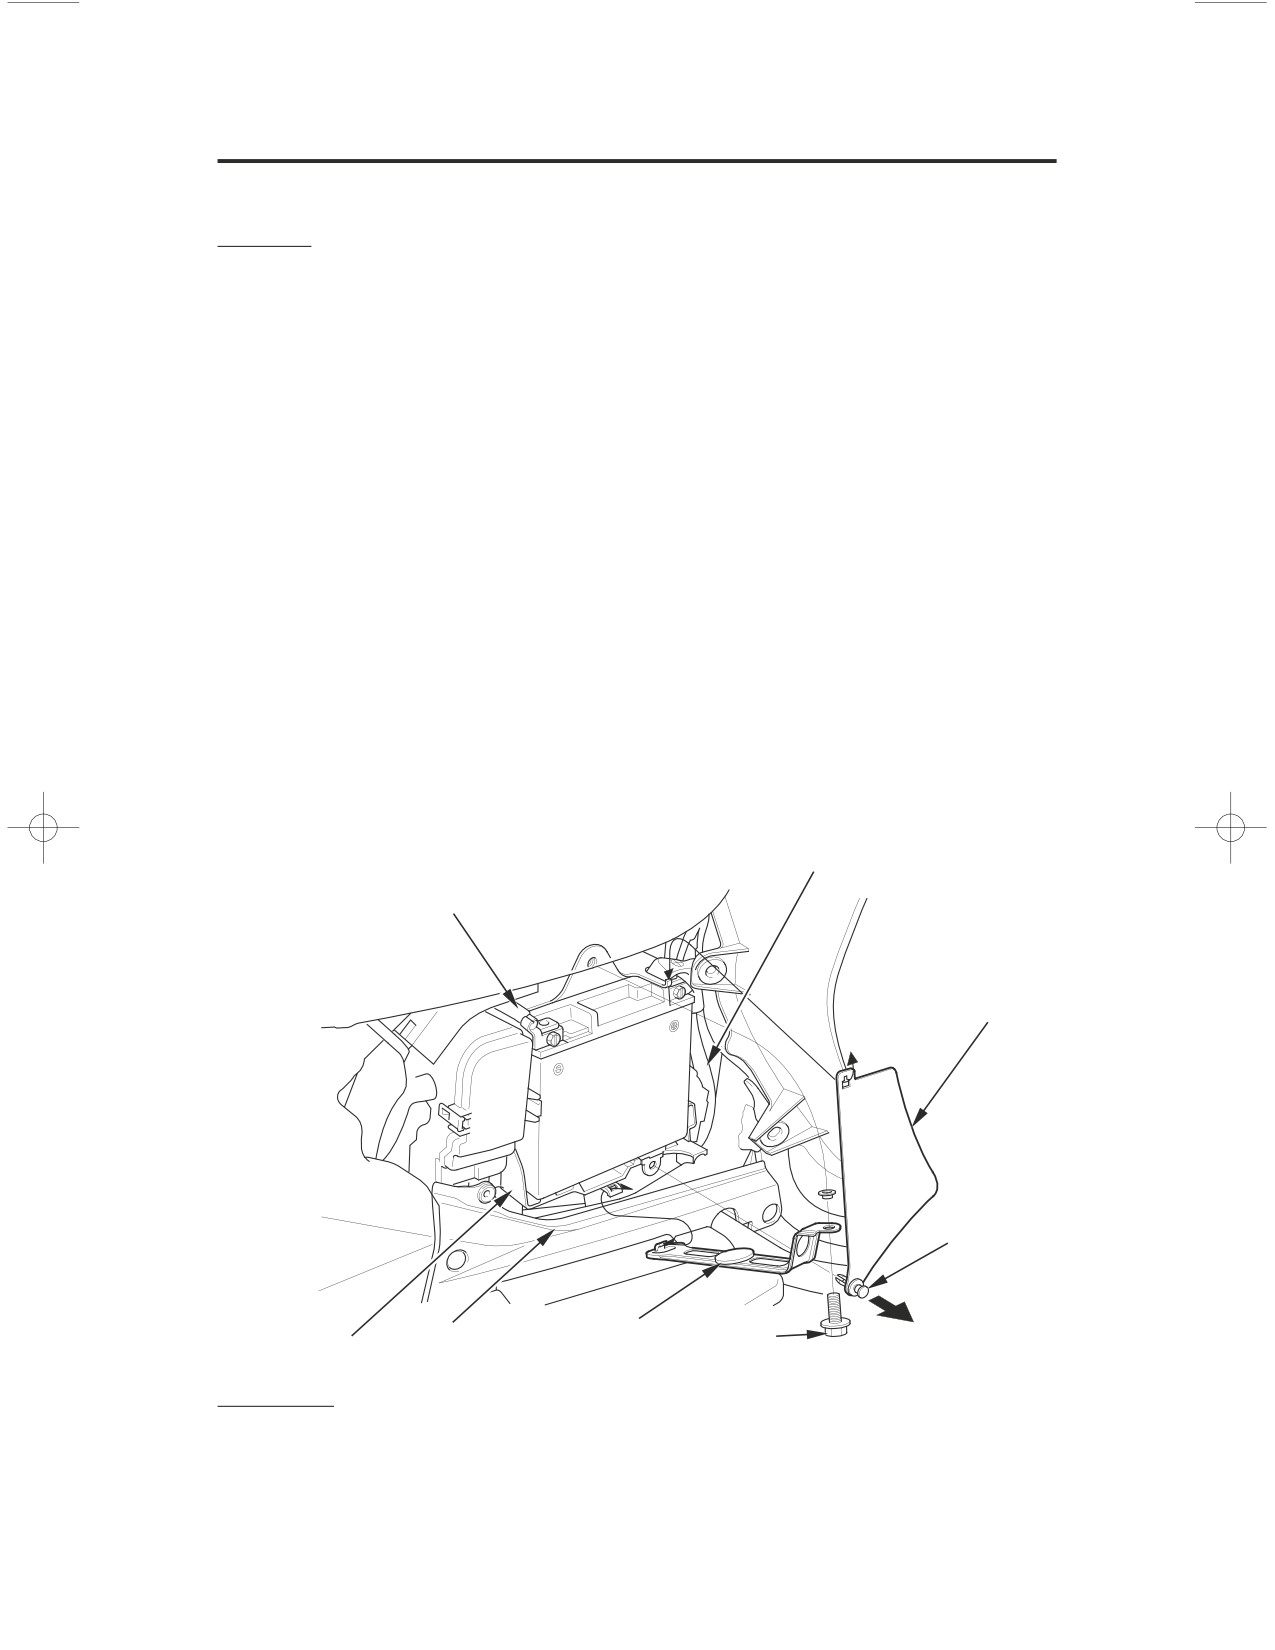
The battery is located in the battery box behind the left side cover.
Removal
1.
Make sure the ignition switch is OFF.
2.
Remove the left side cover (page155).
3.
Pull the clip and remove the battery plate.
4.
Disconnect the negative (ʵ) terminal lead from the battery first.
5.
Remove the bolt and open the battery holder.
6.
Disconnect the positive (ʴ) terminal lead.
7.
Pull the battery out of the battery box.
Be careful to avoid damaging the cover under the battery box when you
remove the battery.
8. Charge the battery (see following section), unless you have been riding
regularly.
9. Store your battery in an easy-to-reach location off the floor, in an area
protected from freezing temperatures and direct sunlight.
10. Clean the battery box after removing the battery for storage. Dry the battery
box and, if paint is missing, re-paint the area.
11. Slow charge the battery (see following section) once every 30 days.
LEFT SIDE
positive (ʴ) terminal lead
negative (ʵ
) terminal lead
battery plate
clip
battery box
cover
battery holder bolt
Installation
1. Reinstall in the reverse order of removal. Be sure to connect the positive (ʴ)
terminal first, then the negative (ʵ
) terminal.
2. Check all bolts and other fasteners are secure.
Servicing Your Honda
199
Battery
Battery Charging
Refer to Saf ety Precautions on page142
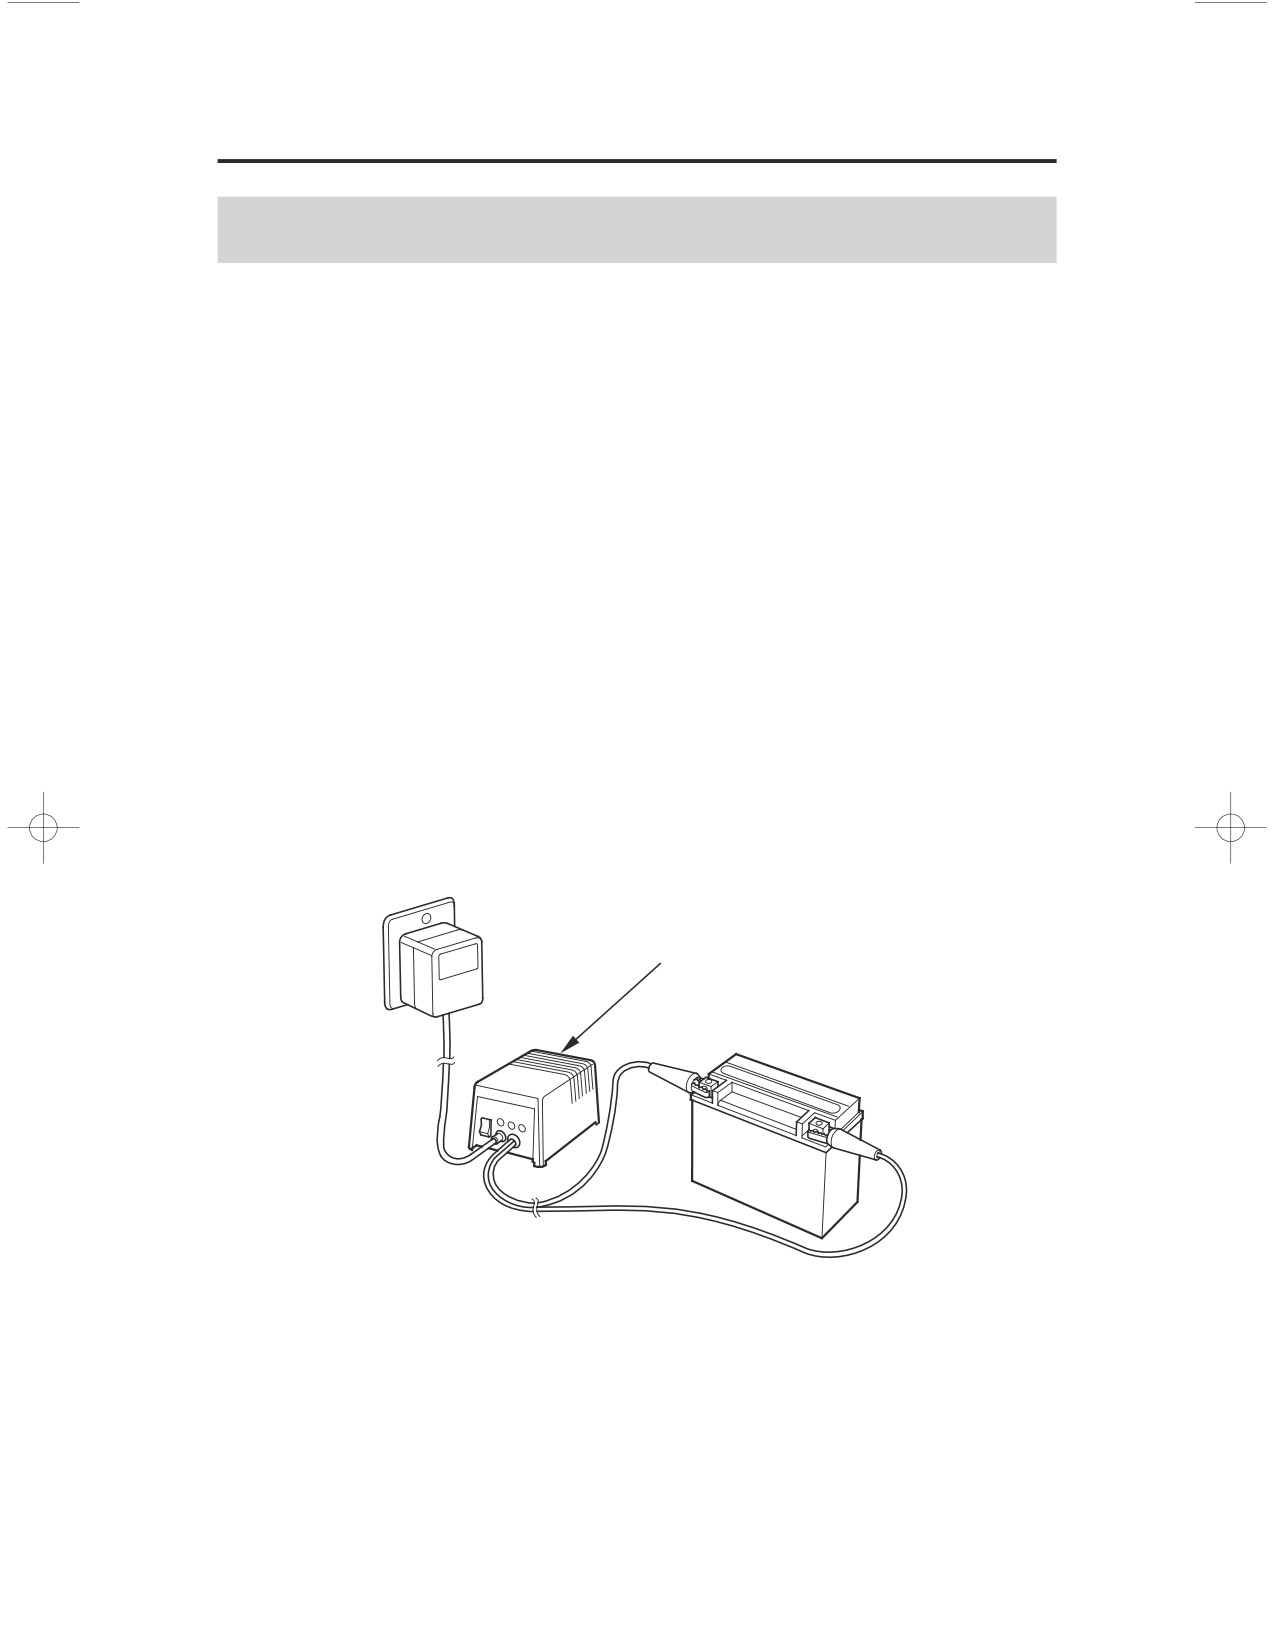
Be sure to read the information that came with your battery charger and follow
the instructions on the battery. Improper charging may damage the battery.
We recommend using a ‘‘trickle’’ charger for home charging. These units can
be left connected for long periods without risking damage to the battery.
However, do not intentionally leave the charger connected longer than the time
period recommended in the charger’s instructions.
Avoid using an automotive-type battery charger. An automotive charger can
overheat a motorcycle battery and cause permanent damage.
‘‘trickle’’ charger
200
Servicing Your Honda
Appearance Care
Frequent cleaning and polishing will keep your Honda looking newer longer.
Frequent cleaning also identifies you as an owner who values your motorcycle.
A clean motorcycle is also easier to inspect and service.
General Recommendations
Refer to
Saf ety Precautions
on page142
To clean your motorcycle, you may use:
ʵwater
ʵa mild, neutral detergent and water
ʵa mild spray and wipe cleaner/polisher
ʵa mild spray and rinse cleaner/degreaser and water
Avoid products that contain harsh detergents or chemical solvents that could
damage the metal, paint, and plastic on your motorcycle.
If your motorcycle is still warm from recent operation, give the engine and
exhaust system time to cool off.
Park in a shady area. Washing your motorcycle in bright sunlight may cause
the finish to fade because water droplets intensify the sun’s brightness.
Spotting is also more likely because surface water can dry before you have
time to wipe it off.
Clean your motorcycle regularly to protect surface finishes.
We recommend the use of a garden hose to wash your motorcycle. High
pressure washers (like those at coin-operated car washes) can damage certain
parts of your motorcycle.
The audio system is designed to be weatherproof unless it is sprayed directly
with hose.
High pressure water (or air) can damage certain parts of your motorcycle.
After cleaning, inspect for damage, wear, and leaks (fuel, oil, coolant, brake,
and clutch fluid).
Servicing Your Honda
201
Appearance Care
Washing Your Motorcycle with a Mild Detergent
Refer to Saf ety Precautions on page142
1. Rinse your motorcycle thoroughly with cool water to remove loose dirt.
2. Fill a bucket with cool water. Mix in a mild, neutral detergent, such as dish
washing liquid or a product made especially for washing motorcycles or
automobiles.
3. Wash your motorcycle with a sponge or a soft towel. As you wash, check for
heavy grime. If necessary, use a mild cleaner/degreaser to remove the grime.
If the inside of the headlight lens appears clouded immediately after washing,
it should clear after a few minutes of riding.
4. After washing, rinse your motorcycle thoroughly with plenty of clean water
to remove any residue. Detergent residue can corrode alloy parts.
5. Dry your motorcycle with a chamois or a soft towel. Leaving water on the
surface to air dry can cause dulling and water spots. As you dry, inspect for
chips and scratches.
6. Start the engine and let it idle for several minutes. The engine heat will help
dry moist areas.
7. As a precaution, ride your motorcycle at a slow speed and apply the brakes
several times. This will help dry the brakes and restore normal braking
performance.
202
Servicing Your Honda
Appearance Care
Cleaning the Windscreen
Saf ety Precautions
Refer to
on page142
Using plenty of water, clean the windscreen with a soft cloth or sponge. (Avoid
using detergents or any kind of chemical cleaner on the windscreen.) Dry with a
soft, clean cloth.
To avoid possible scratching or other damage, use only water and a soft cloth
or sponge to clean the windscreen.
For a dirtier windscreen, use a diluted neutral detergent with a sponge and plenty
of water. Make sure to wash off all the detergent. (Detergent residue may cause
windscreen cracks.)
Replace the windscreen if scratches cannot be removed and they obstruct clear
vision.
Take care to keep battery electrolyte, brake fluid, or other chemical solvents off
the windscreen and screen garnish. They will damage the plastic.
Cleaning the Display
Clean the display with a soft, damp cloth. You may use a mild cleaner intended
for eyeglasses or computer displays.
Harsher chemicals may damage the display.
To avoid possible scratching or other damage, use only water and a soft cloth
or sponge to clean the display.
Take care to keep battery electrolyte, brake fluid, or other chemical solvents off
the display. They will damage the display.
Servicing Your Honda
203
Appearance Care
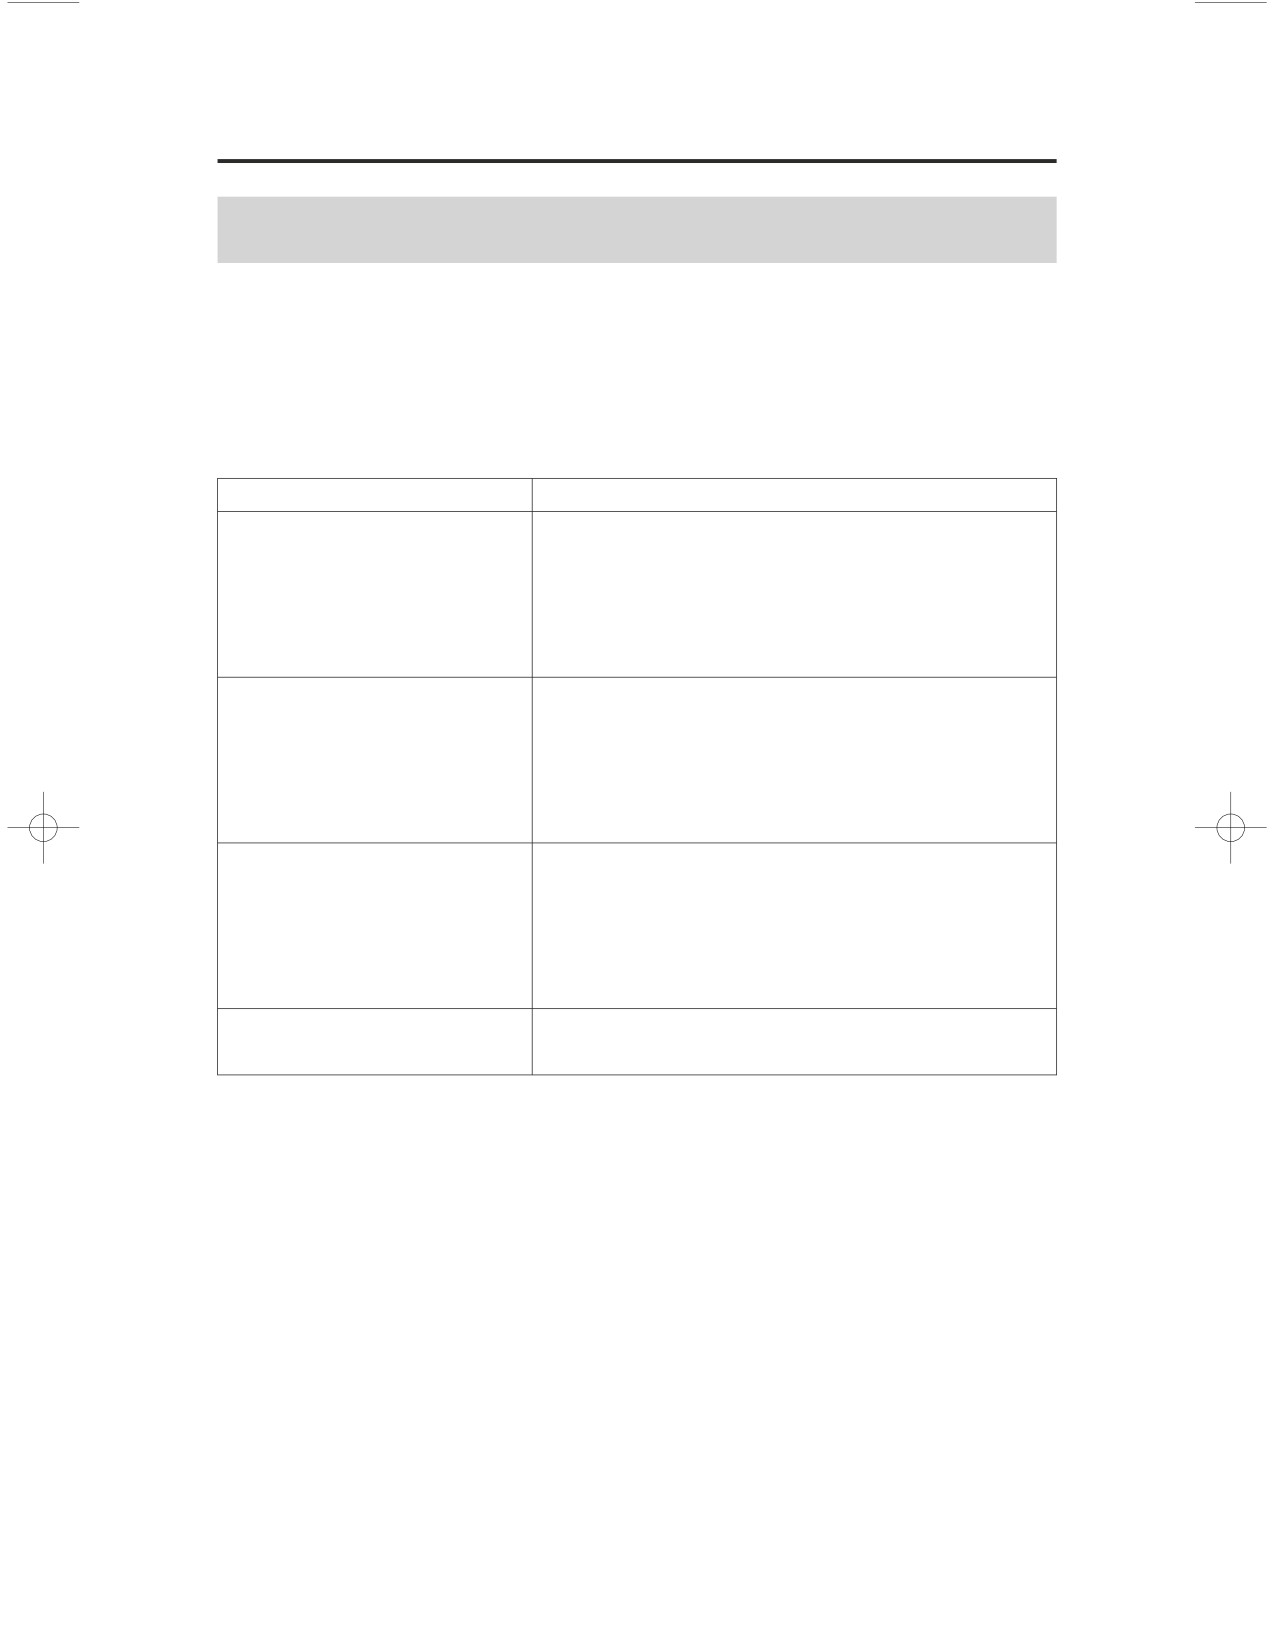
Spray Cleaning Your Motorcycle
Refer to Saf ety Precautions on page142
Avoid using spray cleaner products on the tires or suspension components.
Suggestions for using spray cleaner(s) follow:
Motorcycle Condition
Recommended Cleaning
General cleaning.
Apply a spray cleaner/polish and wipe
Polishing paint,
with a non-abrasive cloth.
chrome, glass, and
clear plastic. Dust.
Fingerprint smudges.
Light road grime.
Spray any difficult-to-reach or very dirty
areas with a spray cleaner/degreaser.
Rinse and dry.
Apply a spray cleaner/polish and wipe
with a non-abrasive cloth.
Heavy grime. Oil leaks.
Use a spray cleaner/degreaser.
Brake dust.
If necessary, rub with a sponge. Rinse
and dry.
Apply a spray cleaner/polish and wipe
with a non-abrasive cloth.
Dull, corroded chrome
Apply a high quality chrome/aluminum
or aluminum.
polish and wipe with a non-abrasive cloth.
204
Servicing Your Honda
Appearance Care
Aluminum Wheel Maintenance
Saf ety Precautions
Refer to
on page142
Aluminum may corrode from contact with dirt, mud, or road salt. Clean the
wheels after riding through any of these substances. Use a wet sponge and mild
detergent, or a commercially-available spray cleaner/degreaser designed for use
on aluminum. Avoid stiff brushes, steel wool, or cleaners containing abrasives
or harsh chemical compounds.
After washing, rinse with plenty of water and dry with a clean cloth. Then apply
a mild, commercially-available spray cleaner/polish or wax.
For stained or dull-looking wheels, use a quality chrome/aluminum polish to
restore the finish.
After you finish cleaning the wheels, it’s important to check for and remove any
cleaner or polish residue found on the brake discs or pads. Use Honda Contact/
Brake Cleaner or an equivalent brake degreasing agent.
Clean the Matte Painted Surface
Refer to
Saf ety Precautions
on page142
Use a soft cloth or sponge, plenty of water, and a mild detergent to clean the
matte paint. Dry with a soft, clean cloth.
Do not use polishing compounds or wax containing polishing compounds. These
can damage or discolor the paint.
To keep your Honda looking new, clean and polish it frequently.
Servicing Your Honda
205
Appearance Care
Finishing Touches
Refer to Saf ety Precautions on page142
After washing your motorcycle, consider using a commercially available spray
cleaner/polish or quality liquid or paste wax to finish the job. Use only a non-
abrasive polish or wax made specifically for motorcycles or automobiles. Apply
the polish or wax according to the instructions on the container.
If a surface on your motorcycle is chipped or scratched, your Honda dealer has
touch-up paint to match your motorcycle’s color. Be sure to use your
motorcycle’s color code (page
) when you buy touch-up paint.
241
If the frame has a chip that exposes the metal, first apply primer (to prevent
corrosion) and then apply the touch-up paint. Several thin layers of touch-up
paint are better than one thick coat.
206
Servicing Your Honda
Tips
Here’s a few helpful tips on how to store and transport your Honda, and how to
be an environmentally responsible motorcycle owner.
Storing Your Honda
208
Transporting Your Motorcycle
210
You & the Environment
211
Tips
207
Storing Your Honda
If you won’t be riding for an extended period, such as during the winter,
thoroughly inspect your motorcycle and correct any problem before storing it.
That way, needed repairs won’t be forgotten and it will be easier to get your
motorcycle running again.
For more information about storage, refer to the Honda Motorcycle Winter
Storage Guide,
available from your Honda dealer (USA only).
We suggest you perform the following procedures to keep your motorcycle in
top condition. These storage procedures will reduce the deterioration that can
occur during storage.
Preparation for Storage
Refer to
Saf ety Precautions
on page142
This procedure requires a means for draining and disposing of drained fuel
(page
211
).
1. Change the engine oil and filter (page
167
).
2. Make sure the cooling system is filled with a 50/50% antifreeze solution
(page
170
).
3. Fill the fuel tank. Make sure the fuel fill cap is properly installed.
4. To prevent rusting in the cylinders, perform the following:
Remove the spark plug caps from the spark plugs. Using tape or string,
secure the caps to any convenient plastic body part so that they are
positioned away from the spark plugs.
Remove the spark plugs from the engine and store them in a safe place. Do
not connect the spark plugs to the spark plug caps.
208
Tips
Storing Your Honda
Pour a tablespoon (15ʵ20 cc) of clean engine oil into each cylinder and
cover the spark plug holes with a piece of cloth.
With the engine stop switch in the RUN position, press the start button
several times to crank the engine and distribute the oil.
Reinstall the spark plugs and spark plug caps.
5. Remove the battery and charge it fully. Store it in an area protected from
freezing temperatures and direct sunlight. Slow charge the battery
(page
200
) once a month.
6. Wash and dry your motorcycle. Wax all painted surfaces. Apply rust-
inhibiting oil to the chrome pieces.
7. Inflate the tires to their recommended pressures (page
).
200
8. Store your motorcycle in an unheated area, free of dampness, away from
sunlight, with a minimum of daily temperature variation.
9. Cover your motorcycle with a porous material. Avoid using plastic or similar
non-breathing, coated materials that restrict air flow and allow heat and
moisture to accumulate.
Removal from Storage
Refer to
Saf ety Precautions
on page142
1. Uncover and clean your motorcycle.
2. If your motorcycle has been stored for more than four months -- change the
engine oil (page
167
).
3. If your motorcycle has been stored for more than two months -- ask your
Honda dealer to drain and replace the fuel.
4. Charge the battery (page
200
) as required. Install the battery.
5.
Perform a pre-ride inspection (page
47
), then test-ride your motorcycle at
low speeds.
Tips
209
Transporting Your Motorcycle
If your motorcycle needs to be transported, it should be carried on a motorcycle
trailer, or a truck or trailer with a flatbed area. Do not tow your motorcycle, as
towing can seriously damage the transmission.
When contacting a towing or transporting service, be sure to ask if they have a
flatbed area, a loading ramp or power ramp to safely lift the motorcycle, and
motorcycle tie-down straps.
210
Tips
You & the Environment
Owning and riding a motorcycle can be enjoyable, but you must do your part to
protect nature.
Following are tips on how you can be an environmentally responsible
motorcycle owner.
Choose Sensible Cleaners.
Use a biodegradable detergent when you wash
your motorcycle. Avoid aerosol spray cleaners that contain
chlorofluorocarbons (CFCs) which damage the atmosphere’s protective ozone
layer. Don’t throw cleaning solvents away; see the following guidelines for
proper disposal.
Recycle Wastes. It’s illegal and thoughtless to put used engine oil in the trash,
down a drain, or on the ground. Used oil, gasoline, coolant, and cleaning
solvents contain poisons that can hurt refuse workers and contaminate our
drinking water, lakes, rivers, and oceans. Before changing your oil, make sure
you have the proper containers. Put oil and other toxic wastes in separate
sealed containers and take them to a recycling center. Call your local or state
office of public works or environmental services to find a recycling center in
your area, and to get instructions on how to dispose of non-recyclable wastes.
Tips
211
212
Tips
Taking Care of the Unexpected
This section discusses the more common problems that can occur with your
motorcycle while you’re riding. It tells you how to evaluate each problem and
what actions you can take to try to resume riding. If the problem cannot be
safely solved, this section also gives instructions on the proper way to have your
motorcycle transported.
For information about transporting your motorcycle, see page
210
General Guidelines
214
If Your Engine Quits or Won’t Start
215
If You Have a Flat Tire
218
If Your Engine Overheats
229
If the Low Oil Pressure Indicator Lights
231
If a Fuse Blows
232
If You Crash
235
If You Lose Your Key
236
If Your Battery Is Low (or Dead)
237
213
Taking Care of the Unexpected
Taking Care of the Unexpected
General Guidelines
Keeping your motorcycle well-maintained is the best way to reduce the
possibility of having a problem on the road.
Remember to take along your owner’s manual, the tool kit that came with your
motorcycle, and any other items (such as tire repair supplies and additional
tools) that might help you solve a problem on your own.
Should you ever have a problem while riding, please follow these guidelines:
Always put personal safety first.
Take time to assess the situation and your options before deciding what to do.
If the problem is relatively minor and you have the tools, supplies, and skills
to make a temporary repair, be sure to have permanent repairs made as soon
as possible.
Do not continue riding if you are hurt or your motorcycle is not in safe riding
condition.
Additional recommendations for specific problems follow.
214
Taking Care of the Unexpected
If Your Engine Quits or Won’t Start
Proper operation and maintenance can prevent starting and engine performance
problems. In many cases, the cause of the problem may be a simple operational
oversight.
If you have a problem starting the engineʵor experience poor engine
performanceʵthe following information may help you. If you can’t correct the
problem, see your Honda dealer.
If your motorcycle won’t start, listen as you press the start button. If you don’t
hear the starter motor turning, refer to the Starter motor doesn’t operate
symptom. If you can hear the starter motor working normally, refer to the
Starter motor works, but the engine won’t start symptom.
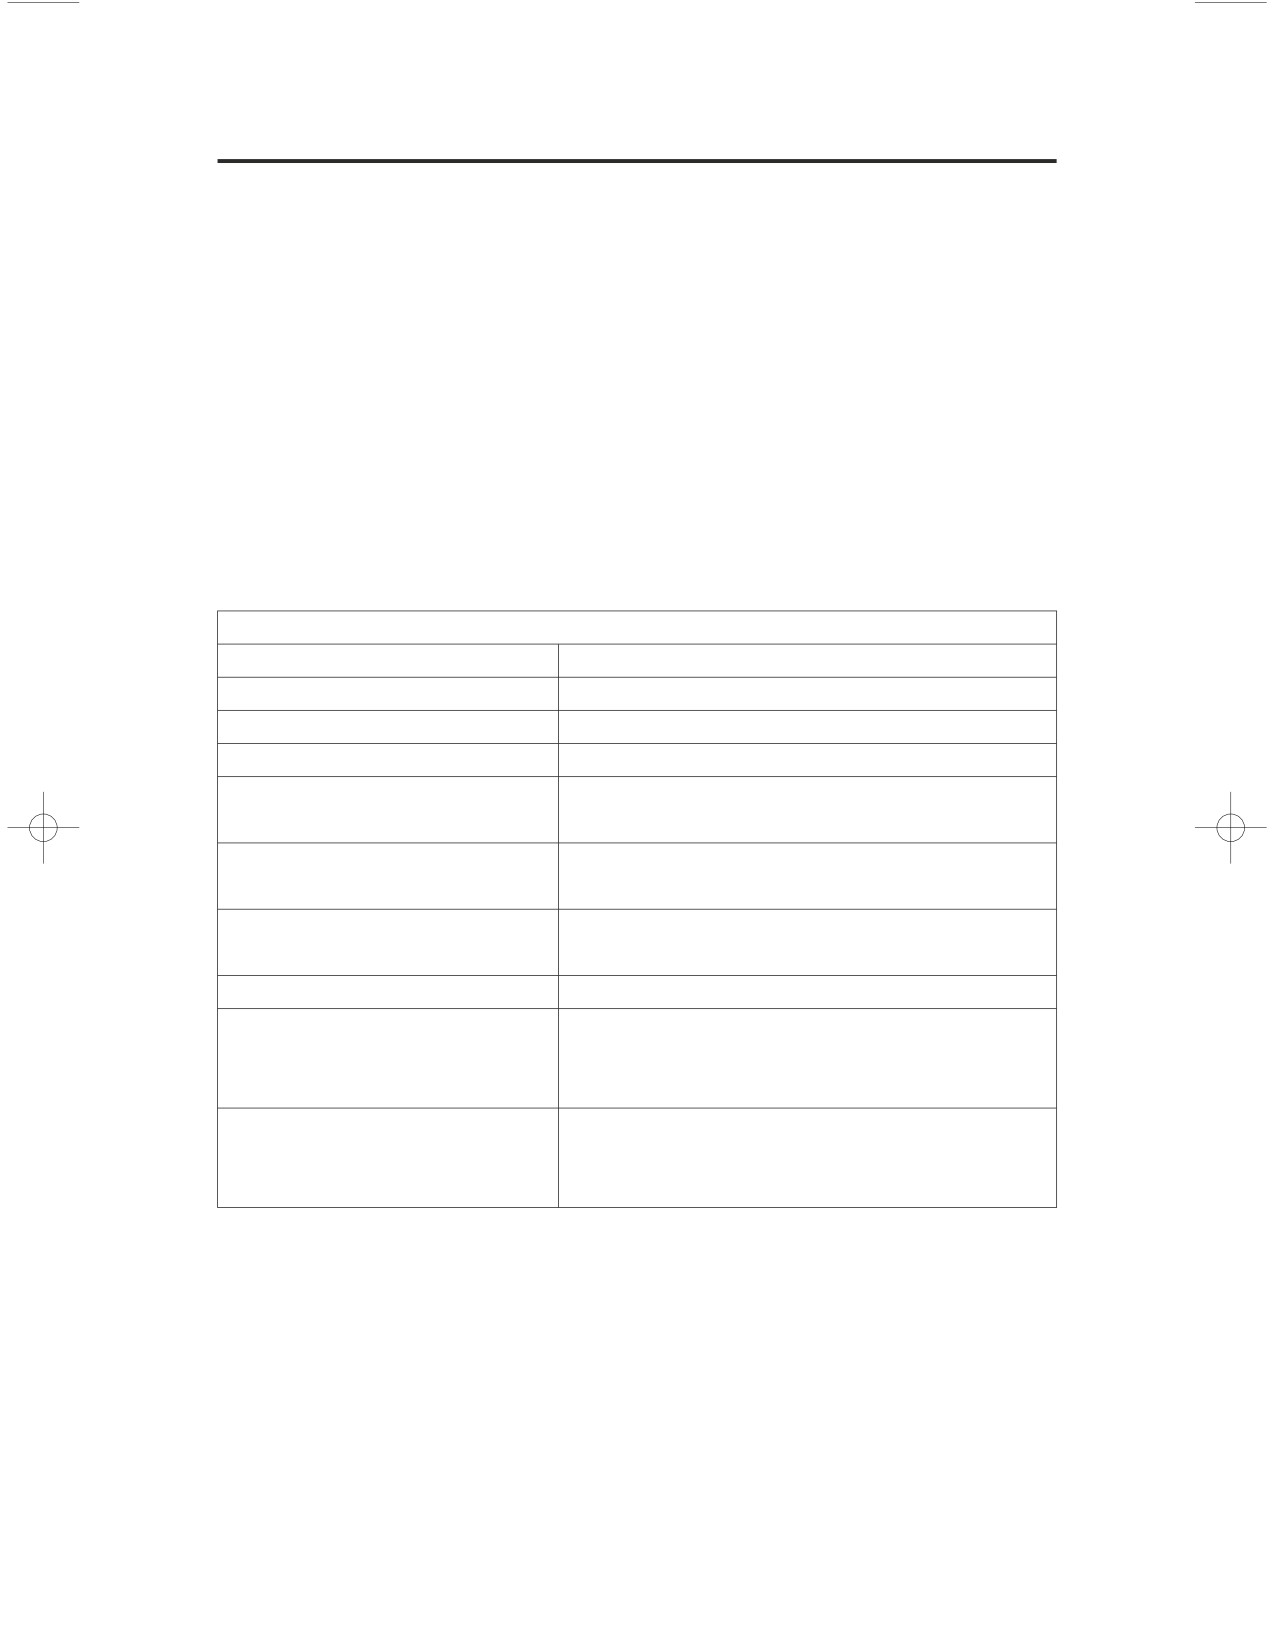
SYMPTOM:
Starter motor doesn’t operate.
POSSIBLE CAUSE
WHAT TO DO
ignition switch OFF
Turn the ignition switch ON.
engine stop switch OFF
Turn the engine stop switch to RUN.
transmission not in neutral
Shift into neutral.
reverse (RVS) switch ON
Push the reverse (RVS) switch to the
OFF position.
side stand down (when
Put the transmission in neutral or raise
transmission not in neutral)
the side stand and pull the clutch lever in.
blown fuse
Replace with a new fuse of the same
rating (page232
).
battery lead loose
Tighten the battery lead.
low (or dead) battery
Charge the battery (page200
). If
charging doesn’t help, see your Honda
dealer.
faulty starter motor
If all possible causes are negative, the
starter motor may be faulty. See your
Honda dealer.
215
Taking Care of the Unexpected
If Your Engine Quits or Won’t Start
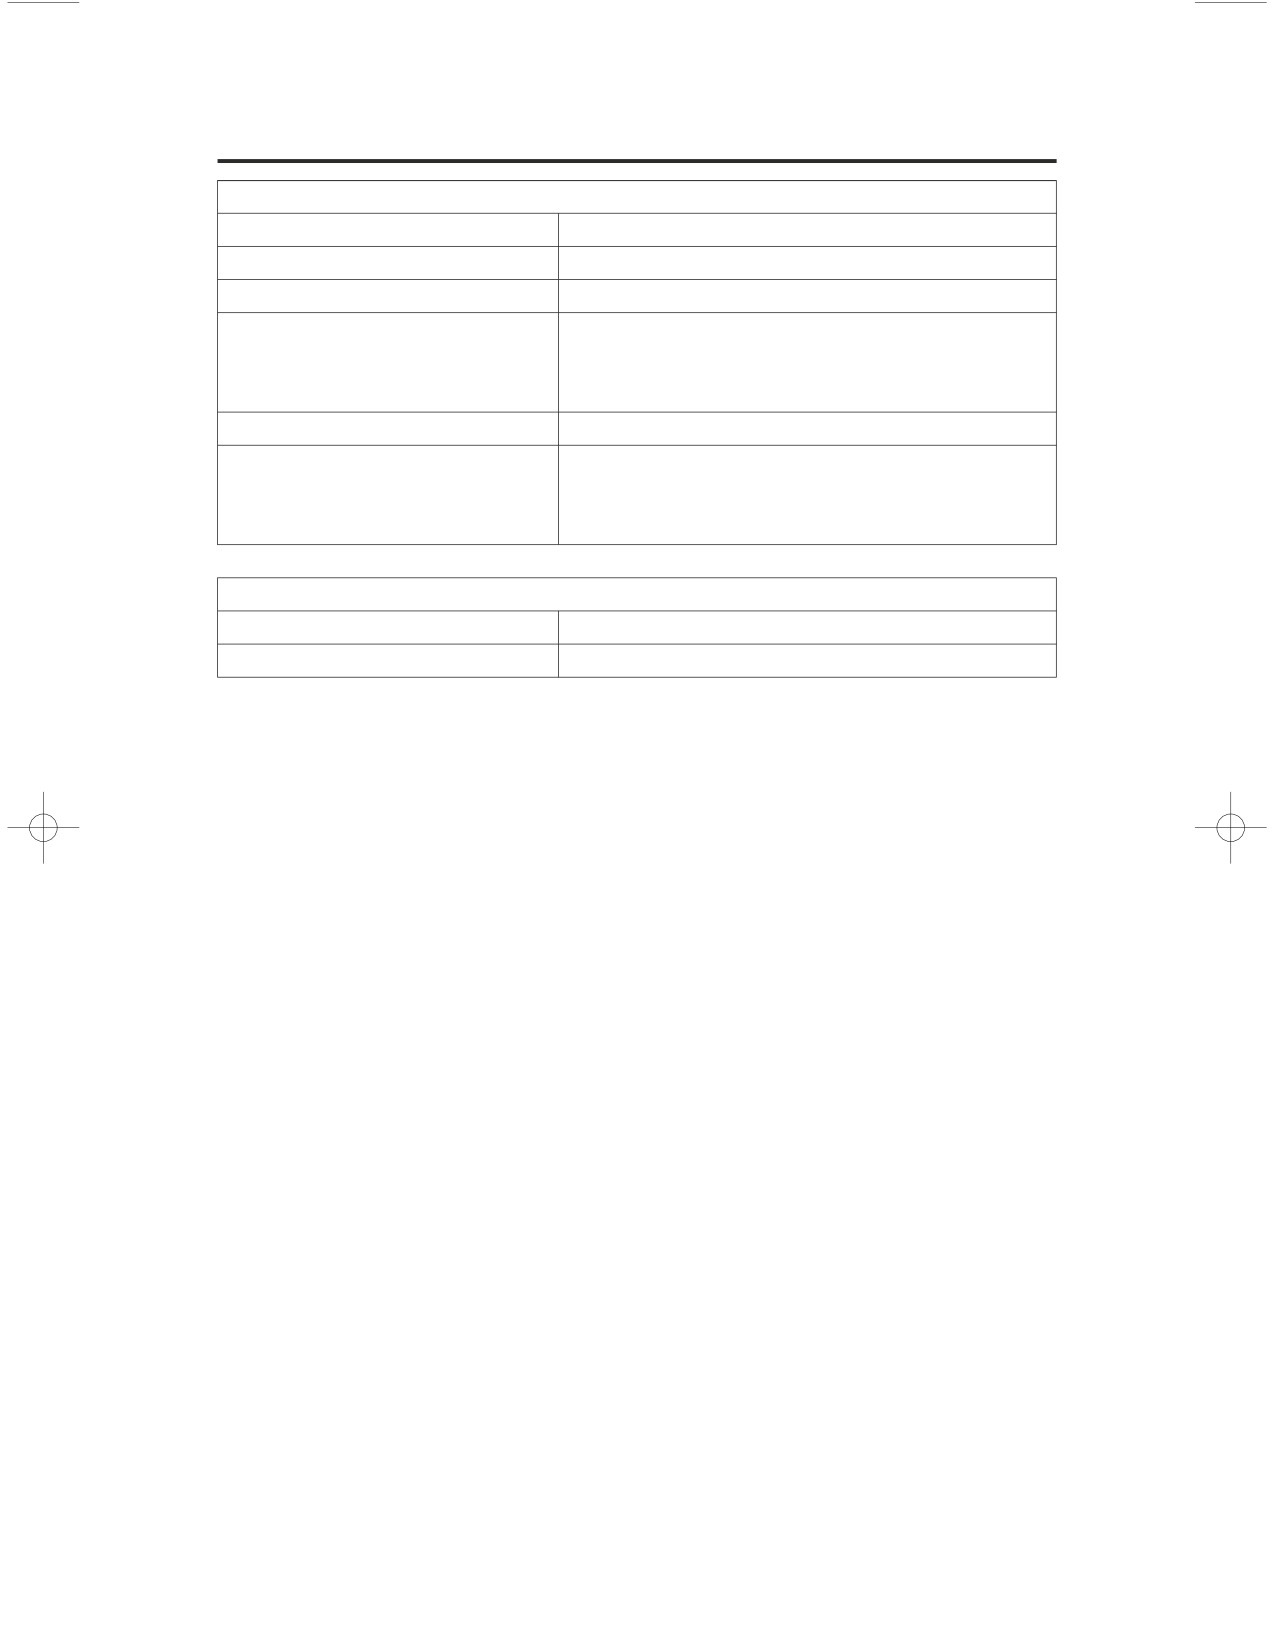
SYMPTOM:
Starter motor works, but the engine won’t start.
POSSIBLE CAUSE
WHAT TO DO
out of fuel
Fill the fuel tank.
flooded engine
See
FloodedEngine
(page
74
).
loose or unconnected
Install the spark plug caps securely. If
spark plug caps
the engine still won’t start, see your
Honda dealer.
loose battery cables
Tighten the battery terminal bolts.
weak battery
Charge the battery (page200). If
charging doesn’t help, see your Honda
dealer.
SYMPTOM:
Engine starts, but stalls as you shift into gear.
POSSIBLE CAUSE
WHAT TO DO
side stand down
Raise the side stand. Start again.
216
Taking Care of the Unexpected
If Your Engine Quits or Won’t Start
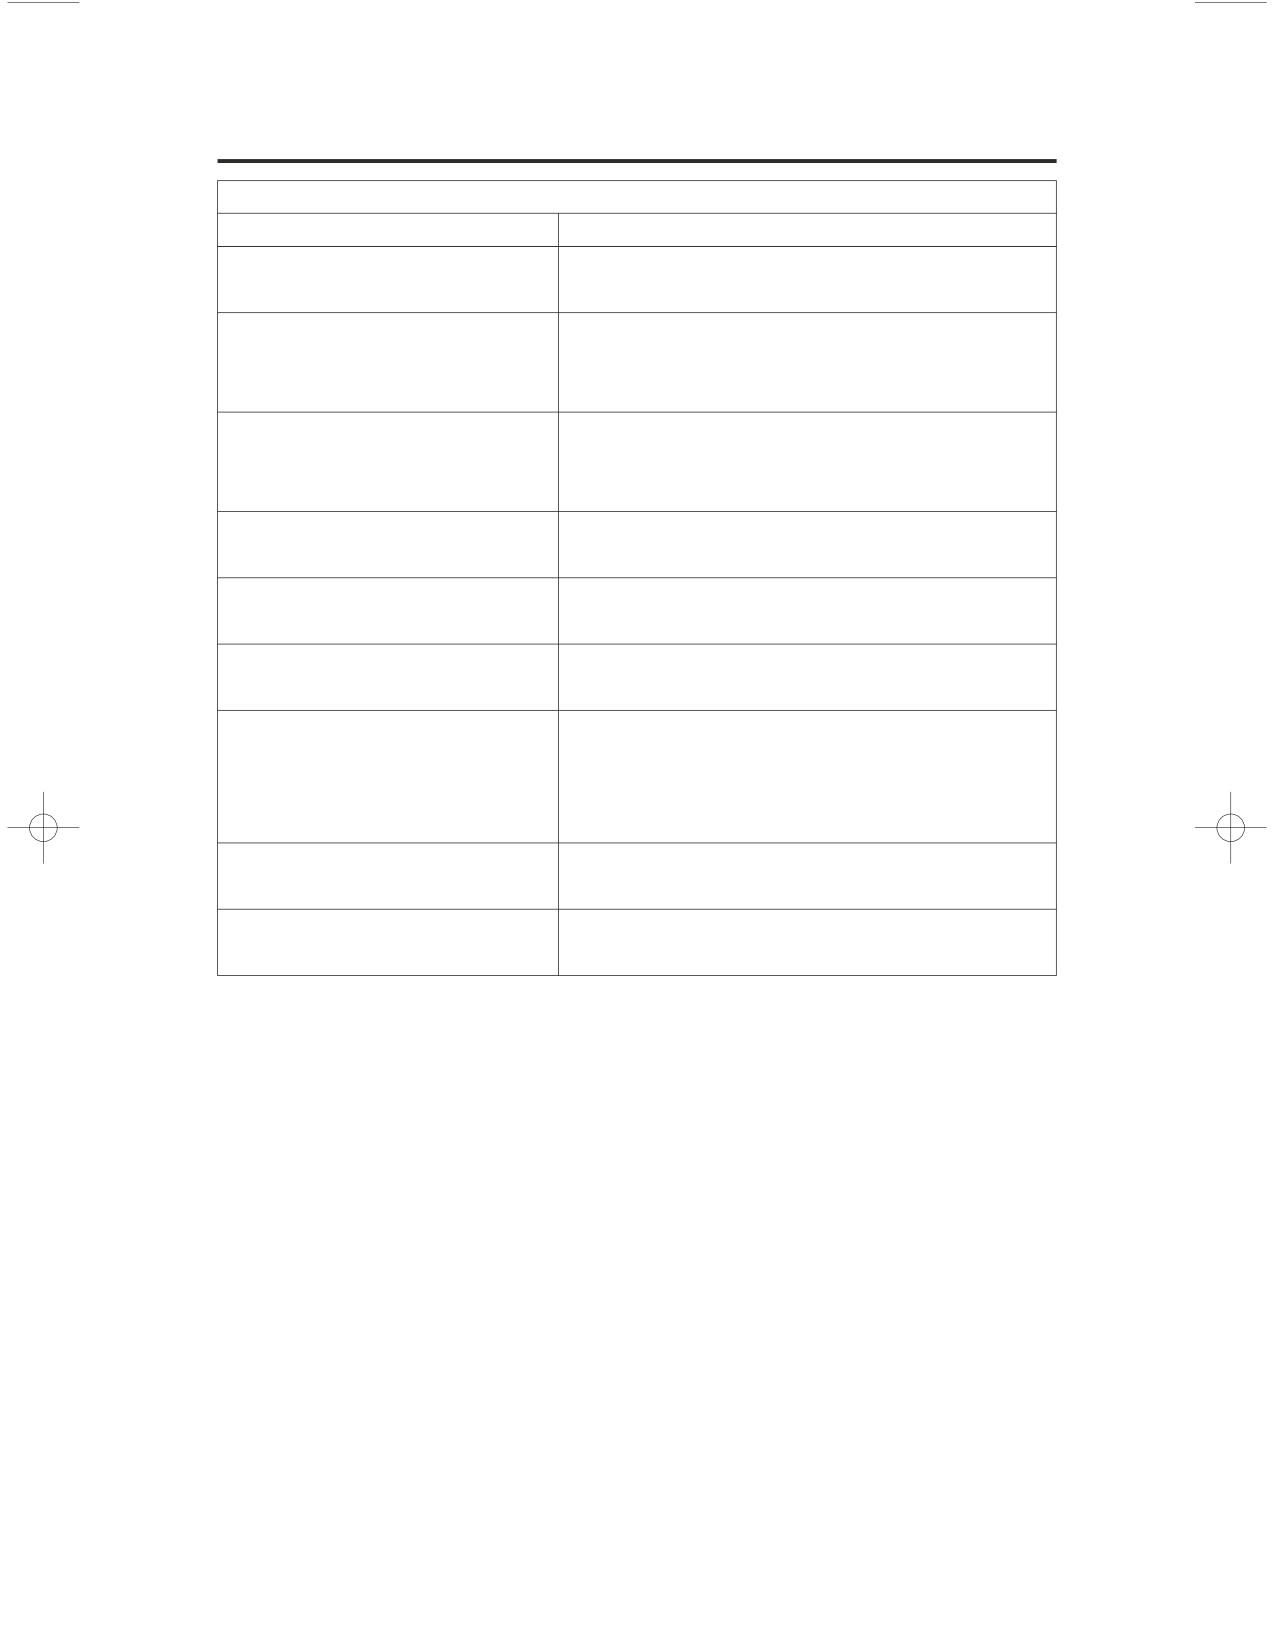
SYMPTOM:
Engine starts, but runs poorly.
POSSIBLE CAUSE
WHAT TO DO
idles roughly, too fast,
See your Honda dealer.
stalls
overheating
Check the coolant temperature gauge.
Refer to
If Your EngineOverheats,
page
229
low oil pressure
Check the low oil pressure indicator.
Refer to
If the Low Oil Pressure
Indicator Lights,
page
231
runs erratically, misfires
May damage catalytic converters.
See your Honda dealer.
blubbers (rich fuel
See your Honda dealer.
mixture)
sooty exhaust (rich fuel
See your Honda dealer.
mixture)
detonates or pings under
If applicable, switch to the recommended
load
octane gasoline (page160
) or change
your brand of gasoline. If the problem
persists, see your Honda dealer.
afterfires (backfires)
May damage catalytic converters.
See your Honda dealer.
pre-ignition (runs on after
May damage catalytic converters.
ignition switched OFF)
See your Honda dealer.
217
Taking Care of the Unexpected
If You Have a Flat Tire
A flat tire is always unwelcome, especially if you are far from help. If you think
you are losing air, or you hit a pothole or hard object, pull safely to the side of
the road so you can inspect the tires and assess the situation. (Be sure to park on
a firm, level surface and use the center stand for support.) You should examine
the tire treads and sidewalls for foreign objects or damage. If you find a tire that
has been punctured or damaged, you have two options.
Option 1:
Have Your Motorcycle Transported
If a tire has a major puncture or a cut in the tread or sidewall, or the bead has
come loose from the rim, there is probably not much you can do except have
your motorcycle transported to a Honda dealer or other qualified service facility.
Even with a simple puncture, this may be the safest and least troublesome
solution. For transporting instructions, see page
210
Option 2:
Make a Temporary Roadside Repair
If a tire has only a minor nail puncture and is not completely flat, you may be
able to make an emergency repair that could allow you to continue riding to
where you can get the tire replaced or permanently repaired.
Riding your motorcycle with a
temporary tire repair can be
risky. If the temporary repair
fails, you can crash and be
seriously injured or killed.
If you must ride with a
temporary tire repair, ride slowly
and carefully and do not exceed
30 mph (50 km/h) until the tire is
permanently repaired or
replaced.
218
Taking Care of the Unexpected
If You Have a Flat Tire
Due to the uncertainty of any temporary repair, you should ride slowly (not over
30 mph, 50 km/h) and carefully (preferably without a passenger or cargo) until
the tire is replaced or permanently repaired. Stop frequently and check the air
pressure. If the tire is losing pressure, it may be unsafe to continue riding. As the
tire gets low, it will affect the handling of your motorcycle (especially with a
passenger and cargo), and it may overheat and blow out.
Types of Temporary Repairs
The following types of temporary repairs generally require a source of air to
2
air designed to inflate a tire.
For more information on tire repair, see page 193 .
Inflate the tire:
Tubeless tires have some self-sealing ability if they are
punctured and the result is usually just a slow leak. If this is the case, you can
try inflating the tire to see if it will hold air pressure. If you can see a nail or
other object embedded in the tire tread, do not remove it at this time.
Plug the hole:
The idea here is to do something to temporarily stop the leak.
If you have a tubeless tire repair kit, you can pull out the nail and try inserting
an external plug in the puncture. Follow the instructions that came with the
repair kit and be sure to inflate the tire to the correct pressure.
Using a puncture-repairing agent can damage the TPMS sensors, causing the
TPMS indicator to turn on. Have you motorcycle checked by your Honda
dealer as soon as possible.
Use caution to not damage the TPMS sensor if an internal plug patch must be
used to repair the tire. If you have a tire prof essionally repaired at a non-
Honda f acility, we recommend that you have the work checked by your Honda
dealer. TPMS wheels require special handling when changing the tire. Failure
to follow the proper tire replacement procedure can result in damage to the
TPMS sensor.
219
Taking Care of the Unexpected
If You Have a Flat Tire
Should You Repair or Replace a Tire?
We strongly recommend that you replace, not permanently repair, any tire that is
punctured or damaged, even if the tire has only a minor puncture. For a full
discussion of repairs and replacement, see page
193
Emergency Front Wheel Removal/Installation
Saf ety Precautions
Refer to
on page142
We recommend wheel removal be done only by your Honda dealer or another
qualified mechanic. Do not attempt to remove the wheel on your own. Wheel
removal requires mechanical skill and professional tools.
Removal
1.
Park your motorcycle on a firm, level surface.
2. Raise the front wheel off the ground by placing a support block under the
engine, being careful to avoid contact with the exhaust pipe and front lower
cover.
3.
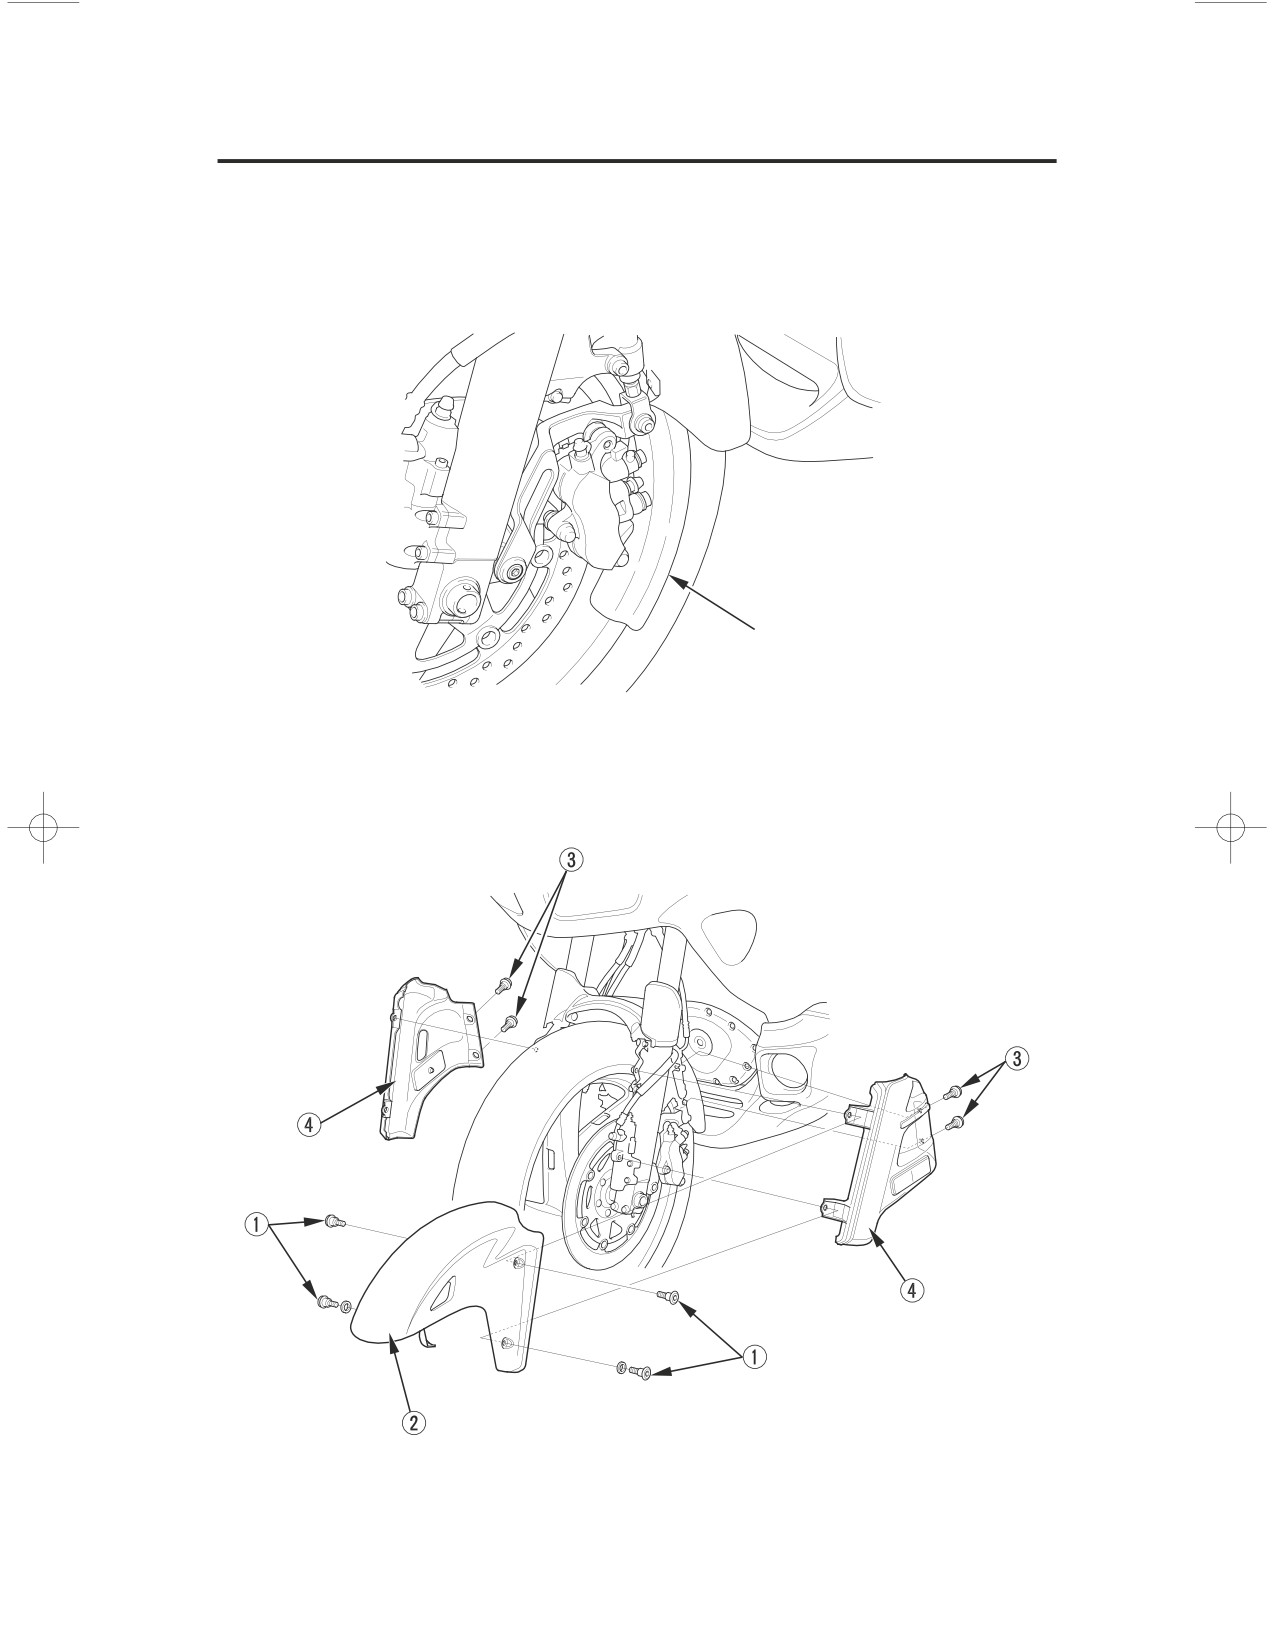
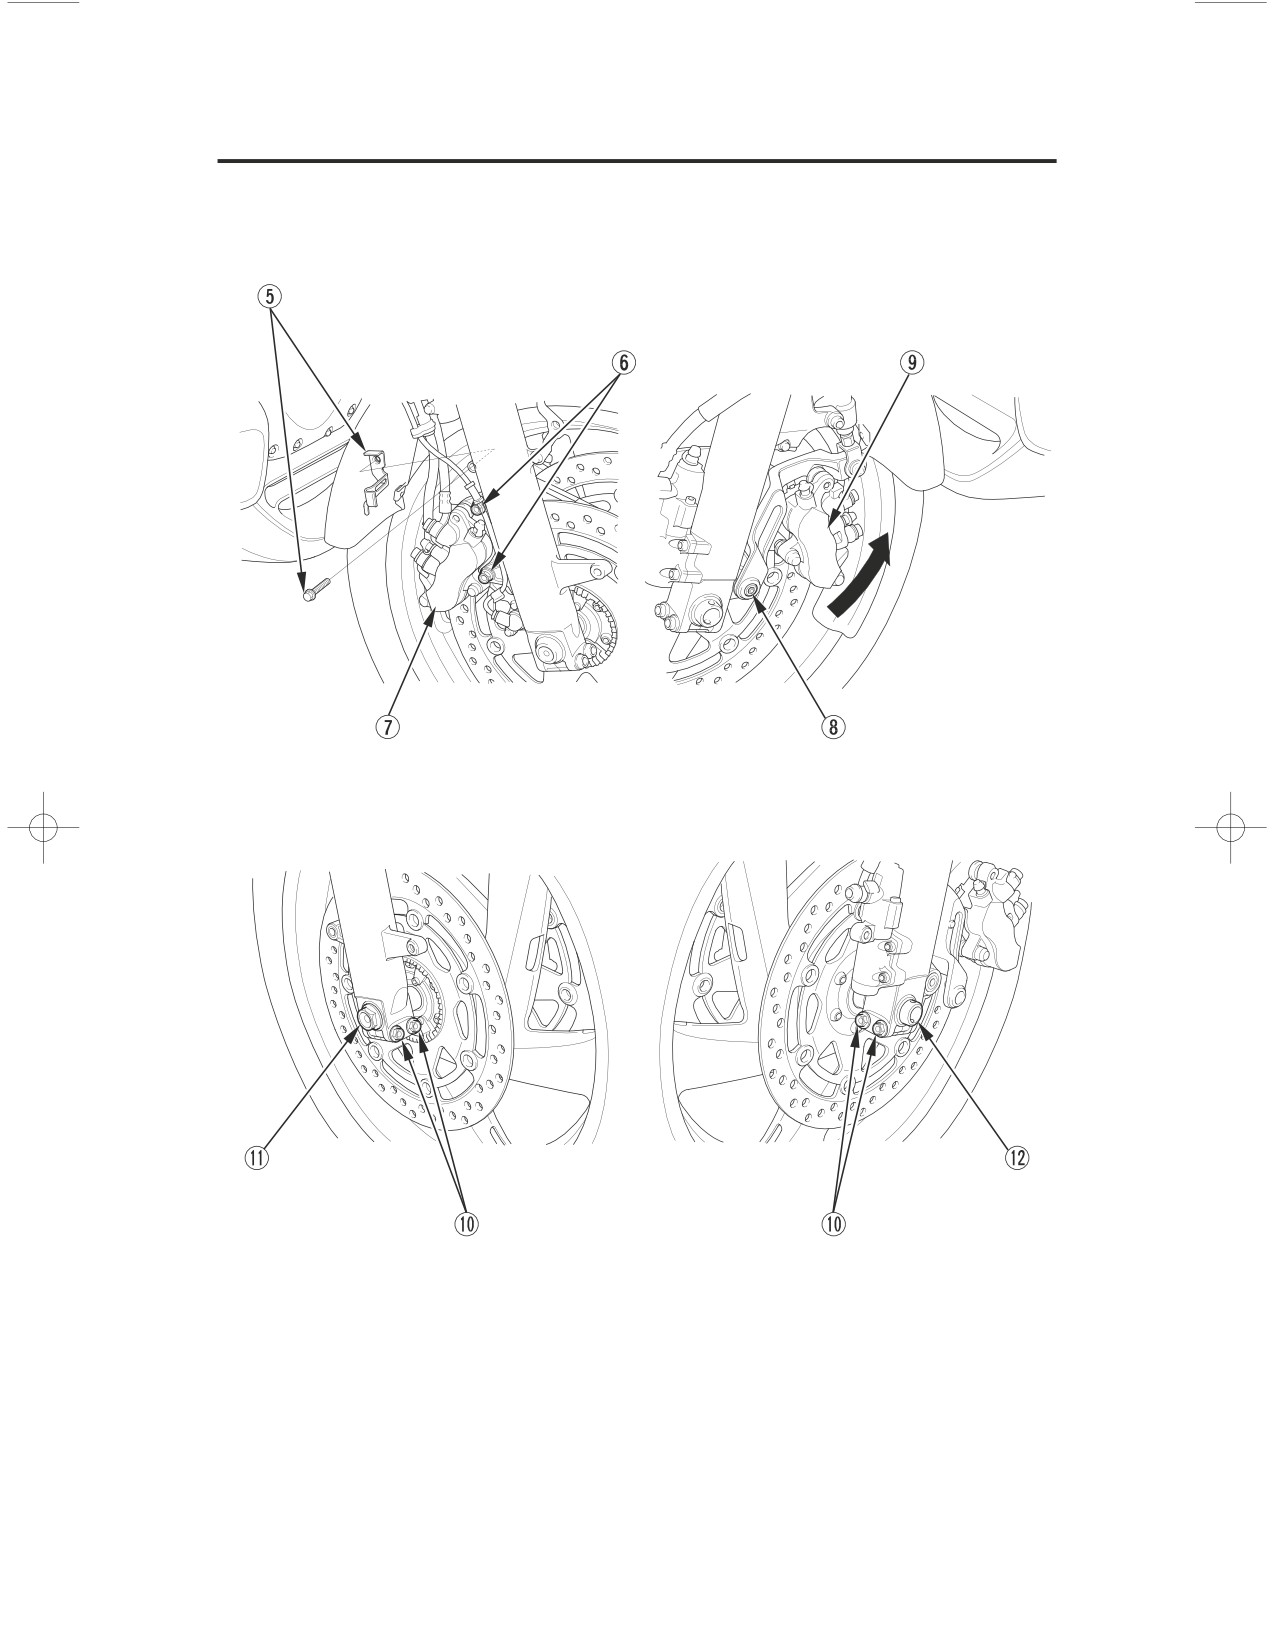
Remove the parts in sequence, according to the order in the illustration.
When removing and installing the wheel, be careful not to damage the
sensor and pulser ring.
(Models equipped with ABS)
To avoid damage to the brake hose during removal, support the caliper
assembly so that it doesn’t hang from the hose. Do not twist the brake hose.
Avoid getting grease, oil, or dirt on the disc or pad surfaces. Any
contamination can cause poor brake performance or rapid pad wear after
reassembly.
Avoid depressing the brake lever and brake pedal when the wheel is off the
motorcycle. This will force the caliper pistons out of the cylinders. The
result will be a loss of brake fluid. If this occurs, the brake system will
require service.
See your Honda dealer for this service.
220
Taking Care of the Unexpected
If You Have a Flat Tire
For related torque specifications, see page
223. Cover both sides of the front
wheel with protective tape or an equivalent.
The numbers indicate the disassembly sequence.
protective tape
221
Taking Care of the Unexpected
If You Have a Flat Tire
(Models equipped with ABS)
222
Taking Care of the Unexpected
If You Have a Flat Tire
Installation
1. Reassemble the removed parts in the reverse order of removal.
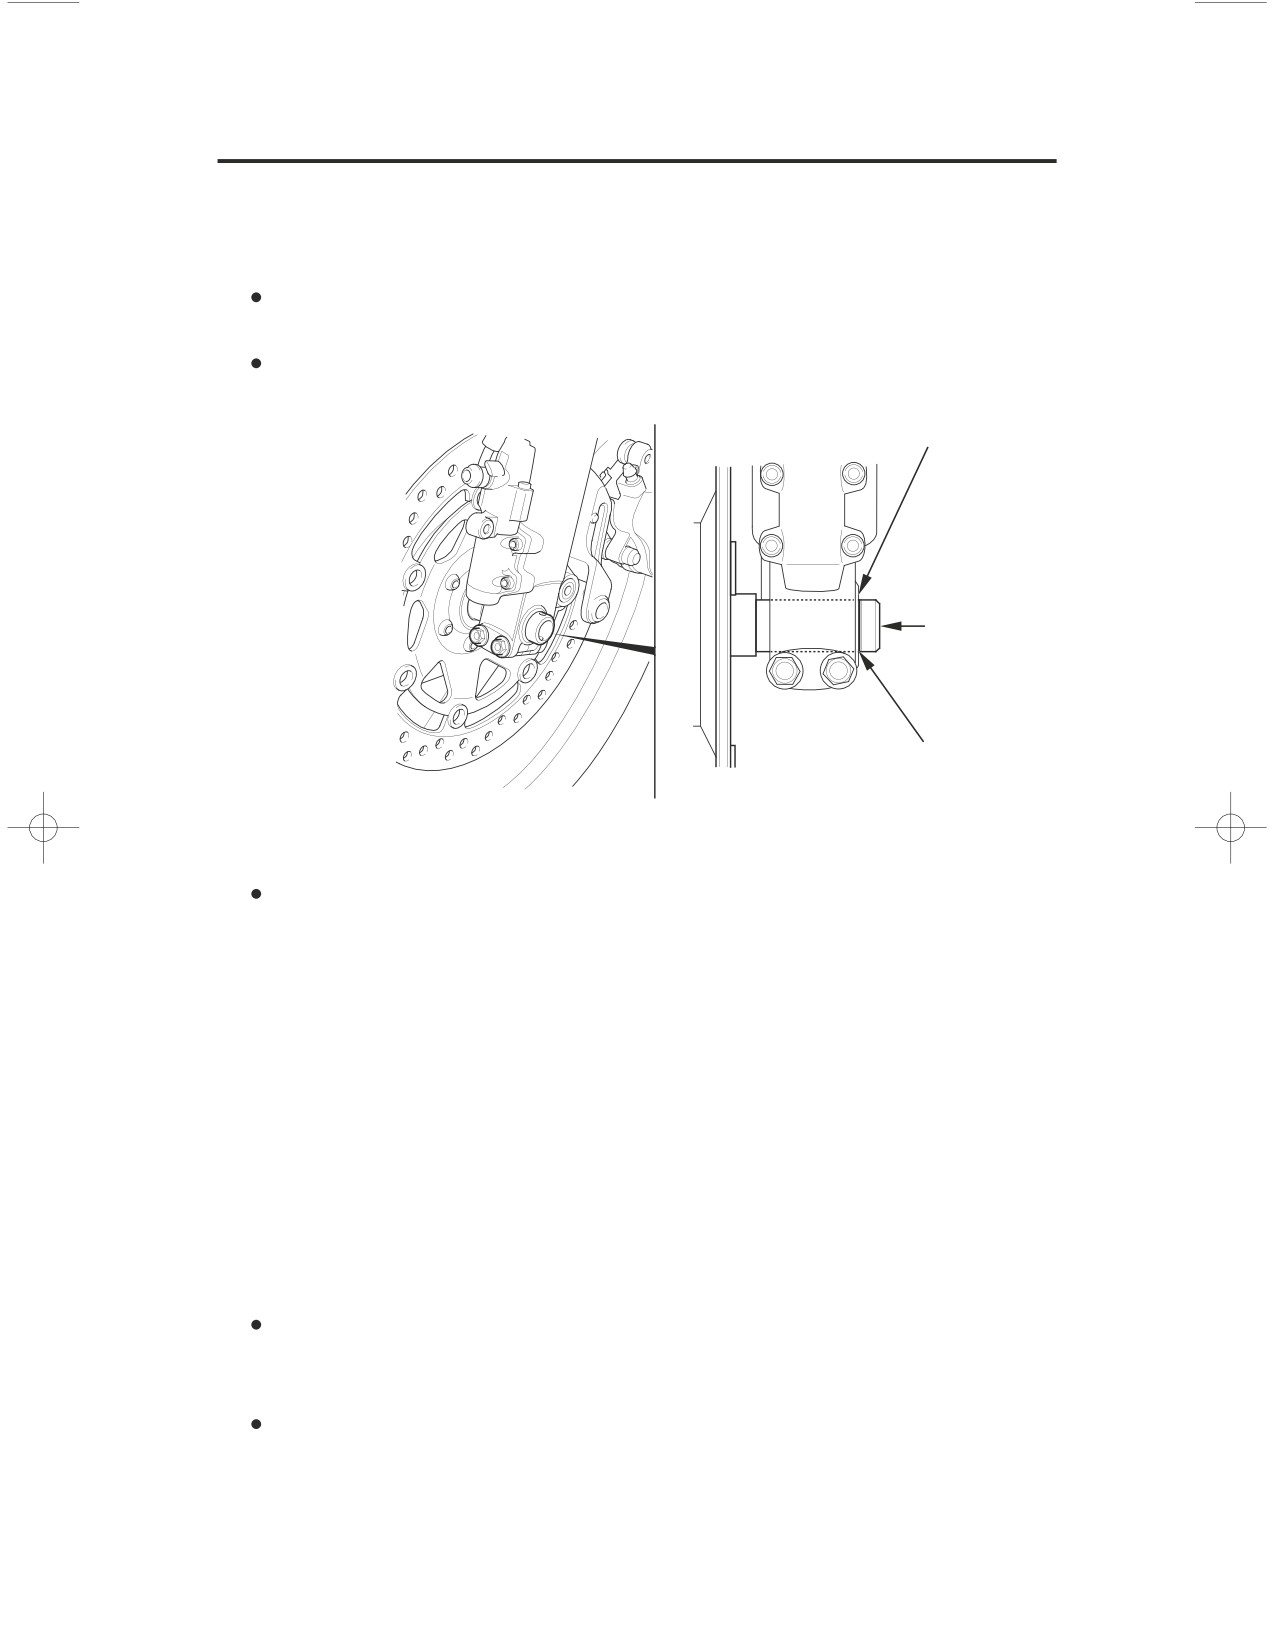
Position the wheel between the fork legs and insert the front axle shaft
from the left side, through the left fork leg and wheel hub.
Align the index line of the front axle shaft with the recessed surface of the
fork leg.
recessed surface
front axle
shaft
index line
Fit the brake disc carefully between the brake pads to avoid damaging the
pads.
2. Install the bolts and tighten to the specified torque:
axle bolt:
44 lbf·ft (59 N·m , 6.0 kgf·m)
right caliper fixing bolts:
23 lbf·ft (31 N·m , 3.2 kgf·m)
left caliper socket bolt:
23 lbf·ft (31 N·m , 3.2 kgf·m)
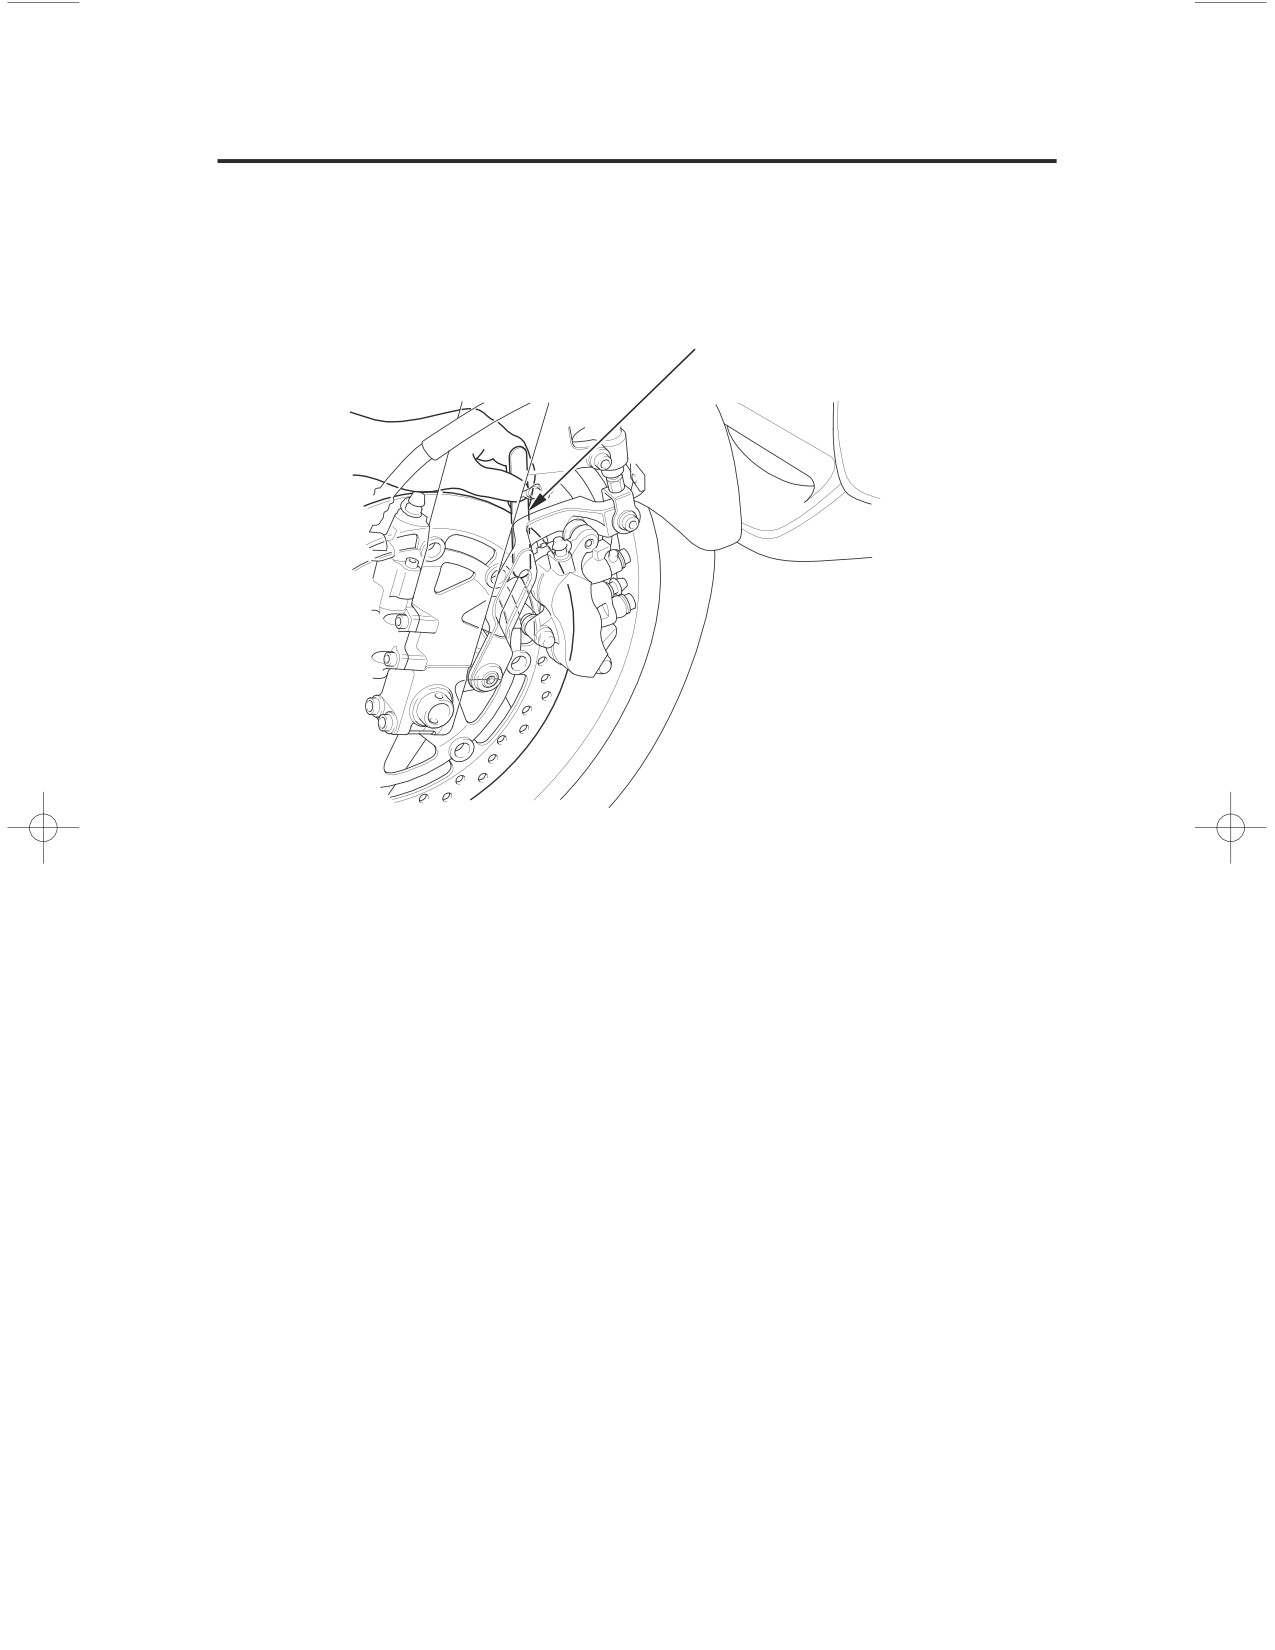
3. Measure the clearance between the brake disc and the caliper holder on each
side with a 0.028 in (0.7 mm) feeler gauge.
If the feeler gauge inserts easily, remove it and tighten the axle pinch bolts
to the specified torque:
16 lbf·ft (22 N·m , 2.2 kgf·m)
If the feeler gauge cannot be inserted easily, loosen the left axle pinch bolt
and pull the left fork outward or push inward to adjust the clearance. Then
tighten the axle pinch bolts to the specified torque.
(cont’d)
223
Taking Care of the Unexpected
If You Have a Flat Tire
Failure to provide adequate disc-to-caliper holder clearance may damage the
brake discs and impair braking efficiency.
feeler gauge
224
Taking Care of the Unexpected
If You Have a Flat Tire
4. After installing the wheel, apply the brake lever AND brake pedal several
times, then recheck both discs for caliper holder to disc clearance. Do not
operate the motorcycle without adequate clearance.
Check for free wheel rotation after the brake lever and brake pedal are
released. Recheck the wheel if the brake drags or if the wheel does not
rotate freely.
After installing the wheel, operate the brake lever AND brake pedal several
times until you feel pressure. You must restore pressure from BOTH the
lever AND the pedal because this motorcycle is equipped with a Linked
Braking System.
Verify proper brake operation before riding.
5. Remove the protective tapes from the front wheel.
If a torque wrench was not used for installation, see your Honda dealer as
soon as possible to verify proper assembly. Improper assembly may lead to
loss of braking capability.
225
Taking Care of the Unexpected
If You Have a Flat Tire
Emergency Rear Wheel Removal/Installation
Refer to Saf ety Precautions on page142
We recommend wheel removal be done only by your Honda dealer or another
qualified mechanic. Do not attempt to remove the wheel on your own. Wheel
removal requires mechanical skill and professional tools.
Removal
1. Park your motorcycle on its center stand on a firm, level surface.
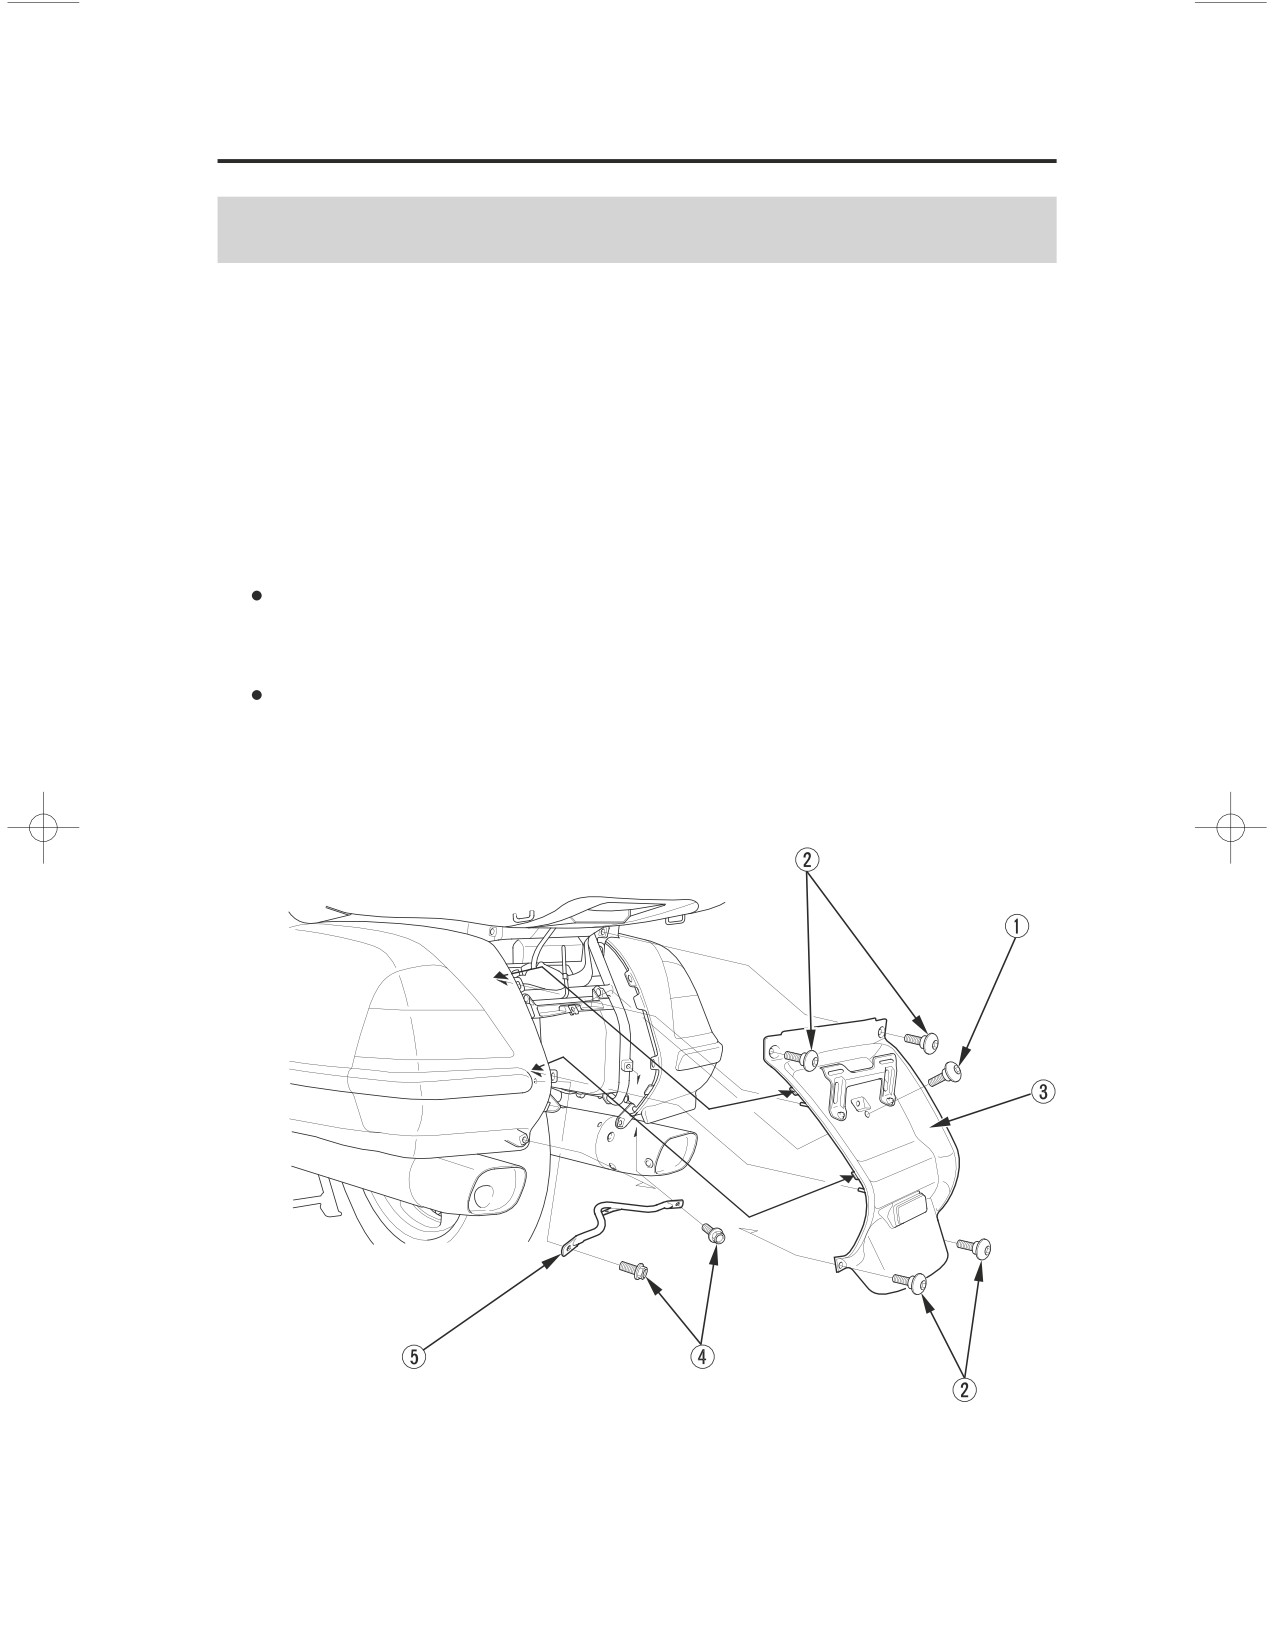
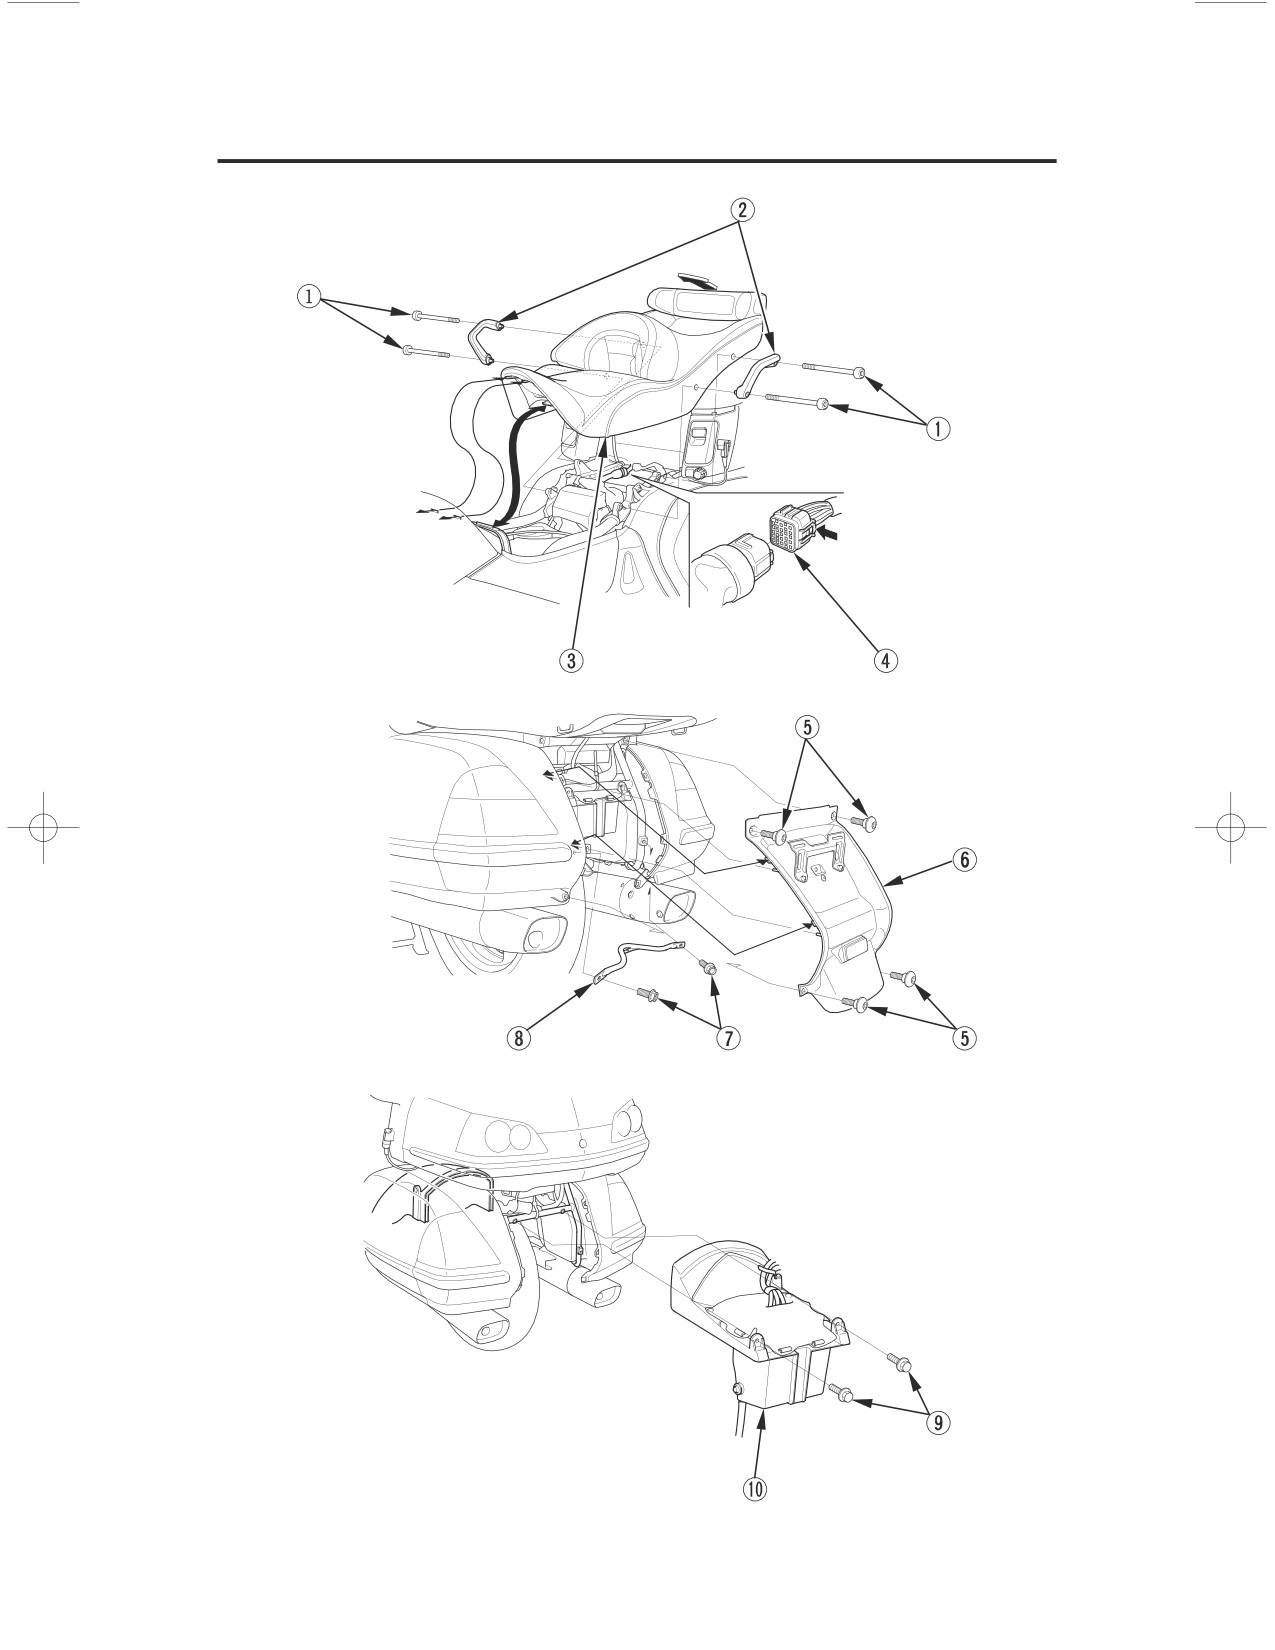
2. Remove the parts in sequence, according to the order in the illustration.
Avoid getting grease, oil, or dirt on the disc or pad surfaces. Any
contamination can cause poor brake performance or rapid pad wear after
reassembly.
When removing and installing the wheel, be careful not to damage the
sensor and pulser ring.
(Models equipped with ABS)
(Models not equipped with Premium Audio)
226
Taking Care of the Unexpected
If You Have a Flat Tire
(Models equipped with Premium Audio)
227
Taking Care of the Unexpected
If You Have a Flat Tire
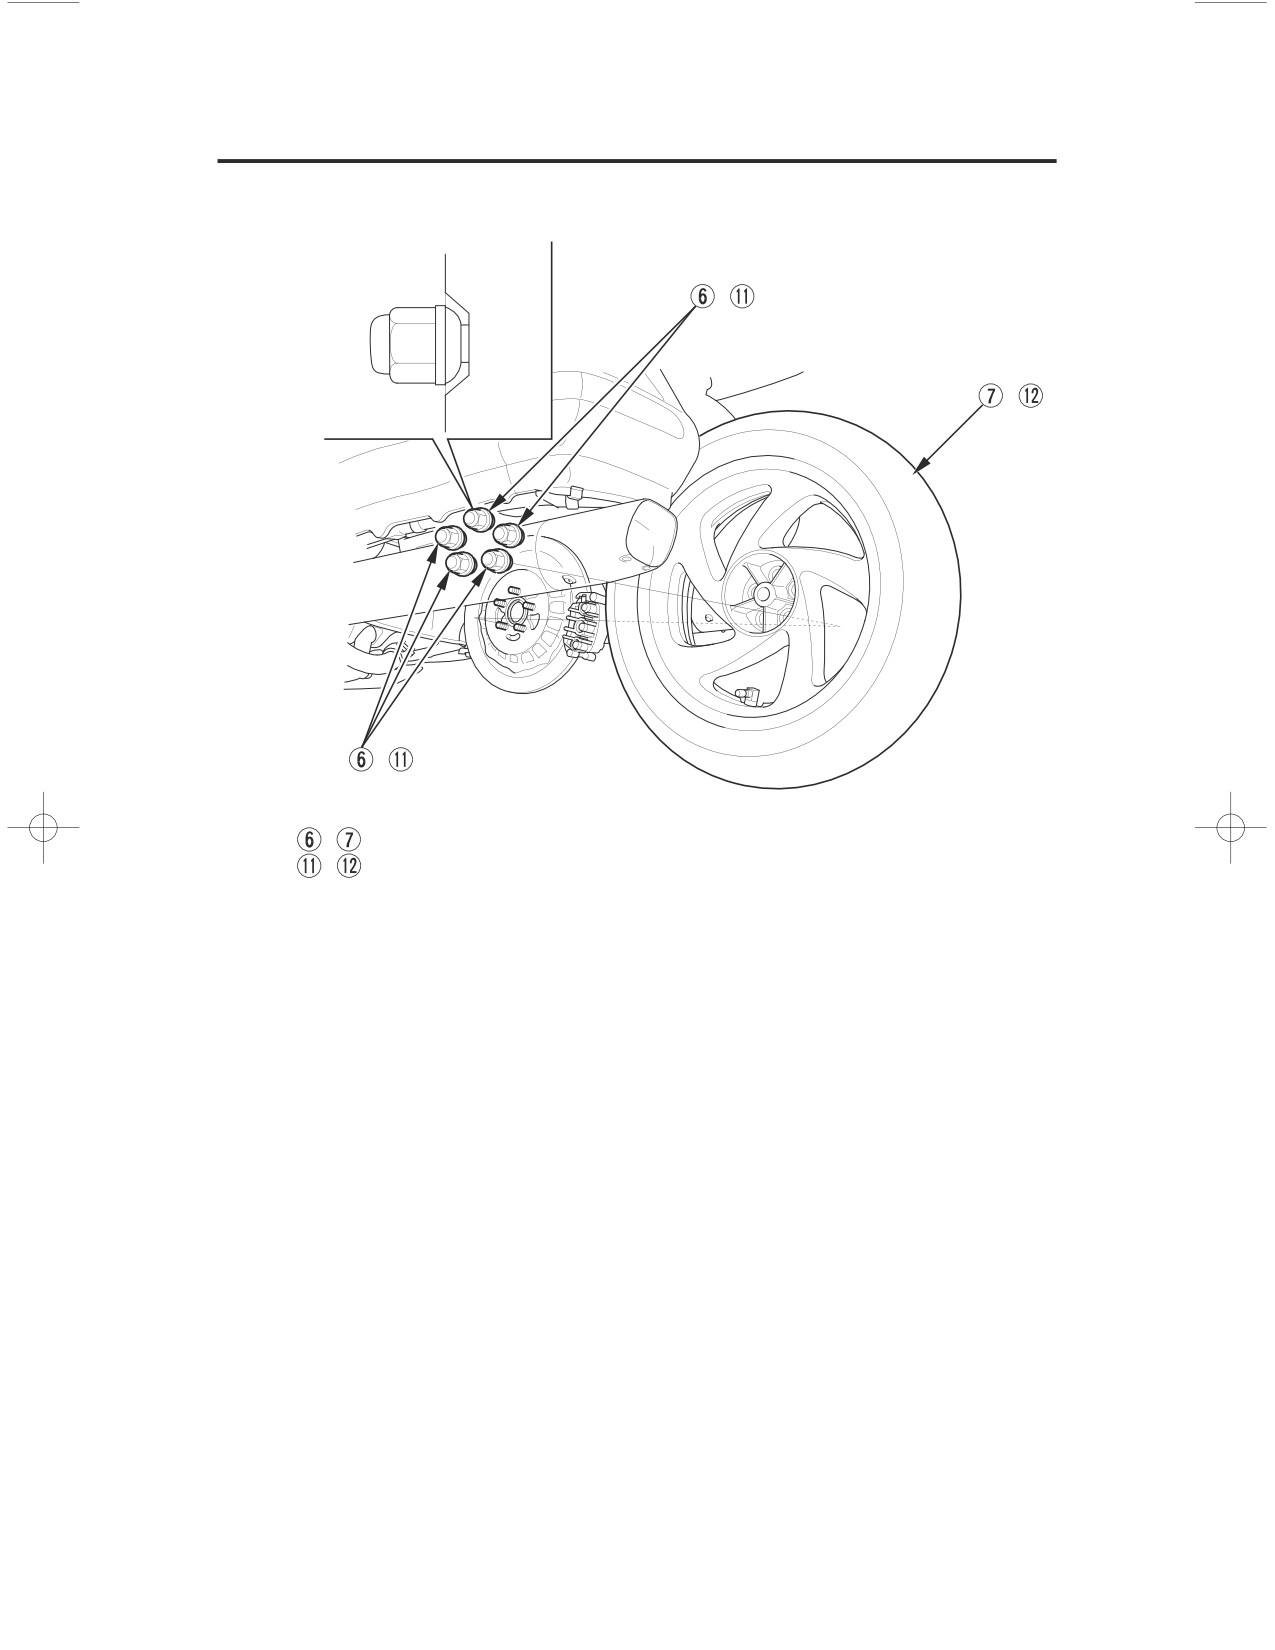
,
,
,
,
: (Models not equipped with Preminum Audio)
,
: (Models equipped with Preminum Audio)
Installation
1. Reassemble the removed parts in the reverse order of removal.
2. Tighten the rear wheel nuts to the specified torque:
80 lbf·ft (108 N·m , 11.0 kgf·m)
3. After installing the wheel, apply the brake several times and then check if the
wheel rotates freely. Recheck the wheel if the brake drags or if the wheel
does not rotate freely.
4. Operate the brake pedal and check the brake operation.
5.
Inspect the brake system (page
184
).
If a torque wrench was not used for installation, see your Honda dealer as
soon as possible to verify proper assembly. Improper assembly may lead to
loss of braking capability.
228
Taking Care of the Unexpected
If Your Engine Overheats
Normally, the needle on your temperature gauge will rise to a point about
midway between C (cold) and H (hot) and then level off. Hot weather may
cause the needle to rise higher than normal. So will temporary stress such as
climbing a hill. If you’re stuck in stop-and-go traffic, the needle may climb
some, but the radiator fan is designed to prevent overheating. Be aware of these
variations as you monitor the gauge.
If your vehicle is operated at sustained speeds between 10 and 15 miles per
hour in high ambient temperature conditions, you may experience high
temperature gauge readings.
If the temperature gauge rises, shifting to second gear or altering your speed
(either faster or slower) may reduce the temperature reading. If the indicator
reaches the red zone, as soon as it is safe to do so, pull over and let the engine
idle until the indicator drops.
Continuing to ride with an overheated engine can cause serious engine damage.
A steaming engine indicates a coolant leak. Shut the engine off and wait until
the steaming stops. Look for a leak, but don’t touch the engine or radiator
system. Let everything cool off first.
If there’s no obvious problem, leave the engine on so the fan and coolant
circulating system can continue working. Monitor the temperature gauge. The
needle may drop to the normal range after a brief stop with no load on the
engine.
Check the radiator fan.
If the fan is not working, turn the engine off. Open the fuse box (page
)
232
and check the radiator fan fuse. If the fuse is blown, replace it with the proper
(same rating) spare fuse. Start the engine. If the needle climbs to the red zone
and stays there, turn the engine off.
If the radiator fan is working, visually check the coolant level in the reserve
tank, located behind the left engine side cover. It isn’t necessary to touch the
radiator system.
(cont’d)
229
Taking Care of the Unexpected
If Your Engine Overheats
If the reserve tank is low or empty, don’t ride without adding coolant
(page
171
). After adding coolant, turn the engine on and check the
temperature gauge.
If the needle doesn’t drop, do not ride. The engine needs repair. Transport
your motorcycle to a Honda dealer (page
210
).
If the temperature drops to normal, check the coolant level. If it has gone
down, add more coolant.
If you are able to resume riding, continue to monitor the gauge frequently.
If there’s a mild leak, you can ride for awhile, carefully watching the gauge. Be
prepared to stop and add more coolant or water. If the leak is bad, transport your
motorcycle to a Honda dealer (page
210
).
230
Taking Care of the Unexpected
If the Low Oil Pressure Indicator Lights
If you check your engine oil level regularly, you should never see the low
oil pressure indicator while riding. Normally, it will only light momentarily
when you turn the ignition switch ON. Occasionally, it may flicker at or
near idling speed.
Low oil pressure may be caused by an oil leak, a low oil level, or some problem
in the engine’s lubrication system.
If the indicator comes on while you’re riding, don’t ignore it. Pull safely to the
side of the road. If possible, pull the clutch lever in and coast to a stop. Stop the
engine as soon as it’s safe to do so.
Continuing to ride with low oil pressure can cause serious engine damage.
Check for an oil leak.
Then check the oil level. If necessary, add the recommended oil (page
166
)
to the upper level mark. If you must leave your motorcycle to get oil, secure it
as much as possible.
After adding oil, start the engine, and check that the low oil pressure indicator
goes off. Check for a possible leak.
If the indicator goes off and there is no leak -- resume riding. If there is a
leak -- do not ride the motorcycle until the leak is repaired by a Honda dealer.
231
Taking Care of the Unexpected
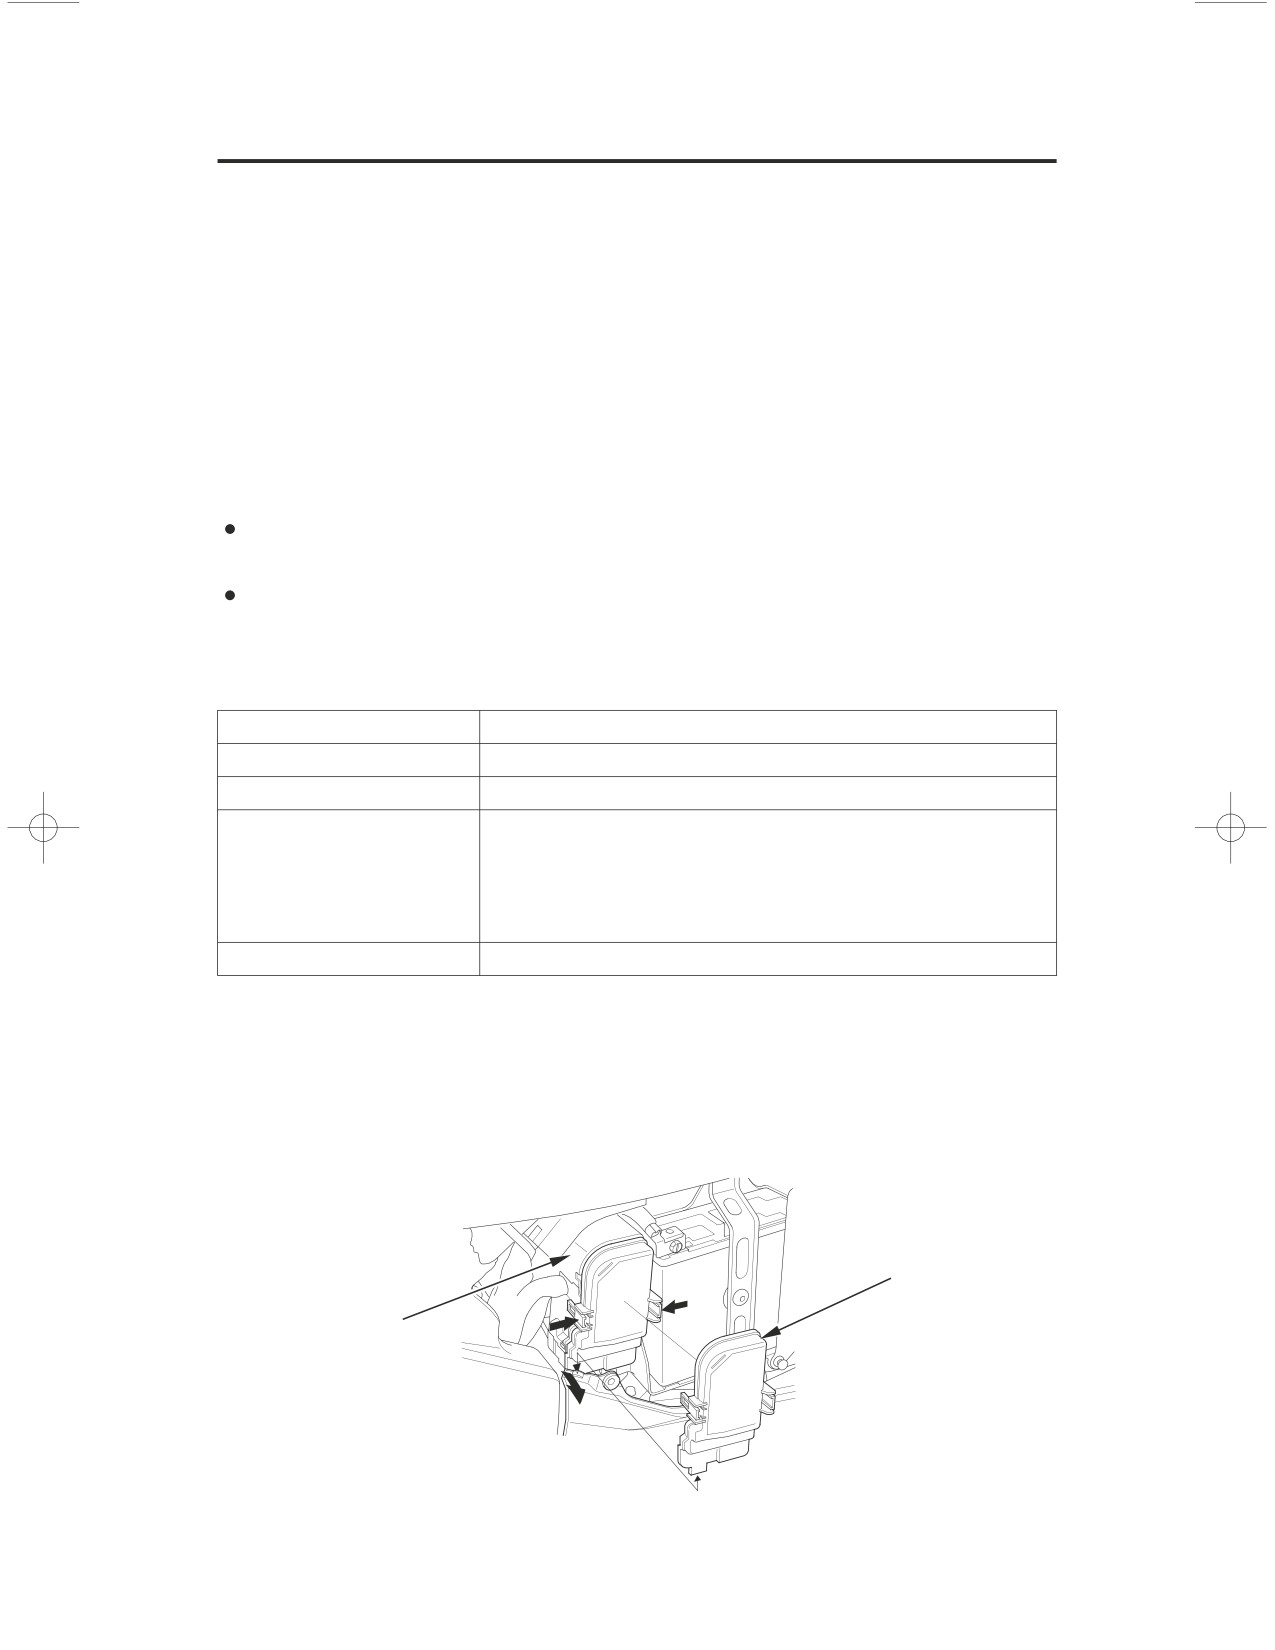
If a Fuse Blows
All of the electrical circuits on your motorcycle have fuses to protect them from
damage caused by excess current flow (short circuit or overload).
If something electrical on your motorcycle stops working, the first thing you
should check for is a blown fuse.
Determine from the chart on the circuit fuse box cover which fuse or fuses
control that component. Check those fuses first, but check all the fuses before
looking elsewhere for another possible cause of the problem. Replace any blown
fuses and check component operation.
The circuit fuse box (including spare fuses) is located behind the left side
cover.
The main fuse is located in the fuse box.
Recommended Fuses
main fuse A
30 A
main fuse B
120 A
speed limiter fuse
60 A
external amplifier
40 A
fuse(models
equipped with
Premium Audio)
other fuses
30 A, 20 A, 15 A, 10 A, 5 A
1.
To prevent an accidental short circuit, turn the ignition switch OFF before
checking or replacing the fuses.
2.
Remove the left side cover (page155).
3.
Remove the fuse box cover.
LEFT SIDE
fuse box cover
fuse box
232
Taking Care of the Unexpected
If a Fuse Blows
Main Fuse Access:
4. Check the two main fuses (A & B) to see if they are blown.
To replace main fuses (A & B), see your Honda dealer for this service.
Speed Limiter Fuse Access:
5. Check the speed limiter (reverse system) fuse to see if it’s blown, see your
Honda dealer for this service.
Circuit Fuses Access:
6. To check or replace a circuit fuse, pull the old fuse out of its retaining clips
with the fuse remover. Look for a burned wire inside the fuse. If the fuse is
blown, replace it with a spare fuse of the same rating.
If you do not have a replacement fuse with the proper rating for the circuit,
install one with a lower rating.
Replacing a f use with one that has a higher rating greatly increases the chance
of damage to the electrical system.
External Amplif ier Fuse Access:
7.
To replace the external amplifier fuse, see your Honda dealer for this service.
(cont’d)
233
Taking Care of the Unexpected