Honda GL1800 Goldwing. Owners Manual - page 5
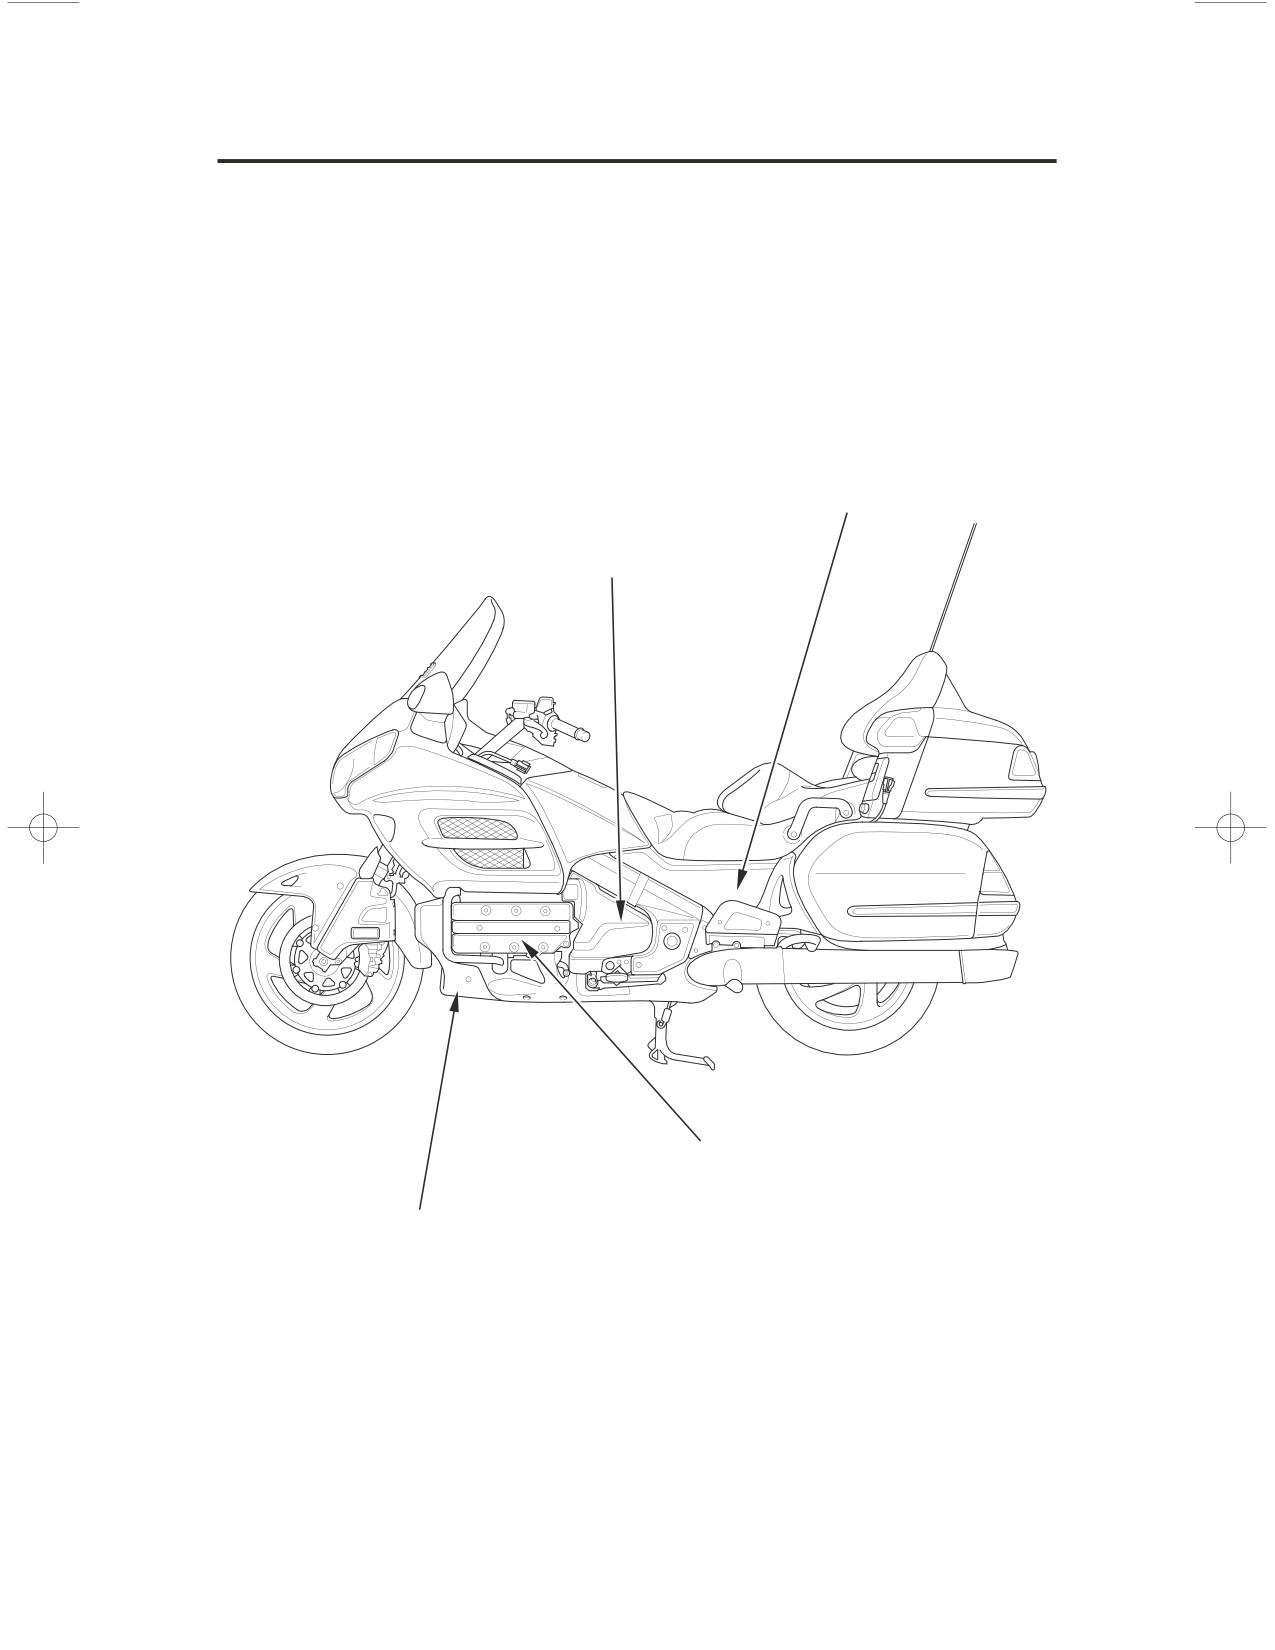
Cover Removal
Refer to Saf ety Precautions on page142
Left side shown; right side similar
side cover
engine side cover
cylinder head side cover
front lower cover
154
Servicing Your Honda
Cover Removal
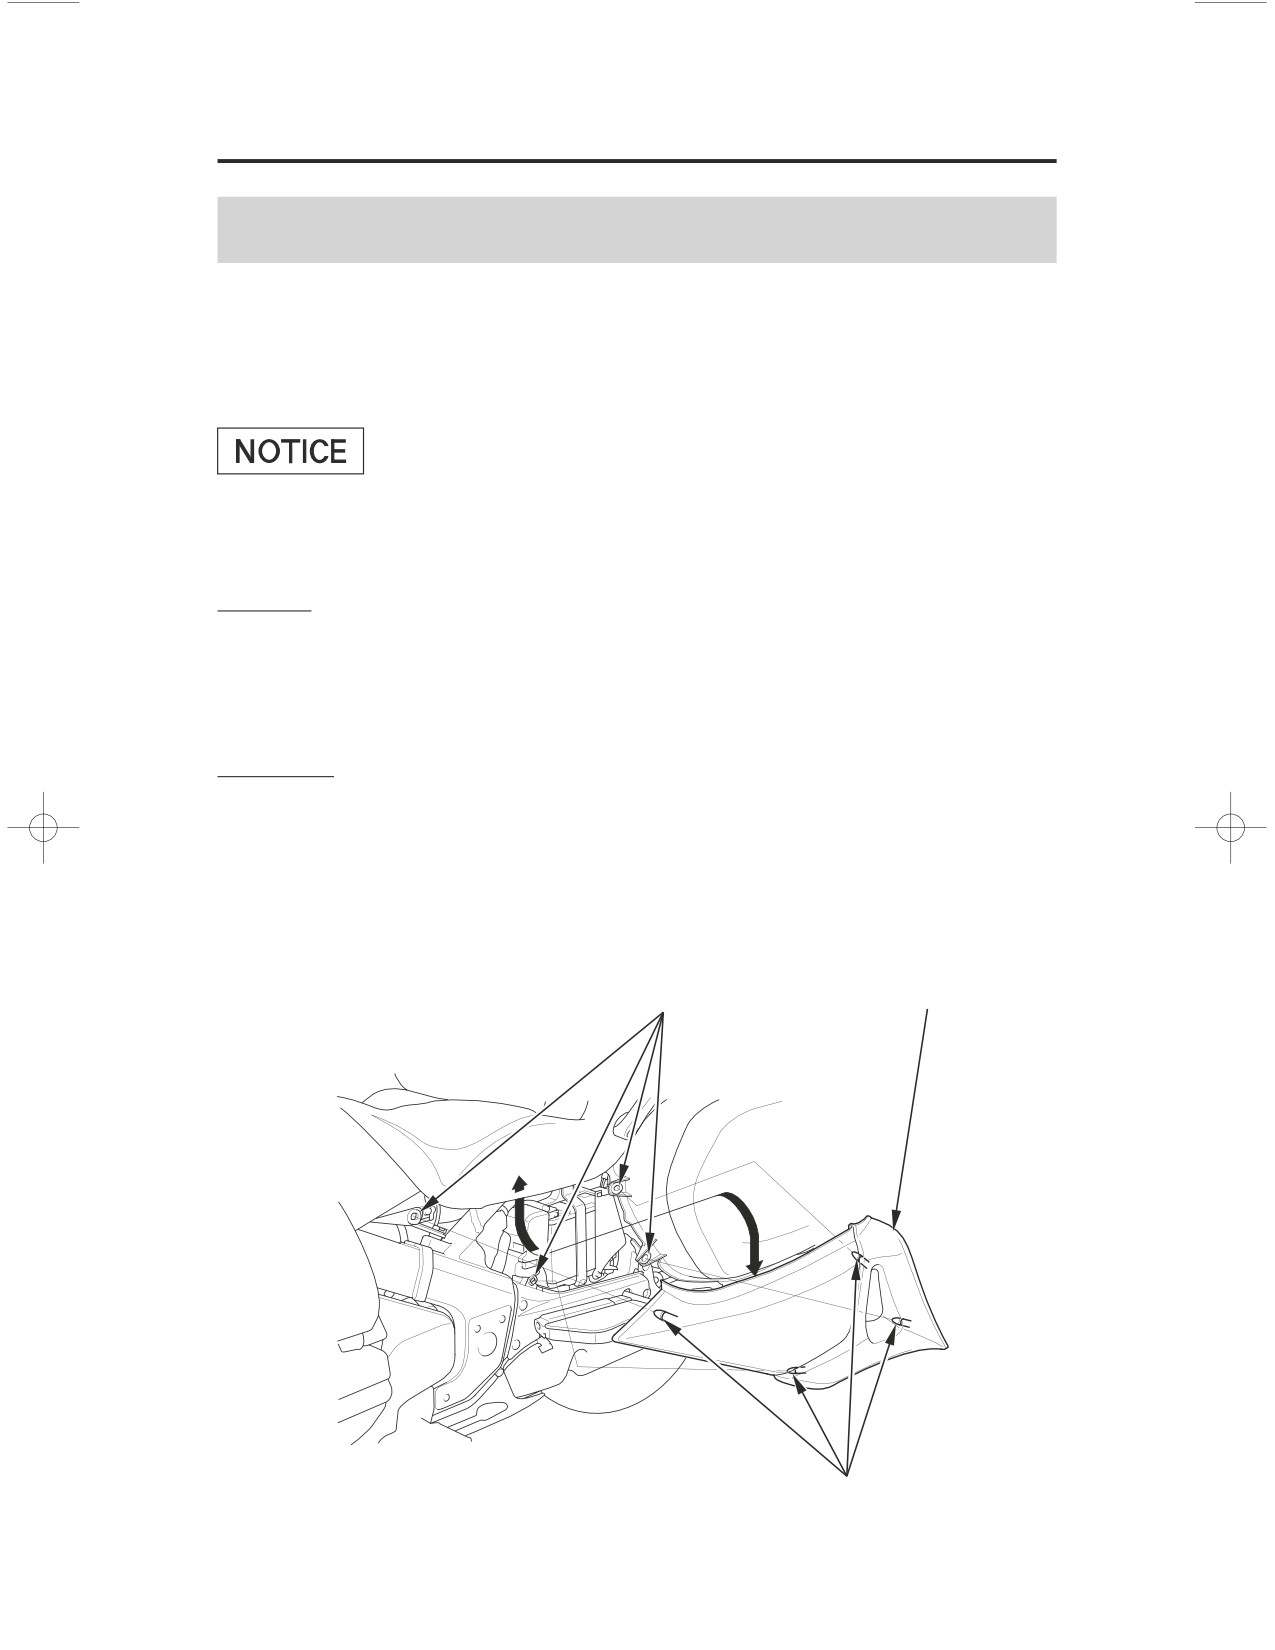
Side Cover Removal
Saf ety Precautions
Refer to
on page142
The left side cover must be removed for battery and fuse maintenance.
Failure to use extreme care removing or installing the side covers may damage
the side cover hooks.
Removal
1. Carefully pull the side cover out until the prongs are clear of the frame
grommets.
2. Remove the side cover.
Installation
1. Insert the top edge of the side cover under the seat.
2. Position the side cover so the prongs on the inside of the cover are lined up
above their securing grommets.
3.
Push the cover in place.
LEFT SIDE
grommets
side cover
prongs
Servicing Your Honda
155
Cover Removal
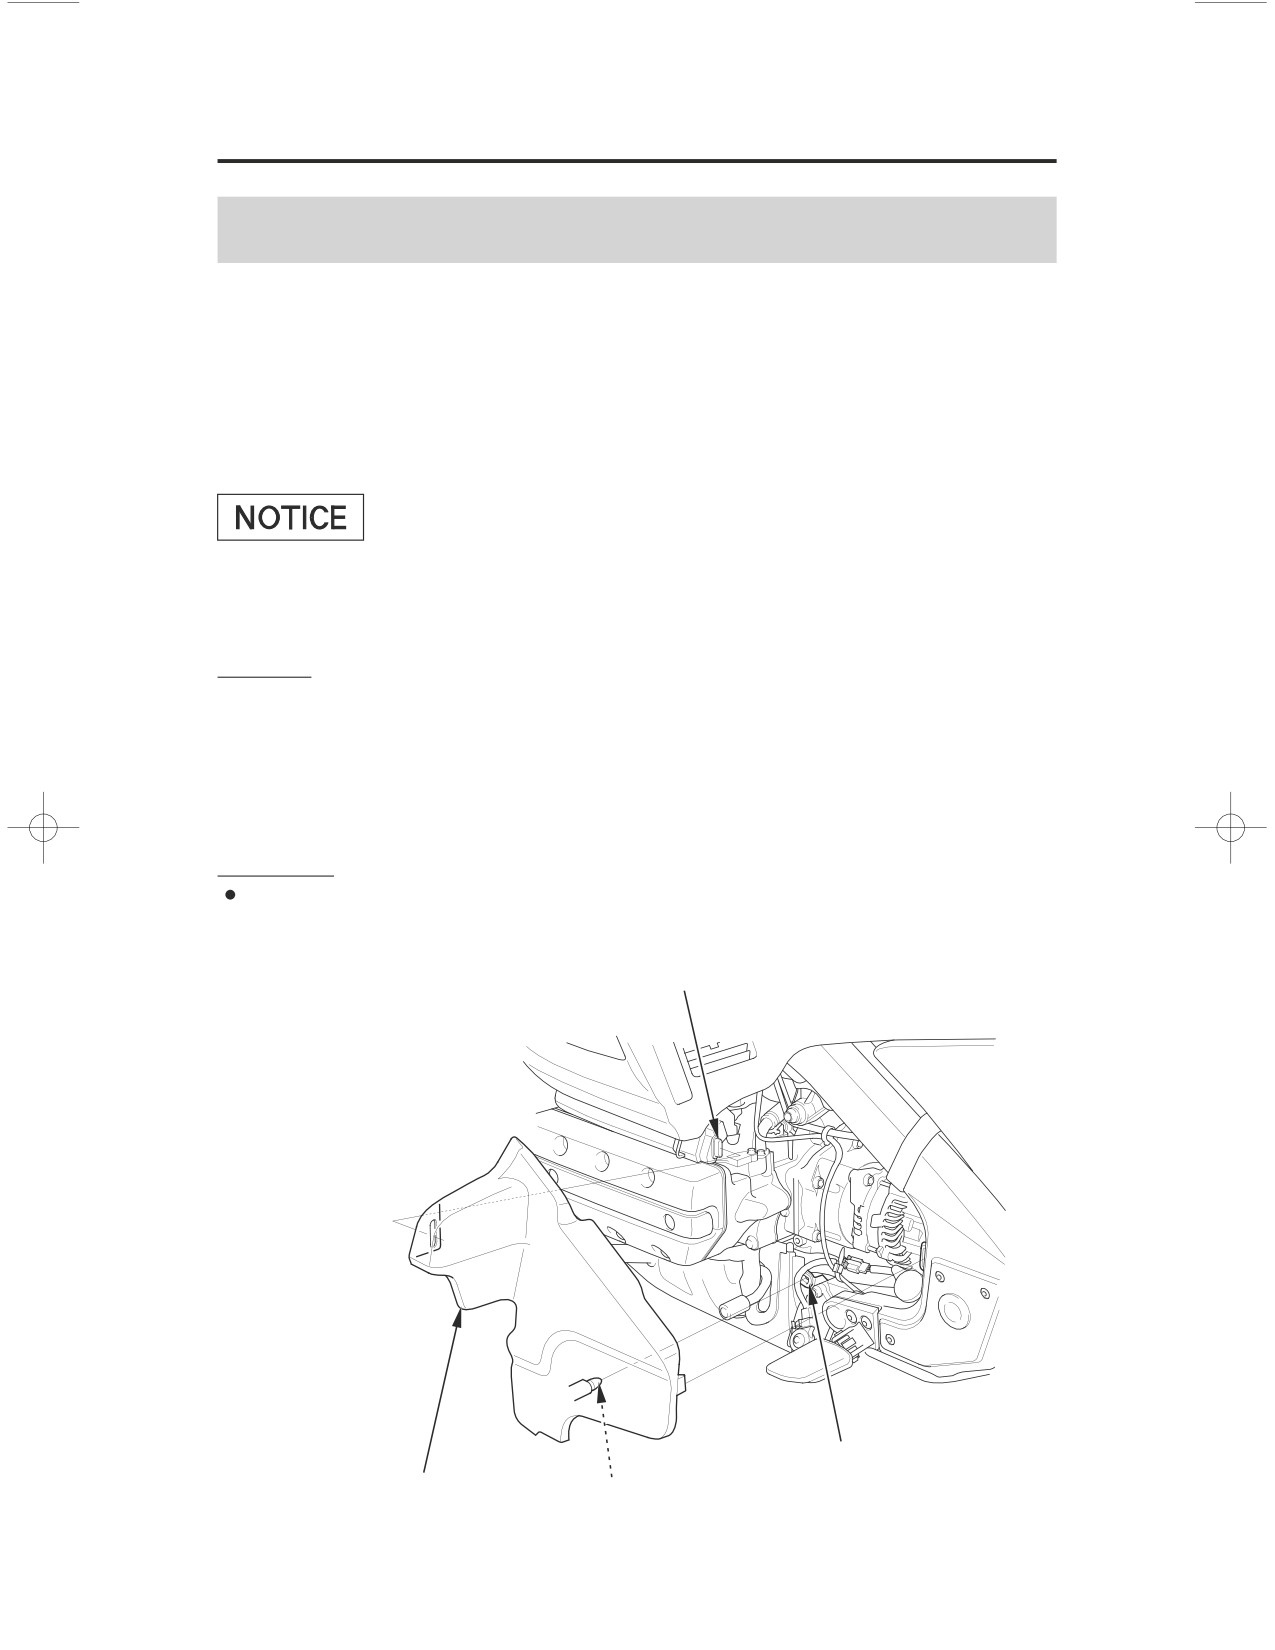
Engine Side Cover Removal
Saf ety Precautions
Refer to
on page142
The left engine side cover must be removed for coolant maintenance.
The right engine side cover must be removed for engine oil and rear brake fluid
maintenance.
Failure to use extreme care removing or installing the side covers may damage
the side cover hooks.
Removal
1. Carefully pull the rear of the engine side cover out until the prongs are clear
of their securing grommets.
2. Carefully slide the engine side cover to the rear until the hook is clear of the
tab in the hole of the engine side cover.
Installation
Installation can be done in the reverse order of removal.
tab
LEFT SIDE
grommet
engine side cover
prong
156
Servicing Your Honda
Cover Removal
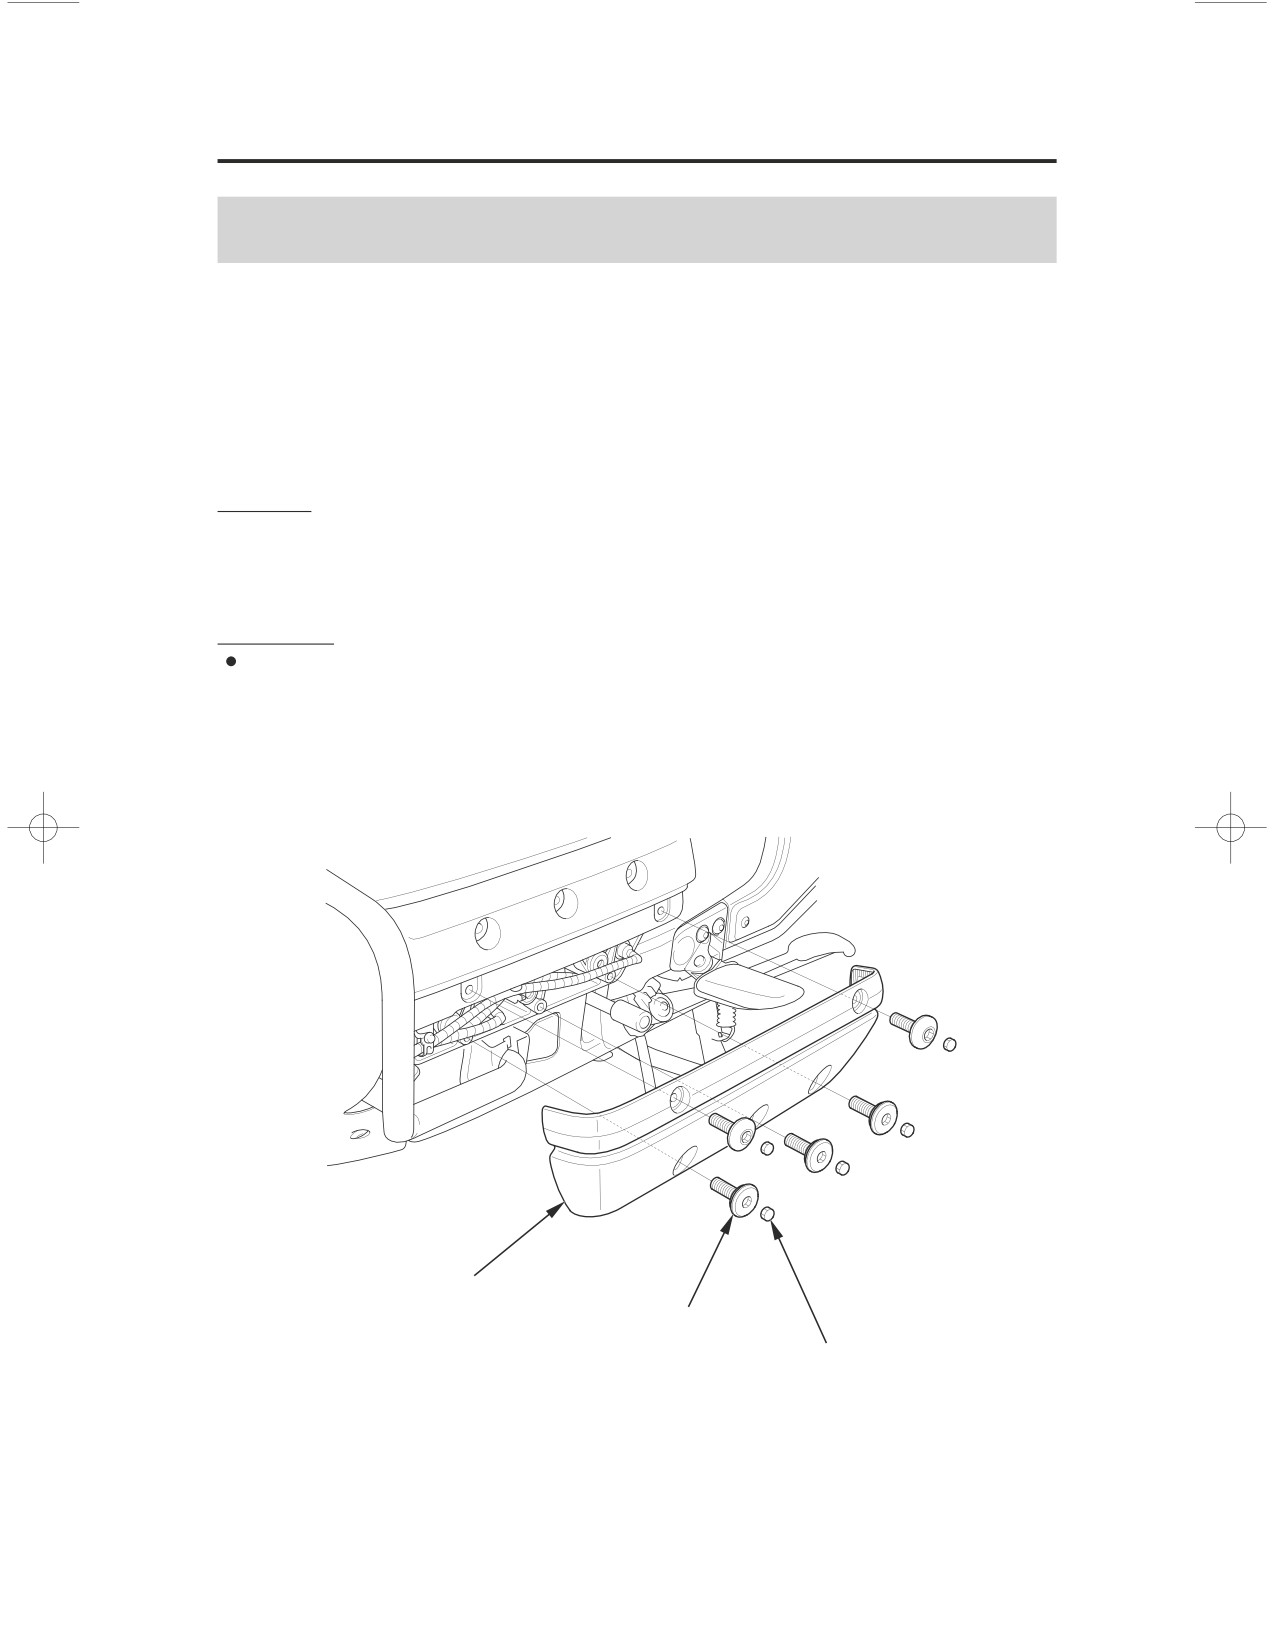
Cylinder Head Side Cover Removal
Refer to Saf ety Precautions on page142
Both cylinder head side covers must be removed for spark plug maintenance.
The left cylinder head side cover must be removed for crankcase breather
maintenance.
Removal
1. Remove the rubber plugs.
2.
Remove the bolts.
Installation
Installation can be done in the reverse order of removal.
LEFT SIDE
cylinder head side cover
bolt
rubber plug
Servicing Your Honda
157
Cover Removal
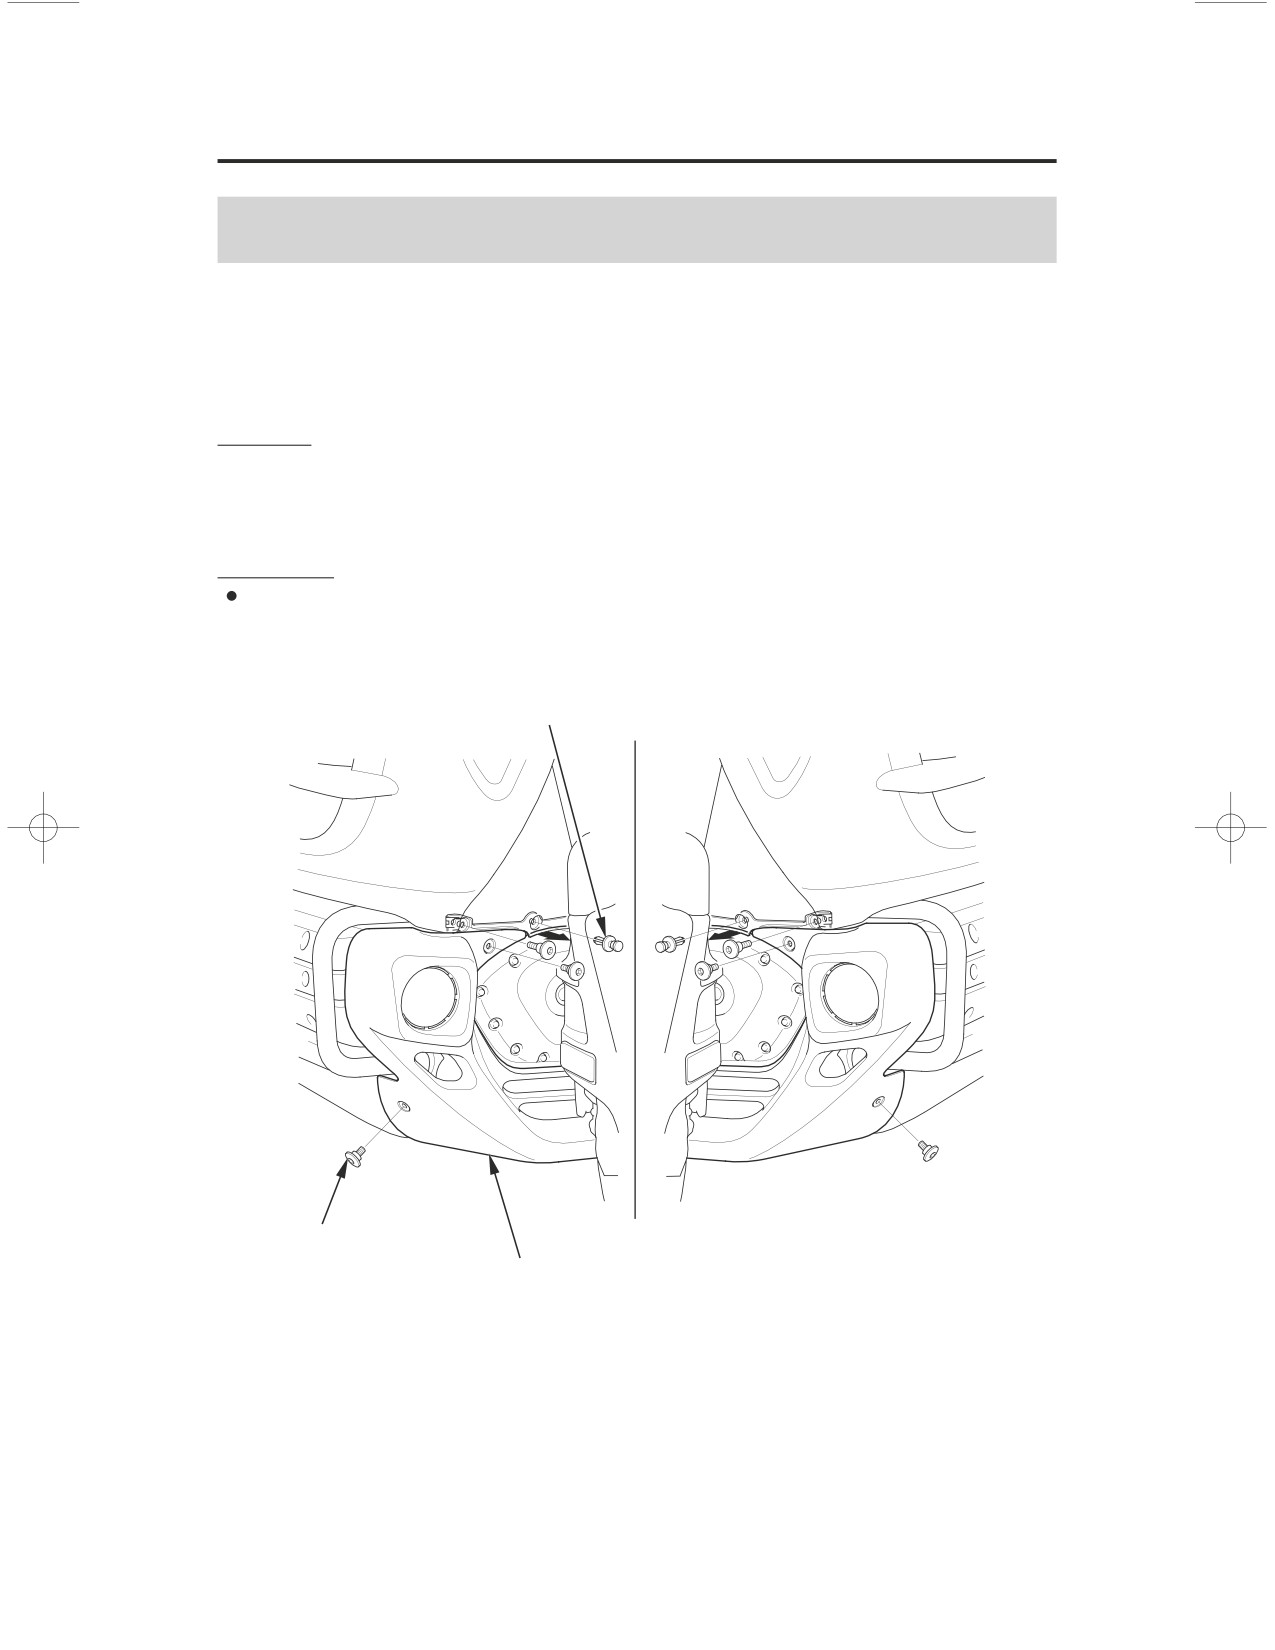
Front Lower Cover Removal
Refer to Saf ety Precautions on page142
The front lower cover must be removed for engine oil maintenance.
Removal
1. Remove the clips.
2.
Remove the bolts.
Installation
Installation can be done in the reverse order of removal.
FRONT
clip
bolt
front lower cover
158
Servicing Your Honda
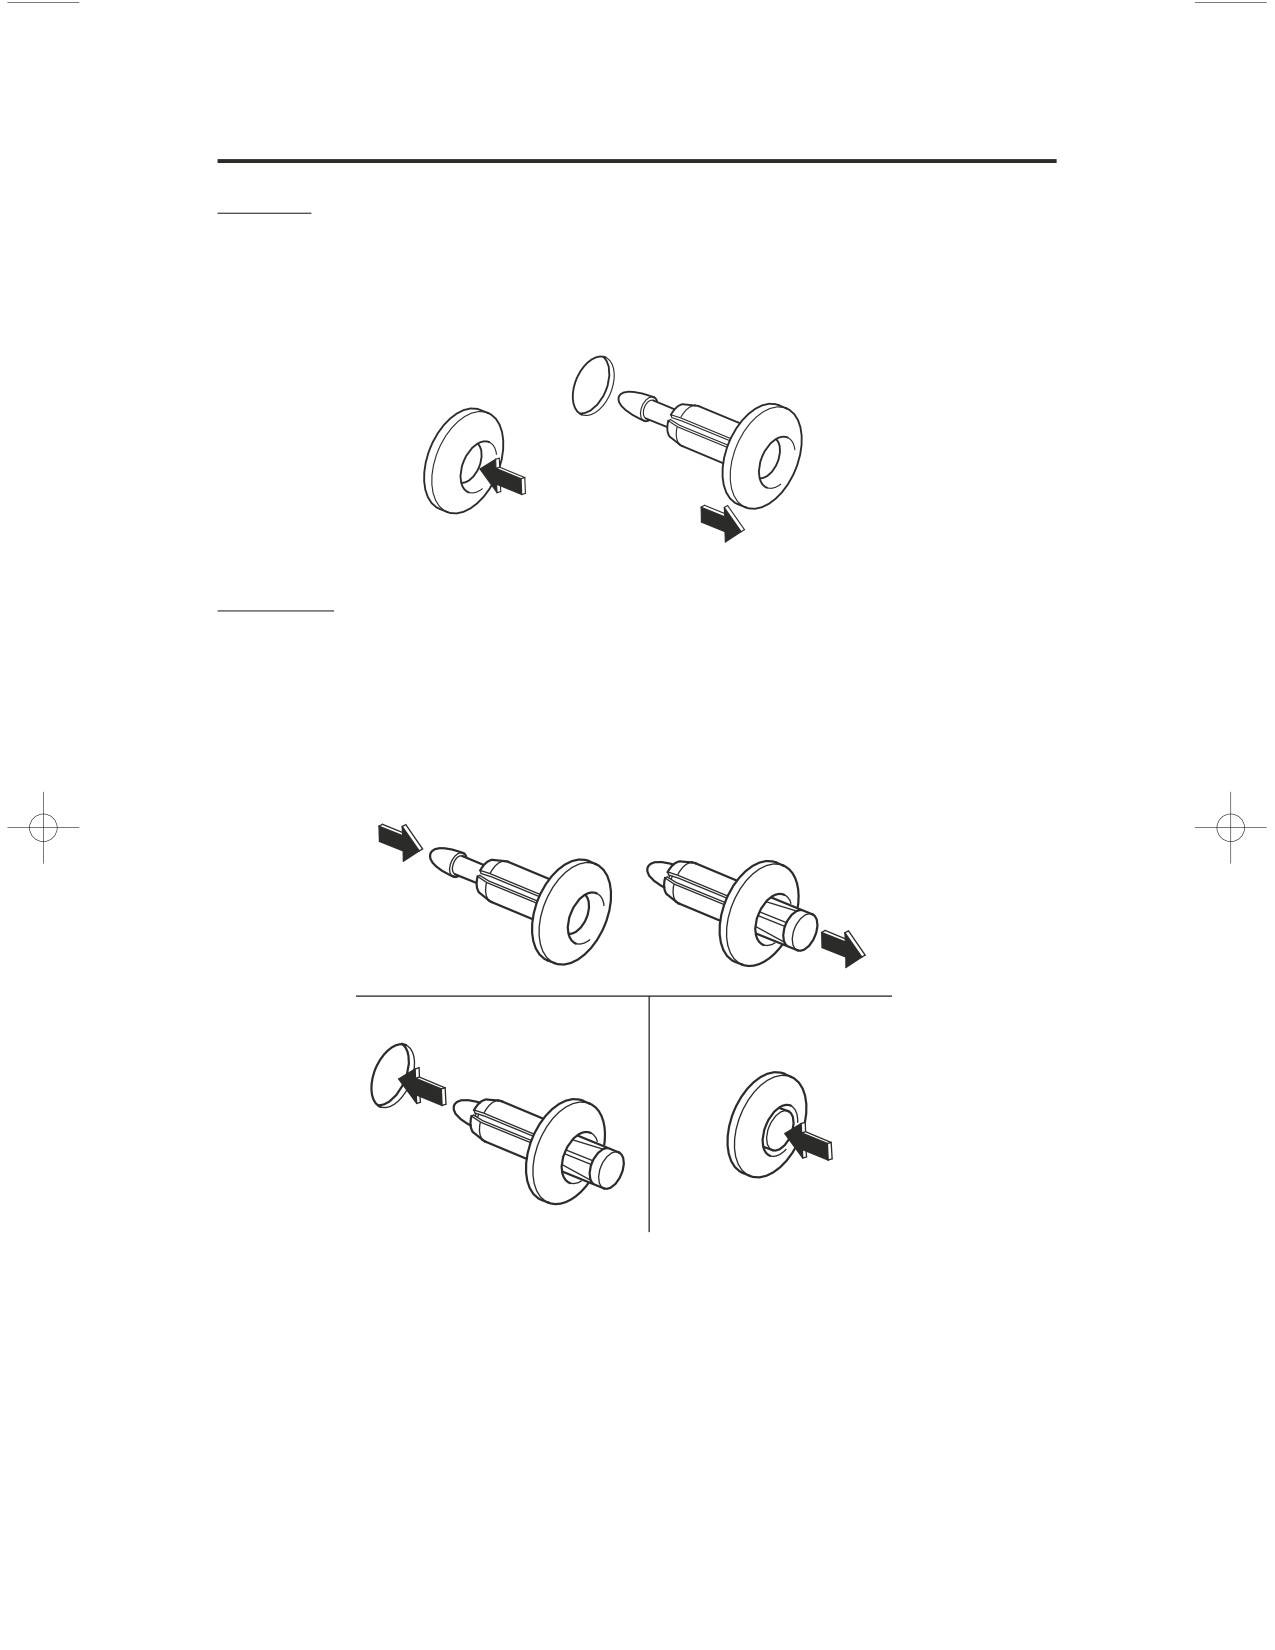
Clip Removal
Removal
1. Press down on the center pin to release the lock.
2. Pull the clip out of the hole.
1.
2.
Installation
1. Push the bottom of the pin.
2. Insert the clip into the hole.
3. Lightly press down on the center pin to lock the clip.
1.
2.
3.
Servicing Your Honda
159
Fuel
Refer to Saf ety Precautions on page142
Fuel Recommendation
type
unleaded
pump octane number
86
(or higher)
We recommend that you use unleaded fuel because it produces fewer engine
deposits and extends the life of exhaust system components.
The use of leaded gas will damage the catalytic converters.
Your engine is designed to use any gasoline that has a pump octane number of
86 or higher. Gasoline pumps at service stations normally display the pump
octane number. For information on the use of oxygenated fuels, see page
256
Use of lower octane gasoline can cause persistent ‘‘pinging’’ or ‘‘spark knock’’
(a loud rapping noise) which, if severe, can lead to engine damage. Light
pinging experienced while operating under a heavy load, such as climbing a hill,
is no cause for concern.
If pinging or spark knock occurs at a steady engine speed under normal load,
change brands of gasoline. If pinging or spark knock persists, consult your
Honda dealer.
160
Servicing Your Honda
Fuel
Never use stale or contaminated gasoline or an oil/gasoline mixture. Avoid
getting dirt, dust, or water in the fuel tank.
Fuel Capacity
Fuel tank capacity, including reserve:
6.6 US gal (25
)
The tank should be refilled as soon as possible when the fuel gauge needle
enters the red band.
Refueling Procedure
Refer to
Saf ety Precautions
on page142
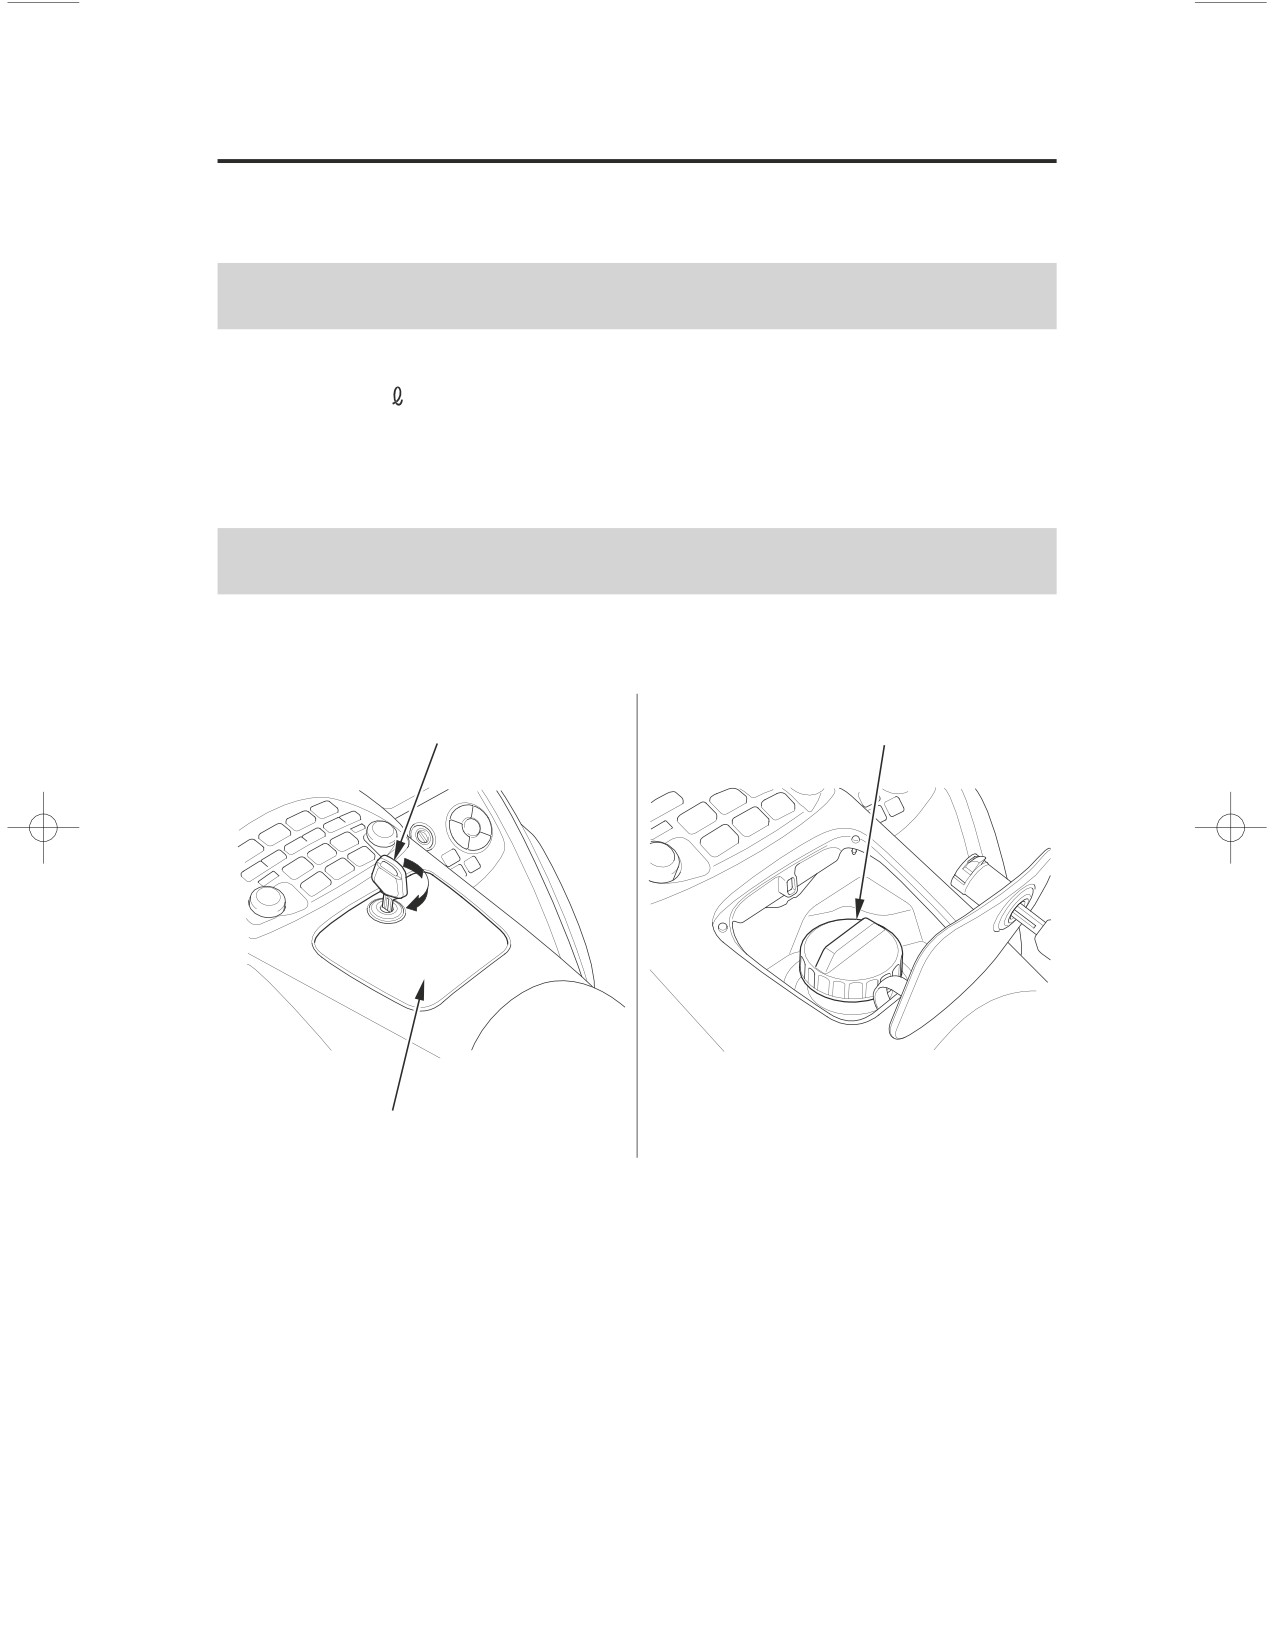
ignition key
fuel fill cap
fuel fill compartment
1. Insert the ignition key in the fuel fill compartment and turn it clockwise.
2. Open the fuel fill compartment.
3. Turn the fuel fill cap counterclockwise and remove it.
(cont’d)
Servicing Your Honda
161
Fuel
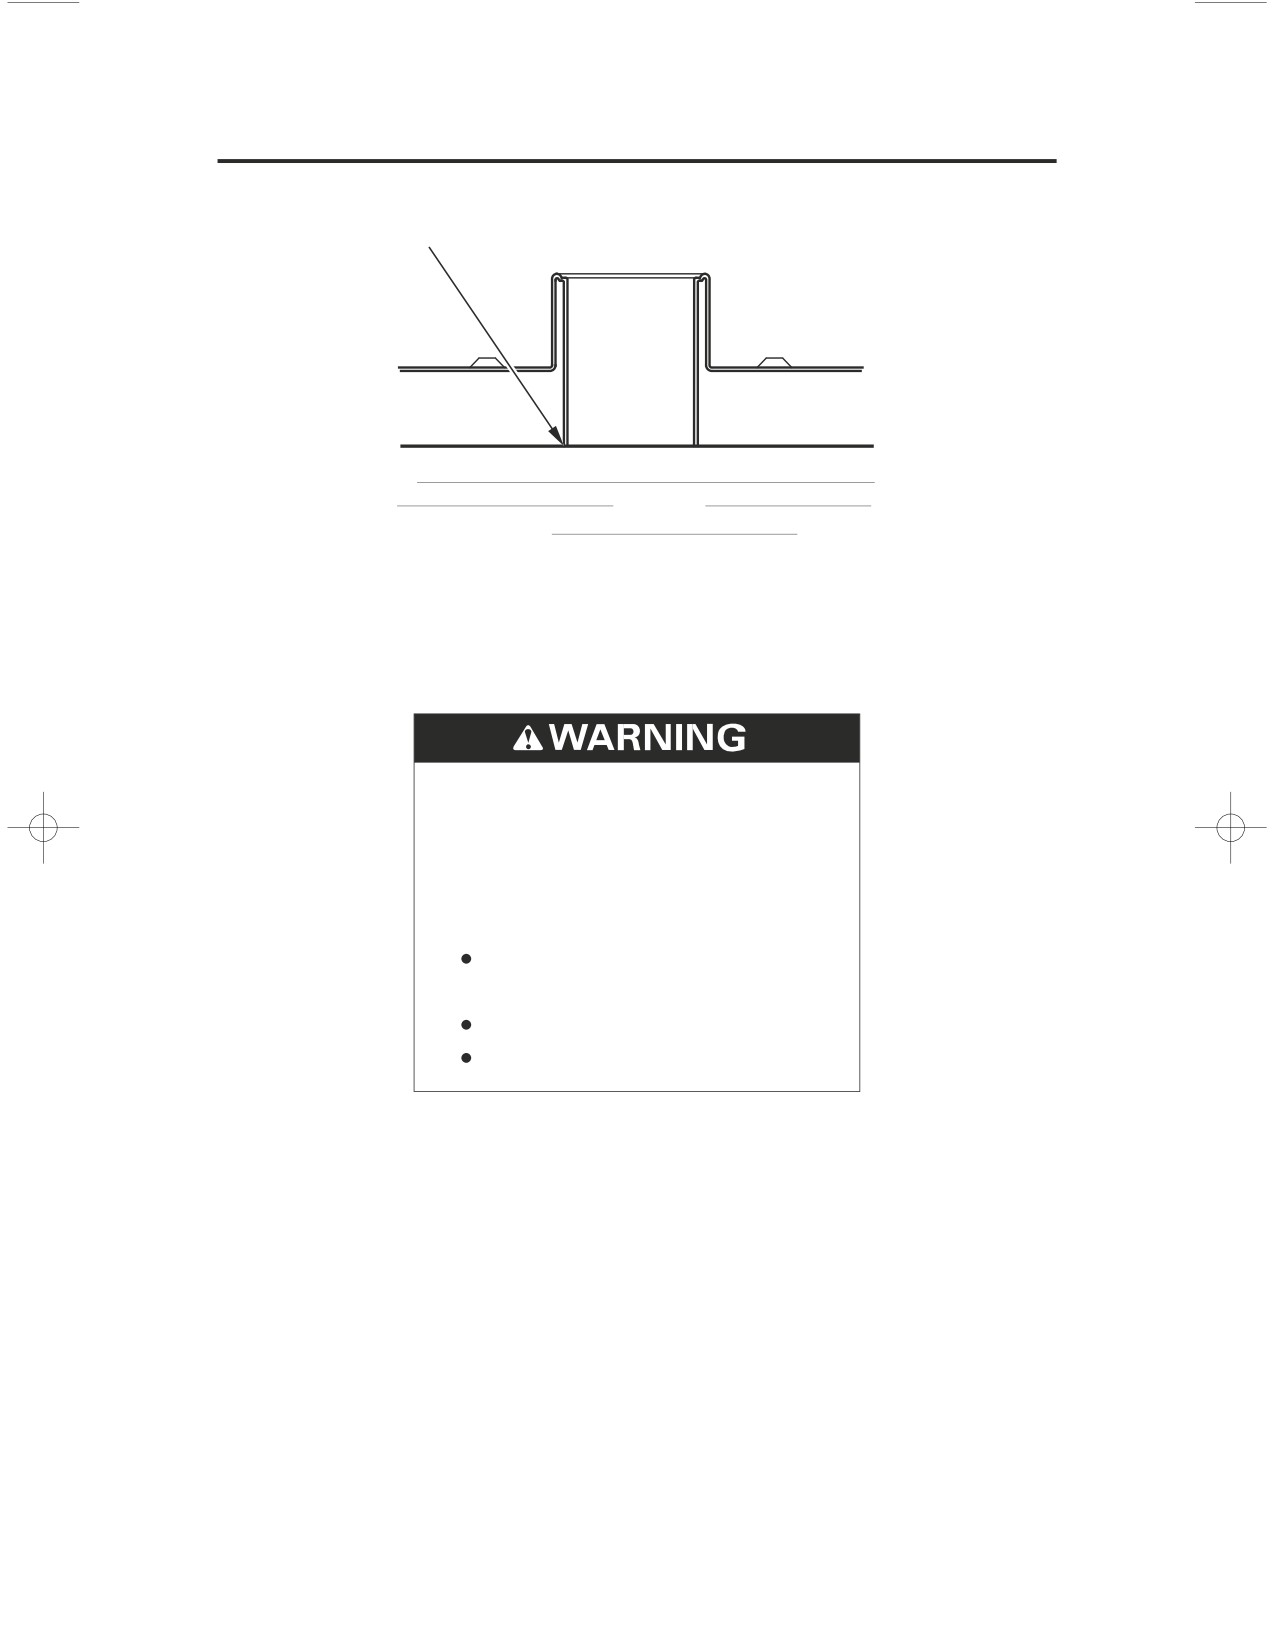
filler neck
4. Add fuel until the level reaches the bottom of the filler neck.
Avoid overfilling the tank. There should be no fuel in the filler neck.
Gasoline is highly flammable
and explosive. You can be
burned or seriously injured
when handling fuel.
Stop the engine and keep
heat, sparks and flame away.
Handle fuel only outdoors.
Wipe up spills immediately.
5. After refueling, be sure to tighten the fuel fill cap firmly by turning it
clockwise until it clicks.
6. Close the fuel fill compartment.
7. Remove the key from the fuel fill compartment.
162
Servicing Your Honda
Engine Oil & Filter
Engine oil quality is a major factor that affects both the performance and the
service life of the engine.
Using the proper oil (page
) and filter, and regularly checking, adding, and
164
changing oil will help extend your engine’s life. Even the best oil wears out.
Changing oil helps get rid of dirt and deposits in the engine. Operating the
engine with old or dirty oil can damage your engine. Running the engine with
insufficient oil can cause serious damage to the engine and transmission.
Change the engine oil as specified in the maintenance schedule on page146
When running in very dusty conditions, oil changes should be performed more
frequently than specified in the maintenance schedule.
Servicing Your Honda
163
Engine Oil & Filter
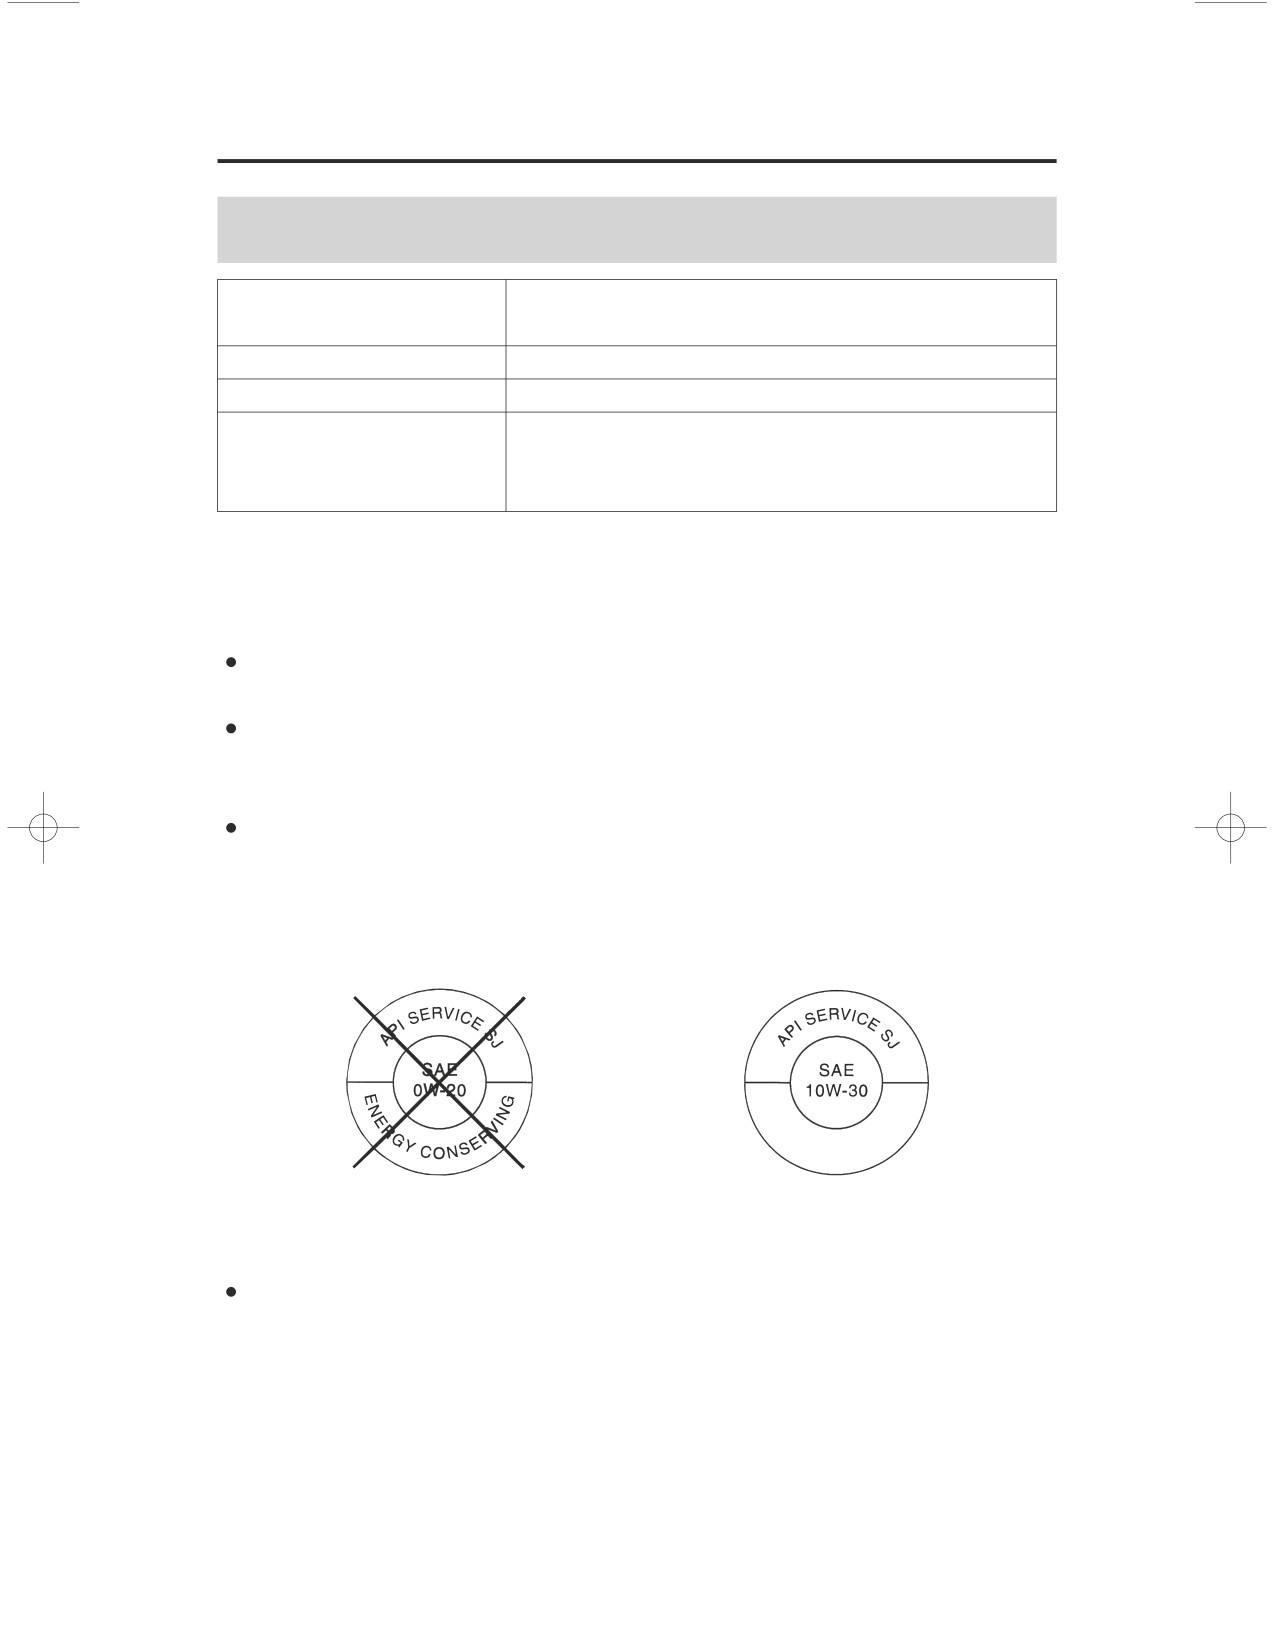
Oil Recommendation
API classification
SG or higher except oils labeled as energy
conserving on the circular API service label
viscosity (weight)
SAE 10W-30
JASO T 903 standard
MA
ˎ
suggested oil
Pro Honda GN4 4-stroke oil (USA &
Canada), or Honda 4-stroke oil (Canada
only), or an equivalent motorcycle oil.
ˎ
Suggested oils are equal in performance to SJ oils that are not labeled as
energy conserving on the circular API service label.
Your motorcycle does not need oil additives. Use the recommended oil.
Do not use oils with graphite or molybdenum additives. They may
adversely affect clutch operation.
Do not use API SH or higher oils displaying a circular API ‘‘energy
conserving’’ service label on the container. They may affect lubrication
and clutch performance.
NOT RECOMMENDED
OK
Do not use non-detergent, vegetable, or castor based racing oils.
164
Servicing Your Honda
Engine Oil & Filter
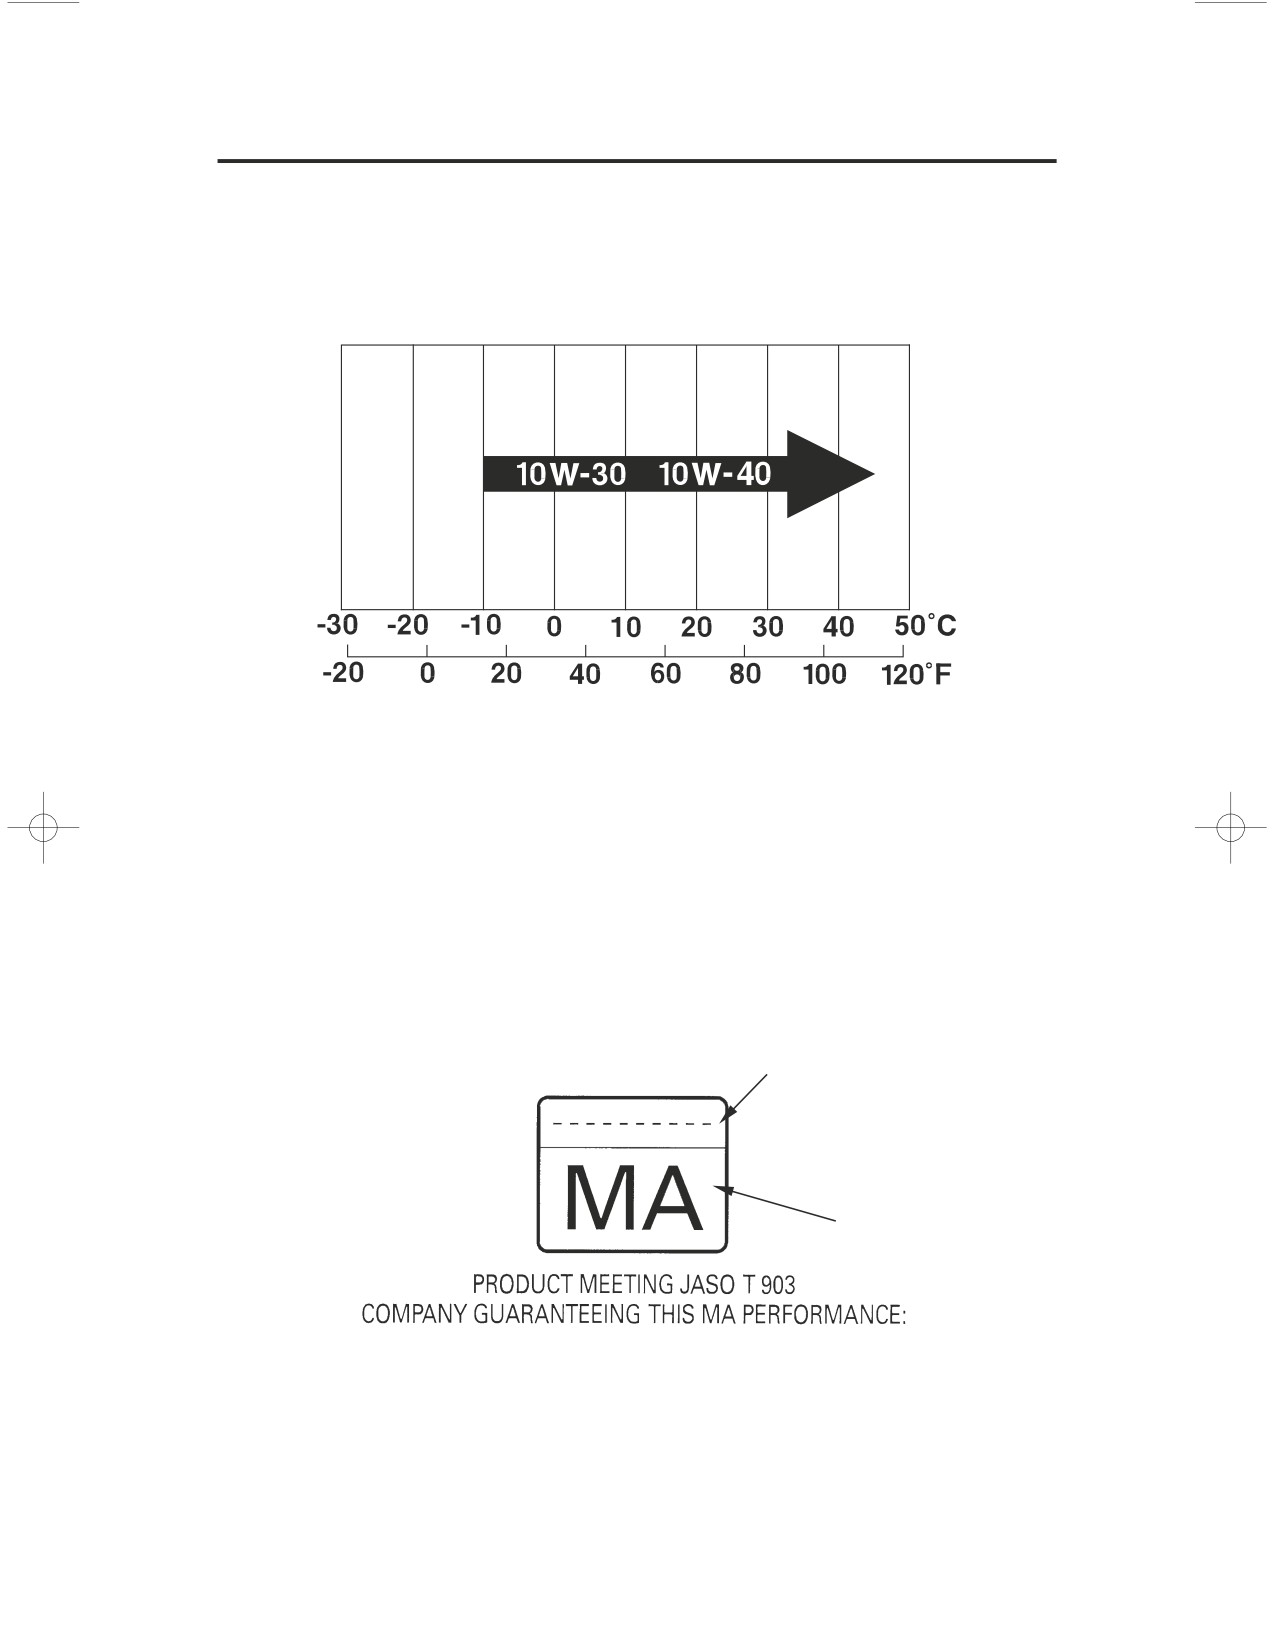
Other viscosities shown in the following chart may be used when the average
temperature in your riding area is within the indicated range.
JASO T 903 standard
The JASO T 903 standard is an index for engine oils for 4-stroke motorcycle
engines.
There are two classes: MA and MB.
Oil conforming to the standard is labeled on the oil container. For example, the
following label shows the MA classification.
code number of the sales
company of the oil
oil classification
Servicing Your Honda
165
Engine Oil & Filter
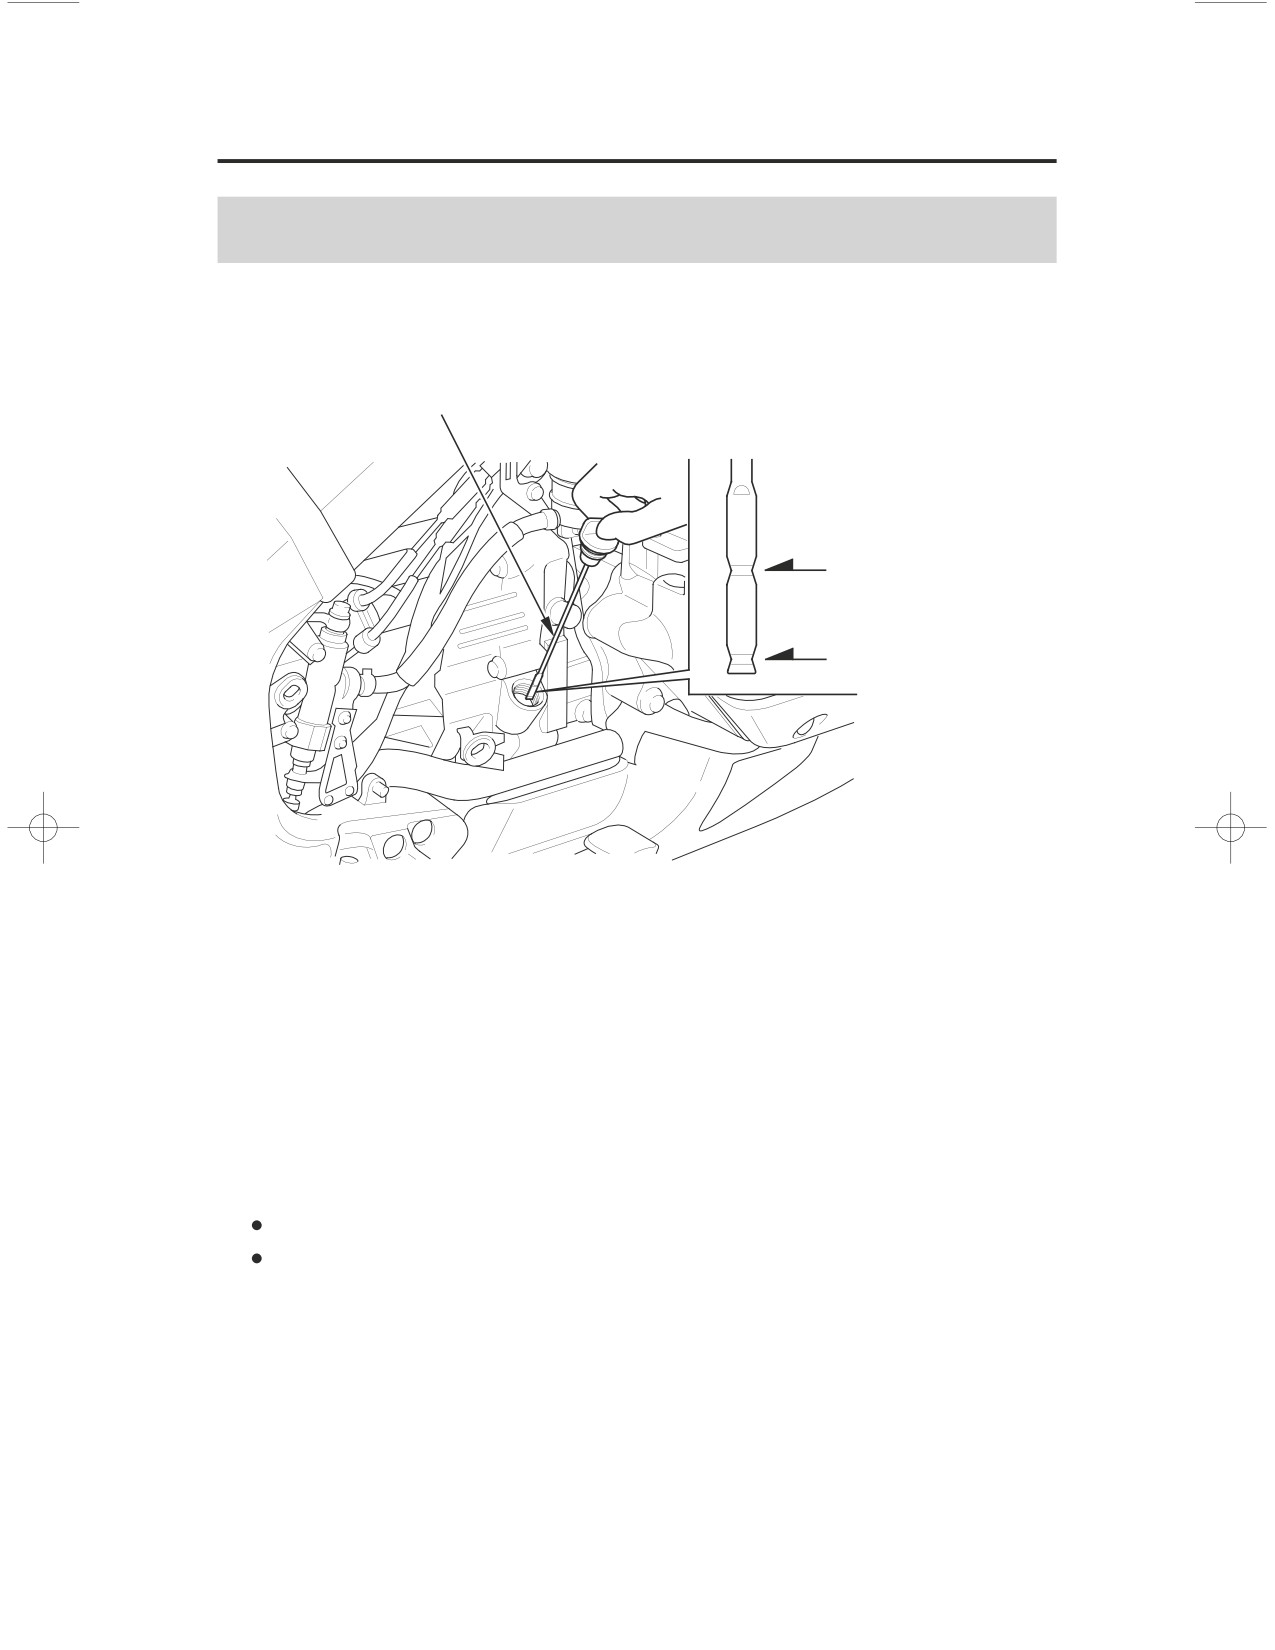
Checking & Adding Oil
Refer to Saf ety Precautions on page142
RIGHT SIDE
oil filler cap/dipstick
upper level mark
lower level mark
1. Park your motorcycle on its center stand on a firm, level surface.
2. Remove the right engine side cover (page156).
3. Start the engine and let it idle for 3ʵ5 minutes. Make sure the low oil
pressure indicator goes off. If the indicator remains on, stop the engine
immediately.
4.
Stop the engine and wait 2ʵ3 minutes.
5. Remove the oil filler cap/dipstick and wipe it clean.
6. Insert the oil filler cap/dipstick until it seats, but don’t screw it in.
7. Remove the oil filler cap/dipstick and check the oil level.
If the oil is at or near the upper level mark
ʵ
you do not have to add oil.
If the oil is below or near the lower level mark
ʵ
add the recommended oil
until it reaches the upper level mark. (Do not overfill.)
8. Reinstall the oil filler cap/dipstick.
9. Reinstall the right engine side cover.
10. Check for oil leaks.
166
Servicing Your Honda
Engine Oil & Filter
Changing Engine Oil & Filter
Saf ety Precautions
Refer to
on page142
Your motorcycle’s oil filter has very specific performance requirements. Use a
new Honda Genuine oil filter or a filter of equal quality specified for your
model.
Using the wrong oil f ilter may result in leaks or engine damage.
This procedure requires mechanical skill and professional tools such as a torque
wrench and oil filter wrench, as well as a means for disposing of the drained
fluid (page
201
). If you do not have the skills or the tools, see your Honda
dealer.
Drain the Engine Oil:
1. Park your motorcycle on its center stand on a firm, level surface.
2. If the engine is cold, start it and let it idle for 3ʵ5 minutes. Turn the engine
off. Wait 2ʵ3 minutes for the oil to settle.
3.
Remove the front lower cover (page
158
).
4. Place a drain pan under the engine oil drain bolt.
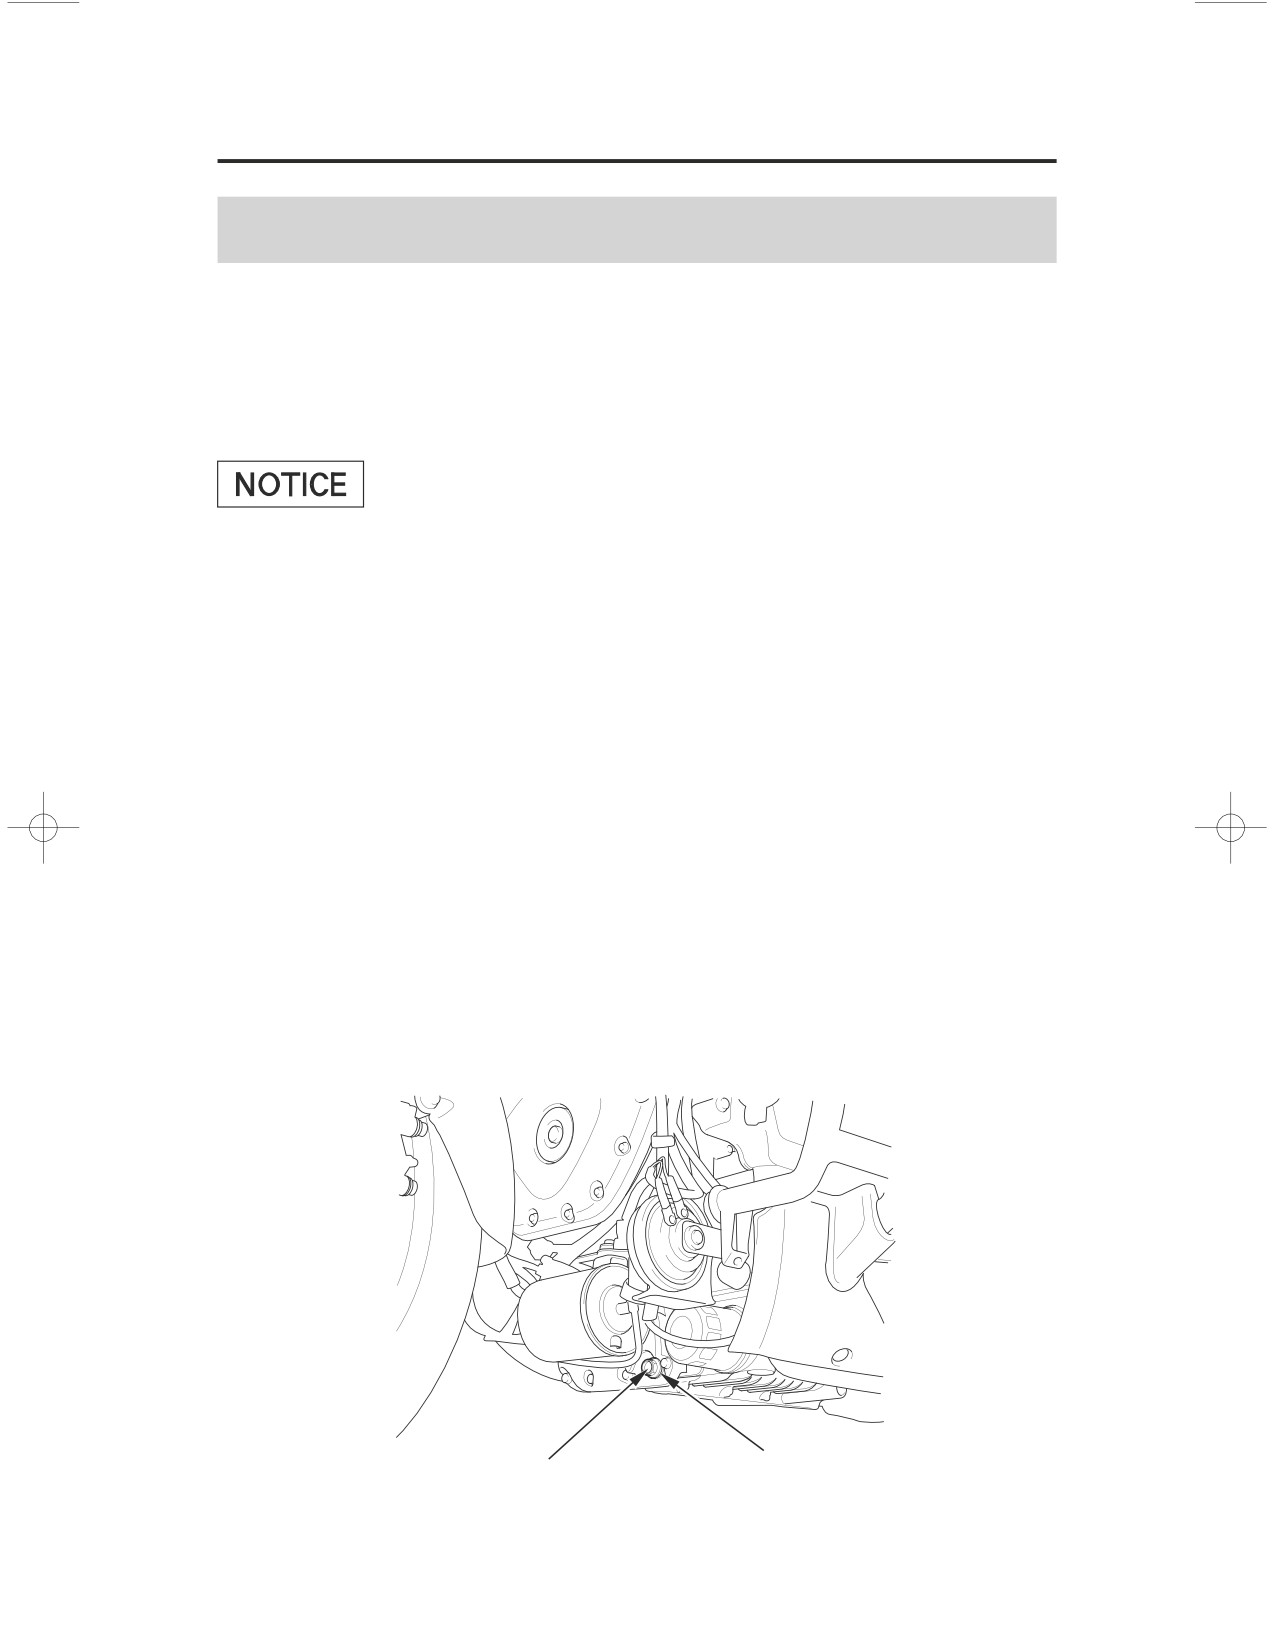
5. To drain the oil, remove the oil filler cap/dipstick, engine oil drain bolt, and
sealing washer.
FRONT, UNDER ENGINE
sealing washer
engine oil drain bolt
(cont’d)
Servicing Your Honda
167
Engine Oil & Filter
Install a New Oil Filter:
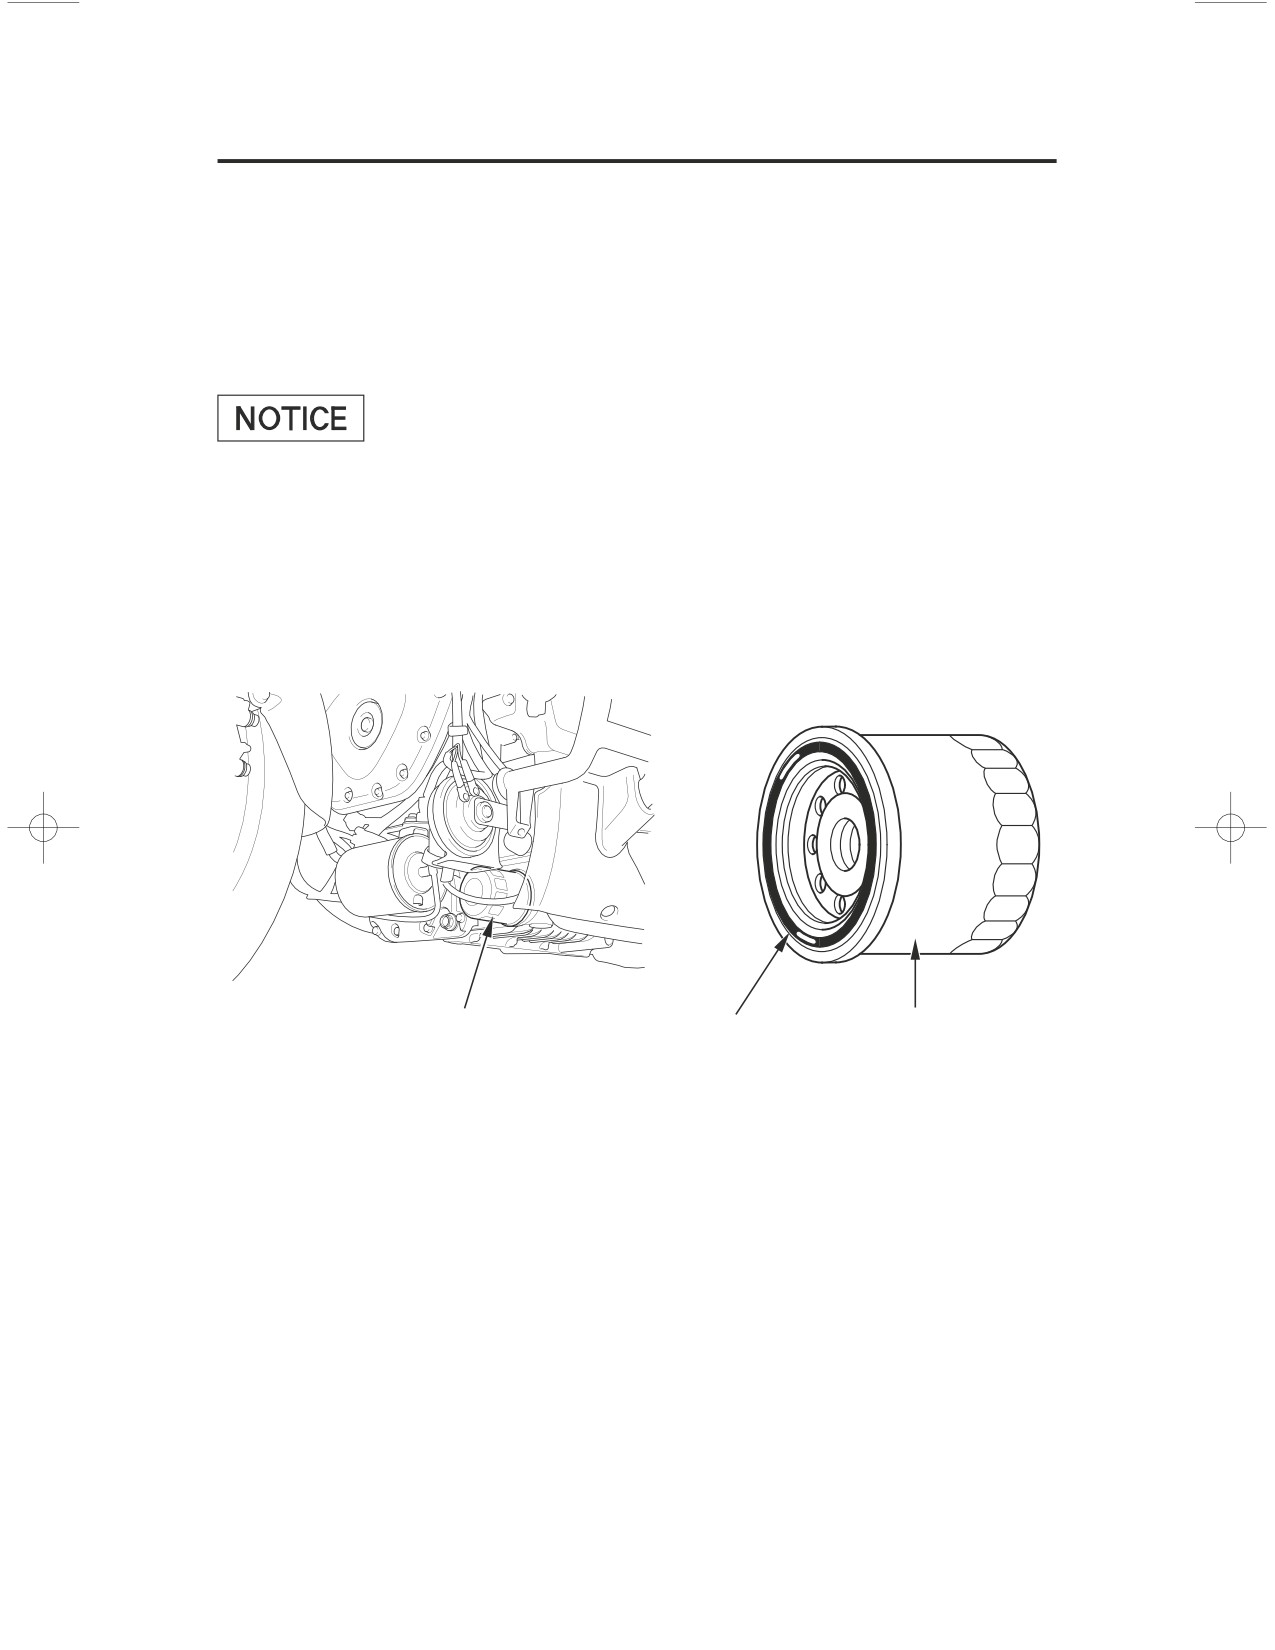
6. Remove the oil filter with a filter wrench and let the remaining oil drain out.
Discard the oil filter in an approved manner (page
211
).
7.
Pour the drained oil into a suitable container and dispose of it in an approved
manner (page
211
).
Improper disposal of drained f luids is harmf ul to the environment.
8. Apply a thin coat of engine oil to the rubber seal of a new oil filter.
LEFT FRONT, UNDER ENGINE
oil filter
rubber seal
oil filter
9. Install the new oil filter and tighten it by hand.
10. Using an oil filter wrench attachment and a torque wrench, tighten the new oil
filter to the specified torque:
19 lbf·ft (26 N·m , 2.7 kgf·m)
11. Check the condition of the sealing washer on the engine oil drain bolt.
Replace the washer every other time the oil is changed.
Install the engine oil drain bolt and tighten it to the specified torque:
25 lbf·ft (34 N·m , 3.5 kgf·m)
168
Servicing Your Honda
Engine Oil & Filter
Add Engine Oil:
12. Fill the crankcase with the recommended oil (page
164
), approximately:
3.9 US qt (3.7
)
13. Install the oil filler cap/dipstick securely.
14. Start the engine and let it idle for 3ʵ5 minutes.
15.
Stop the engine and wait 2ʵ3 minutes.
16.
Check that the oil level is at upper level mark on the dipstick (page
166
).
17. Check that there are no oil leaks.
If a torque wrench is not used for installation, see your Honda dealer as soon as
possible to verify proper assembly.
Servicing Your Honda
169
Coolant
Your motorcycle’s liquid cooling system dissipates engine heat through the
coolant jacket that surrounds the cylinder and cylinder head.
Maintaining the coolant will allow the cooling system to work properly and
prevent freezing, overheating, and corrosion.
Coolant Recommendation
Use Pro Honda HP coolant or an equivalent high quality ethylene glycol
antifreeze containing corrosion protection inhibitors specifically recommended
for use in aluminum engines. Check the antifreeze container label.
Use only distilled water as a part of the coolant solution. Water that is high in
mineral content or salt may be harmful to the aluminum engine.
Using coolant with silicate inhibitors may cause premature wear of water pump
seals or blockage of radiator passages. Using tap water may cause engine
damage.
The factory provides a 50/50 solution of antifreeze and water in this motorcycle.
This coolant solution is recommended for most operating temperatures and
provides good corrosion protection.
Decreasing the concentration of antifreeze to less than 40% will not provide
proper corrosion protection.
Increasing the concentration of antifreeze is not recommended because it
decreases cooling system performance. Higher concentrations of antifreeze (up
to 60%) should only be used to provide additional protection against freezing.
Check the cooling system frequently during freezing weather.
170
Servicing Your Honda
Coolant
Checking & Adding Coolant
Refer to Saf ety Precautions on page142
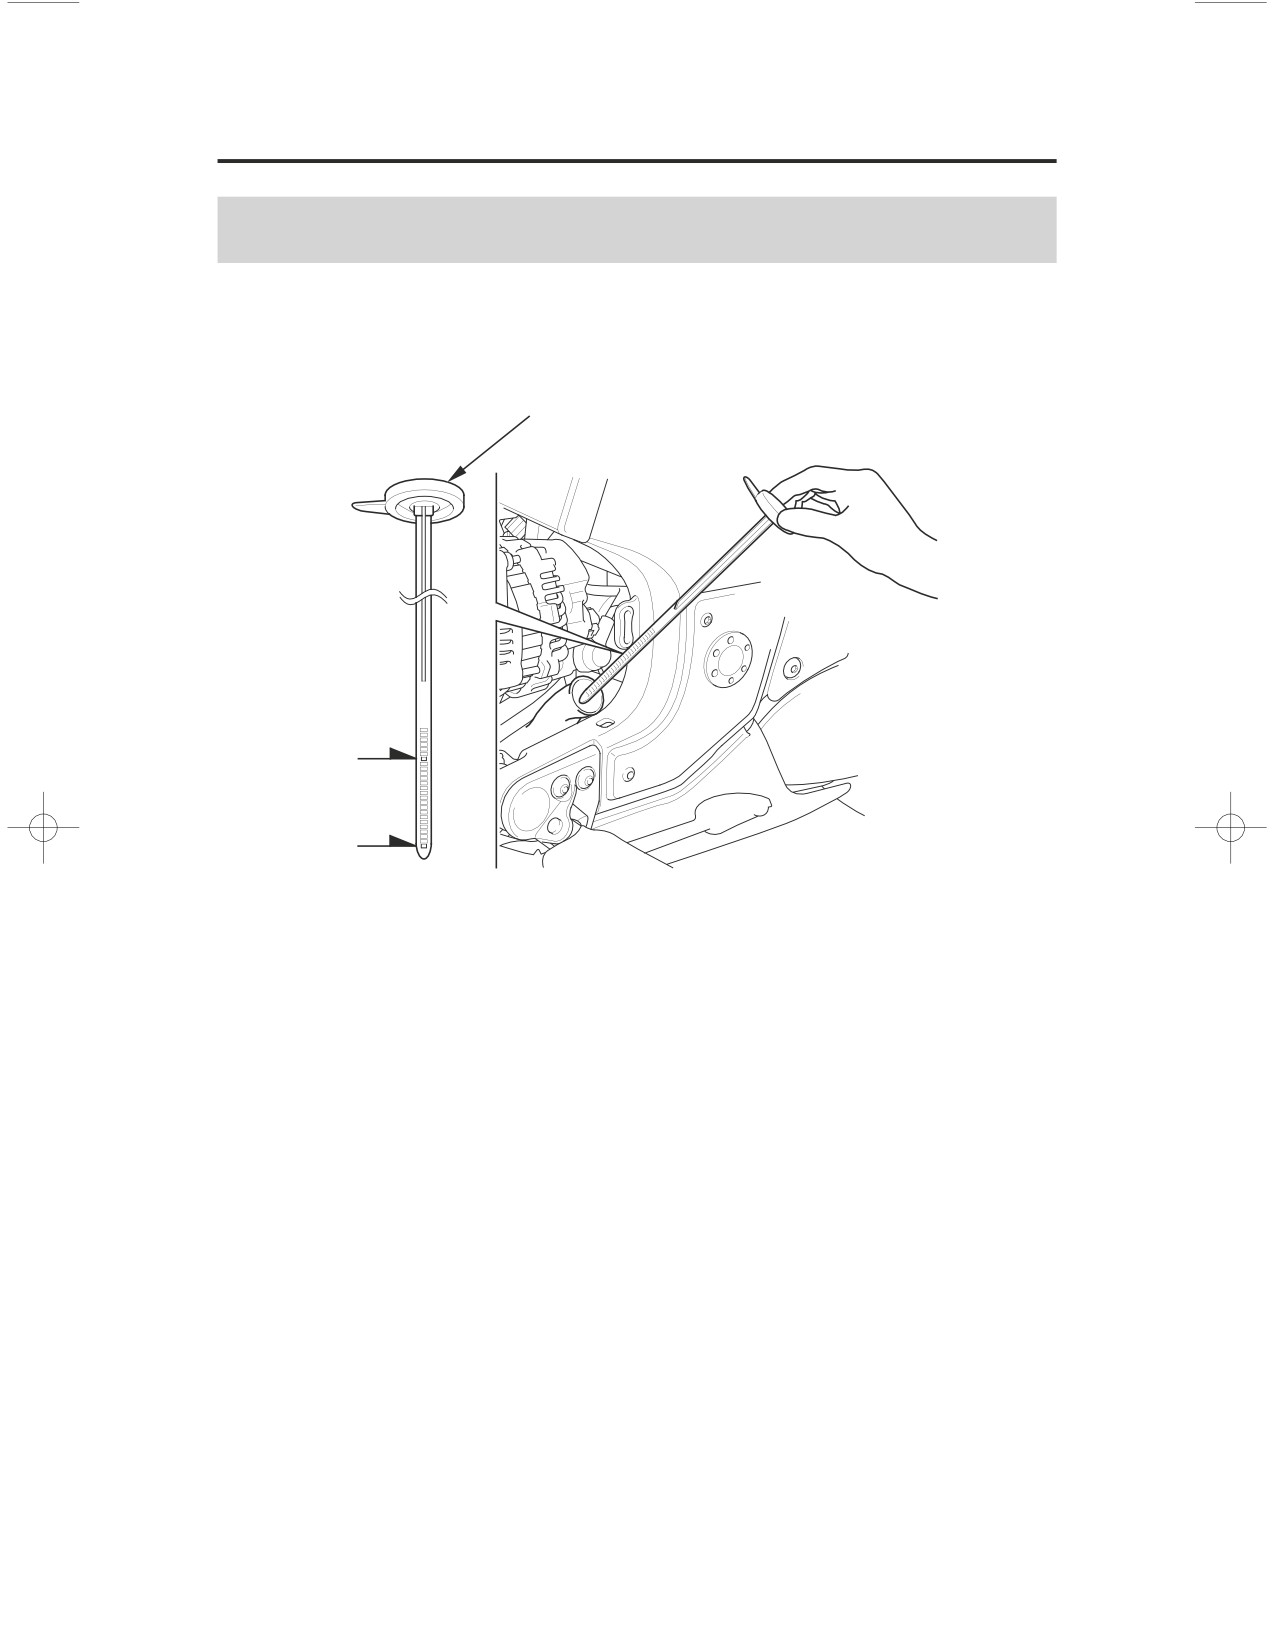
LEFT SIDE
reserve tank cap/dipstick
upper level
lower level
1. Remove the left engine side cover (page
).
156
2. With the engine at normal operating temperature, remove the reserve tank
cap/dipstick and check the coolant level.
If the reserve tank is empty, or if coolant loss is excessive, check for leaks
and see your Honda dealer for repair.
3. Add coolant to the reserve tank as required to bring the coolant level to the
upper level mark.
Always add coolant to the reserve tank. Do not attempt to add coolant by
removing the radiator cap.
4.
Reinstall the left engine side cover.
Servicing Your Honda
171
Coolant
Coolant Replacement
Refer to
Saf ety Precautions
on page142
Coolant should be replaced by your Honda dealer, unless you have the proper
tools and service data and are mechanically qualified. Refer to the official
Honda Service Manual (page
258
).
Removing the radiator cap while
the engine is hot can cause the
coolant to spray out, seriously
scalding you.
Always let the engine and
radiator cool down before
removing the radiator cap.
To properly dispose of drained coolant, refer to You & the Environment,
page
211
Improper disposal of drained f luids is harmf ul to the environment.
172
Servicing Your Honda
Crankcase Breather
Refer to Saf ety Precautions on page142
Service the crankcase breather more frequently if your motorcycle is ridden in
the rain or often at full throttle. Service the breather if you can see deposits in
the transparent section of the drain tube.
Draining
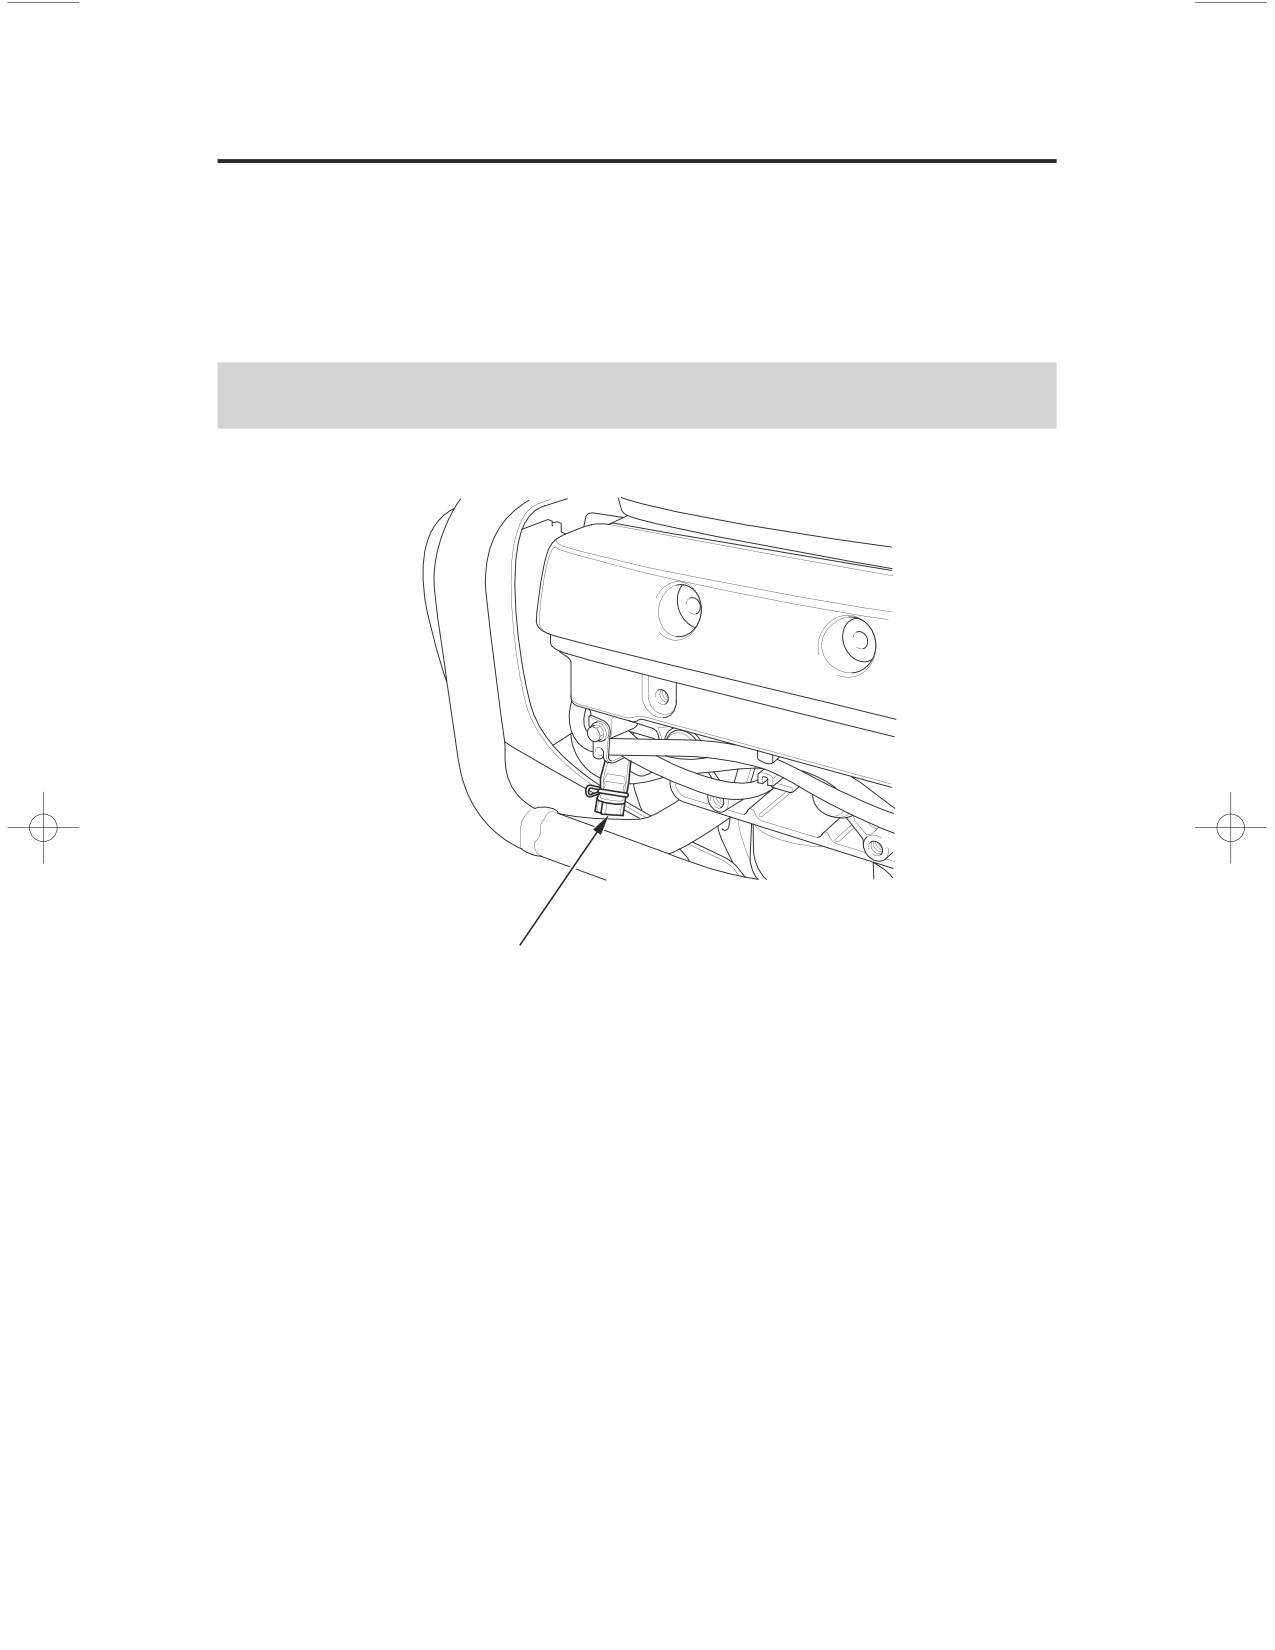
LEFT SIDE
crankcase breather tube plug
1. Place a drain pan under the crankcase breather tube plug.
2. Remove the left cylinder head side cover (page
).
157
3. Remove the plug to drain the deposits in the tube.
4. Reinstall the crankcase breather tube plug.
5. Reinstall the left cylinder head side cover.
Servicing Your Honda
173
Final Drive Oil
Oil Recommendation
type
hypoid gear oil
viscosity (weight)
SAE 80
Checking & Adding Oil
Refer to
Saf ety Precautions
on page142
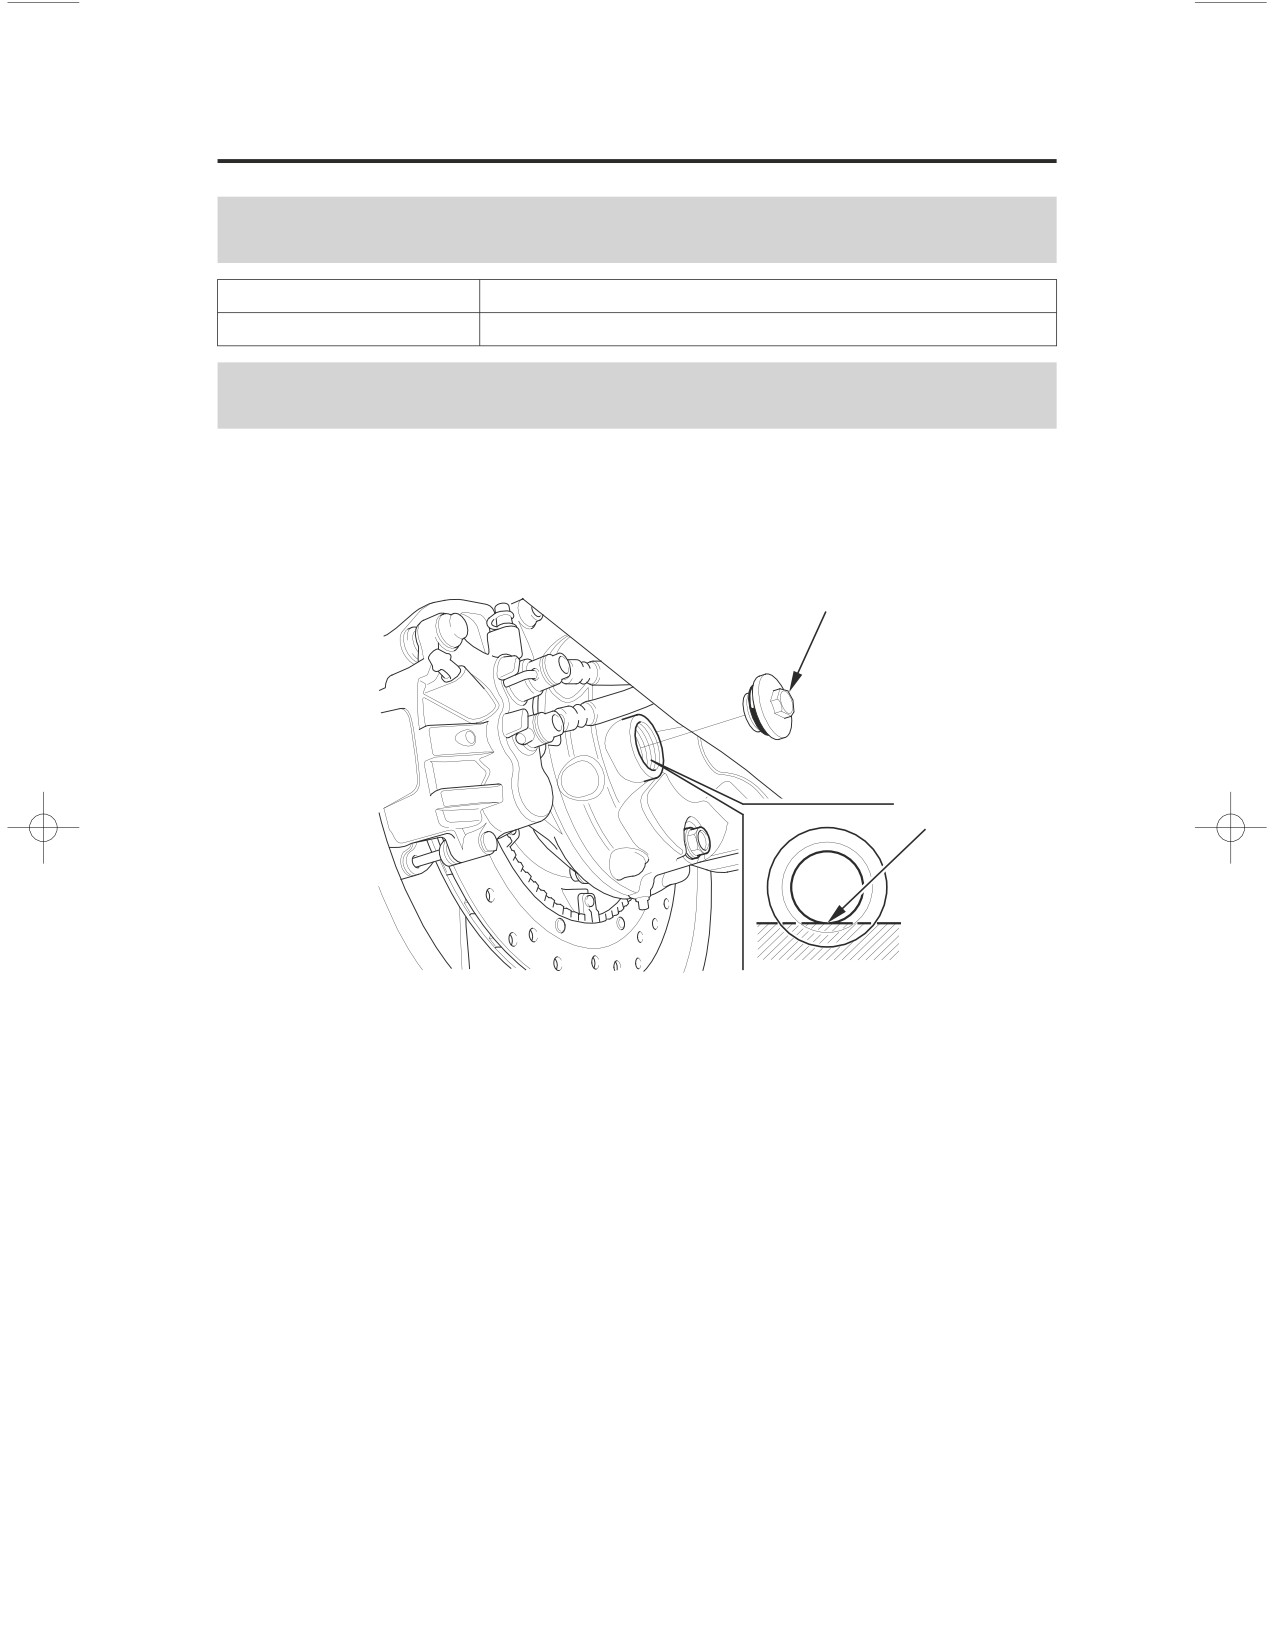
RIGHT REAR
oil filler cap
lower edge
1. Place the motorcycle on its center stand on a firm, level surface.
2. Remove the oil filler cap.
3. Check the oil level. It should be flush with the lower edge of the oil filler hole.
4. If the level is low, check for oil leaks. Add the recommended oil through the
oil filler hole until it reaches the lower edge of the opening.
5. Install the oil filler cap.
174
Servicing Your Honda
Final Drive Oil
Changing Oil
Refer to
Saf ety Precautions
on page142
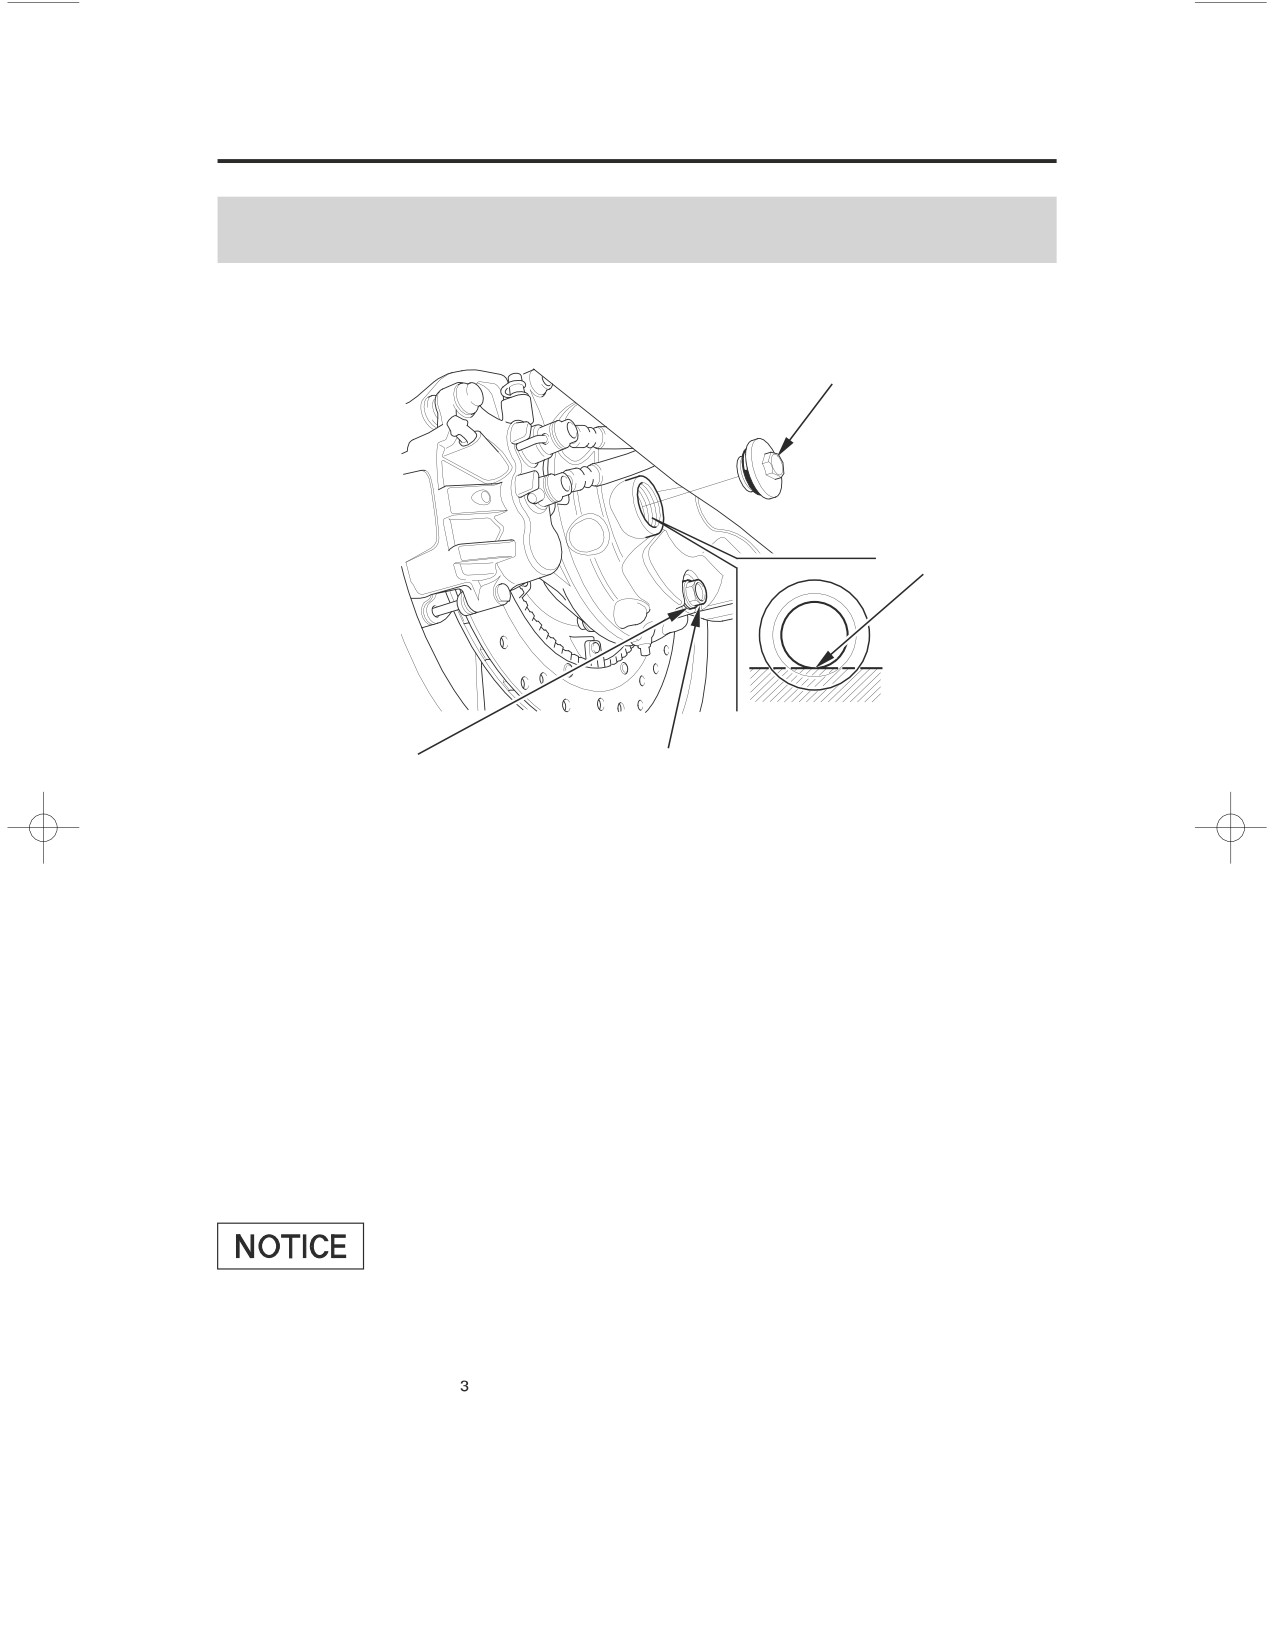
RIGHT REAR
oil filler cap
lower edge
sealing washer
drain bolt
Change the oil with the final drive at normal operating temperature to assure
complete and rapid draining.
1. Place the motorcycle on its center stand on a firm, level surface.
2. Place a drain pan under the drain bolt.
3. Remove the oil filler cap, drain bolt and sealing washer.
4. After the oil has completely drained, check that the sealing washer is in good
condition. Reinstall the drain bolt with its sealing washer (or a new washer, if
necessary) and tighten it to the specified torque:
15 lbf·ft (20 N·m , 2.0 kgf·m)
5. Pour the drained oil into a suitable container and dispose of it in an approved
manner (page
211
).
Improper disposal of drained f luids is harmf ul to the environment.
6.
Fill the final drive with the recommended oil:
4.1 US oz (120 cm )
Make sure the final drive oil level is at the lower edge of the oil filler
inspection hole.
7. Install the oil filler cap.
Servicing Your Honda
175
Clutch System
Your motorcycle has a hydraulically-actuated clutch. There are no adjustments
to perform, but the clutch system must be inspected periodically for fluid level
and leakage.
If the motorcycle creeps or stalls when shifted into gear, or if the clutch slips,
causing acceleration to lag behind engine speed, there is probably air in the
clutch system. See your Honda dealer to have the air bled out of the system.
Clutch Lever Adjustment
Refer to
Saf ety Precautions
on page142
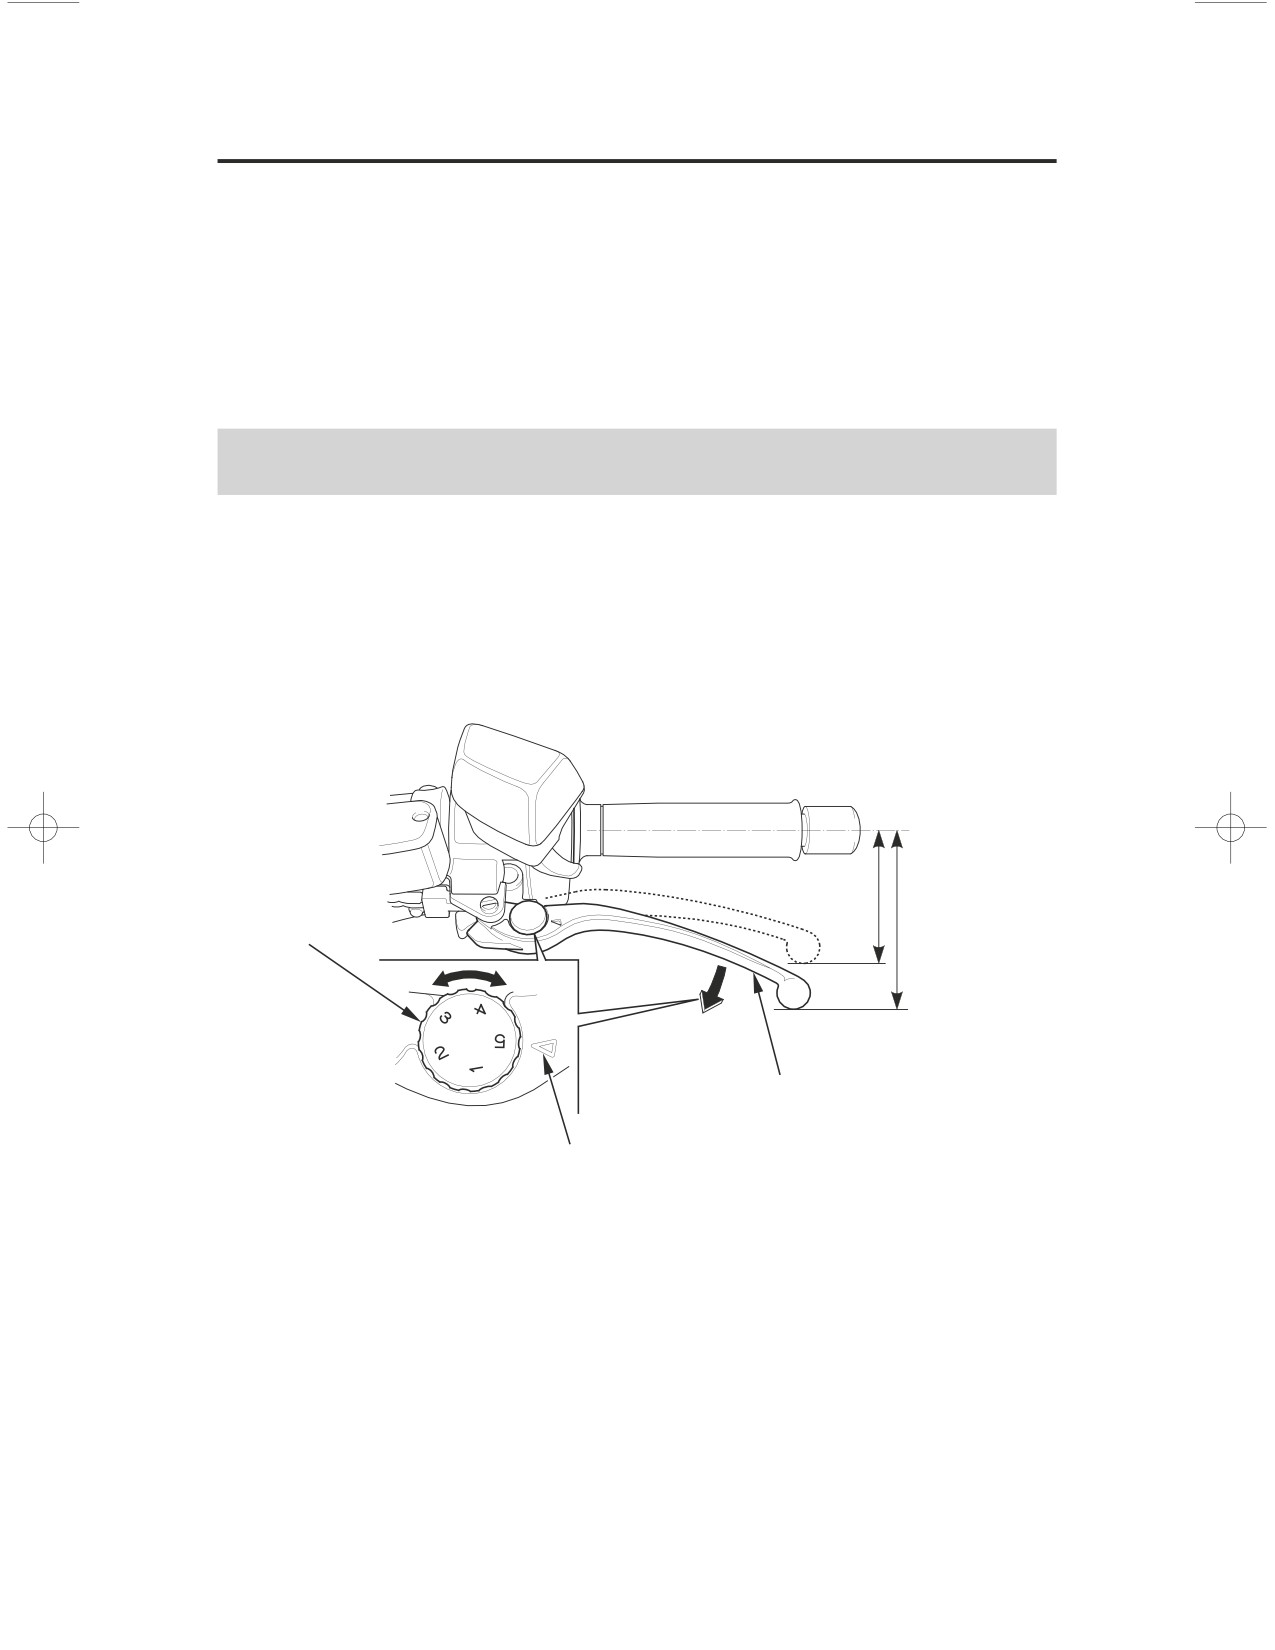
The distance between the tip of the clutch lever and the grip may be adjusted.
LEFT HANDLEBAR
adjuster dial
clutch lever
index mark
1. Turn the adjuster dial while pushing the clutch lever forward.
2. Align the index mark on the clutch lever with the numbers on the adjuster dial.
3. Start the engine, pull the clutch lever in, and shift into gear. Make sure the
engine does not stall and the motorcycle does not creep. Gradually release the
clutch lever and open the throttle. Your motorcycle should move smoothly
and accelerate gradually.
176
Servicing Your Honda
Clutch System
Fluid Level Inspection
Refer to Saf ety Precautions on page142
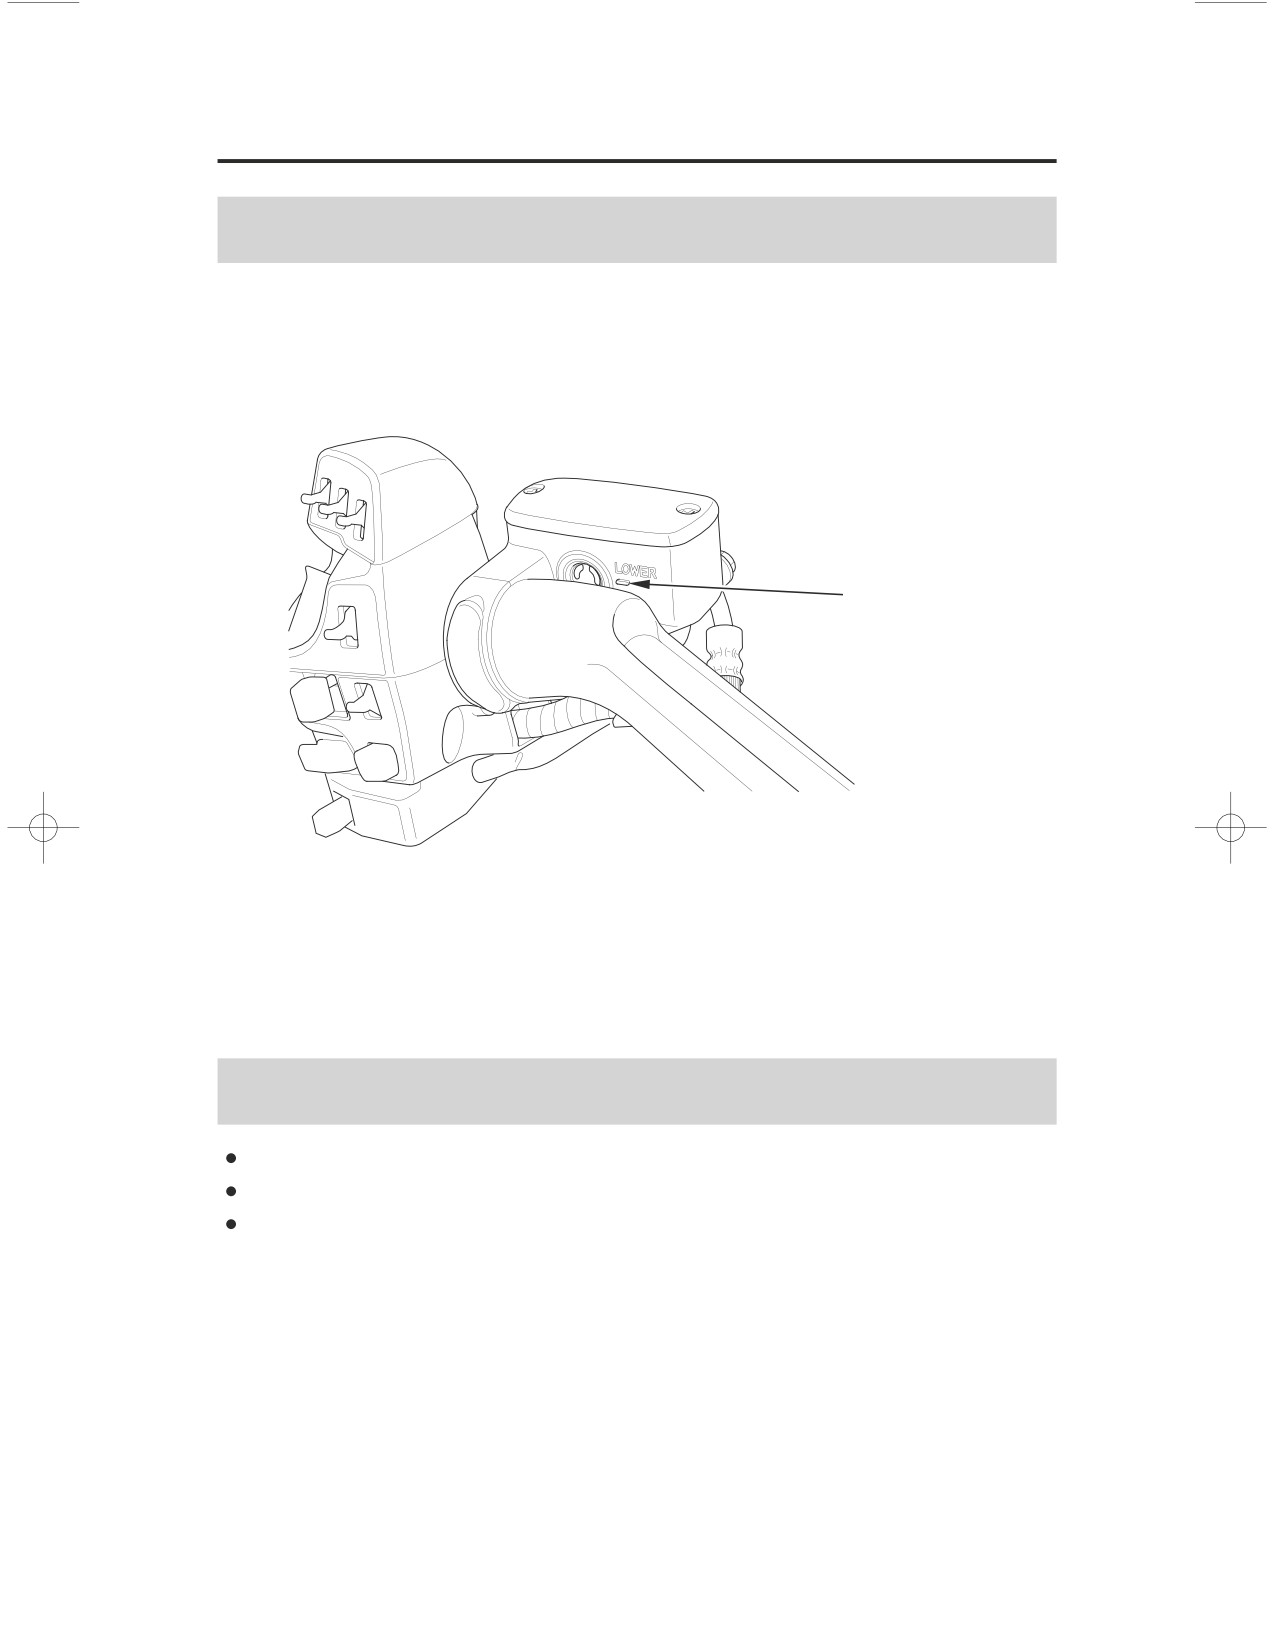
LEFT HANDLEBAR
LOWER level mark
Check that the fluid level is above the LOWER level mark. If the fluid level is
below the LOWER level mark, it indicates fluid leakage. See your Honda dealer
for repair.
Other Inspections
Make sure there are no fluid leaks.
Check for deterioration or cracks in the hose and fittings.
Check that the clutch lever assembly is positioned properly and the securing
bolts are tight.
Servicing Your Honda
177
Spark Plugs
Spark Plug Recommendation
standard spark
BKR6E-11 (NGK)
or K20PR-U11 (DENSO)
plug
for cold climate
BKR5E-11 (NGK)
or
K16PR-U11 (DENSO)
(below 5°C, 41°F)
for extended high
BKR7E-11 (NGK)
or
K22PR-U11 (DENSO)
speed riding
Use only the recommended type of spark plugs in the recommended heat range.
Using spark plugs with an improper heat range can cause engine damage.
Spark Plug Inspection & Replacement
Refer to
Saf ety Precautions
on page142
1. Remove the left and right cylinder head side cover (page157).
2. Clean any dirt from around the spark plug bases.
3. Disconnect the spark plug caps. Take care to avoid damaging the spark plug
wire when disconnecting the caps.
4.
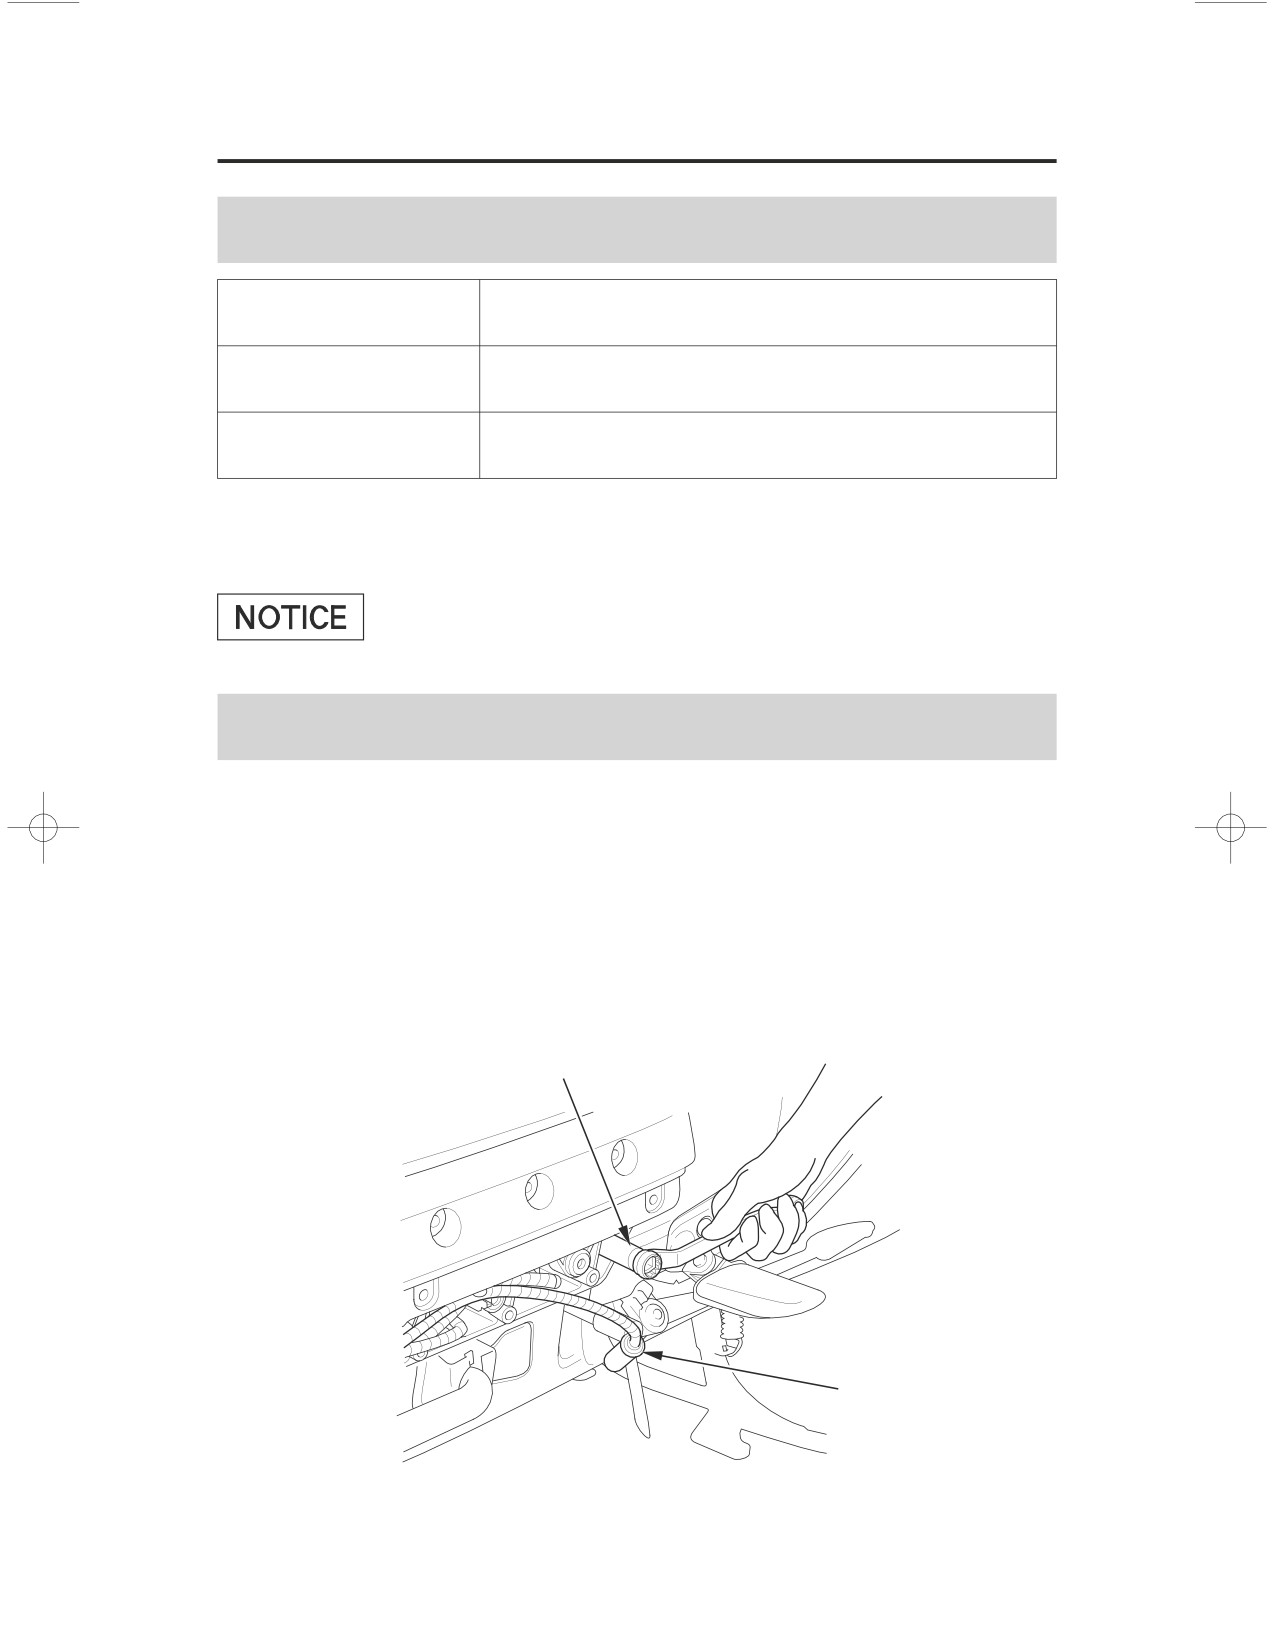
Using a spark plug wrench provided in the tool kit, remove the spark plugs.
spark plug wrench
spark plug cap
178
Servicing Your Honda
Spark Plugs
5. Inspect the electrodes and center porcelain for deposits, corrosion, or carbon
fouling. If the corrosion or deposits are heavy, replace the plug. Clean a
carbon or wet-fouled plug with a plug cleaner, if available, or a wire brush.
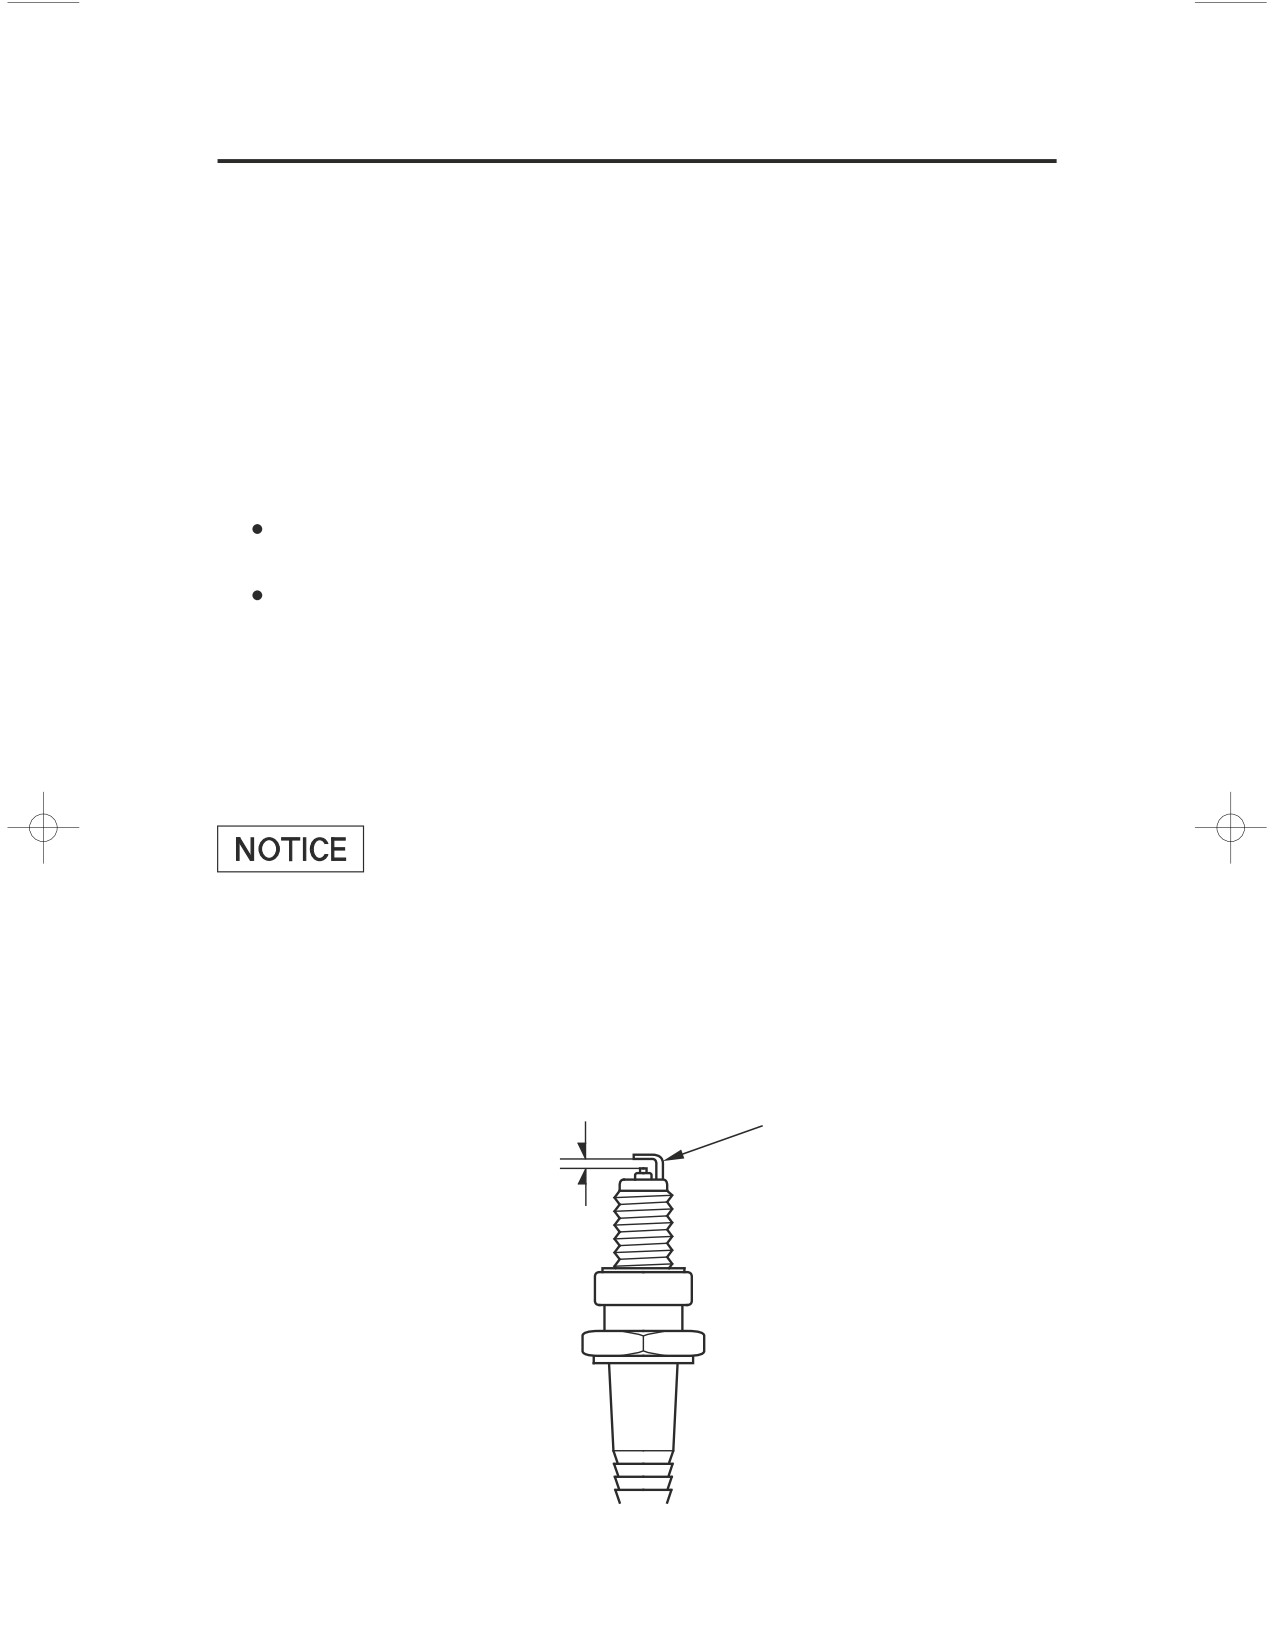
Check the spark plug gap using a wire-type feeler gauge. If adjustment is
6.
necessary, bend the side electrode carefully.
The gap should be:
0.039ʵ0.043 in (1.00ʵ
1.10 mm)
7.
With the plug washers attached, install the spark plugs in by hand to prevent
cross-threading.
Tighten each spark plug:
8.
If the old plug is good:
1/8 turn after it seats.
If installing a new plug, tighten it twice to prevent loosening:
a) First, tighten the plug:
NGK:
3/4
turn after it seats.
DENSO:
1/2
turn after it seats.
b)Then loosen the plug.
c)
Next, tighten the plug again:
1/8 turn after it seats.
An improperly tightened spark plug can damage the engine. If a plug is too
loose, a piston may be damaged. If a plug is too tight, the threads may be
damaged.
9.
Reinstall the spark plug caps. Take care to avoid pinching any cables or wires.
10.
Reinstall the left and right cylinder head side covers.
side electrode
spark plug gap
Servicing Your Honda
179
Suspension
Your front and rear suspension systems use springs and hydraulic damping
devices that suspend your weight and most of the weight of your motorcycle.
The spring pre-load for your rear suspension system adjusts the amount of force
required to begin compression of the spring.
The oil damper systems hydraulically control the natural compression and
rebound of the suspension springs so that traction and comfort are maintained as
the wheels ride over road surfaces.
Consider adjusting your rear suspension pre-load whenever you change your
normal load, when adding or subtracting a passenger, cargo, or accessories, or
when the road or riding conditions change.
The way you ride your motorcycle and the type of ride you want to experience
can also influence your suspension needs.
Lower spring pre-load provides a softer ride and is usually preferred for light
loads and smooth roads. Higher spring pre-load provides a firmer ride and is
recommended for heavy loads, rough road conditions, and faster, more
challenging riding.
Rear Suspension Adjustment
The rear suspension can be adjusted for rider (and passenger) weight and riding
conditions by changing the spring pre-load.
Do not attempt to disassemble, service, or dispose of the damper; see your
Honda dealer. The instructions found in this owner’s manual are limited to
adjustments of the shock assembly only.
Rear Suspension Spring Pre-load Adjustment
Rear suspension spring pre-load can be easily increased or decreased using the
rear suspension spring pre-load adjustment switch on the left fairing panel. Then
you can confirm the pre-load position with the multi information display.
This rear suspension spring pre-load adjustment system functions only when the
ignition switch is ON or ACC, your motorcycle is stopped, and the transmission
is in neutral. (When the reverse indicator is ON, the system will not function.)
180
Servicing Your Honda
Suspension
The rear suspension spring pre-load adjustment system has 26 positions (from
0 to 25) for different road or riding conditions. (Standard position is 0.)
Adjustment
1. Place the motorcycle on its center stand on a firm, level surface. To prevent
discharging the battery, make sure the audio system and other electrical
accessories are off.
Turn the ignition switch to ON or ACC.
2.
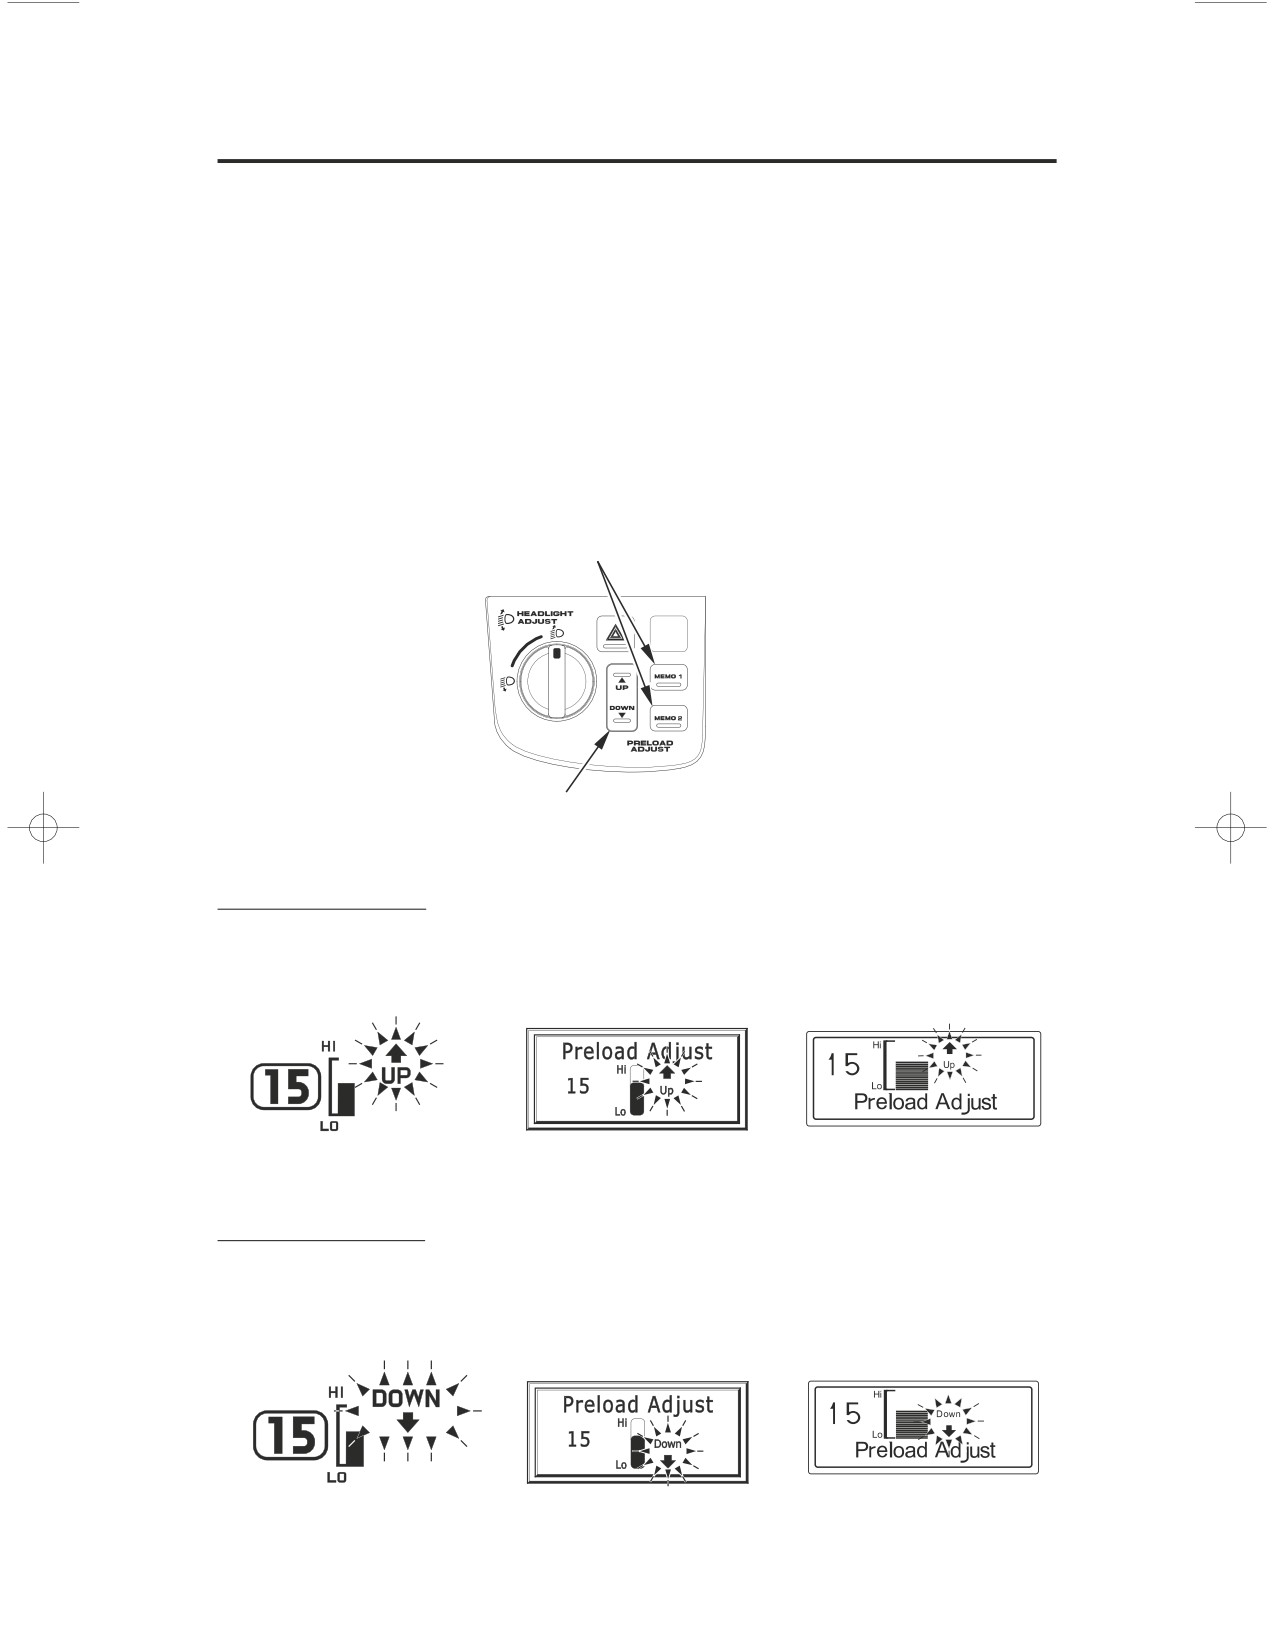
Push the DOWN or UP side of rear suspension spring pre-load adjustment
3.
switch until the desired pre-load is reached.
MEMO button
rear suspension spring pre-load
adjustment switch
To increase (HIGH)
(Models not equipped with
(Models equipped with
Navigation System)
Navigation System)
For USA
For Canada
To decrease (LOW)
(Models not equipped with
(Models equipped with
Navigation System)
Navigation System)
For USA
For Canada
Servicing Your Honda
181
Suspension
Storing Pre-load Into the Memory
You may store two selected adjustments in ‘‘MEMO 1’’ or ‘‘MEMO 2’’.
1. Adjust the pre-load to the desired position.
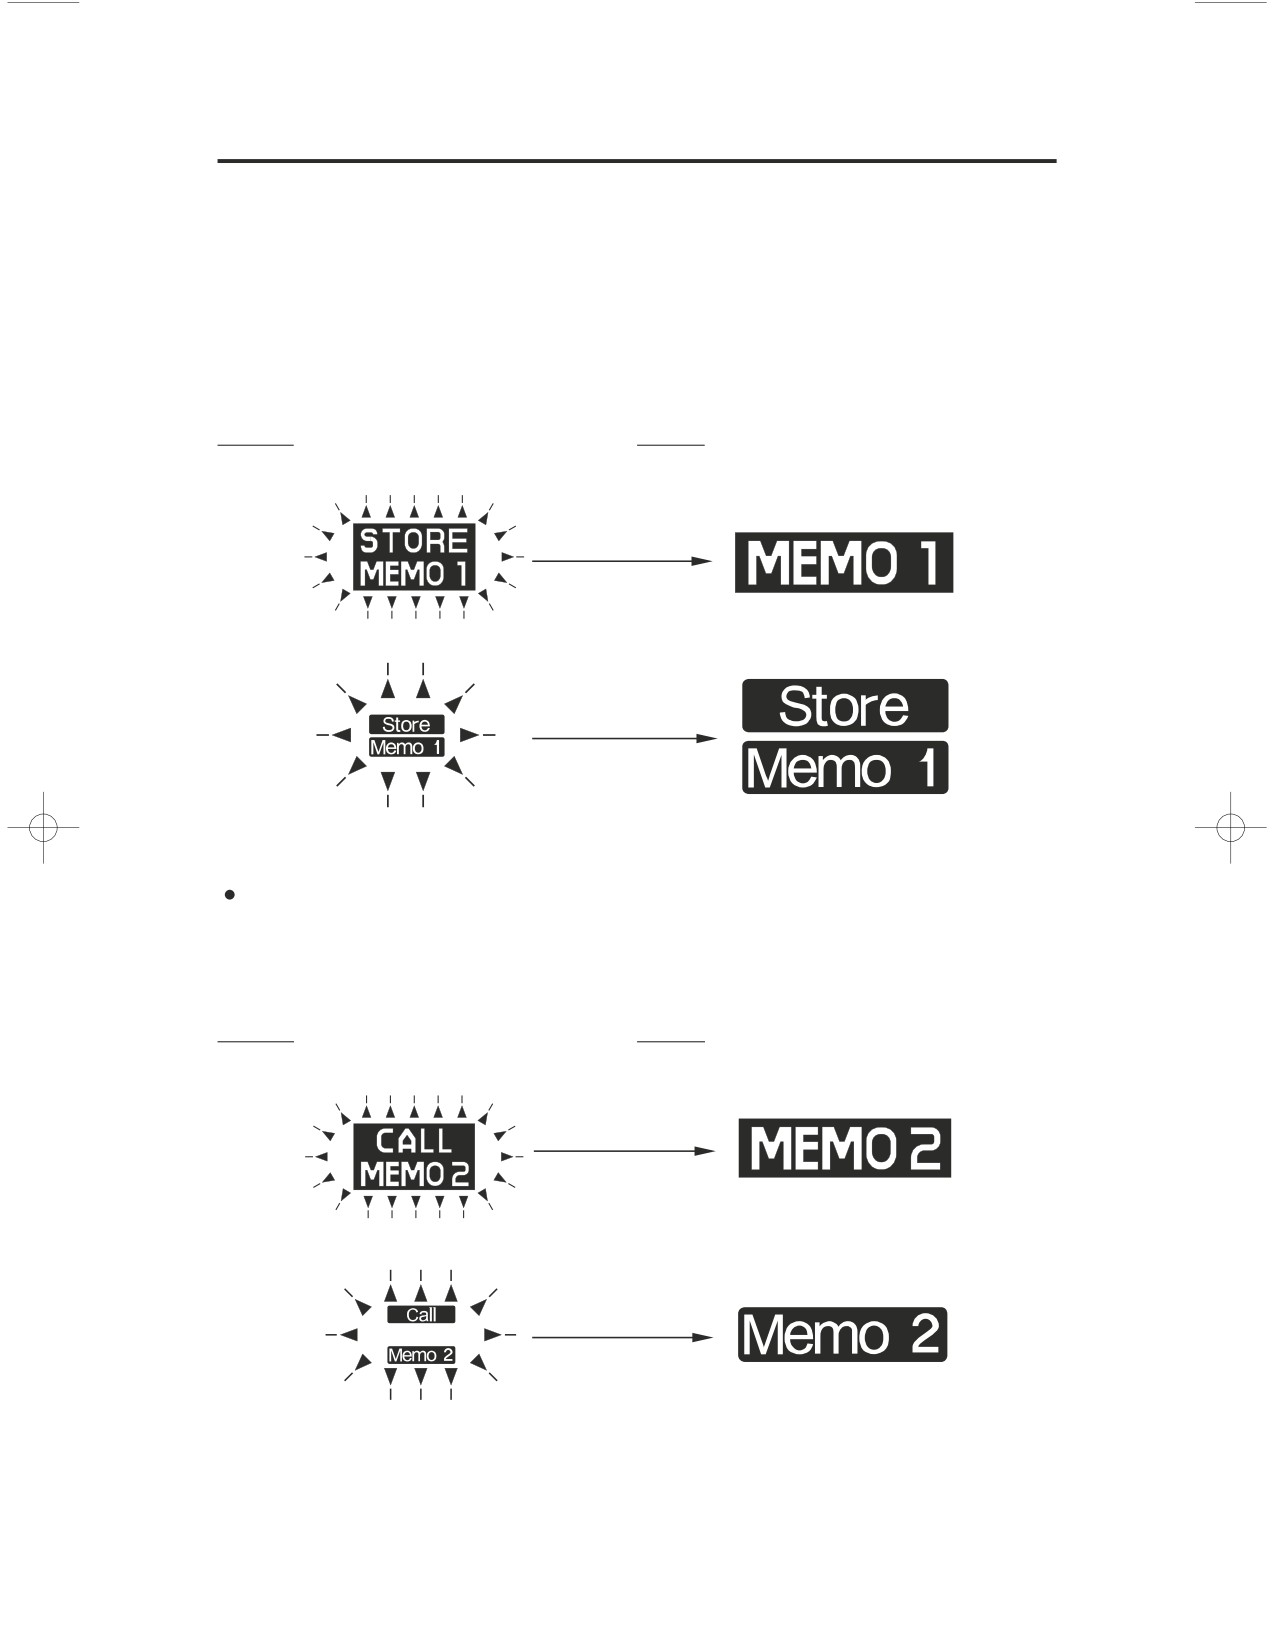
2. Push and hold the MEMO 1 or MEMO 2 button until ‘‘STORE MEMO 1’’ or
‘‘STORE MEMO 2’’ blinks in the multi information display. When the
blinking stops, the current position is stored in memory.
Storing
Stored
(Models not equipped with Navigation System)
(Models equipped with Navigation System)
Selecting the Memorized Position
Push the MEMO (1 or 2) button to select the memorized position. ‘‘CALL
MEMO 1’’ or ‘‘CALL MEMO 2’’ will blink. When the position is selected,
‘‘MEMO 1’’ or ‘‘MEMO 2’’ will turn on.
Calling
Called
(Models not equipped with Navigation System)
(Models equipped with Navigation System)
Pushing the rear suspension spring pre-load adjustment switch or the MEMO
(1 or 2) button while selecting a memorized position will cancel the calling
procedure.
182
Servicing Your Honda
Suspension
Each MEMO button stores only one pre-load position. Storing a new position
erases the previous setting stored in that button’s memory. If you want to add a
new position while retaining the current one, use the other memory button.
All stored pre-load positions will be lost if your motorcycle’s battery goes low
(or dead) or is disconnected.
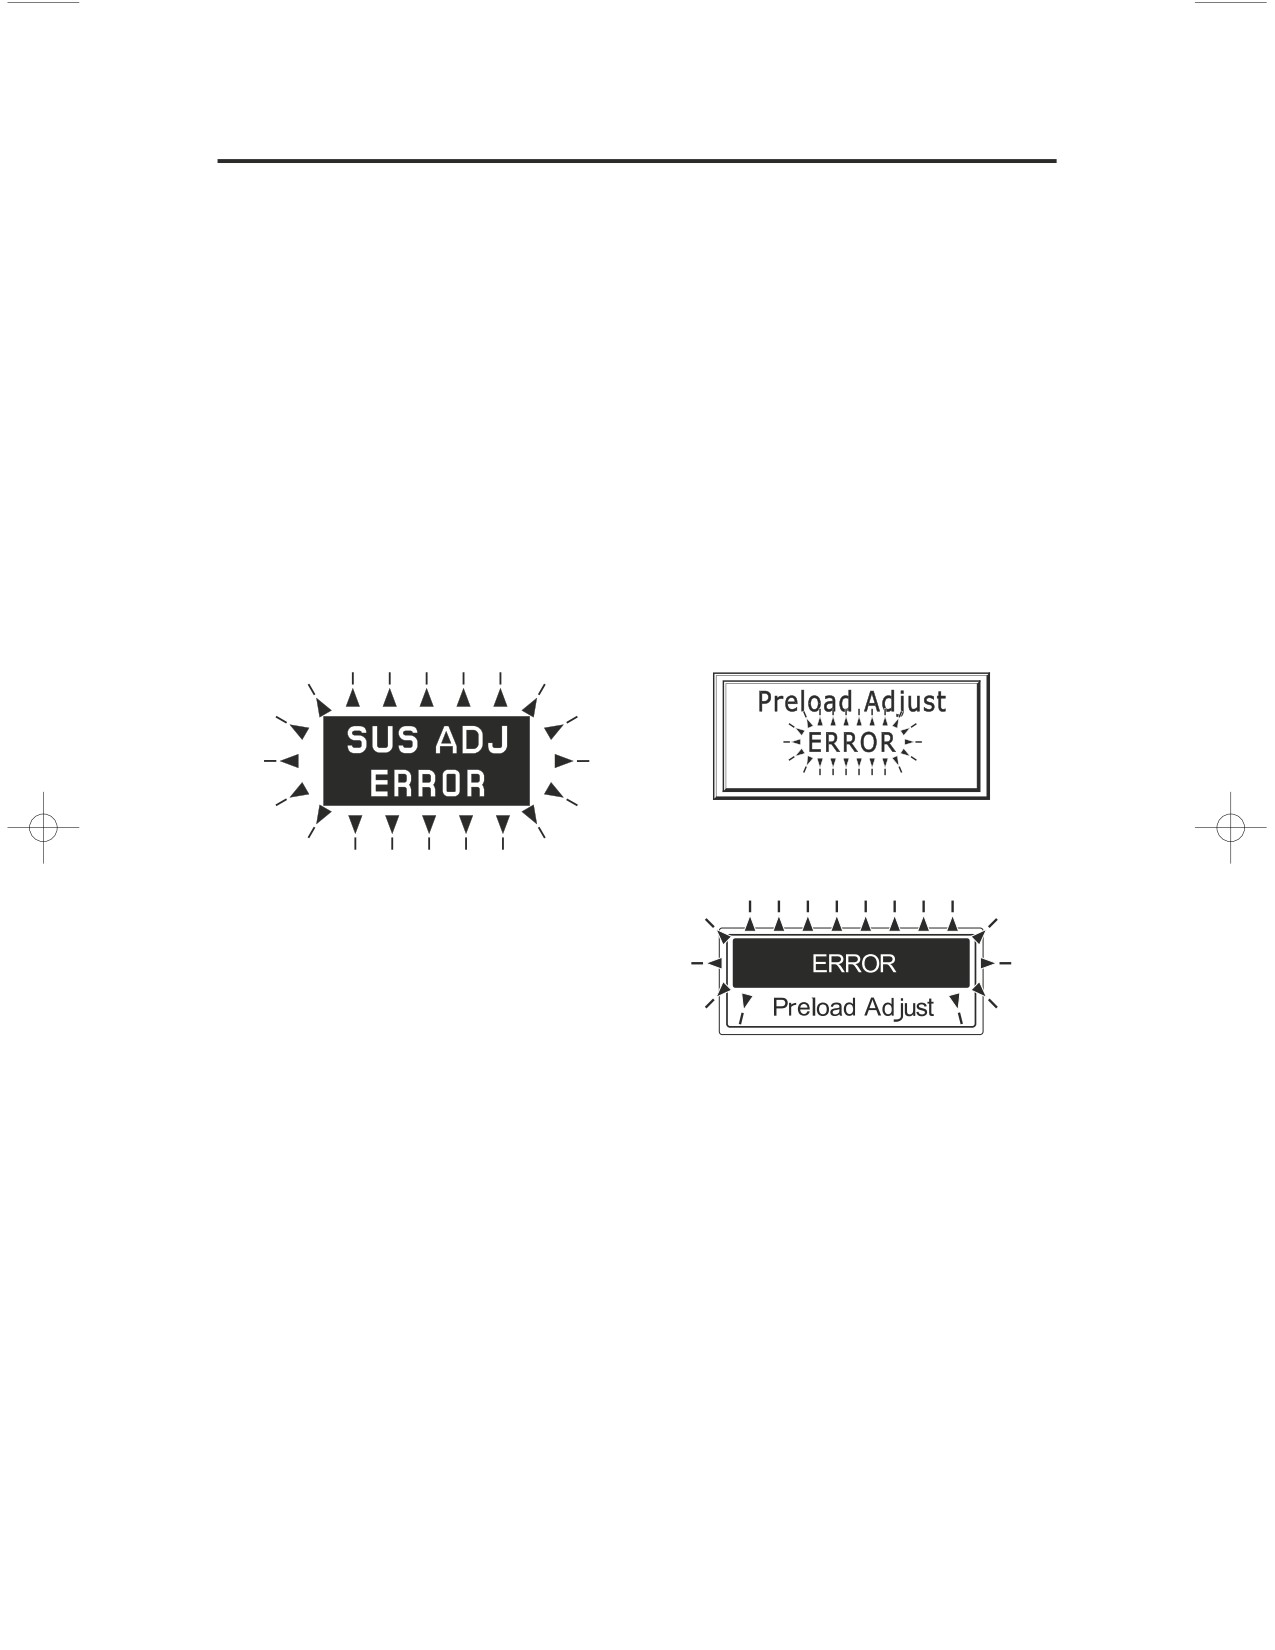
If ‘‘SUS ADJ ERROR’’ blinks on the display, contact your Honda dealer.
(Models not equipped with
(Models equipped with
Navigation System)
Navigation System)
For USA
For Canada
Servicing Your Honda
183
Brakes
The hydraulic braking systems on your motorcycle dissipate the heat generated
by the friction of the brake pads on the brake discs as the wheels are slowed.
As the brake pads wear, the brake fluid level will drop. A leak in the system will
also cause the level to drop.
Frequently inspect the system to ensure there are no fluid leaks. Periodically
inspect the brake fluid level and the brake pads for wear.
If the brake lever or brake pedal freeplay does not feel within the normal range
187
while riding, check the brake pads for wear (page
). Worn pads should be
replaced. If the pads are not worn beyond the recommended limit, there is
probably air in the brake system. See your Honda dealer to have the air bled
from the system.
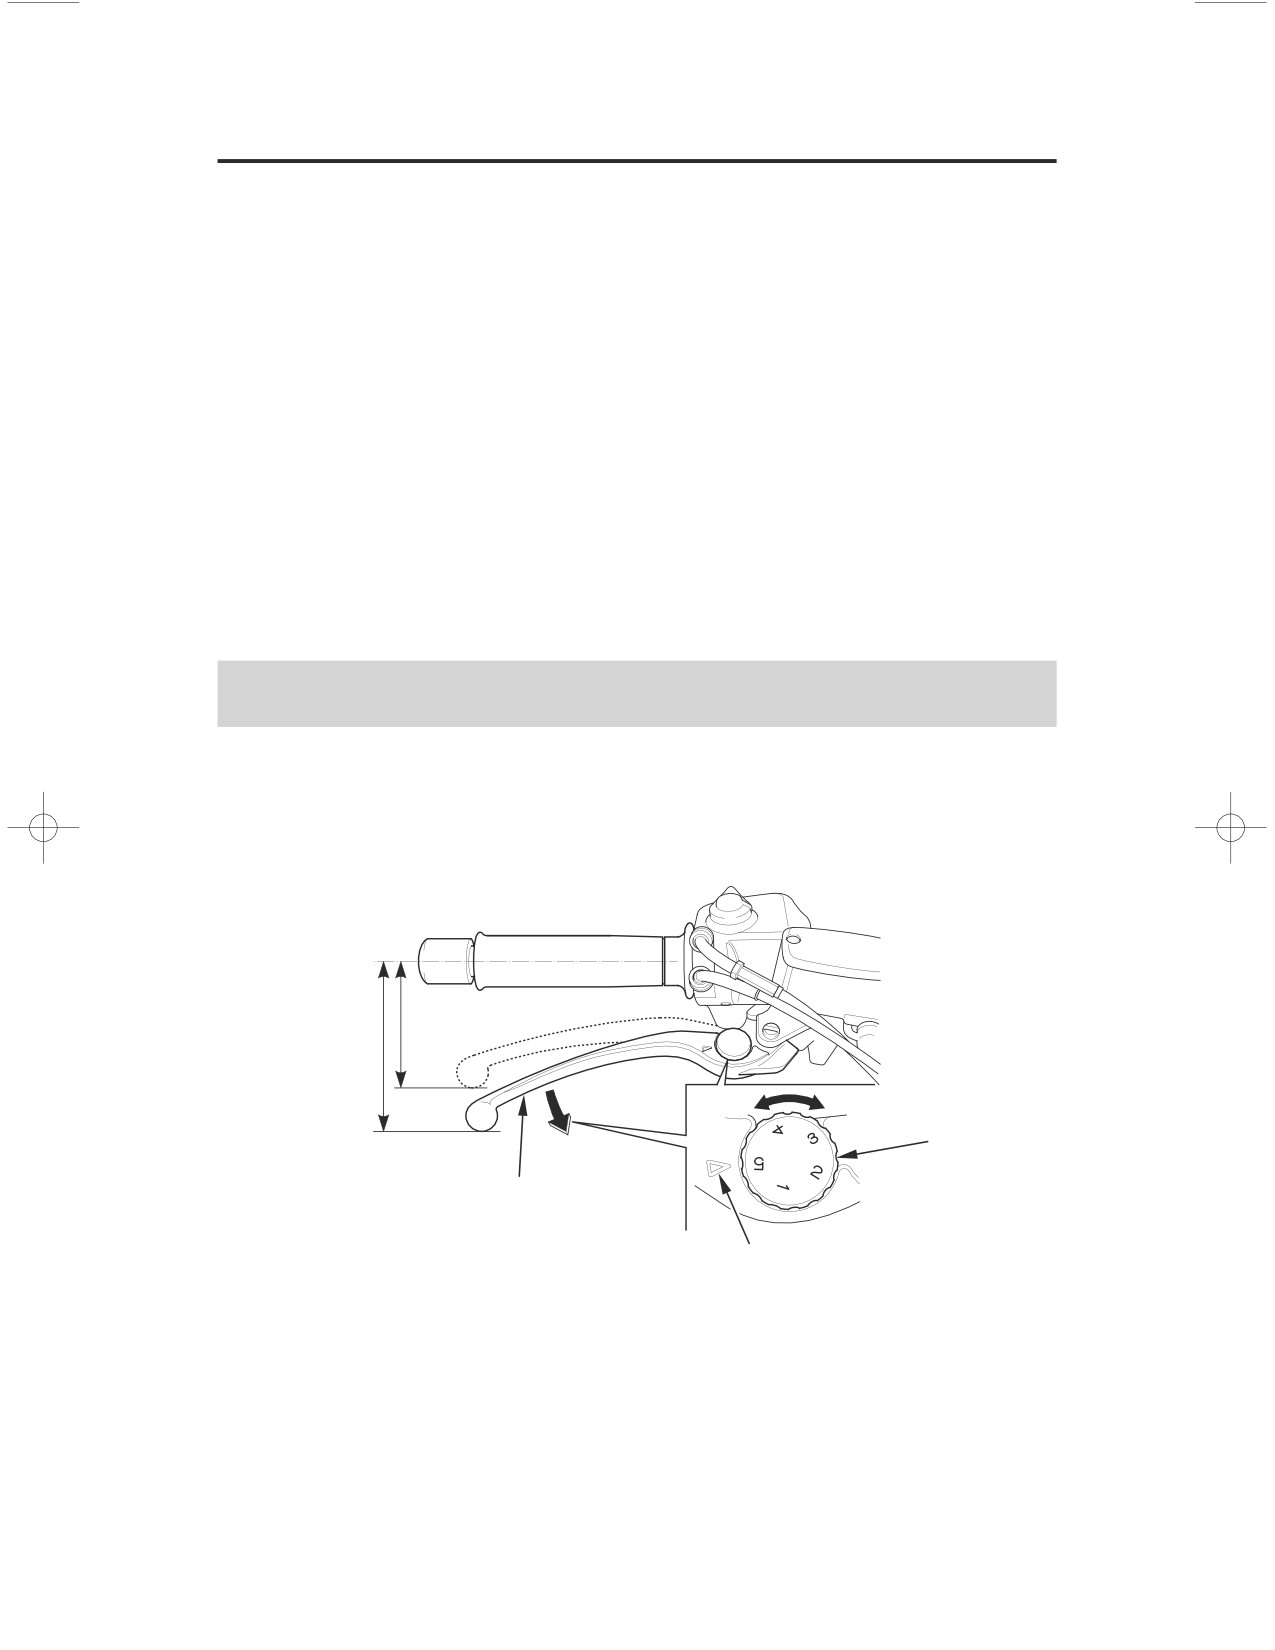
Front Brake Lever Adjustment
Refer to
Saf ety Precautions
on page142
The distance between the tip of the brake lever and the grip may be adjusted.
RIGHT HANDLEBAR
adjuster dial
brake lever
index mark
1. Turn the adjuster dial while pushing the brake lever forward.
2. Align the index mark on the brake lever with the numbers on the adjuster dial.
3. Apply the brake, release it, then spin the wheel and check that it rotates freely.
Repeat this procedure several times.
184
Servicing Your Honda
Brakes
Brake Fluid Recommendation
brake fluid
Honda DOT 4 Brake Fluid
The recommended brake fluid is Honda DOT 4 Brake Fluid, or any brake fluid
of equal quality and performance. Use fresh brake fluid from a sealed container.
Be sure to read the label before opening the sealed container. An opened
container may be contaminated or may have absorbed moisture from the air.
Fluid Level Inspection
Refer to
Saf ety Precautions
on page142
If your inspection indicates a low fluid level, have your Honda dealer add the
recommended brake fluid.
Do not add or replace brake fluid, except in an emergency. If you do add fluid,
have your Honda dealer check the system as soon as possible.
Brake f luid can damage plastic and painted surf aces. Handle with care.
Wipe up spills immediately. Avoid brake fluid contact with skin or eyes. If it
comes in contact with your eyes, wash them out with clean water and
immediately call a doctor. If it comes in contact with your skin, wash with clean
water and, if necessary, call a doctor.
Servicing Your Honda
185
Brakes
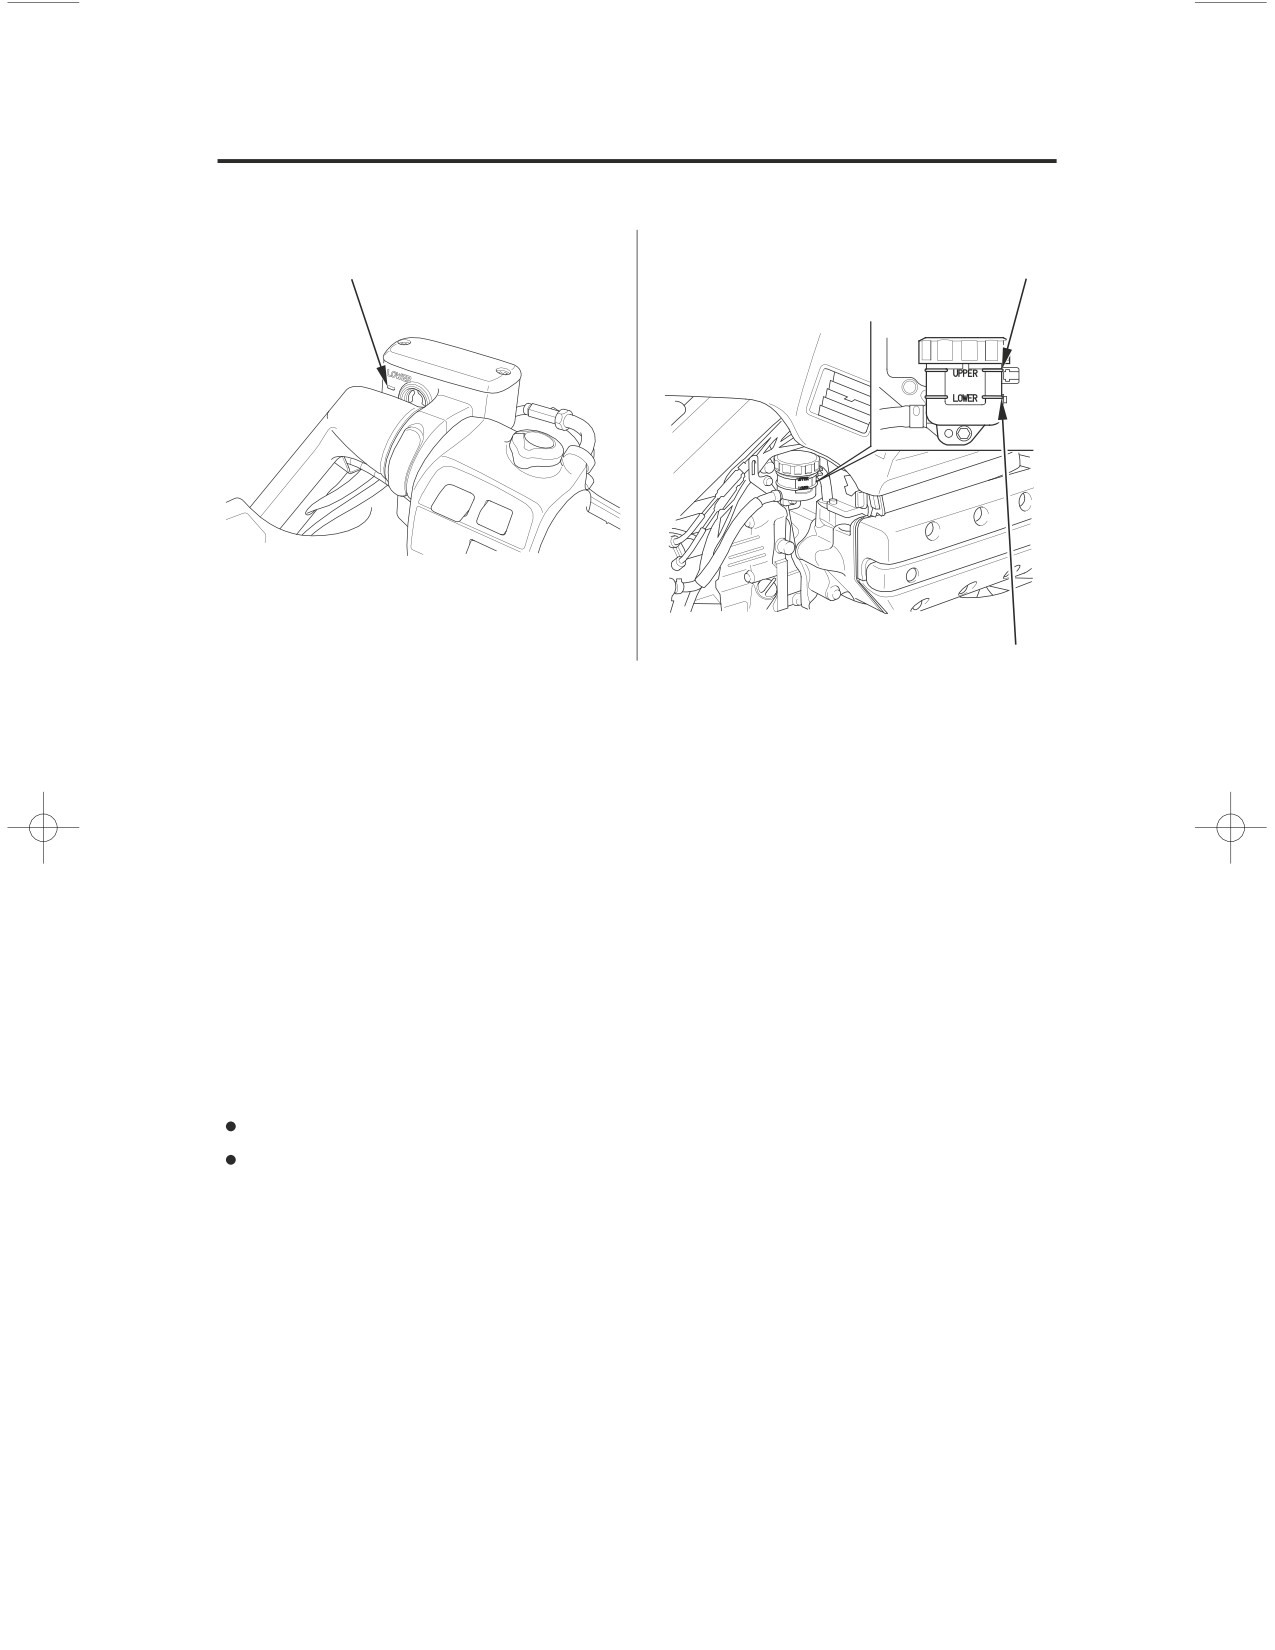
RIGHT HANDLEBAR
RIGHT SIDE
(Front Brake)
(Rear Brake)
LOWER level mark
UPPER level mark
LOWER level mark
1. Place your motorcycle in an upright position on a firm, level surface.
2. Check the fluid level.
Front: It should be above the LOWER level mark.
Rear: It should be between the UPPER and LOWER level marks.
If the level is at or below the LOWER level mark, check the brake pads for
wear.
Worn pads should be replaced. If the pads are not worn beyond the
recommended limit, have your brake system inspected for leaks.
Other Inspections
Make sure there are no fluid leaks.
Check for deterioration or cracks in the hoses and fittings.
186
Servicing Your Honda
Brakes
Brake Pad Wear
Refer to Saf ety Precautions on page142
Brake pad wear depends upon the severity of usage, the type of riding, and road
conditions. Generally, the pads will wear faster on wet and dirty roads. Inspect
the pads at each regular maintenance interval (page
).
147
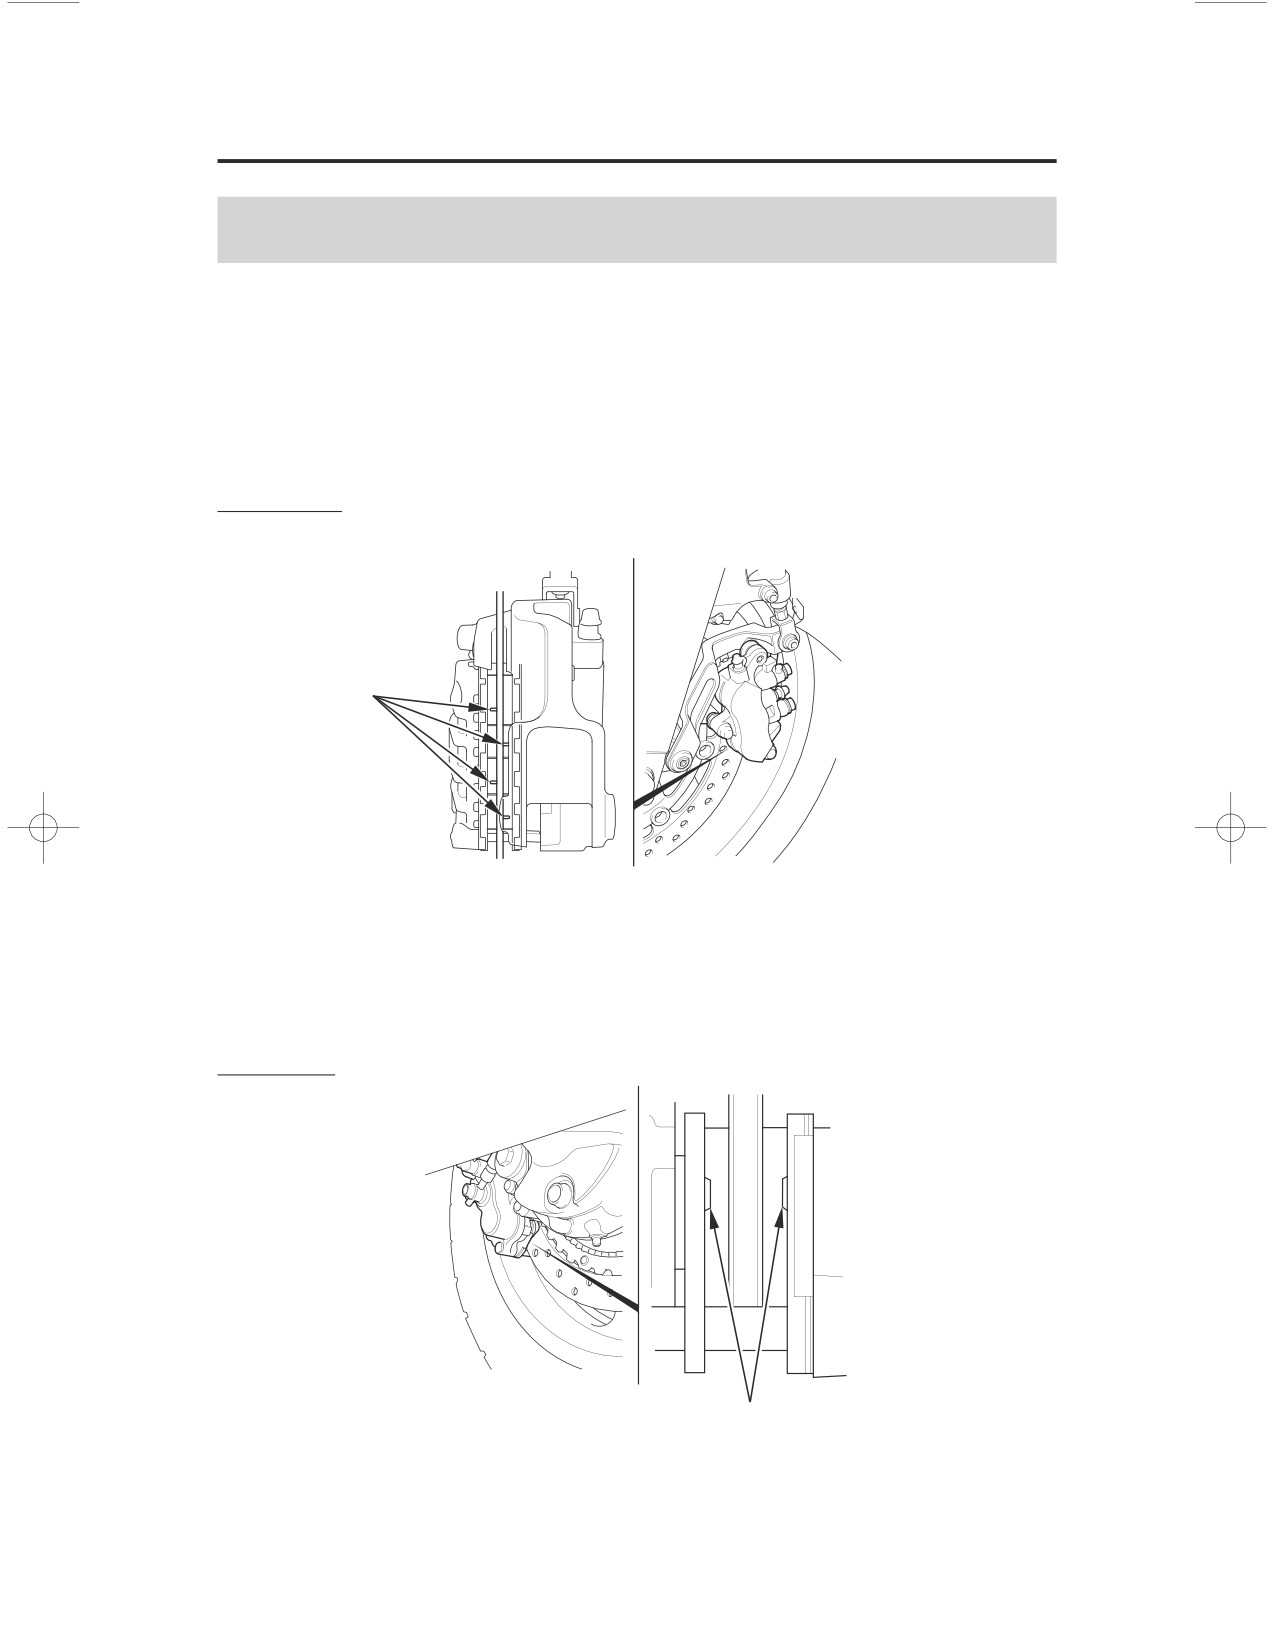
Front Brake
LEFT FRONT (right side similar)
grooves
Always inspect both pads in both the right and left front brake calipers.
Check the grooves in each pad. If either pad is worn to the bottom of the
grooves, replace both pads as a set. See your Honda dealer for this service.
Rear Brake
RIGHT REAR
cutouts
Check the cutouts in each pad. If either pad is worn to the cutout, replace both
pads as a set. See your Honda dealer for this service.
Servicing Your Honda
187
Brakes
Brake System Inspection
Refer to Saf ety Precautions on page142
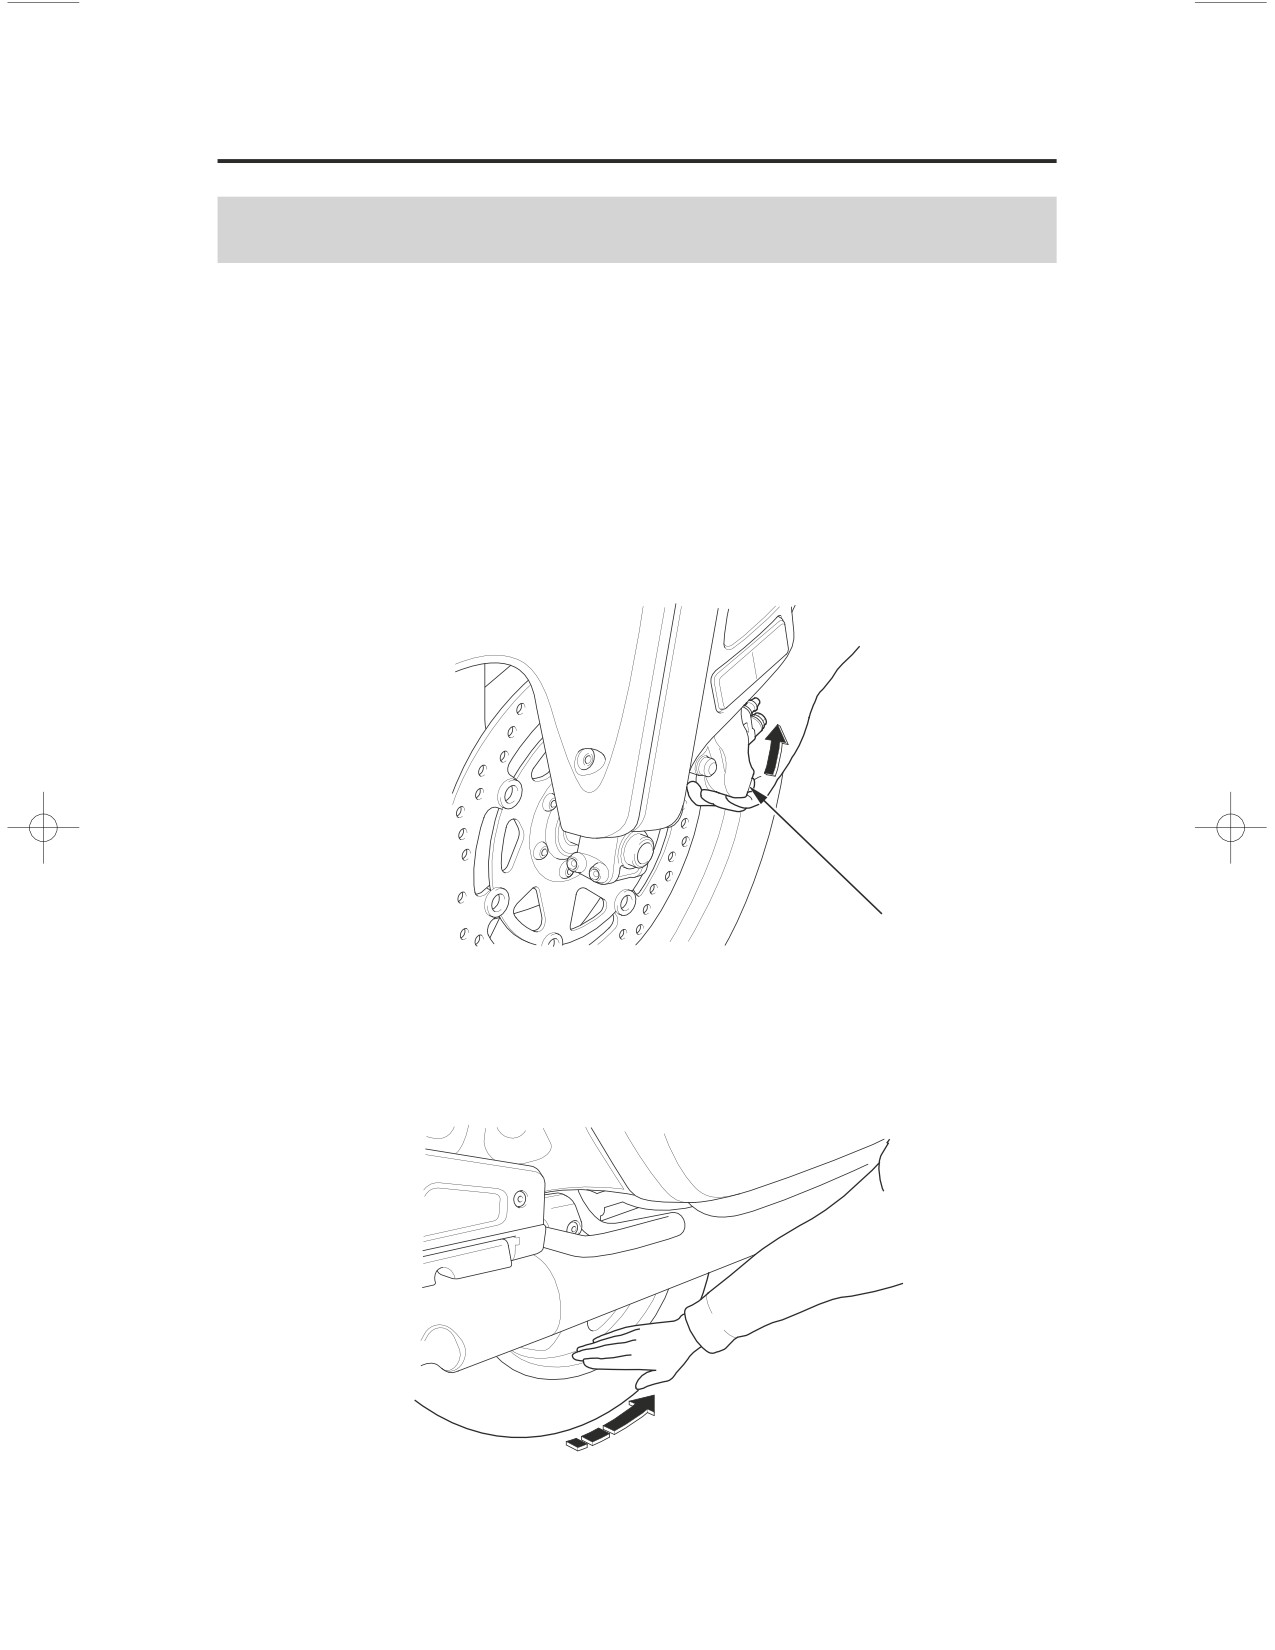
1. Place the motorcycle on its center stand, stop the engine, and place the
transmission in neutral.
2. Move the left caliper assembly upward while slowly rotating the rear wheel.
The brake system is normal if the rear wheel stops. If the rear wheel does not
stop, see your Honda dealer.
LEFT FRONT
brake caliper
LEFT REAR
188
Servicing Your Honda
Tires
To safely operate your motorcycle, your tires must be the proper type and size,
in good condition with adequate tread, and correctly inflated for the load you are
carrying.
Using tires that are excessively
worn or improperly inflated
can cause a crash in which you
can be seriously hurt or killed.
Follow all instructions in this
owner’s manual regarding tire
inflation and maintenance.
The following pages give detailed information on how and when to check your
air pressure, how to inspect your tires for wear and damage, and our
recommendations for tire repair and replacement.
Servicing Your Honda
189
Tires
Air Pressure
Refer to Saf ety Precautions on page142
Properly inflated tires provide the best combination of handling, tread life, and
riding comfort. Generally, underinflated tires wear unevenly, adversely affect
handling, and are more likely to fail from being overheated. Overinflated tires
make your motorcycle ride harshly, are more prone to damage from road
hazards, and wear unevenly.
Even though your motorcycle is equipped with tire pressure monitoring system
(TPMS), we recommend that you visually check your tires before every ride and
use an air pressure gauge to measure the air pressure at least once a month or
any time you think the tires might be low. Even tires that are in good condition
may lose one to two psi per month if not checked and adjusted regularly.
See page 85 for more information.
Tubeless tires have some degree of self-sealing ability if they are punctured.
However, because leakage is often very slow, you should look closely for
punctures whenever a tire is not fully inflated.
Always check air pressure when your tires are ‘‘cold’’, after the motorcycle has
been parked for at least three hours. If you check air pressure when your tires
are ‘‘warm’’ -- even if your motorcycle has only been ridden for a few miles --
the readings will be higher. If you let air out of warm tires to match the
recommended cold pressures, the tires will be underinflated.
The recommended ‘‘cold’’ tire pressures are:
front
36 psi (250 kPa , 2.50 kgf/cm )
rear
41 psi (280 kPa , 2.80 kgf/cm )
190
Servicing Your Honda
Tires
Inspection
Refer to Saf ety Precautions on page142
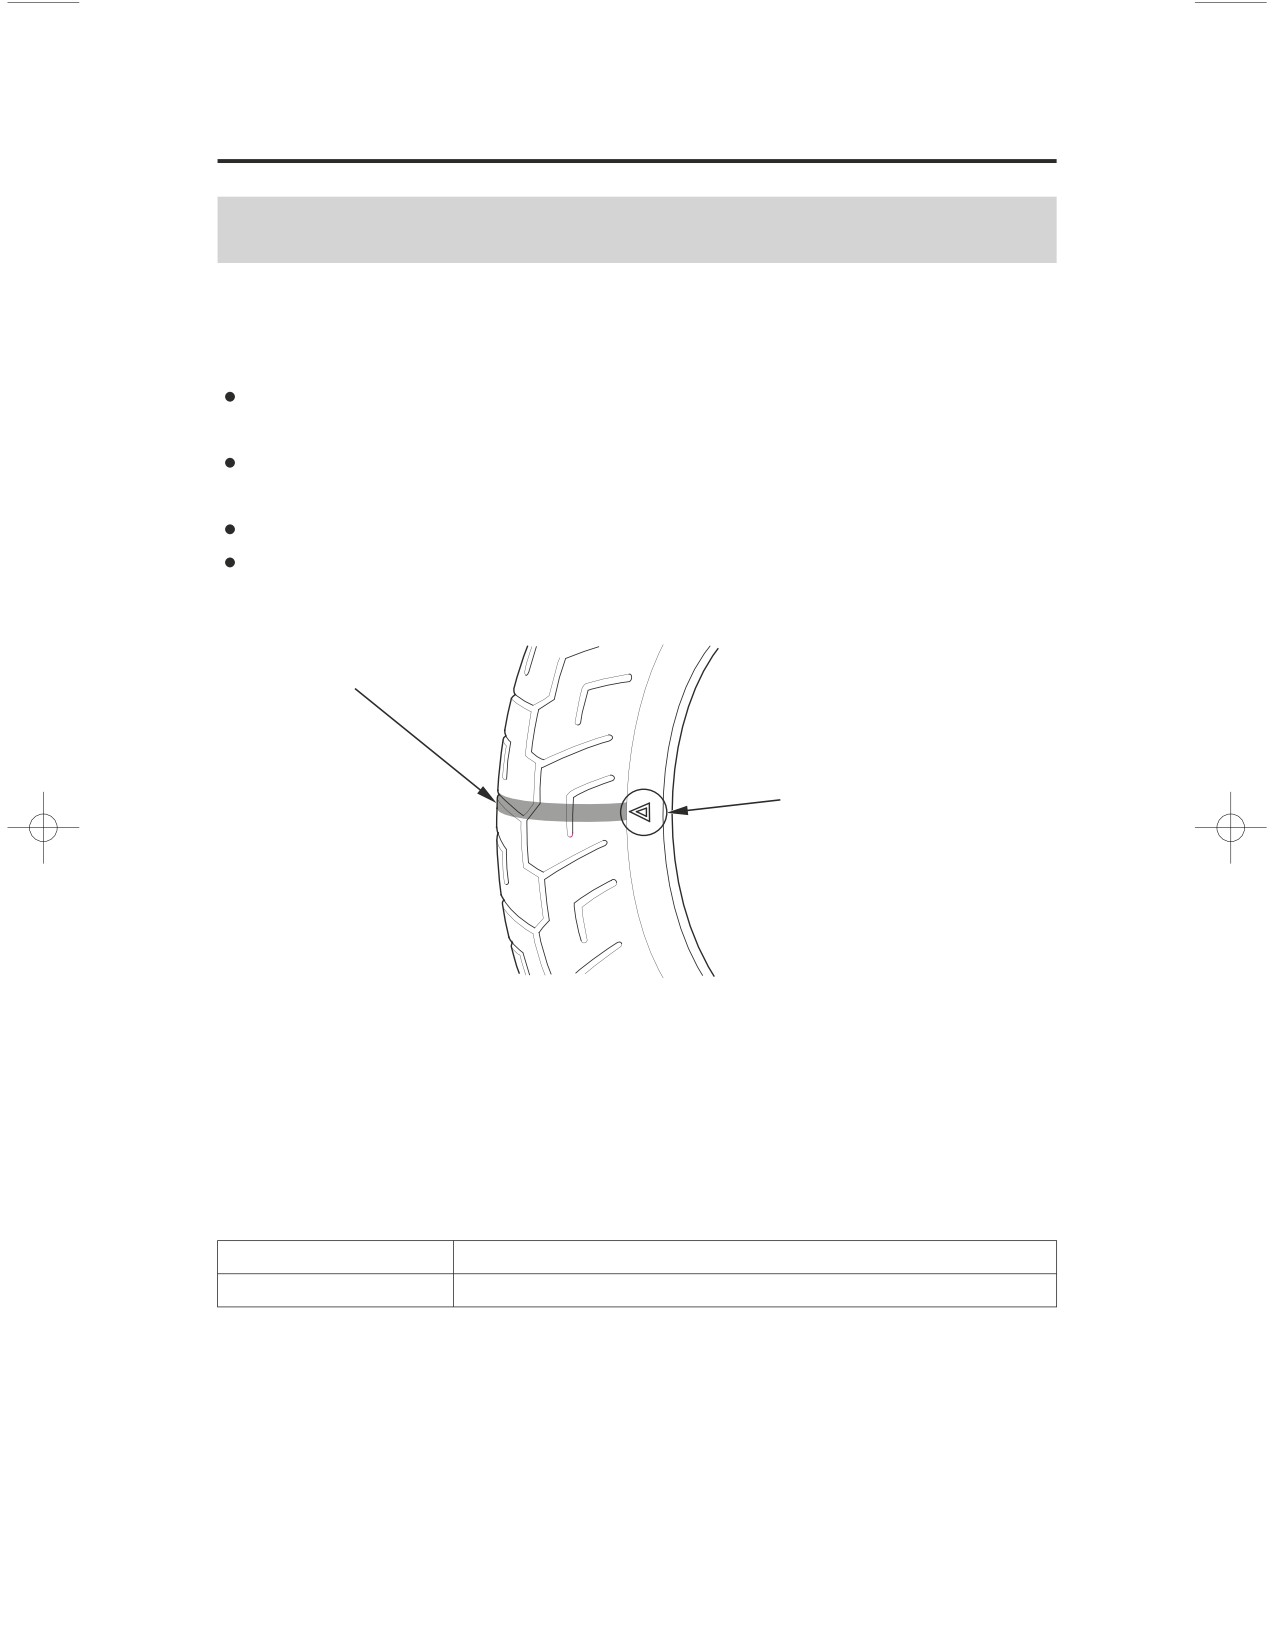
Whenever you check the tire pressures, you should also look for:
Bumps or bulges in the side of the tire or the tread. Replace any tire that has a
bump or bulge.
Cuts, slits, or cracks in the tires.
Replace the tire if you can see fabric or cord.
Nails or other foreign objects embedded in the side of the tire or tread.
Excessive tread wear.
wear indicator
wear indicator location
mark
Also, if you hit a pothole or hard object while riding, pull to the side of the road
as soon as you safely can and carefully inspect the tires for damage.
For the best performance, you should replace a tire before the tread depth at the
center reaches the following limits:
front
0.06 in (1.5 mm)
rear
0.08 in (2.0 mm)
If the wear indicators are visible, replace the tire immediately as it is no longer
safe.
Servicing Your Honda
191
Tires
Tire Service Life
The service life of your tires is dependent on many factors, including, but not
limited to, riding habits, road conditions, vehicle loading, tire pressure,
maintenance history, speed, and environmental conditions (even when the tires
are not in use).
In addition to your regular inspections and tire pressure maintenance, it is
recommended that you have annual inspections performed once the tires reach 5
years old. It is also recommended that all tires be removed from service after 10
years from the date of manufacture, regardless of their condition or state of
wear.
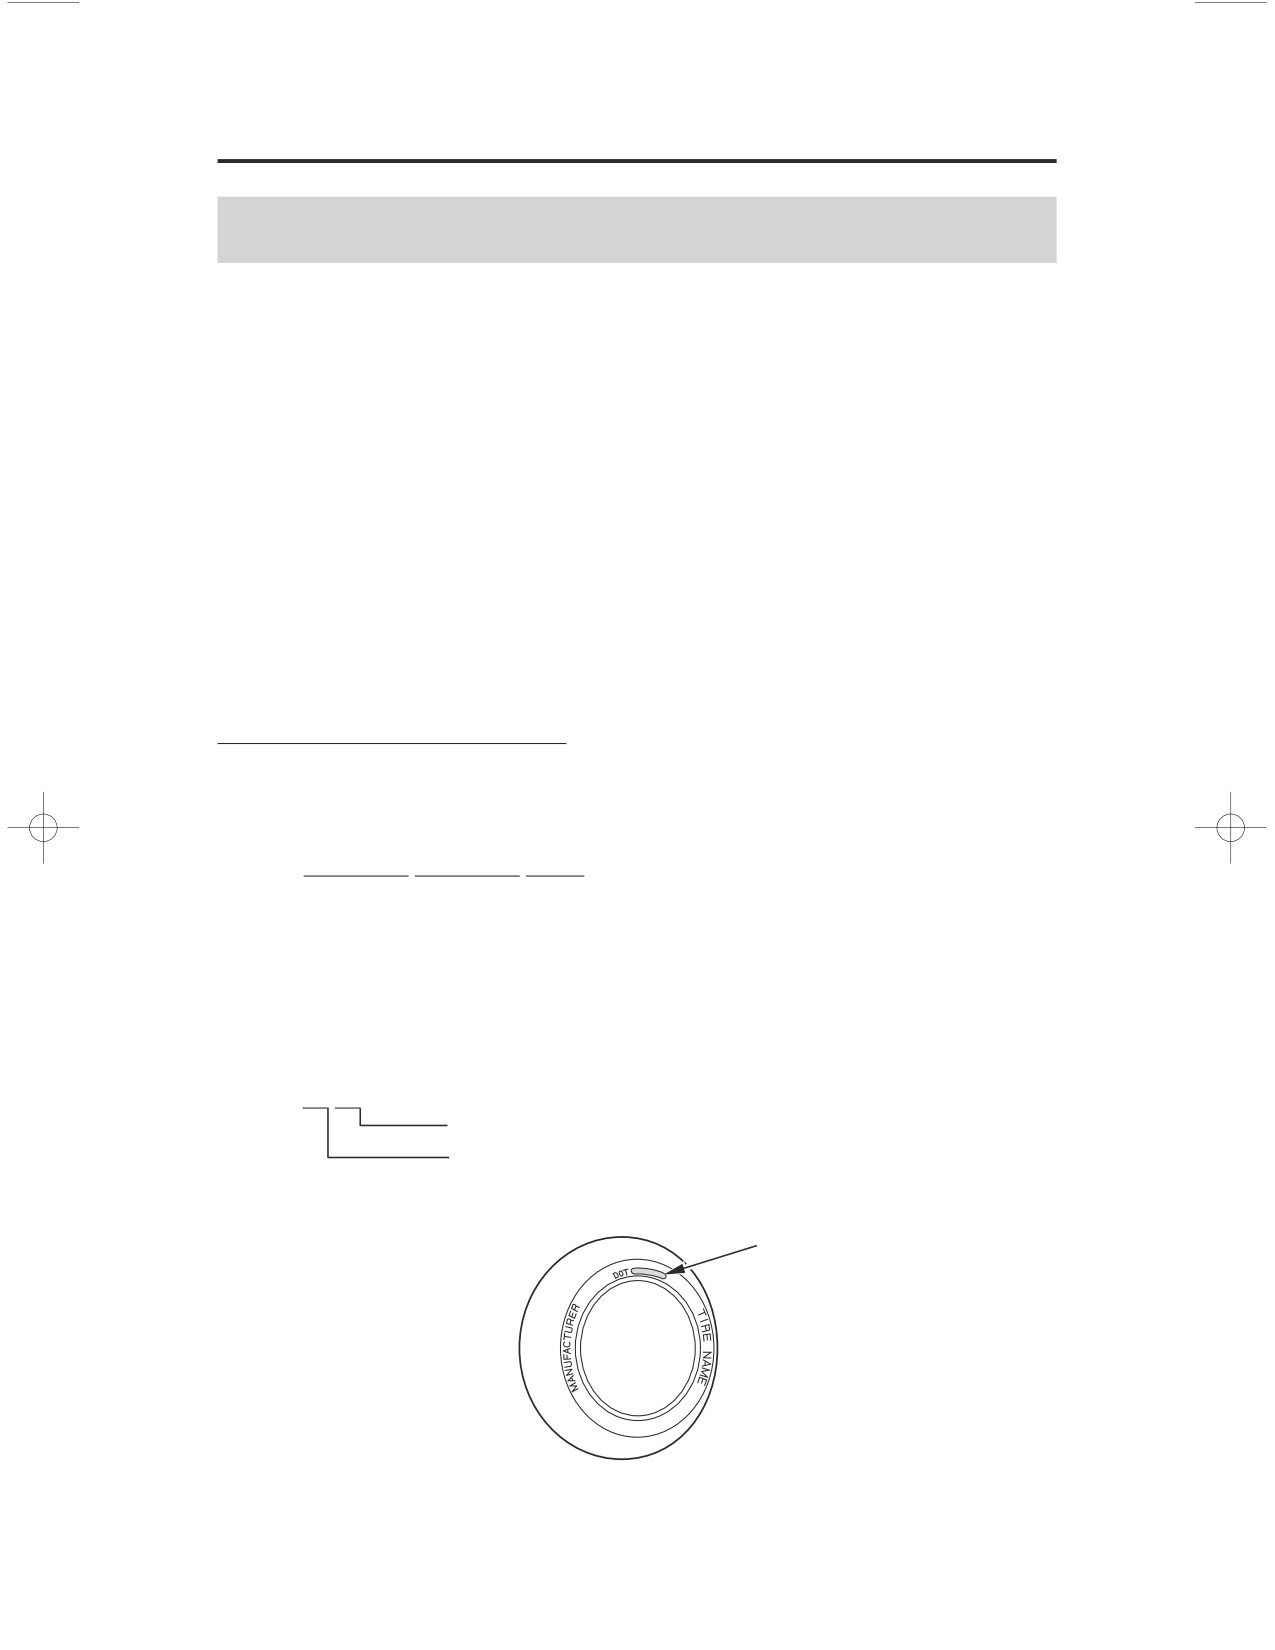
The last four digits of the TIN (tire identification number) (1) are found on the
sidewall of the tire, and indicate the date of manufacture.
Tire Identification Number (TIN)
The tire identification number (TIN) is a group of numbers and letters that look
like the following example.
TIN is located on the sidewall of the tire.
DOT
ʷʷʷʷ ʷʷʷʷ
22 07
(2)
(3)
(4)
DOT
ʵ
This indicates that the tire meets all requirements of the U.S.
Department of Transportation.
(2)
ʷʷʷʷ ʵ
Factory code
(3) ʷʷʷʷ ʵ
Tire type code
(4)
22 07
ʵ
Date of manufacture
Year
Week
TIRE LABELING EXAMPLE
(1)
(1) tire identification number (TIN)
192
Servicing Your Honda
Tires
Tire Repair
Saf ety Precautions
Refer to
on page142
We strongly recommend that you replace, not repair, any tire that is punctured or
damaged. As discussed below, a tire that is repaired, either temporarily or
permanently, will have lower speed and performance limits than a new or
undamaged tire.
A temporary repair can sometimes be made in an emergency situation.
However, since a temporary repair may not hold, you must ride very slowly,
preferably without any cargo or passenger, and have the tire replaced or
permanently repaired as soon as possible.
(For more information on temporary repairs, see If You Have a Flat Tire,
page
218
.)
Using a puncture-repairing agent can damage the TPMS sensors, causing the
TPMS indicator to turn on. Have you motorcycle checked by your Honda
dealer as soon as possible.
Use caution to not damage the TPMS sensor if an internal plug patch must be
used to repair the tire. If you have a tire prof essionally repaired at a non-
Honda f acility, we recommend that you have the work checked by your Honda
dealer. TPMS wheels require special handling when changing the tire. Failure
to follow the proper tire replacement procedure can result in damage to the
TPMS sensor.
Servicing Your Honda
193