Honda GL1800 Goldwing. Owners Manual - page 4
Audio Systems
Auto Volume Control (AVC)
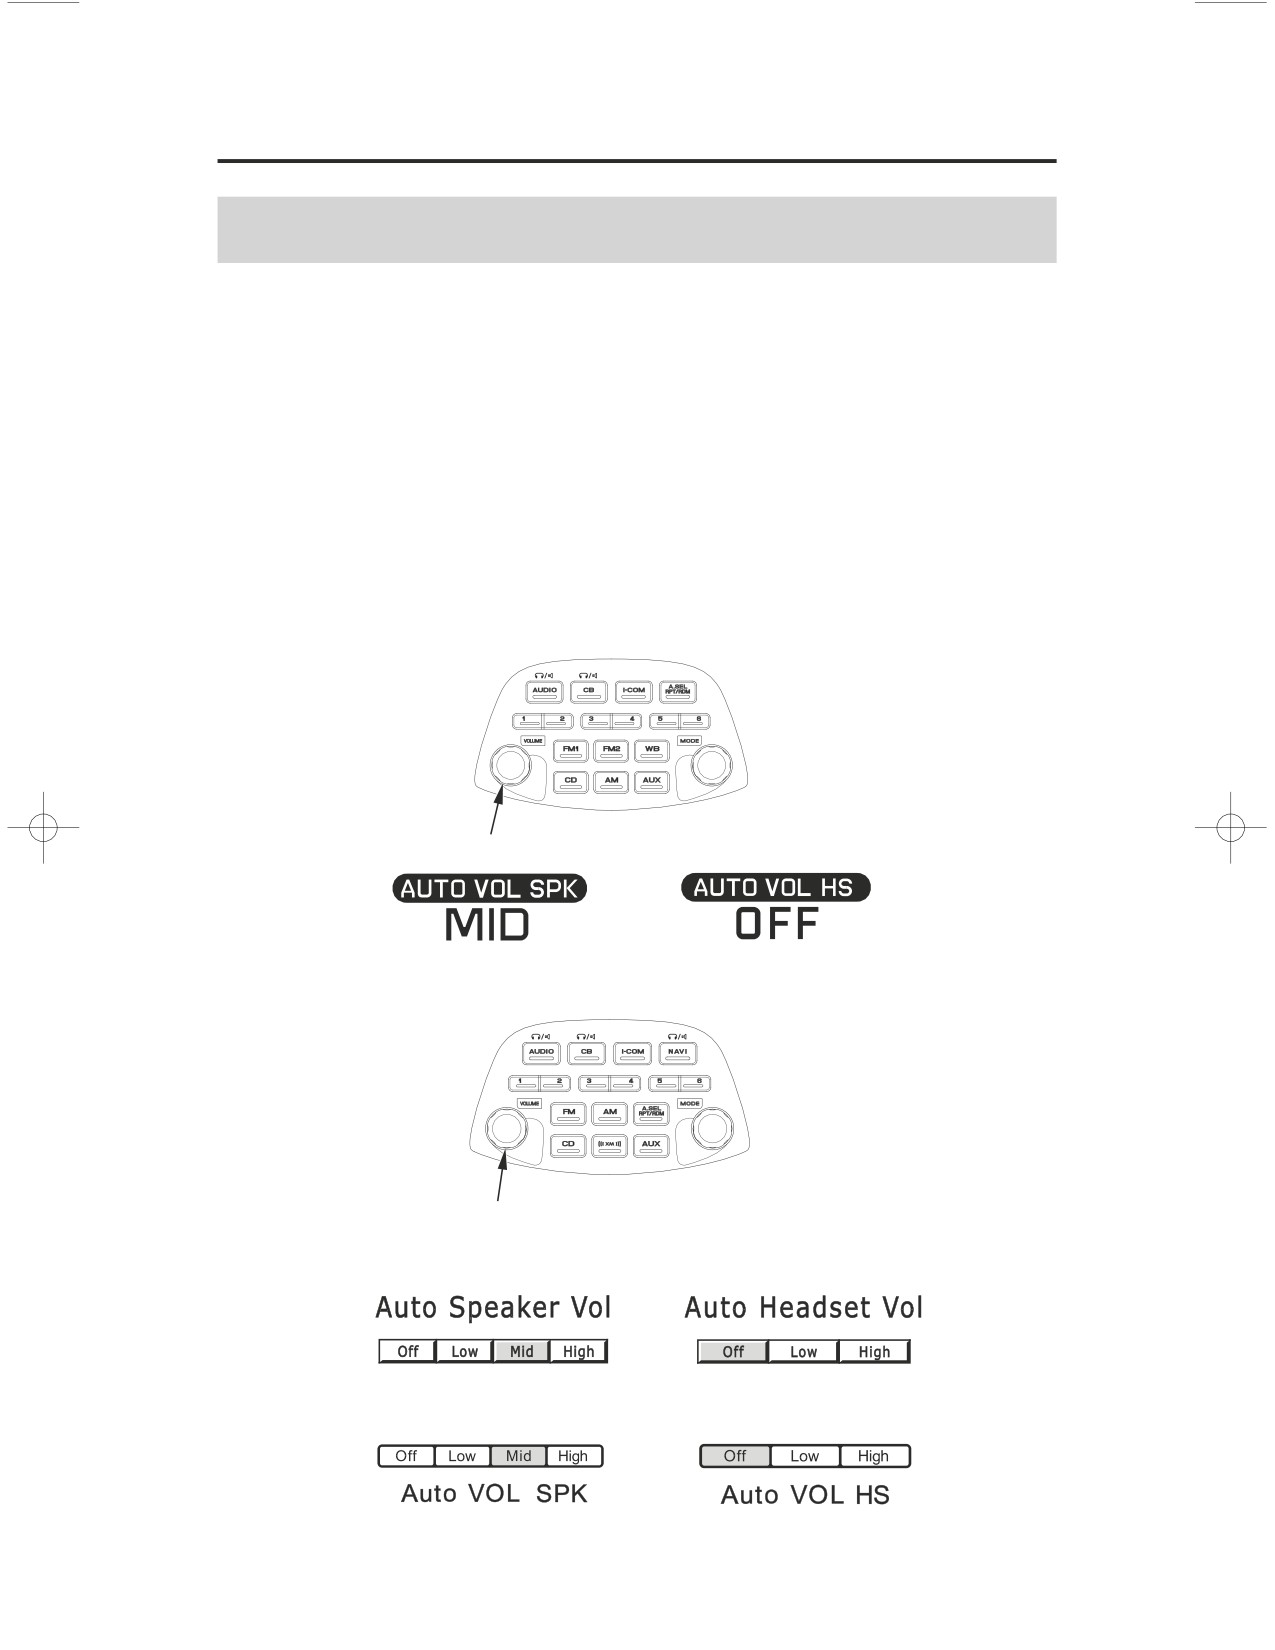
To automatically increase volume as the speed of the motorcycle increases. Push
the VOLUME knob/button until ‘‘AUTO VOL SPK’’ (‘‘Auto Speaker Vol’’) is
displayed (page
). To select the volume control of headset, push the
100
VOLUME knob/button until ‘‘AUTO VOL HS’’ (‘‘Auto Headset Vol’’) is
displayed (page
100). Then, within 5 seconds, change the AVC setting.
AUTO VOL SPK has four settings
ʵ
HI (High), MID (Mid), LO (Low), and
OFF (Off).
AUTO VOL HS has three settings
ʵ
HI (High), LO (Low), and OFF (Off).
(Models not equipped with Navigation System)
VOLUME knob/button
(Models equipped with Navigation System)
VOLUME knob/button
For USA
For Canada
114
Audio Systems
Audio Systems
Muting
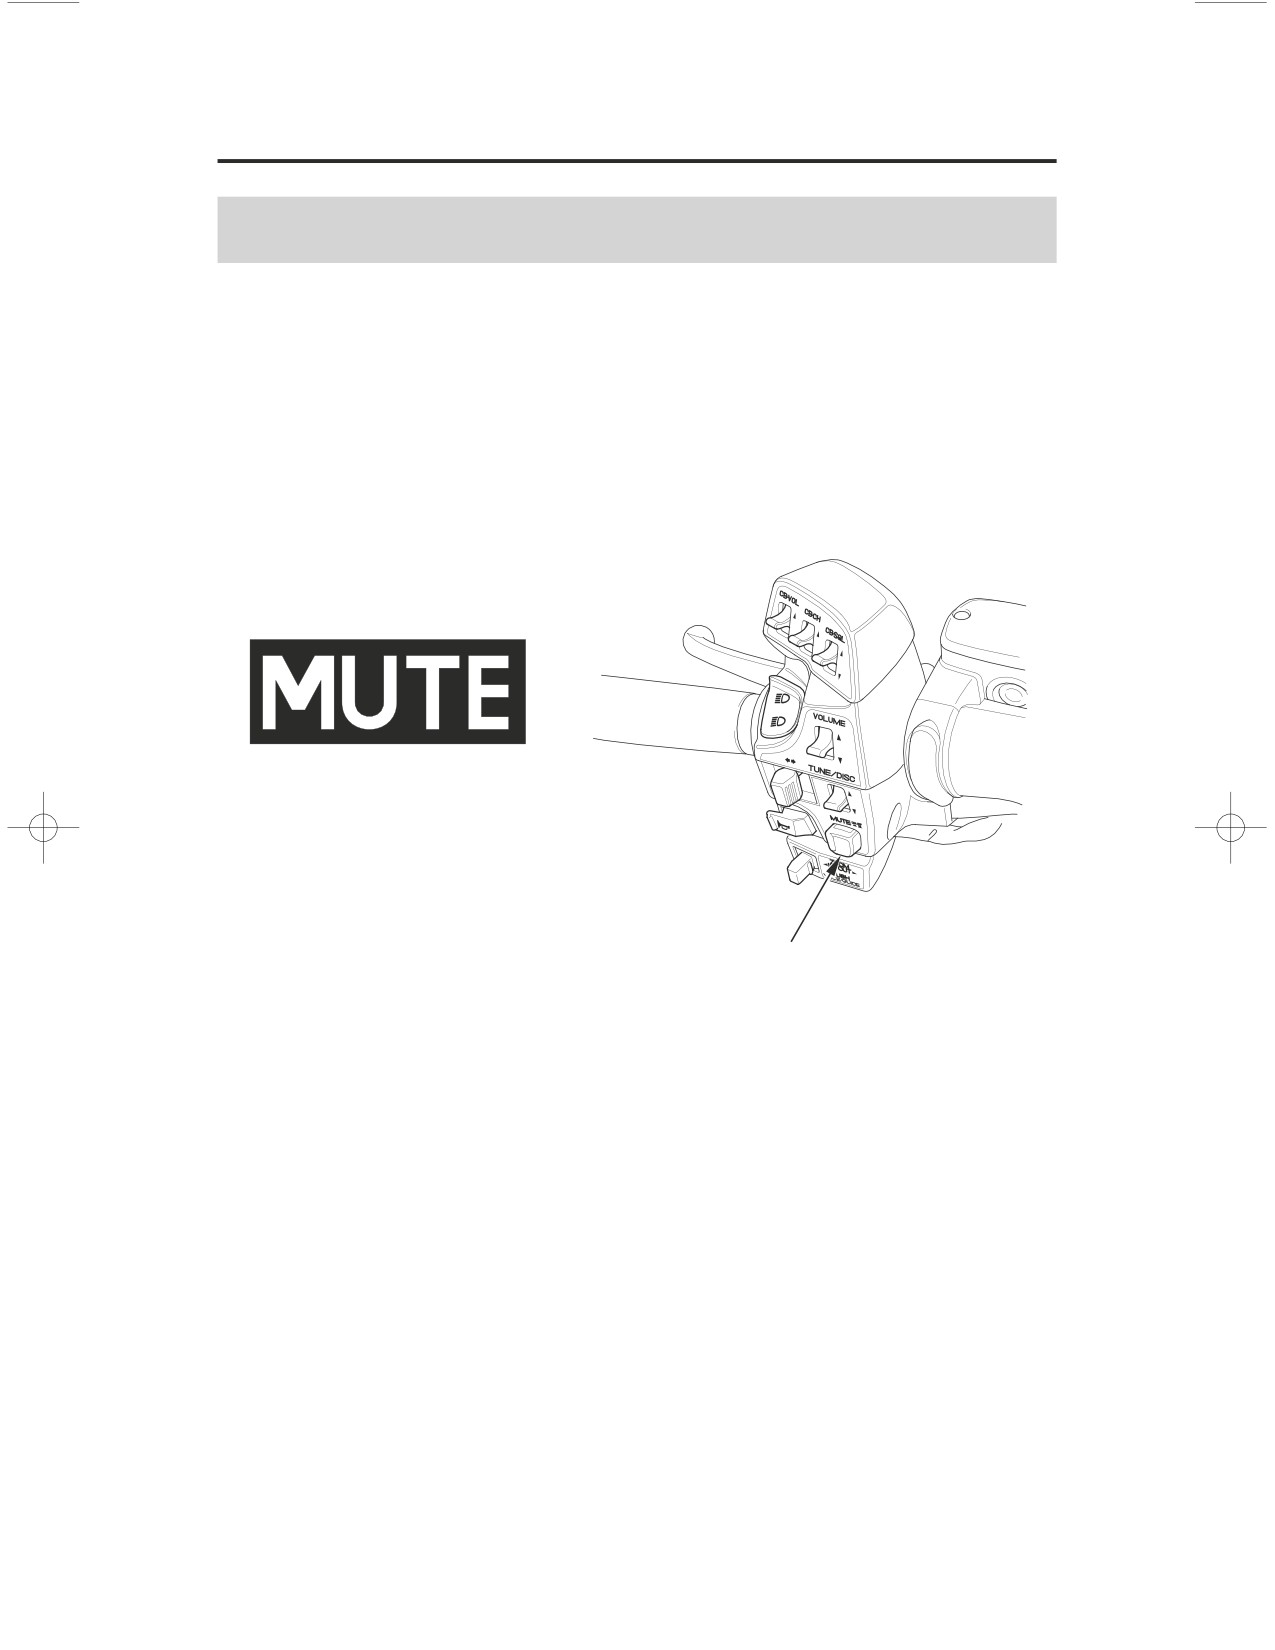
To instantly lower the radio’s volume so you may hear surrounding sounds more
clearly
ʵ
push the MUTE button.
The display will indicate ‘‘MUTE’’.
To restore the original volume
ʵ
push the MUTE button again to restore the
original volume.
LEFT HANDLEBAR
MUTE button
Audio Systems
115
AM/FM Radio
Radio Antenna
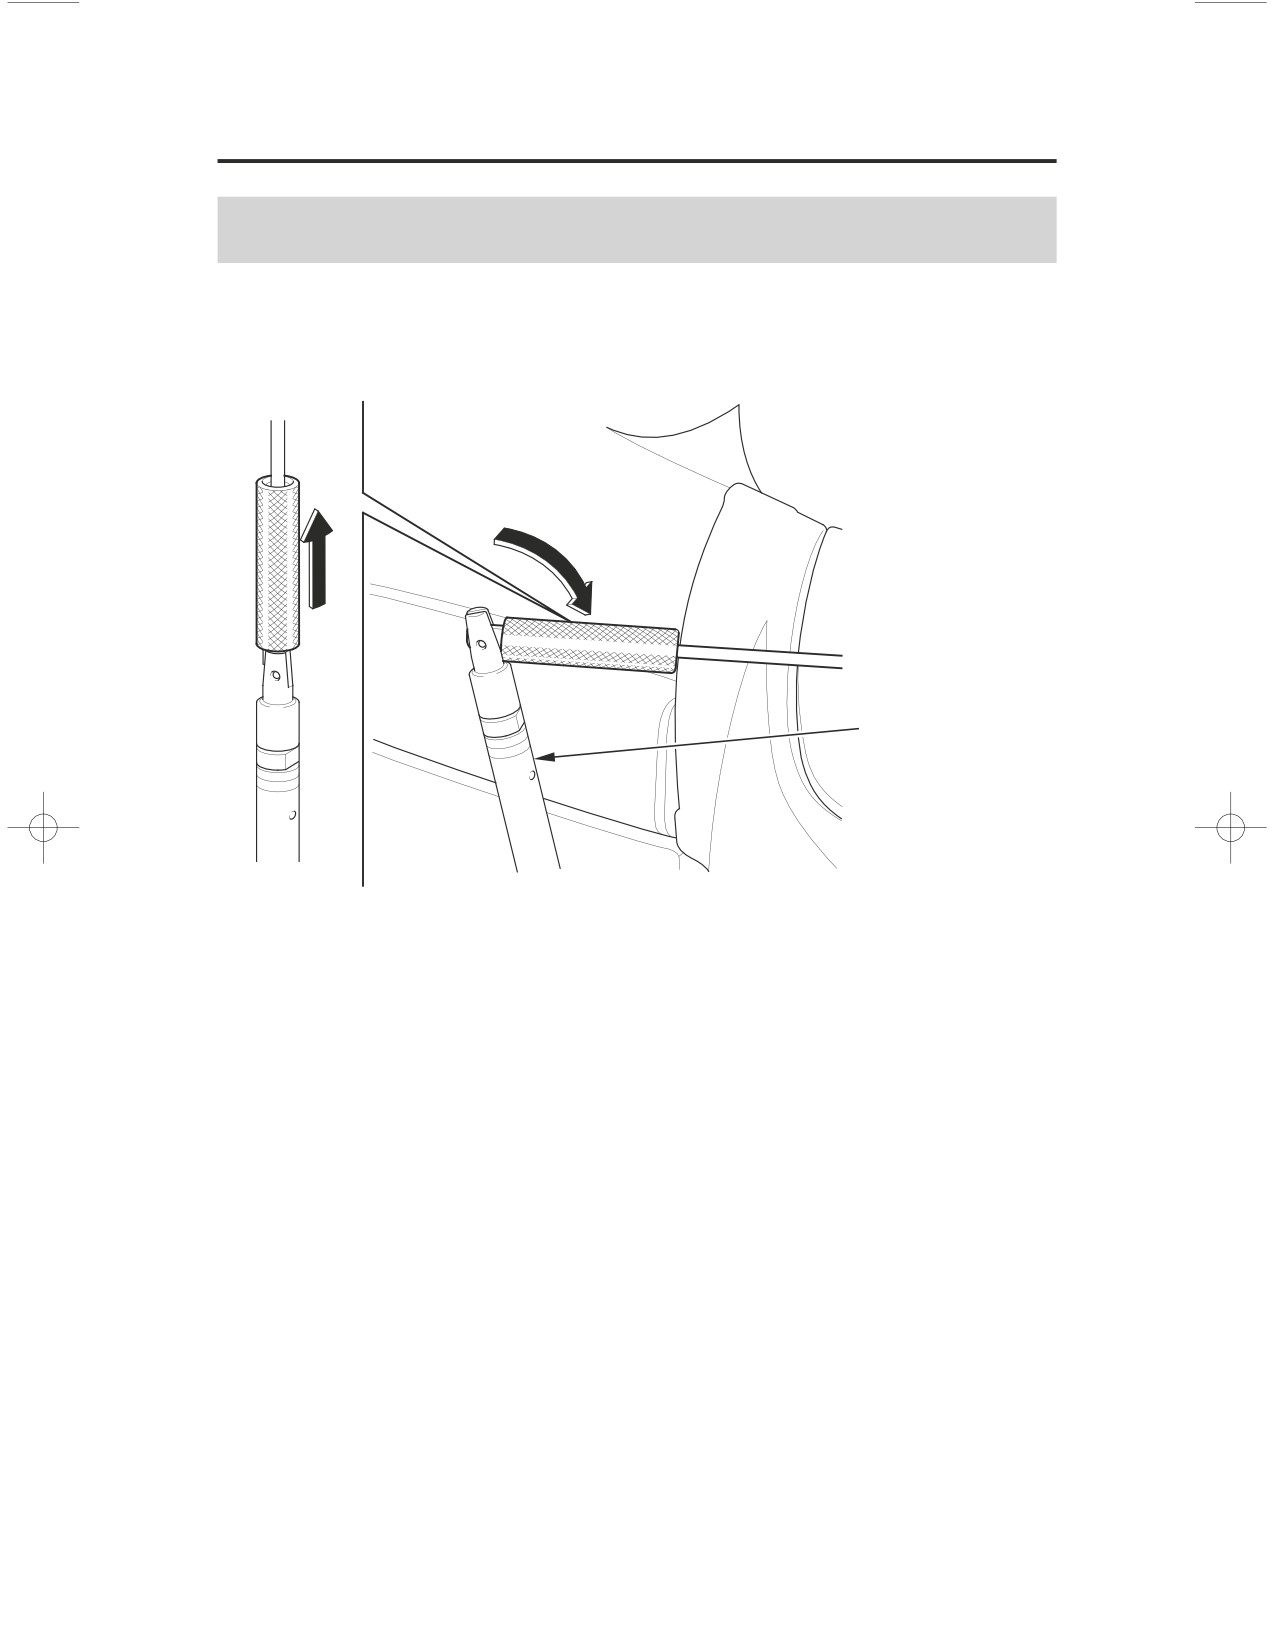
To fold the AM/FM radio antenna, pull up on the knurled coupling.
radio antenna
116
Audio Systems
AM/FM Radio
Select Band
(Models not equipped with Navigation System)
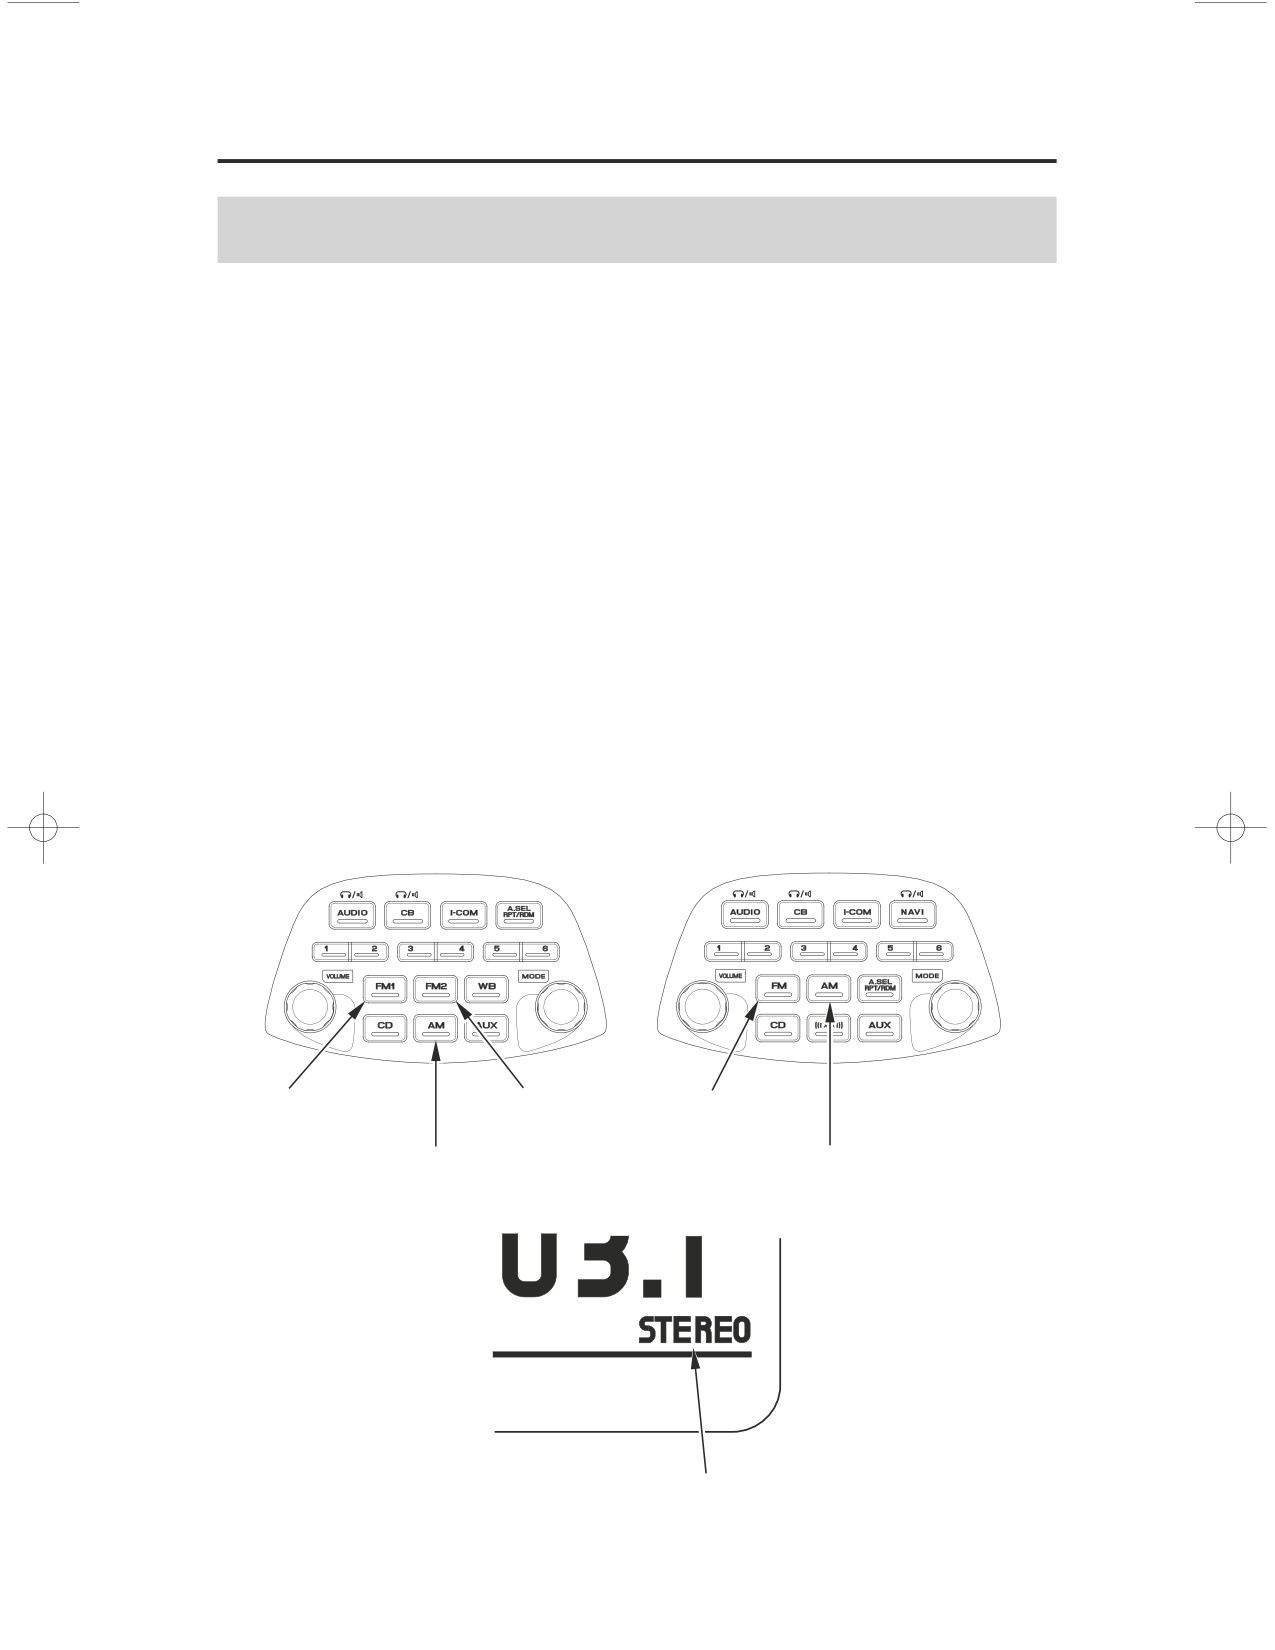
To change to AM or FM when you are in the radio mode
ʵ
push the AM button,
FM1 button or FM2 button.
(Models equipped with Navigation System)
Push the FM button to switch to FM1/FM2.
Push the AM button to switch to AM/WB (USA only).
Push the AM button to listen to AM (Canada only).
Reception of a stereo signal is indicated when the STEREO indicator appears in
the display. (Stereo reception is available only for FM stereo broadcasts.) As FM
stereo reception becomes weaker, special circuits in the radio gradually blend
the sound toward mono to maintain some sound quality, even though the
STEREO indicator remains ON.
(Models not equipped with
(Models equipped with
Navigation System)
Navigation System)
FM1 button
FM2 button
FM button
AM button
AM button
STEREO indicator
Audio Systems
117
AM/FM Radio
Select Station
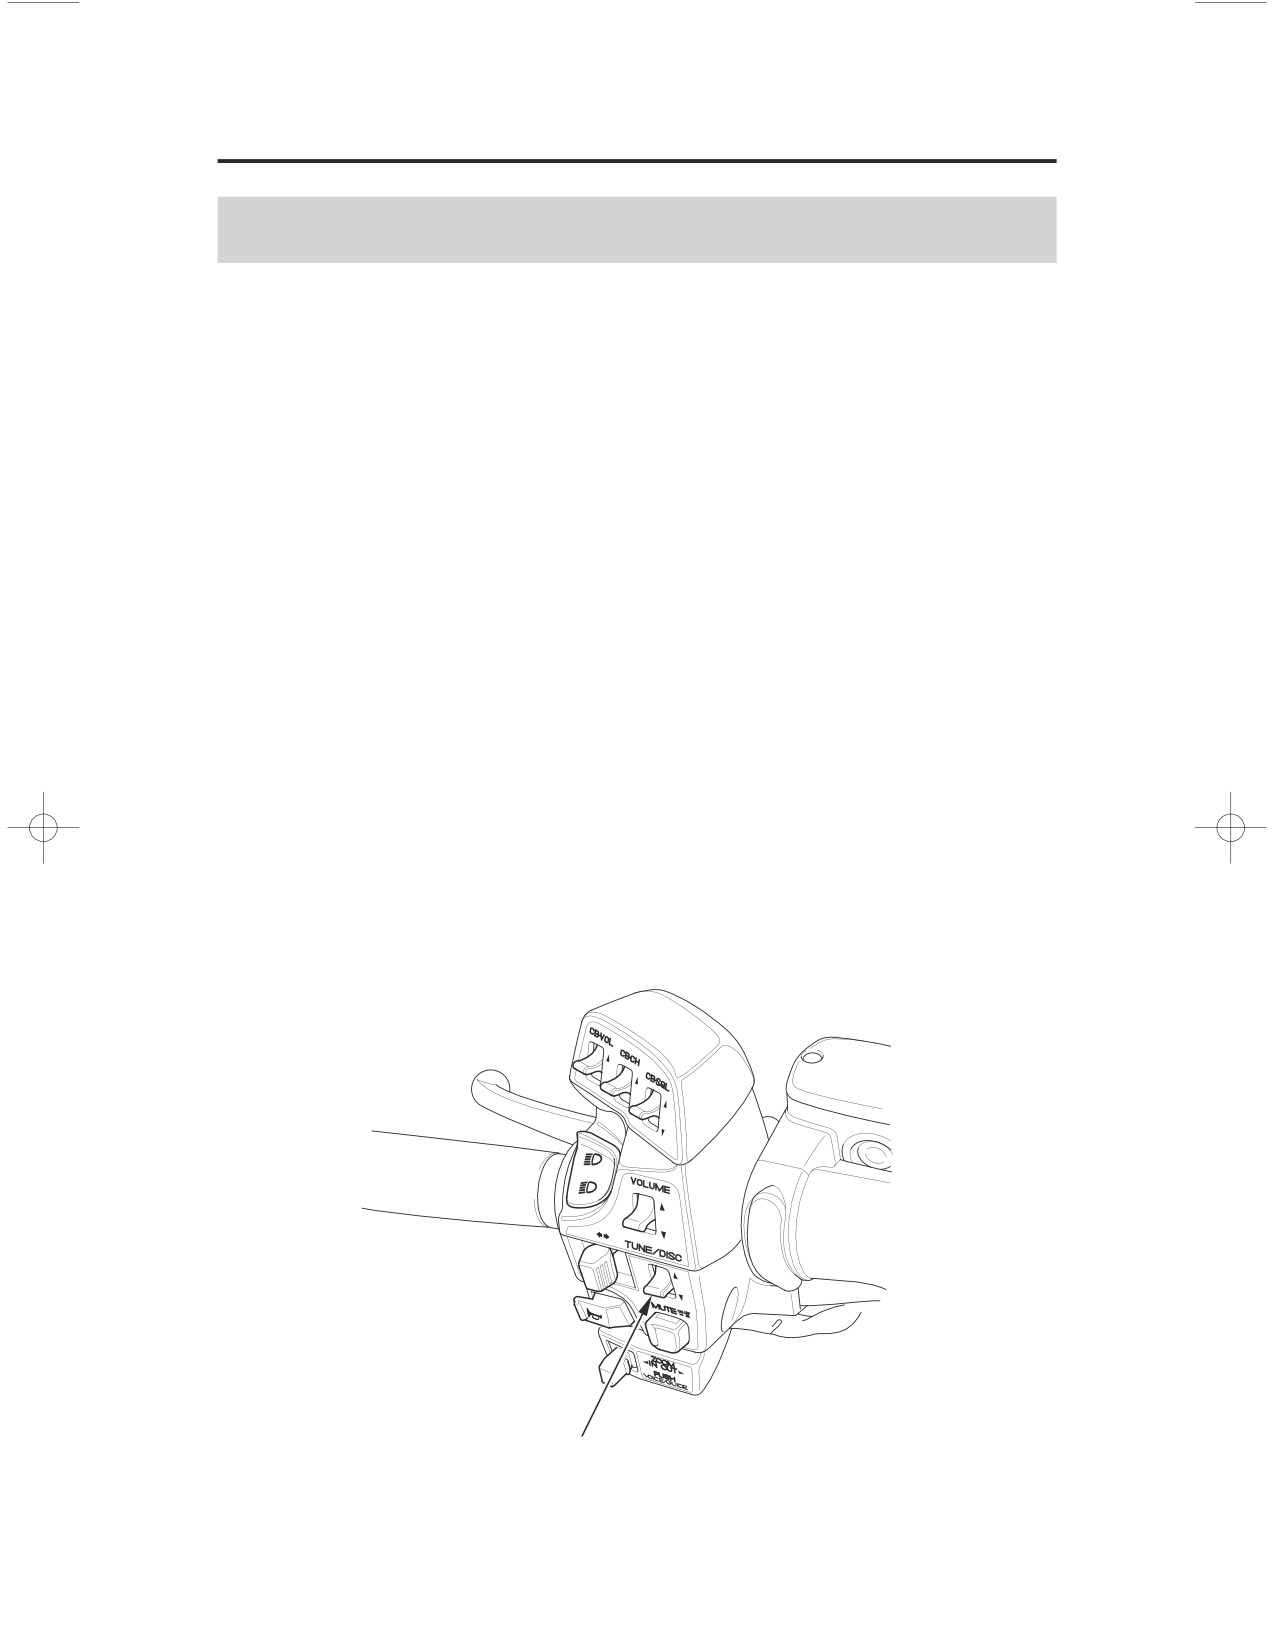
To raise the radio frequency
ʵ
push the TUNE/DISC lever up.
To lower the radio frequency
ʵ
push the TUNE/DISC lever down.
To move up or down the radio frequencies in sequence, move the lever one click
at a time. The AM frequency display moves in 10 kHz steps. The FM frequency
moves in 0.2 kHz steps.
The SEEK function searches the band for a station with a strong signal. To
activate it, push the TUNE/DISC lever up or down and release it. The frequency
display will begin moving. Depending on which way you push the switch, the
system scans upward or downward from the current frequency.
It stops when it finds a station with a strong signal.
When the frequency display reaches either end, it transitions to the other end of
the band and continues in the same direction.
To reach a known frequency rapidly
ʵ
push the TUNE/DISC lever up or down
and continue to hold it down until you see the desired frequency.
LEFT HANDLEBAR
TUNE/DISC lever
118
Audio Systems
AM/FM Radio
Preset Stations
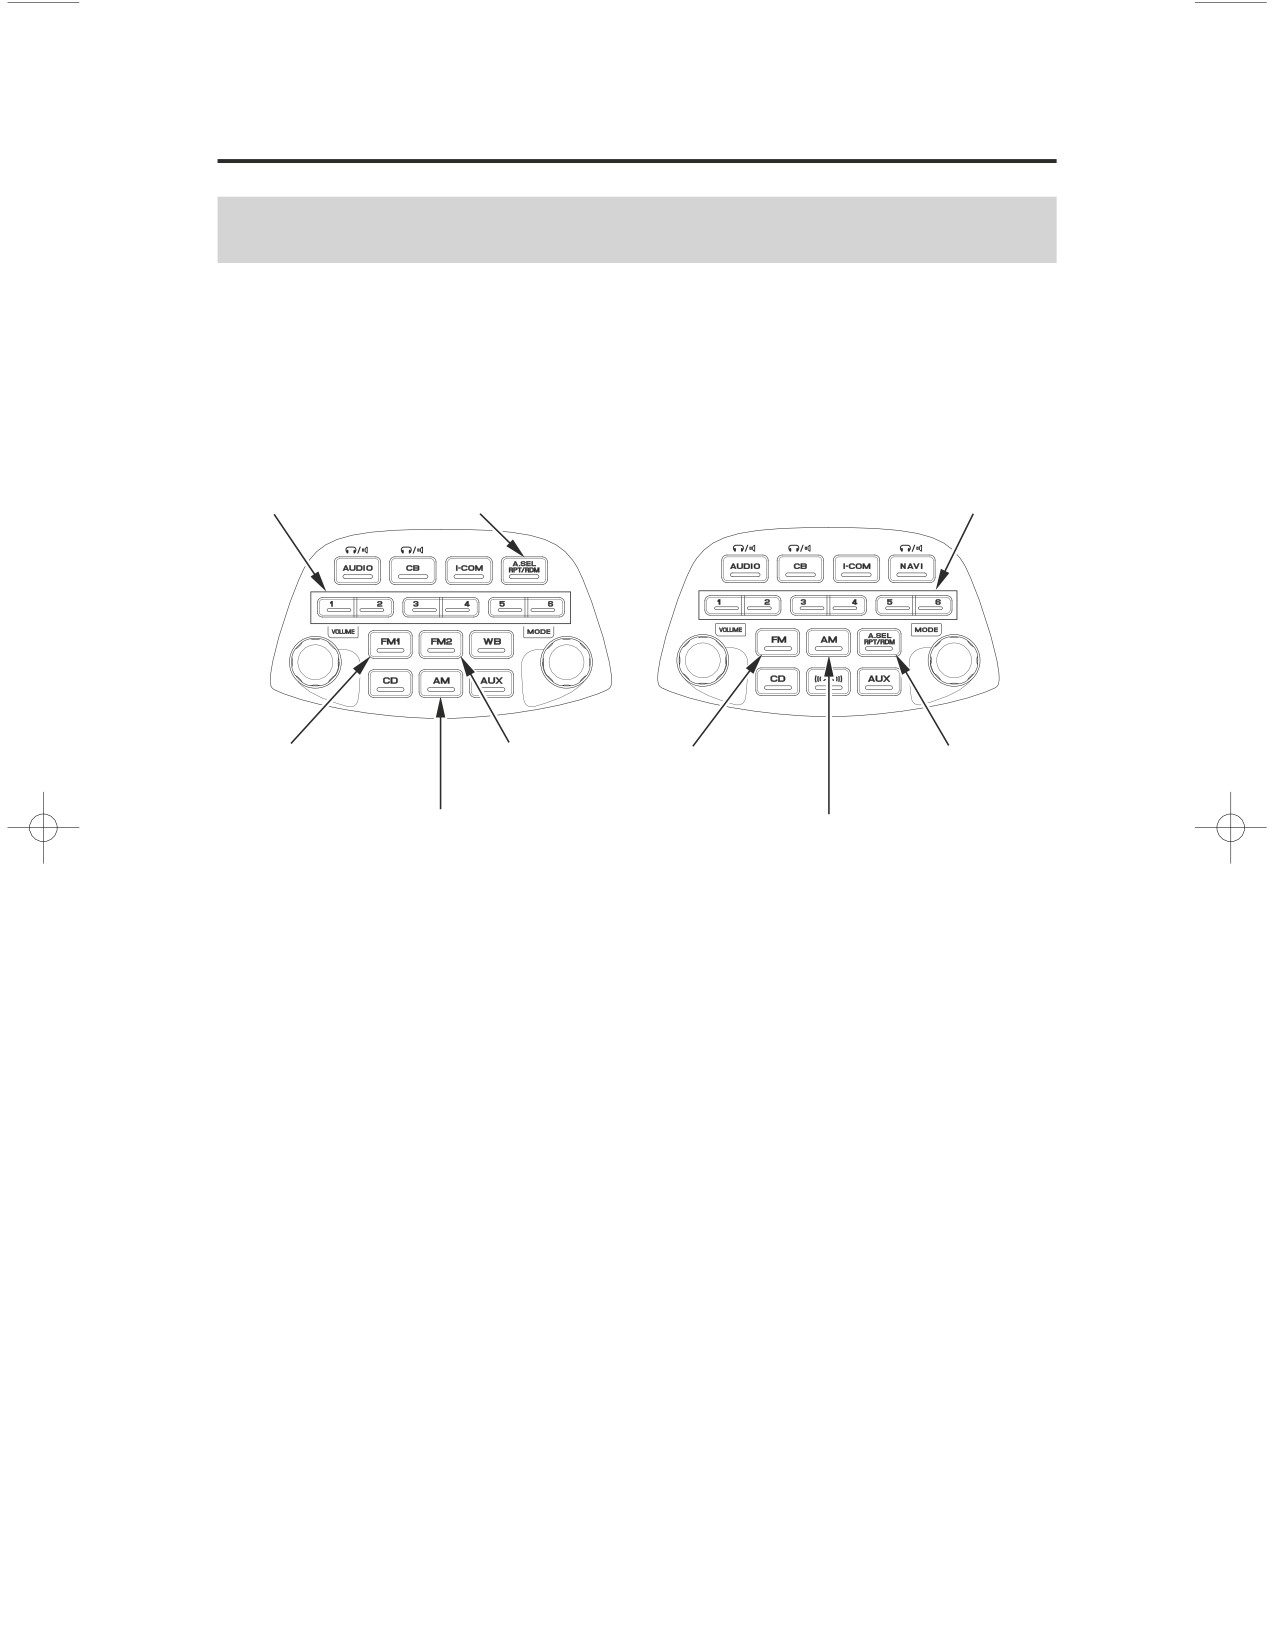
You can store the frequencies of your favorite radio stations in the six preset
buttons. Each button will store one frequency on the AM band, and two
frequencies on the FM band.
(Models not equipped with
(Models equipped with
Navigation System)
Navigation System)
preset buttons
A.SEL button
preset buttons
FM1 button
FM2 button FM button
A.SEL button
AM button
AM button
1. Check that A.SEL is not turned on. If it is on, push the A.SEL button to turn it
off.
2. Select the desired band, AM or FM. FM1 and FM2 let you store two
frequencies with each Preset button.
3. Use the TUNE or SEEK function to tune the radio to a desired station.
4. Pick the Preset button you want for that station. Press the button and hold it.
5. Repeat steps 1 to 3 to store a total of six stations on AM and twelve on FM.
Once a station’s frequency is stored, simply press and release the proper Preset
button to tune to it. The preset frequencies will be lost if your motorcycle’s
battery goes low (or dead) or is disconnected, or if the radio fuse is removed.
Audio Systems
119
AM/FM Radio
Auto Select
If you are traveling far from home and can no longer receive the stations you
preset, you can use the Auto Select feature to find stations in the local area.
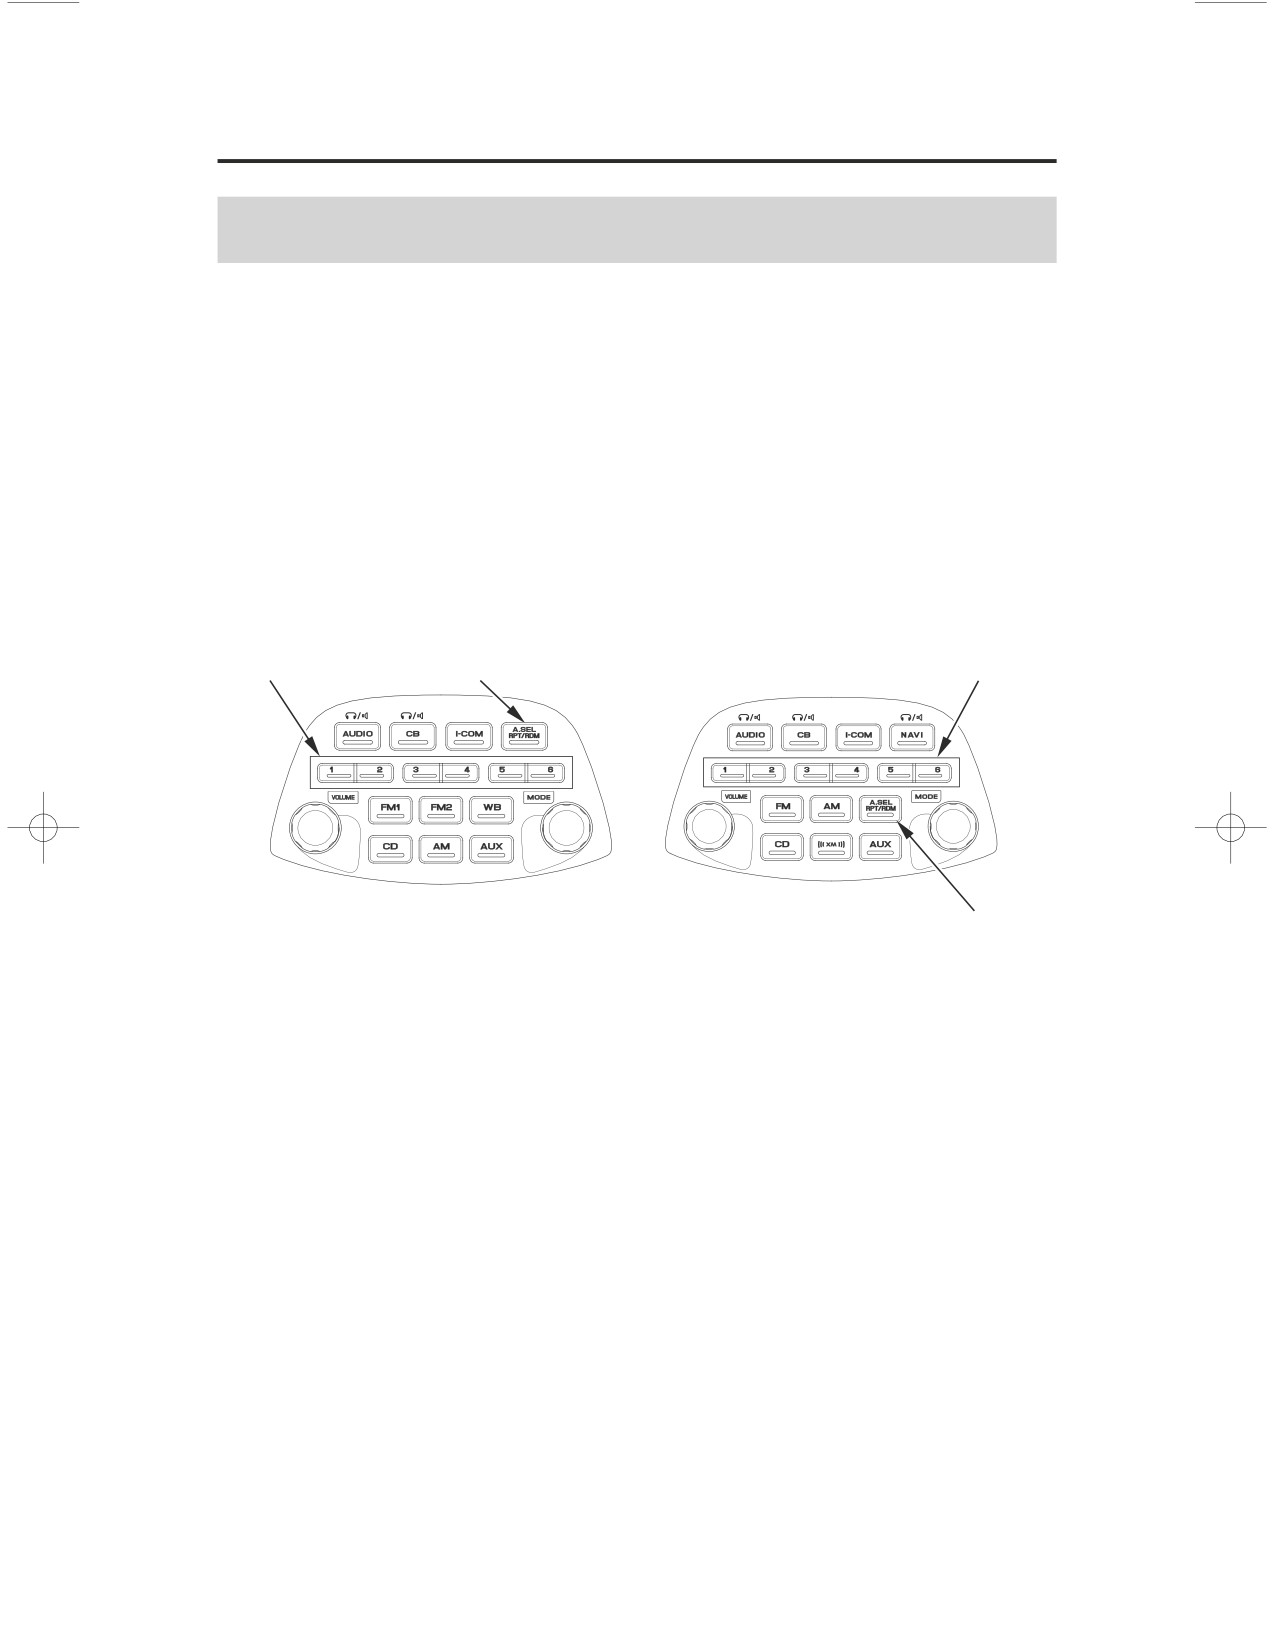
To activate Auto Select, push the A.SEL button. A.SEL will appear in the
display, and the system will go into scan mode for several seconds.
It automatically scans both bands, looking for stations with strong signals. It
stores the frequencies of six AM stations and twelve FM stations in the preset
buttons (page
). You can then use the preset buttons to select those stations.
119
(Models not equipped with
(Models equipped with
Navigation System)
Navigation System)
preset buttons
A.SEL button
preset buttons
A.SEL button
If you are in a remote area, Auto Select may not find six strong AM stations or
twelve strong FM stations. If this happens, you will see a ‘‘0’’ displayed when
you push any preset button that does not have a station stored.
With Auto Select on, you cannot manually store any frequencies in the preset
buttons. If you do not like the stations found by Auto Select, you can use the
TUNE and SEEK functions to find other stations.
Auto Select does not erase the frequencies that you preset previously. When you
return home, turn off Auto Select by pressing the A.SEL button. The preset
buttons will then select the frequencies you originally set.
120
Audio Systems
XM Radio (USA only)
(Models equipped with Navigation System)
Your motorcycle is capable of receiving XM Satellite Radio anywhere in the
United States, except Hawaii and Alaska. XM is a registered trade mark of XM
Satellite Radio, Inc.
XM Satellite Radio receives signals from two satellites to produce clear, high-
quality digital reception. It offers many channels in several categories. Along
with a large selection of different types of music, XM Satellite Radio also
allows you to view channel and category selections in the audio display.
Receiving Satellite Radio Service
If your XM radio service has expired or you purchased your motorcycle from a
previous owner, you can listen to a sampling of the broadcasts available on XM
Satellite Radio. With the ignition switch in the ACCESSORY or the ON
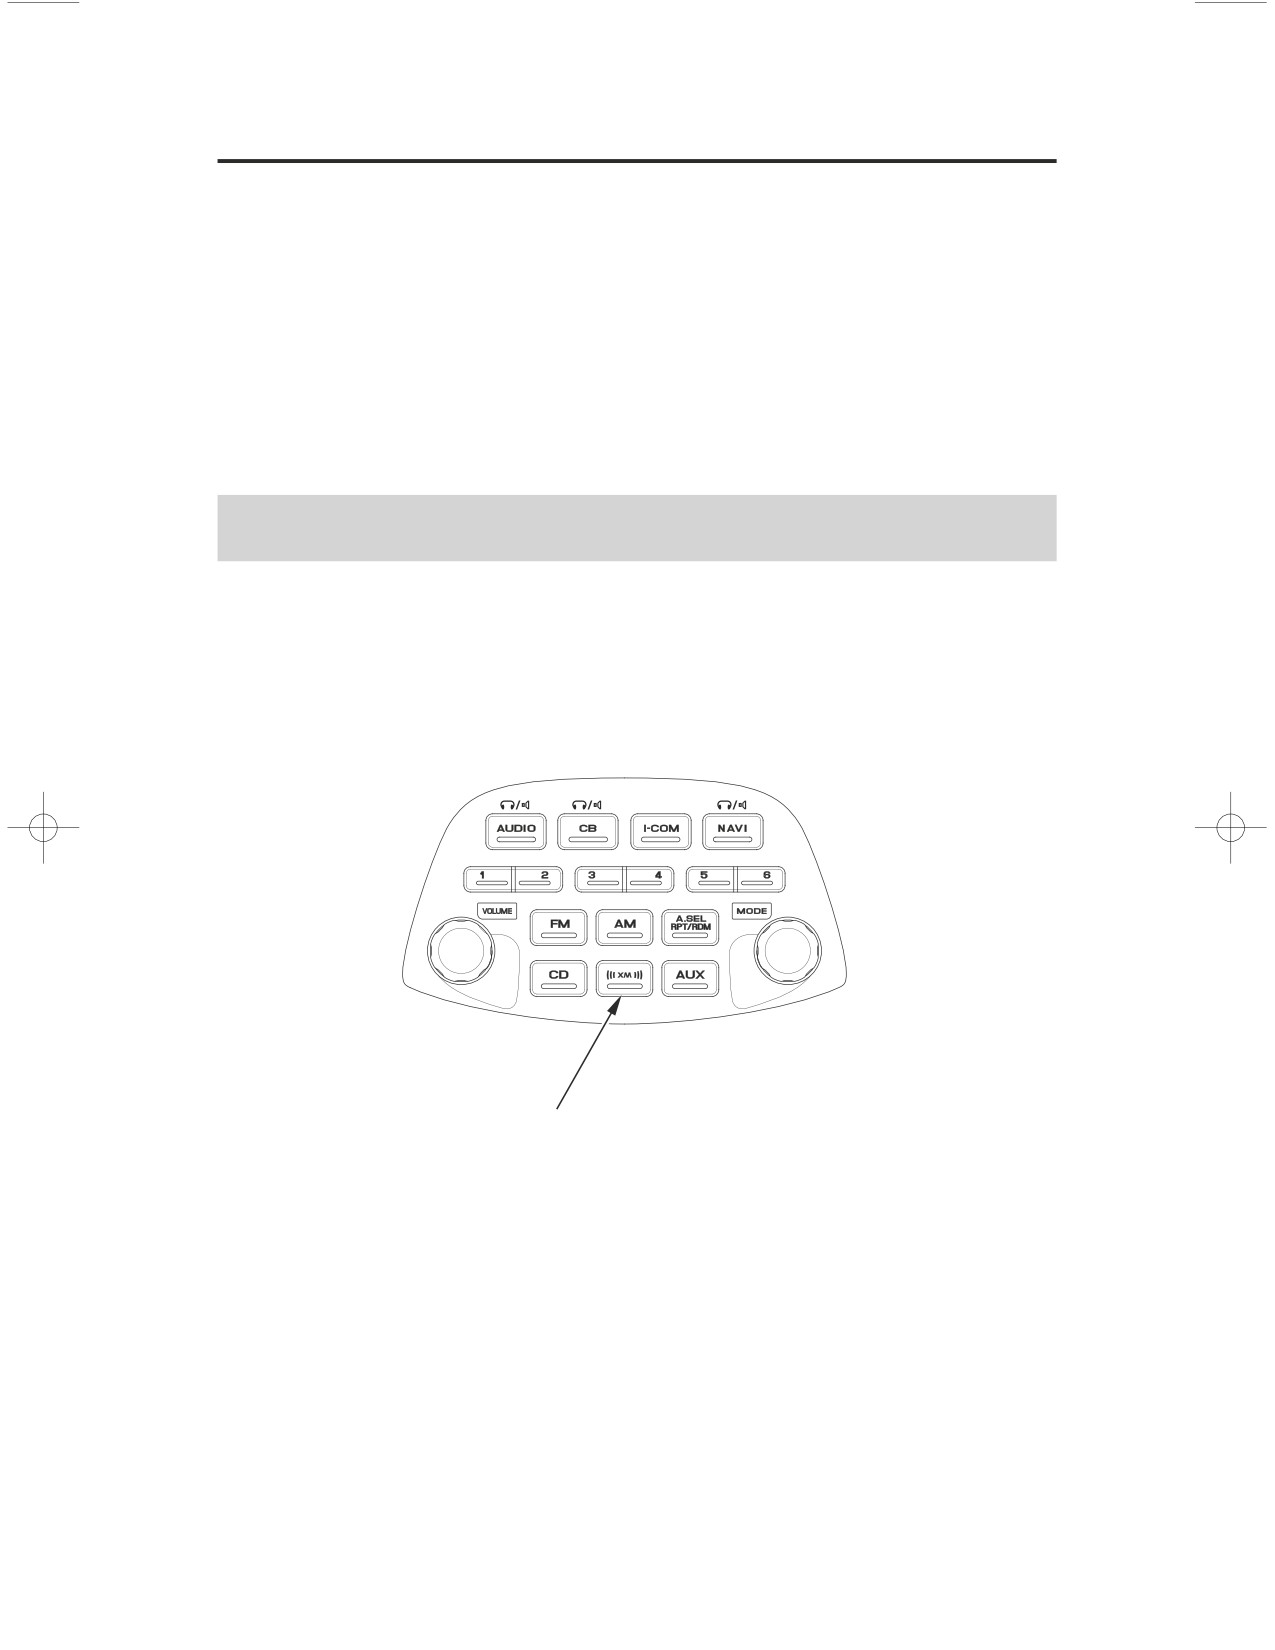
position, press the XM button. A variety of music types and styles will play.
XM button
If you decide to purchase XM satellite radio service, contact XM Radio at
Radio ID number, which may be found on XM Channel 0, and your credit card
number.
Audio Systems
121
XM Radio (USA only)
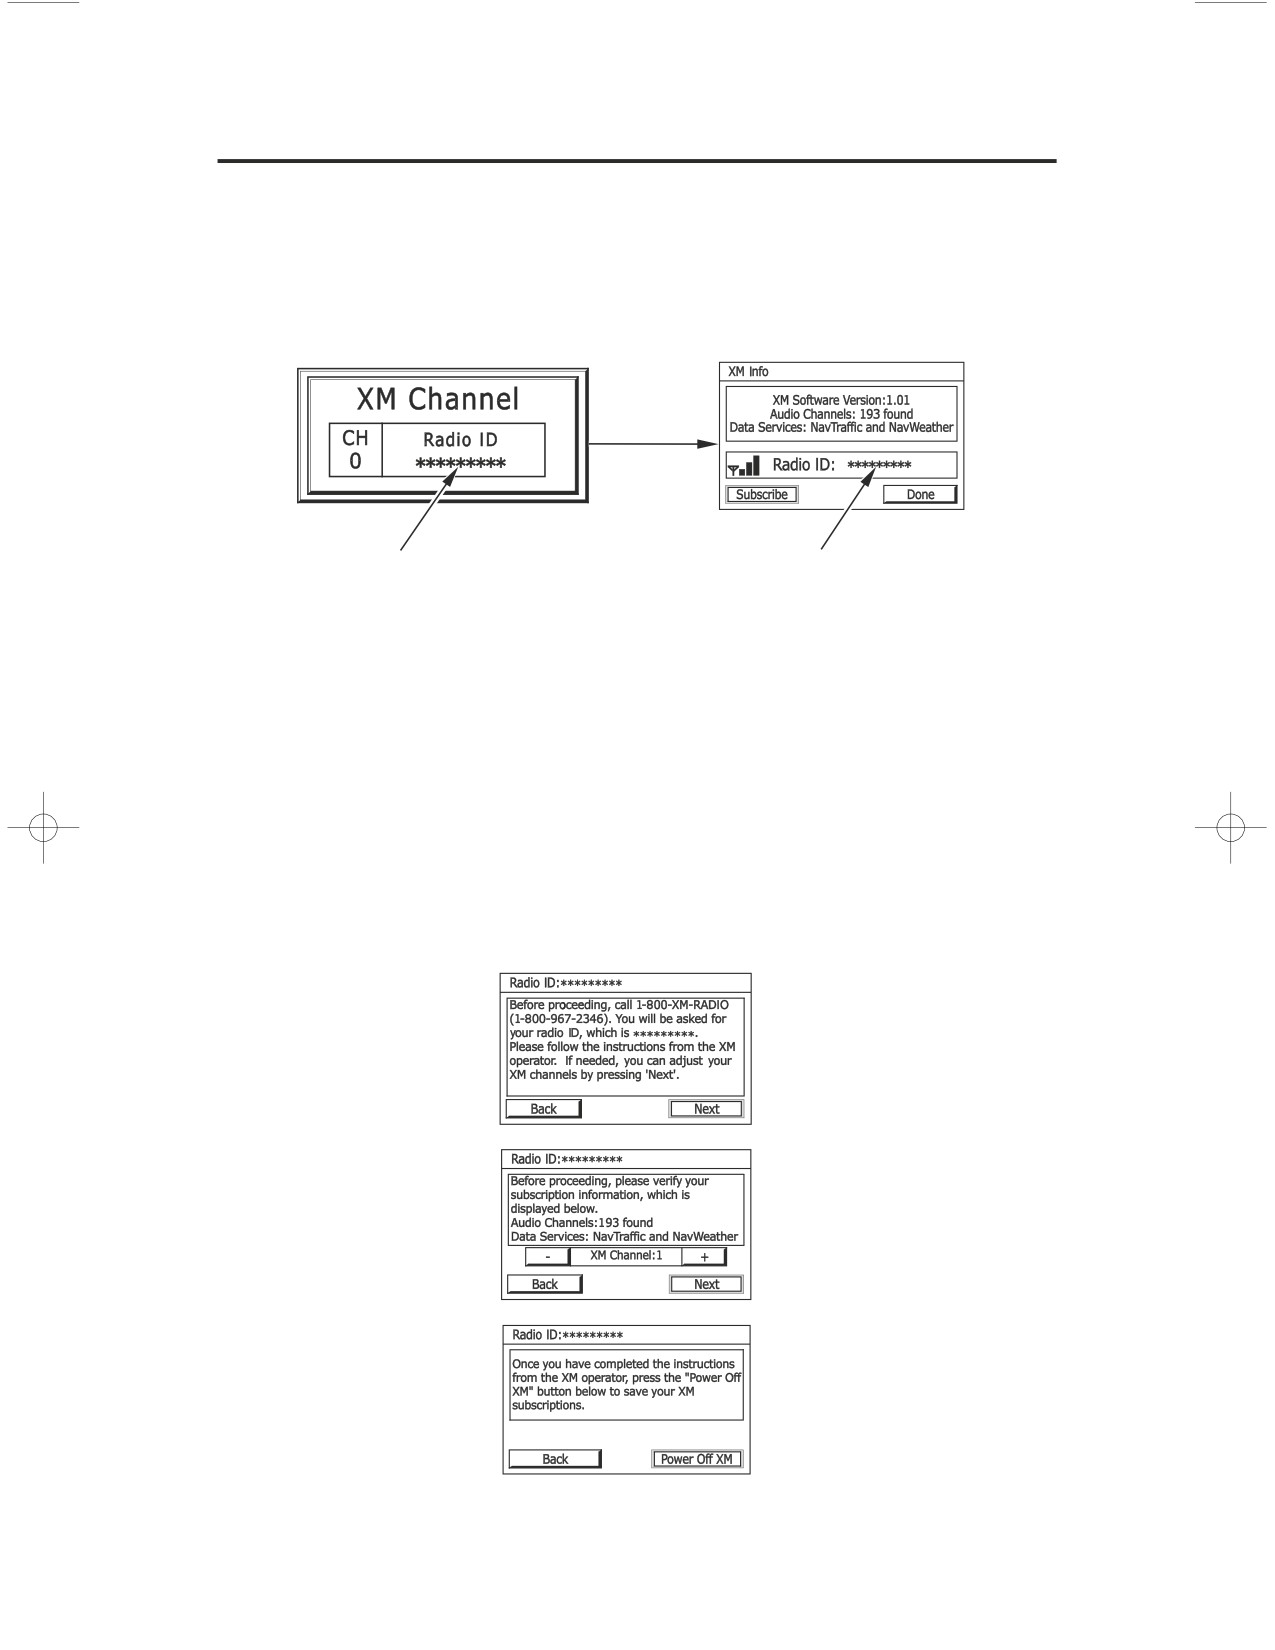
To get your Radio ID number, push the TUNE/DISC lever until CH 0 appears in
the display under channel mode (Display channel 0 at only ALL Category
search mode) (page
) or choose Menu screen on the Setup/info menu,
125
highlight XM Info and press ENT.
Radio ID number
Radio ID number
Contact XM Radio at
After you’ve registered with XM Radio, keep your audio system in the Satellite
Radio mode while you wait for activation. This should take about 30 minutes.
While waiting for activation, make sure your vehicle remains in an open area
with good reception. XM Radio will continue to send an activation signal to
your motorcycle for at least 3 hours from the activation request. If you miss that
window, simply log onto
refresh with your Radio ID and
follow the steps to refresh the signal.
122
Audio Systems
XM Radio (USA only)
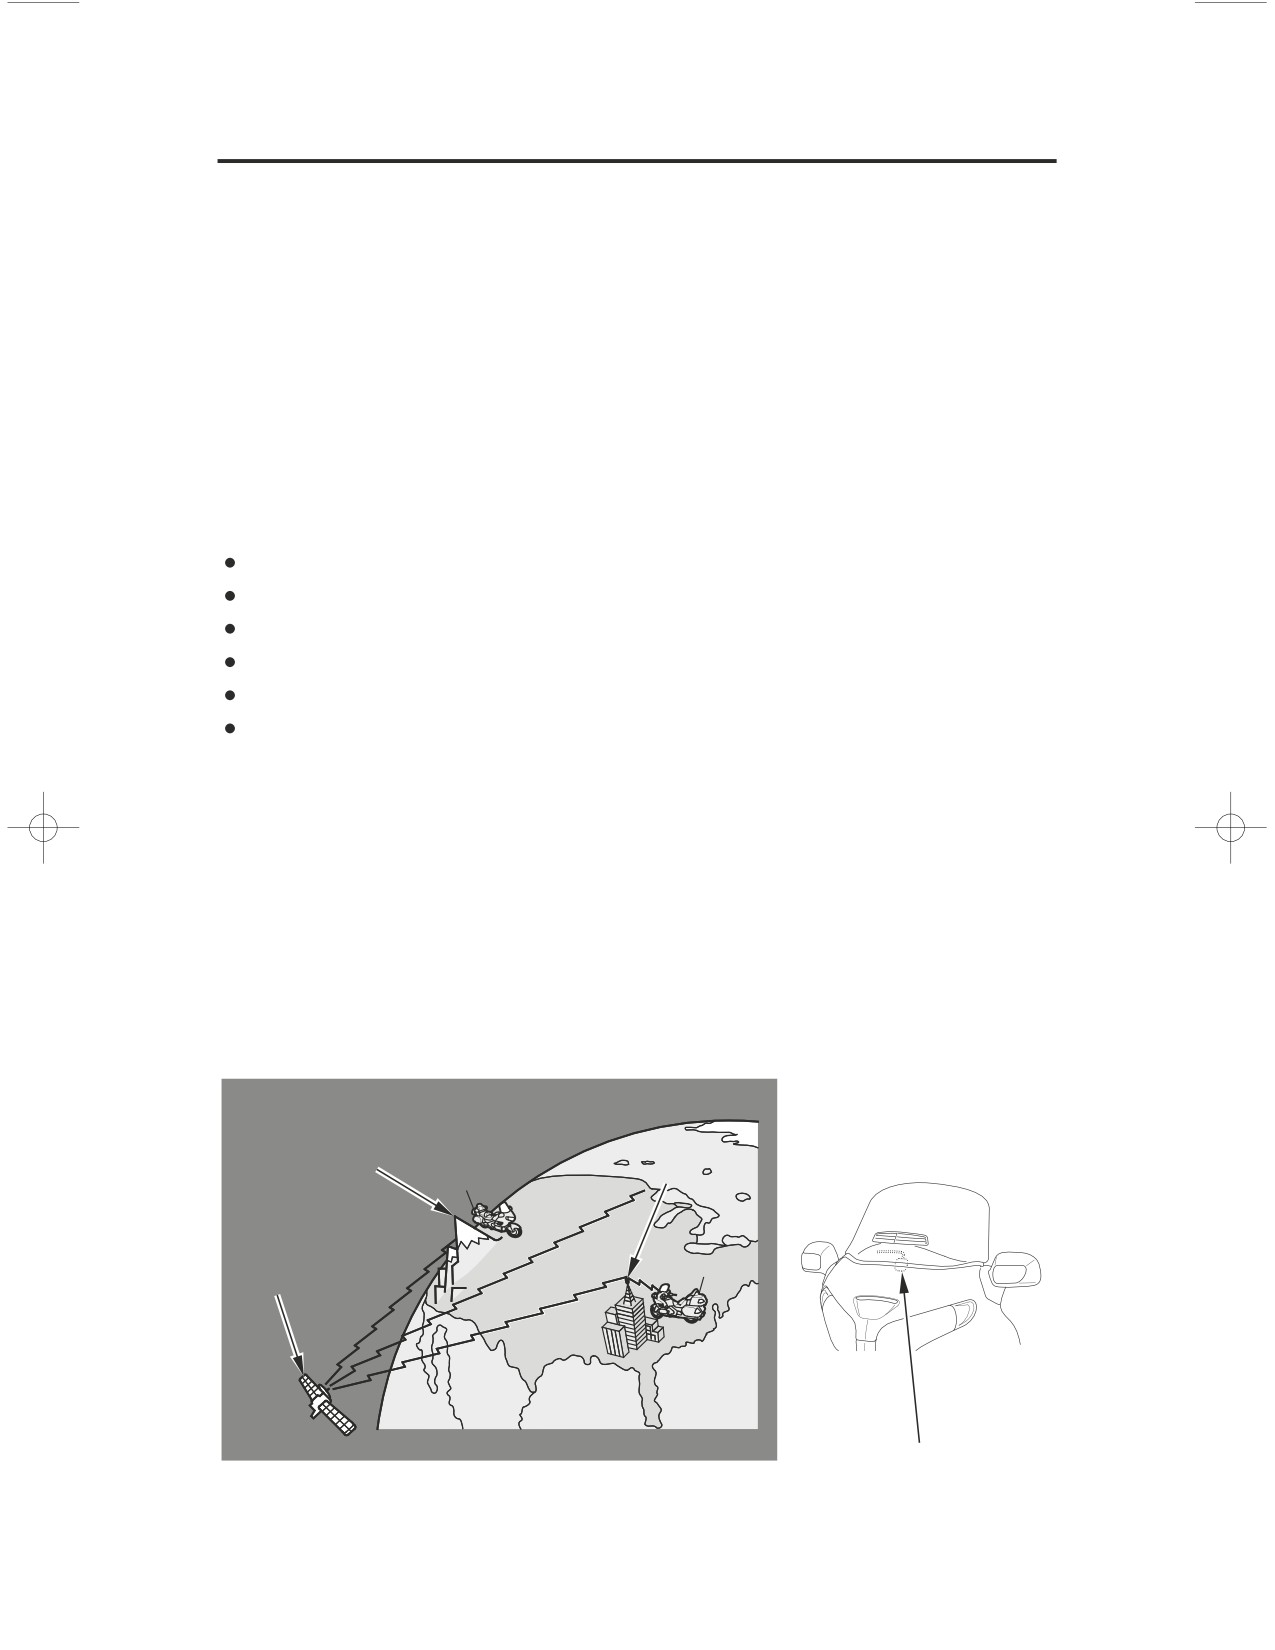
The XM satellites are in orbit over the equator; therefore, objects south of the
vehicle may cause satellite reception interruptions. To help compensate for this,
ground-based repeaters are placed in major metropolitan areas.
Satellite signals are more likely to be blocked by tall buildings and mountains
the farther north you travel from the equator. Carrying large items on a travel
trunk can also block the signal.
Depending on where you ride, you may experience reception problems.
Interference can be caused by any of these conditions:
Riding on the north side of an east/west mountain road.
Riding on the north side of a large commercial truck on an east/west road.
Riding in tunnels.
Riding on a road beside a vertical wall, steep cliff, or hill to the south of you.
Riding on the lower level of a multi-tiered road.
Riding on a single-lane road alongside dense trees taller than 50 ft. (15 m) to
the south of you.
There may be other geographic situations, parking conditions, and also installing
metallic or metalized accessories near the windscreen could affect XM radio
reception.
As required by the FCC:
Changes or modif ications not expressly approved by the party responsible f or
compliance could void the user’s authority to operate the equipment.
Signal may be blocked by
mountains or large
obstacles to the south.
Ground repeater
Satellite
XM radio antenna
Signal is weaker in these areas.
Audio Systems
123
XM Radio (USA only)
Operating the XM Radio
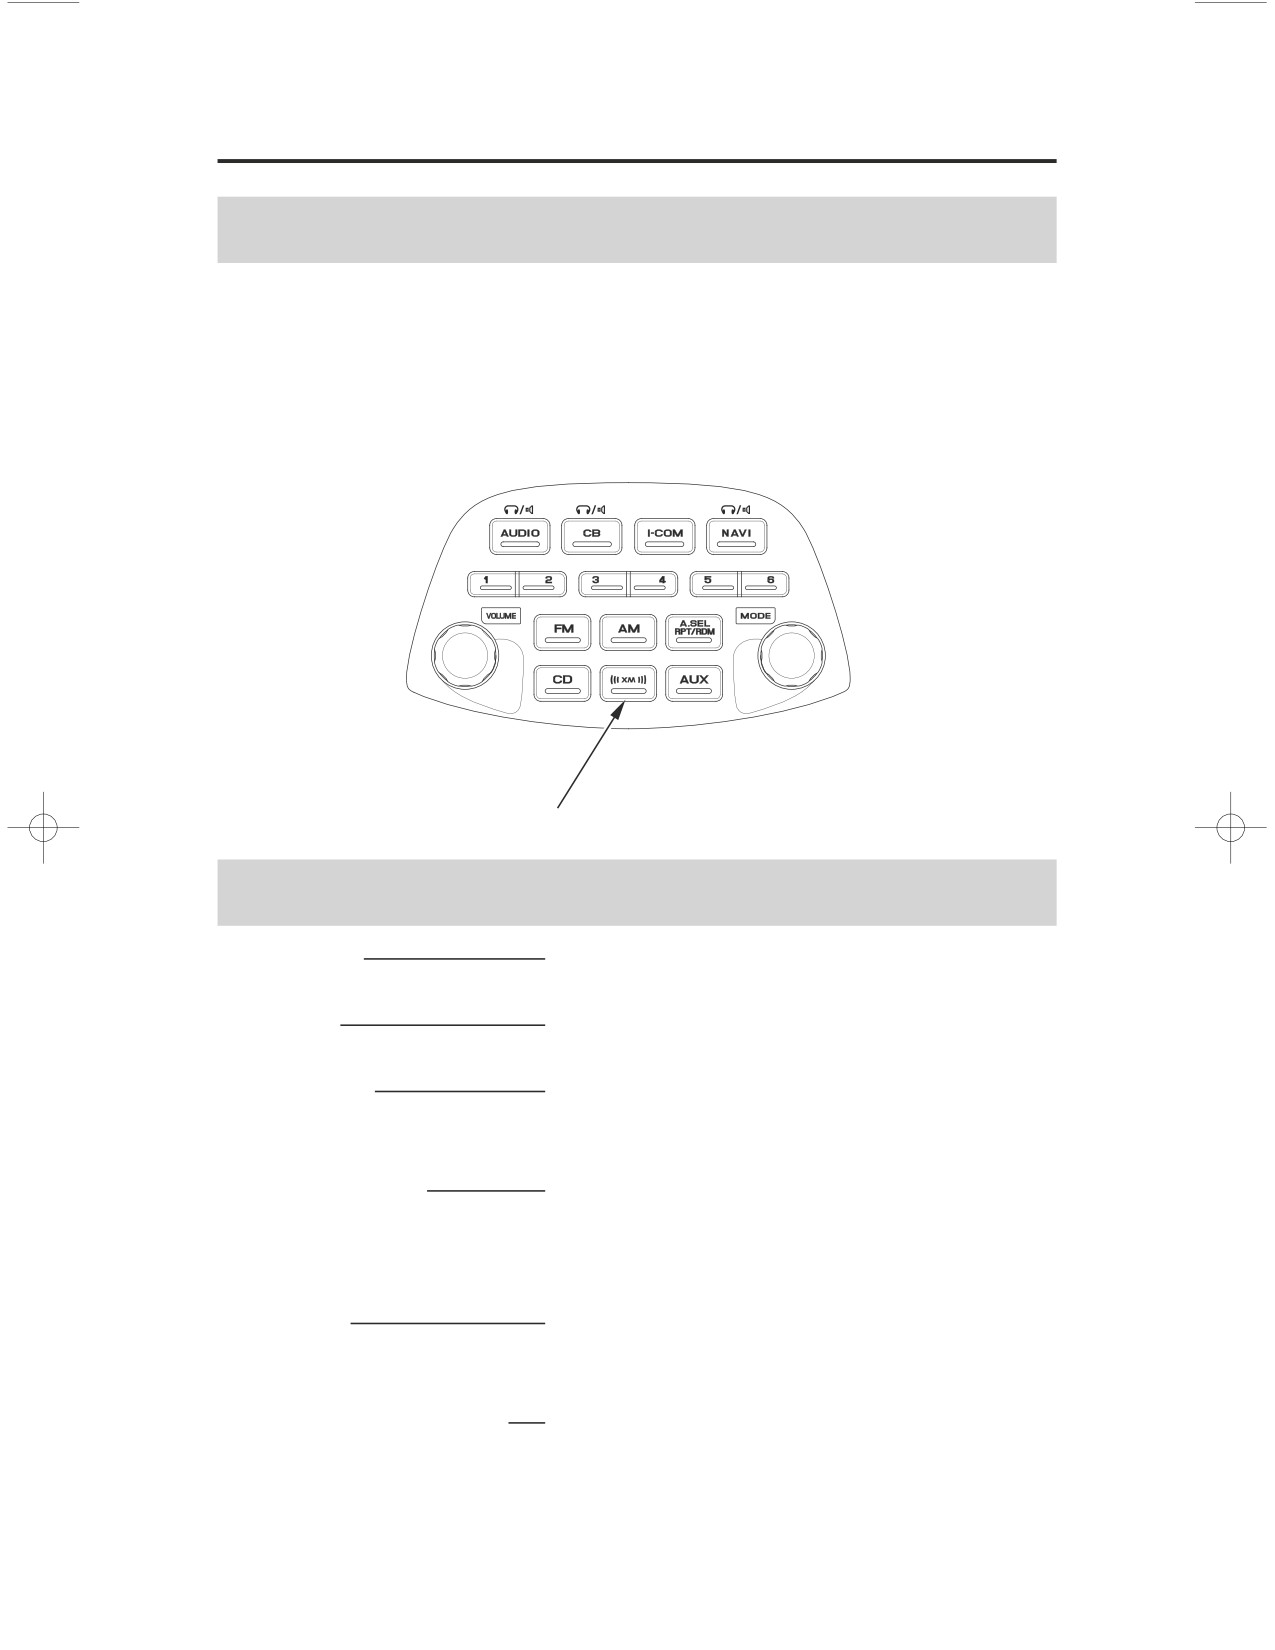
To listen to XM satellite radio, turn the ignition switch to the ON or
ACCESSORY position, and push the XM button. The last channel you listened
to will show in the display.
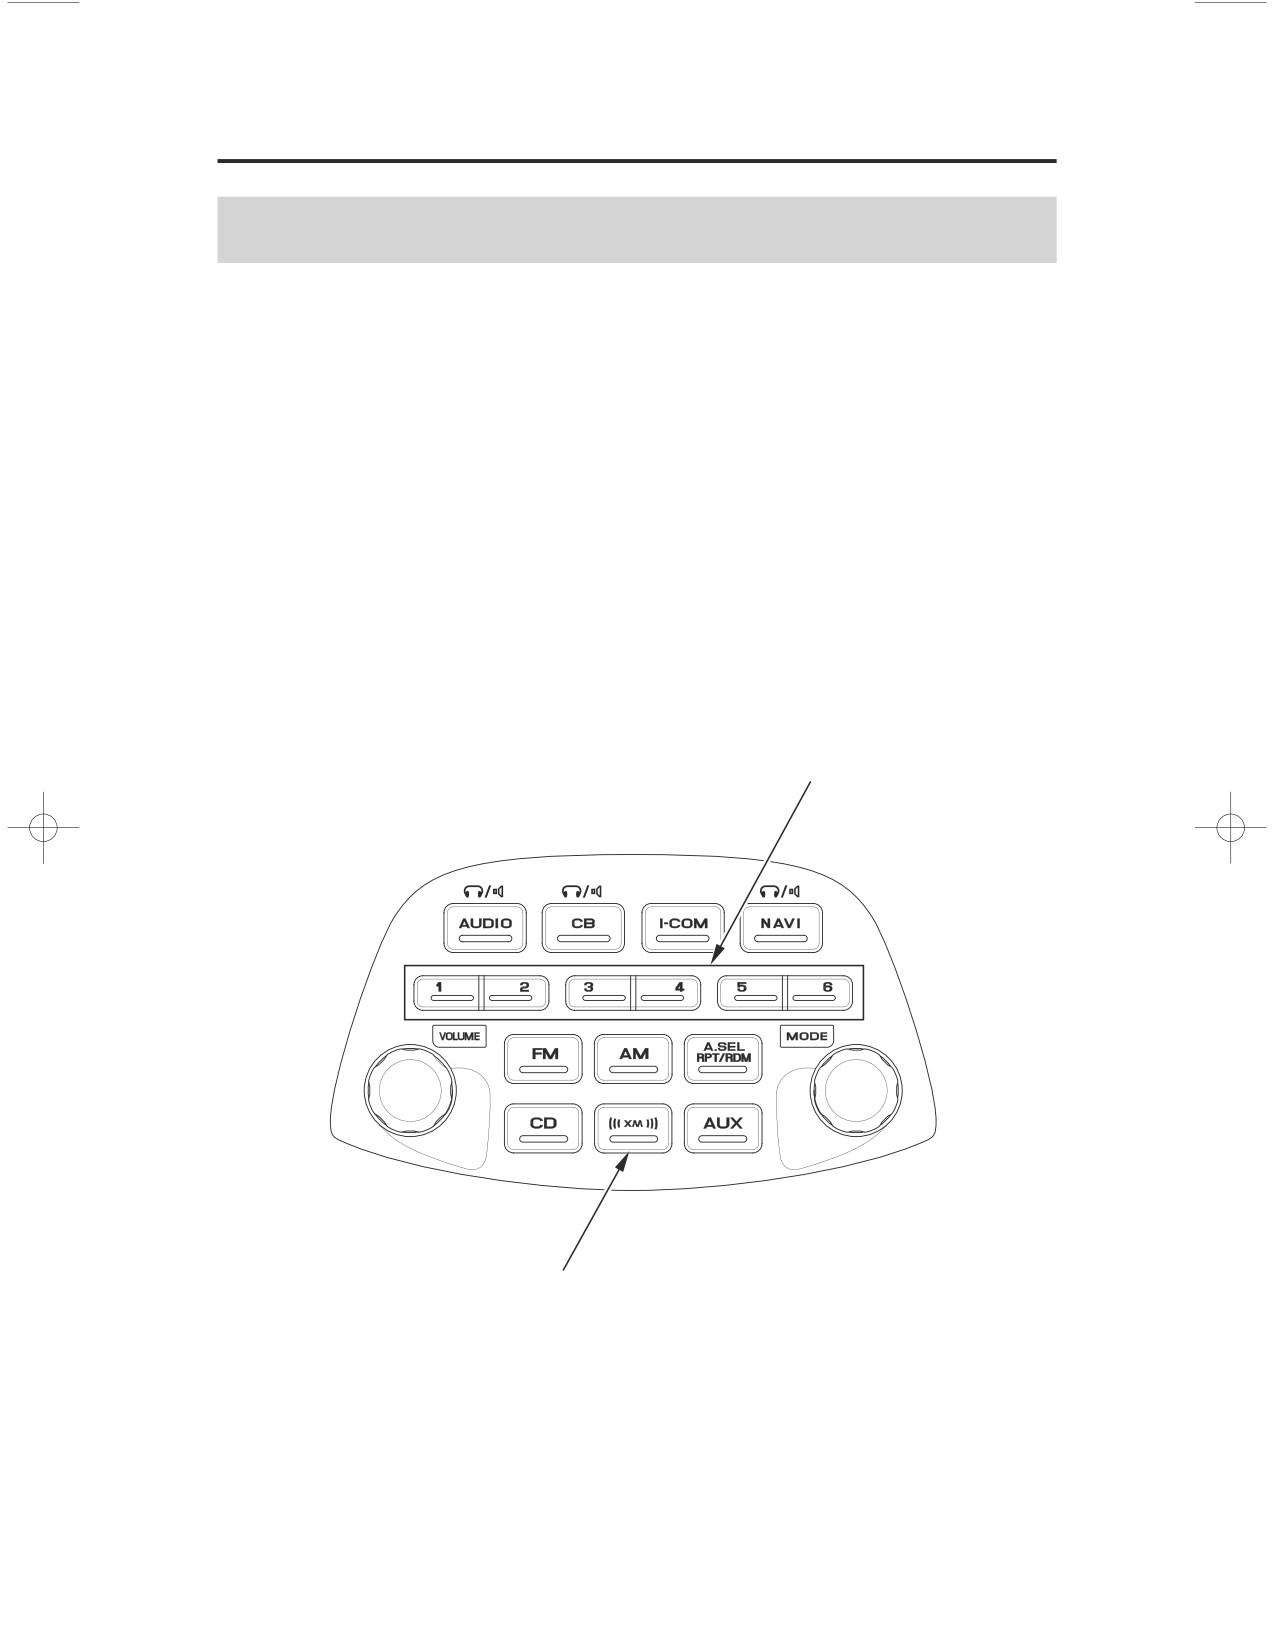
Push the XM button to switch to XM1/XM2.
XM button
XM Radio Display Messages
‘LOADING’
XM is loading the audio or program
information.
‘OFF AIR’
The channel currently selected is no longer
broadcasting.
‘UPDATING’
The encryption code is being updated. Wait
until the encryption code is fully updated.
Channels 0 and 1 should still work normally.
‘NO XM SIGNAL’
The signal is currently too weak. Move the
vehicle to an area away from tall buildings, and
with an unobstructed view of the southern
horizon.
‘ʵʵʵʵ’
The selected channel number does not exist, or
is not part of your subscription, or this channel
has no artist or title information at this time.
‘CHECK XM ANTENNA’ There is a problem with the XM antenna.
Please consult your dealer.
124
Audio Systems
XM Radio (USA only)
Select Channel
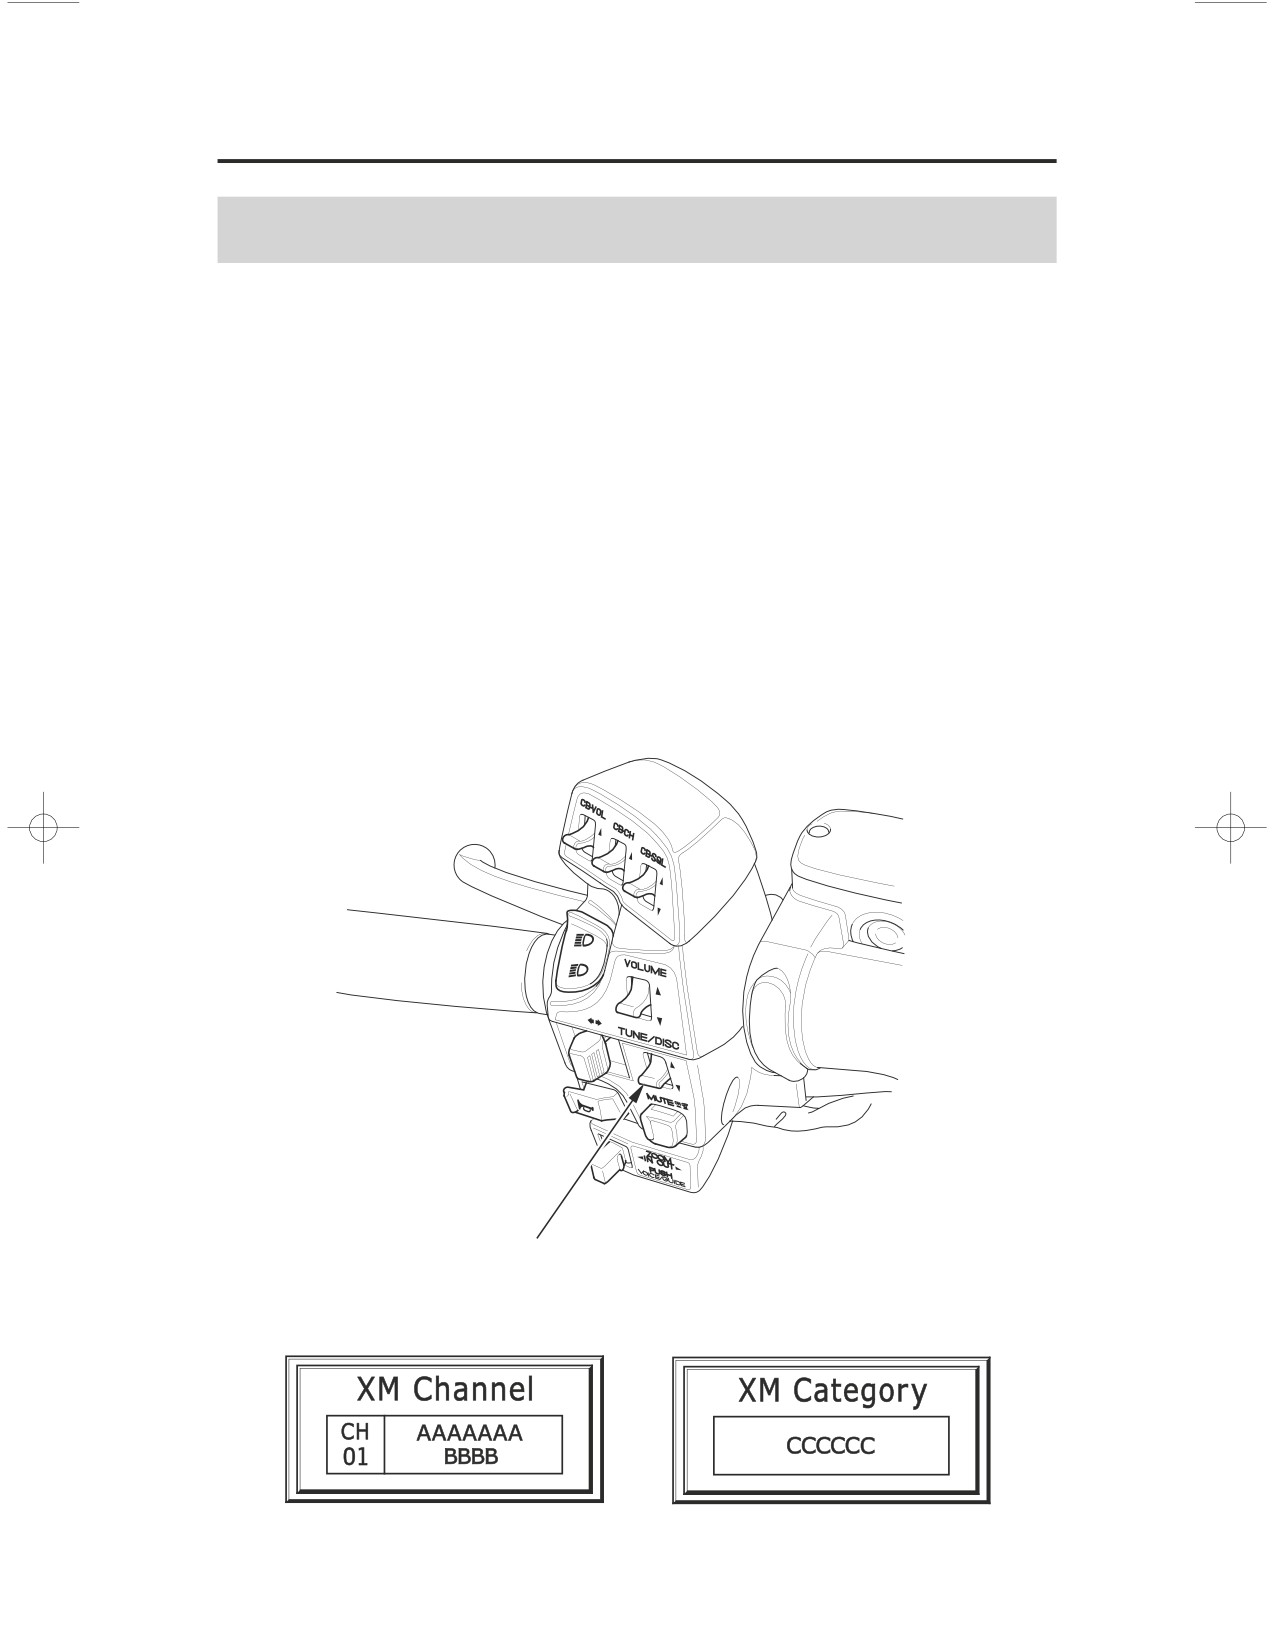
To select channel from XM Channel, push the TUNE/DISC lever.
To select channel from XM Category, push and hold the TUNE/DISC lever then
select the category while XM Category is displaying.
Push the TUNE/DISC lever up or down and continue to hold it down until you
see the desired channel.
In the channel mode, you can select all of the available channels. In the category
mode, such as Jazz, Rock, Classical, etc., you can select all of the channels
within that category.
You may experience periods when XM radio does not transmit the artist’s name
and song title information. If this happens, there is nothing wrong with your
system.
TUNE/DISC lever
XM Channel
XM Category
Audio Systems
125
XM Radio (USA only)
Preset Channel
You can store the channels of your favorite up to 12 preset channels using the
six preset buttons. Each button stores one channel from the XM1 band and one
channel from the XM2 band.
1. Push the XM button to select XM1 or XM2.
2. Select the channel (page
125
).
3. Pick the Preset button you want for that channels. Press and hold the preset
button until you hear a beep.
4.
Repeat steps 2 and 3 to store a total of six channel on each XM1 and XM2.
Once a channel is stored, simply press and release the proper preset button to
tune to it. The preset channels will be lost if your motorcycle’s battery goes low
(or dead) or is disconnected, or if the radio fuse is removed.
preset buttons
XM button
126
Audio Systems
Weather Information
Weather Band (WB)
(Models not equipped with Navigation System)
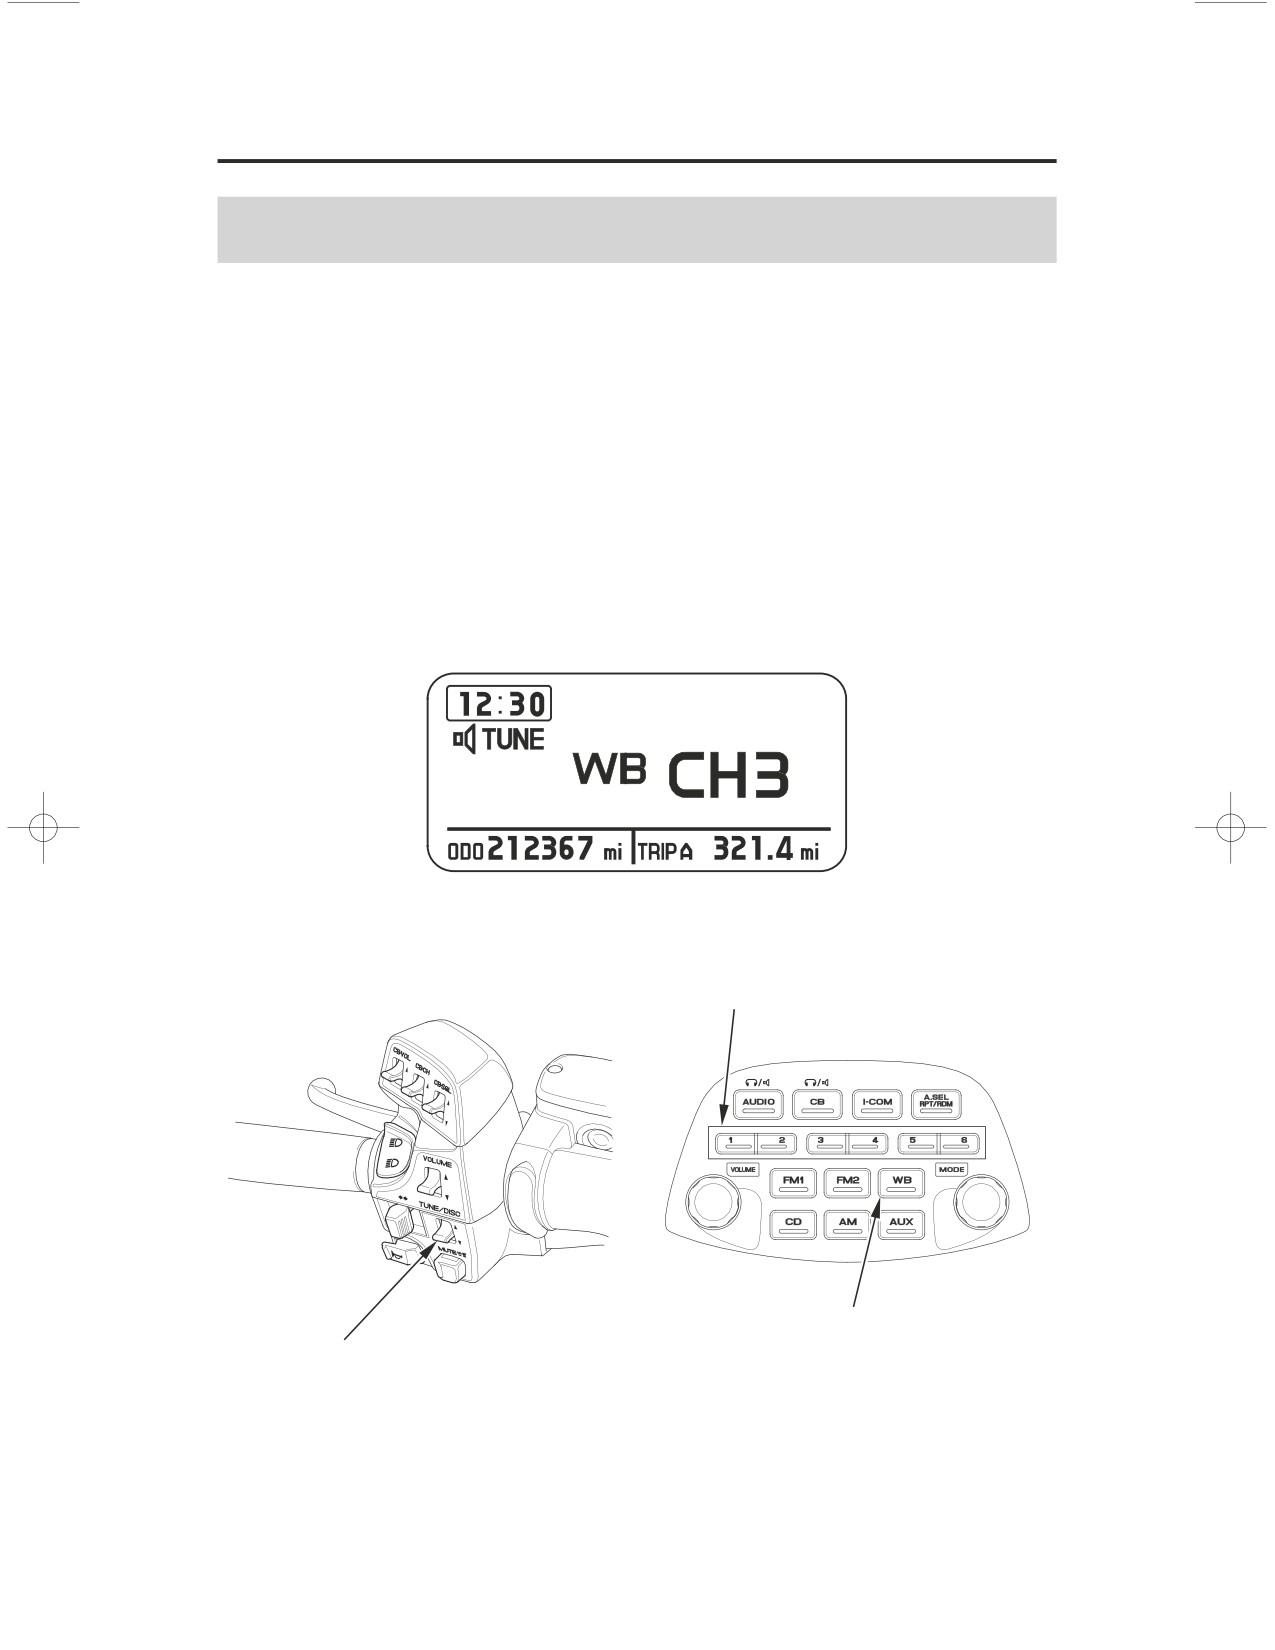
To listen to the Weather Band
ʵ
push the WB button.
To cancel the Weather Band
ʵ
push another band button (AM, FM1 or FM2).
To select channels 1ʵ6ʵ
push the desired preset button.
To select channel 7
ʵ
push the TUNE/DISC lever up or down until channel 7 is
selected.
(The TUNE/DISC lever may be used to select any of the 7 channels. The lever
must be used to select channel 7.)
LEFT HANDLEBAR
preset buttons
WB button
TUNE/DISC lever
Audio Systems
127
Weather Information
(Models equipped with Navigation System)
For USA
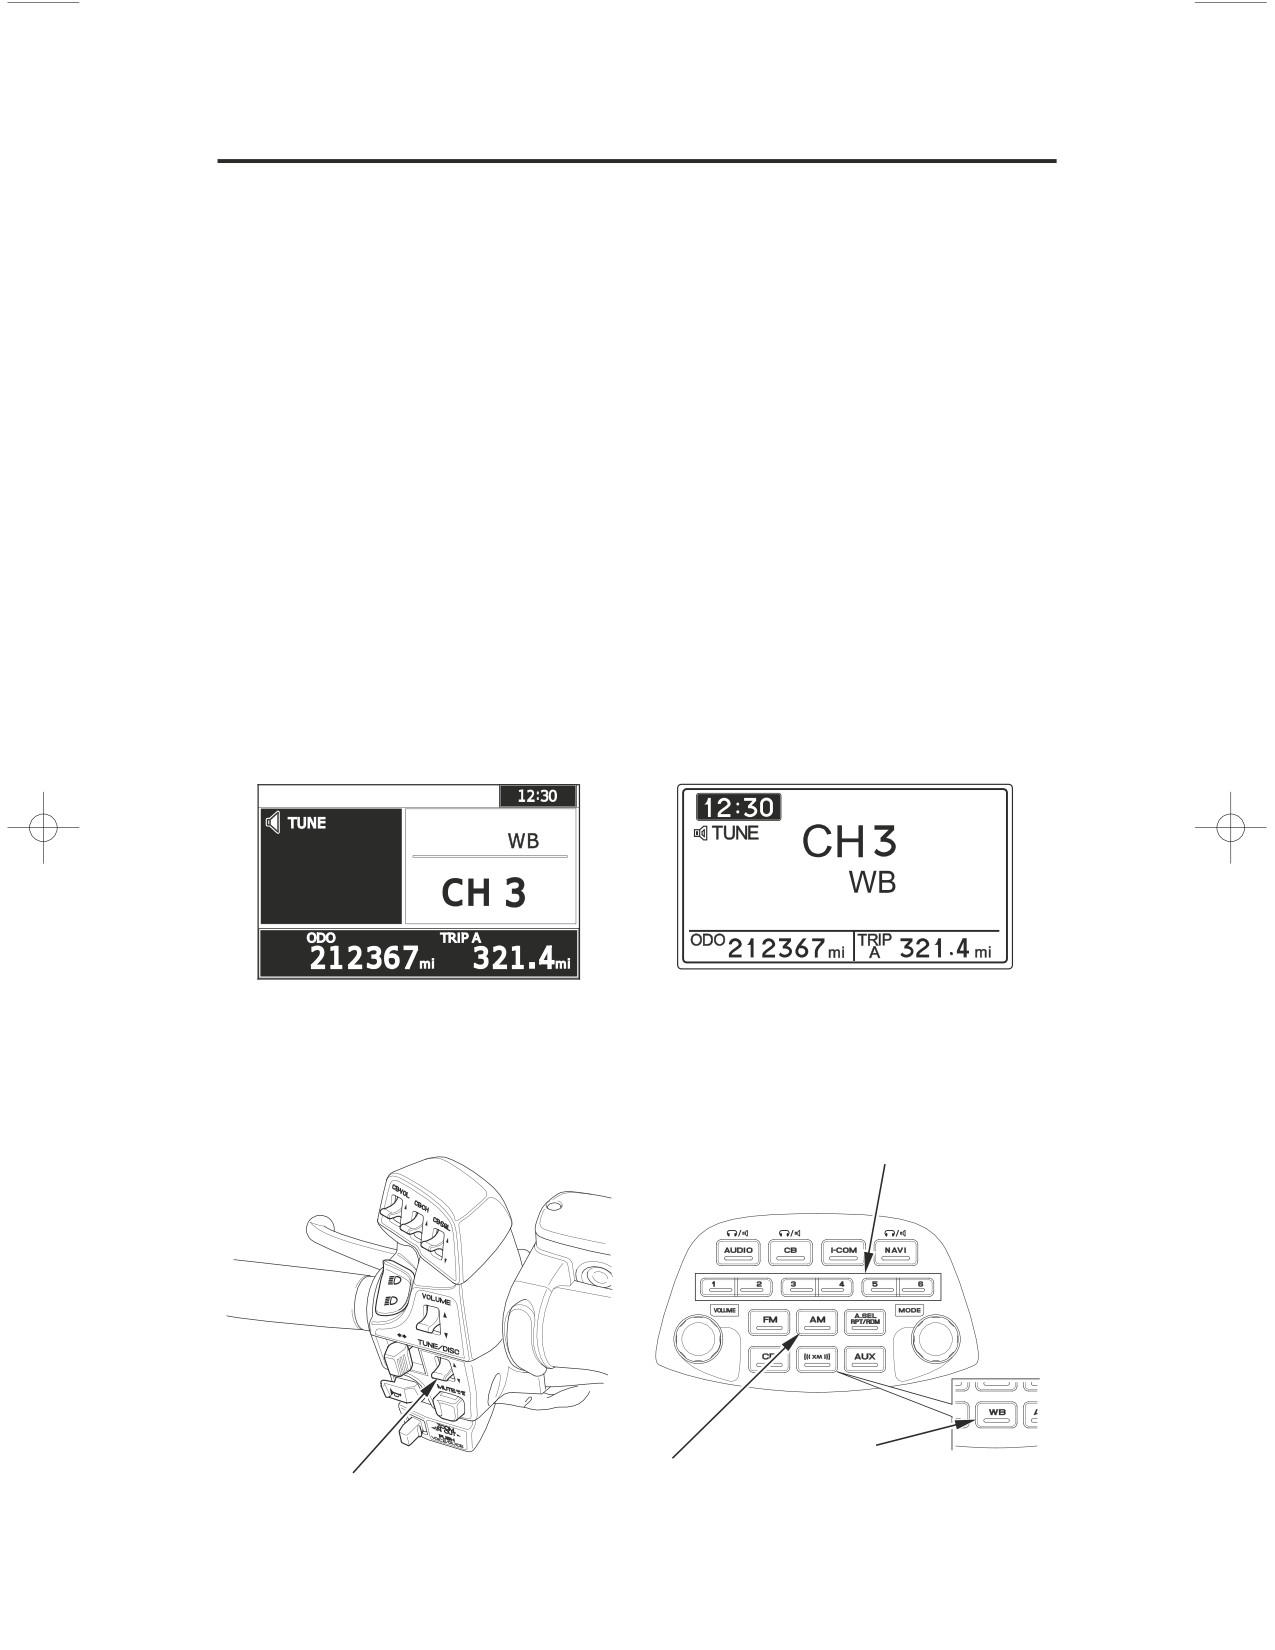
To listen to the Weather Band
ʵ
push the AM button to switch AM/WB.
To cancel the Weather Band
ʵ
push the AM button again or another band
button (FM or XM).
For Canada
To listen to the Weather Band
ʵ
push the WB button.
To cancel the Weather Band
ʵ
push another band button (AM or FM).
To select channels 1ʵ6ʵ
push the desired preset button.
To select channel 7
ʵ
push the TUNE/DISC lever up or down until channel 7 is
selected.
(The TUNE/DISC lever may be used to select any of the 7 channels. The lever
must be used to select channel 7.)
For USA
For Canada
LEFT HANDLEBAR
preset buttons
WB button
AM button
For Canada only
TUNE/DISC lever
128
Audio Systems
Auxiliary Function
Auxiliary (AUX) Input
Use this function to listen to other audio such as a portable CD player:
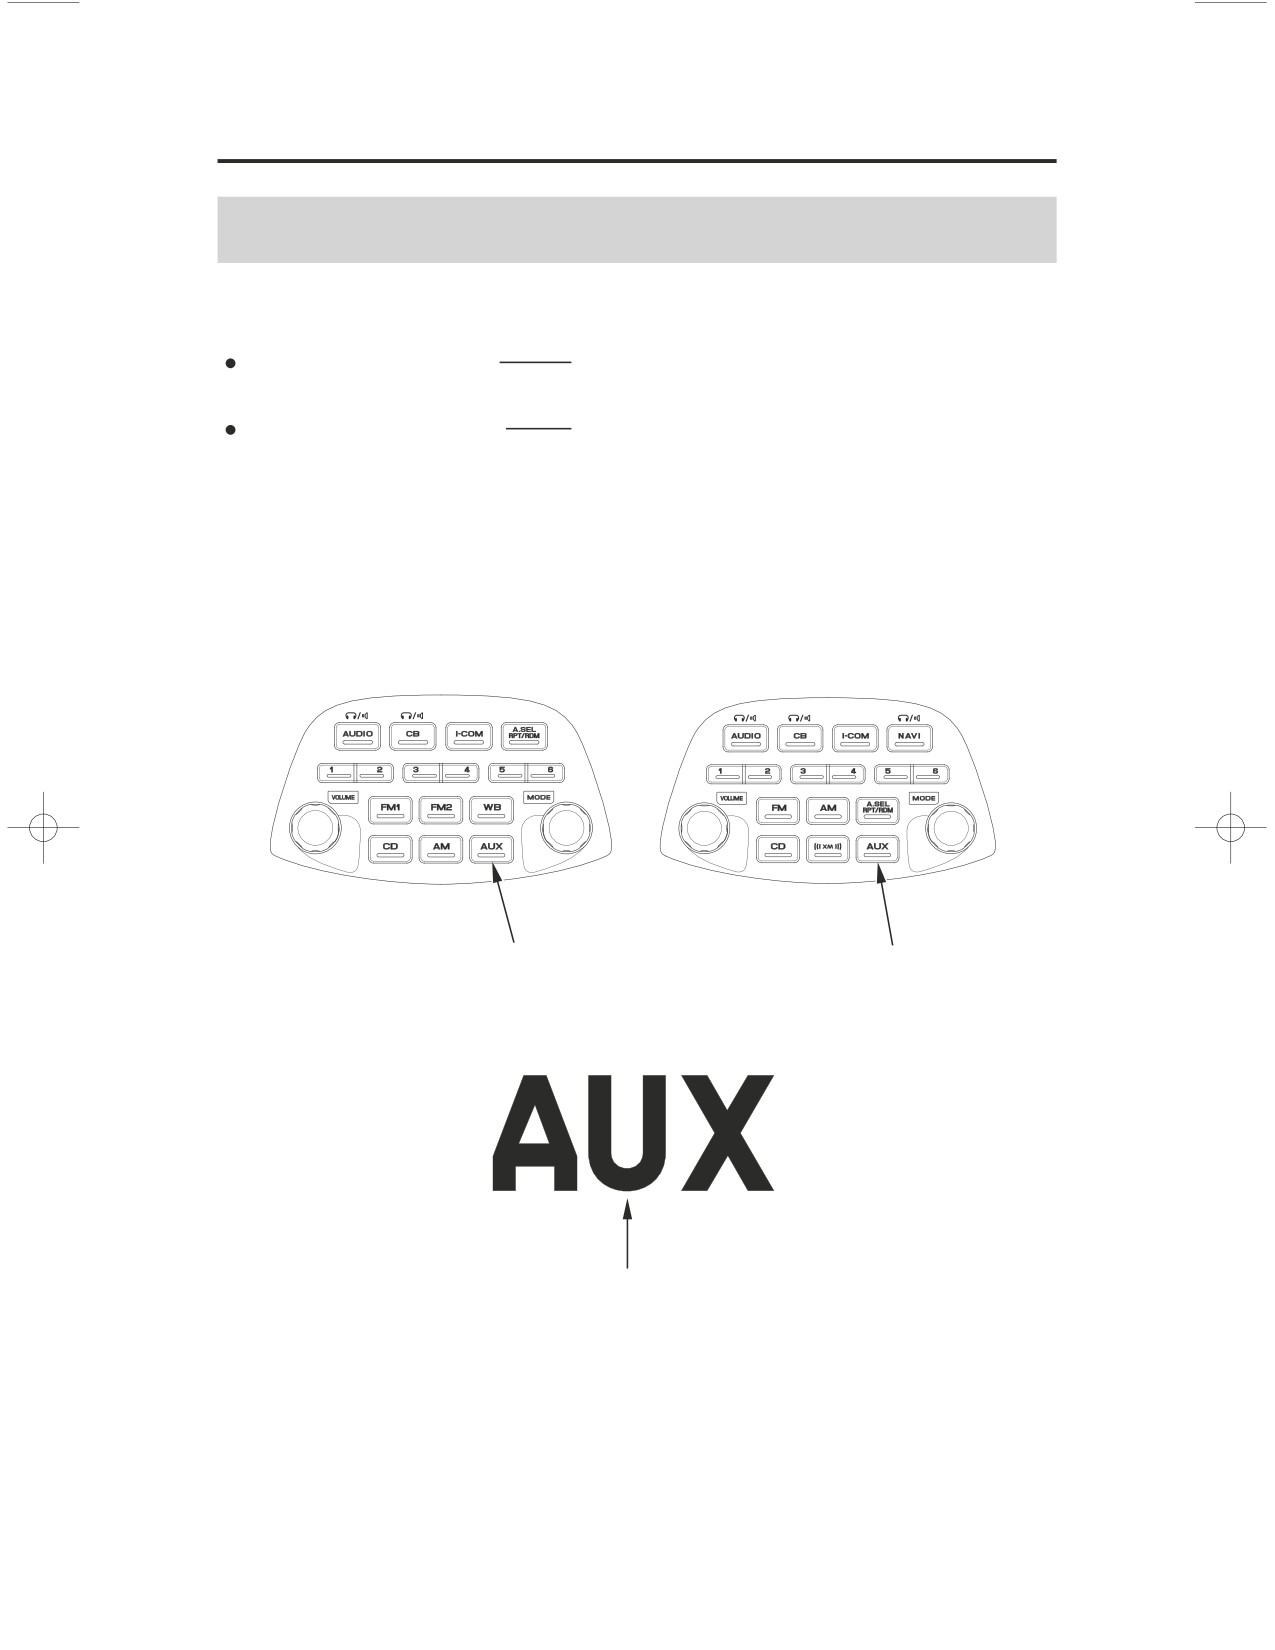
To turn the function on
push the AUX button. (AUX appears on the
display.)
To turn the function off
push the AM, FM1, FM2, FM, or WB button.
The following functions operate the same as they do with the AM/FM radio:
Switch output, Tone control, Fader control, AMB, AVC, BEEP, Muting.
(Models not equipped with
(Models equipped with
Navigation System)
Navigation System)
AUX button
AUX button
AUX indicator
Audio Systems
129
Auxiliary Function
Input Jack Setup
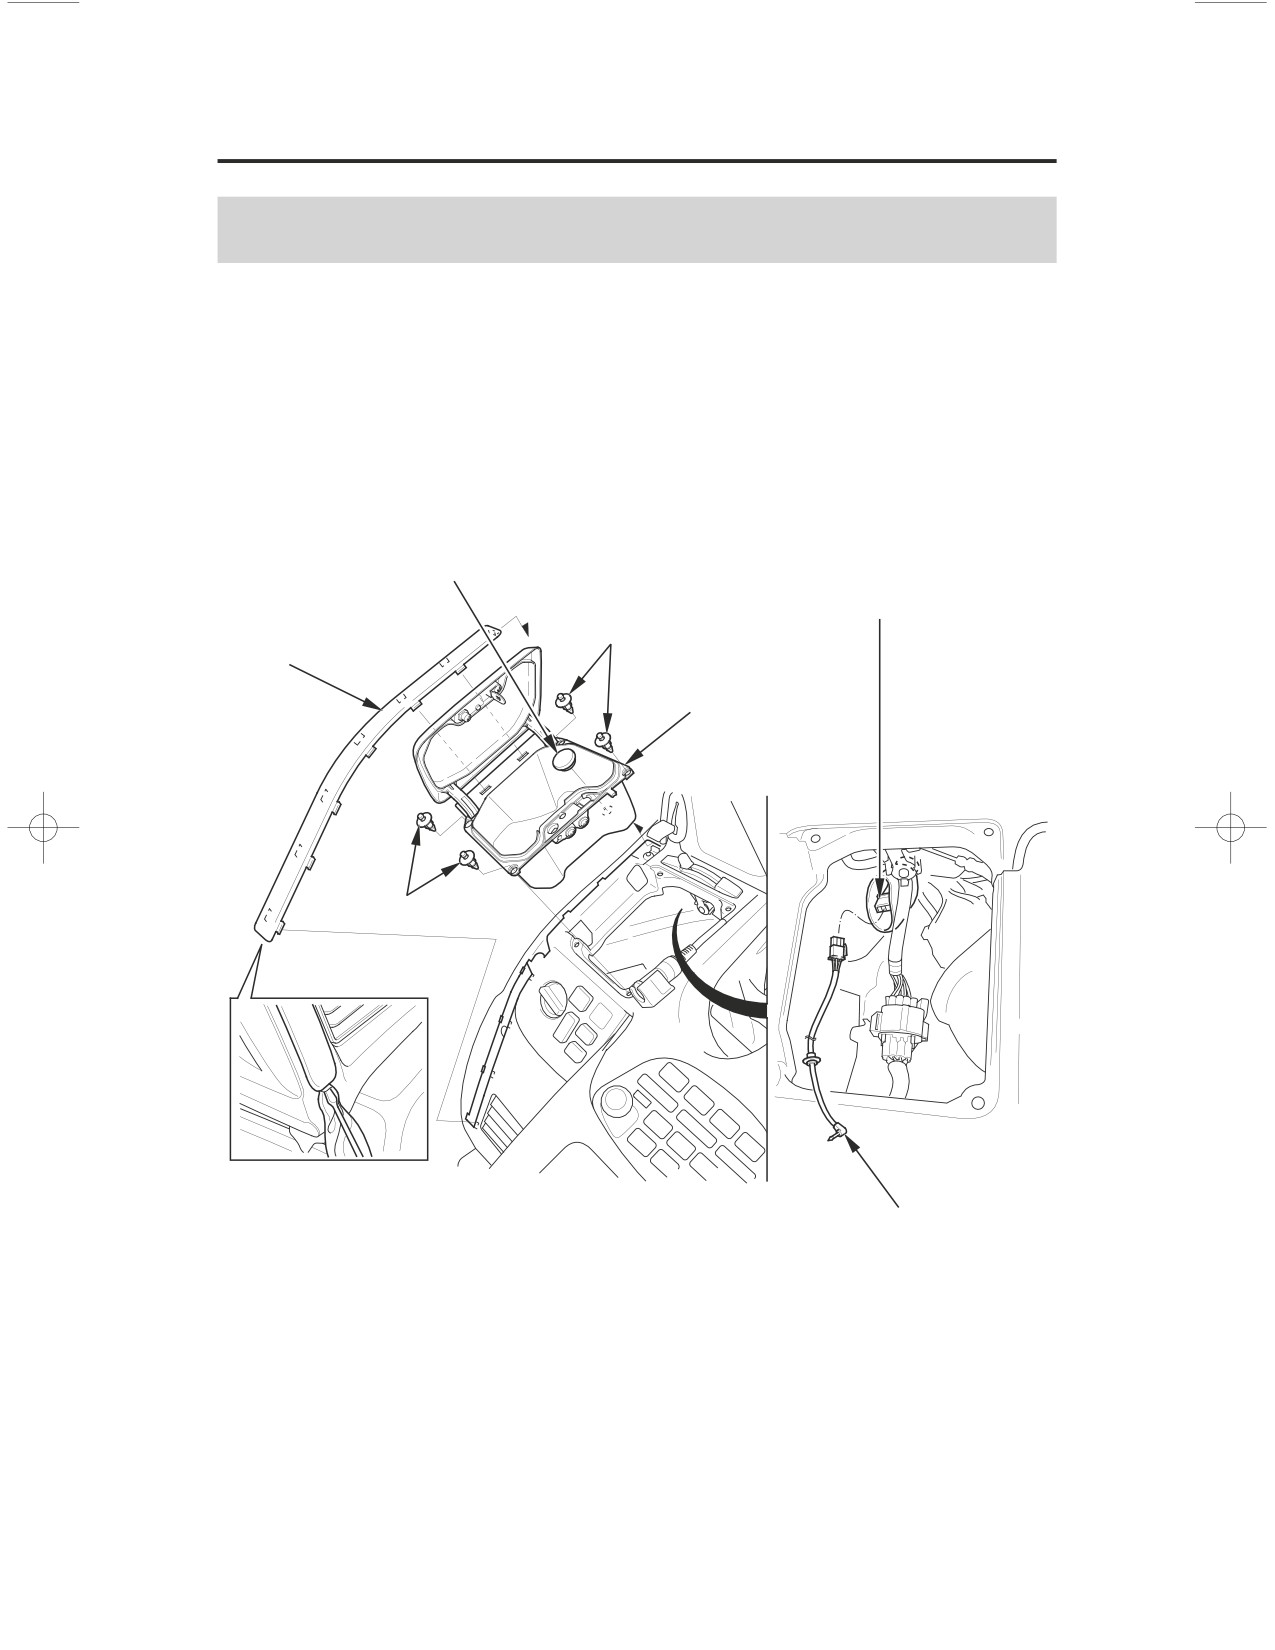
The auxiliary input jack connector is located under the left fairing pocket. To
use it:
1. Attach a cloth to the cover and remove the cover with care using a flat-tip
screwdriver.
2. Open the left fairing pocket cover and remove the clips and grommet A.
3.
Lift out the fairing pocket.
grommet A
wire harness connector
clips
cover
fairing pocket
clips
auxiliary input patch cord
4. Remove the auxiliary input patch cord from the owner’s manual pouch.
5. Plug the auxiliary input patch cord into the wire harness connector.
130
Audio Systems
Auxiliary Function
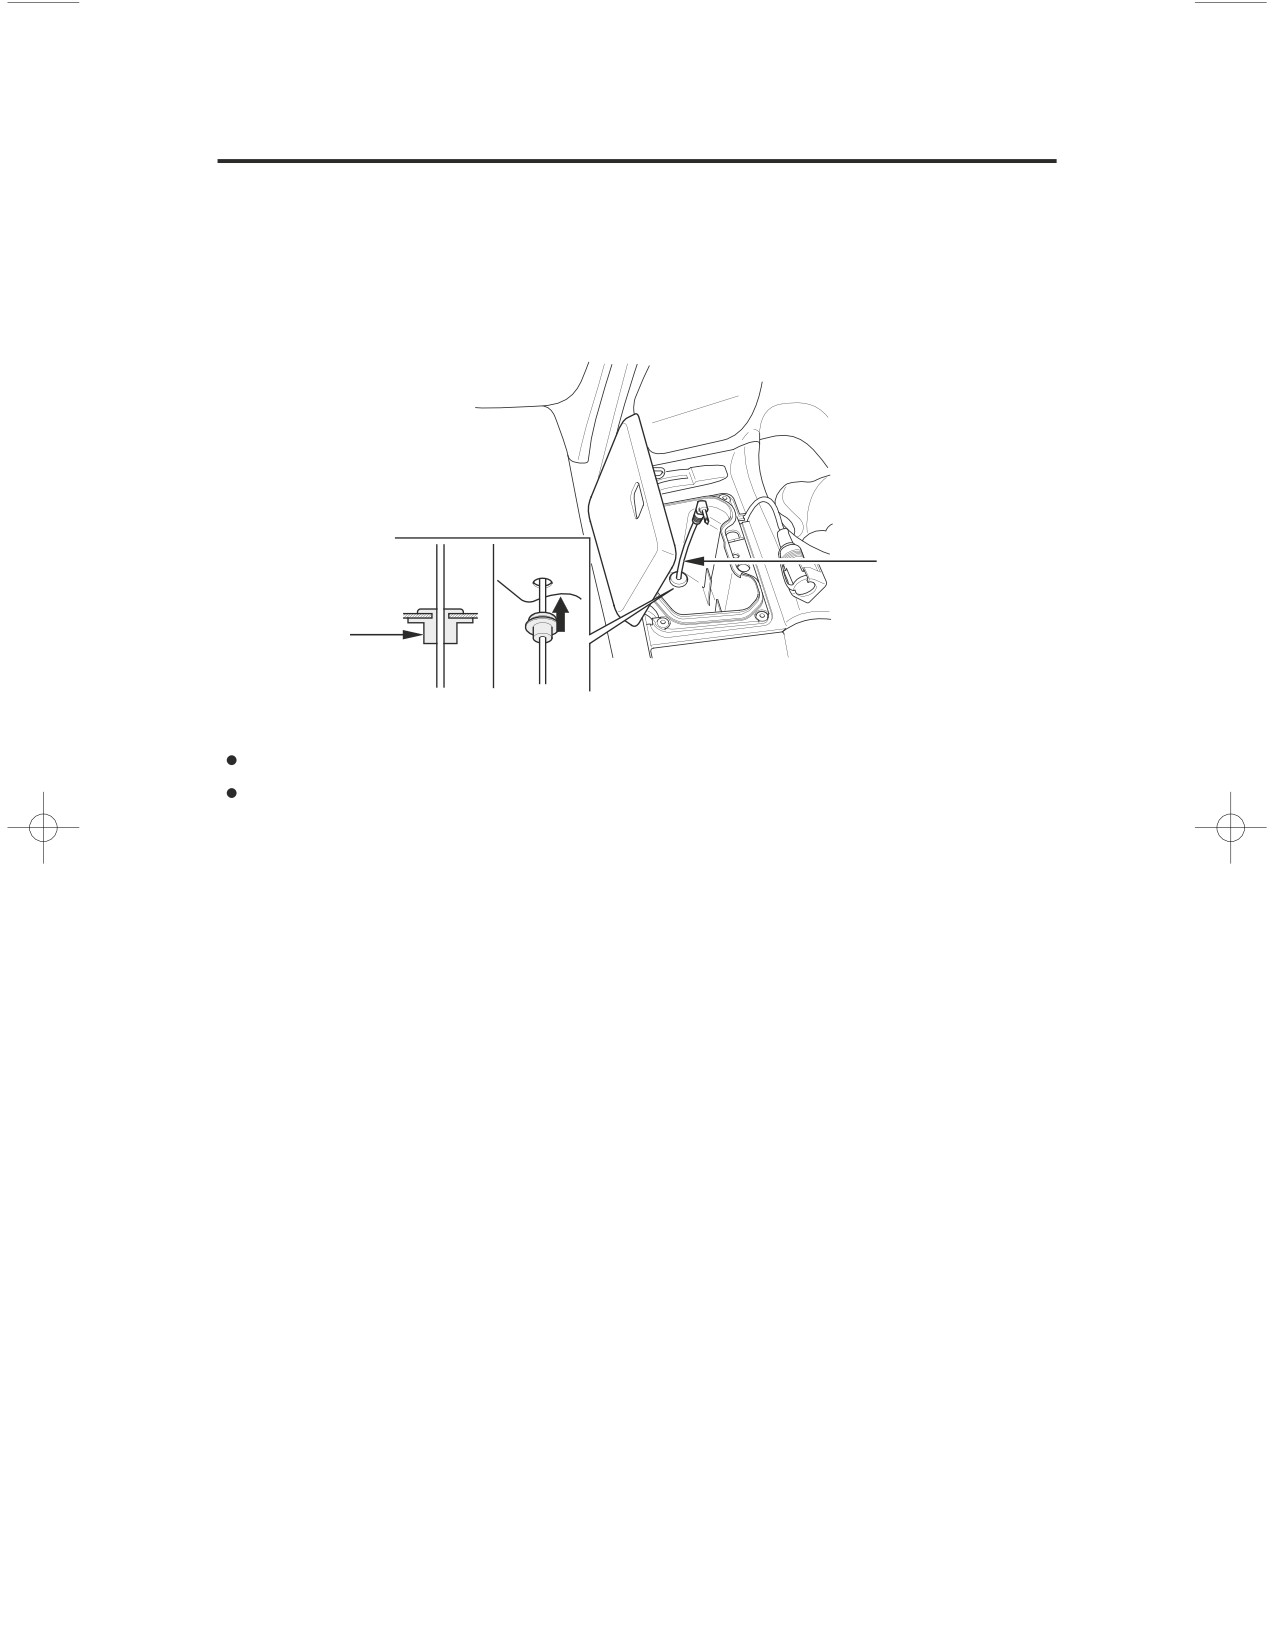
6. Route the auxiliary input patch cord through the hole in the bottom of the
fairing pocket.
7. Install the grommet B to left fairing pocket.
Do not pull on the auxiliary cord as the wires could be damaged.
auxiliary input
patch cord
grommet B
Some portable audio systems may pick up noise from the ignition.
Adjust the volume of the portable audio system so that it is about the same
level as the GL’s radio volume. If the volume of the portable audio system is
set too high, the sound coming out from the speakers or headset may be
distorted.
Audio Systems
131
Intercom (I-COM) System
System Control
Some local governments prohibit the use of a headset by the operator of a motor
vehicle. Always obey applicable laws and regulations.
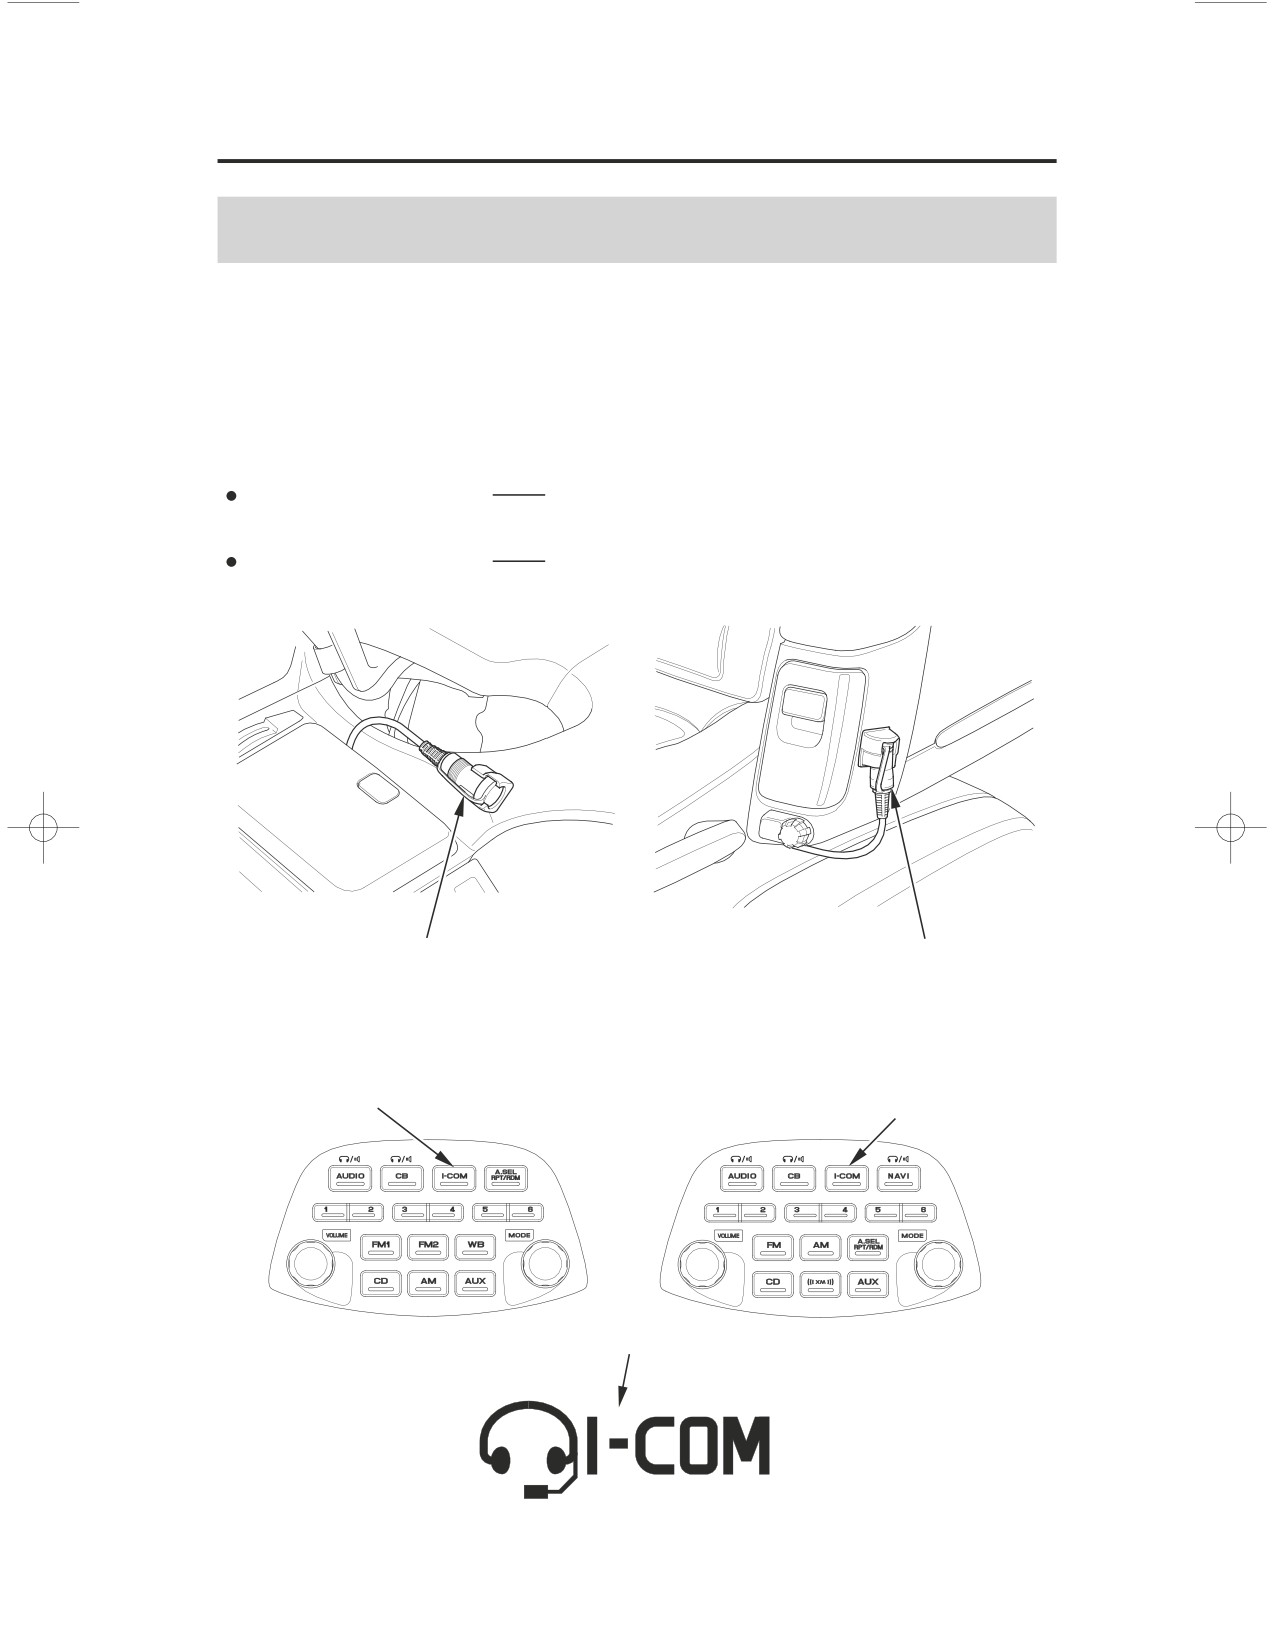
The intercom system may be used to communicate with your passenger. (If you
want to use this system, you must have headsets.)
To turn the system on
push the I-COM button. (I-COM appears on the
display.)
To turn the system off
push and hold the I-COM button. (I-COM
disappears.)
front headset terminal
rear headset terminal
(Models not equipped with
(Models equipped with
Navigation System)
Navigation System)
I-COM button
I-COM button
I-COM mode indicator
132
Audio Systems
Intercom (I-COM) System
VOLUME Control
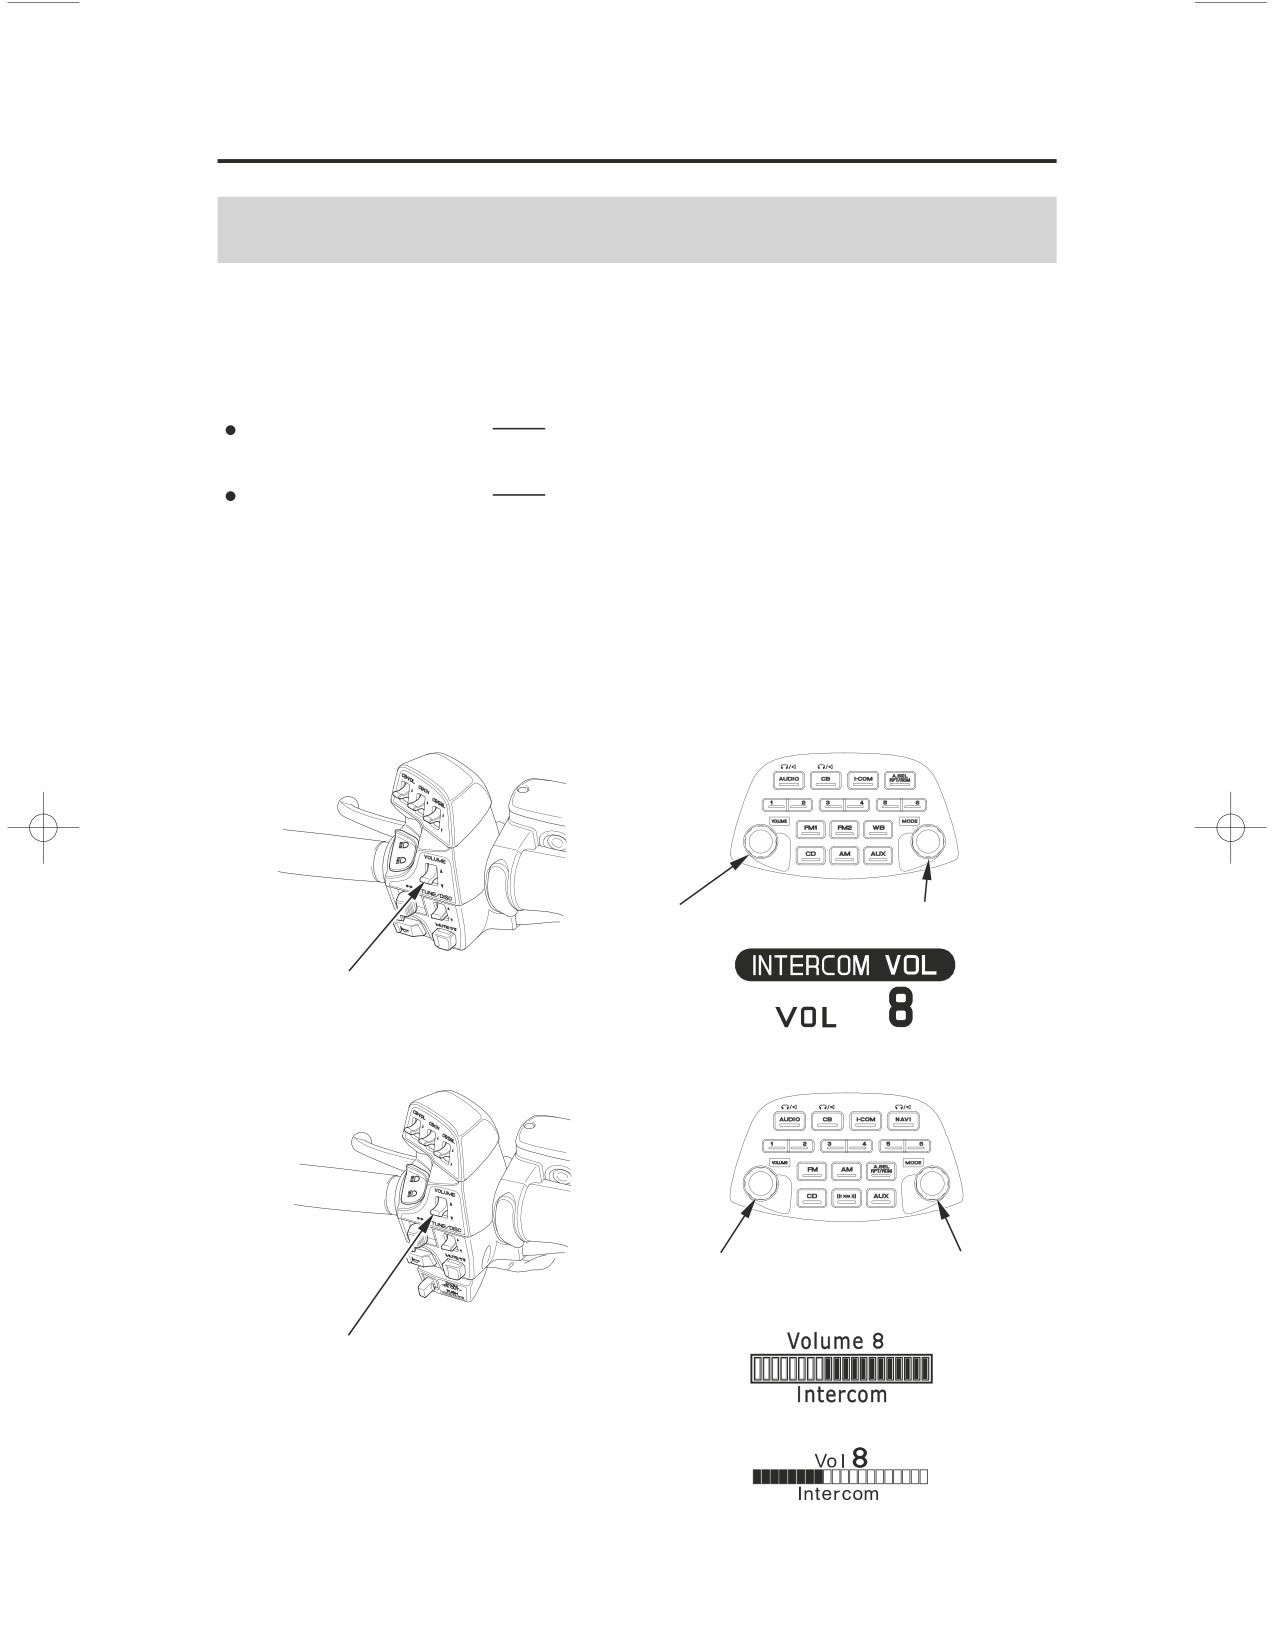
To select the Volume control, push the MODE knob/button until ‘‘INTERCOM
VOL’’ (‘‘Intercom’’) is displayed (page100). Then, within 5 seconds, change
the volume control.
To increase the volume
push the VOLUME lever up or turn the
VOLUME knob/button clockwise.
To decrease the volume
push the VOLUME lever down or turn the
VOLUME knob/button counterclockwise.
To increase or decrease the volume rapidly
ʵ
push the VOLUME lever up or
down and hold it down.
(VOLUME level range : from 0 to 20)
(Models not equipped with Navigation System)
VOLUME knob/button MODE knob/button
VOLUME lever
(Models equipped with Navigation System)
VOLUME knob/button MODE knob/button
For USA
VOLUME lever
For Canada
Audio Systems
133
Intercom (I-COM) System
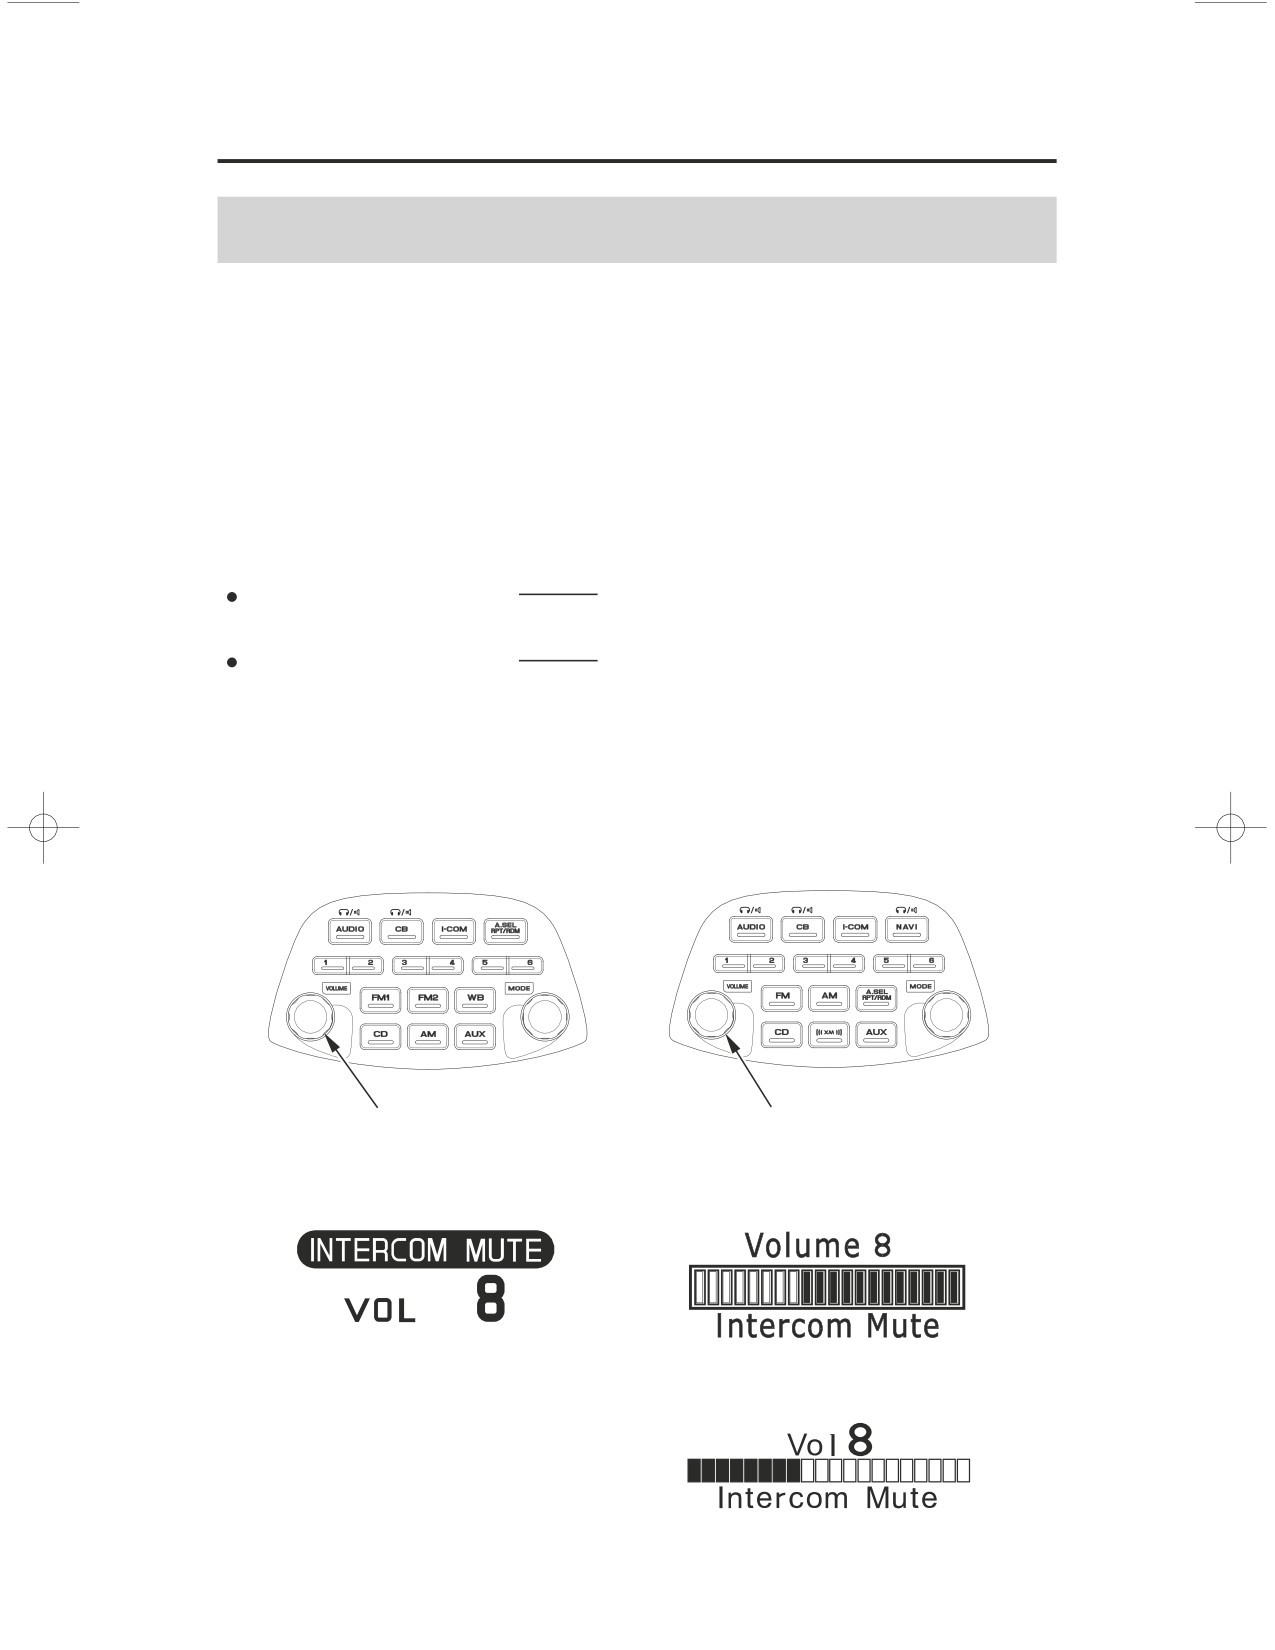
Intercom Muting
The intercom mute system automatically lowers (does not silence) the music/
program volume when you speak through the intercom.
The sensitivity of the intercom microphone to your voice or ambient sound sets
the level at which the intercom system mutes the music/program volume.
To adjust this system
ʵ
push the VOLUME knob/button until ‘‘INTERCOM
MUTE’’ (‘‘Intercom Mute’’) is displayed (page100).
To increase microphone
turn the VOLUME knob/button clockwise.
sensitivity
To decrease microphone
turn the VOLUME knob/button
sensitivity
counterclockwise. (Intercom Mute control
range: from 0 to 20)
(Models not equipped with
(Models equipped with
Navigation System)
Navigation System)
VOLUME knob/button
VOLUME knob/button
For USA
For Canada
134
Audio Systems
Navigation System
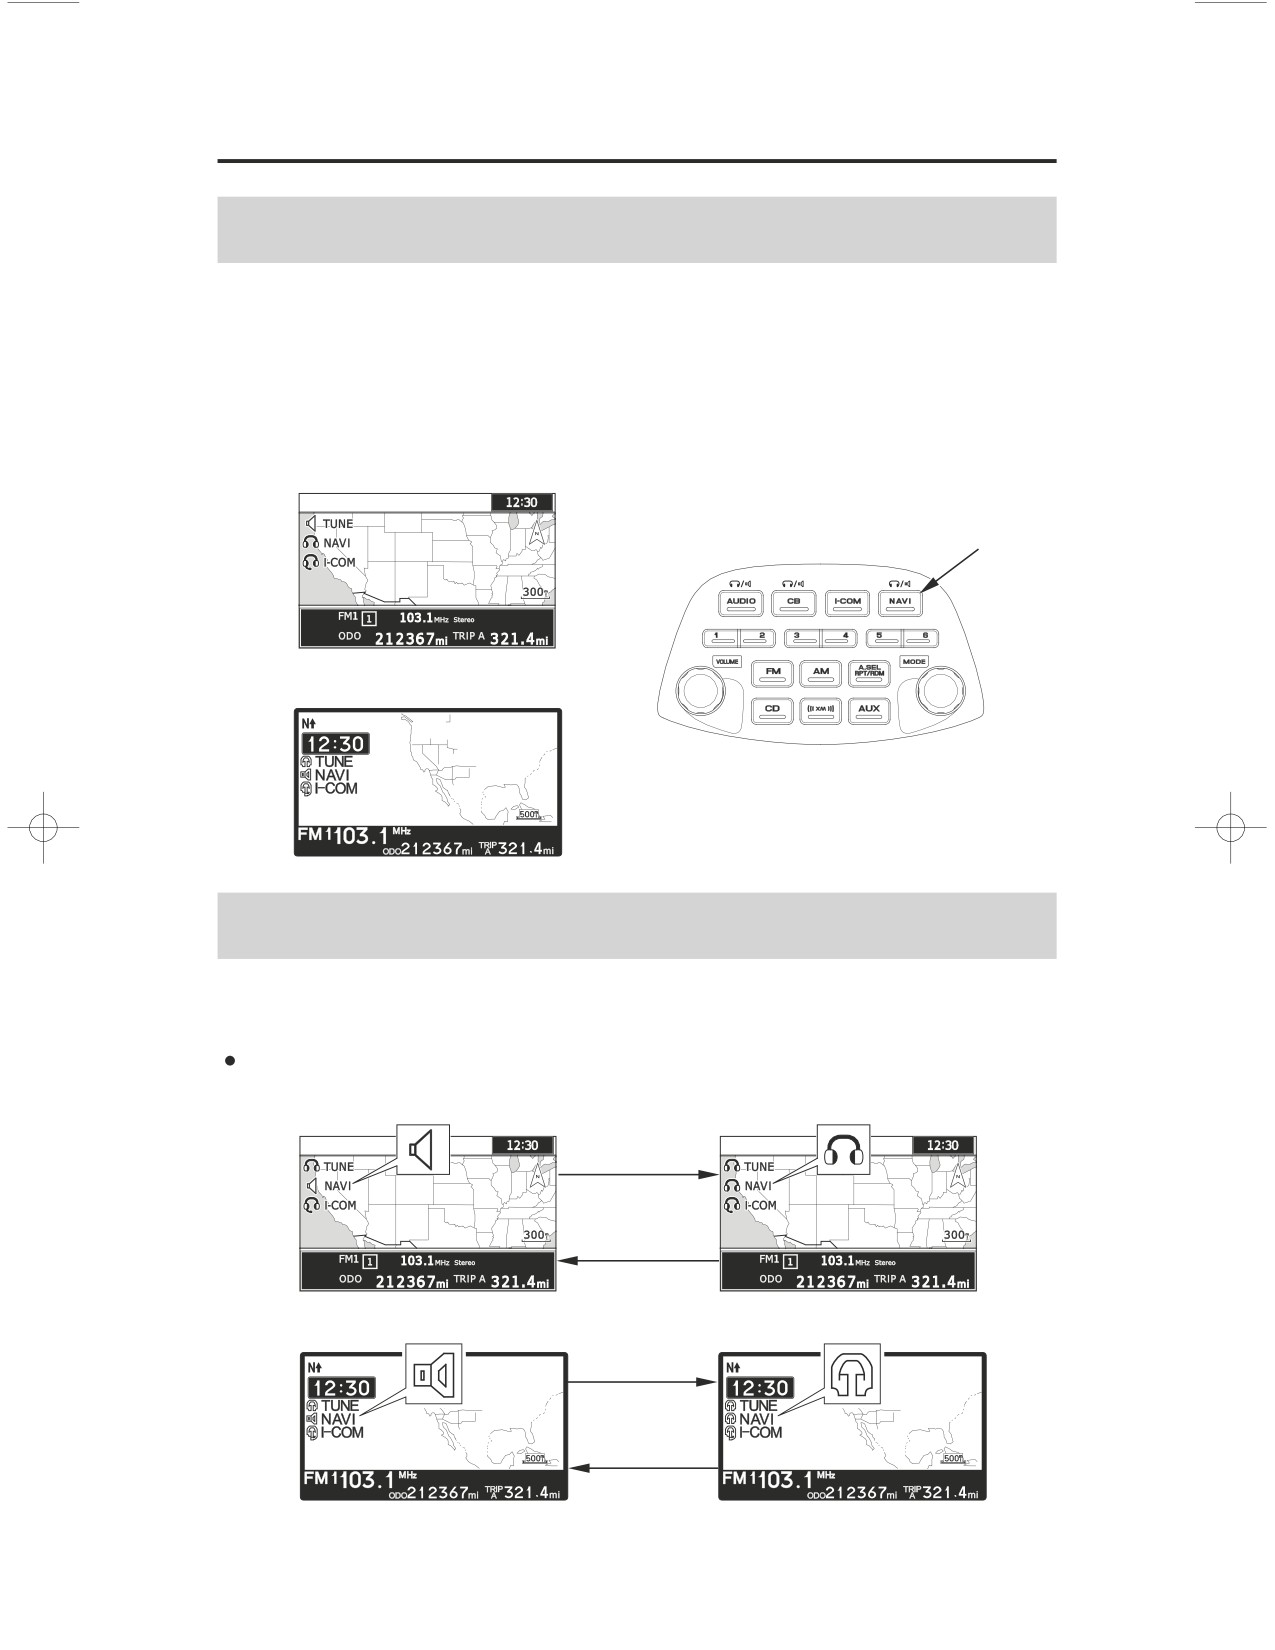
System Control
To turn the Navi voice on with the Navigation System turned off
ʵ
push the
NAVI button.
To turn the Navi voice off with the Navigation System turned on
ʵ
push and
hold the NAVI button.
For USA
NAVI button
For Canada
Switch Output
When the navigation voice guidance is turned on, you can switch its output
between Speaker and Headset (optional equipment).
Push the NAVI button switches output.
For USA
For Canada
Audio Systems
135
Navigation System
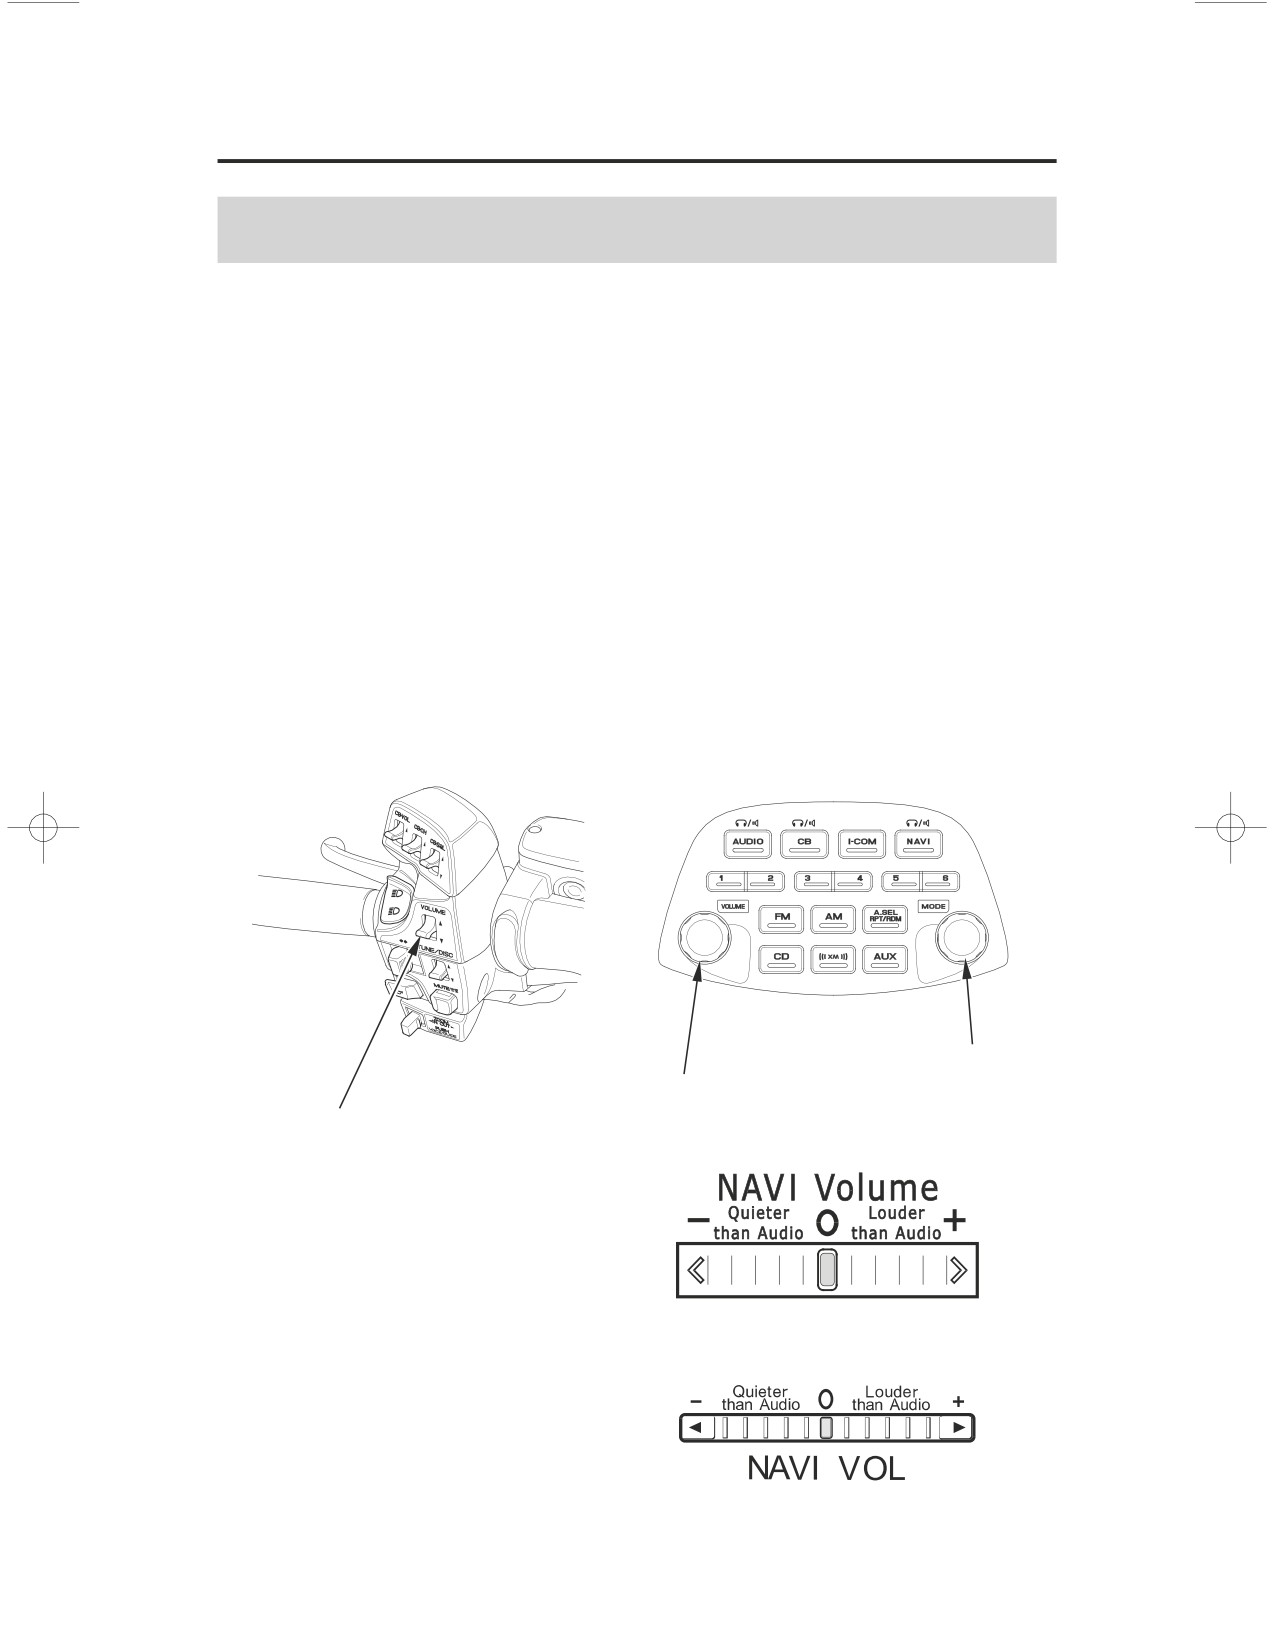
Navi Volume Control
To select the volume control, push the VOLUME knob/button until ‘‘NAVI
VOL’’ is displayed (page100). Then, within the 5 seconds, change the navigation
volume control.
To make the Navi volume louder than the audio volume
ʵ
push the VOLUME
lever up or turn the VOLUME knob/button clockwise.
To make the Navi volume quieter than the audio volume
ʵ
push the VOLUME
lever down or turn the VOLUME knob/button counterclockwise.
To increase or decrease the volume rapidly
ʵ
push the VOLUME lever up or
down and hold it down.
(NAVI VOLUME level ranges: from 5 down to
ʵ5)
MODE knob/button
VOLUME knob/button
VOLUME lever
For USA
For Canada
136
Audio Systems
Servicing Your Honda
To help keep your motorcycle in good shape, this section includes a
Maintenance Schedule for required service, a list of periodic checks you should
perform at least once a month, and step-by-step instructions for specific
maintenance tasks. You’ll also find important safety precautions, information on
fuels and oils, and tips for keeping your Honda looking great.
For information about the exhaust emission and noise emission requirements of
the U.S. Environmental Protection Agency (EPA), the California Air Resources
Board (CARB), and Environment Canada (EC), see page
251
For information about replacing fuses, see page
232
USA only
Maintenance, replacement or repair of the emission control devices and
systems may be performed by any motorcycle repair establishment or
individual using parts that are ‘‘certified’’ to EPA standards.
Bef ore You Service Your Honda
The Importance of Maintenance
140
Maintenance Safety
141
Important Safety Precautions
142
Periodic Maintenance
143
Maintenance Schedule
144
Maintenance Record
148
(cont’d)
Servicing Your Honda
137
Servicing Your Honda
Service Preparations
Maintenance Component Locations
149
Tool Kit
152
Owner’s Manual Storage
153
Cover Removal
154
Clip Removal
159
Service Procedures
Fluids & Filters
Fuel
160
Engine Oil & Filter
163
Coolant
170
Crankcase Breather
173
Final Drive Oil
174
Engine
Clutch System
176
Spark Plugs
178
Chassis
Suspension
180
Brakes
184
Tires
189
Side Stand
196
Electrical
Battery
197
Appearance Care
201
138
Servicing Your Honda
Servicing Your Honda
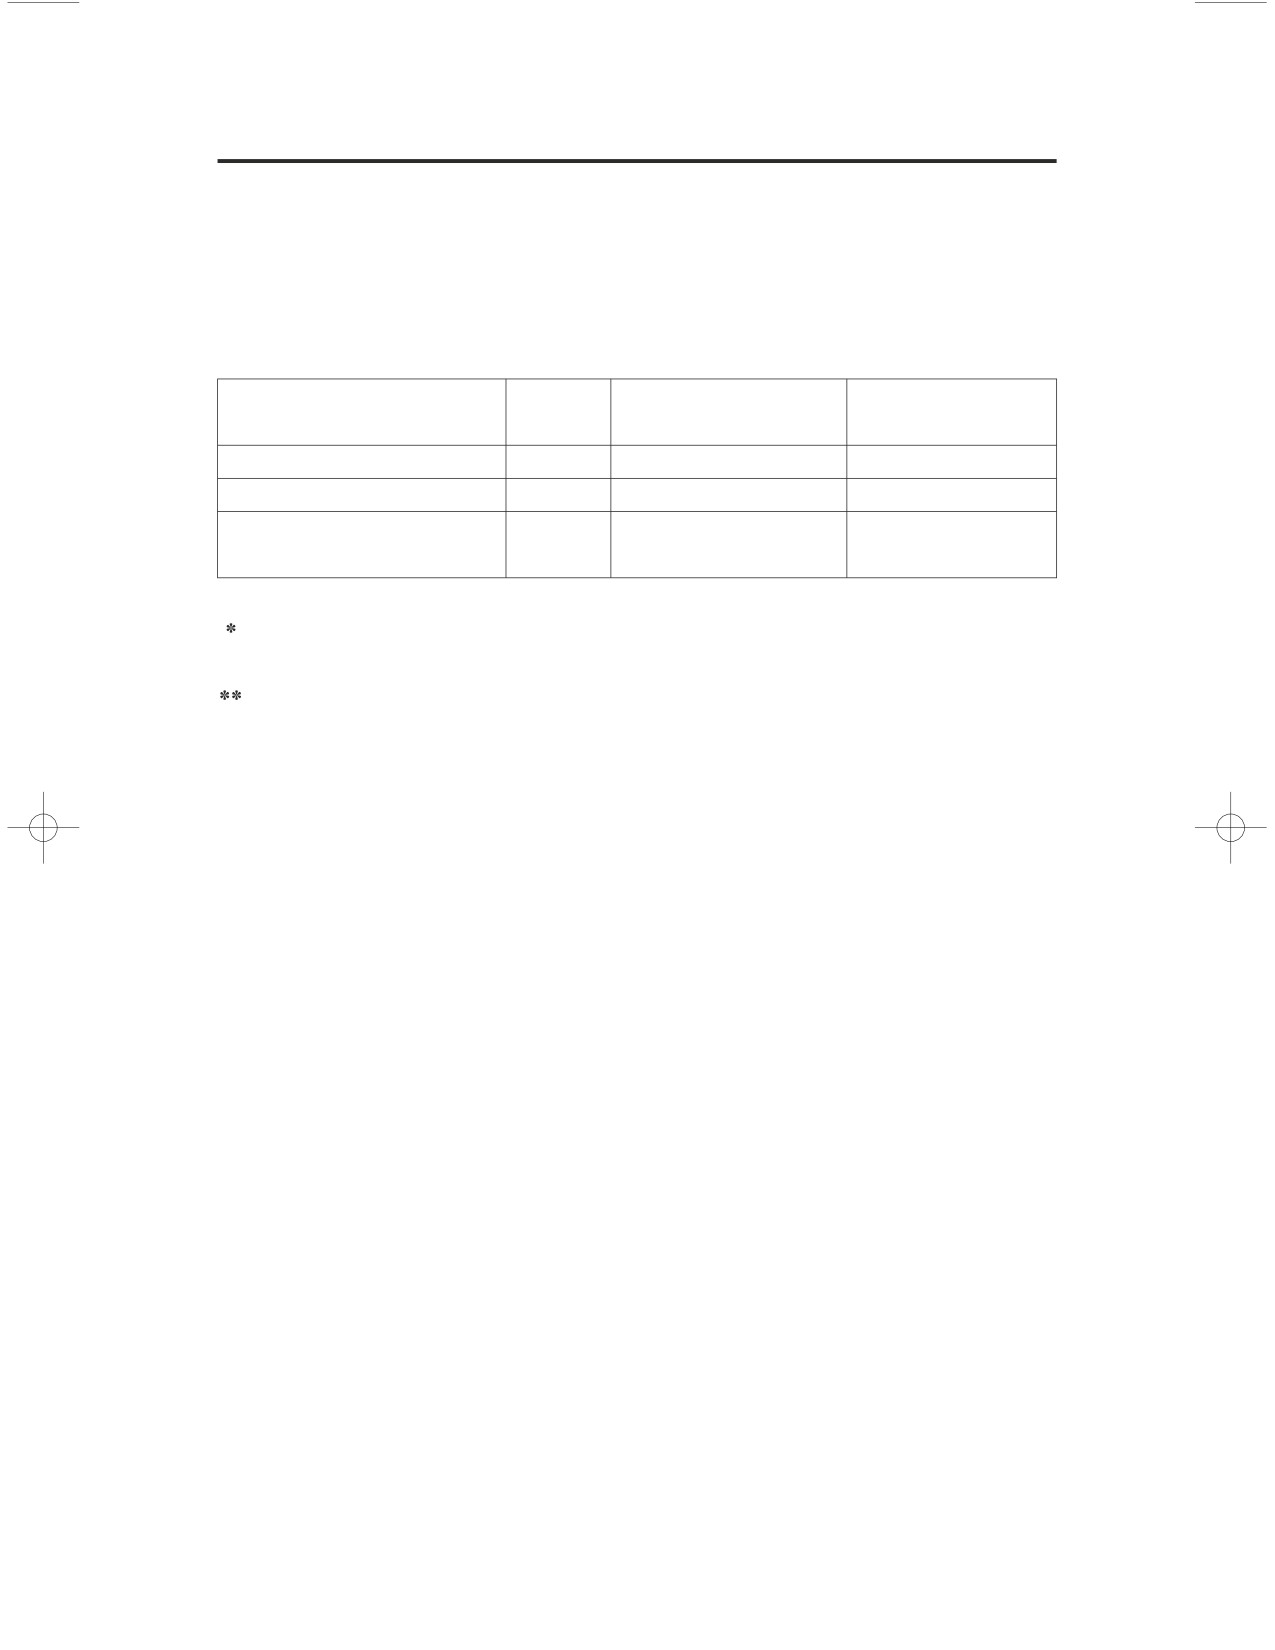
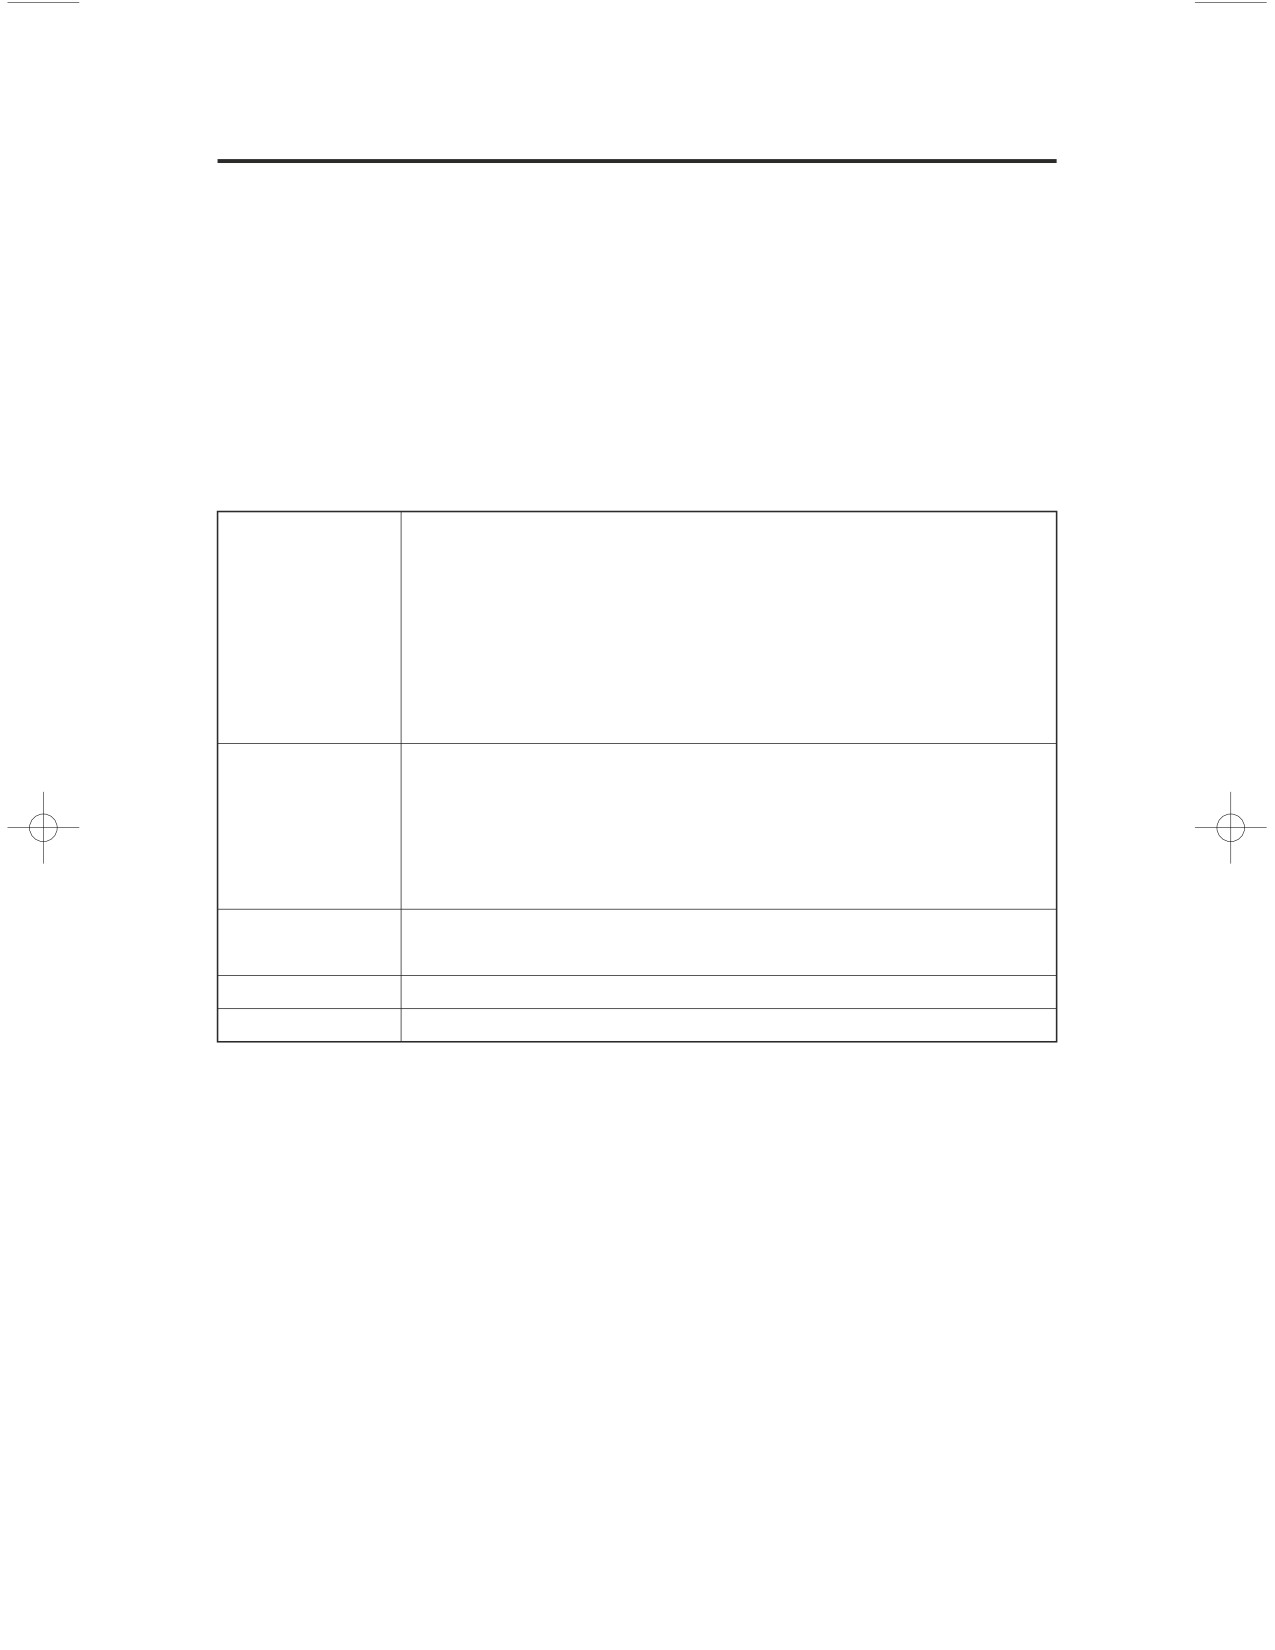
The following table summarizes the three types of inspections and servicing
recommendations for your motorcycle. Both the pre-ride inspection and the
scheduled maintenance at the recommended intervals are necessary to assure
safe and dependable performance. The periodic checks provide additional
confidence in your motorcycle’s performance.
Type of Inspection/
Refer to
When Performed
Who Performs
Service
page:
Pre-ride Inspection
47
before every ride
you
ˎ
Periodic Maintenance
143
monthly
you
Maintenance Schedule
144
interval on schedule
your Honda
ˎˎ
dealer
more often if you ride frequently or long distances; or anytime you clean your
motorcycle
unless you have the proper tools and service data and are mechanically
qualified
Servicing Your Honda
139
The Importance of Maintenance
Keeping your motorcycle well-maintained is absolutely essential to your safety.
It’s also a good way to protect your investment, get maximum performance,
avoid breakdowns, and have more fun. A properly maintained motorcycle will
also help to reduce air pollution.
Remember, proper maintenance is the owner’s responsibility. Be sure to inspect
your motorcycle before each ride, perform the periodic checks, and follow the
Maintenance Schedule in this section.
Improperly maintaining this
motorcycle or failing to correct a
problem before you ride can
cause a crash in which you can
be seriously hurt or killed.
Always follow the inspection
and maintenance
recommendations and
schedules in this owner’s
manual.
If your motorcycle overturns or is involved in a crash, be sure your Honda
dealer inspects all major parts, even if you are able to make some of the repairs
yourself.
140
Servicing Your Honda
Maintenance Safety
This section includes instructions on how to perform some important
maintenance tasks. If you have basic mechanical skills, you can perform many
of these tasks with the tools provided with your motorcycle.
Other tasks that are more difficult and require special tools are best performed
by professionals. Wheel removal should normally be handled only by a Honda
technician or other qualified mechanic. Instructions are included in this manual
only to assist in emergency service.
Some of the most important safety precautions follow. However, we cannot
warn you of every conceivable hazard that can arise in performing maintenance.
Only you can decide whether or not you should perform a given task.
Failure to properly follow
maintenance instructions and
precautions can cause you to
be seriously hurt or killed.
Always follow the procedures
and precautions in this owner’s
manual.
Servicing Your Honda
141
Maintenance Safety
Important Safety Precautions
Make sure the engine is off before you begin any maintenance or repairs.
This will help eliminate several potential hazards:
Carbon monoxide poisoning from engine exhaust.
Be sure there is
adequate ventilation whenever you operate the engine.
Burns from hot motorcycle parts.
Let the engine and exhaust system cool
before touching.
Injury from moving parts.
Do not run the engine unless instructed to do so.
Read the instructions before you begin, and make sure you have the tools and
skills required.
To help prevent the motorcycle from falling over, park it on a firm, level
surface, using the center stand.
To reduce the possibility of a fire or explosion, be careful when working
around gasoline. Use only non-flammable solvent, not gasoline, to clean parts.
Keep cigarettes, sparks, and flames away from all fuel-related parts.
Remember that your Honda dealer knows your motorcycle best and is fully
equipped to maintain and repair it. To ensure the best quality and reliability, use
only new Honda Genuine Parts or their equivalents for repair and replacement.
If you have the tools and skills required for additional maintenance jobs, you
can purchase an official Honda Service Manual (page
258
).
142
Servicing Your Honda
Periodic Maintenance
In addition to the regularly scheduled maintenance (page
) and daily pre-ride
144
inspection (page
), consider performing the periodic checks on the following
47
page at least once a month, even if you haven’t ridden your motorcycle, or as
often as once a week if you ride frequently or for long distances. It’s a good idea
to perform this maintenance any time you clean your motorcycle.
Check the odometer reading and perform any scheduled maintenance checks
that are needed (page144). Remember, more frequent checks may be needed for
riding in severe conditions.
Tires
Check the air pressure with a gauge and add air if needed
&
(page
190
).
Wheels
Examine the tread for wear (page
191
).
Look closely for nails, embedded objects, cuts, and other
types of damage (page
). Rotate the rear wheel so
191
you can inspect the entire surface.
Check the condition of the wheels.
Fluids
Check the levels of the engine oil (page
166
), coolant
(page
171), brake fluid (page
185
), clutch fluid
(page
177
), and final drive oil (page
174). Add the
correct fluid as necessary, and investigate the cause of
any low fluid level.
Lights
Make sure the headlight, brakelight, taillight, and turn
signals are working properly.
Fuses
Make sure you have a full supply of spare fuses.
Nuts & Bolts
Check the major fasteners and tighten as needed.
Servicing Your Honda
143
Maintenance Schedule
The required Maintenance Schedule that follows specifies how often you should
have your motorcycle serviced, and what things need attention. It is essential to
have your motorcycle serviced as scheduled to maintain safe, dependable
performance and proper emission control.
The service intervals in this Maintenance Schedule are based on average riding
conditions. Some items will need more frequent service if you ride in unusually
wet or dusty areas or at full throttle. Consult your Honda dealer for
recommendations applicable to your individual needs and use.
Some items in the Maintenance Schedule can be performed with basic
mechanical skills and hand tools. Procedures for these items are provided in this
manual. Other items involve more extensive procedures and may require special
training, tools, and equipment. We recommend that you have your Honda dealer
perform these tasks unless you have advanced mechanical skills and the required
tools and equipment. Procedures for such items in this schedule are provided in
an official Honda Service Manual available for purchase (page 258 ).
144
Servicing Your Honda
Maintenance Schedule
If you do not feel capable of performing a given task or need assistance,
remember that your Honda dealer knows your motorcycle best and is fully
equipped to maintain and repair it. If you decide to do your own maintenance,
use only Honda Genuine Parts or their equivalents for repair or replacement to
ensure the best quality and reliability.
Perform the pre-ride inspection (page
47) and owner maintenance (page146) at
each scheduled maintenance period.
The following items require some mechanical knowledge. Certain items
ˎ
ˎˎ
(particularly those marked
and
) may require more technical information
and tools. Consult your Honda dealer.
Should be serviced by your Honda dealer, unless you have the proper tools
and service data and are mechanically qualified. Refer to the official Honda
Service Manual (page
258).
In the interest of safety, we recommend these items be serviced only by your
Honda dealer.
Summary of Maintenance Schedule Notes
& Procedures:
NOTES:
1. At higher odometer readings, repeat at the frequency interval established here.
2. Service more frequently if the motorcycle is ridden in unusually wet or dusty
areas.
3. Service more frequently if the motorcycle is ridden often at full throttle or in
the rain.
4. Service more frequently if noisy.
5. Replace every 2 years, or at indicated odometer interval, whichever comes
first. Replacement requires mechanical skill.
6. Replace at 4,000 mi (6,400 km) or 6 months, then every 8,000 mi (12,800 km)
or 12 months.
Maintenance Procedures:
I: inspect and clean, adjust, lubricate,
or replace, if necessary
C: clean
A: adjust
L: lubricate
R: replace
Servicing Your Honda
145
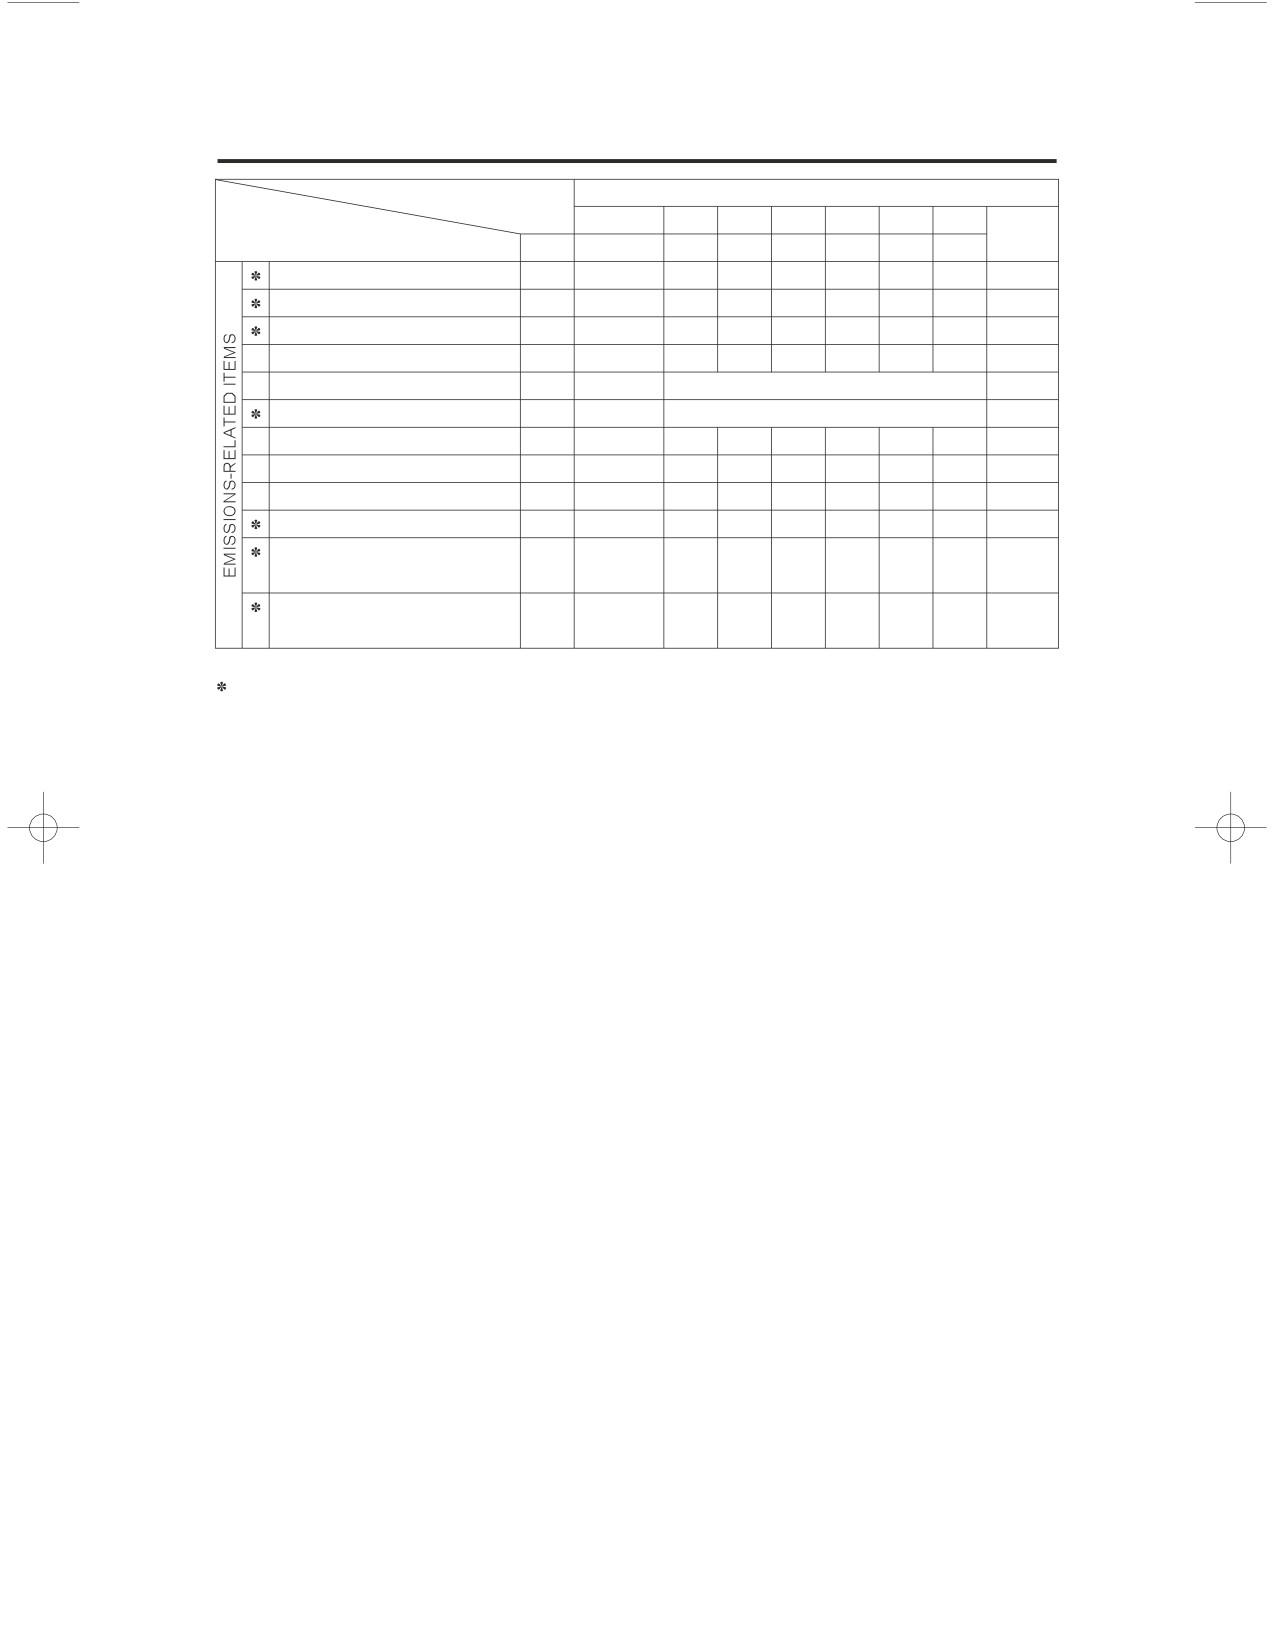
Maintenance Schedule
FREQUENCY
ODOMETER READING (Note 1)
ʷ1,000 mi
4
8
12
16
20
24
Refer to
ITEM
NOTE
ʷ1,000 km
6.4
12.8
19.2
25.6
32.0
38.4
page
FUEL LINE
I
I
I
ʵ
THROTTLE OPERATION
I
I
I
ʵ
AIR CLEANER
2
R
R
ʵ
CRANKCASE BREATHER
3
C
C
C
C
C
C
173
SPARK PLUGS
EVERY 16,000 mi (25,600 km) R
178
VALVE CLEARANCE
4
EVERY 32,000 mi (51,200 km) I
ʵ
ENGINE OIL
6
R
R
R
163
ENGINE OIL FILTER
R
R
R
167
RADIATOR COOLANT
5
I
I
R
170
COOLING SYSTEM
I
I
I
ʵ
SECONDARY AIR SUPPLY
I
I
I
ʵ
SYSTEM
EVAPORATIVE EMISSION
I
I
ʵ
CONTROL SYSTEM
Should be serviced by your Honda dealer, unless you have the proper tools and service data
and are mechanically qualified. Refer to the official Honda Service Manual (page 258 ).
146
Servicing Your Honda
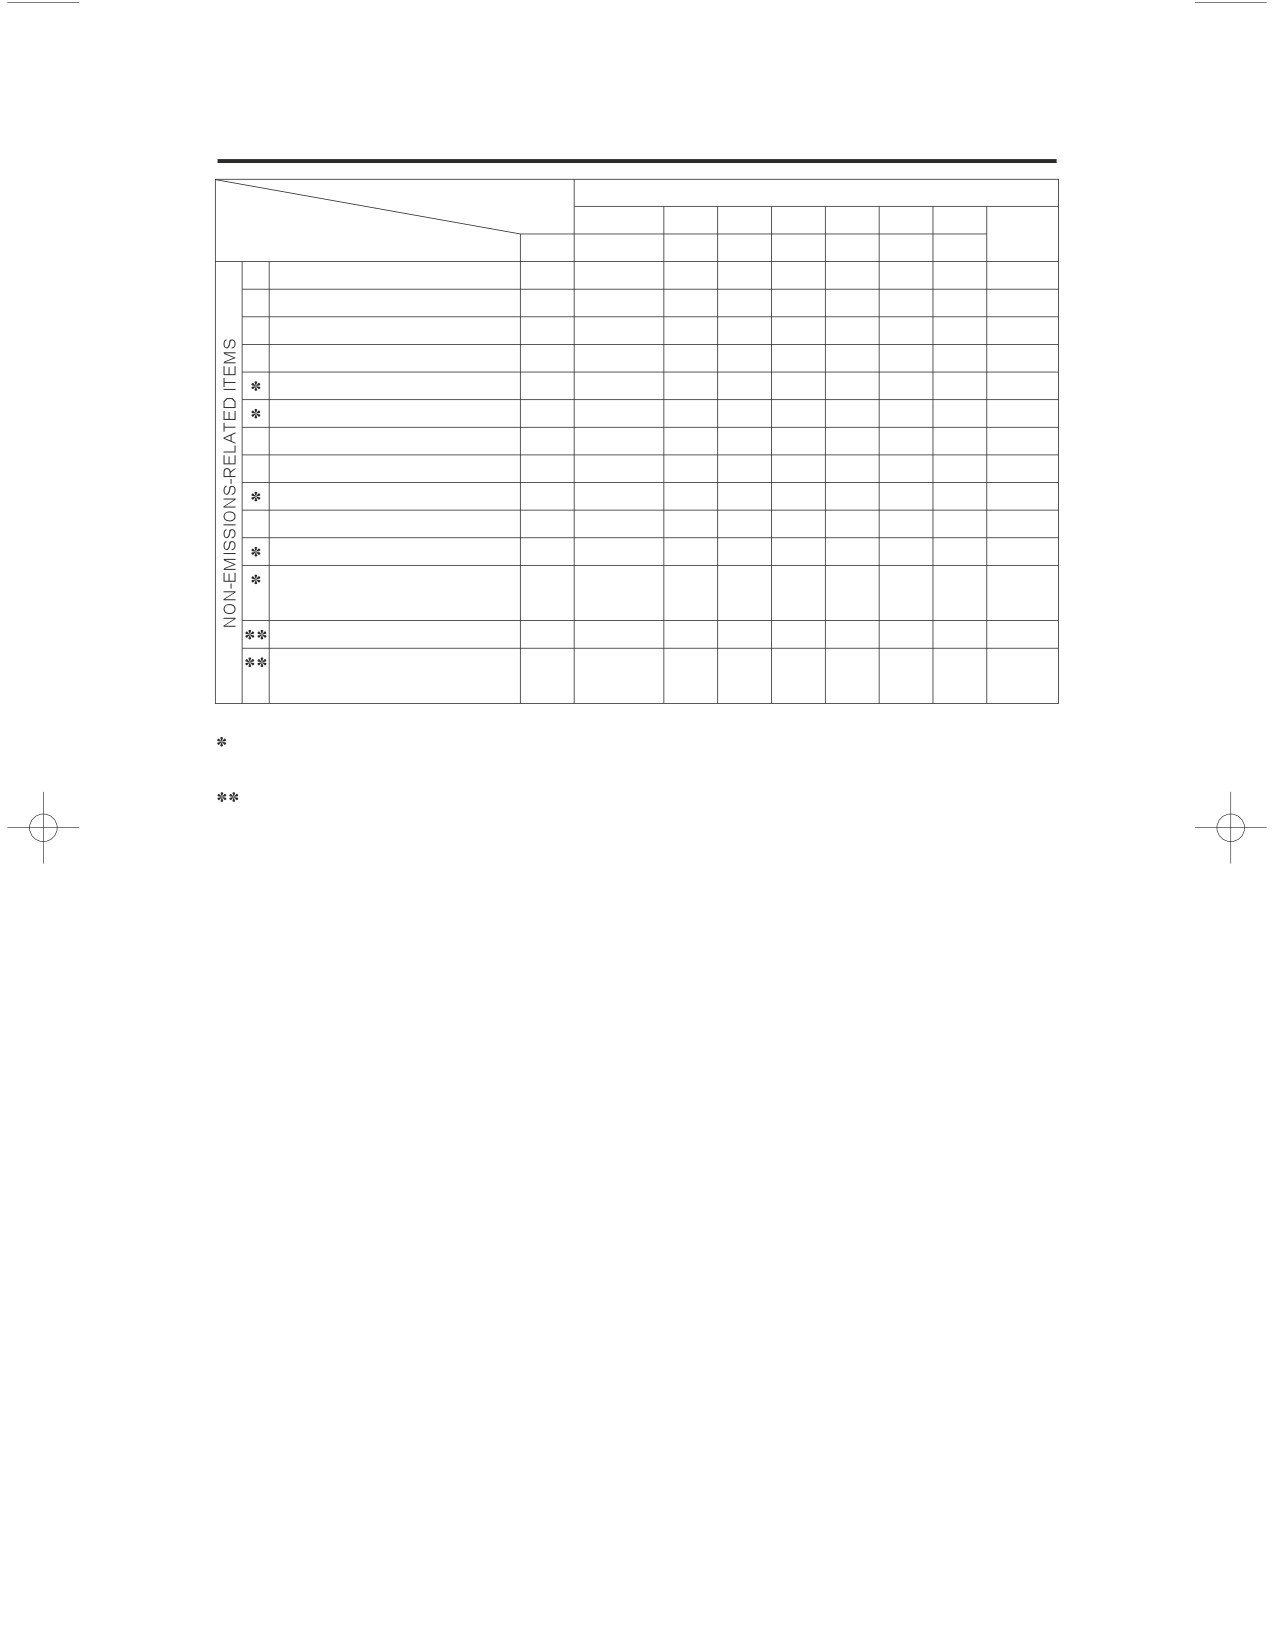
Maintenance Schedule
FREQUENCY
ODOMETER READING (Note 1)
ʷ1,000 mi
4
8
12
16
20
24
Refer to
ITEM
NOTE
ʷ1,000 km
6.4
12.8
19.2
25.6
32.0
38.4
page
FINAL DRIVE OIL
I
I
R
174
BRAKE FLUID
5
I
I
R
I
I
R
185
BRAKE PADS WEAR
I
I
I
I
I
I
187
BRAKE SYSTEM
I
I
I
188
BRAKELIGHT SWITCH
I
I
I
ʵ
HEADLIGHT AIM
I
I
I
ʵ
CLUTCH SYSTEM
I
I
I
176
CLUTCH FLUID
5
I
I
R
I
I
R
177
REVERSE OPERATION
I
I
I
ʵ
SIDE STAND
I
I
I
196
SUSPENSION
I
I
I
ʵ
NUTS, BOLTS,
I
I
I
ʵ
FASTENERS
WHEELS/TIRES
I
I
I
ʵ
STEERING HEAD
I
I
I
ʵ
BEARINGS
Should be serviced by your Honda dealer, unless you have the proper tools and service data
and are mechanically qualified. Refer to the official Honda Service Manual (page 258 ).
In the interest of safety, we recommend these items be serviced only by your Honda dealer.
Servicing Your Honda
147
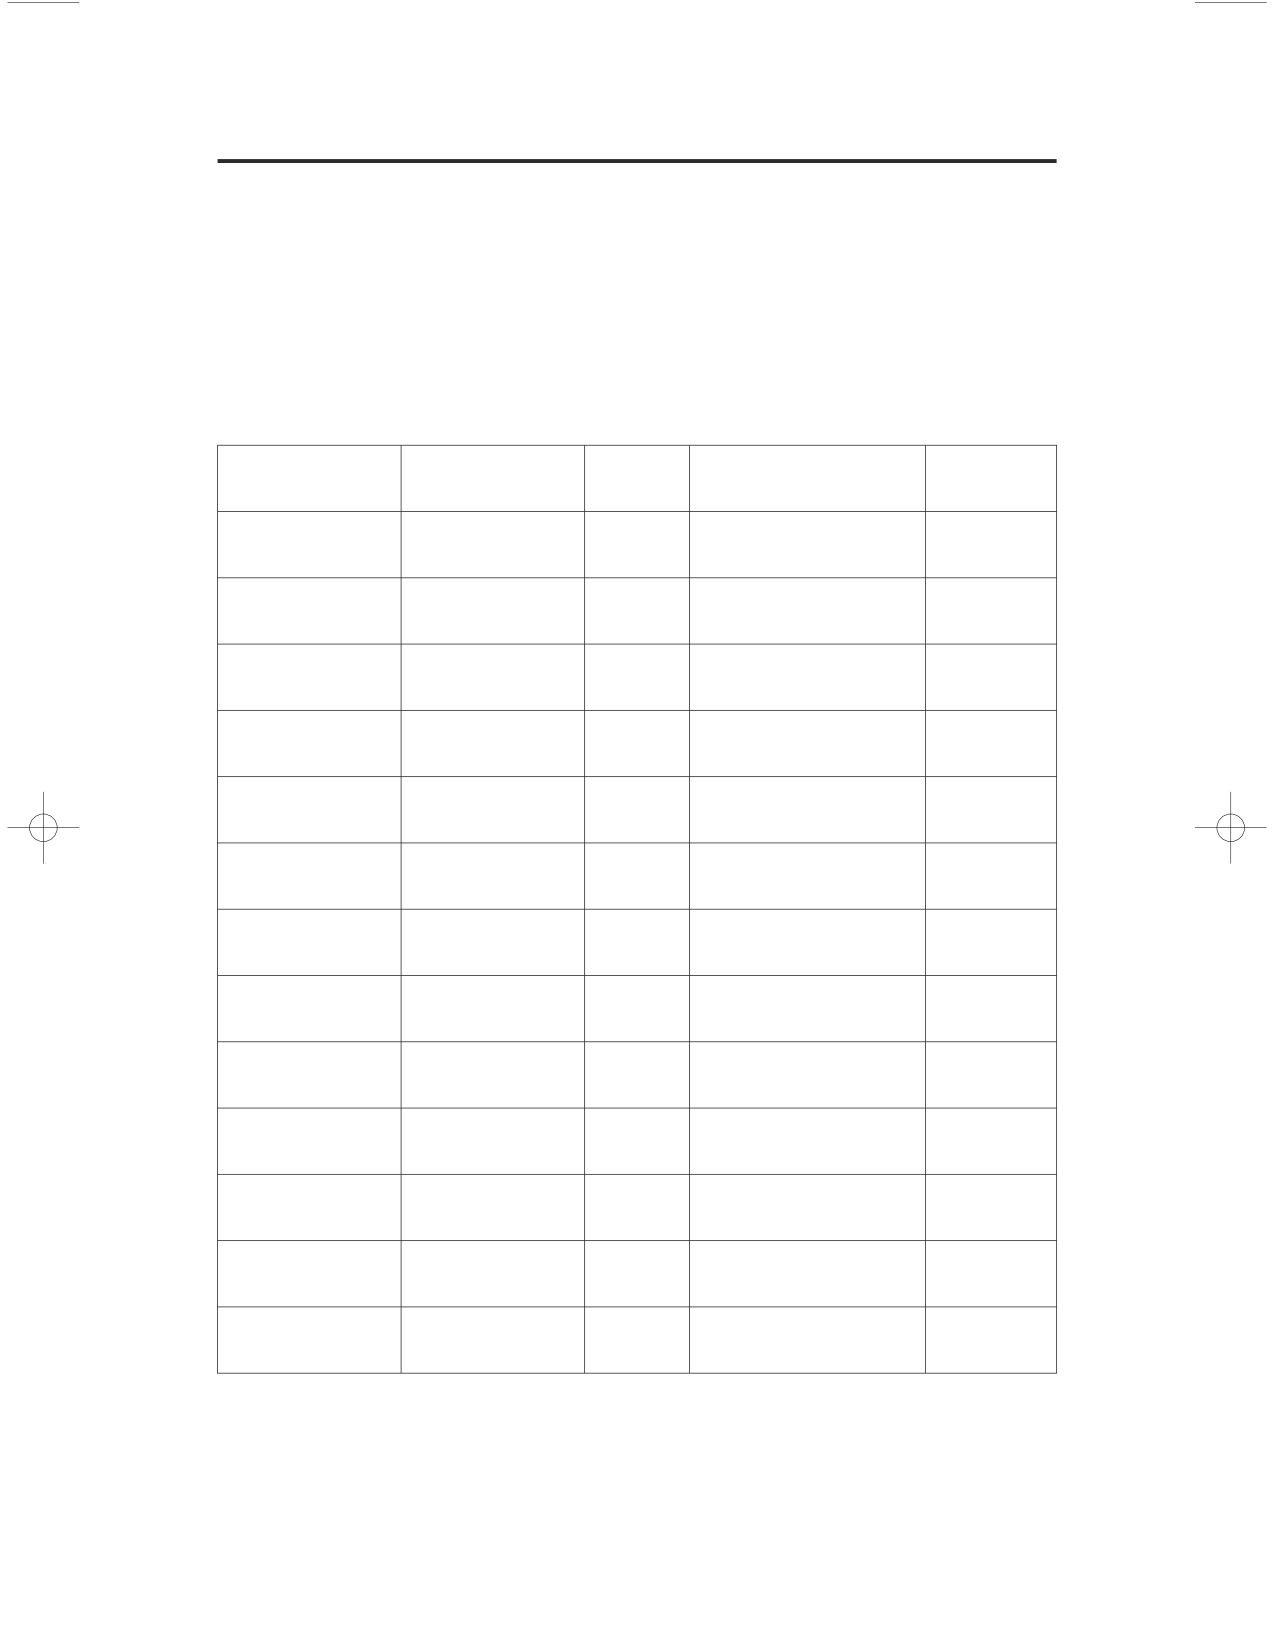
Maintenance Record
Keeping an accurate maintenance record will help ensure that your motorcycle
is properly maintained. Retain detailed receipts to verify the maintenance was
performed. If the motorcycle is sold, these receipts should be transferred with
the motorcycle to the new owner. Make sure whoever performs the maintenance
completes this record. All scheduled maintenance is considered a normal owner
operating cost and will be charged for by your dealer. Use the space under Notes
to record anything you want to remind yourself about or mention to your dealer.
Miles
Odometer
Date
Performed By:
Notes
(km)
4,000
(6,400)
8,000
(12,000)
12,000
(19,200)
16,000
(25,600)
20,000
(32,000)
24,000
(38,400)
28,000
(44,800)
32,000
(51,200)
36,000
(57,600)
40,000
(64,000)
44,000
(70,400)
48,000
(76,800)
52,000
(83,200)
148
Servicing Your Honda
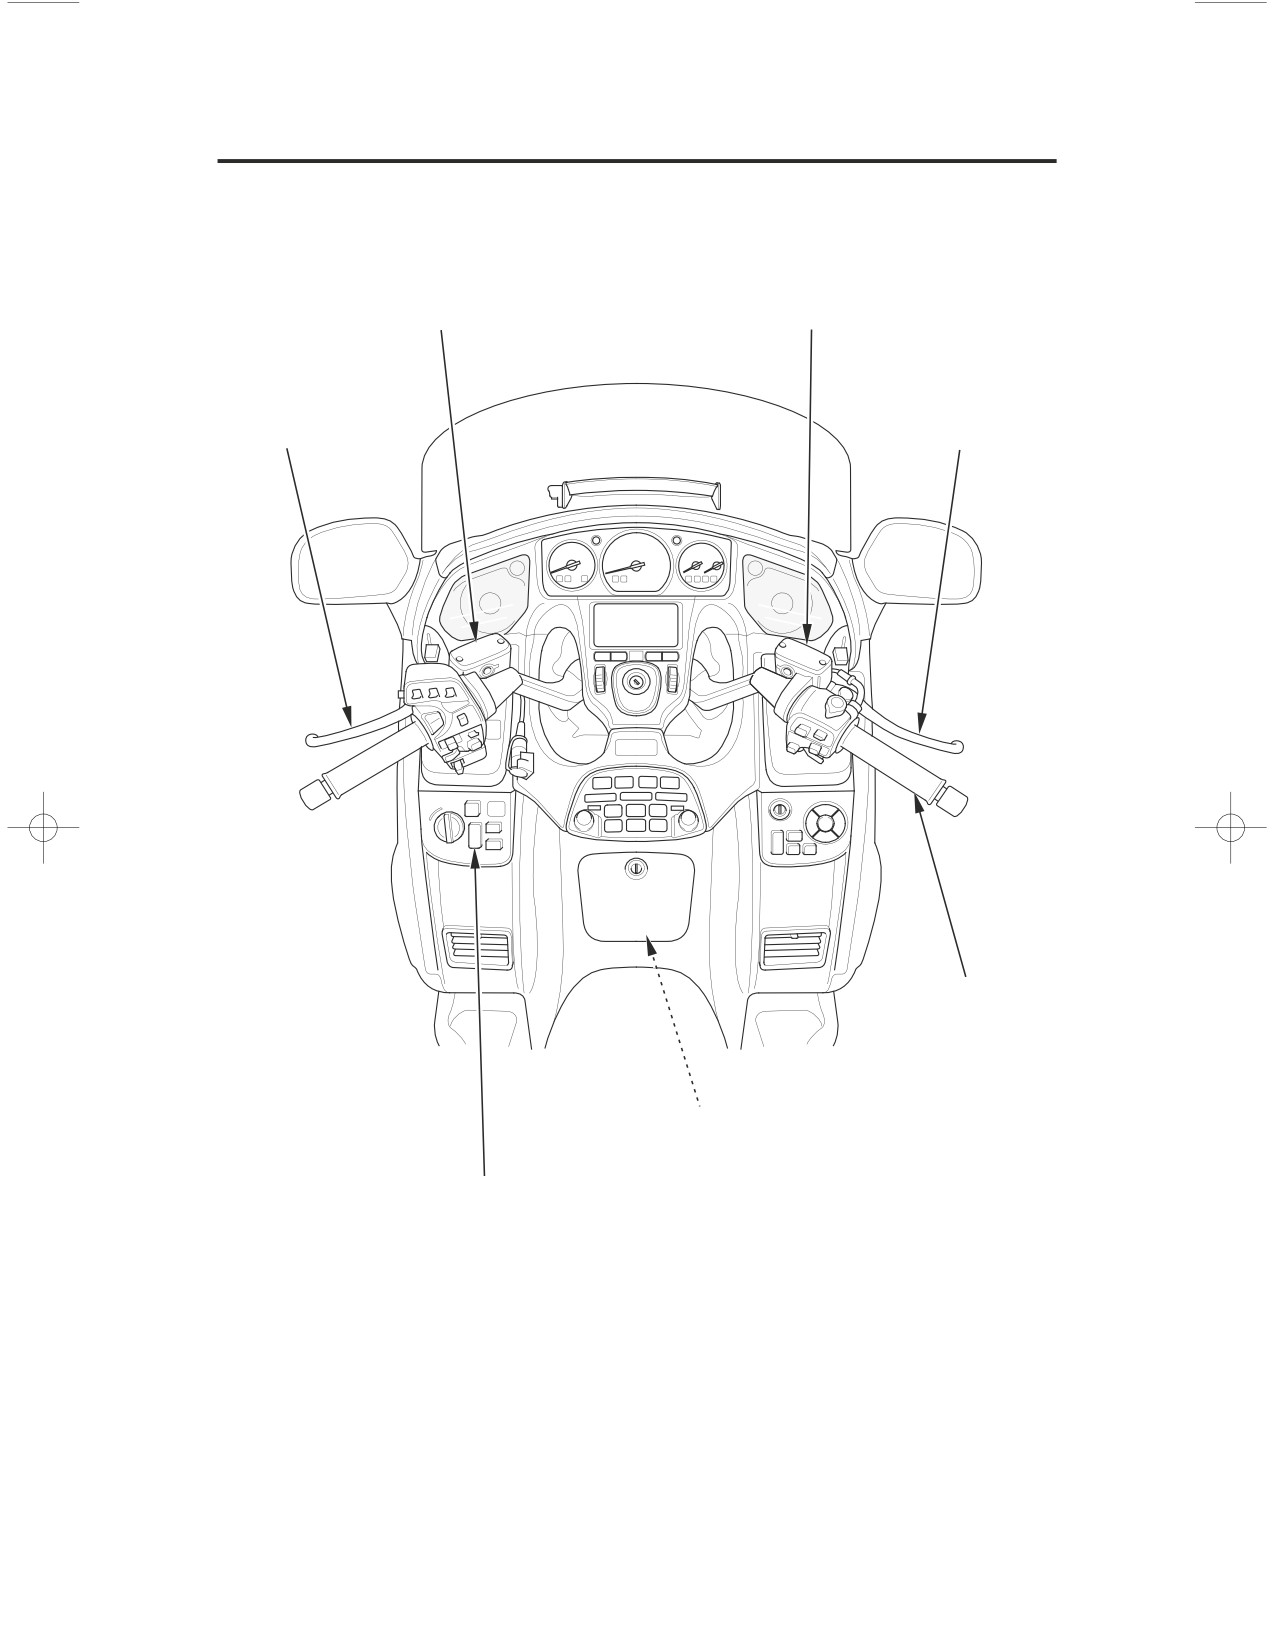
Maintenance Component Locations
clutch fluid reservoir
front brake fluid reservoir
clutch lever
front brake lever
throttle grip
fuel fill cap
rear suspension spring pre-load adjustment switch
Servicing Your Honda
149
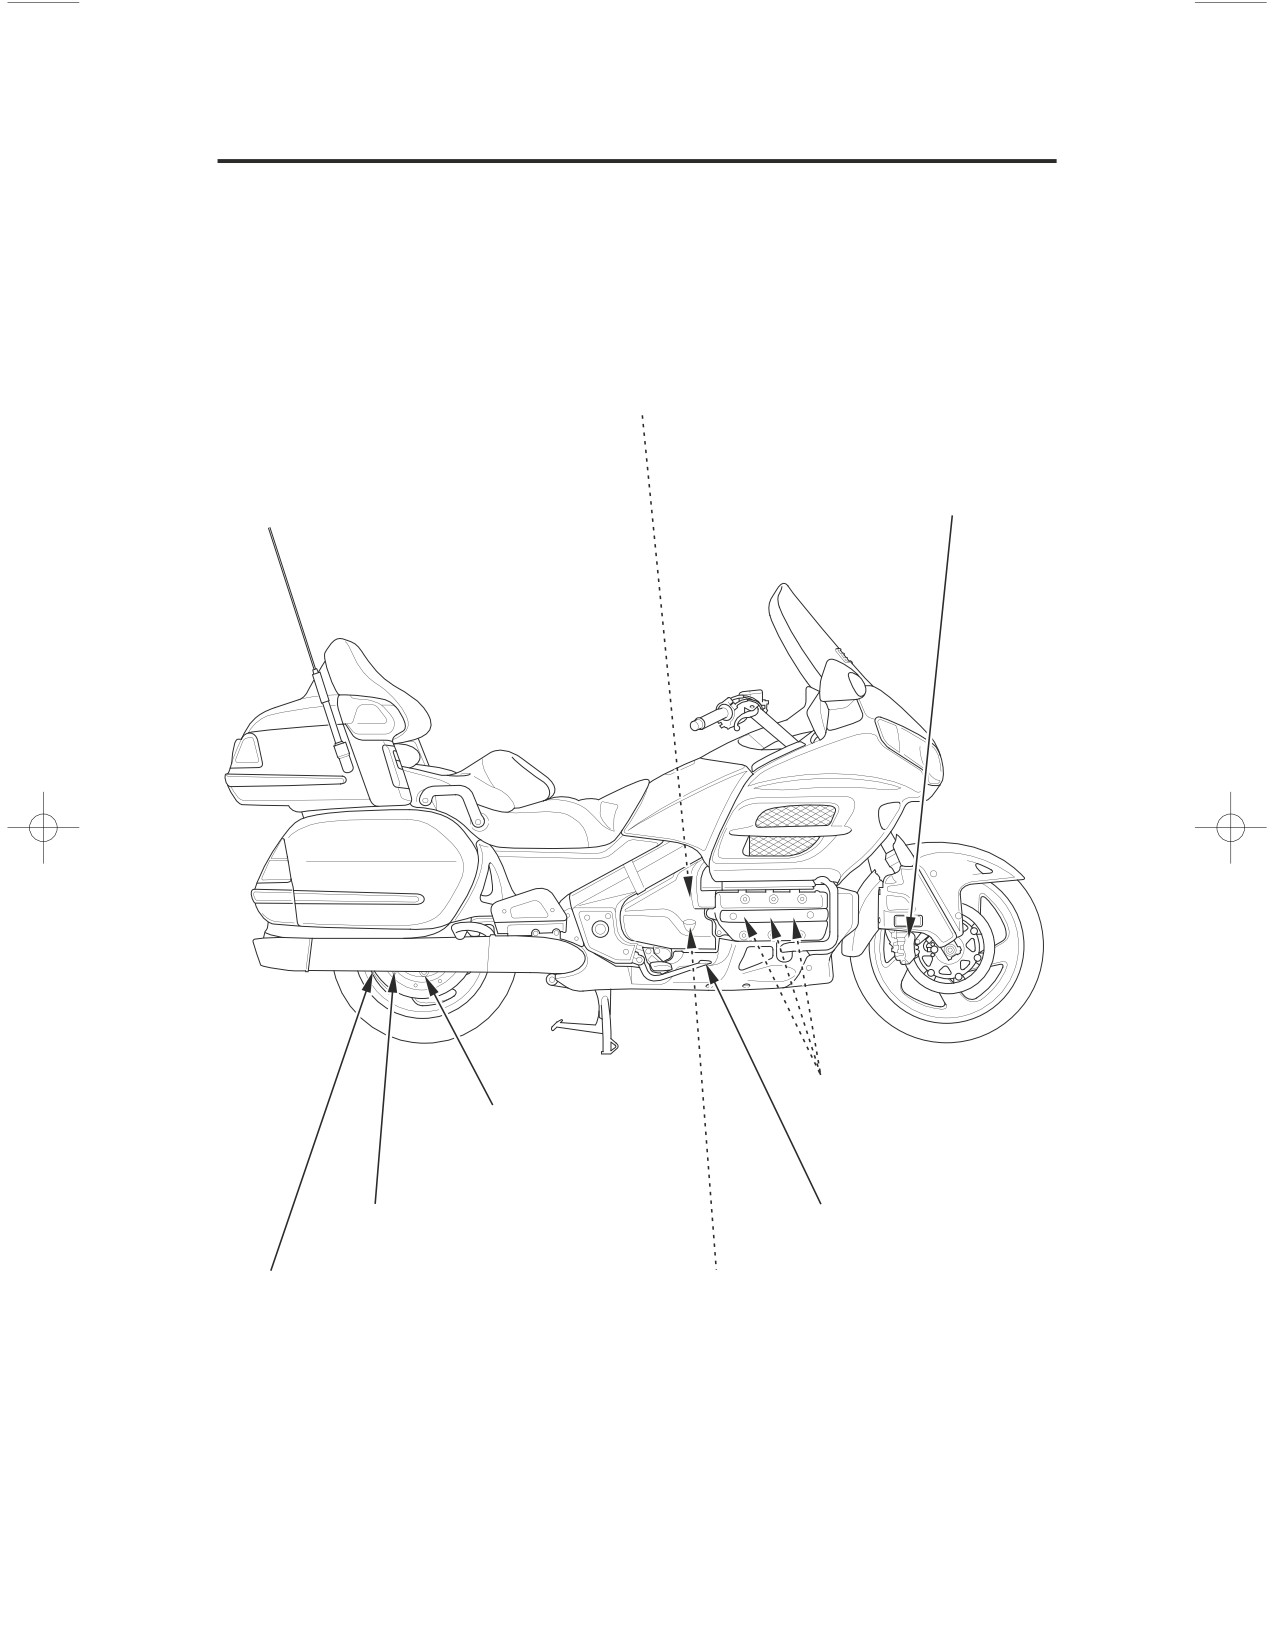
Maintenance Component Locations
rear brake fluid reservoir
front brake caliper
spark plugs
final drive gear
oil drain bolt
final drive gear oil filler cap
rear brake pedal
rear brake caliper
engine oil filler cap/dipstick
150
Servicing Your Honda
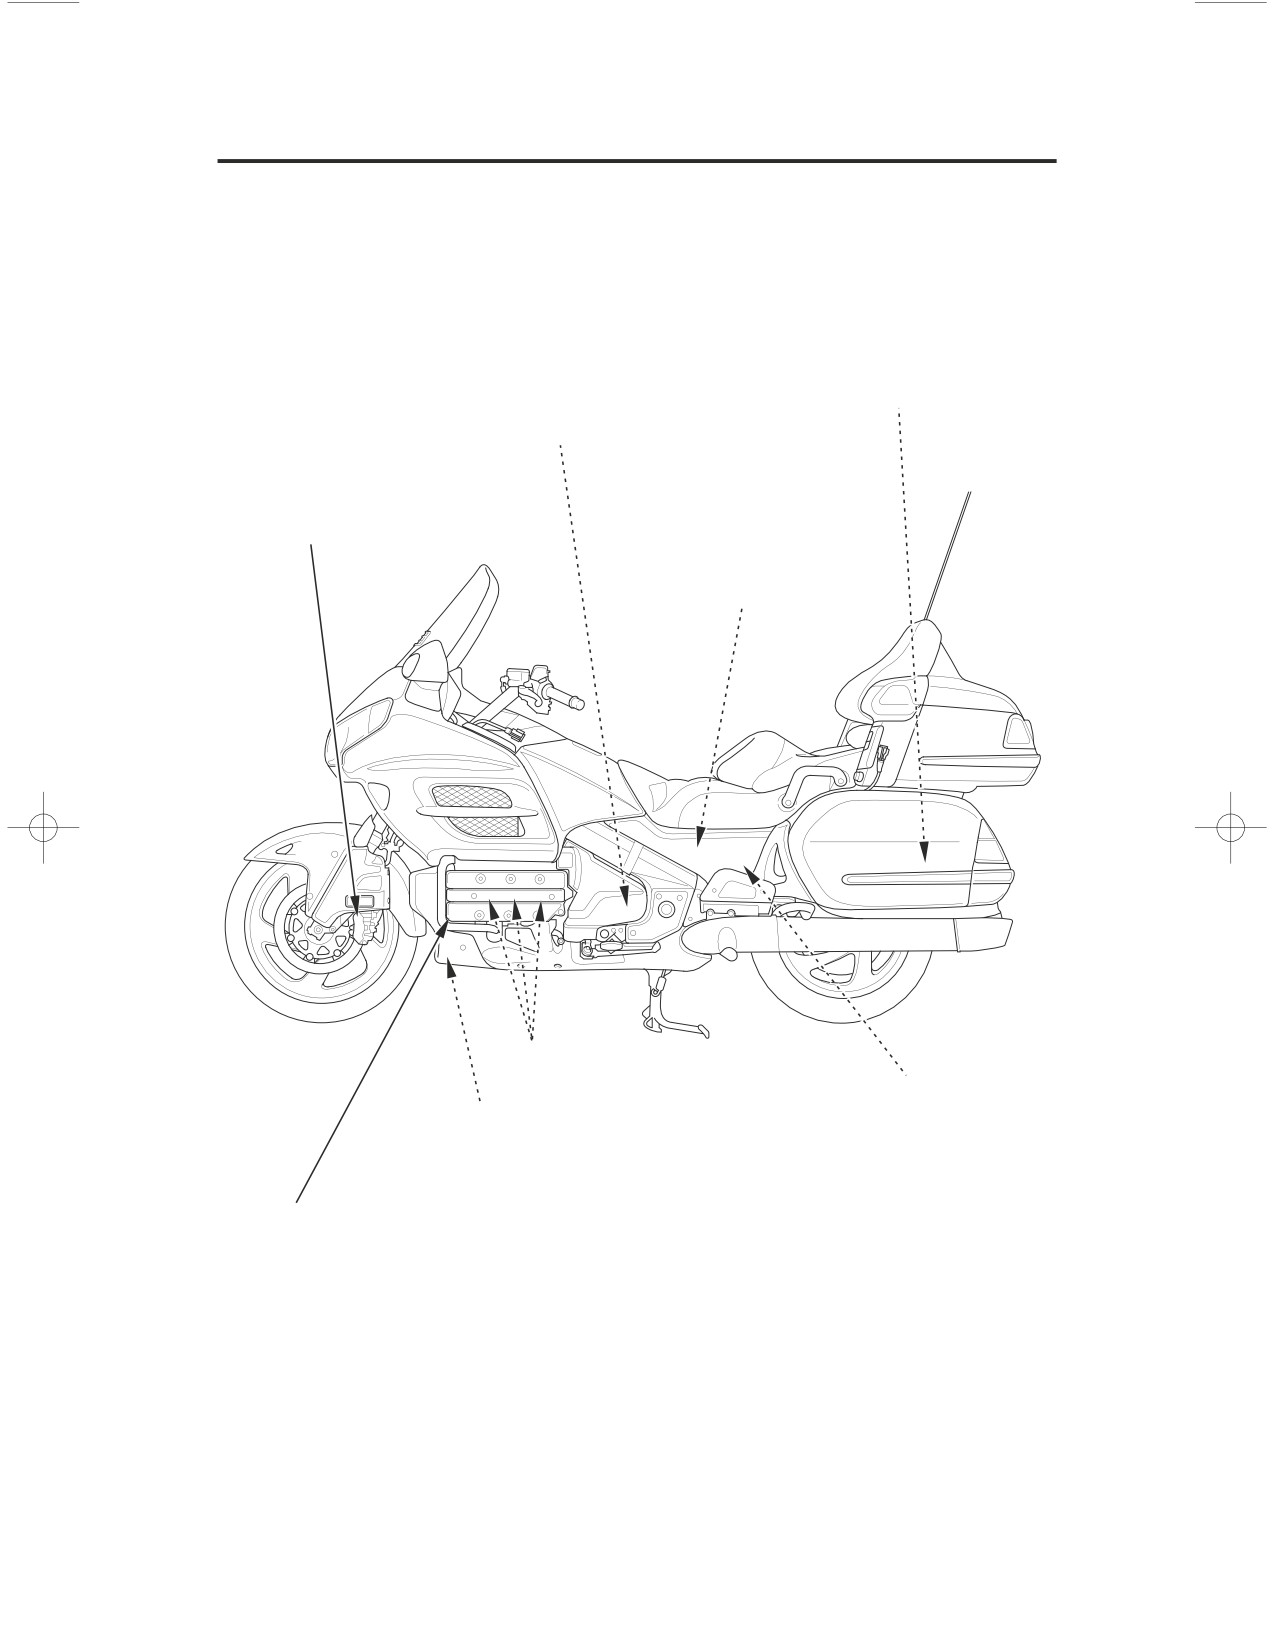
Maintenance Component Locations
owner’s manual
tool kit
coolant reserve tank cap
front brake caliper
fuse box
main fuse (A, B)
spark plugs
battery
engine oil filter
engine oil drain bolt
crankcase breather tube
Servicing Your Honda
151
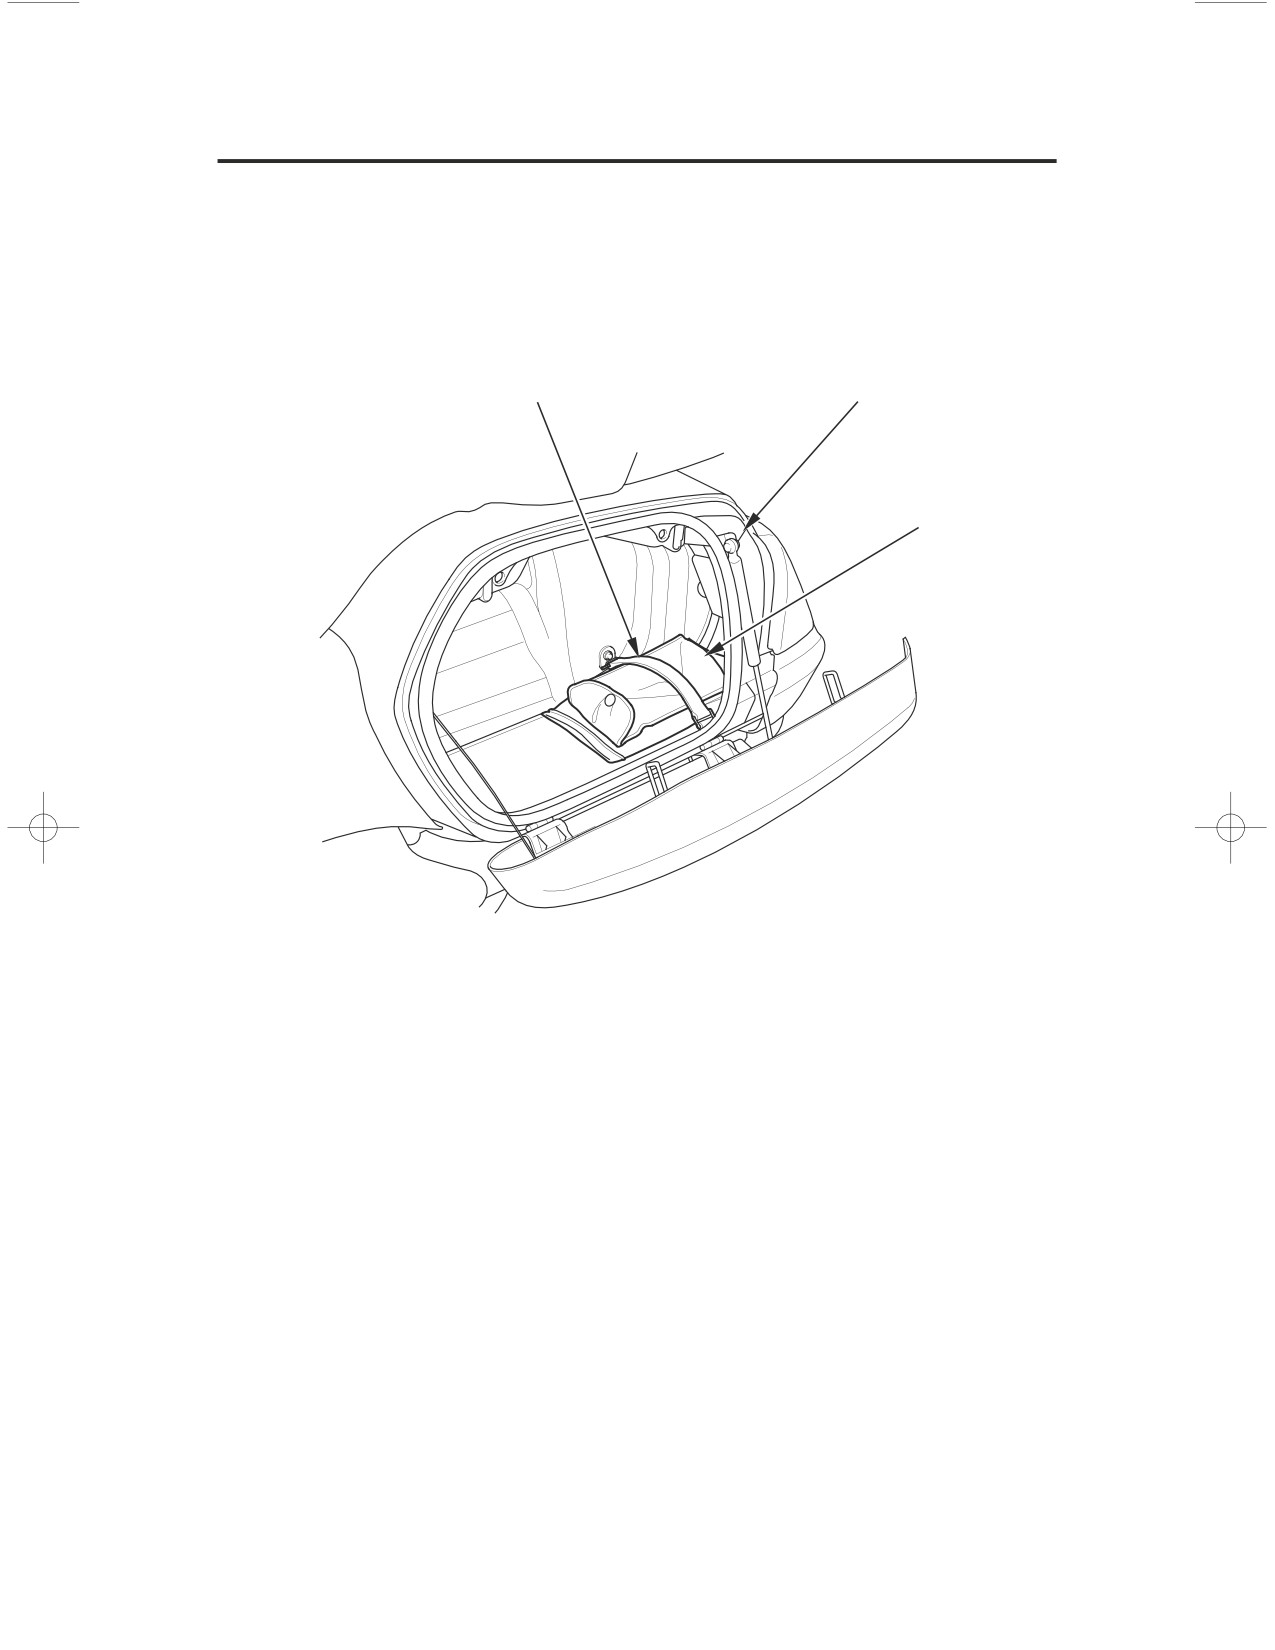
Tool Kit
The tool kit is located in the left saddlebag (page
).
52
An optional, larger tool kit may be available. Check with your Honda dealer’s
parts department.
LEFT SIDE
tool band
left saddlebag
tool kit
152
Servicing Your Honda
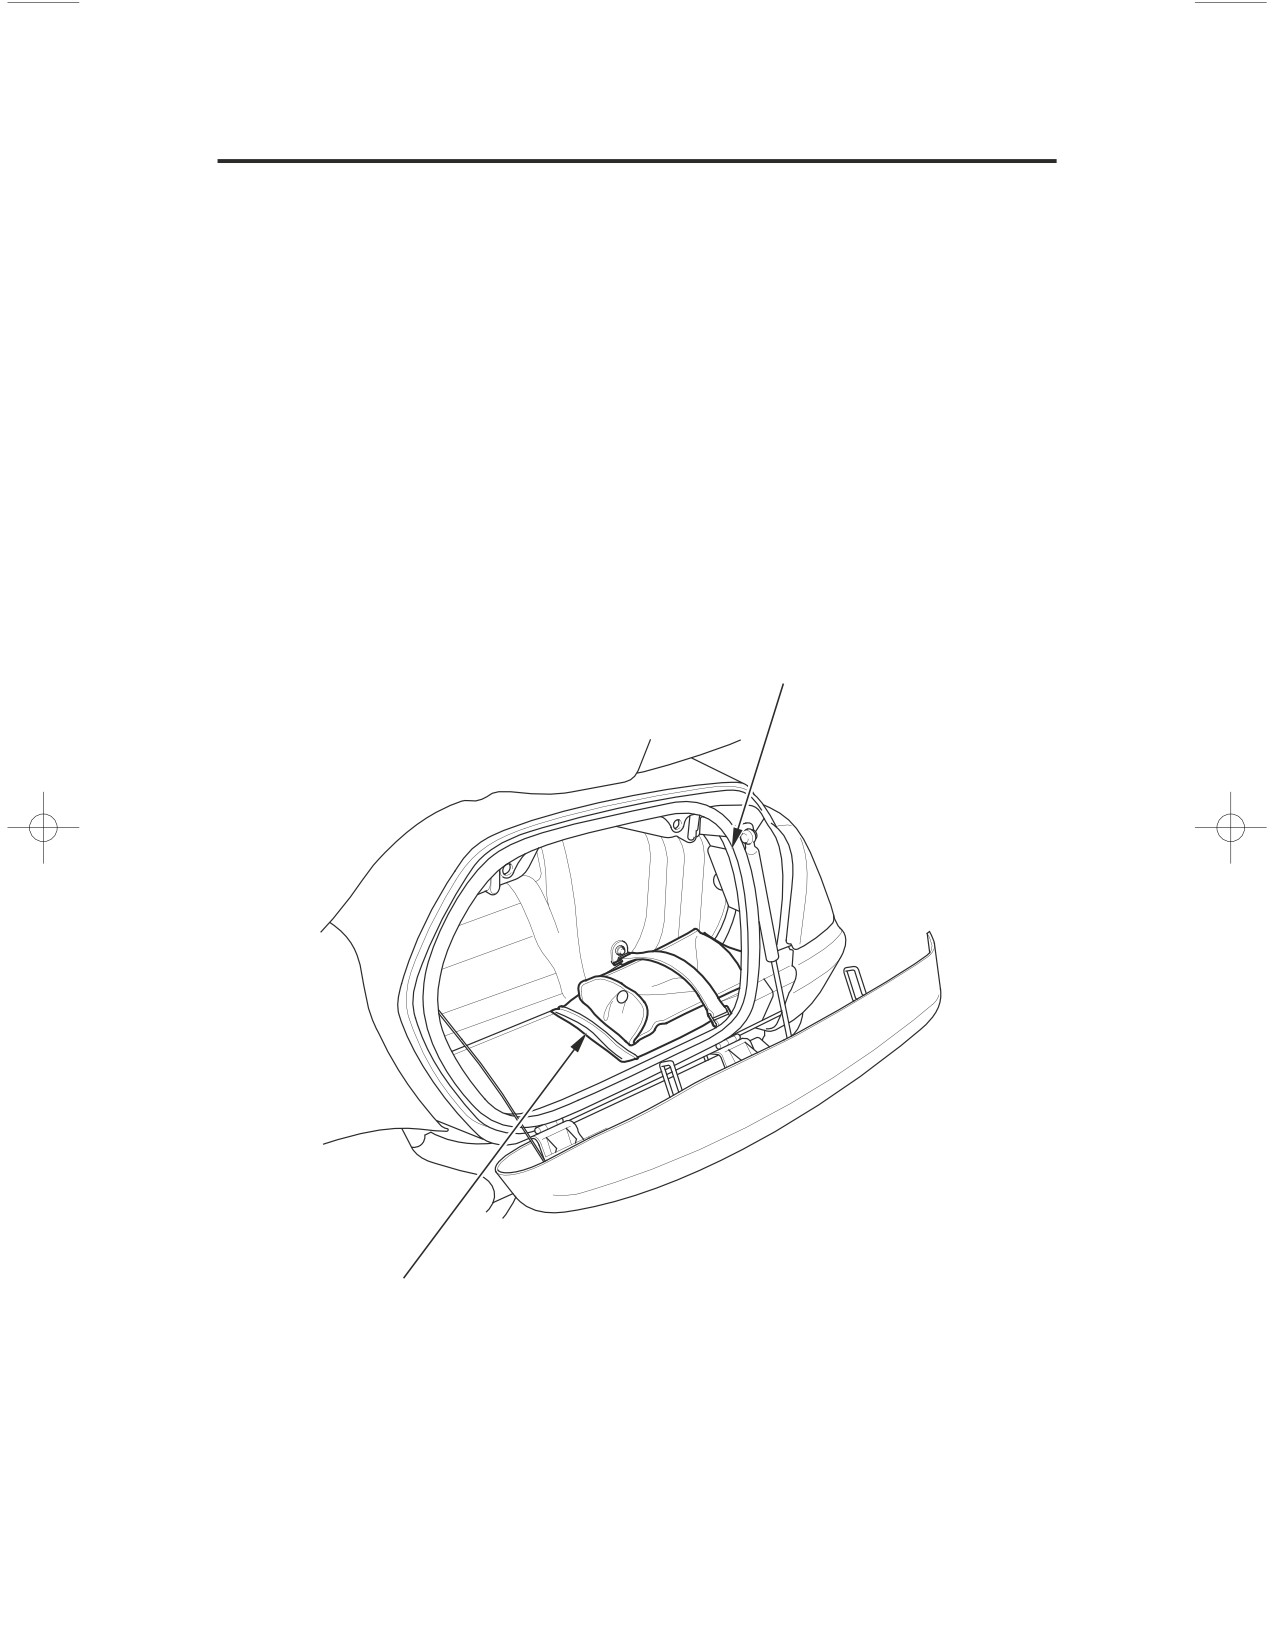
Owner’s Manual Storage
Your motorcycle provides storage for the owner’s manual so you’ll have it with
you for easy reference. Store your owner’s manual (and other documents) in the
plastic storage bag in the left saddlebag (page
).
52
For models equipped with Navigation System:
Store your Navigation System Manual with your owner’s manual.
For models equipped with Airbag:
Store your Owner’s Manual Airbag Supplement and Navigation System Manual
with your owner’s manual.
Be careful not to flood this area when washing your motorcycle.
LEFT SIDE
left saddlebag
owner’s manual
Servicing Your Honda
153