Honda GL1800 Goldwing. Owners Manual - page 2
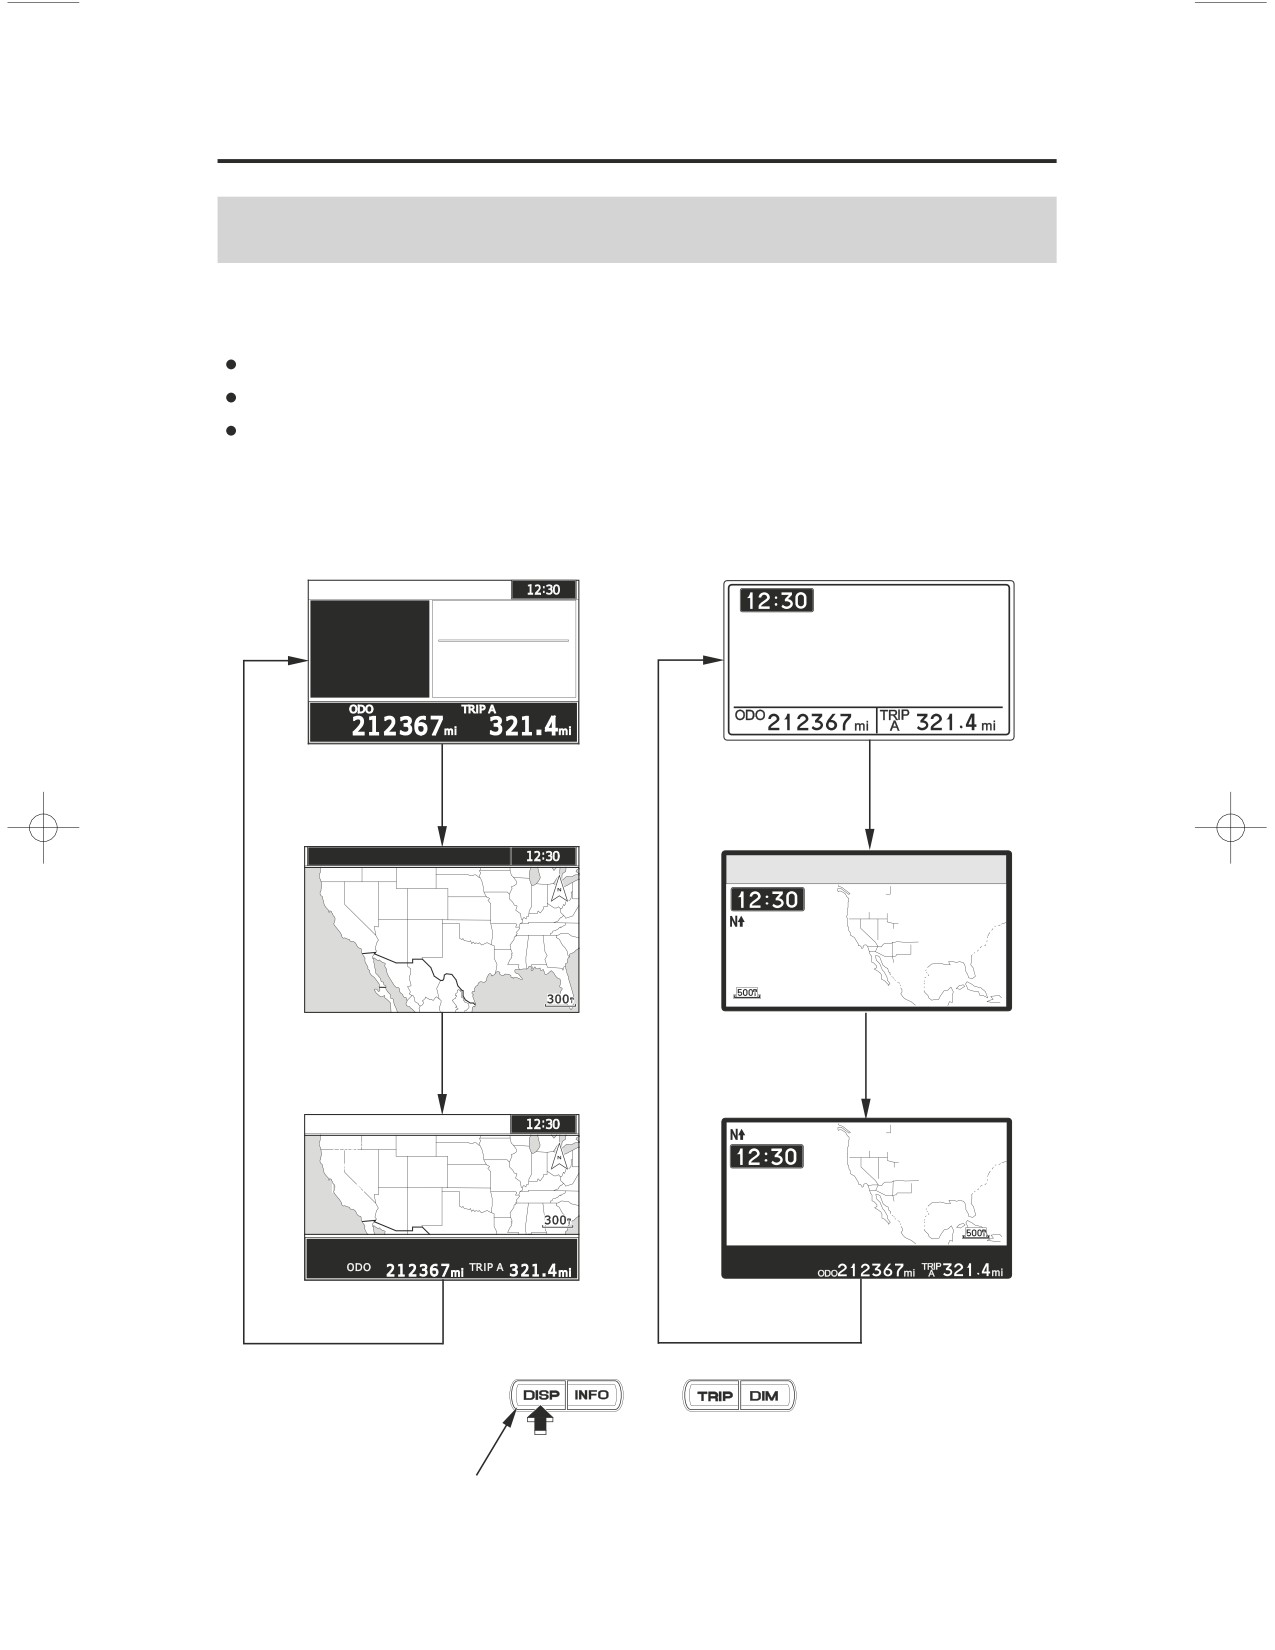
Multi Information Display
Display Type Selection
(Models equipped with Navigation System)
Press the DISP button to toggle between:
The Multi Information Display (time, odometer, and tripmeter)
A Navi full screen map with the time
A split screen with the Multi information condensed in a bar below the map.
For USA
For Canada
DISP button
34
Instruments & Controls
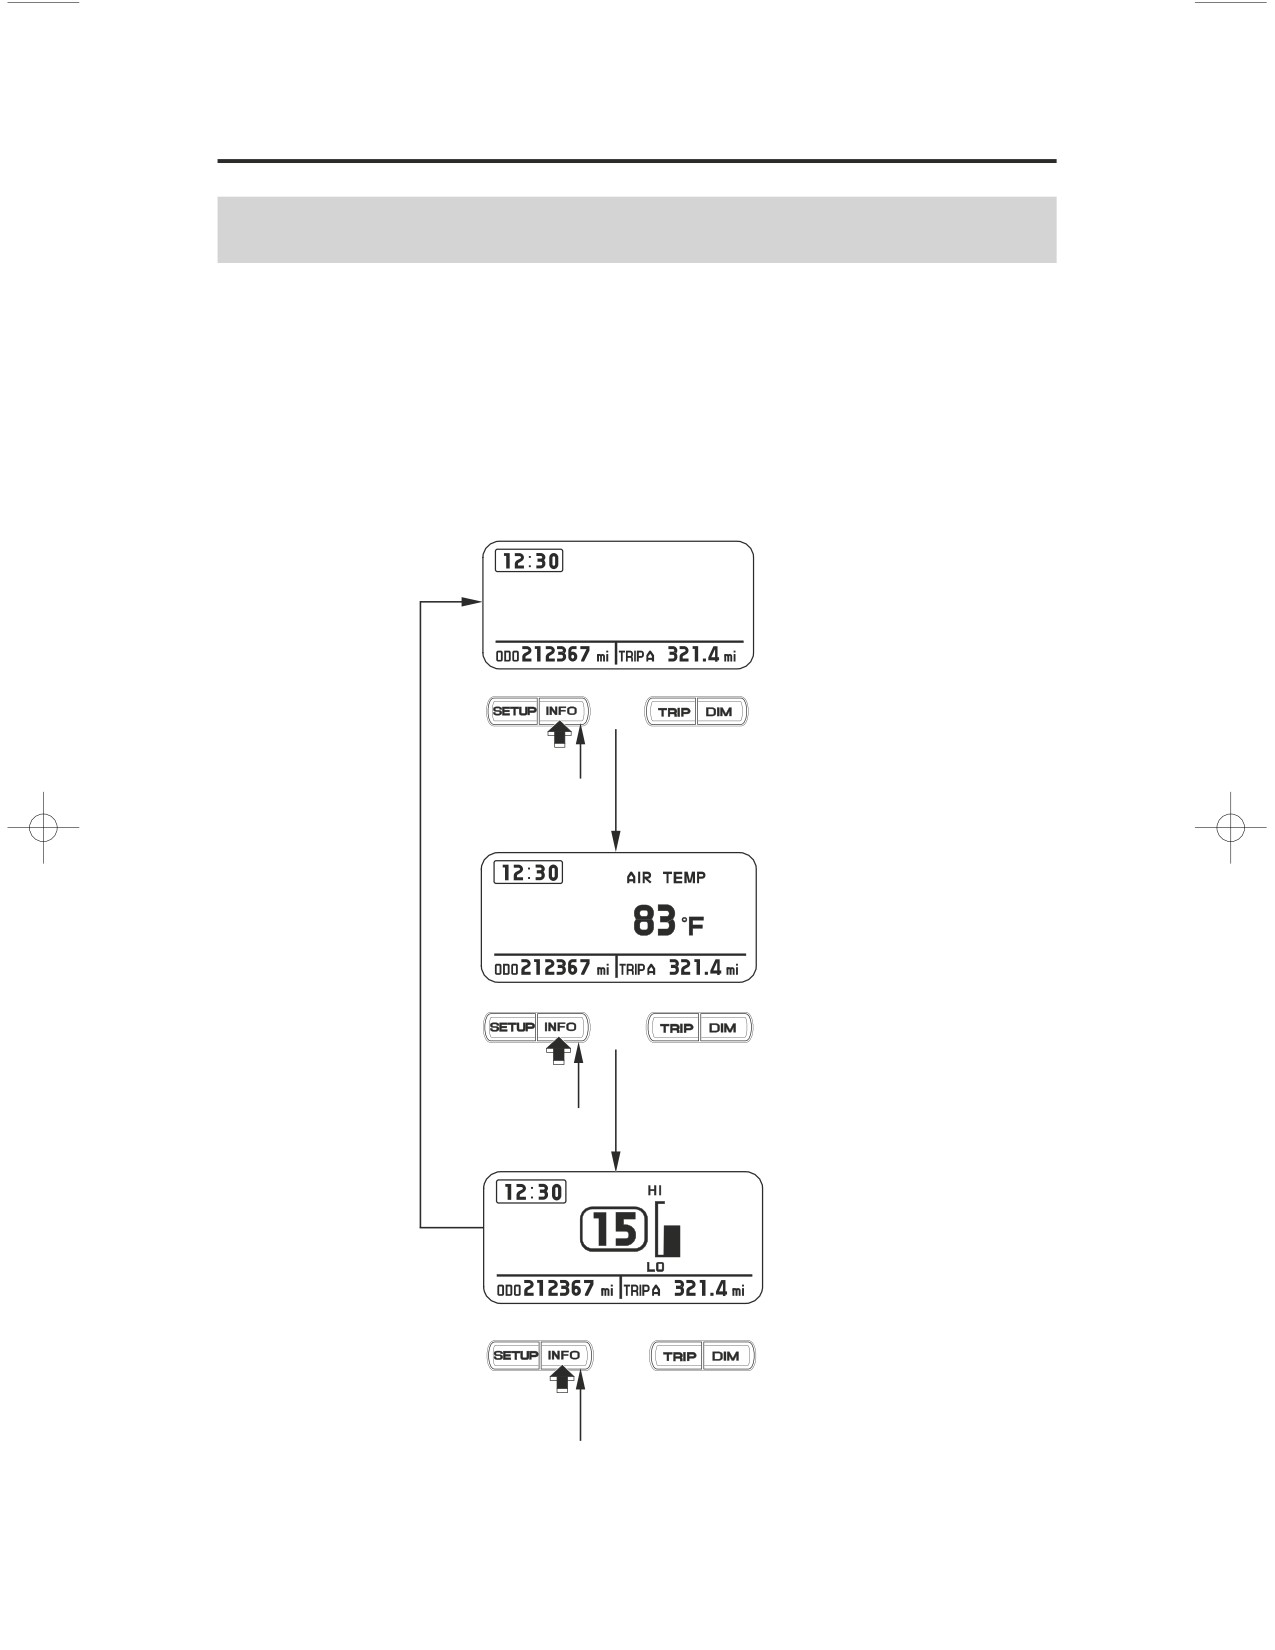
Multi Information Display
Changing the Information Display
The display changes as follows each time the INFO button is pushed.
When approximately 5 seconds pass without operating a button, the display
automatically returns to the previous display.
(Models not equipped with Navigation System)
INFO button
INFO button
INFO button
Instruments & Controls
35
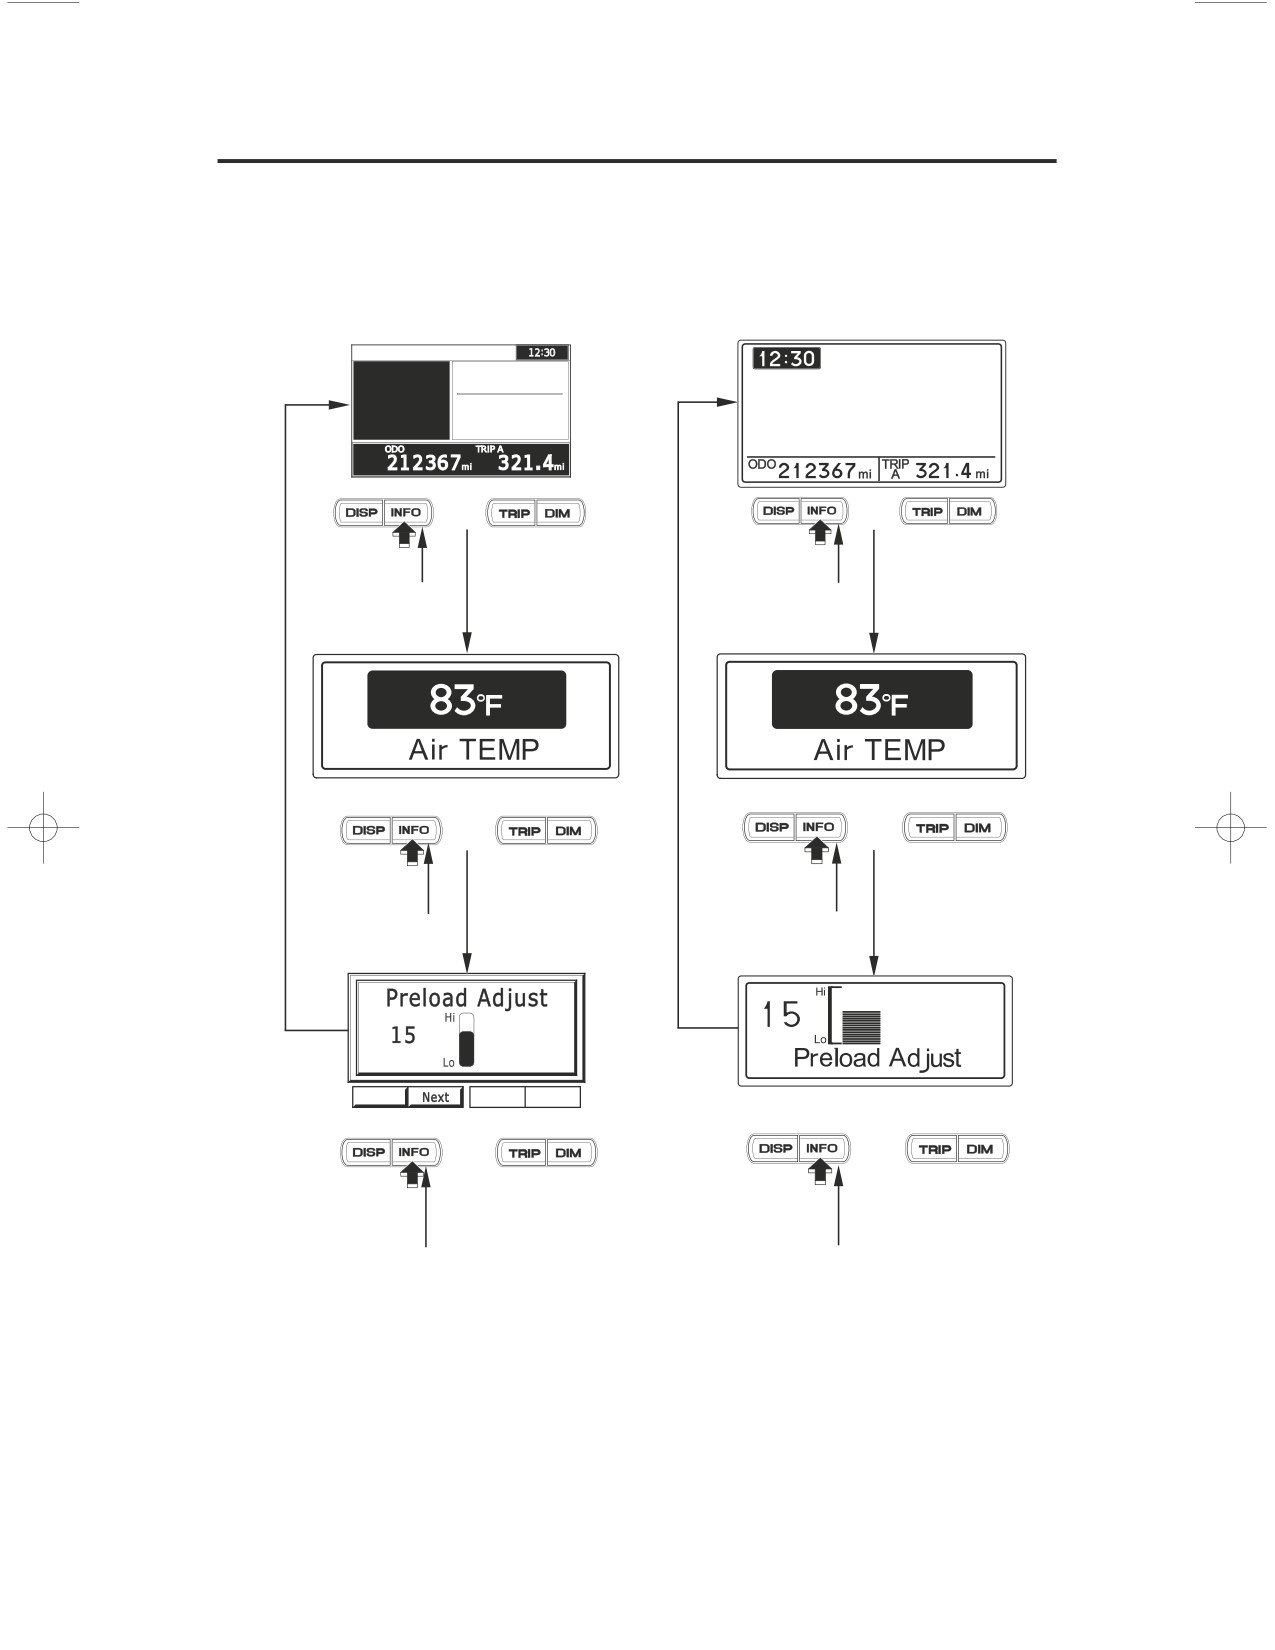
Multi Information Display
(Models equipped with Navigation System)
For USA
For Canada
INFO button
INFO button
INFO button
INFO button
INFO button
INFO button
36
Instruments & Controls
Controls & Features
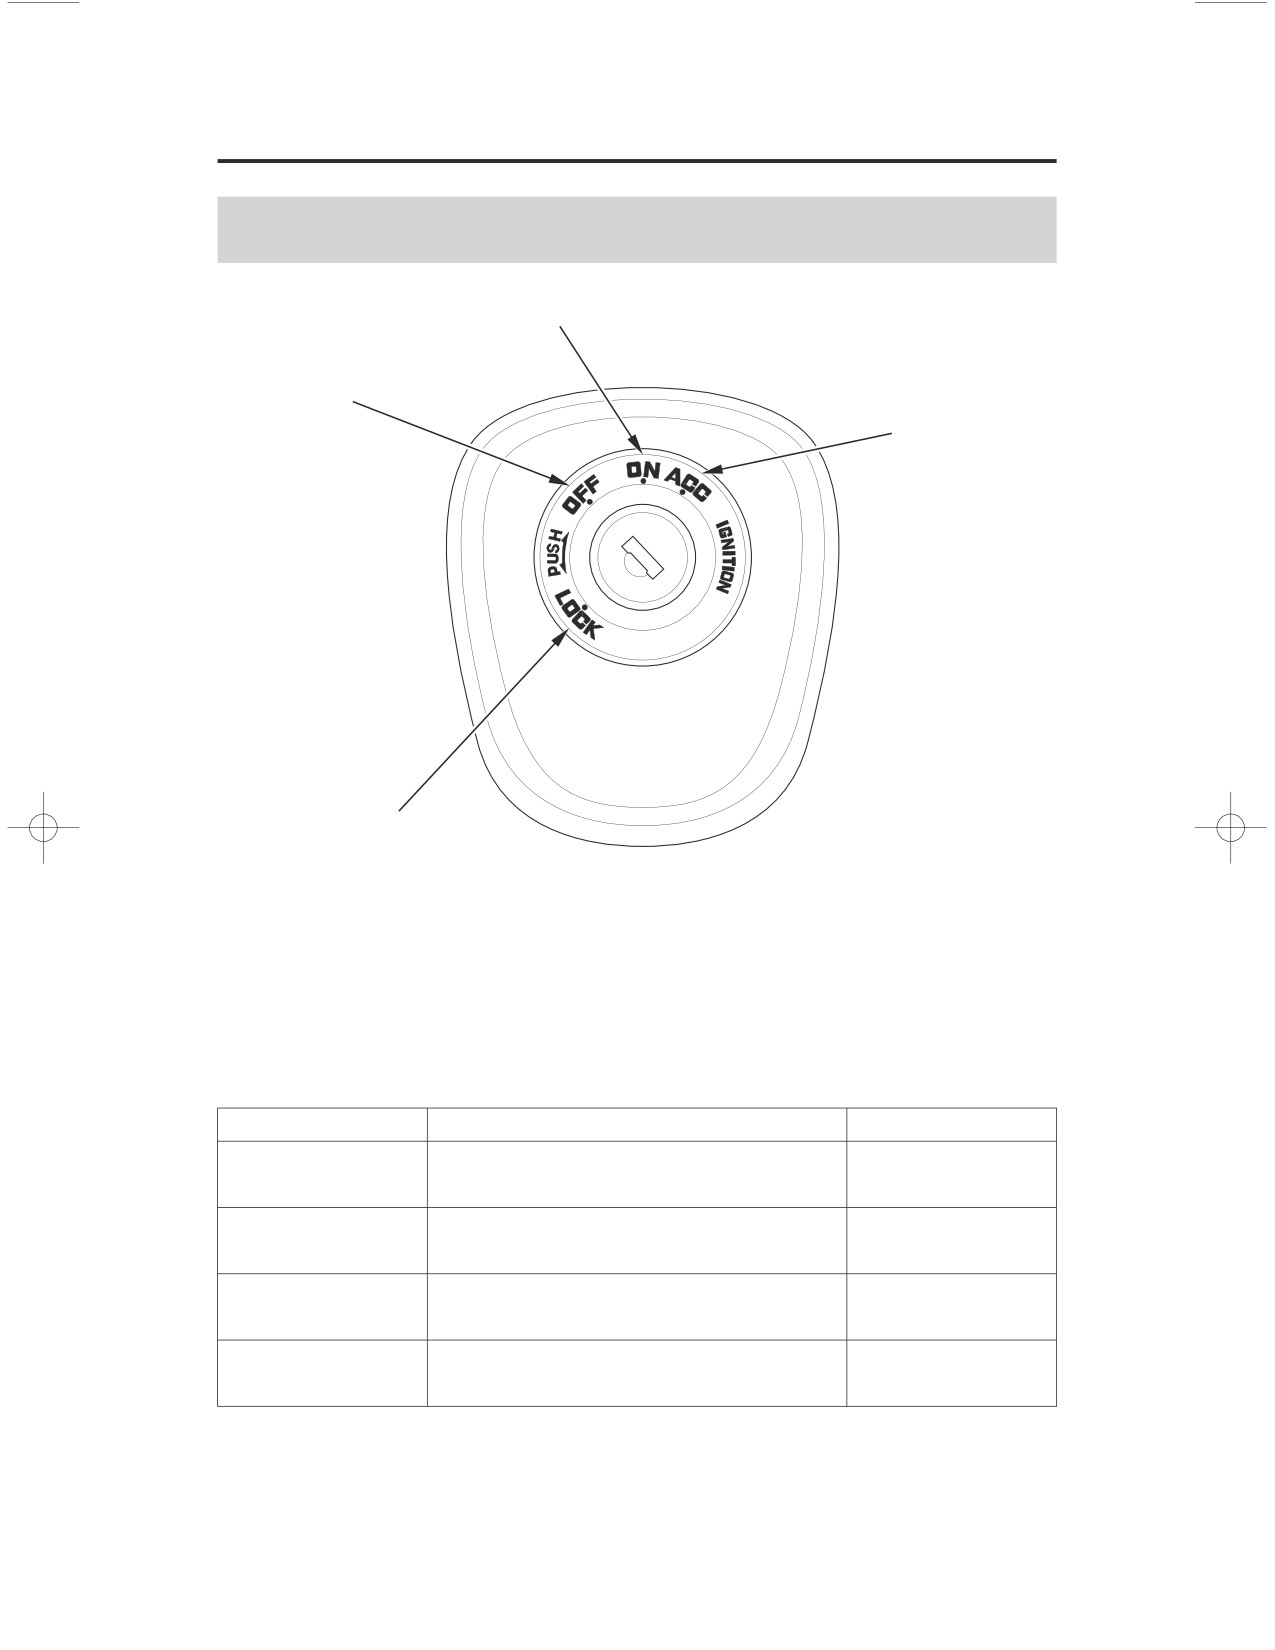
Ignition Switch
ON
OFF
ACC
LOCK
The ignition switch is used for starting and stopping the engine (page73) and to
lock the steering for theft prevention (page
89). Insert the key and turn it to the
right for the ON and ACC (accessory) positions.
Push down on the key and turn it to the left to the LOCK (steering lock) position.
Key Position
Function
Key Removal
ACC
Only the accessory circuits
cannot be
function.
removed
ON
Electrical circuits on.
cannot be
removed
OFF
No electrical circuits function.
can be
removed
LOCK
No electrical circuits function.
can be
(steering lock)
Locks the steering head.
removed
To unlock the steering lock, insert and push down on the key and turn it to the
right to the OFF position.
Instruments & Controls
37
Controls & Features
Engine Stop Switch
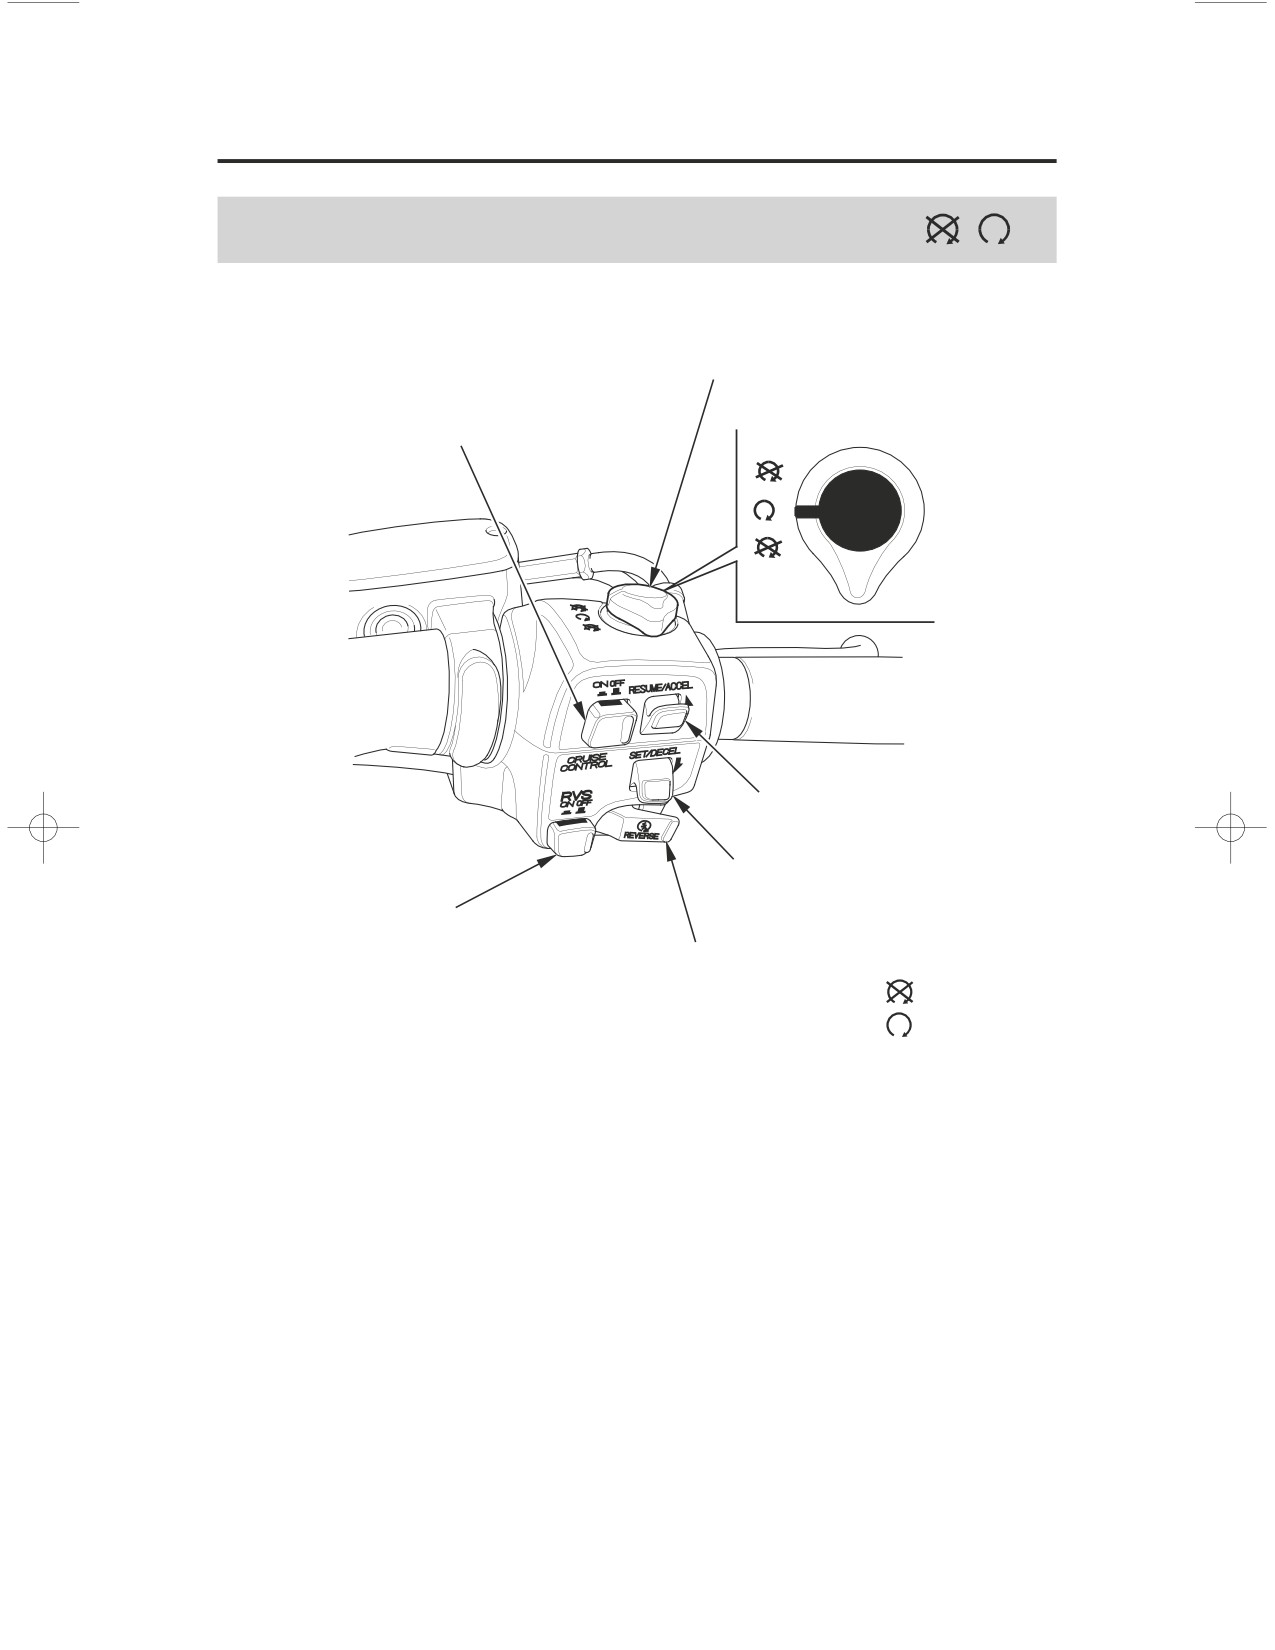
RIGHT HANDLEBAR
engine stop switch
CRUISE CONTROL master switch
RESUME/ACCEL switch
SET/DECEL switch
reverse (RVS) switch
start/reverse button
OFF
RUN
The engine stop switch is used to stop the engine in an emergency. To operate,
turn the switch to the OFF position. The switch must be in the RUN position to
start the engine, and it should normally remain in the RUN position even when
the engine is OFF.
If your motorcycle is stopped with the ignition switch ON and the engine stop
switch OFF, the headlight and taillight will remain on, resulting in battery
discharge.
38
Instruments & Controls
Controls & Features
Start/Reverse Button
The start/reverse button is used for starting the engine. Pushing the start/reverse
button in starts the engine. See
Starting Procedure,
page
74
When the start/reverse button is pushed, the starter motor will crank the engine;
the headlight will automatically go out, but the taillight will stay on.
The starter motor will not operate if the engine stop switch is in the OFF
position when the start/reverse button is pushed.
The start/reverse button is also used for reverse riding. See Riding in Reverse,
page
78
Reverse (RVS) Switch
The reverse switch is used to shift into reverse gear so you may back up your
motorcycle. For instructions, see
Riding in Reverse,
page
78
Cruise Control Switches
Three switches are used to activate, adjust, and de-activate the cruise control
system: a CRUISE CONTROL master switch, a SET/DECEL switch, and a
RESUME/ACCEL switch. For operating instructions, see Riding with Cruise
Control, page
93
Instruments & Controls
39
Controls & Features
Headlight Dimmer Switch
The headlight dimmer switch is used to change between the high and low
headlight beams. To operate, push the button to HI for high beam, LO for low
beam.
Turn Signal Switch
The turn signal switch is used to signal a turn. To operate, move the switch all
the way to the left or right and release it.
The appropriate turn signal lights will start blinking. The lights will
automatically stop when you complete the turn. (You can manually cancel the
lights by pushing the switch in.)
To signal a lane change, move the switch all the way to the left or right and
release it. The turn signal lights will automatically stop in 7 seconds or after
riding 110 yards (120 m).
Horn Button
The horn is used to alert other motorists. To operate, push the button.
Audio Control Switches
The audio control switches mounted on the left handlebar and above the fuel fill
compartment are used to operate the radio. For specific features and operation
instructions, see
Audio Systems,
page 97 .
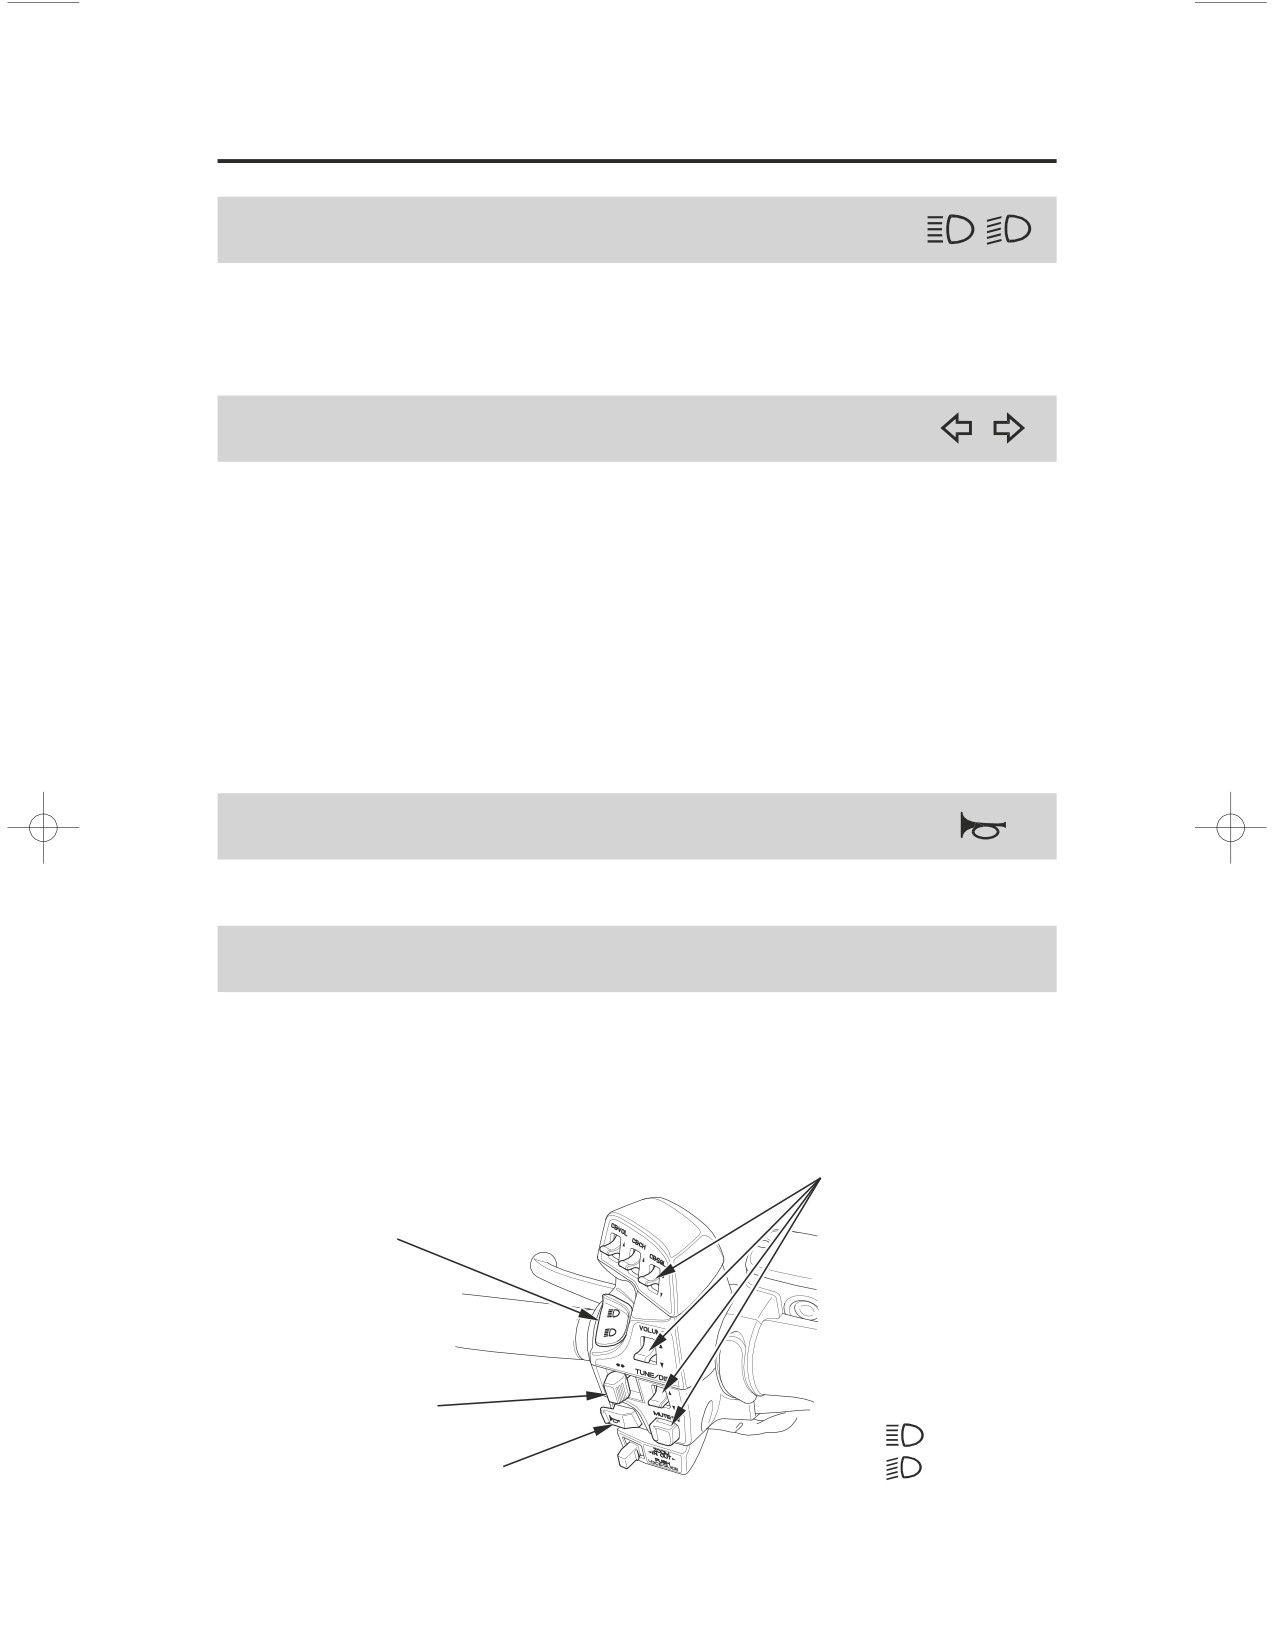
LEFT HANDLEBAR
audio control switches
headlight dimmer switch
turn signal switch
HI
horn button
LO
40
Instruments & Controls
Controls & Features
Hazard Switch
The hazard switch is used to activate the hazard lights on your motorcycle if you
need to stop near heavy traffic or if your motorcycle is disabled.
To operate, turn the ignition key to the ON or ACC position, and push the
hazard switch. The front and rear turn signals will blink simultaneously until
you push the switch again.
If you anticipate using the hazard system for an extended time, use the ACC
position and turn off all unnecessary accessories to conserve battery capacity.
Be sure to turn the switch off when the hazard warning is no longer required, or
the turn signals will not work properly and may confuse other drivers.
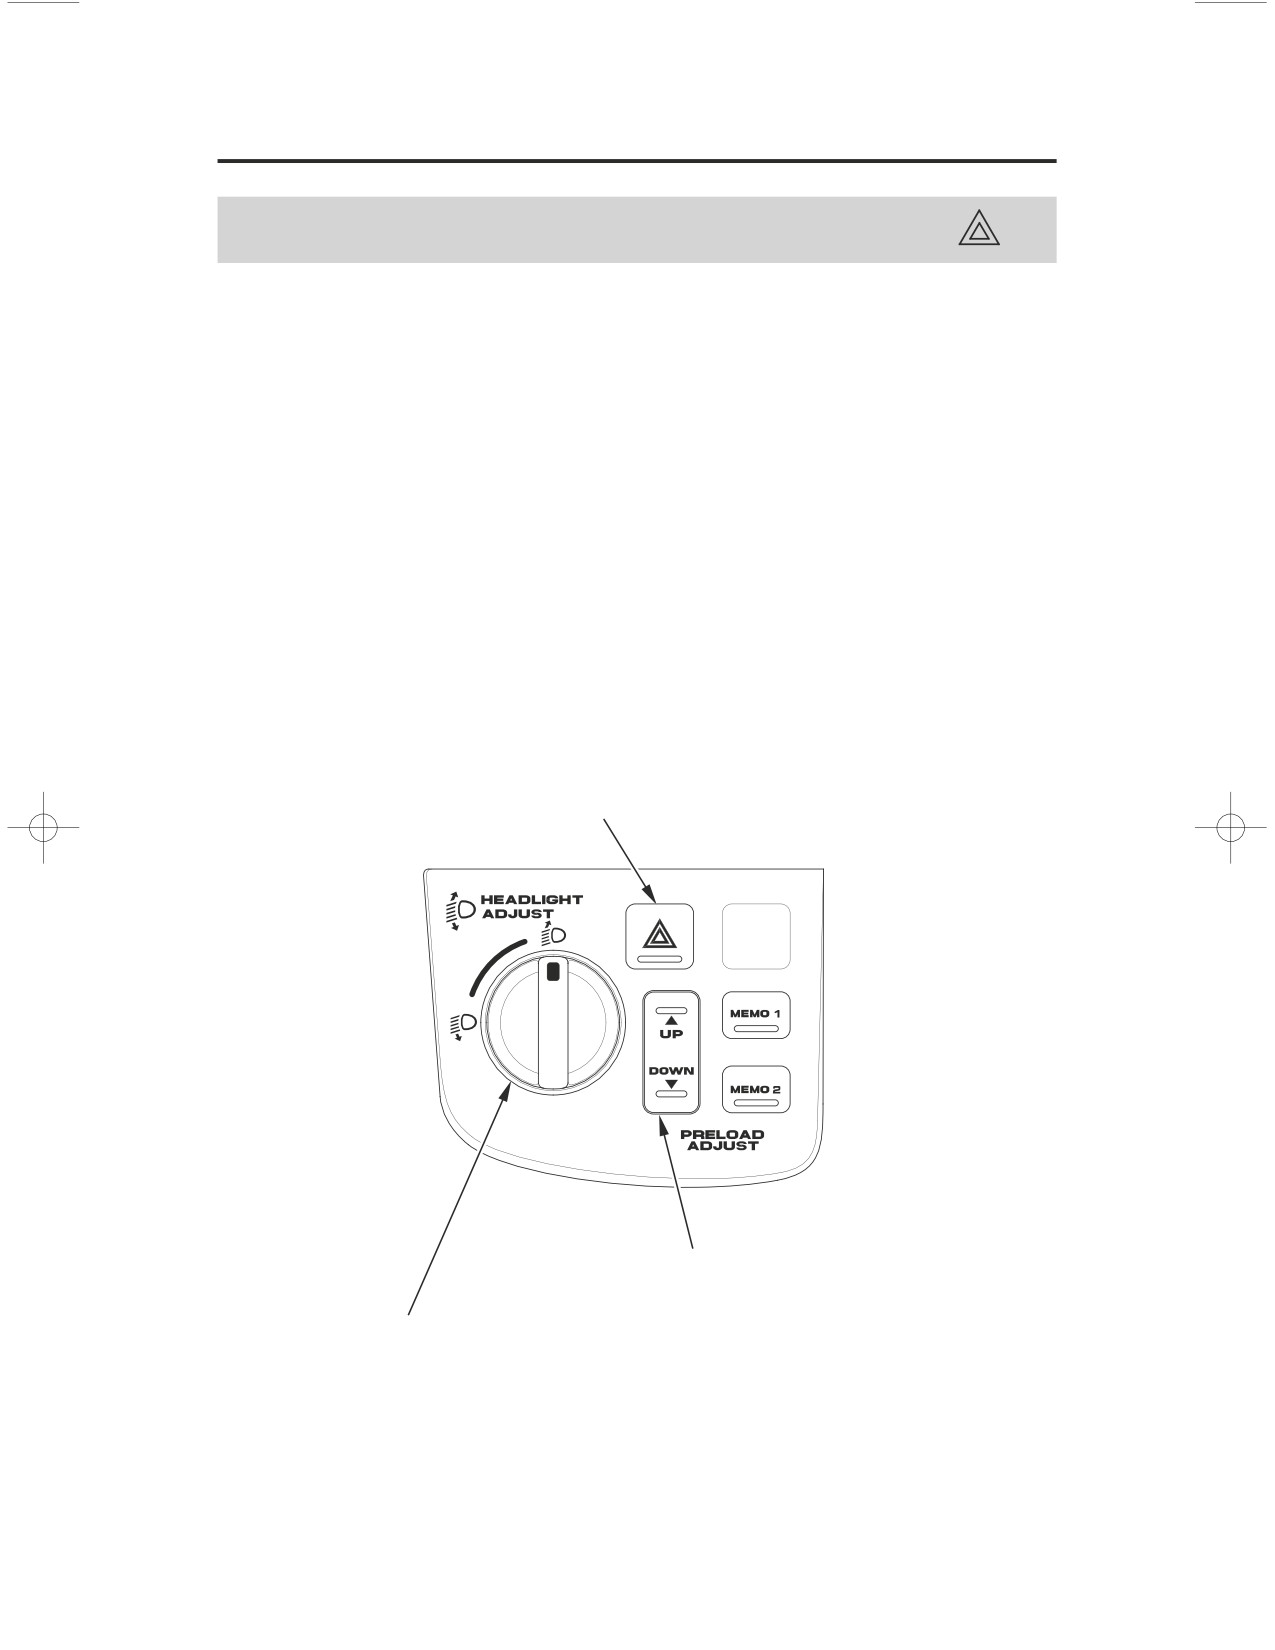
LEFT SIDE
hazard switch
rear suspension spring pre-load adjustment switch
headlight beam adjustment knob
Instruments & Controls
41
Controls & Features
Headlight Beam Adjustment Knob
The adjustment knob is used to raise or lower the height of the headlight beam.
You may need to adjust the headlight if you change to a lighter or heavier load
than you normally carry on your motorcycle.
If you carry a heavier or lighter than normal load, you may need to adjust your
headlight beam so you can better see the road ahead and don’t blind oncoming
drivers. Obey local laws and regulations concerning headlight adjustment.
To operate, start the engine.
To lower the beam, turn the headlight beam adjustment knob counterclockwise.
To raise the beam, turn the knob clockwise.
Rear Suspension Spring Pre-load Adjustment Switch
The rear suspension spring pre-load adjustment switch is used to adjust the rear
suspension to suit your load and riding conditions. For instructions on when and
how to adjust the rear suspension, see Rear Suspension Spring Pre-load
Adjustment, page
181
Ventilation Controls
The windscreen ventilation louver is used to direct the flow of fresh air
(page
64
).
The side ventilation louvers and foot warmer ventilation louvers are used to
direct the flow of warm air (pages65,66).
Windscreen Height Adjustment
The windscreen height adjustment levers are used to raise or lower your
windscreen to suit your riding preference. For instructions, see page
63
42
Instruments & Controls
Before Riding
Before each ride, you need to make sure you and your Honda are both ready to
ride. To help get you prepared, this section discusses how to evaluate your riding
readiness, what items you should check on your motorcycle, and adjustments to
make for your comfort, convenience, or safety. This section also includes
important information about loading.
For information about adjusting the suspension on your Honda, see page
181
Are You Ready to Ride?
44
Protective Apparel
44
Rider Training
46
Is Your Motorcycle Ready to Ride?
47
Pre-ride Inspection
47
Load Limits & Guidelines
49
Loading
49
Load Limits
50
Loading Guidelines
51
Cargo Compartment
52
Travel Trunk & Saddlebags
52
Remote Transmitter
56
Fairing Pockets
60
Trunk Side Pockets
61
Comfort & Convenience Adjustment
62
Windscreen Height Adjustment
63
Windscreen Ventilation Louver
64
Side Ventilation Louvers
65
Foot Warmer Ventilation Louvers
66
Handgrip Heater
67
Seat Heater
68
Accessories
69
Accessory (ACC) Terminal
69
Before Riding
43
Are You Ready to Ride?
Before you ride your motorcycle for the first time, we urge you to:
Read this owner’s manual.
Make sure you understand all the safety messages.
Know how to operate all the controls.
Before each ride, be sure:
You feel well and are in good physical and mental condition.
You are wearing an approved motorcycle helmet (with chin strap tightened
securely), eye protection, and other protective clothing.
You don’t have any alcohol or drugs in your system.
Make sure your passenger is ready to ride, too, and is wearing proper gear
including a helmet.
If you are not riding with a passenger and want to carry an extra helmet, use a
commercially-available elastic cord, strap, or net to secure the helmet to the seat.
The travel trunk may also be used to store an extra helmet.
Protective Apparel
For your safety, we strongly recommend that you always wear an approved
motorcycle helmet, eye protection, boots, gloves, long pants, and a long-sleeved
shirt or jacket whenever you ride.
Although complete protection is not possible, wearing proper gear can reduce
the chance of injury when you ride.
Following are suggestions to help you choose the proper gear.
44
Before Riding
Are You Ready to Ride?
Helmets and Eye Protection
Your helmet is your most important piece of riding gear because it offers the
best protection against head injuries. A helmet should fit your head comfortably
and securely. A bright-colored helmet and reflective strips can make you more
noticeable in traffic.
An open-face helmet offers some protection, but a full-face helmet offers more.
Regardless of the style, look for a DOT (Department of Transportation) sticker
on any helmet you buy (USA only). Always wear a face shield or goggles to
protect your eyes and help your vision.
Not wearing a helmet increases
the chance of serious injury or
death in a crash.
Be sure you and your
passenger always wear a
helmet, eye protection, and
other protective apparel when
you ride.
Additional Riding Gear
In addition to a helmet and eye protection, we also recommend:
Sturdy boots with non-slip soles to help protect your feet and ankles.
Leather gloves to help protect your hands.
A motorcycle riding suit or jacket for comfort as well as protection.
Bright-colored and reflective clothing can help make you more noticeable in
traffic. Avoid loose clothes that could get caught on any part of your
motorcycle.
Before Riding
45
Are You Ready to Ride?
Rider Training
Developing your riding skills is an on-going process. Even if you have ridden
other motorcycles, take time to become familiar with how this motorcycle works
and handles. Practice riding the motorcycle in a safe area to build your skills. Do
not ride in traffic until you get accustomed to the motorcycle’s controls, and feel
comfortable with its size and weight.
We urge all riders to take a certified course approved by the Motorcycle Safety
Foundation (MSF). New riders should start with the basic course, and even
experienced riders will find the advanced course beneficial. For information
about the MSF training course nearest you, call the national toll-free number:
(800) 446-9227.
Other riding tips can be found in the
Riding Tips
booklet that came with your
motorcycle (USA only).
46
Before Riding
Is Your Motorcycle Ready to Ride?
Before each ride, it’s important to inspect your motorcycle and make sure any
problem you find is corrected. A pre-ride inspection is a must, not only for
safety, but because having a breakdown, or even a flat tire, can be a major
inconvenience.
Improperly maintaining this
motorcycle or failing to correct a
problem before riding can cause
a crash in which you can be
seriously hurt or killed.
Always perform a pre-ride
inspection before every ride and
correct any problems.
Pre-ride Inspection
Check the following items before you get on the motorcycle:
Tires
Look at the tires. If a tire appears low, use an air pressure gauge
&
to check its pressure. Also look for signs of excessive wear
Wheels
(page 191 ) or damage to the tires and wheels.
Leaks,
Walk around your motorcycle and look for anything that appears
Loose
unusual, such as a leak or loose cable.
Parts
Lights
Make sure the headlight, brakelight, taillight, and turn signals are
working properly.
Before Riding
47
Is Your Motorcycle Ready to Ride?
If you are carrying a passenger or cargo, also check the following:
Load Limits
Make sure you do not exceed the load limits (page
50
).
Cargo
Check that all cargo is secure.
Adjustments
Adjust the rear suspension (page
180
) according to your load.
Check these items after you get on the motorcycle:
Throttle
Rotate the throttle to check it moves smoothly without binding.
Brakes
Pull the brake lever and press on the brake pedal to check that
they operate normally.
Indicators
Turn the ignition on and check for normal operation of the
indicators (page
16
).
Gauges
Check the fuel level and other gauges (page16).
If you haven’t ridden the motorcycle in over a week, you should also check
other items, such as the oil level and other fluids. See
Periodic Maintenance
(page143). Periodic maintenance should also be done at least once a month, no
matter how often you ride.
Remember, be sure to take care of any problem you find, or have your Honda
dealer correct it before you ride.
48
Before Riding
Load Limits & Guidelines
Your motorcycle has been designed to carry you and one passenger. When you
carry a passenger, you may feel some difference during acceleration and
braking. But so long as you keep your motorcycle well-maintained, with good
tires and brakes, you can safely carry loads within the given limits and
guidelines.
However, exceeding the weight limit or carrying an unbalanced load can
seriously impair your motorcycle’s handling, braking, and stability. Non-Honda
accessories, improper modifications, and poor maintenance can also reduce your
safety margin.
Loading
How much weight you put on your motorcycle, and how you load it, are
important to your safety. Anytime you ride with a passenger or cargo, you
should be aware of the following information.
Overloading or improper loading
can cause a crash and you can
be seriously hurt or killed.
Follow all load limits and other
loading guidelines in this
manual.
Before Riding
49
Load Limits & Guidelines
Load Limits
Following are the load limits for your motorcycle:
maximum weight capacity:
=
410 lbs (186 kg)
includes the weight of the rider,
=
419 lbs (190 kg)
passenger, all cargo, and all accessories.
(Canada only)
maximum cargo weight:
=
71 lbs (32 kg)
includes following maximum compartment
(Models not equipped
weights:
with Airbag)
=
66 lbs (30 kg)
(Models equipped with
Airbag)
travel trunk
=
20.0 lbs (9.0 kg)
each saddlebag
=
20.0 lbs (9.0 kg)
each fairing pocket
(Models not equipped with Airbag)
=
4.5 lbs (2.0 kg)
fairing pocket
(Models equipped with Airbag)
=
4.5 lbs (2.0 kg)
each trunk side pocket
=
1.0 lbs (0.5 kg)
The weight of added accessories will reduce the maximum cargo weight you can
carry.
50
Before Riding
Load Limits & Guidelines
Loading Guidelines
Improperly loading your motorcycle can affect its stability and handling. Even
if your motorcycle is properly loaded, you should ride at reduced speeds and
never exceed 80 mph (130 km/h) when carrying cargo.
Follow these guidelines whenever you carry a passenger or cargo:
Check that both tires are properly inflated (page
190
).
If you change your normal load, you may need to adjust the rear suspension
(page
180
).
To prevent loose items from creating a hazard, make sure that all cargo is tied
down securely before you ride.
Place cargo weight as low and close to the center of your motorcycle as
possible.
Balance cargo weight evenly on both sides.
Make sure all cargo compartments are securely closed.
Check the headlight beam adjustment if you change your normal load.
Do not attach large or heavy items (such as a sleeping bag or tent) to the
handlebar, forks, or fender.
Before Riding
51
Cargo Compartment
Your motorcycle comes with a lockable travel trunk and dual saddlebags, plus
two trunk side pockets and front fairing pockets.
Instructions on how to open, close, and lock these compartments follow.
Travel Trunk & Saddlebags
The travel trunk and saddlebags are for lightweight items.
Cargo in the travel trunk and both saddlebags should not exceed:
20.0 lbs (9.0 kg) each
However, regardless of compartment capacity, be sure you do not exceed the
maximum load and cargo weight limits (page50).
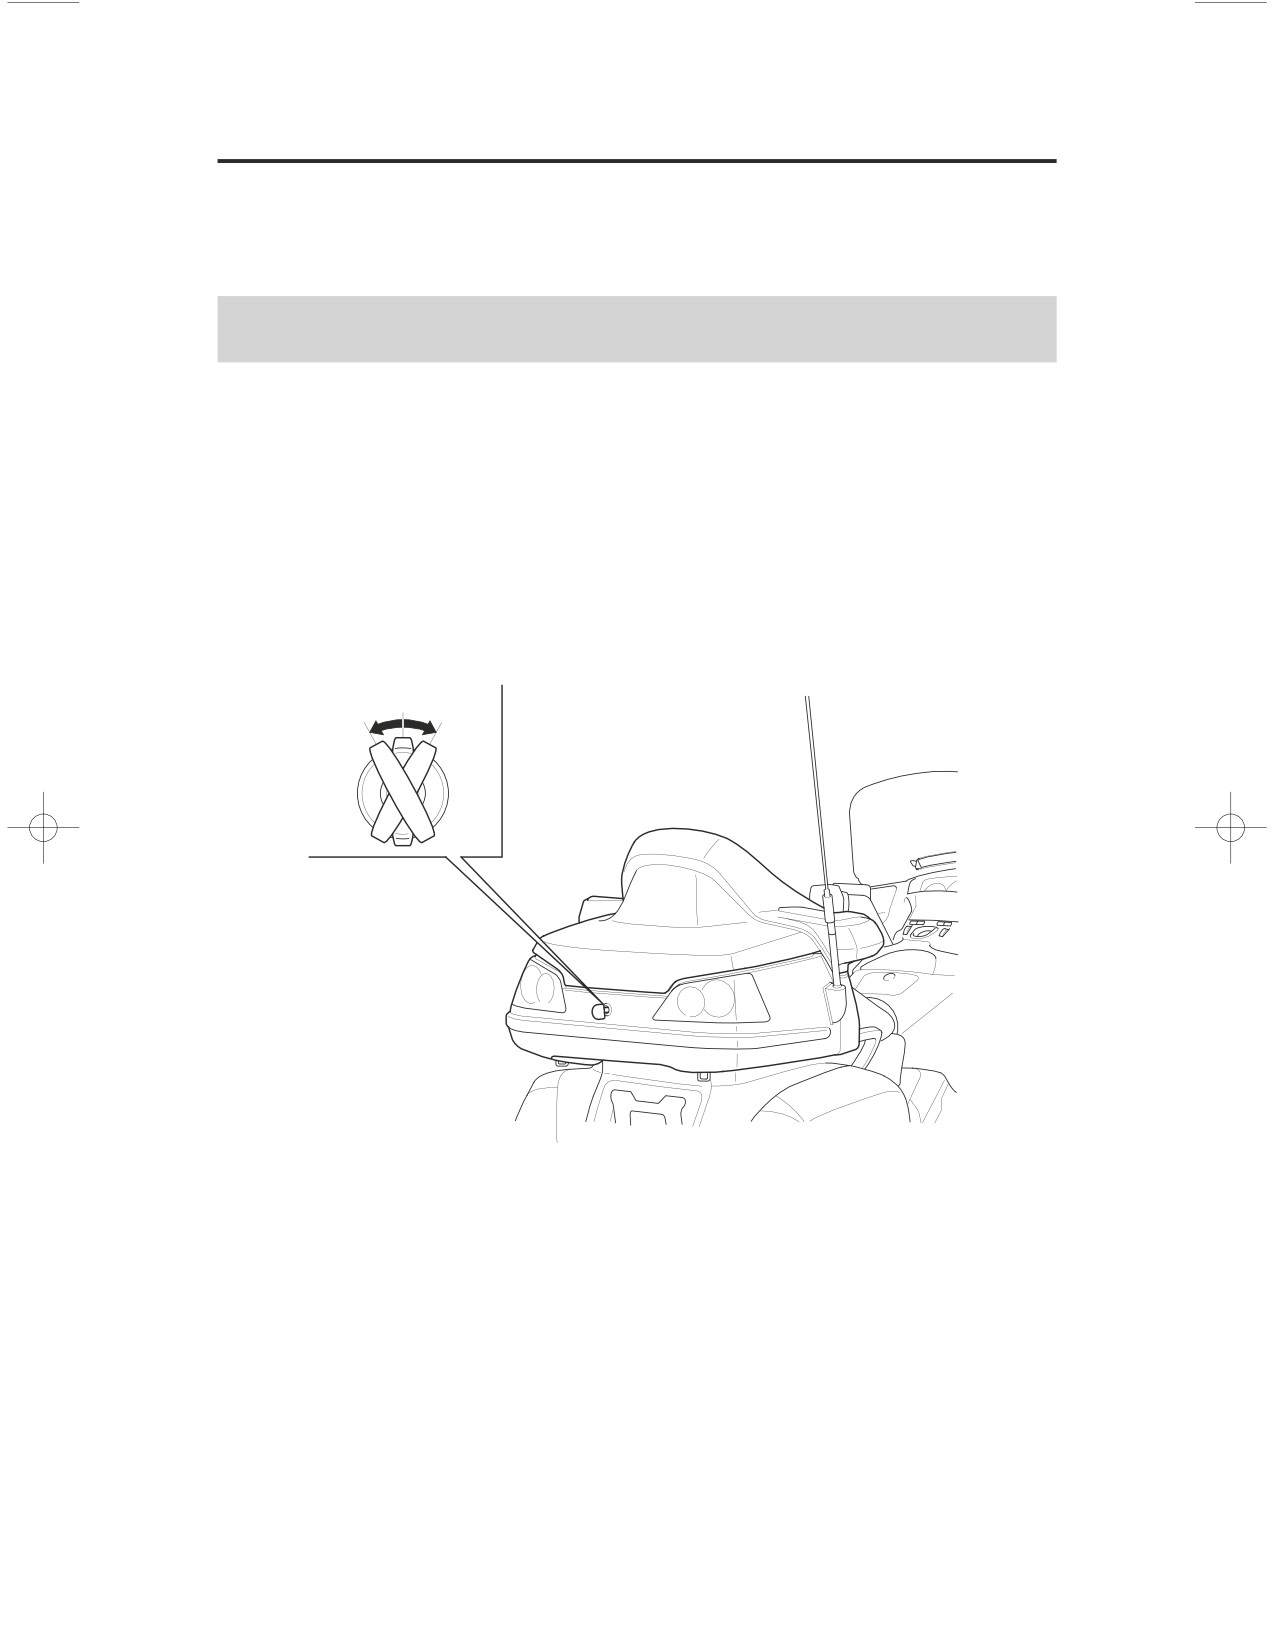
To Lock & Unlock the Travel Trunk & Saddlebags
LOCK UNLOCK
The travel trunk and saddlebags can be locked and unlocked with the ignition
key or remote transmitter.
To use the remote transmitter, see page
56
To unlock:
Insert the ignition key and turn it clockwise.
To lock:
Insert the ignition key and turn it counterclockwise.
52
Before Riding
Cargo Compartment
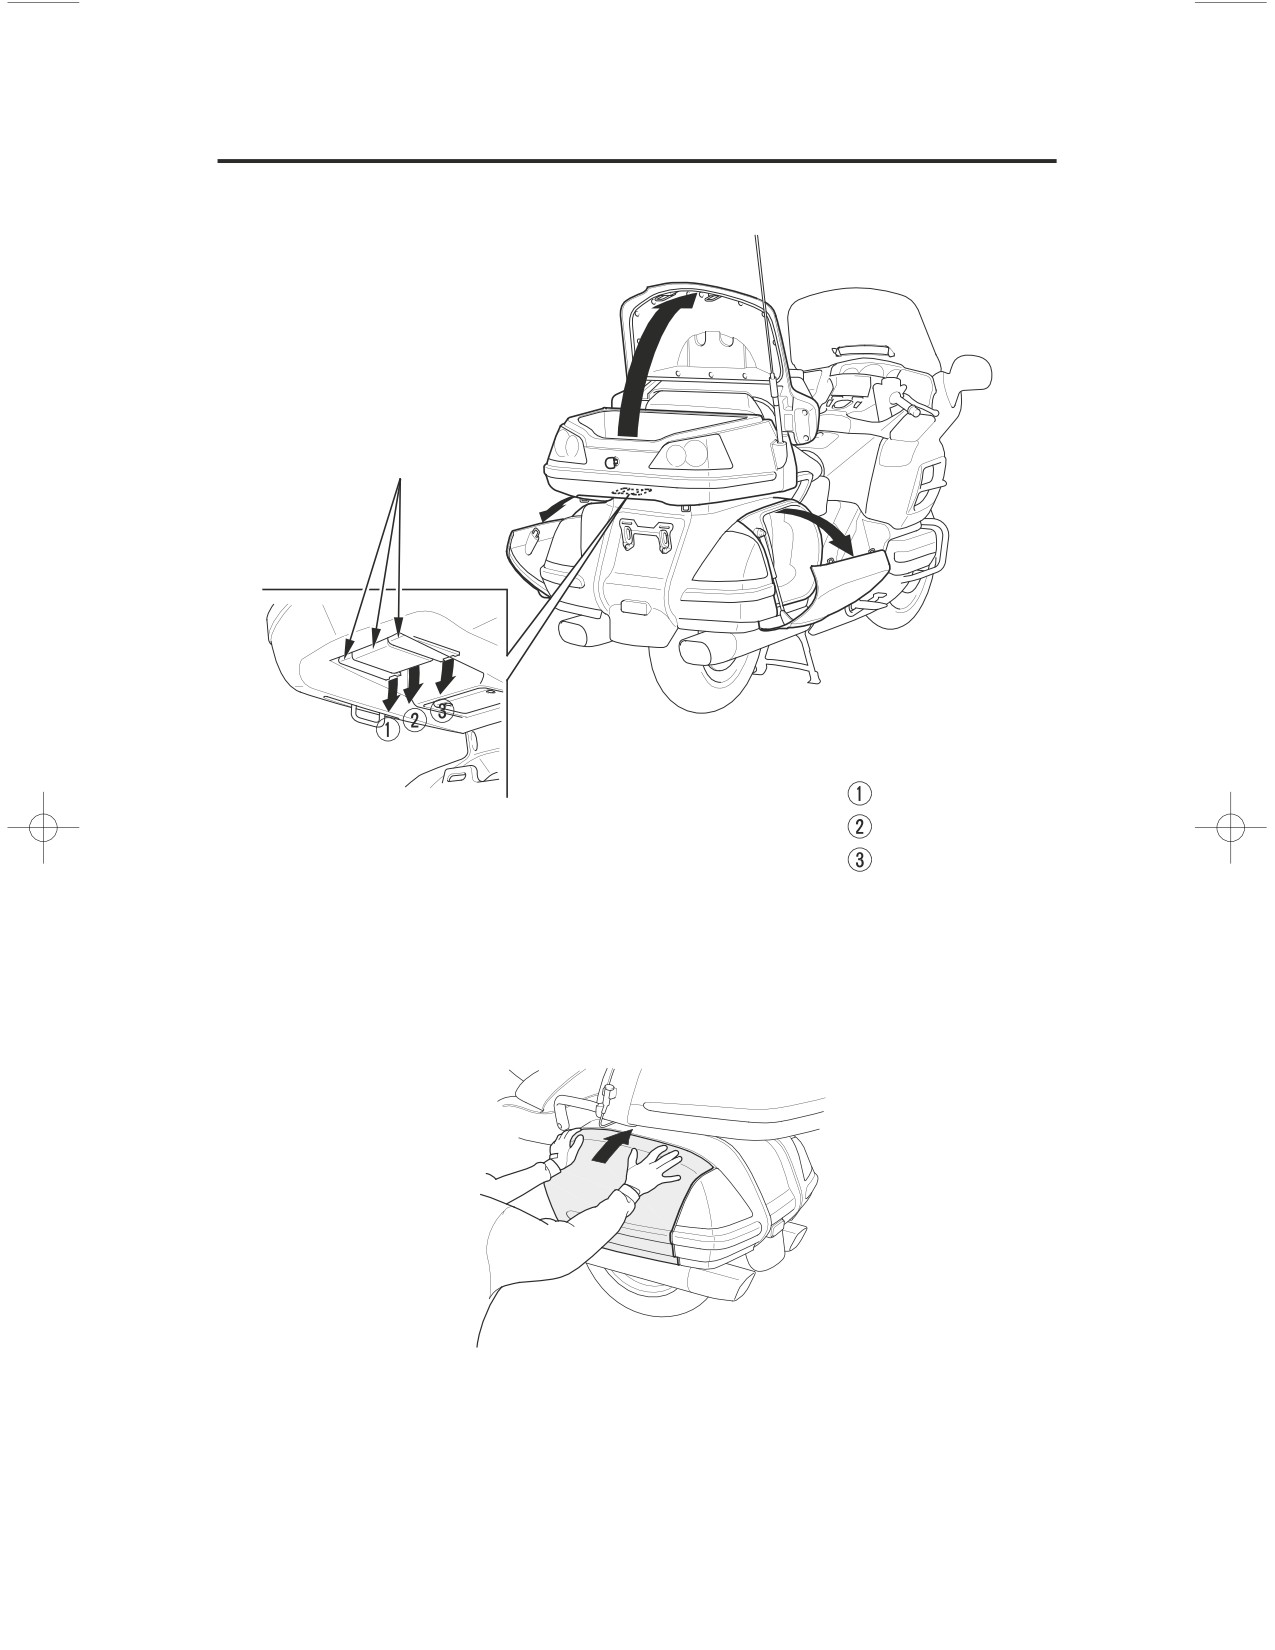
To Open & Shut the Travel Trunk & Saddlebags
latch levers
OPEN
left saddlebag
travel trunk
right saddlebag
To open the travel trunk, pull the middle latch lever down.
To open the right or left saddlebag, pull the right or left latch lever down.
TO CLOSE:
To shut each compartment, place your hands flat on the edges of its lid and press
down until it is firmly closed and check the travel trunk & saddlebags open
indicator is not displayed.
To lock the all compartments, use the ignition key or transmitter.
Before Riding
53
Cargo Compartment
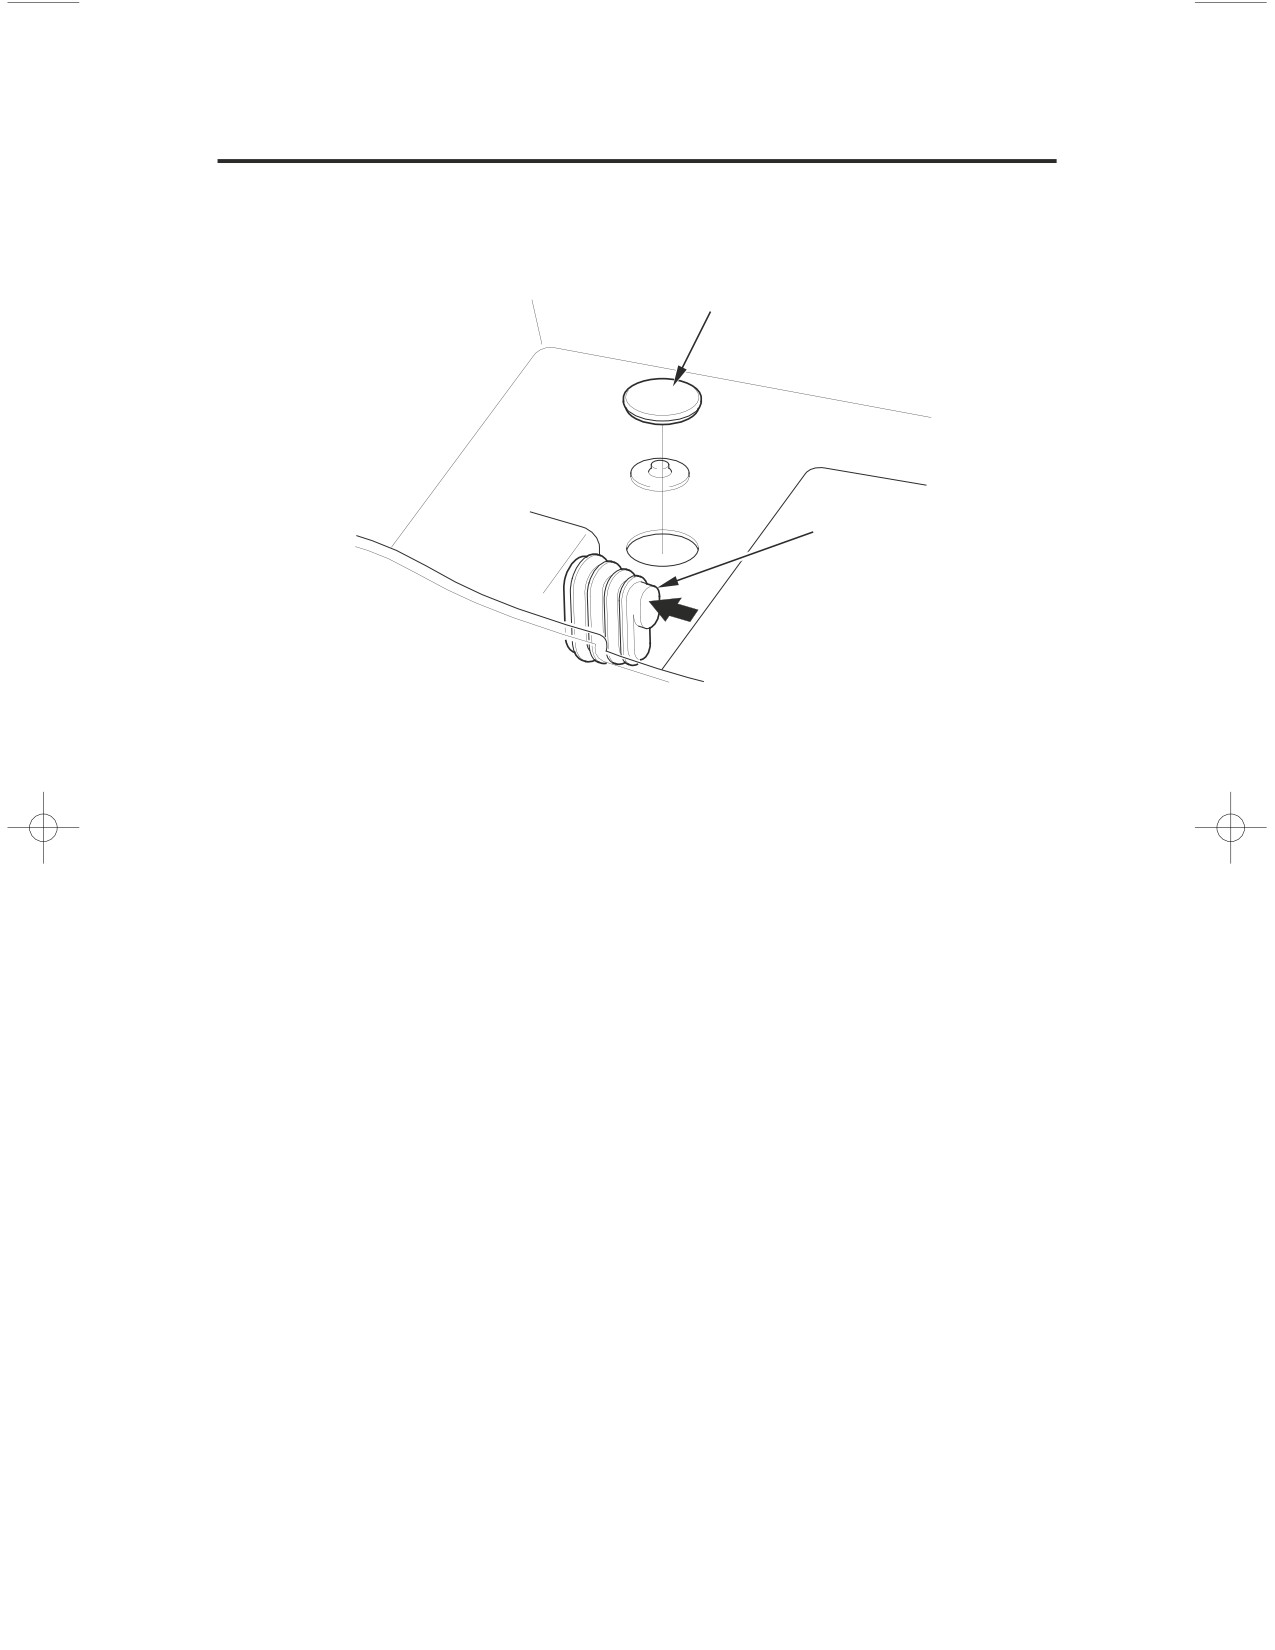
If a Saddlebag Won’t Open
REAR
plug
rod
PUSH
1. Open the travel trunk and remove the plug from the right or left access hole in
the floor of the trunk.
2. Put your finger through the access hole and push the rod.
The saddlebag should open.
54
Before Riding
Cargo Compartment
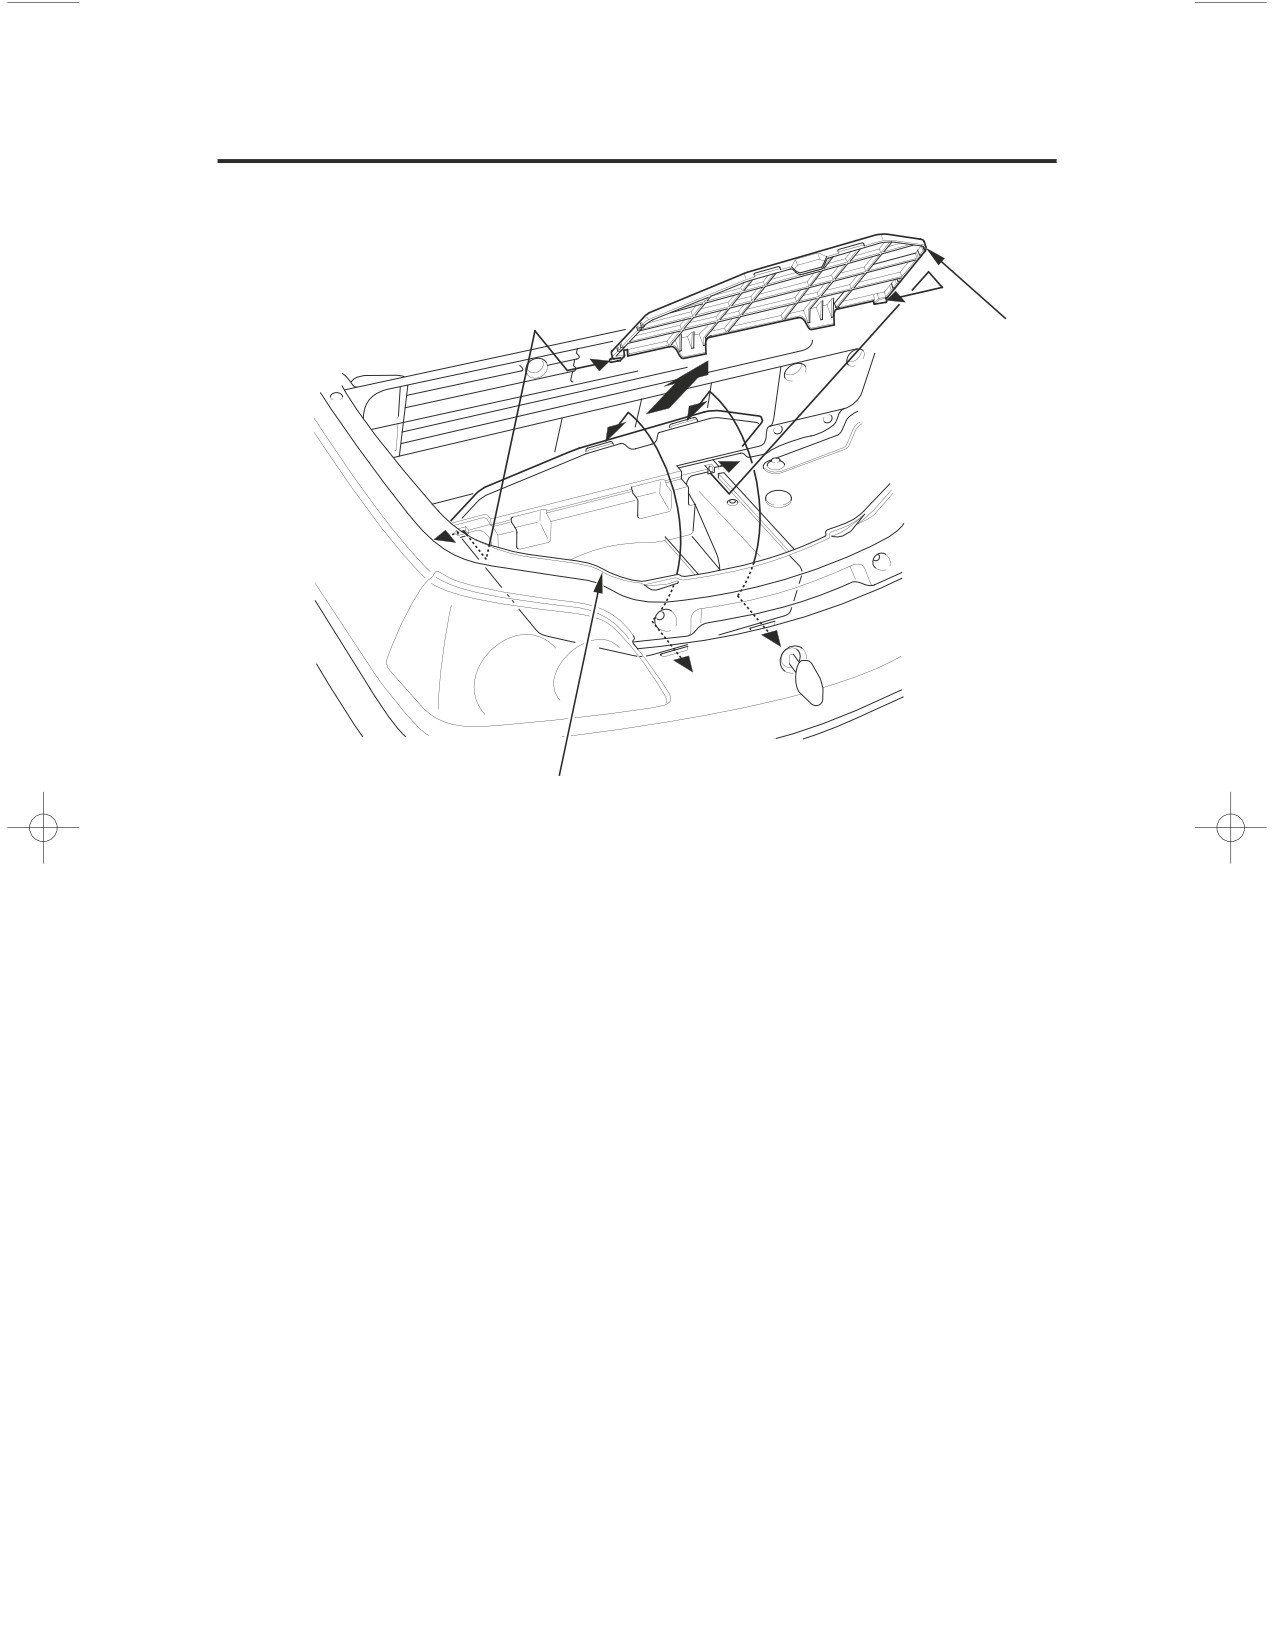
Storage Box
cover
storage box
Your motorcycle has a storage box in the travel trunk. To open the storage box,
push forward on the cover and raise it.
Before Riding
55
Cargo Compartment
Remote Transmitter
You can lock and unlock your motorcycle’s trunk and saddlebags with the
remote transmitter.
If the ignition switch is left off for more than one month, the remote transmitter
will no longer operate the remote control system. To reset the system, turn the
ignition switch ON.
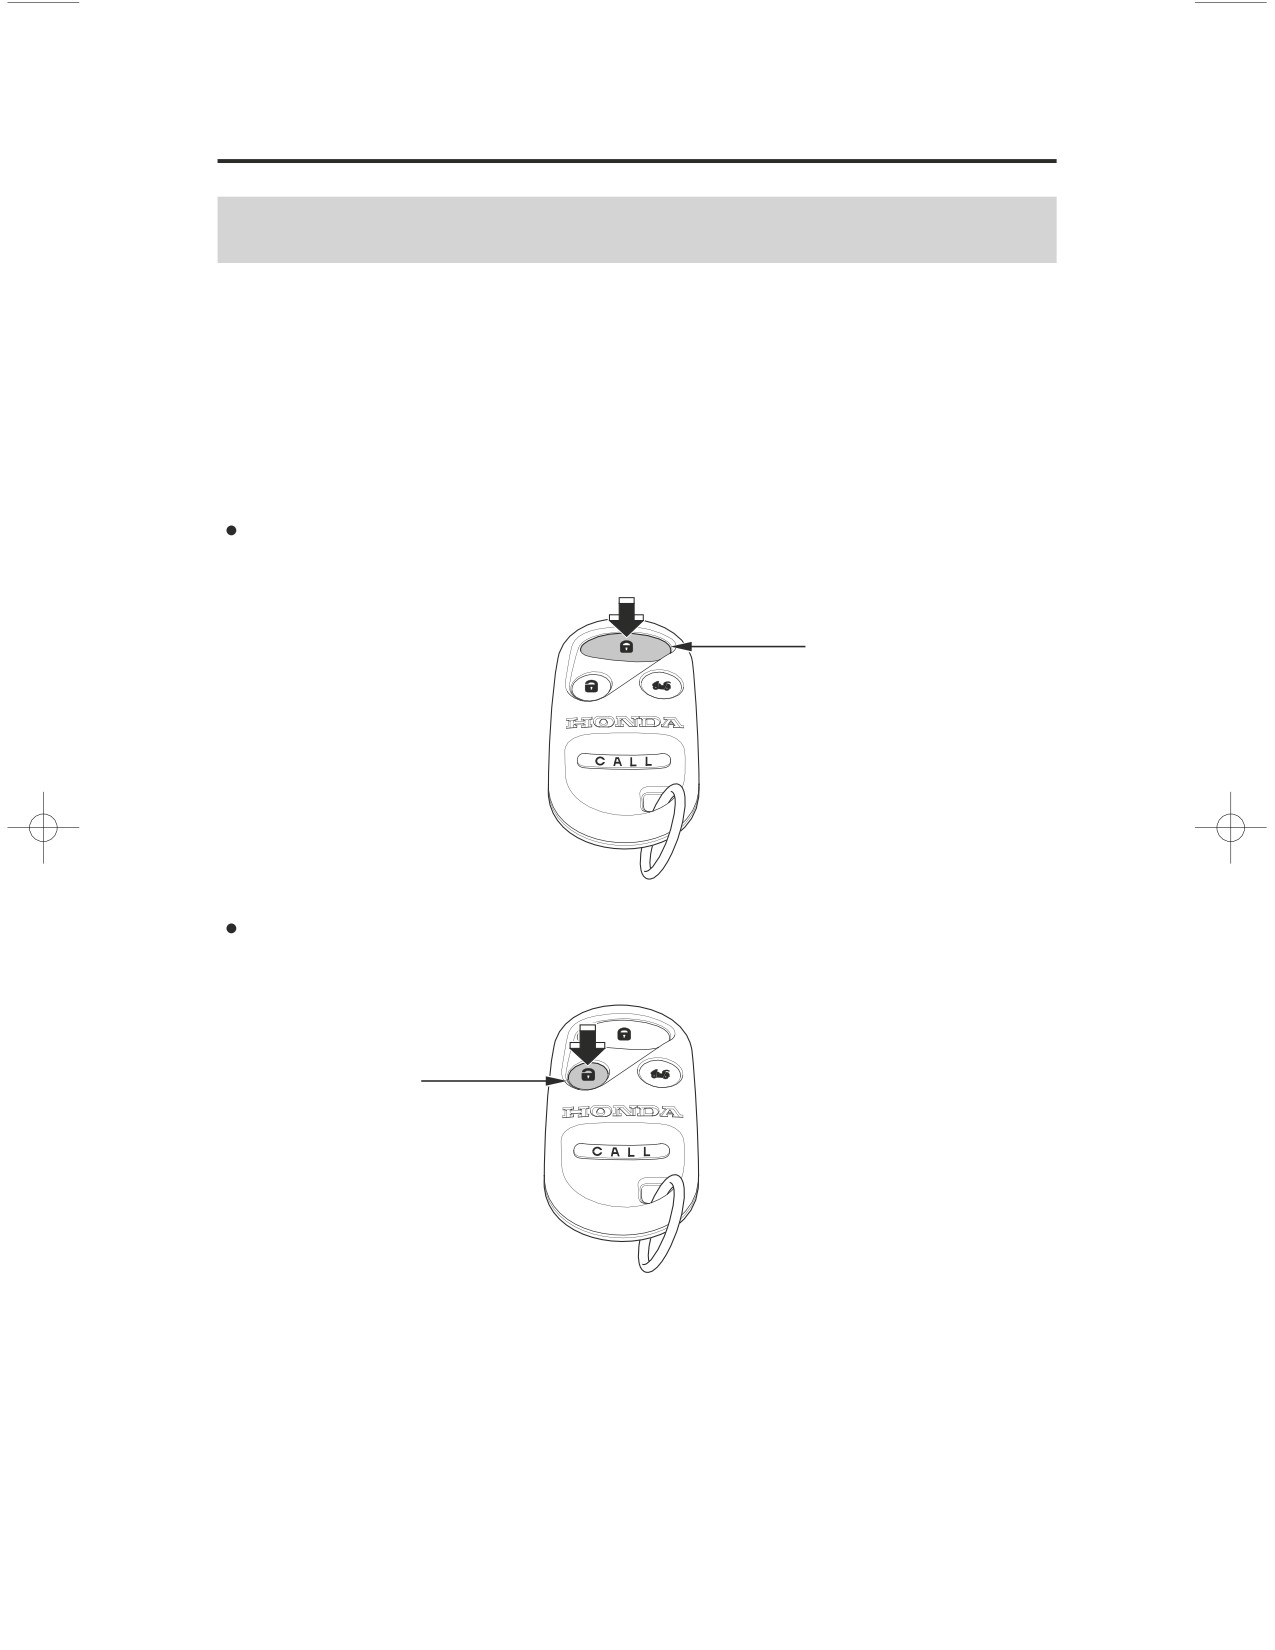
To lock the compartments
ʵ
push the lock button.
(The front and rear turn signal lights will blink once.)
lock button
To unlock the compartments
ʵ
push the unlock button.
(The front and rear turn signal lights will blink two times.)
unlock button
If you unlock the compartments with the transmitter, but do not open any of the
compartments within thirty seconds, the compartments automatically relock.
You cannot lock the compartments with the remote transmitter if any
compartment is not fully closed. (The front and rear turn signal lights will blink
ten times.)
56
Before Riding
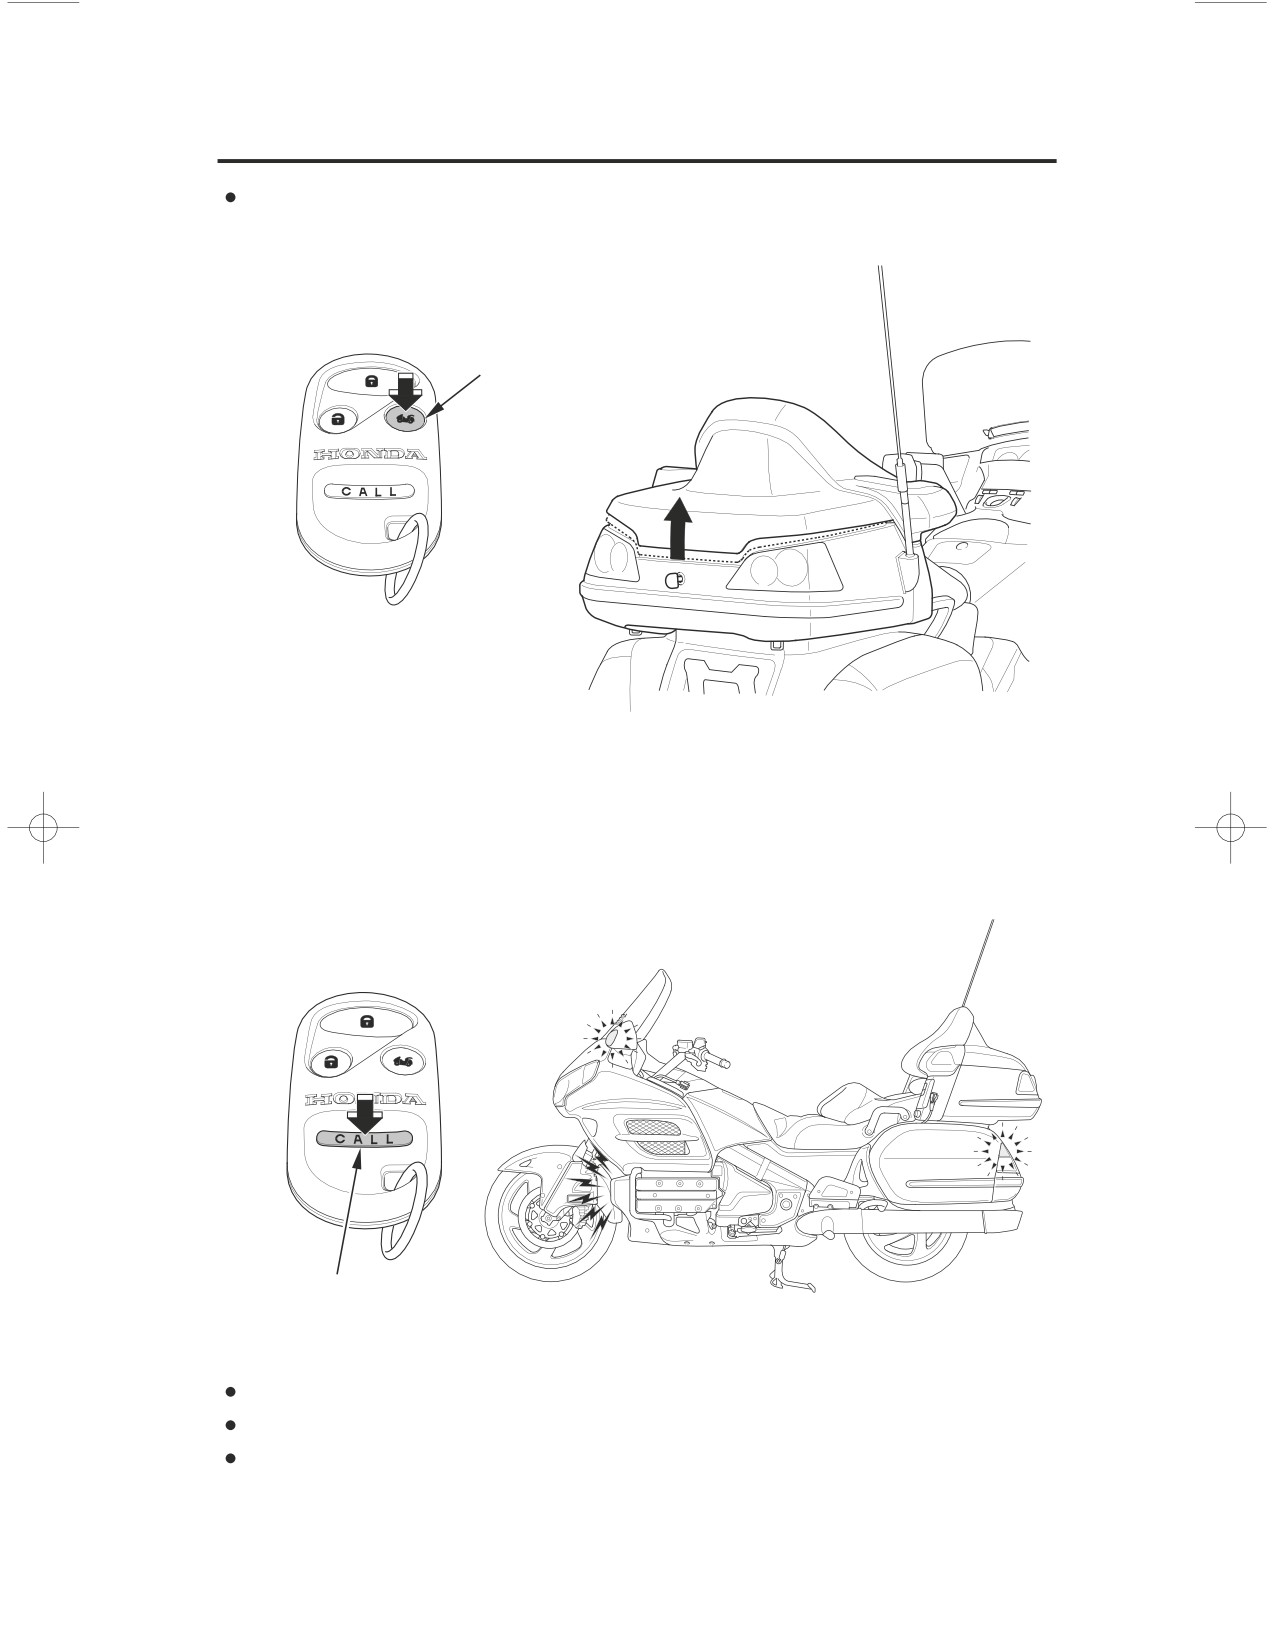
Cargo Compartment
To open the trunk, push and hold the trunk release button for approximately
one second.
trunk release button
Call Mode
The call mode is provided to let you locate your motorcycle when it is parked in
a large lot.
Push and hold the CALL button, the horn will sound and the turn signal lights
will blink two times.
CALL button
When the ignition switch is in the ON or ACC position:
You can lock and unlock the compartments.
The trunk release button will not operate.
The call mode will not operate.
Before Riding
57
Cargo Compartment
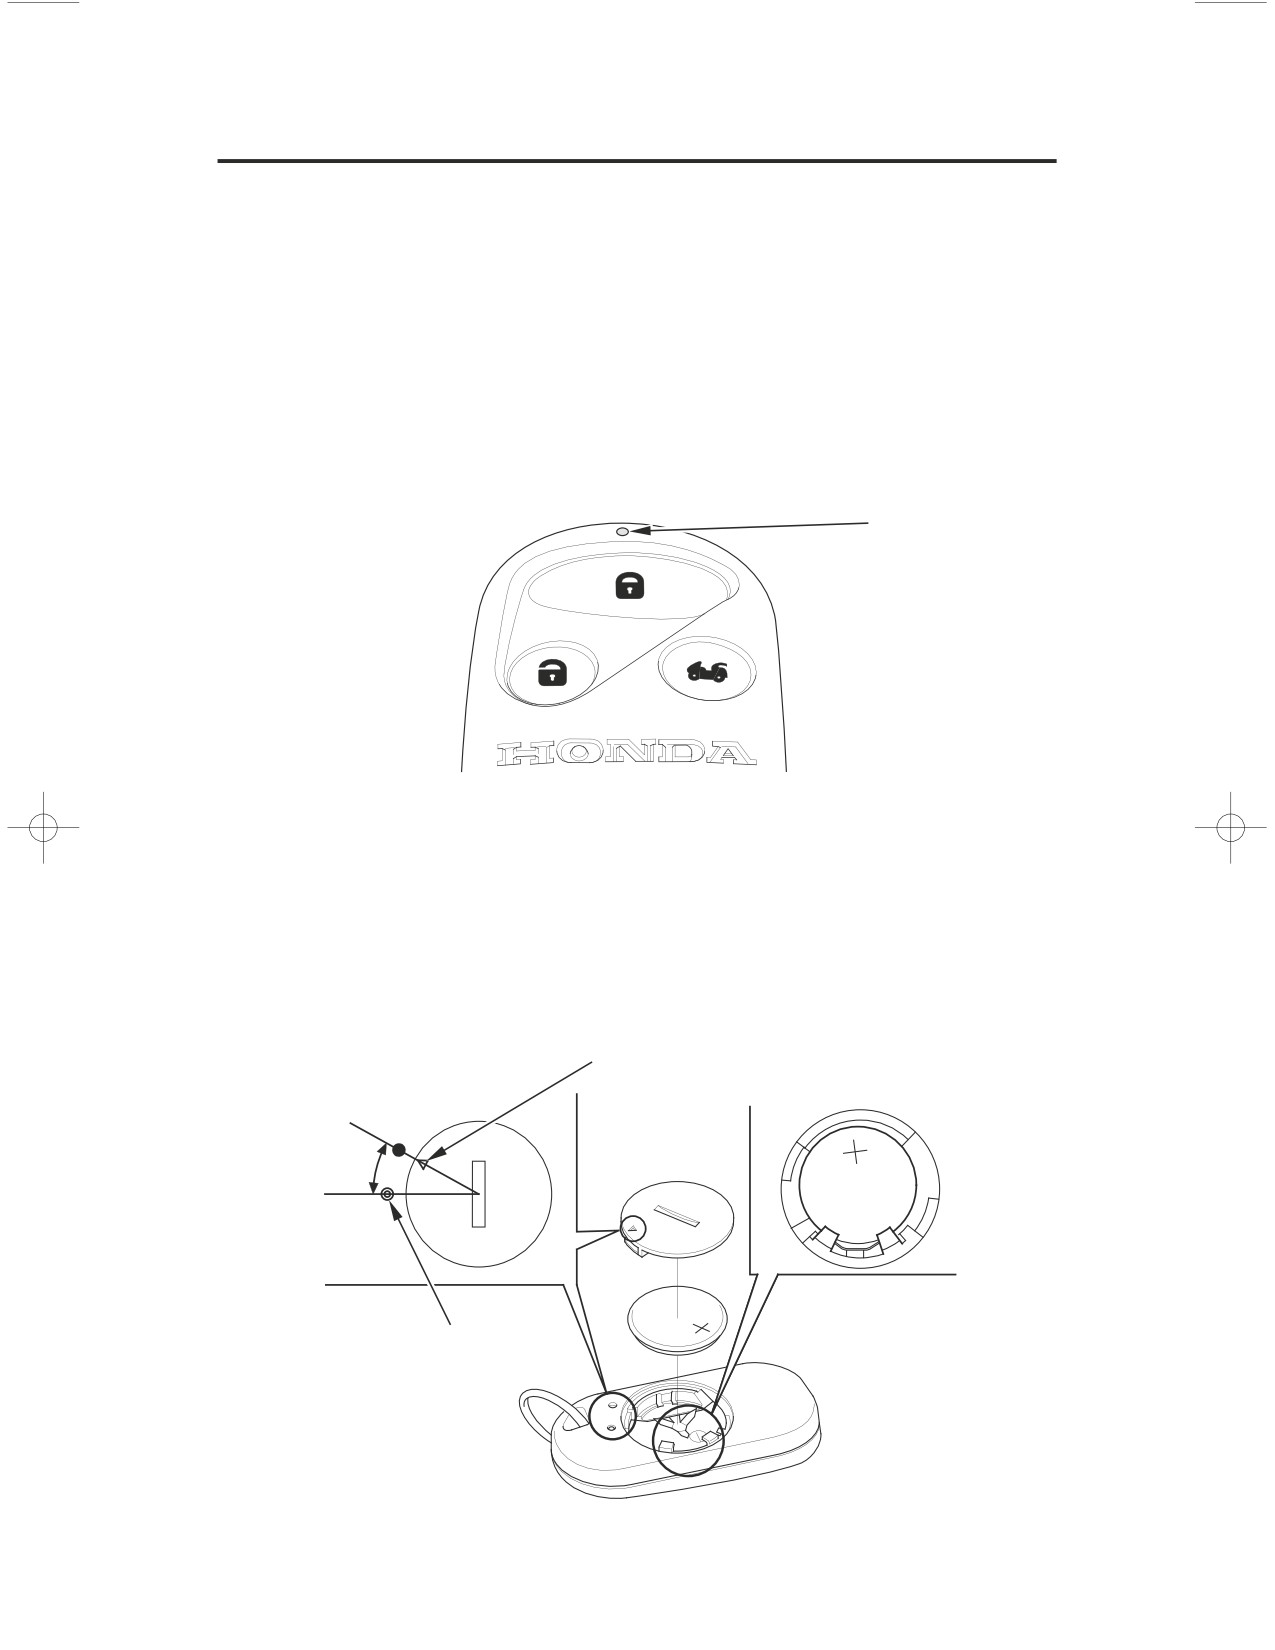
Replacing the Battery
When the remote transmitter’s battery begins to get weak, it may take several
pushes on the button to lock or unlock the compartments, and the LED will get
dim. Replace the battery as soon as possible.
Battery type: CR2025
Recycle or dispose of batteries properly, according to local regulations.
Improper battery disposal can harm the environment.
LED
1. Use a coin to turn the round cover on the back of the transmitter
counterclockwise.
2. Remove the old battery and note the polarity. Make sure the polarity of the
new battery is the same (ʴ
side facing up), then insert it in the transmitter.
3.
Align the
˜
mark on the cover with the
˕
mark on the transmitter, then
set the cover in place and turn it clockwise.
˜ mark
LOCK
OPEN
˕ mark
58
Before Riding
Cargo Compartment
Transmitter Care
Avoid severe shock to the transmitter, such as dropping or throwing it. Also,
protect it from extreme hot or cold temperatures.
Clean the transmitter case with a soft cloth. Do not use strong cleaners or
solvents that could harm the case. Immersing the transmitter in any liquid will
harm the transmitter and cause it to not function properly.
If you lose a transmitter, you will need to have the replacement programmed to
your motorcycle’s system by your Honda dealer. Any other transmitters you
have will also need to be reprogrammed.
As required by the FCC:
This device complies with Part 15 of the FCC rules. Operation is subject to the
f ollowing two conditions: (1) This device may not cause harmf ul interf erence,
and (2) this device must accept any interf erence received, including
interf erence that may cause undesired operation.
Changes or modif ications not expressly approved by the party responsible f or
compliance could void the user’s authority to operate the equipment.
This device complies with Industry Canada Standard RSS-210. Operation is
subject to the f ollowing two conditions: (1) this device may not cause
interf erence, and (2) this device must accept any interf erence that may cause
undesired operation of the device.
Before Riding
59
Cargo Compartment
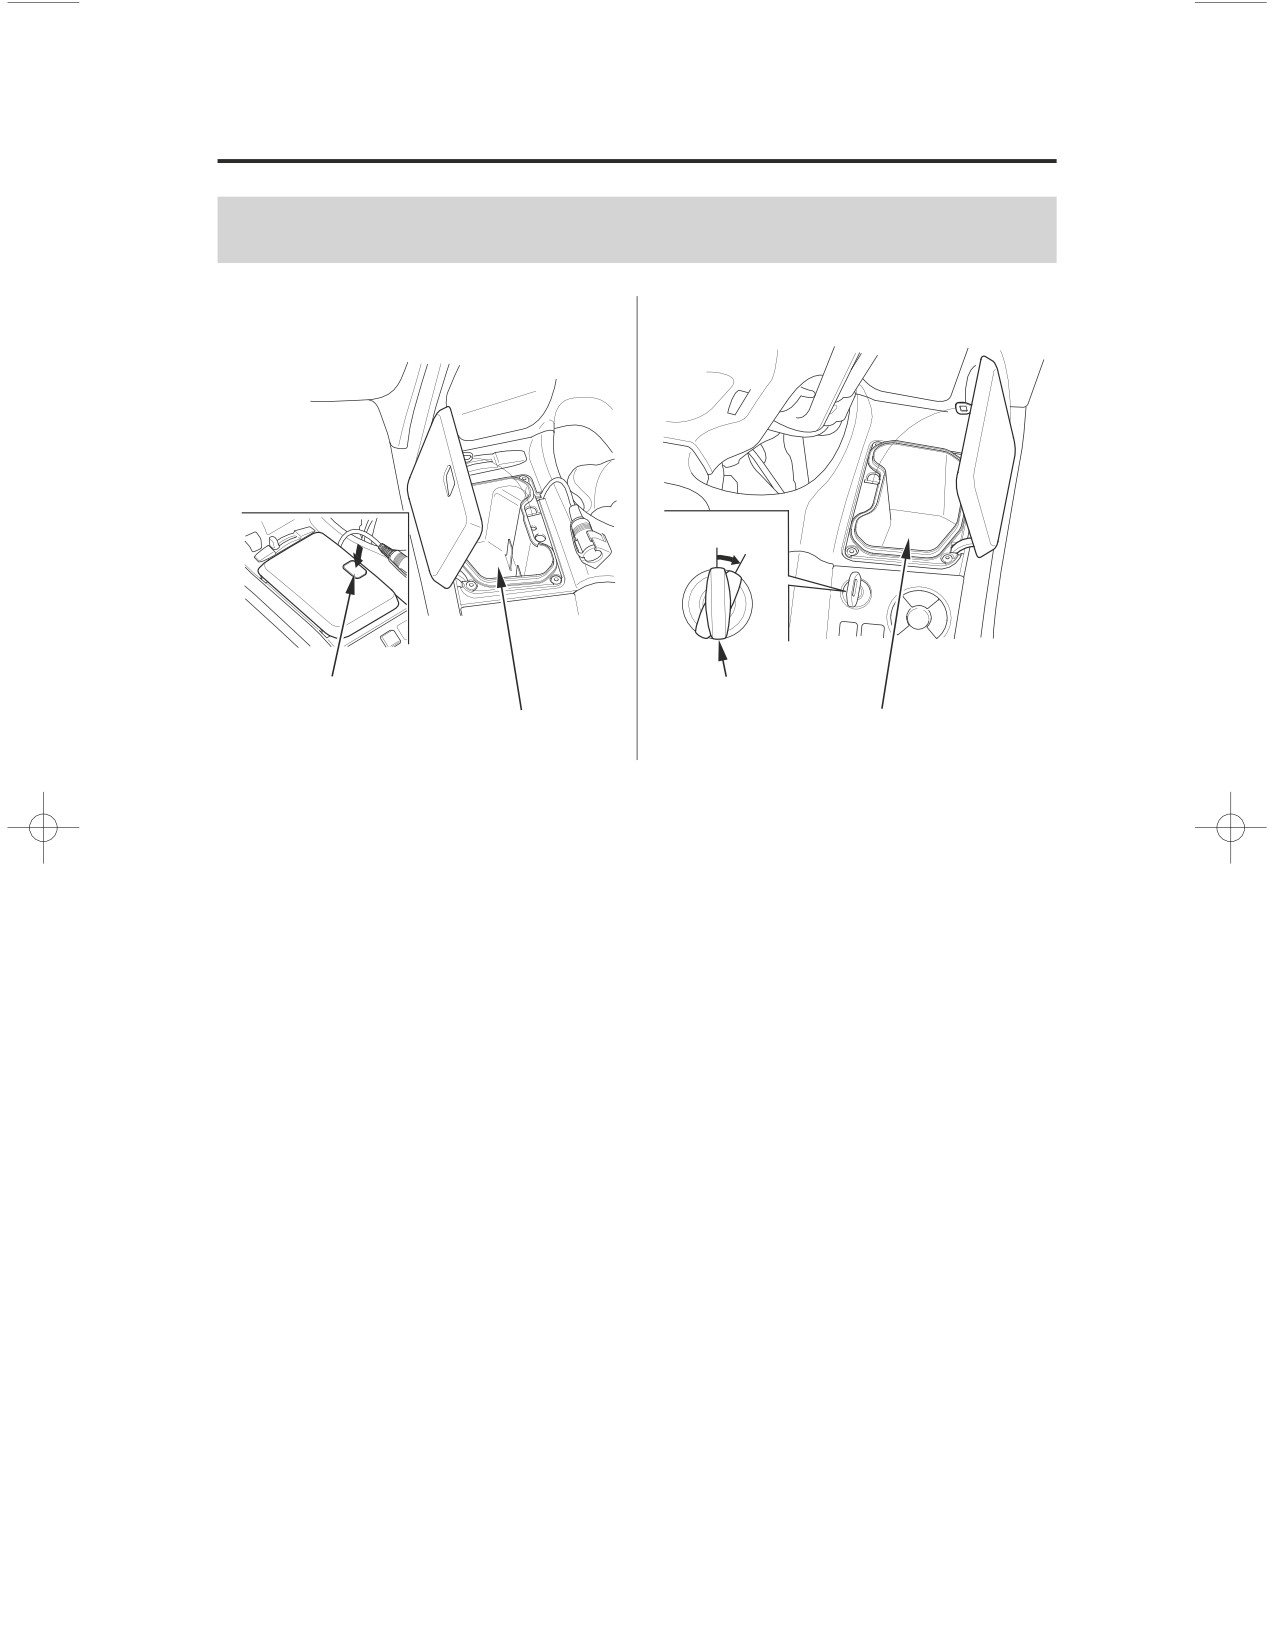
Fairing Pockets
LEFT SIDE
(Models not equipped with Airbag)
RIGHT SIDE
PUSH
OPEN
button
ignition key
left fairing pocket
right fairing pocket
The fairing pockets are for lightweight items.
Cargo in each fairing pocket should not exceed:
4.5 lbs (2.0 kg)
To open the left fairing pocket, push the button.
(Models not equipped with Airbag)
To open the right fairing pocket, insert the ignition key, turn it clockwise.
To close the fairing pocket, place your hands flat on the edges of its lid and
press down until it is firmly closed.
Make sure the fairing pockets are closed before riding.
Be careful not to flood this area when washing your motorcycle.
Take care to keep gasoline, brake fluid, or other chemical solvents off the
pocket covers. They will damage the surface of the pocket covers.
Do not store valuables in the fairing pockets.
60
Before Riding
Cargo Compartment
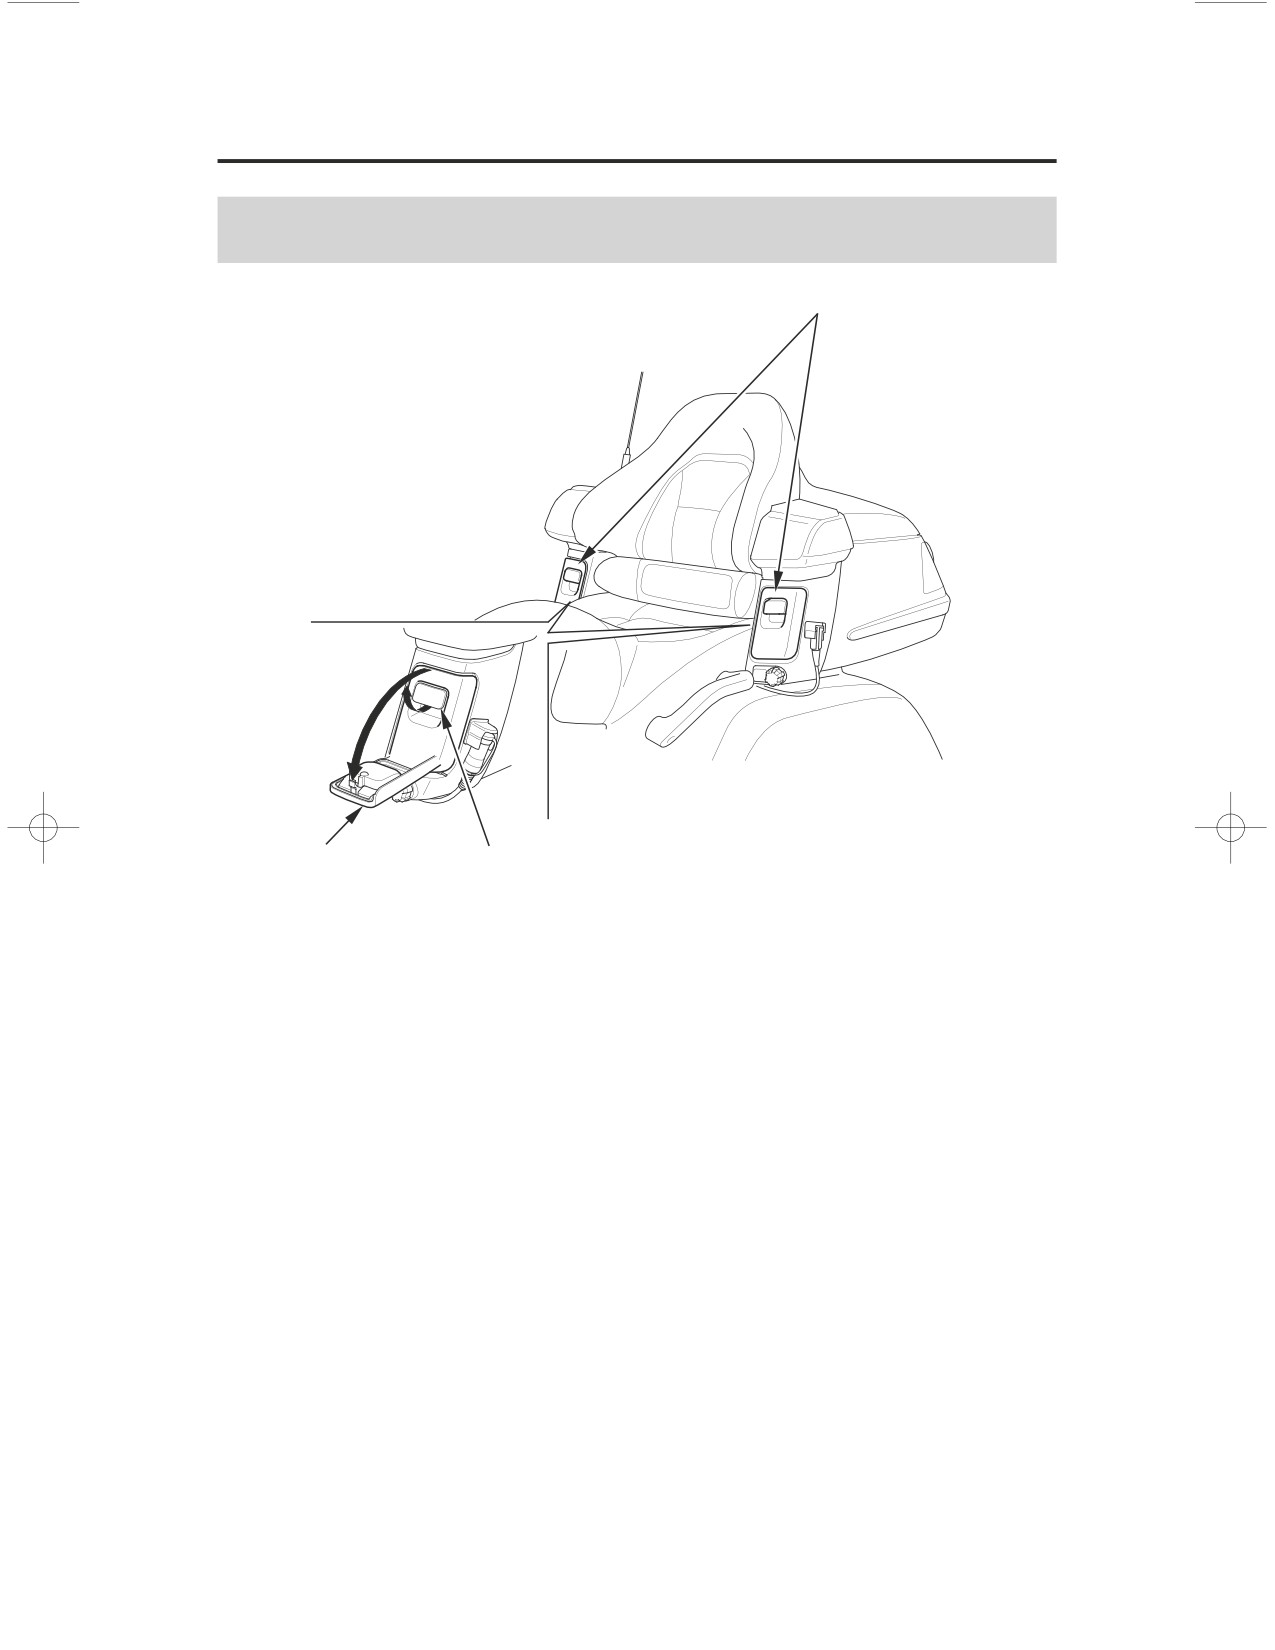
Trunk Side Pockets
trunk side pockets
lid
lever
The trunk side pockets are for soft, lightweight items.
Cargo in each trunk side pocket should not exceed:
1.0 lbs (0.5 kg)
Do not put sharp or hard objects in the trunk side pockets. Such objects could
interfere with opening the lids or damage the pockets.
To open the lid, pull the lever up.
To close the lid, pull the lid up. Check that latch is secure.
Make sure the trunk side pockets are closed before riding.
Be careful not to flood this area when washing your motorcycle.
Before Riding
61
Comfort & Convenience Adjustment
Your motorcycle has many features you can adjust to suit your personal
preference and increase your comfort and convenience, and your passenger’s as
well.
We recommend that you take time to check the following items and make any
desired adjustments before each ride:
Suspension
The rear suspension spring pre-load (page181) can be adjusted
for a softer or firmer ride using an electrical adjustment
system. You may want to adjust your suspension whenever
you change your normal load.
Windscreen
Your windscreen height can be adjusted slightly higher or
Height
lower (page63).
Ventilation
If you need to adjust the ventilation louvers (pages64ʵ66),
Louvers
do it before you ride.
Handgrip
The range of the handgrips heater can be adjusted higher or
Heater
lower (page
67
).
Make sure the handgrip heater switch moves easily over the
full adjustment range.
Select the heat level you want before your ride (with the
engine running).
Seat
The range of the seat heater can be adjusted higher or lower
Heater
(page
68
).
Make sure the seat heater switch moves easily over the full
adjustment range.
Select the heat level you want before your ride (with the
engine running).
62
Before Riding
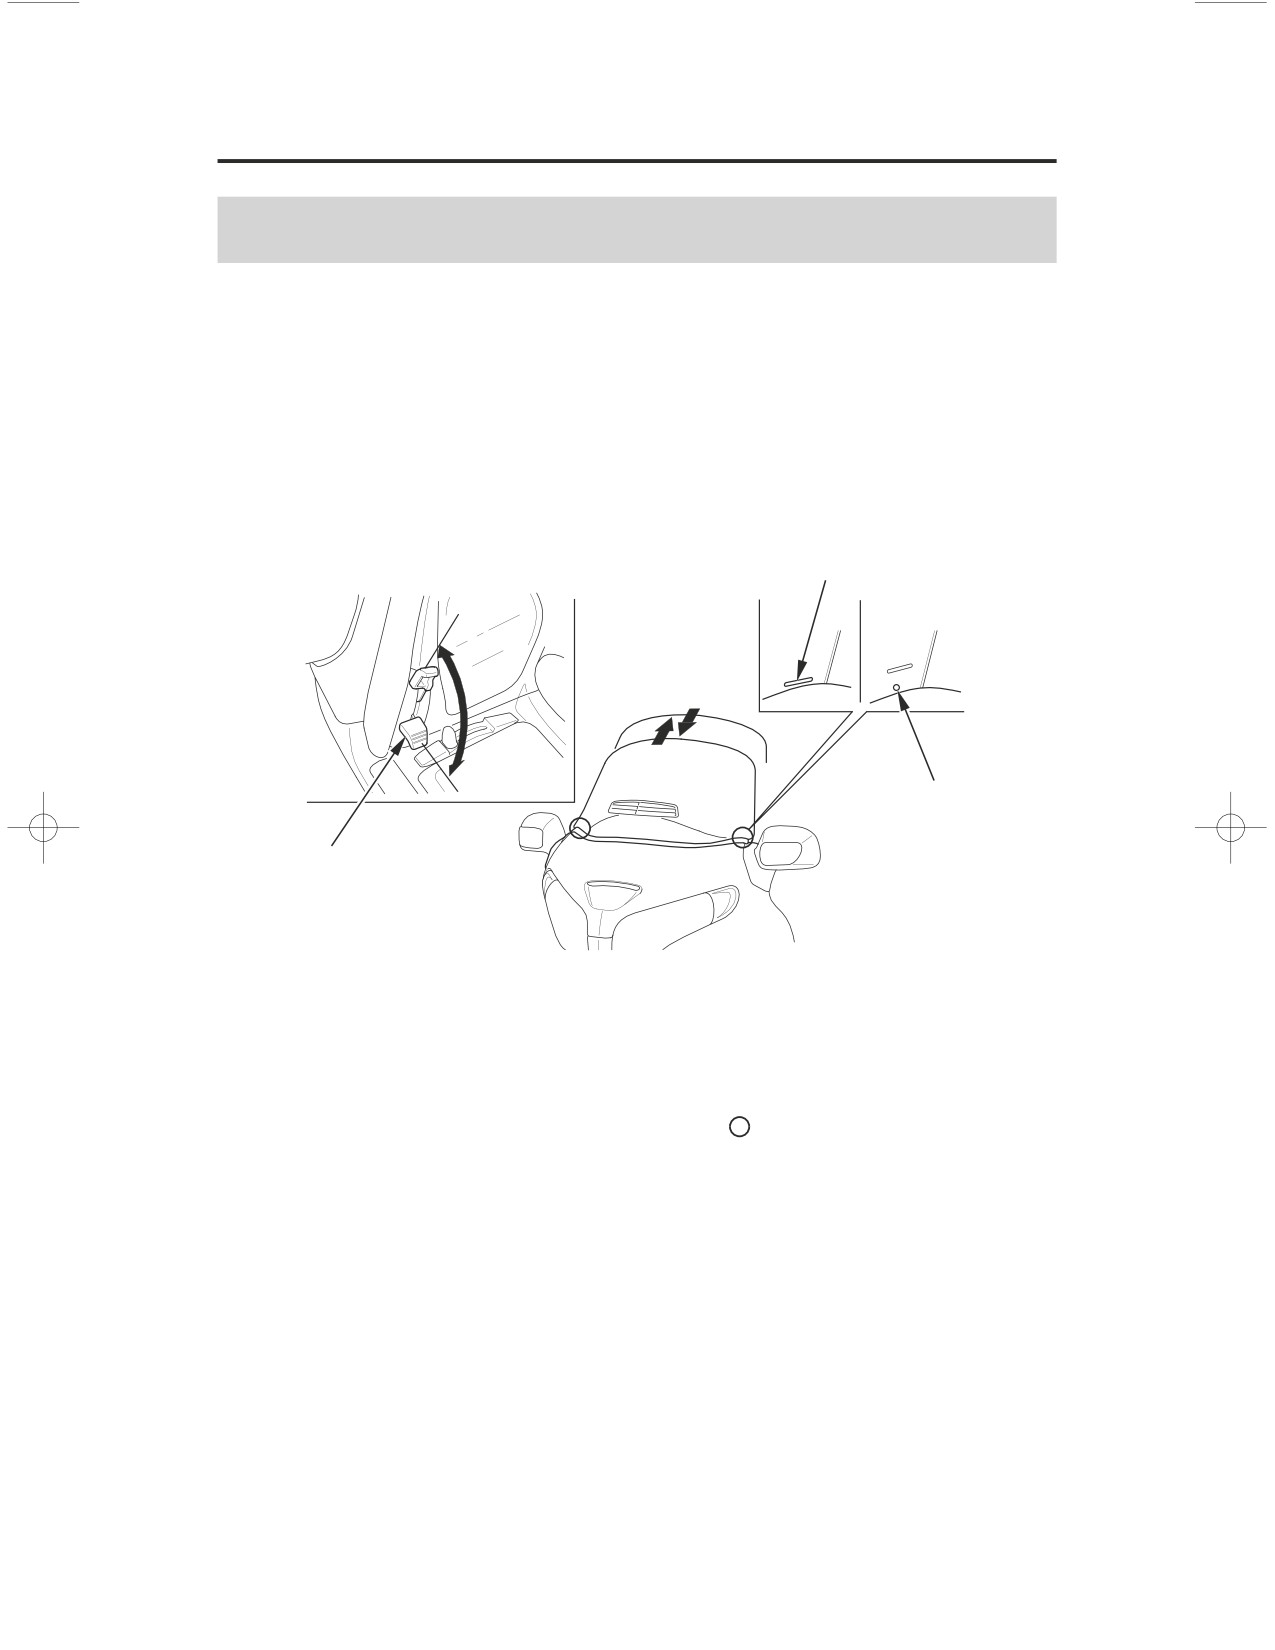
Comfort & Convenience Adjustment
Windscreen Height Adjustment
The windscreen adjuster has 6 positions.
You can adjust your windscreen height slightly higher or lower.
If possible, we recommend you adjust your windscreen height to below eye
level for better visibility.
To Adjust Windscreen Height
FRONT
upper edge
RELEASE
SECURE
upper mark
lever
1. Pull both levers up to release the windscreen.
2. To raise:
Move the windscreen up to the desired position.
To lower:
Move the windscreen up to the upper mark (
), lower it all the way (to
reset the ratchet mechanism), then raise it to the desired position.
3. On both sides, align the mark on the windscreen with the upper edge of the
instrument panel.
4. Push the levers down to secure the windscreen.
Before Riding
63
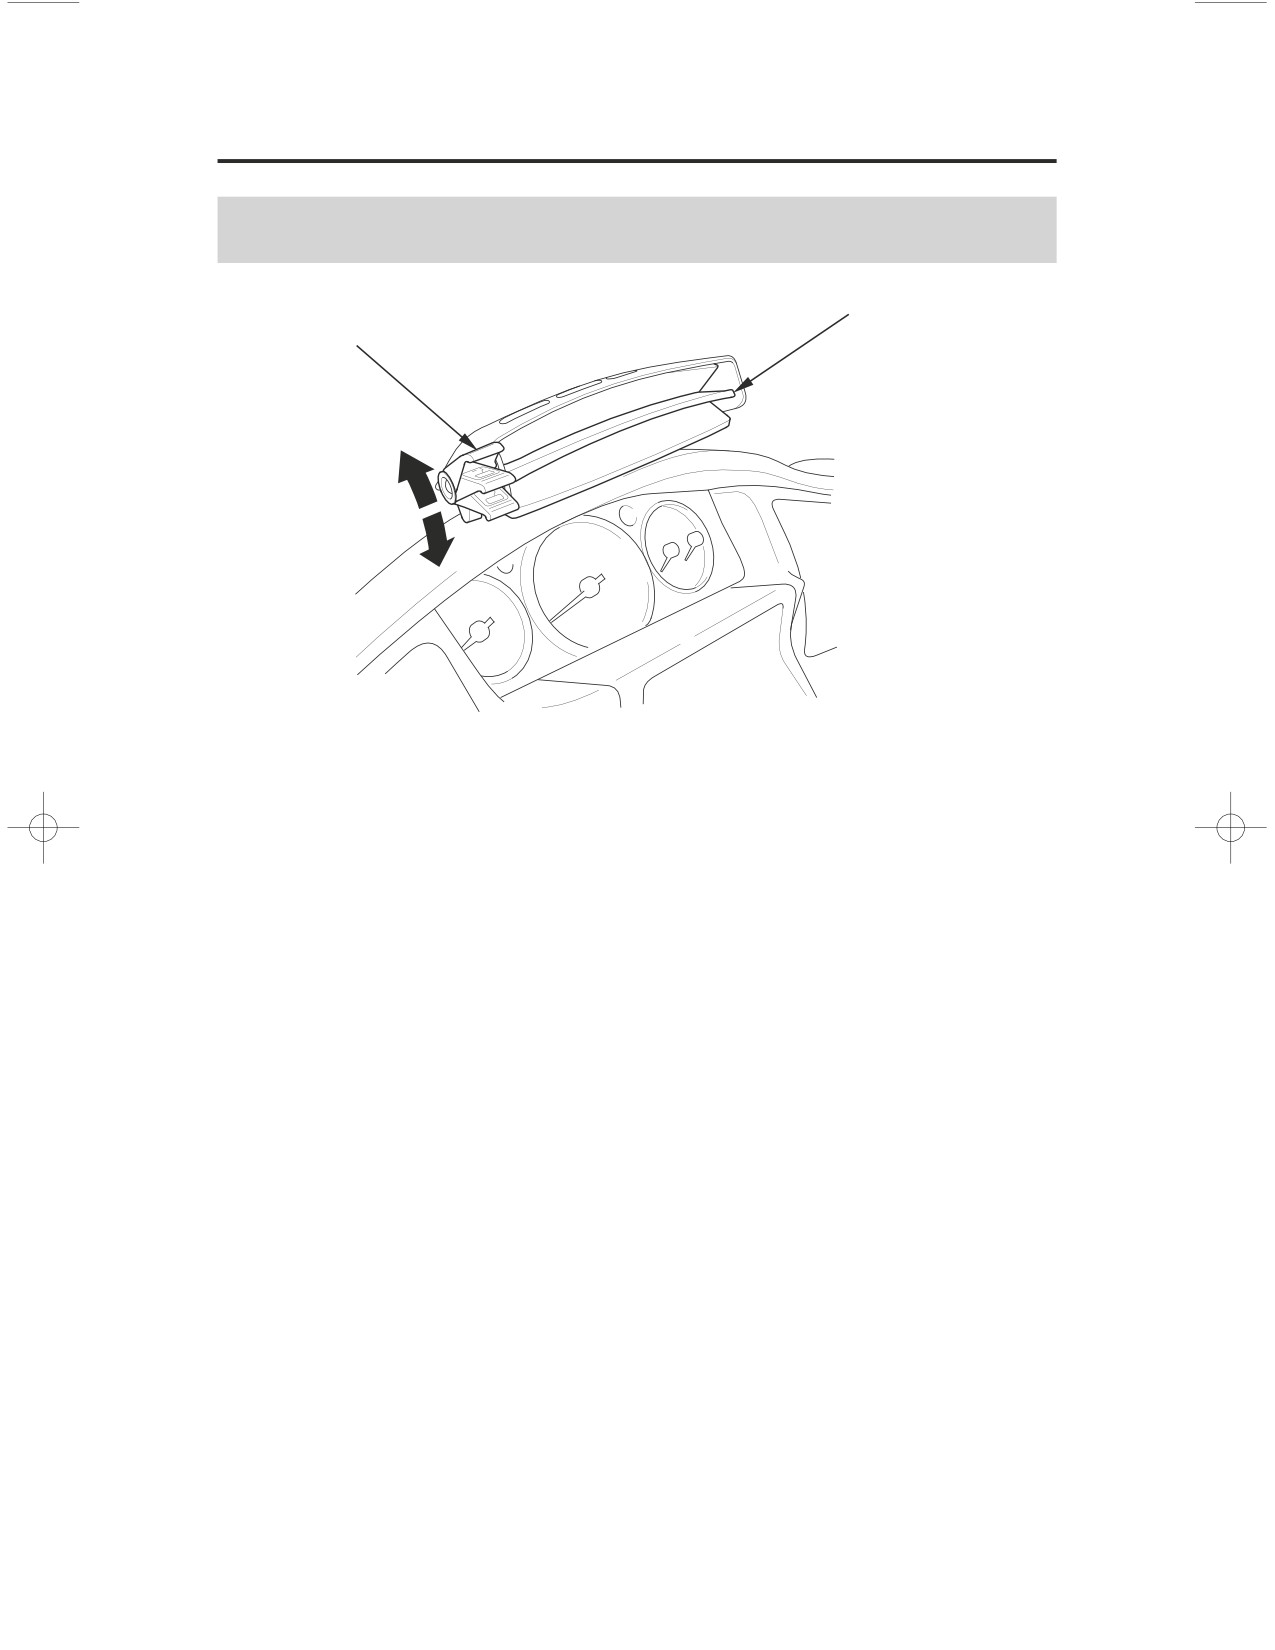
Comfort & Convenience Adjustment
Windscreen Ventilation Louver
windscreen ventilation louver
lever
CLOSE
OPEN
You can adjust the windscreen ventilation louver with the lever to control and
direct the flow of fresh air.
64
Before Riding
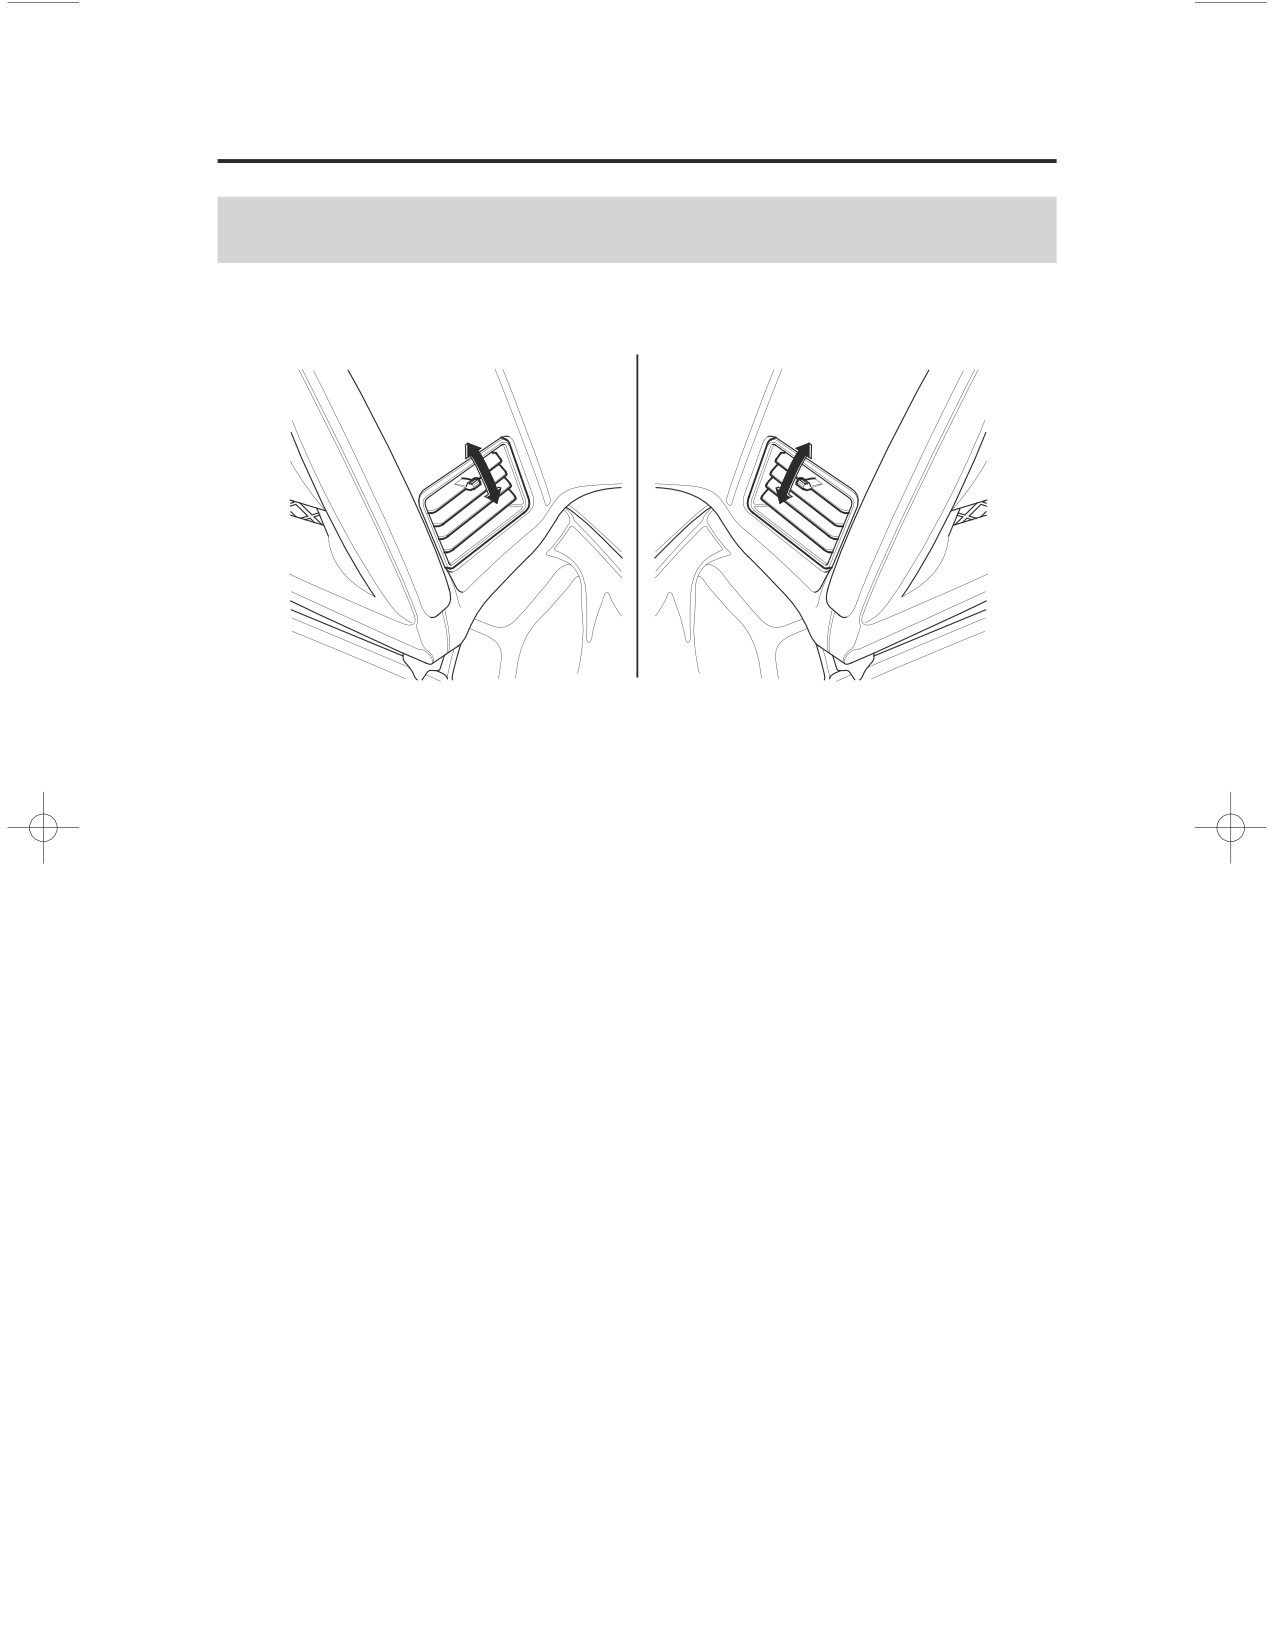
Comfort & Convenience Adjustment
Side Ventilation Louvers
LEFT SIDE
RIGHT SIDE
OPEN
OPEN
CLOSE
CLOSE
You can adjust the side ventilation louvers to direct the flow of air.
Before Riding
65
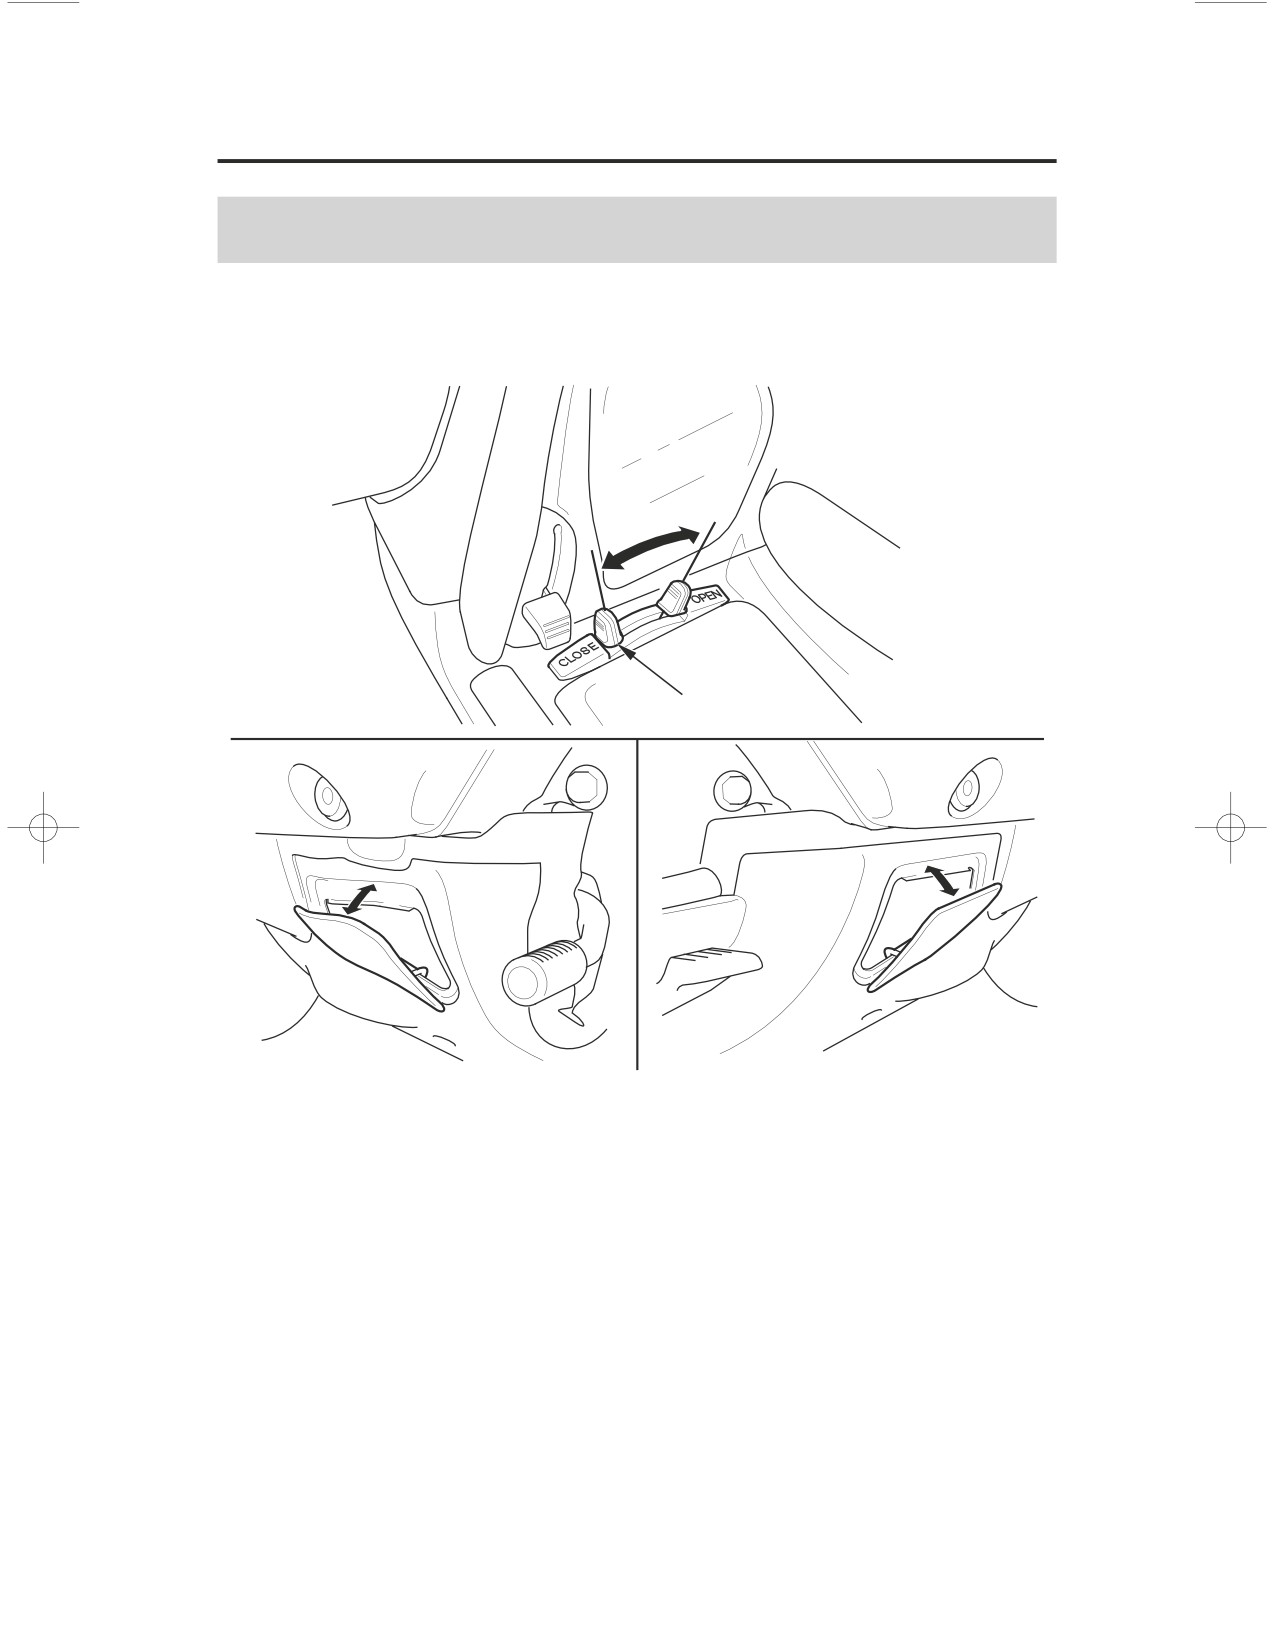
Comfort & Convenience Adjustment
Foot Warmer Ventilation Louvers
(Models equipped with Comfort Package)
LEFT UPPER
OPEN
CLOSE
lever
LEFT SIDE
RIGHT SIDE
You can adjust the foot warmer ventilation louvers with the lever to control and
direct the flow of warm air.
66
Before Riding
Comfort & Convenience Adjustment
Handgrip Heater
(Models equipped with Comfort Package)
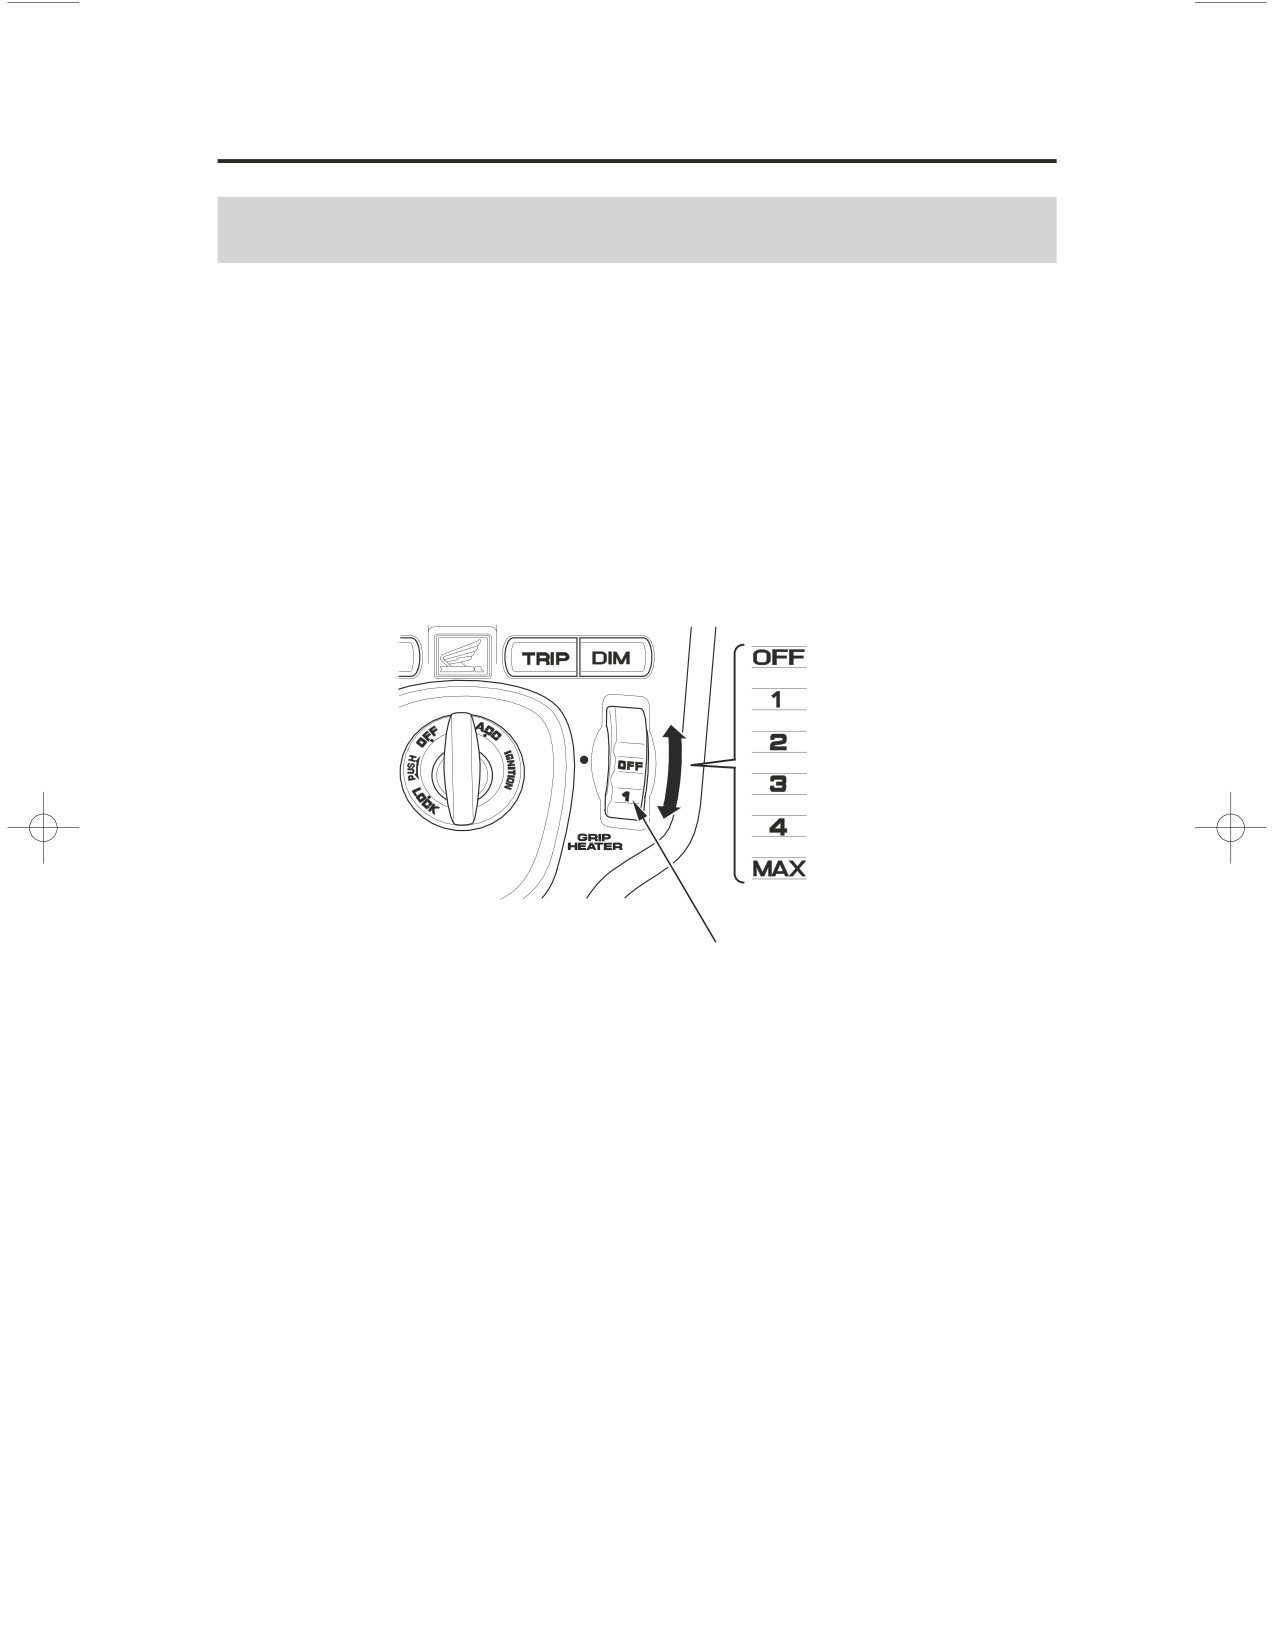
The handgrip heater warms up the right and left handgrips of the handlebar for
comfortable riding on a cold day.
The handgrip heater switch is located on the right side of the ignition switch.
To operate, adjust the handgrip heater switch with the engine started. The
handgrip heater switch has 6 positions (OFF, 1, 2, 3, 4, MAX).
RIGHT SIDE OF THE IGNITION SWITCH
handgrip heater switch
To warm up the handgrip heaters, turn the handgrip heater switch toward the
MAX position.
To cool down the handgrip heaters, turn the handgrip heater switch toward the
OFF position.
Do not leave the handgrip heater in the high position for a long time on a warm
day.
Wear gloves to protect your hands from the heated grips.
Do not use the handgrip heater with the engine at idle for a long time. It may
result in a low (or dead) battery.
Before Riding
67
Comfort & Convenience Adjustment
Seat Heater
(Models equipped with Comfort Package)
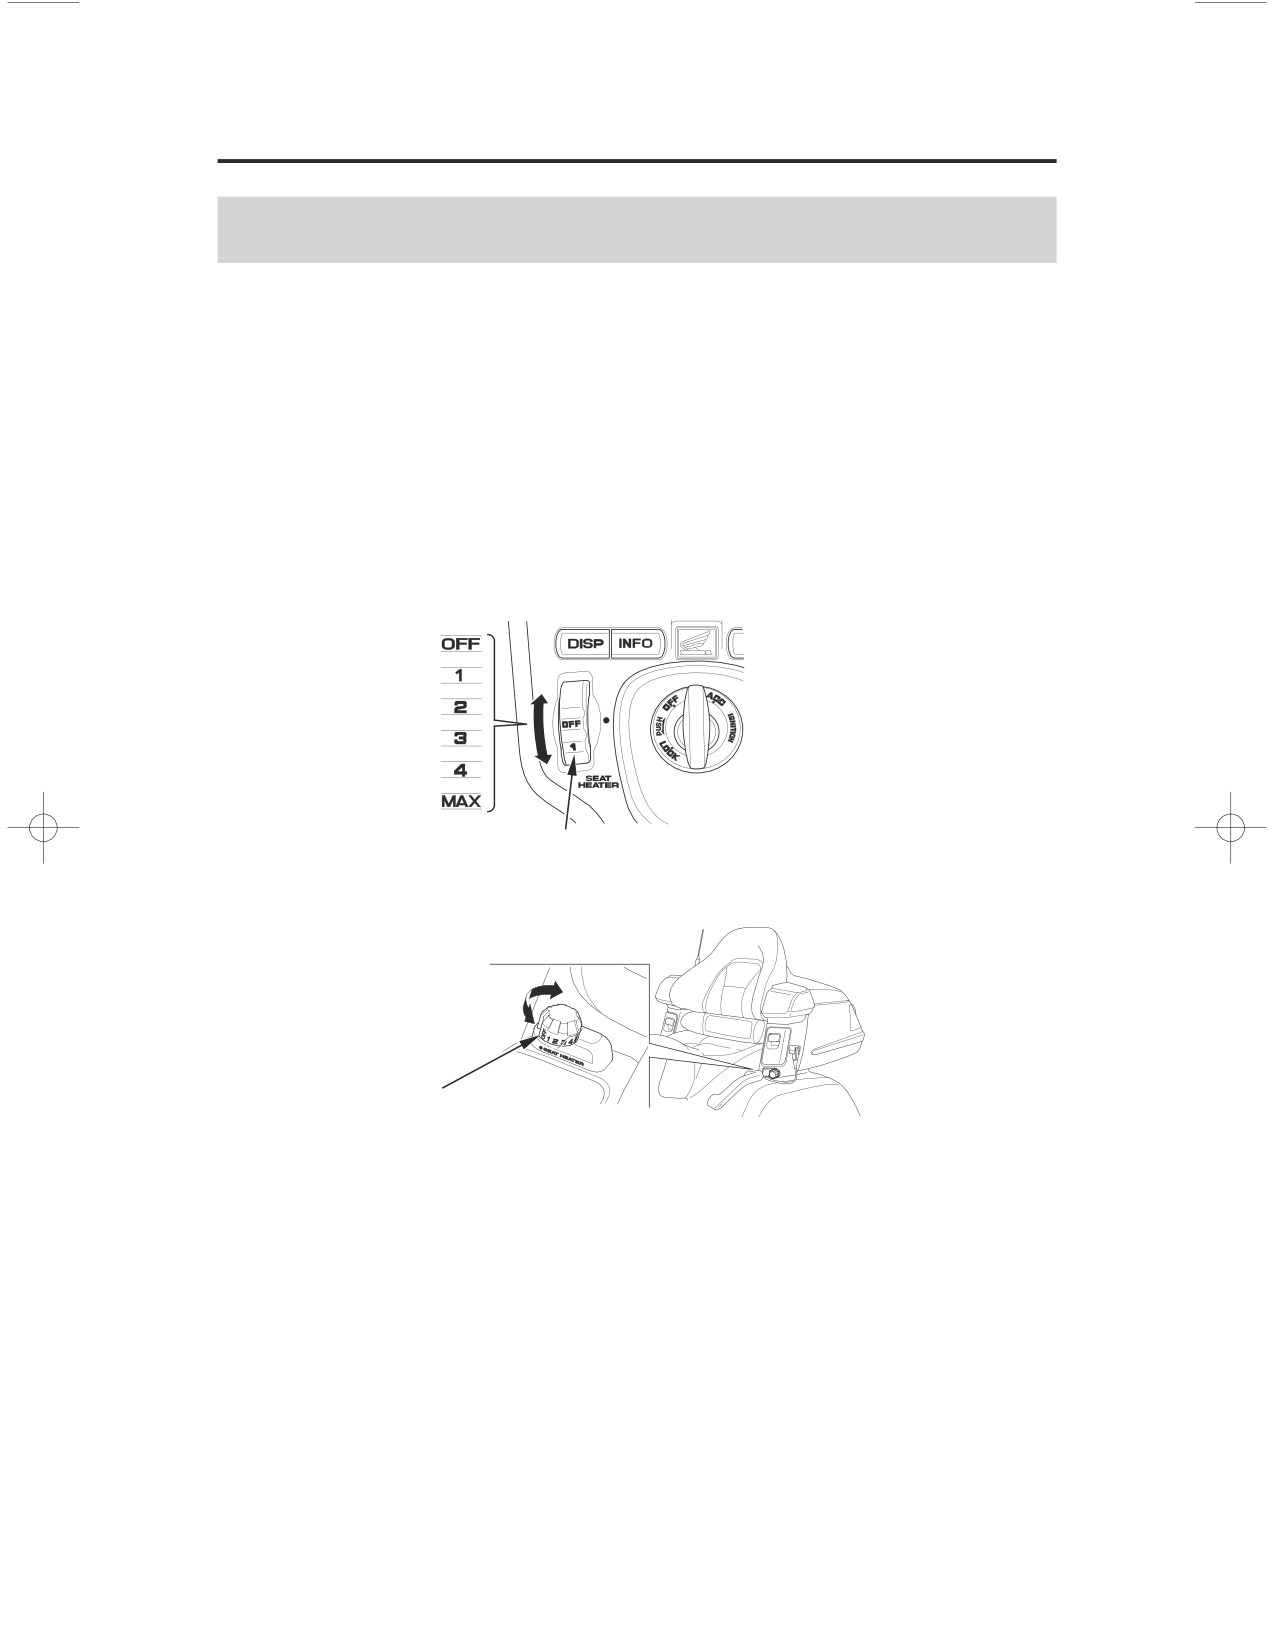
The seat heater warms up the driver’s seat (and the passenger’s seat) for
comfortable riding on a cold day.
The front seat heater switch is located on the left side of the ignition switch.
The rear seat heater switch is located under the left trunk side pocket.
To operate, adjust the seat heater switch with the engine started.
The front and rear seat heater switches have 6 positions (OFF, 1, 2, 3, 4, MAX).
LEFT SIDE OF THE IGNITION SWITCH
front seat heater switch
UNDER THE LEFT TRUNK SIDE POCKET
rear seat heater switch
To warm up the seat heater, turn the seat heater switch toward the MAX position.
To cool down the seat heater, turn the seat heater switch toward the OFF
position.
Do not leave the seat heater in the high position for a long time on a warm day.
Do not use the seat heater with the engine at idle for a long time. It may result in
a low (or dead) battery.
Do not use the seat when it is torn, cut or damaged as you can get burned.
Do not apply excessive stress to the seat, e.g. by securing articles to it with tie-
down straps during transportation.
68
Before Riding
Accessories
Accessory (ACC) Terminal
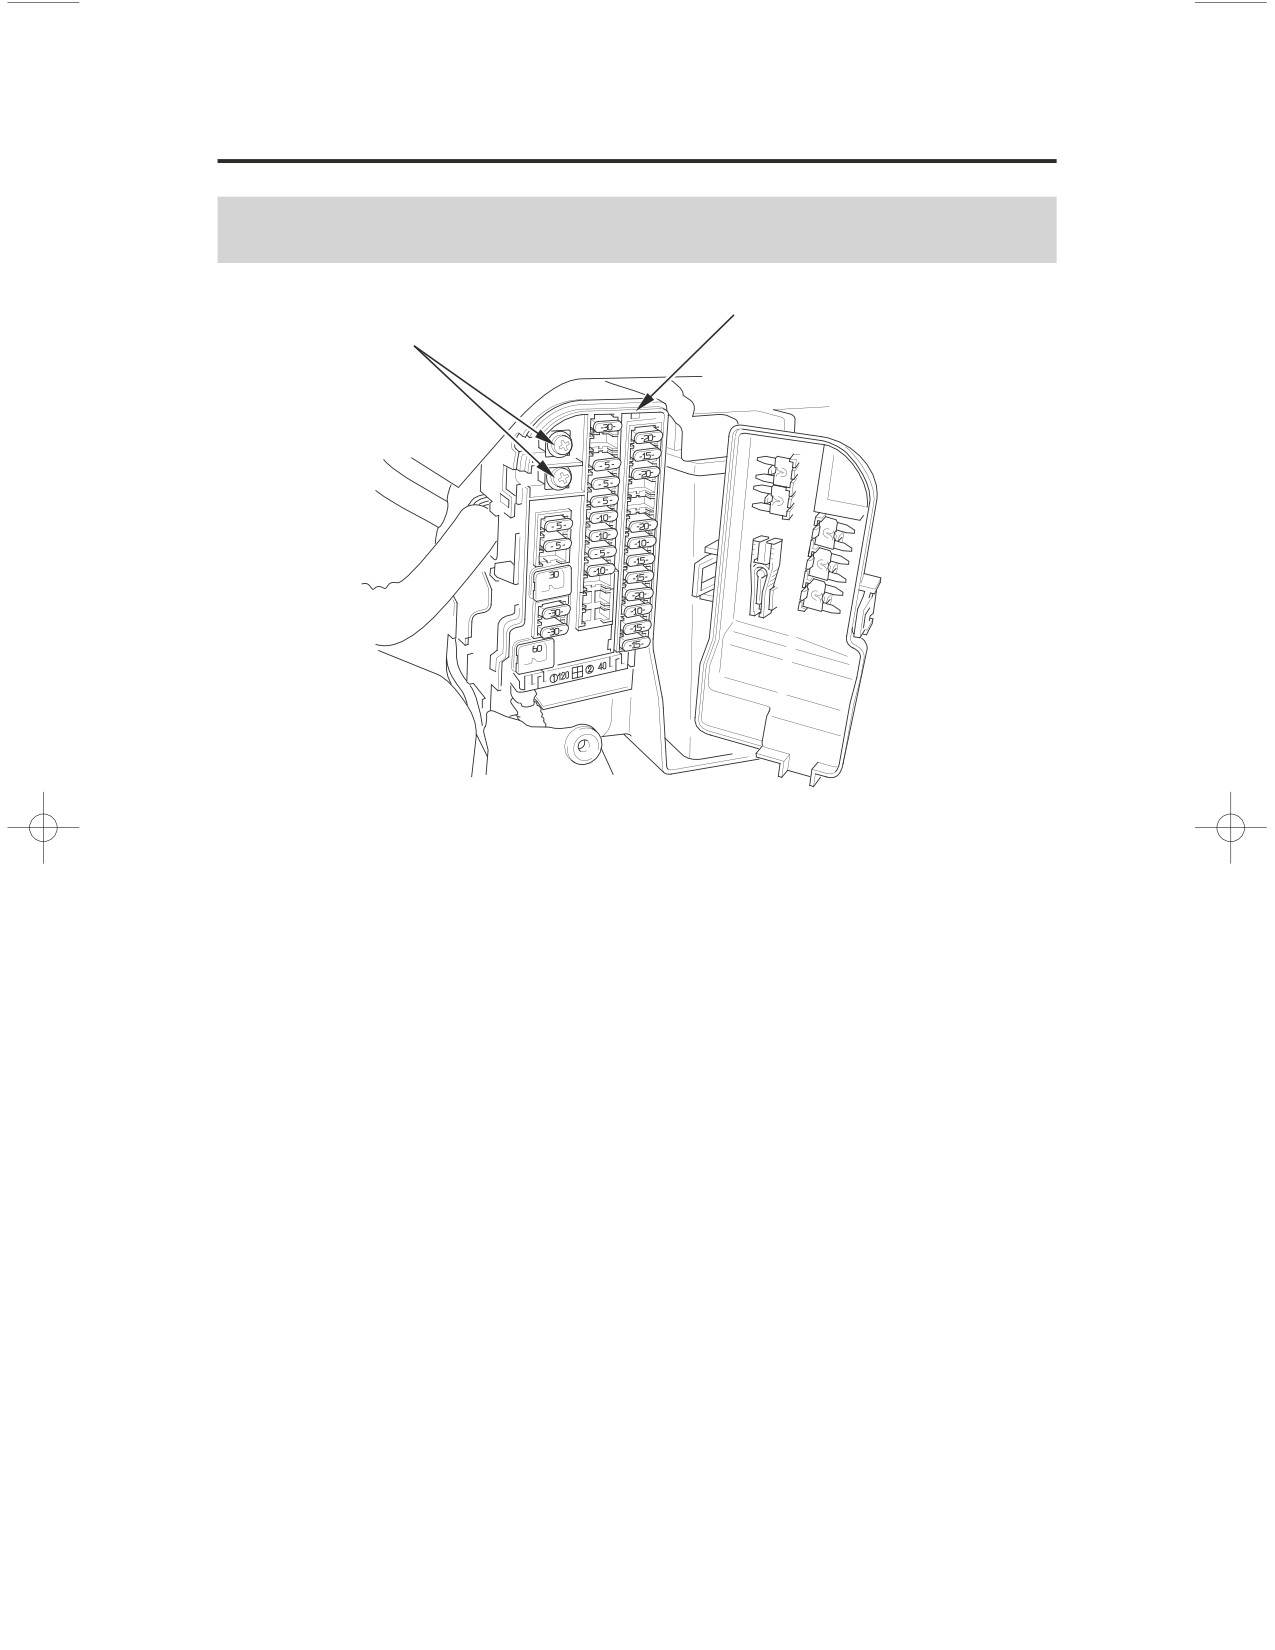
fuse box
accessory (ACC)
terminal
For your convenience, your motorcycle is equipped with an accessory (ACC)
terminal and optional accessory socket. The terminal and socket provide 12V
DC power for electrical accessories. When both terminal and socket are being
used, the combined power rating of each accessory should be 60 watts (5 amps)
or less. Before installing any accessories, read Accessories and Modif ications,
page
4
If you install any accessories, check the battery frequently to determine the state
of charge. Higher current demands may blow a fuse or discharge the battery. For
more information, see
Battery,
page
197, and
If a Fuse Blows,
page
232
Connect accessory electrical leads securely, and keep them insulated, away from
hot parts and sharp edges.
Before Riding
69
70
Before Riding
Basic Operation & Riding
This section gives basic riding instructions, including how to start and stop your
engine, and how to use the throttle, clutch, and brakes. It also provides important
information on riding with a passenger or cargo, and operating your cruise
control.
To protect your new engine and enjoy optimum performance and service life,
refer to Break-in Guidelines (page
248
).
To protect the catalytic converters in your motorcycle’s exhaust system, avoid
extended idling and the use of leaded gasoline.
Safe Riding Precautions
72
Starting & Stopping the Engine
73
Preparation
73
Starting Procedure
74
Flooded Engine
74
Bank Angle Sensor Ignition Cut-off System
75
How to Stop the Engine
75
Shifting Gears
76
While You Are Riding
77
Riding in Reverse
78
Braking
80
Anti-Lock Brake System (ABS)
82
ABS Indicator Light
83
Tire Pressure Monitoring System (TPMS)
85
Low Tire Pressure Indicator
86
Tire Pressure Monitoring System (TPMS) Indicator
87
Changing a Tire with TPMS
88
Parking
89
Theft-prevention Tips
91
Riding with a Passenger or Cargo
92
Riding with Cruise Control
93
Cruise Control
93
To Set Cruise Control
94
To Change the Set Speed
94
To Cancel Cruise Control
95
Riding in Bad Weather
96
Basic Operation & Riding
71
Safe Riding Precautions
Before riding your motorcycle for the first time, please review the Motorcycle
Saf ety
section beginning on page 1, and the
Bef ore Riding
section beginning on
page
43
Even if you have ridden other motorcycles, take time to become familiar with
how this motorcycle works and handles. Practice in a safe area until you build
your skills and get accustomed to the motorcycle’s size and weight.
Make sure flammable materials such as dry grass or leaves do not come in
contact with the exhaust system when riding, idling, or parking your motorcycle.
72
Basic Operation & Riding
Starting & Stopping the Engine
Always follow the proper starting procedure described below.
For your safety, avoid starting or operating the engine in an enclosed area such
as a garage. Your motorcycle’s exhaust contains poisonous carbon monoxide
gas which can collect rapidly in an enclosed area and cause illness or death.
Your motorcycle can be started with the transmission in gear by pulling in the
clutch lever before operating the starter.
Your motorcycle is equipped with a side stand ignition cut-off system. If the
side stand is down -- the engine cannot be started unless the transmission is in
neutral. If the side stand is up -- the engine can be started in neutral, or in gear
with the clutch lever pulled in. After starting with the side stand down, the
engine will stop if the transmission is put in gear before raising the side stand.
Preparation
Before starting, insert the key, turn the ignition switch ON, and confirm the
following:
The transmission is in neutral (neutral indicator is ON).
The engine stop switch is set to RUN.
The low oil pressure indicator is ON.
The PGM-FI malfunction indicator lamp (MIL) is OFF.
The ABS indicator light is ON (models equipped with ABS).
The airbag indicator is OFF (Models equipped with Airbag).
The low oil pressure indicator and airbag indicator (models equipped with
Airbag) should go off a few seconds after the engine starts. If the low oil
pressure indicator lights during operation, stop the engine immediately and
check the engine oil level.
If the airbag indicator stays on or lights during operation, have your motorcycle
inspected as soon as possible by an authorized Honda dealer (models equipped
with Airbag).
Basic Operation & Riding
73