Honda GL1800 Goldwing. Owners Manual - page 1
2009
Honda GL1800
GOLDWING
OWNER’S MANUAL
Introduction
Congratulations on choosing a GL1800 GOLDWING motorcycle.
When you own a Honda, you’re part of a worldwide family of satisfied
customersʵ
people who appreciate Honda’s reputation for building quality into
every product.
Your GOLDWING has earned its reputation as the ultimate luxury touring
motorcycle. It comes loaded with power, unequaled cargo space, a sophisticated
audio system, adjustable windscreen, suspension, and ventilation, and other
unique features to provide maximum convenience and comfort. Additionally,
there are special packages available: Anti-Lock Brake System (ABS), Tire
Pressure Monitoring System (TPMS), Premium Audio, Navigation System,
Airbag, and Comfort.
Before riding, take time to get acquainted with your motorcycle and how it
works. To protect your investment, we urge you to take responsibility for
keeping your motorcycle well maintained. Scheduled service is a must, of
course. But it’s just as important to observe the break-in guidelines, and perform
all pre-ride and other periodic checks detailed in this manual.
We also recommend that you read this owner’s manual before you ride. It’s full
of facts, instructions, safety information, and helpful tips. To make it easy to use,
the manual contains a detailed list of topics at the beginning of each section, and
both an in-depth table of contents and an index at the back of the book.
As you read this manual, you will find information that is preceded by a
symbol. This information is intended to help you avoid damage to your
Honda, other property, or the environment.
Introduction
Introduction
Read the Warranties Booklet (page
261
) thoroughly so you understand the
coverages that protect your new Honda and are aware of your rights and
responsibilities.
If you have any questions, or if you ever need special service or repairs,
remember that your Honda dealer knows your motorcycle best and is dedicated
to your complete satisfaction.
Please report any change of address or ownership to your Honda dealer so we
will be able to contact you concerning important product information.
You may also want to visit our website at www.honda.com.
Happy riding!
California Proposition 65 Warning
WARNING: This product contains or emits chemicals known to the State of
California to cause cancer and birth defects or other reproductive harm.
Introduction
A Few Words About Safety
Your safety, and the safety of others, is very important. And operating this
motorcycle safely is an important responsibility.
To help you make informed decisions about safety, we have provided operating
procedures and other information on labels and in this manual. This information
alerts you to potential hazards that could hurt you or others.
Of course, it is not practical or possible to warn you about all hazards associated
with operating or maintaining a motorcycle. You must use your own good
judgment.
You will find important safety information in a variety of forms, including:
Safety Labels
-- on the motorcycle.
Safety Messages
-- preceded by a safety alert symbol
and one of three
signal words:
DANGER, WARNING, orCAUTION
These signal words mean:
You WILL be KILLED or SERIOUSLY HURT
if you don’t follow instructions.
You CAN be KILLED or SERIOUSLY HURT
if you don’t follow instructions.
You CAN be HURT if you don’t follow
instructions.
Safety Headings
-- such as Important Safety Reminders or Important Safety
Precautions.
Safety Section
-- such as Motorcycle Safety.
Instructions -- how to use this motorcycle correctly and safely.
This entire manual is filled with important safety information -- please read it
carefully.
Safety Messages
Contents
These pages give an overview of the contents of your owner’s manual. The first
page of each section lists the topics covered in that section.
Motorcycle Safety
1
Important safety information you should know, plus a look at the safety-
related labels on your motorcycle.
Instruments & Controls
11
The location and function of gauges, indicators, controls, and the Multi
Information Display on your motorcycle and operating instructions for
various controls and features.
Before Riding
43
The importance of wearing a helmet and other protective gear, how to make
sure you and your motorcycle are ready to ride, and important information
about loading.
Basic Operation & Riding
71
How to start and stop the engine, shift gears, and brake. Also, riding
precautions and important information about riding with a passenger or cargo.
Audio Systems
97
The location, function, and operation of the audio components on your
motorcycle.
Servicing Your Honda
137
Why your motorcycle needs regular maintenance, what you need to know
before servicing your Honda, an owner maintenance schedule, and
instructions for specific maintenance and adjustment items.
Contents
Contents
Tips
207
How to store and transport your motorcycle and how to be an environmentally
responsible rider.
Taking Care of the Unexpected
213
What to do if you have a flat tire, your engine won’t start, etc.
Technical Information
239
ID numbers, technical specifications, and other technical facts.
Consumer Information
257
Information on warranties, emission controls, how to get Honda service
manuals, and...
‘‘Reporting Safety Defects’’
266
Table of Contents
268
Sequential listing of topics in this owner’s manual.
Index
276
Quick Reference
Handy facts about fuel, engine oil, tire sizes, and air pressures.
Contents
Motorcycle Safety
This section presents some of the most important information and
recommendations to help you ride your motorcycle safely. Please take a few
moments to read these pages. This section also includes information about the
location of safety labels on your motorcycle.
Important Safety Information
2
Accessories & Modifications
4
Safety Labels
6
Motorcycle Safety
1
Important Safety Information
Your motorcycle can provide many years of service and pleasureʵif you take
responsibility for your own safety and understand the challenges you can meet
while riding.
There is much that you can do to protect yourself when you ride. You’ll find
many helpful recommendations throughout this manual. The following are a
few that we consider to be most important.
Always Wear a Helmet
It’s a proven fact: helmets significantly reduce the number and severity of head
injuries. So always wear an approved motorcycle helmet and make sure your
passenger does the same. We also recommend that you wear eye protection,
sturdy boots, gloves, and other protective gear (page
).
44
Take Time to Learn & Practice
Even if you have ridden other motorcycles, take time to become familiar with
how this motorcycle works and handles. Practice in a safe area until you build
your skills and get accustomed to the motorcycle’s size and weight.
Because many accidents involve inexperienced or untrained riders, we urge all
riders to take a certified course approved by the Motorcycle Safety Foundation
(MSF). See page
46
Ride Defensively
The most frequent motorcycle collision happens when a car turns left in front of
a motorcycle. Another common situation is a car moving suddenly into your
lane.
Always pay attention to other vehicles around you, and do not assume that other
drivers see you. Be prepared to stop quickly or make an evasive maneuver. For
other riding tips, see the booklet,
You and Your Motorcycle Riding Tips,
which
came with your new motorcycle (USA only).
2
Motorcycle Safety
Important Safety Information
Make Yourself Easy to See
Some drivers do not see motorcycles because they are not looking for them. To
make yourself more visible, wear bright reflective clothing, position yourself so
other drivers can see you, signal before turning or changing lanes, and use your
horn when it will help others notice you.
Ride within Your Limits
Pushing limits is another major cause of motorcycle accidents. Never ride
beyond your personal abilities or faster than conditions warrant. Remember that
alcohol, drugs, fatigue, and inattention can significantly reduce your ability to
make good judgments and ride safely.
Don’t Drink and Ride
Alcohol and riding don’t mix. Even one drink can reduce your ability to respond
to changing conditions, and your reaction time gets worse with every additional
drink. So don’t drink and ride, and don’t let your friends drink and ride either.
Keep Your Honda in Safe Condition
It’s important to keep your motorcycle properly maintained and in safe riding
condition. To help avoid problems, inspect your motorcycle before every ride
and perform all recommended maintenance. Never exceed load limits (page
50
),
and do not modify your motorcycle (page
5
) or install accessories that would
make your motorcycle unsafe (page
4
).
Motorcycle Safety
3
Accessories & Modifications
Modifying your motorcycle or using non-Honda accessories can make your
motorcycle unsafe. Before you consider making any modifications or adding an
accessory, be sure to read the following information.
Improper accessories or
modifications can cause a crash
in which you can be seriously
hurt or killed.
Follow all instructions in this
owner’s manual regarding
accessories and modifications.
Accessories
We strongly recommend that you use only Honda Genuine Accessories that
have been specifically designed and tested for your motorcycle. Because Honda
cannot test all other accessories, you must be personally responsible for proper
selection, installation, and use of non-Honda accessories.
Check with your Honda dealer for assistance and always follow these
guidelines:
Make sure the accessory does not obscure any lights, reduce ground clearance
and lean angle, limit suspension travel or steering travel, alter your riding
position, or interfere with operating any controls.
Do not add any electrical equipment that will exceed the motorcycle’s
electrical system capacity (page
245). A blown fuse can cause a loss of lights
or engine power (page
232).
Do not pull a trailer or sidecar with your motorcycle. This motorcycle was not
designed for these attachments, and their use can seriously impair your
motorcycle’s handling.
Carefully consider the weight of any accessories and any cargo stored in
those accessories to avoid exceeding the maximum weight limits.
For more information, see
Load Limits,
page
50
Modifying the tire pressure monitoring system (TPMS) or any other part of
your motorcycle’s safety systems could make the systems ineffective
(page
85
).
4
Motorcycle Safety
Accessories & Modifications
Modifications
We strongly advise you not to remove any original equipment or modify your
motorcycle in any way that would change its design or operation. Such changes
could seriously impair your motorcycle’s handling, stability, and braking,
making it unsafe to ride.
Removing or modifying your lights, exhaust system, emission control system, or
other equipment can also make your motorcycle illegal.
Motorcycle Safety
5
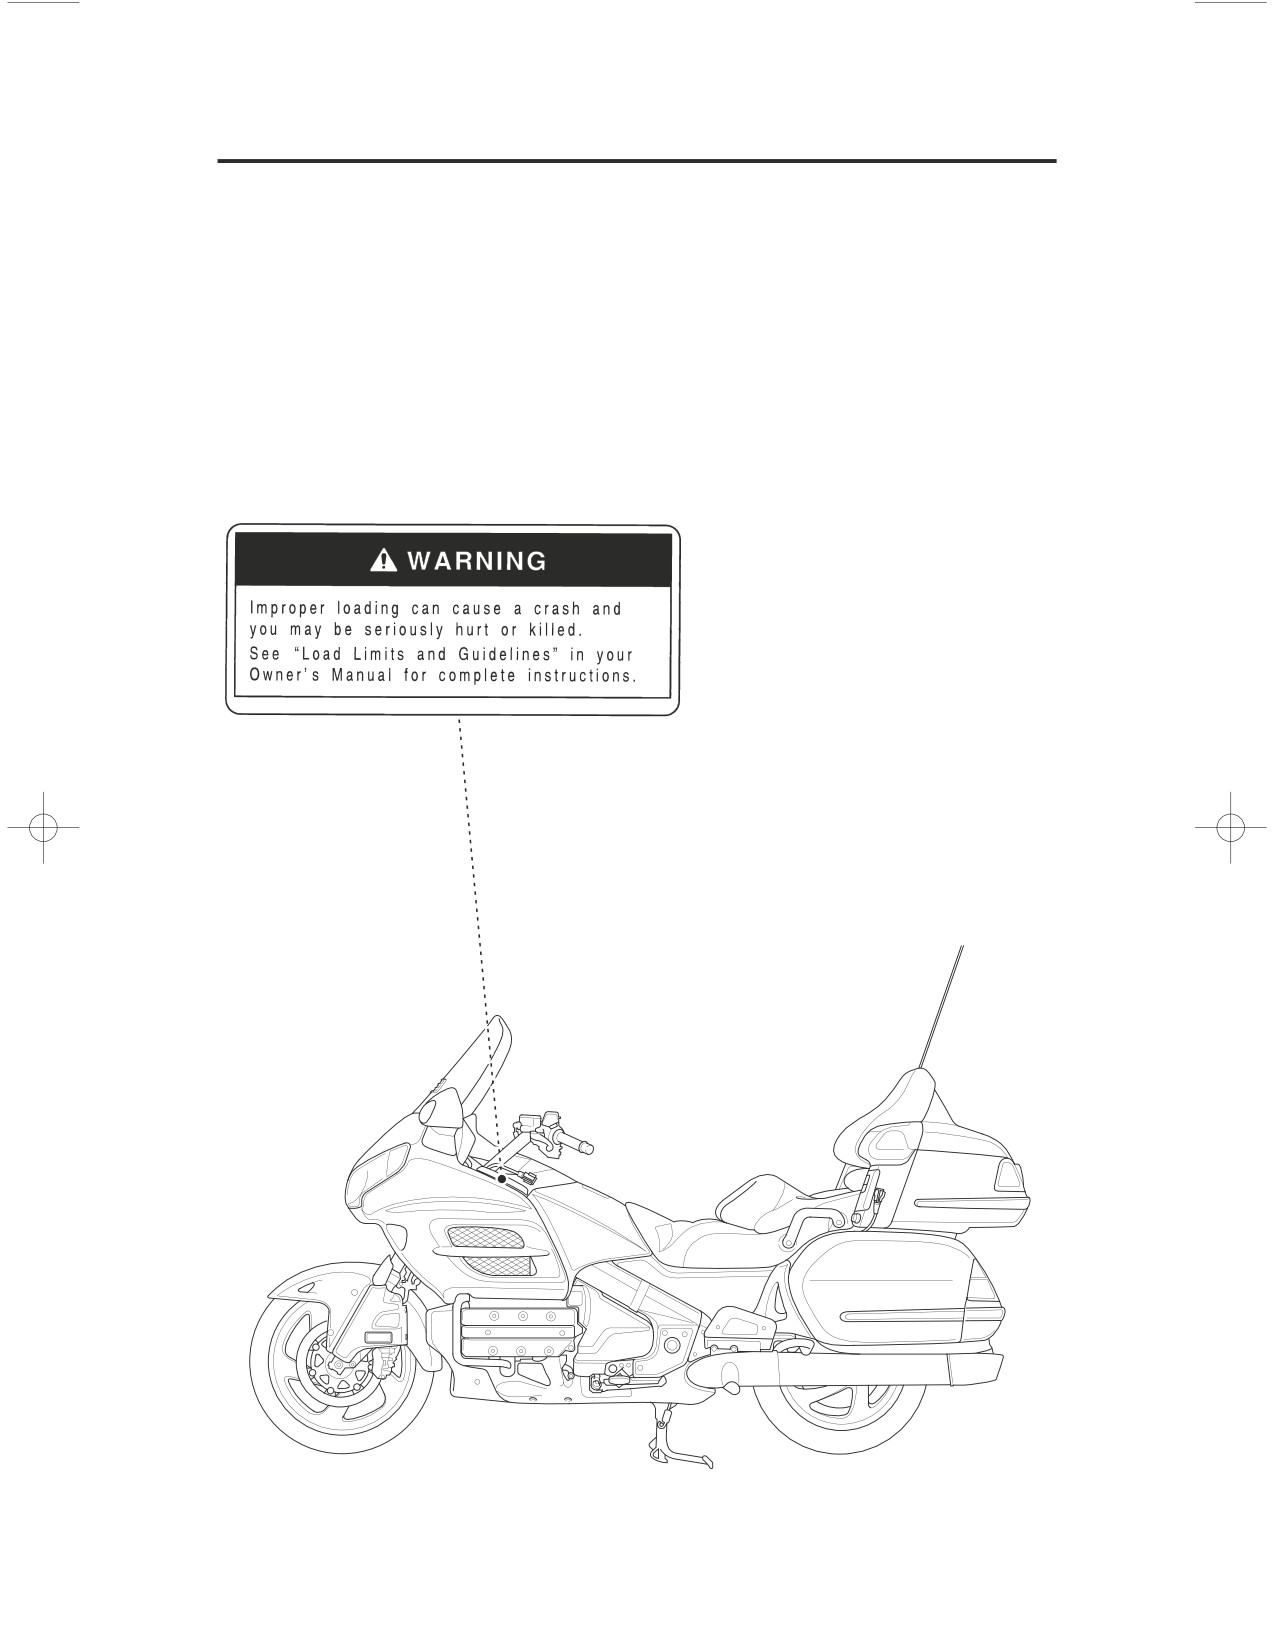
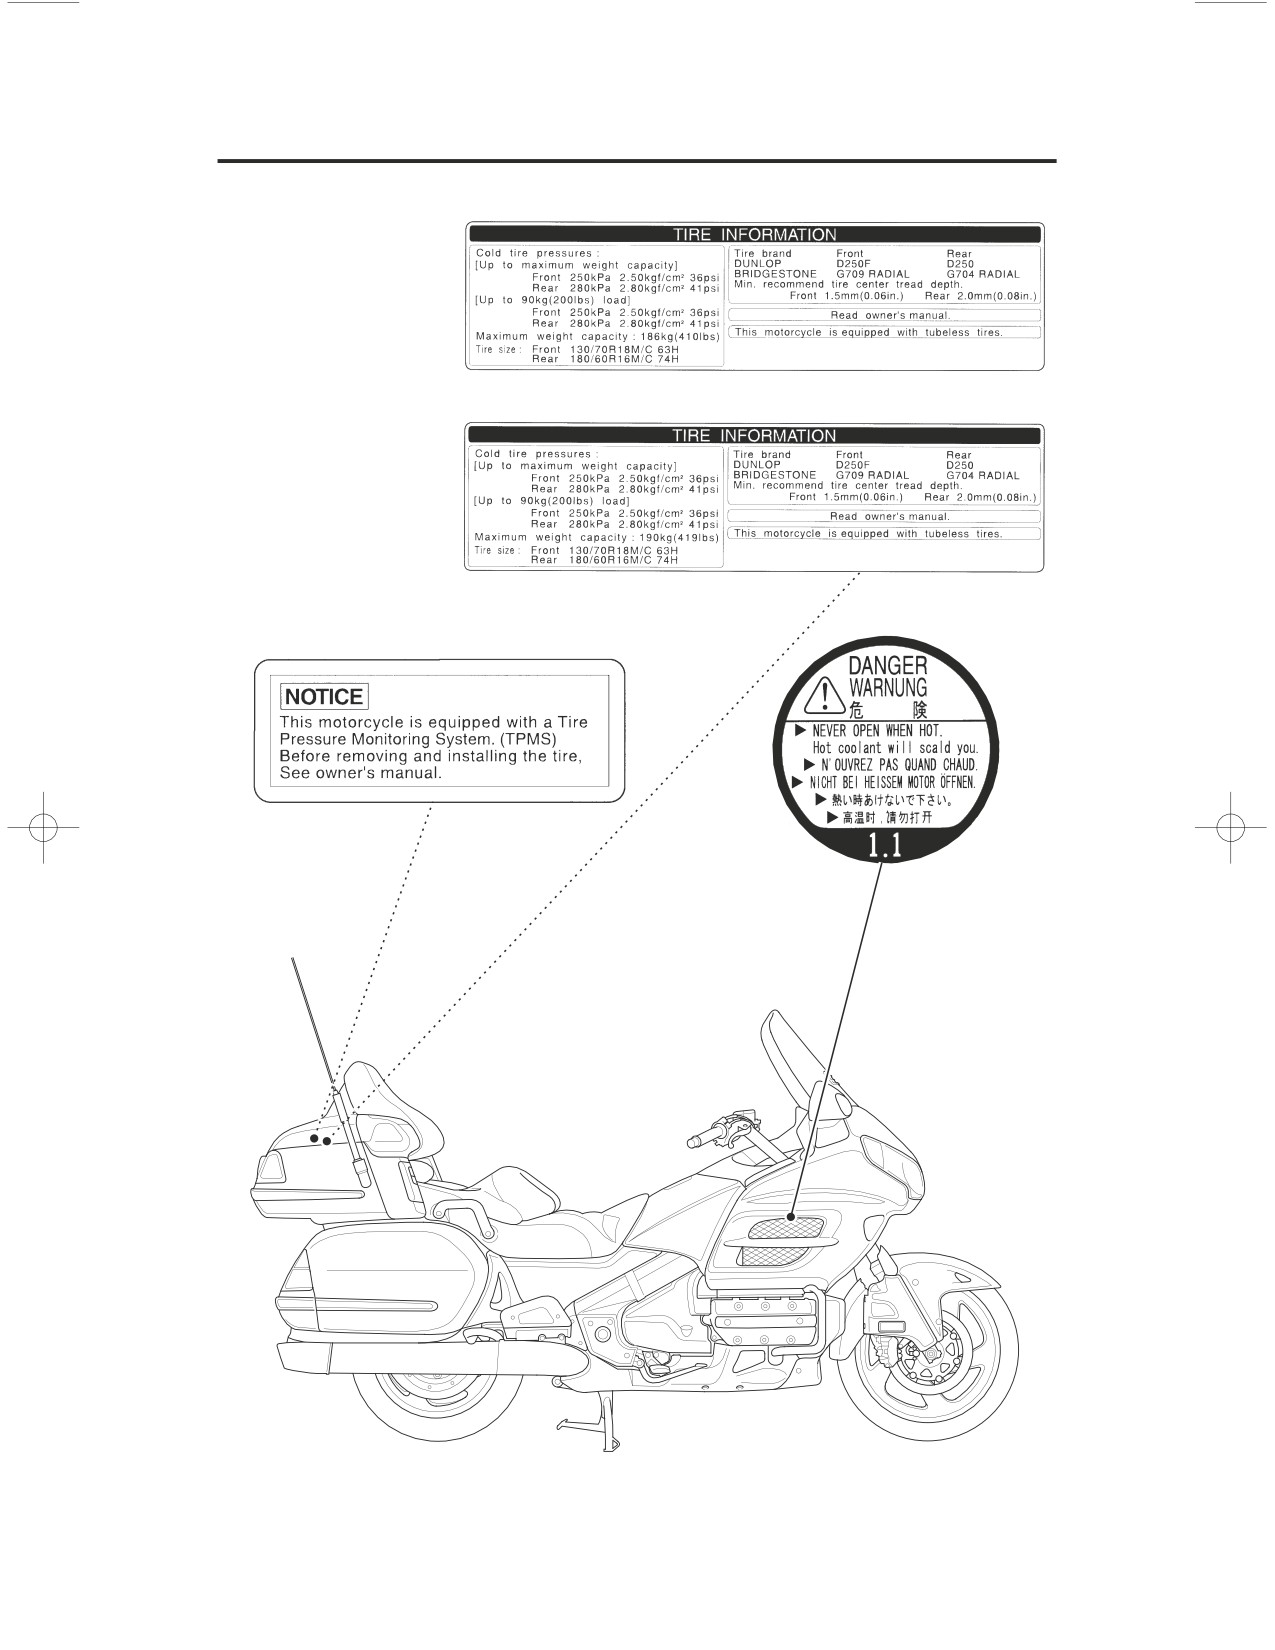
Safety Labels
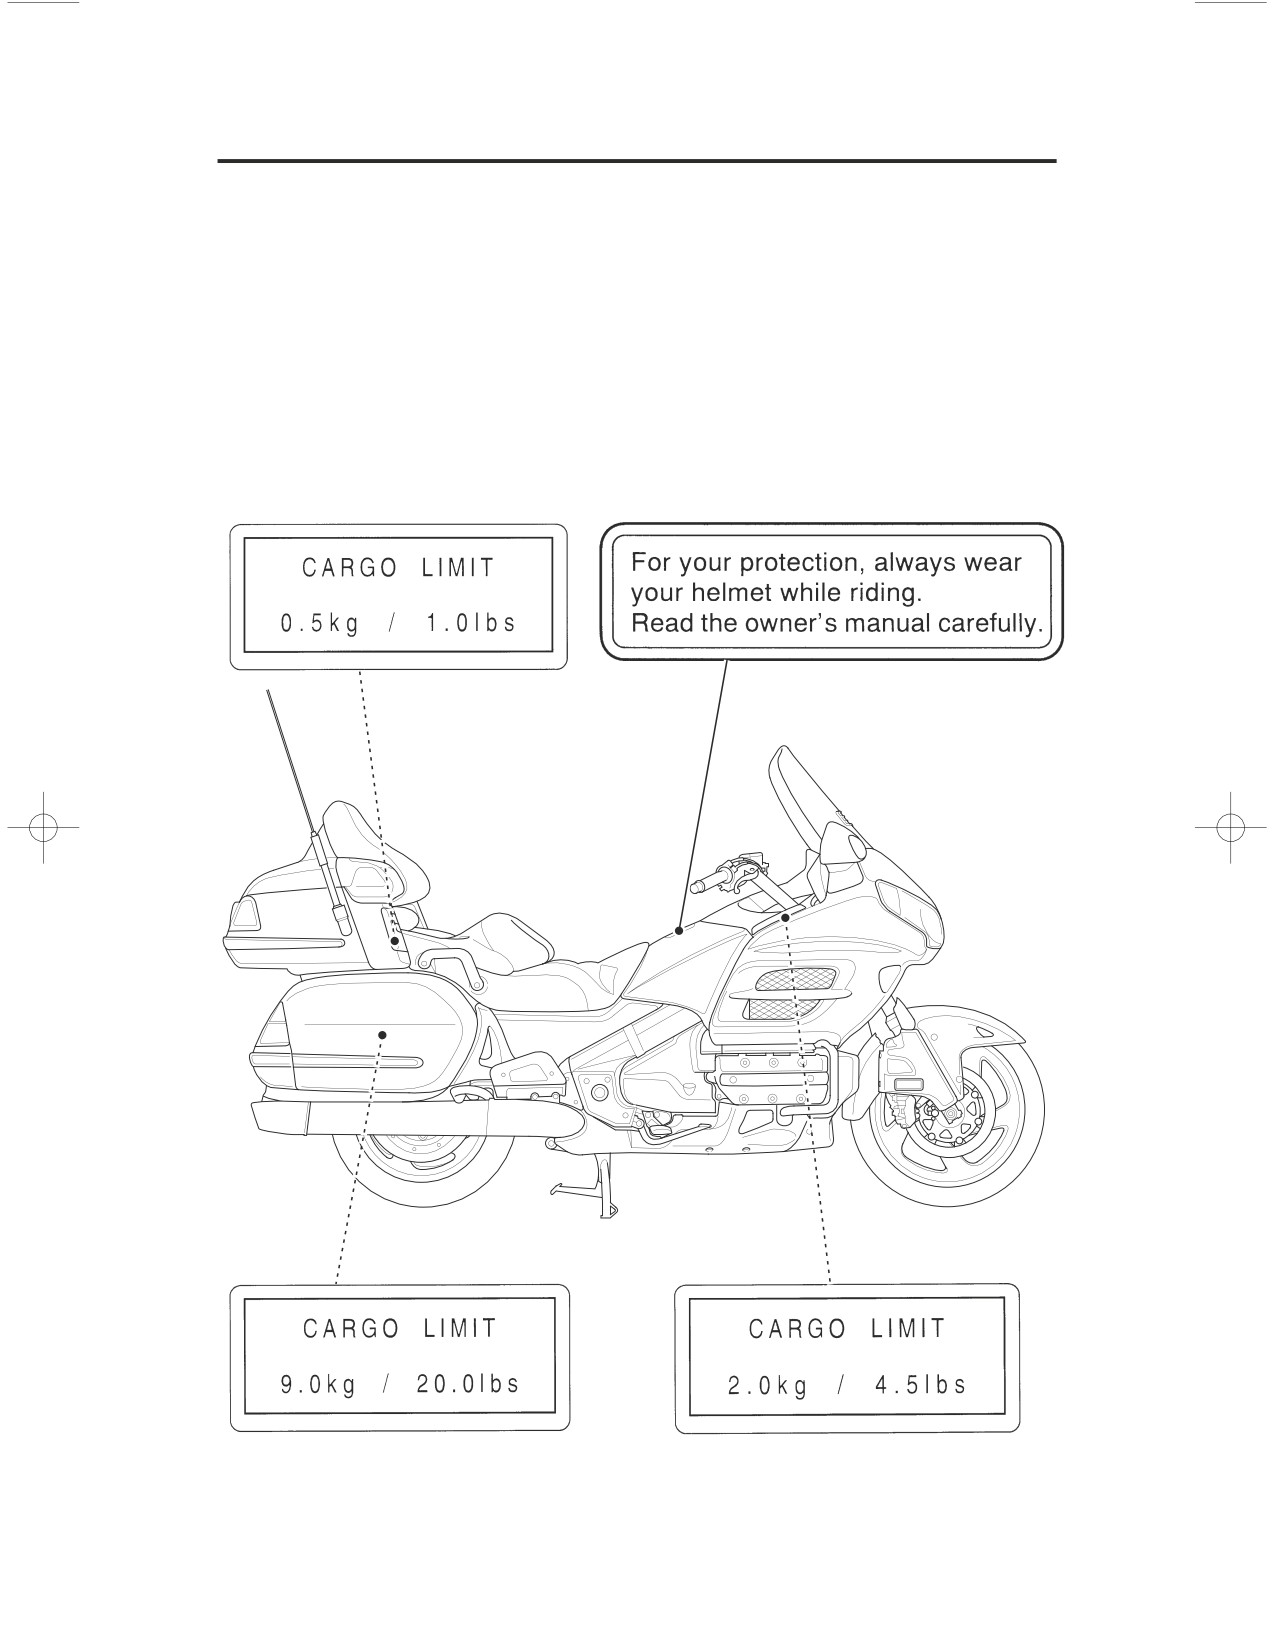
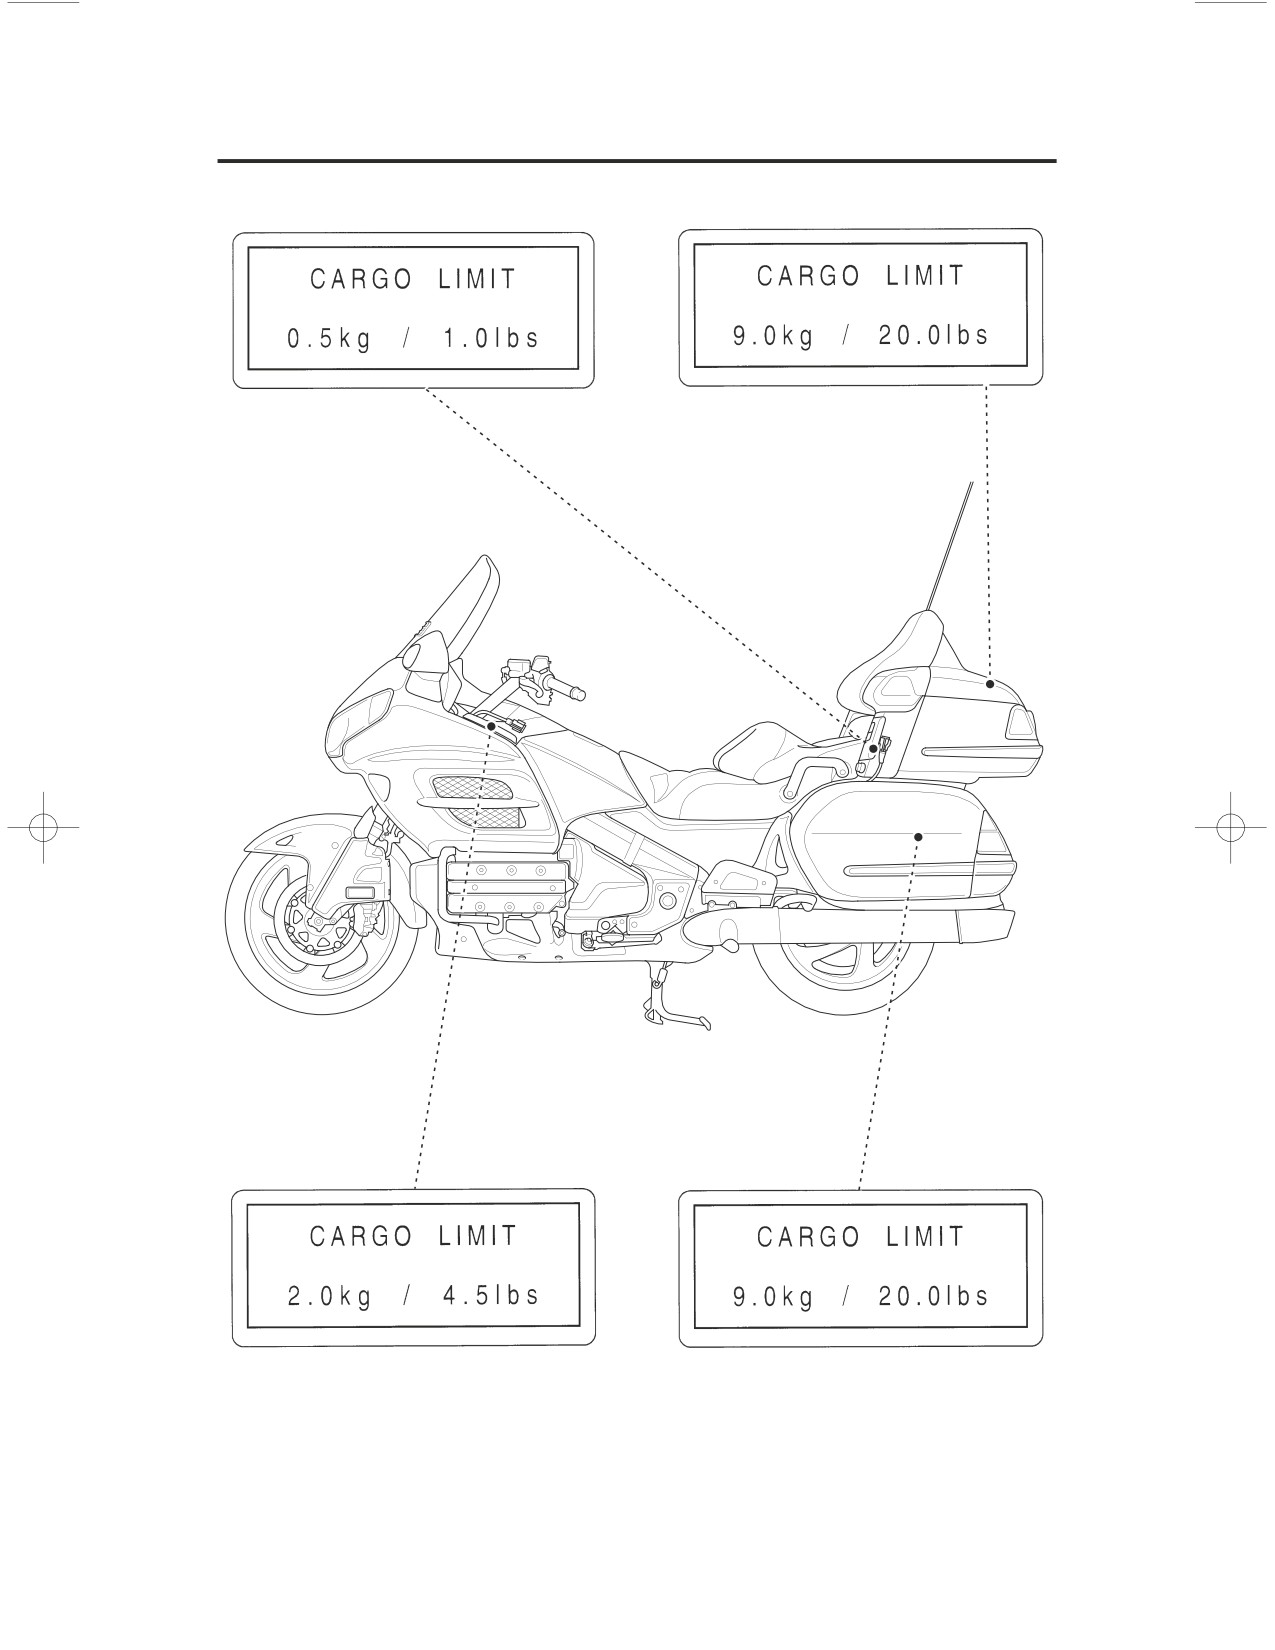
Safety labels on your motorcycle either warn you of potential hazards that could
cause serious injury or they provide important safety information. Read these
labels carefully and don’t remove them.
If a label comes off or becomes hard to read, contact your Honda dealer for a
replacement.
(Models not equipped with Airbag)
6
Motorcycle Safety
Safety Labels
Motorcycle Safety
7
Safety Labels
8
Motorcycle Safety
Safety Labels
ʪ
ʫ
For USA
ʪFor Canada
ʫ
Motorcycle Safety
9
10
Motorcycle Safety
Instruments & Controls
This section shows the location of all gauges, indicators, and controls you would
normally use before or while riding your motorcycle.
The items listed on this page are described in this section. Instructions for other
components are presented in other sections of this manual where they will be
most useful.
Operation Component Locations
12
Gauges & Indicators
16
Multi Information Display
22
Opening/Ending Ceremony
23
On/Off-Opening/Ending Ceremony
24
Special Message for Opening/Ending Ceremony
25
Odometer/Tripmeter
27
Switch the Day Mode Display and Night Mode Display
28
Display Illumination Adjustment
29
Digital Clock
31
Air Temperature Meter
32
Travel Trunk & Saddlebags Open Indicator
33
Display Type Selection
34
Changing the Information Display
35
Controls & Features
37
Ignition Switch
37
Engine Stop Switch
38
Start/Reverse Button
39
Reverse (RVS) Switch
39
Cruise Control Switches
39
Headlight Dimmer Switch
40
Turn Signal Switch
40
Horn Button
40
Audio Control Switches
40
Hazard Switch
41
Headlight Beam Adjustment Knob
42
Rear Suspension Spring Pre-load Adjustment Switch
42
Ventilation Controls
42
Windscreen Height Adjustment
42
Instruments & Controls
11
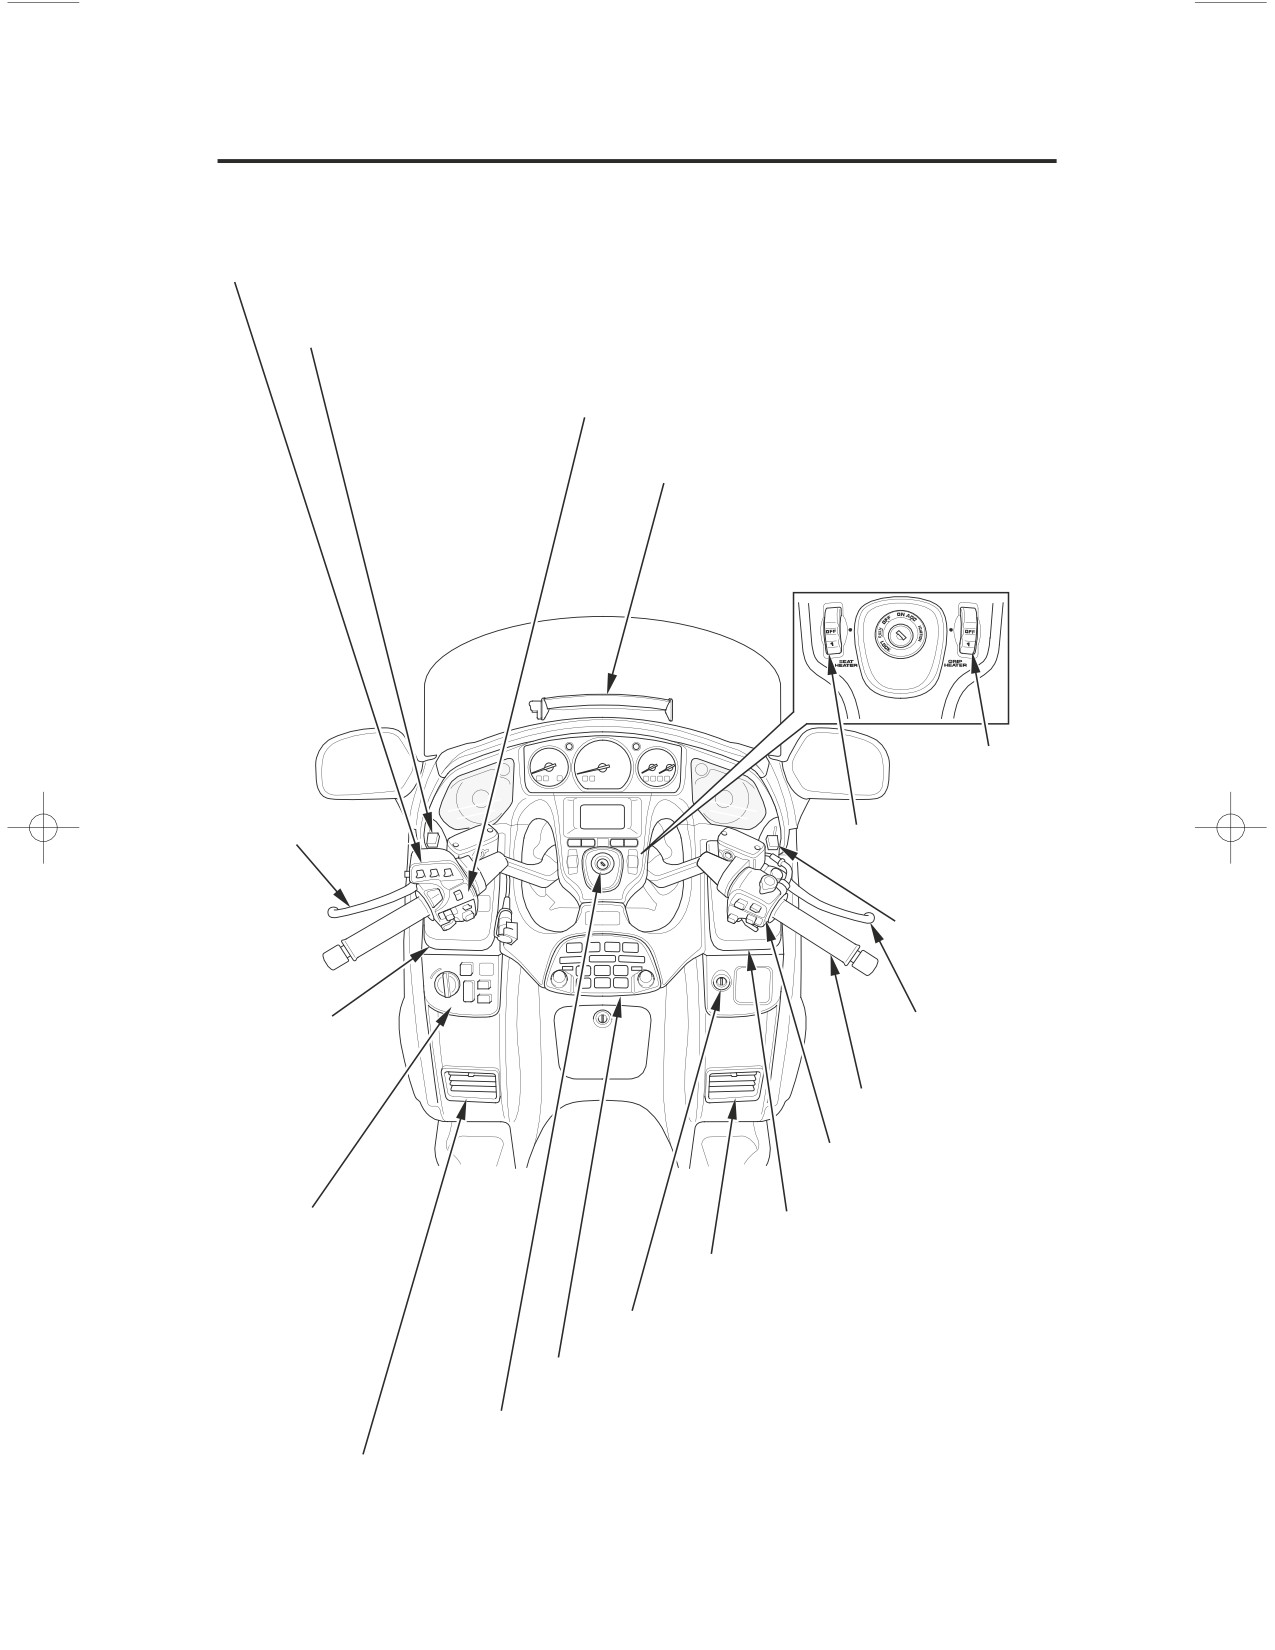
Operation Component Locations
(Models not equipped with Navigation System)
audio system controls
windscreen height lever
left handlebar controls
windscreen ventilation louver
(Models equipped with
Comfort Package)
handgrip heater
switch
clutch lever
front seat heater
switch
windscreen
height lever
left fairing
front brake
pocket
lever
throttle grip
right handlebar controls
left fairing
right fairing pocket
panel controls
right side ventilation louver
fairing pocket lock
audio system controls
ignition switch
left side ventilation louver
12
Instruments & Controls
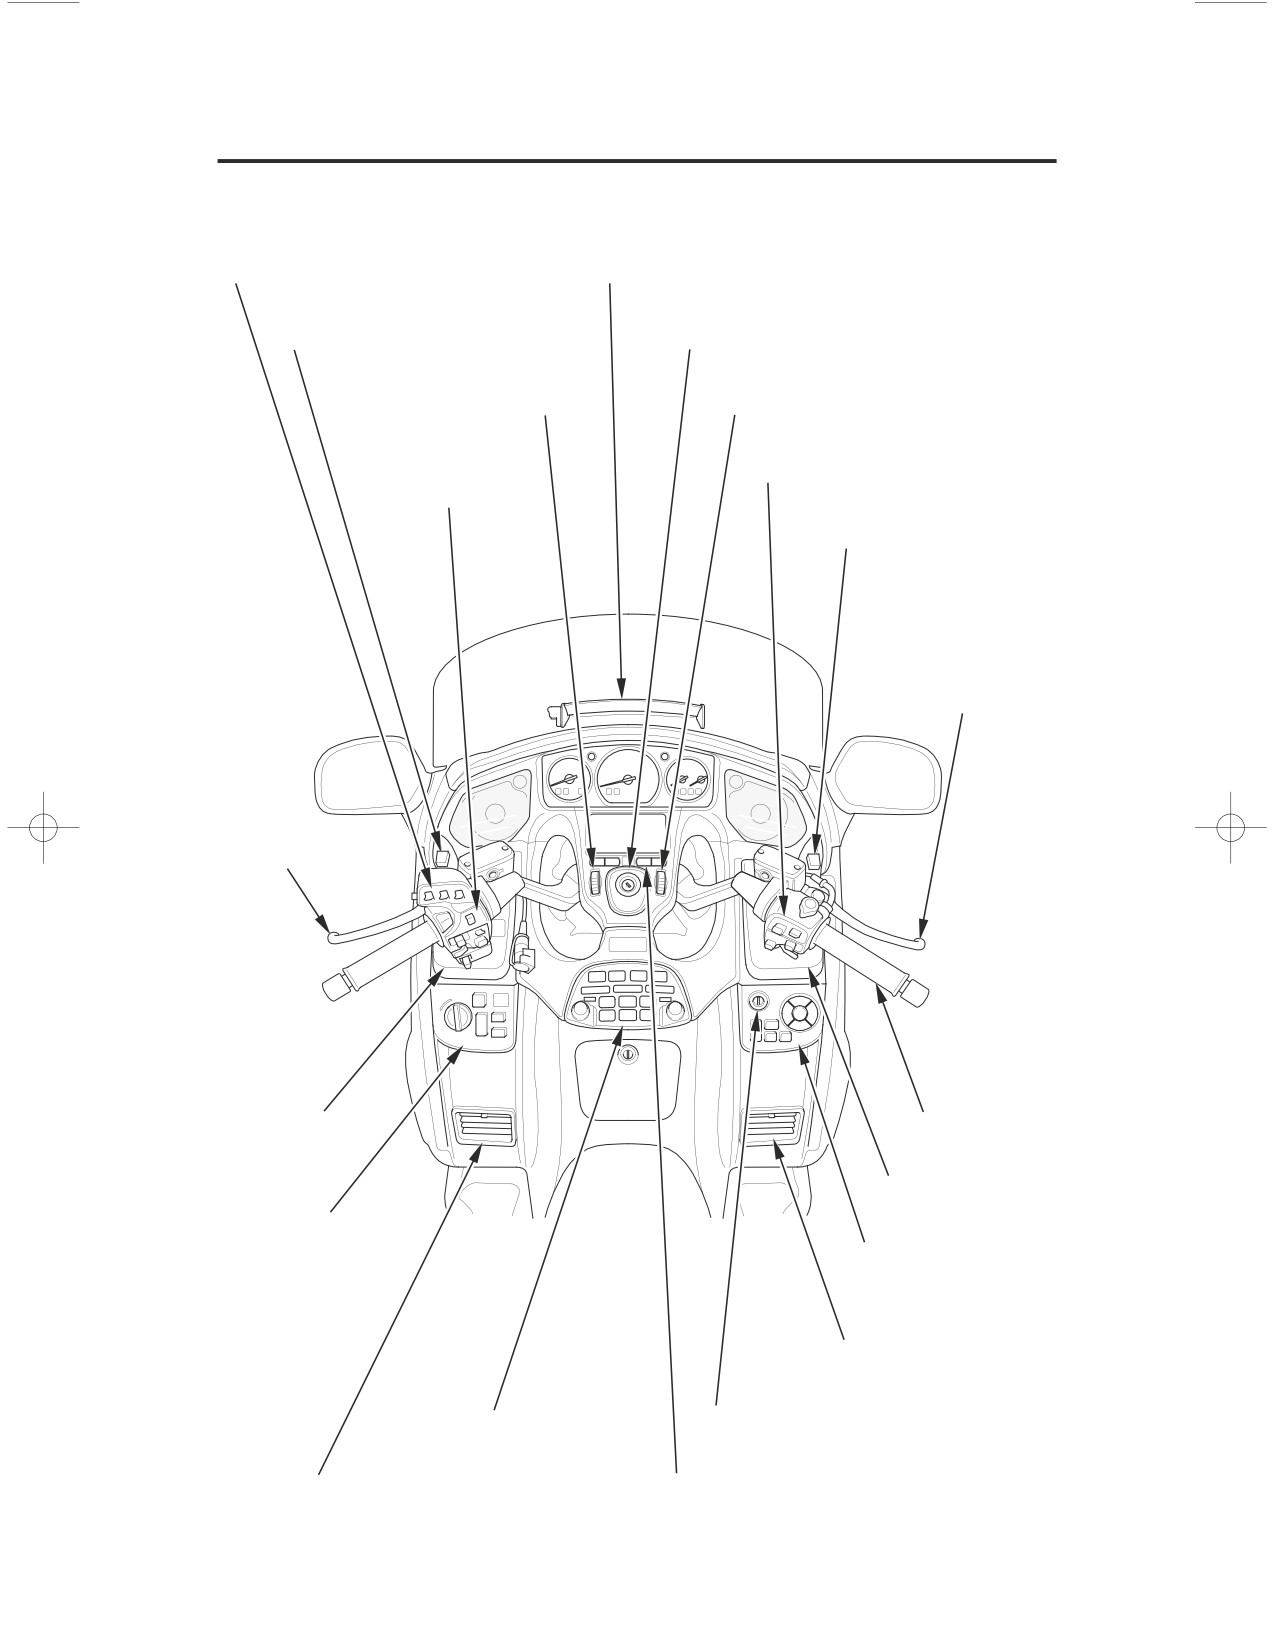
Operation Component Locations
(Models equipped with Navigation System)
audio system controls
windscreen ventilation louver
windscreen height lever
ignition switch
front seat heater switch
handgrip heater switch
left handlebar
right handlebar controls
controls
windscreen height lever
front brake lever
clutch lever
left fairing
throttle grip
pocket
right fairing pocket
left fairing panel
controls
right fairing panel
controls
right side ventilation
louver
audio system controls
fairing pocket lock
left side ventilation louver
multi information display controls
Instruments & Controls
13
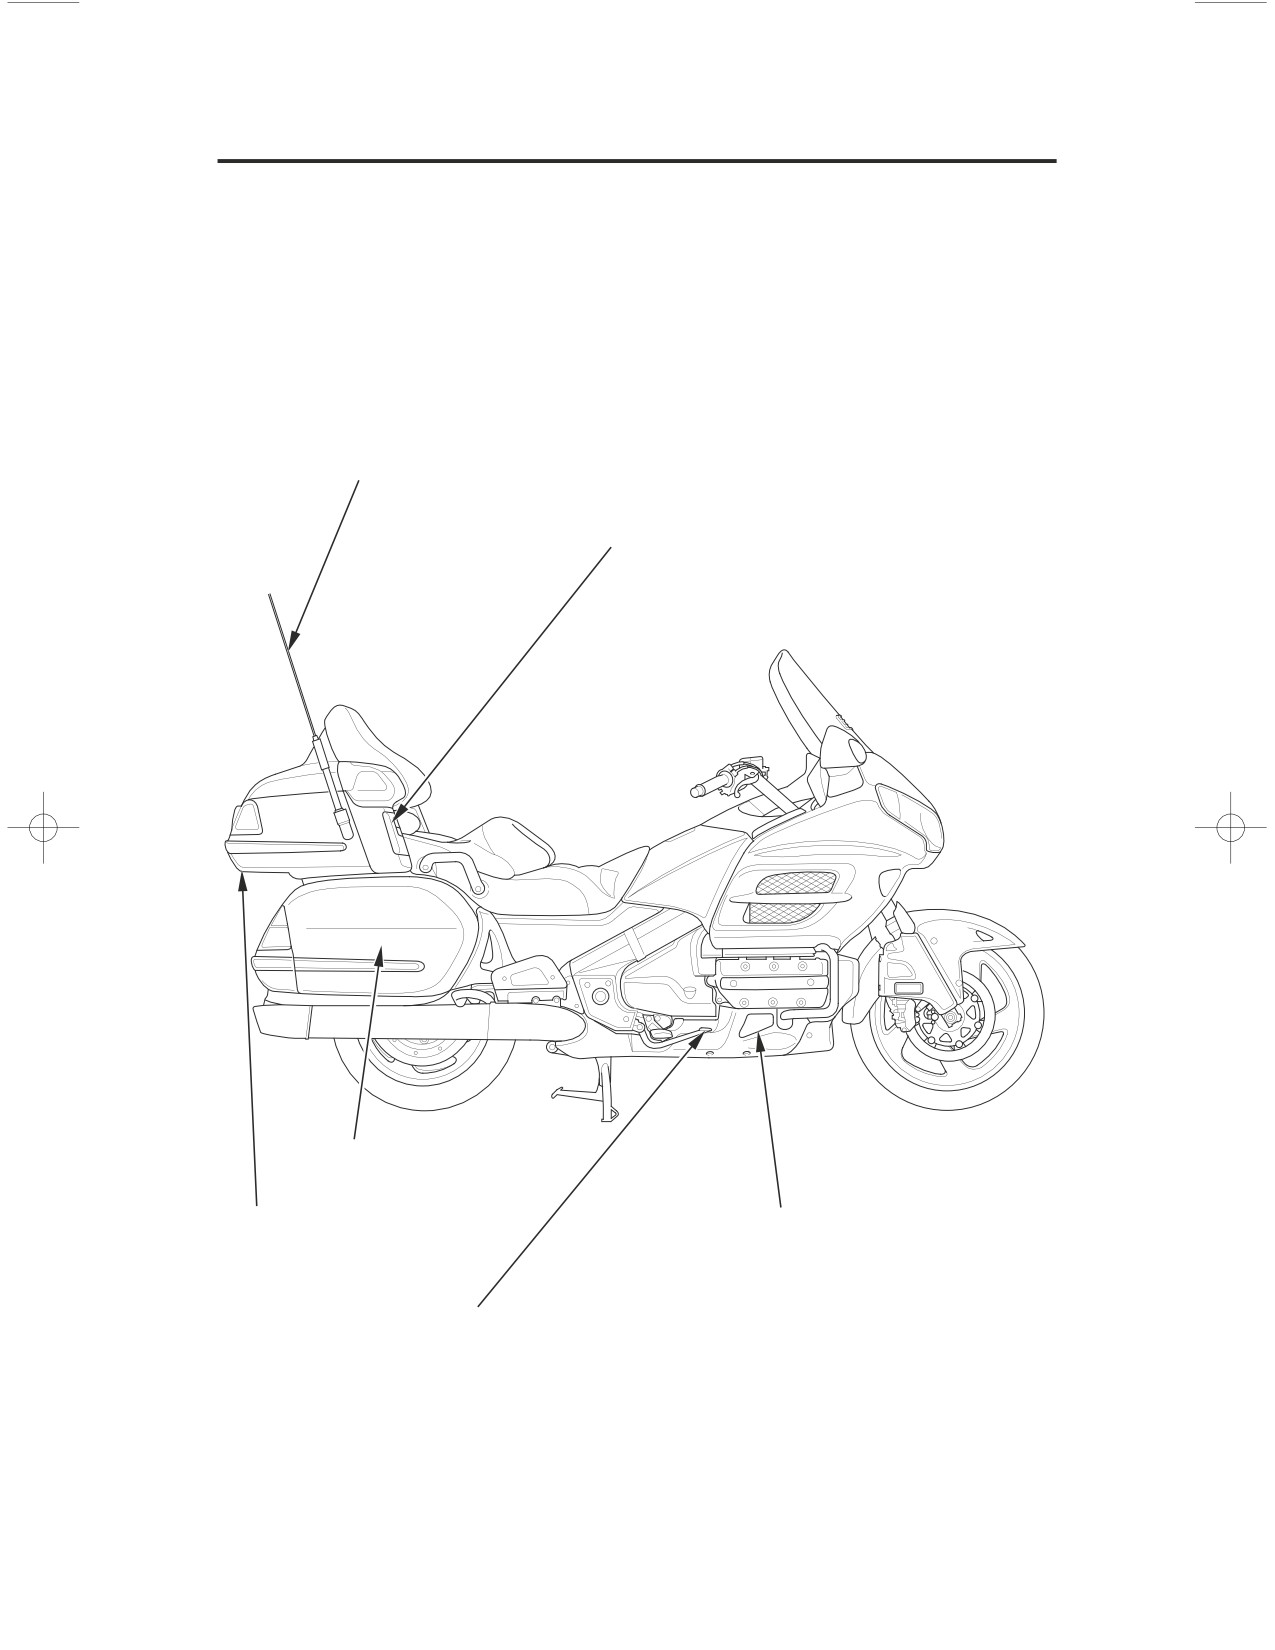
Operation Component Locations
radio antenna
trunk side pocket
saddlebag
helmet holder
foot warmer ventilation louver
(Models equipped with Comfort Package)
rear brake pedal
14
Instruments & Controls
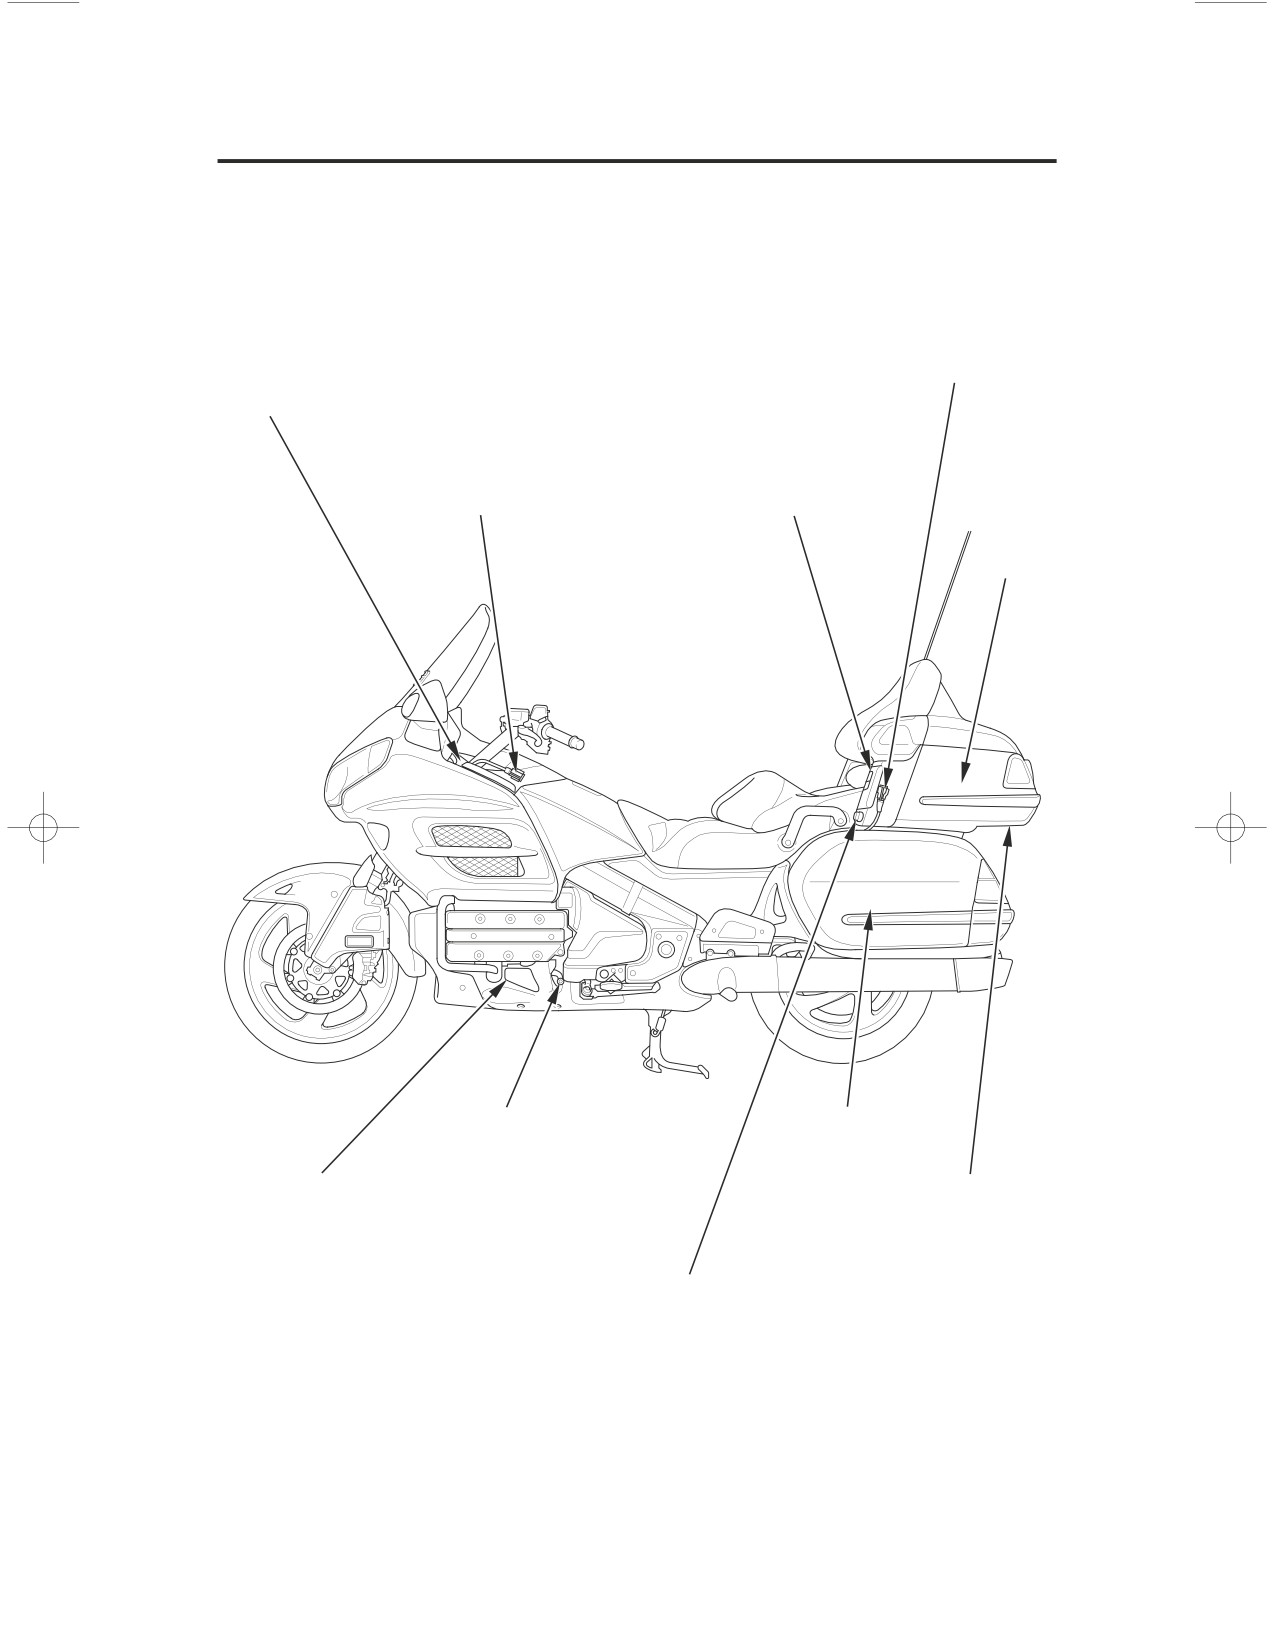
Operation Component Locations
foot warmer ventilation louver lever
rear headset terminal
(Models equipped with Comfort Package)
front headset terminal
trunk side pocket
trunk
shift lever
saddlebag
foot warmer ventilation louver
helmet holder
(Models equipped with Comfort Package)
rear seat heater switch
(Models equipped with Comfort Package)
Instruments & Controls
15
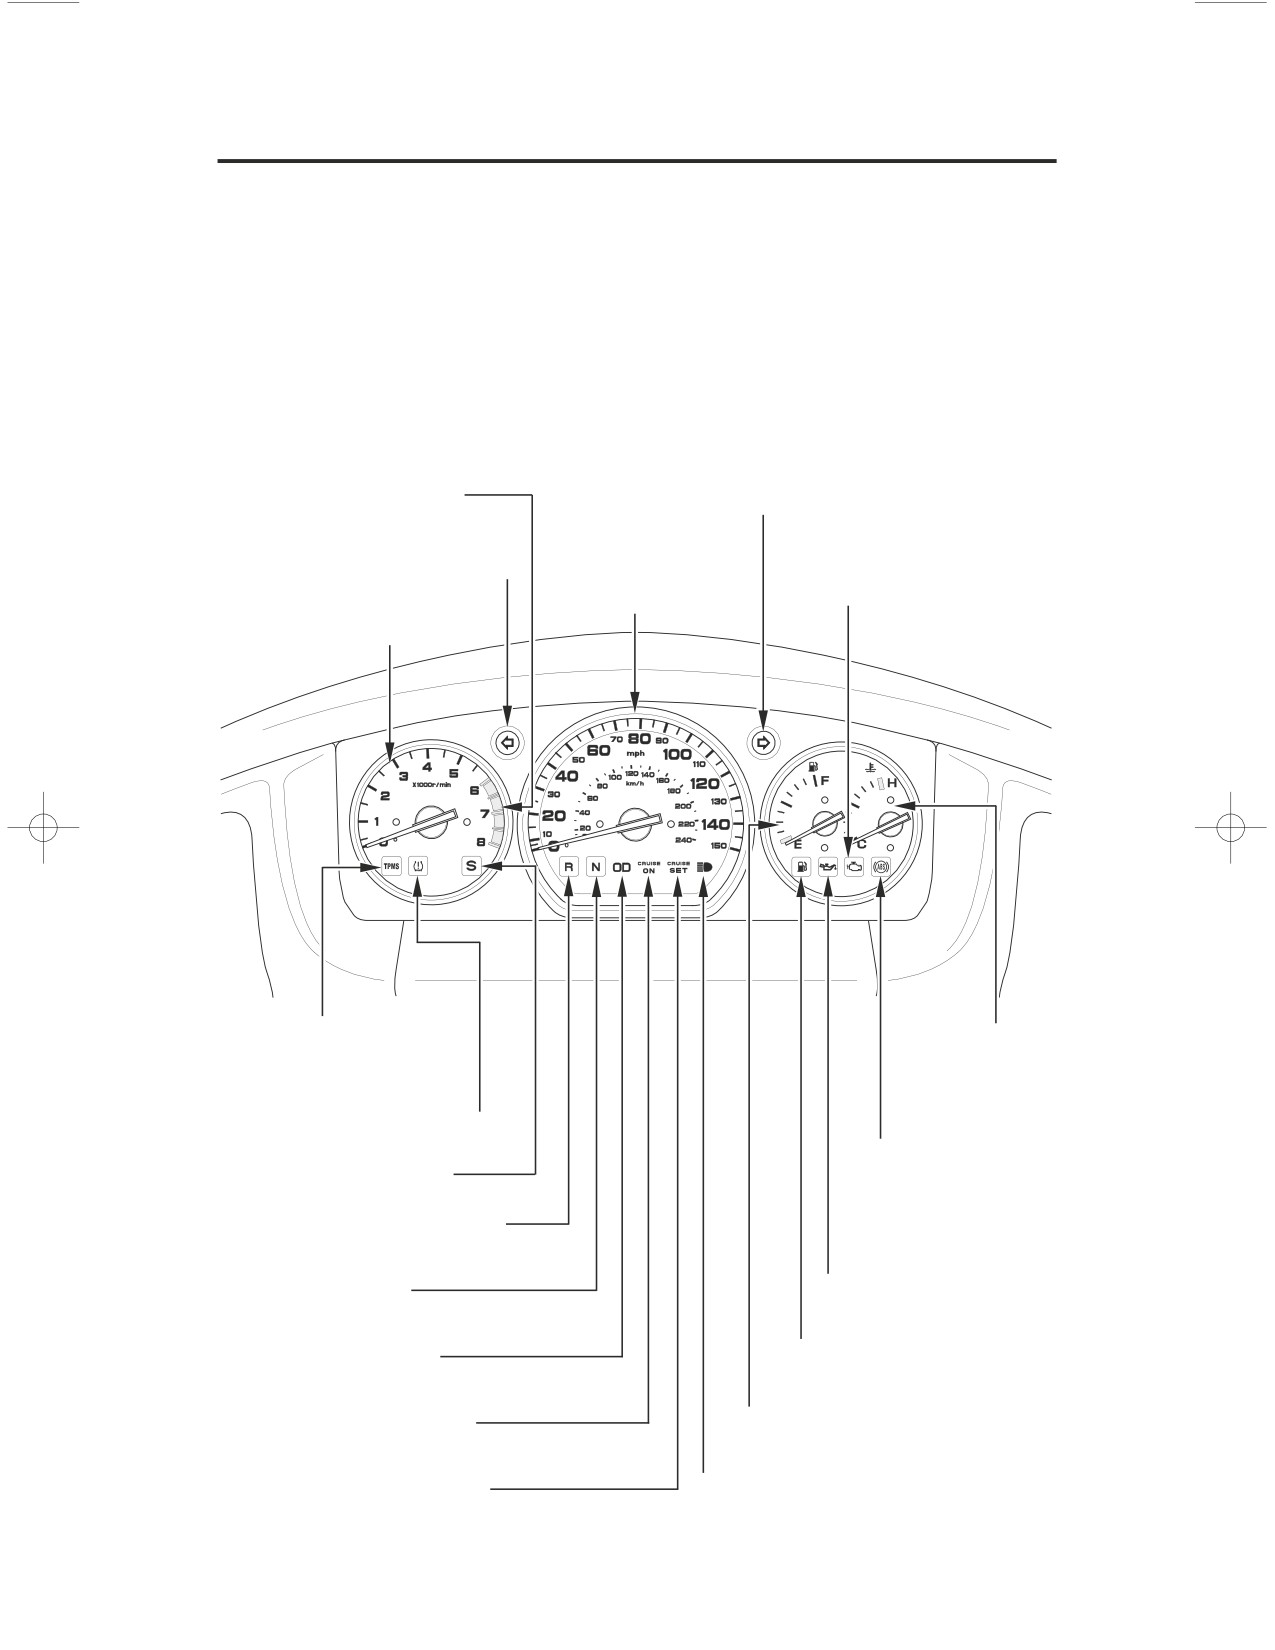
Gauges & Indicators
The gauges and indicators on your motorcycle keep you informed, alert you to
possible problems, and make your riding safer and more enjoyable. Refer to the
gauges and indicators frequently. Their functions are described on the following
pages.
USA: Speedometer, odometer & tripmeter read in miles.
Canada: Speedometer, odometer & tripmeter read in kilometers.
tachometer red zone
right turn signal indicator
left turn signal indicator
PGM-FI malfunction
indicator lamp (MIL)
speedometer
tachometer
tire pressure
coolant
monitoring system
temperature
(TPMS) indicator
gauge
low tire pressure indicator
anti-lock brake system
side stand indicator
(ABS) indicator
(Models equipped
reverse system indicator
with ABS)
neutral indicator
low oil pressure indicator
overdrive indicator
low fuel indicator
CRUISE ON indicator
fuel gauge
CRUISE SET indicator
high beam indicator
16
Instruments & Controls
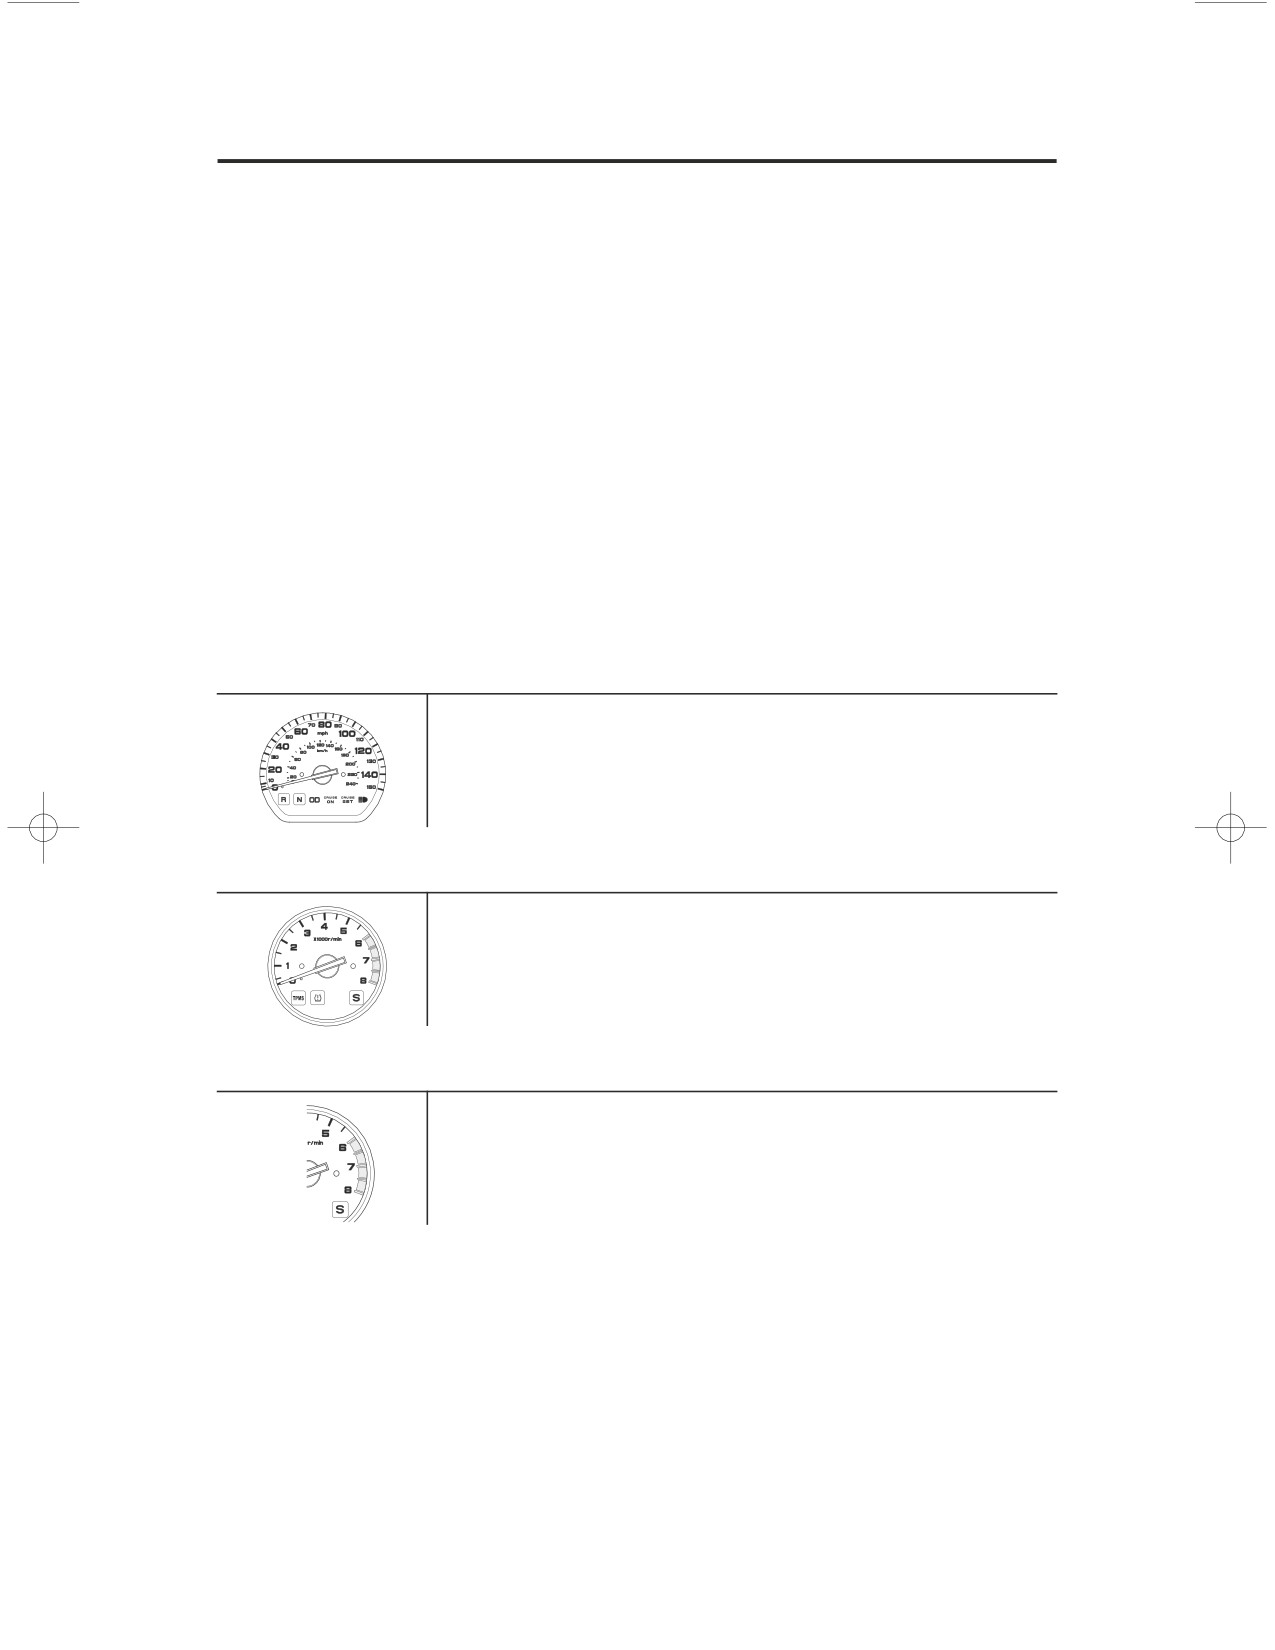
Gauges & Indicators
Lamp Check
Most of the indicator lights come on when you turn the ignition switch ON so
you can check that they are working. Some indicators turn off after a few
seconds; others remain on until or after the engine is started. The ABS indicator
goes off after you ride the motorcycle at a speed above 6 mph (10 km/h).
All indicators are identified on the following pages with the words: Lamp Check.
When applicable, the high beam and neutral indicators come on when you turn
the ignition switch ON and remain on until you select the low beam or shift out
of neutral.
If one of these indicators does not come on when it should, have your Honda
dealer check for problems.
speedometer
Shows riding speed in miles (USA) or kilometers (Canada) per hour.
tachometer
Shows engine speed in revolutions per minute (rpm).
tachometer red zone
Shows excessive engine rpm range (indicated from the beginning of the
tachometer red zone) in which operation may damage the engine. Do not let the
tachometer needle enter the red zone.
Instruments & Controls
17
Gauges & Indicators
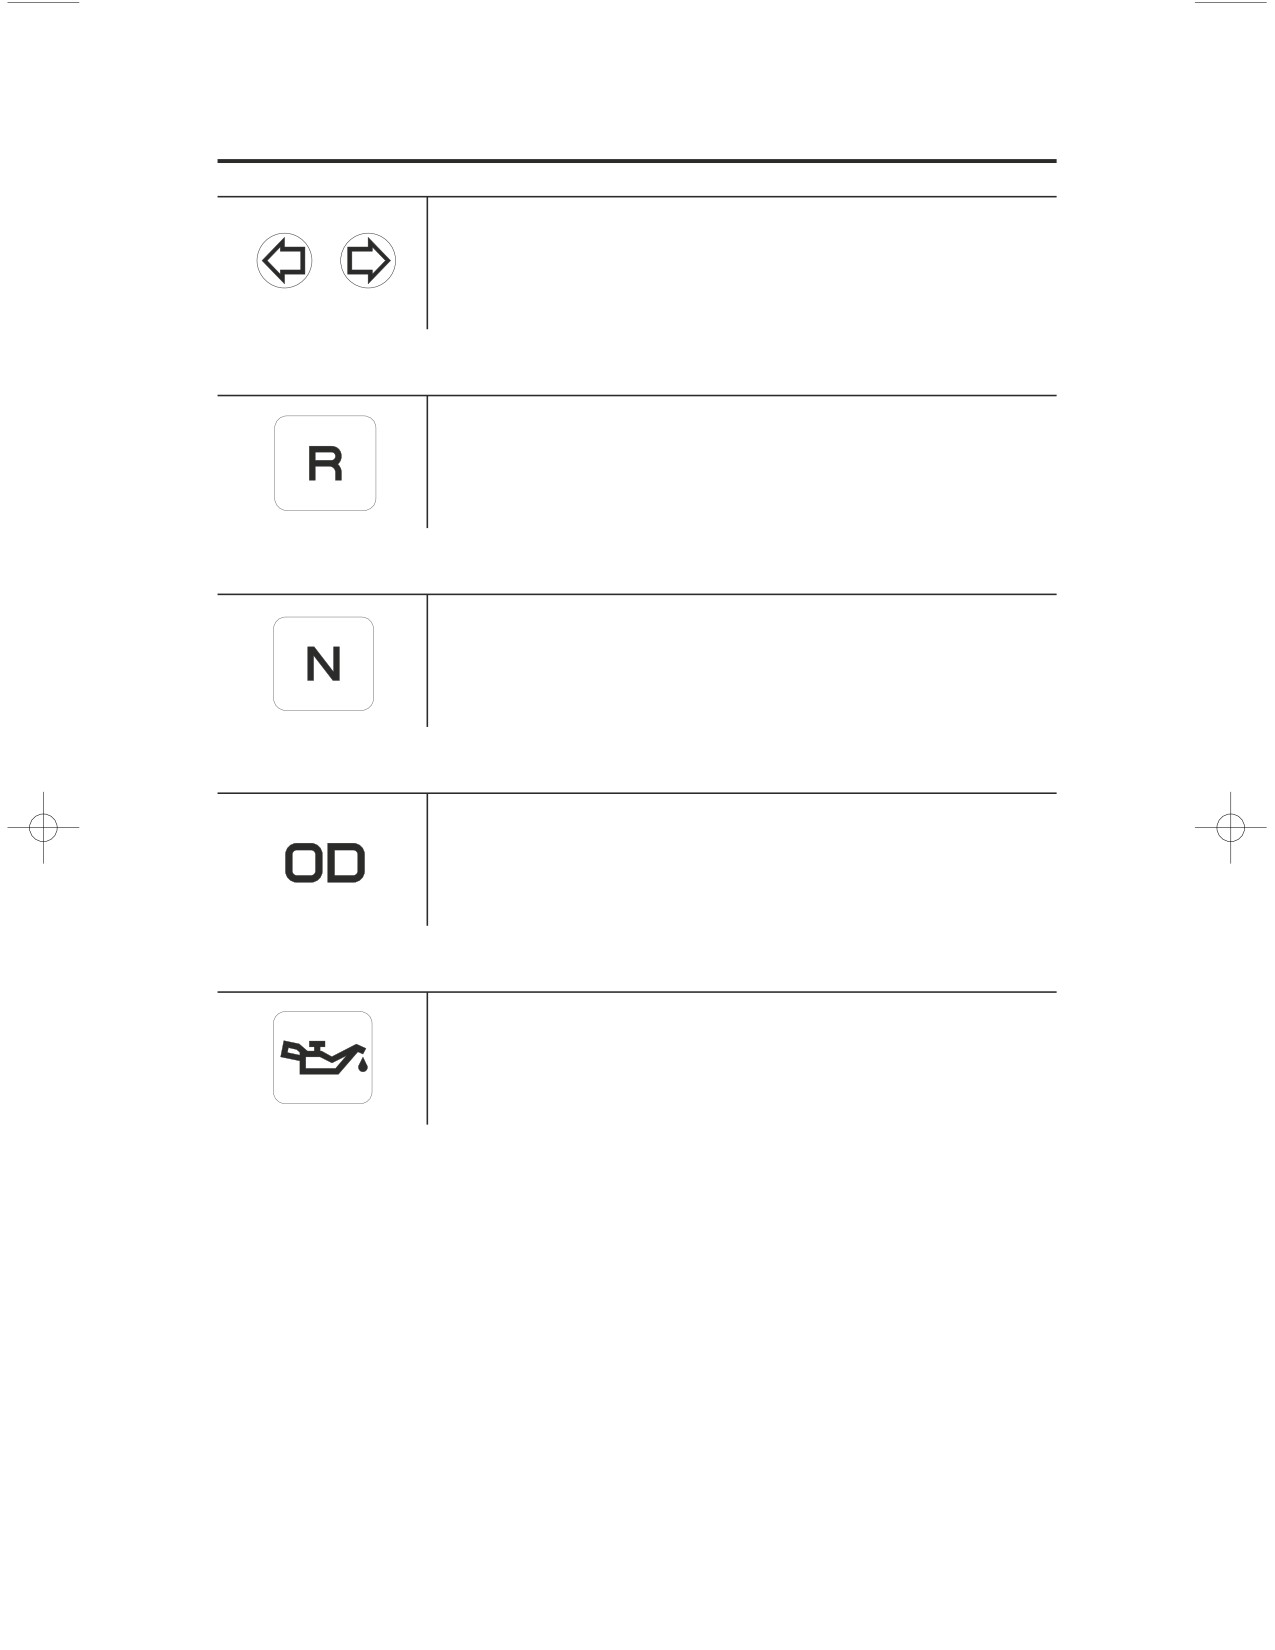
turn signal indicator (green)
Flashes when either turn signal operates.
reverse system indicator
Lights when the reverse system is engaged.
neutral indicator (green)
Lights when the transmission is in neutral.
overdrive indicator
Lights when the transmission is in overdrive (5th gear).
low oil pressure indicator (red)
Lights when engine oil pressure is low enough to cause engine damage. If the
low oil pressure indicator lights during operation, pull safely to the side of the
road. See page
231
for instructions and cautions.
Lamp Check
18
Instruments & Controls
Gauges & Indicators
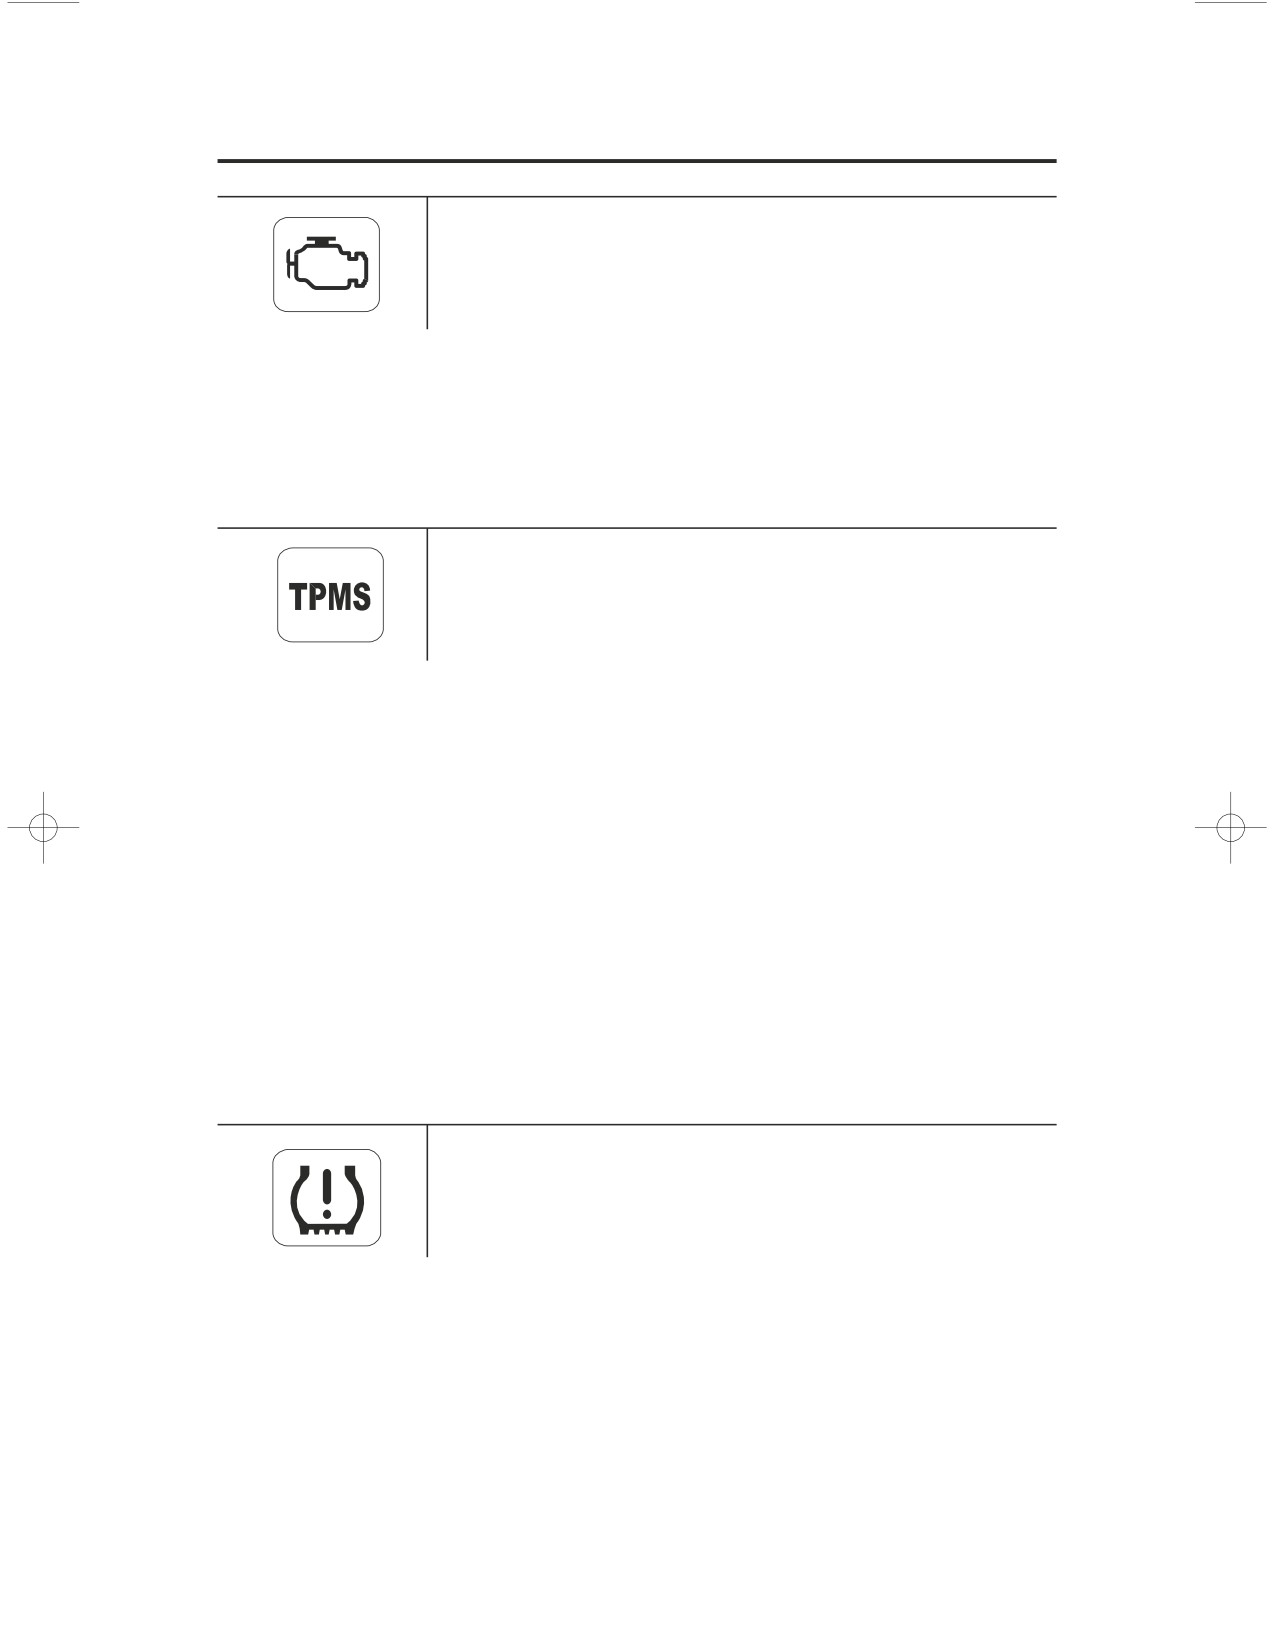
PGM-FI malfunction indicator lamp (MIL) (amber)
Lights when there is any abnormality in the PGM-FI (Programmed Fuel
Injection) system. Should also light for a few seconds and then go off when the
ignition switch is turned ON and the engine stop switch is at RUN. If the
indicator comes on at any other time, reduce speed and take your motorcycle to
a Honda dealer as soon as possible. Lamp Check.
tire pressure monitoring system (TPMS) indicator
(amber)
Lights when there is any abnormality in the tire pressure monitoring system
(TPMS). Should also light for a few seconds and then go off when the ignition
switch is turned ON. See page
85
for instructions and cautions.
Lamp Check
If the indicator turns on and stays on at any other time, there is a problem with
the TPMS, and the indicator will remain on until the problem is solved.
Or if the TPMS indicator does not turn on when you turn the ignition switch to
ON, it is possible there is a problem and it will not turn on until the problem is
solved.
With this indicator on, the low tire pressure indicator will not come on when a
tire loses pressure, take the motorcycle to your Honda dealer to have the system
checked.
low tire pressure indicator (amber)
Flashes or lights when one or more of your motorcycle tires are significantly
low on pressure. Should also light for a few seconds and then go off when the
ignition switch is turned ON. If the indicator comes on while riding, stop the
motorcycle in a safe place and check the front and rear tires for inflation.
See page
85
for instructions and cautions.
Lamp Check
Instruments & Controls
19
Gauges & Indicators
(Models equipped with ABS)
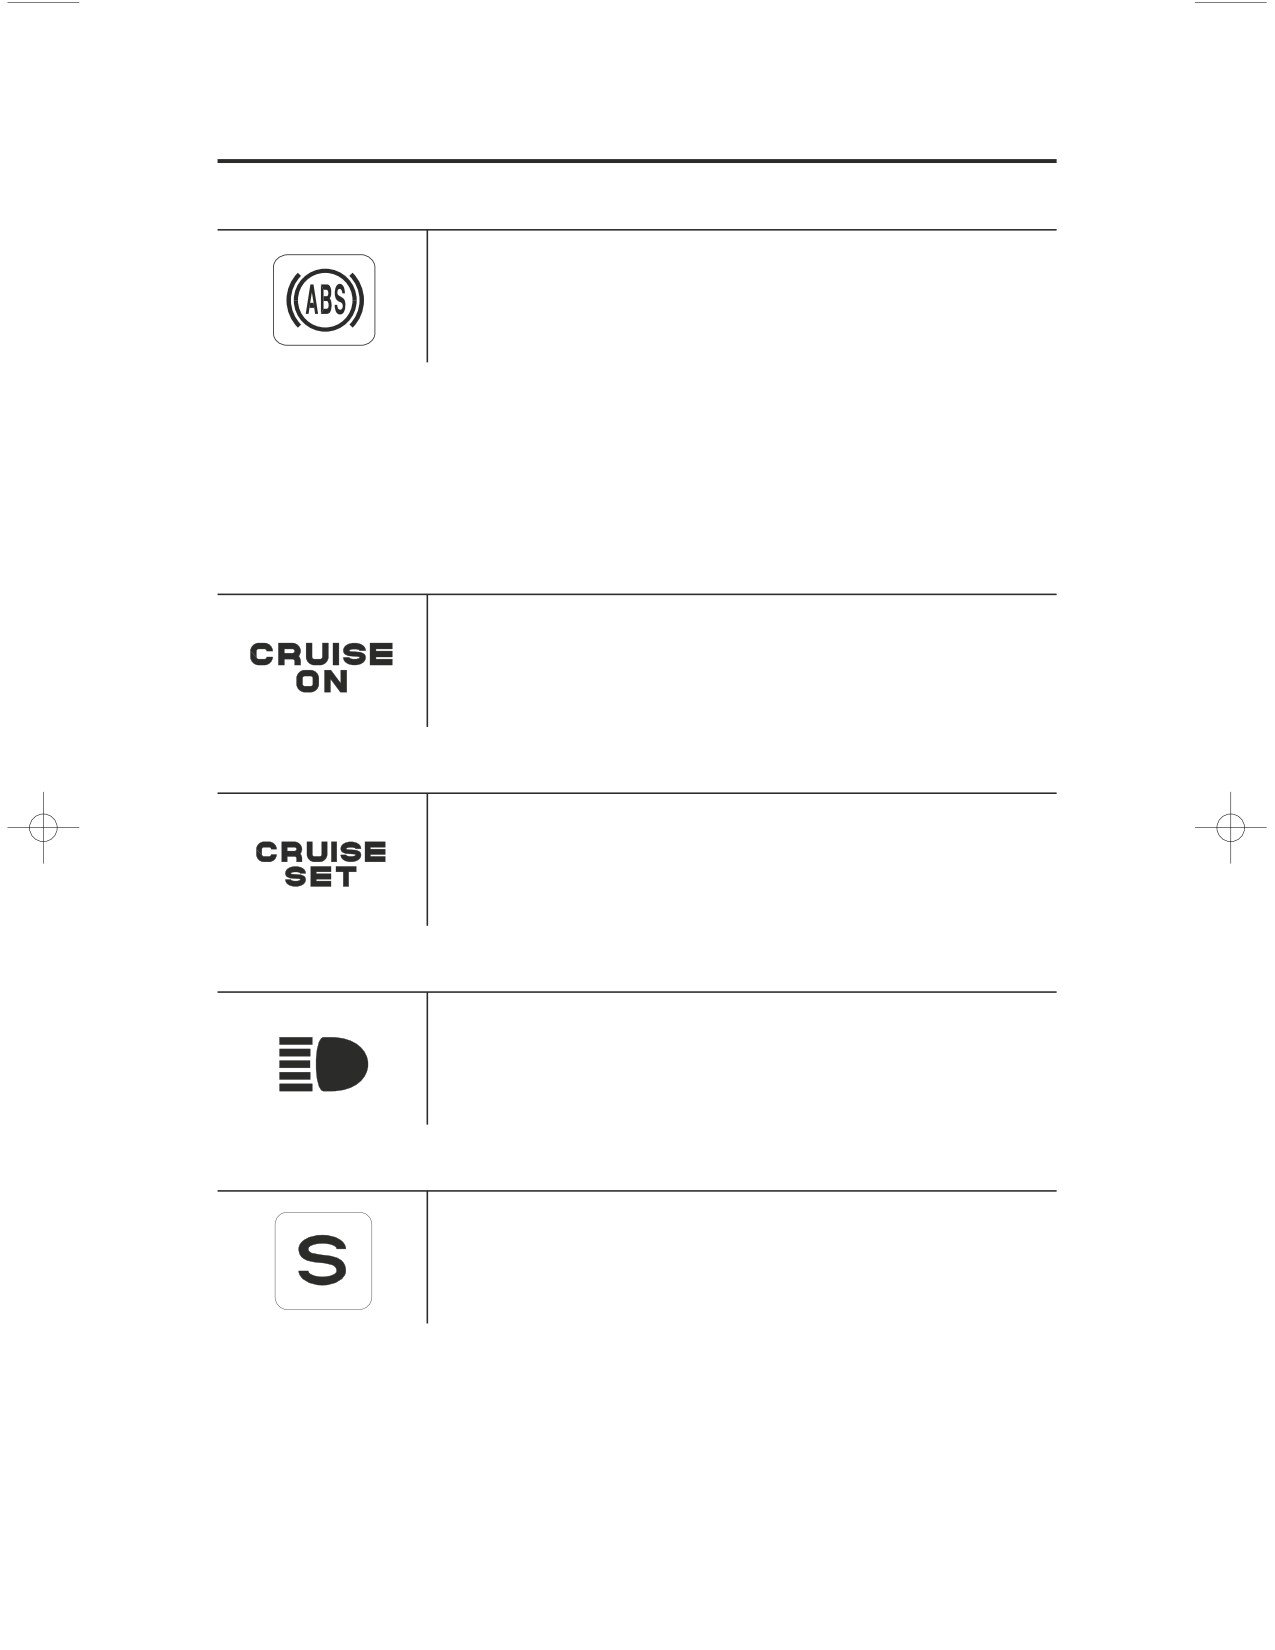
Anti-Lock Brake System indicator (ABS) (amber)
Lights when there is any abnormality in the anti-lock brake system (ABS).
Normally, this indicator comes on when the ignition switch is turned ON, and
goes off after you ride the motorcycle at a speed above 6 mph (10 km/h). If the
indicator comes on while riding, stop the motorcycle in a safe place and turn off
the engine. Refer to
ABS Indicator, page
83
. For information about ABS, see
page
82. Lamp Check.
CRUISE ON indicator
Lights when the CRUISE CONTROL master switch is on.
CRUISE SET indicator
Lights when the cruise control SET/DECEL switch is on.
high beam indicator (blue)
Lights when the headlight is on high beam.
side stand indicator (amber)
Lights when the side stand is put downʵto indicate that the side stand ignition
cut-off system (page
73
) is activated.
20
Instruments & Controls
Gauges & Indicators
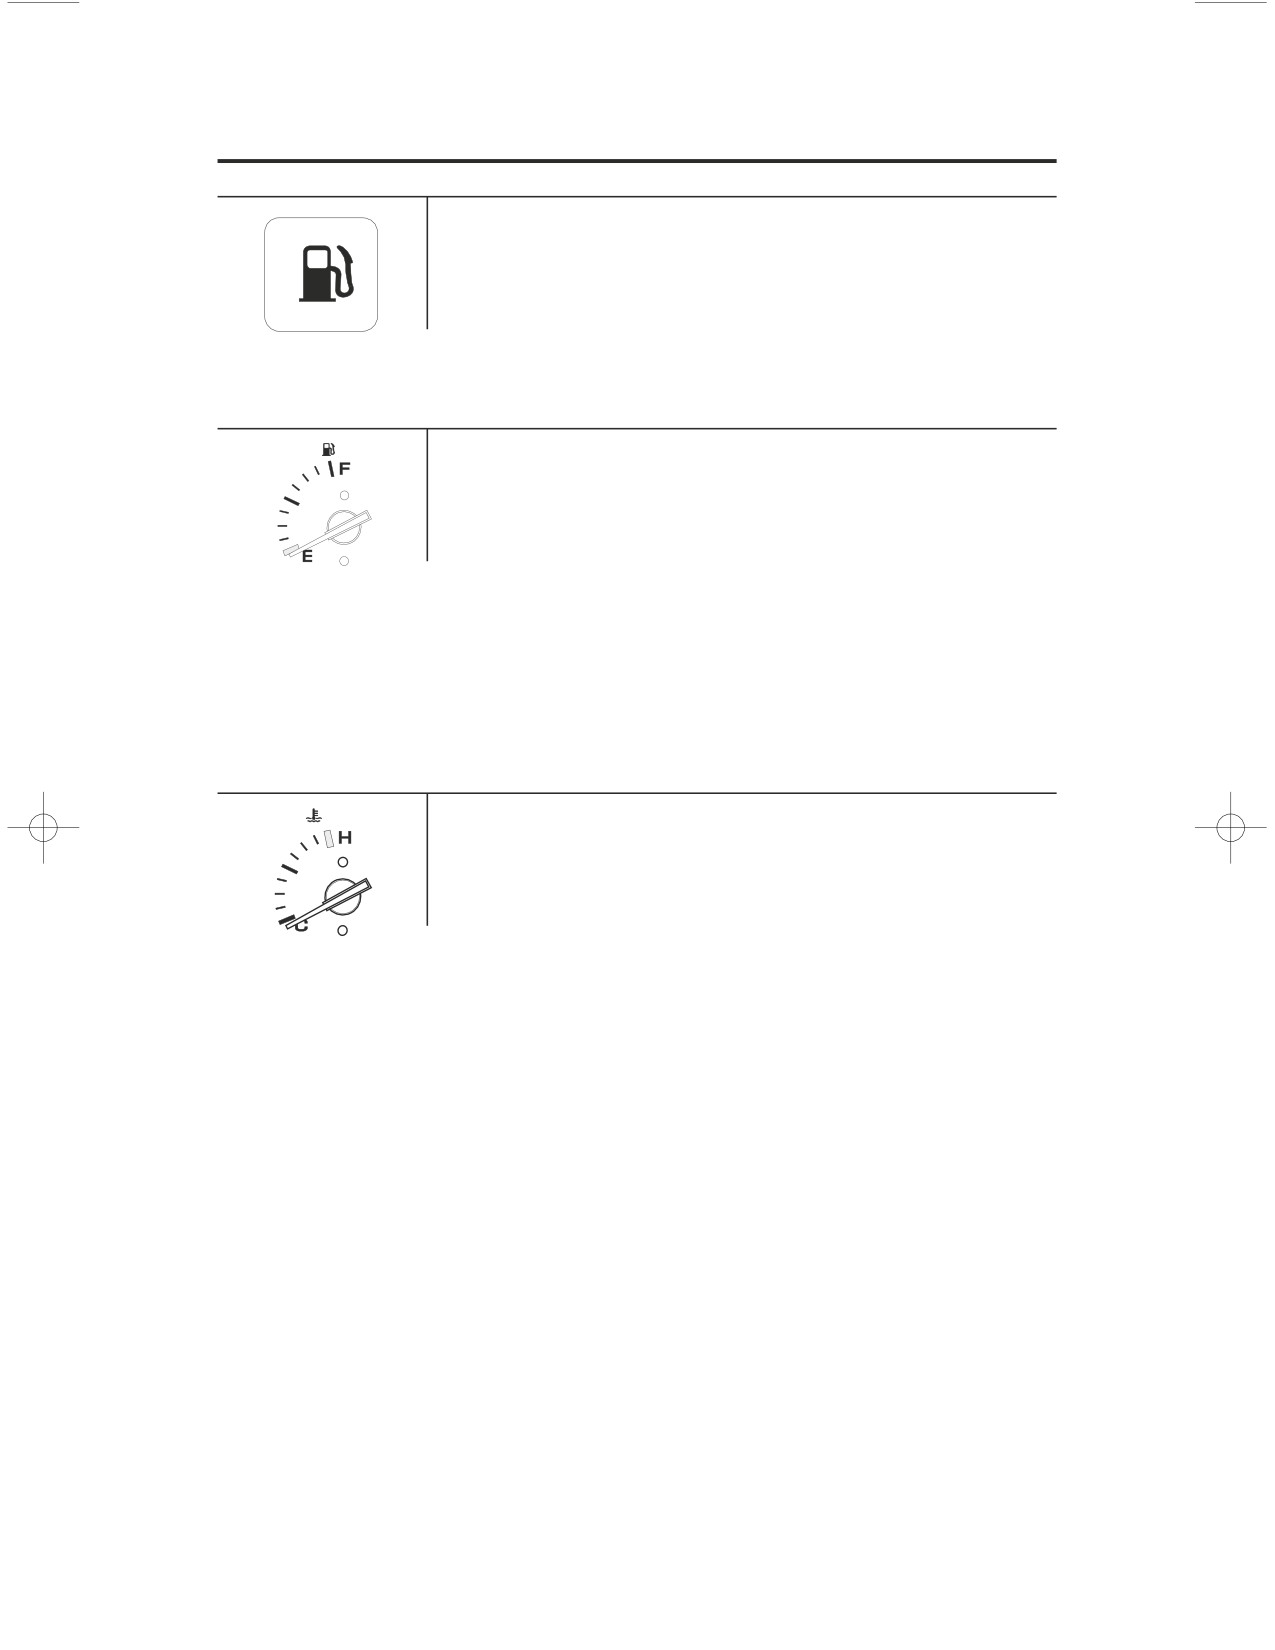
low fuel indicator
Lights as a reminder to refuel soon. The indicator comes on when there is about
1.16 US gal (4.4 liters) left in the fuel tank. Lamp Check.
fuel gauge
Shows the approximate fuel supply available, if your motorcycle is on a level
surface.
At F (Full) there are 6.6 US gal (25 liters), including reserve supply. When the
gauge needle enters the red band, fuel will be low and you should refill the tank
as soon as possible. The amount of fuel left in the tank when the needle enters
the red band is approximately 0.79 US gal (3.0 liters).
coolant temperature gauge
Shows engine coolant temperature. When the needle moves above the C (cold)
mark, the engine is warm enough to start riding. If the needle approaches the H
(hot) mark, pull safely to the side of the road. See page
229
for instructions
and cautions.
Instruments & Controls
21
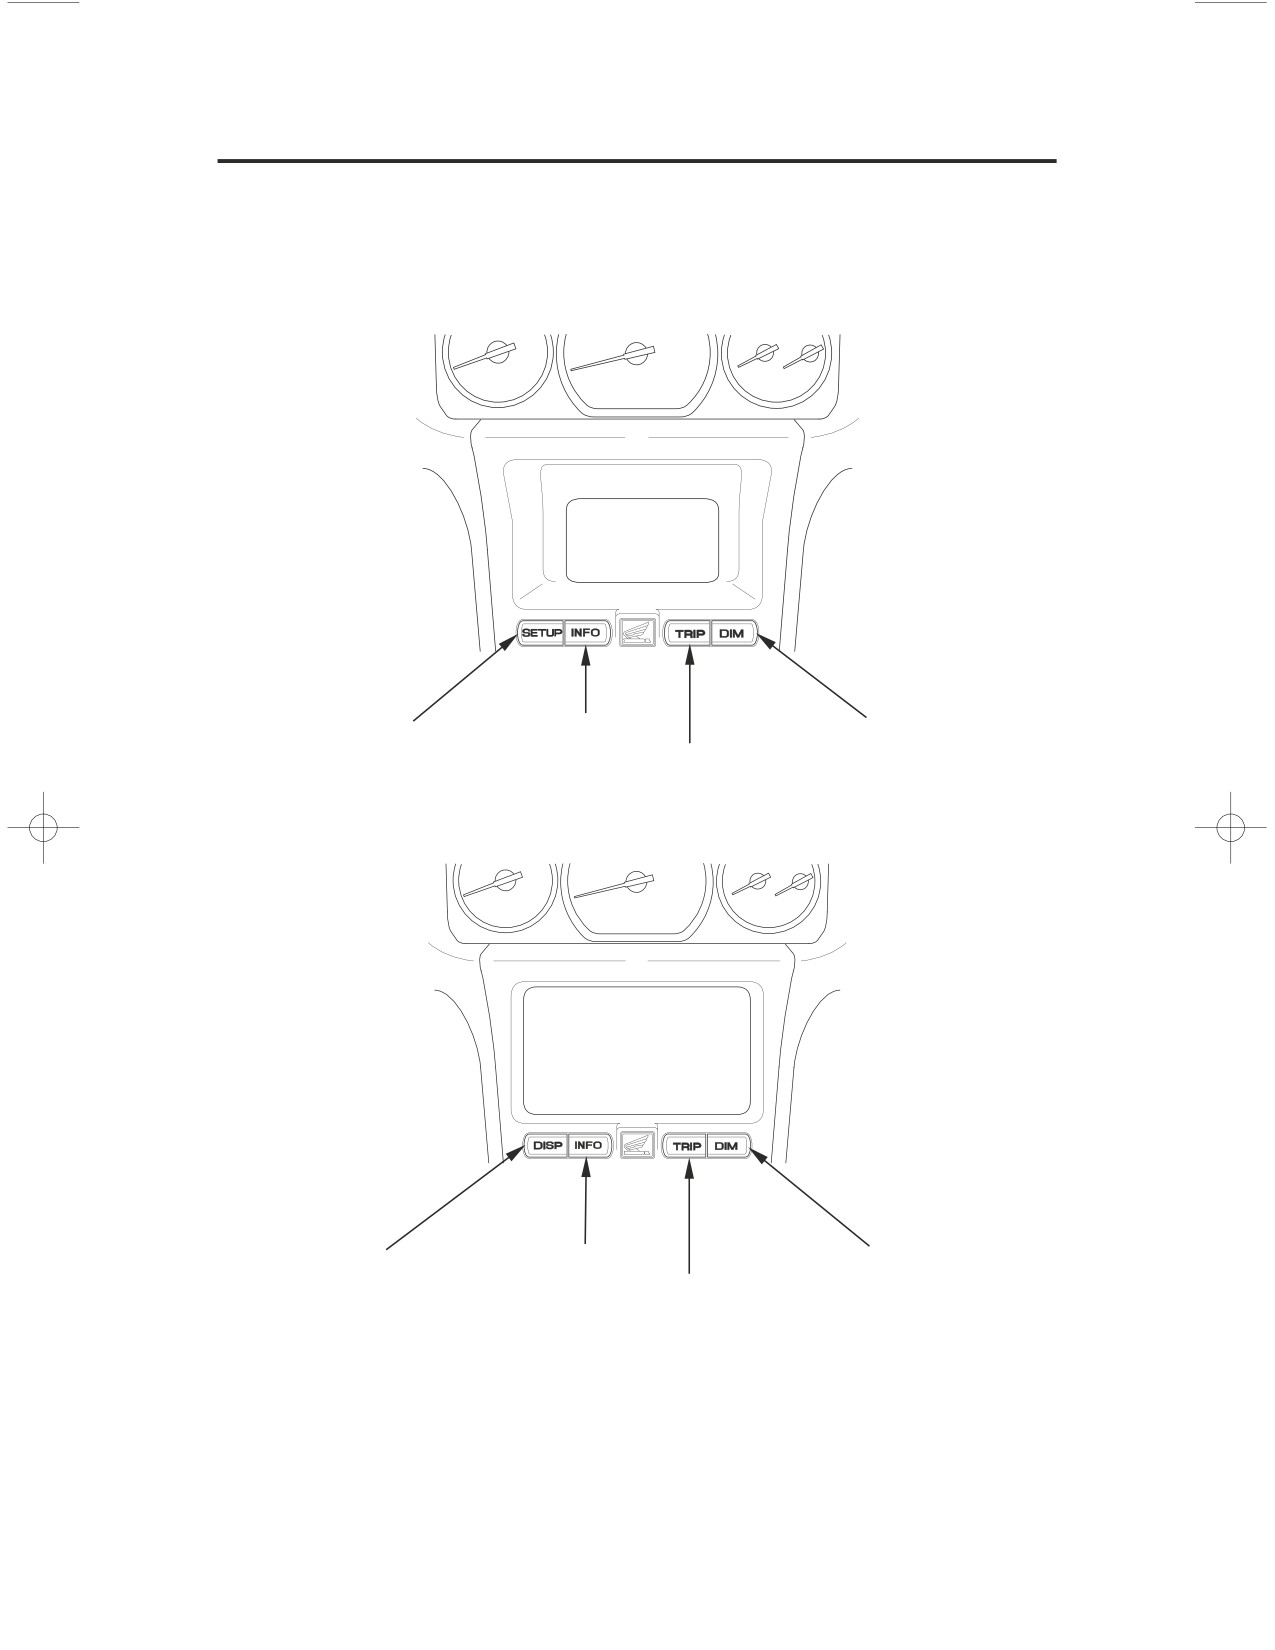
Multi Information Display
Your motorcycle is equipped with a Multi Information Display that presents
various displays. This section explains display functions and operations.
(Models not equipped with Navigation System)
SETUP button
INFO button
DIM button
TRIP button
(Models equipped with Navigation System)
DISP button
INFO button
DIM button
TRIP button
The Opening/Ending Ceremony and Clock can be set with the Setup/Info
Menu of the Navigation System. Refer to the Navigation System Manual for
further information.
22
Instruments & Controls
Multi Information Display
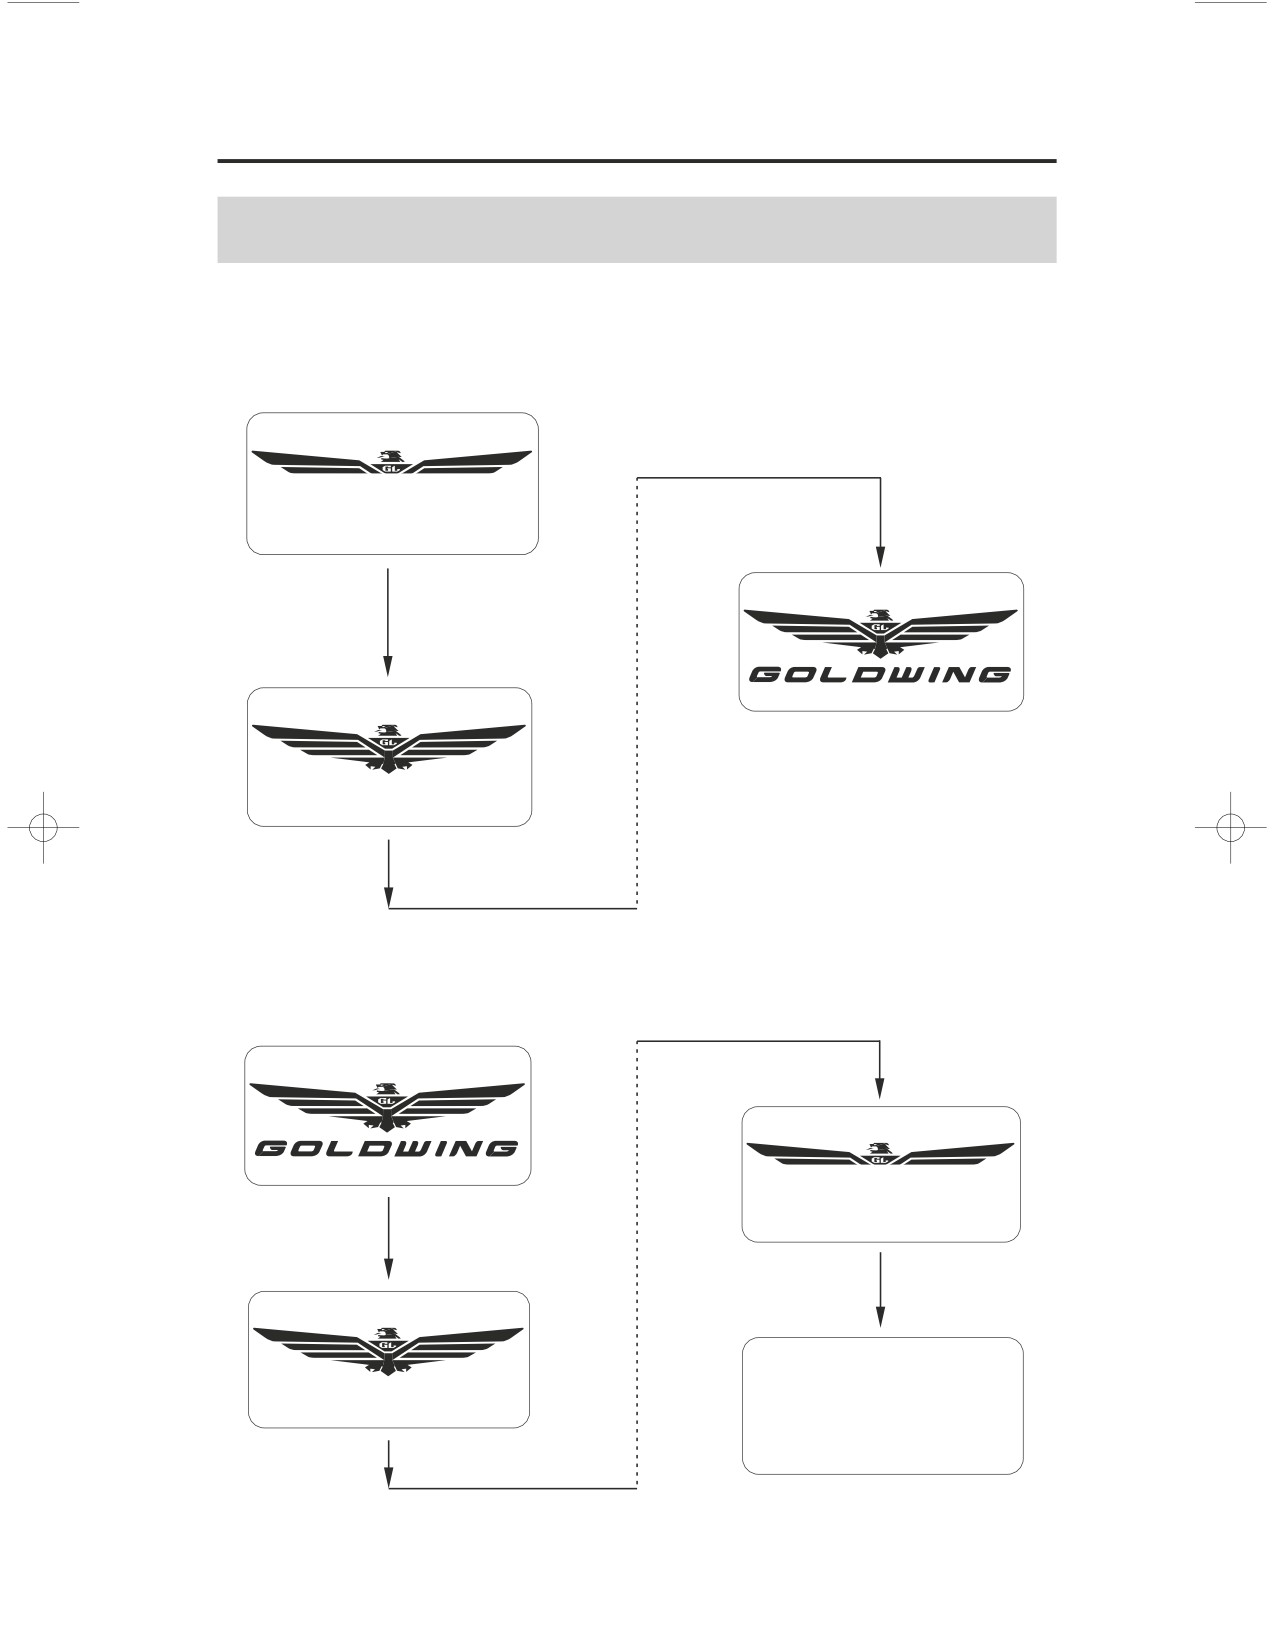
Opening/Ending Ceremony
(Models not equipped with Navigation System)
When the ignition switch is turned ON or ACC, the display presents an
‘‘opening ceremony.’’
When the ignition switch is turned OFF, the display presents an ‘‘ending
ceremony.’’
Instruments & Controls
23
Multi Information Display
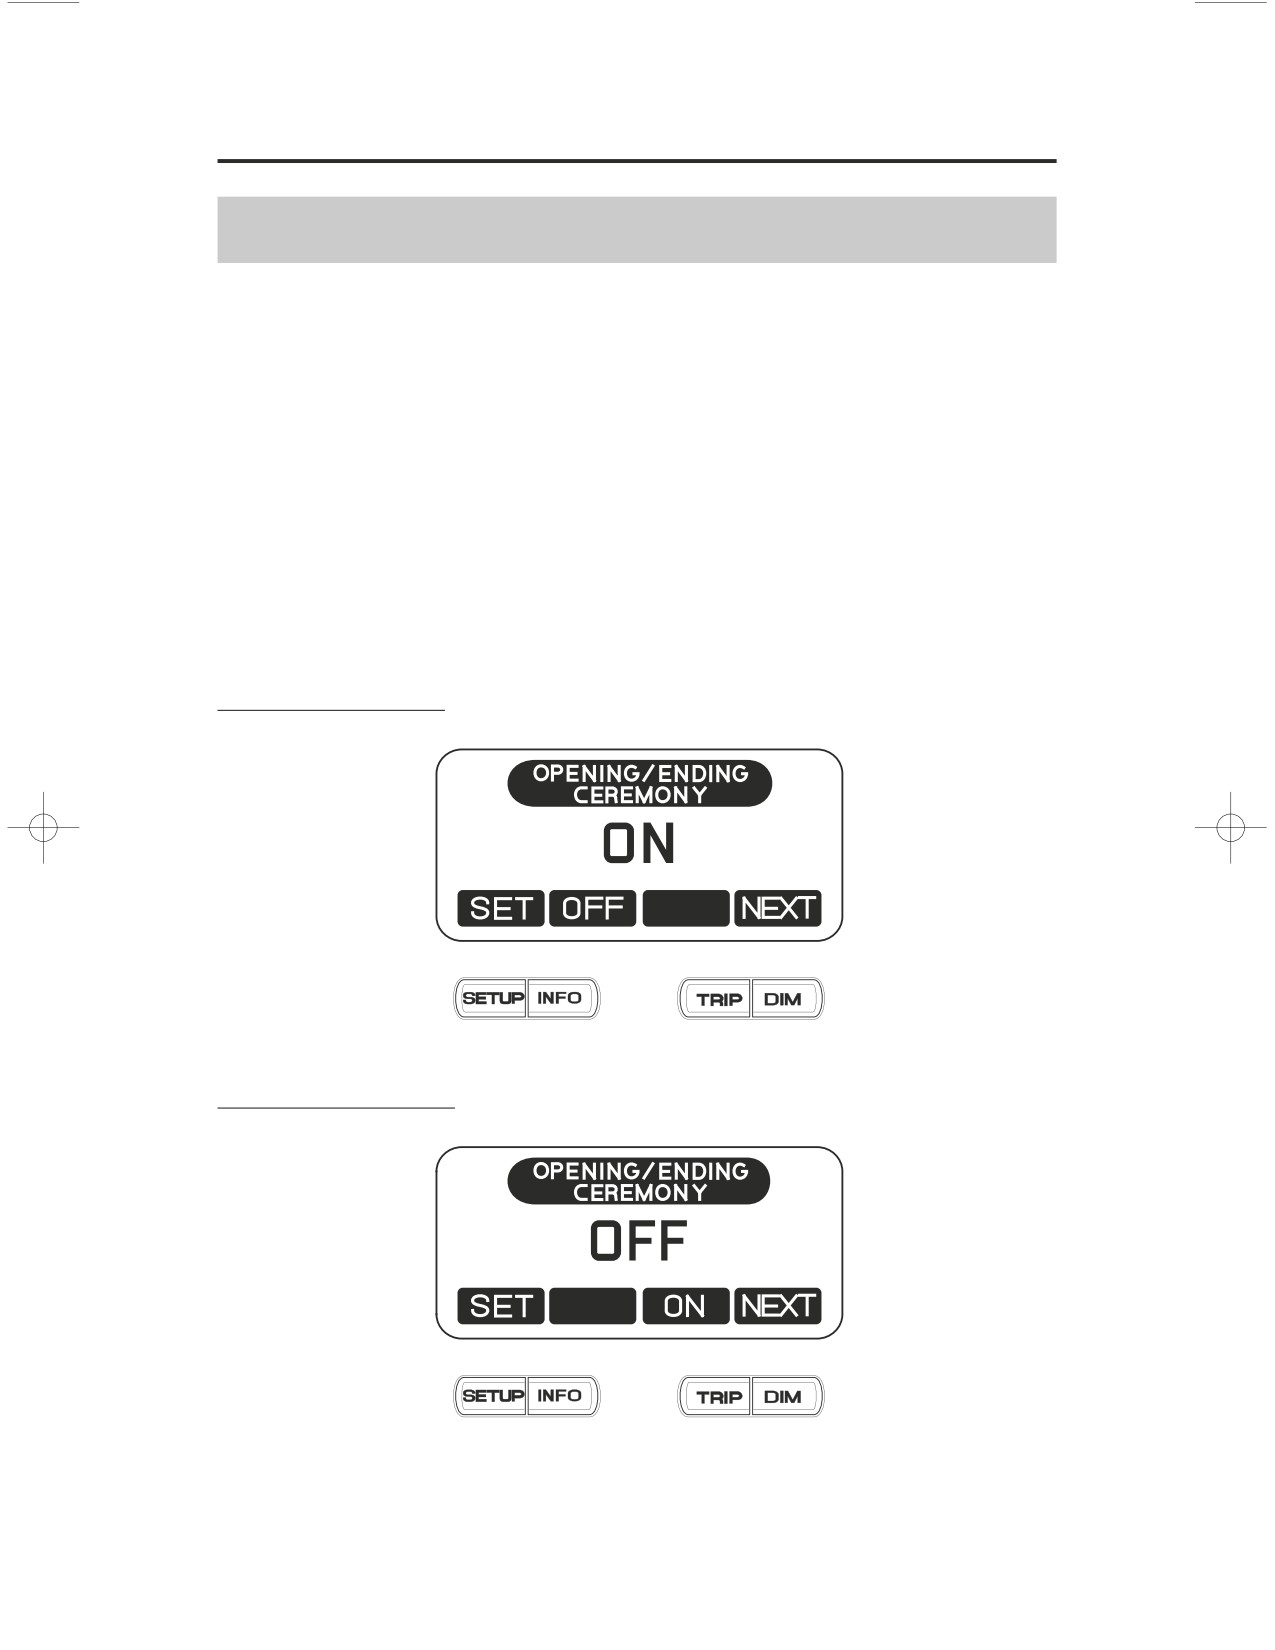
On/Off-Opening/Ending Ceremony
(Models not equipped with Navigation System)
The opening/ending ceremony can be turned off.
1. Push the SETUP button to show the CLOCK ADJUST display (page
).
31
2. Push the DIM button to show the OPENING/ENDING CEREMONY display.
3. Push the TRIP or INFO button to switch ON/OFF.
4. Push the SETUP button to fix the setting.
When approximately 5 seconds pass without operating a button on the
OPENING/ENDING CEREMONY display, the display automatically returns to
the previous display.
ceremony display ON
ceremony display OFF
24
Instruments & Controls
Multi Information Display
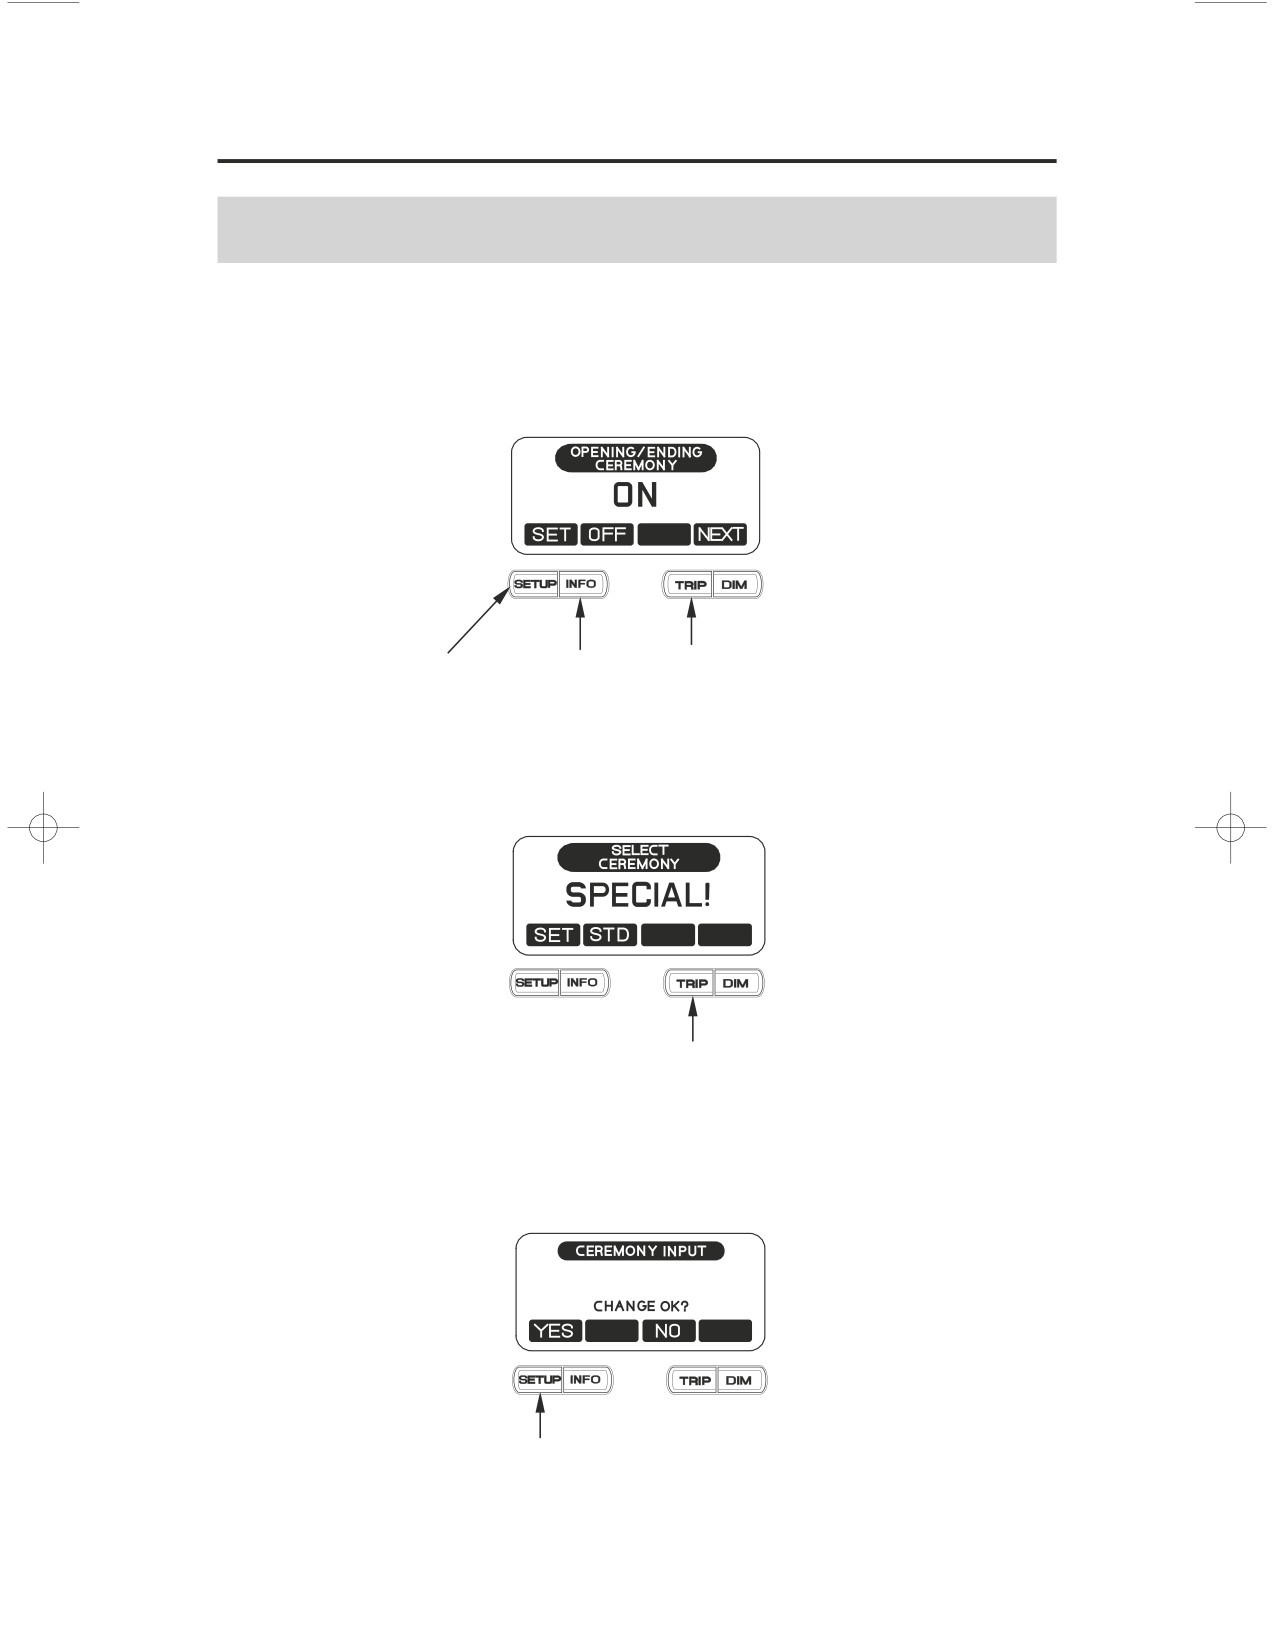
Special Message for Opening/Ending Ceremony
(Models not equipped with Navigation System)
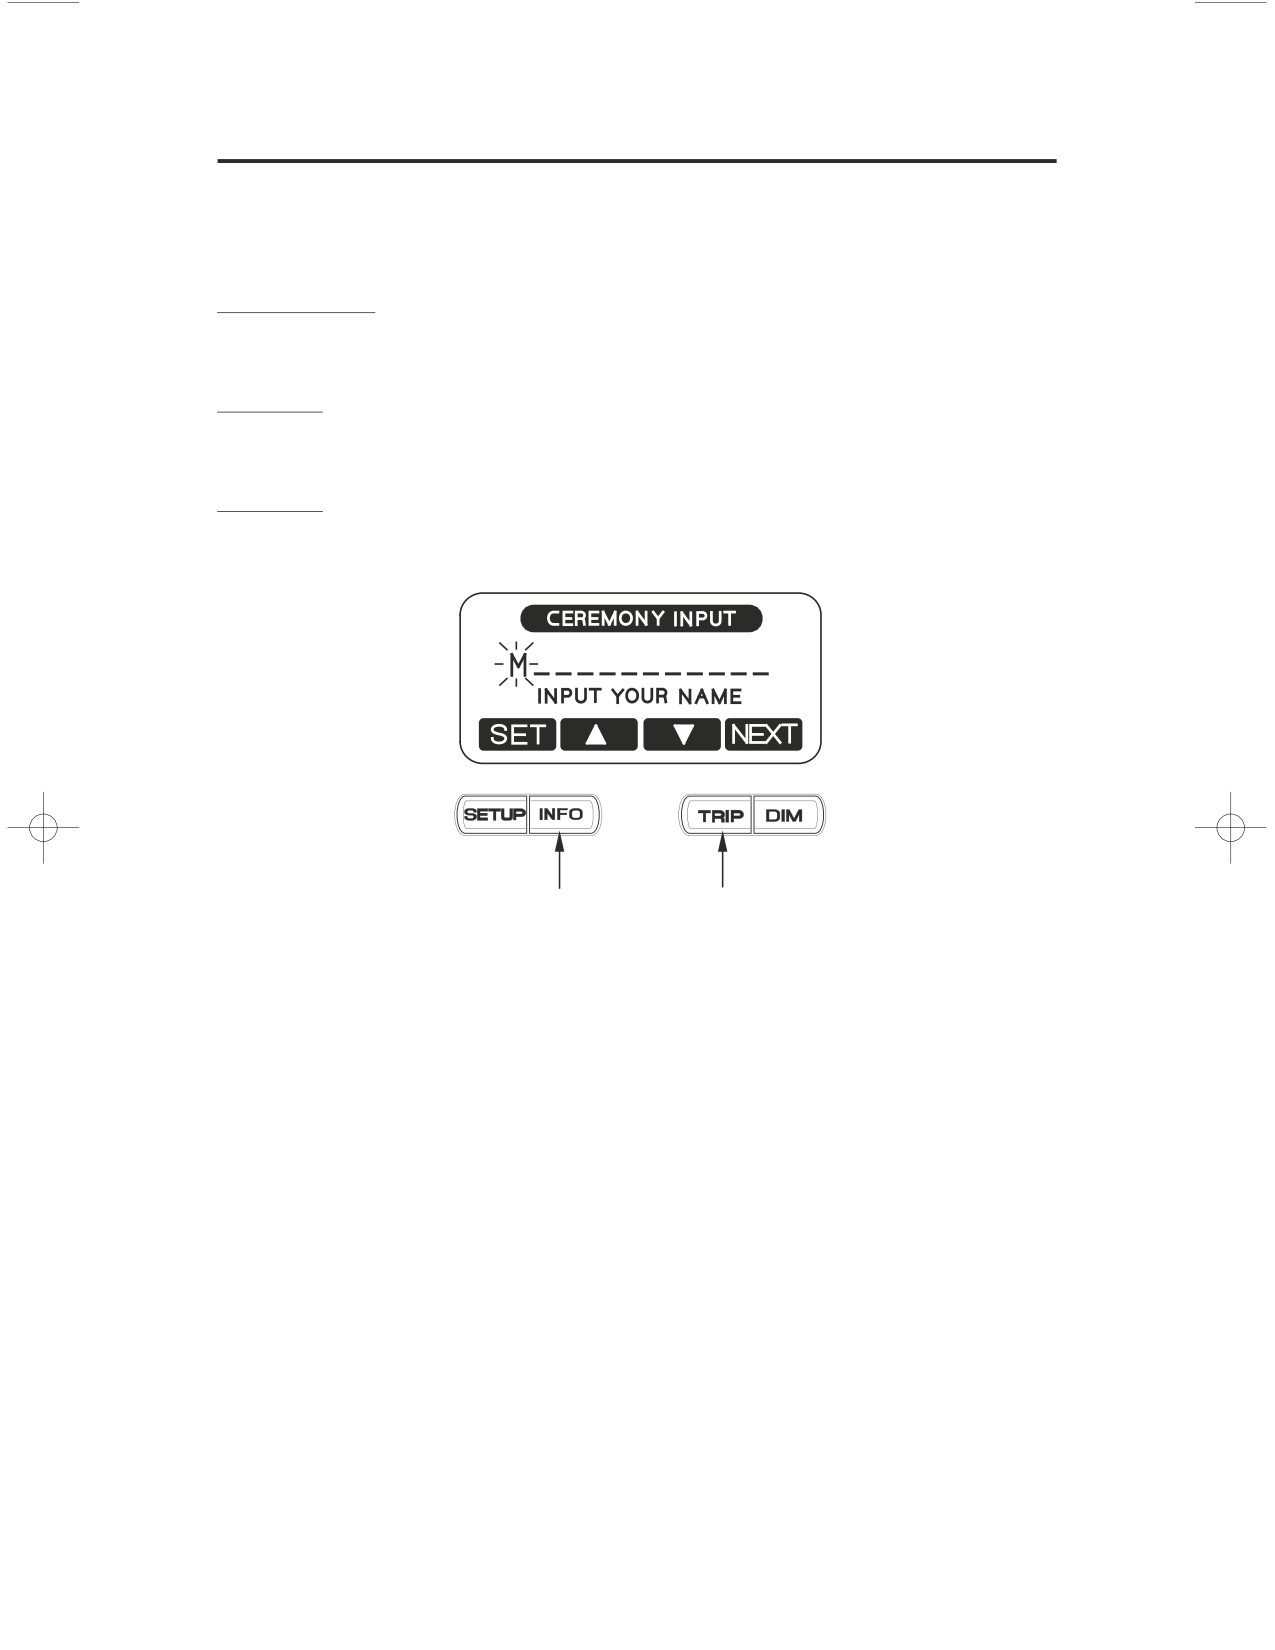
1. Select ‘‘ON’’ on the OPENING/ENDING CEREMONY display (page24).
2. Push and hold the TRIP button. Push and hold the INFO button. Then push
the SETUP button.
SETUP button INFO button TRIP button
3. The display should now show ‘‘STANDARD’’ in the middle line.
4. Use the TRIP button to select the ‘‘SPL’’ function.
The display should now show ‘‘SPECIAL!’’ in the middle line.
TRIP button
5. Push the SETUP button to select the ‘‘SET’’ function.
The display should now show ‘‘CHANGE OK?’’ in the middle line.
6.
Push the SETUP button to select the ‘‘YES’’ function.
SETUP button
Instruments & Controls
25
Multi Information Display
7. Use the INFO and TRIP buttons to cycle through the alphabet, number and
symbol selection.
Capital Letters
ABCDEFGHIJKLMNOPQRSTUVWXYZ
Numbers
0123456789
Symbols
ʂʡˌ$%&ʟ
ˎʴ,ʵ./ʼ=ʻʁ
()
INFO button
TRIP button
8. When you have completed your message, push the SETUP button to select
the ‘‘SET’’ function which will lock in your special message to be used for
the opening and ending ceremony.
When approximately 5 seconds pass without operating a button, the display
automatically returns to the previous display.
26
Instruments & Controls
Multi Information Display
Odometer/Tripmeter
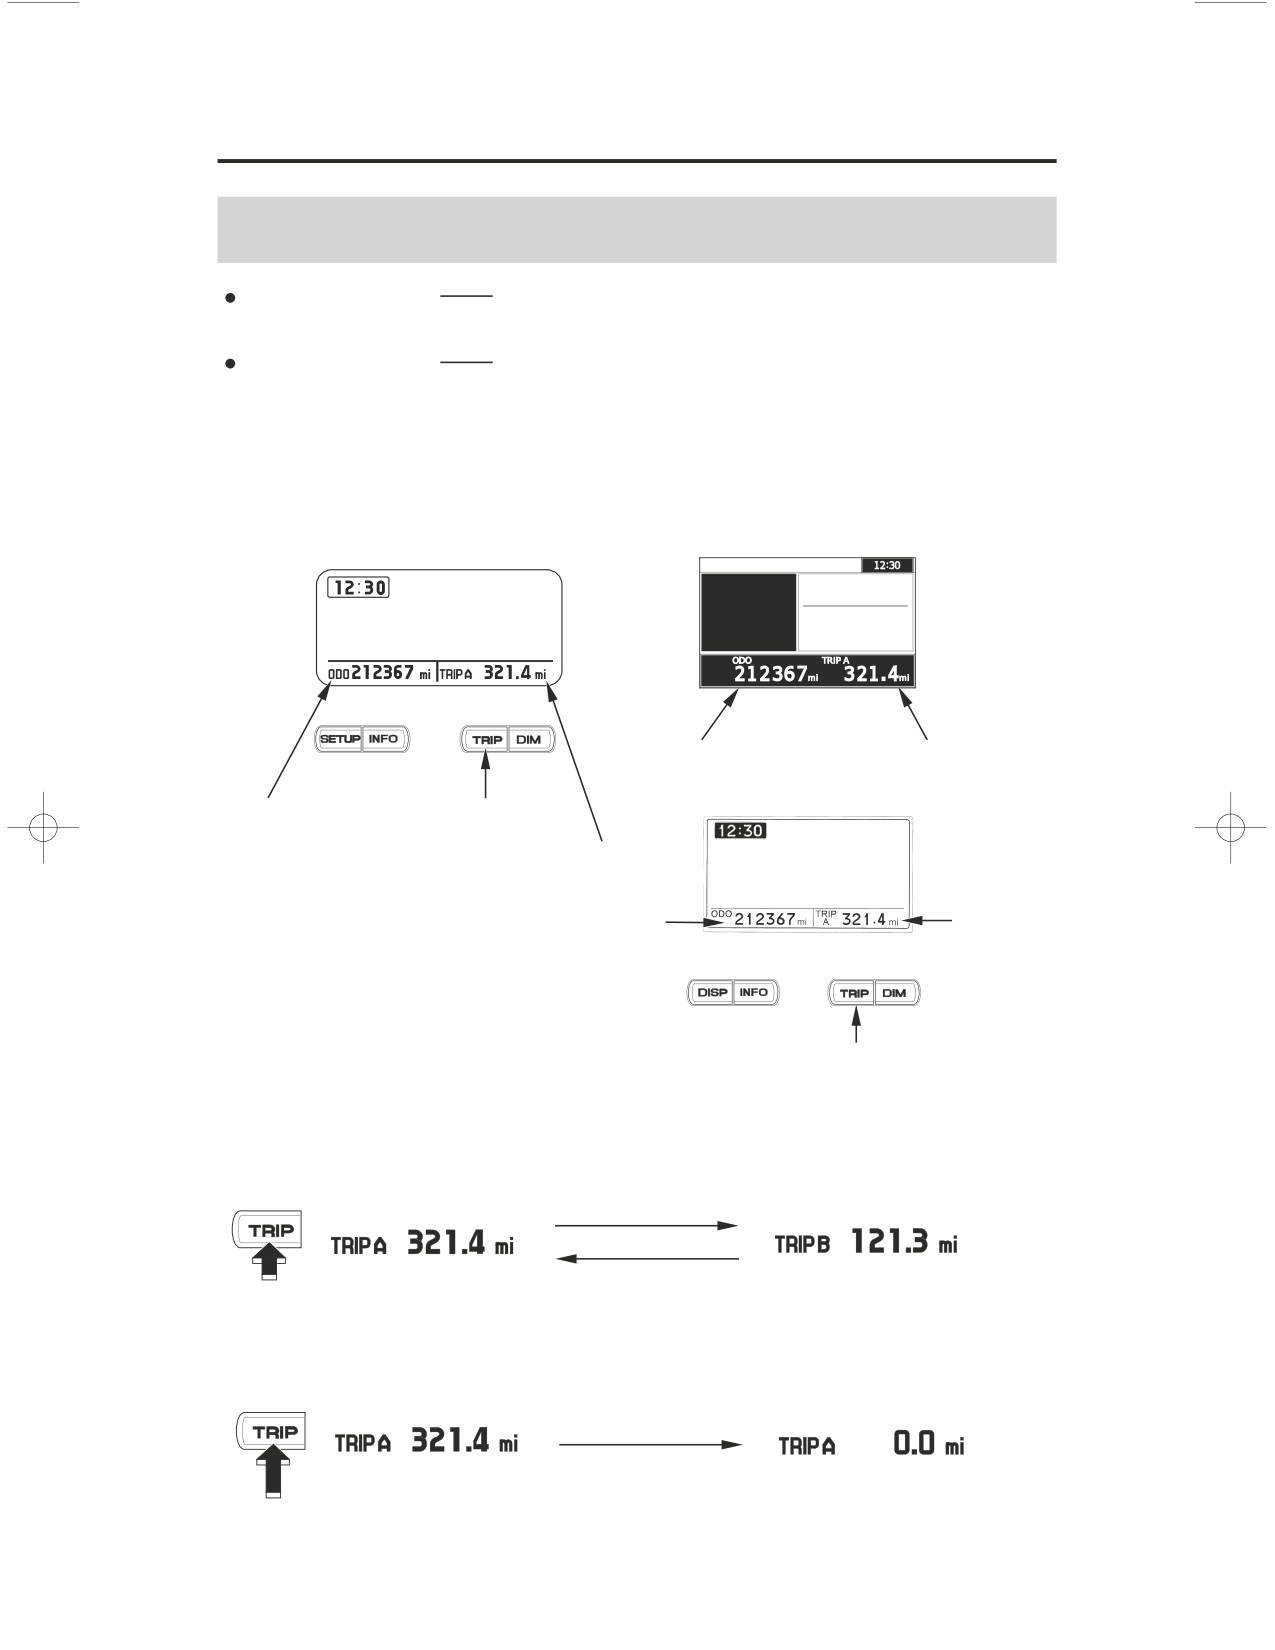
ODO (Odometer)
shows the total miles (USA) or kilometers (Canada)
ridden.
TRIP (Tripmeter)
shows the number of miles (USA) or kilometers
(Canada) ridden since you last reset the meter.
(Models not equipped with
(Models equipped with
Navigation System)
Navigation System)
For USA
odometer
tripmeter
For Canada
odometer
TRIP button
tripmeter
odometer
tripmeter
TRIP button
The tripmeter will show mileage in two sub modes, ‘‘TRIP A’’ and ‘‘TRIP B.’’
Push the TRIP button to select the ‘‘TRIP A’’ or ‘‘TRIP B’’ mode.
To reset the tripmeter, push and hold the TRIP button with the display in the
‘‘TRIP A’’ or ‘‘TRIP B’’ mode.
Instruments & Controls
27
Multi Information Display
Switch the Day Mode Display and Night Mode Display
(Models equipped with Navigation System)
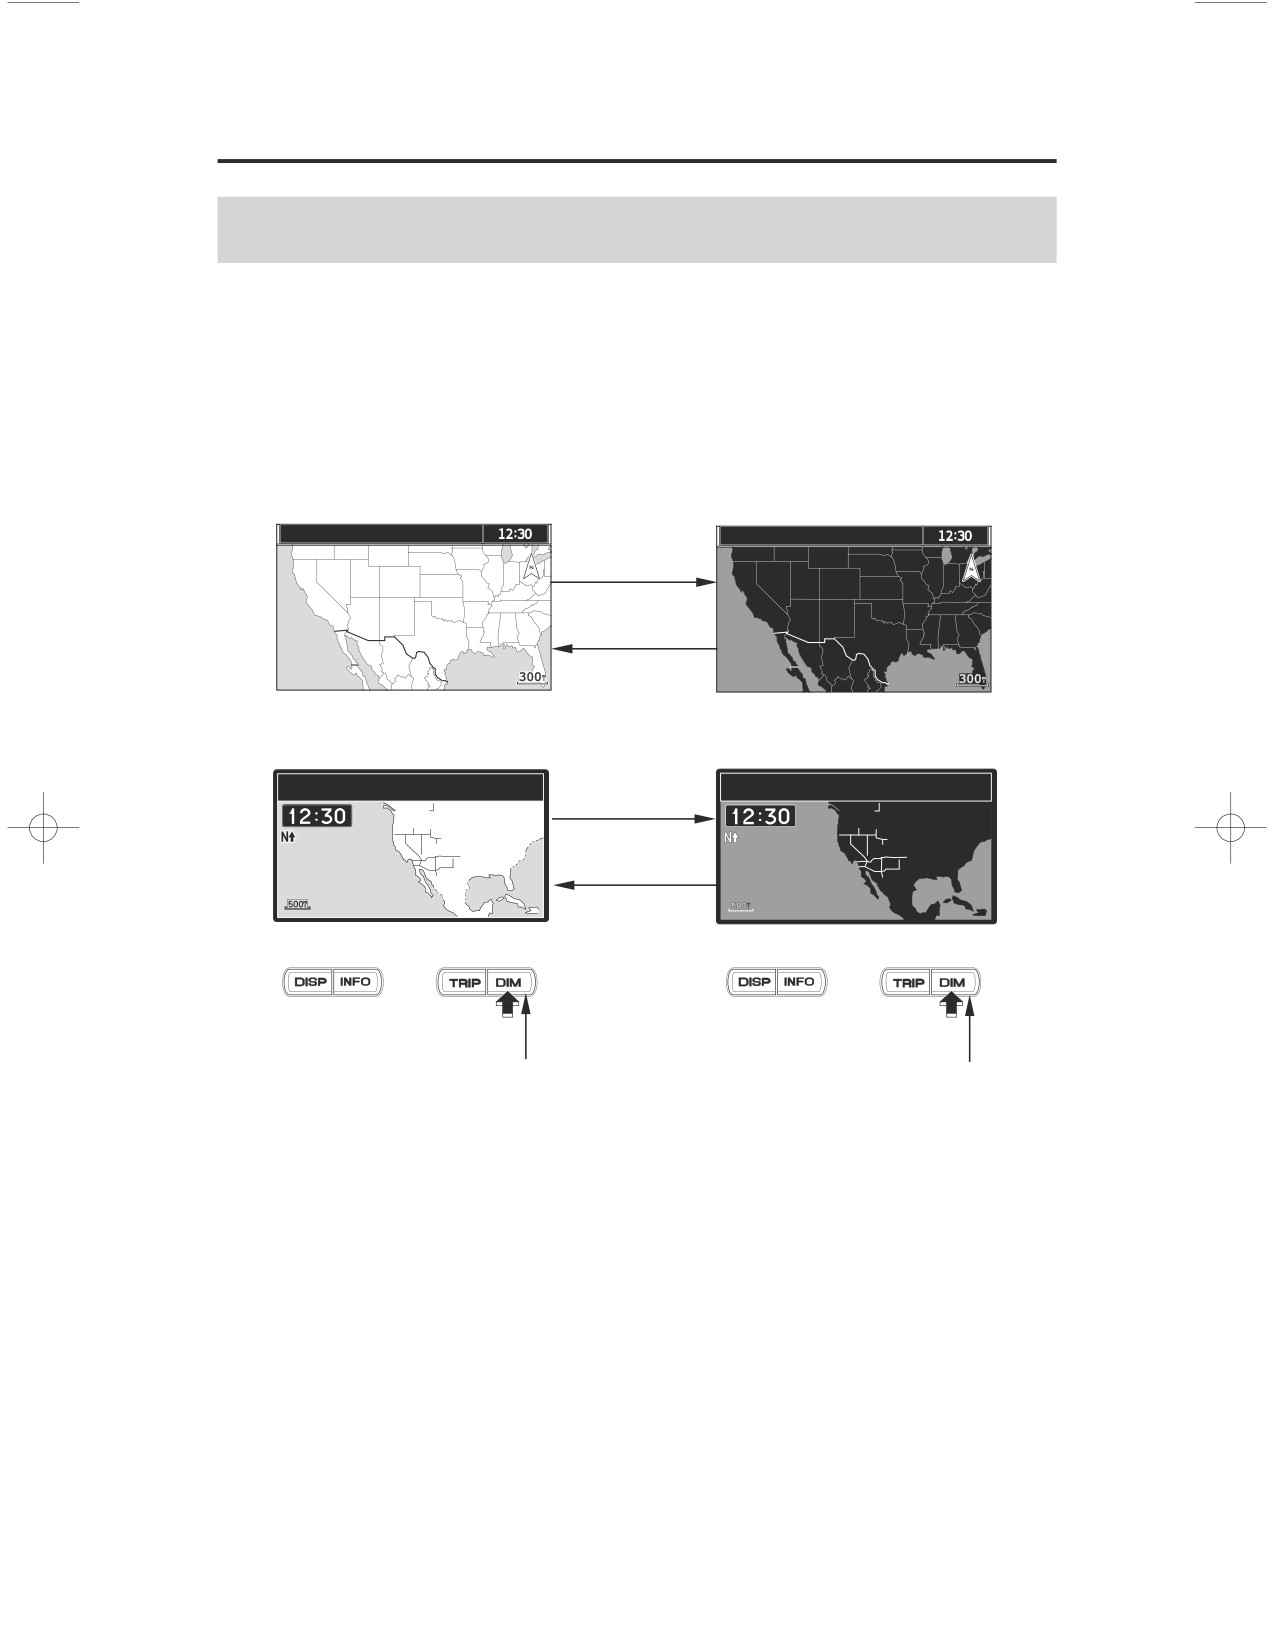
The display automatically switches to the Day mode or Night mode in
accordance with the time. To switch the display manually, push and hold the
DIM button.
Refer to the Navigation System Manual for further information.
For USA
For Canada
DIM button
DIM button
28
Instruments & Controls
Multi Information Display
Display Illumination Adjustment
(Models not equipped with Navigation System)
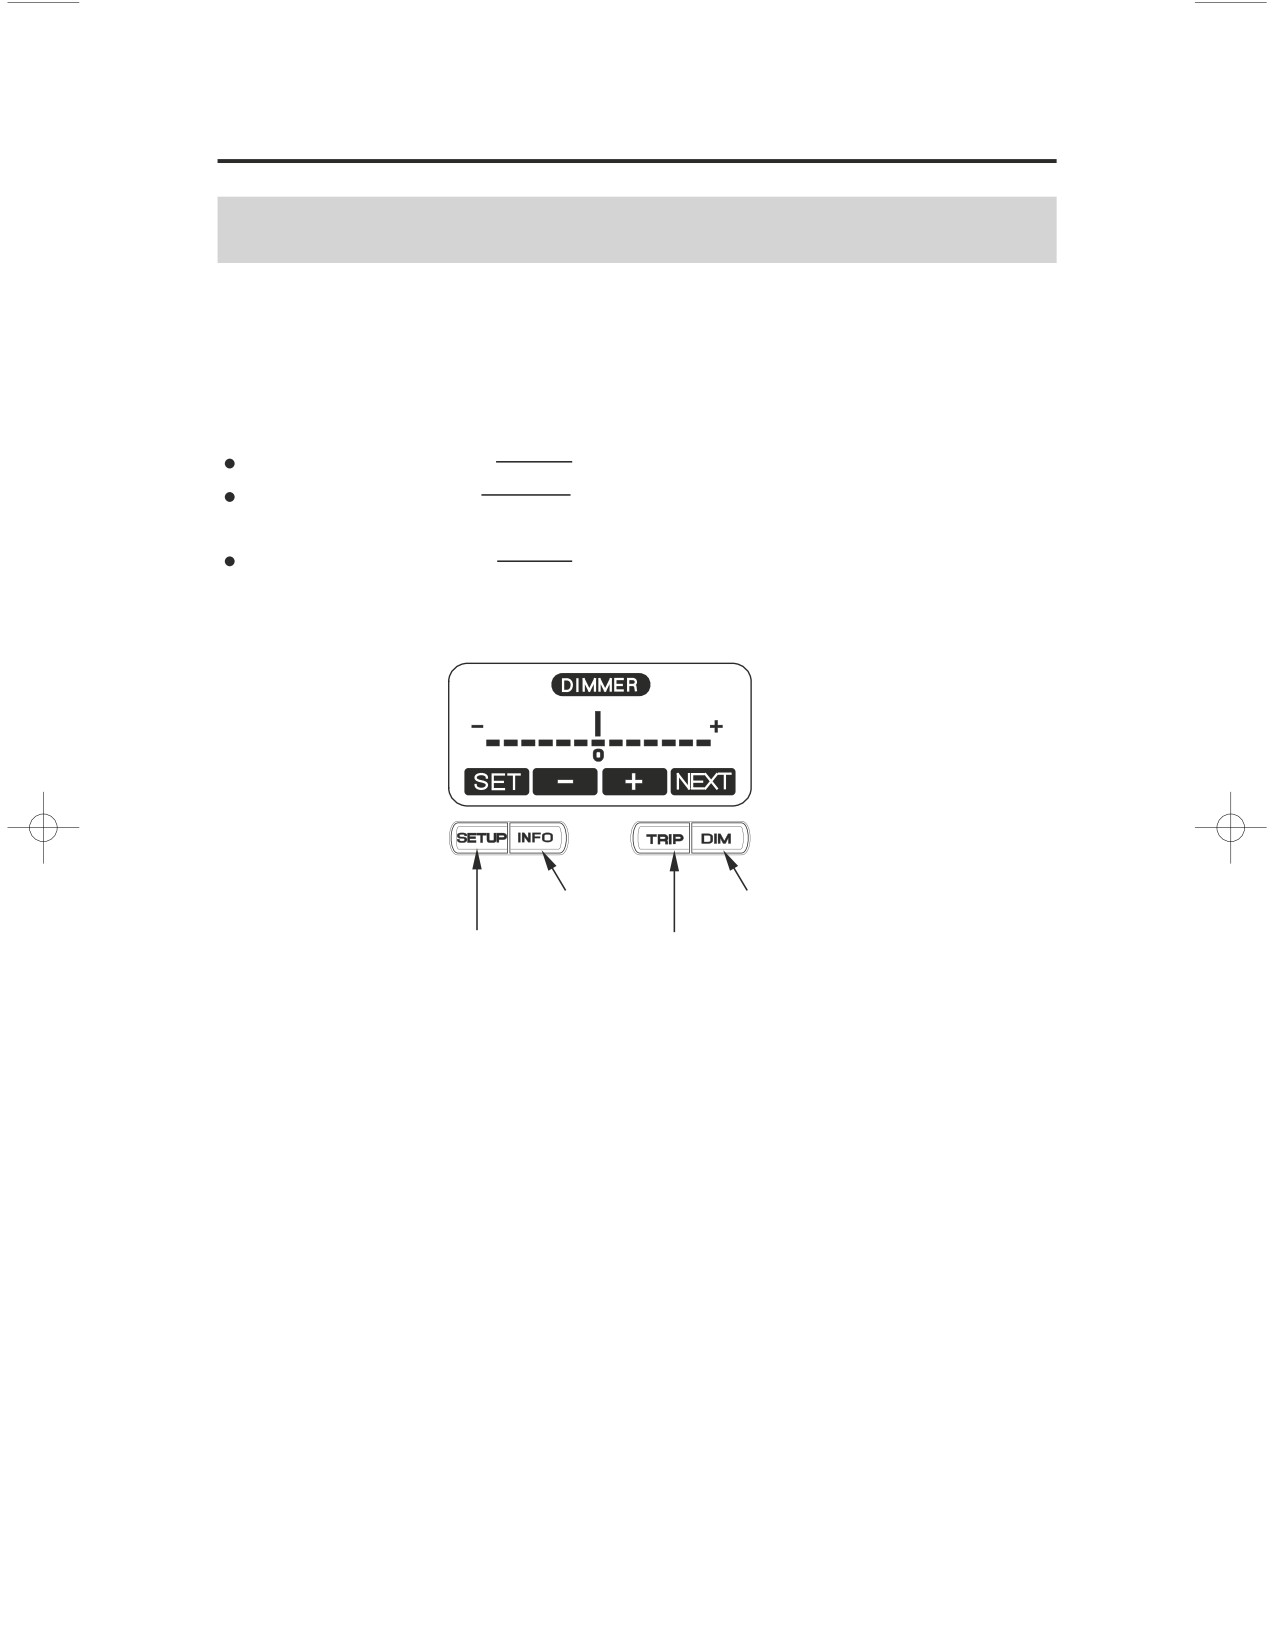
To adjust the brightness of the display:
Push the DIM button once. ‘‘DIMMER’’ will display.
To brighten the display
push the TRIP button (ʴ).
To darken the display
push the INFO button (ʵ).
(The brighter and darker ranges each have six steps.)
To set the selected step
push the SETUP button.
INFO button
DIM button
SETUP button TRIP button
Instruments & Controls
29
Multi Information Display
(Models equipped with Navigation System)
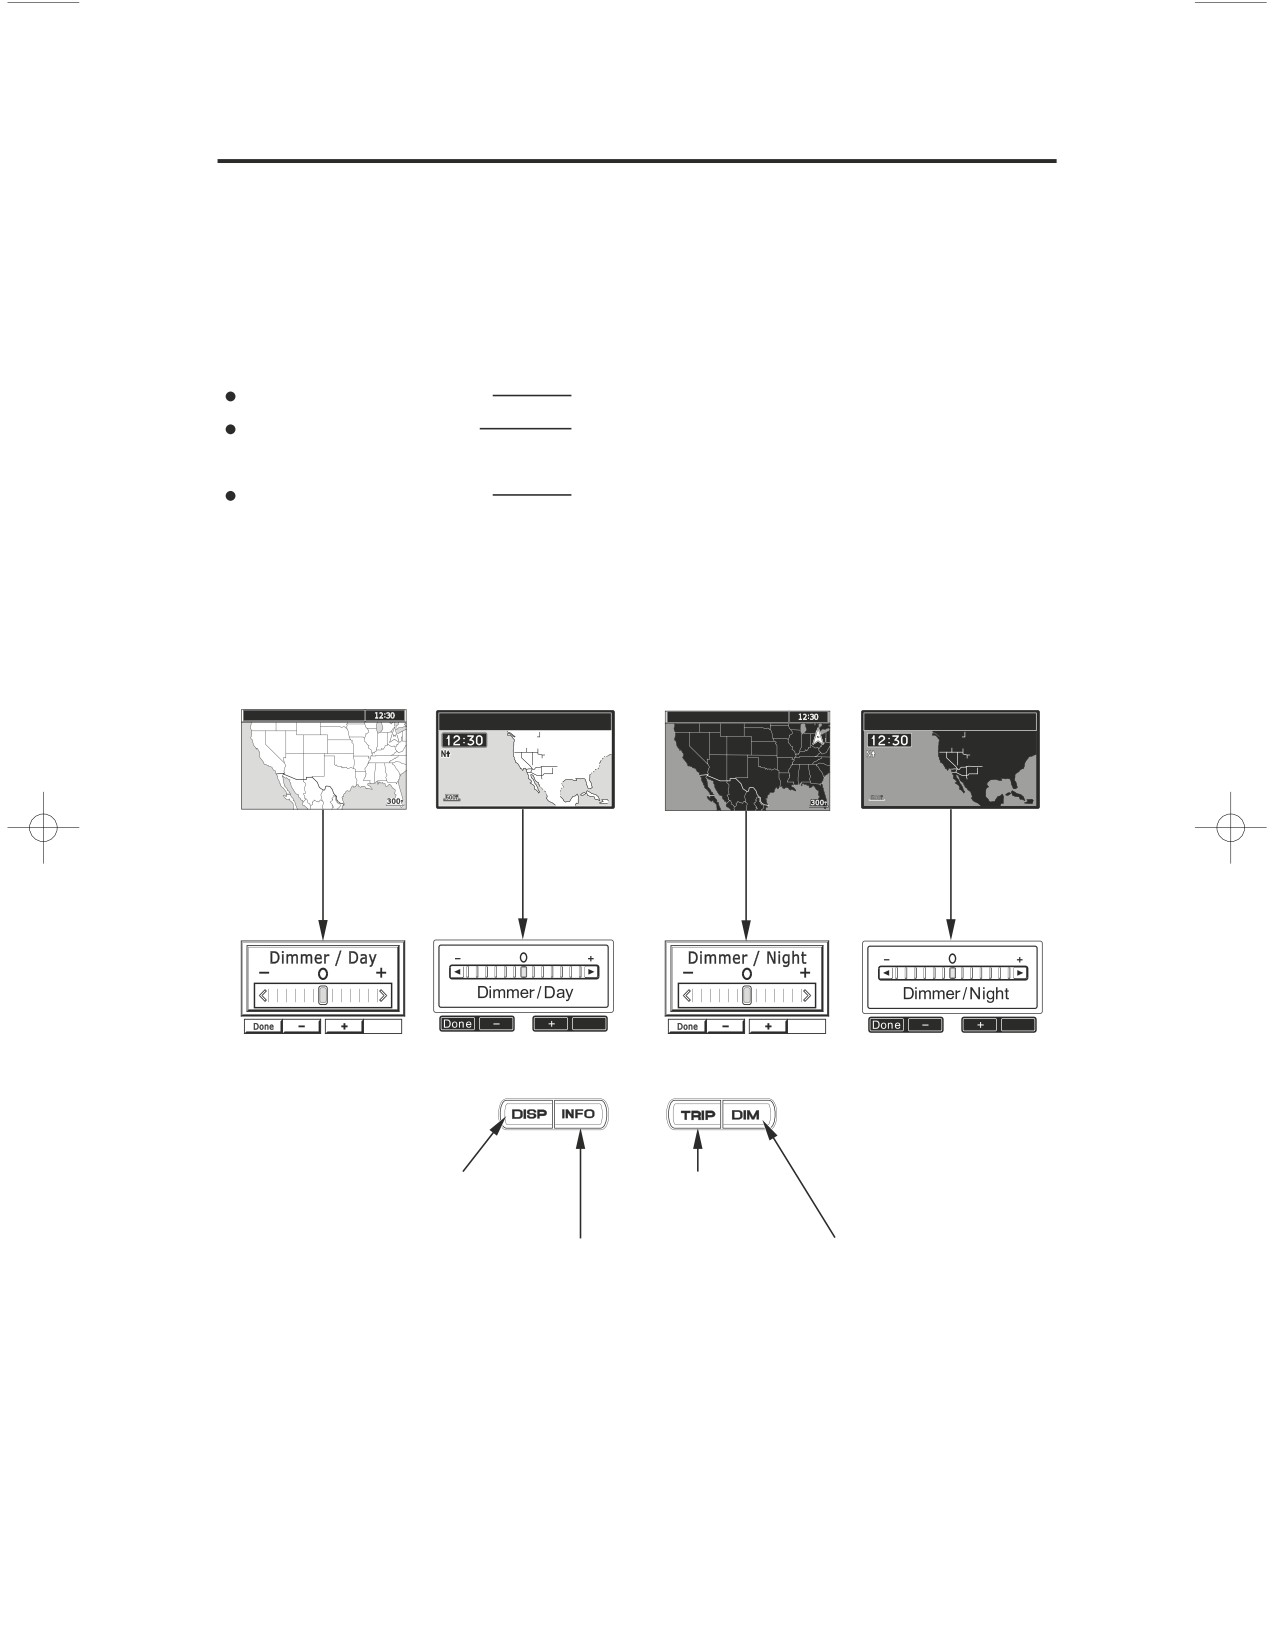
To adjust the brightness of the display:
Push the DIM button once. The display shows ‘‘Dimmer/Day’’ at Day mode,
while it shows ‘‘Dimmer/Night’’ at Night mode.
To brighten the display
push the TRIP button (ʴ).
To darken the display
push the INFO button (ʵ).
(The brighter and darker ranges each have six steps.)
To set the selected step
push the DISP button.
To switch the display between ‘‘Dimmer/Day’’ and ‘‘Dimmer/Night’’, select
the display between Day mode and Night mode (page28) and push the DIM
button.
For USA
For Canada
For USA
For Canada
DISP button
TRIP button
INFO button
DIM button
When approximately 5 seconds pass without operating a button, the display
automatically returns to the previous display.
The display can become dark when the display is very hot. If it does not restore
the original brightness, consult your Honda dealer.
30
Instruments & Controls
Multi Information Display
Digital Clock
(Models not equipped with Navigation System)
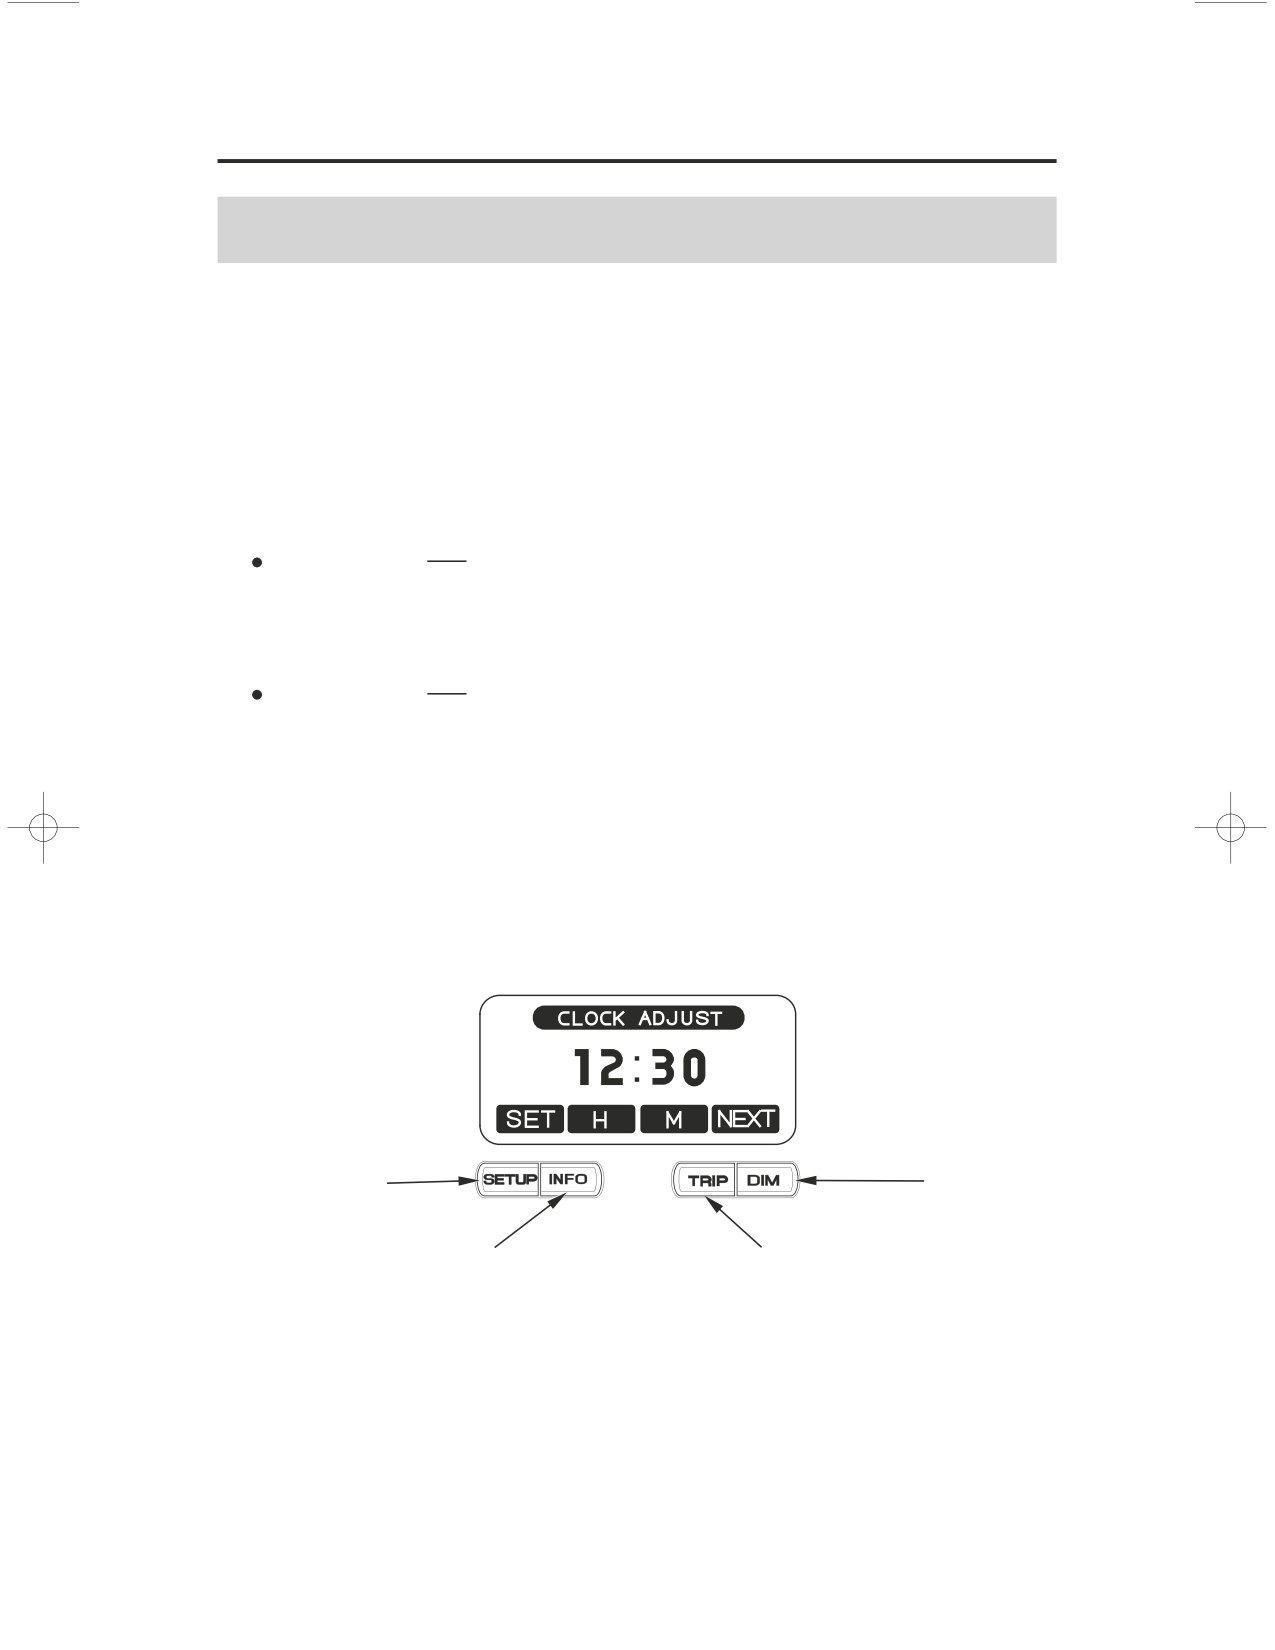
The display shows the hour and minute.
To adjust the time:
1.
Turn the ignition switch to ON or ACC.
2. Push the SETUP button once. ‘‘CLOCK ADJUST’’ will display.
3. To set the hour, press and release the INFO button until the desired hour
appears.
Quick setting
push and hold the INFO button until the desired hour
appears.
4. To set the minute, press and release the TRIP button until the desired minute
appears.
Quick setting
push and hold the TRIP button until the desired minute
appears.
5. Once the time is selected, push the SETUP button to enter the time.
When approximately 5 seconds pass without operating a button on the CLOCK
ADJUST display, the display automatically returns to the previous display.
Be sure to push the SETUP button to enter your adjusted time in the system.
SETUP button
DIM button
INFO button
TRIP button
(Models equipped with Navigation System)
The navigation system receives signals from the Global Positioning System
(GPS) and automatically sets the time display based on the time zone you select.
You may also set the time manually using the ‘‘Other’’ option. Refer to the
Navigation System Manual.
Instruments & Controls
31
Multi Information Display
Air Temperature Meter
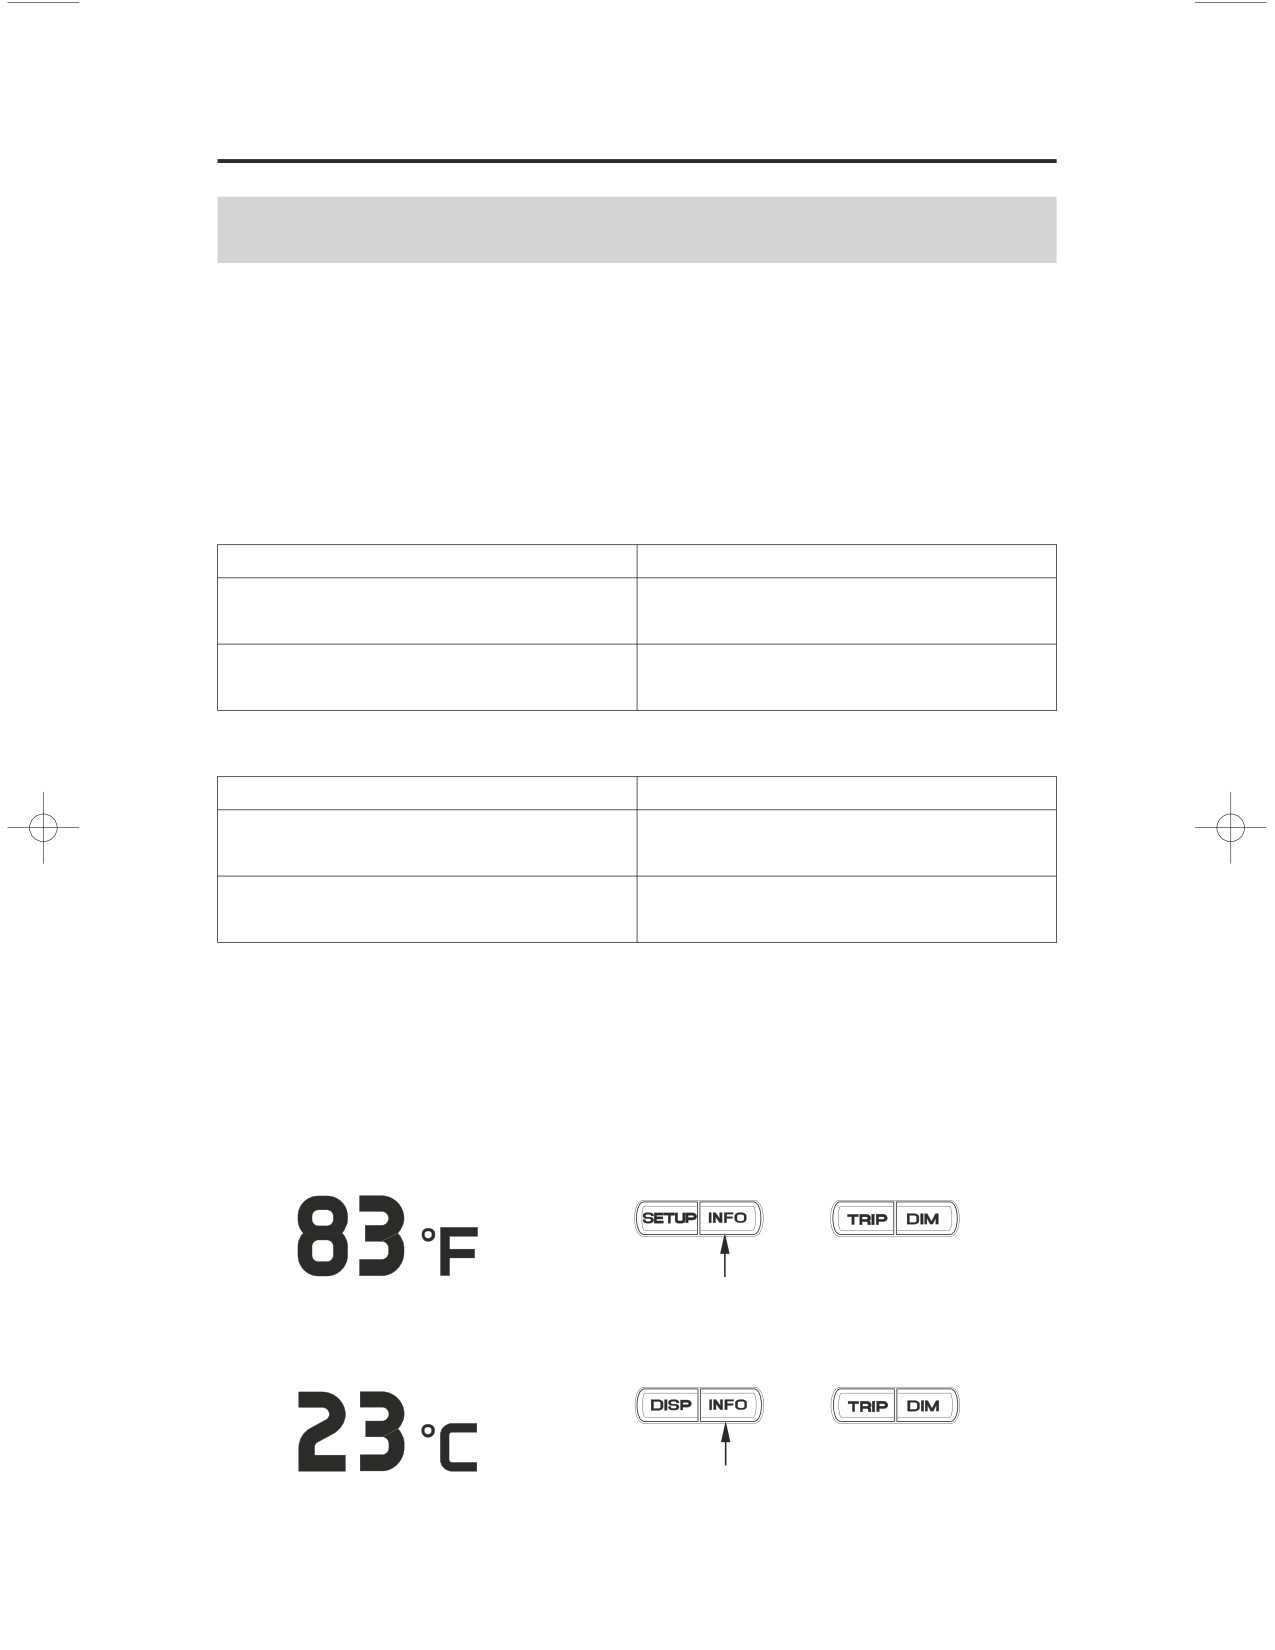
Push the INFO button once to display the air temperature.
After 5 seconds, the previous display returns.
USA: Fahrenheit (°F)
Canada: Centigrade (°C)
Temperature Display
(Models not equipped with Navigation System)
Below 13°F (ʵ11°C)
‘‘- -’’ is displayed
Between:
actual air temperature is indicated.
14°F
ʵ122°F (ʵ10°Cʵ
50°C)
Above 122°F (50°C)
The display will remain and blink
‘‘122°F (50°C)’’
(Models equipped with Navigation System)
Below 13°F (ʵ11°C)
‘‘- -’’ is displayed
Between:
actual air temperature is indicated.
14°F
ʵ158°F (ʵ10°Cʵ
70°C)
Above 158°F (70°C)
The display will remain
‘‘158°F (70°C)’’
The temperature sensor is located in the upper fairing. Therefore, the
temperature reading can be affected by heat reflection from the road surface,
engine heat, and the exhaust from the surrounding traffic. This can cause an
error in the temperature reading when your speed is under 19 mph (30 km/h).
For USA
(Models not equipped with Navigation System)
INFO button
(Models equipped with Navigation System)
For Canada
INFO button
32
Instruments & Controls
Multi Information Display
Travel Trunk & Saddlebags Open Indicator
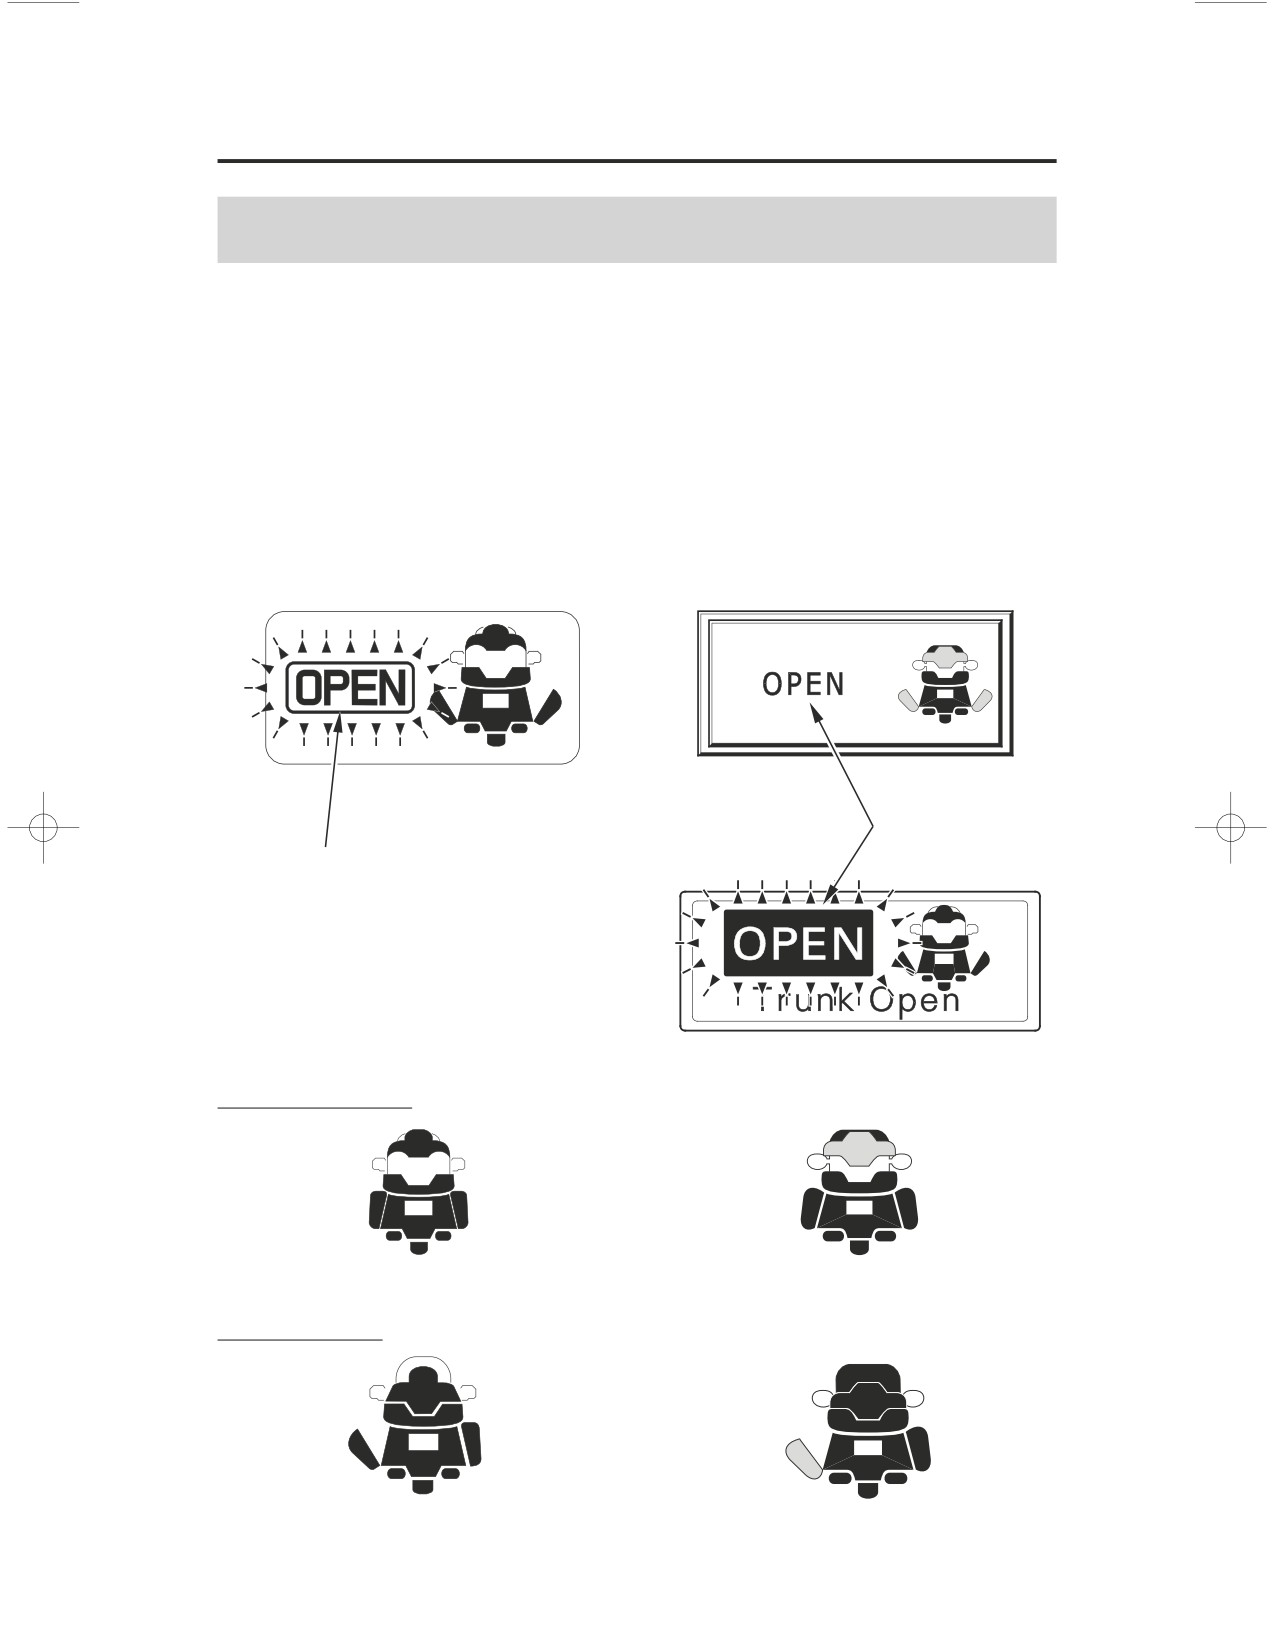
This indicator turns on when the ignition switch is ON and your motorcycle’s
travel trunk or saddlebags are open.
If all compartments are not fully closed, the display will blink OPEN and
indicate the open compartment(s).
(Models not equipped with
(Models equipped with
Navigation System)
Navigation System)
For USA
open indicator
For Canada
open indicator
Travel Trunk open
Saddlebag open
Instruments & Controls
33
///////////////////////////////////////