Citroen C4 (2023 year). Manual in english - page 14
7-3. Do-it-yourself maintenance
527
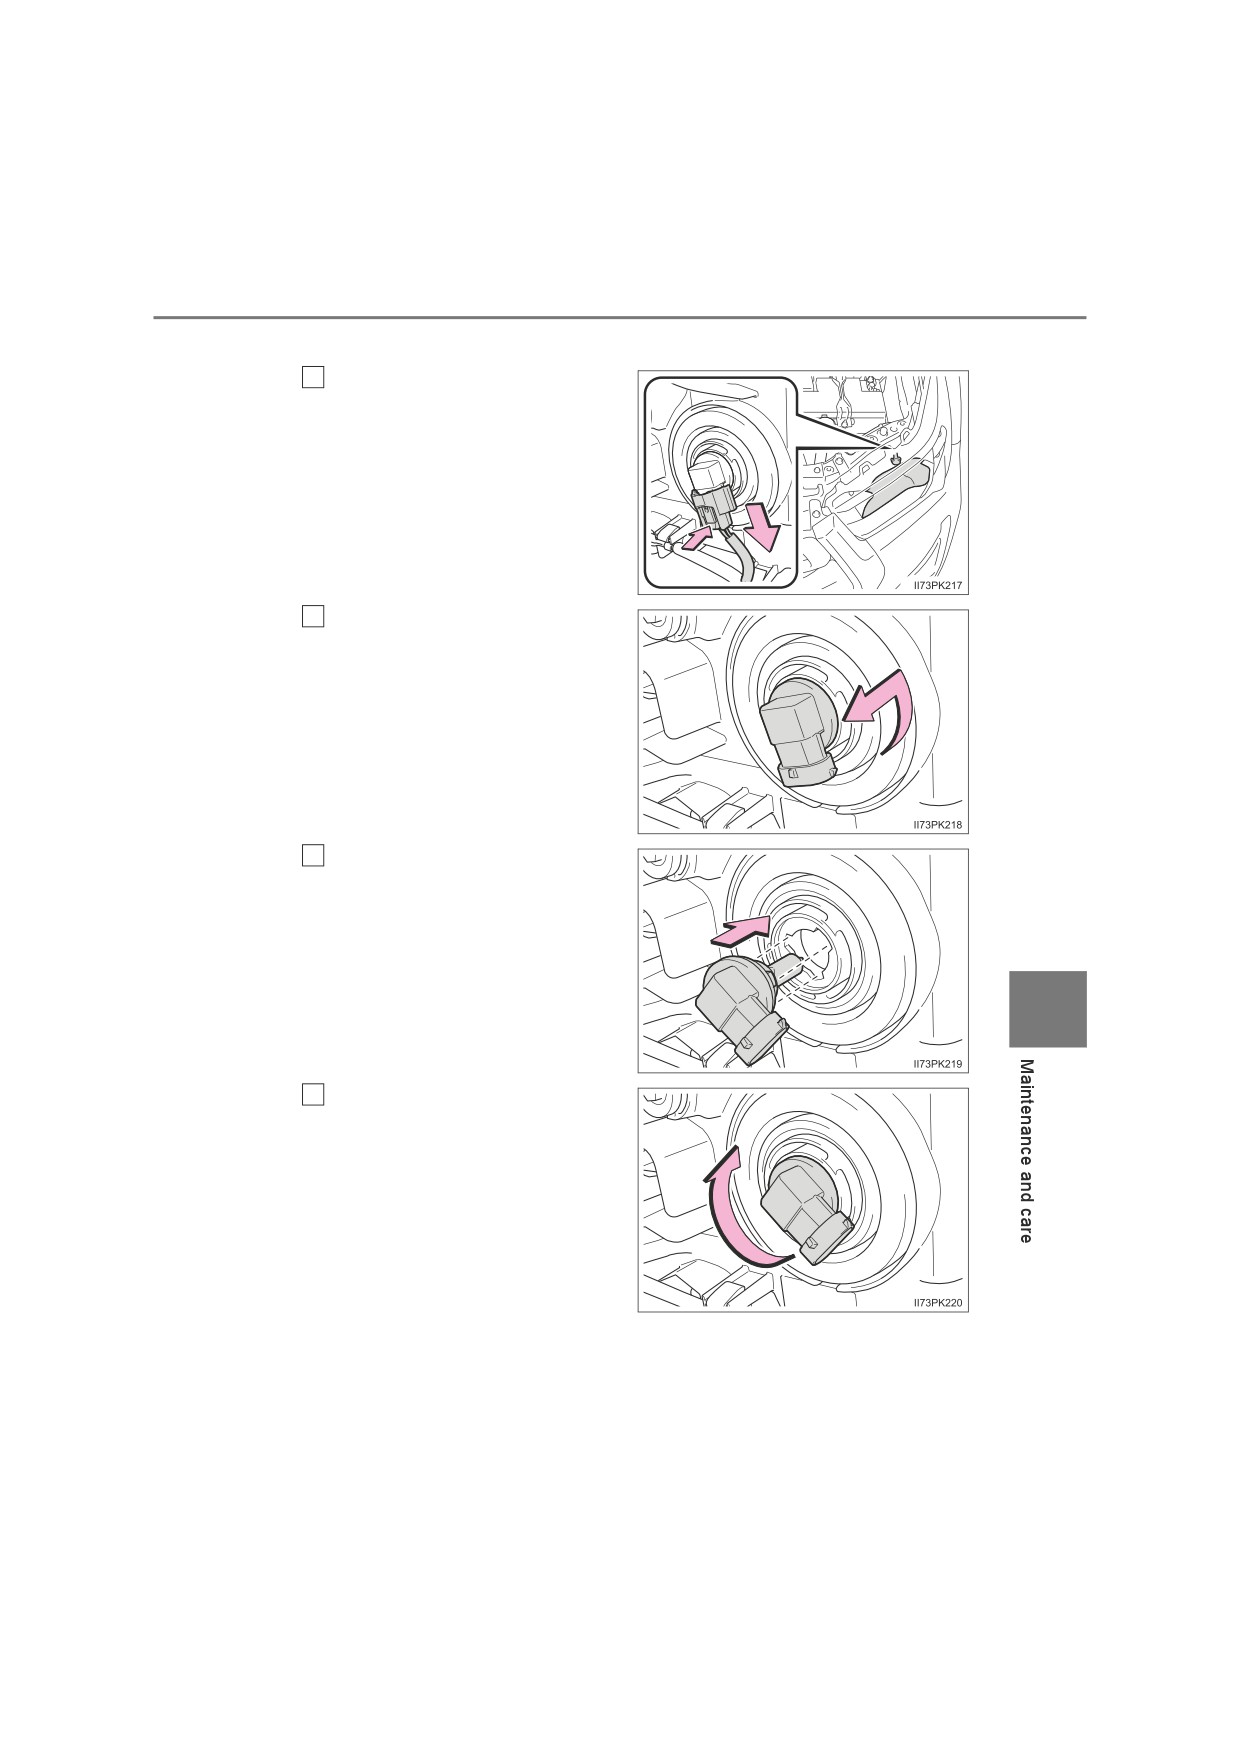
■ Headlight (low beams) (halogen headlights type B)
1
Unplug the connector while
depressing the lock release.
2
Turn the bulb base counter-
clockwise.
Replace the light bulb, and
3
install the bulb base.
Align the 3 tabs on the light bulb
with the mounting, and insert.
7
4
Turn and secure the bulb
base.
528
7-3. Do-it-yourself maintenance
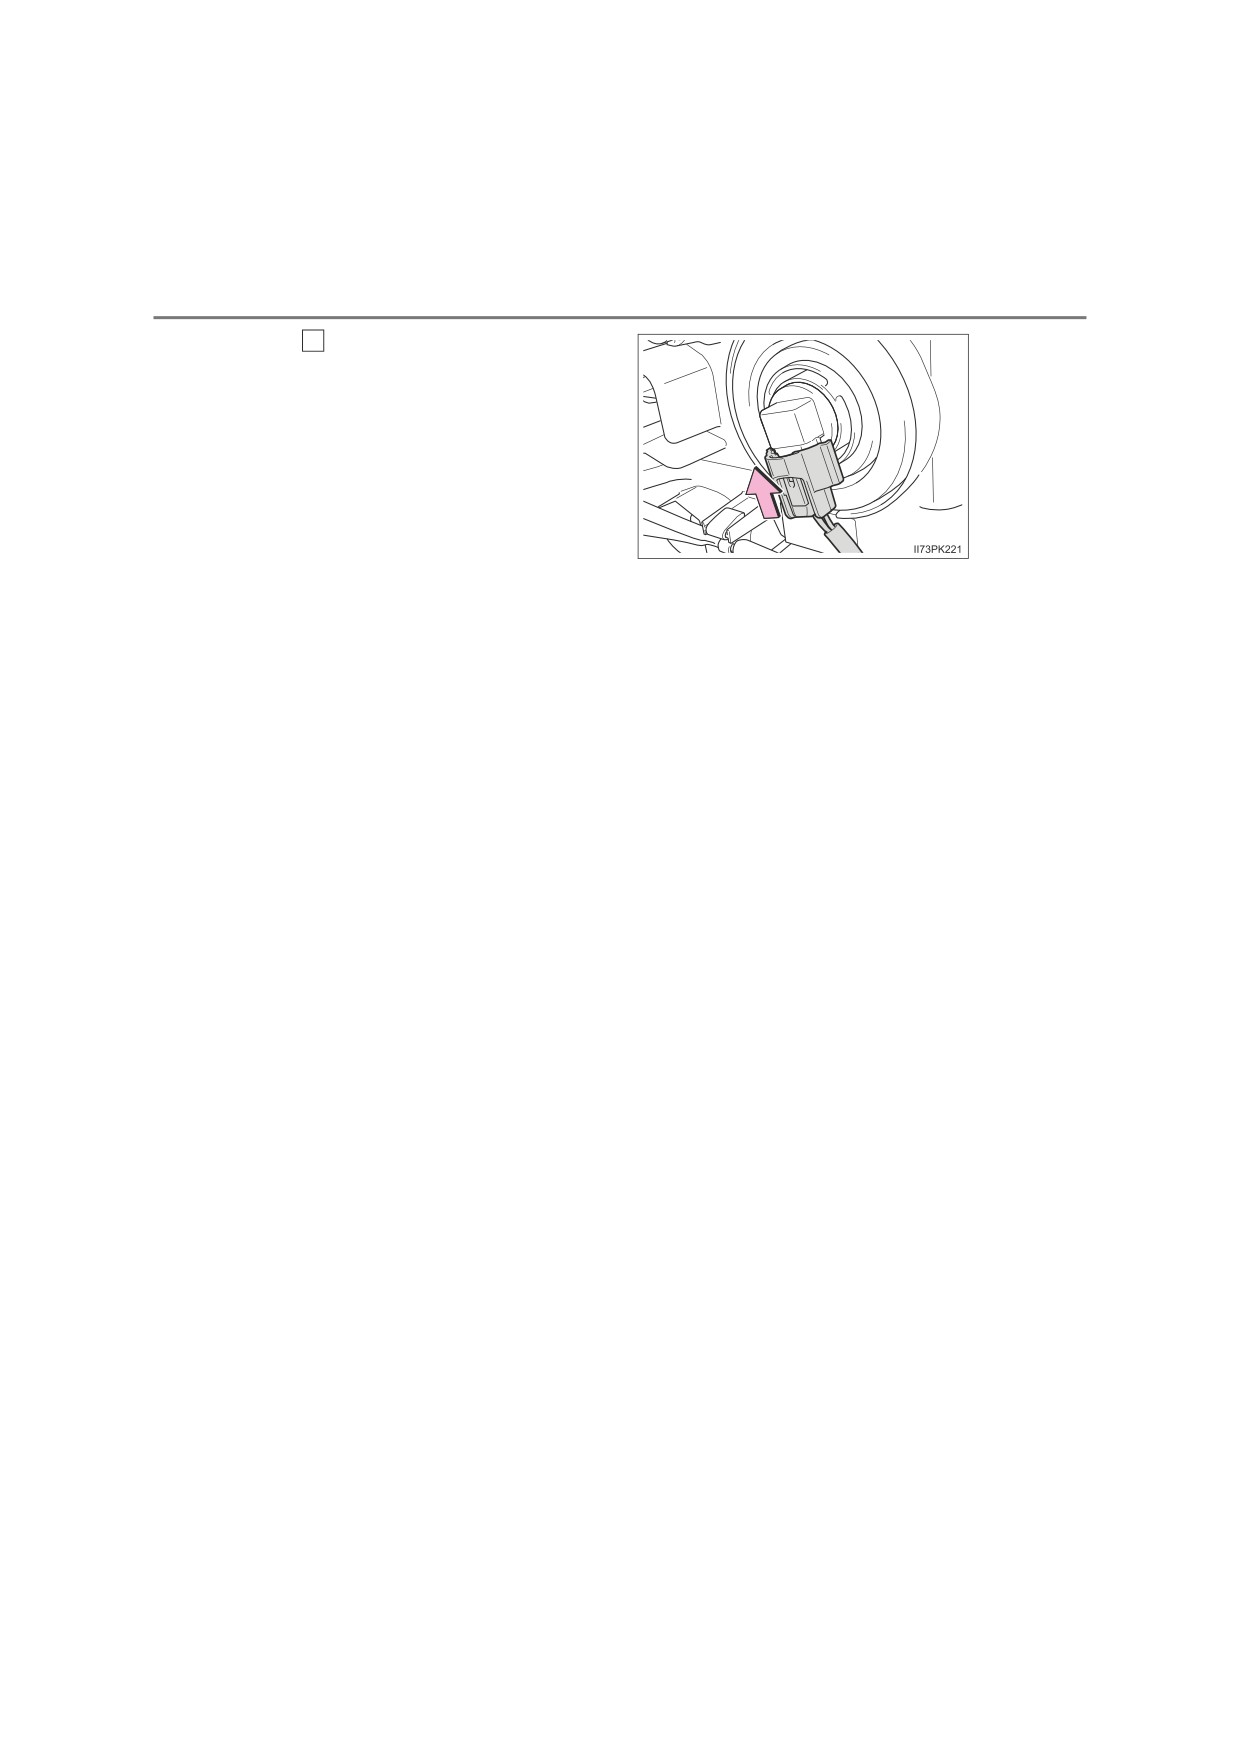
5
Install the connector
Shake the bulb base gently to
check that it is not loose, turn
the headlight low beams on
once and visually confirm that
no light is leaking through the
mounting.
7-3. Do-it-yourself maintenance
529
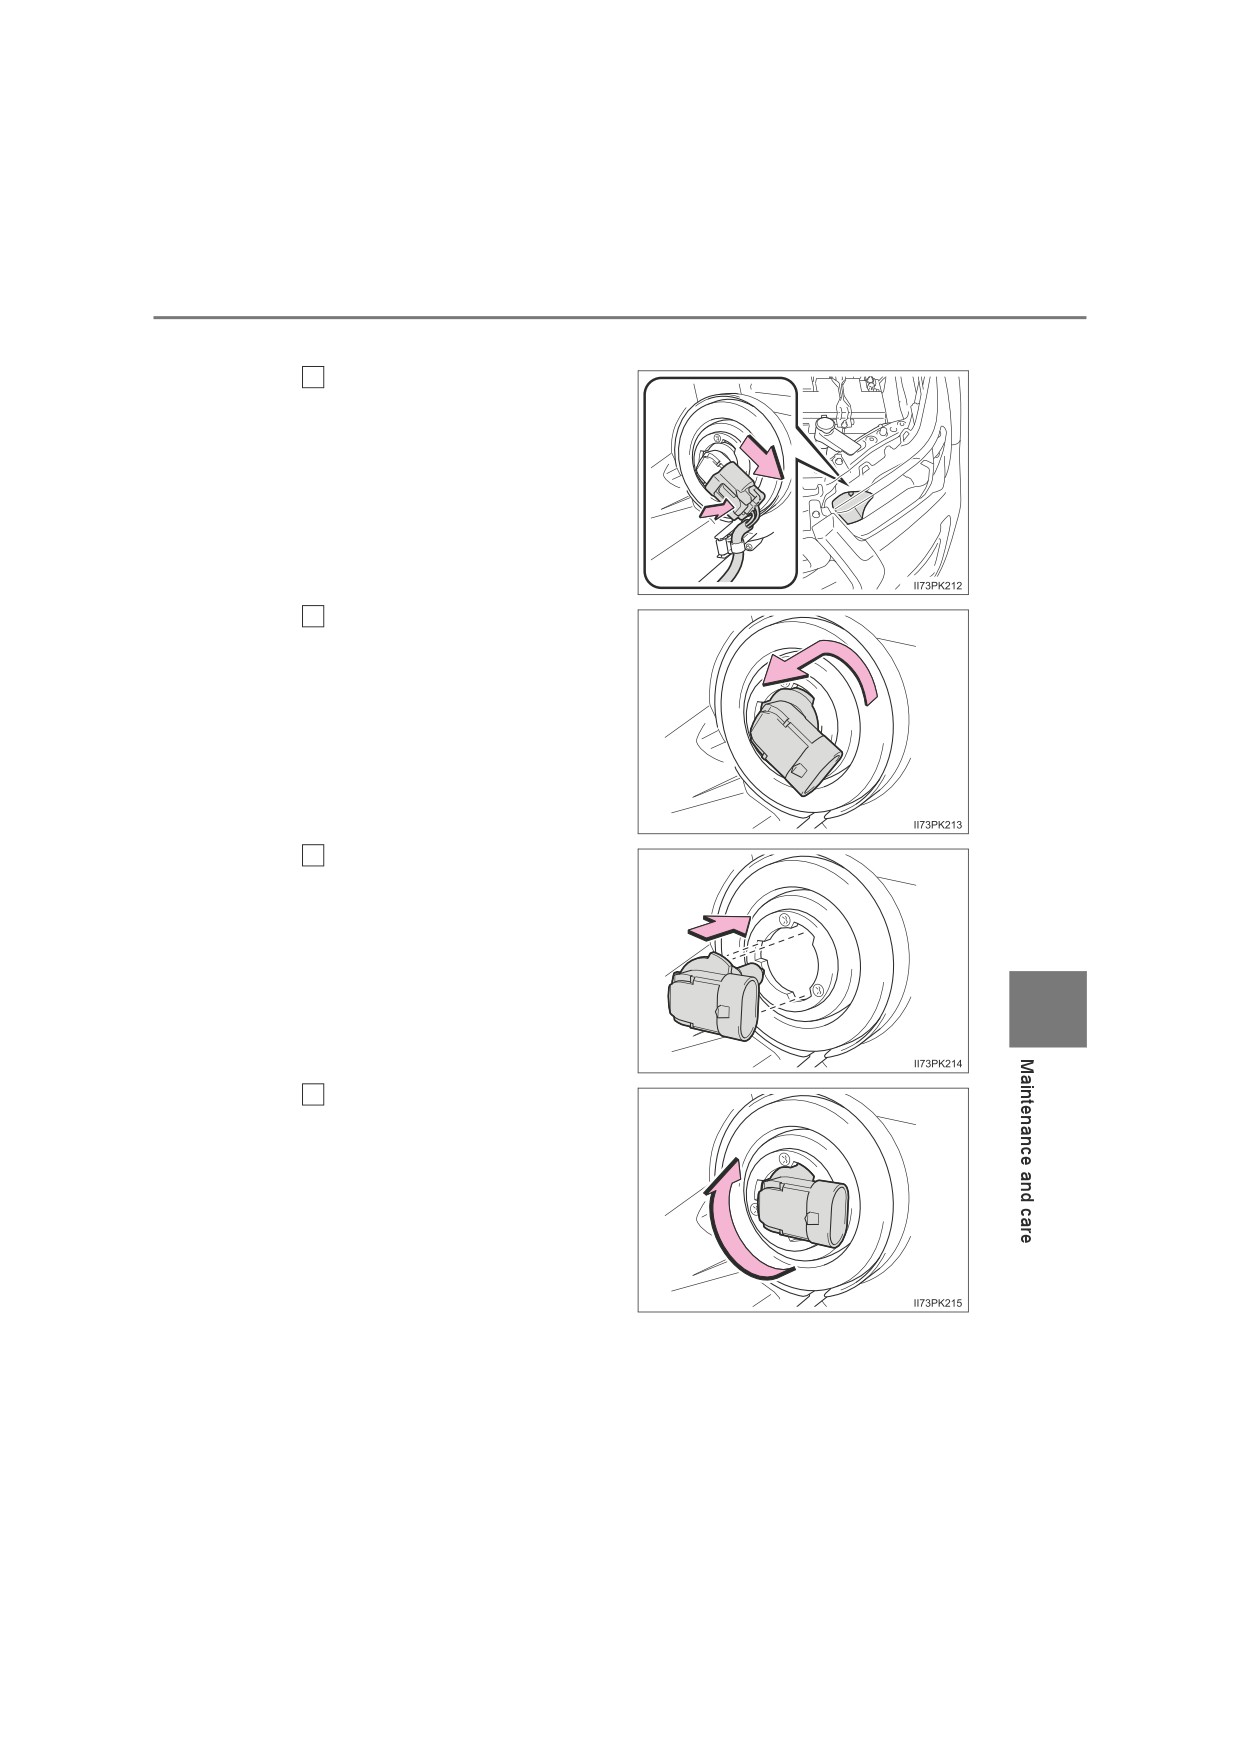
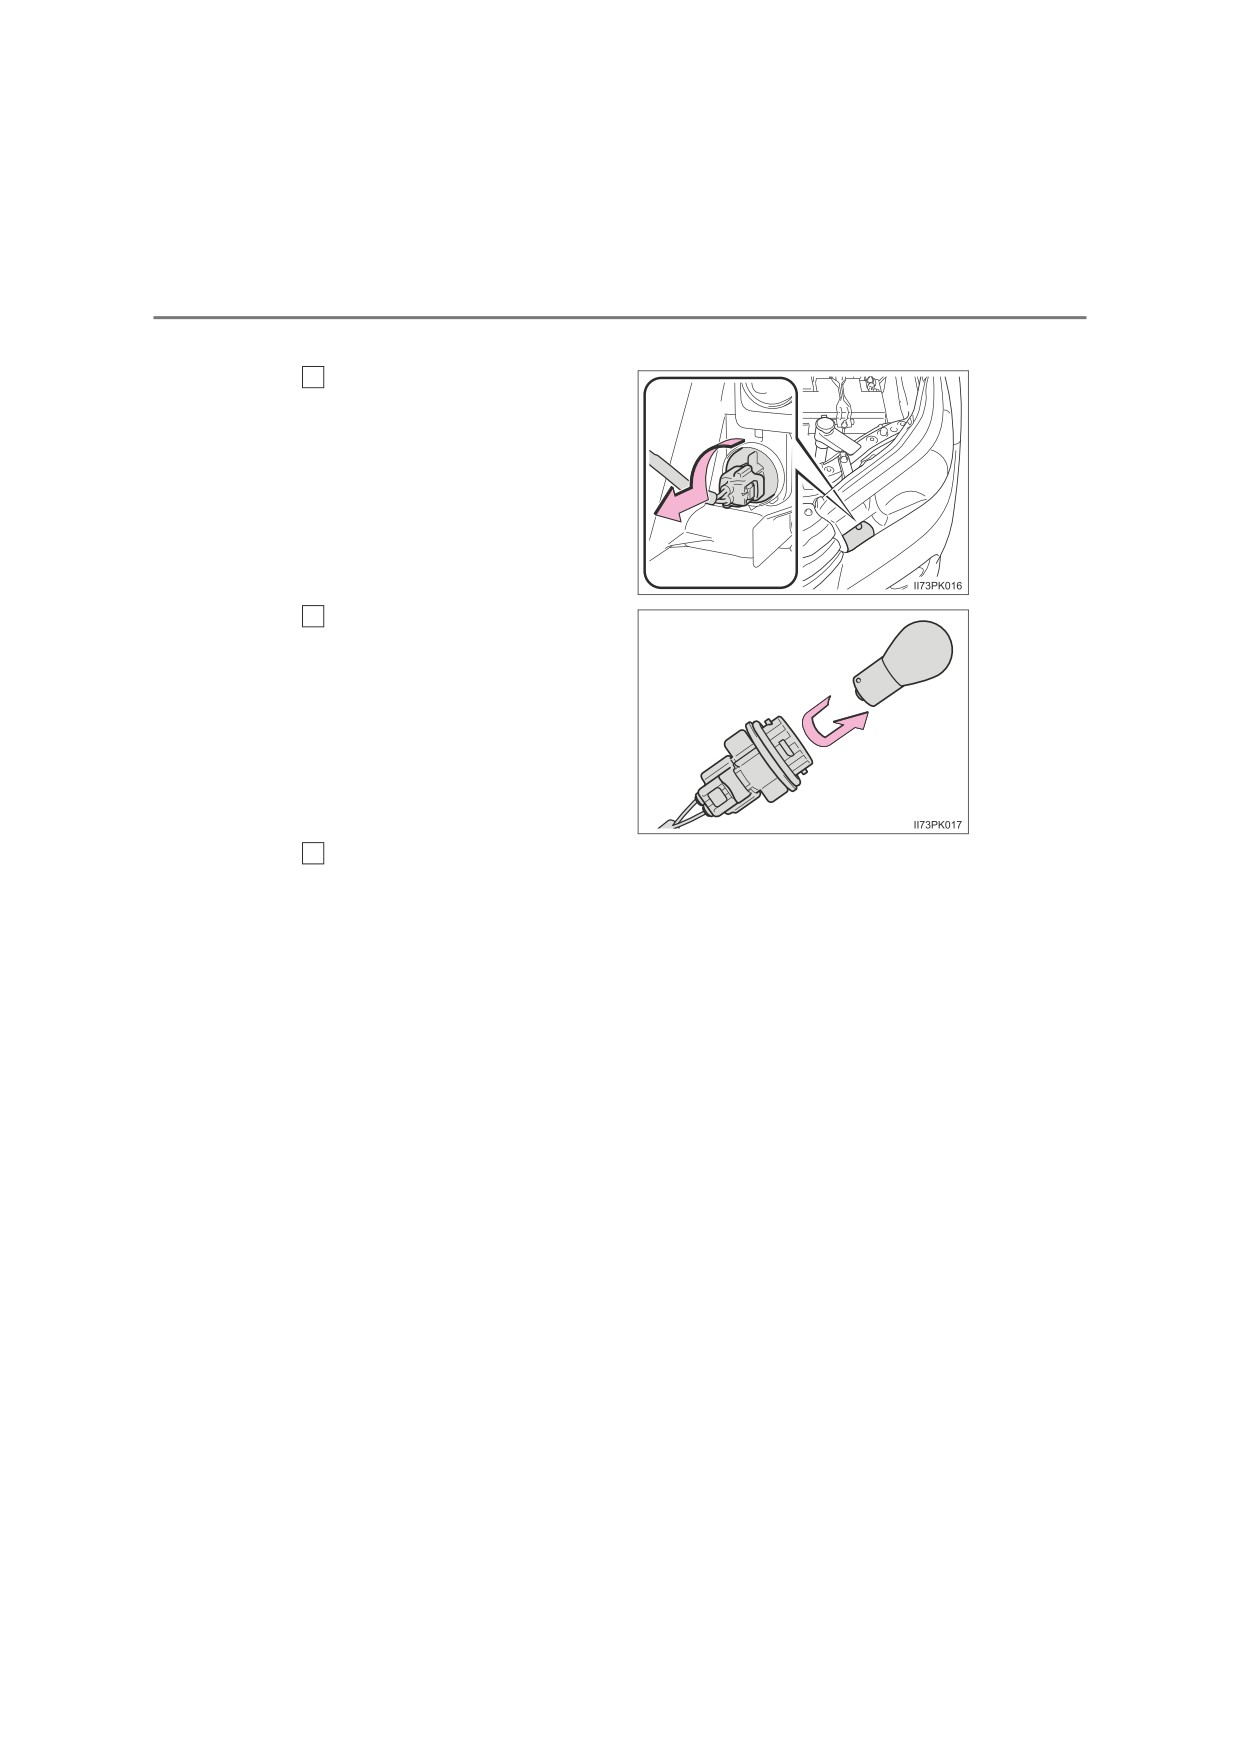
■ Headlight (high beams) (halogen headlights type B)
1
Unplug the connector while
depressing the lock release.
2
Turn the bulb base counter-
clockwise.
Replace the light bulb, and
3
install the bulb base.
Align the 3 tabs on the light bulb
with the mounting, and insert.
7
4
Turn and secure the bulb
base.
530
7-3. Do-it-yourself maintenance
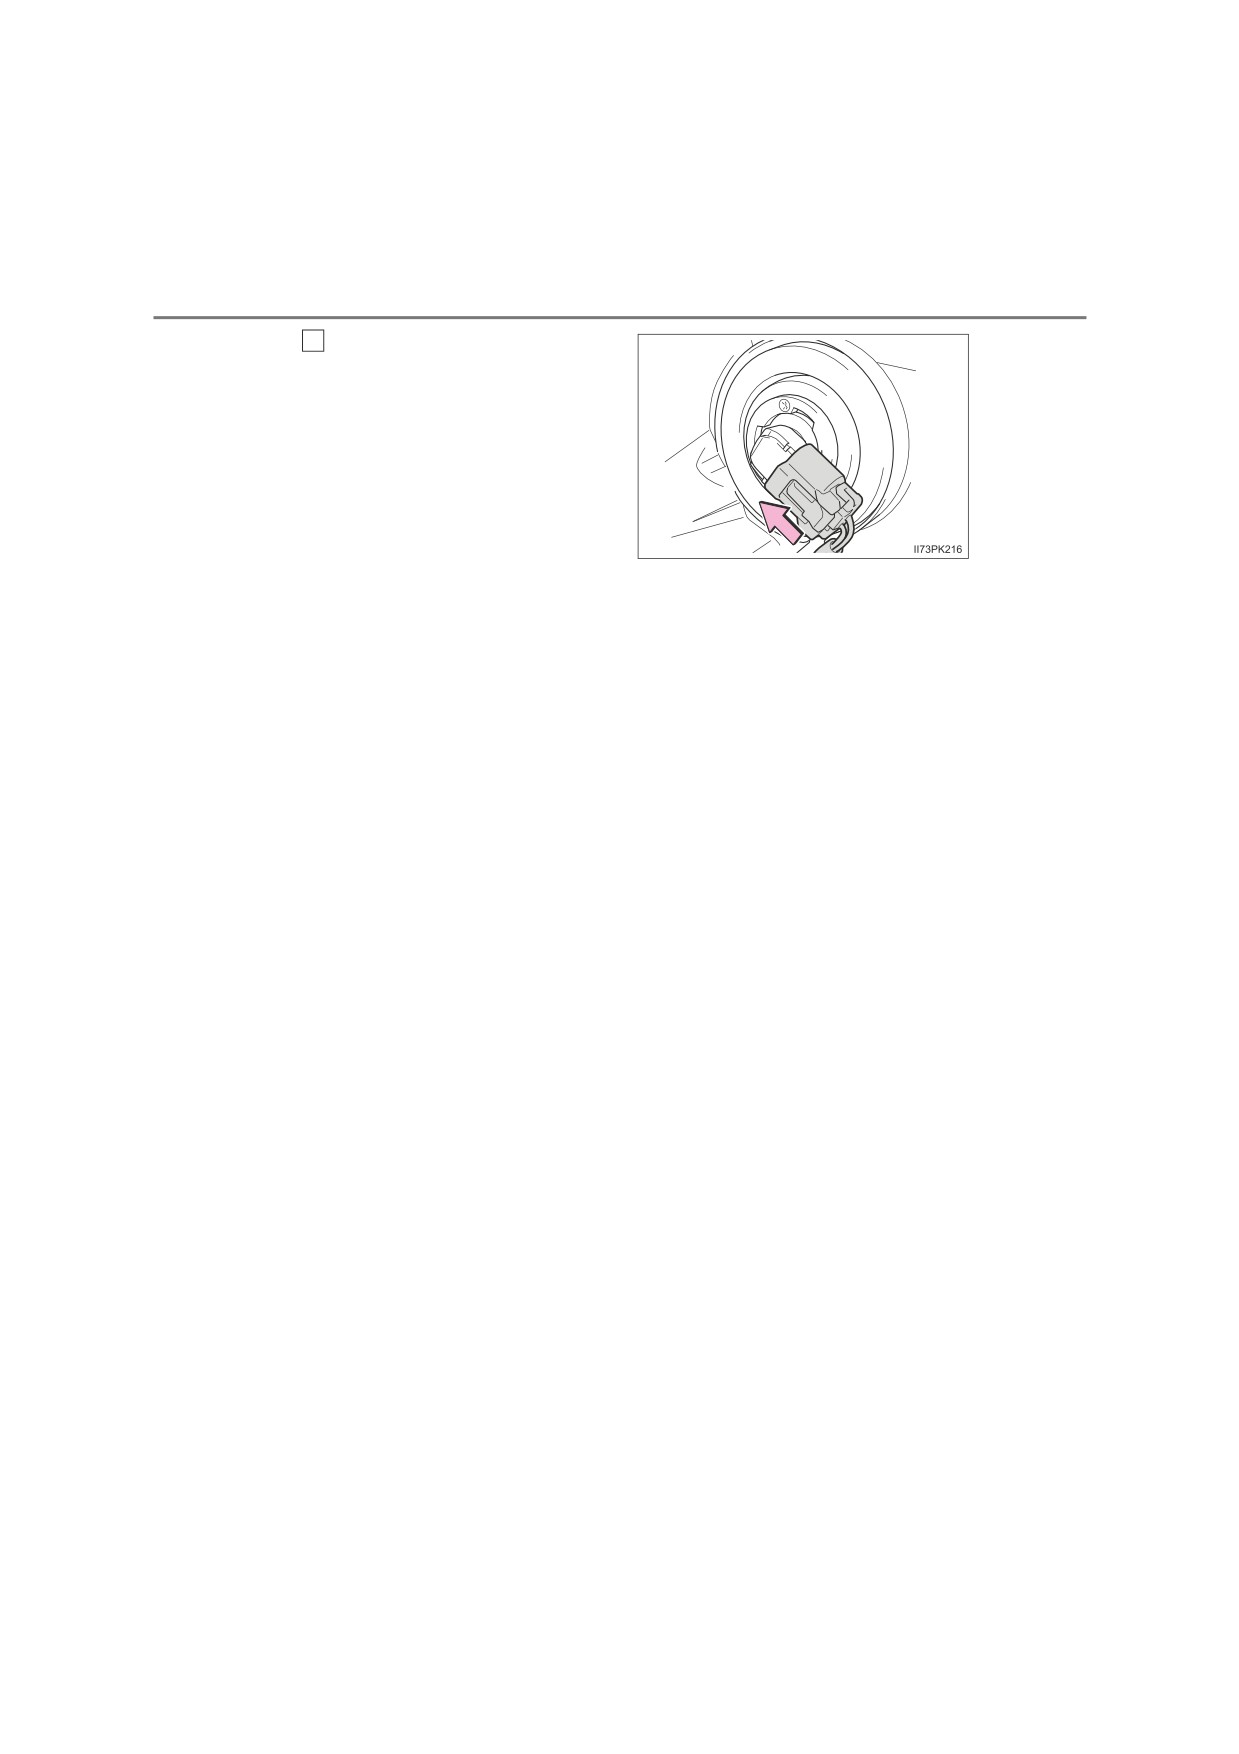
5
Install the connector
Shake the bulb base gently to
check that it is not loose, turn
the headlight high beams on
once and visually confirm that
no light is leaking through the
mounting.
7-3. Do-it-yourself maintenance
531
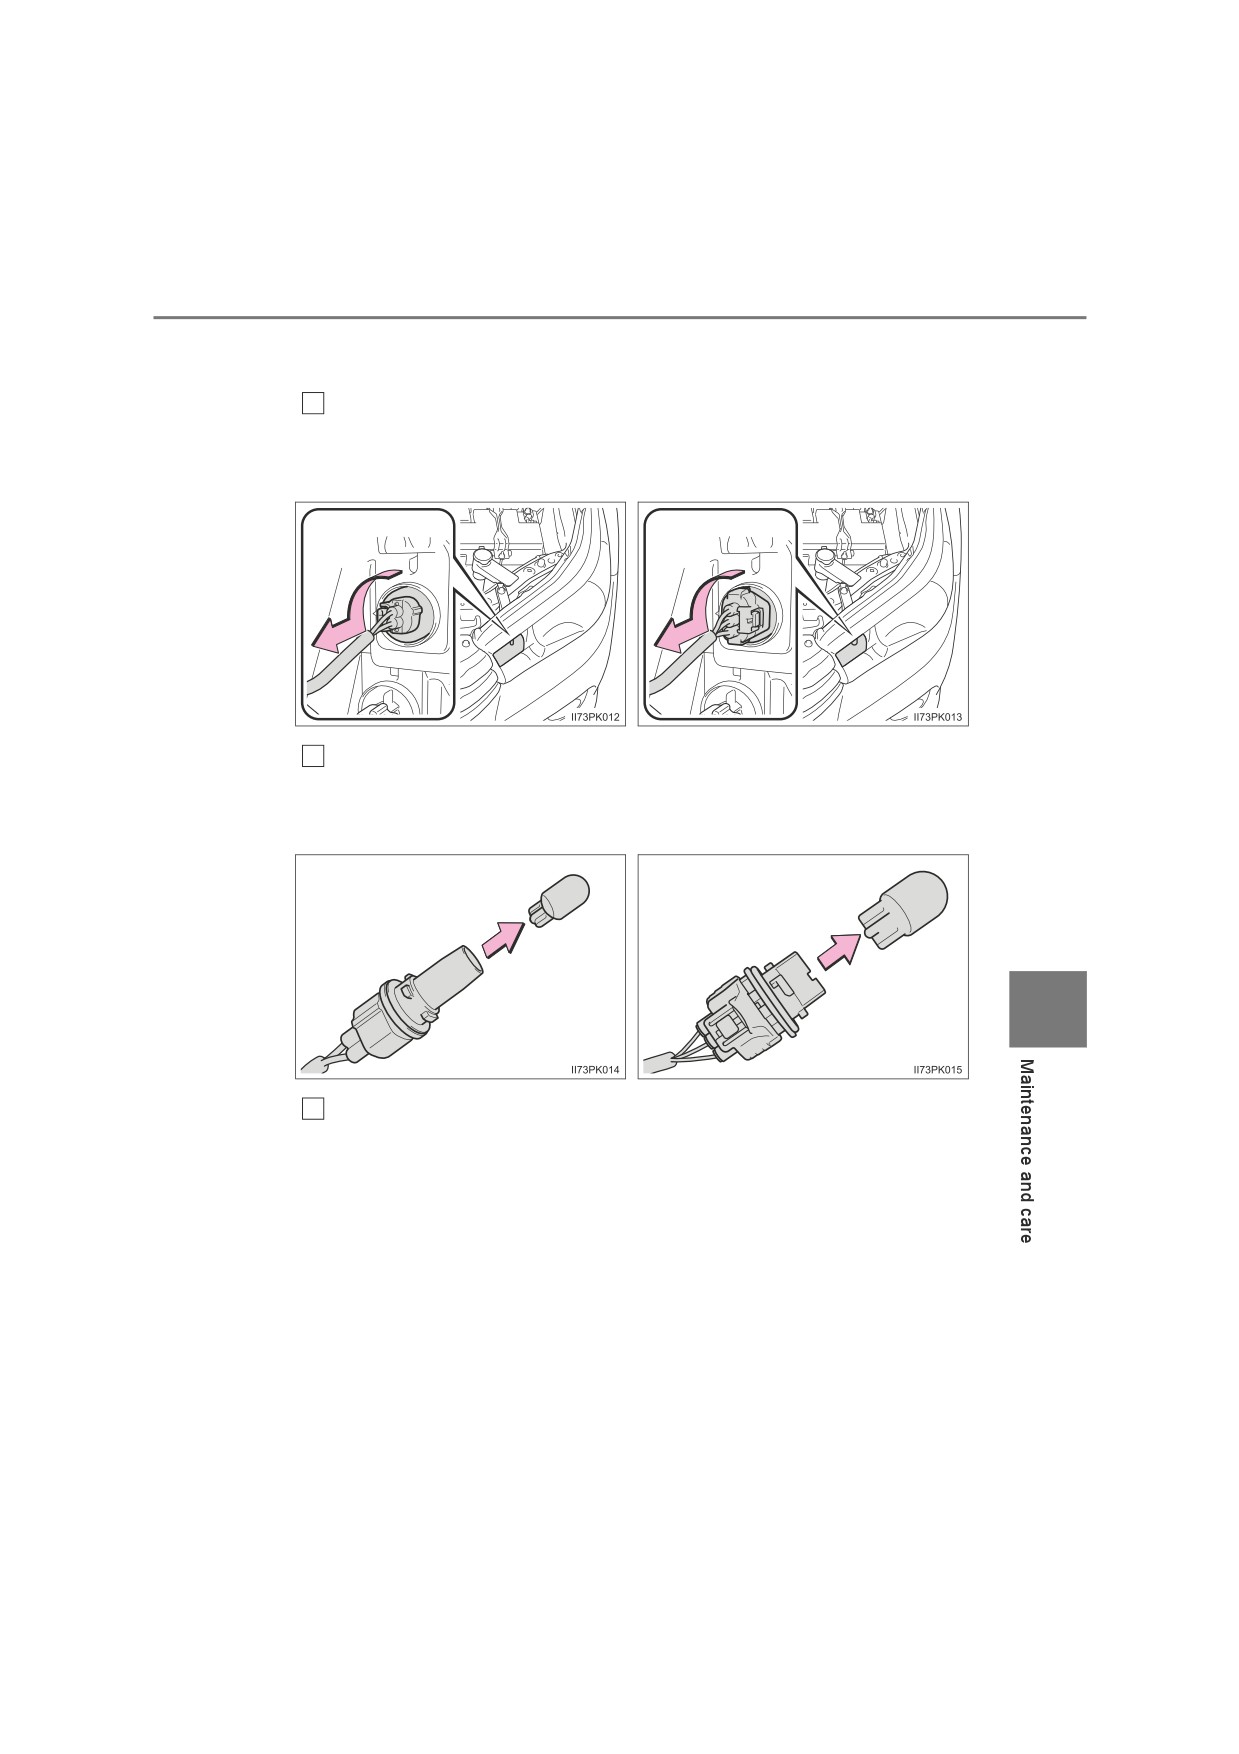
■ Front position lights/daytime running lights (if equipped)
(halogen headlights type A)
1
Turn the bulb base counterclockwise.
Vehicles without daytime run-
Vehicles with daytime
running
ning lights
lights
2
Remove the light bulb.
Vehicles without daytime run-
Vehicles with daytime running
ning lights
lights
7
When installing, reverse the steps listed.
3
532
7-3. Do-it-yourself maintenance
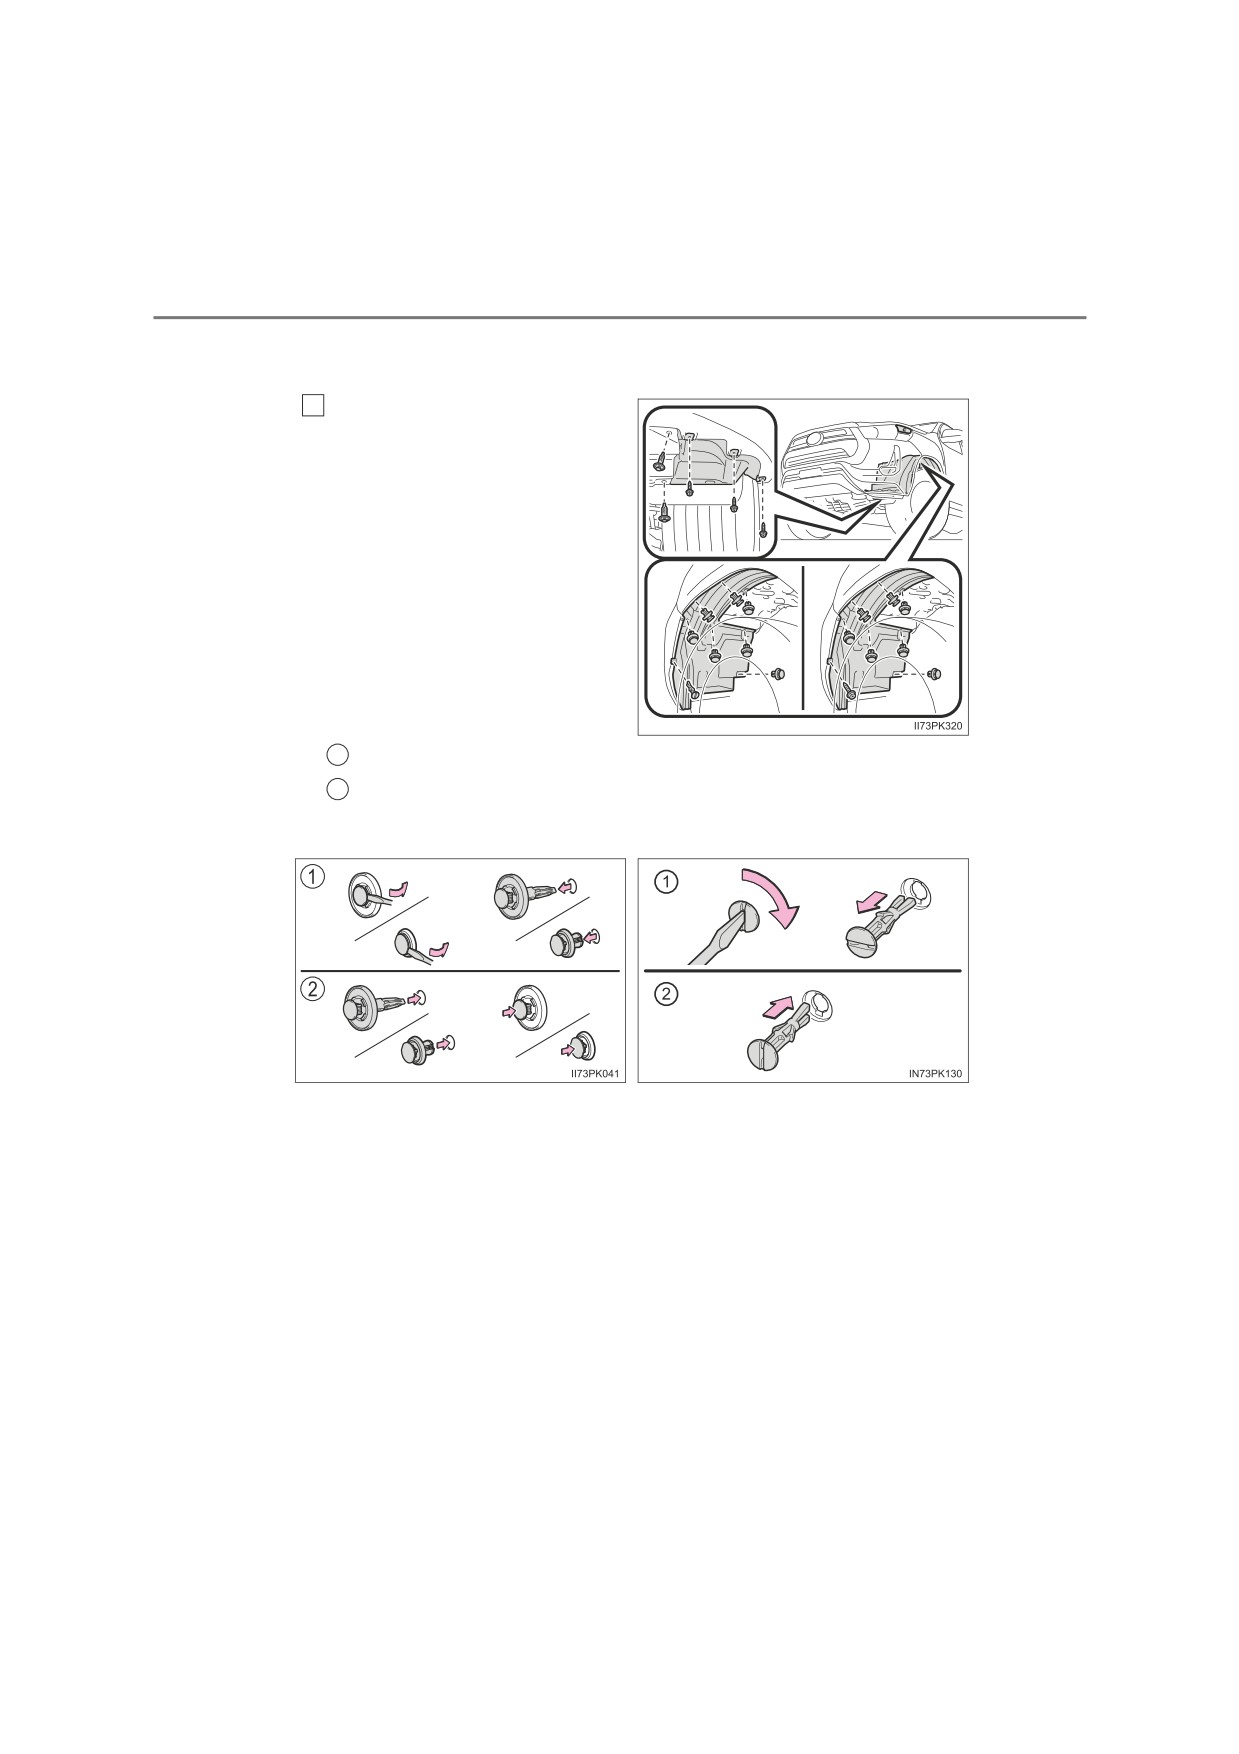
■ Front position lights/daytime running lights (if equipped) (halo-
gen headlight type B)
To allow enough working
1
space, turn the steering
wheel to the opposite side
where the bulb to be
replaced is located.
Remove the screws and
clips.
1
Removing the clip
2
Installing the clip
Type A
Type B
7-3. Do-it-yourself maintenance
533
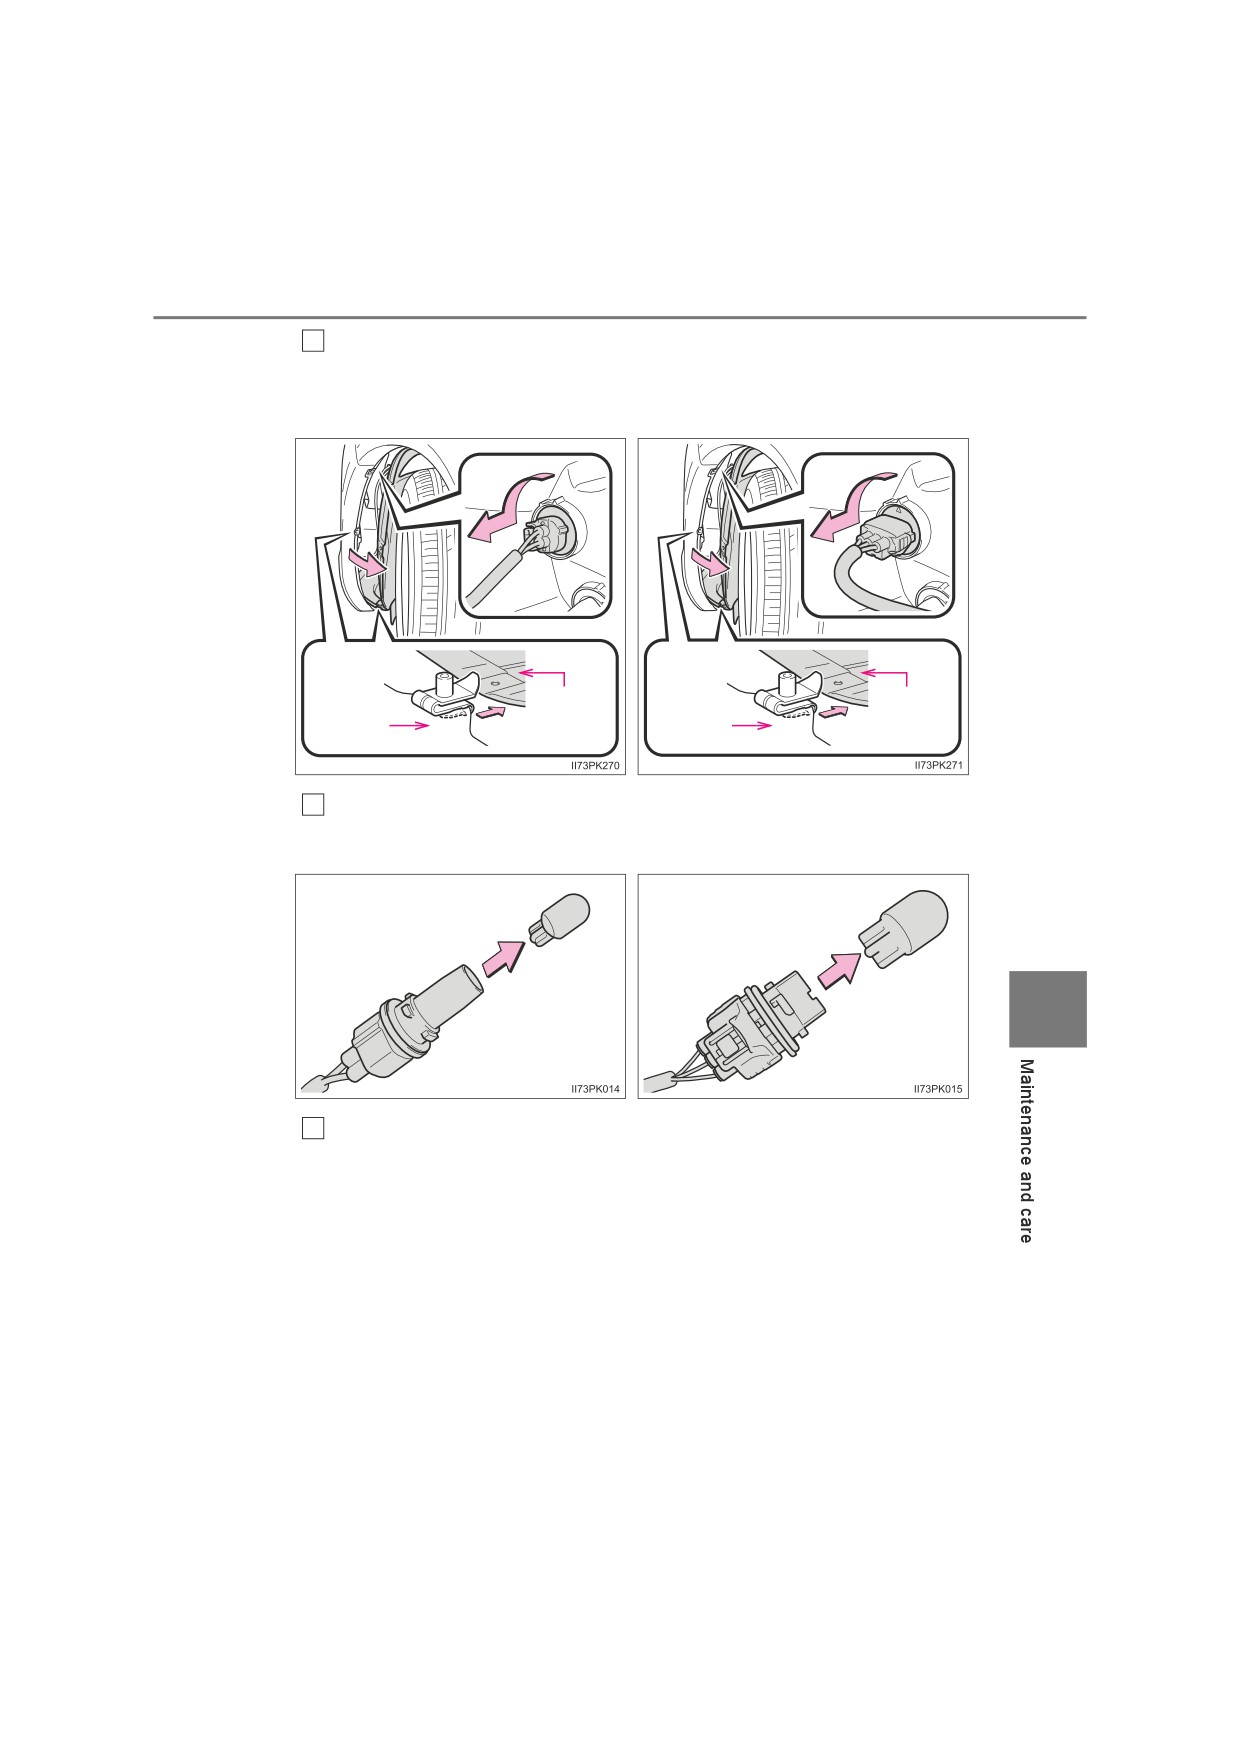
2
Partly remove the fender liner and turn the bulb base counter-
clockwise.
Without daytime running lights
With daytime running lights
Fender
Fender
Bumper
liner
Bumper
liner
3
Remove the light bulb.
Without daytime running lights
With daytime running lights
7
When installing, reverse the steps listed.
4
534
7-3. Do-it-yourself maintenance
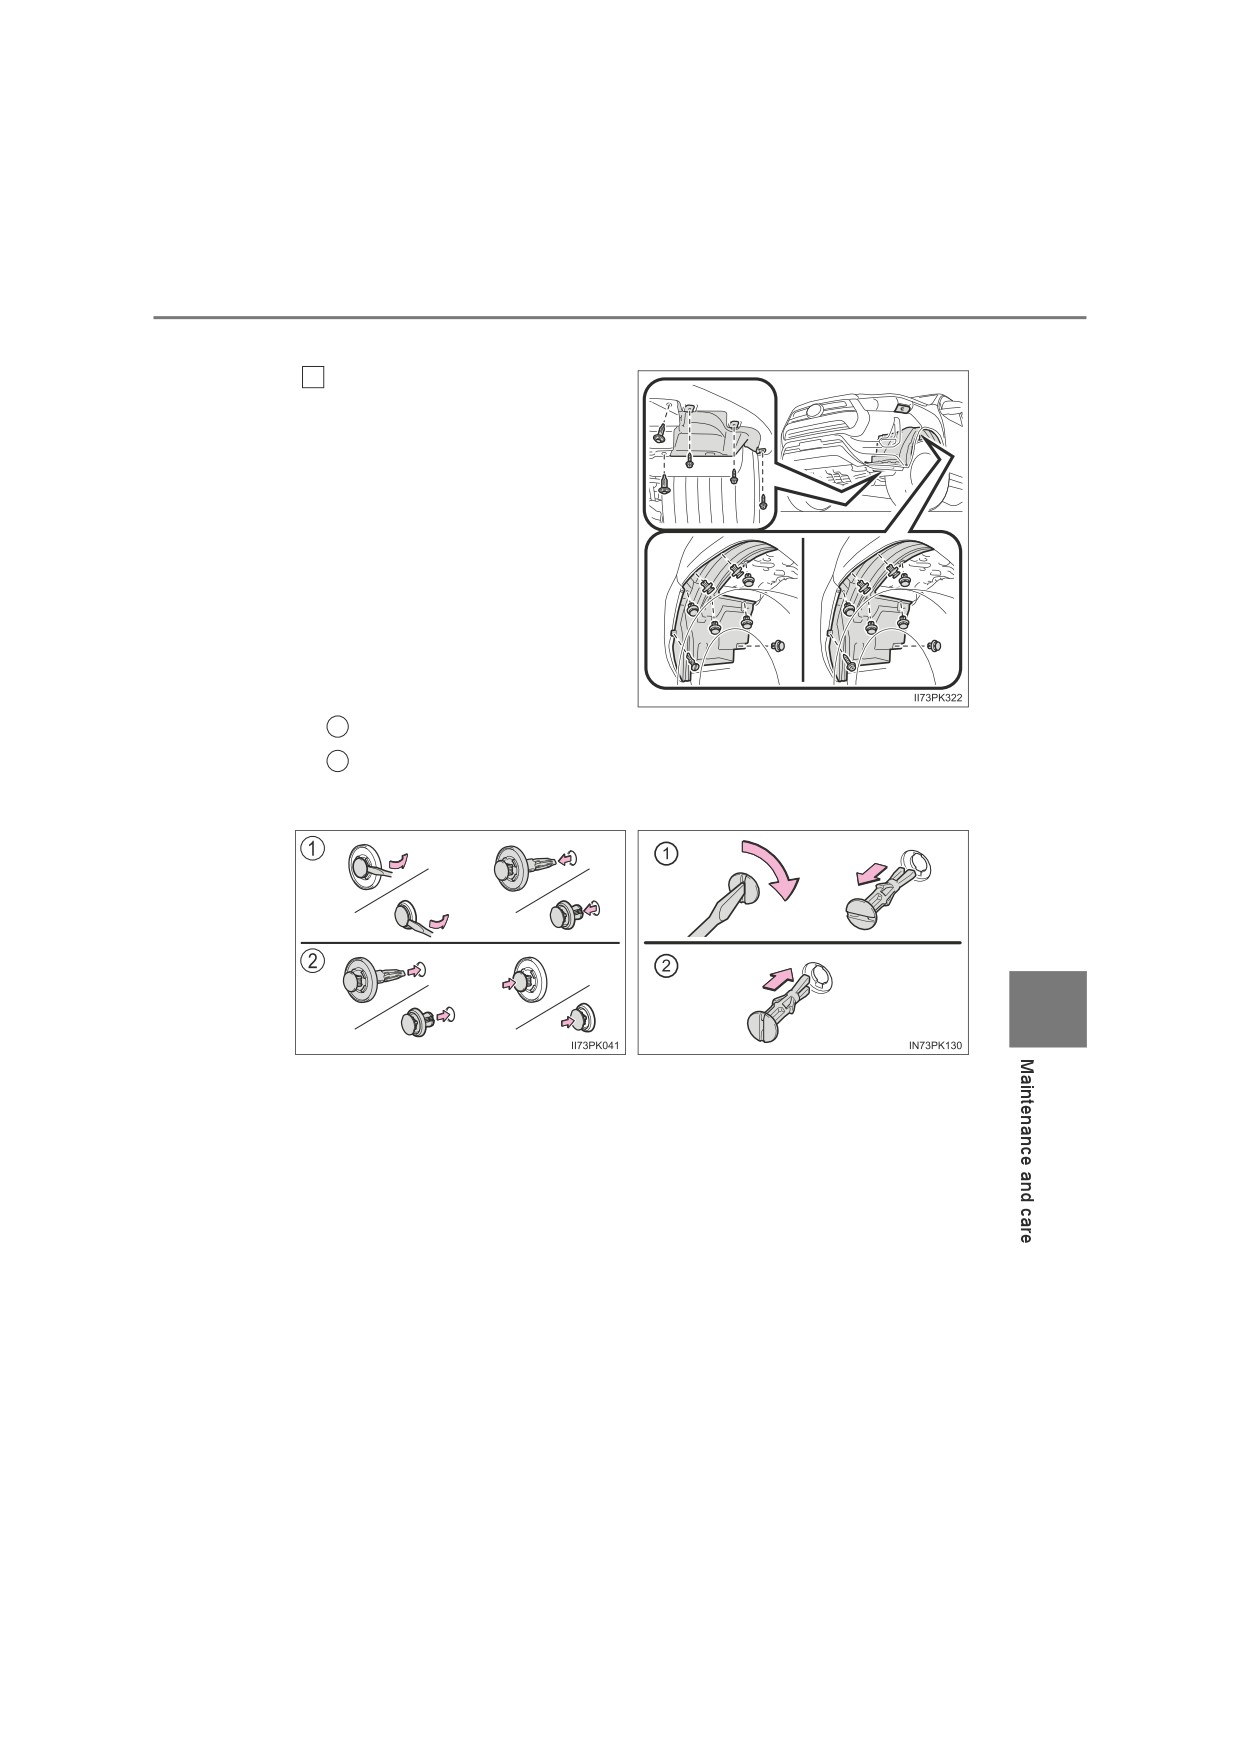
■ Front turn signal lights (halogen headlights type A)
1
Turn the bulb base counter-
clockwise.
2
Remove the light bulb.
3
When installing, reverse the steps listed.
7-3. Do-it-yourself maintenance
535
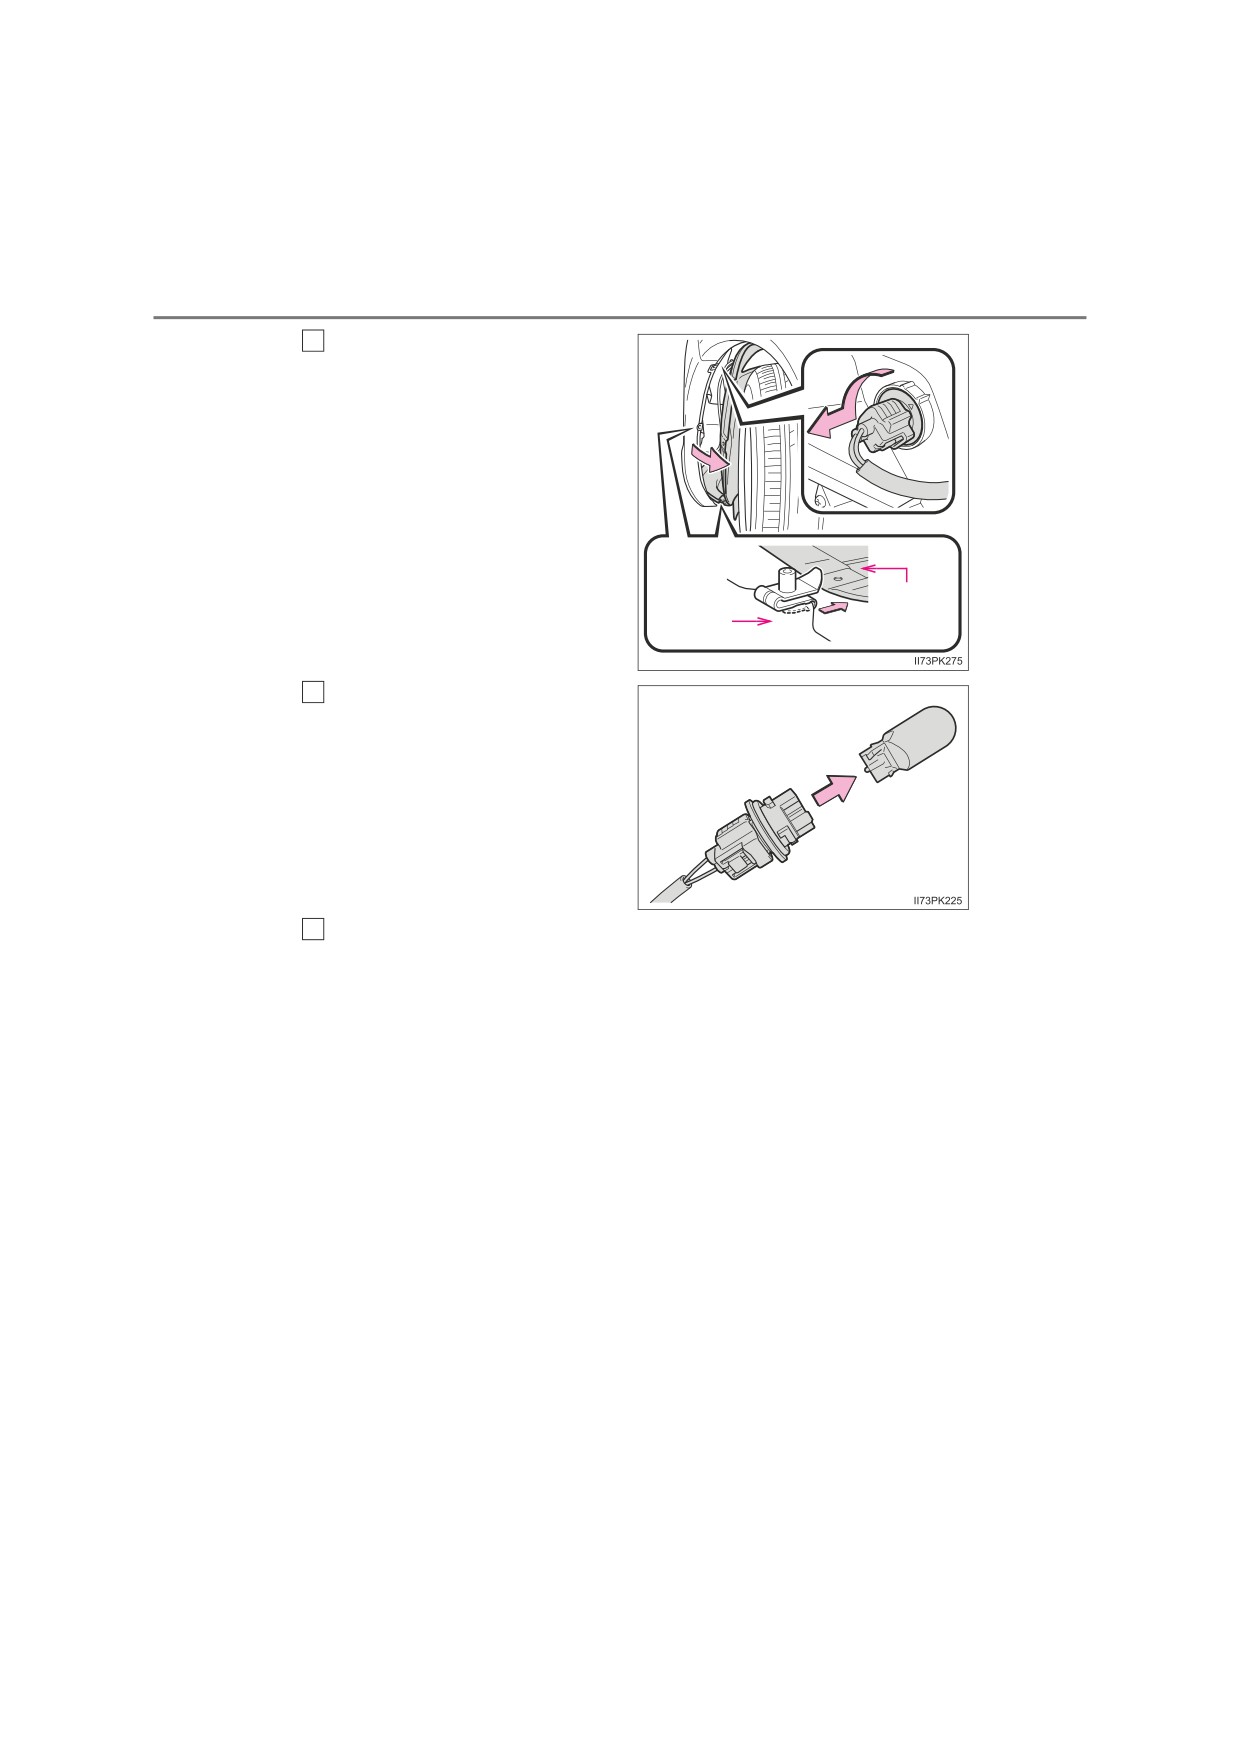
■ Front turn signal lights (halogen headlights type B)
To allow enough working
1
space, turn the steering
wheel to the opposite side
where the bulb to be
replaced is located.
Remove the screws and
clips.
1
Removing the clip
2
Installing the clip
Type A
Type B
7
536
7-3. Do-it-yourself maintenance
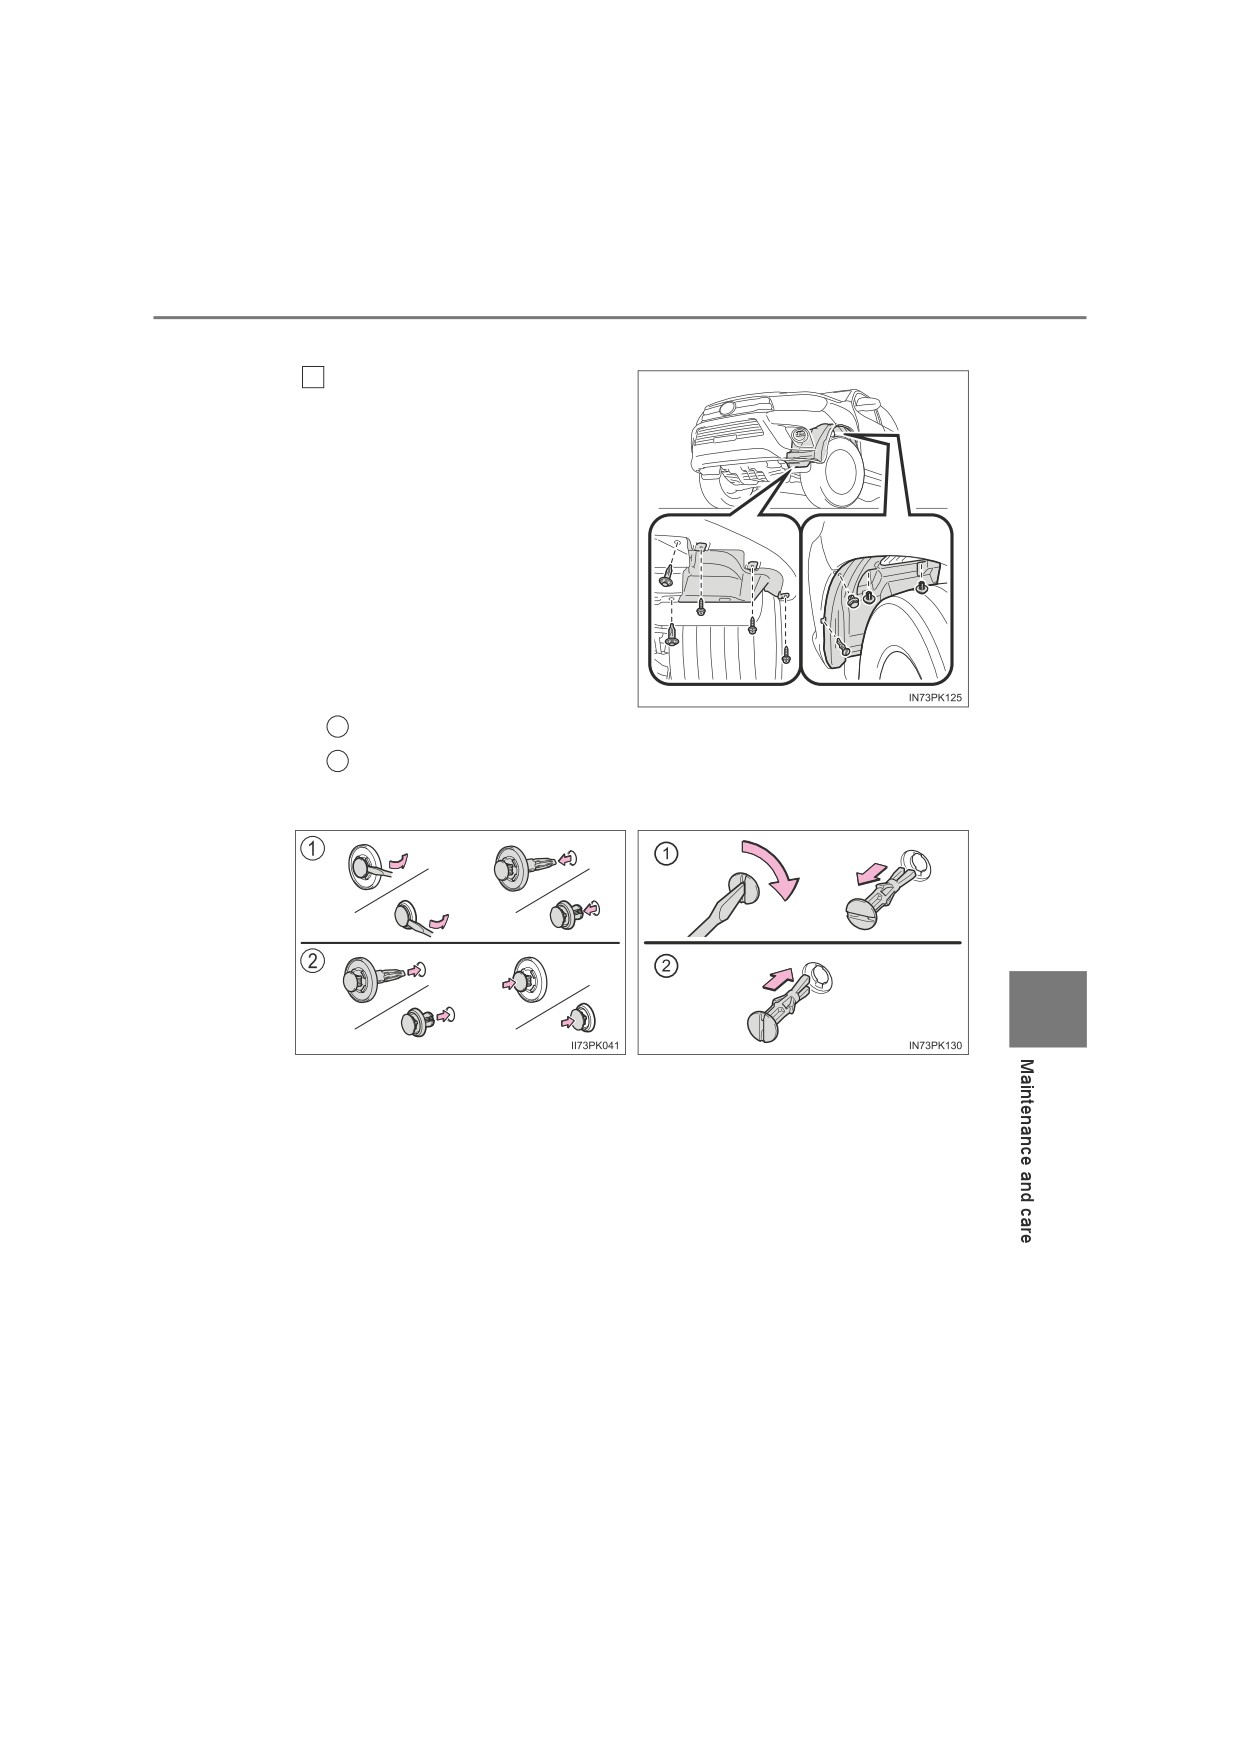
2
Partly remove the fender
liner and turn the bulb base
counterclockwise.
Fender
Bumper
liner
Remove the light bulb.
3
When installing, reverse the steps listed.
4
7-3. Do-it-yourself maintenance
537
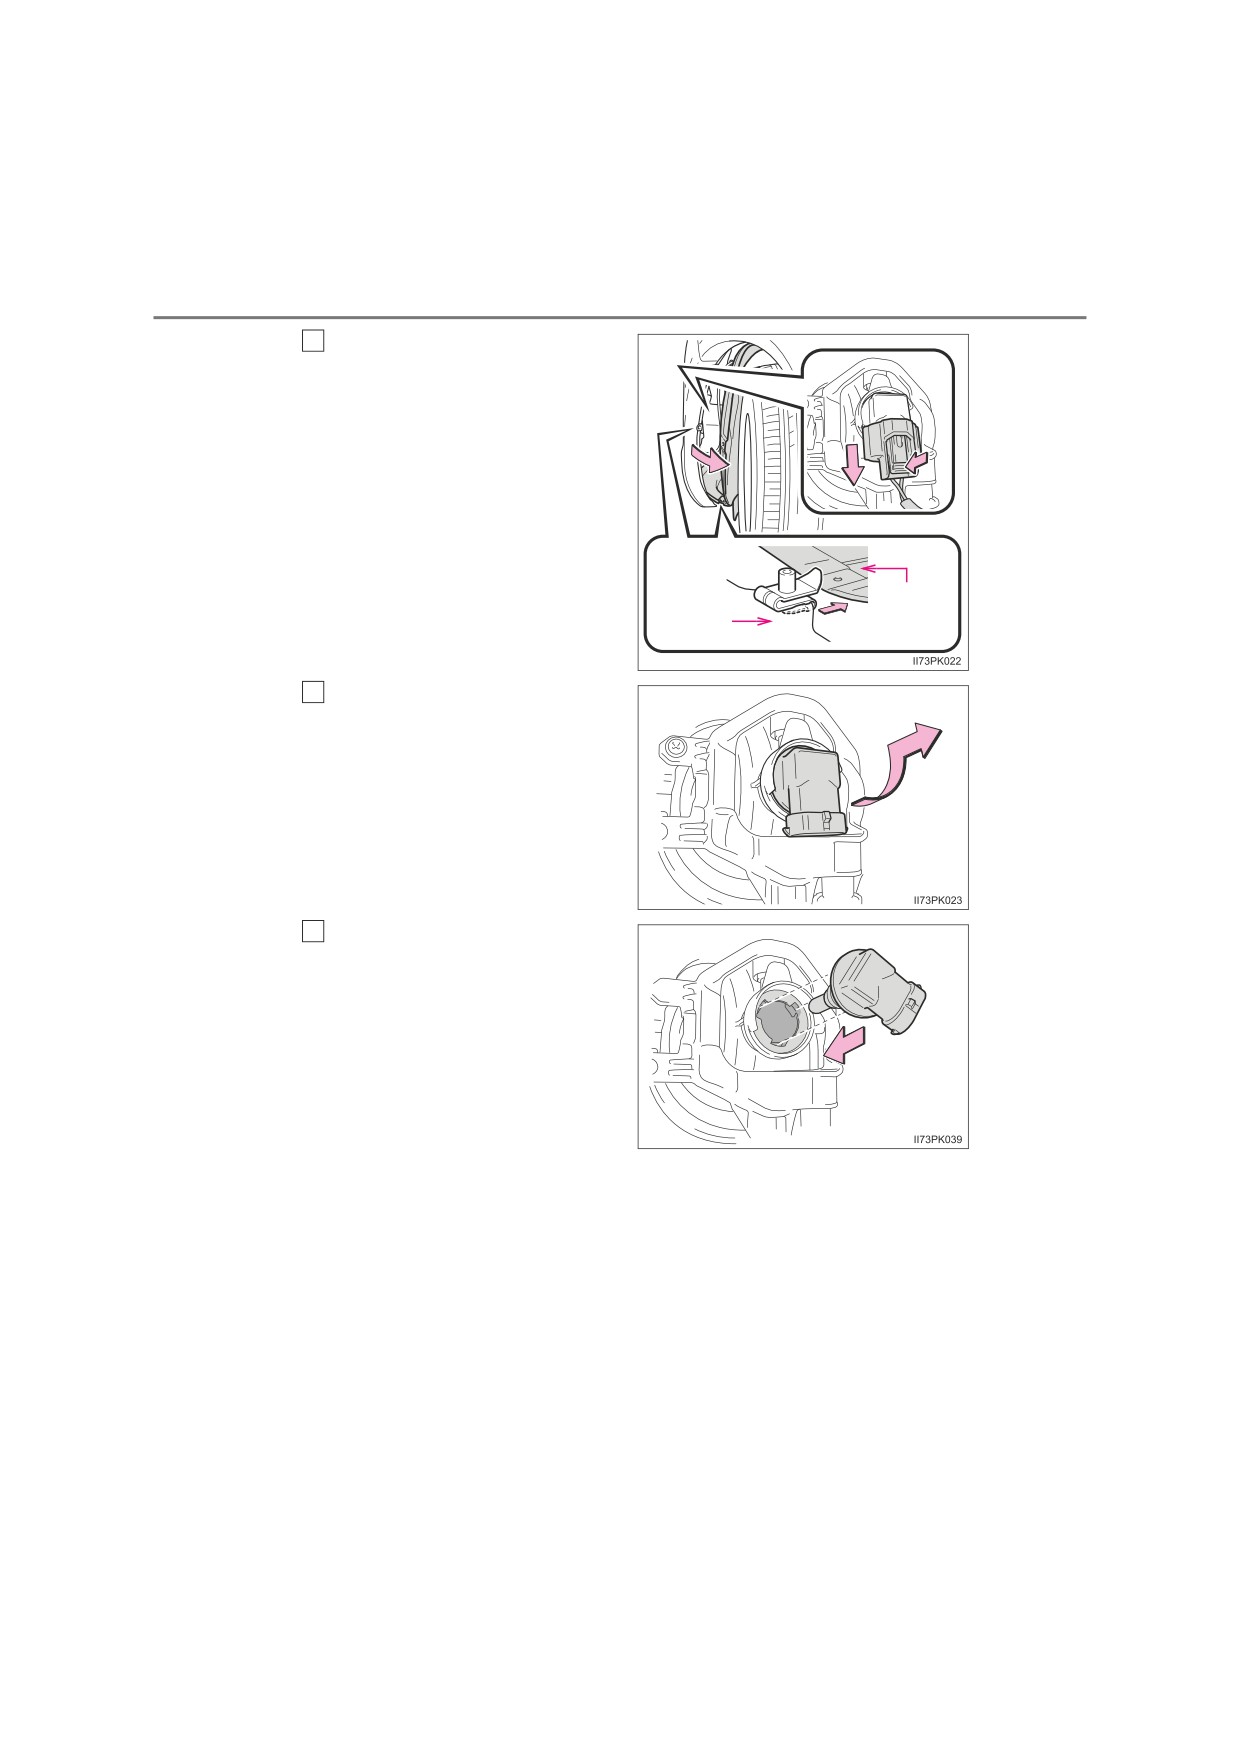
■ Halogen front fog lights (if equipped)
To allow enough working
1
space, turn the steering
wheel to the opposite side
where the bulb to be
replaced is located.
Remove the screws and
clips.
1
Removing the clip
2
Installing the clip
Type A
Type B
7
538
7-3. Do-it-yourself maintenance
2
Partly remove the fender
liner and unplug the connec-
tor while pressing the lock
release.
Fender
Bumper
liner
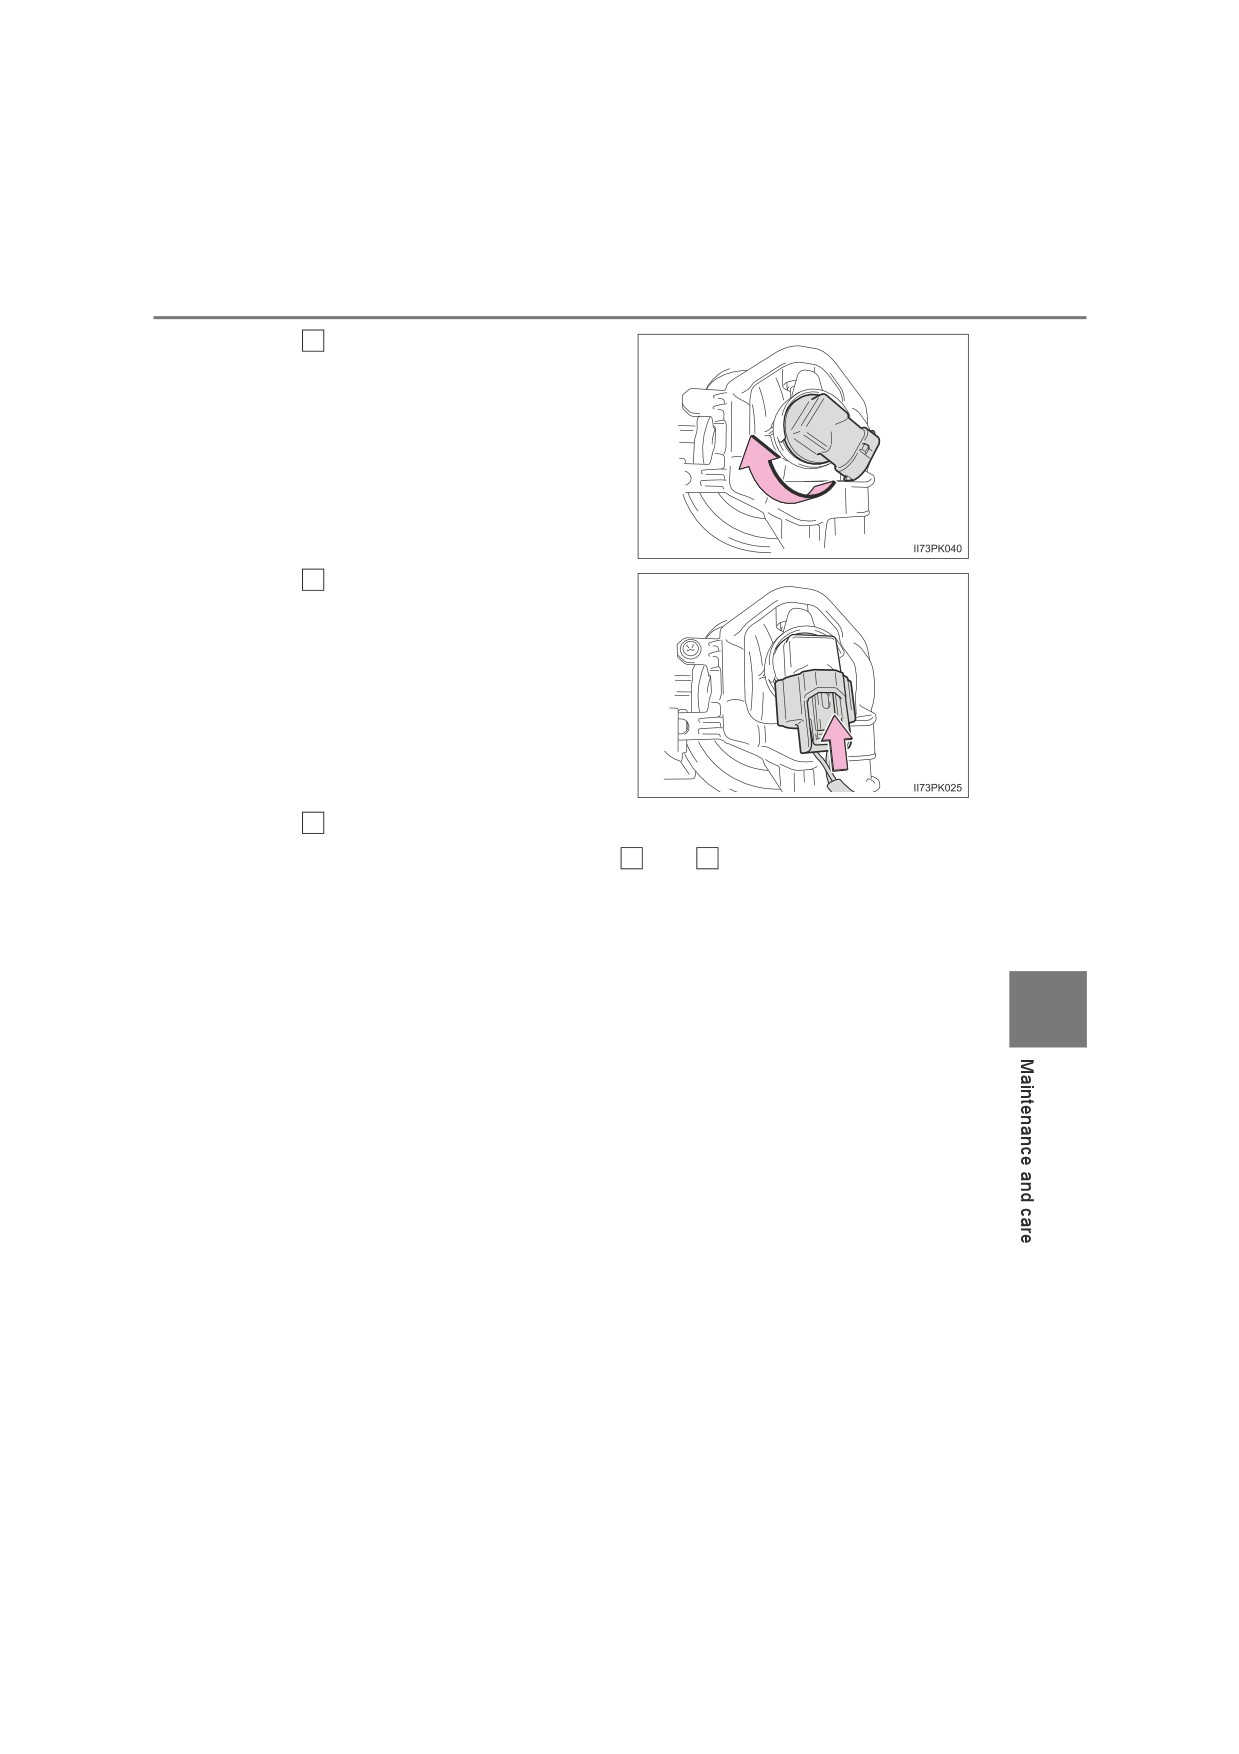
3
Turn the bulb base counter-
clockwise.
Replace the light bulb, and
4
install the bulb base.
Align the 3 tabs on the light bulb
with the mounting, and insert.
7-3. Do-it-yourself maintenance
539
5
Turn and secure the bulb
base.
Install the connector.
6
Shake the bulb base gently to
check that it is not loose, turn
the front fog lights on once and
visually confirm that no light is
leaking through the mounting.
7
When installing the fender liner, screws and clips, reverse the
removing procedure in steps
1
and
2
7
540
7-3. Do-it-yourself maintenance
■ Stop/tail lights, rear turn signal lights, back-up lights and rear
fog light (if equipped) (without LED stop lights)
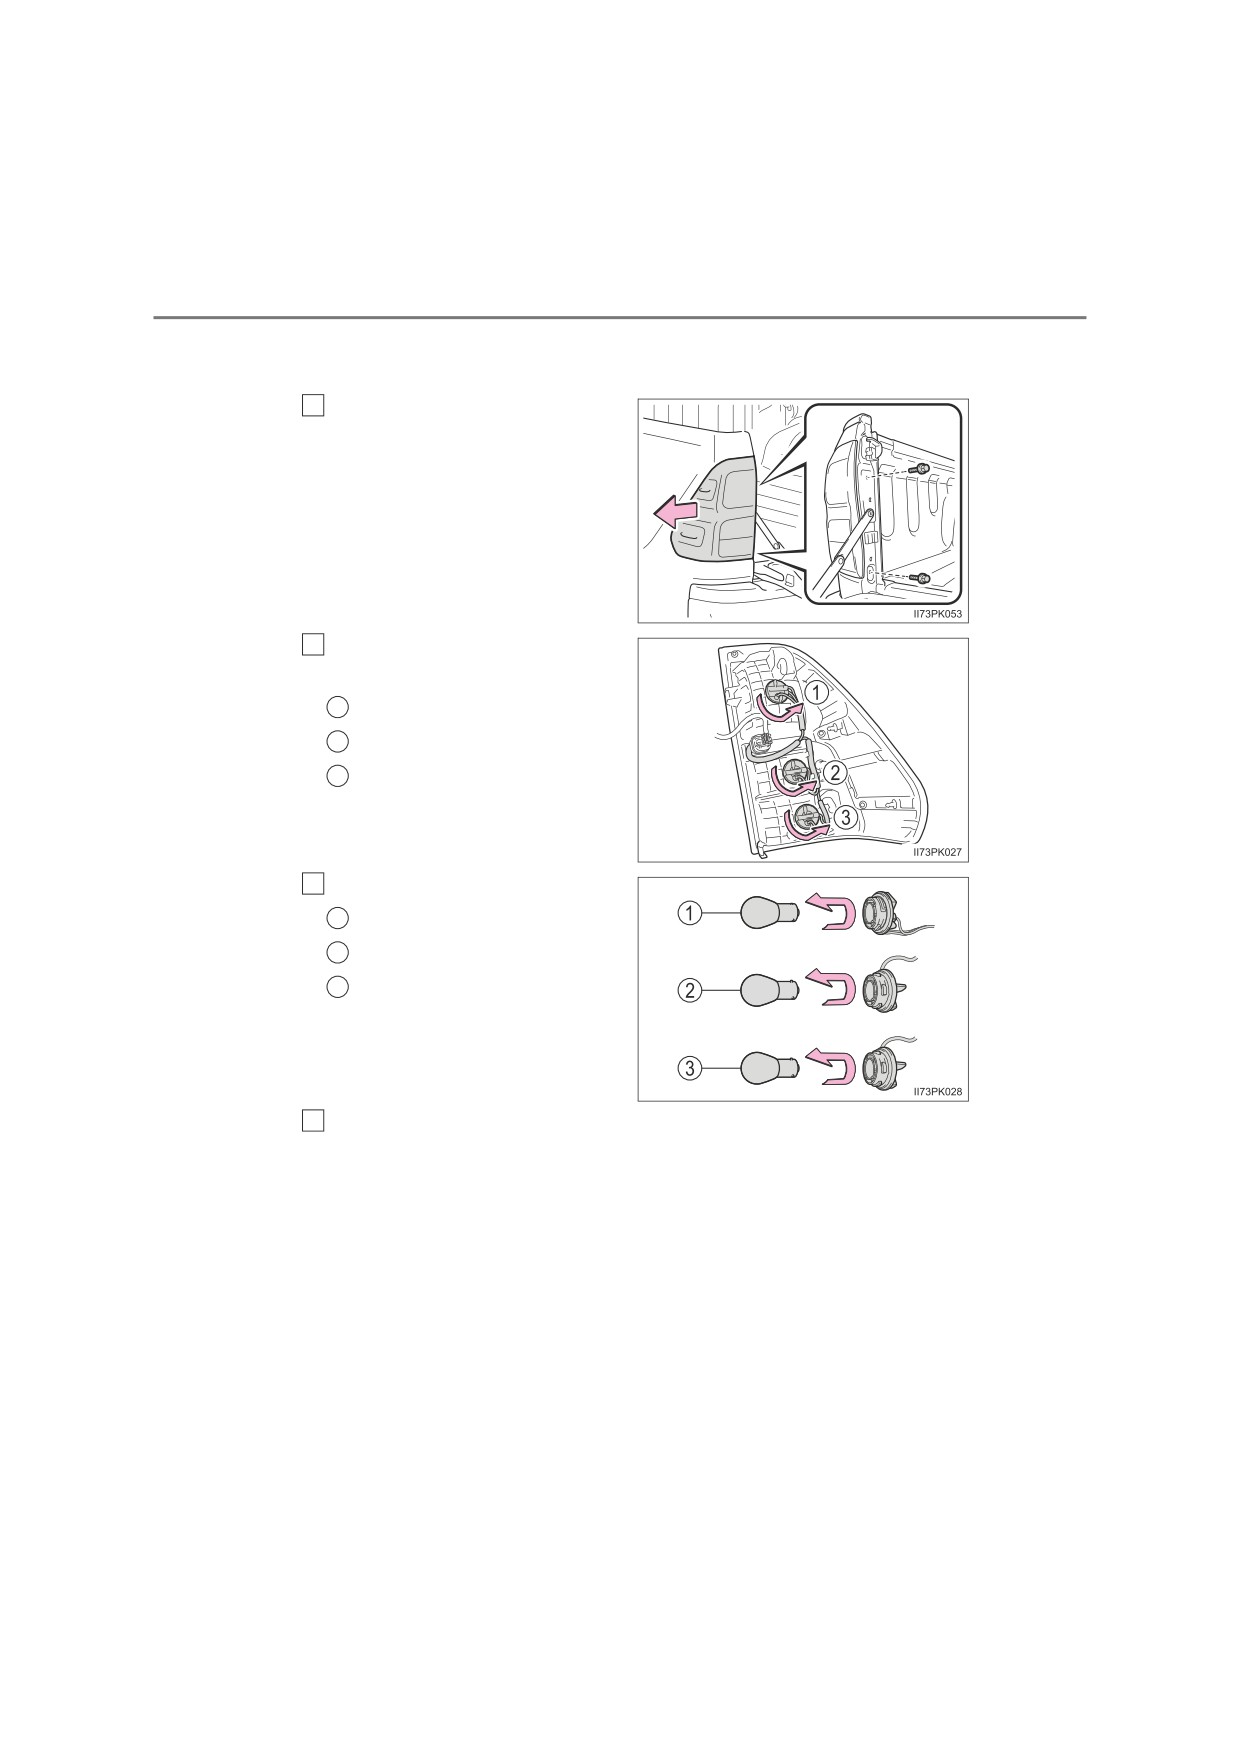
1
Remove the securing bolts
and pull the unit sideways to
remove.
2
Turn the bulb base counter-
clockwise.
1
Stop/tail light
2
Rear turn signal light
3
Back-up light or rear fog
light
3
Remove the light bulb.
1
Stop/tail light
2
Rear turn signal light
3
Back-up light or rear fog
light
When installing, reverse the steps listed.
4
7-3. Do-it-yourself maintenance
541
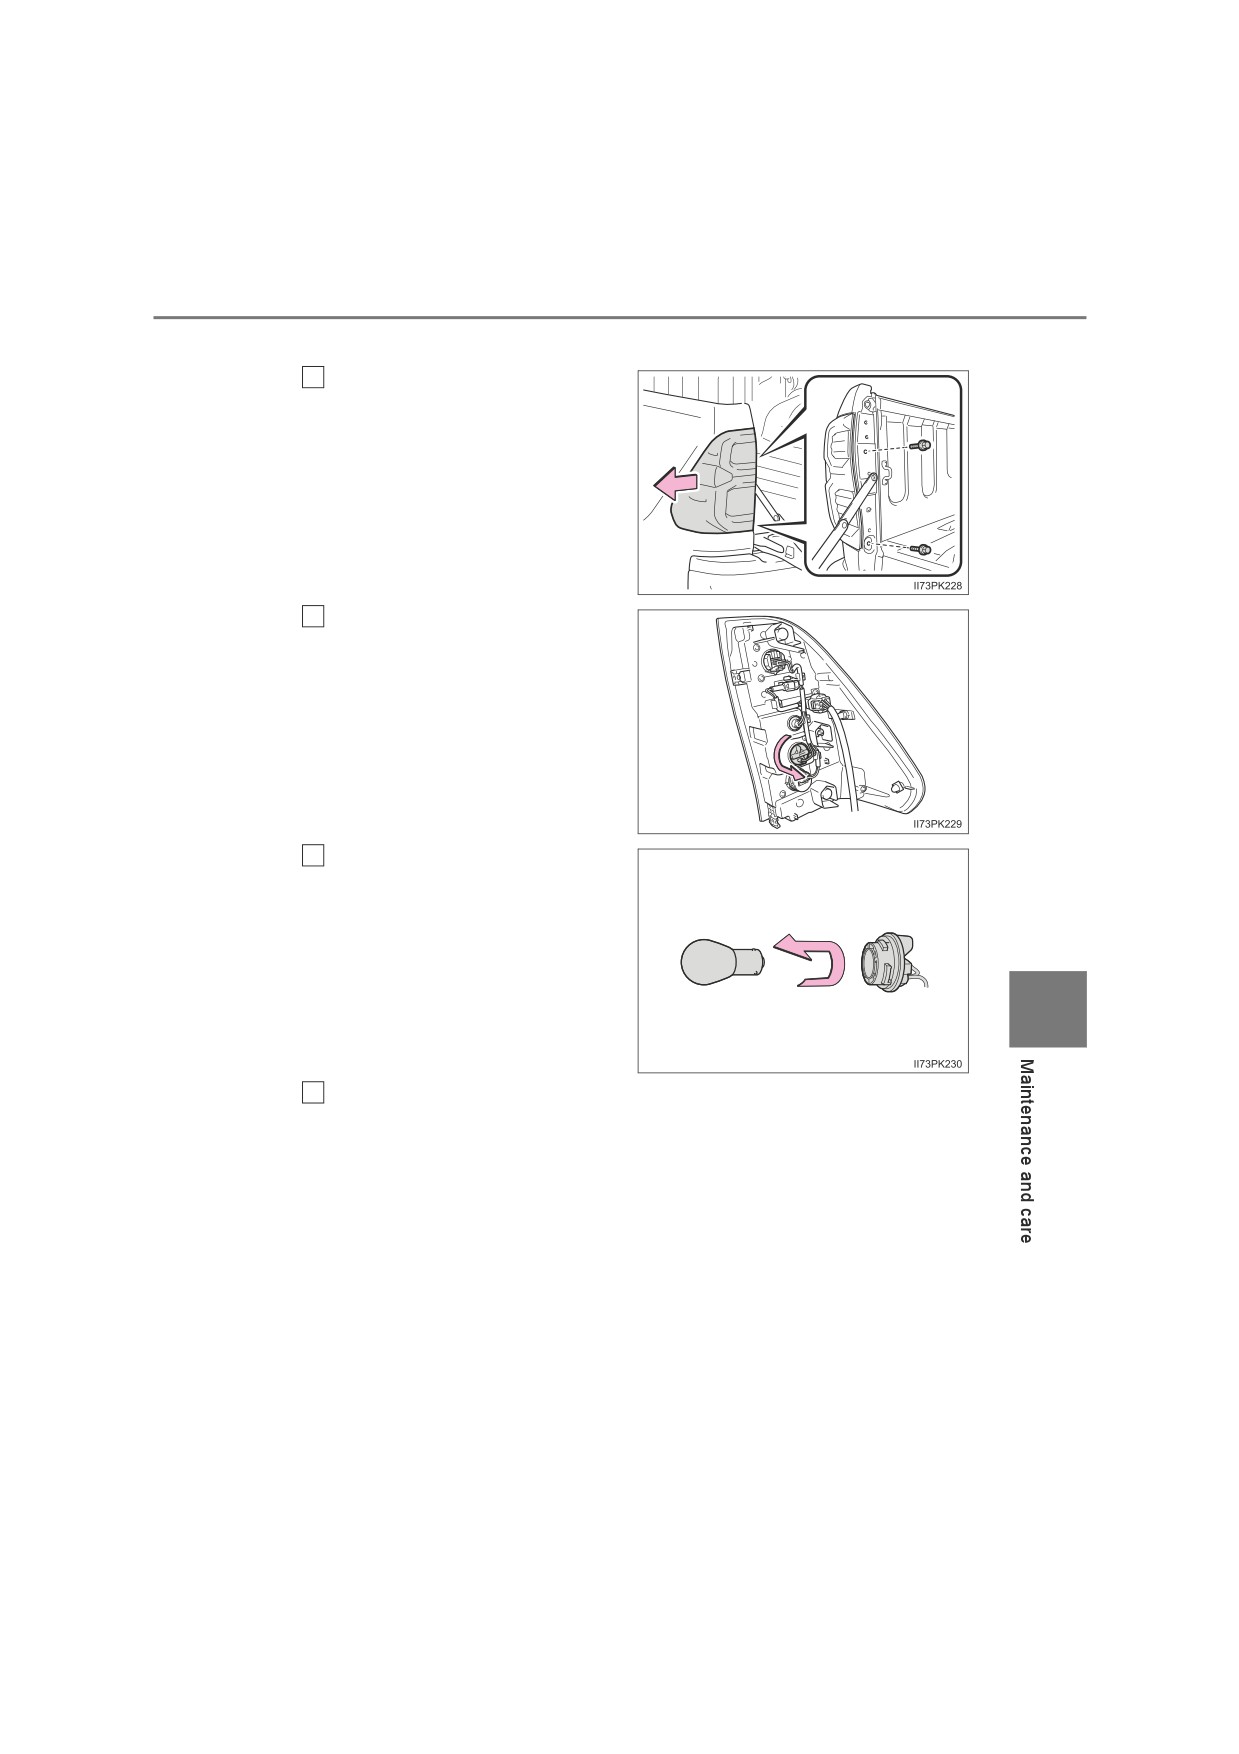
■ Rear turn signal lights (with LED stop lights)
Remove the securing bolts
1
and pull the unit sideways to
remove.
2
Turn the bulb base counter-
clockwise.
Remove the light bulb.
3
7
When installing, reverse the steps listed.
4
542
7-3. Do-it-yourself maintenance
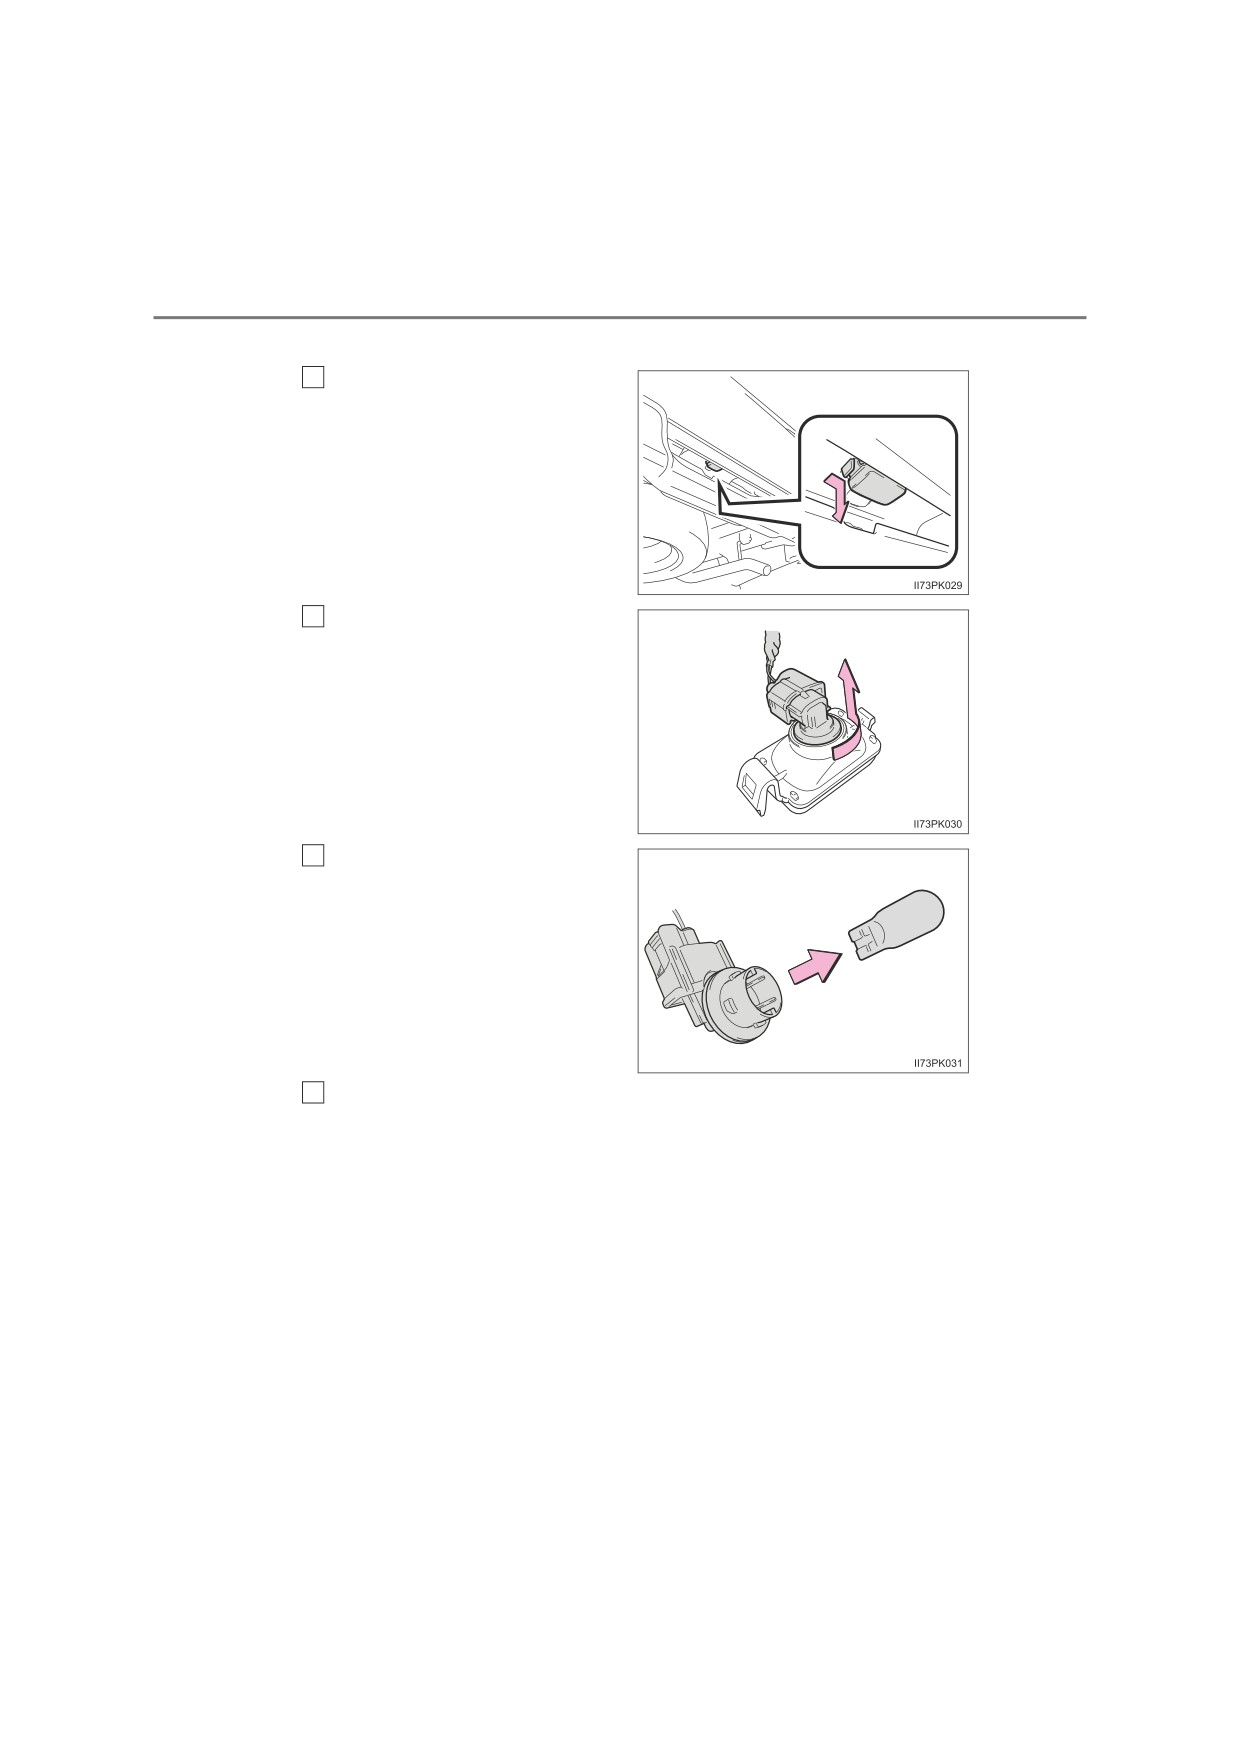
■ License plate light
1
Remove the unit.
2
Turn the bulb base counter-
clockwise.
3
Remove the light bulb.
4
When installing, reverse the steps listed.
7-3. Do-it-yourself maintenance
543
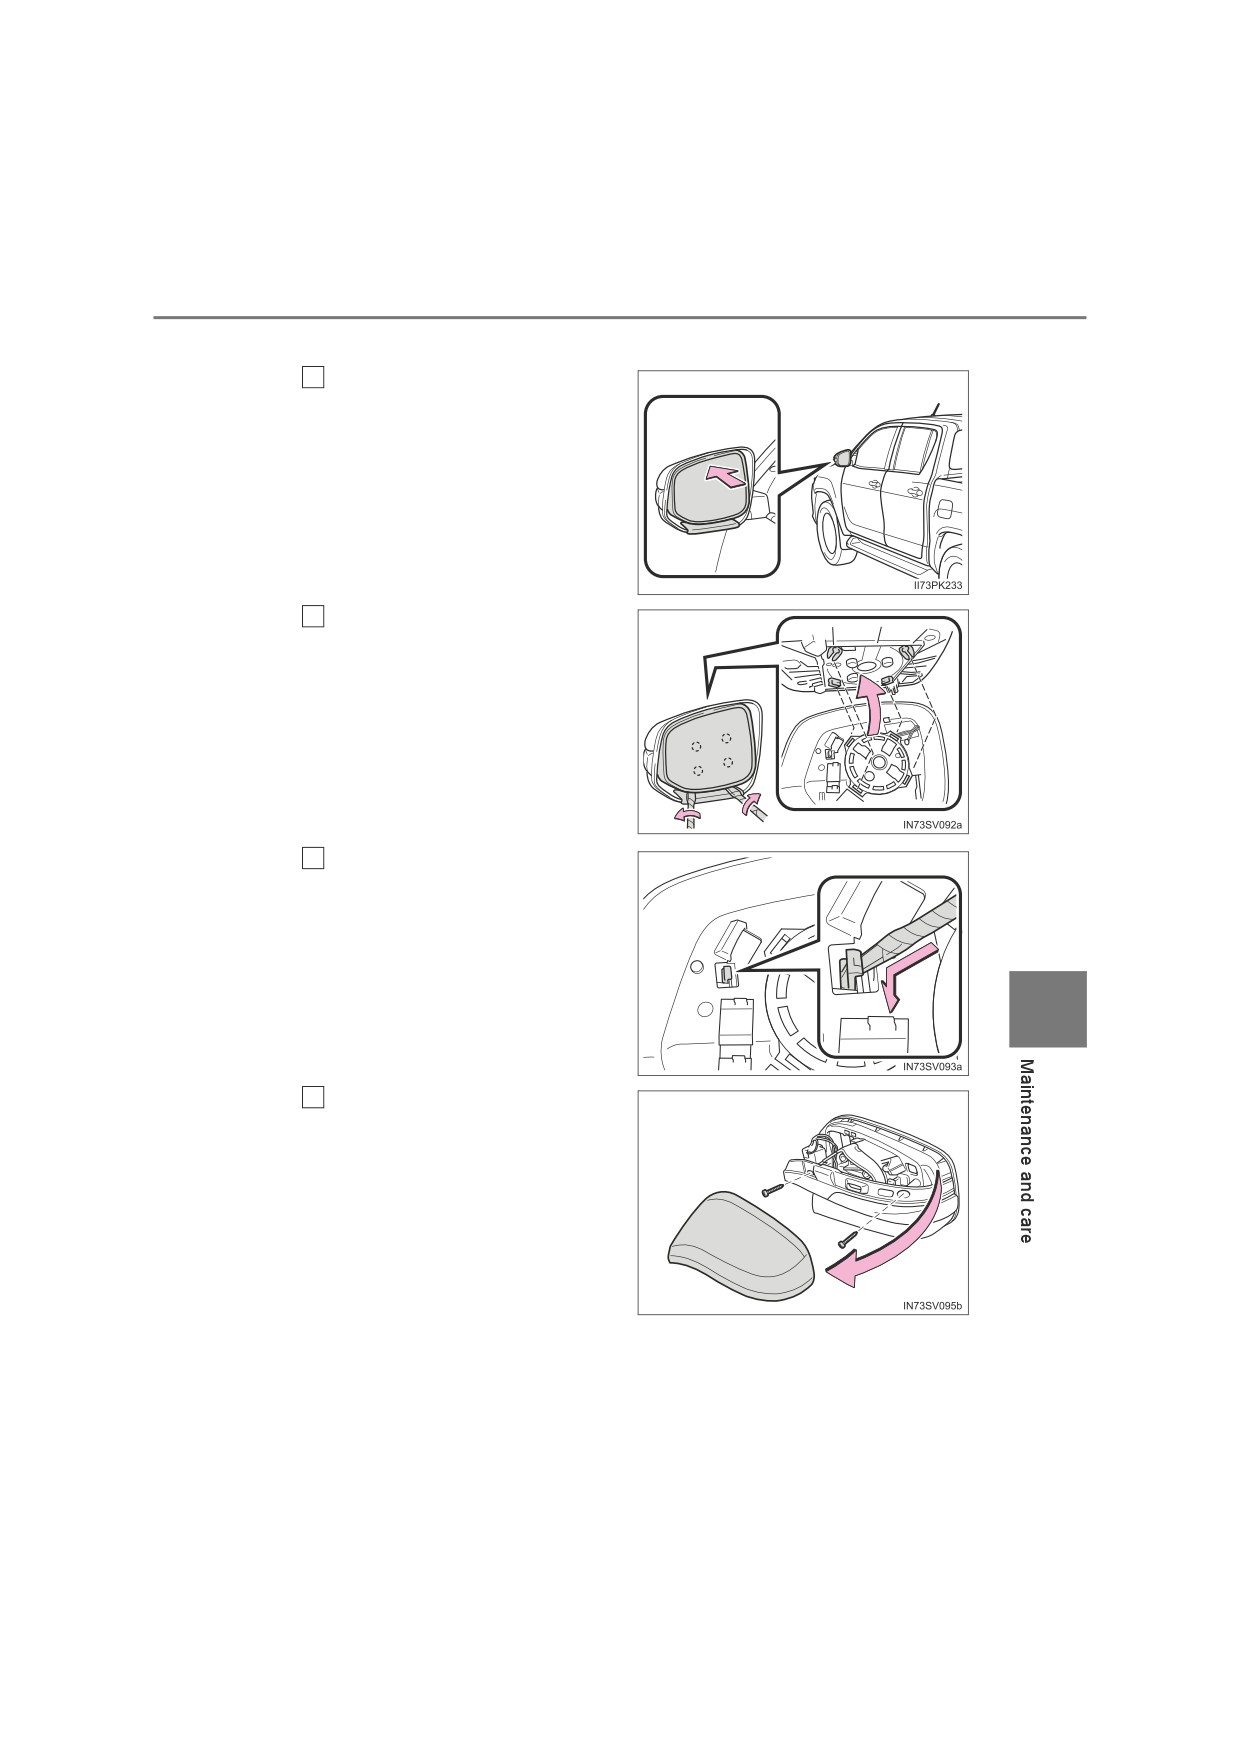
■ Outer foot lights (if equipped)
Press the upper part of the
1
outside rear view mirror to tilt
the mirror face upward, and
apply protective tape to the
lower part of the mirror cover.
2
Insert
2 flathead screw-
drivers wrapped in protective
tape, and disconnect the tabs
behind the mirror.
Pry the mirror out toward you,
disconnecting the
2 tabs at a
time.
Work carefully, ensuring that
you do not drop the mirror.
Disconnect the tab as shown
3
in the illustration.
7
4
Remove the upper cover and
screws.
544
7-3. Do-it-yourself maintenance
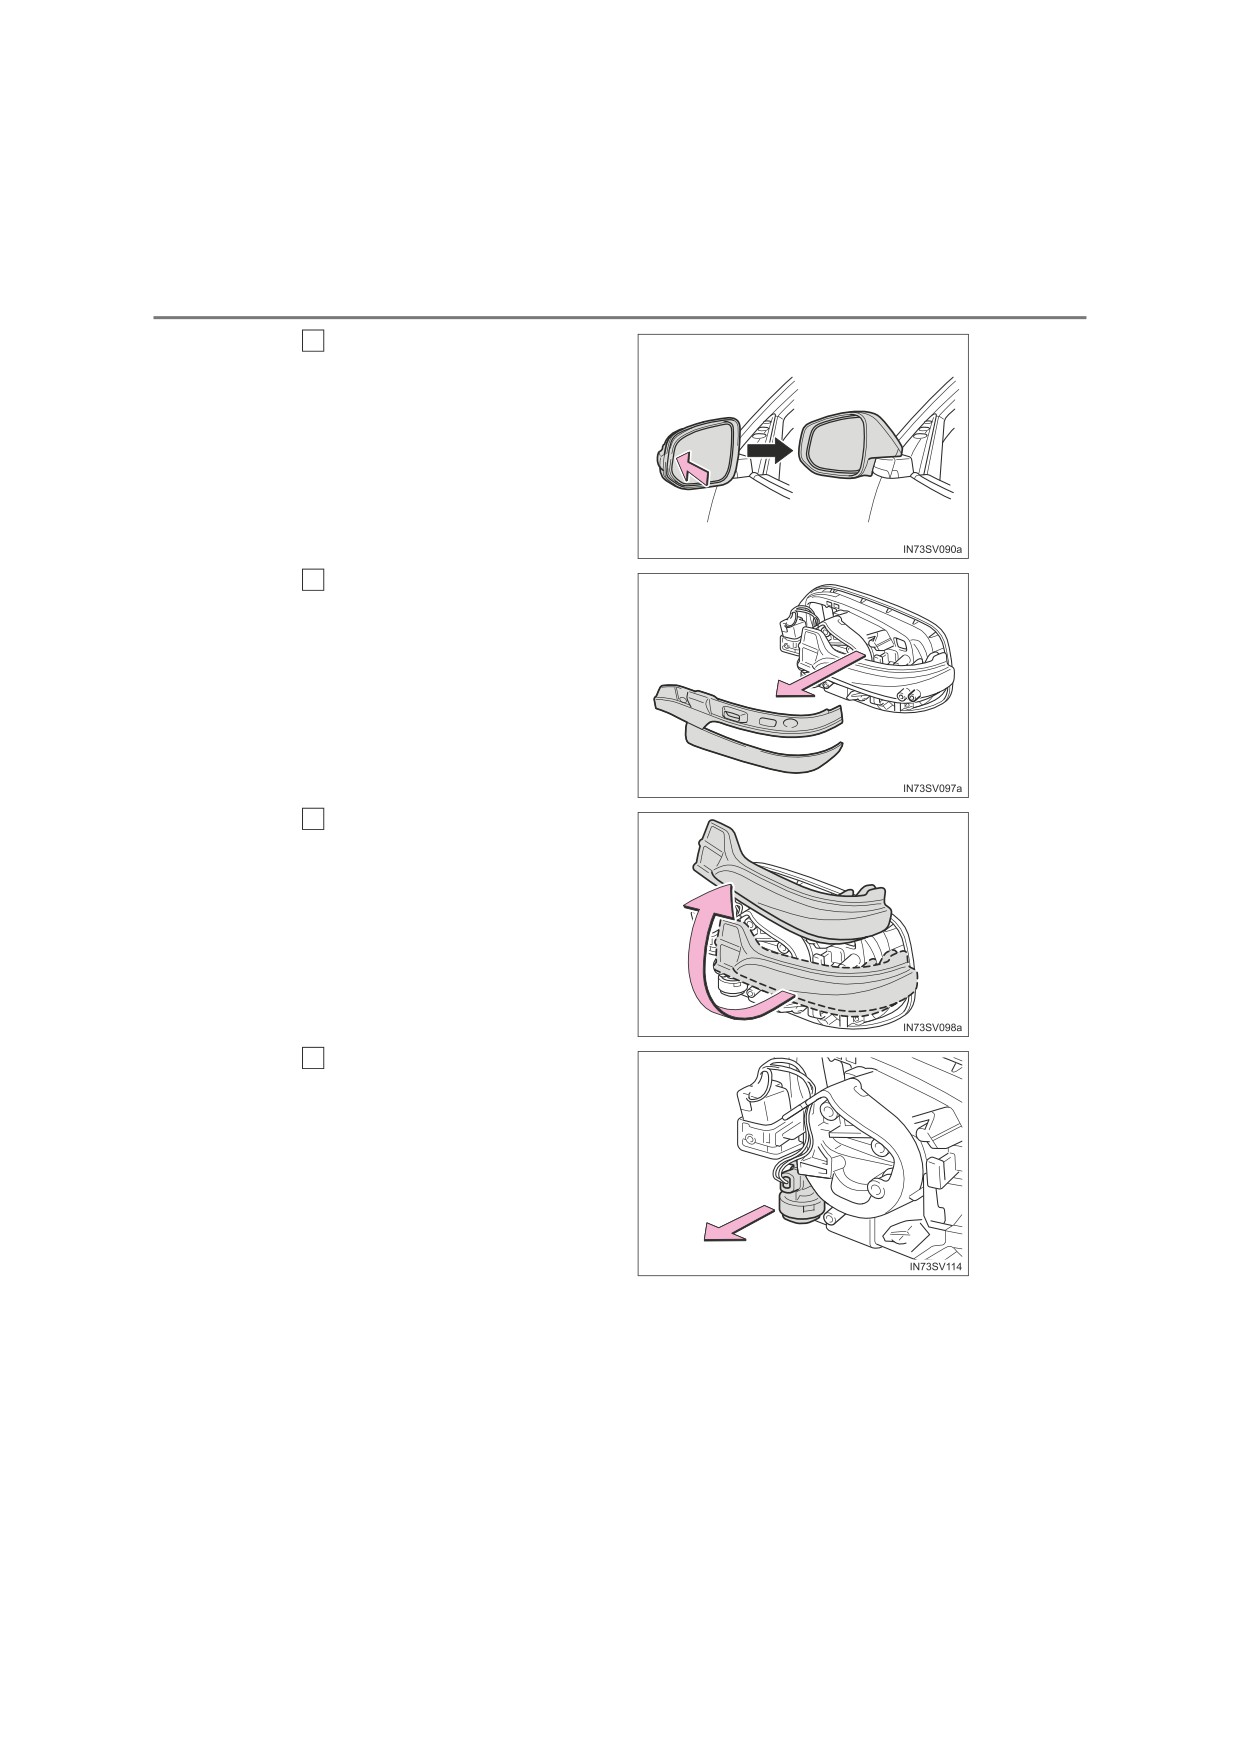
5
Fold the mirror forward.
Remove the lower cover.
6
7
Remove the side turn signal
light lens.
Remove the bulb base.
8
7-3. Do-it-yourself maintenance
545
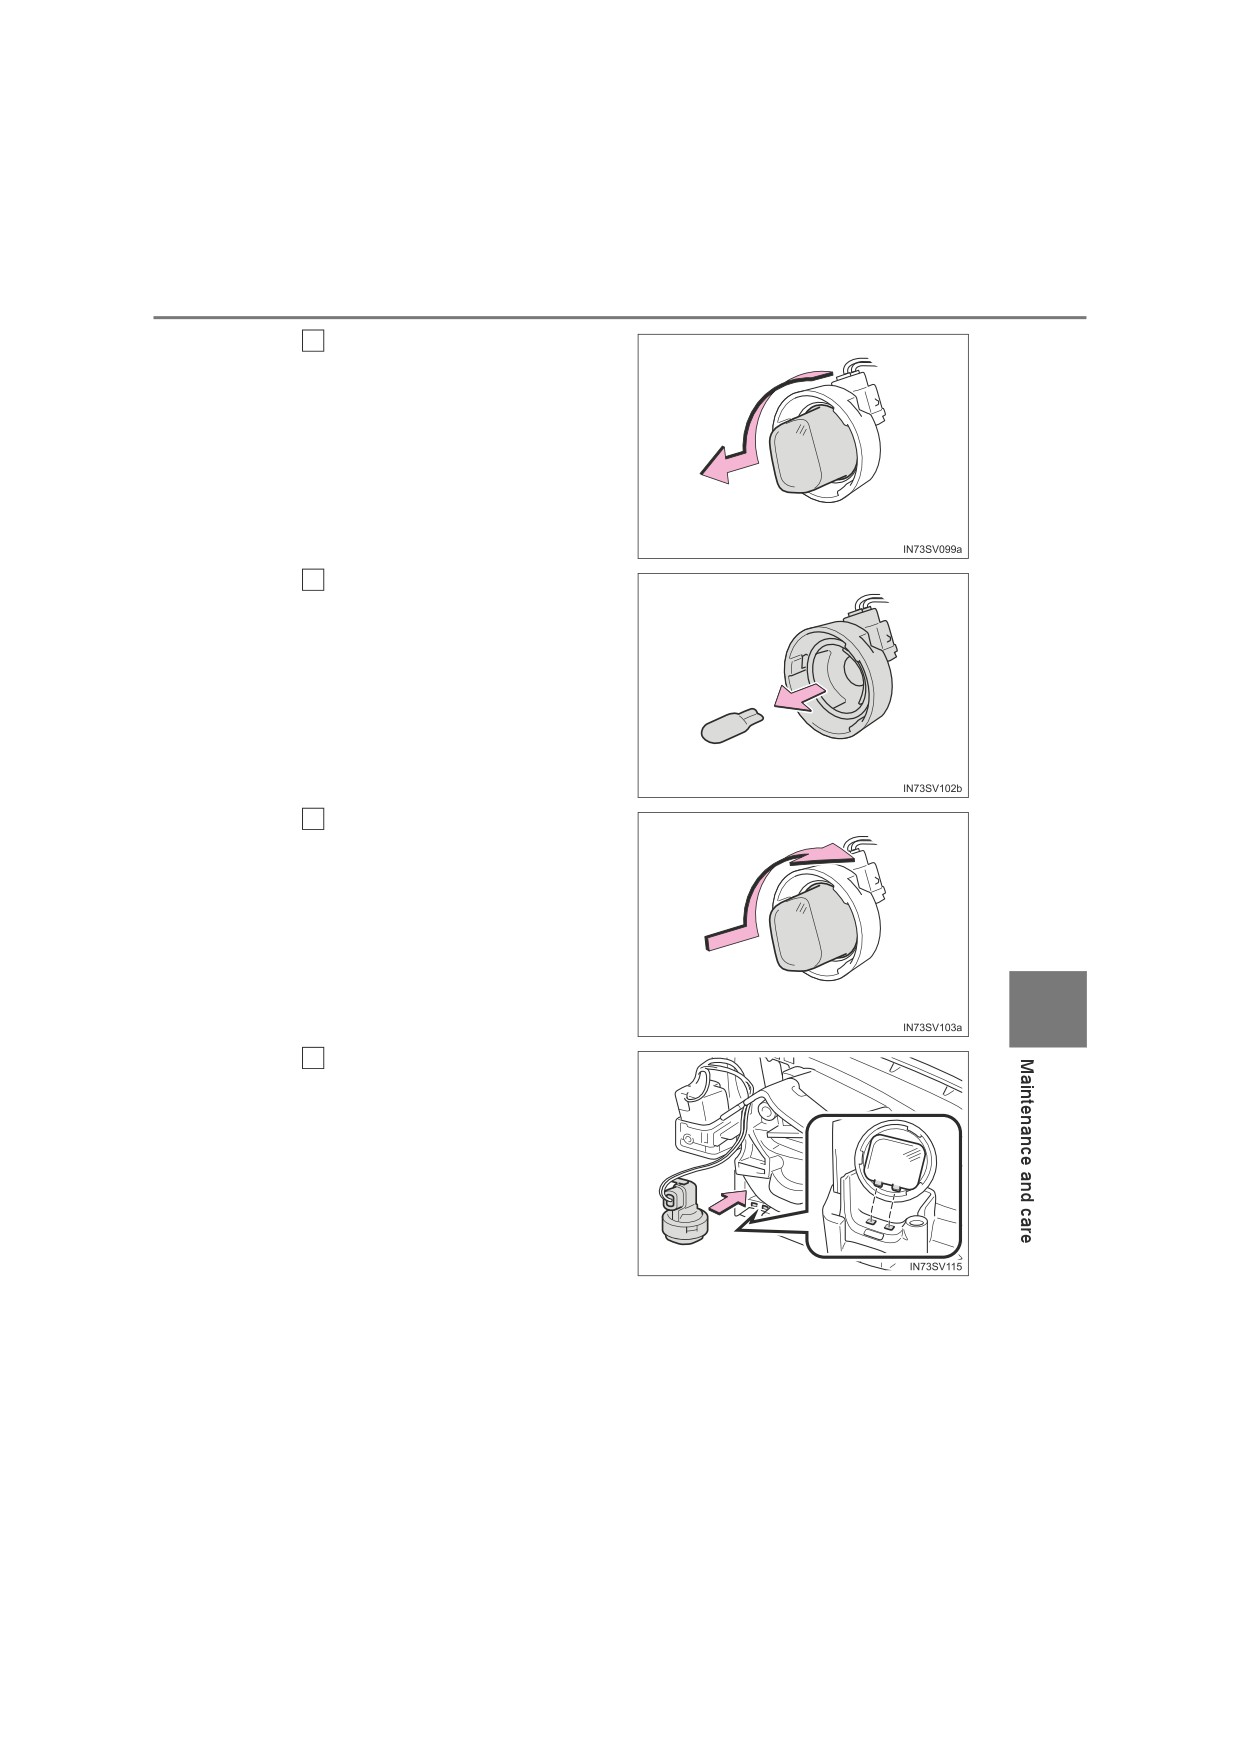
9
Turn the cover counterclock-
wise and remove it.
Remove the light bulb.
10
After installing the new bulb,
11
install the cover clockwise.
7
Install the bulb base.
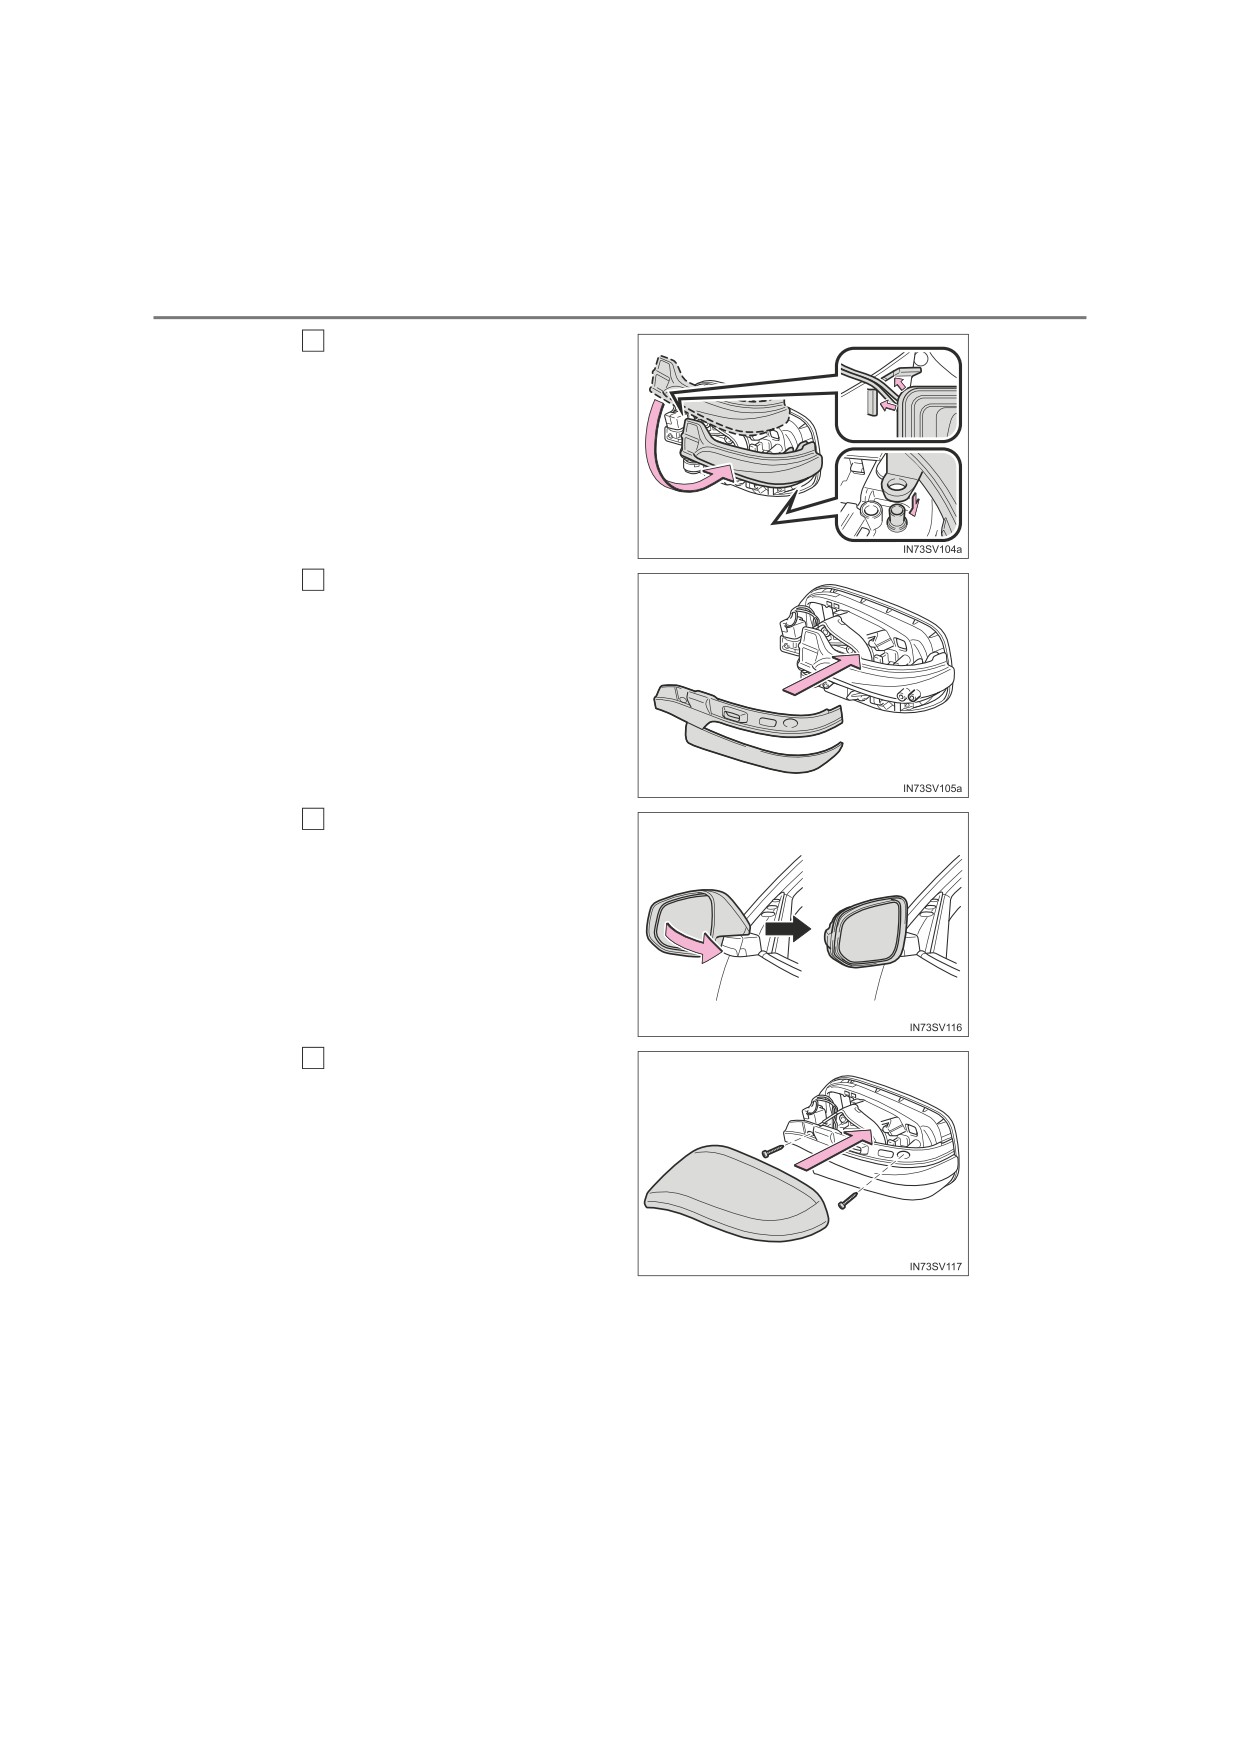
12
Insert the two claws (left-hand
side) or claw (right-hand side)
into the hole(s).
546
7-3. Do-it-yourself maintenance
13
Install the side turn signal
light lens.
Insert the projection into the
hole of the lens, and align the
lens corner with the plate, as
shown in the illustration.
Install the lower cover.
14
15
Return the mirror to its origi-
nal position.
16
Install the screws and upper
cover.
7-3. Do-it-yourself maintenance
547
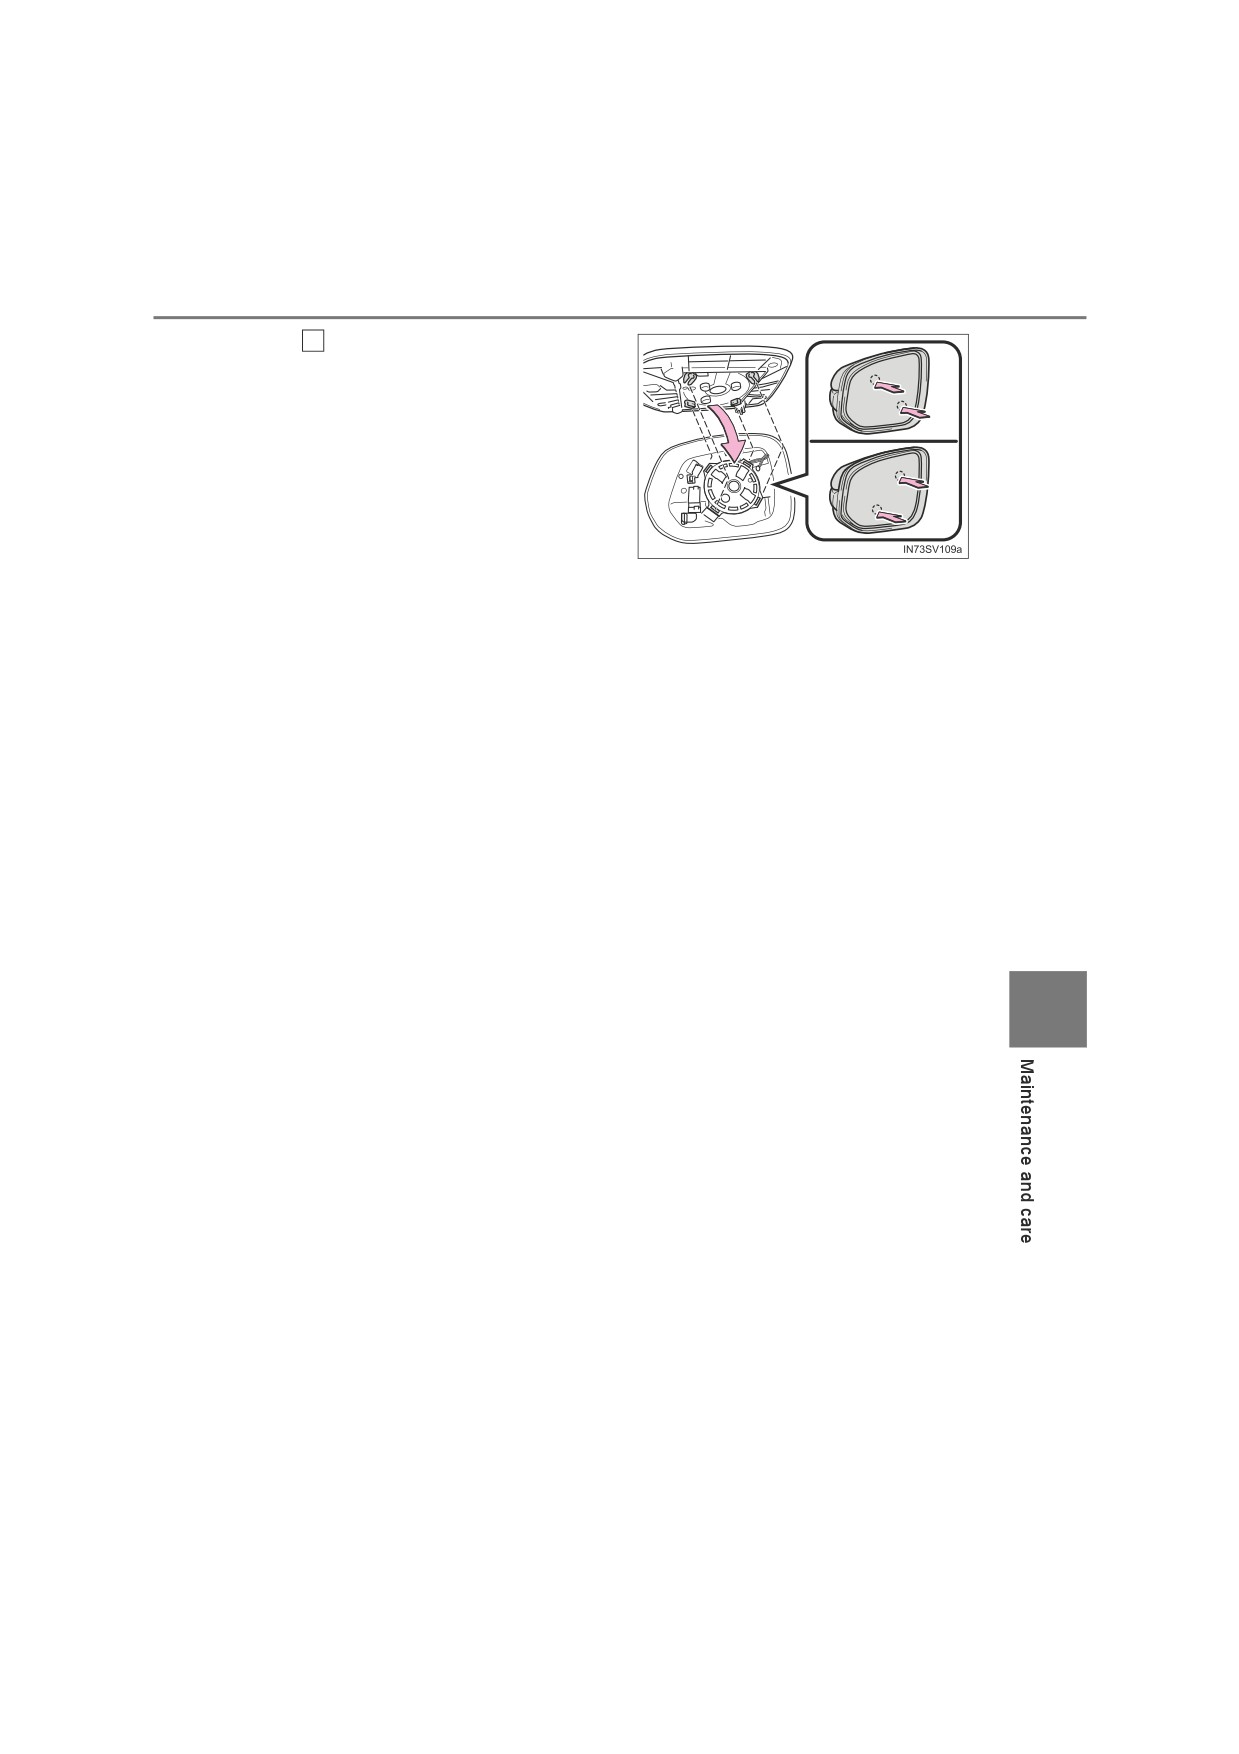
17
Align the tabs, and secure
the mirror by pushing in each
diagonally-opposite pair of
tabs in order.
Make sure to insert the tabs in
order as shown in the illustra-
tion, and push them in until a
click is heard.
If you do not hear the click, do
not force the tabs in. Instead,
remove the mirror and check
that the tabs are aligned.
■ Replacing the following bulbs
If any of the lights listed below has burnt out, have it replaced by
any authorized Toyota retailer or Toyota authorized repairer, or any
reliable repairer.
● Headlights (high/low beams) (LED headlights)
● Front position lights/daytime running lights (if equipped) (LED
headlights)
● Front turn signal lights (LED headlights)
● Side turn signal lights
● LED front fog lights (if equipped)
● LED stop lights
● Tail lights (LED stop lights)
7
● Rear fog lights (if equipped) or back-up lights (LED stop lights)
● High mounted stoplight (if equipped)
548
7-3. Do-it-yourself maintenance
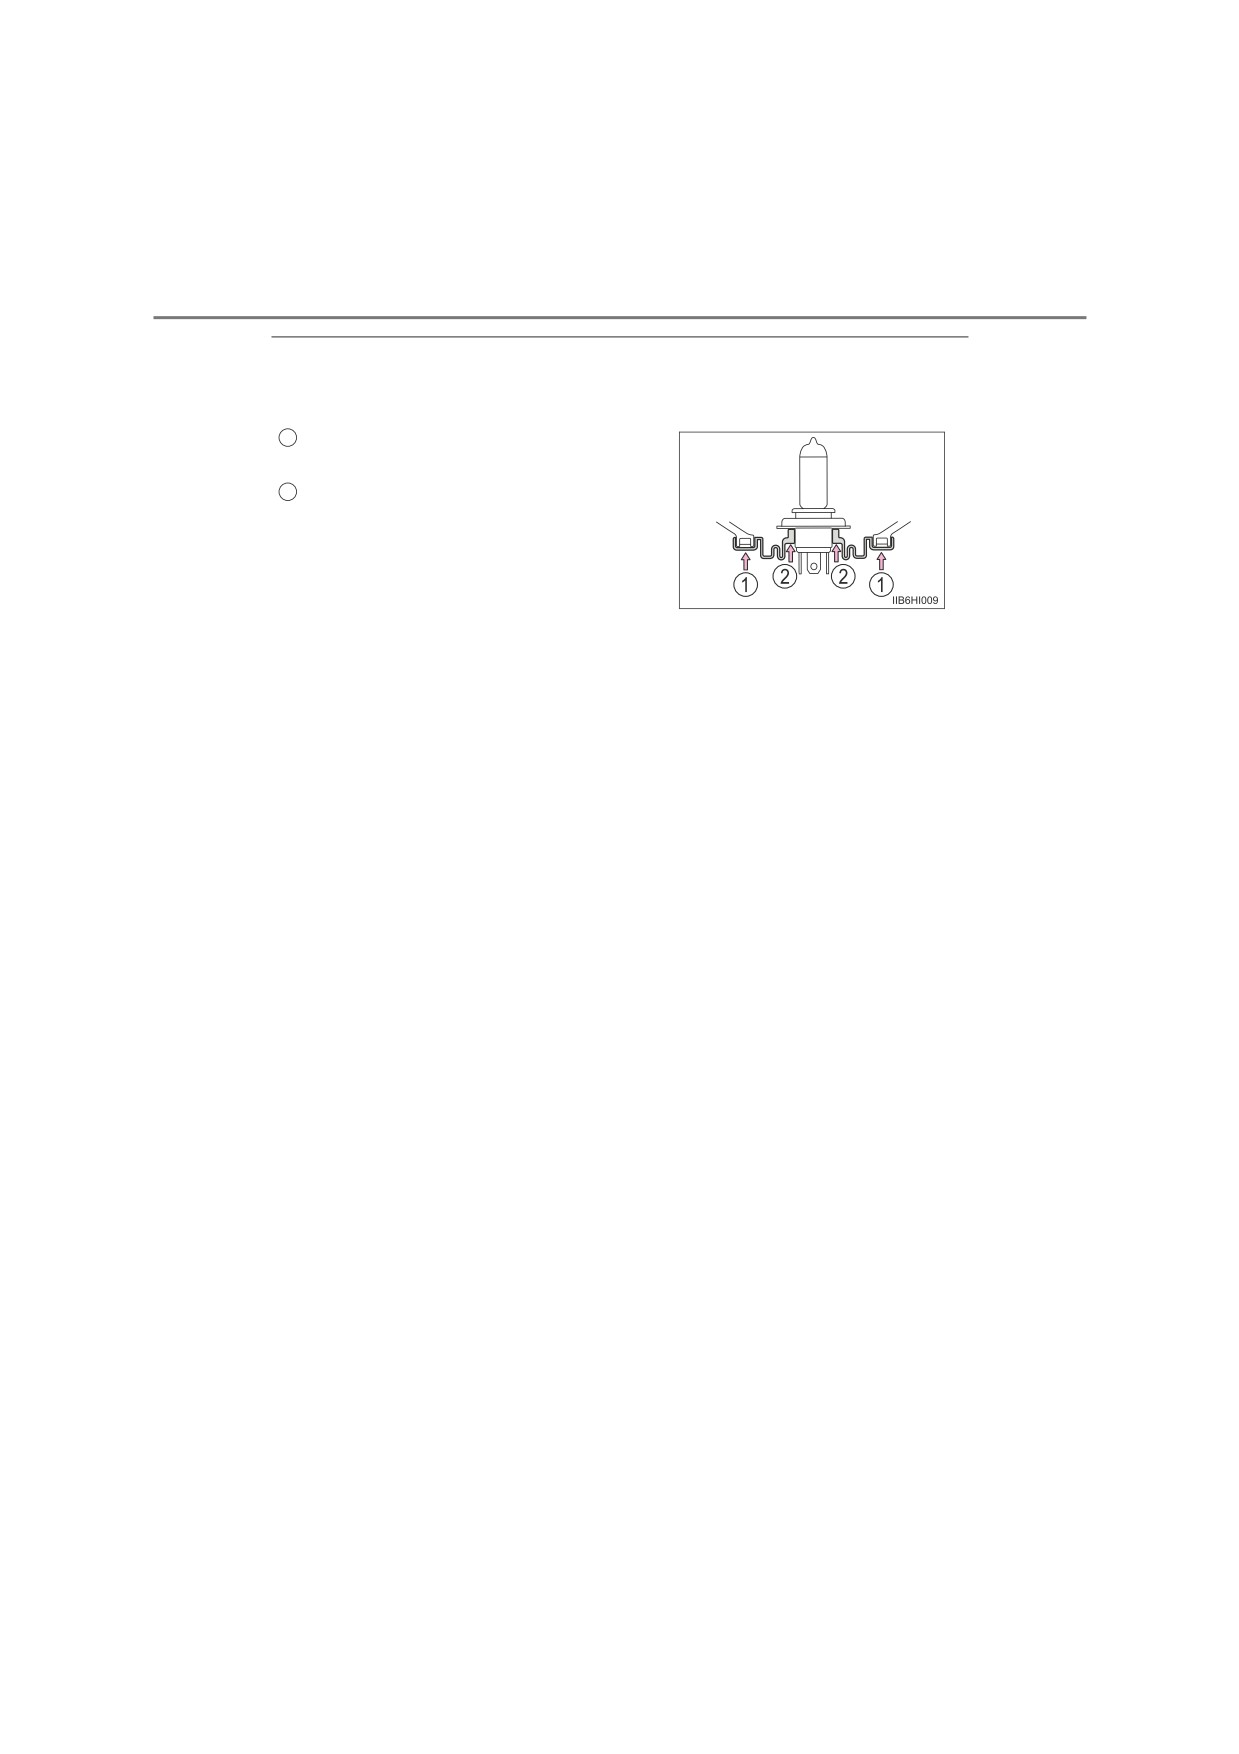
■ When installing the rubber cover of the headlight (halogen headlights
type A)
Ensure the rubber cover is securely attached.
1
Fit the rubber cover outer circumfer-
ence in firmly.
Fit the rubber cover around the light
2
bulb in until the light bulb plug can be
seen.
■ LED lights
The following lights consist of a number of LEDs. If any of the LEDs burn out,
take your vehicle to any authorized Toyota retailer or Toyota authorized
repairer, or any reliable repairer to have the light replaced.
● Headlights (high/low beams) (LED headlights)
●Front position lights/daytime running lights (if equipped) (LED headlights)
● Front turn signal lights (LED headlights)
● Side turn signal lights (mirror-mounted type)
● LED front fog lights (if equipped)
●LED stop lights
● Tail lights (LED stop lights)
●Rear fog lights (if equipped) or back-up lights (LED stop lights)
● High mounted stoplight (if equipped)
■ Condensation build-up on the inside of the lens
Temporary condensation build-up on the inside of the headlight lens does not
indicate a malfunction. Contact any authorized Toyota retailer or Toyota
authorized repairer, or any reliable repairer for more information in the follow-
ing situations:
● Large drops of water have built up on the inside of the lens.
● Water has built up inside the headlight.
7-3. Do-it-yourself maintenance
549
WARNING
■ Replacing light bulbs
● Turn off the lights. Do not attempt to replace the bulb immediately after
turning off the lights.
The bulbs become very hot and may cause burns.
●Do not touch the glass portion of the light bulb with bare hands. When it is
unavoidable to hold the glass portion, use and hold with a clean dry cloth
to avoid getting moisture and oils on the bulb.
Also, if the bulb is scratched or dropped, it may blow out or crack.
●Fully install light bulbs and any parts used to secure them. Failure to do so
may result in heat damage, fire, or water entering the headlight unit. This
may damage the headlights or cause condensation to build up on the lens.
●Do not attempt to repair or disassemble light bulbs, connectors, electric
circuits or component parts.
Doing so may result in death or serious injury due to electric shock.
■ To prevent damage or fire
● Make sure bulbs are fully seated and locked.
●Check the wattage of the bulb before installing to prevent heat damage.
NOTICE
■ When replacing the outer foot lights
If the front window is stopping you from conducting the replace operation
properly, open the window on the side you are working on to allow you
enough space to work. Continuing the operation without giving yourself
7
enough space to work could lead you to scratch the vehicle.
550
7-3. Do-it-yourself maintenance
551
When trouble arises
8
8-1.
Essential information
8-2.
Steps to take in an
Emergency flashers
552
emergency
If your vehicle has to
If your vehicle needs
be stopped in an
to be towed
557
emergency
553
If you think something is
If the vehicle is
wrong
562
submerged or water on
Fuel pump shut off
the road is rising
555
system (gasoline engine
only)
563
If a warning light turns on
or a warning buzzer
sounds
564
If a warning message is
displayed
573
If you have a flat tire
579
If the engine will not
start
596
If the electronic key does
not operate properly
(vehicles with smart
entry & start system)
598
If the vehicle battery is
discharged
602
If your vehicle
overheats
608
If you run out of fuel
and the engine stalls
(diesel engine only)
612
If the vehicle becomes
stuck
613
552
8-1. Essential information
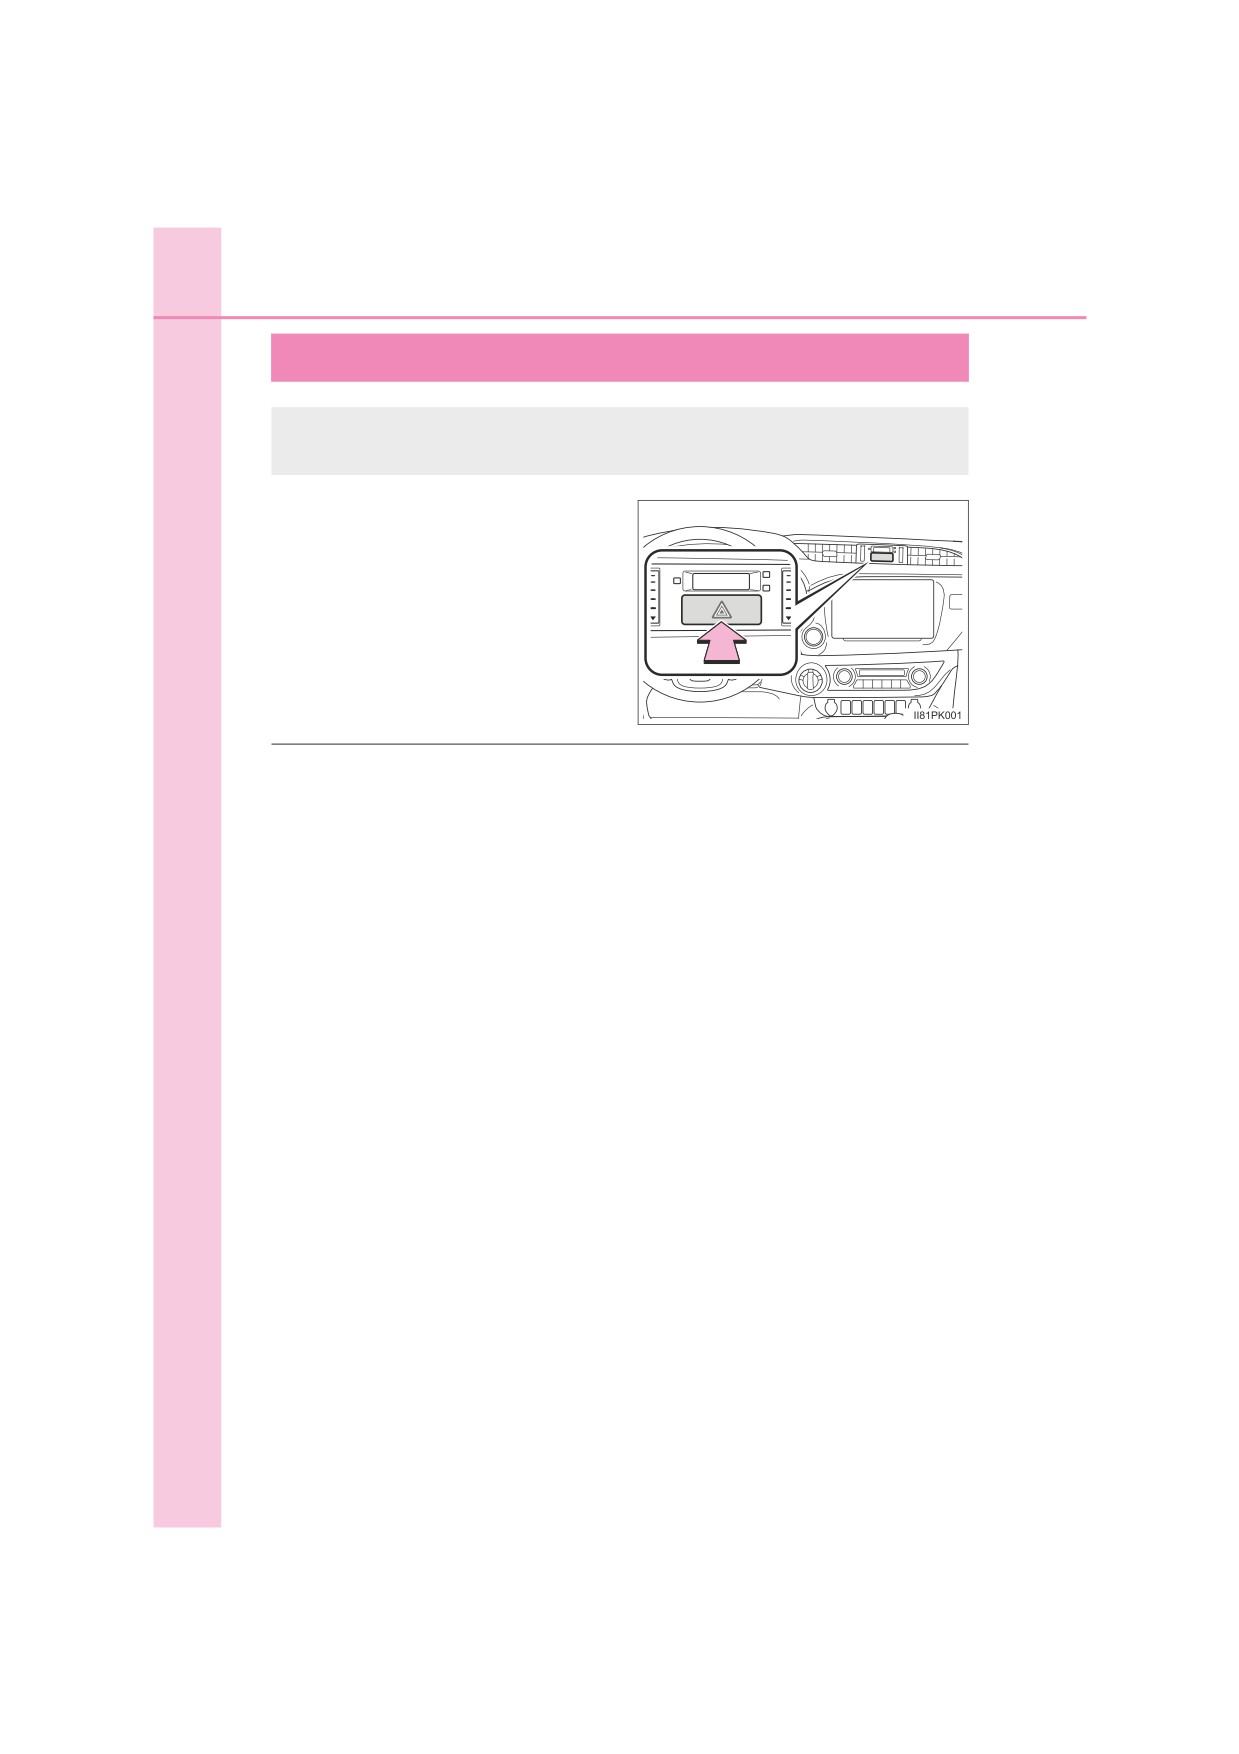
Emergency flashers
The emergency flashers are used to warn other drivers when the
vehicle has to be stopped in the road due to a breakdown, etc.
Press the switch.
All the turn signal lights will flash.
To turn them off, press the switch
once again.
■ Emergency flashers
If the emergency flashers are used for a long time while the engine is not
operating, the battery may discharge.
8-1. Essential information
553
If your vehicle has to be stopped in an
emergency
Only in an emergency, such as if it becomes impossible to stop
the vehicle in the normal way, stop the vehicle using the follow-
ing procedure:
1
Steadily step on the brake pedal with both feet and firmly depress it.
Do not pump the brake pedal repeatedly as this will increase the effort
required to slow the vehicle.
2
Shift the shift lever to N.
If the shift lever is shifted to N
3
After slowing down, stop the vehicle in a safe place by the road.
4
Stop the engine.
If the shift lever cannot be shifted to N
3
Keep depressing the brake pedal with both feet to reduce vehicle
speed as much as possible.
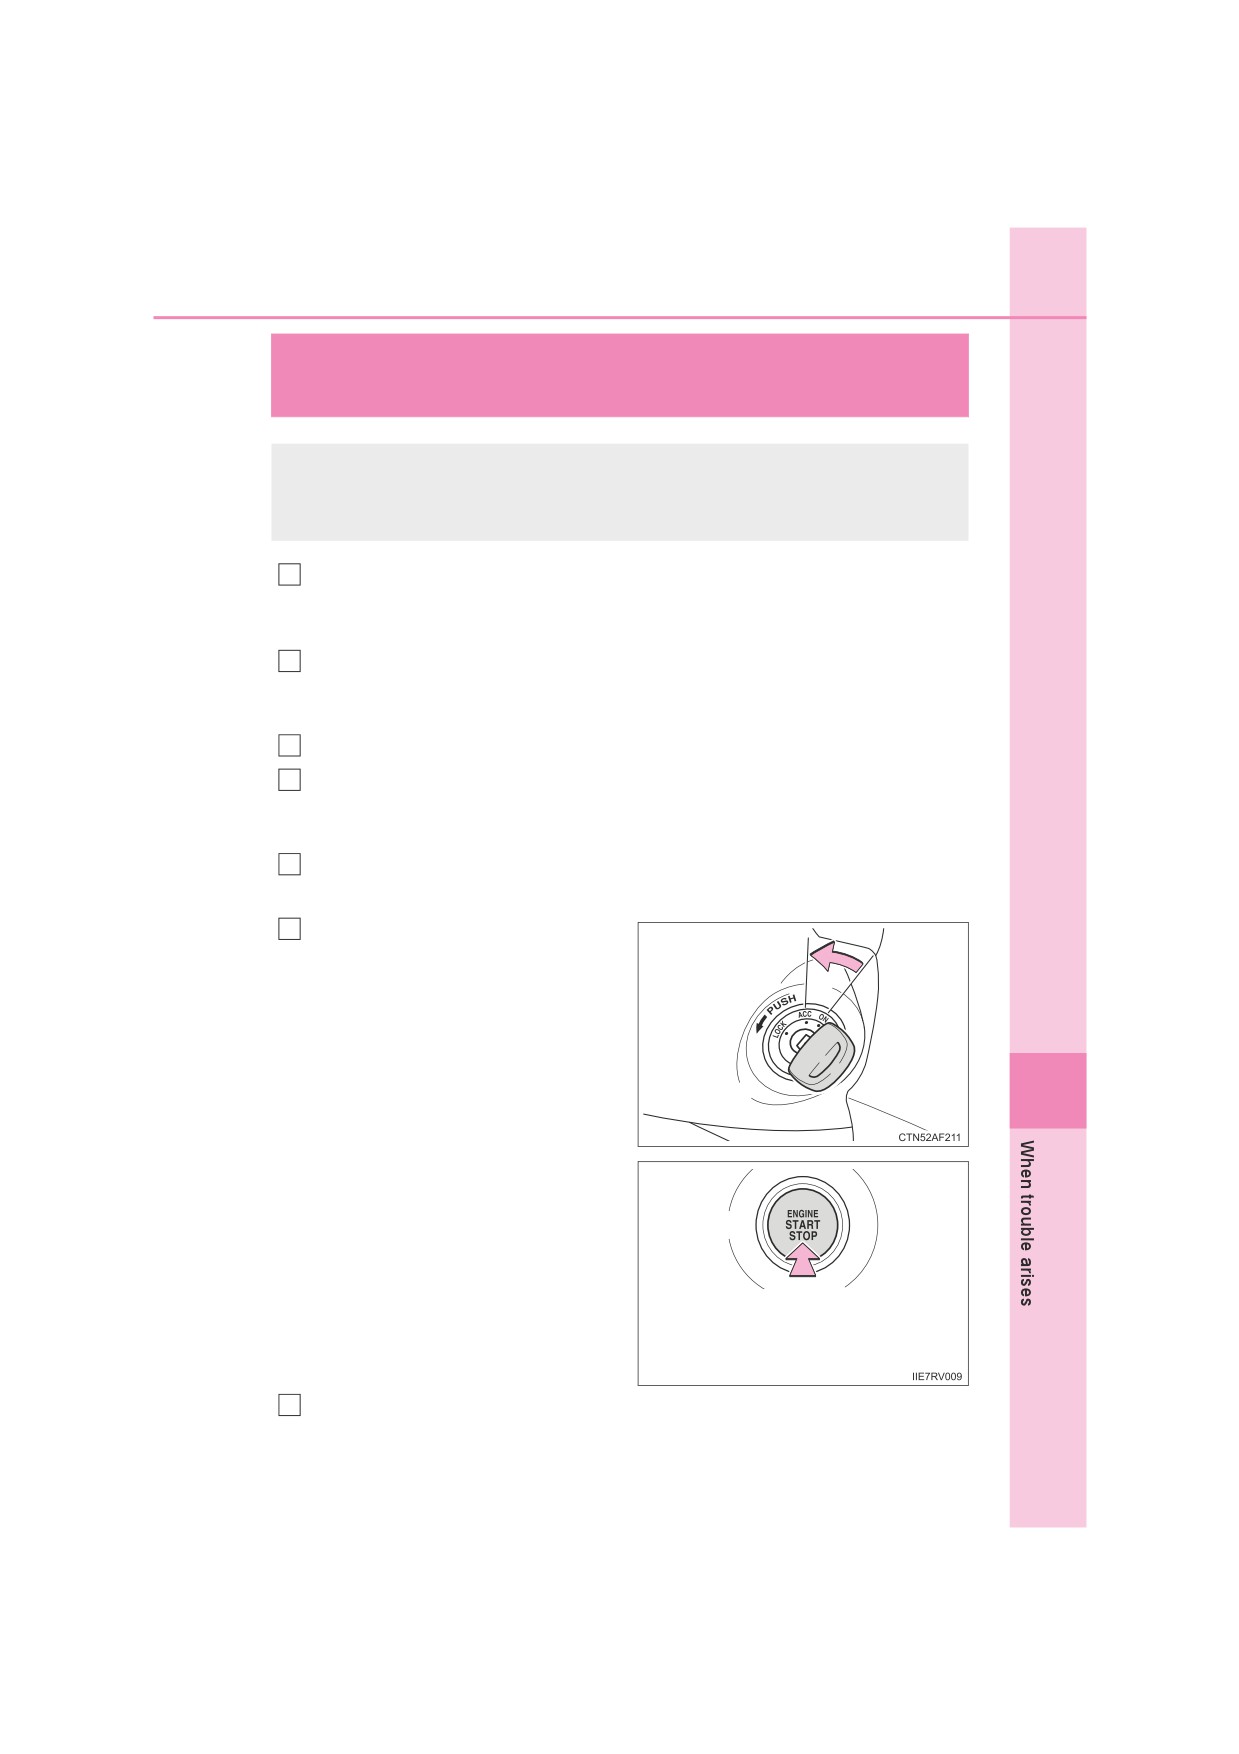
4
Vehicles without smart entry &
start system:
Stop the engine by turning the
engine switch to the
“ACC”
position.
8
Vehicles with smart entry &
start system:
To stop the engine, press and
hold the engine switch for
2
consecutive seconds or more,
Press and hold for 2 seconds or
or press it briefly
3 times or
more, or press briefly 3 times or
more in succession.
more
Stop the vehicle in a safe place by the road.
5
554
8-1. Essential information
WARNING
■ If the engine has to be turned off while driving
● Power assist for the brakes and steering wheel will be lost, making the
brake pedal harder to depress and the steering wheel heavier to turn.
Decelerate as much as possible before turning off the engine.
● Vehicles without smart entry & start system: Never attempt to remove the
key, as doing so will lock the steering wheel.
8-1. Essential information
555
If the vehicle is submerged or water on the
road is rising
This vehicle is not designed to be able to drive on roads that are
deeply flooded with water. Do not drive on roads where the
roads may be submerged or the water may be rising. It is dan-
gerous to remain in the vehicle, if it anticipated that the vehicle
will be flooded or set a drift. Remain calm and follow the follow-
ing.
● If the door can be opened, open the door and exit the vehicle.
● If the door can not be opened, open the window using the power
window switch and ensure an escape route.
● If the window can be opened, exit the vehicle through the window.
● If the door and window cannot be opened due to the rising water,
remain calm, wait until the water level inside the vehicle rises to the
point that the water pressure inside of the vehicle equals the water
pressure outside of the vehicle and then open the door after waiting
for the rising water to enter the vehicle, and exit the vehicle. When
the outside water level exceeds half the height of the door, the door
cannot be opened from the inside due to water pressure.
■ Water level exceeds the floor
When the water level exceeds the floor and time has passed, the electrical
equipment will get damaged, the power windows will not operate, the engine
stop, and the vehicle may not be able to get moving.
8
■ Using an emergency escape hammer*
Laminated glass is used in the windshield on this vehicle.
Laminated glass cannot be shattered with an emergency hammer*.
Tempered glass is used in the windows on this vehicle.
*: Contact any authorized Toyota retailer or Toyota authorized repairer, or any
reliable repairer or aftermarket accessory manufacturer for further informa-
tion about an emergency hammer.
556
8-1. Essential information
WARNING
■ Caution while driving
Do not drive on roads where the roads may be submerged or the water may
be rising. Otherwise the vehicle may be damaged and cannot move, as well
as become flooded and set a drift, which may lead to death.
8-2. Steps to take in an emergency
557
If your vehicle needs to be towed
If towing is necessary, we recommend having your vehicle
towed by any authorized Toyota retailer or Toyota authorized
repairer, or any reliable repairer or commercial towing service,
using a wheel-lift type truck or flatbed truck.
Use a safety chain system for all towing, and abide by all state/
provincial and local laws.
Situations when it is necessary to contact dealers before towing
The following may indicate a problem with your transmission. Contact
any authorized Toyota retailer or Toyota authorized repairer, or any
reliable repairer or commercial towing service before towing.
● The engine is running but the vehicle does not move.
● The vehicle makes an abnormal sound.
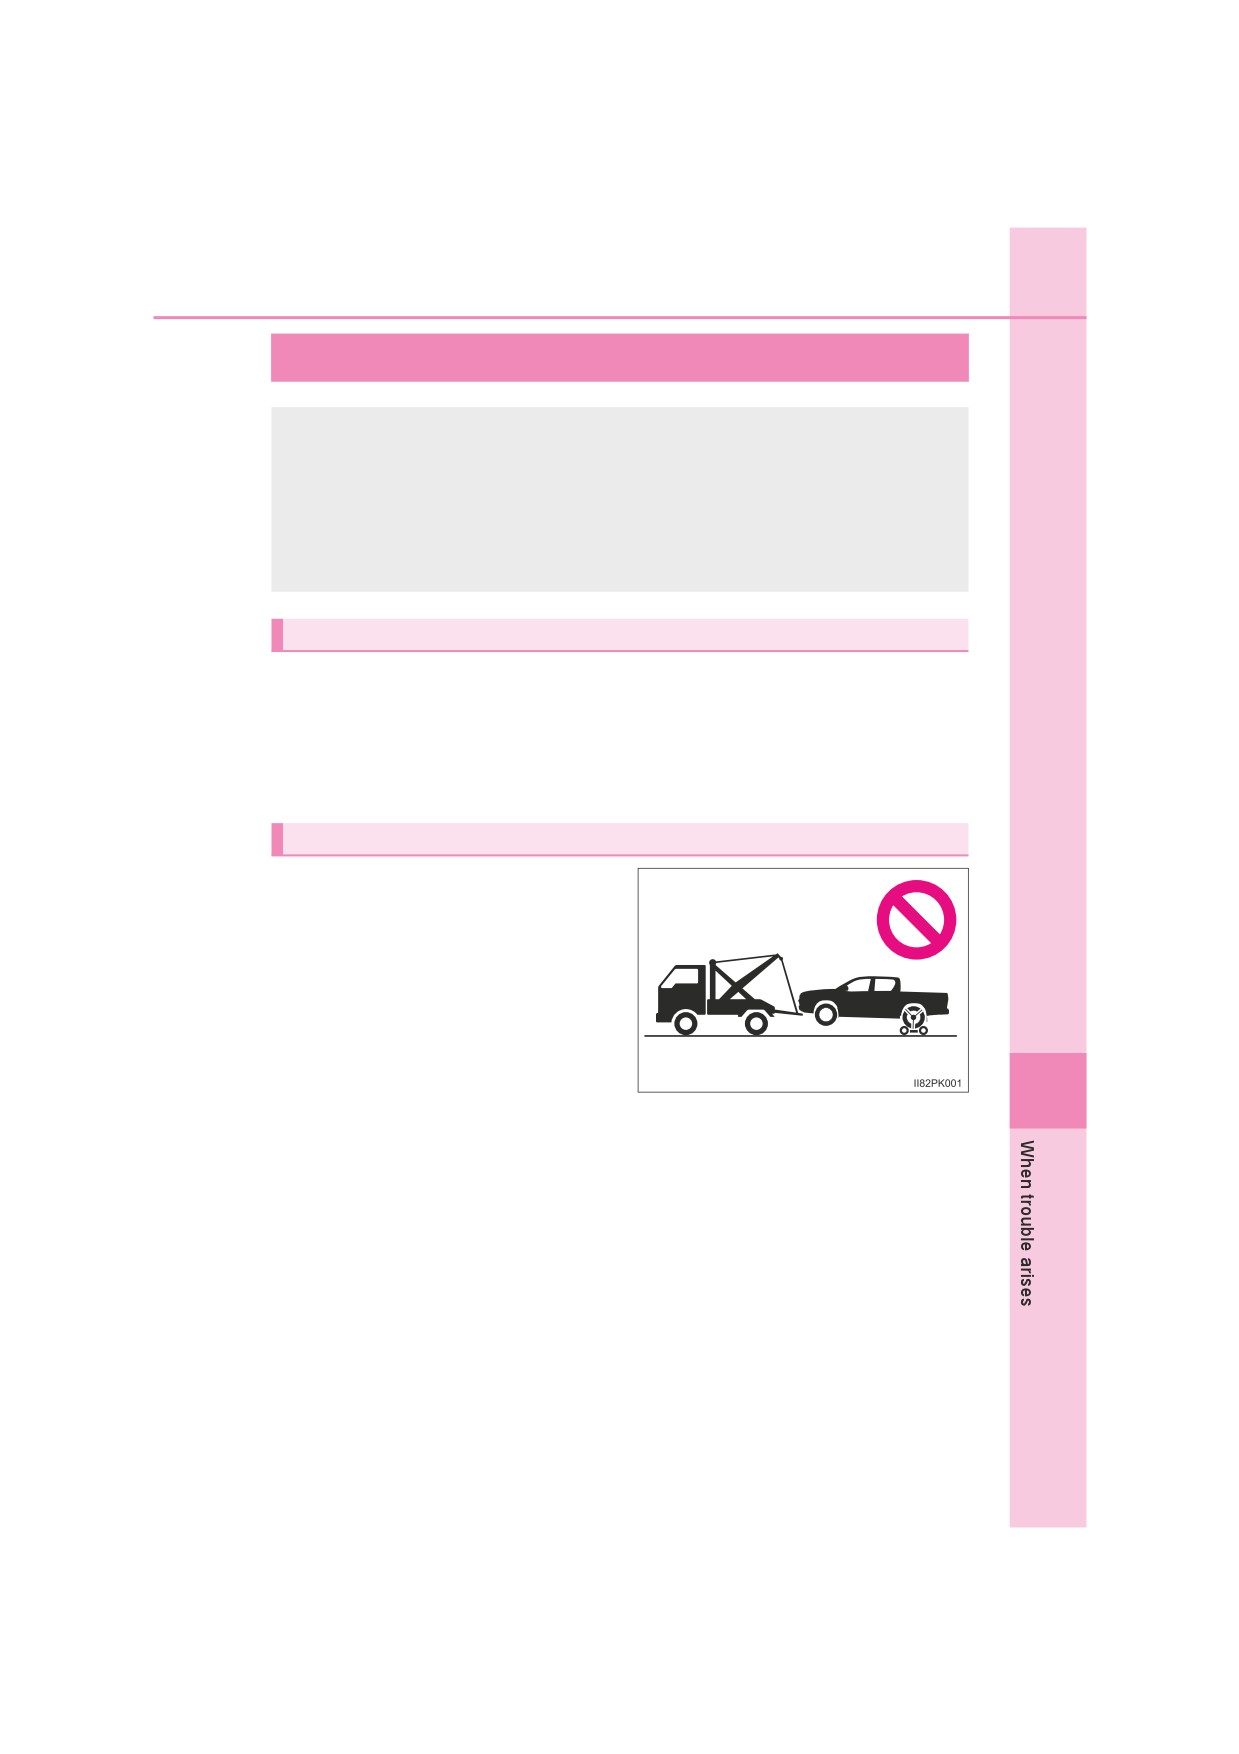
Towing with a sling-type truck
Do not tow with a sling-type truck
to prevent body damage.
8
558
8-2. Steps to take in an emergency
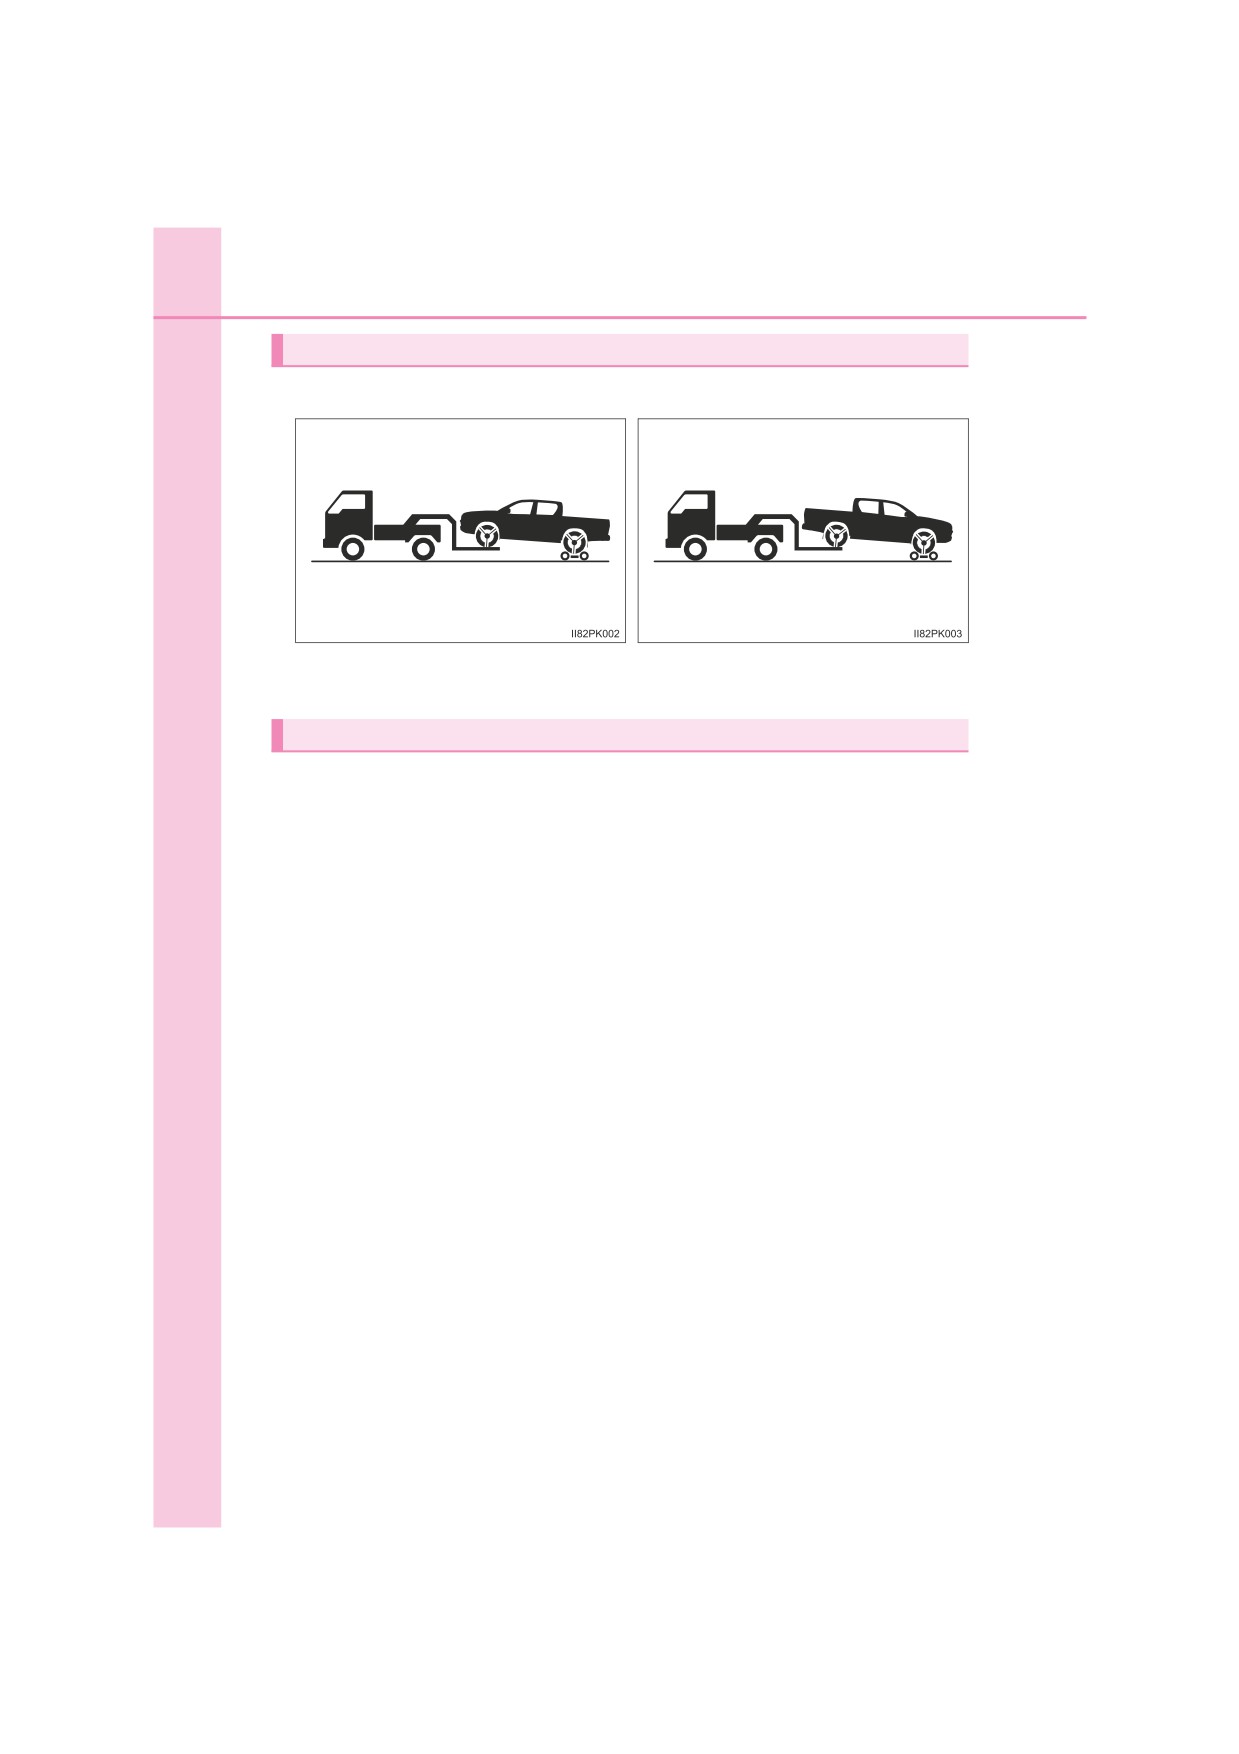
Towing with a wheel-lift type truck
From the front
From the rear
Use a towing dolly under the rear
Use a towing dolly under the
wheels.
front wheels.
Using a flatbed truck
When using a flatbed truck to transport the vehicle, use tire strapping
belts. Refer to the owner’s manual of the flatbed truck for the tire
strapping method.
In order to suppress vehicle movement during transportation, set the
parking brake and turn the engine switch to the “LOCK” position (vehi-
cles without smart entry & start system) or off (vehicles with smart
entry & start system).
8-2. Steps to take in an emergency
559
Emergency towing
If a tow truck is not available in an emergency, your vehicle may be
temporarily towed using cables or chains secured to the emergency
towing hooks. This should only be attempted on hard surfaced roads
for at most 80 km (50 miles) at under 30 km/h (18 mph).
A driver must be in the vehicle to steer and operate the brakes. The
vehicle’s wheels, drive train, axles, steering and brakes must be in
good condition.
Emergency towing procedure
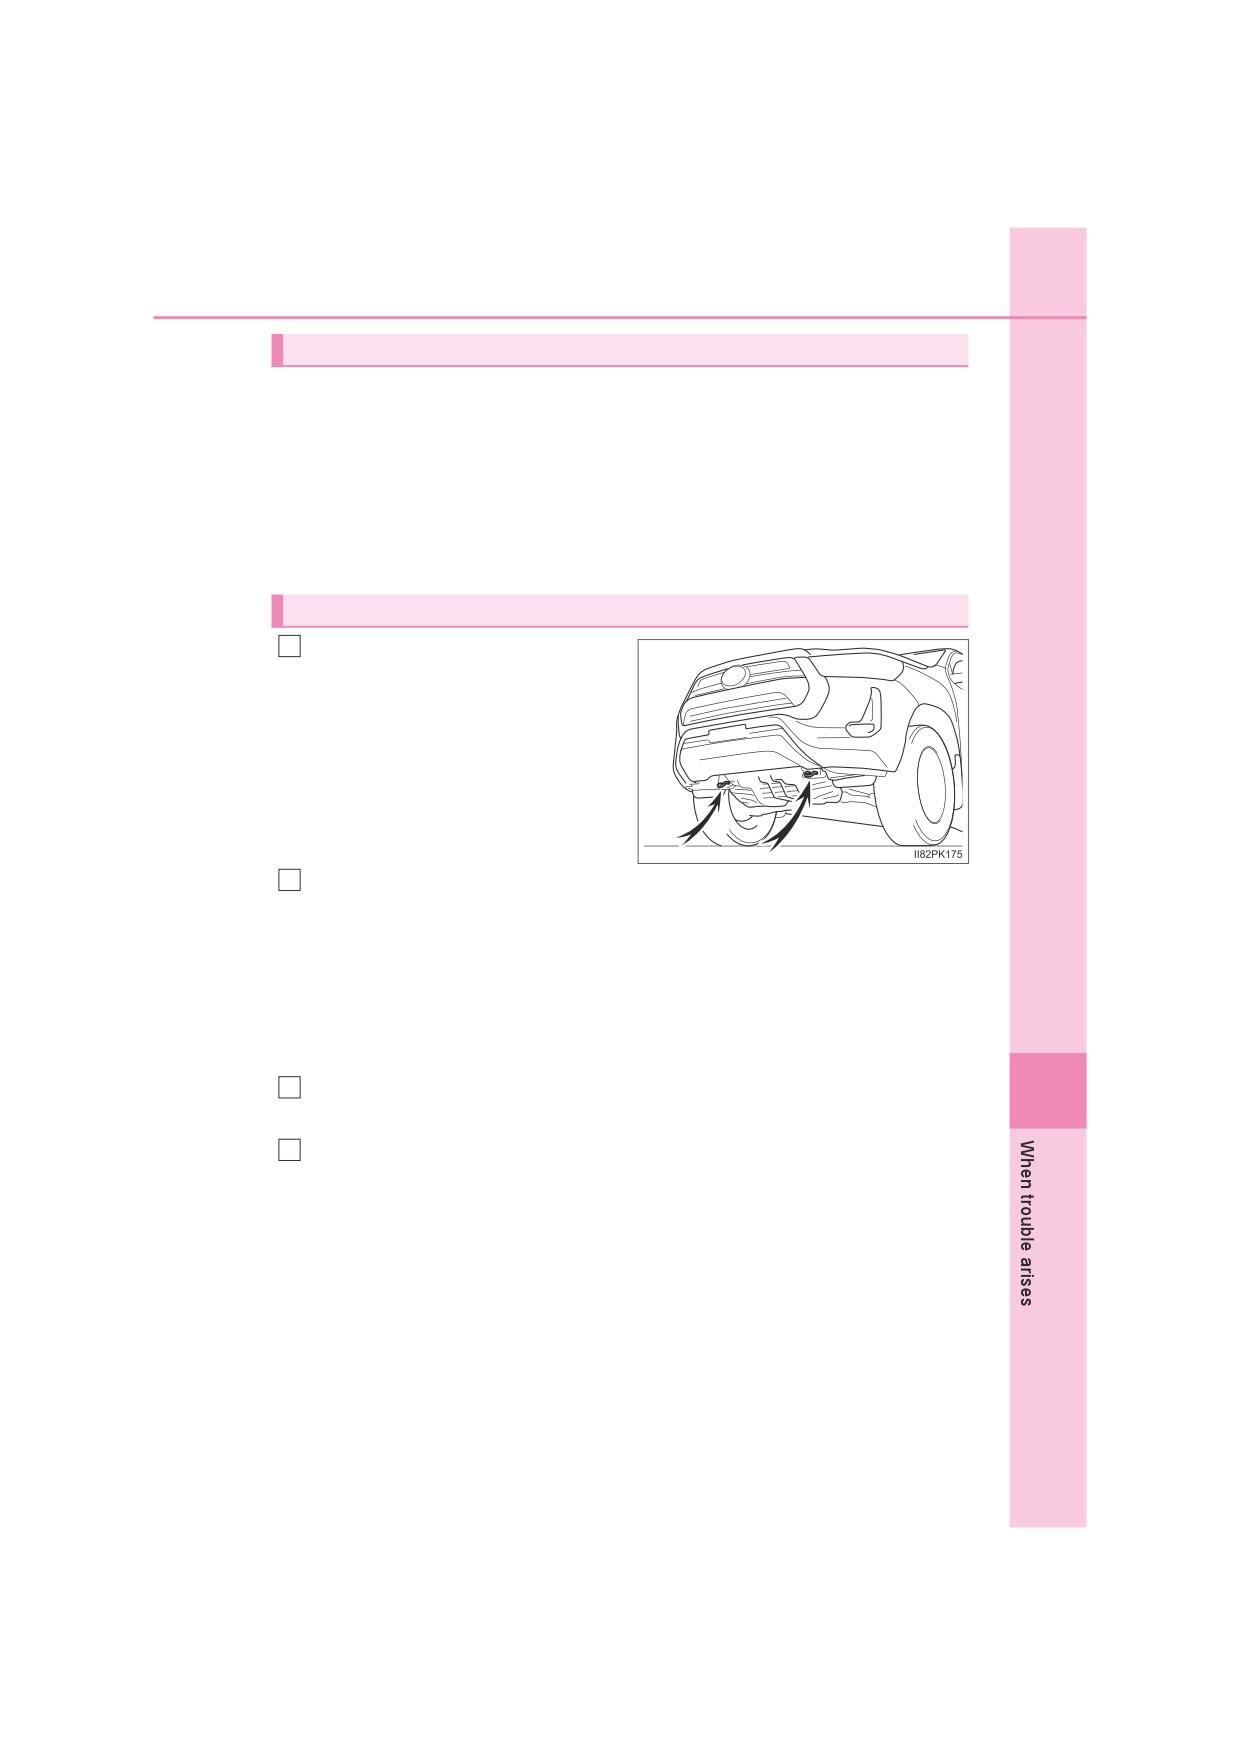
Securely attach cables or
1
chains to the towing hooks.
Take care not to damage the vehi-
cle body.
Enter the vehicle being towed and start the engine.
2
If the engine does not start, turn the engine switch to the “ON” position
(vehicles without smart entry & start system) or IGNITION ON mode (vehi-
cles with smart entry & start system).
Vehicles with Stop & Start system:
Before towing the vehicle, turn the engine switch to the “LOCK” position
(vehicles without smart entry & start system) or off (vehicles with smart
entry & start system) once, and then start the engine.
3
4WD models: Turn the front-wheel drive control switch to H2.
8
(P. 329)
4
Shift the shift lever to N and release the parking brake.
When the shift lever cannot be shifted (automatic transmission):
P. 235
560
8-2. Steps to take in an emergency
■While towing
If the engine is not running, the power assist for the brakes and steering will
not function, making steering and braking more difficult.
WARNING
Observe the following precautions.
Failure to do so may result in death or serious injury.
■ When towing the vehicle
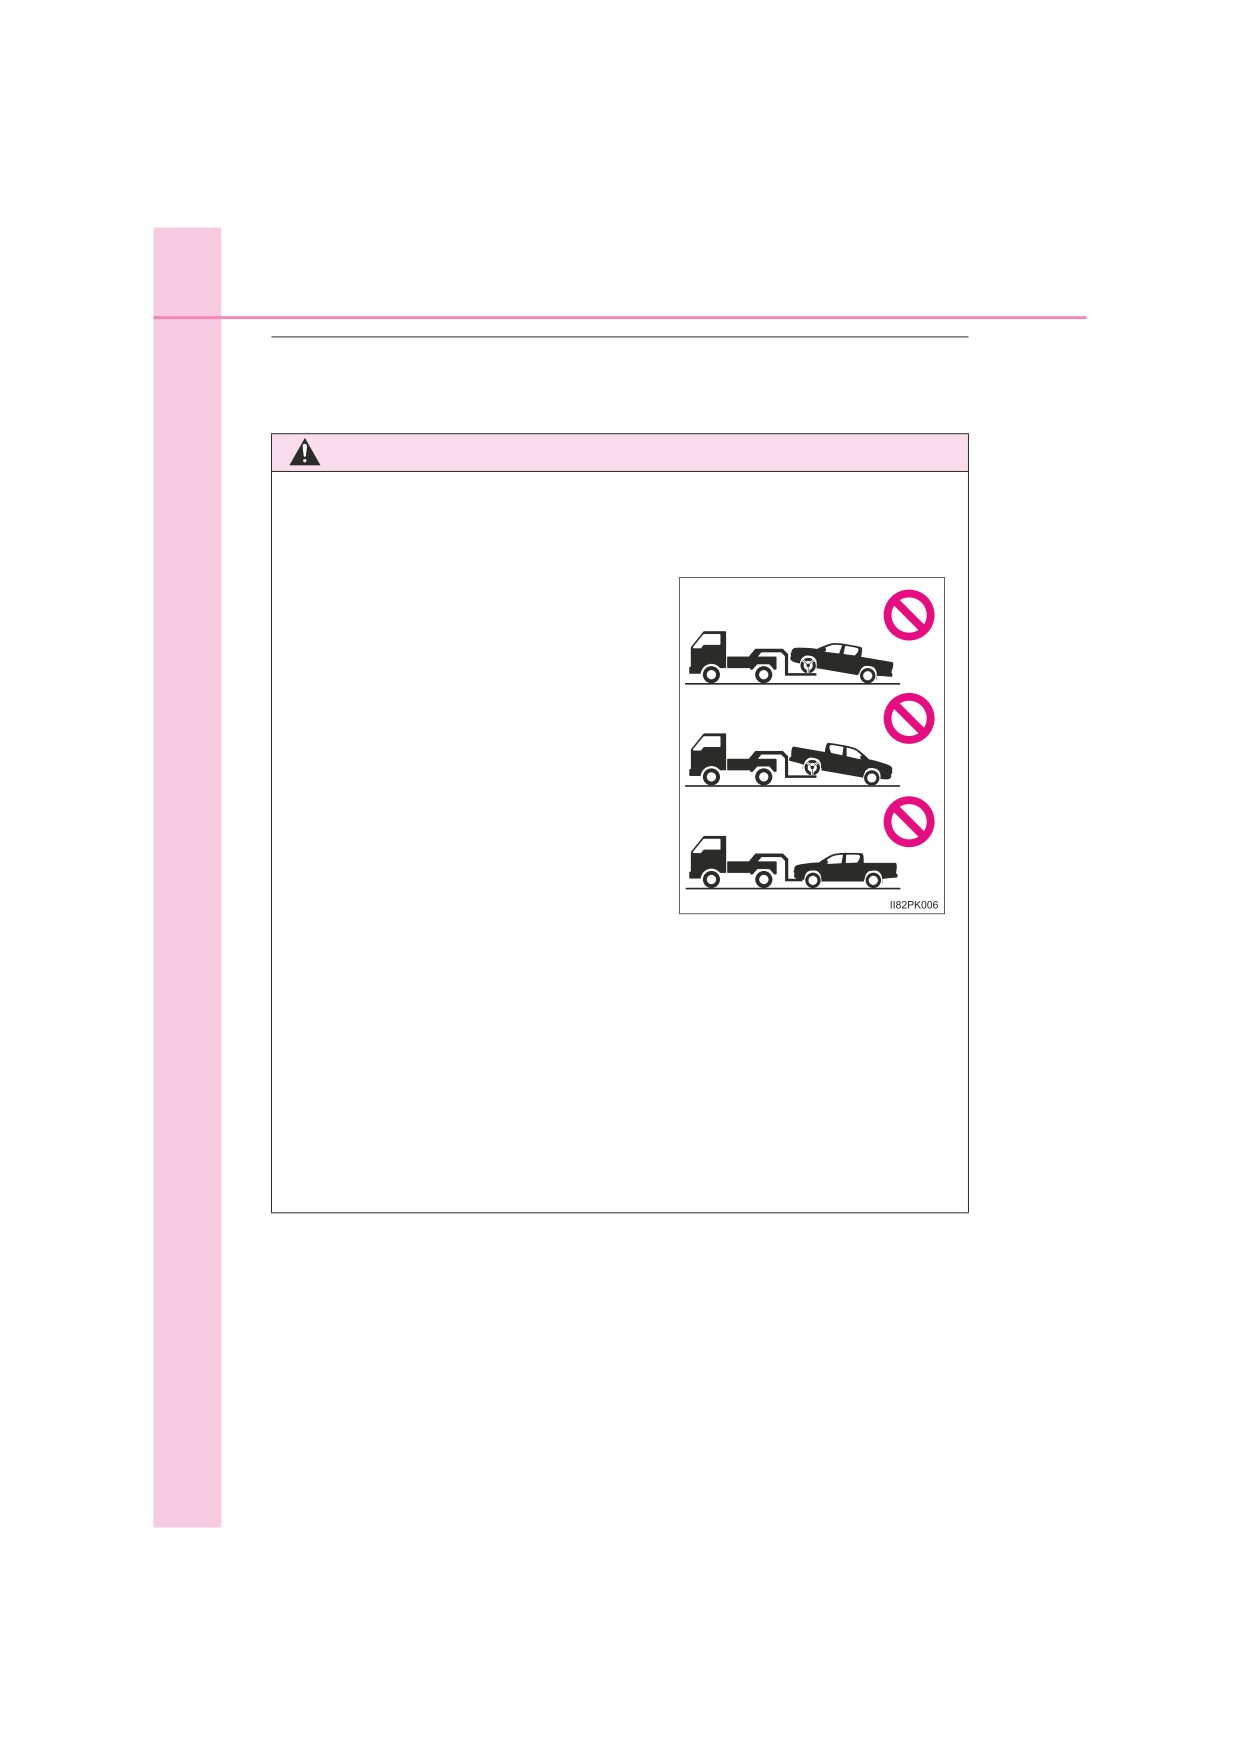
Pre Runner (2WD models): Be sure to
transport the vehicle with all four wheels
raised off the ground. If the vehicle is
towed with the tires contacting the
ground, the drivetrain and related parts
may be damaged or an accident may
occur due to a change in direction of the
vehicle.
4WD models: Be sure to transport the
vehicle with all four wheels raised off the
ground. If the vehicle is towed with the
tires contacting the ground, the drivetrain
and related parts may be damaged, and
the vehicle may fly off the truck.
■ While towing
●When towing using cables or chains, avoid sudden starts, etc. which place
excessive stress on the towing hooks, cables or chains. The towing hooks,
cables or chains may become damaged, broken debris may hit people,
and cause serious damage.
● Vehicles without smart entry & start system or vehicles with manual trans-
mission: Do not turn the engine switch to the “LOCK” position (vehicles
without smart entry & start system) or off (vehicles with smart entry & start
system).
There is a possibility that the steering wheel is locked and cannot be oper-
ated.
8-2. Steps to take in an emergency
561
NOTICE
■ To prevent damage to the vehicle when towing using a wheel-lift type
truck
●Do not tow the vehicle from the rear when the engine switch is in the
“LOCK” position or the key is removed (vehicles without smart entry & start
system) or the engine switch is turned to off (vehicles with smart entry &
start system). The steering lock mechanism (if equipped) is not strong
enough to hold the front wheels straight.
● When raising the vehicle, ensure adequate ground clearance for towing at
the opposite end of the raised vehicle. Without adequate clearance, the
vehicle could be damaged while being towed.
■ To prevent damage to the vehicle when towing with a sling-type truck
Do not tow with a sling-type truck, either from the front or rear.
■ To prevent damage to the vehicle during emergency towing
Do not secure cables or chains to the suspension components.
■ When towing a vehicle equipped with a Stop & Start system (if
equipped)
If it is necessary to tow the vehicle with all 4 wheels on the ground, perform
the following procedure before towing the vehicle, in order to protect the
system.
Turn the engine switch to the “LOCK” position (vehicles without smart entry
& start system) or off (vehicles with smart entry & start system) and then
start the engine or turn the engine switch to the “ON” position (vehicles with-
out smart entry & start system) or IGNITION ON mode (vehicles with smart
entry & start system).
8
562
8-2. Steps to take in an emergency
If you think something is wrong
If you notice any of the following symptoms, your vehicle proba-
bly needs adjustment or repair. Contact any authorized Toyota
retailer or Toyota authorized repairer, or any reliable repairer as
soon as possible.
Visible symptoms
● Fluid leaks under the vehicle.
(Water dripping from the air conditioning after use is normal.)
● Flat-looking tires or uneven tire wear
● Engine coolant temperature gauge needle continually points higher
than normal.
Audible symptoms
● Changes in exhaust sound
● Excessive tire squeal when cornering
● Strange noises related to the suspension system
● Pinging or other noises related to the engine
Operational symptoms
● Engine missing, stumbling or running roughly
● Appreciable loss of power
● Vehicle pulls heavily to one side when braking
● Vehicle pulls heavily to one side when driving on a level road
● Loss of brake effectiveness, spongy feeling, pedal almost touches
the floor
8-2. Steps to take in an emergency
563
Fuel pump shut off system (gasoline engine only)
To minimize the risk of fuel leakage when the engine stalls or
when an airbag inflates upon collision, the fuel pump shut off
system stops the supply of fuel to the engine.
Follow the procedure below to restart the engine after the system is
activated.
Turn the engine switch to the “ACC” or “LOCK” position (vehicles
1
without smart entry & start system) or ACCESSORY mode or off
(vehicles with smart entry & start system).
Restart the engine.
2
NOTICE
■ Before starting the engine
Inspect the ground under the vehicle.
If you find that fuel has leaked onto the ground, the fuel system has been
damaged and is in need of repair. Do not restart the engine.
8
564
8-2. Steps to take in an emergency
If a warning light turns on or a warning
buzzer sounds
Calmly perform the following actions if any of the warning lights
comes on or flashes. If a light comes on or flashes, but then
goes off, this does not necessarily indicate a malfunction in the
system. However, if this continues to occur, have the vehicle
inspected by any authorized Toyota retailer or Toyota authorized
repairer, or any reliable repairer.
Warning light and warning buzzer list
Warning light
Warning light/Details/Actions
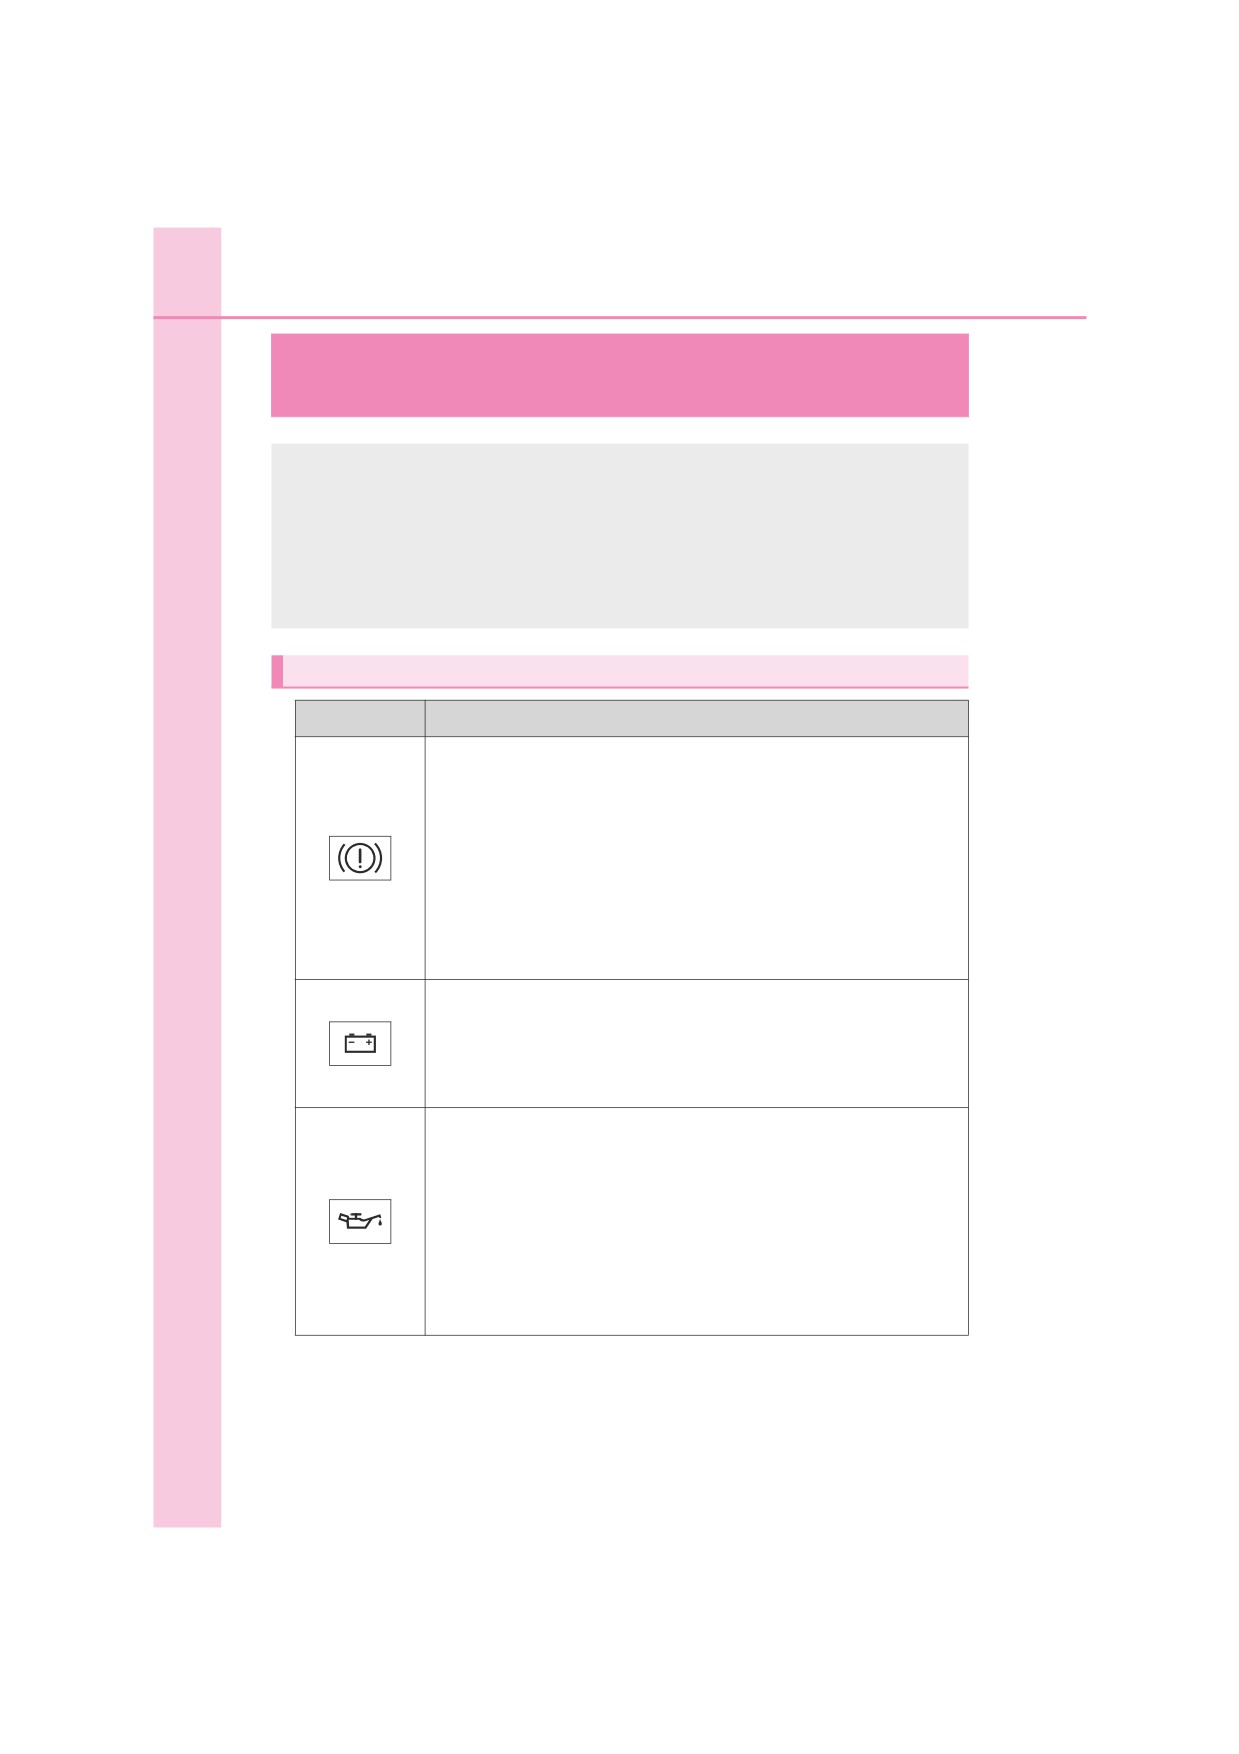
Brake system warning light (warning buzzer)
Indicates:
• Low brake fluid
• Malfunction in the brake system
• Low negative pressure in the vacuum tank
(diesel
engine)
Immediately stop the vehicle in a safe place and con-
tact any authorized Toyota retailer or Toyota autho-
rized repairer, or any reliable repairer. Continuing to
drive the vehicle may be dangerous.
Charging system warning light*1 (if equipped)
Indicates a malfunction in the vehicle’s charging system
Immediately stop the vehicle in a safe place and con-
tact any authorized Toyota retailer or Toyota autho-
rized repairer, or any reliable repairer.
Low engine oil pressure warning light
(warning
buzzer)*1, 2 (if equipped)
Indicates that the engine oil pressure is too low (This
warning light may come on if the vehicle is stopped on a
slope. Move to a level surface and check to see if the light
goes off.)
Immediately stop the vehicle in a safe place and con-
tact any authorized Toyota retailer or Toyota autho-
rized repairer, or any reliable repairer.
8-2. Steps to take in an emergency
565
Warning light
Warning light/Details/Actions
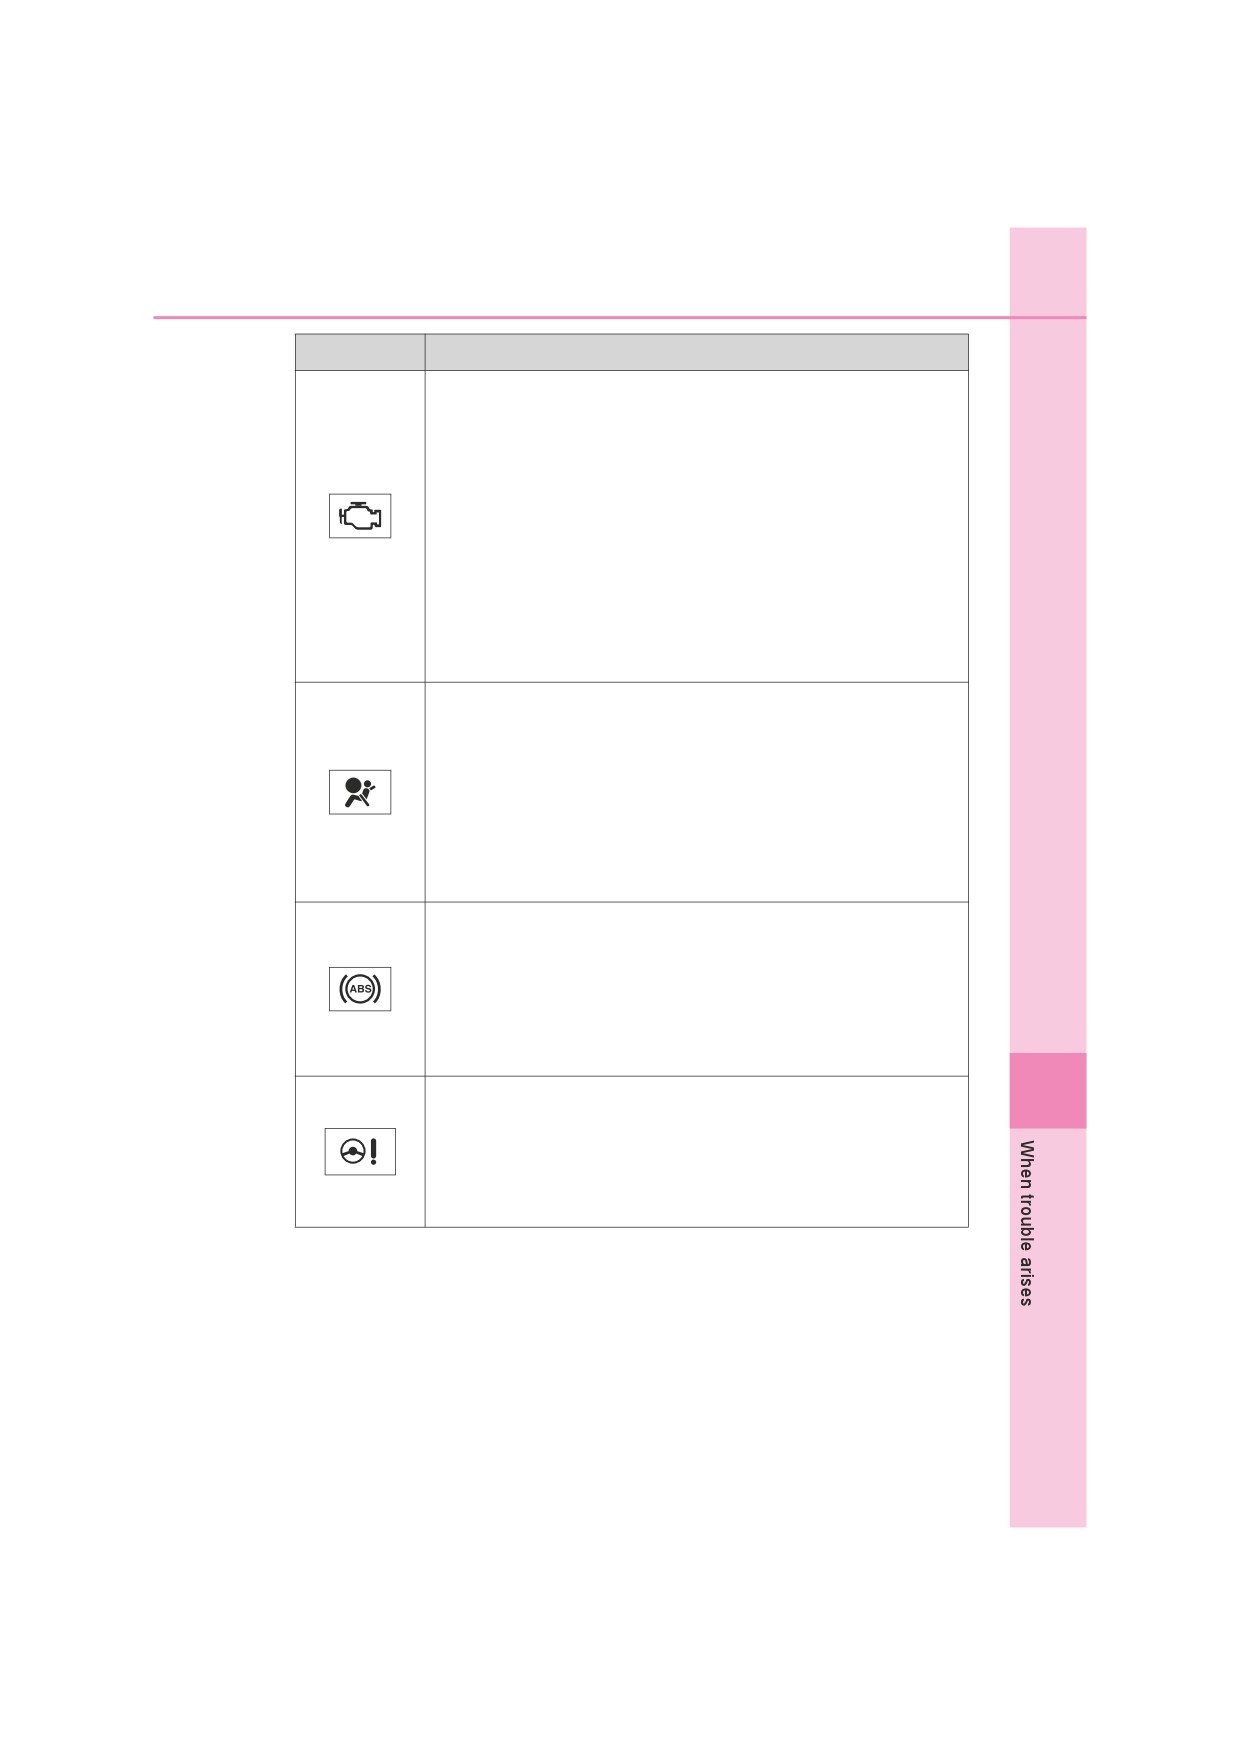
Malfunction indicator lamp (warning buzzer)
Indicates the followings if the warning light comes on or
flashes:
• Malfunction in the emission control system. (if equipped)
• Malfunction in the electronic engine control system.
• Malfunction in the electronic automatic transmission
control system. (if equipped)
(Flashes or
• The boost pressure in the turbocharger is abnormally
illuminates)
high.*3 (diesel engine)
• Malfunction in DPF system. (if equipped)
Have the vehicle inspected by any authorized Toyota
retailer or Toyota authorized repairer, or any reliable
repairer immediately.
SRS warning light
Indicates a malfunction in:
• The SRS airbag system;
• The seat belt pretensioner system; or
• The front passenger occupant classification system (if
equipped)
Have the vehicle inspected by any authorized Toyota
retailer or Toyota authorized repairer, or any reliable
repairer immediately.
ABS warning light
Indicates a malfunction in:
• The ABS; or
• The brake assist system (vehicles with VSC system)
Have the vehicle inspected by any authorized Toyota
retailer or Toyota authorized repairer, or any reliable
repairer immediately.
8
Power steering system warning light (warning buzzer)
(if equipped)
Indicates a malfunction in the power steering system
Have the vehicle inspected by any authorized Toyota
retailer or Toyota authorized repairer, or any reliable
repairer immediately.
566
8-2. Steps to take in an emergency
Warning light
Warning light/Details/Actions
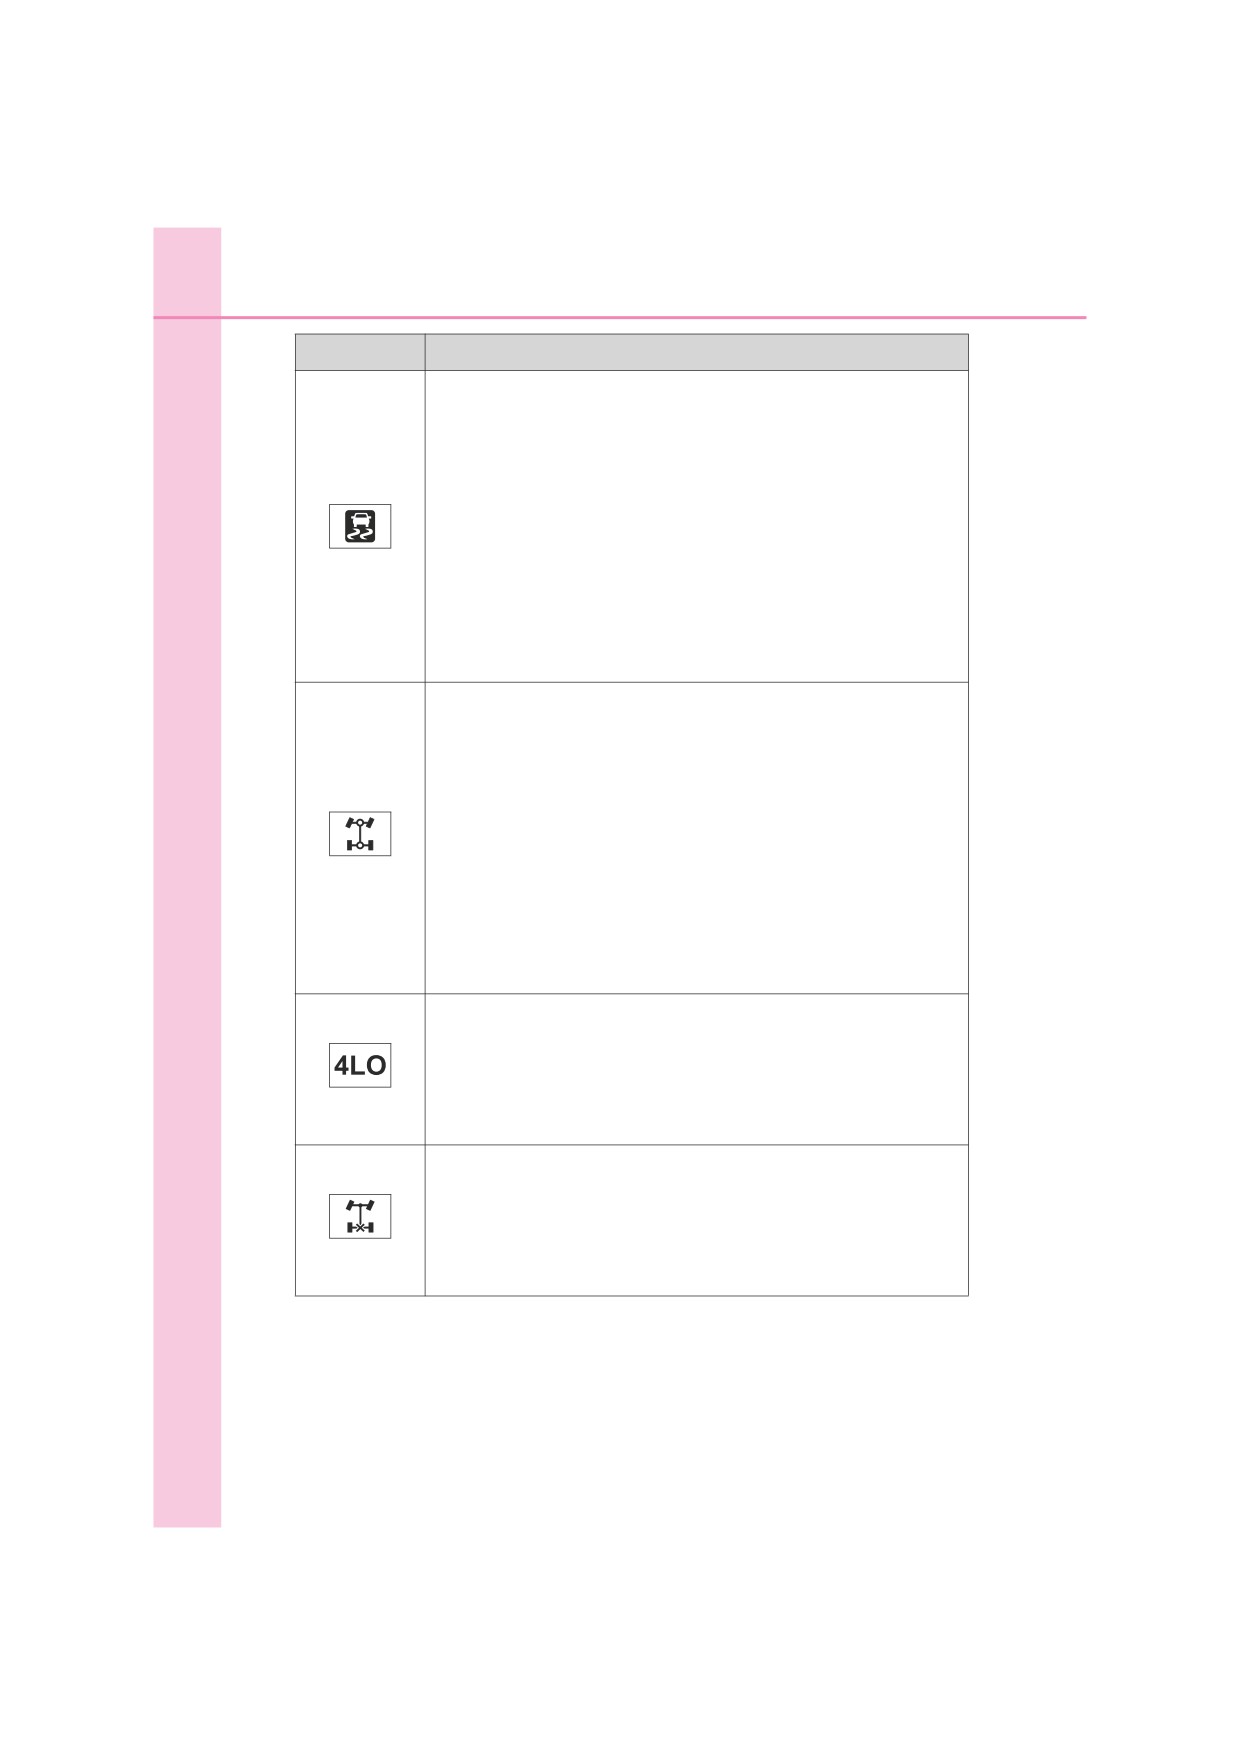
Slip indicator (if equipped)
Indicates a malfunction in:
• The VSC system (if equipped);
• Trailer sway control system (if equipped);
• The TRC/A-TRC system (if equipped);
• The AUTO LSD system (if equipped);
• The hill-start assist control system (if equipped); or
• The downhill assist control system (if equipped)
Have the vehicle inspected by any authorized Toyota
retailer or Toyota authorized repairer, or any reliable
repairer immediately.
The light will flash when any of the above systems other
than the hill-start assist control system are operating.
Four-wheel drive indicator light (warning buzzer)*4 (if
equipped)
Indicates that the differential oil temperature is too high
when the light flashes rapidly and a buzzer sounds.
Turn the front-wheel drive control switch to H2, and
reduce the vehicle speed or stop the vehicle in a safe
place. (P. 329)
(Flashes)
Indicates a malfunction in the four-wheel drive system
when the light flashes rapidly and a buzzer does not
sound.
Have the vehicle inspected by any authorized Toyota
retailer or Toyota authorized repairer, or any reliable
repairer immediately.
Low speed four-wheel drive indicator light (if equipped)
Indicates a malfunction in the four-wheel drive system
when the light flashes rapidly.
Have the vehicle inspected by any authorized Toyota
(Flashes)
retailer or Toyota authorized repairer, or any reliable
repairer immediately.
Rear differential lock indicator light (if equipped)
Indicates a malfunction in the rear differential lock system
when the light flashes rapidly.
Have the vehicle inspected by any authorized Toyota
(Flashes)
retailer or Toyota authorized repairer, or any reliable
repairer immediately.