Citroen C4 (2023 year). Manual in english - page 11
5-6. Using Bluetooth® devices
407
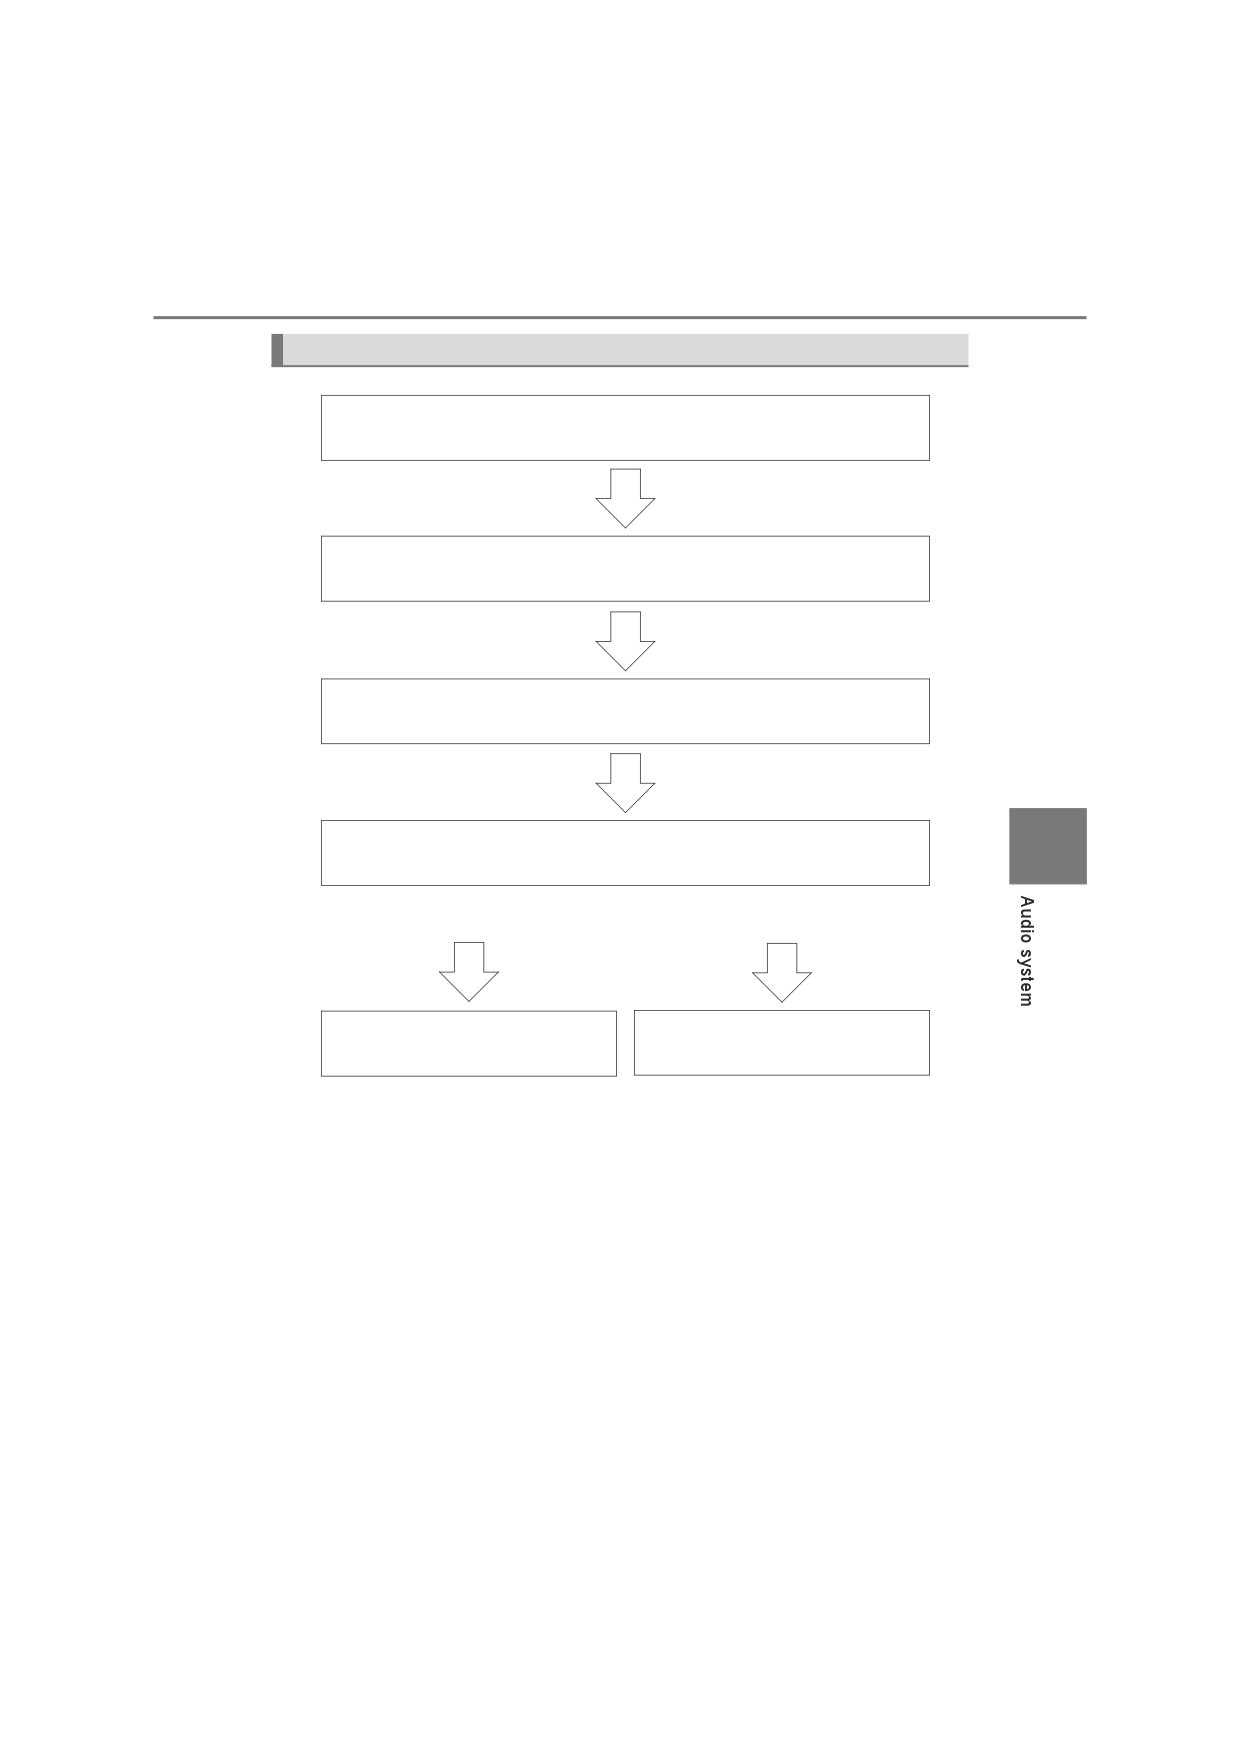
Device registration/connection flow
1. Register the Bluetooth® device to be used with audio
system (P. 412)
2. Select the Bluetooth® device to be used
(P. 413)
3. Set automatic connection of the device
(P. 415)
4. Check Bluetooth® connection condition
5
(P. 408)
To be used for audio
To be used for hands-free phone
5. Use Bluetooth® audio
5. Use Bluetooth® phone
(P. 422)
(P. 424)
408
5-6. Using Bluetooth® devices
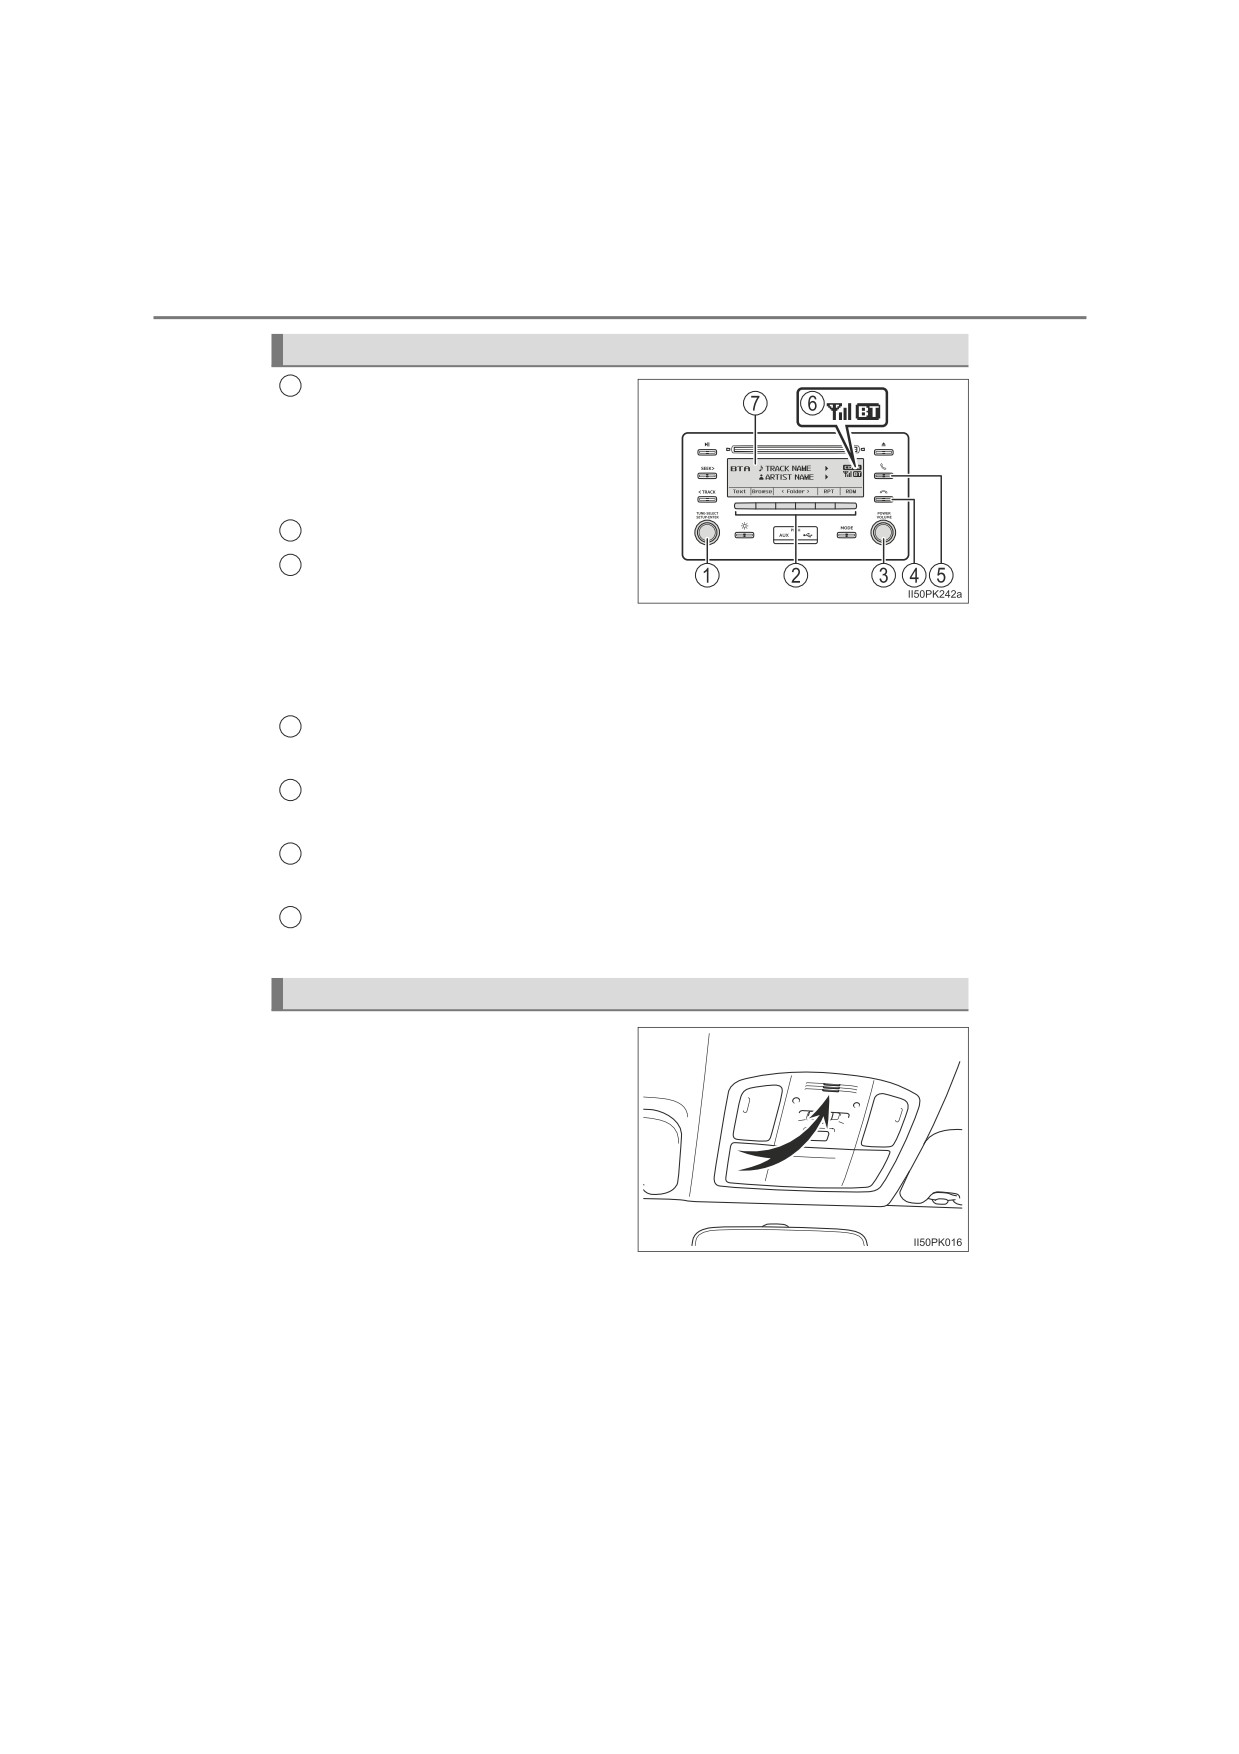
Audio unit
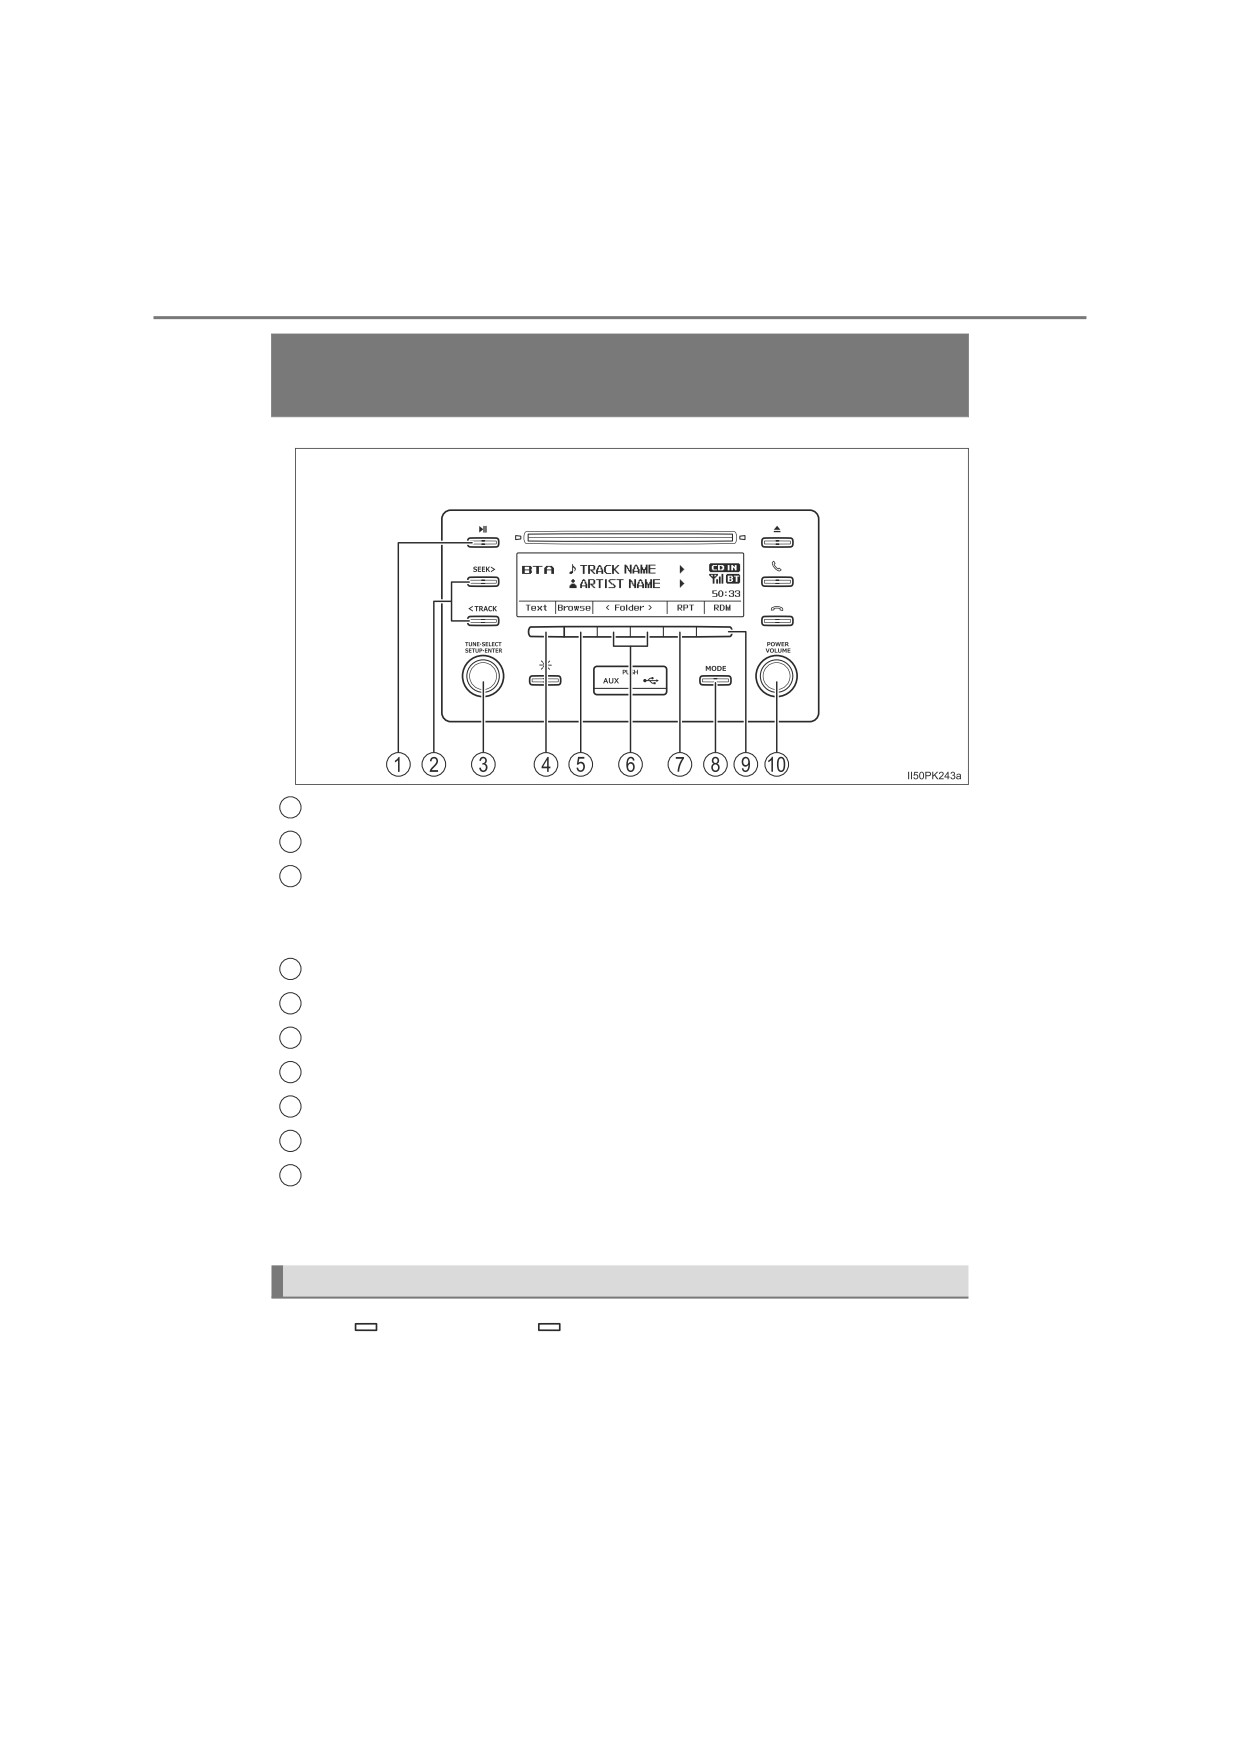
“TUNE•SELECT” knob
1
Displays set up menu or selects
items such as menu and number
Turn: Selects an item
Press: Inputs the selected item
2
Function button
3
“POWER VOLUME” knob
Press: Turning the audio system
on or off (except during hands-free
mode: dialing, receiving call and
talking)
Turn: Adjusting the volume
4
On-hook button
Turns the hands-free system off/ends a call/refuses a call
5
Off-hook button
Turns the hands-free system on/starts a call
Bluetooth® connection condition
6
If “BT” is not displayed, the Bluetooth® audio/phone cannot be used.
7
Display
A message, name, number, etc. is displayed.
Microphone
You can use the microphone
when talking on the phone.
The person you are speaking to
can be heard from the speakers.
To use the hands-free system, you
must register your Bluetooth®
phone in the system. (P. 412)
5-6. Using Bluetooth® devices
409
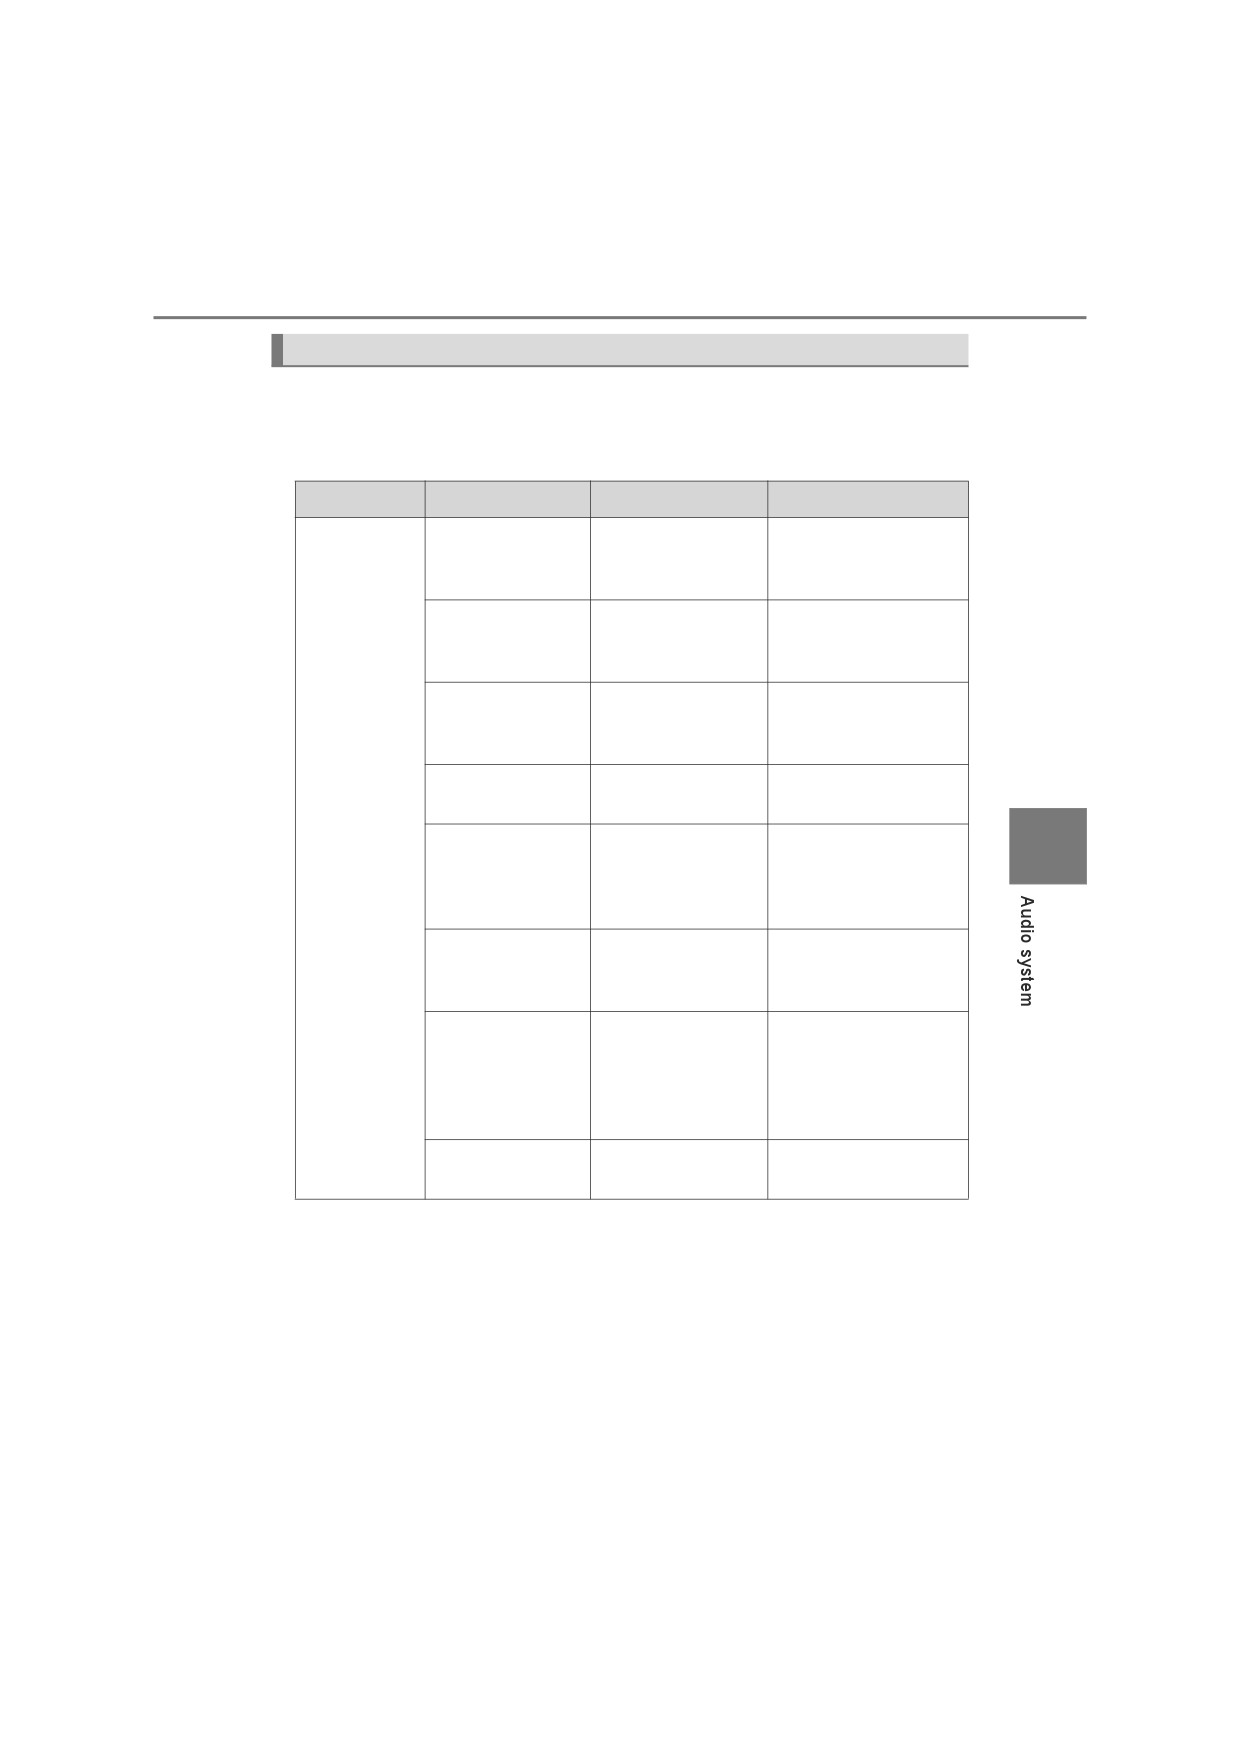
Menu list of the Bluetooth® audio/phone
To enter a menu, press the
“TUNE•SELECT” knob and navigate
menus by using the knob.
“Bluetooth®” menu
First menu
Second menu
Third menu
Operation details
Registering
a
“Pairing”
-
Bluetooth® device
(P. 412)
Listing the registered
“List phone”
-
cellular phones
(P. 413)
Listing the registered
“List audio”
-
portable
players
(P. 414)
Changing the pass-
“Passkey”
-
key (P. 415)
Setting
automatic
5
“Bluetooth”
connection of the
“BT power”
-
device on or off
(P. 415)
Displaying
the
“Device name”
“Bluetooth info”
device status
“Device address”
(P. 415)
Setting the auto-
matic
connection
“Display setting”
-
confirmation display
to on or off
(P. 416)
Initializing the set-
“Reset”
-
tings (P. 416)

410
5-6. Using Bluetooth® devices
“TEL” menu
First menu
Second menu
Third menu
Operation details
Setting
automatic
contact/call history
“Auto transfer”
transfer on or off
(P. 417)
Adding a new num-
“Add contacts”
ber (P. 417)
Deleting a contact
“Delete contacts”*
stored in the phone-
book (P. 417)
“Phonebook”
Sorting contacts by
“Sort contacts”
the first name or last
name field (P. 418)
Transferring the call
“Transfer history”
histories (P. 418)
“TEL”
Deleting a number
“Delete call
stored in the call his-
history”*
tory (P. 418)
Adding a new con-
“Add favourites”
tact to the favorite
list (P. 419)
“Favourites”
Deleting a contact
“Delete
from the favorite list
favourites”
(P. 420)
Setting call volume
“Call volume”
(P. 420)
“HF sound
“Ringtone
Setting ring tone vol-
setting”
volume”
ume (P. 420)
Setting the ring tone
“Ringtone”
(P. 421)
*: For PBAP compatible Bluetooth® phones, this function is available when
“Automatic transfer” is set to off.
■ Bluetooth® audio/phone system functions
Depending on the Bluetooth® device, certain functions may not be available.
5-6. Using Bluetooth® devices
411
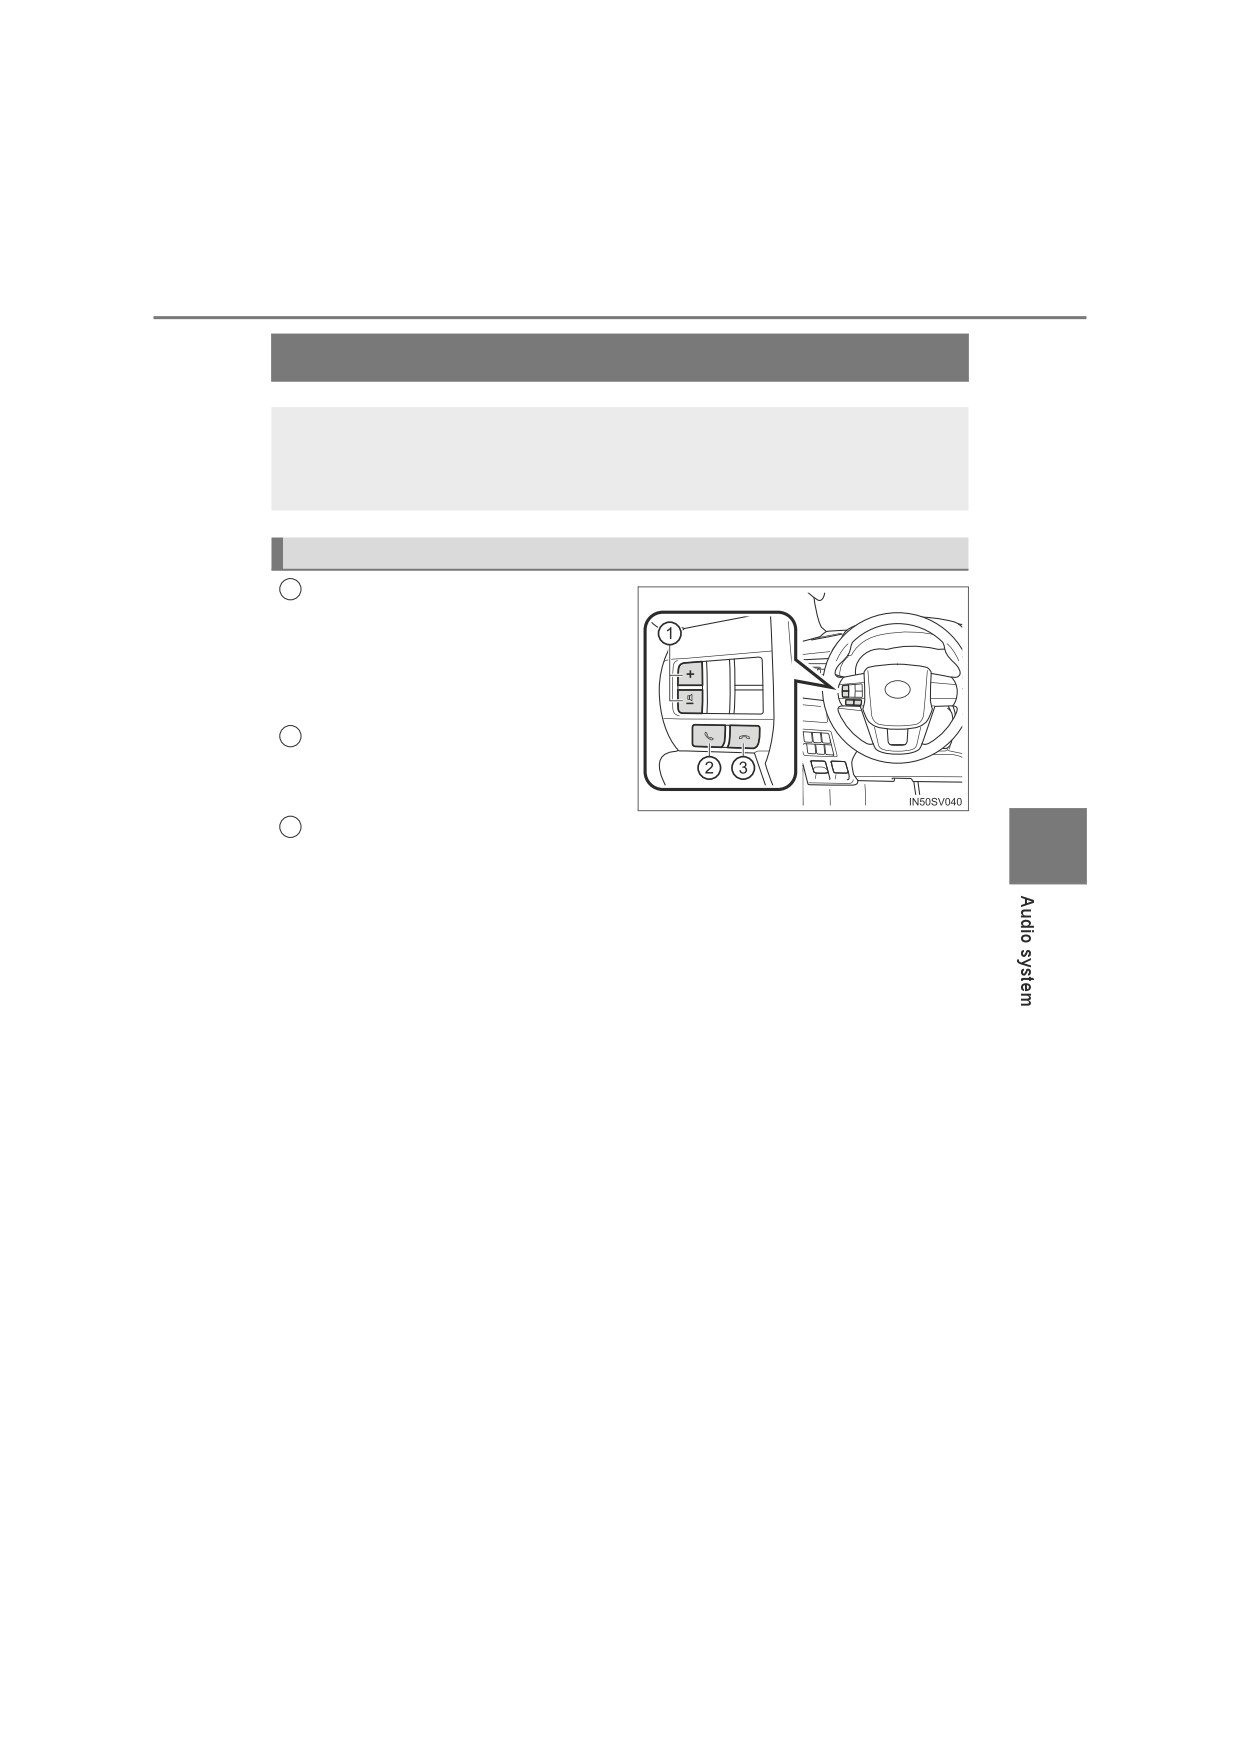
Using the steering wheel switches
The steering wheel switches can be used to operate a connected
cellular phone, or portable digital audio player (portable player).
Vehicles without audio system: P. 468
Operating Bluetooth® phone using the steering wheel switches
1
Volume control switch
• Press the “+” side to increase
the volume.
• Press the “-” side to decrease
the volume.
2
Off-hook switch
Turns the hands-free system
on/starts a call
3
On-hook switch
5
Turns the hands-free system
off/ends a call/refuses a call
412
5-6. Using Bluetooth® devices
Registering a Bluetooth® device
Before using the Bluetooth® audio/phone, it is necessary to reg-
ister a Bluetooth® device in the system. You can register up to 5
Bluetooth® devices.
How to register a Bluetooth® device
1
Press the “TUNE•SELECT” knob and select “Bluetooth” using the
knob.
2
Press the knob and select “Pairing” using the knob.
A passkey will be displayed.
3
SSP (Secure Simple Pairing) incompatible Bluetooth® devices:
Input the passkey into the device.
SSP (Secure Simple Pairing) compatible Bluetooth® devices:
Select
“Yes” to register the device. Depending on the type of
device, it may register automatically.
If a Bluetooth® device has both music player and cellular phone func-
tions, both functions will be registered at the same time. When delet-
ing the device, both functions will be deleted at the same time.
If the off-hook button is pressed and the “TEL” mode is entered when
no phones have been registered, the registration screen will be auto-
matically displayed.
5-7. “SETUP” menu
413
Using the “SETUP” menu (“Bluetooth”
menu)
Registering a Bluetooth® device in the system allows the system
to function. The following functions can be used for registered
devices. To enter the set up menu, press the “TUNE•SELECT”
knob and select “Bluetooth®” using the knob.
Registering a Bluetooth® device
Select “Pairing” using the “TUNE•SELECT” knob, and perform the
procedure for registering a device. (P. 412)
Listing the registered cellular phones
Select “List phone” using the “TUNE•SELECT” knob. The list of regis-
tered cellular phones will be displayed.
● Connecting the registered cellular phone to the audio system
5
1
Select the name of the cellular phone to be connected using the
“TUNE•SELECT” knob.
2
Select “Select” using the knob.
● Deleting a registered cellular phone
1
Select the name of the cellular phone to be deleted using the
“TUNE•SELECT” knob.
2
Select “Delete” using the knob.
3
Press
(YES).
● Disconnecting the registered cellular phone from the audio system
1
Select the name of the cellular phone to be disconnected using
the “TUNE•SELECT” knob.
2
Select “Disconnect” using the knob.
3
Press
(YES).
414
5-7. “SETUP” menu
Listing the registered portable players
Select “List audio” using the “TUNE•SELECT” knob. The list of regis-
tered portable players will be displayed.
● Connecting the registered portable player to the audio system
Select the name of the portable player to be connected using the
1
“TUNE•SELECT” knob.
2
Select “Select” using the knob.
● Deleting the registered portable player
1
Select the name of the portable player to be deleted using the
“TUNE•SELECT” knob.
2
Select “Delete” using the knob.
3
Press
(YES).
● Disconnecting the registered portable player from the audio system
1
Select the name of the portable player to be disconnected using
the “TUNE•SELECT” knob.
2
Select “Disconnect” using the knob.
3
Press
(YES).
● Selecting the connection method
1
Select the name of the desired portable player using the
“TUNE•SELECT” knob.
2
Select “Connection Method” using the knob.
3
Select “From vehicle” or “From audio” using the knob.
5-7. “SETUP” menu
415
Changing the passkey
1
Select “Passkey” using the “TUNE•SELECT” knob.
2
Select a 4 to 8-digit passkey using the knob.
Input the number 1 digit at a time.
3
When the entire number to be registered as a passkey has been
input, press
(ENTER).
If the passkey to be registered has 8 digits, pressing
(ENTER) is not
necessary.
Setting automatic connection of the device on or off
If
“BT power” is set to on, the registered device will be connected
automatically when the engine switch is turned to the “ACC” position
(vehicles without smart entry & start system) or ACCESSORY mode
(vehicles with smart entry & start system).
Select “BT power ON” or “BT power OFF” using the “TUNE•SELECT”
knob.
5
Displaying the device status
Select “Bluetooth info” using the “TUNE•SELECT” knob.
● Displaying the device name
Select “Device name” using the “TUNE•SELECT” knob.
● Displaying the device address
Select “Device address” using the “TUNE•SELECT” knob.
416
5-7. “SETUP” menu
Setting the automatic connection confirmation display to on or off
If the “Display setting” is set to on, the portable player connection sta-
tus will be displayed when the engine switch is turned to the “ACC”
position (vehicles without smart entry & start system) or ACCESSORY
mode (vehicles with smart entry & start system).
Select
“Display setting ON” or
“Display setting OFF” using the
“TUNE•SELECT” knob.
Initialization
Select “Initialize” or “Reset” using the “TUNE•SELECT” knob.
● Initializing the HF sound settings
Select “HF sound setting” using the “TUNE•SELECT” knob and
press
(YES).
For details about HF sound settings: P. 420
● Initializing the device information
Select “Car device info” using the “TUNE•SELECT” knob and press
(YES).
Automatic connection of a portable device, automatic connection confirma-
tion display and the passkey will be initialized.
● Initializing all settings
Select “All initialize” or “Reset all” using the “TUNE•SELECT” knob
and press
(YES).
5-7. “SETUP” menu
417
Using the “SETUP” menu (“TEL” menu)
To enter the set up menu, press the “TUNE•SELECT” knob and
select “TEL” using the knob.
Setting automatic contact/call history transfer
The automatic transfer function is available for PBAP compatible
Bluetooth® phones only.
1
Select “Phonebook” using the “TUNE•SELECT” knob.
2
Select “Auto transfer ON” or “Auto transfer OFF” using the knob.
When set to on, the phone’s contact data and call history are automatically
transferred.
Adding a new phone number
Select “Phonebook” using the “TUNE•SELECT” knob, and select “Add
contacts” using the knob.
5
● Transferring all contacts from the cellular phone
Select “Overwrite all” using the “TUNE•SELECT” knob and press
(YES).
● Transferring one contact from the cellular phone
Select “Add one contact” using the “TUNE•SELECT” knob and
press
(YES).
Deleting a registered phone number
1
Select “Phonebook” using the “TUNE•SELECT” knob.
2
Select “Delete contacts” using the knob.
3
Select the desired phone number using the knob and press
(YES).
To delete all the registered phone numbers, press
(ALL) and then
press
(YES).
Press
(A-Z) to display the registered names in alphabetical order of the
initial.
418
5-7. “SETUP” menu
Changing the sorting order of the contacts
1
Select “Phonebook” using the “TUNE•SELECT” knob.
2
Select “Sort contacts” using the knob.
3
Select “Sort by first” or “Sort by last” using the knob.
Transferring call histories
This function is available for PBAP compatible Bluetooth® phones
only.
1
Select “Phonebook” using the “TUNE•SELECT” knob.
2
Select “Transfer history” using the knob and press
(YES).
Deleting call histories
Select
“Phonebook” using the “TUNE•SELECT” knob, and select
“Delete call history” using the knob.
● Deleting outgoing call history
1
Select “Outgoing calls” using the “TUNE•SELECT” knob.
2
Select the desired phone number using the knob and press
(YES).
To delete all outgoing call history data, press
(ALL) and then
press
(YES).
● Deleting incoming call history
1
Select “Incoming calls” using the “TUNE•SELECT” knob.
2
Select the desired phone number using the knob and press
(YES).
To delete all incoming call history data, press
(ALL) and then
press
(YES).
● Deleting missed call history
1
Select “Missed calls” using the “TUNE•SELECT” knob.
2
Select the desired phone number using the knob and press
(YES).
To delete all missed call history data, press
(ALL) and then
press
(YES).
5-7. “SETUP” menu
419
● Deleting a number from all call histories (Outgoing calls, Incoming
calls and Missed calls)
1
Select “All calls” using the “TUNE•SELECT” knob.
2
Select the desired phone number using the knob and press
(YES).
To delete all of the call histories data, press
(ALL) and then
press
(YES).
Registering favorites
Up to 15 contacts can be registered in the favorites list.
■ Registering the contacts from the “SETUP” mode
1
Press the “TUNE•SELECT” knob.
2
Select “TEL” using the knob.
3
Select “Favourites” using knob.
4
Select “Add favourites” using the knob.
Press
(A-Z) to display the registered names in alphabetical
5
order of the initial.
5
Select desired contact using the knob.
■ Registering the contacts from the “TEL” mode
1
Press the off-hook button.
2
Select “Phonebook”, “All calls”, “Missed calls”, “Incoming calls” or
“Outgoing calls” using the “TUNE•SELECT” knob.
3
Select a desired number using the knob
4
Press
(Add favourite).
● When 15 contacts have already been registered to the favorites
list, a registered contact needs to be replaced.
1
Select the contact to be replaced using the “TUNE•SELECT”
knob.
2
Select
(YES) when the confirmation screen appears.
420
5-7. “SETUP” menu
Deleting favorites
■ Deleting the contacts from the “SETUP” mode
1
Press the “TUNE•SELECT” knob.
2
Select “TEL” using the knob.
3
Select “Favourites” using the knob.
4
Select “Delete favourites” using the knob.
5
Select desired contact using the knob.
You can select all contacts by selecting
(ALL).
6
Select
(YES) when the confirmation screen appears.
■ Deleting the contacts from the “TEL” mode
1
Press the off-hook button.
2
Select “Favourites” using the “TUNE•SELECT” knob.
3
Select a desired contact using the knob
4
Press
(Delete favourite).
5
Select
(YES) when the confirmation screen appears.
Setting call volume
1
Select “HF sound setting” using the “TUNE•SELECT” knob.
2
Select “Call volume” using the knob.
3
Change the call volume.
To decrease the volume: Turn the knob counterclockwise.
To increase the volume: Turn the knob clockwise.
To set the volume, press
(BACK).
Setting ring tone volume
1
Select “HF sound setting” using the “TUNE•SELECT” knob.
2
Select “Ringtone volume” using the knob.
3
Change the ring tone volume.
To decrease the volume: Turn the knob counterclockwise.
To increase the volume: Turn the knob clockwise.
To set the volume, press
(BACK).
5-7. “SETUP” menu
421
Setting ring tone
1
Select “HF sound setting” using the “TUNE•SELECT” knob.
2
Select “Ringtone” using the knob.
3
Using the knob, select a ring tone (1 - 3 or “From phone”). To set
the selected ring tone, press
(BACK).
■Phone number
Up to 5000 names (maximum of 1000 names per device) can be stored.
■ Call history
Up to 10 numbers can be stored in each of the outgoing, incoming and
missed call history memories.
■ Limitation of number of digits
A phone number that exceeds 24 digits cannot be registered.
■ Bluetooth® phone system functions
Certain functions may not be available during driving.
5
422
5-8. Bluetooth® Audio
Operating a Bluetooth® enabled portable
player
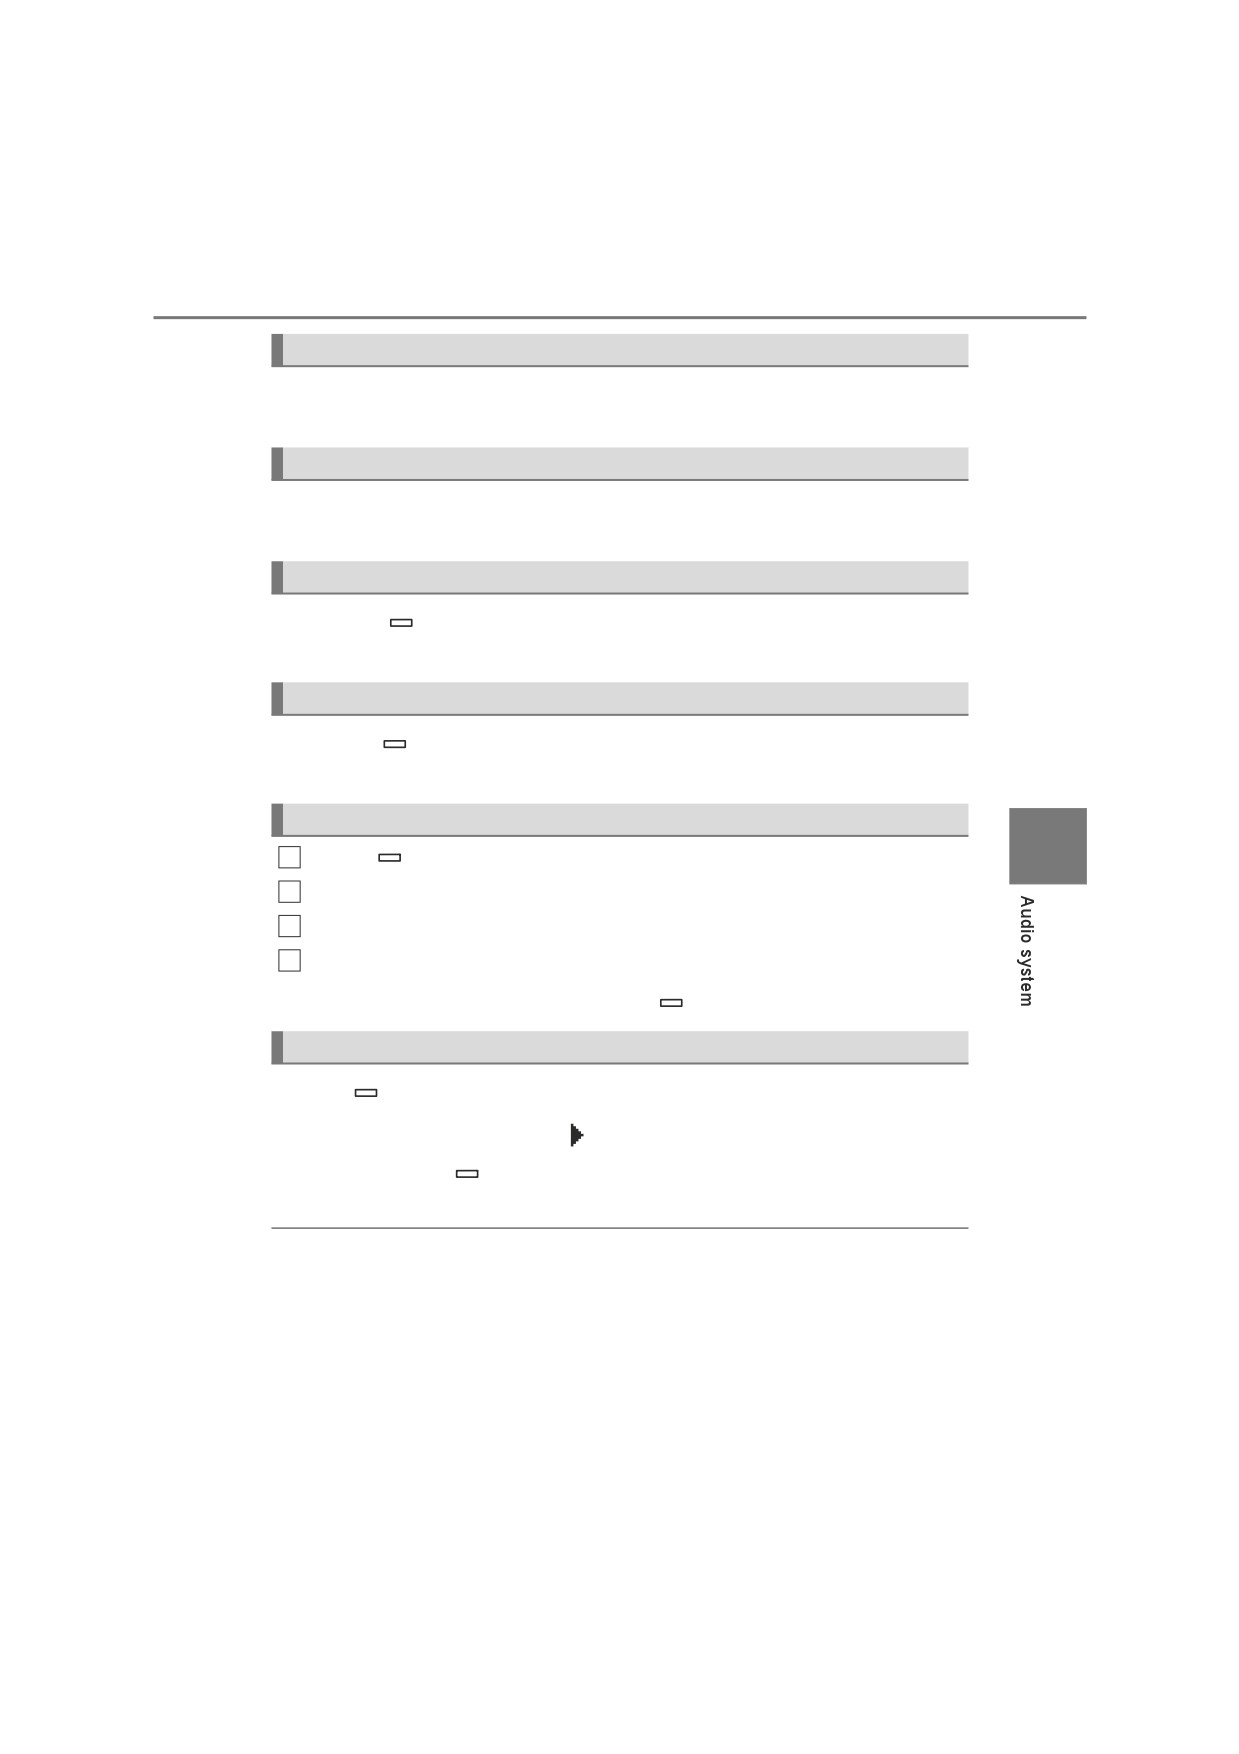
1
Pause/playback
2
Selecting a track, fast-forwarding or rewinding
3
“TUNE•SELECT” knob
Press: Displaying list of the current folder
Turn: Selecting an item
4
Displaying text message
5
Displaying play mode
6
Selecting a folder
7
Repeat play
8
Changing the audio source/playback
9
Random play or back button
10
“POWER VOLUME” knob
Press: Turning the audio system on or off
Turn: Adjusting the volume
Selecting an album
Press
(<FOLDER) or
(FOLDER>) to select desired album.
5-8. Bluetooth® Audio
423
Selecting a track
Turn the “TUNE•SELECT” knob or press the “SEEK >” or “< TRACK”
button to move up or down.
Fast-forwarding and rewinding tracks
Press and hold the “SEEK >” or “< TRACK” button until you hear a
beep.
Repeat play
Pressing
(RPT) changes modes in the following order: Track
repeatAlbum repeatOff.
Random play
Pressing
(RDM) changes modes in the following order: Album ran-
domAll track randomOff.
Selecting a play mode
5
1
Press
(“BROWSE”). The playlist will be displayed.
2
Turn the “TUNE•SELECT” knob to display the folder/file list.
3
Press the knob to select the desired item.
4
Repeat the same procedure to select the desired file.
To return to the previous display, press
(BACK).
Switching the display
Press
(TEXT) to display or hide the album title.
If there are continuing texts,
is displayed.
Press and hold
(TEXT) until you hear a beep to display the remaining
texts.
■ Bluetooth® audio system functions
Depending on the portable player that is connected to the system, certain
functions may not be available.
■ Display
P. 388
424
5-9. Bluetooth® Phone
Making a phone call
To enter the “TEL” mode, press the off-hook button.
Dialing from the phonebook
1
Select “Phonebook” using the “TUNE•SELECT” knob.
2
Select the desired name using the knob and press the off-hook but-
ton.
Press
(A-Z) to display the registered names in alphabetical order
of the initial.
Dialing from favorites
1
Select “Favourites” using the “TUNE•SELECT” knob.
2
Select the desired name using the knob and press the off-hook but-
ton.
Dialing by entering the number
1
Select “Dial by number” using the “TUNE•SELECT” knob.
2
Enter the phone number and press the off-hook button.
Dialing from call histories
1
Select “All calls”, “Missed calls”, “Incoming calls” or “Outgoing calls”
using the “TUNE•SELECT” knob.
2
Select a desired number using the knob and press the off-hook but-
ton.
The following operations can be performed:
● Registering a number as a Favorite
P. 419
● Deleting the selected number
Press
(DELETE) and press
(YES).
5-9. Bluetooth® Phone
425
When receiving a phone call
Answering the phone
Press the off-hook button.
Refusing the call
Press the on-hook button.
Receiving a call when on another call
Press the off-hook button.
Pressing the off-hook button again returns you to the previous call.
Adjusting the ring tone volume when receiving a call
To decrease the volume: Turn the “POWER VOLUME” knob counter-
clockwise.
To increase the volume: Turn the “POWER VOLUME” knob clockwise.
5
426
5-9. Bluetooth® Phone
Speaking on the phone
Transferring a call
A call can be transferred between the cellular phone and system while
dialing, receiving a call, or during a call. Use one of the following
methods:
a. Operate the cellular phone.
Refer to the manual that comes with the cellular phone for the operation of
the phone.
b. Press
(TEL).*
*: This operation can be performed only when transferring a call from the cel-
lular phone to the system during a call.
Muting your voice
Press
(MUTE).
Press
(UNMUTE) to cancel the mute.
Inputting digits
This operation cannot be performed while driving.
1
Press
(“0-9”)
2
Turn the “TUNE•SELECT” knob to select the desired number.
3
Press the knob to decide the number.
4
Press
(SEND) to send tones.
Pressing
(BACK) preserves the number and returns to the previous
screen.
Pressing
(“EXIT”) or (“Wait”) deletes the number and go to “Entering a
number” screen.
Phone number containing a “p” symbol
When the “p” symbol is dialed in an outgoing call, there will be a
pause for 2 seconds before the following digits are dialed automati-
cally.
Phone number containing a “w” symbol
When the “w” symbol is dialed in an outgoing call, you need to press
(SEND) again to dial following digits.
This operation can be performed while driving.
5-9. Bluetooth® Phone
427
Adjusting the outgoing volume
Your voice volume that the other party hears from their speaker can
be adjusted.
1
Press
(Send Vol)
2
Use the “TUNE•SELECT” knob to adjust the volume. (-5 to +5)
Setting call volume
To decrease the volume: Turn the “POWER VOLUME” knob counter-
clockwise.
To increase the volume: Turn the “POWER VOLUME” knob clockwise.
■When talking on the phone
● Do not talk simultaneously with the other party.
●Keep the volume of the received voice down. Otherwise, voice echo will
increase.
■ Automatic volume adjustment
When vehicle speed is 80 km/h (50 mph) or more, the volume automatically
5
increases. The volume returns to the previous volume setting when vehicle
speed drops to 70 km/h (43 mph) or less.
■ Phone call system functions
Depending on the cellular phone, certain functions may not be available.
■ Situations where the system may not recognize your voice
● When driving on a rough road
● When driving at high speeds
● When air is blowing out of the vents onto the microphone
● When the air conditioning fan emits a loud noise
428
5-10. Bluetooth®
Bluetooth®
■When using the Bluetooth® audio/phone
● In the following situations, the system may not function.
• The portable player does not support Bluetooth®
• The cellular phone is located outside the service area
• The Bluetooth® device is switched off
• The Bluetooth® device has a low battery
• The Bluetooth® device is not connected to the system
• The Bluetooth® device is behind the seat or in the glove box or console
box, or metal material covers or touches the device
●There may be a delay if a cellular phone connection is made during
Bluetooth® audio play.
● Depending on the type of portable audio player that is connected to the sys-
tem, operation may differ slightly and certain functions may not be available.
● This system is not guaranteed to operate with all Bluetooth® devices.
■ When transferring ownership of the vehicle
Be sure to initialize the system to prevent personal data from being improp-
erly accessed. (P. 416)
■ About Bluetooth®
Bluetooth is a registered trademark of
Bluetooth SIG, Inc.
®
5-10. Bluetooth
429
■ Compatible models
The Bluetooth® audio system supports portable audio players with the follow-
ing specifications
●Bluetooth® specifications:
Ver. 1.1 or higher (Recommended: Ver. 4.1)
● Profiles:
• A2DP (Advanced Audio Distribution Profile) Ver. 1.0, or higher (Recom-
mended: Ver. 1.3)
This is a profile to transmit stereo audio or high quality sound to the audio
system.
• AVRCP (Audio/Video Remote Control Profile) Ver. 1.0 or higher (Recom-
mended: Ver. 1.6)
This is a profile to allow remote control the A/V equipment.
However, please note that some functions may be limited depending on
the type of portable audio player connected.
The hands-free system supports cellular phones with the following speci-
fications.
●Bluetooth® specifications: Ver. 2.0 or higher (Recommended: Ver. 4.1 +EDR
or higher)
● Profiles:
5
• HFP (Hands Free Profile) Ver. 1.0 or higher (Recommended: Ver. 1.7)
This is a profile to allow hands-free phone calls using a cellular phone. It
has outgoing and incoming call functions.
• OPP (Object Push Profile) Ver. 1.1 or higher (Recommended: Ver. 1.2)
This is a profile to transfer phonebook data. When a Bluetooth® compati-
ble cellular phone has both PBAP and OPP, OPP cannot be used.
• PBAP (Phone Book Access Profile) Ver. 1.0 or higher (Recommended:
Ver. 1.2)
This is a profile to transfer phonebook data.
430
5-10. Bluetooth®
WARNING
■ While driving
Do not operate the portable audio player, cellular phone or connect a device
to the Bluetooth® system.
■ Caution regarding interference with electronic devices
● Your audio unit is fitted with Bluetooth® antennas. People with implantable
cardiac pacemakers, cardiac resynchronization therapy-pacemakers or
implantable cardioverter defibrillators should maintain a reasonable dis-
tance between themselves and the Bluetooth® antennas. The radio waves
may affect the operation of such devices.
●Before using Bluetooth® devices, users of any electrical medical device
other than implantable cardiac pacemakers, cardiac resynchronization
therapy-pacemakers or implantable cardioverter defibrillators should con-
sult the manufacturer of the device for information about its operation
under the influence of radio waves. Radio waves could have unexpected
effects on the operation of such medical devices.
NOTICE
■ When leaving the vehicle
Do not leave your portable audio player or cellular phone in the vehicle. The
inside of the vehicle may become hot, causing damage to the portable
audio player or cellular phone.
431
Interior features
6
6-1.
Using the air conditioning
6-2.
Using the interior lights
system and defogger
Interior lights list
451
Manual air conditioning
• Personal/interior light
system
432
main switch
452
Automatic air conditioning
• Personal/interior
system
439
lights
452
• Interior light
452
Heated steering wheel/
seat heaters
448
6-3.
Using the storage features
List of storage features
454
• Glove box
455
• Console box
455
• Cup holders
456
• Bottle holders
457
• Auxiliary boxes
458
Luggage compartment
features
461
6-4.
Using the other interior
features
Other interior features
462
• Sun visors
462
• Vanity mirror
462
• Clock
463
• Power outlets
464
• Grocery bag hooks
466
• Coat hooks
467
• Armrest
467
Using the steering wheel
audio switches
468
432
6-1. Using the air conditioning system and defogger
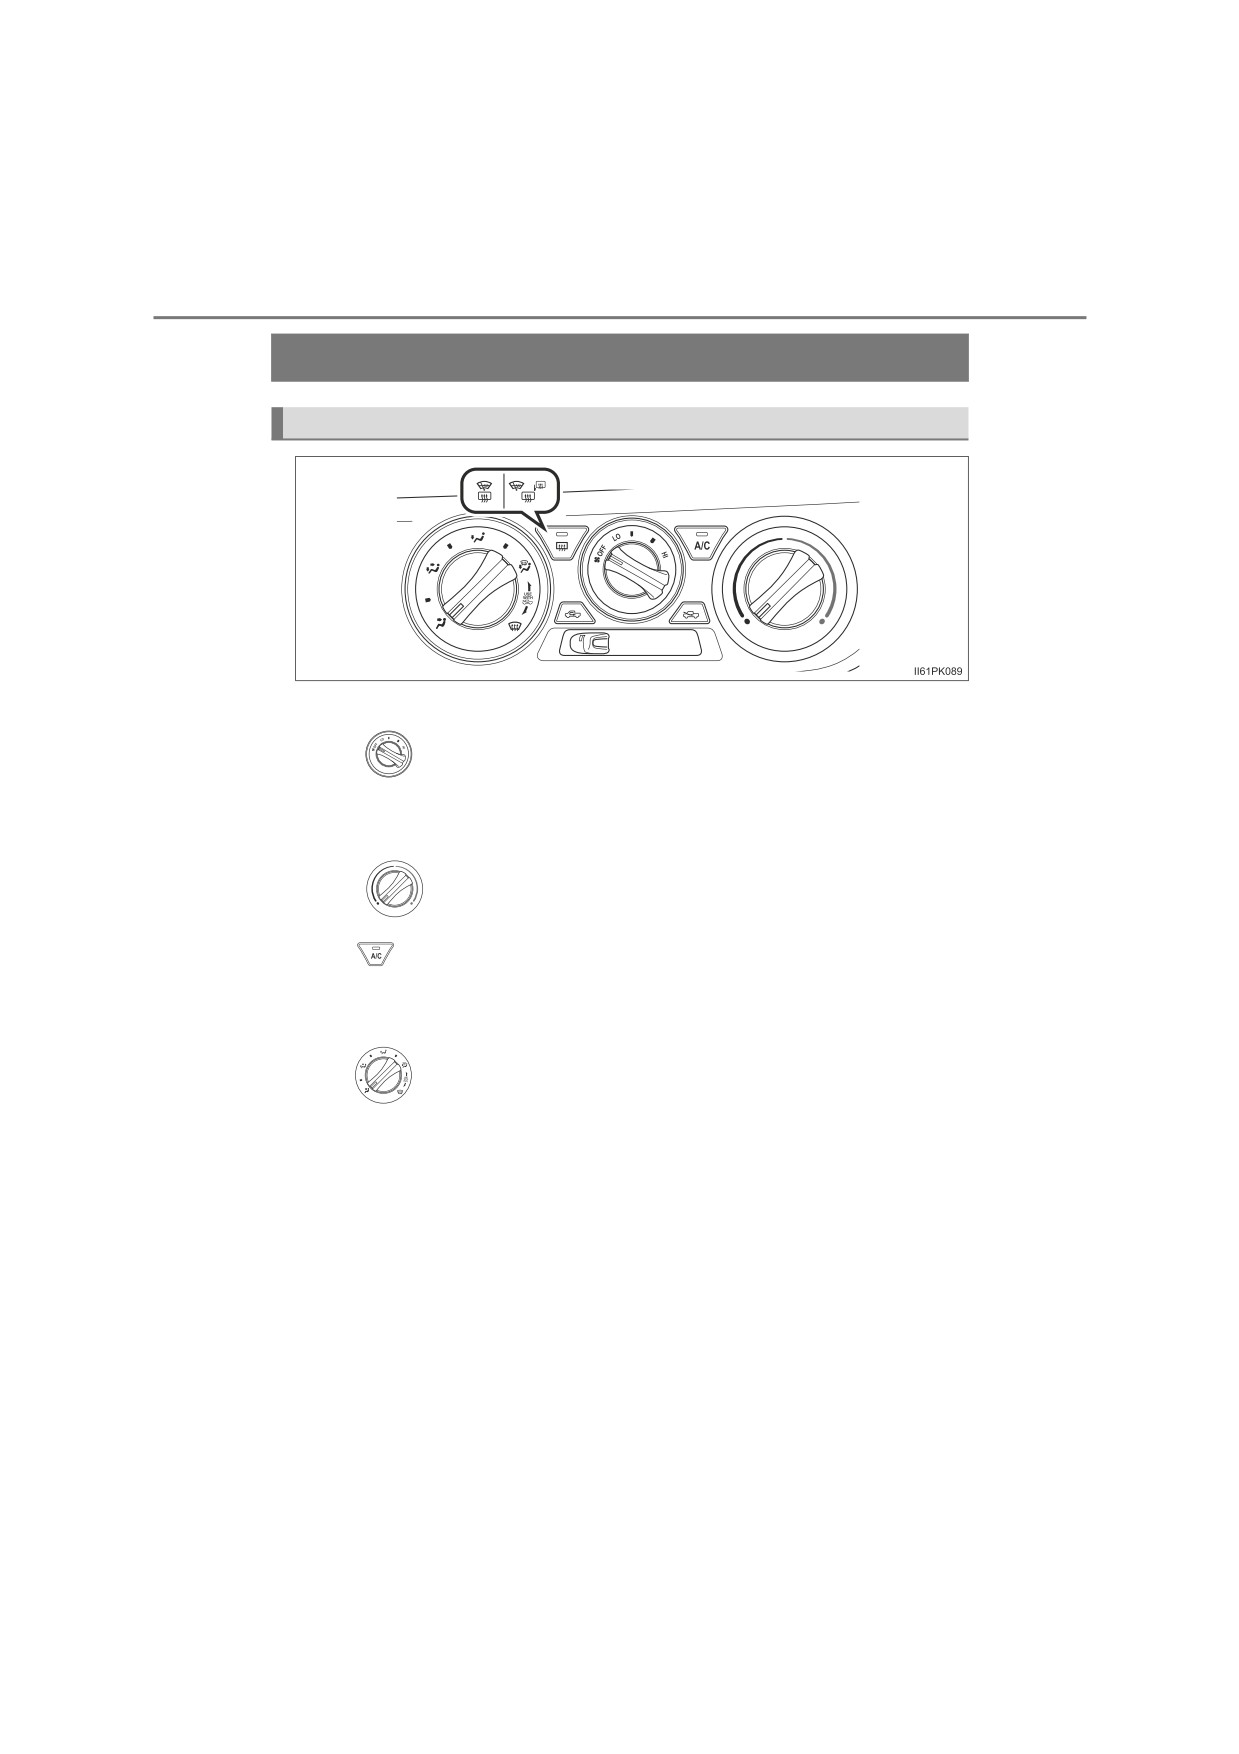
Manual air conditioning system
Air conditioning controls
■ Adjusting the fan speed setting
Turn
clockwise (increase) or counterclockwise (decrease).
Turning the dial to “OFF” turns off the fan.
■ Adjusting the temperature setting
Turn
clockwise (warm) or counterclockwise (cool).
If
(if equipped) is not pressed, the system will blow ambient tem-
perature air or heated air.
■ Changing the air flow mode
Set
to the desired position.
The positions between the air outlet selections can also be selected for
more delicate adjustment.
: If equipped
6-1. Using the air conditioning system and defogger
433
Other functions
■ Switching between outside air and recirculated air modes
Move the outside/recirculated air mode lever.
The mode switches between
(introduces air from outside the vehi-
cle) and
(recycles air inside the vehicle) each time the lever is
moved.
■ Defogging the windshield (vehicles with
)
1
Set
to
position.
Set the outside/recirculated air mode lever to outside air mode if recircu-
lated air mode is used.
Perform the following operations accordingly:
2
● To adjust the fan speed, turn
● To adjust the temperature setting, turn
● If the dehumidification function is not operating, press
to
6
operate the dehumidification function.
To defog the windshield and the side windows early, turn the air
flow and temperature up.
■ Defogging the rear window and outside rear view mirrors (if
equipped)
Defoggers are used to defog the rear window, and to remove rain-
drops, dew and frost from the outside rear view mirrors.
Press
(vehicles with rear window defogger),
(vehicles
with rear window defogger and windshield wiper de-icer) or
(vehicles with rear window defogger, outside rear view mirror defog-
gers and windshield wiper de-icer).
The indicator illuminates on the switch when the defoggers are on.
The defoggers will automatically turn off after approximately 15 minutes.
434
6-1. Using the air conditioning system and defogger
■ Windshield wiper de-icer (if equipped)
This feature is used to prevent ice from building up on the wind-
shield and wiper blades.
Press
or
The indicator illuminates on the switch when the windshield wiper de-
icer is on.
The windshield wiper de-icer will automatically turn off after approxi-
mately 15 minutes.
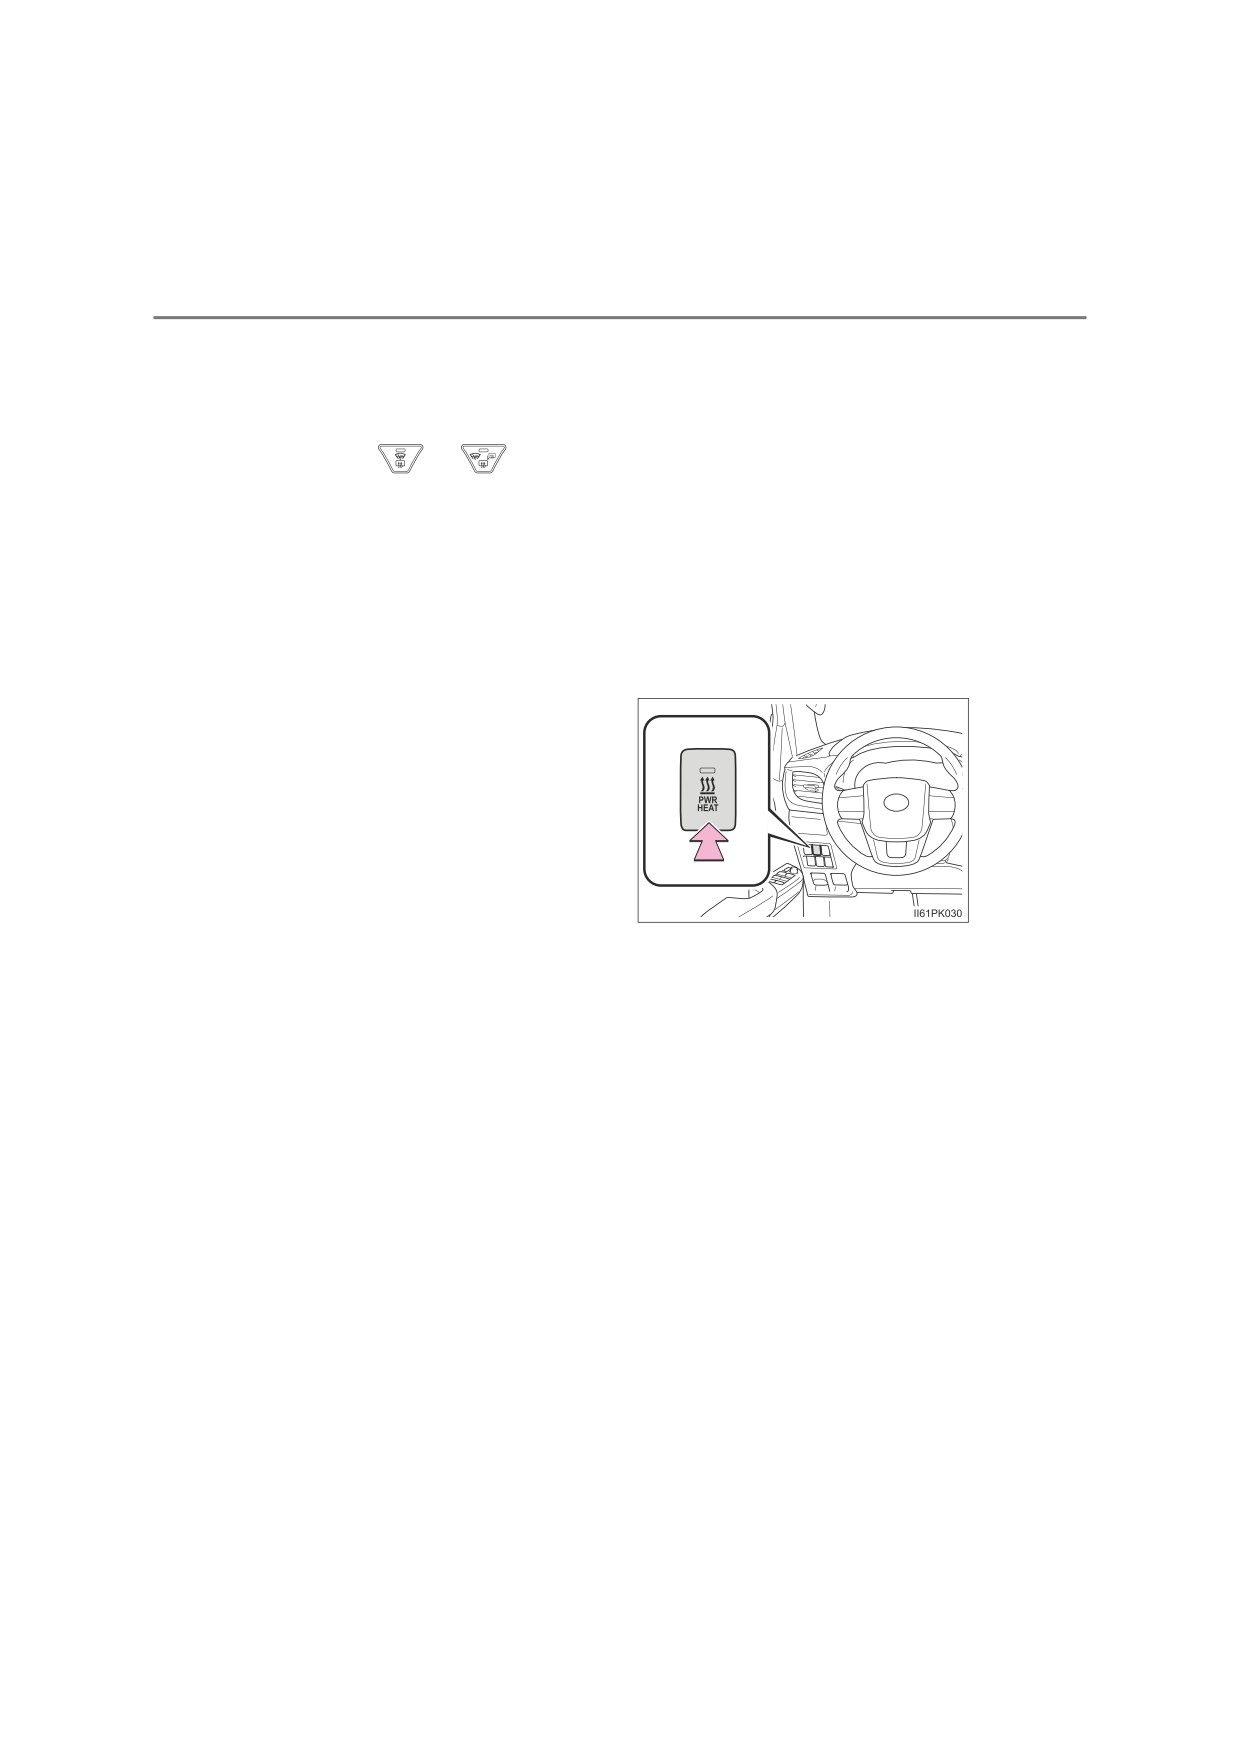
■ Power heater (if equipped)
This feature is used to heat the engine coolant, speed up warming
of the cab in cold weather, and keep the cab warm.
Press the switch to turn the
power heater on/off.
The indicator illuminates on the
switch when the power heater is
on.
If you do not turn the switch to
off, the engine speed may be
increased when the engine is
started.
6-1. Using the air conditioning system and defogger
435
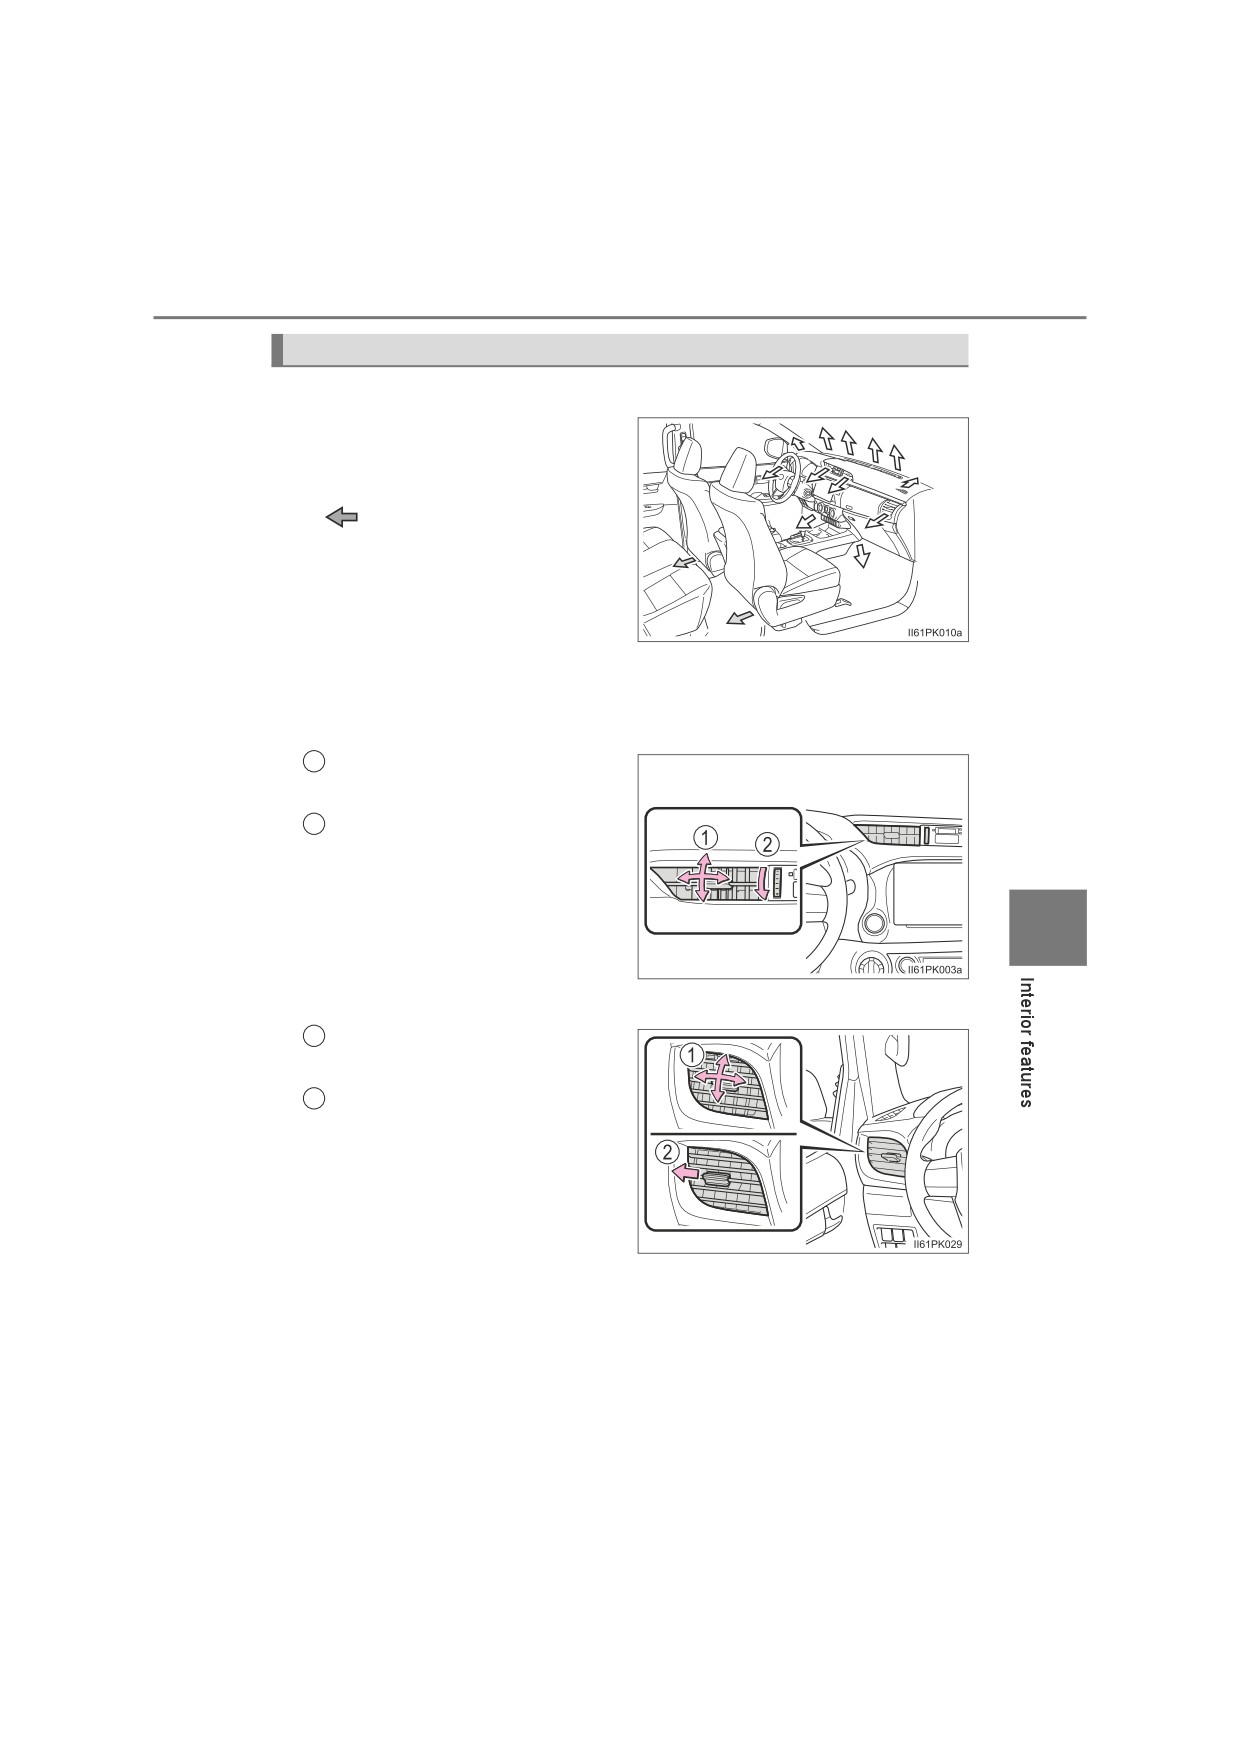
Air outlets
■ Location of air outlets
The air outlets and air volume
changes according to the
selected air flow mode.
: Some models
■ Adjusting the air flow direction and opening/closing the air
outlets
Center outlets
1
Direct air flow to the left or
right, up or down.
2
Close the vents.
6
Side outlets
1
Direct air flow to the left or
right, up or down.
2
Close the vents.
436
6-1. Using the air conditioning system and defogger
■ Fogging up of the windows
●The windows will easily fog up when the humidity in the vehicle is high.
Turning
(if equipped) on will dehumidify the air from the outlets and
defog the windshield effectively.
● If you turn
(if equipped) off, the windows may fog up more easily.
● The windows may fog up if the recirculated air mode is used.
■When driving on dusty roads
Close all windows. If dust thrown up by the vehicle is still drawn into the vehi-
cle after closing the windows, it is recommended that the air intake mode be
set to outside air mode and the fan speed to any setting except off.
■ Outside/recirculated air mode
Setting to the recirculated air mode temporarily is recommended in prevent-
ing dirty air from entering the vehicle interior and helping to cool the vehicle
when the outside air temperature is high.
■ When the outside temperature falls to nearly 0°C (32°F) (vehicles with
)
The dehumidification function may not operate even when
is pressed.
■ Ventilation and air conditioning odors
● To let fresh air in, set the air conditioning system to the outside air mode.
● During use, various odors from inside and outside the vehicle may enter into
and accumulate in the air conditioning system. This may then cause odor to
be emitted from the vents.
● To reduce potential odors from occurring:
It is recommended that the air conditioning system be set to outside air
mode prior to turning the vehicle off.
■ Air conditioning filter
P. 512
6-1. Using the air conditioning system and defogger
437
■ Air conditioning refrigerant (vehicles with
for models made in
Thailand*)
Type: R-134a (HFC-134a)
Capacity: 0.50 kg (1.10 lb.)
GWP (Global Warming Potential): 1430
CO2 equivalent: 0.72 t (1587.33 lb.)
6
*: See “Checking your vehicle’s model” if you are not sure of which model
your vehicle is. (P. 12)
438
6-1. Using the air conditioning system and defogger
WARNING
■ To prevent the windshield from fogging up
●Do not set
to
during cool air operation in extremely humid
weather. The difference between the temperature of the outside air and
that of the windshield can cause the outer surface of the windshield to fog
up, blocking your vision.
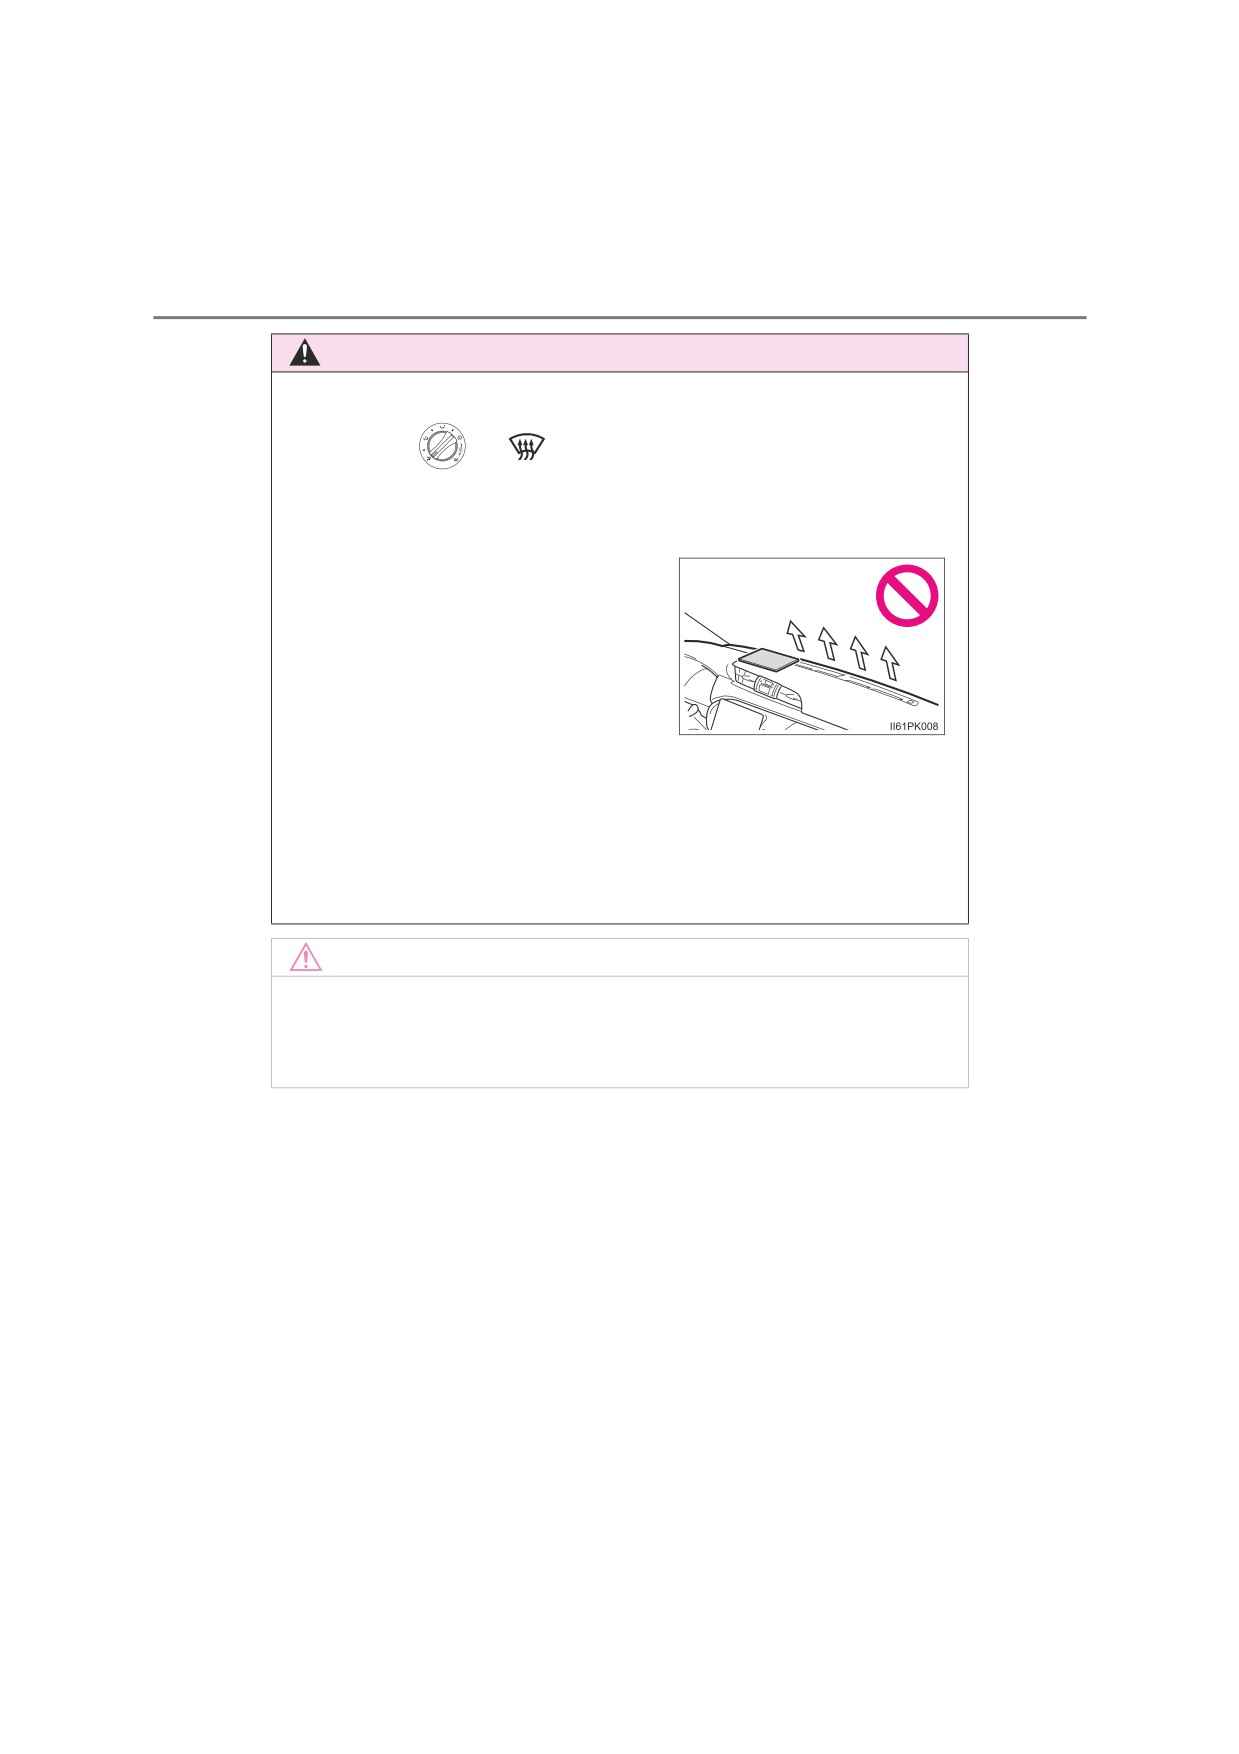
●Do not place anything on the instrument
panel which may cover the air outlets.
Otherwise, air flow may be obstructed,
preventing the windshield defoggers
from defogging.
■ To prevent burns
● Vehicles with outside rear view
mirror defoggers: Do not touch the rear
view mirror surfaces
when the outside rear view mirror defoggers are on.
● Vehicles with windshield wiper de-icer: Do not touch the glass at lower part
of the windshield or the side of the front pillars when the windshield wiper
de-icer is on.
NOTICE
■ To prevent battery discharge
Do not leave the air conditioning system on longer than necessary when the
engine is not running.
6-1. Using the air conditioning system and defogger
439
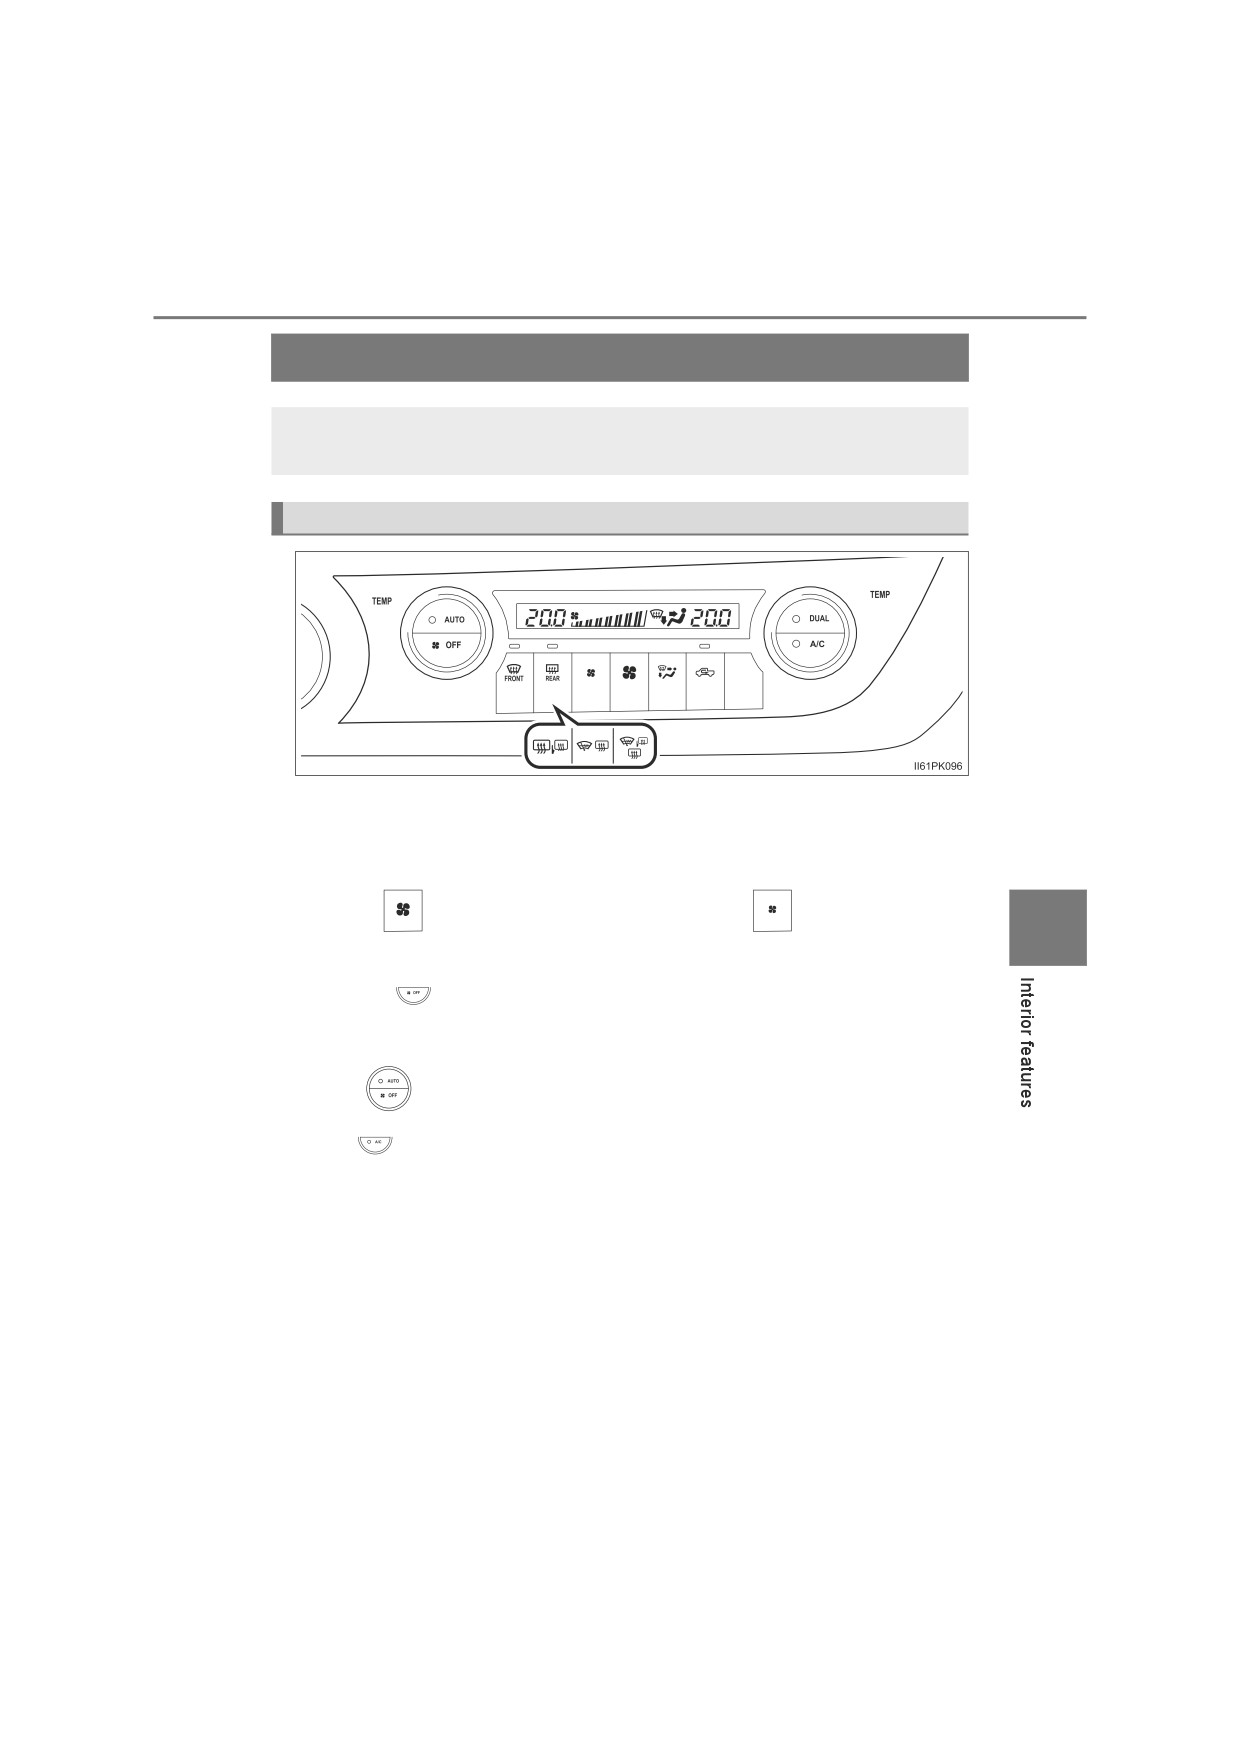
Automatic air conditioning system
Air outlets and fan speed are automatically adjusted according
to the temperature setting.
Air conditioning controls
This illustration is for a left-hand drive vehicle. Some button positions
differ for right-hand drive vehicles.
■ Adjusting the fan speed setting
Press
to increase the fan speed and
to decrease the
6
fan speed.
Press
to turn the fan off.
■ Adjusting the temperature setting
Turn
clockwise (warm) or counterclockwise (cool).
If
is not pressed, the system will blow ambient temperature air or
heated air.
: If equipped
440
6-1. Using the air conditioning system and defogger
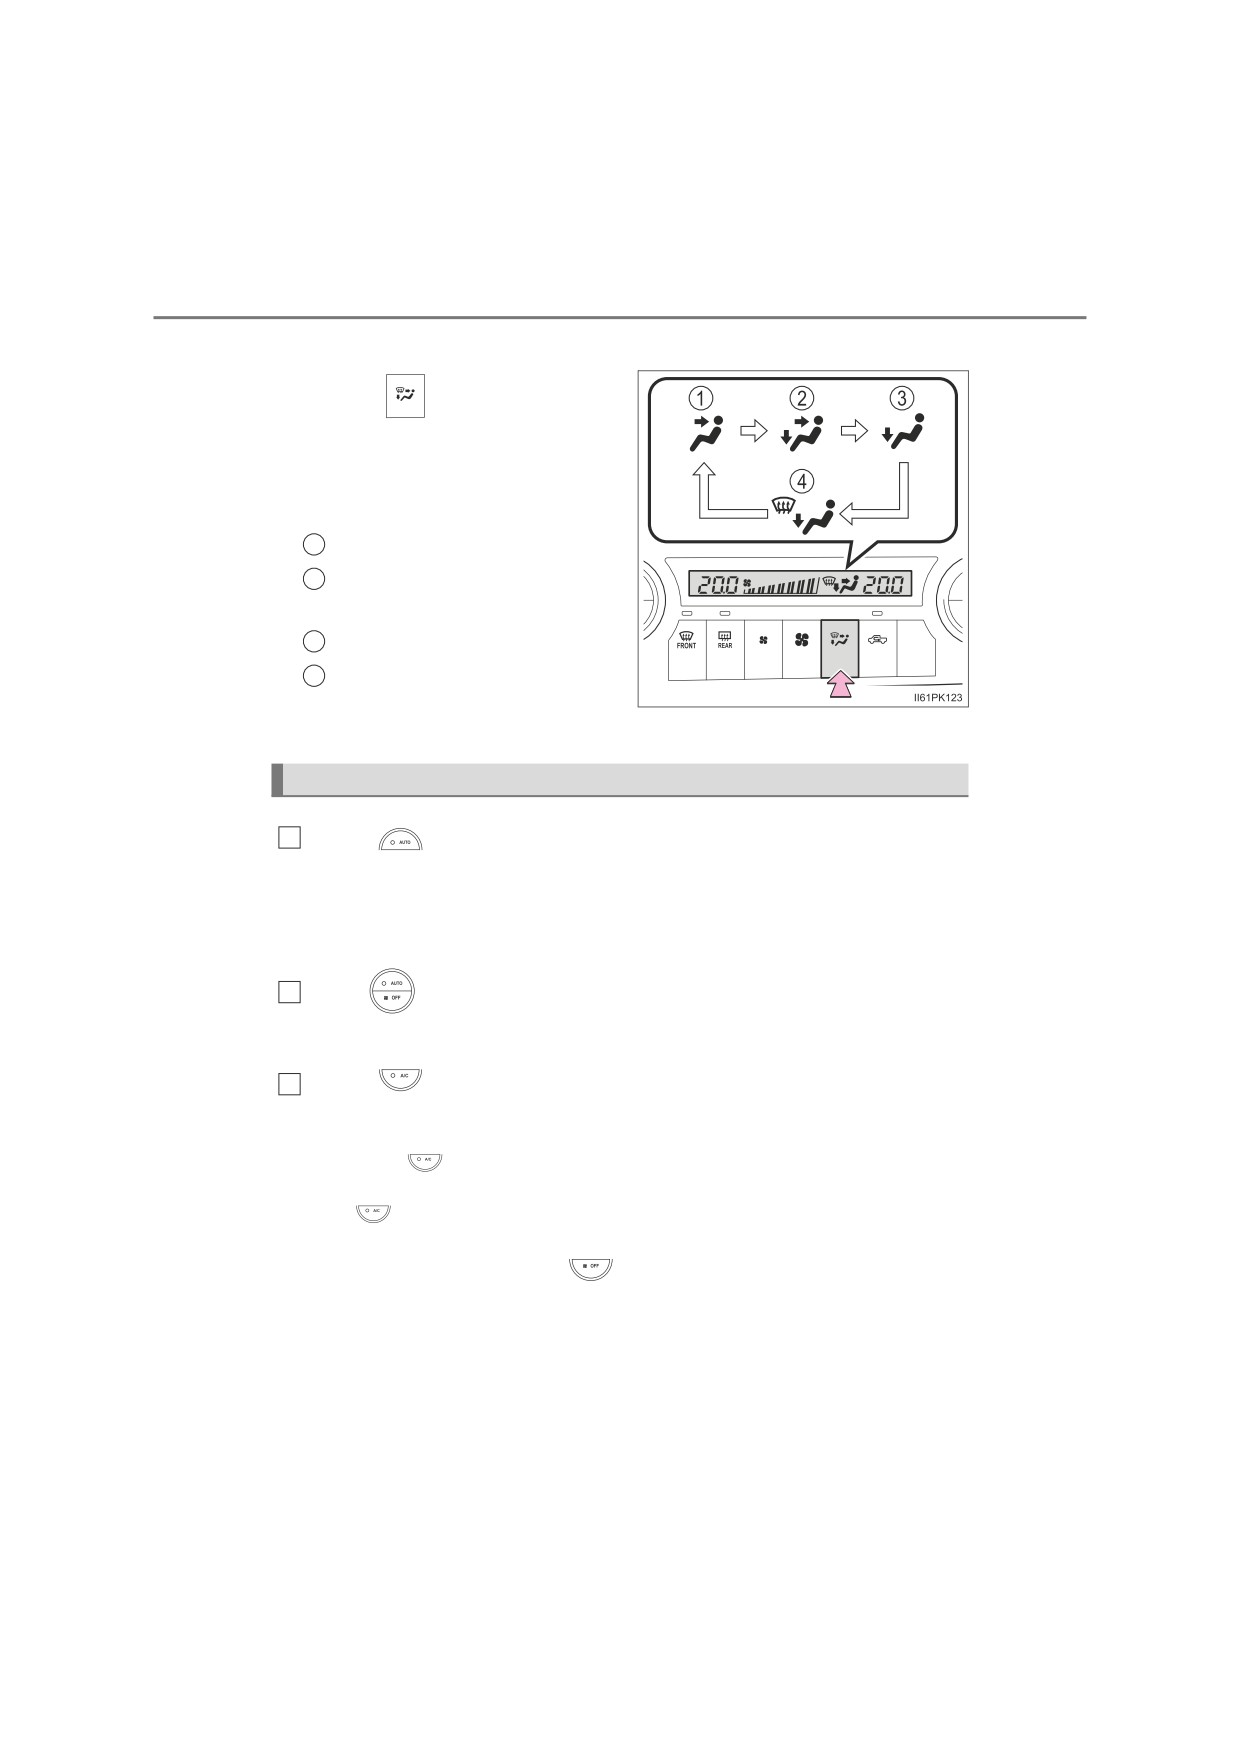
■ Changing the air flow mode
Press
to change the air
outlets.
The air outlets used are
switched each time the button is
pressed.
1
Air flows to the upper body.
2
Air flows to the upper body
and feet.
3
Mainly air flows to the feet.
4
Air flows to the feet and the
windshield defogger oper-
ates.
Using automatic mode
1
Press
The dehumidification function begins to operate. Air outlets and fan
speed are automatically adjusted according to the temperature set-
ting.
2
Turn
clockwise (warm) or counterclockwise (cool) to adjust
the temperature.
3
Press
The cooling and dehumidification function switches between on and off
each time
is pressed.
The
indicator illuminates when the function is on.
To stop the operation, press
■ Automatic mode indicator
If the fan speed setting or air flow modes are operated, the auto-
matic mode indicator goes off. However, automatic mode for func-
tions other than that operated is maintained.
6-1. Using the air conditioning system and defogger
441
■ Adjusting the temperature for driver and passenger seats sep-
arately (“DUAL” mode)
To turn on the “DUAL” mode, perform the following either operation:
● Press
● Turn
clockwise (warm) or counterclockwise (cool) to adjust
the temperature.
The
indicator comes on when the “DUAL” mode is on.
Other functions
■ Switching between outside air and recirculated air modes
Press
The mode switches between outside air mode (indicator off) and recir-
culated air mode (indicator on) each time the button is pressed.
■ Defogging the windshield
Press
6
The dehumidification function operates and fan speed increases.
Set
to the outside air mode if the recirculated air mode is used. (It
may switch automatically.)
To defog the windshield and the side windows early, turn the air flow and
temperature up.
To return to the previous mode, press
again when the windshield is
defogged.
The
indicator illuminates when the windshield dehumidification
function is on.
442
6-1. Using the air conditioning system and defogger
■ Defogging the rear window and outside rear view mirrors (if
equipped)
Defoggers are used to defog the rear window, and to remove rain-
drops, dew and frost from the outside rear view mirrors.
Press
(vehicles with rear window defogger),
(vehicles
with rear window defogger and outside rear view mirror defoggers),
(vehicles with rear window defogger and windshield wiper de-
icer) or
(vehicles with rear window defogger, outside rear view
mirror defoggers and windshield wiper de-icer).
The indicator illuminates on the switch when the defoggers are on.
The defoggers will automatically turn off after approximately 15 to 60
minutes.
■ Windshield wiper de-icer (if equipped)
This feature is used to prevent ice from building up on the wind-
shield and wiper blades.
Press
or
The indicator illuminates on the switch when the windshield wiper de-
icer is on.
The windshield wiper de-icer will automatically turn off after approxi-
mately 15 to 60 minutes.
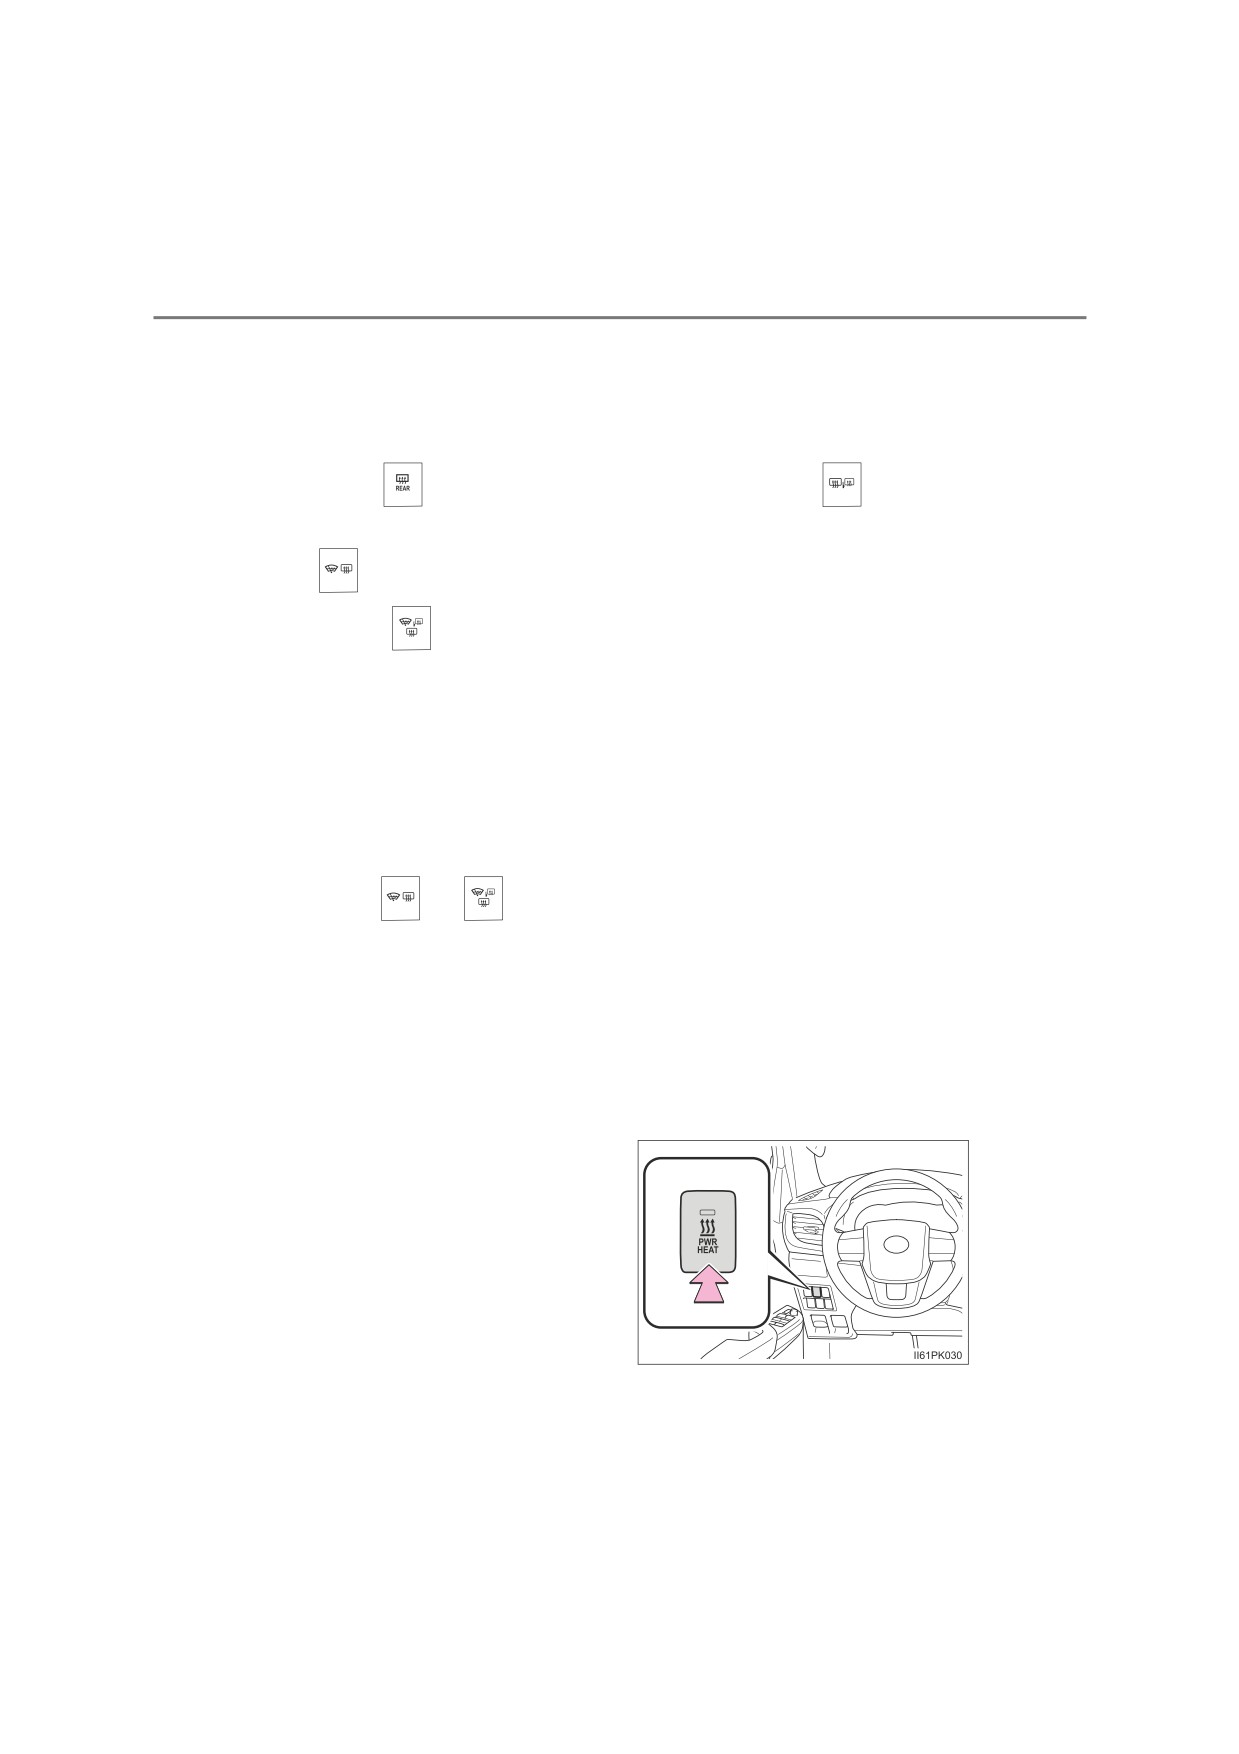
■ Power heater (if equipped)
This feature is used to heat the engine coolant, speed up warming
of the cab in cold weather, and keep the cab warm.
Press the switch to turn the
power heater on/off
The indicator illuminates on the
switch when the power heater is
on.
If you do not turn the switch to
off, the engine speed may be
increased when the engine is
started.
6-1. Using the air conditioning system and defogger
443
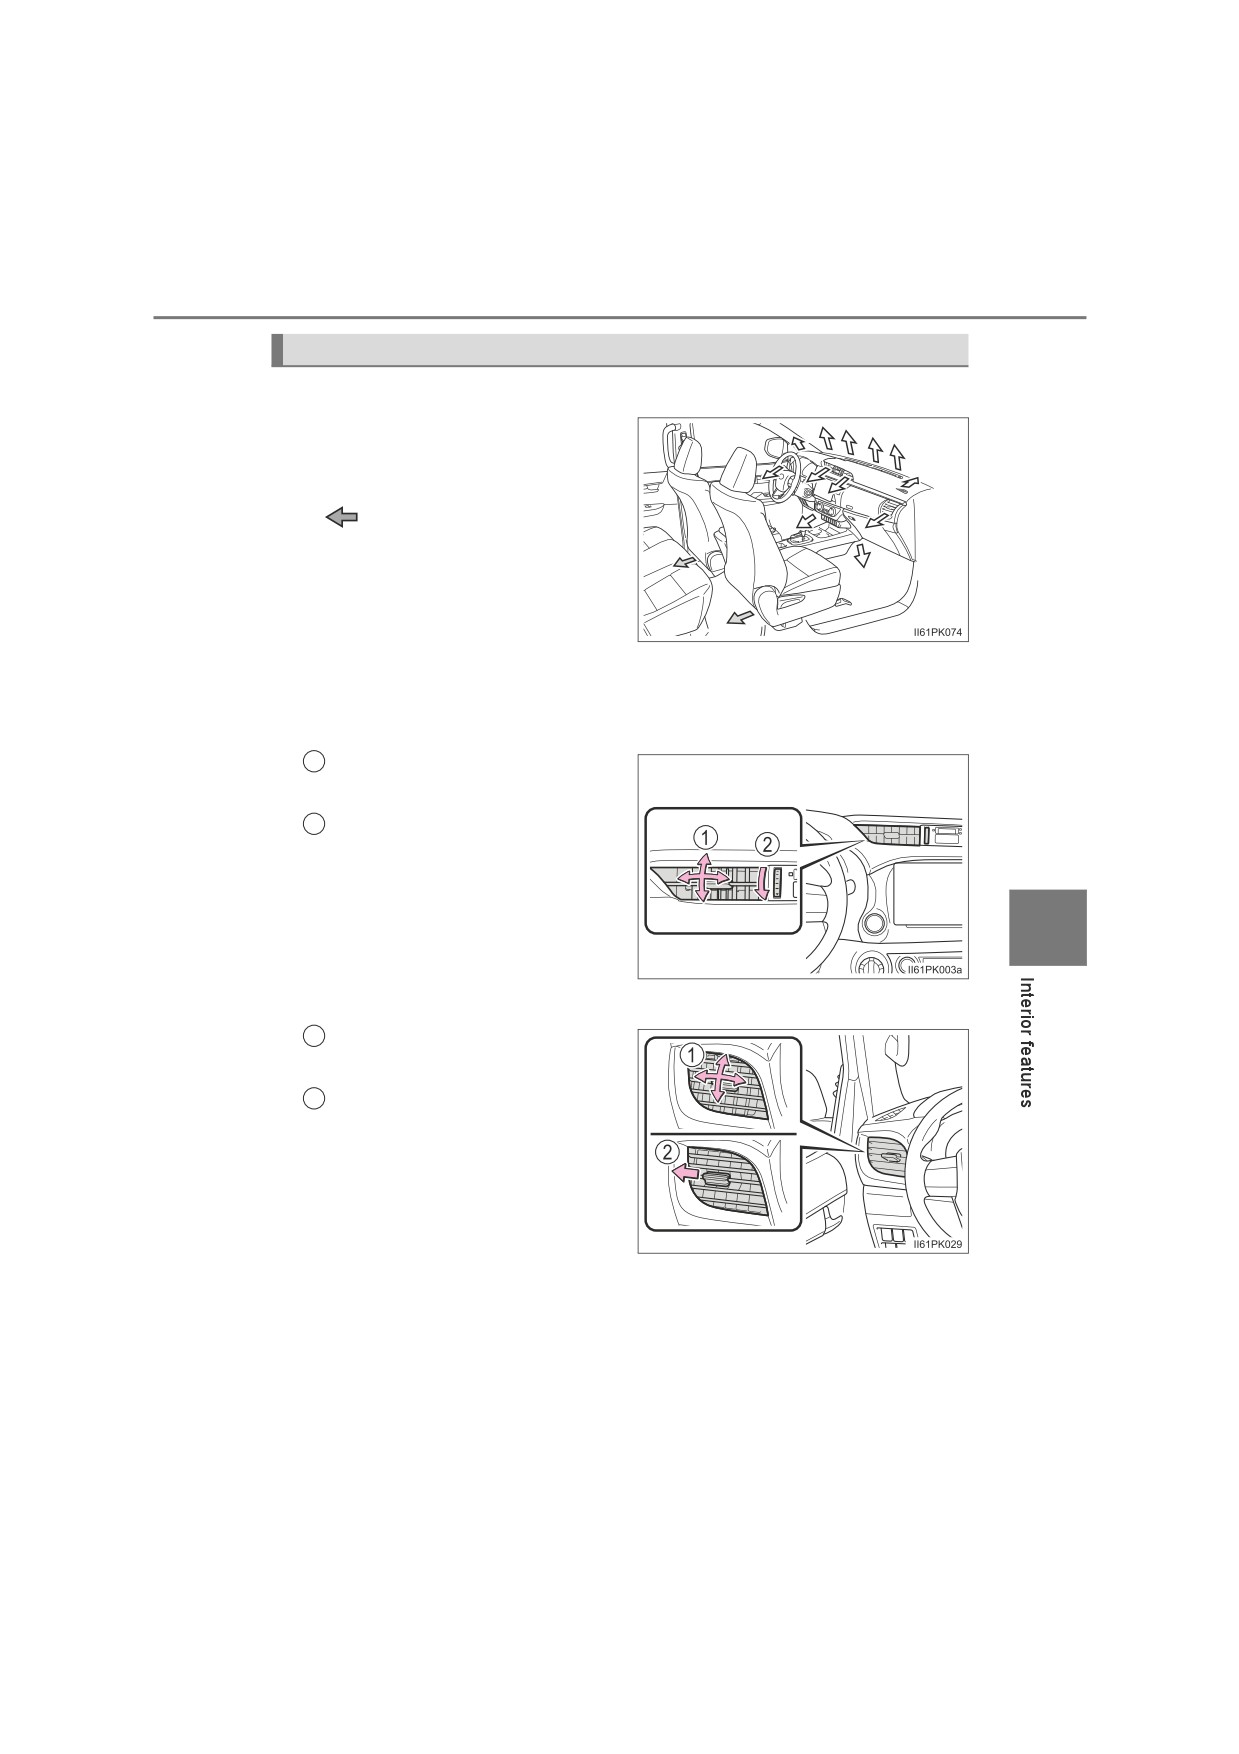
Air outlets
■ Location of air outlets
The air outlets and air volume
changes according to the
selected air flow mode.
: Some models
■ Adjusting the air flow direction and opening/closing the air
outlets
Center outlets
1
Direct air flow to the left or
right, up or down.
2
Close the vents.
6
Side outlets
1
Direct air flow to the left or
right, up or down.
2
Close the vents.
444
6-1. Using the air conditioning system and defogger
■ Using automatic mode
Fan speed is adjusted automatically according to the temperature setting and
the ambient conditions.
Therefore, the fan may stop for a while until warm or cool air is ready to flow
immediately after
is pressed.
■ Fogging up of the windows
●The windows will easily fog up when the humidity in the vehicle is high.
Turning
on will dehumidify the air from the outlets and defog the wind-
shield effectively.
● If you turn
off, the windows may fog up more easily.
● The windows may fog up if the recirculated air mode is used.
■When driving on dusty roads
Close all windows. If dust thrown up by the vehicle is still drawn into the vehi-
cle after closing the windows, it is recommended that the air intake mode be
set to outside air mode and the fan speed to any setting except off.
■ Outside/recirculated air mode
● Setting to the recirculated air mode temporarily is recommended in prevent-
ing dirty air from entering the vehicle interior and helping to cool the vehicle
when the outside air temperature is high.
● Outside/recirculated air mode may automatically switch depending on the
temperature setting or the inside temperature.
■ Operation of the air conditioning system in Eco drive mode (if equipped)
●In Eco drive mode, the air conditioning system is controlled as follows to pri-
oritize fuel efficiency:
• Engine speed and compressor operation controlled to restrict heating/
cooling capacity
• Fan speed restricted when automatic mode is selected
● To improve air conditioning performance, perform the following operations.
• Adjust the fan speed
• Turn off Eco drive mode
• Adjust the temperature setting
■ When the outside temperature falls to nearly 0°C (32°F)
The dehumidification function may not operate even when
is pressed.
6-1. Using the air conditioning system and defogger
445
■ Ventilation and air conditioning odors
● To let fresh air in, set the air conditioning system to the outside air mode.
● During use, various odors from inside and outside the vehicle may enter into
and accumulate in the air conditioning system. This may then cause odor to
be emitted from the vents.
● To reduce potential odors from occurring:
• It is recommended that the air conditioning system be set to outside air
mode prior to turning the vehicle off.
• For some models: The start timing of the blower may be delayed for a
short period of time immediately after the air conditioning system is
started in automatic mode.
■ Air conditioning filter
P. 512
6
446
6-1. Using the air conditioning system and defogger
■ Air conditioning refrigerant (models made in Thailand*)
Type: R-134a (HFC-134a)
Capacity: 0.50 kg (1.10 lb.)
GWP (Global Warming Potential): 1430
CO2 equivalent: 0.72 t (1587.33 lb.)
*: See “Checking your vehicle’s model” if you are not sure of which model
your vehicle is. (P. 12)