Citroen C4 (2023 year). Manual in english - page 9
4-5. Using the driving support systems
327
WARNING
■ Cautions regarding the use of the system
There is a limit to the degree of recognition accuracy and control perfor-
mance that this system can provide, do not overly rely on this system. The
driver is always responsible for paying attention to the vehicle’s surround-
ings and driving safely.
■ To ensure the system can operate properly
Observe the following precautions.
Failure to do so may result in the vehicle being unable to be driven safely
and possibly cause an accident.
●Do not damage the sensors, and always keep them clean.
●Do not attach a sticker or install an electronic component, such as a backlit
license plate (especially fluorescent type), fog lights, fender pole or wire-
less antenna near a radar sensor.
●Do not subject the surrounding area of the sensor to a strong impact. If
subjected to an impact, have the vehicle inspected by any authorized
4
Toyota retailer or Toyota authorized repairer, or any reliable repairer. If the
front or rear bumper needs to be removed/installed or replaced, contact
any authorized Toyota retailer or Toyota authorized repairer, or any reliable
repairer.
●Do not modify, disassemble or paint the sensors.
●Do not attach a license plate cover.
● Keep your tires properly inflated.
■ When to disable the function
In the following situations, disable the function as it may operate even
though there is no possibility of a collision.
●Failing to observe the warnings above.
● A non-genuine Toyota suspension (lowered suspension, etc.) is installed.
■ Notes when washing the vehicle
Do not apply intensive bursts of water or steam to the sensor area.
Doing so may result in the sensor malfunctioning.
● When using a high pressure washer to wash the vehicle, do not spray the
sensors directly, as doing so may cause a sensor to malfunction.
● When using steam to clean the vehicle, do not direct steam too close to
the sensors as doing so may cause a sensor to malfunction.
328
4-5. Using the driving support systems
NOTICE
■ When using the Toyota parking assist-sensor
In the following situations, the system may not function correctly due to a
sensor malfunction etc. Have the vehicle checked by any authorized Toyota
retailer or Toyota authorized repairer, or any reliable repairer.
● Toyota parking assist-sensor operation display flashes, and a beep
sounds when no objects are detected.
● If the area around a sensor collides with something, or is subjected to
strong impact.
●If the bumper collides with something.
● If the display shows up and remains on without a beep.
4-5. Using the driving support systems
329
Four-wheel drive system
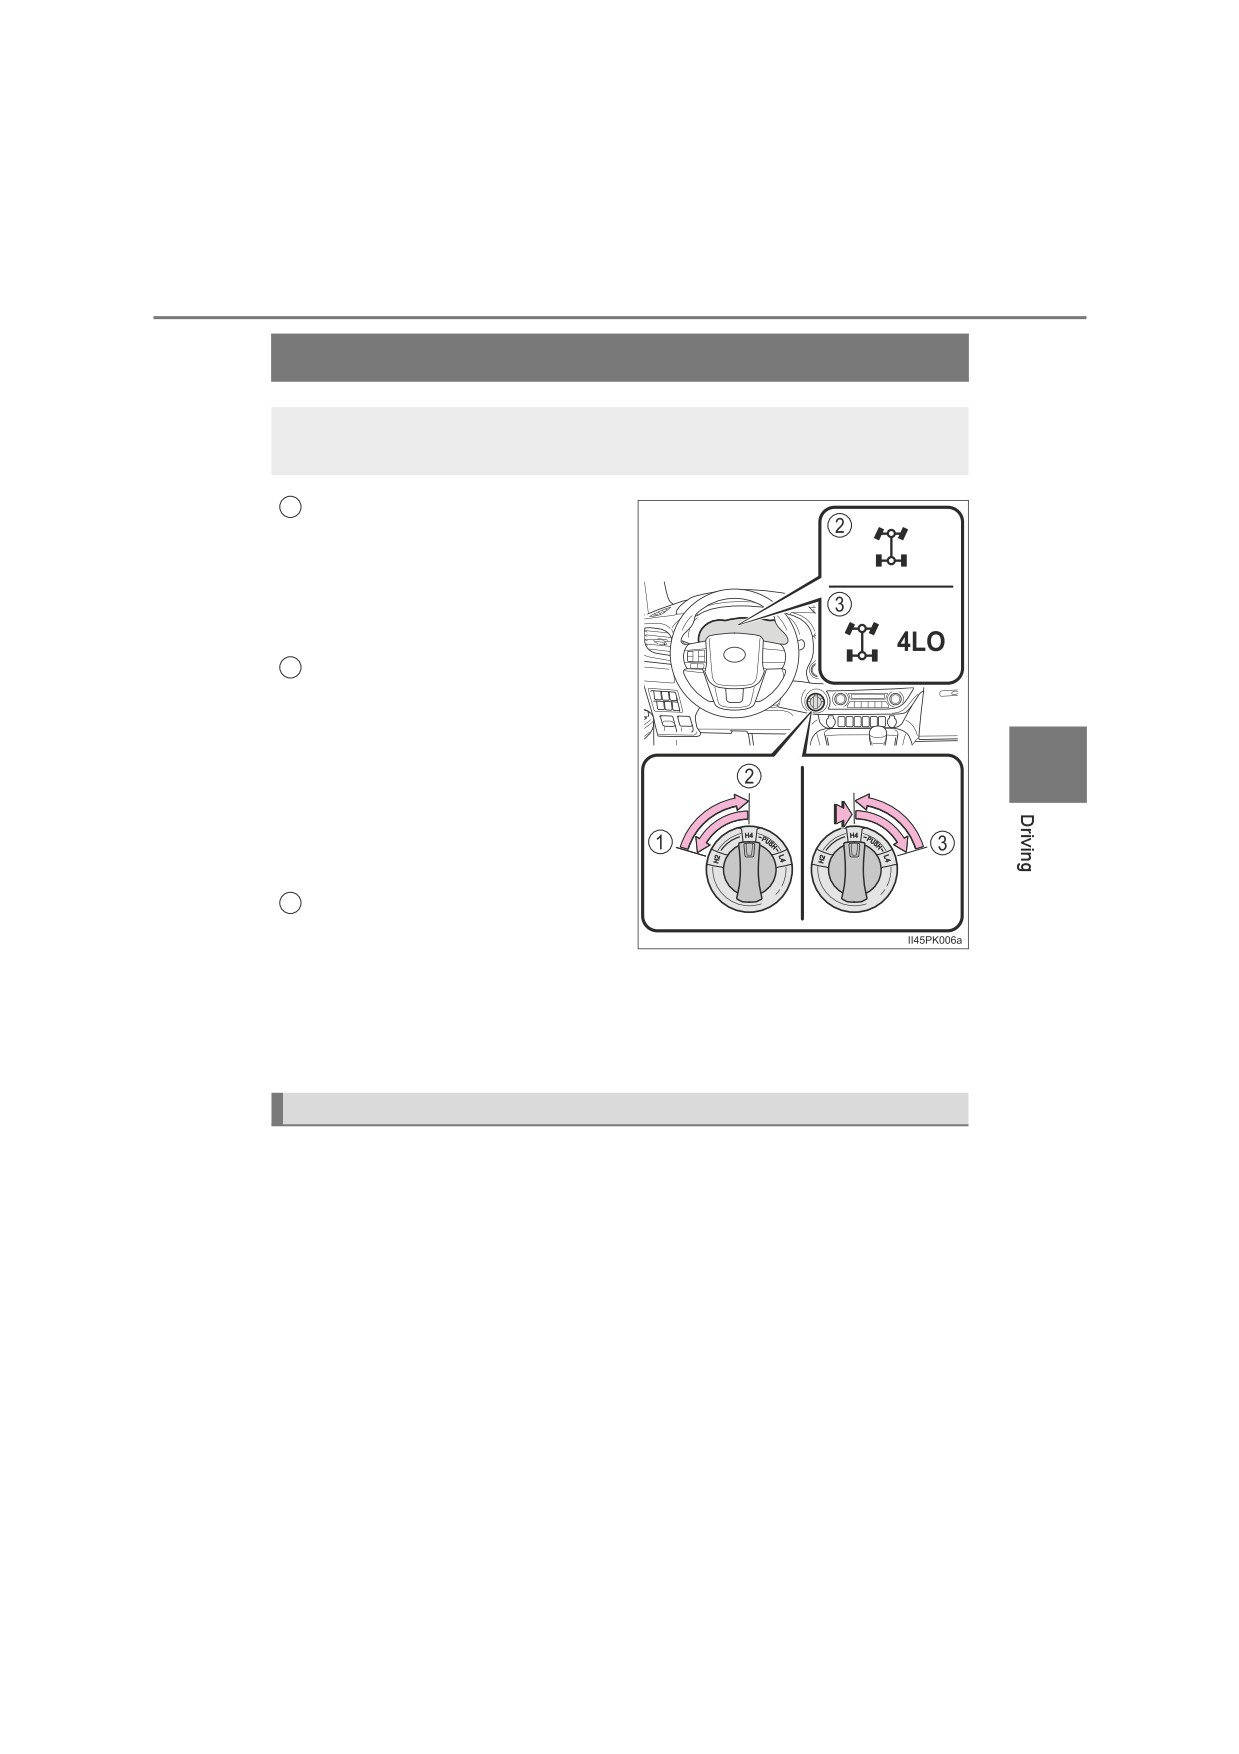
Use the front-wheel drive control switch to select the following
transfer modes.
1
H2 (high speed position, two-
wheel drive)
Use this for normal driving on dry
hard-surfaced roads. This position
gives greater economy, quietest
ride and least wear.
2
H4 (high speed position, four-
wheel drive)
Use this for driving only on tracks
that permit the tires slide, like off-
4
road, icy or snow-covered roads.
This position provides greater trac-
tion than two-wheel drive.
The four-wheel drive indicator
light comes on
3
L4 (low speed position, four-
wheel drive)
Use this for maximum power and traction. Use L4 for climbing or descend-
ing steep hills, off-road driving, and hard pulling in sand, mud or deep
snow.
The four-wheel drive and low speed four-wheel drive indicator lights
come on
A.D.D. (automatic disconnecting differential) (if equipped)
The A.D.D. can be engaged or disengaged by the shifting operations
described in the following shifting procedures.
: If equipped
330
4-5. Using the driving support systems
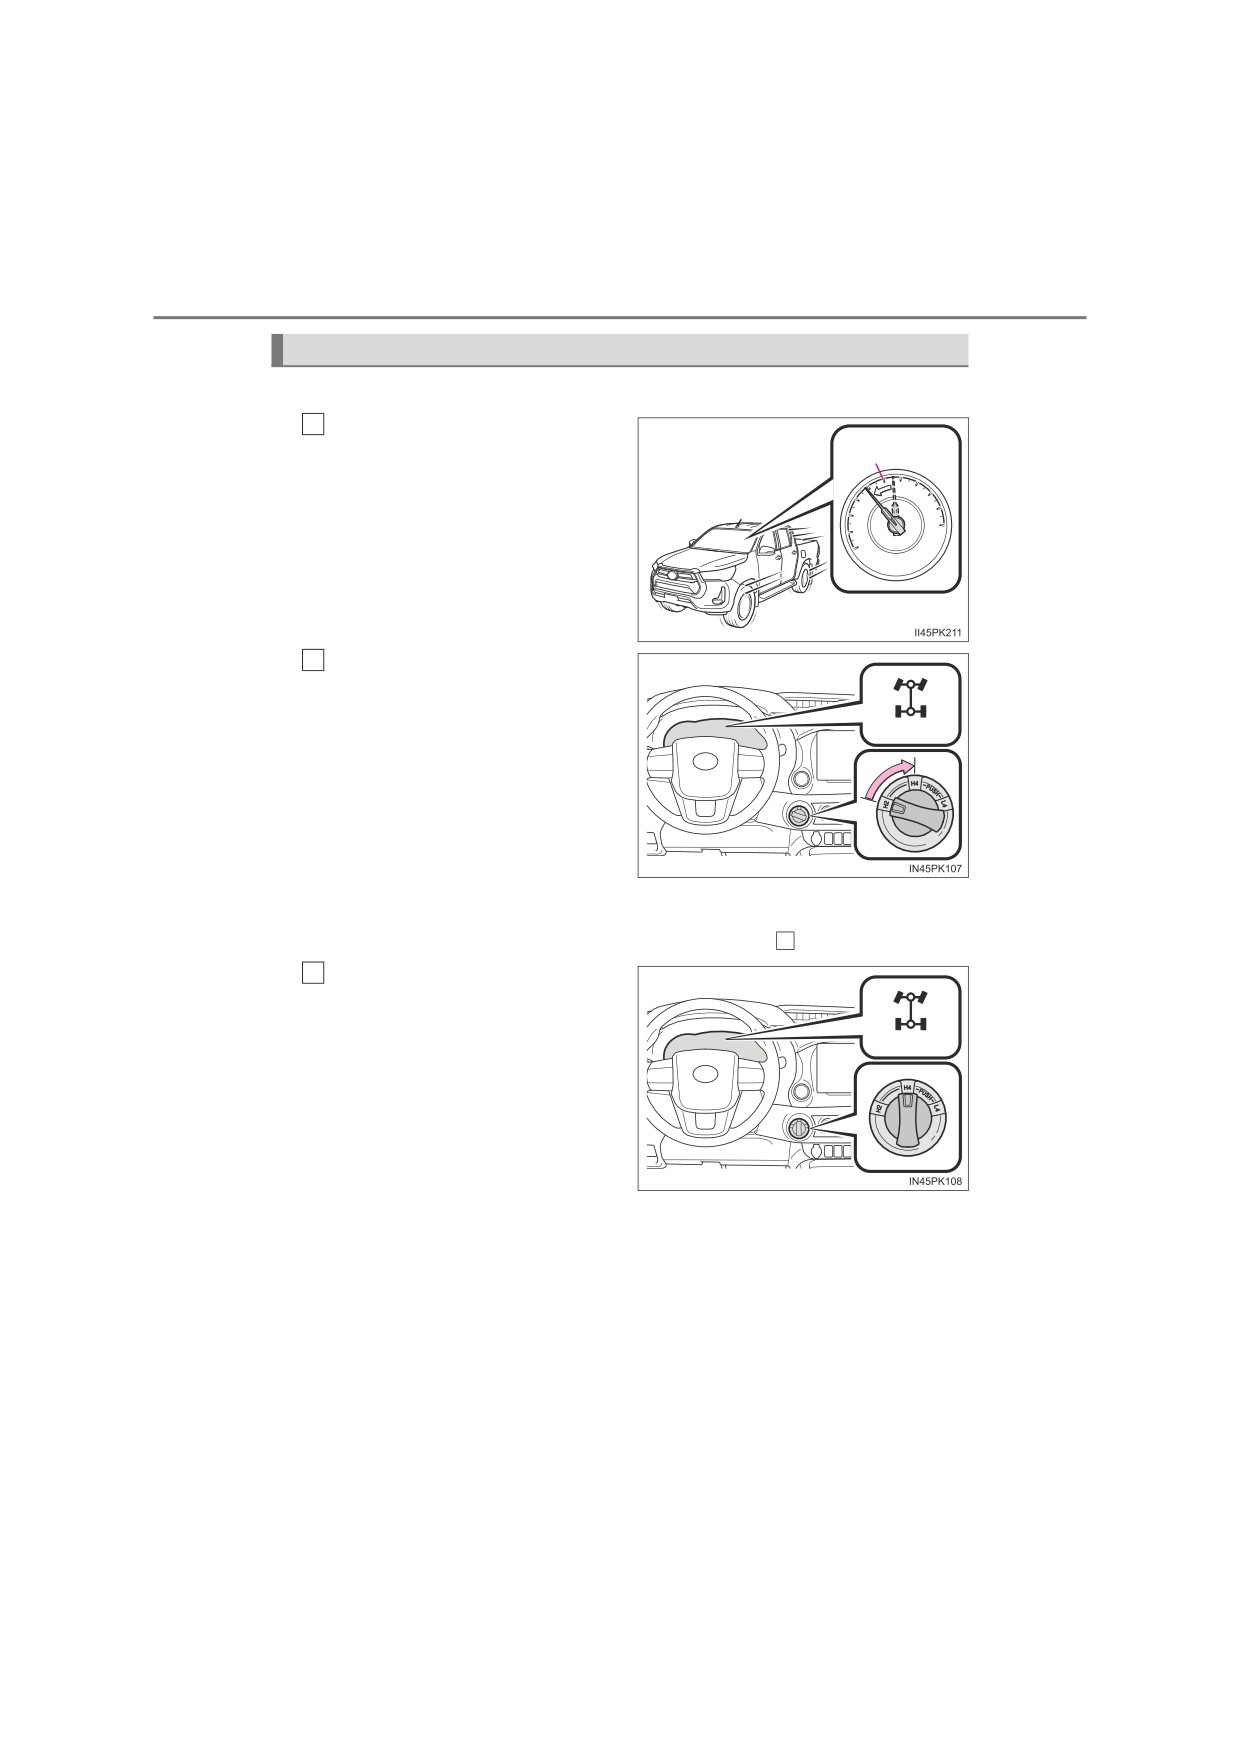
Shifting between H2 and H4
■ Shifting from H2 to H4
1
Reduce the vehicle speed to
100 km/h
less than 100 km/h (62 mph).
(62 mph)
The transfer mode cannot be
switched if the vehicle speed is
more than 100 km/h (62 mph).
Turn the front-wheel drive
2
control switch to H4.
The four-wheel drive indicator
(Flashes)
light flashes while switching.
If turning the front-wheel drive
control switch when the vehicle
speed is more than
100 km/h
(62 mph), the four-wheel drive
indicator light flashes and a
buzzer sounds.
Reduce the vehicle speed to less than 100 km/h (62 mph), or return the
front-wheel drive control switch to H2 and try step
1
again.
3
Check that the four-wheel
drive indicator light comes on.
The four-wheel drive indicator
(Comes on)
light comes on when switching
the transfer mode is completed.
If the four-wheel drive indicator
light does not stop flashing after
turning the front-wheel drive
control switch from H2 to H4,
perform any of the followings
while driving straight.
• Accelerating
• Decelerating
• Driving in reverse
The four-wheel drive indicator light may not stop flashing if the front-
wheel drive control switch is turned from H2 to H4 while the vehicle is
stopped. In this case, perform any of the followings.
• Driving forward
• Driving in reverse
4-5. Using the driving support systems
331
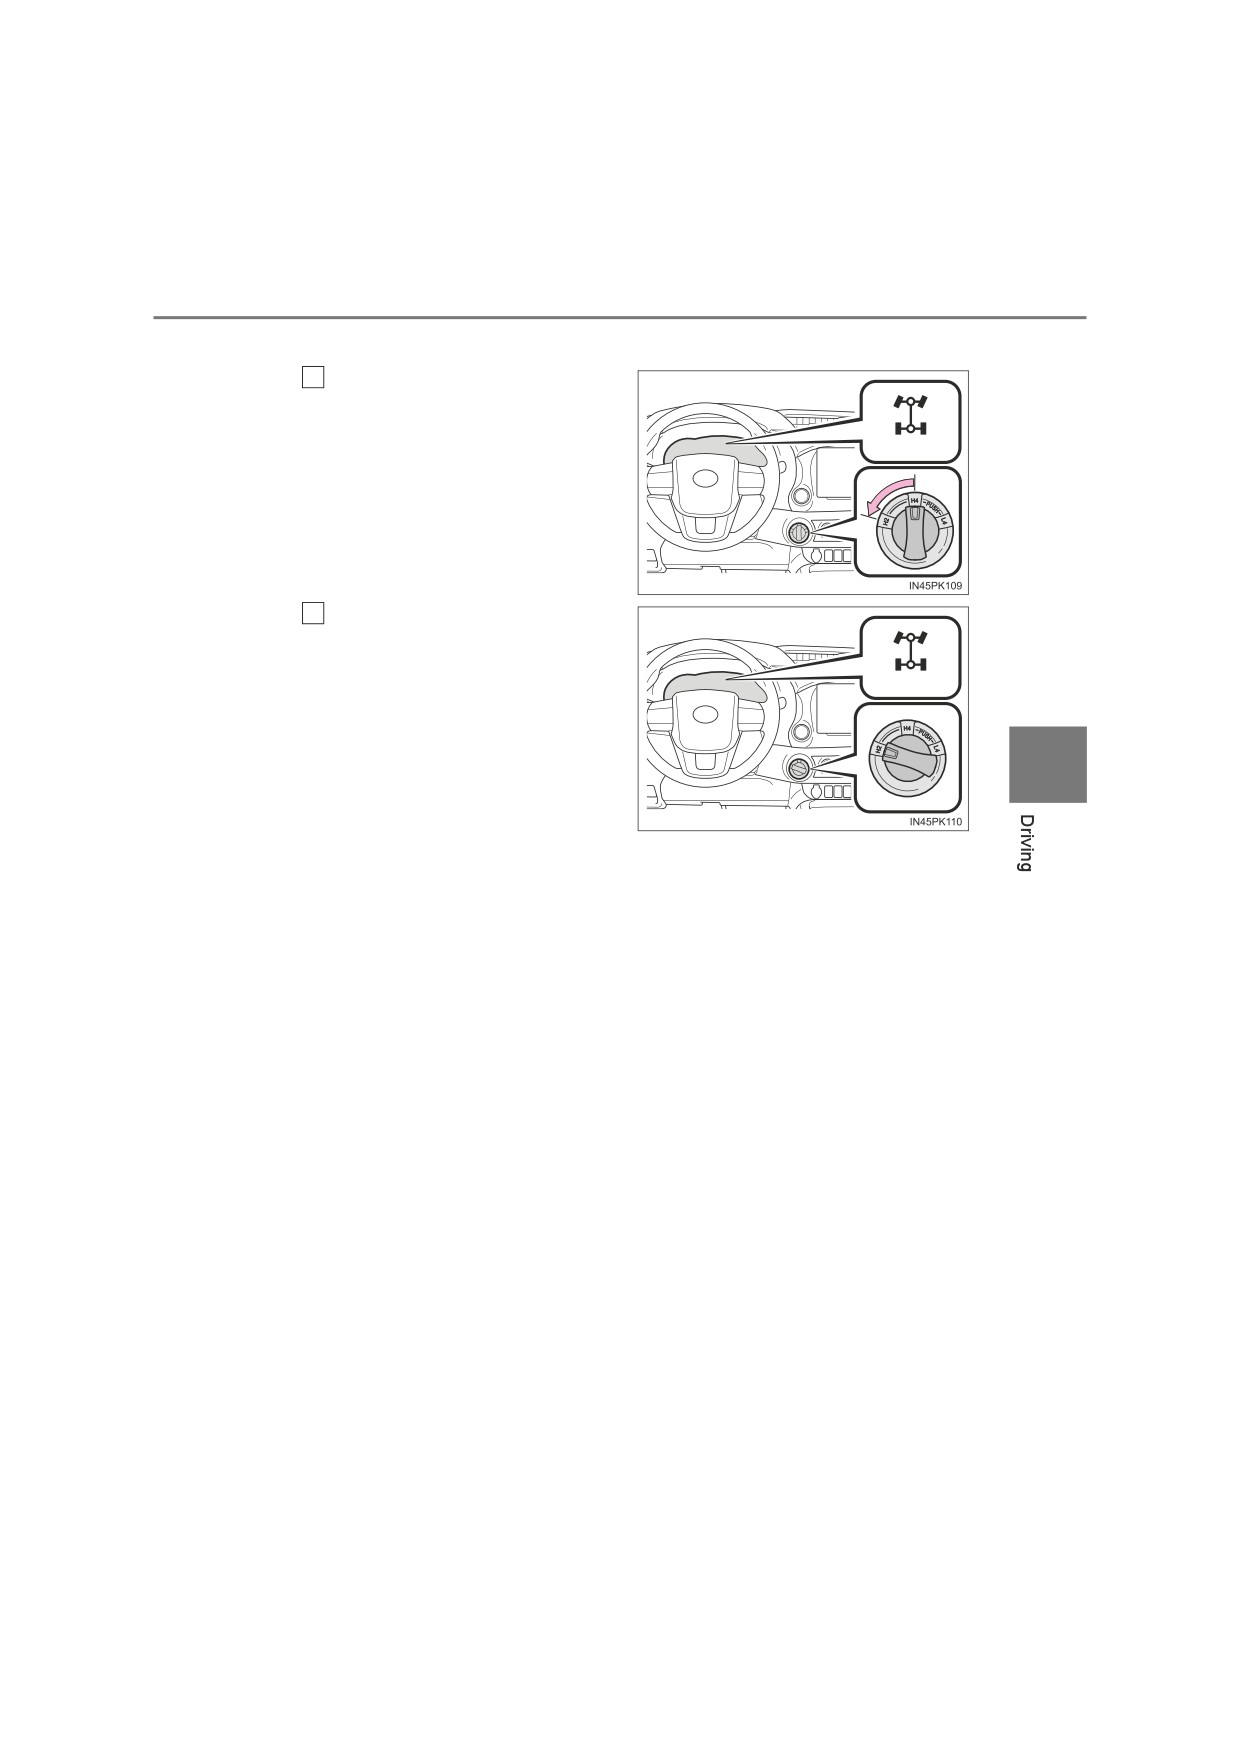
■ Shifting from H4 to H2
Turn the front-wheel drive
1
control switch to H2.
The four-wheel drive indicator
(Flashes)
light flashes while switching.
Check that the four-wheel
2
drive indicator light goes off.
The four-wheel drive indicator
(Goes off)
light goes off when switching the
transfer mode is completed.
If the four-wheel drive indicator
4
light does not stop flashing after
turning the front-wheel drive
control switch from H4 to H2,
perform the followings while
driving straight.
• Accelerating
• Decelerating
• Driving in reverse
If the four-wheel drive indicator light is still flashing, perform the opera-
tions above while turning the steering wheel left and right.
Impact may be felt through the vehicle body and steering. However, this
does not indicate a malfunction.
332
4-5. Using the driving support systems
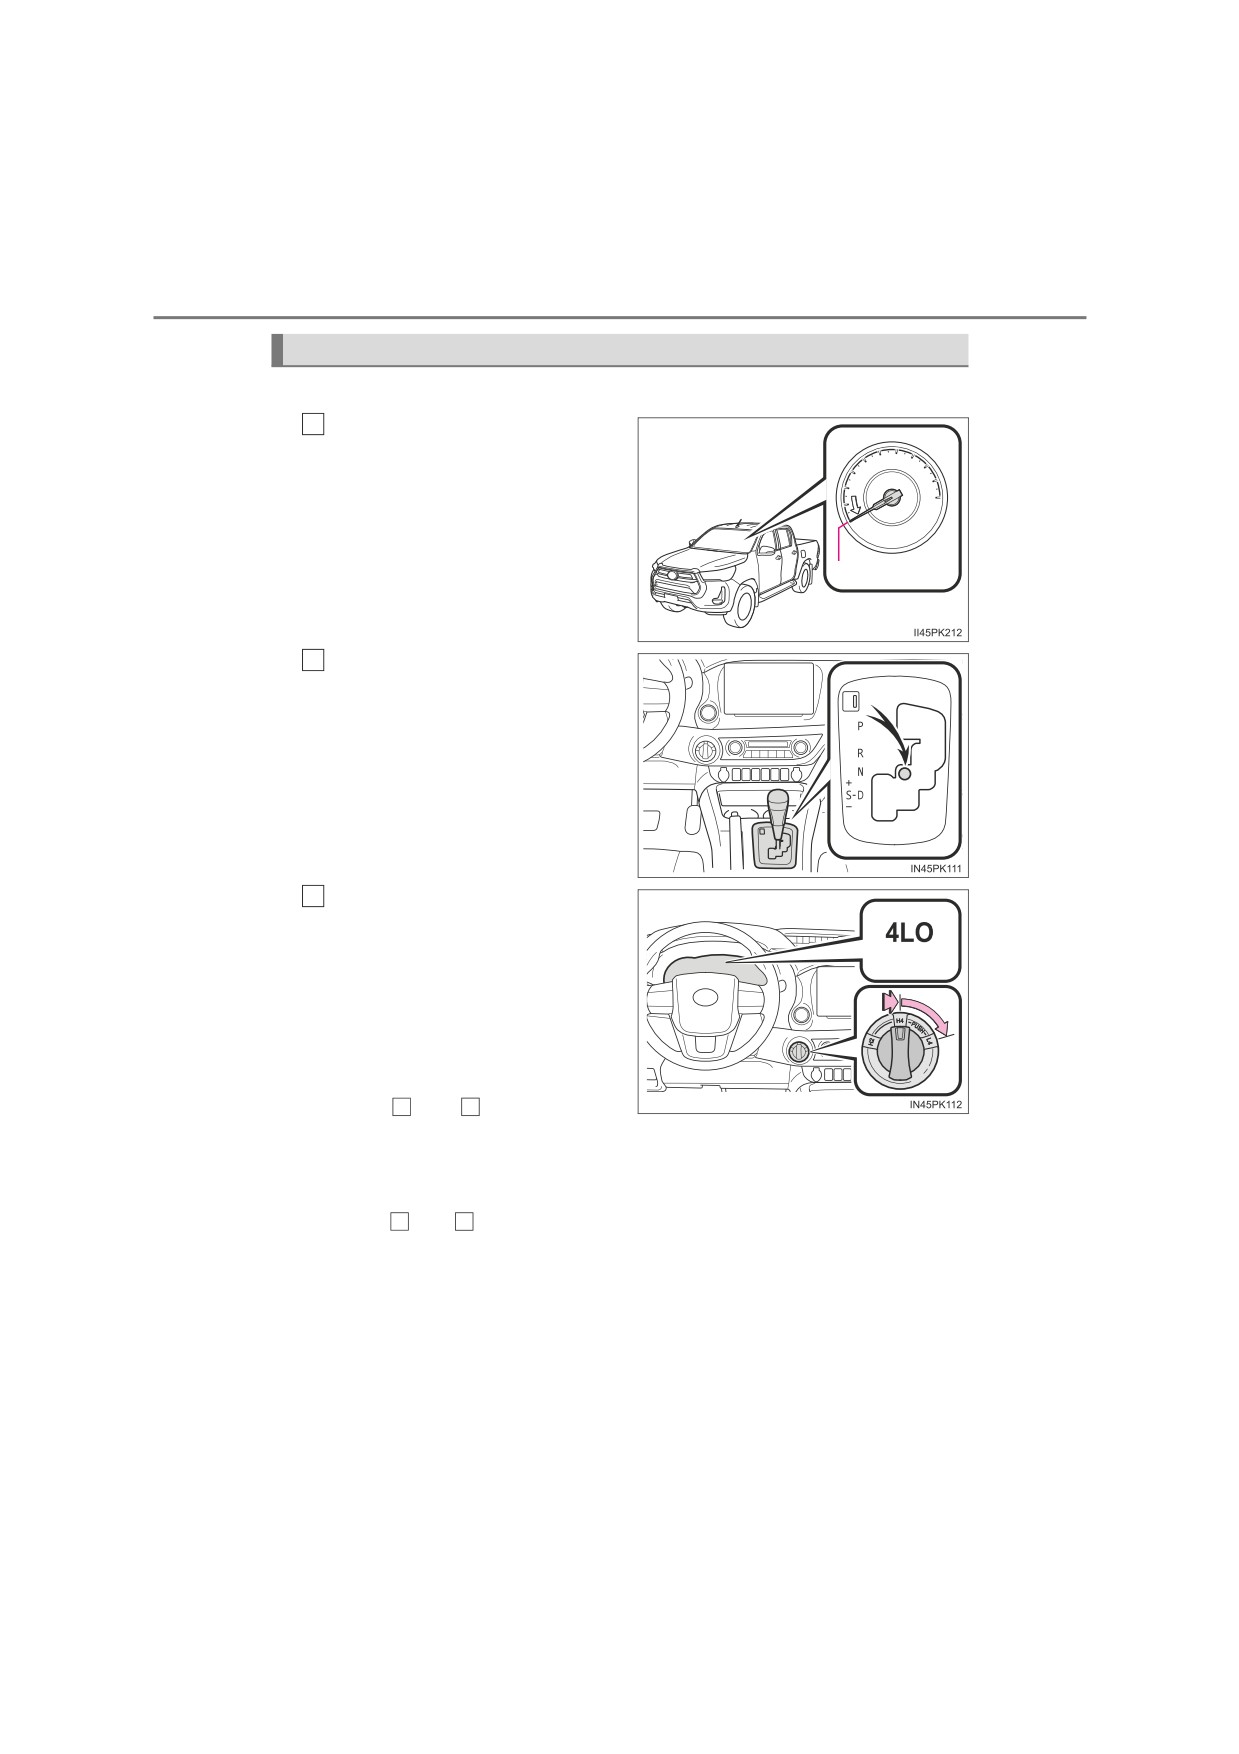
Shifting between H4 and L4 (automatic transmission)
■ Shifting from H4 to L4
1
Stop the vehicle.
The transfer mode cannot be
switched if the vehicle is mov-
ing.
0 km/h (0 mph)
2
Shift the shift lever to N.
Keep the shift lever in N
until
switching the transfer mode is
completed (indicator on).
The transfer mode cannot be
switched if the shift lever is in
other than N.
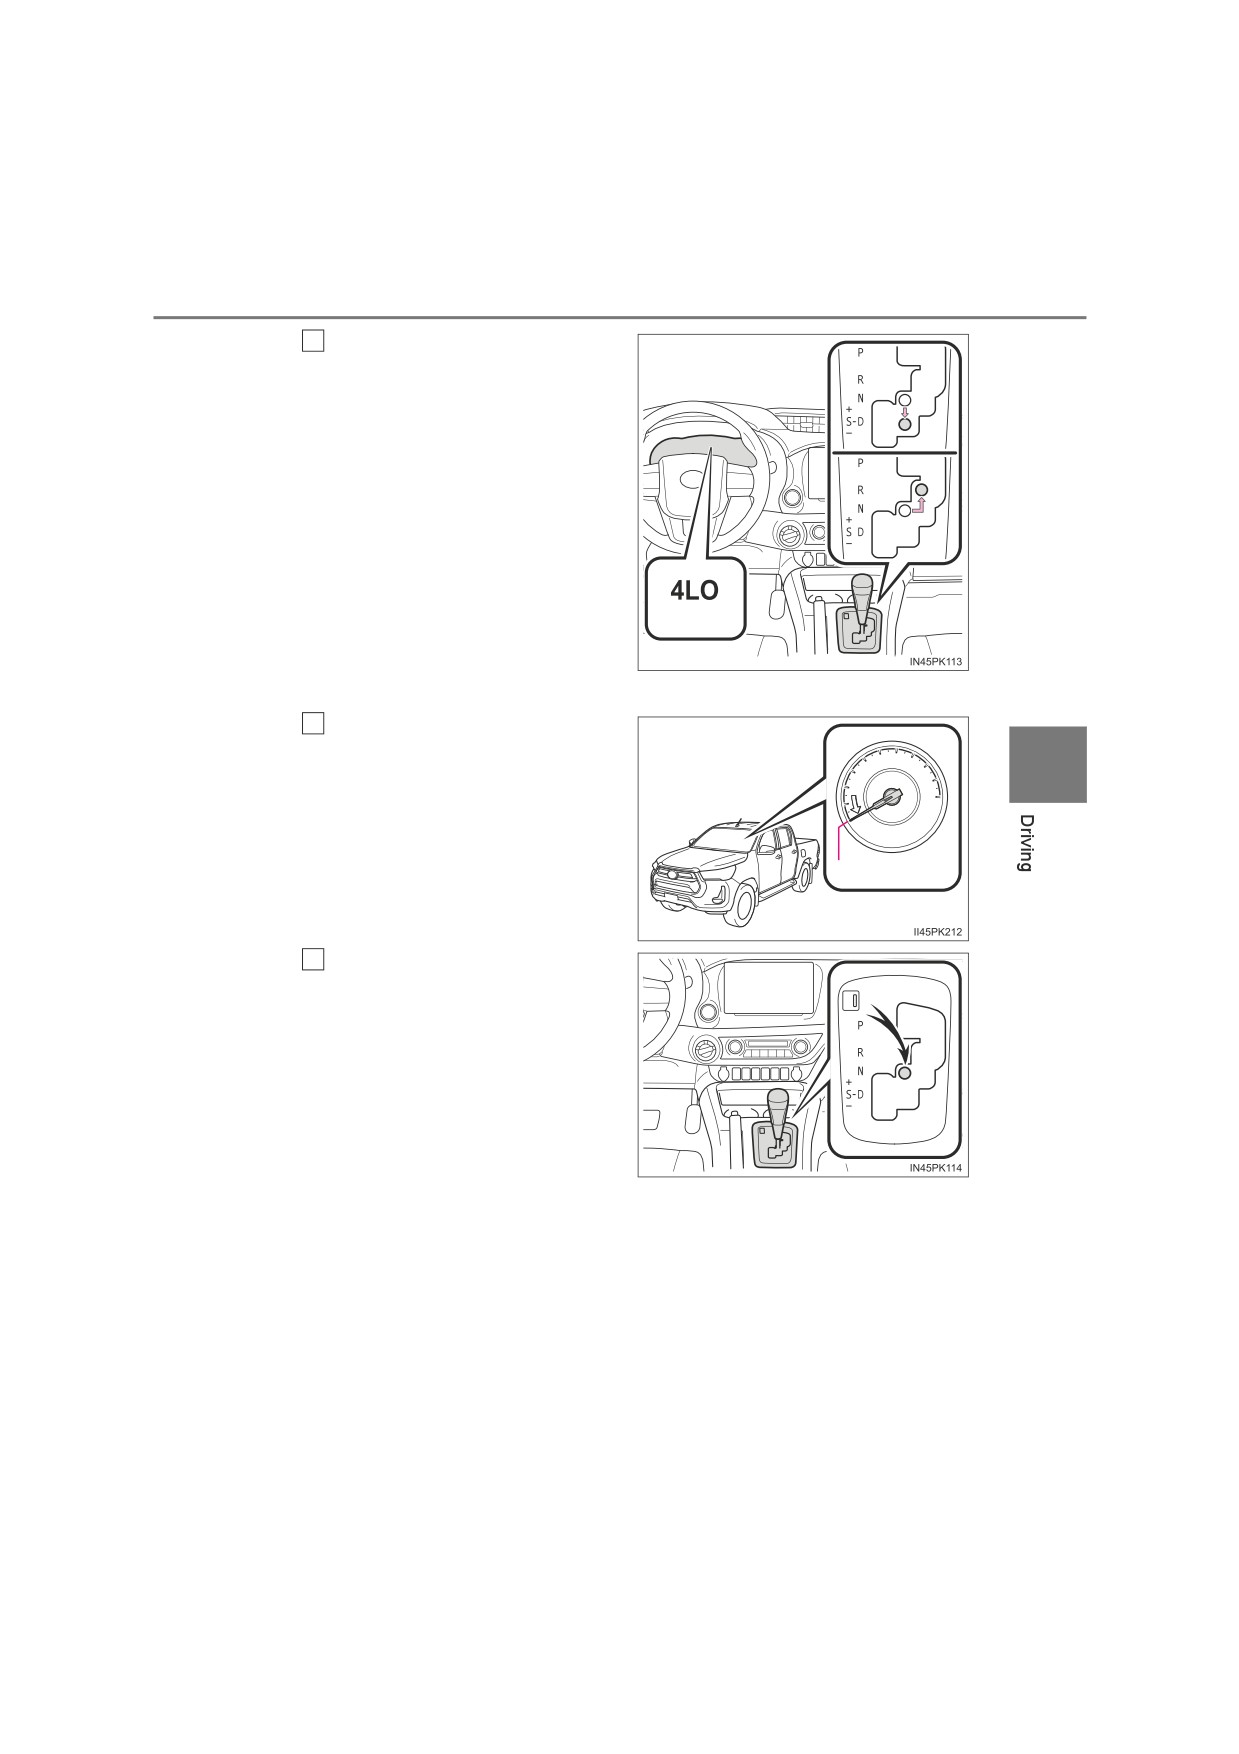
3
Push and turn the front-
wheel drive control switch to
L4.
(Flashes)
The low speed four-wheel drive
indicator light flashes while
switching.
If turning the front-wheel drive
control switch without following
steps
1
and
2
, the low speed
four-wheel drive indicator light
flashes and a buzzer sounds.
Return the front-wheel drive
control switch to H4 and try
steps
1
and
2
again.
If the shift lever is shifted to other than N while the low speed four-wheel
drive indicator light is flashing, gear noise may be caused. Immediately
shift the shift lever to N and wait until switching the transfer mode is
completed.
4-5. Using the driving support systems
333
4
Check that the low speed
four-wheel drive indicator
light comes on.
The low speed four-wheel drive
indicator light comes on when
switching the transfer mode is
completed.
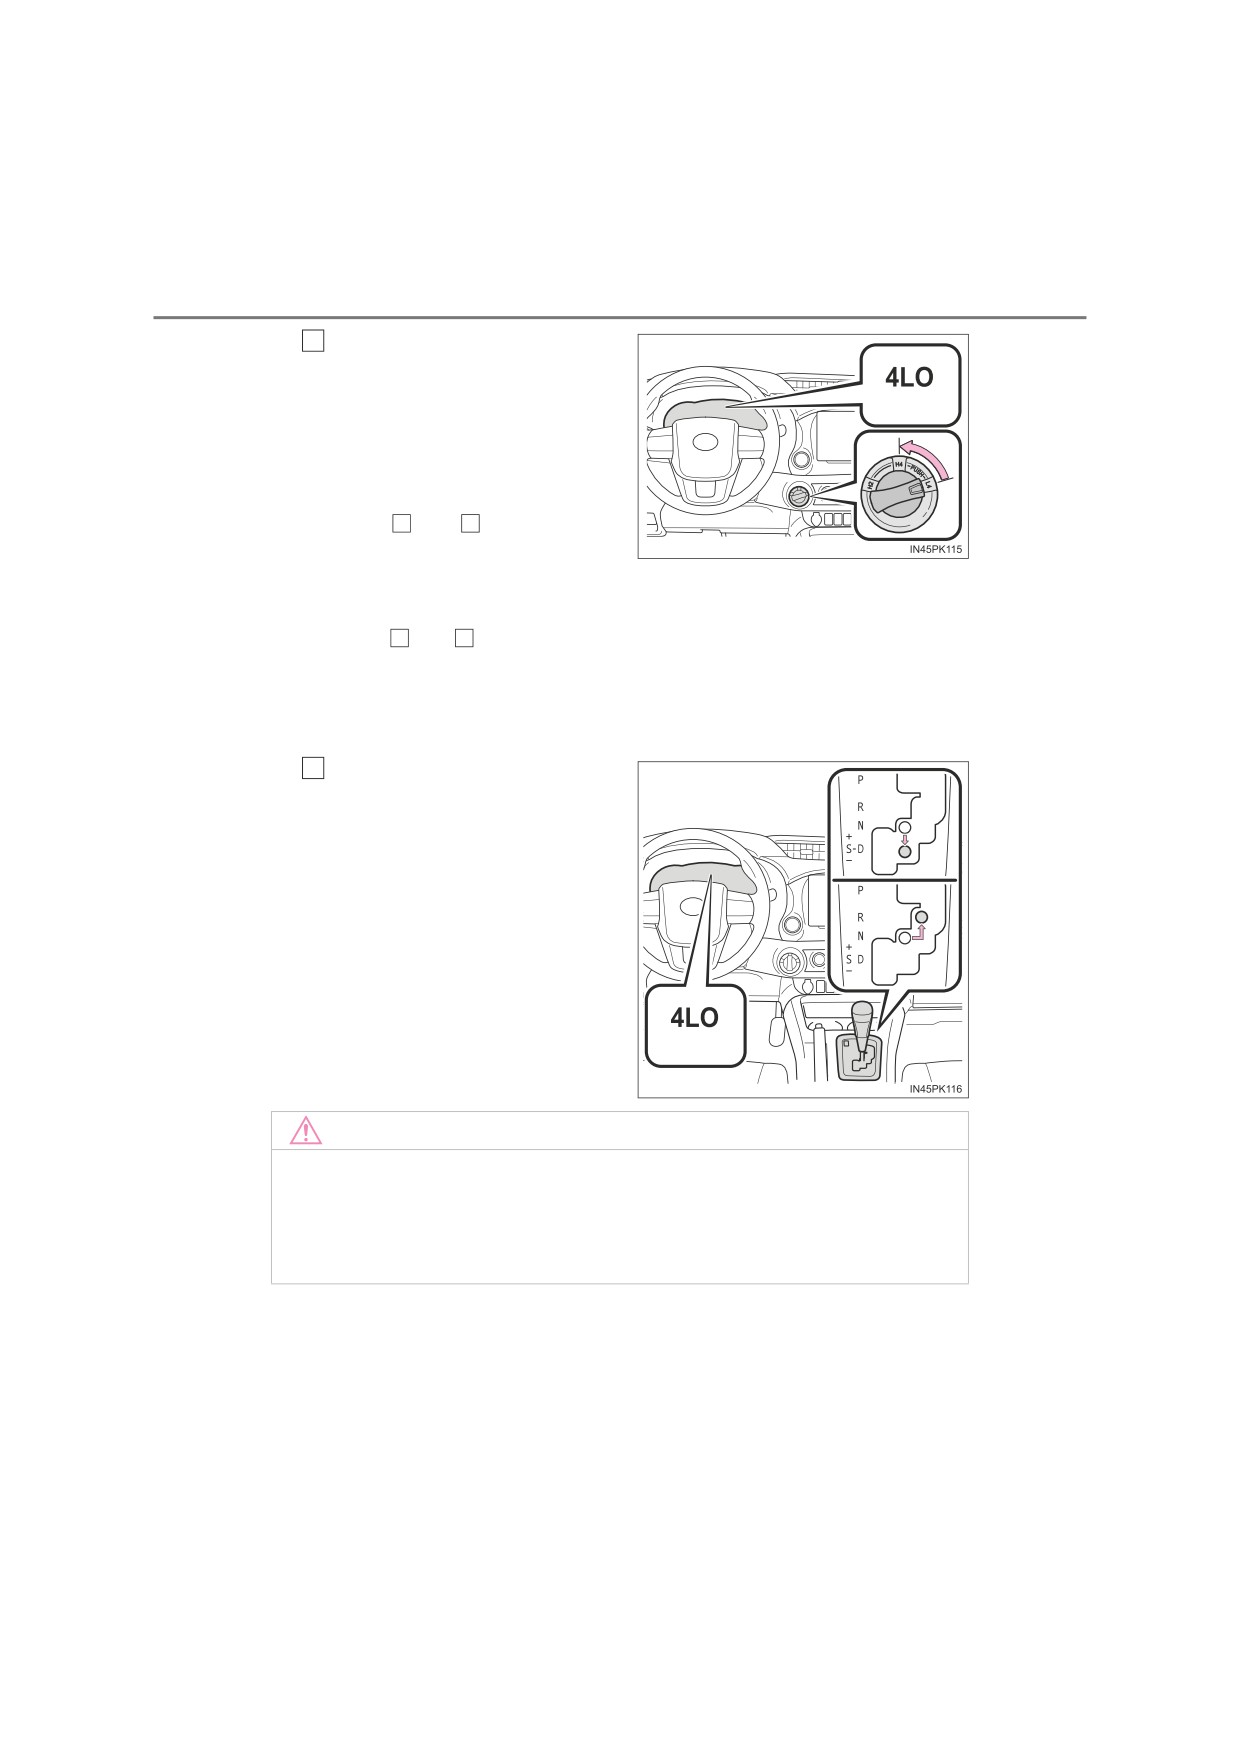
Shift the shift lever from N to D
or R to drive the vehicle.
(Comes on)
■ Shifting from L4 to H4
1
Stop the vehicle.
The transfer mode cannot be
4
switched if the vehicle is mov-
ing.
0 km/h (0 mph)
2
Shift the shift lever to N.
Keep the shift lever in N
until
switching the transfer mode is
completed (indicator off).
The transfer mode cannot be
switched if the shift lever is in
other than N.
334
4-5. Using the driving support systems
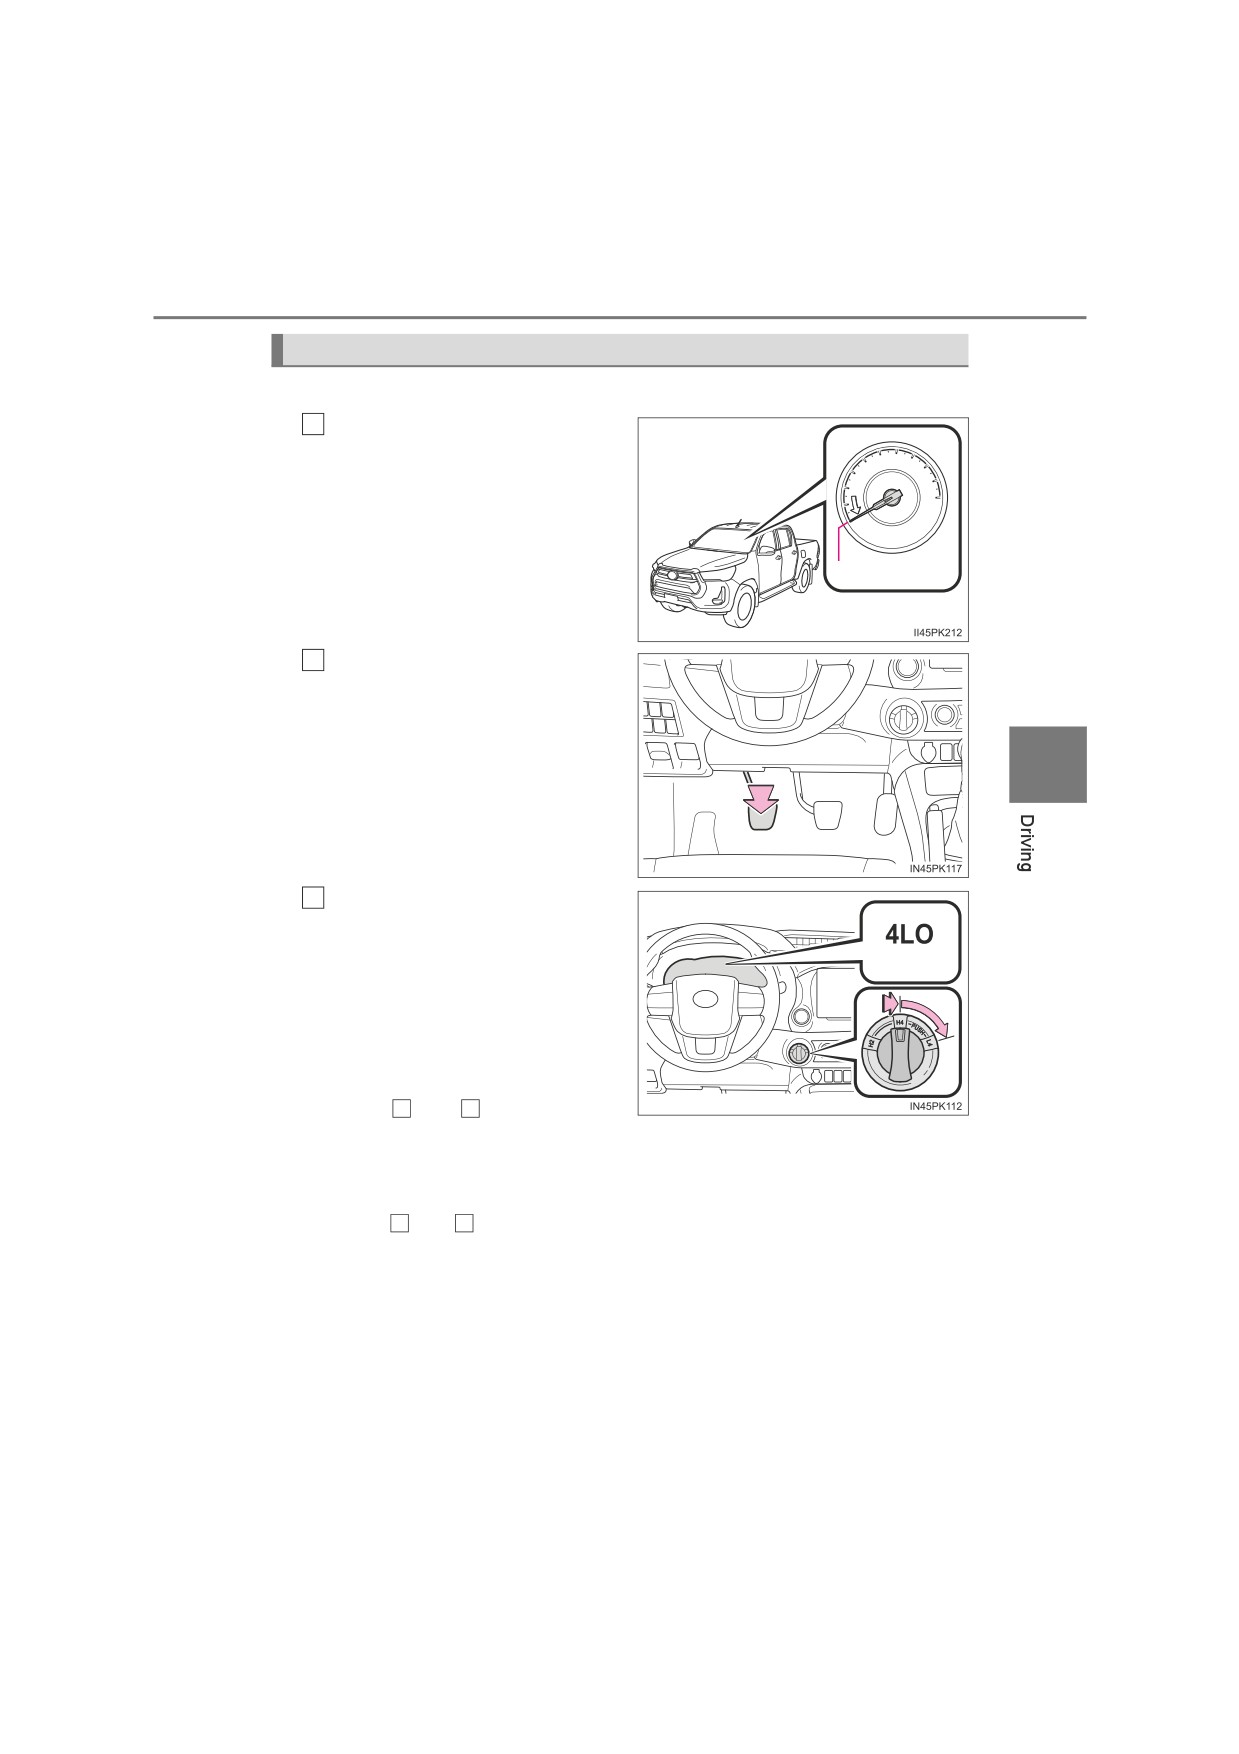
3
Turn the front-wheel drive
control switch to H4.
The low speed four-wheel drive
(Flashes)
indicator light flashes while
switching.
If turning the front-wheel drive
control switch without following
steps
1
and
2
, the low speed
four-wheel drive indicator light
flashes and a buzzer sounds.
Return the front-wheel drive
control switch to L4 and try
steps
1
and
2
again.
If the shift lever is shifted to other than N while the low speed four-wheel
drive indicator light is flashing, gear noise may be caused. Immediately
shift the shift lever to N and wait until switching the transfer mode is
completed.
Check that the low speed
4
four-wheel drive indicator
light goes off.
The low speed four-wheel drive
indicator light goes off when
switching the transfer mode is
completed.
Shift the shift lever from N to D
or R to drive the vehicle.
(Goes off)
NOTICE
■ Shifting between H4 and L4
Do not shift the shift lever to other than N or depress the accelerator pedal
while the low speed four-wheel drive indicator light is flashing. Failure to do
so may cause gear noise and result in a malfunction.
4-5. Using the driving support systems
335
Shifting between H4 and L4 (manual transmission)
■ Shifting from H4 to L4
1
Stop the vehicle.
The transfer mode cannot be
switched if the vehicle is mov-
ing.
0 km/h (0 mph)
2
Firmly depress the clutch
pedal.
Keep depressing the clutch
pedal until switching the transfer
4
mode is completed
(indicator
on).
The transfer mode cannot be
switched if the clutch pedal is
not fully depressed.
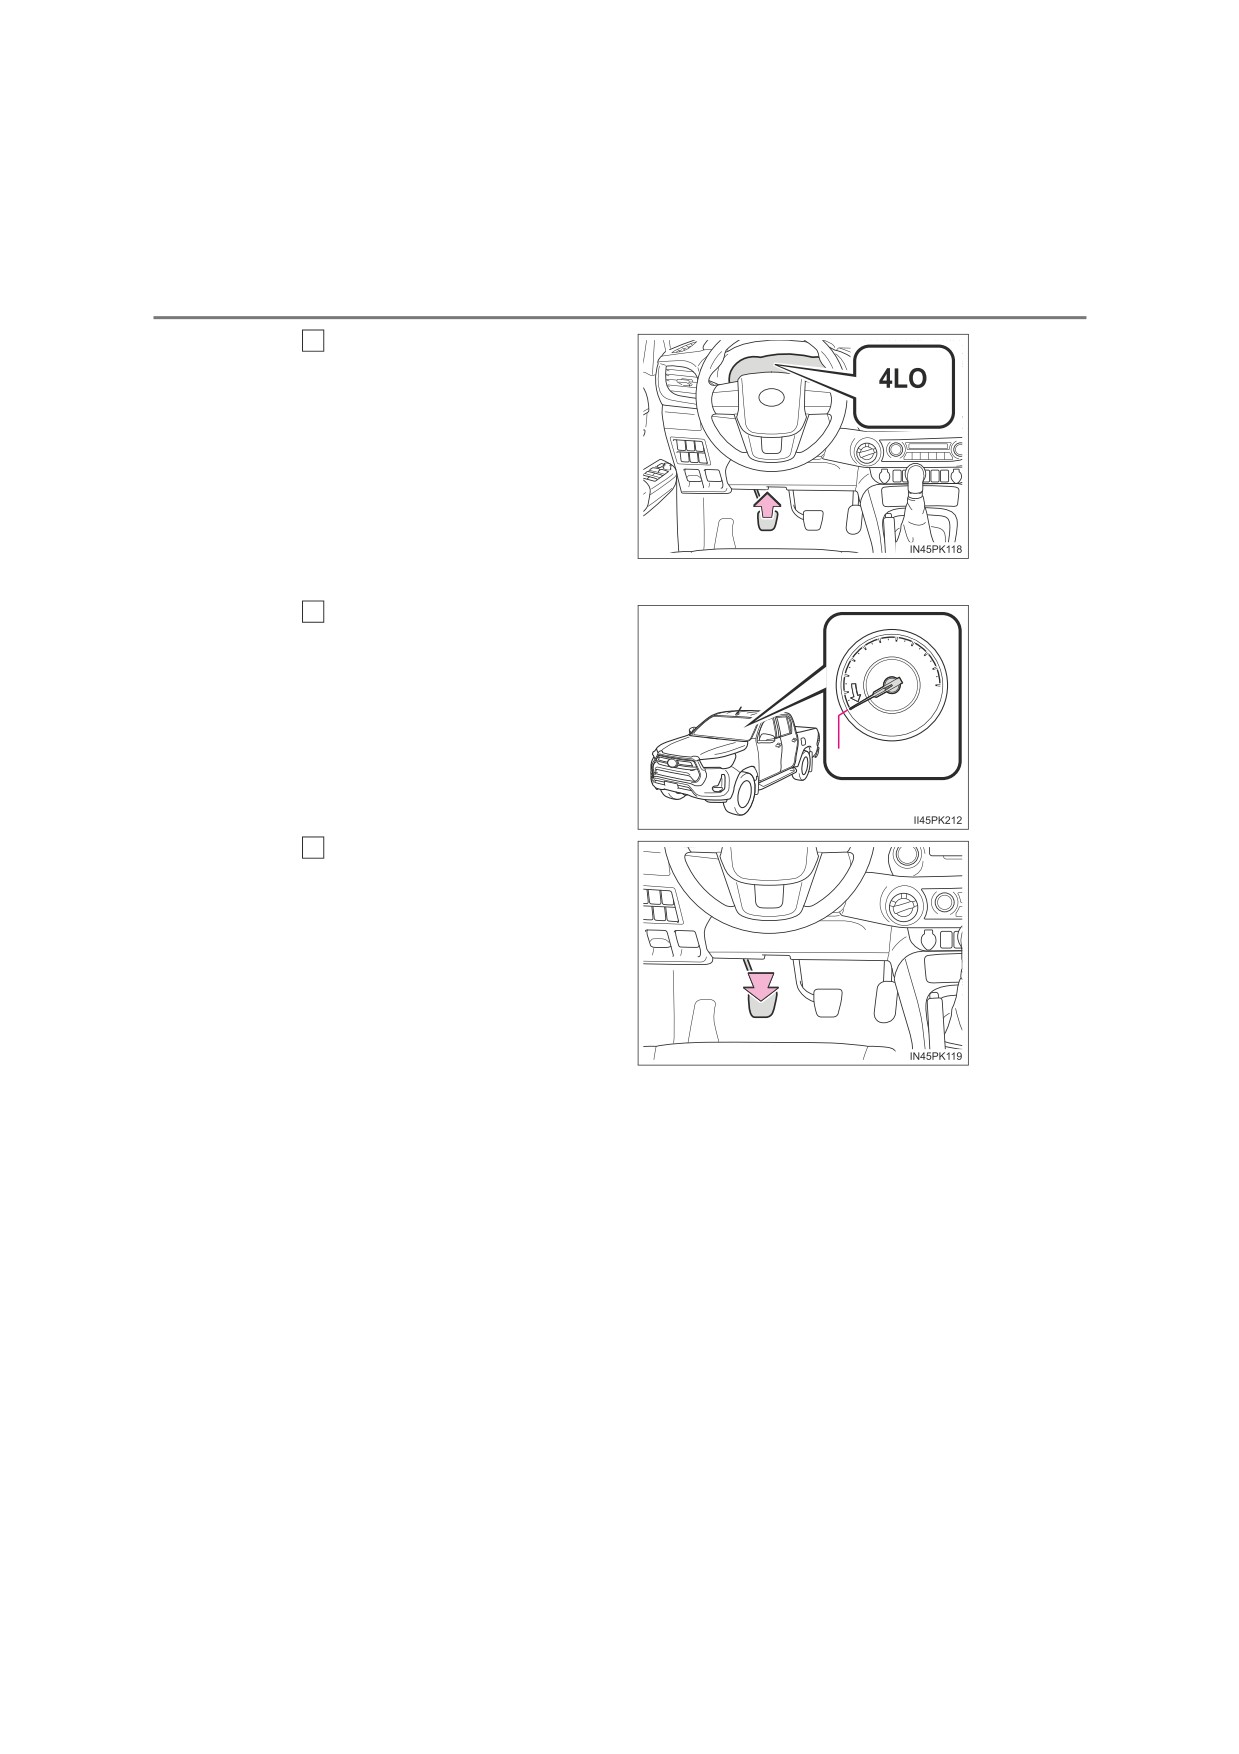
Push and turn the front-
3
wheel drive control switch to
L4.
(Flashes)
The low speed four-wheel drive
indicator light flashes while
switching.
If turning the front-wheel drive
control switch without following
steps
1
and
2
, the low speed
four-wheel drive indicator light
flashes and a buzzer sounds.
Return the front-wheel drive
control switch to H4 and try
steps
1
and
2
again.
If the clutch pedal is released while the low speed four-wheel drive indi-
cator light is flashing, gear noise may be caused. Immediately depress
the clutch pedal firmly and wait until switching the transfer mode is com-
pleted.
336
4-5. Using the driving support systems
4
Check that the low speed
four-wheel drive indicator
light comes on.
(Comes on)
The low speed four-wheel drive
indicator light comes on when
switching the transfer mode is
completed.
Release the clutch pedal to
drive the vehicle.
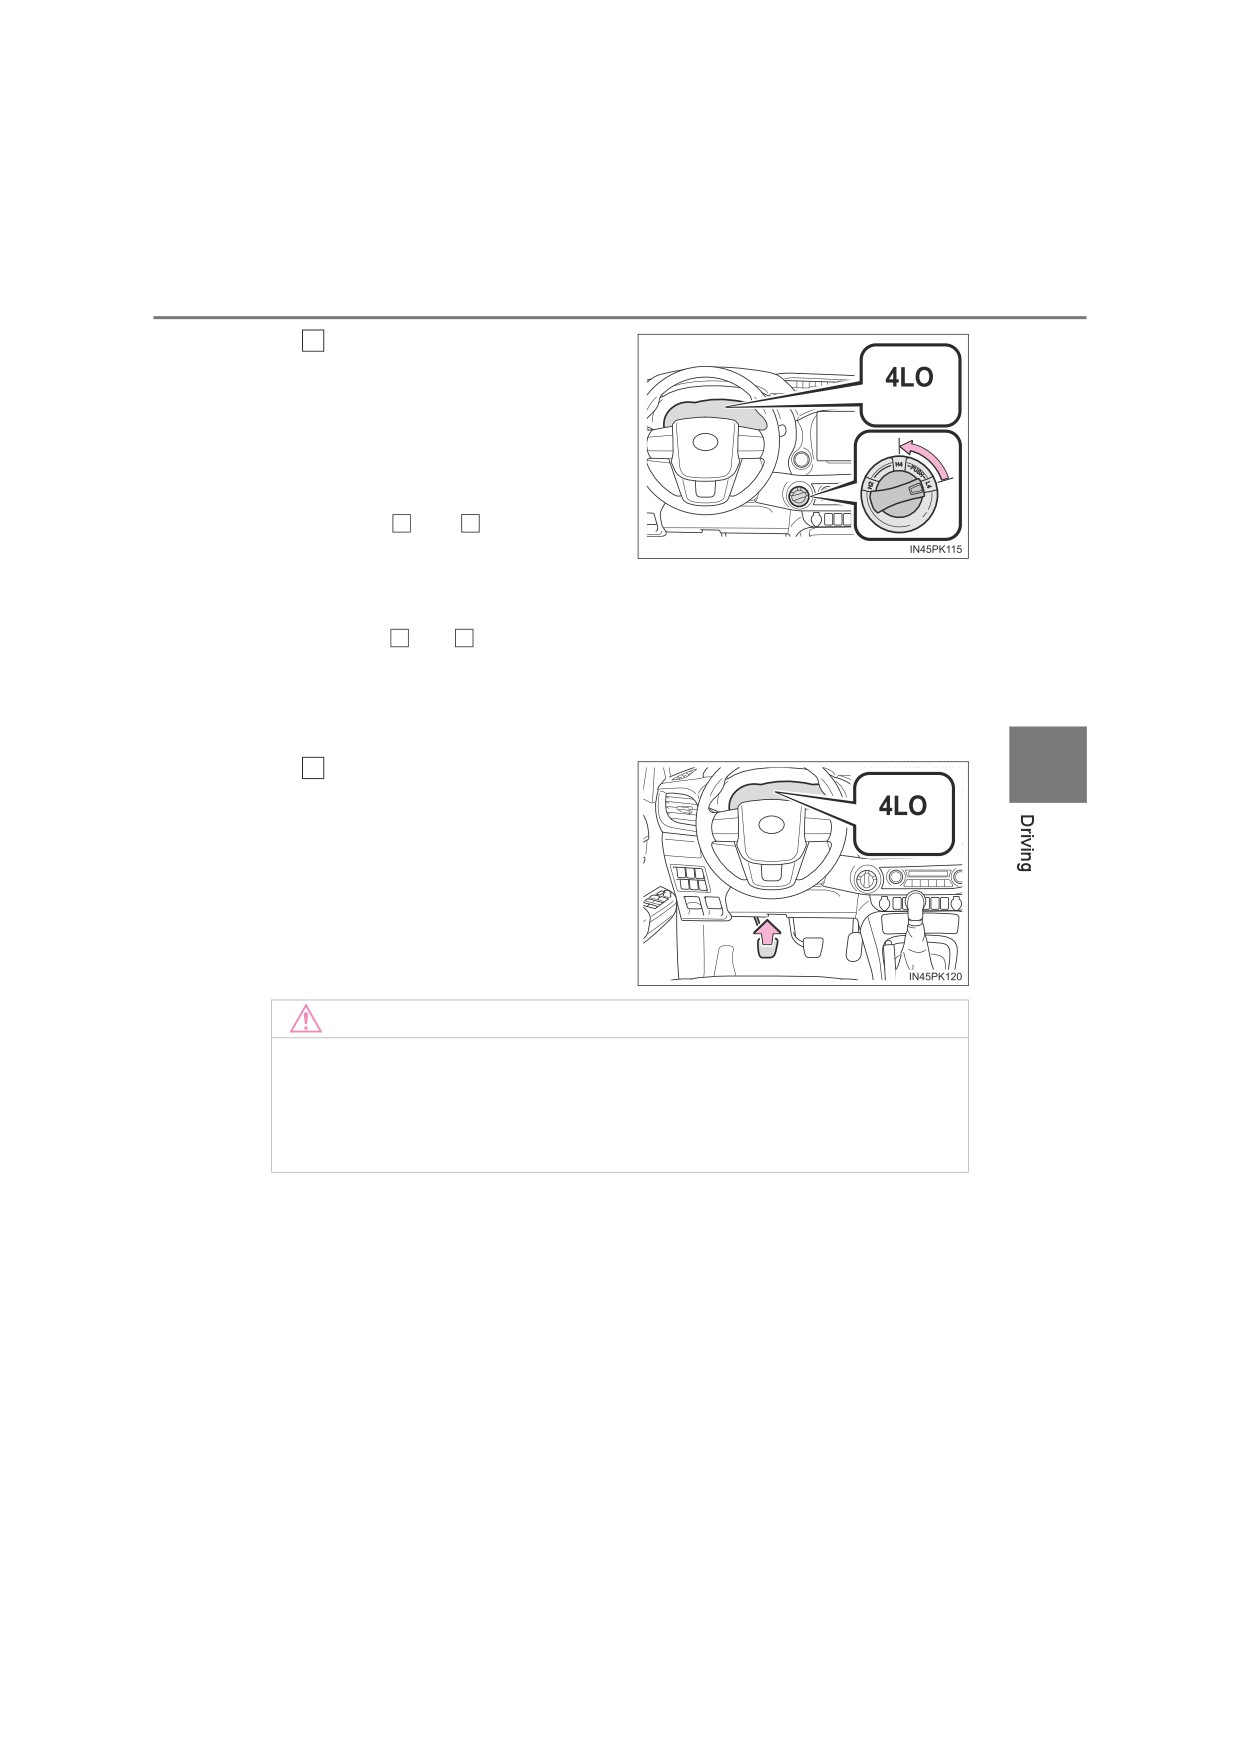
■ Shifting from L4 to H4
1
Stop the vehicle.
The transfer mode cannot be
switched if the vehicle is mov-
ing.
0 km/h (0 mph)
2
Firmly depress the clutch
pedal.
Keep depressing the clutch
pedal until switching the transfer
mode is completed
(indicator
off).
The transfer mode cannot be
switched if the clutch pedal is
not fully depressed.
4-5. Using the driving support systems
337
3
Turn the front-wheel drive
control switch to H4.
The low speed four-wheel drive
(Flashes)
indicator light flashes while
switching.
If turning the front-wheel drive
control switch without following
steps
1
and
2
, the low speed
four-wheel drive indicator light
flashes and a buzzer sounds.
Return the front-wheel drive
control switch to L4 and try
steps
1
and
2
again.
If the clutch pedal is released while
the low speed four-wheel drive indi-
cator light is flashing, gear noise may be caused. Immediately depress
the clutch pedal firmly and wait until
switching the transfer mode is com-
pleted.
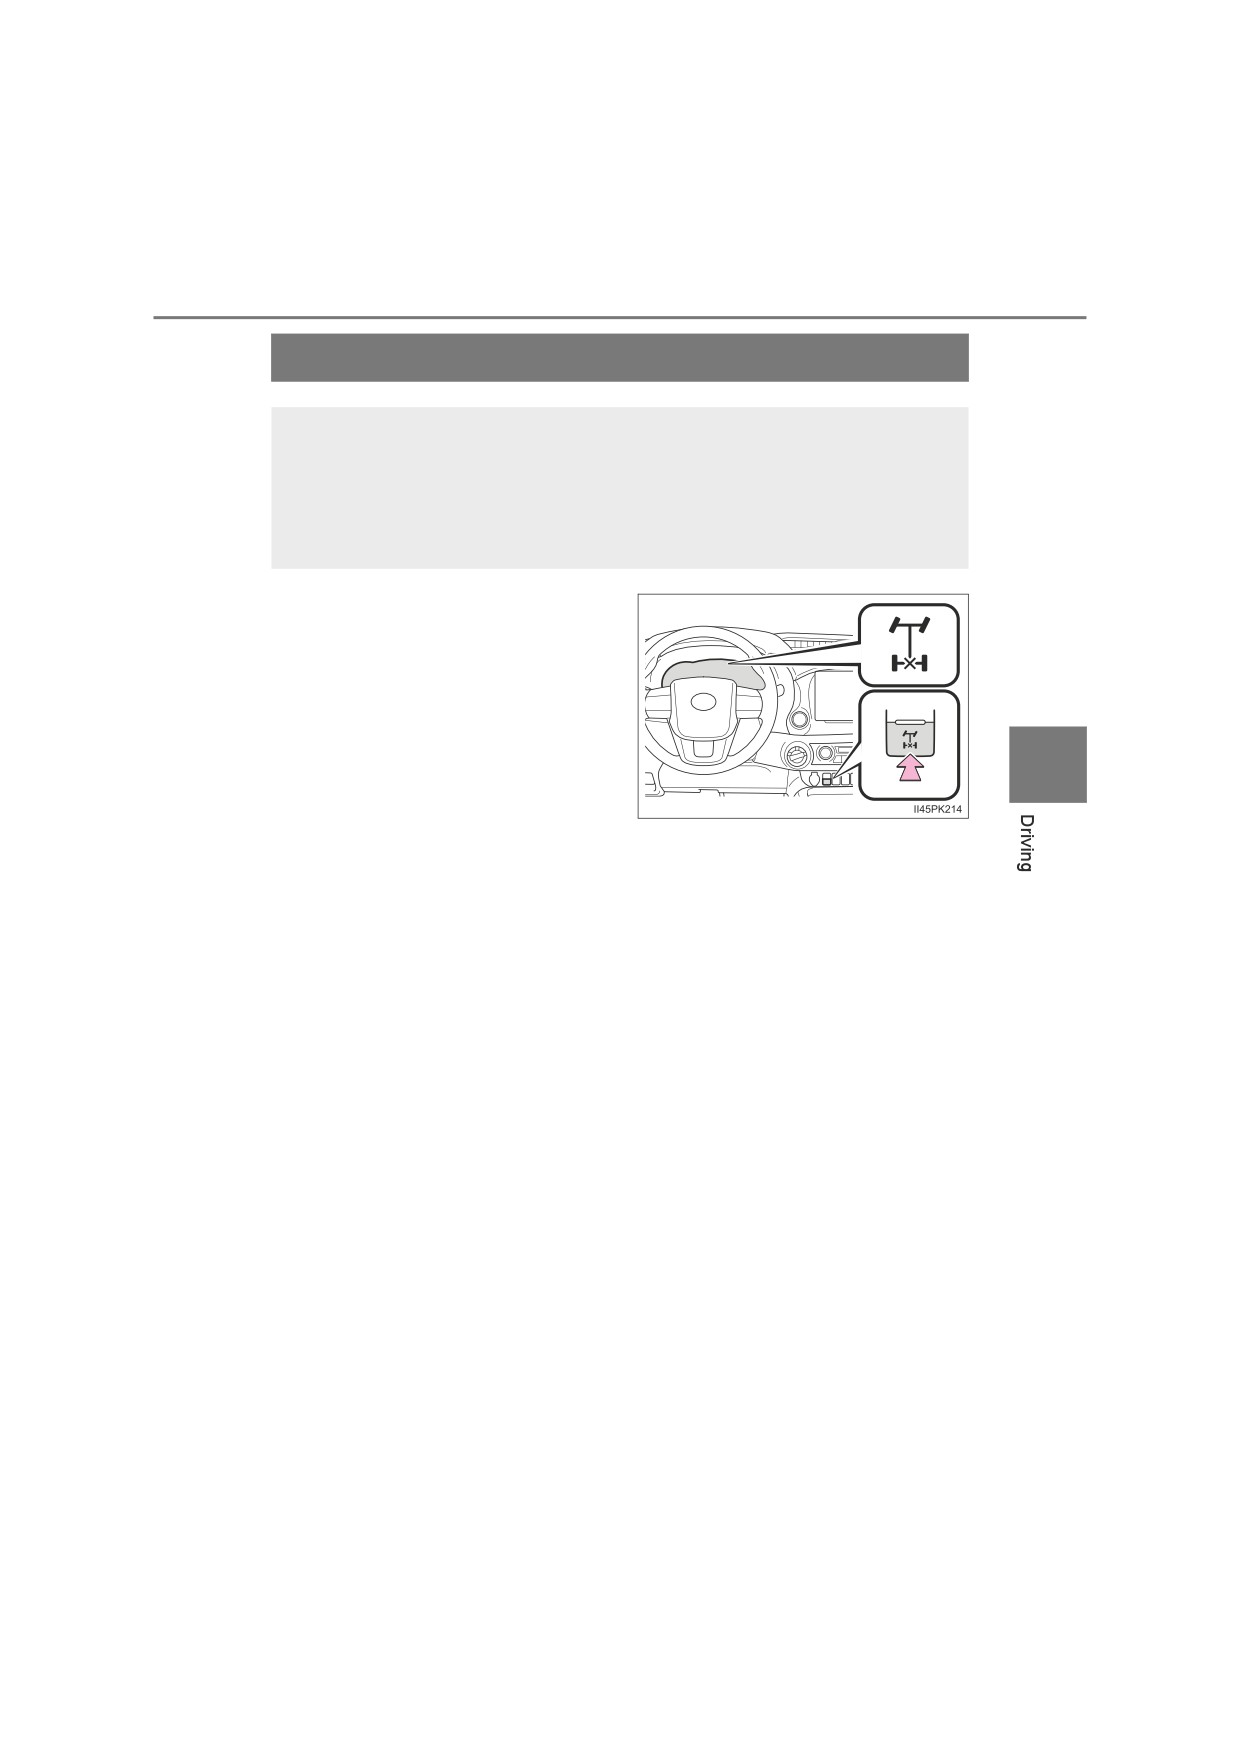
4
Check that the low speed
4
four-wheel drive indicator
light goes off.
(Goes off)
The low speed four-wheel drive
indicator light goes off when
switching the transfer mode is
completed.
Release the clutch pedal to
drive the vehicle.
NOTICE
■ Shifting between H4 and L4
Do not release the clutch pedal or depress the accelerator pedal while the
low speed four-wheel drive indicator light is flashing. Failure to do so may
cause gear noise and result in a malfunction.
338
4-5. Using the driving support systems
■ Four-wheel drive usage frequency (vehicles with A.D.D.)
You should drive in four-wheel drive for at least 16 km (10 miles) each month.
This will assure that the front drive components are lubricated.
■Shifting between H2 and H4
If you have trouble shifting in cold weather, reduce your speed or stop the
vehicle and reshift.
■Shifting to L4 (vehicles with VSC)
VSC is automatically turned off.
■ When driving on dry paved surface roads and expressway
Use H2 position. If the vehicle is driven in H4 or L4 position for a long time, a
warning buzzer sounds, and the four-wheel drive indicator light flashes rap-
idly or a warning message is shown on the multi-information display. If the
warning message is shown on the multi-information display, follow the mes-
sage.
WARNING
■ While driving
●Never turn the front-wheel drive control switch from H2 to H4 if the wheels
are slipping. Stop the slipping or spinning before shifting.
●For normal driving on dry and hard surface roads, use H2 position. Driving
on dry and hard surface roads in H4 or L4 position may cause drive com-
ponent oil leakage, seizure, or other problems resulting in an accident.
Further, it may cause tire wear and increased fuel consumption.
● Avoid turning suddenly in H4 or L4 position. If you do turn suddenly, the
difference in turning speeds between the front and rear wheels may have
a similar effect to braking, thus making driving difficult.
4-5. Using the driving support systems
339
Rear differential lock system
The rear differential lock system is provided for use only when
wheel spinning occurs in a ditch or on a slippery or ragged sur-
face.
This differential lock system is effective in case one of the rear
wheels is spinning.
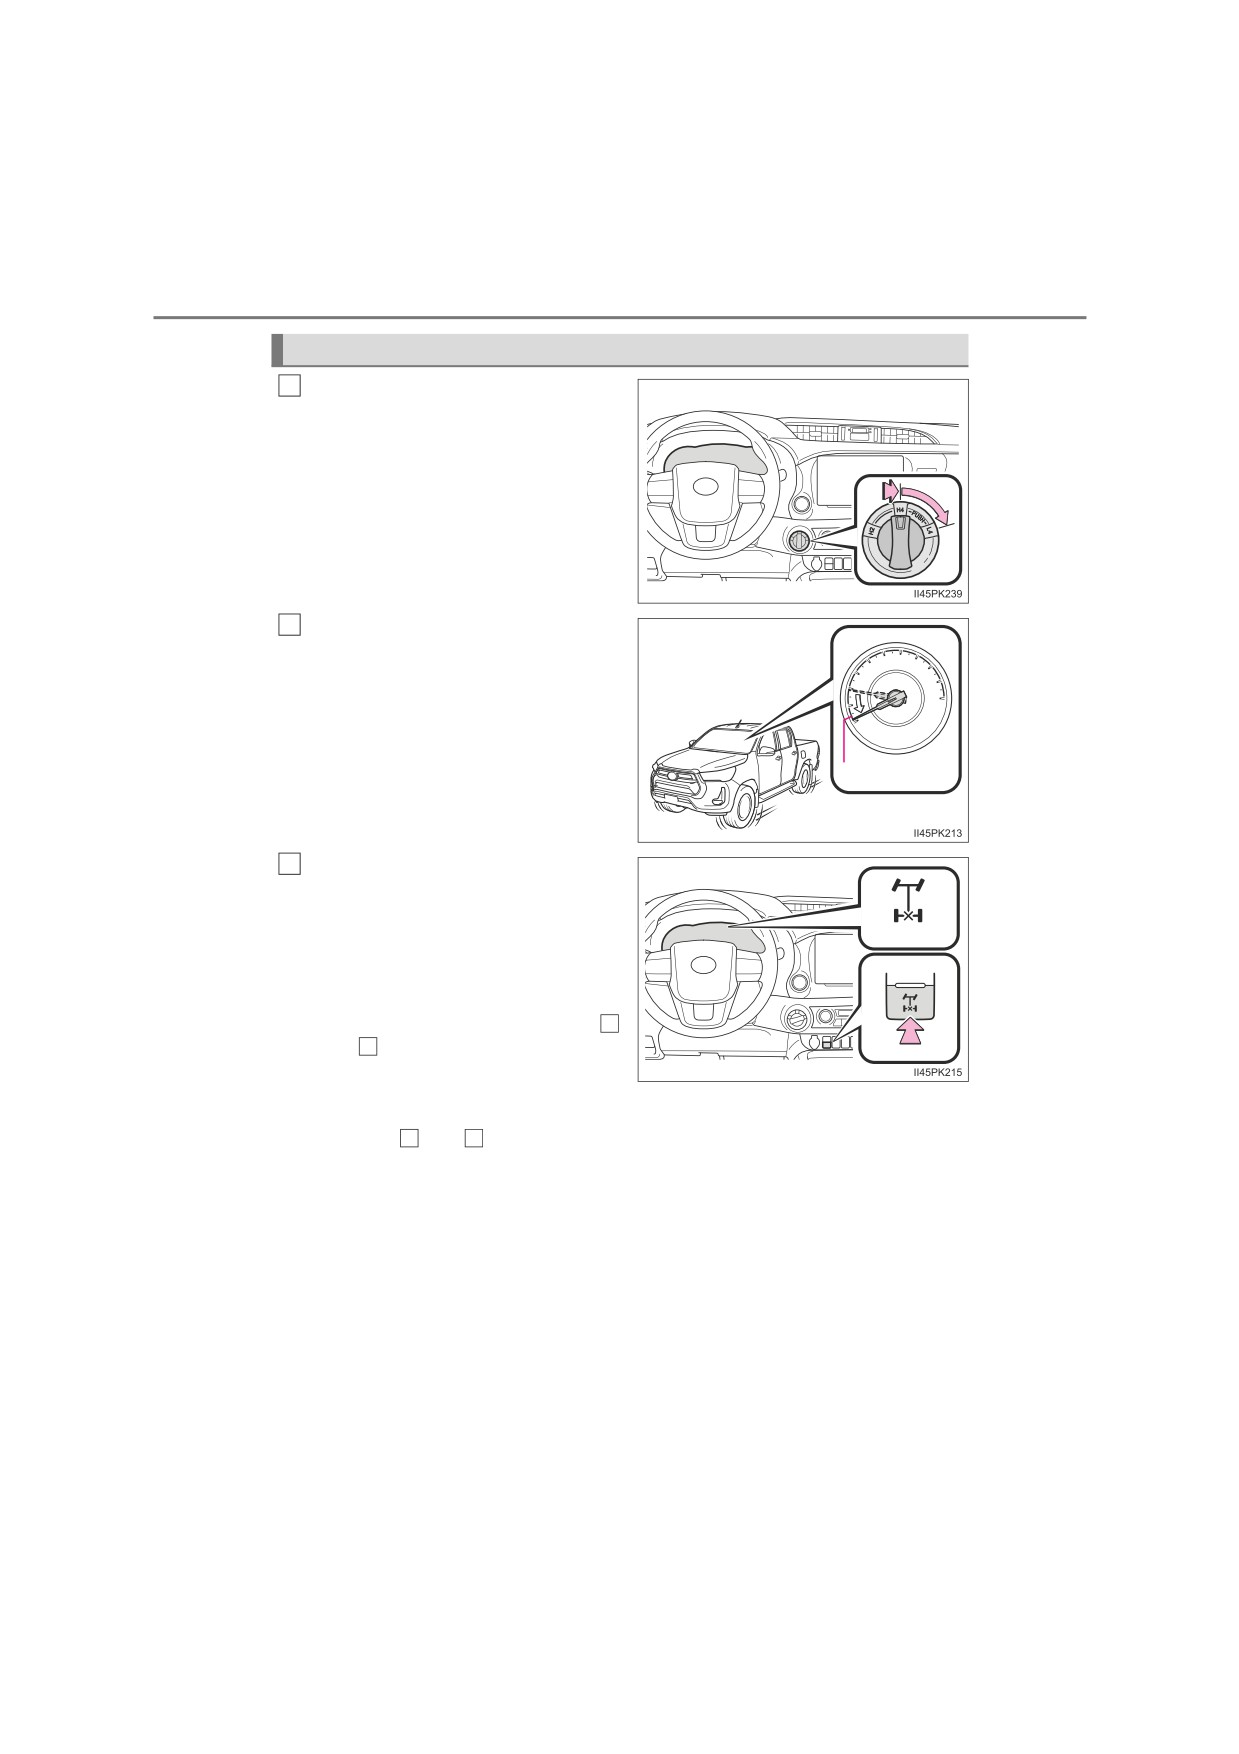
Press the rear differential lock
switch to lock the rear differential.
The rear differential lock indicator
comes on.
To unlock the rear differential, push
the switch again.
4
: If equipped
340
4-5. Using the driving support systems
Using the rear differential lock system
4WD models only: Before using
1
the rear differential lock system,
turn the front-wheel drive con-
trol switch to L4 and try to move
the vehicle. (P. 332, 335)
If this is not sufficient, use the rear
differential lock system as well.
Reduce the vehicle speed to
2
less than 8 km/h (5 mph).
Make sure that the wheels are not
spinning.
8 km/h (5 mph)
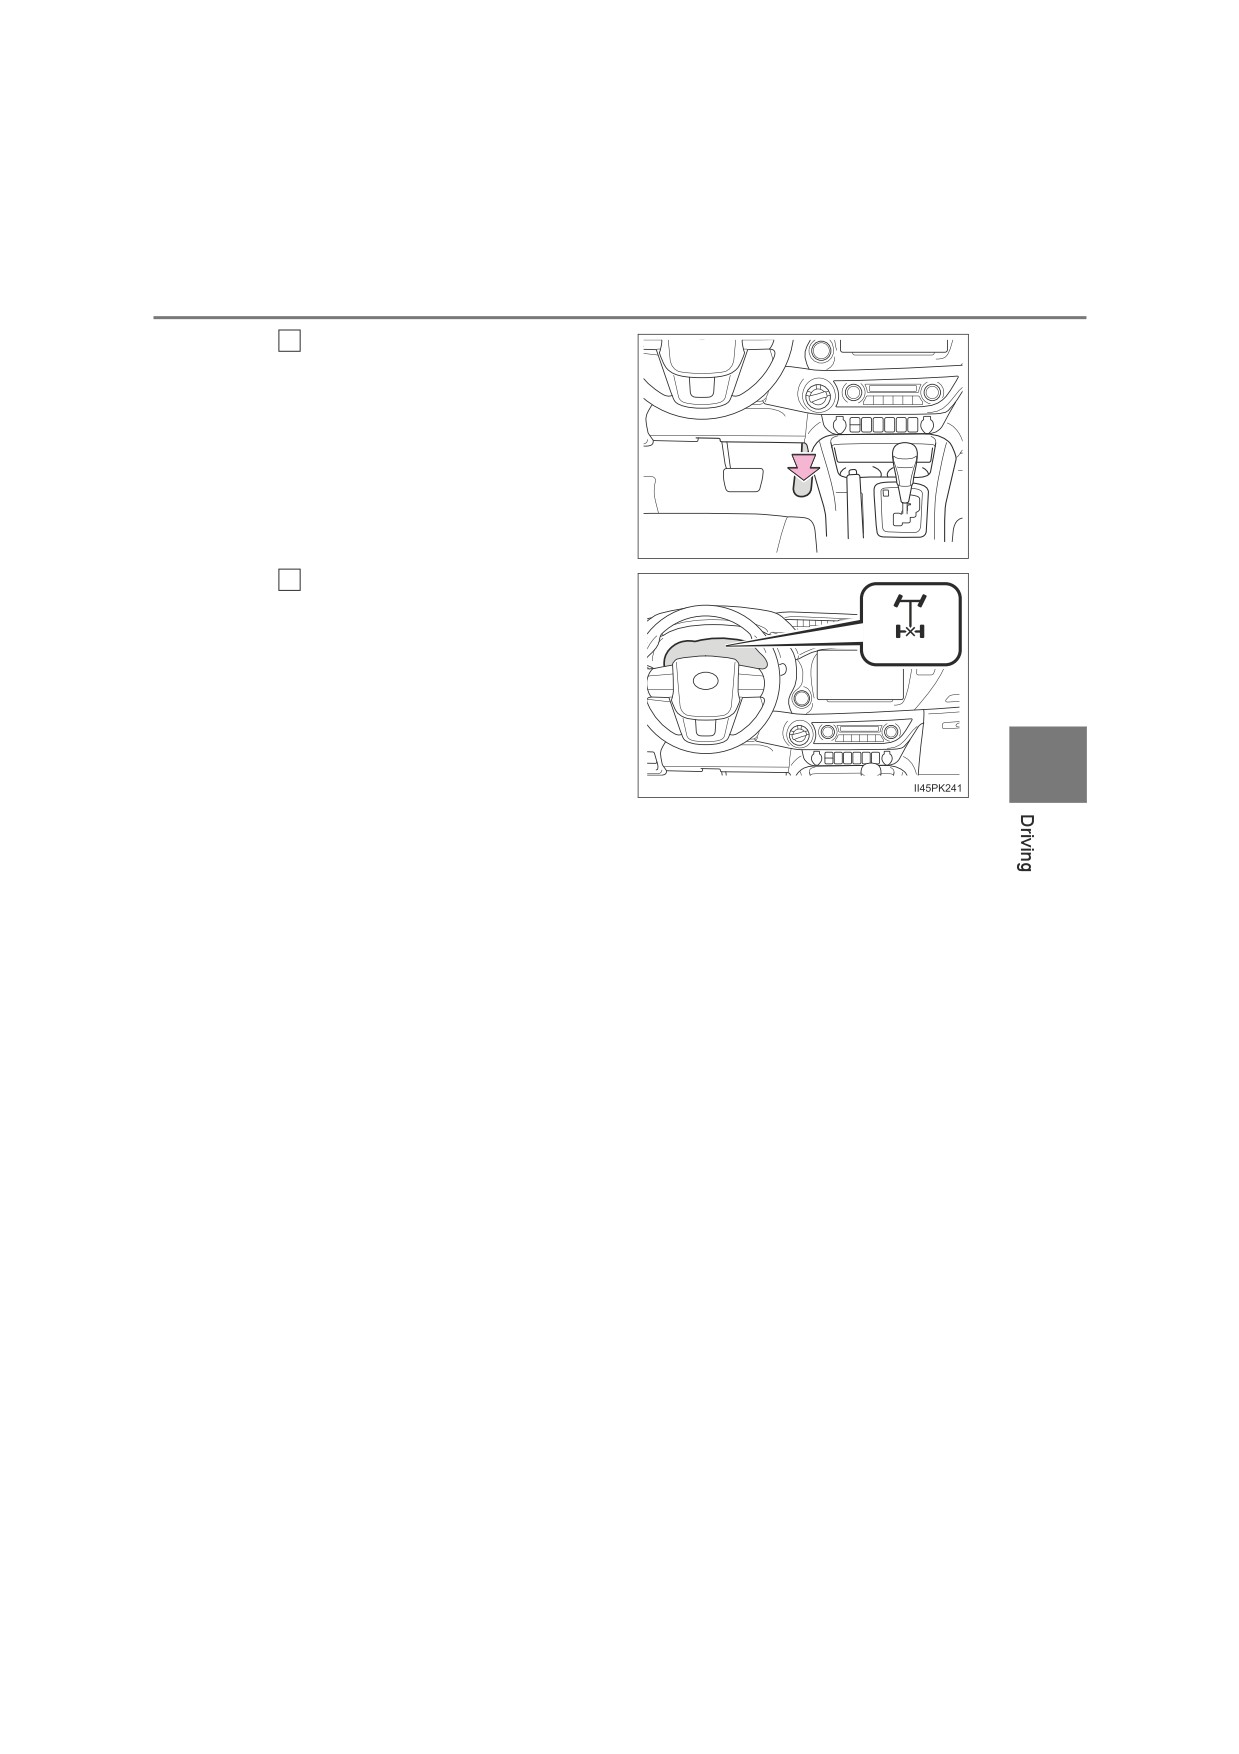
3
Press the rear differential lock
switch.
The rear differential lock indicator
(Flashes)
flashes while the rear differential is
being locked.
If pressing the rear differential lock
switch without following steps
1
and
2
, the rear differential lock
indicator flashes three times and a
buzzer sounds three times, and the
rear differential cannot be locked.
Try steps
1
and
2
again.
4-5.
Using the driving support
systems
341
4
Gently depress the accelerator
pedal.
II45PK240
Check that the rear differential
5
lock indicator comes on.
The rear differential lock indicator
(Comes on)
comes on when locking the rear
differential is completed.
If the rear differential lock indicator
does not stop flashing after press-
4
ing the rear differential lock switch,
perform any of the followings while
turning the steering wheel left and
right.
• Accelerating
• Decelerating
Unlock the rear differential as soon as the vehicle moves. To unlock
the rear differential, push the switch again.
342
4-5. Using the driving support systems
■ Locking the rear differential
The following systems do not operate when the rear differential is locked.
It is normal operation for the ABS warning light, VSC OFF indicator (if
equipped) and “TRC OFF” indicator (if equipped) to be on or for “TRC turned
off” to be displayed on the multi-information display (if equipped) at this time.
• ABS
• Brake assist (if equipped)
• VSC (if equipped)
• TRC/A-TRC (if equipped)
• Trailer Sway Control (if equipped)
• Hill-start assist control (if equipped)
• Downhill assist control (if equipped)
■ Unlocking the rear differential
If the rear differential lock indicator still flashes even after unlocking the rear
differential, check the safety of the surrounding area and slightly turn the
steering wheel in either direction while the vehicle is in motion.
■ Automatic system cancelation of the rear differential lock system
The rear differential lock is also unlocked in any of the following situations:
● The front-wheel drive control switch is turned to H2 or H4 (4WD models)
● The engine switch is turned to the “ACC” or “LOCK” position (vehicles with-
out smart entry & start system) or ACCESSORY or off (vehicles with smart
entry & start system)
■ After unlocking the rear differential
Check that the indicator goes off.
WARNING
■ To avoid an accident
Failure to observe the following precautions may result in an accident.
●Do not use the rear differential lock system except when wheel spinning
occurs in a ditch or on a slippery or rugged surface. Large steering effort
and careful cornering control will be required.
●Do not lock the rear differential until the wheels have stopped spinning.
Otherwise, the vehicle may move in an unexpected direction when the dif-
ferential lock is engaged, resulting in an accident. This may also lead to
possible damage to rear differential lock component parts.
●Do not drive over 8 km/h (5 mph) when the differential is locked.
●Do not keep driving with the rear differential lock switch on.
4-5. Using the driving support systems
343
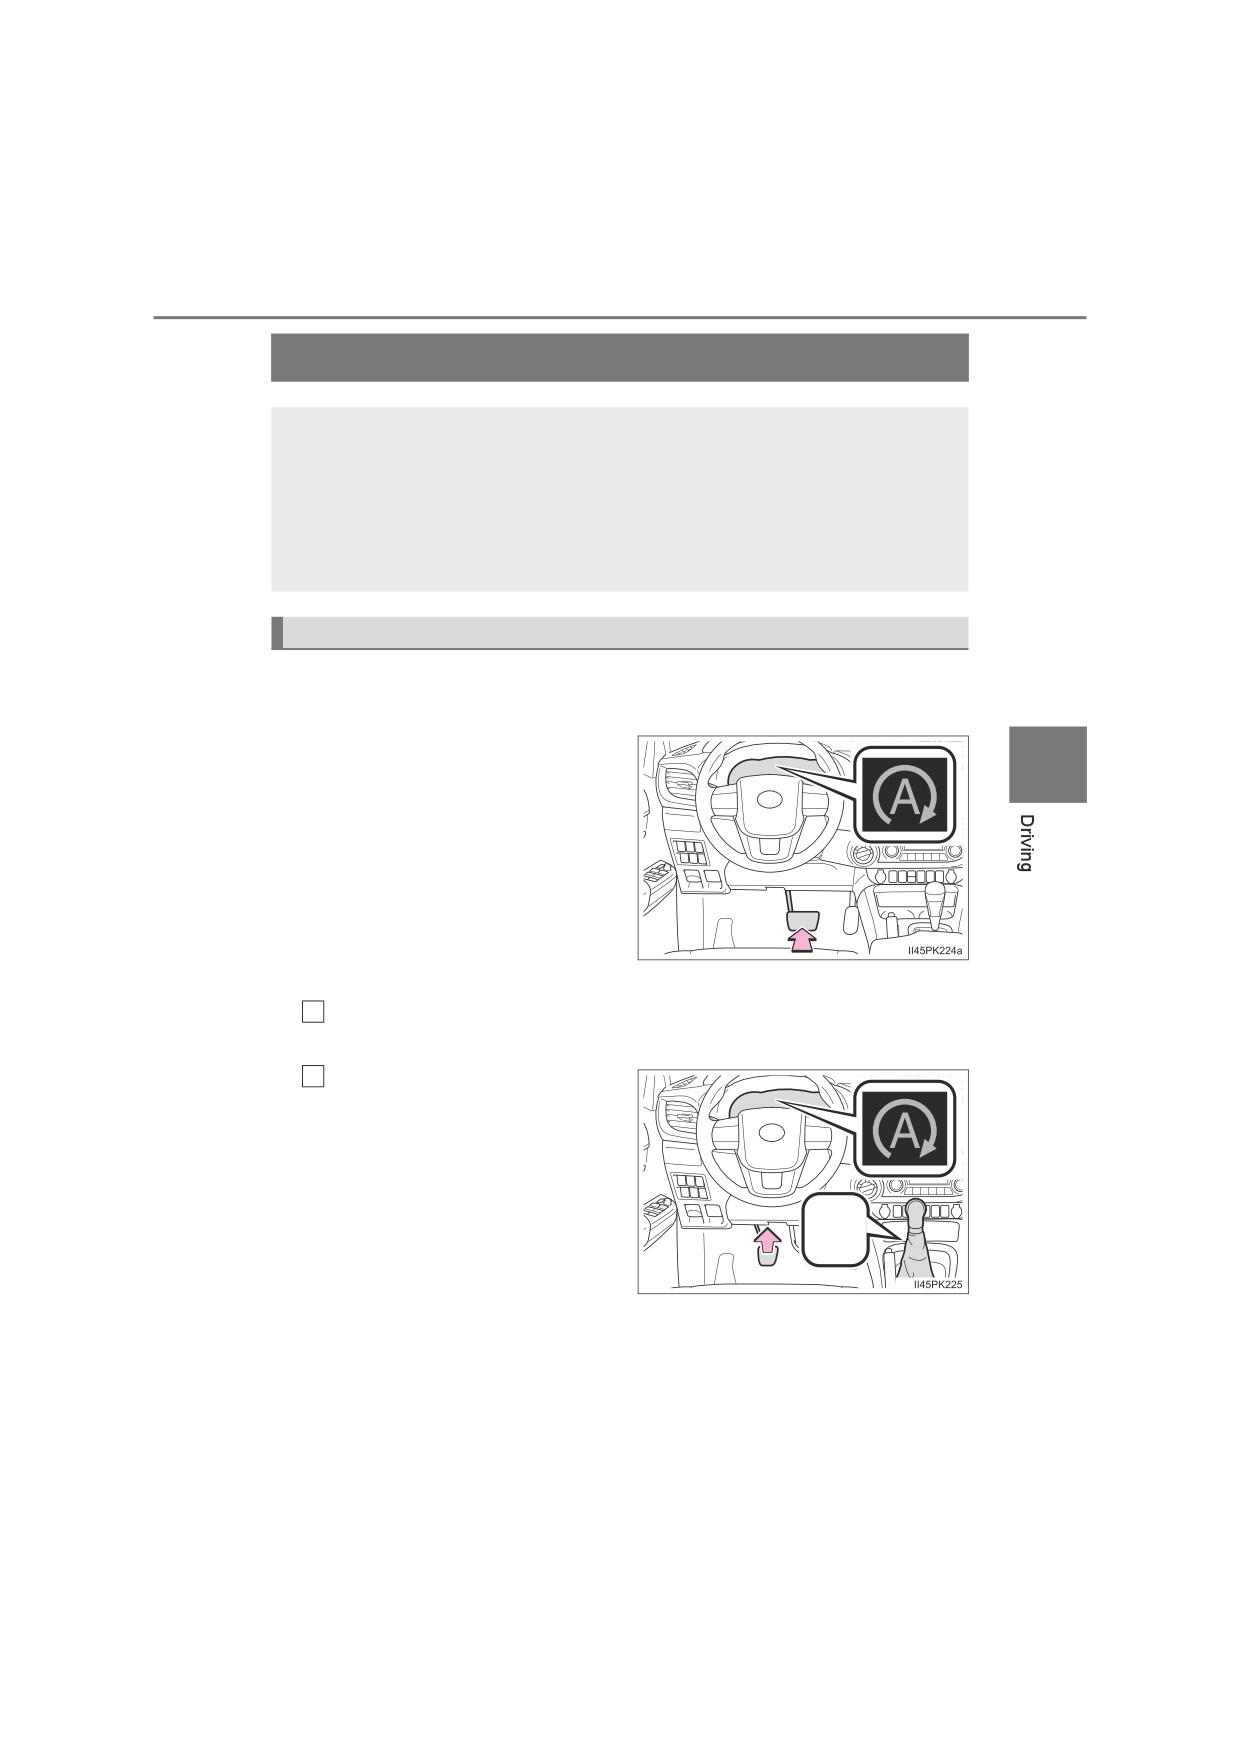
Stop & Start system
The Stop & Start system stops and starts the engine according
to brake pedal (vehicles with automatic transmission) or clutch
pedal (vehicles with manual transmission) or shift lever opera-
tion when the vehicle is stopped, such as at a stoplight, inter-
section, etc., in order to improve fuel economy and reduce noise
pollution caused by the engine idling.
Stop & Start system operation
■ Stopping the engine
Vehicles with automatic transmission
While driving with the D shift
4
position selected, depress
the brake pedal and stop the
vehicle. The engine will stop
automatically.
When the engine stops, the
Stop & Start indicator will illu-
minate.
Vehicles with manual transmission
1
Fully depress the clutch pedal
and
depress the brake pedal to
stop the vehicle.
Move the shift lever to N and
2
release the clutch pedal. The
engine will stop automati-
cally.
When the engine is stopped
by the Stop & Start system,
the Stop & Start indicator will
N
illuminate.
: If equipped
344
4-5. Using the driving support systems
■ Restarting the engine
Vehicles with automatic transmission
Release the brake pedal. The engine will start automatically.
When the engine starts, the Stop & Start indicator will turn off.
Vehicles with manual transmission
With the shift lever in N, depress the clutch pedal. The engine will
start automatically.
When the engine starts, the Stop & Start indicator will turn off.
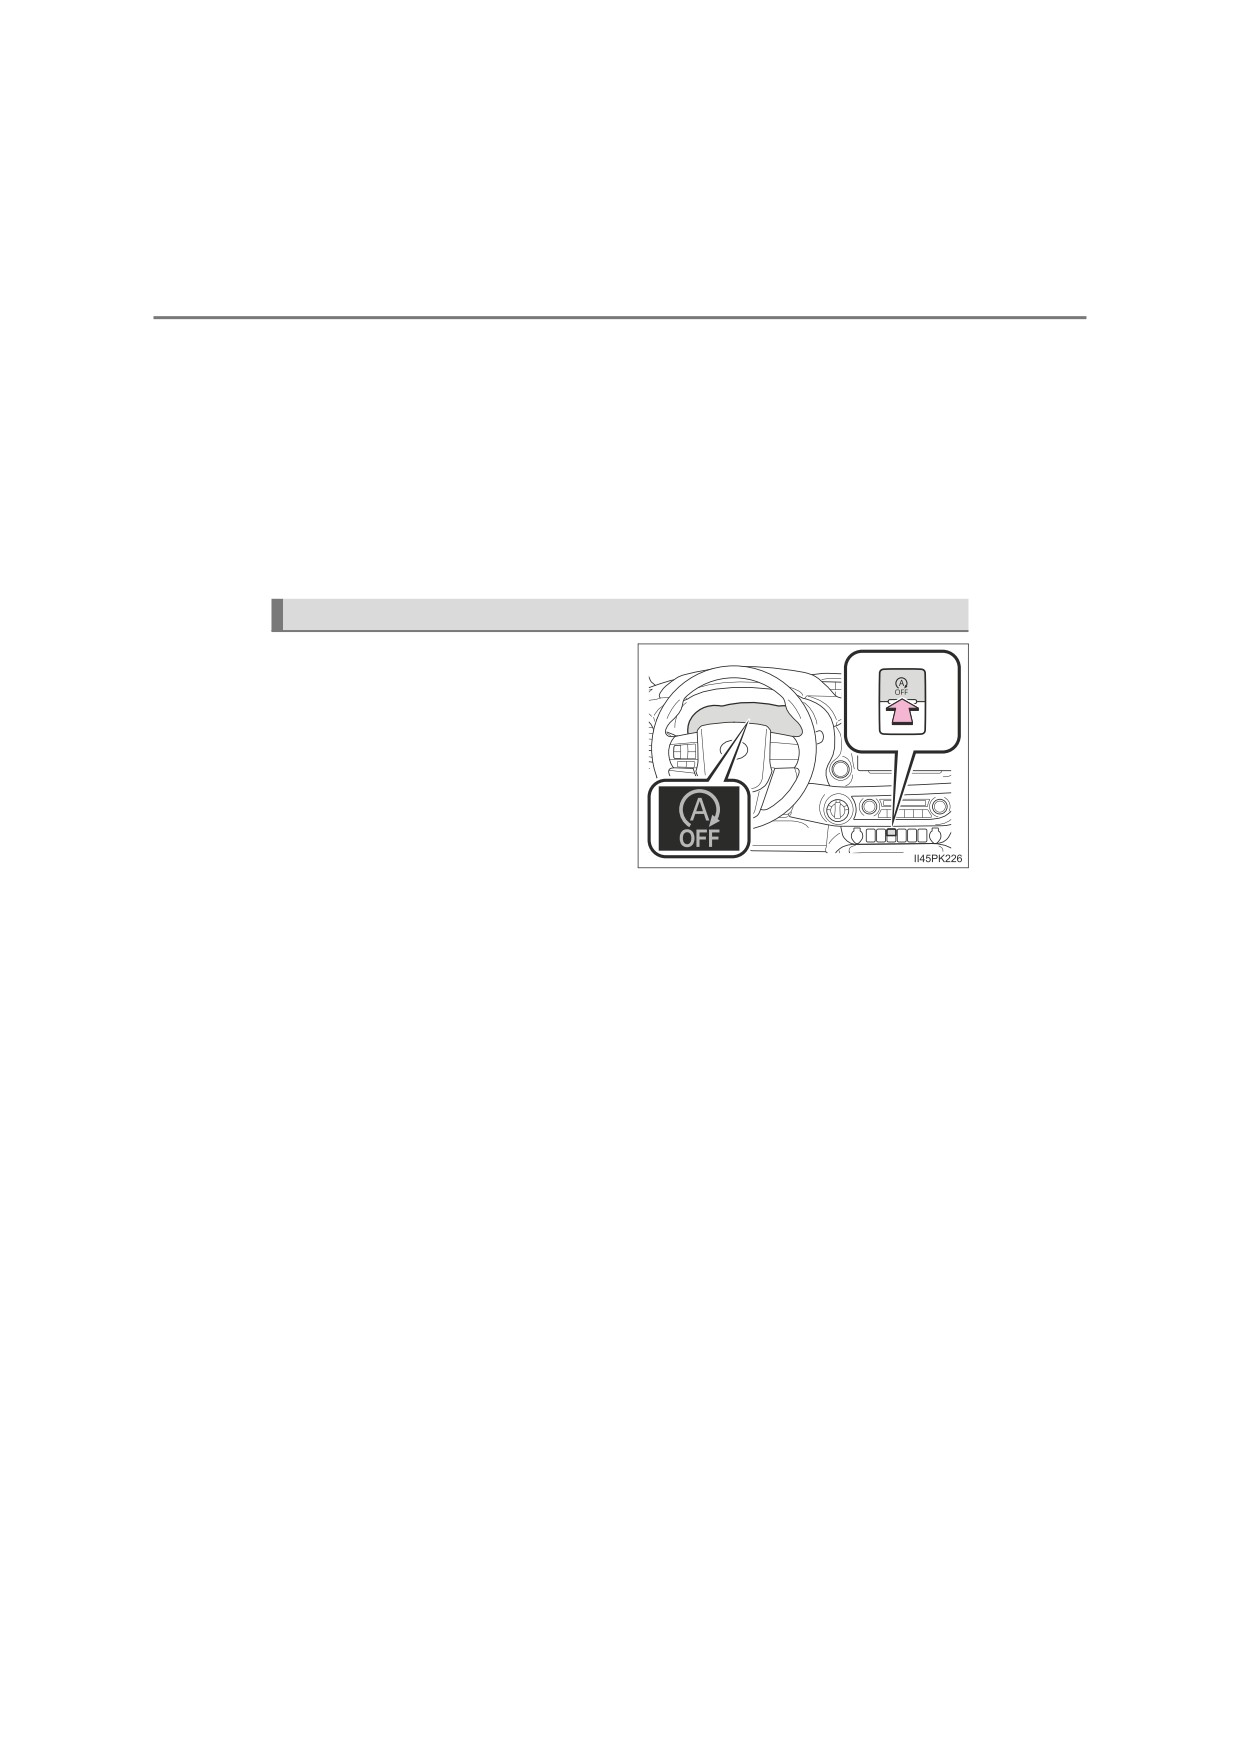
Disabling the Stop & Start system
Press the Stop & Start cancel
switch to disable the Stop & Start
system.
The Stop & Start cancel indicator
will illuminate.
Pressing the switch again will
enable the Stop & Start system and
the Stop & Start cancel indicator
will turn off.
■ Automatic enabling of the Stop & Start system
If the Stop & Start system is disabled using the Stop & Start cancel
switch, it will be automatically re-enabled once the engine switch is
turned to the “LOCK” position*1 or off*2 and then the engine is
started.
*1: Vehicles without smart entry & start system
*2: Vehicles with smart entry & start system
4-5. Using the driving support systems
345
Hill-start assist control (vehicles with automatic transmission)
When the engine is stopped by the Stop & Start system when the
vehicle is on an incline, when the brake pedal is released, brake force
is temporarily maintained to prevent the vehicle from rolling back-
wards before the engine is restarted and drive force is generated.
When drive force is generated, the maintained brake force is automat-
ically canceled.
● This function operates on flat surfaces as well as steep inclines.
● Sound may be generated from the brake system, but this does not
indicate a malfunction.
● Brake pedal response may change and vibration may occur, but
this does not indicate a malfunction.
■Points for use
4
● If the engine switch is pressed when the engine is stopped by the Stop &
Start system, the engine will not be able to be restarted by the automatic
engine start function. In this case, restart the engine using the normal
engine starting procedure. (P. 218, 221)
● When the engine is being restarted by the Stop & Start system, the power
outlets may be temporarily unusable, but this does not indicate a malfunc-
tion.
●Installation and removal of electrical components and wireless devices may
affect the Stop & Start system. Contact any authorized Toyota retailer or
Toyota authorized repairer, or any reliable repairer for details.
● When stopping the vehicle for a longer period of time, turn the engine switch
to the “LOCK” position*1 or off*2 to stop the engine completely.
● When the engine is restarted by the Stop & Start system, the steering wheel
may temporarily feel heavy.
●4WD models only: While driving in L4 mode, it is recommended that the
Stop & Start system be canceled because the system may not operate prop-
erly.
*1: Vehicles without smart entry & start system
*2: Vehicles with smart entry & start system
346
4-5. Using the driving support systems
■ Operating conditions
●The Stop & Start system is operational when all of the following conditions
are met:
• The vehicle has been driven a certain amount of time.
• The brake pedal is being depressed firmly. (vehicles with automatic trans-
mission)
• The clutch pedal is not depressed. (vehicles with manual transmission)
• The D shift position is selected. (vehicles with automatic transmission)
• The shift lever is in N. (vehicles with manual transmission)
• The driver’s seat belt is fastened.
• The driver’s door is closed.
• The selected driving mode is normal or Eco drive mode. (if equipped)
• The rear differential is not locked. (if equipped)
•
is off. (vehicles without manual air conditioning system)
• The accelerator pedal is not being depressed. (vehicles with automatic
transmission)
• The engine is adequately warmed up.
• The outside temperature is -5°C (23°F) or higher.
• The hood is closed. (P. 347)
●In the following situations, the engine may not be stopped by the Stop &
Start system. This is not a malfunction of the Stop & Start system.
• When the air conditioning system is being used.
• When the power heater is being used.
• When the battery is undergoing a periodic recharge.
• When the battery is not sufficiently charged, such as if the vehicle has
been parked for a long time and the battery charge has decreased, the
electric load is large, the battery fluid temperature is excessively low or
the battery has deteriorated.
• When the brake booster vacuum is low.
• When the elapsed time since the engine was restarted is short.
• When the vehicle is stopped frequently, such as when in a traffic jam.
• When the engine coolant temperature or transmission fluid temperature
is extremely low or high.
• When the vehicle is stopped on a steep incline. (vehicles with automatic
transmission)
• When the steering wheel is being operated.
• When the vehicle is being driven in a high altitude area.
• When the battery fluid temperature is extremely low or high.
• For a while after the battery terminals have been disconnected and
reconnected.
4-5. Using the driving support systems
347
● When the engine is stopped by the Stop & Start system, the engine will be
restarted automatically if any of the following conditions are met:
(To enable the engine to be stopped by the Stop & Start system again, drive
the vehicle.)
• The air conditioning system is turned on.
•
is turned on.
• The power heater is turned on.
• The shift lever is shifted from D or P. (vehicles with automatic transmis-
sion)
• The shift lever is shifted from P. (When the engine is stopped by the Stop
& Start system when the shift lever is in P.) (vehicles with automatic trans-
mission)
• The driver’s seat belt is unfastened.
• The driver’s door is opened.
• The driving mode is changed from normal or Eco drive mode to another
mode. (if equipped)
• The rear differential is locked. (if equipped)
• The Stop & Start cancel switch is pressed.
4
• The steering wheel is operated.
• The accelerator pedal is depressed. (vehicles with automatic transmis-
sion)
• The vehicle starts to roll on an incline.
● When the engine is stopped by the Stop & Start system, the engine may
restart automatically in the following situations:
(To enable the engine to be stopped by the Stop & Start system again, drive
the vehicle.)
• When the brake pedal is pumped or strongly depressed.
• When the air conditioning system is being used.
• When a switch of the air conditioning system is operated (
, etc.).
• If the battery charge becomes low.
■ When the hood is opened
●If the hood is opened while the engine is stopped by the Stop & Start sys-
tem, the engine will stall and will not be able to be restarted by the automatic
engine start function. In this case, restart the engine using the normal
engine starting procedure. (P. 218, 221)
● If the hood is closed after the engine is started with the hood open, the Stop
& Start system will not operate. Close the hood, turn the engine switch to the
“LOCK” position*1 or off*2, wait 30 seconds or more, and then start the
engine.
*1: Vehicles without smart entry & start system
*2: Vehicles with smart entry & start system
348
4-5. Using the driving support systems
■ Air conditioning system operation while the engine is stopped by the
Stop & Start system
Vehicles with an automatic air conditioning system: When the air conditioning
is in automatic mode and the engine is stopped by the Stop & Start system,
the fan may operate at a low speed in order to prevent the temperature in the
cabin from increasing or decreasing or may be stopped.
To prioritize air conditioning system performance when the vehicle is stopped,
disable the Stop & Start system by pressing the Stop & Start cancel switch.
● If the windshield is fogged up
Turn
on. (P. 441)
If the windshield fogs up frequently, press the Stop & Start cancel switch to
disable the Stop & Start system.
● If an odor is emitted from the air conditioning system
• Vehicles with manual air conditioning system:
If the idling stop time setting is set to “Extended” change it to “Standard”.
If an odor is emitted when the idling stop time setting is set to “Standard”,
press the Stop & Start cancel switch to deactivate the Stop & Start sys-
tem.
• Vehicles with automatic air conditioning system:
Press the Stop & Start cancel switch to deactivate the Stop & Start sys-
tem.
■ Changing the idling stop time with the air conditioning system on
The length of time the Stop & Start system will operate when the air condition-
ing system is on can be changed in
of the multi-information display
(P. 644). (The length of time the Stop & Start system will operate when the
air conditioning system is off cannot be changed.)
■ Displaying the Stop & Start system status
P. 139
4-5. Using the driving support systems
349
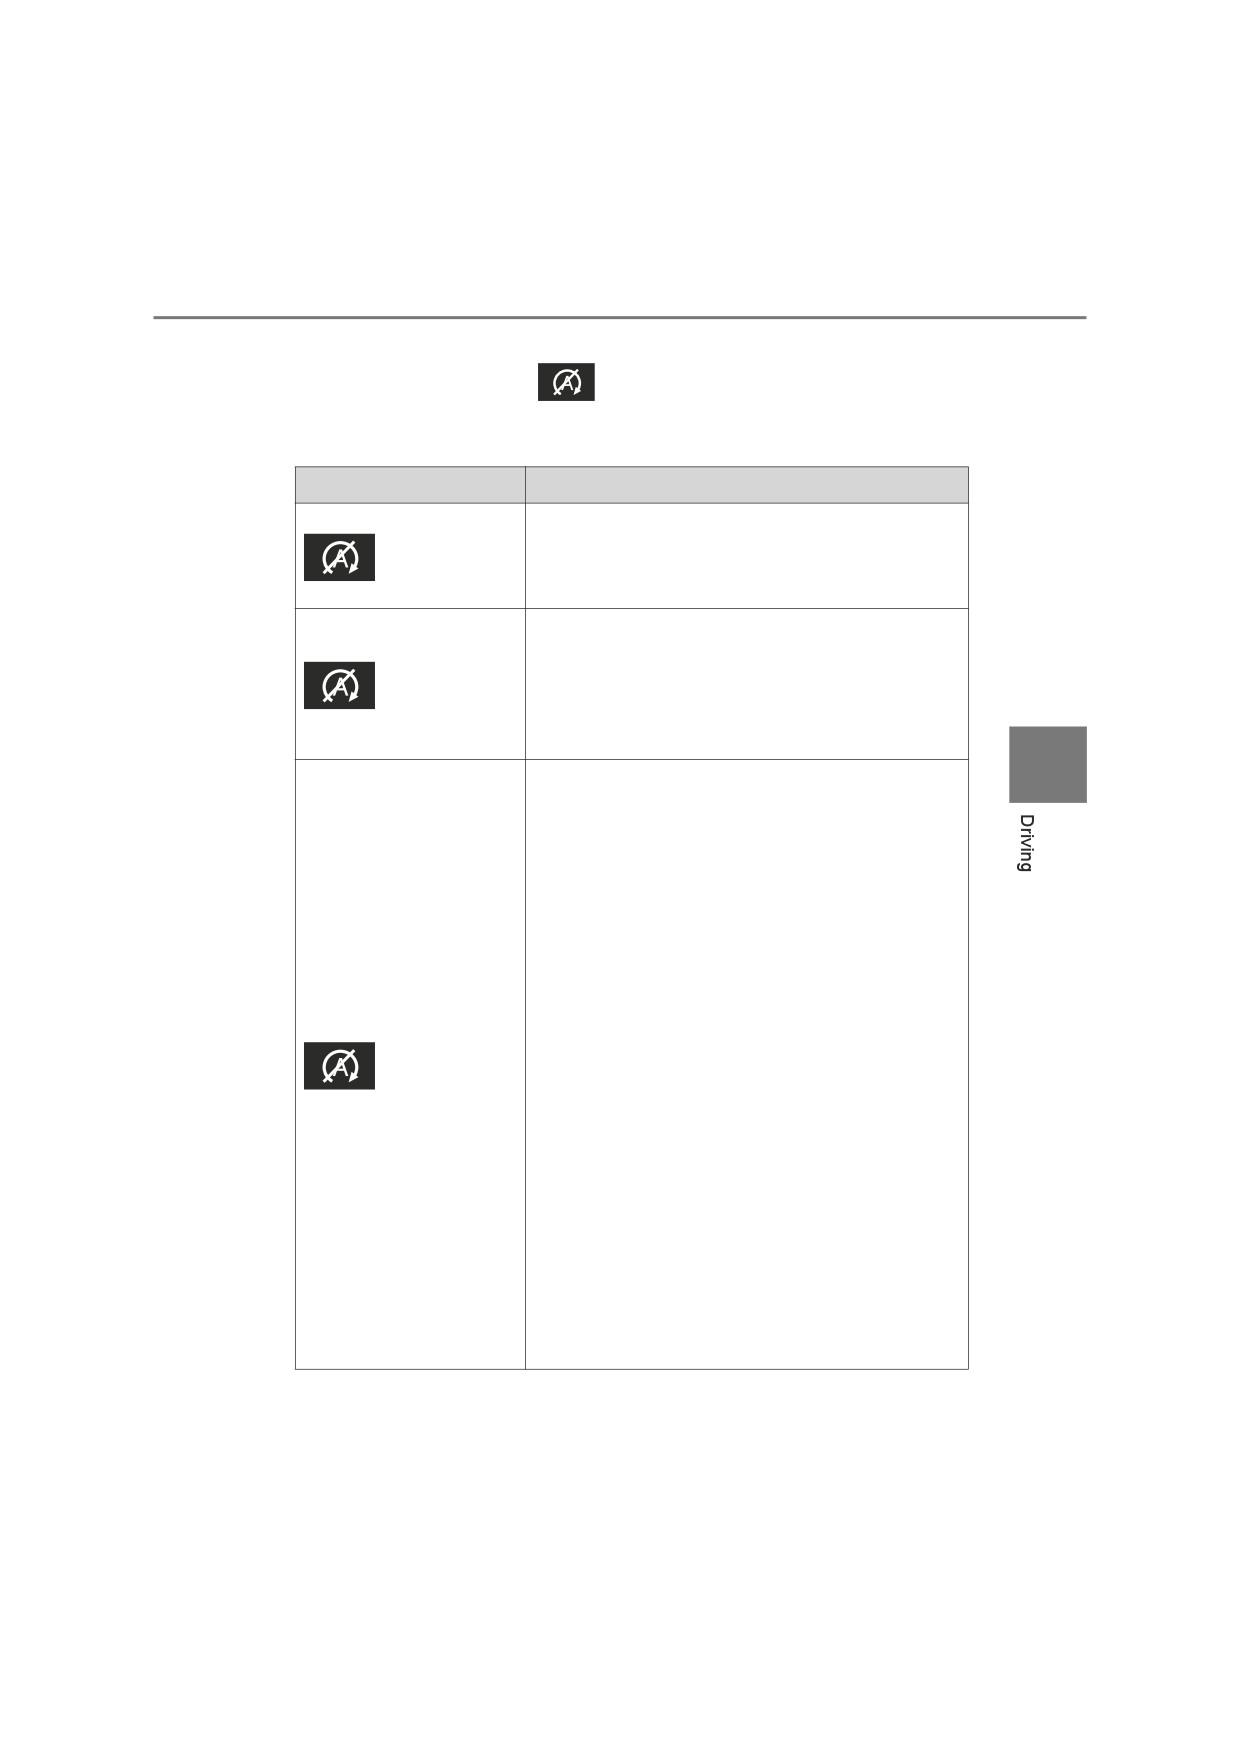
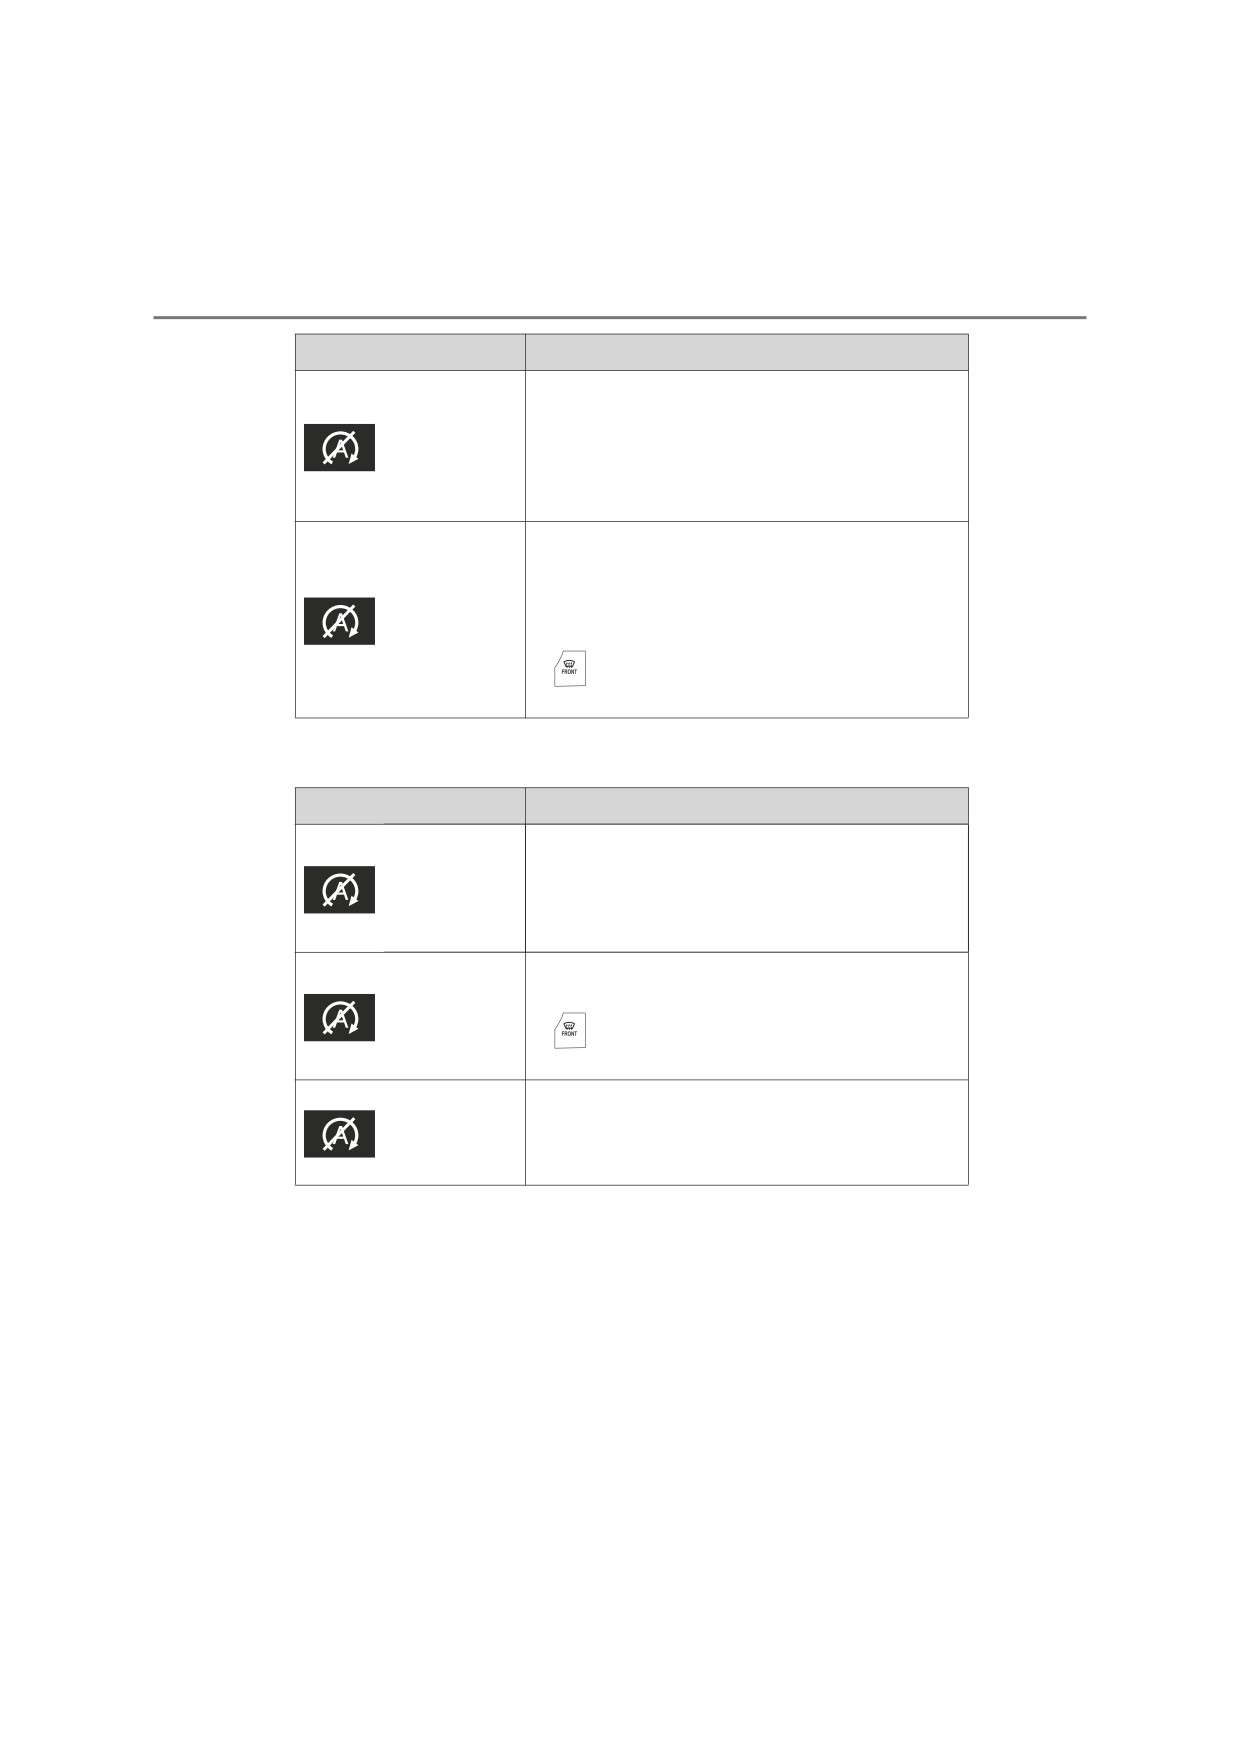
■ Multi-information display messages
If the following situations,
and a message may be displayed on the
multi-information display.
● When the engine cannot be stopped by the Stop & Start system
Message
Details/Actions
Vehicles with automatic transmission:
“Press Brake
The brake pedal is not depressed enough.
Harder
to
If the brake pedal is depressed further, the
Activate”
system will operate.
A non-dedicated battery for the Stop & Start sys-
tem may have been installed.
“Non-Dedi-
The Stop & Start system does not operate.
cated Battery”
Have the vehicle inspected by any autho-
rized Toyota retailer or Toyota authorized
repairer, or any reliable repairer.
4
• The battery charge amount may be low.
Engine stop is temporarily prohibited to
prioritize charging of the battery, but if the
engine is operated for a short while,
engine stop is allowed.
• A refresh charge may be occurring, such as
when the battery is undergoing a periodic
recharge, for a while after the battery terminals
have been disconnected and reconnected, for
a while after the battery has been replaced,
etc.
After a refresh charge for up to an hour
“Battery
completes, the system can be operated.
Charging”
• The engine may have been started with the
hood opened.
Close the hood, turn the engine switch to
the
“LOCK” position
(vehicles without
smart entry & start system) or off (vehicles
with smart entry & start system), wait 30
seconds or more, and then start the
engine.
If the message is displayed continuously
(60
minutes or more), the battery may have deterio-
rated. Contact any authorized Toyota retailer or
Toyota authorized repairer, or any reliable
repairer.
350
4-5. Using the driving support systems
Message
Details/Actions
• The vehicle is being driven in a high altitude
area.
“Preparing to
• The brake booster vacuum is low.
Operate”
When the brake booster vacuum reaches a
predetermined level, the system will be
enabled.
• The air conditioning system is being used
when the ambient temperature is high or low.
If the difference between the set tempera-
“For Climate
ture and cabin temperature is small, the
Control”
system will be enabled.
•
is on.
• The power heater is on.
● When the engine automatically restarts while stopped by the Stop & Start
system
Message
Details/Actions
The brake pedal has been depressed further or
pumped.
“Preparing to
The system will be enabled after the
Operate”
engine runs and the brake booster vacuum
reaches a predetermined level.
• The air conditioning system has been turned
on or is being used.
“For Climate
Control”
•
has been turned on.
• The power heater has been turned on.
The battery charge may be low.
“Battery
The engine is restarted to prioritize battery
Charging”
charging. Operating the engine for a short
while allows the system to recover.
4-5. Using the driving support systems
351
■ When the buzzer sounds (vehicles with automatic transmission)
If the driver’s door is opened when the engine is stopped by the Stop & Start
system and the shift lever is in D, a buzzer will sound and the Stop & Start
system indicator will flash. To stop the buzzer, close the driver’s door.
■ The Stop & Start system protection function
● When the volume of the audio system is excessively high, sound output
from the audio system may suddenly be cut off in order to reduce battery
consumption. To prevent the audio system from being cut off, keep the vol-
ume of audio system at a moderate level. If the audio system has been cut
off, turn the engine switch to the “LOCK” position*1 or off*2, wait for 3 sec-
onds or more and then turn it to the “ACC” position*1 or ACCESSORY
mode*2 or the “ON” position*1 or IGNITION ON mode*2 to re-enable the
audio system.
● The audio system may not be activated if the battery terminals are discon-
nected and then reconnected. If this occurs, turn the engine switch to the
“LOCK” position*1 or off*2 and then repeat the following operation twice to
activate the audio system normally.
• Turn the engine switch to the “ON” position*1 or IGNITION ON mode*2
4
and then to the “LOCK” position*1 or off*2.
*1: Vehicles without smart entry & start system
*2: Vehicles with smart entry & start system
■ Replacing the battery
P. 605
■ If the Stop & Start cancel indicator flashes continuously
The system may be malfunctioning. Have the vehicle inspected by any autho-
rized Toyota retailer or Toyota authorized repairer, or any reliable repairer.
■ If “Stop & Start System Malfunction Visit Your Dealer” is displayed on
the multi-information display
The system may be malfunctioning. Have the vehicle inspected by any autho-
rized Toyota retailer or Toyota authorized repairer, or any reliable repairer.
352
4-5. Using the driving support systems
WARNING
■ When the Stop & Start system is operating
Make sure to disable the Stop & Start system while the vehicle is in a poorly
ventilated area.
If not disabled, the engine may be automatically restarted unexpectedly,
causing exhaust gases to collect and enter the vehicle, possibly resulting in
death or a serious health hazard.
●Do not leave the vehicle while the engine is stopped by the Stop & Start
system (while the Stop & Start indicator is on).
An accident may occur due to the automatic engine start function.
●Depress the brake pedal and apply the parking brake when necessary,
while the engine is stopped by the Stop & Start system (while the Stop &
Start indicator is on).
■ Off-road driving precaution
When driving off-road, such as driving through water, press the Stop & Start
cancel switch to disable the Stop & Start system. Failure to do so may
cause the engine to be unable to restart.
NOTICE
■ To ensure the system operates correctly
If any of the following situations occur, the Stop & Start system may not
operate correctly. Have your vehicle inspected by any authorized Toyota
retailer or Toyota authorized repairer, or any reliable repairer.
●While the driver’s seat belt is fastened, the driver’s and front passenger’s
seat belt reminder light flashes.
●Even though the driver’s seat belt is not fastened, the driver’s and front
passenger’s seat belt reminder light does not illuminate.
●Even though the driver’s door is closed, the open door warning light is illu-
minated or the interior light is illuminated when the interior light switch is in
the door position.
● Even though the driver’s door is open, the open door warning light does
not illuminate or the interior light does not illuminate when the interior light
switch is in the door position.
■ If the engine stalls (vehicles with manual transmission)
If the Stop & Start system is enabled and the clutch pedal is depressed
quickly, the engine may restart.
4-5. Using the driving support systems
353
Driving assist systems
To keep driving safety and performance, the following systems
operate automatically in response to various driving situations.
Be aware, however, that these systems are supplementary and
should not be relied upon too heavily when operating the vehi-
cle.
◆ ABS (Anti-lock Brake System)
Helps to prevent wheel lock when the brakes are applied suddenly, or if the
brakes are applied while driving on a slippery road surface
◆ Brake assist (if equipped)
Generates an increased level of braking force after the brake pedal is
depressed when the system detects a panic stop situation
4
◆ VSC (Vehicle Stability Control) (if equipped)
Helps the driver to control skidding when swerving suddenly or turning on
slippery road surfaces
◆ TRC (Traction Control) for Pre Runner and H2 position on 4WD
models (if equipped)
Helps to maintain drive power and prevent the drive wheels from spinning
when starting the vehicle or accelerating on slippery roads
◆ A-TRC (Active Traction Control) for H4 and L4 position on 4WD
models (if equipped)
Helps to maintain drive power and prevent the four wheels from spinning
when starting the vehicle or accelerating on slippery roads
◆ Hill-start assist control (if equipped)
Helps to reduce the backward movement of the vehicle when starting on
an uphill
◆ Emergency brake signal (if equipped)
When the brakes are applied suddenly, the emergency flashers automati-
cally flash to alert the vehicle behind.
354
4-5. Using the driving support systems
◆ Trailer Sway Control (if equipped)
Helps the driver to control trailer sway by selectively applying brake pres-
sure for individual wheels and reducing driving torque when trailer sway is
detected.
Trailer Sway Control is part of the VSC system and will not operate if VSC
is turned off or experiences a malfunction.
When the TRC/A-TRC/VSC/Trailer Sway Control systems are
operating
The slip indicator will flash while
the
TRC/A-TRC/VSC/Trailer
Sway Control systems are operat-
ing.
4-5. Using the driving support systems
355
Disabling the TRC/A-TRC systems
If the vehicle gets stuck in mud, dirt or snow, the TRC/A-TRC systems
may reduce power from the engine to the wheels. Pressing
to
turn the system off may make it easier for you to rock the vehicle in
order to free it.
Vehicles without AUTO LSD system (without multi-information dis-
play)
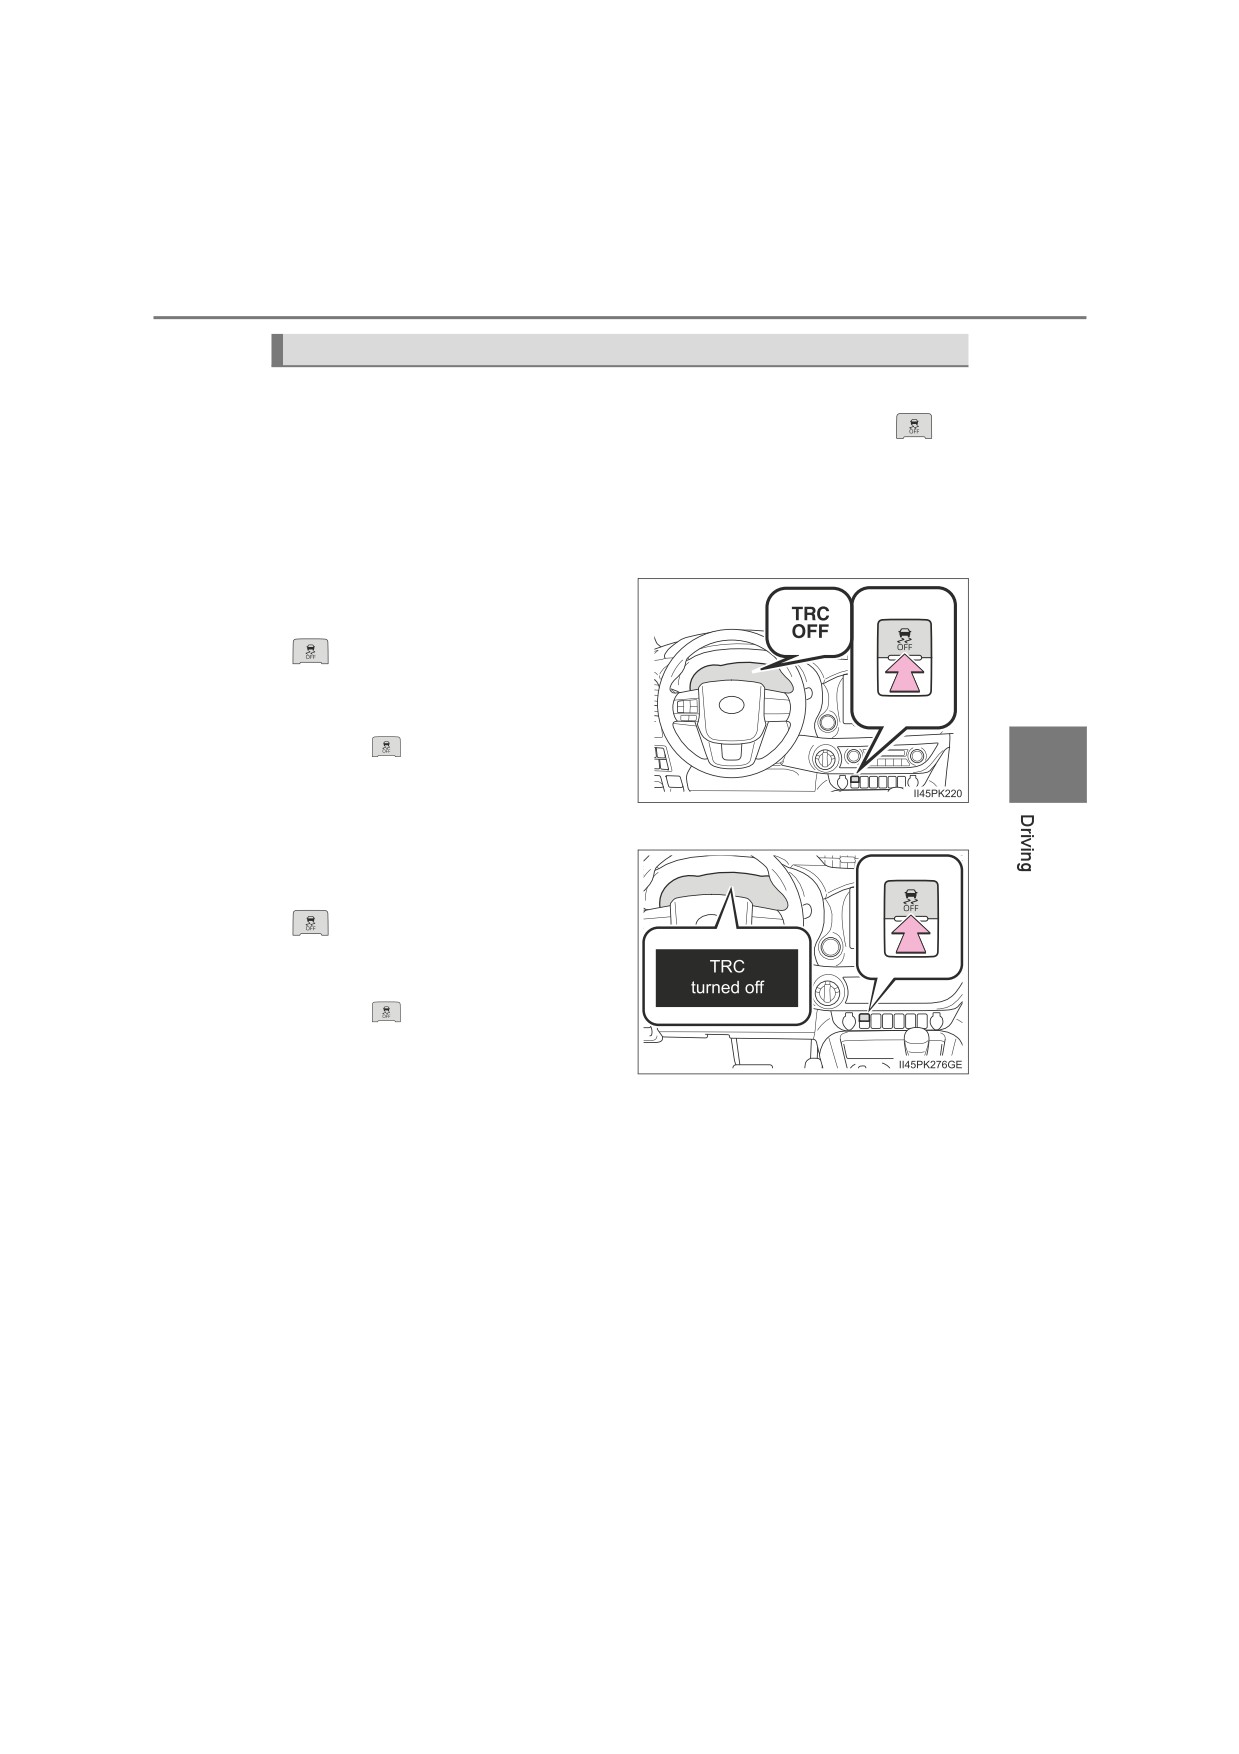
To turn the TRC/A-TRC systems
off, quickly press and release
The “TRC OFF” indicator light will
come on.
Press
again to turn the system
4
back on.
Vehicles without AUTO LSD system (with multi-information display)
To turn the TRC/A-TRC systems
off, quickly press and release
“TRC turned off” will be shown on
the multi-information display.
Press
again to turn the system
back on.
356
4-5. Using the driving support systems
Vehicles with AUTO LSD system
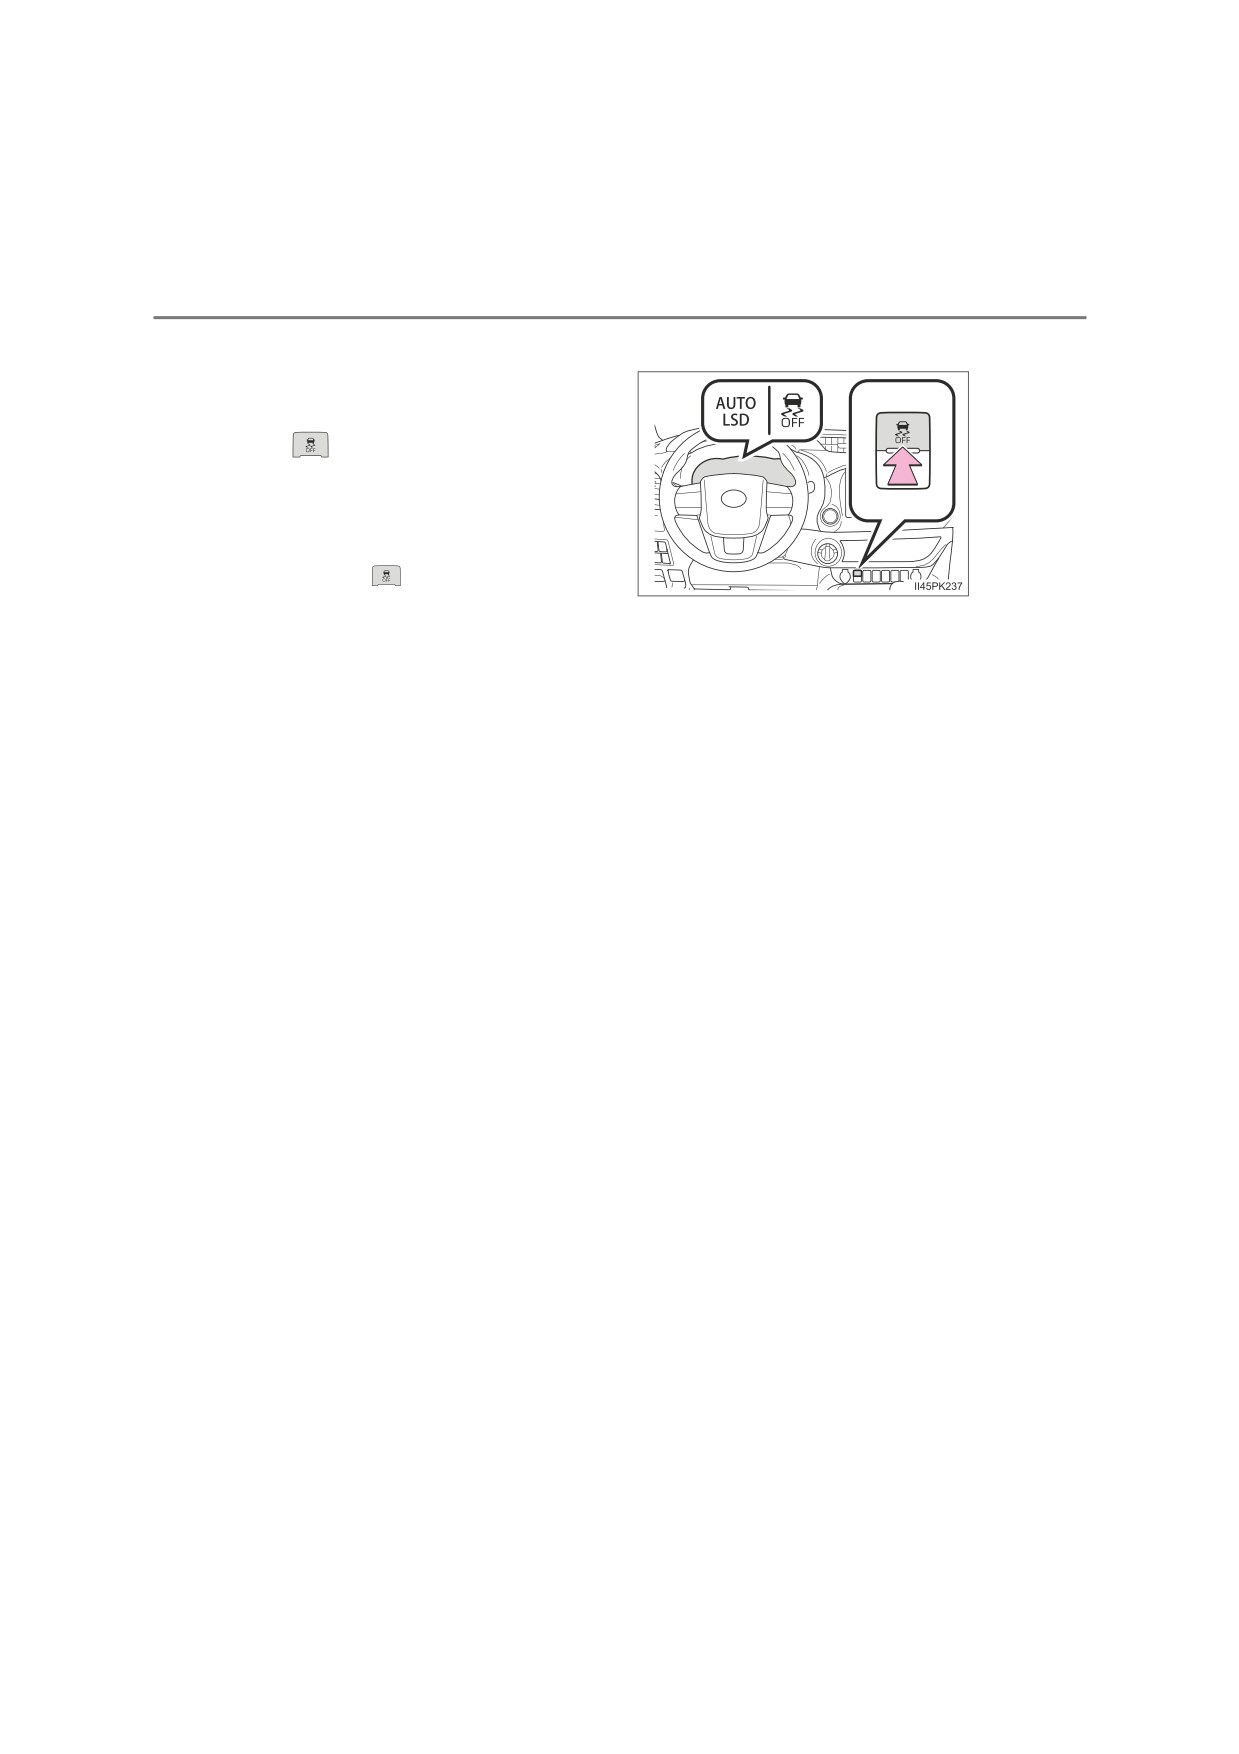
To turn the TRC/A-TRC systems
off, quickly press and release
(The AUTO LSD system
turns on.*1)
The “AUTO LSD” and VSC OFF
indicators will come on.*2
Press
again to turn the system
back on.
*1: Pre Runner and in 2WD mode on 4WD models only
*2: On vehicles with pre-collision system, pre-collision brake assist and pre-
collision braking will also be disabled until the vehicle reaches a certain
speed. The PCS warning light will come on and the message will be
shown on the multi-information display. (if equipped) (P. 281)
4-5. Using the driving support systems
357
■ Turning off TRC, A-TRC, VSC and Trailer Sway Control systems
Vehicles without multi-information display
To turn the TRC, A-TRC, VSC and Trailer Sway Control systems off, press
and hold
for more than 3 seconds while the vehicle is stopped.
The “TRC OFF” indicator light and VSC OFF indicator light will come on.*
Press
again to turn the system back on.
Vehicles with multi-information display
To turn the TRC, A-TRC, VSC and Trailer Sway Control systems off, press
and hold
for more than 3 seconds while the vehicle is stopped.
The VSC OFF indicator light will come on and the “TRC turned off” will be
shown on the multi-information display.*
Press
again to turn the system back on.
*: On vehicles with pre-collision system, pre-collision brake assist and pre-
collision braking will also be disabled. The PCS warning light will come on
4
and the message will be shown on the multi-information display. (P. 281)
■ When “TRC OFF” indicator light comes on or the message is displayed
on the multi-information display showing that TRC/A-TRC has been dis-
abled even if
has not been pressed
TRC, A-TRC and downhill assist control is temporary deactivated. If the indi-
cator light continues to remain on or the information continues to show, con-
tact any authorized Toyota retailer or Toyota authorized repairer, or any
reliable repairer.
■ Sounds and vibrations caused by the ABS, brake assist, VSC, Trailer
Sway Control, TRC, A-TRC and the hill-start assist control systems
● A sound may be heard from the engine compartment when the brake pedal
is depressed repeatedly, when the engine is started or just after the vehicle
begins to move. This sound does not indicate that a malfunction has
occurred in any of these systems.
● Any of the following conditions may occur when the above systems are
operating. None of these indicates that a malfunction has occurred.
• Vibrations may be felt through the vehicle body and steering.
• A motor sound may be heard also after the vehicle comes to a stop.
• The brake pedal may pulsate slightly after the ABS is activated.
• The brake pedal may move down slightly after the ABS is activated.
358
4-5. Using the driving support systems
■ Automatic reactivation of TRC, A-TRC, VSC and Trailer Sway Control
systems
After turning the TRC, A-TRC, VSC and Trailer Sway Control systems off, the
systems will be automatically re-enabled in the following situations:
● When the engine switch is turned to the “LOCK” position (vehicles without
smart entry & start system) or off (vehicles with smart entry & start system).
● If only the TRC/A-TRC system is turned off (P. 355), the TRC/A-TRC will
turn on when vehicle speed increases.
If the TRC, A-TRC, VSC and Trailer Sway Control systems are turned off
(P. 357), automatic re-enabling will not occur when vehicle speed
increases.
■ Operating conditions of the hill-start assist control
When the following four conditions are met, the hill-start assist control will
operate:
● Vehicles with automatic transmission: The shift lever is in a position other
than P or N (when starting off forward/backward on an upward incline)
Vehicles with manual transmission: The shift lever is in a position other than
R when starting off forward on an upward incline, or the shift lever is in R
when starting off backward on an upward incline.
●The vehicle is stopped
● The accelerator pedal is not depressed
● The parking brake is not engaged
■ Automatic system cancelation of the hill-start assist control
The hill-start assist control will turn off in any of the following situations:
● Vehicles with automatic transmission: The shift lever is shifted to P or N
Vehicles with manual transmission: The shift lever is shifted to R when start-
ing off forward on an upward incline, or the shift lever is shifted to other than
R when starting off backward on an upward incline.
● The accelerator pedal is depressed
● The parking brake is engaged
● 2 seconds at maximum elapsed after the brake pedal is released
4-5. Using the driving support systems
359
■ Operating conditions of emergency brake signal
When the following conditions are met, the emergency brake signal will oper-
ate:
● The emergency flashers are off.
●Actual vehicle speed is over 55 km/h (35 mph).
● The system judges from the vehicle deceleration that it is a sudden braking
operation.
■ Automatic system cancelation of emergency brake signal
The emergency brake signal will be canceled in any of the following situa-
tions:
● The emergency flashers are turned on.
● The system judges from the vehicle deceleration that is not a sudden brak-
ing operation.
WARNING
■ The ABS does not operate effectively when
4
●The limits of tire gripping performance have been exceeded (such as
excessively worn tires on a snow covered road).
●The vehicle hydroplanes while driving at high speed on wet or slick roads.
■ Stopping distance when the ABS is operating may exceed that of nor-
mal conditions
The ABS is not designed to shorten the vehicle’s stopping distance. Always
maintain a safe distance from the vehicle in front of you, especially in the
following situations:
● When driving on dirt, gravel or snow-covered roads
●When driving with tire chains
●When driving over bumps in the road
● When driving over roads with potholes or uneven surfaces
360
4-5. Using the driving support systems
WARNING
■ TRC/A-TRC/VSC may not operate effectively when
Directional control and power may not be achievable while driving on slip-
pery road surfaces, even if the TRC/A-TRC/VSC system is operating.
Drive the vehicle carefully in conditions where stability and power may be
lost.
■ Hill-start assist control does not operate effectively when
●Do not overly rely on the hill-start assist control. The hill-start assist control
may not operate effectively on steep inclines and roads covered with ice.
●Unlike the parking brake, the hill-start assist control is not intended to hold
the vehicle stationary for an extended period of time. Do not attempt to use
the hill-start assist control to hold the vehicle on an incline, as doing so
may lead to an accident.
■ When the TRC/VSC/Trailer Sway Control is activated
The slip indicator flashes. Always drive carefully.
Reckless driving may cause an accident. Exercise particular care when the
indicator flashes.
■ When the TRC/A-TRC/VSC/Trailer Sway Control systems are turned off
Be especially careful and drive at a speed appropriate to the road condi-
tions. As these are the systems to help ensure vehicle stability and driving
force, do not turn the TRC/A-TRC/VSC/Trailer Sway Control systems off
unless necessary.
■ Replacing tires
Make sure that all tires are of the specified size, brand, tread pattern and
total load capacity. In addition, make sure that the tires are inflated to the
recommended tire inflation pressure level.
The ABS, TRC, A-TRC, VSC, Trailer Sway Control, hill-start assist control
and downhill assist control systems will not function correctly if different tires
are installed on the vehicle.
Contact any authorized Toyota retailer or Toyota authorized repairer, or any
reliable repairer for further information when replacing tires or wheels.
■ Handling of tires and the suspension
Using tires with any kind of problem or modifying the suspension will affect
the driving assist systems, and may cause a system to malfunction.
4-5. Using the driving support systems
361
WARNING
■ Trailer Sway Control precaution
The Trailer Sway Control system is not able to reduce trailer sway in all situ-
ations. Depending on many factors such as the conditions of the vehicle,
trailer, road surface, and driving environment, the Trailer Sway Control sys-
tem may not be effective. Refer to your trailer owner’s manual for informa-
tion on how to tow your trailer properly.
■ If trailer sway occurs (vehicles with Trailer Sway Control)
Observe the following precautions.
Failing to do so may cause death or serious injury.
●Firmly grip the steering wheel. Steer straight ahead.
Do not try to control trailer sway by turning the steering wheel.
● Begin releasing the accelerator pedal immediately but very gradually to
reduce speed.
Do not increase speed. Do not apply vehicle brakes.
If you make no extreme correction with the steering or brakes, your vehicle
4
and trailer should stabilize. (P. 213)
362
4-5. Using the driving support systems
Downhill assist control system
The downhill assist control system helps to prevent excessive
speed on steep downhill slopes.
The system will operate when the vehicle is traveling under
30 km/h (18 mph) and transfer mode is in L4 or H4.
System operation
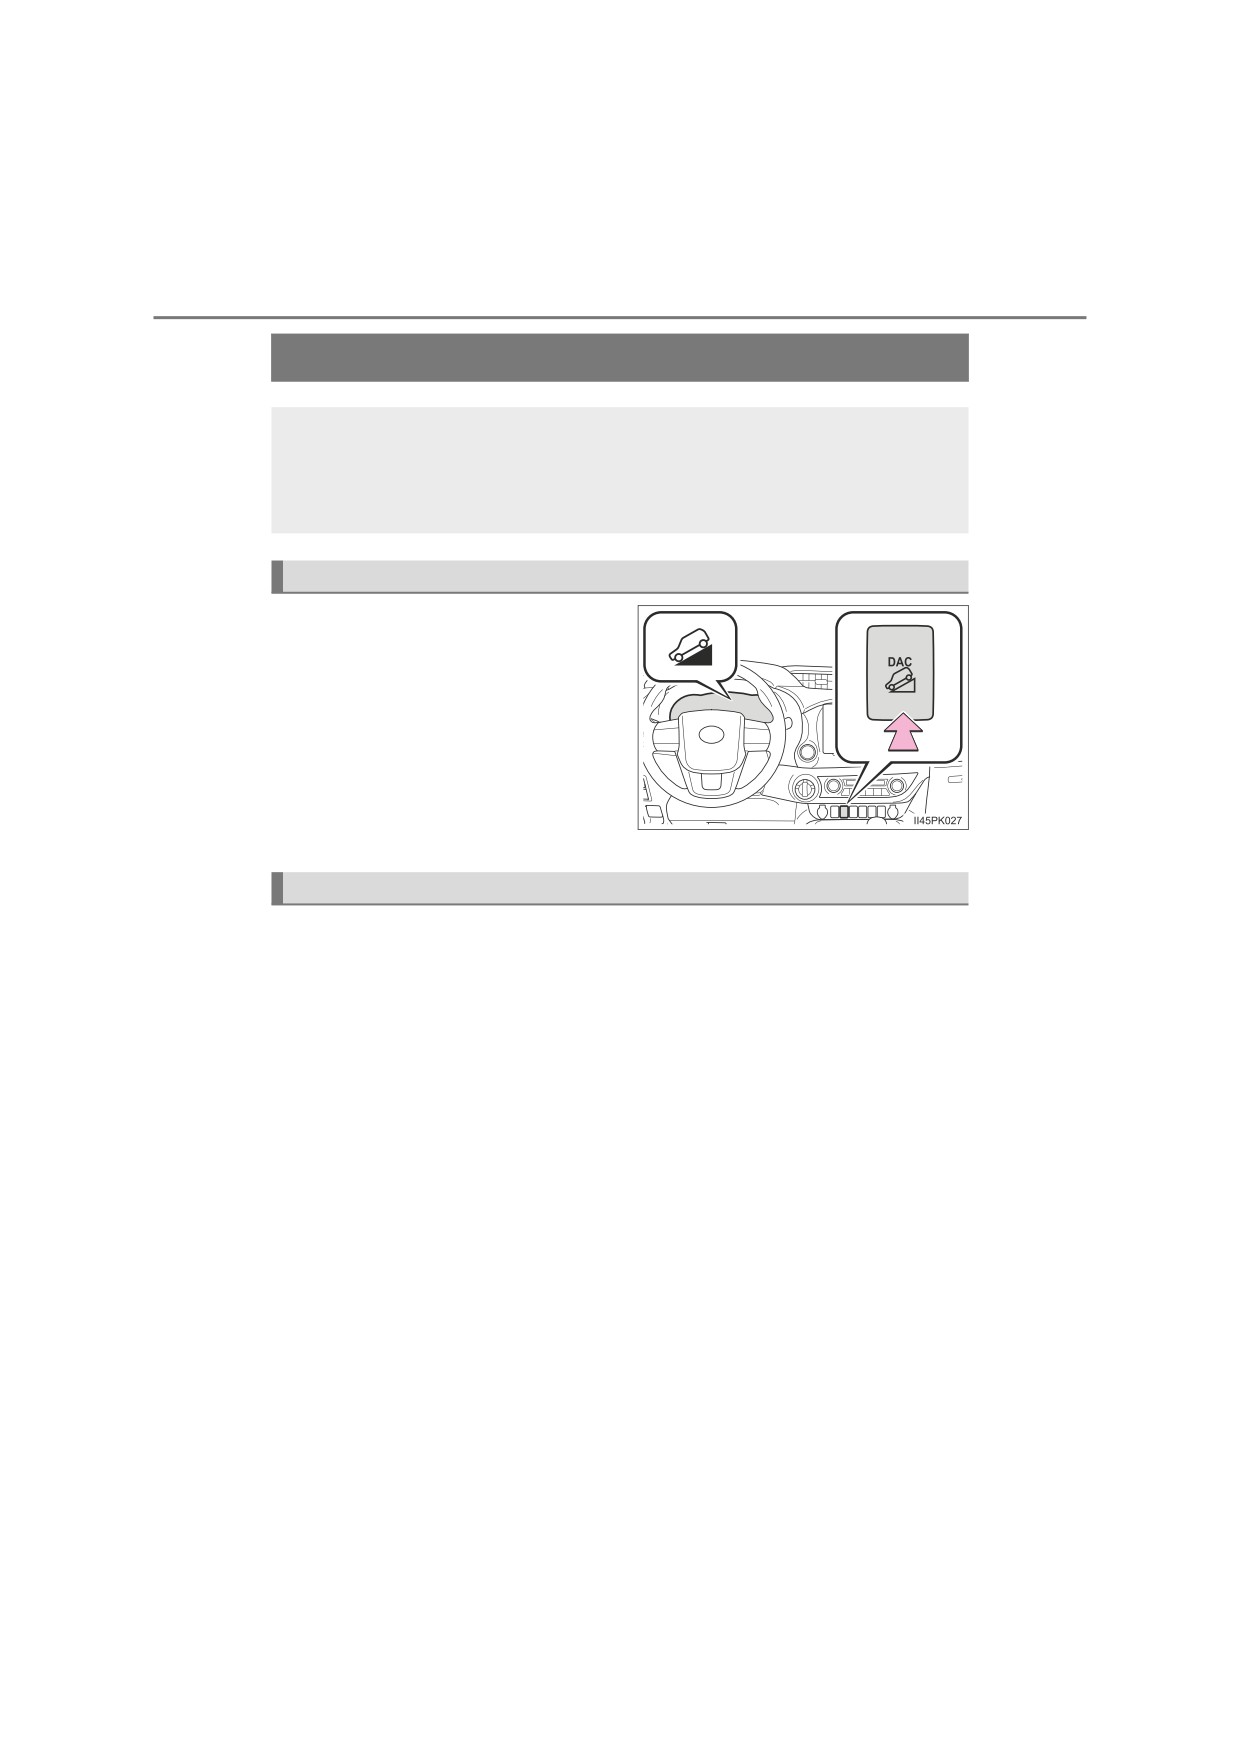
Press the
“DAC” switch. The
downhill assist control system
indicator will come on and the sys-
tem will operate.
When the system is in operation,
the slip indicator will flash, and the
stop lights/high mounted stop lights
will be lit. A sound may also occur
during the operation. This does not
indicated a malfunction.
Turning off the system
Press the “DAC” switch while the system is in operation. The downhill
assist control system indicator will flash as the system gradually
ceases operation, and will turn off when the system is fully off.
Press the “DAC” switch while the downhill assist control system indi-
cator is flashing to start the system again.
: If equipped
4-5. Using the driving support systems
363
■ Operating tips (vehicles with automatic transmission)
The system will operate when the shift lever is in a position other than P, how-
ever to make effective use of the system it is recommended to select a lower
shift range.
■ The system will not operate when
● The transfer mode is in H2.
● The rear differential is locked. (if equipped)
■ If the downhill assist control system indicator flashes
●In the following situations, the indicator flashes and the system will not oper-
ate:
• The transfer mode is not in L4 or H4.
• The rear differential is locked. (if equipped)
• The shift lever is in P. (vehicles with automatic transmission)
• The accelerator or brake pedal is depressed.
• The vehicle speed exceeds approximately 30 km/h (18 mph).
• The brake system overheats.
4
●In the following situations, the indicator flashes to alert the driver, but the
system will operate:
• The shift lever is in N. (vehicles with automatic transmission)
• The clutch pedal is depressed. (vehicles with manual transmission)
• The “DAC” switch is turned off while the system is operating.
The system will gradually ceases operation. The indicator will flash during
operation, and then go off when the system is fully off.
■ When the downhill assist control system is operated continuously
This may cause the brake actuator to overheat. In this case, the downhill
assist control system will stop operating, a buzzer will sound and the downhill
assist control system indicator will start flashing, and “TRC turned off” will be
shown on the multi-information display. Refrain from using the system until
the downhill assist control system indicator stays on and the message goes
off. (The vehicle can be driven normally during this time.)
■ Sounds and vibrations caused by the downhill assist control system
● A sound may be heard from the engine compartment when the engine is
started or just after the vehicle begins to move. This sound does not indicate
that a malfunction has occurred in downhill assist control system.
● Either of the following conditions may occur when the downhill assist control
system is operating. None of these are indicators that a malfunction has
occurred.
• Vibrations may be felt through the vehicle body and steering.
• A motor sound may be heard after the vehicle comes to a stop.
364
4-5. Using the driving support systems
■ System malfunction
In the following cases, have your vehicle checked by any authorized Toyota
retailer or Toyota authorized repairer, or any reliable repairer.
● The downhill assist control system indicator does not come on when the
engine switch is turned to the “ON” position (vehicles without smart entry &
start system) or IGNITION ON mode (vehicles with smart entry & start sys-
tem).
● The downhill assist control system indicator does not come on when the
“DAC” switch is pressed.
●The slip indicator comes on.
WARNING
■ When using downhill assist control system
●Do not rely overmuch on the downhill assist control system. This function
does not extend the vehicle’s performance limitations. Always thoroughly
check the road conditions, and drive safely.
● Vehicles with manual transmission: Drive in a low gear. Driving in a high
gear when using downhill assist control system may cause the engine to
stall, which may lose the brake effectiveness and lock the tires, resulting in
an accident.
● Vehicles with manual transmission: On a steep slope, use the engine brak-
ing efficiently. If the vehicle is driven in N or with the clutch pedal
depressed on a steep slope, the load on the brake increases and con-
trolling the vehicle speed may be impossible, resulting in an accident.
■ The system may not operate on the following surfaces, which may lead
to an accident causing death or serious injury
● Slippery surfaces such as wet or muddy roads
● Icy surface
●Unpaved roads
4-5. Using the driving support systems
365
AUTO LSD
The AUTO LSD system aids traction by using the traction con-
trol system to control engine performance and braking when
one of the drive wheels begins to spin. The system should be
used only when one of the drive wheels spinning occurs in a
ditch or rough surface.
System operation
The system can be used on Pre Runner and in 2WD mode on 4WD
models.
To turn the AUTO LSD system on,
quickly press and release
4
The “AUTO LSD” indicator light
and VSC OFF indicator light will
come on. Press
again to turn
the system off.
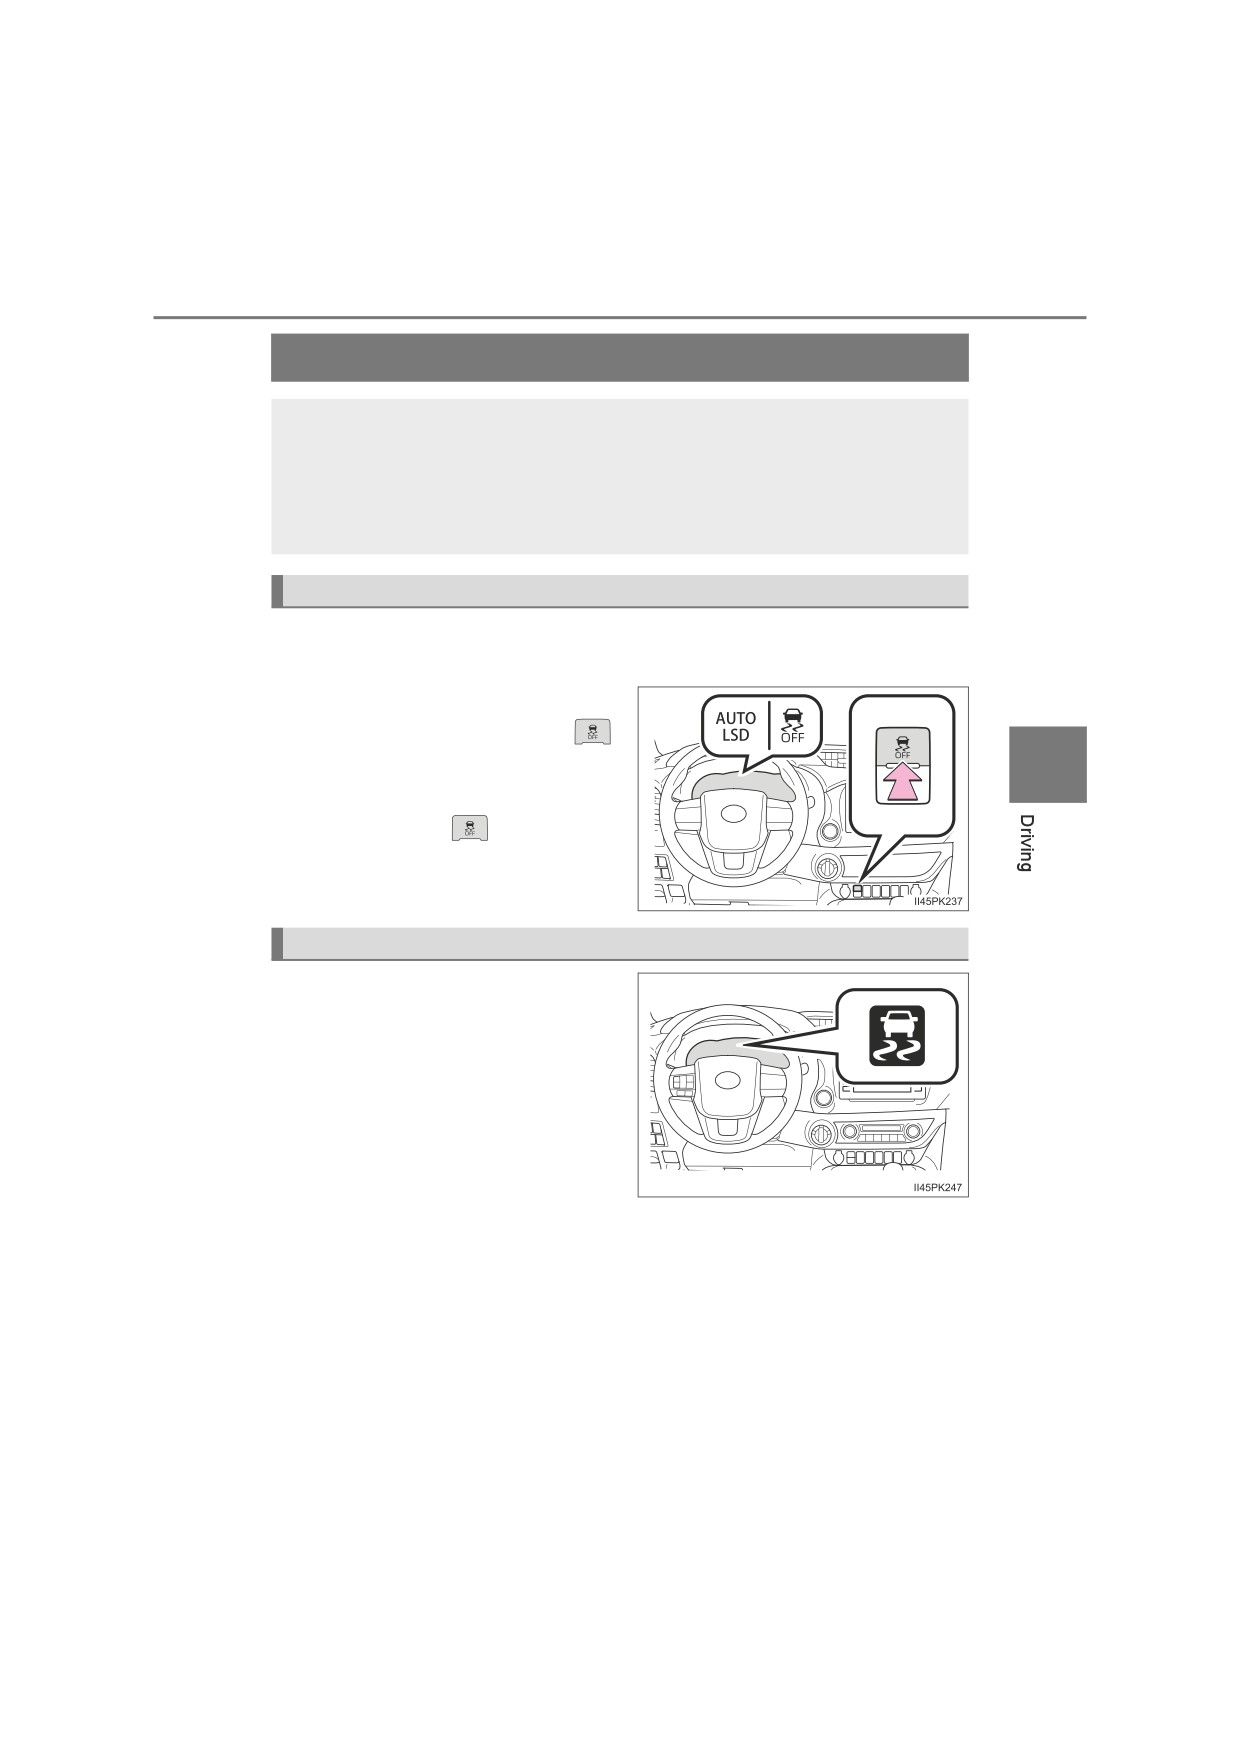
When the AUTO LSD system is operating
If the drive wheels spin, the slip
indicator flashes to indicate that
the AUTO LSD system has con-
trolled the spinning of the drive
wheels.
: If equipped
366
4-5. Using the driving support systems
■ If the engine is turned off and restarted
The AUTO LSD system and the indicators are automatically turned off.
■ Reactivation of the VSC system linked to vehicle speed
When the AUTO LSD system is turned on, the VSC and TRC systems will
turn on automatically if vehicle speed increase.
■ If the brake system overheats
The system will cease operation and a buzzer will alert the driver. At this time,
the “AUTO LSD” indicator will flash and “TRC turned off” will be shown on the
multi-information display. Stop the vehicle in a safe place. (There is no prob-
lem with continuing normal driving.) The system will be automatically restored
after a short time.
WARNING
■ To avoid an accident
Failure to do so, a much greater steering effort and more careful cornering
control will be required.
●Do not use the AUTO LSD system in conditions other than when one of
the drive wheels spinning occurs in a ditch or rough surface.
●Do not drive with the AUTO LSD system continuously turned on.
NOTICE
■ Activating while driving
Do not activate the AUTO LSD system if the wheel is slipping. Stop the slip-
ping or spinning before activating.