Citroen C4 (2023 year). Manual in english - page 7
4-3. Operating the lights and wipers
247
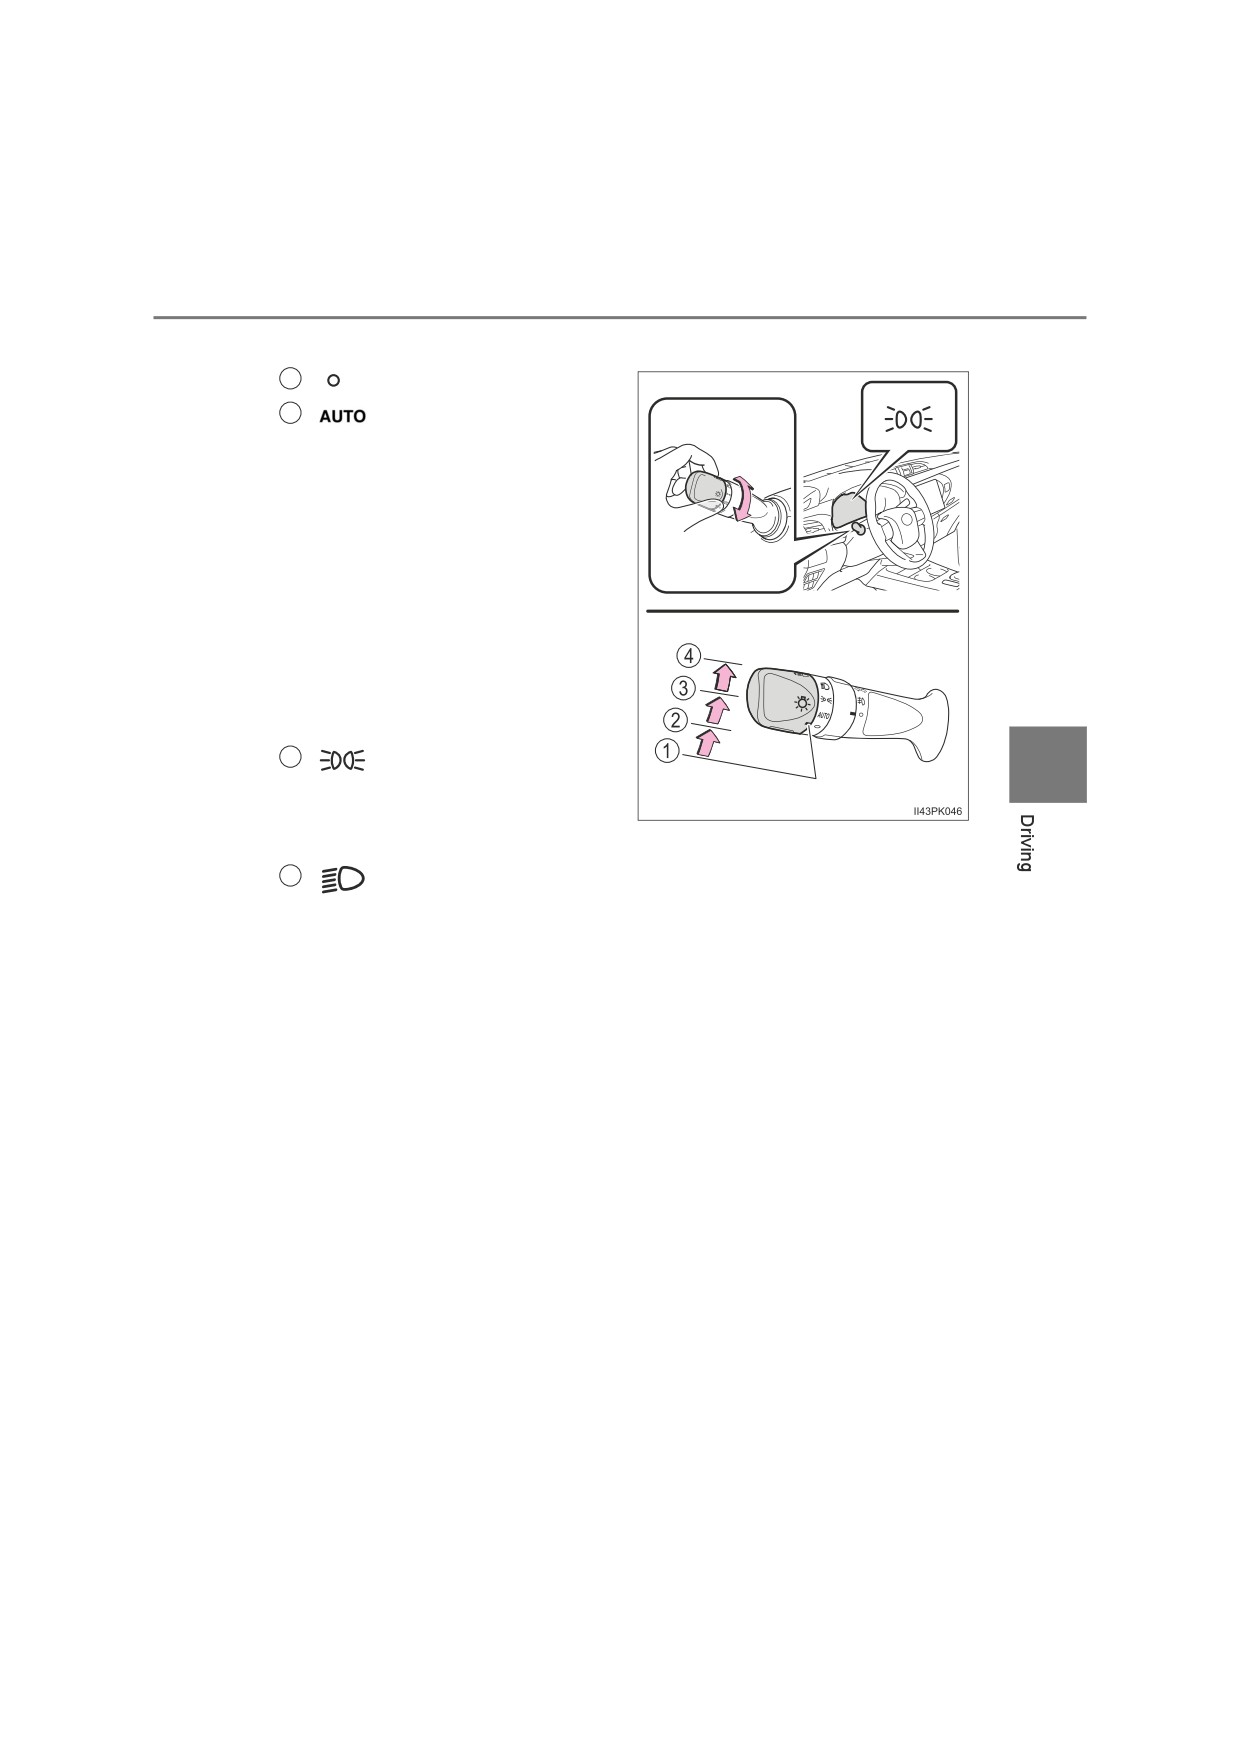
Type B
1
Off.
2
The headlights, front
(if equipped)
position, tail, license
plate and instrument
panel lights turn on and
off automatically
(when
the engine switch is in
the “ON” position [vehi-
cles without smart entry
& start system] or IGNI-
TION ON mode [vehi-
cles with smart entry &
start system]).
3
The front position, tail,
4
license plate and instru-
ment panel lights turn
on.
4
The headlights and all lights listed above turn on.
248
4-3. Operating the lights and wipers
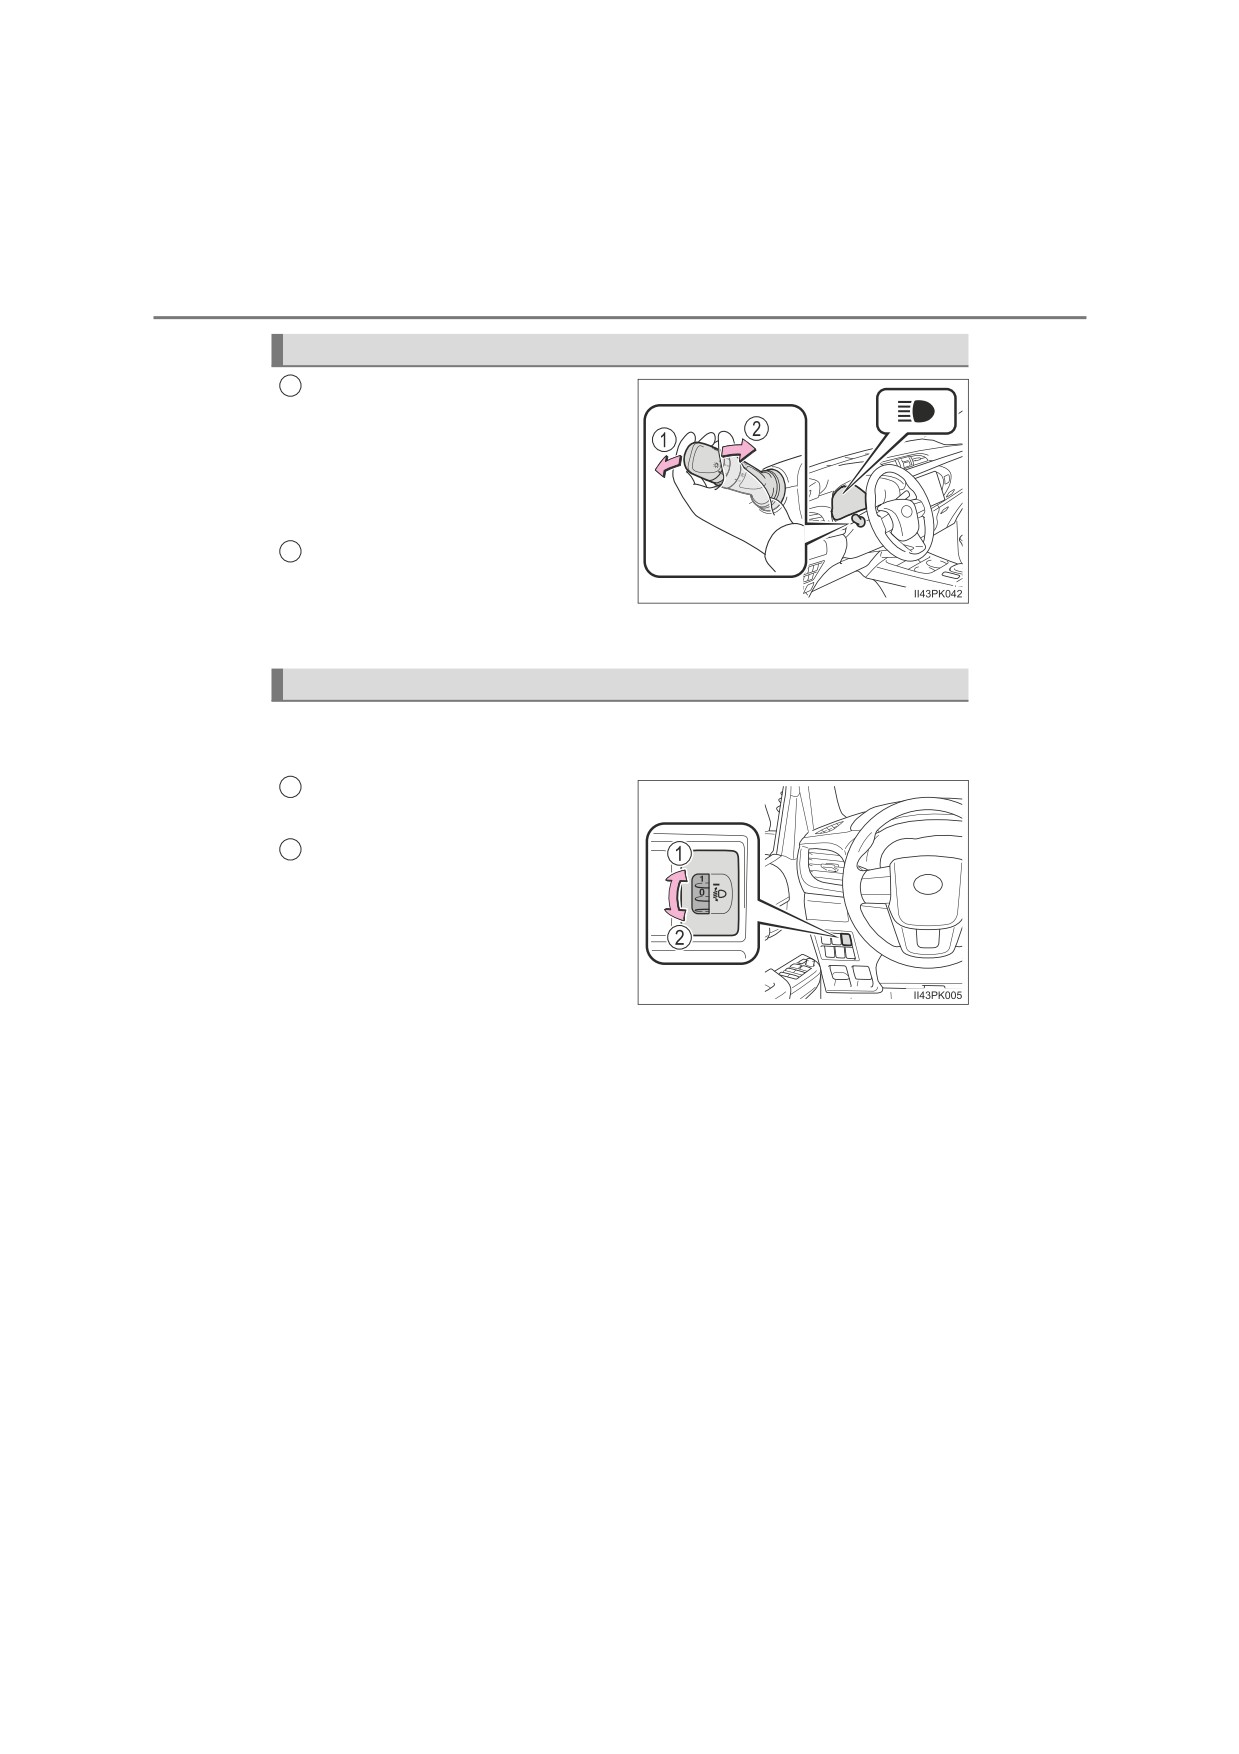
Turning on the high beam headlights
With the headlights on, push
1
the lever away from you to turn
on the high beams.
Pull the lever toward you to the
center position to turn the high
beams off.
Pull the lever toward you and
2
release it to flash the high
beams once.
You can flash the high beams with the headlights on or off.
Manual headlight leveling dial (if equipped)
The level of the headlights can be adjusted according to the number
of passengers and the loading condition of the vehicle.
Raises the level of the head-
1
lights
2
Lowers the level of
the head-
lights
4-3. Operating the lights and wipers
249
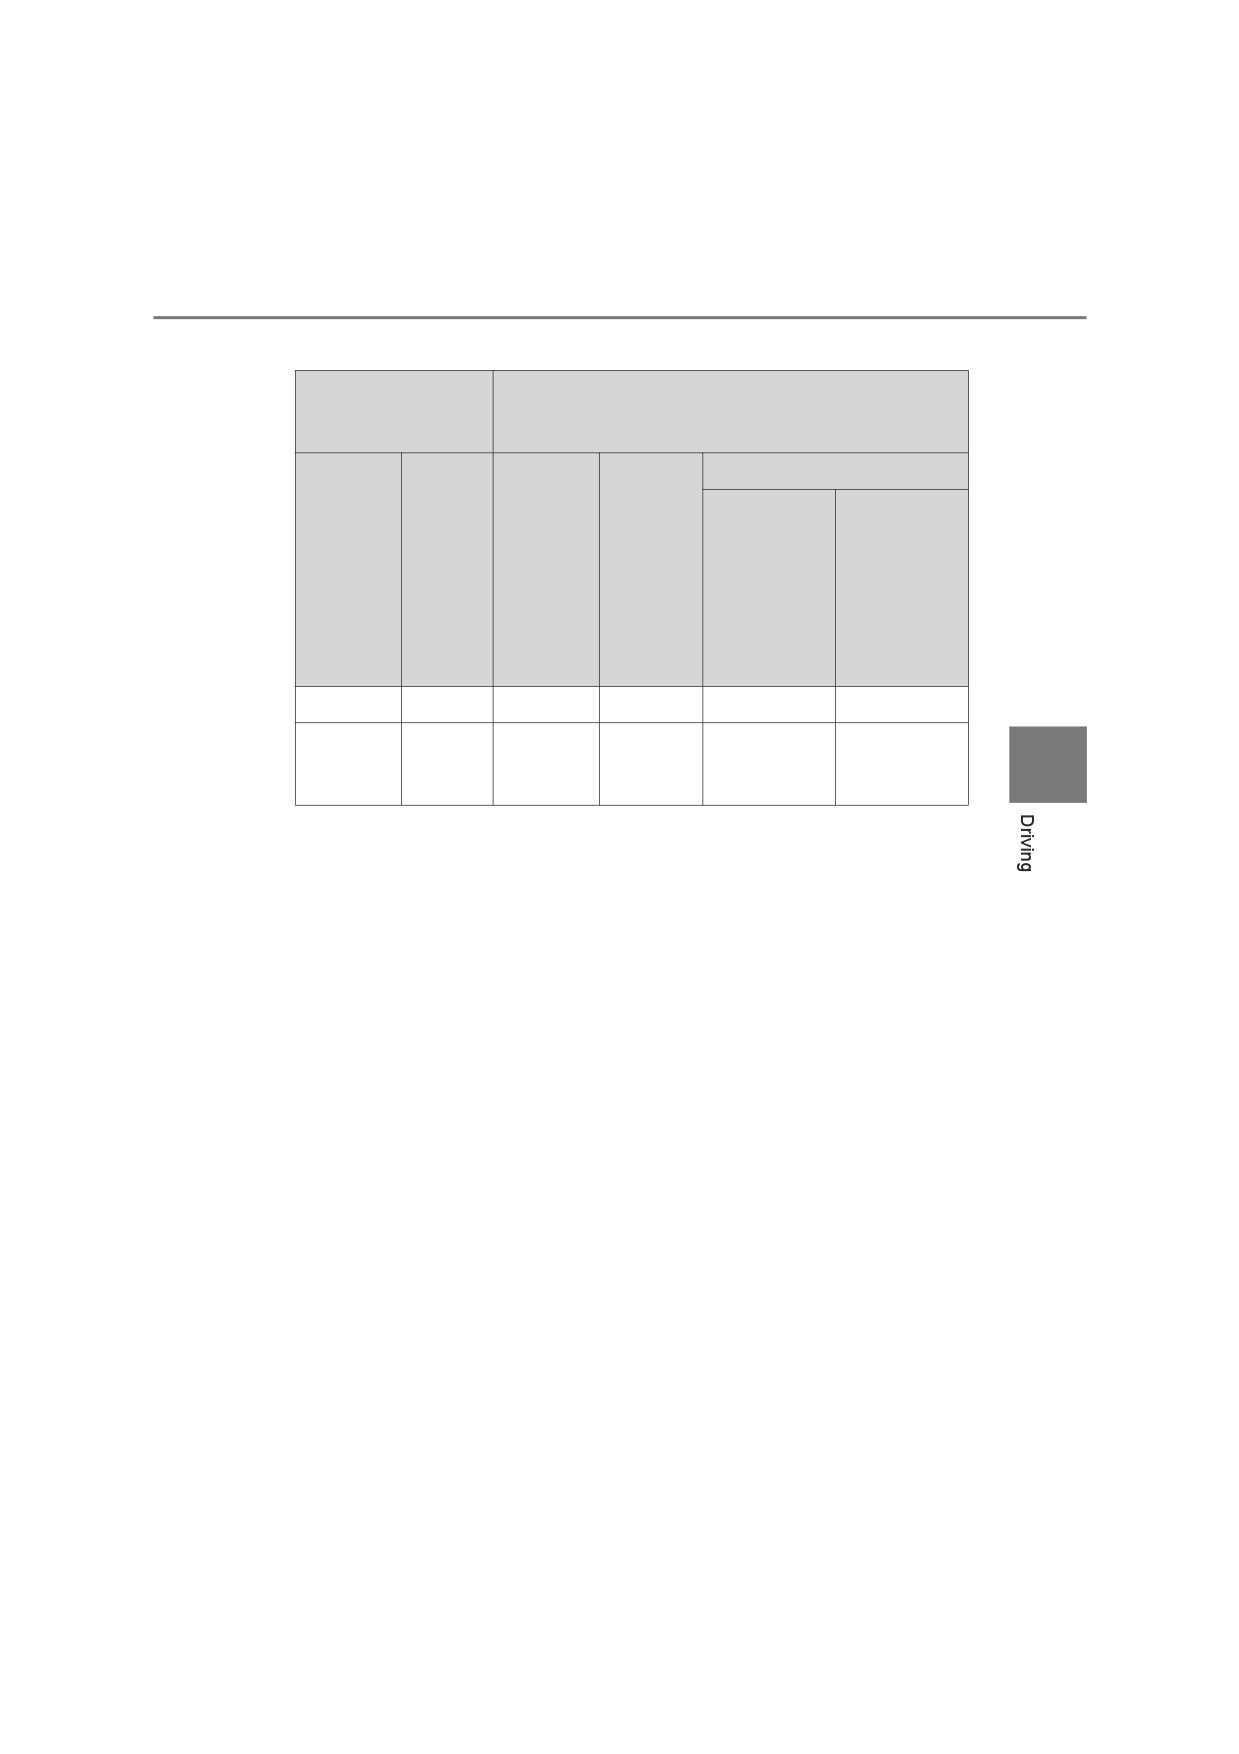
■ Guide to dial settings
Occupancy and
luggage load
Dial position
conditions
Double-cab models
Except for
For Russia,
Russia,
Byelarus,
Luggage
Single-cab
Smart-cab
Byelarus,
Occupants
Kazakhstan,
load
models
models
Kazakhstan,
Kyrgyzstan,
Kyrgyzstan,
Armenia,
Armenia,
Ukraine and
Ukraine and
Moldova
Moldova
Driver
None
0
0
0
0
Full
2.5*1
2*1
2.5*3
*2, 6
4
Driver
luggage
3
2.5
2.5*2
3*4
loading
3.5*2, 7
*1: Halogen headlights type A (P. 523)
*2: Halogen headlights type B (P. 523)
*3: Vehicles with Heavy Duty Suspension*5
*4: Vehicles without Heavy Duty Suspension*5
*5: Contact any authorized Toyota retailer or Toyota authorized repairer, or any
reliable repairer, if you are not sure of which specifications your vehicle is
equipped with.
*6: Except for GUN135L-DTTSXW models*8 without Heavy Duty Suspen-
sion*5
*7: For GUN135L-DTTSXW models*8 without Heavy Duty Suspension*5
*8: The model code is indicated on the manufacturer’ plate or label. (P. 622)
250
4-3. Operating the lights and wipers
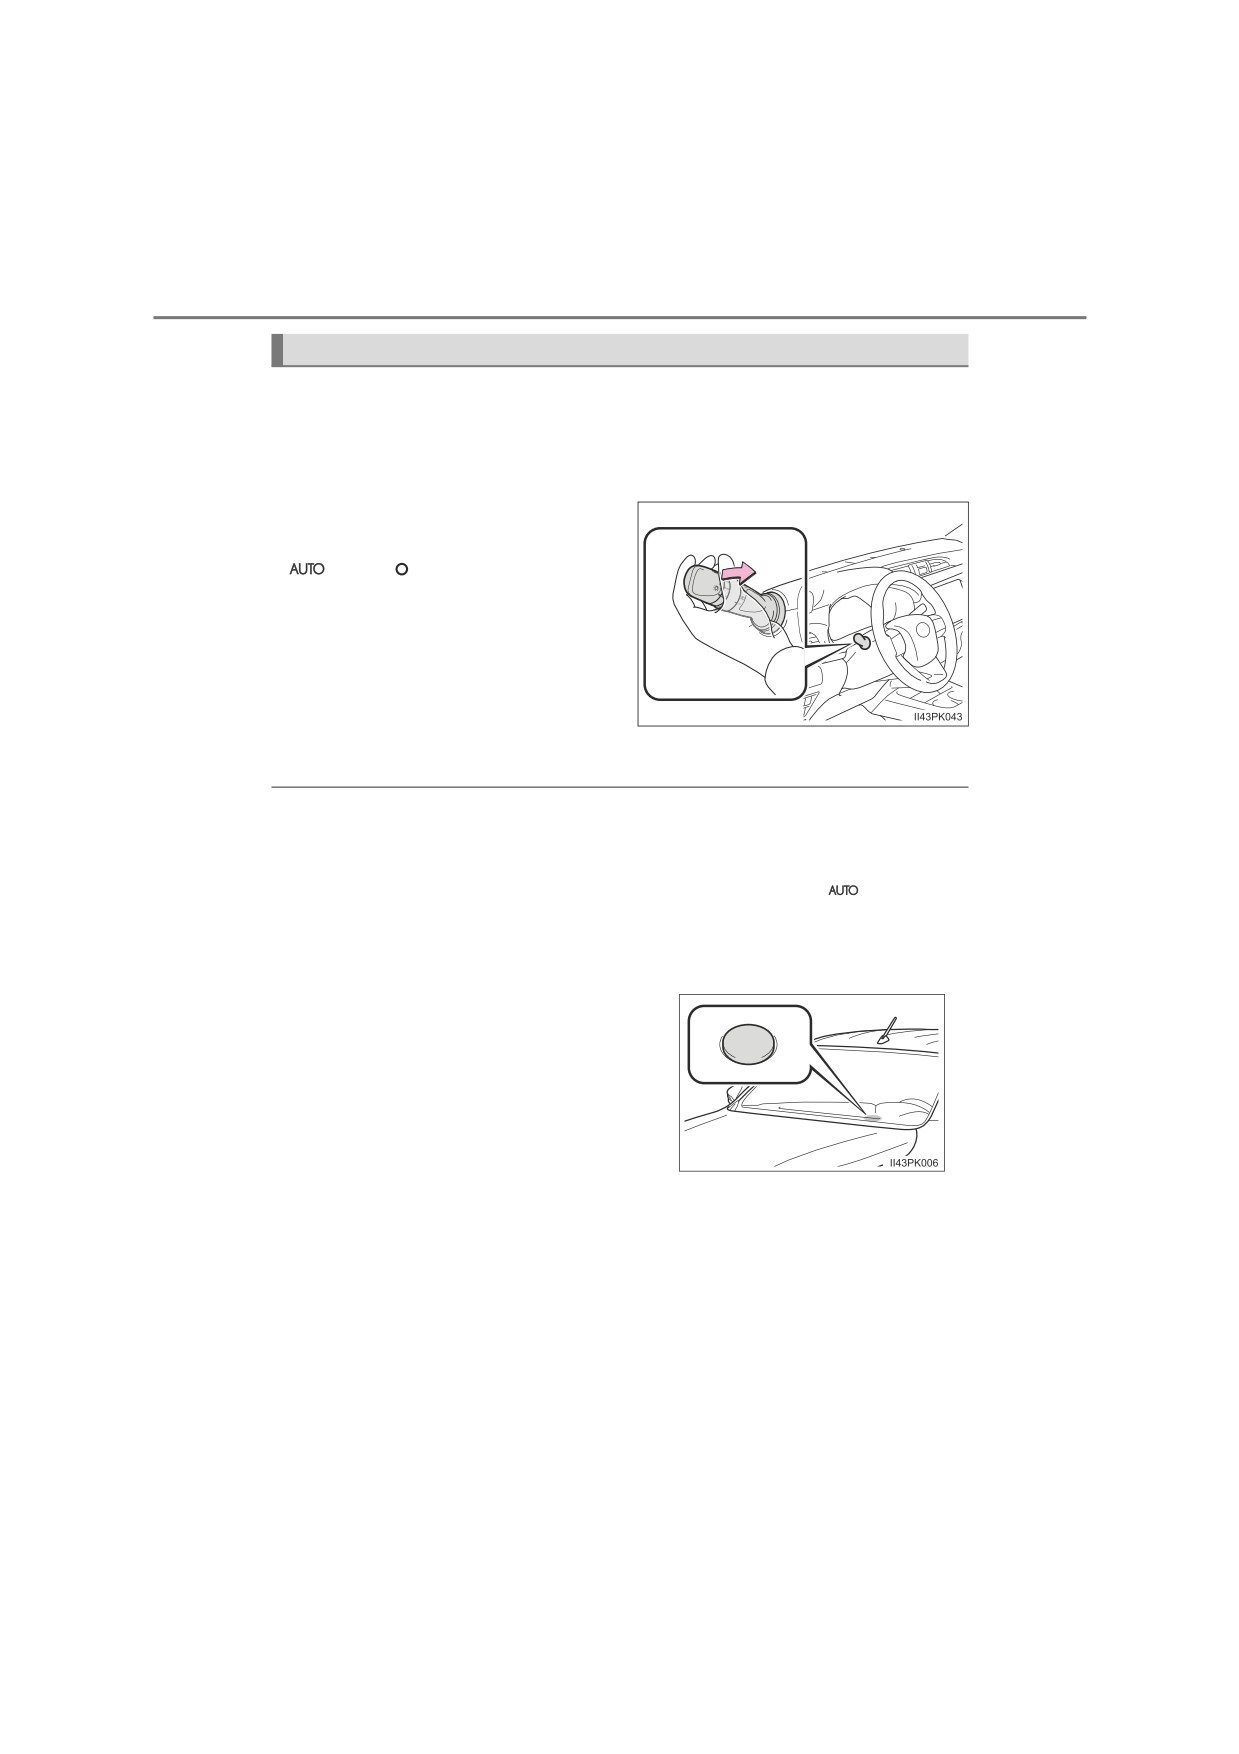
Extended Headlight Lighting system (if equipped)
This system allows the headlights and front position lights to be turned
on for 30 seconds when the engine switch is turned to the “LOCK”
position (vehicles without smart entry & start system) or off (vehicles
with smart entry & start system).
Pull the lever toward you and
release it with the light switch is in
or
after turning the
engine switch to the “LOCK” posi-
tion (vehicles without smart entry
& start system) or off
(vehicles
with smart entry & start system).
Pull the lever toward you and
release it again to turn off the
lights.
■ Daytime running light system (if equipped)
To make your vehicle more visible to other drivers during daytime driving, the
daytime running lights turn on automatically whenever the engine is started
and the parking brake is released with the headlight switch in
. (Illuminate
brighter than the front position lights.) The daytime running light system is not
designed for use at night.
■ Headlight control sensor (if equipped)
The sensor may not function properly if an
object is placed on the sensor, or anything
that blocks the sensor is affixed to the
windshield.
Doing so interferes with the sensor
detecting the level of ambient light and
may cause the automatic headlight sys-
tem to malfunction.
4-3. Operating the lights and wipers
251
■ Automatic light off system (if equipped)
Models for model code destination Blank* (except for Kazakhstan, Kyrgyz-
stan and Russia)
The lights turn off after the engine switch is turned to the “LOCK” position
(vehicles without smart entry & start system) or off (vehicles with smart entry
& start system) and the driver’s door is opened.
To turn the lights on again, turn the engine switch to the “ON” position (vehi-
cles without smart entry & start system) or to IGNITION ON mode (vehicles
with smart entry & start system), or turn the light switch to
or
once
and then back to
or
Models for model code destination Blank (for Kazakhstan, Kyrgyzstan and
Russia) and W*
When the light switch is in
or
:
The headlights and front fog lights turn off after the engine switch is turned to
the “LOCK” position (vehicles without smart entry & start system) or off (vehi-
cles with smart entry & start system).
4
When the light switch is in AUTO:
The lights turn off after the engine switch is turned to the “LOCK” position
(vehicles without smart entry & start system) or off (vehicles with smart entry
& start system).
To turn the lights on again, turn the engine switch to the “ON” position (vehi-
cles without smart entry & start system) or to IGNITION ON mode (vehicles
with smart entry & start system), or turn the light switch to
or
once
and then back to
or
*: See “Checking your vehicle’s model” if you are not sure of which model
your vehicle is. (P. 12)
■ Light reminder buzzer (if equipped)
Vehicles without smart entry & start system
A buzzer sounds when the engine switch is turned to the “LOCK” position, the
key is removed and the driver’s door is opened while the lights are turned on.
Vehicles with smart entry & start system
A buzzer sounds when the engine switch is turned off and the driver’s door is
opened while the lights are turned on.
252
4-3. Operating the lights and wipers
■ Battery-saving function
Models for model code destination Blank* (except for Kazakhstan, Kyrgyz-
stan and Russia)
In order to prevent the battery of the vehicle from discharging, if the head-
lights and/or tail lights are on when the engine switch is turned to the “LOCK”
position (vehicles without smart entry & start system) or off (vehicles with
smart entry & start system), the battery-saving function will operate and auto-
matically turn off all the lights after approximately 20 minutes.
Models for model code destination Blank (for Kazakhstan, Kyrgyzstan and
Russia) and W*
In order to prevent the battery of the vehicle from discharging, if the light
switch is in
or
position when the engine switch is turned to the
“LOCK” position (vehicles without smart entry & start system) or off (vehicles
with smart entry & start system), the battery-saving function will operate and
automatically turn off all the lights after approximately 20 minutes.
When any of the following are performed, the battery-saving function is can-
celed once and then reactivated. All the lights will turn off automatically 20
minutes after the battery-saving function has been reactivated:
● When the headlight switch is operated
● When a door is closed once and then opened
*: See “Checking your vehicle’s model” if you are not sure of which model
your vehicle is. (P. 12)
■ Automatic headlight leveling system (if equipped)
The level of the headlights is automatically adjusted according to the number
of passengers and the loading condition of the vehicle to ensure that the
headlights do not interfere with other road users.
■ Customization
Settings (e.g. light sensor sensitivity) can be changed.
(Customizable features: P. 644)
NOTICE
■ To prevent battery discharge
Do not leave the lights on longer than necessary when the engine is not
running.
4-3. Operating the lights and wipers
253
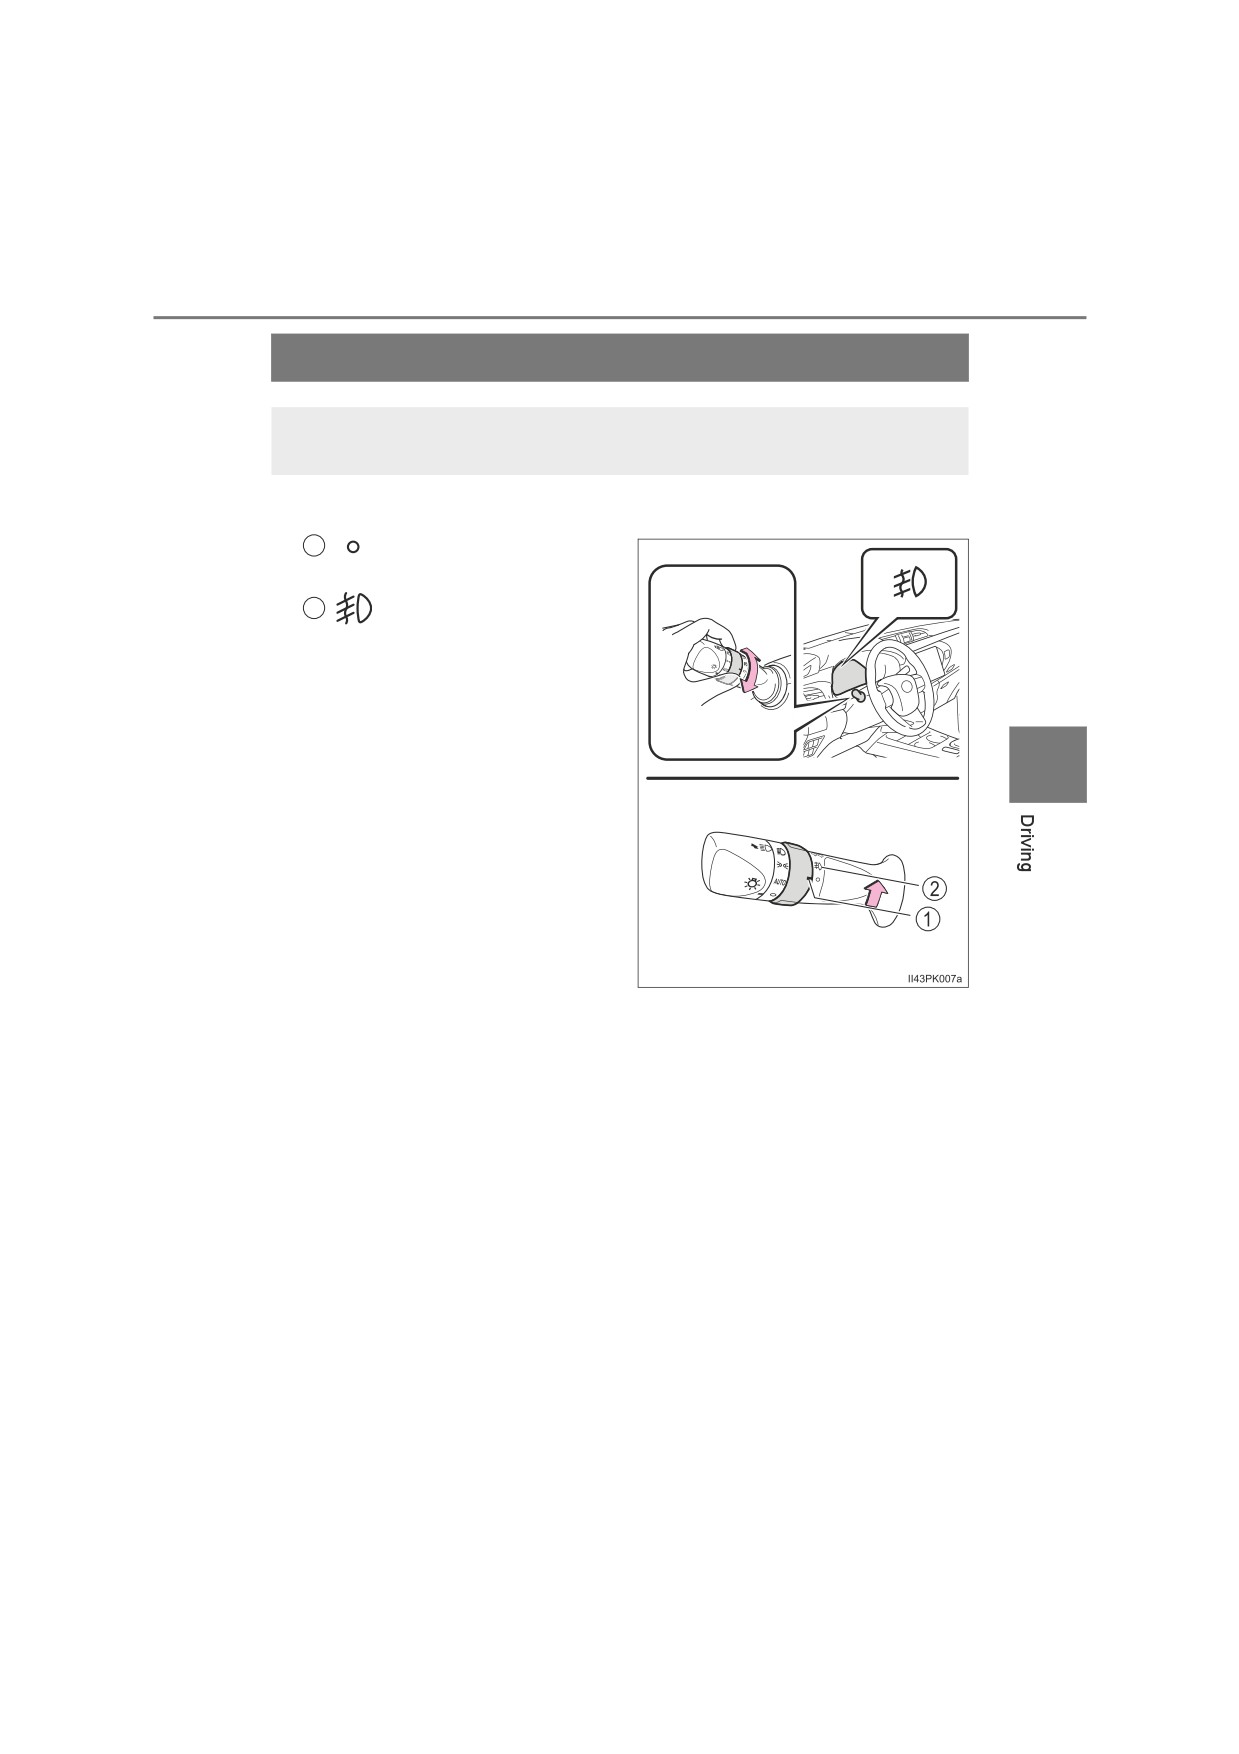
Fog light switch
The fog lights secure excellent visibility in difficult driving con-
ditions, such as in rain and fog.
■ Front fog light switch (if equipped)
1
Turns the front fog lights
off
2
Turns the front fog lights
on
4
: If equipped
254
4-3. Operating the lights and wipers
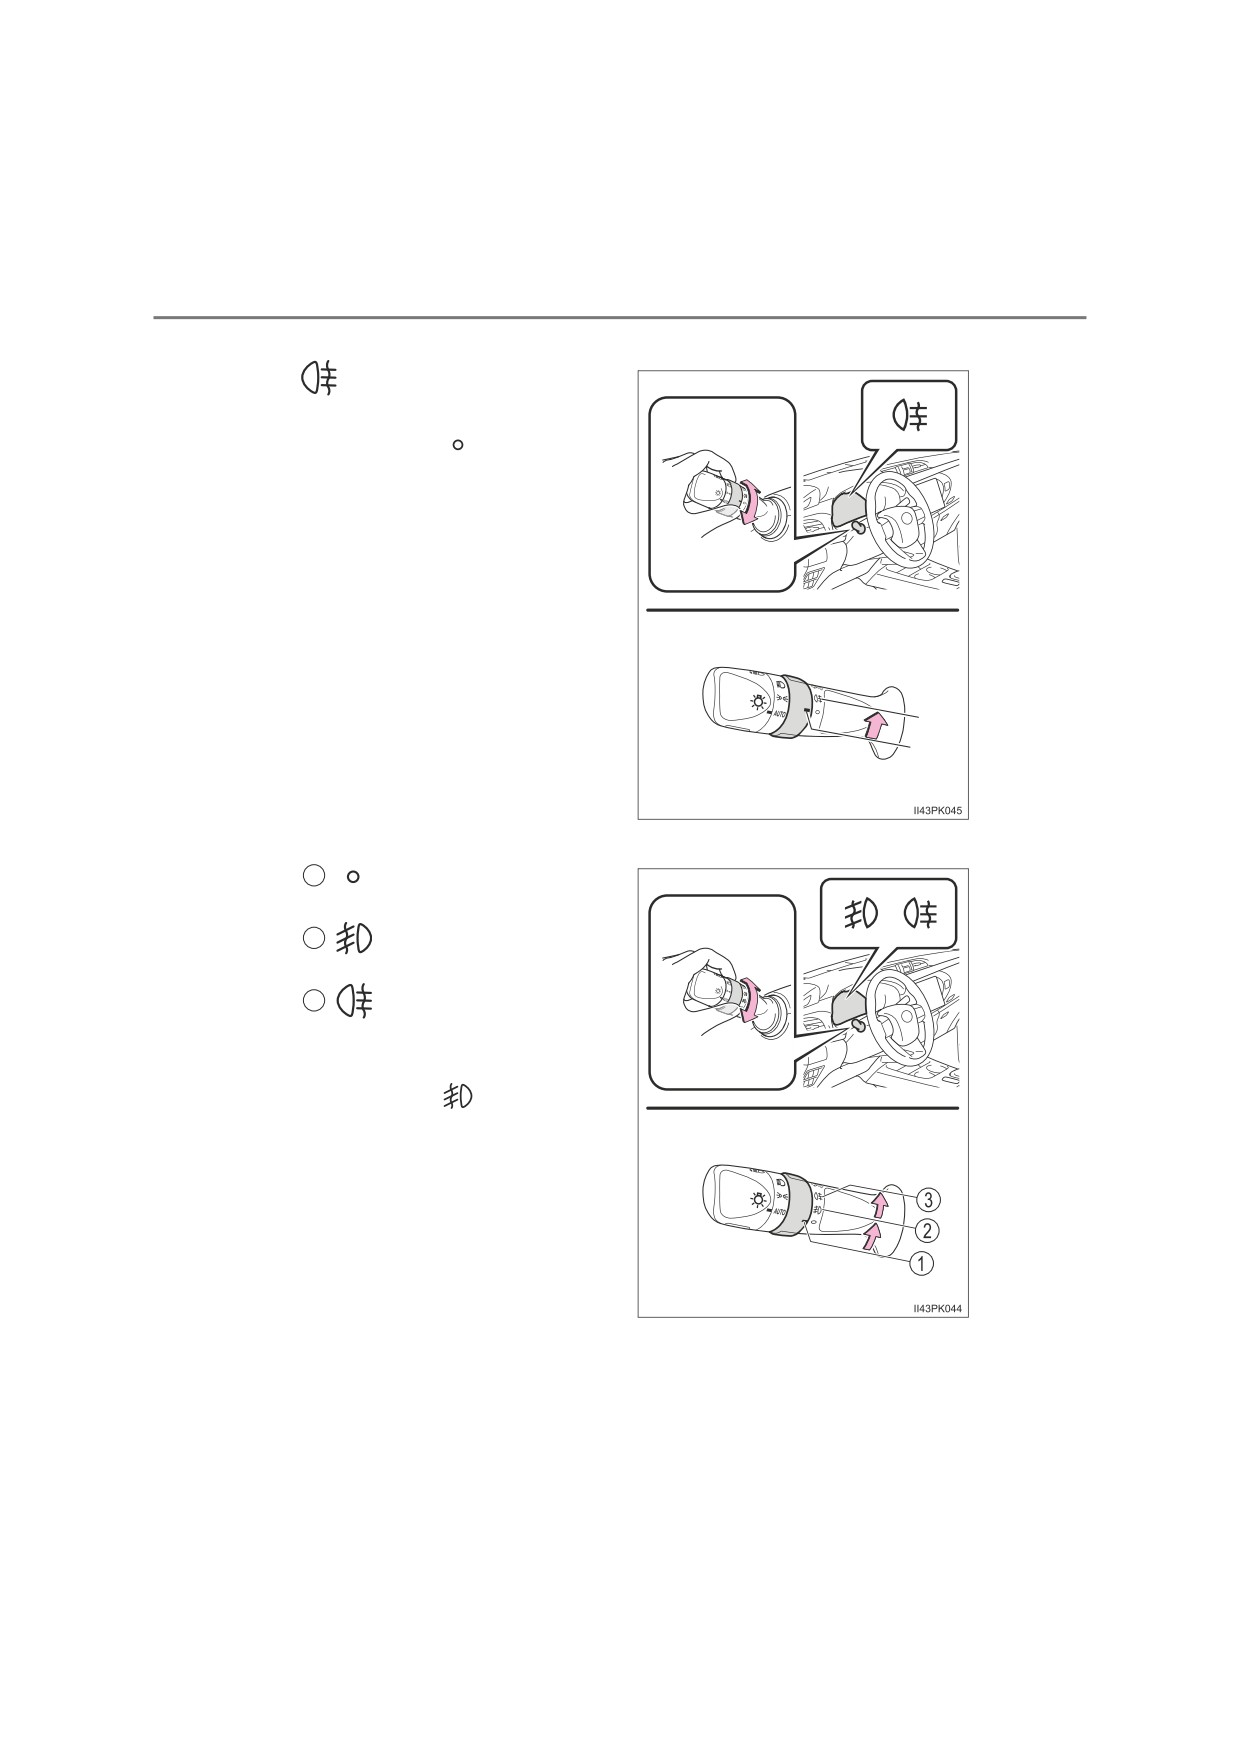
■ Rear fog light switch (if equipped)
Turns the rear fog light on
Releasing the switch ring
returns it to
Operating the switch ring again
turns the rear fog light off.
■ Front and rear fog light switch (if equipped)
1
Turns the front and rear
fog lights off
2
Turns the front fog lights
on
3
Turns both front and
rear fog lights on
Releasing the switch ring
returns it to
Operating the switch ring again
turns only the rear fog light off.
4-3. Operating the lights and wipers
255
■ Fog lights can be used when
Vehicles with front and rear fog lights
Front fog lights: The headlights or front position lights are turned on.
Rear fog light: The front fog lights are turned on.
Vehicles with rear fog light only
The headlights are turned on.
4
256
4-3. Operating the lights and wipers
Windshield wipers and washer
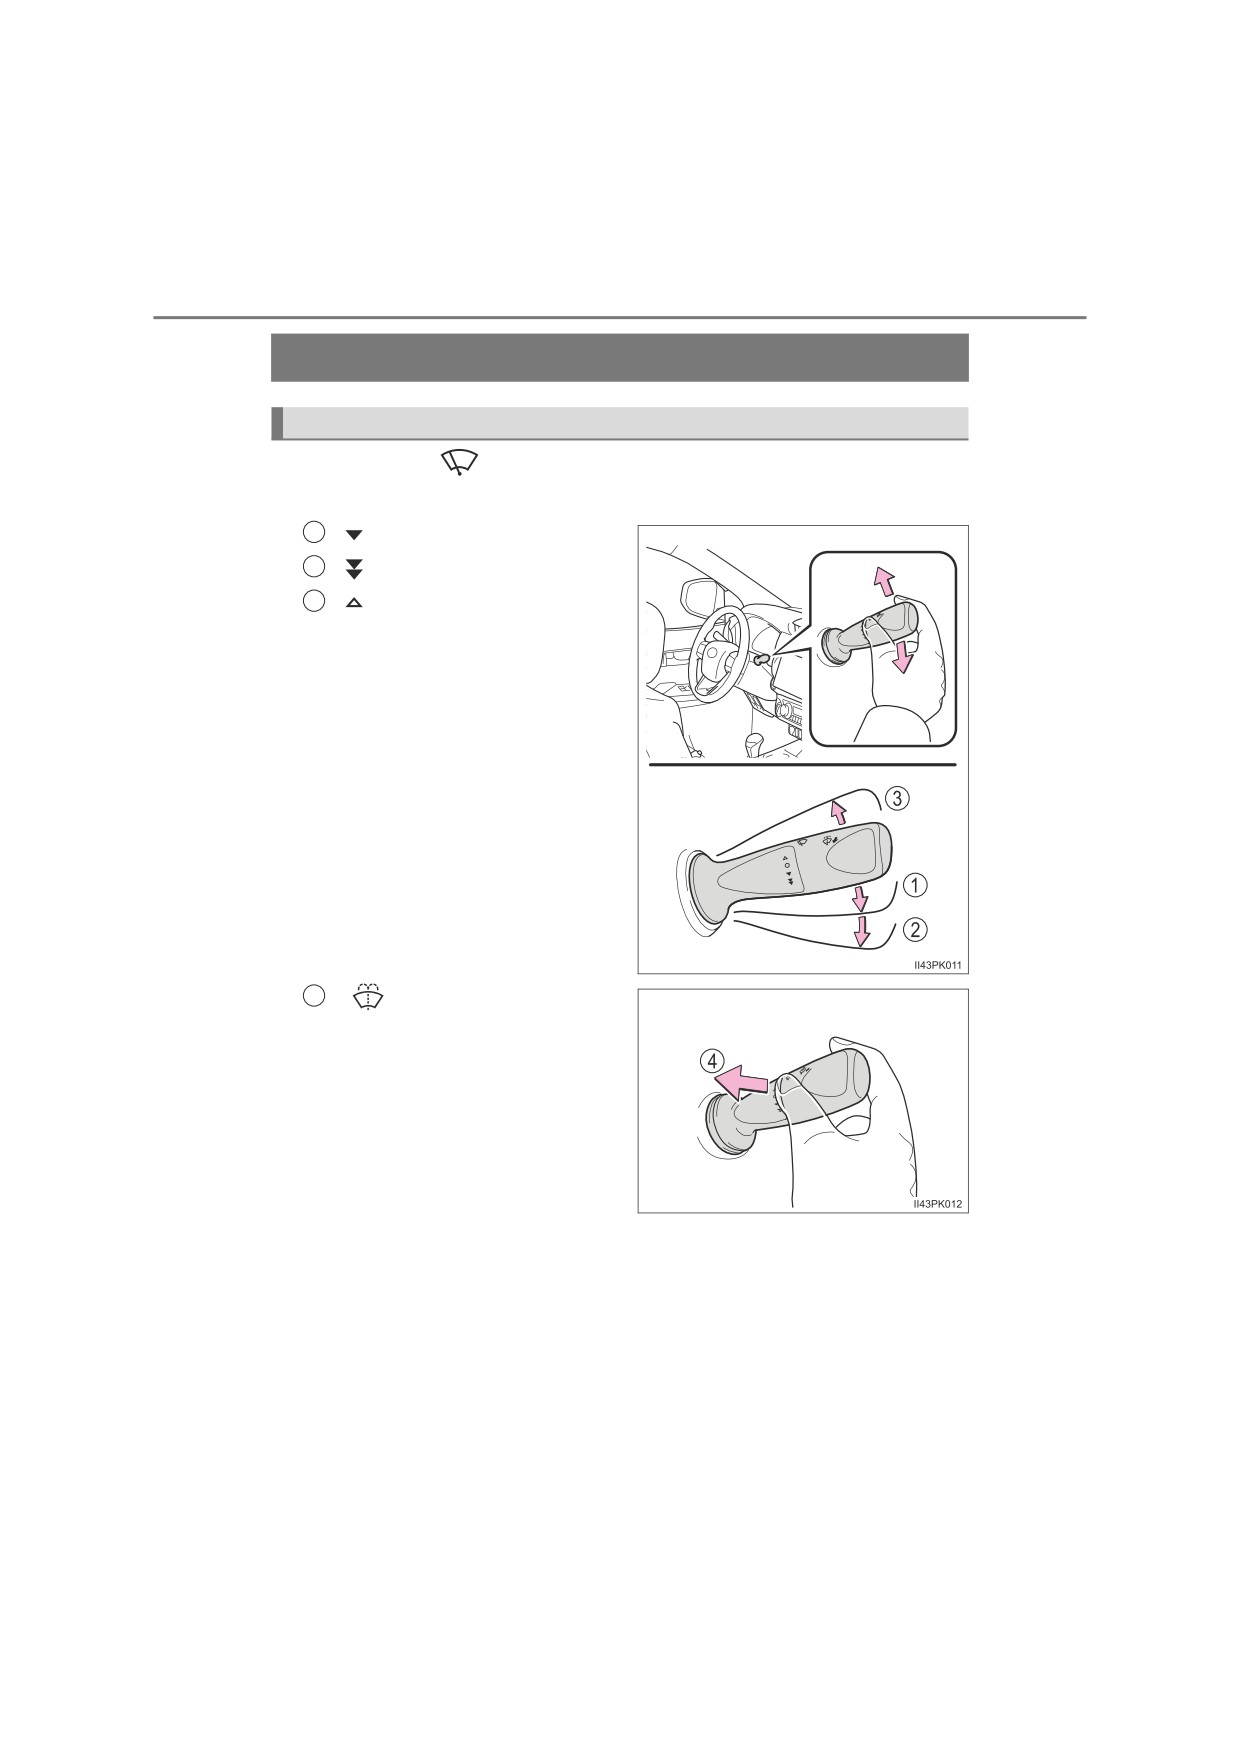
Operating the wiper lever
Operating the
lever operates the wipers or washer as follows.
■ Windshield wipers without intermittent operation
1
Low speed operation
2
High speed operation
3
Temporary operation
4
Washer operation
Pulling the lever operates the
washer.
4-3. Operating the lights and wipers
257
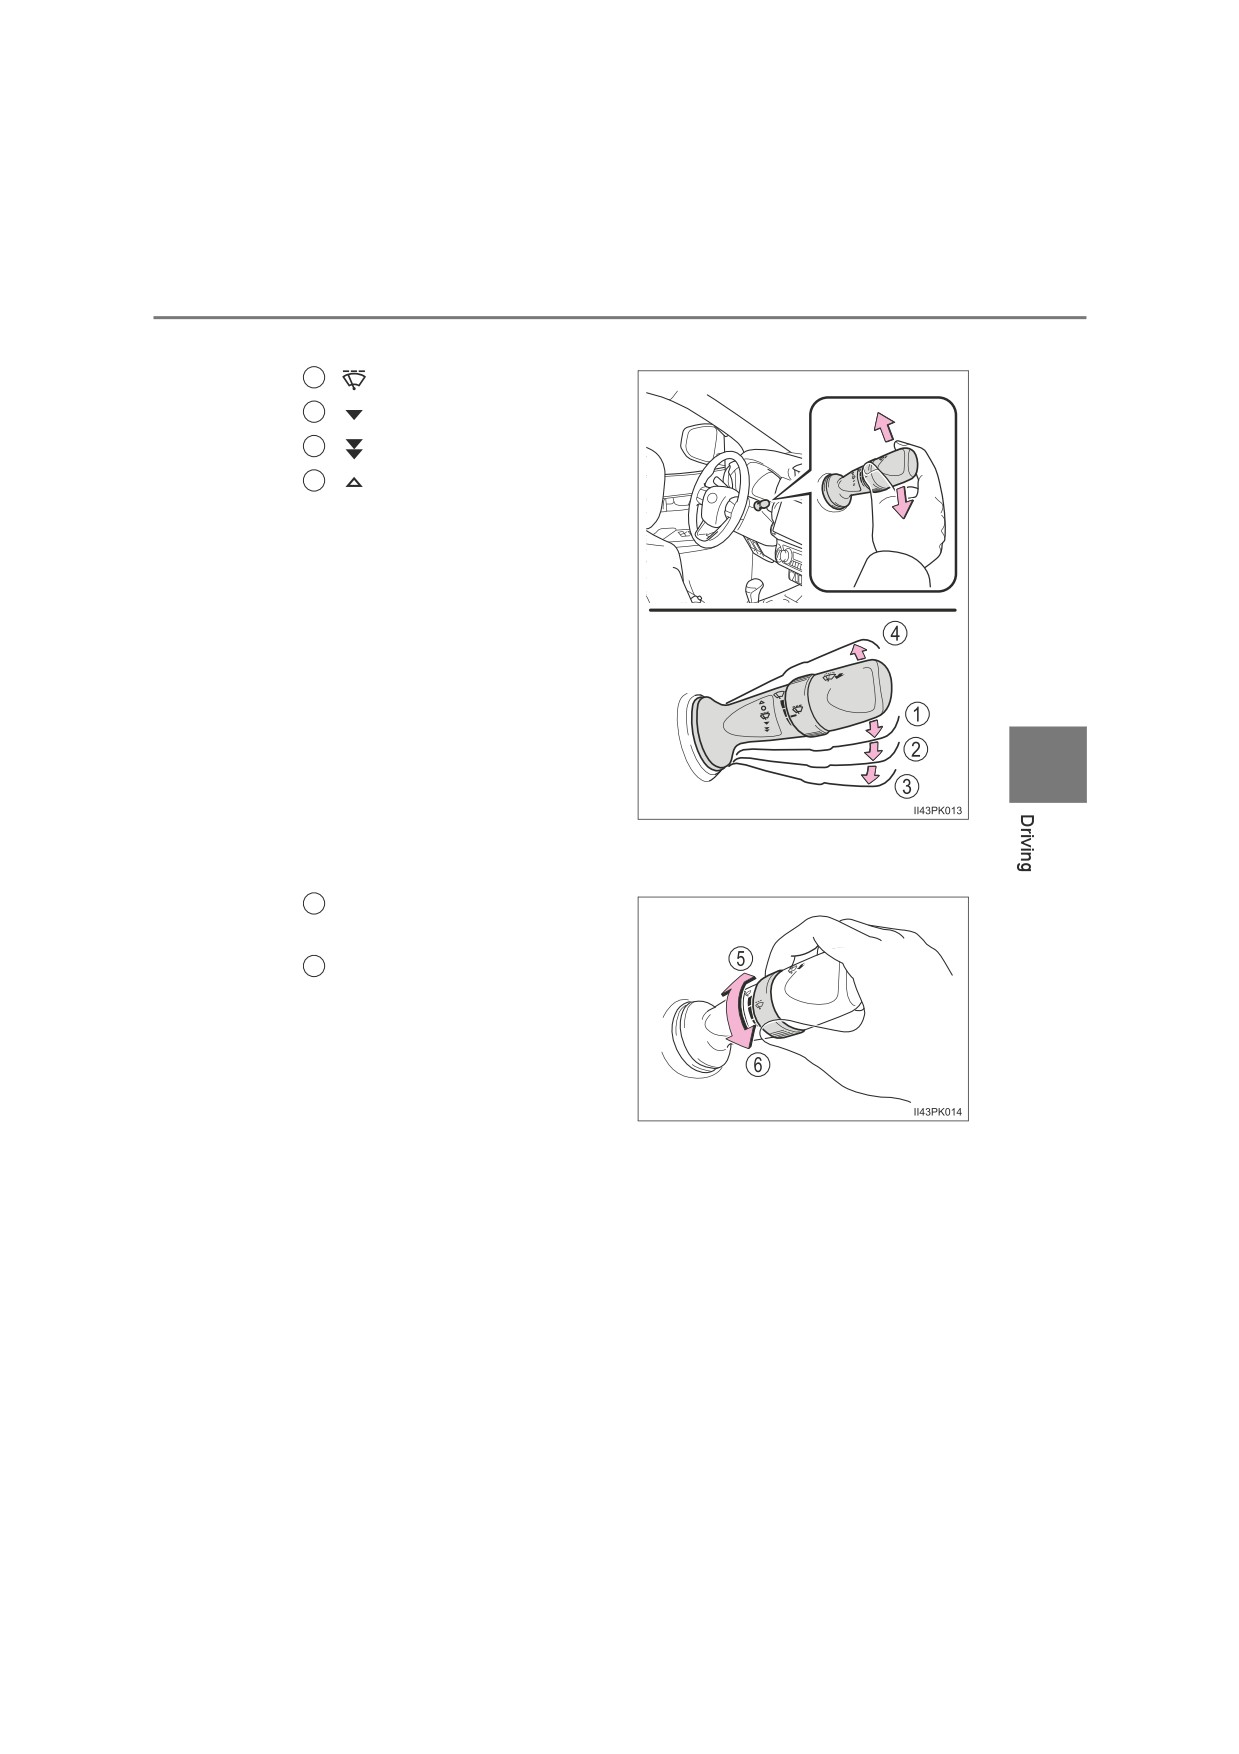
■ Windshield wipers with intermittent operation
1
Intermittent operation
2
Low speed operation
3
High speed operation
4
Temporary operation
4
If equipped, wiper intervals can be adjusted when intermittent oper-
ation is selected.
Increases the intermittent
5
windshield wiper frequency
Decreases the intermittent
6
windshield wiper frequency
258
4-3. Operating the lights and wipers
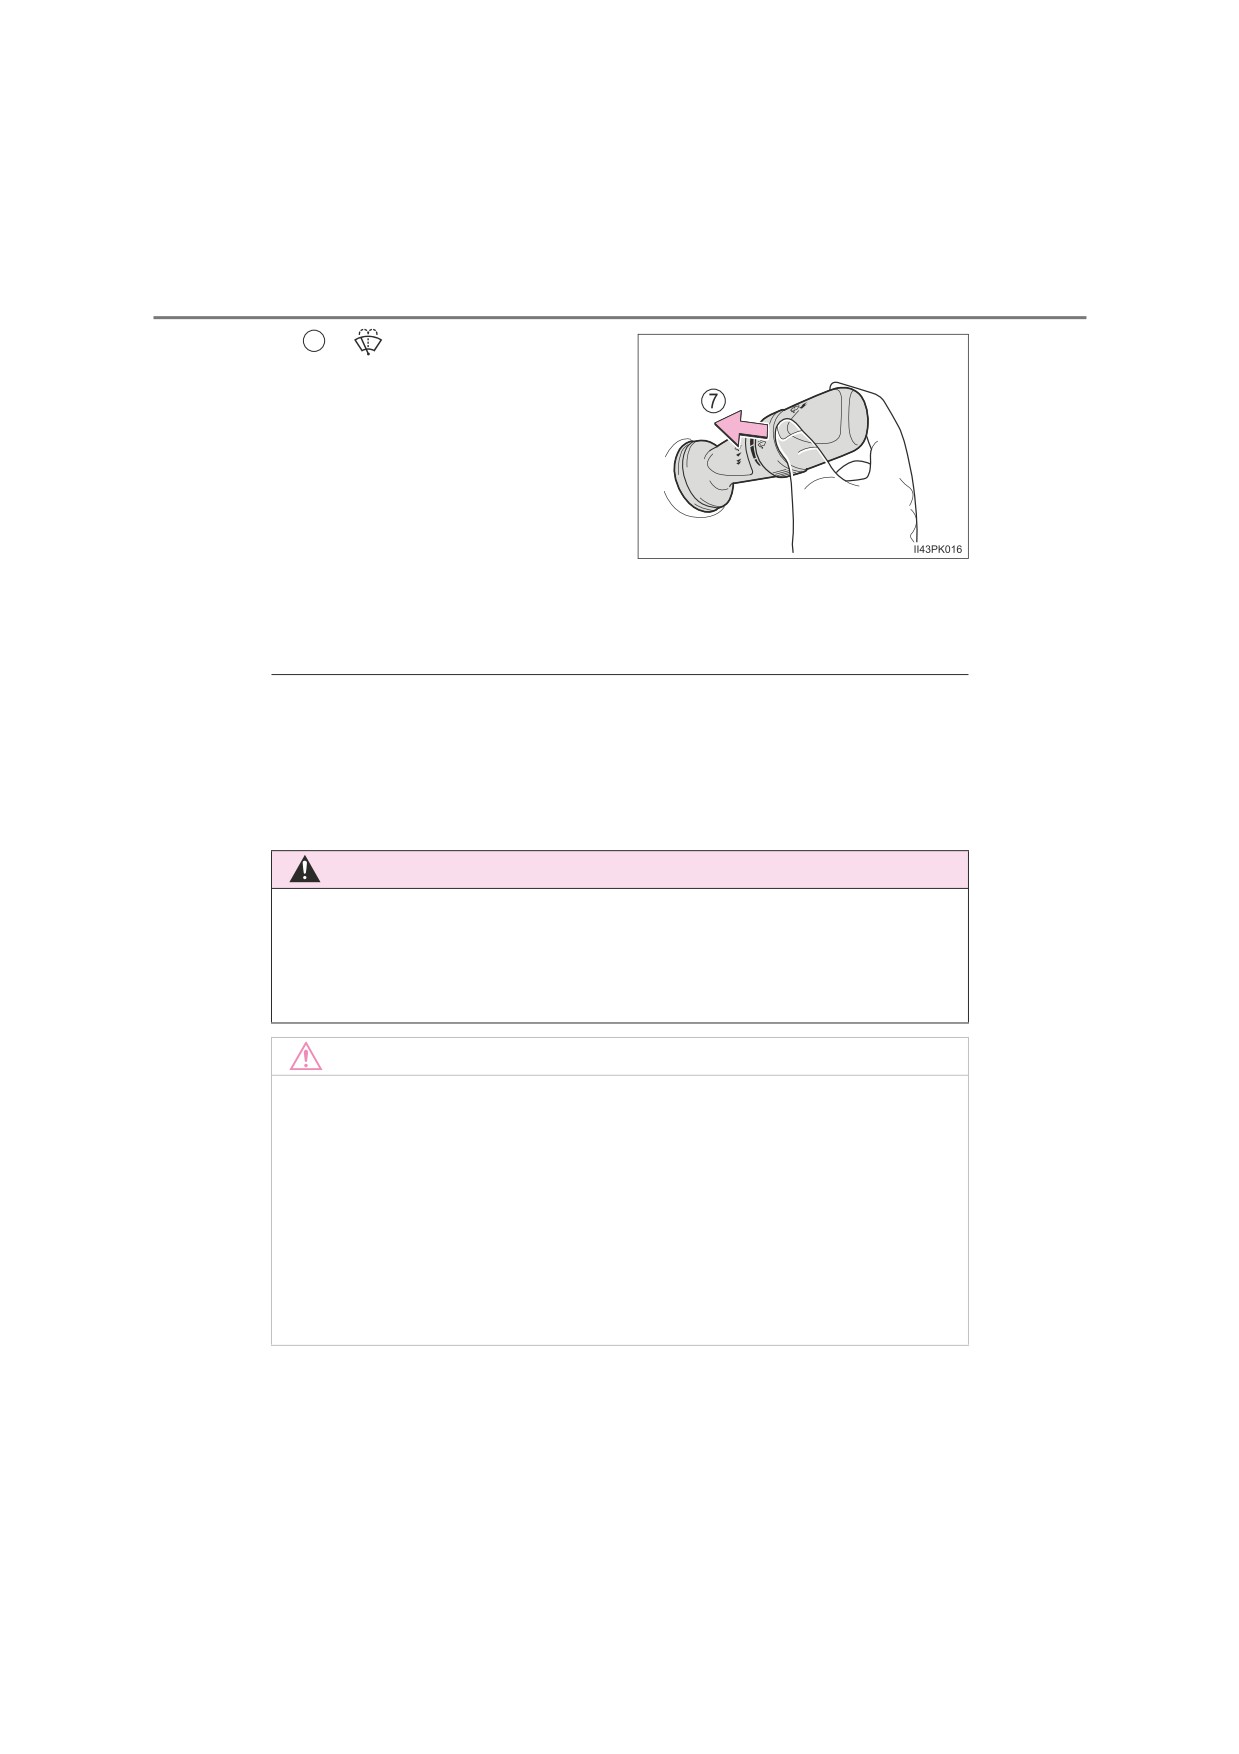
7
Washer/wiper dual
operation
Pulling the lever operates the
wipers and washer.
The wipers will automatically
operate a couple of times after
the washer squirts.
If the headlights are on, the
headlight cleaners will operate
once.
And then, the headlight cleaners
will operate every five times you
pull the lever. (if equipped)
■ The windshield wipers and washer can be operated when
The engine switch is in the “ON” position (vehicles without smart entry & start
system) or IGNITION ON mode (vehicles with smart entry & start system).
■ If no windshield washer fluid sprays
Check that the washer nozzles are not blocked if there is washer fluid in the
windshield washer fluid reservoir.
WARNING
■ Caution regarding the use of washer fluid
When it is cold, do not use the washer fluid until the windshield becomes
warm. The fluid may freeze on the windshield and cause low visibility. This
may lead to an accident, resulting in death or serious injury.
NOTICE
■ When the windshield is dry
Do not use the wipers, as they may damage the windshield.
■ When the washer fluid tank is empty
Do not operate the switch continually as the washer fluid pump may over-
heat.
■ When a nozzle becomes blocked
In this case, contact any authorized Toyota retailer or Toyota authorized
repairer, or any reliable repairer.
Do not try to clear it with a pin or other object. The nozzle will be damaged.
4-4. Refueling
259
Opening the fuel tank cap
Perform the following steps to open the fuel tank cap:
Before refueling the vehicle
● Close all the doors and windows, and turn the engine switch to the
“LOCK” position (vehicles without smart entry & start system) or off
(vehicles with smart entry & start system).
● Confirm the type of fuel.
■ Fuel types
P. 641
■ Fuel tank opening for unleaded gasoline (gasoline engine)
To help prevent incorrect fueling, your vehicle has a fuel tank opening that
4
only accommodates the special nozzle on unleaded fuel pumps.
260
4-4. Refueling
WARNING
■ When refueling the vehicle
Observe the following precautions while refueling the vehicle. Failure to do
so may result in death or serious injury.
●After exiting the vehicle and before opening the fuel cap, touch an
unpainted metal surface to discharge any static electricity. It is important to
discharge static electricity before refueling because sparks resulting from
static electricity can cause fuel vapors to ignite while refueling.
● Type A (P. 261) only: Always hold the grips on the fuel tank cap and turn
it slowly to remove it.
A whooshing sound may be heard when the fuel tank cap is loosened.
Wait until the sound cannot be heard before fully removing the cap. In hot
weather, pressurized fuel may spray out the filler neck and cause injury.
●Do not allow anyone that has not discharged static electricity from their
body to come close to an open fuel tank.
●Do not inhale vaporized fuel.
Fuel contains substances that are harmful if inhaled.
●Do not smoke while refueling the vehicle.
Doing so may cause the fuel to ignite and cause a fire.
●Do not return to the vehicle or touch any person or object that is statically
charged.
This may cause static electricity to build up, resulting in a possible ignition
hazard.
■ When refueling
Observe the following precautions to prevent fuel overflowing from the fuel
tank:
●Securely insert the fuel nozzle into the fuel filler neck.
● Stop filling the tank after the fuel nozzle automatically clicks off.
●Do not top off the fuel tank.
4-4. Refueling
261
NOTICE
■ Refueling
●Do not spill fuel during refueling.
Doing so may damage the vehicle, such as causing the emission control
system to operate abnormally or damaging fuel system components or the
vehicle’s painted surface.
● Vehicles with DPF system:
Use the specified fuel. If fuel other than the specified fuel is used, white
smoke may be continuously emitted from the exhaust pipe during regener-
ating the filter. (P. 367)
Opening the fuel tank cap
■ Type A
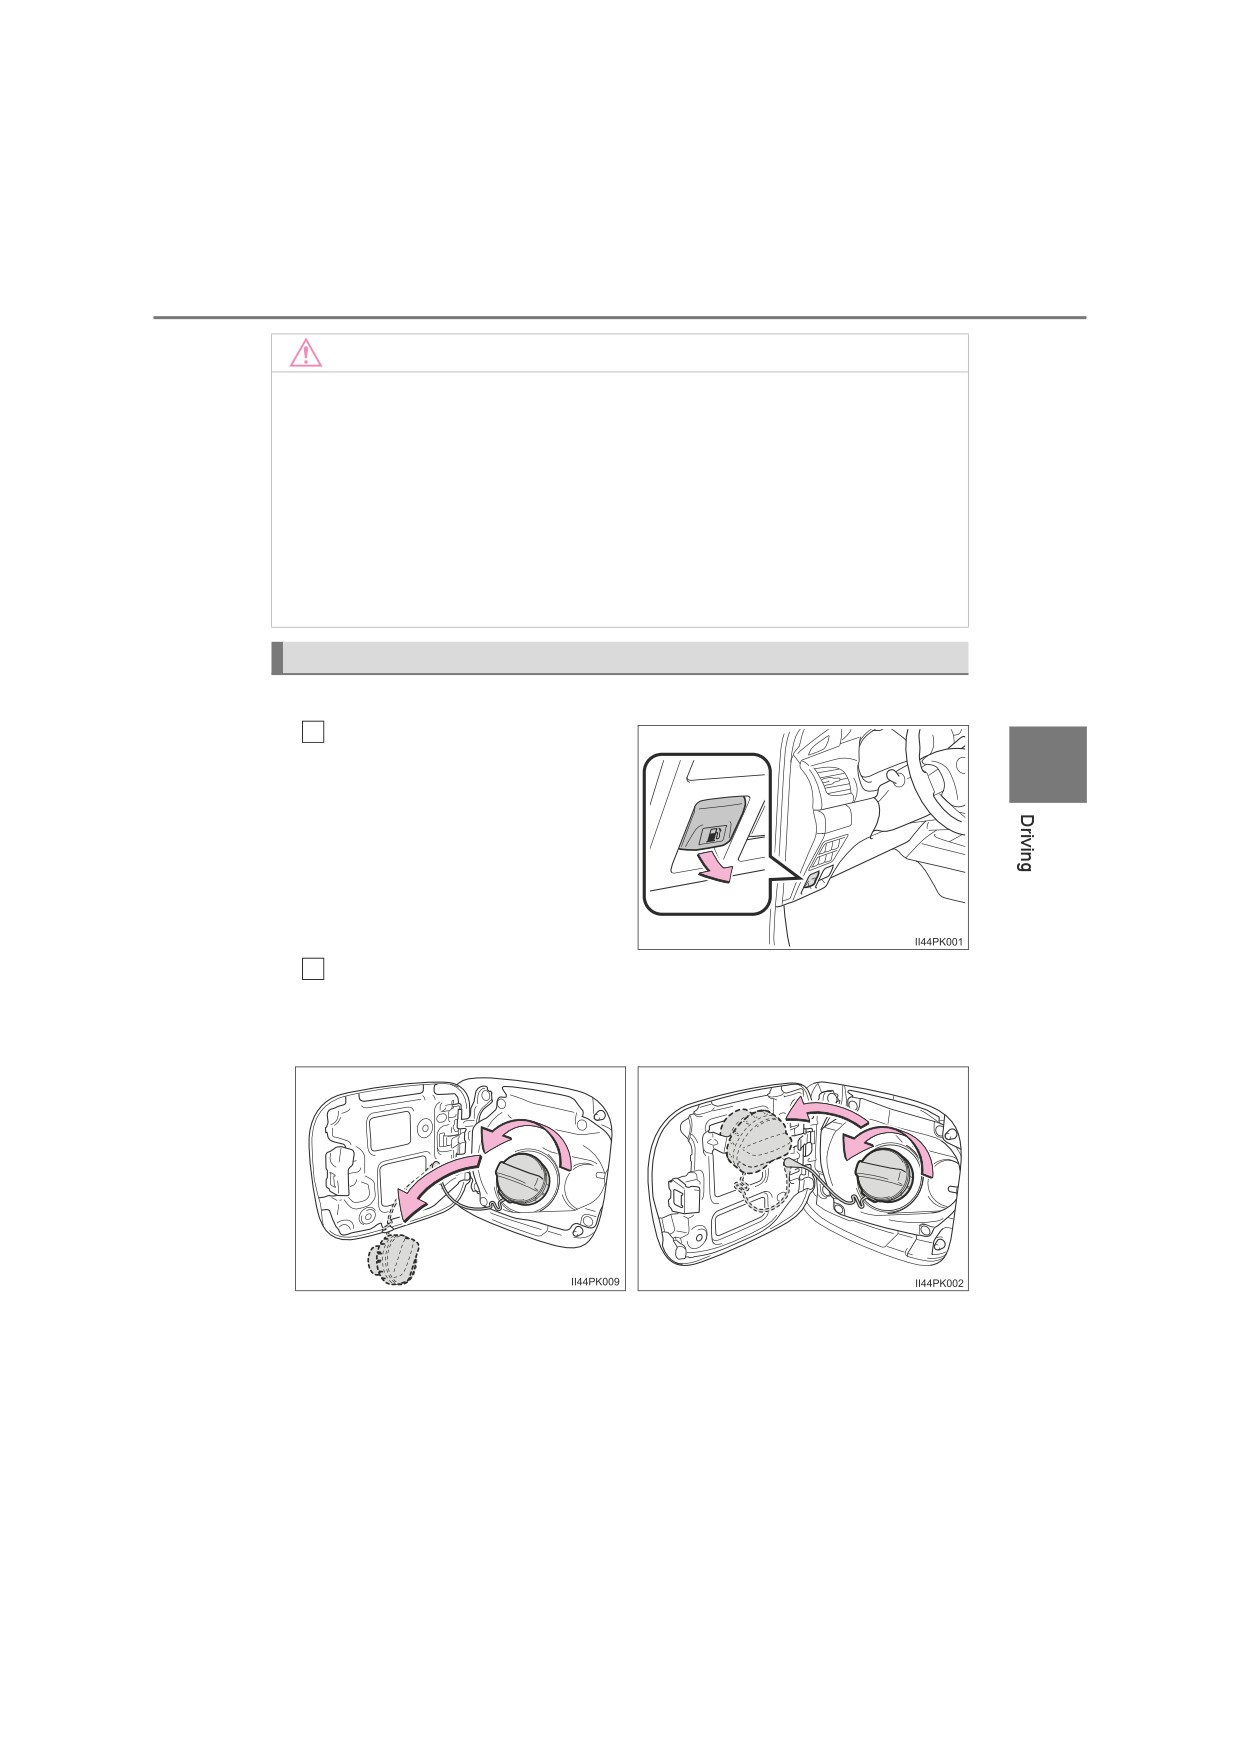
1
Pull up the opener to open
the fuel filler door.
4
2
Turn the fuel tank cap slowly to remove it and hang it on the back
of the fuel filler door.
Fuel filler door type A
Fuel filler door type B
262
4-4. Refueling
■ Type B
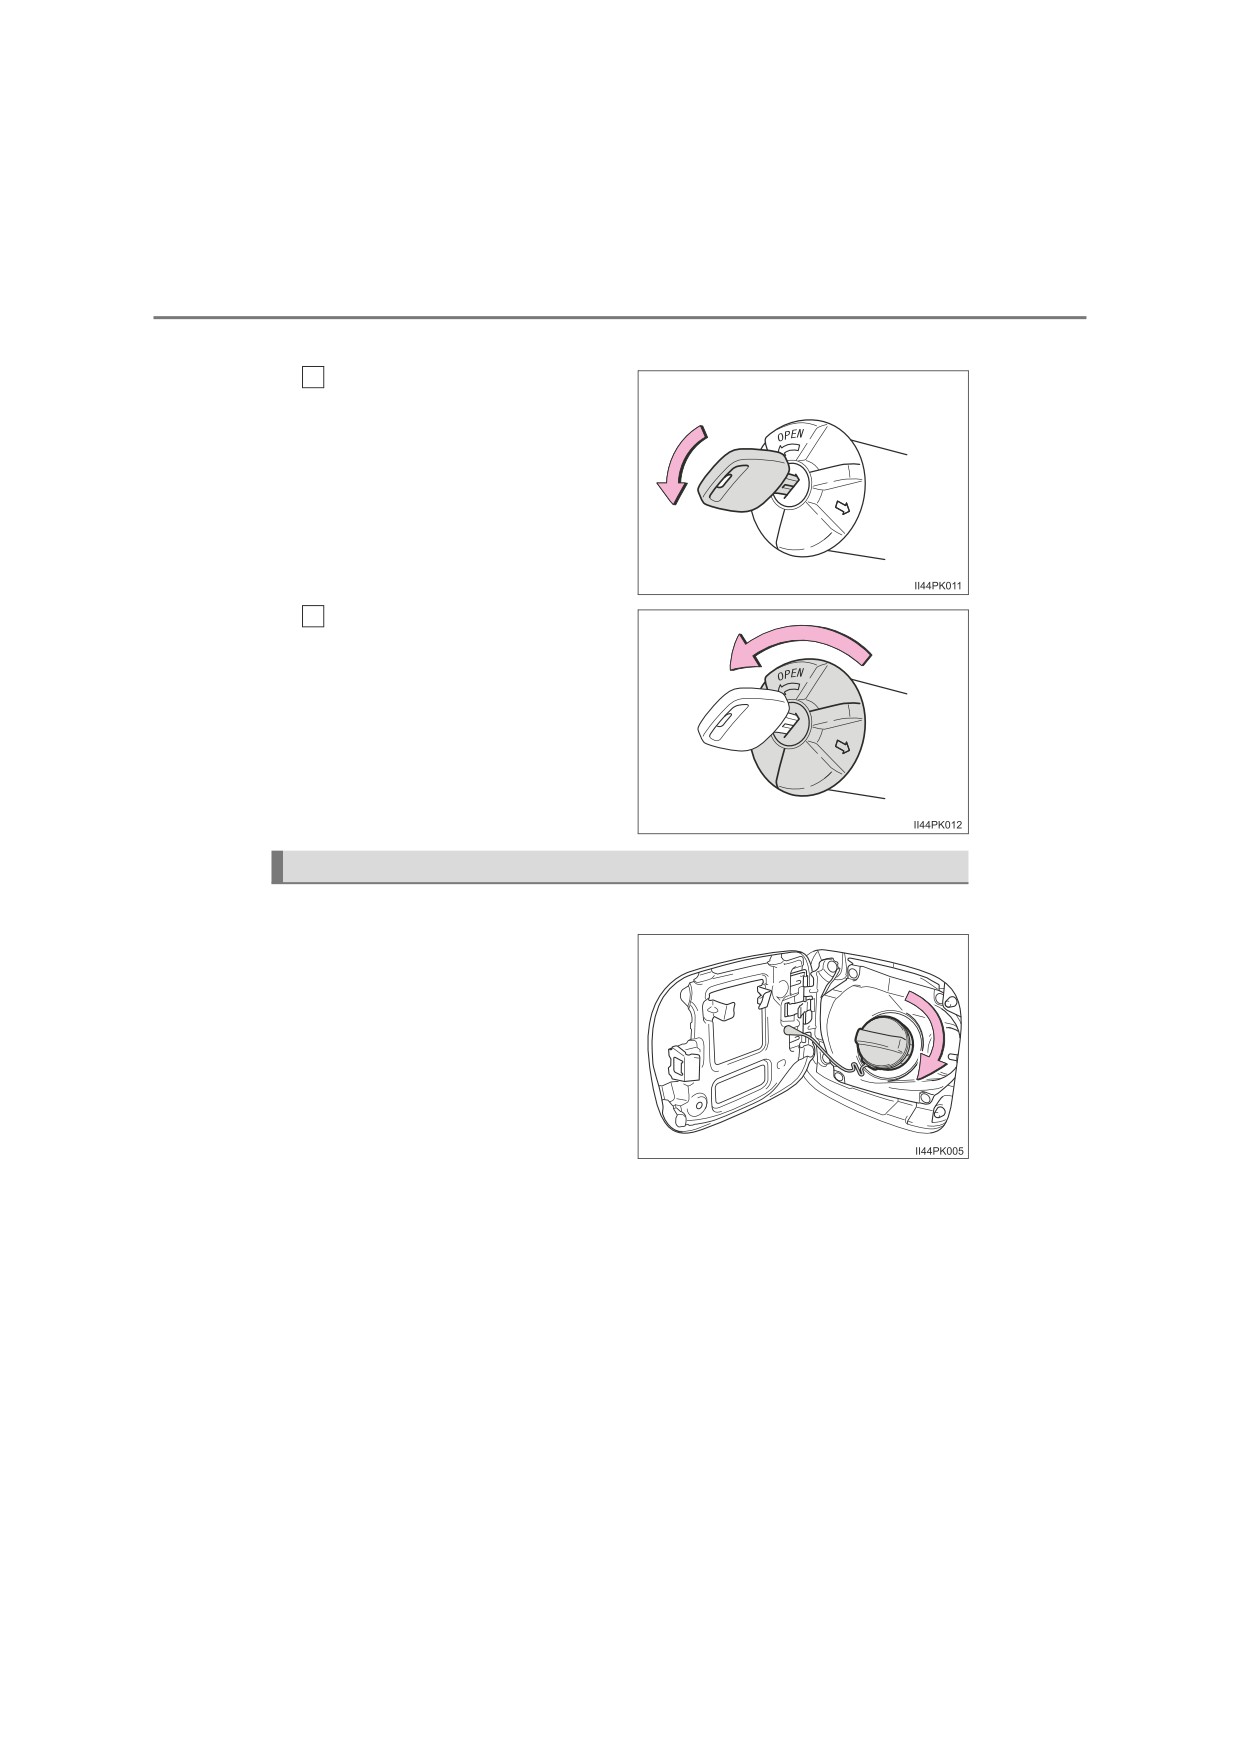
To unlock the fuel tank cap,
1
insert the key and turn it
counterclockwise.
2
Turn the fuel tank cap slowly
to open.
Make sure not to hold and turn
the key.
Closing the fuel tank cap
■ Type A
After refueling, turn the fuel
tank cap until you hear a click.
Once the cap is released, it will
turn slightly in the opposite
direction.
4-4. Refueling
263
■ Type B
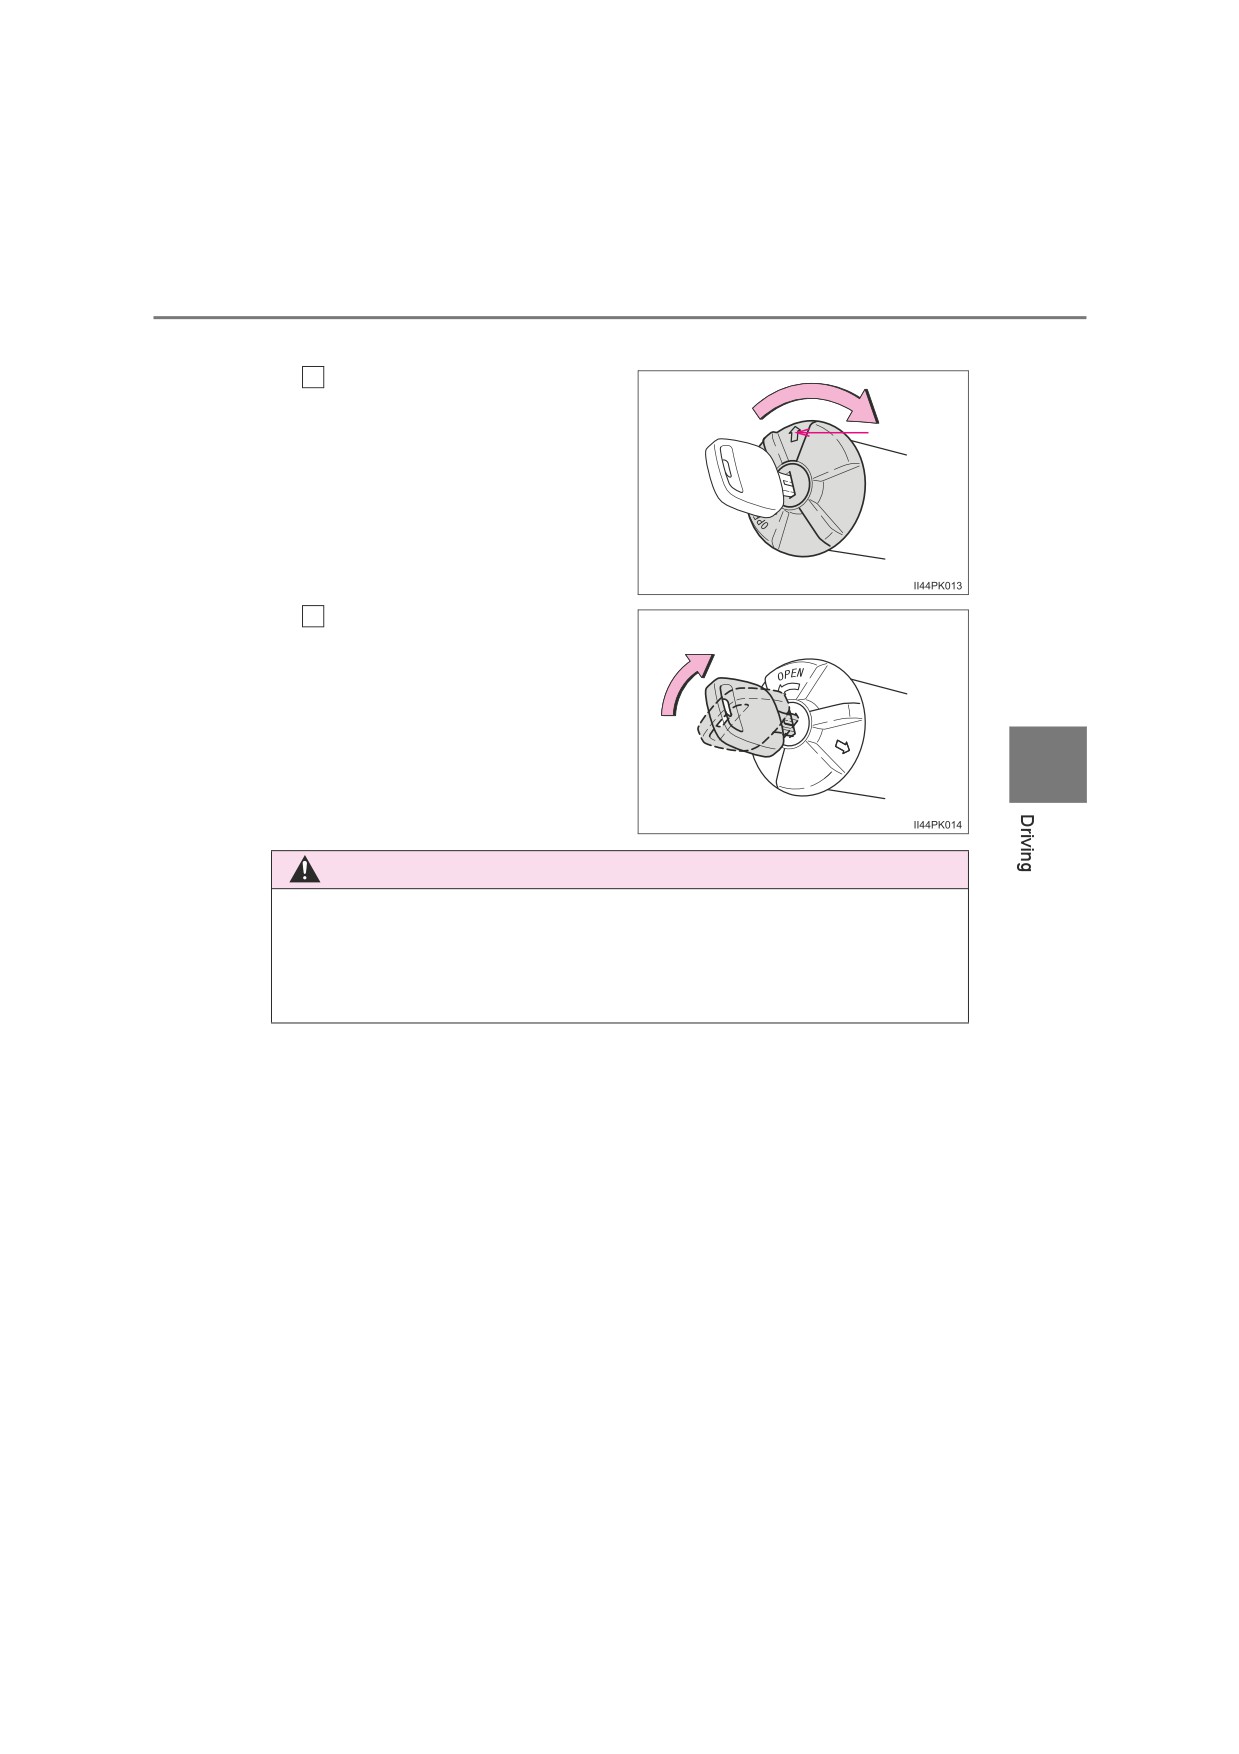
Close the fuel tank cap
1
Make sure to put the fuel tank
cap with the arrow upward and
Arrow
turn it slowly to close.
When turning the fuel tank cap,
do not hold and turn the key.
Lock the fuel cap
2
Turning the fuel cap key clock-
wise.
4
WARNING
■ When replacing the fuel tank cap
Do not use anything but a genuine Toyota fuel tank cap designed for your
vehicle. Doing so may cause a fire or other incident which may result in
death or serious injury.
264
4-5. Using the driving support systems
Toyota Safety Sense
The Toyota Safety Sense consists of the following drive assist
systems and contributes to a safe and comfortable driving expe-
rience:
Driving assist system
◆ PCS (Pre-Collision System)
P. 271
◆ LDA (Lane Departure Alert With Yaw Assist Function)
P. 282
◆ RSA (Road Sign Assist)
P. 293
◆ Dynamic radar cruise control
P. 299
WARNING
■ Toyota Safety Sense
The Toyota Safety Sense is designed to operate under the assumption that
the driver will drive safely, and is designed to help reduce the impact to the
occupants and the vehicle in the case of a collision or assist the driver in
normal driving conditions.
As there is a limit to the degree of recognition accuracy and control perfor-
mance that this system can provide, do not overly rely on this system. The
driver is always responsible for paying attention to the vehicle’s surround-
ings and driving safely.
: If equipped
4-5. Using the driving support systems
265
Sensors
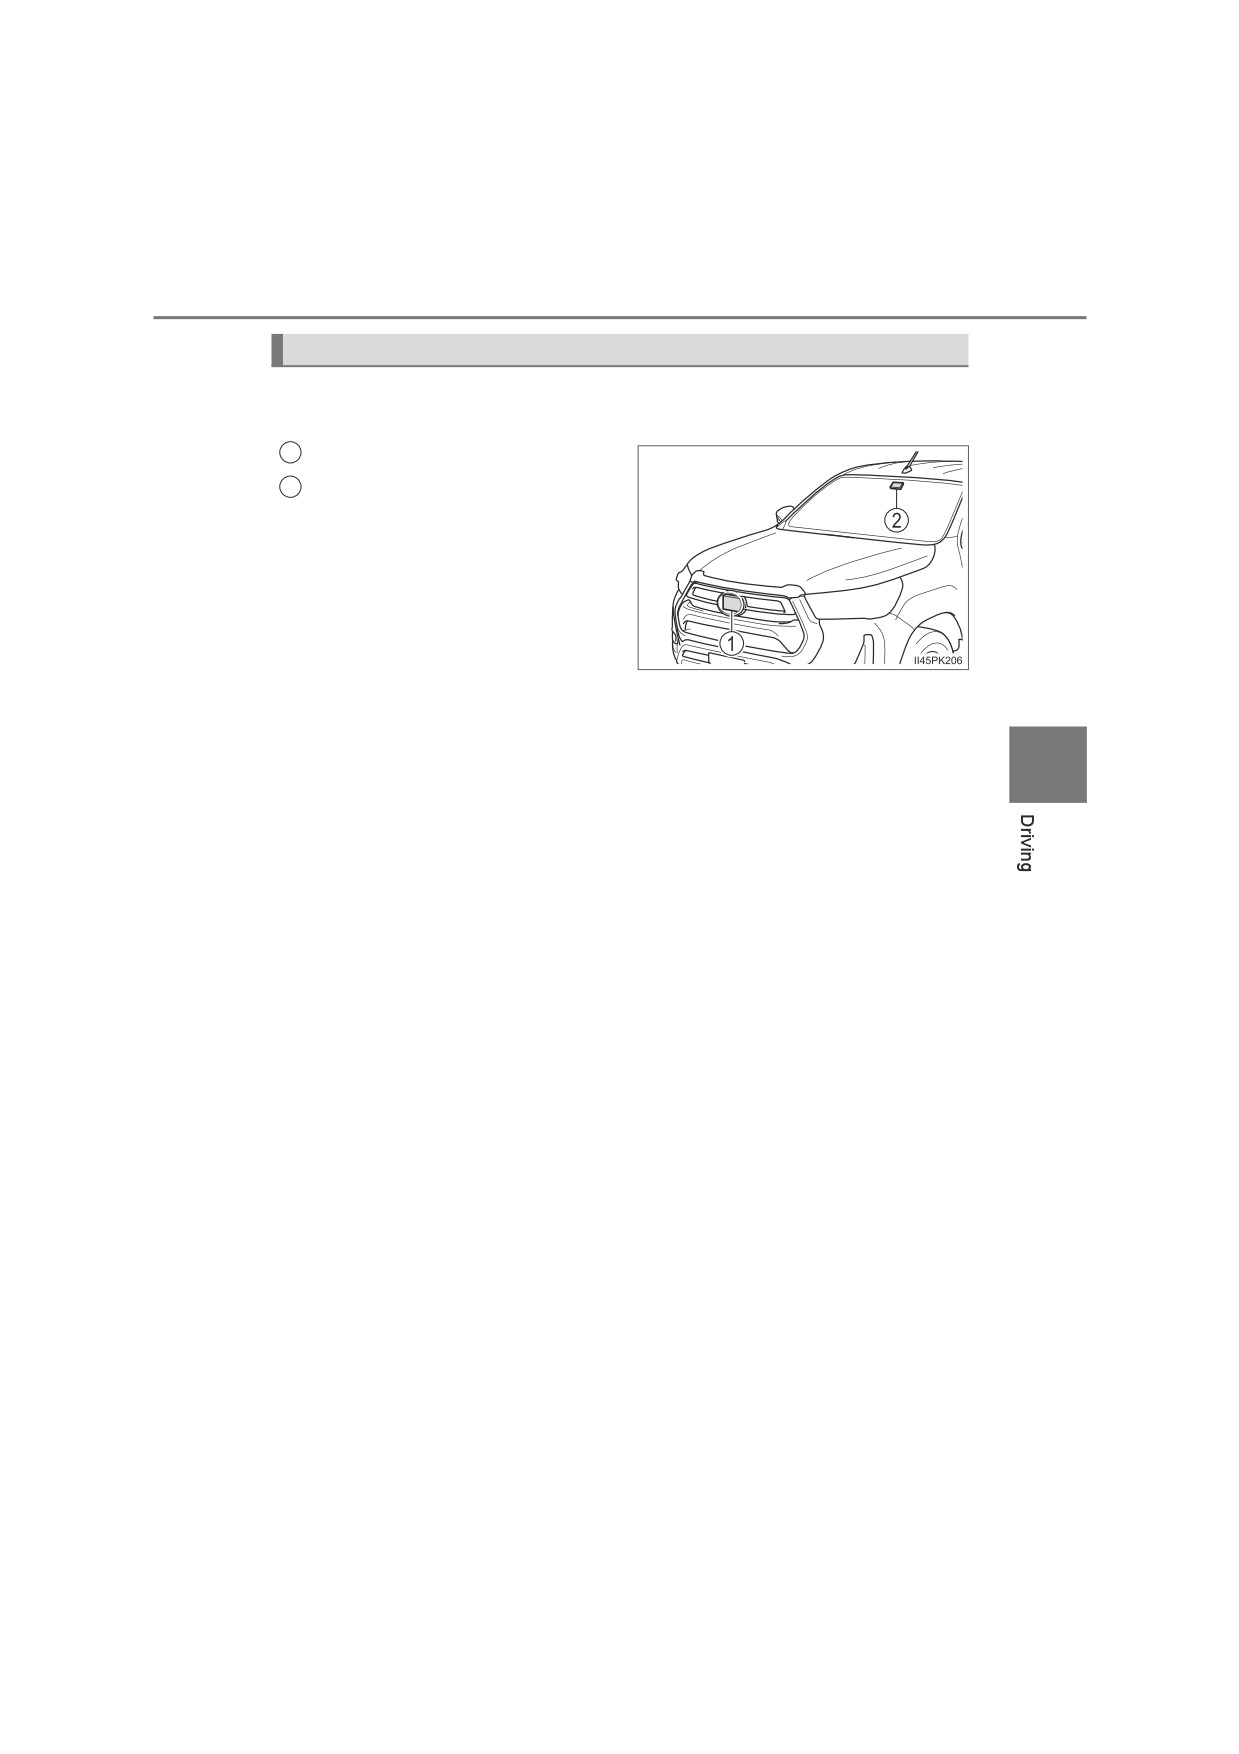
Two types of sensors, located behind the front grille and windshield,
detect information necessary to operate the drive assist systems.
1
Radar sensor
2
Front camera
4
266
4-5. Using the driving support systems
WARNING
■ To avoid malfunction of the radar sensor
Observe the following precautions.
Otherwise, the radar sensor may not operate properly, possibly leading to
an accident resulting in death or serious injury.
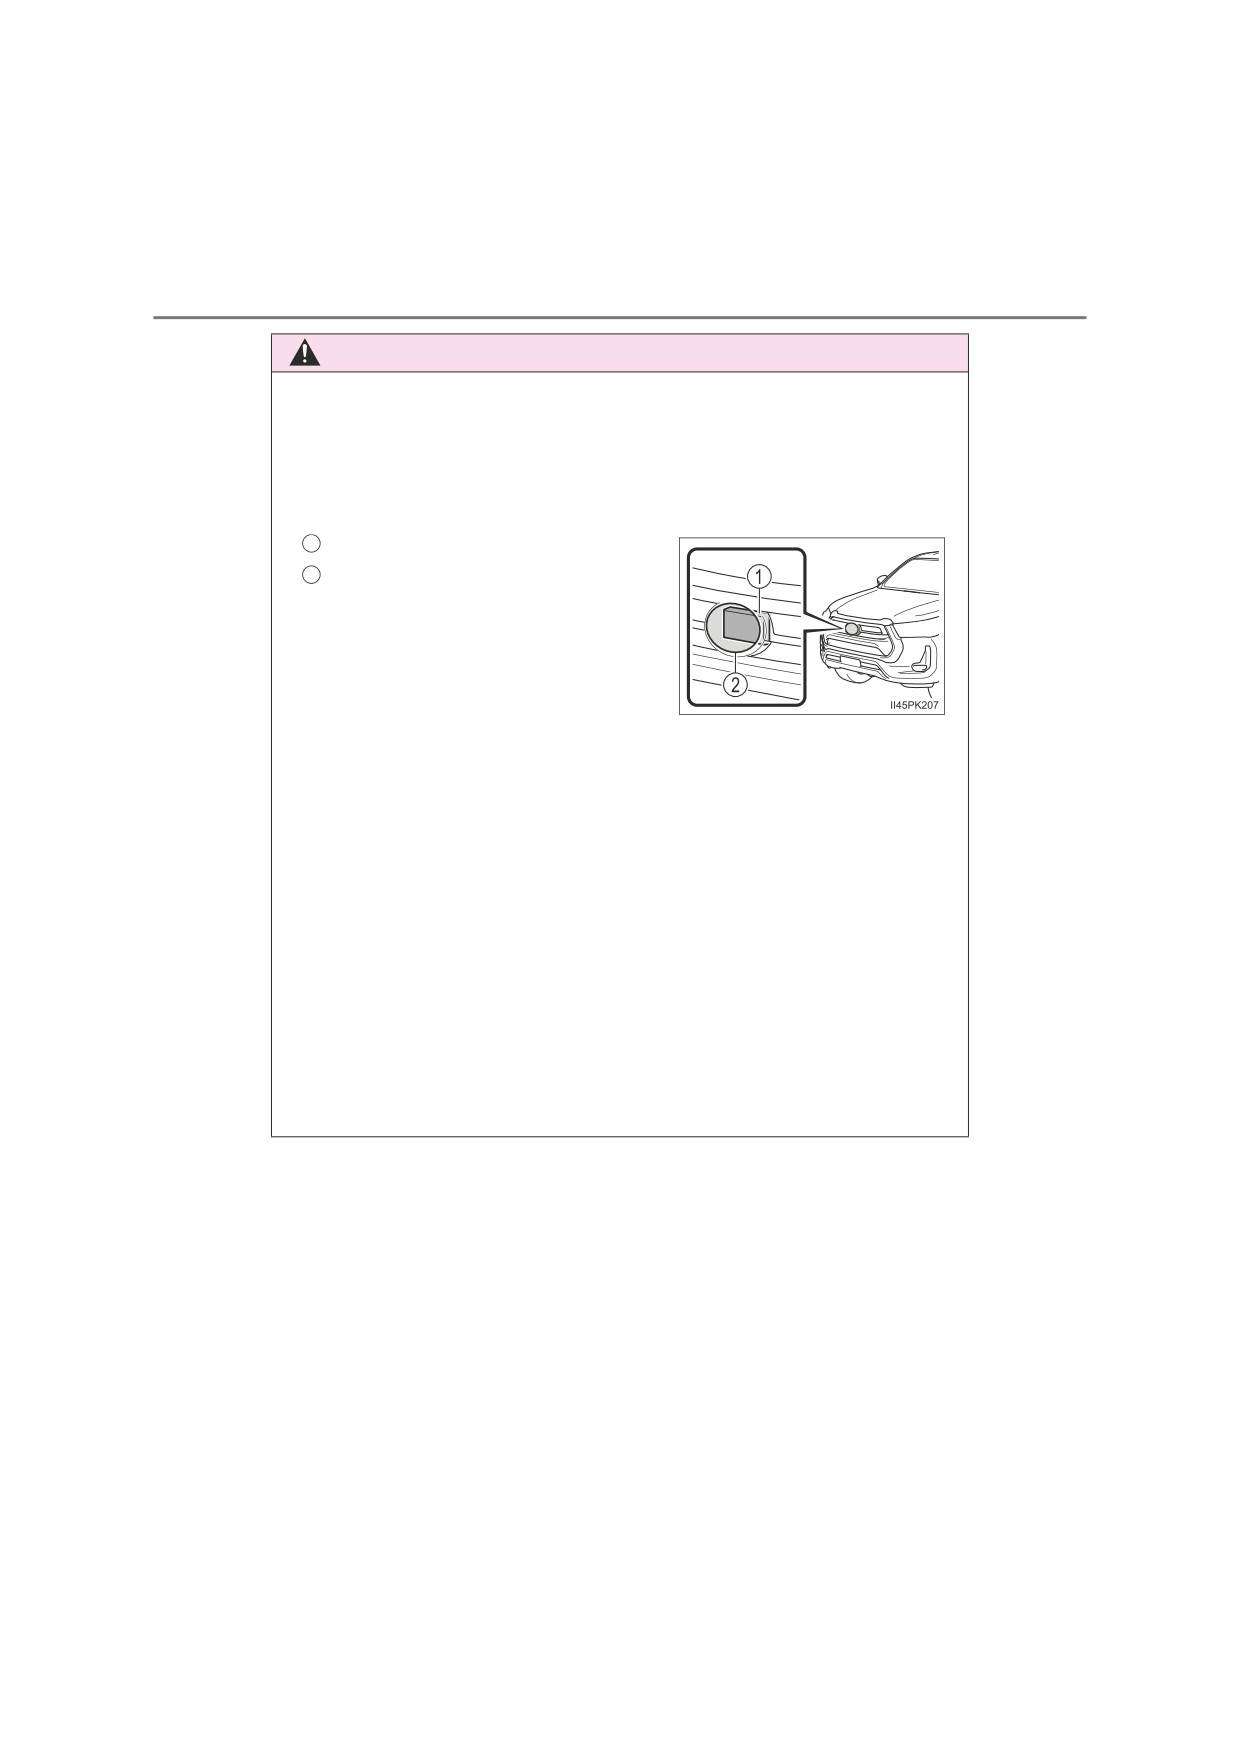
● Keep the radar sensor and the radar sensor cover clean at all times.
1
Radar sensor
2
Radar sensor cover
If the front of the radar sensor or the
front or back of the radar sensor cover
is dirty or covered with water droplets,
snow, etc., clean it.
Clean the radar sensor and radar
sen-
sor cover with a soft cloth to avoid
damaging them.
●Do not attach accessories, stickers (including transparent stickers) or
other items to the radar sensor, radar sensor cover or surrounding area.
●Do not subject the radar sensor or its surrounding area to a strong impact.
If the radar sensor, front grille, or front bumper has been subjected to a
strong impact, have the vehicle inspected by any authorized Toyota
retailer or Toyota authorized repairer, or any reliable repairer.
●Do not disassemble the radar sensor.
●Do not modify or paint the radar sensor or radar sensor cover.
● In the following cases, the radar sensor must be recalibrated. Contact any
authorized Toyota retailer or Toyota authorized repairer, or any reliable
repairer for details.
• When the radar sensor or front grille are removed and installed, or
replaced
• When the front bumper is replaced
4-5. Using the driving support systems
267
WARNING
■ To avoid malfunction of the front camera
Observe the following precautions.
Otherwise, the front camera may not operate properly, possibly leading to
an accident resulting in death or serious injury.
●Keep the windshield clean at all times.
• If the windshield is dirty or covered with an oily film, water droplets,
snow, etc., clean the windshield.
• If a glass coating agent is applied to the windshield, it will still be neces-
sary to use the windshield wipers to remove water droplets, etc. from
the area of the windshield in front of the front camera.
• If the inner side of the windshield where the front camera is installed is
dirty, contact any authorized Toyota retailer or Toyota authorized
repairer, or any reliable repairer.
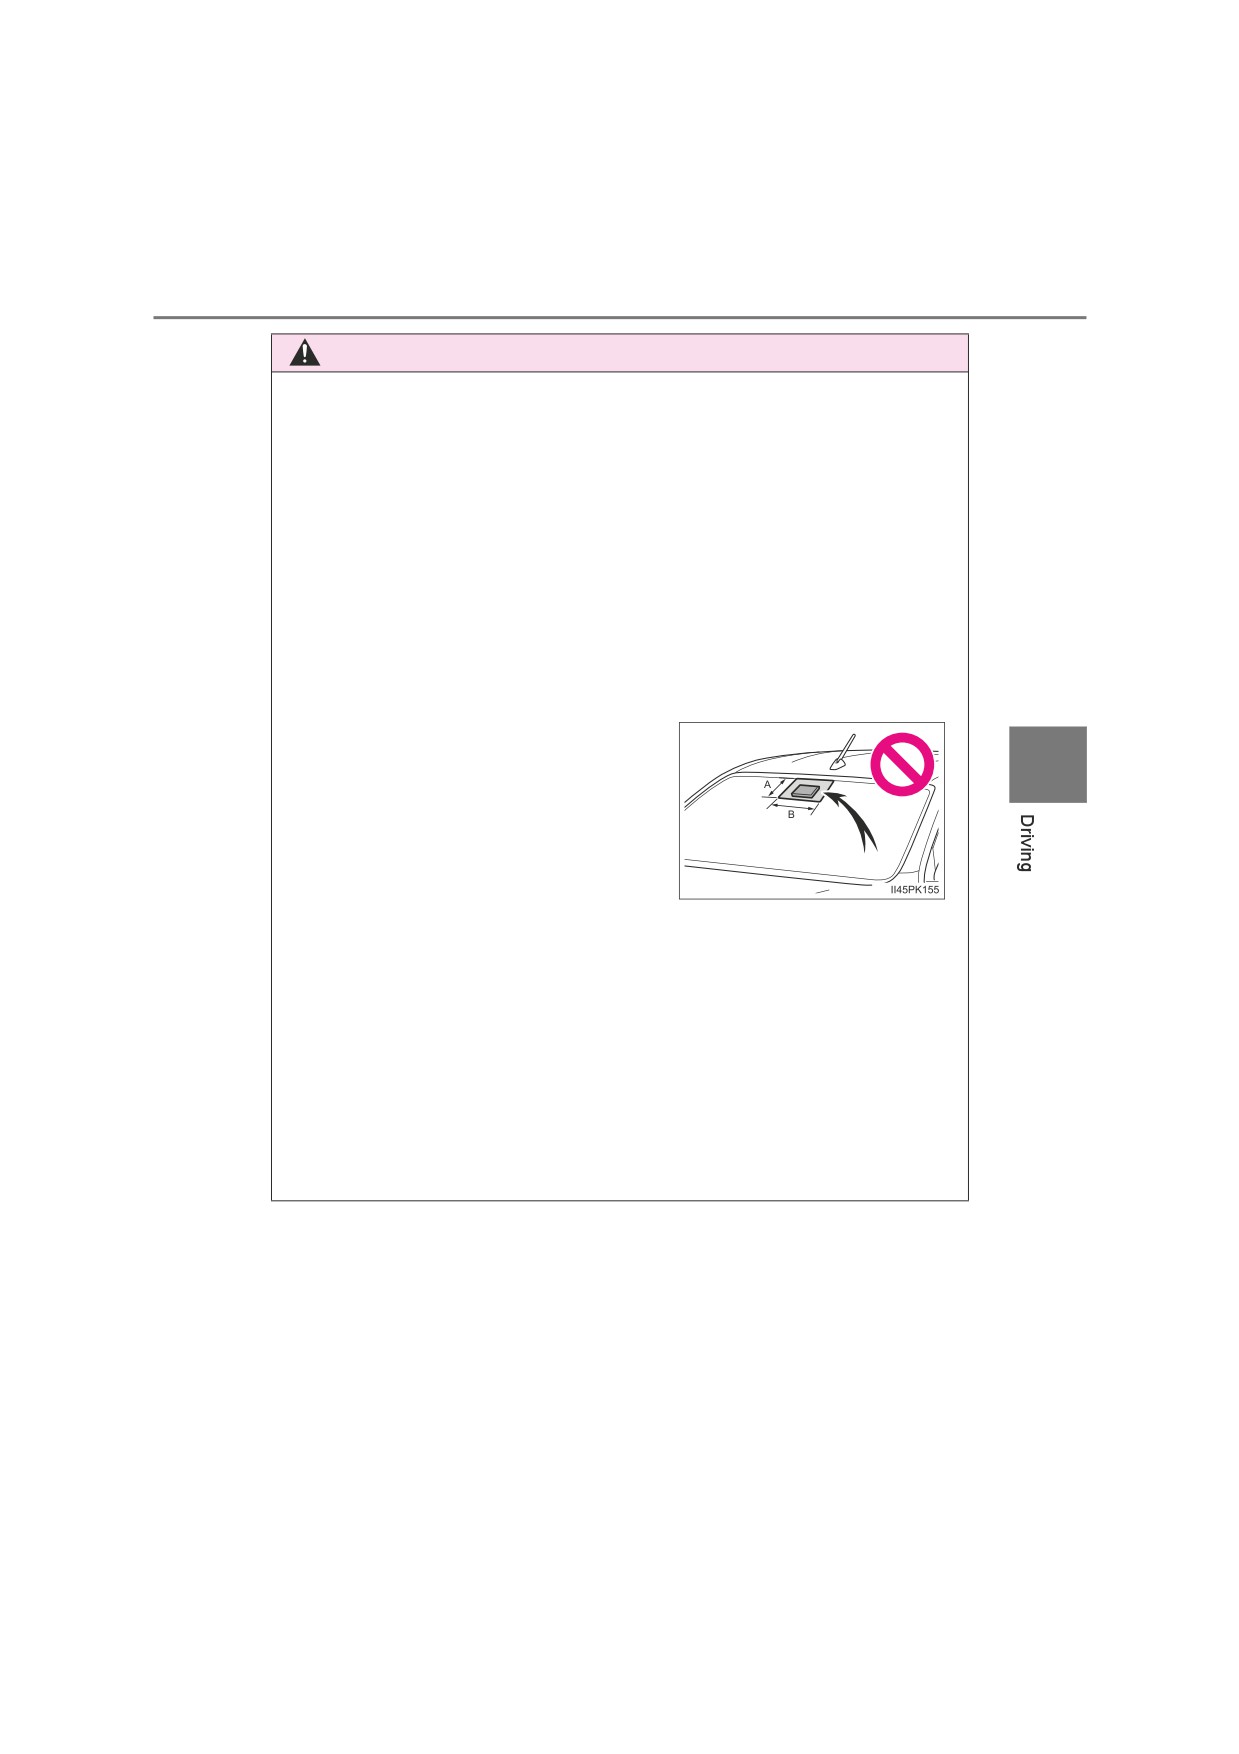
●Do not attach objects, such as stickers,
transparent stickers, etc., to the outer
4
side of the windshield in front of the
front camera (shaded area in the illus-
tration).
A: From the top of the windshield to
approximately 1 cm (0.4 in.) below the
bottom of the front camera
B: Approximately
20 cm
(7.9 in.)
(Approximately 10 cm [4.0 in.] to the
right and left from the center of the
front camera)
● If the part of the windshield in front of the front camera is fogged up or cov-
ered with condensation, or ice, use the windshield defogger to remove
the
fog, condensation, or ice. (P. 433, 441)
● If water droplets cannot be properly removed from the area of the wind-
shield in front of the front camera by the windshield wipers, replace the
wiper insert or wiper blade.
●Do not attach window tint to the windshield.
268
4-5. Using the driving support systems
WARNING
●Replace the windshield if it is damaged or cracked.
After replacing the windshield, the front camera must be recalibrated. Con-
tact any authorized Toyota retailer or Toyota authorized repairer, or any
reliable repairer for details.
●Do not allow liquids to contact the front camera.
●Do not allow bright lights to shine into the front camera.
●Do not dirty or damage the front camera.
When cleaning the inside of the windshield, do not allow glass cleaner to
contact the lens of the front camera. Also, do not touch the lens.
If the lens is dirty or damaged, contact any authorized Toyota retailer or
Toyota authorized repairer, or any reliable repairer.
●Do not subject the front camera to a strong impact.
●Do not change the installation position or direction of the front camera or
remove it.
●Do not disassemble the front camera.
●Do not modify any components of the vehicle around the front camera
(inside rear view mirror, etc.) or ceiling.
●Do not attach any accessories to the hood, front grille or front bumper that
may obstruct the front camera. Contact any authorized Toyota retailer or
Toyota authorized repairer, or any reliable repairer for details.
● If a surfboard or other long object is to be mounted on the roof, make sure
that it will not obstruct the front camera.
●Do not modify the headlights or other lights.

4-5. Using the driving support systems
269
■ If a warning message is displayed on the multi-information display
A system may be temporarily unavailable or there may be a malfunction in
the system.
● In the following situations, perform the actions specified in the table. When
the normal operating conditions are detected, the message will disappear
and the system will become operational.
If the message does not disappear, contact any authorized Toyota retailer
or Toyota authorized repairer, or any reliable repairer.
Situation
Actions
When the area around a cam-
era is covered with dirt, mois-
Using the wiper and A/C function,
ture
(fogged up, covered with
remove the dirt and other attached mat-
condensation, ice, etc.), or
ter. (P. 433, 441)
other foreign matter
If the front camera is hot, such as after
4
the vehicle had been parked in the sun,
use the air conditioning system to
decrease the temperature around the
front camera.
If a sunshade was used when the vehi-
When the temperature around
cle was parked, depending on its type,
the front camera is outside of
the sunlight reflected from the surface
the operational range, such as
of the sunshade may cause the tem-
when the vehicle is in the sun or
perature of the front camera to become
in an extremely cold environ-
excessively high.
ment
If the front camera is cold, such after the
vehicle is parked in an extremely cold
environment, use the air conditioning
system to increase the temperature
around the front camera.
The area in front of the front
camera is obstructed, such as
when the hood is open or a
Close the hood, remove the sticker, etc.
sticker is attached to the part of
to clear the obstruction.
the windshield in front of the
front camera.
Check whether there is attached materi-
When
“Pre-Collision System
als on the radar sensor and radar sensor
Unavailable” is displayed.
cover, and if there is, remove it.
270
4-5. Using the driving support systems
●In the following situations, if the situation has changed (or the vehicle has
been driven for some time) and the normal operating conditions are
detected, the message will disappear and the system will become opera-
tional.
If the message does not disappear, contact any authorized Toyota retailer
or Toyota authorized repairer, or any reliable repairer.
• When the temperature around the radar sensor is outside of the opera-
tional range, such as when the vehicle is in the sun or in an extremely
cold environment
• When the front camera cannot detect objects in front of the vehicle, such
as when driving in the dark, snow, or fog, or when bright lights are shining
into the front camera
• Depending on the conditions in the vicinity of the vehicle, the radar may
judge the surrounding environment can not be properly recognized. In
that case, “Pre-Collision System Unavailable” is displayed.
4-5. Using the driving support systems
271
PCS (Pre-Collision System)
The pre-collision system uses a radar sensor and front camera
to detect objects (P. 271) in front of the vehicle. When the sys-
tem determines that the possibility of a frontal collision with an
object is high, a warning operates to urge the driver to take eva-
sive action and the potential brake pressure is increased to help
the driver avoid the collision. If the system determines that the
possibility of a frontal collision with an object is extremely high,
the brakes are automatically applied to help avoid the collision
or help reduce the impact of the collision.
The pre-collision system can be disabled/enabled and the warning
timing can be changed. (P. 275)
4
Detectable objects
The system can detect the following:
● Vehicles
● Bicyclists
● Pedestrians
: If equipped
272
4-5. Using the driving support systems
System functions
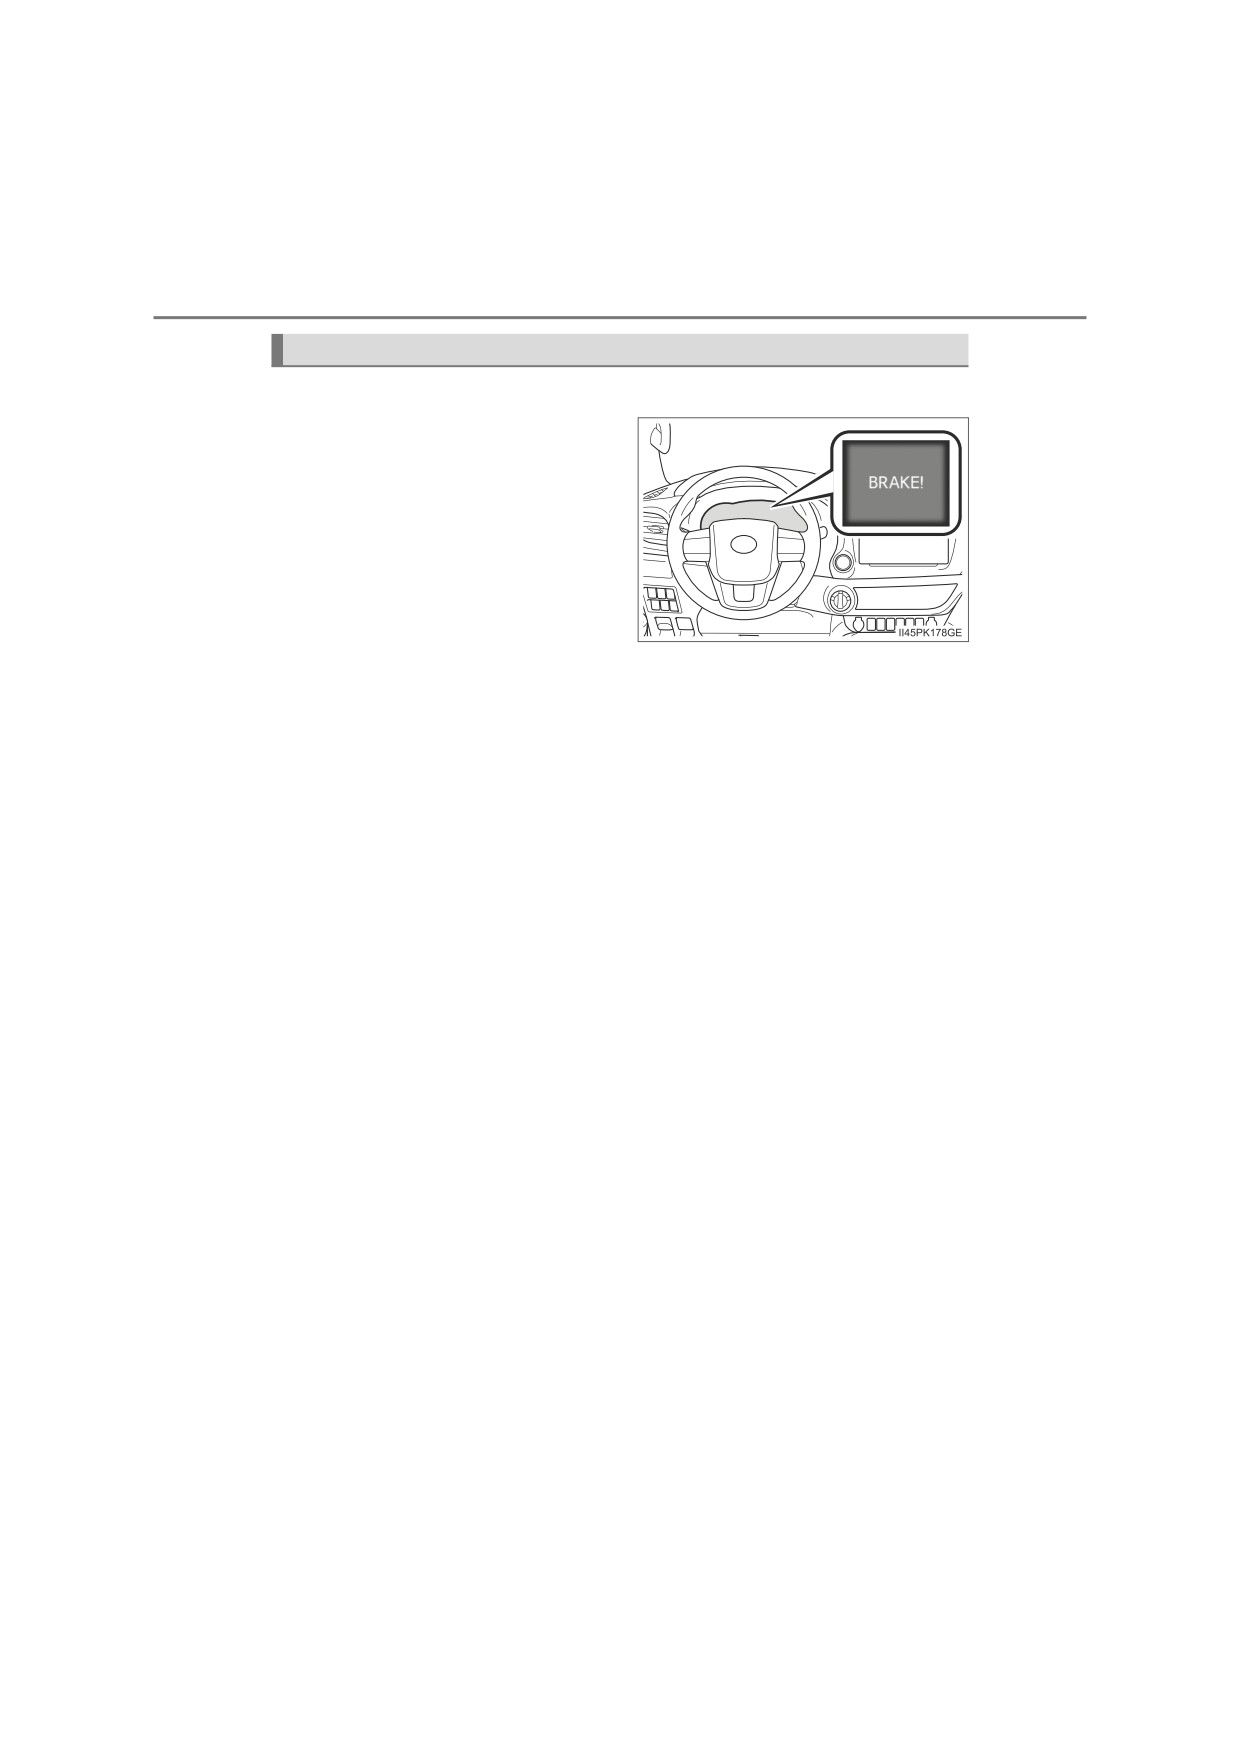
■ Pre-collision warning
When the system determines
that the possibility of a frontal
collision is high, a buzzer will
sound and a warning message
will be displayed on the multi-
information display to urge the
driver to take evasive action.
■ Pre-collision brake assist
When the system determines that the possibility of a frontal colli-
sion is high, the system applies greater braking force in relation to
how strongly the brake pedal is depressed.
■ Pre-collision braking
If the system determines that the possibility of a frontal collision is
extremely high, the brakes are automatically applied to help avoid
the collision or reduce the impact of the collision.
4-5. Using the driving support systems
273
WARNING
■ Limitations of the pre-collision system
●The driver is solely responsible for safe driving. Always drive safely, taking
care to observe your surroundings.
Do not use the pre-collision system instead of normal braking operations
under any circumstances. This system will not prevent collisions or lessen
collision damage or injury in every situation. Do not overly rely on this sys-
tem. Failure to do so may lead to an accident, resulting in death or serious
injury.
●Although this system is designed to help avoid a collision or help reduce
the impact of the collision, its effectiveness may change according to vari-
ous conditions, therefore the system may not always be able to achieve
the same level of performance.
Read the following conditions carefully. Do not overly rely on this system
and always drive carefully.
• Conditions under which the system may operate even if there is no pos-
sibility of a collision: P. 277
4
• Conditions under which the system may not operate properly: P. 279
●Do not attempt to test the operation of the pre-collision system yourself.
Depending on the objects used for testing (dummies, cardboard objects
imitating detectable objects, etc.), the system may not operate properly,
possibly leading to an accident.
■ Pre-collision braking
●When the pre-collision braking function is operating, a large amount of
braking force will be applied.
●If the vehicle is stopped by the operation of the pre-collision braking func-
tion, the pre-collision braking function operation will be canceled after
approximately 2 seconds. Depress the brake pedal as necessary.
●The pre-collision braking function may not operate if certain operations are
performed by the driver. If the accelerator pedal is being depressed
strongly or the steering wheel is being turned, the system may determine
that the driver is taking evasive action and possibly prevent the pre-colli-
sion braking function from operating.
● In some situations, while the pre-collision braking function is operating,
operation of the function may be canceled if the accelerator pedal is
depressed strongly or the steering wheel is turned and the system deter-
mines that the driver is taking evasive action.
● If the brake pedal is being depressed, the system may determine that the
driver is taking evasive action and possibly delay the operation timing of
the pre-collision braking function.
274
4-5. Using the driving support systems
WARNING
■ When to disable the pre-collision system
In the following situations, disable the system, as it may not operate prop-
erly, possibly leading to an accident resulting in death or serious injury:
●When the vehicle is being towed
●When your vehicle is towing another vehicle
● When transporting the vehicle via truck, boat, train or similar means of
transportation
● When the vehicle is raised on a lift with the engine running and the tires
are allowed to rotate freely
● When inspecting the vehicle using a drum tester such as a chassis
dynamometer or speedometer tester, or when using an on vehicle wheel
balancer
●When a strong impact is applied to the front bumper or front grille, due to
an accident or other reasons
● If the vehicle cannot be driven in a stable manner, such as when the vehi-
cle has been in an accident or is malfunctioning
● When the vehicle is driven in a sporty manner or off-road
● When the tires are not properly inflated
● When the tires are very worn
● When tires of a size other than specified are installed
●When tire chains are installed
● When a compact spare tire or an emergency tire puncture repair kit is used
● If equipment (snow plow, etc.) that may obstruct the radar sensor or front
camera is temporarily installed to the vehicle
4-5. Using the driving support systems
275
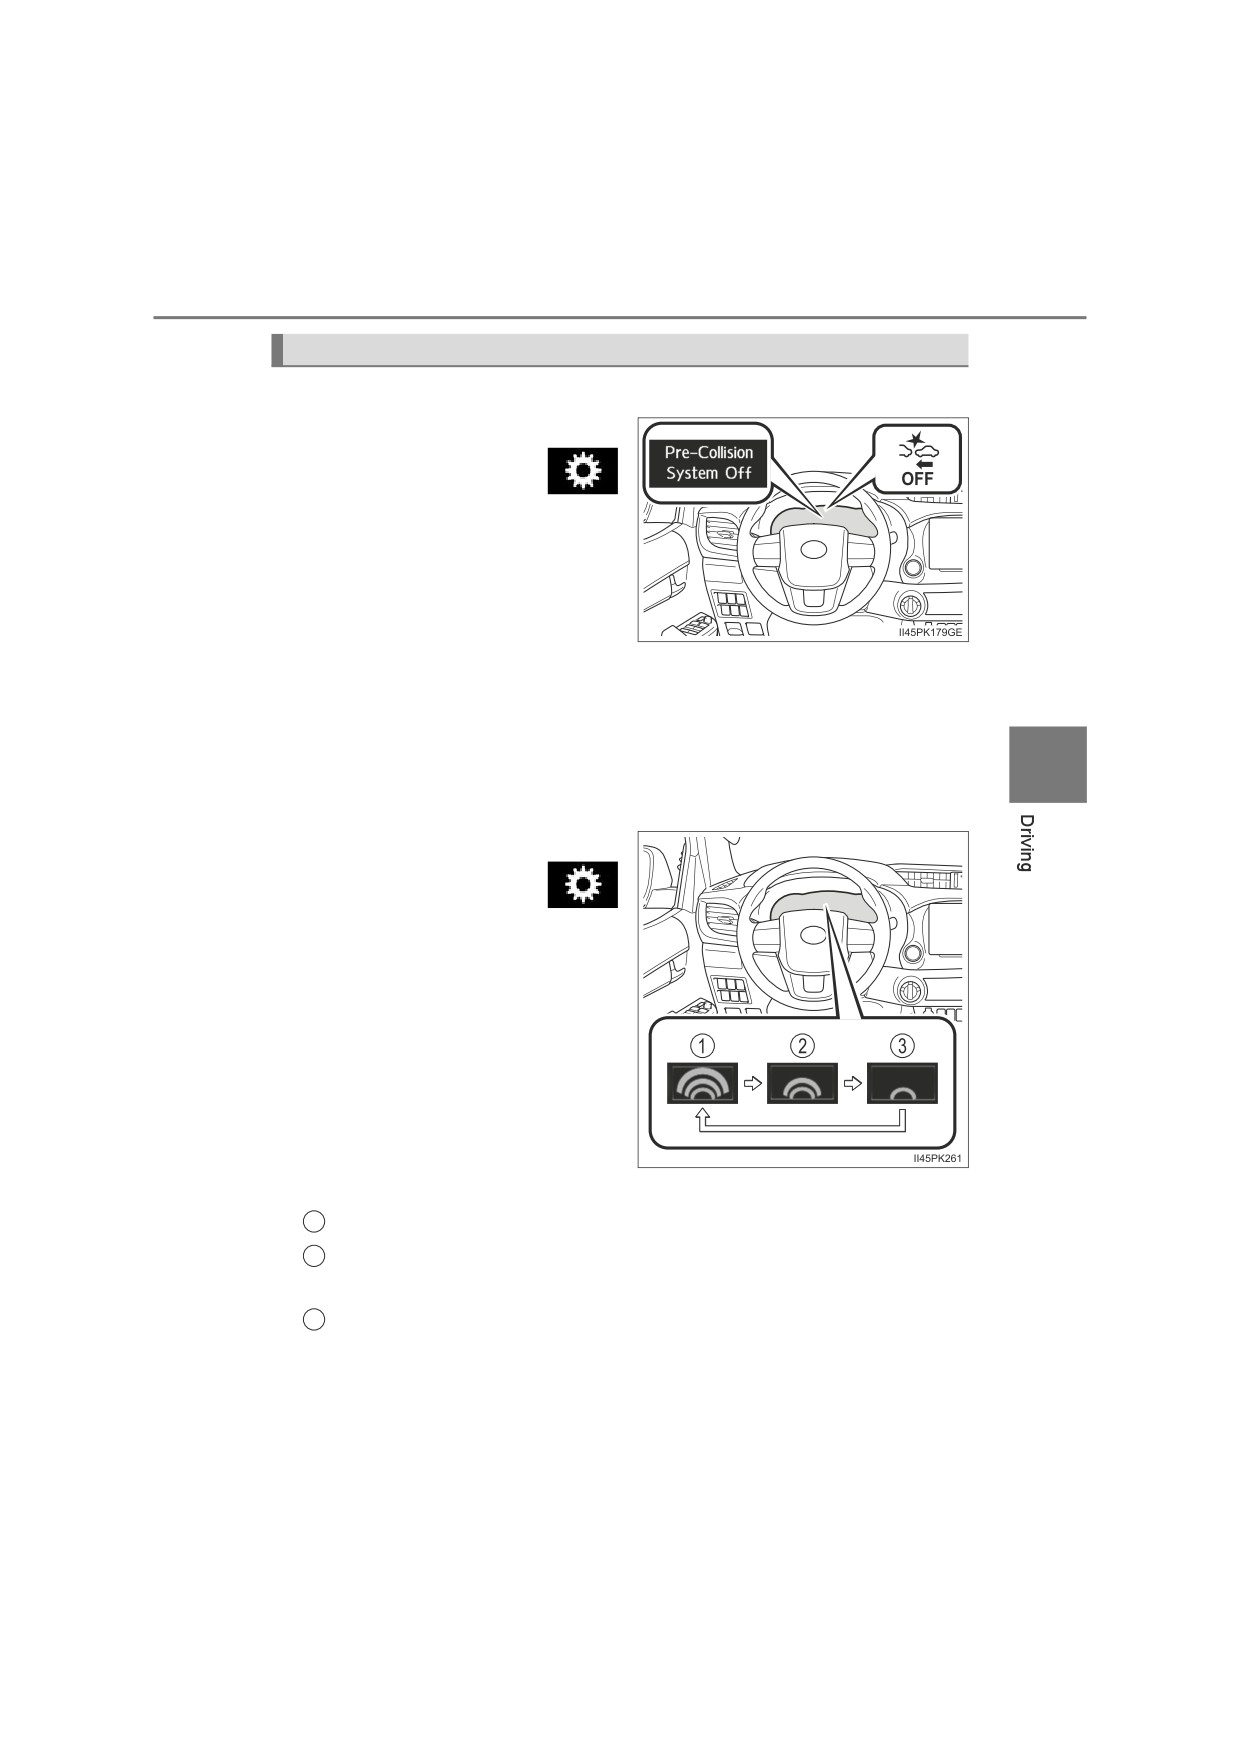
Changing settings of the pre-collision system
■ Enabling/disabling the pre-collision system
The pre-collision system can be
enabled/disabled on
(P. 137) of the multi-informa-
tion display.
The system is automatically
enabled each time the engine
switch is turned to the
“ON”
position (vehicles without smart
entry & start system) or IGNI-
TION ON mode (vehicles with
smart entry & start system).
If the system is disabled, the PCS warning light will turn on and a
4
message will be displayed on the multi-information display.
■ Changing the pre-collision warning timing
The pre-collision warning timing
can be changed on
(P. 137) of the multi-informa-
tion display.
The warning timing setting is
retained when the engine switch
is turned to the “LOCK” position
(vehicles without smart entry &
start system) or off
(vehicles
with smart entry & start system).
However, if the pre-collision sys-
tem is disabled and re-enabled,
the operation timing will return to
the default setting (middle).
1
Early
2
Middle
This is the default setting.
3
Late

276
4-5. Using the driving support systems
■ Operational conditions
The pre-collision system is enabled and the system determines that the pos-
sibility of a frontal collision with a detected object is high.
Each function is operational at the following speed
●Pre-collision warning
Relative speed between
Detectable objects
Vehicle speed
your vehicle and object
Approx. 10 to 180 km/h
Approx. 10 to 180 km/h
Vehicles
(7 to 110 mph)
(7 to 110 mph)
Bicyclists and pedestri-
Approx. 10 to 80 km/h
Approx. 10 to 80 km/h
ans
(7 to 50 mph)
(7 to 50 mph)
While the pre-collision warning function is operating, if the steering wheel is
operated heavily or suddenly, the pre-collision warning may be cancelled.
● Pre-collision brake assist
Relative speed between
Detectable objects
Vehicle speed
your vehicle and object
Approx. 30 to 180 km/h
Approx. 30 to 180 km/h
Vehicles
(20 to 110 mph)
(20 to 110 mph)
Bicyclists and pedestri-
Approx. 30 to 80 km/h
Approx. 30 to 80 km/h
ans
(20 to 50 mph)
(20 to 50 mph)
●Pre-collision braking
Relative speed between
Detectable objects
Vehicle speed
your vehicle and object
Approx. 10 to 180 km/h
Approx. 10 to 180 km/h
Vehicles
(7 to 110 mph)
(7 to 110 mph)
Bicyclists and pedestri-
Approx. 10 to 80 km/h
Approx. 10 to 80 km/h
ans
(7 to 50 mph)
(7 to 50 mph)
The system may not operate in the following situations:
● If a battery terminal has been disconnected and reconnected and then the
vehicle has not been driven for a certain amount of time
● If the shift lever is in R
● When the VSC OFF indicator is illuminated (only the pre-collision warning
function will be operational)
4-5. Using the driving support systems
277
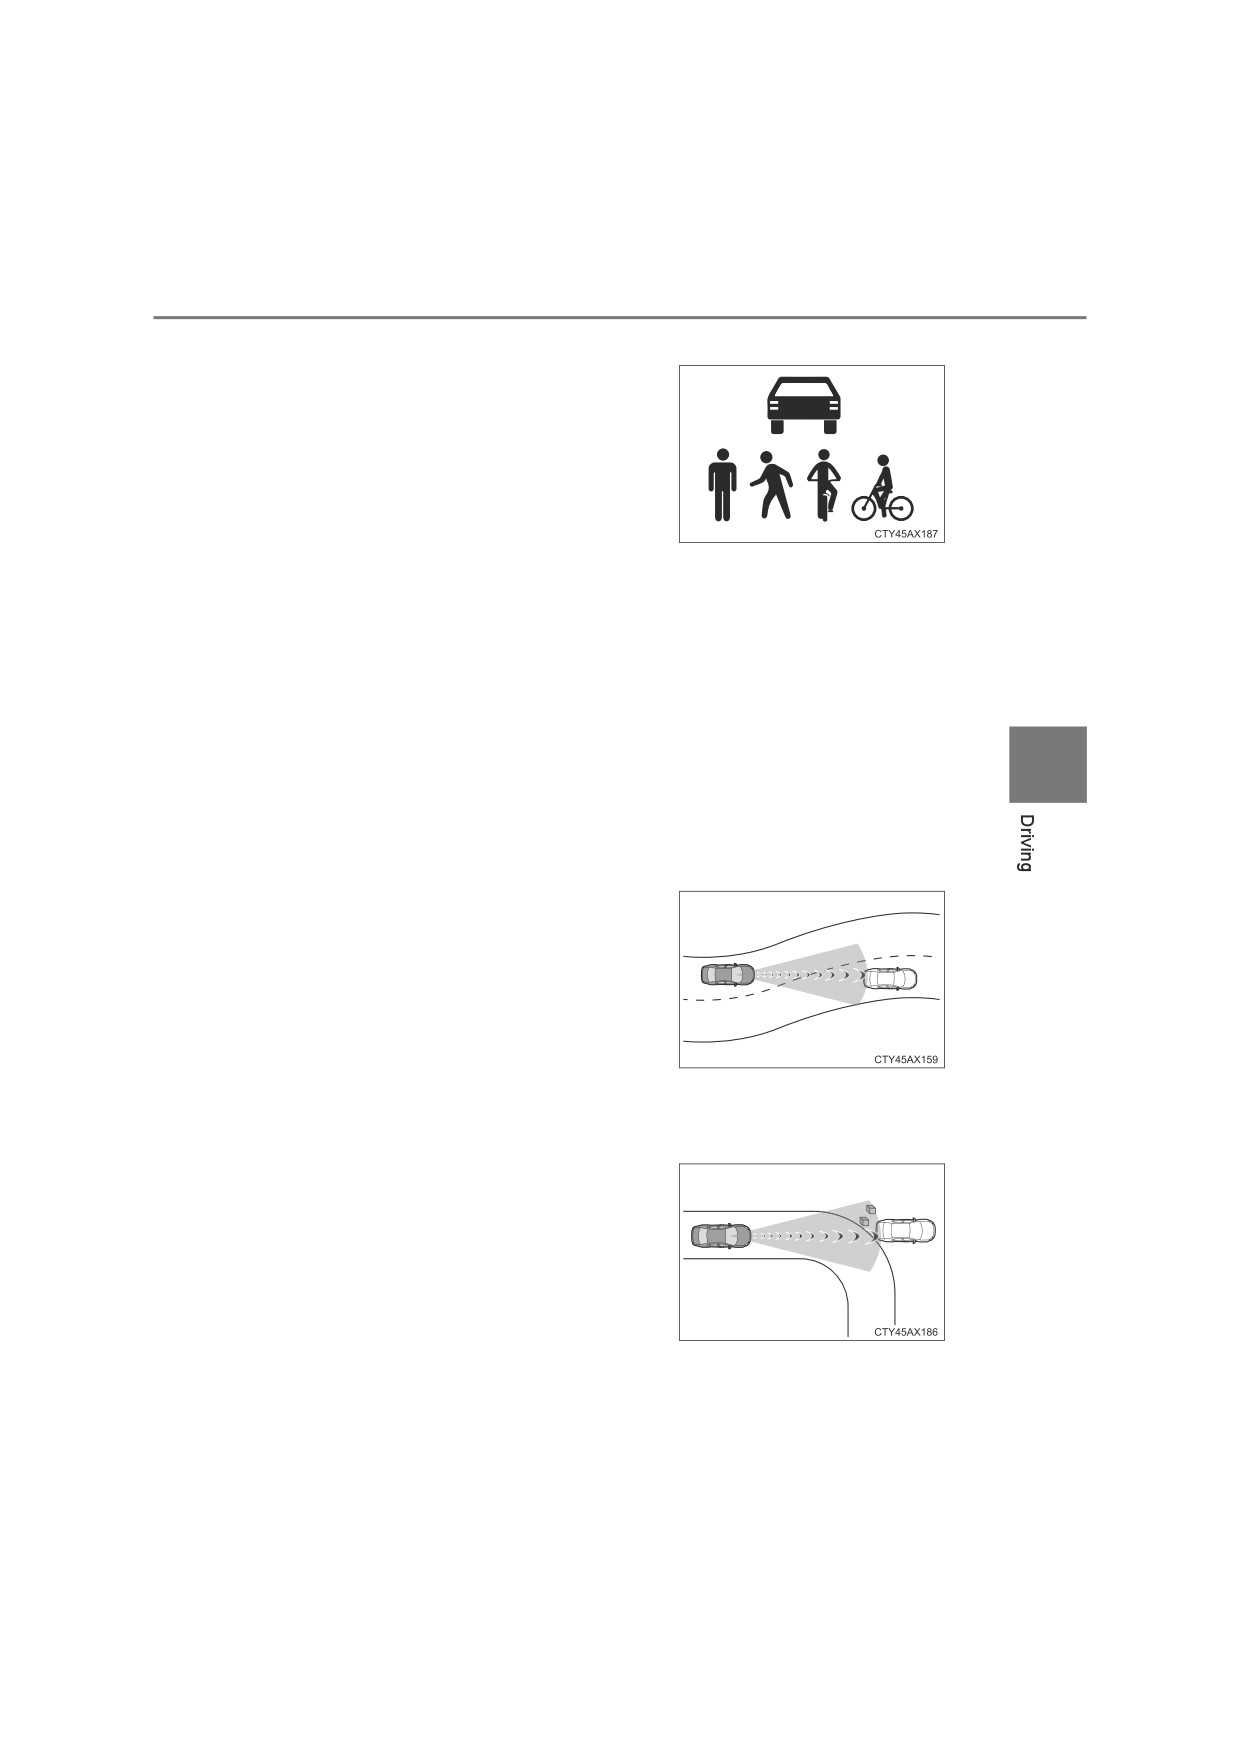
■ Object detection function
The system detects objects based on
their size, profile, motion, etc. However,
an object may not be detected depending
on the surrounding brightness and the
motion, posture, and angle of the
detected object, preventing the system
from operating properly. (P. 279)
The illustration shows an image of detect-
able objects.
■ Cancelation of the pre-collision braking
If either of the following occur while the pre-collision braking function is oper-
ating, it will be canceled:
● The accelerator pedal is depressed strongly.
● The steering wheel is turned sharply or abruptly.
■ Conditions under which the system may operate even if there is no pos-
4
sibility of a collision
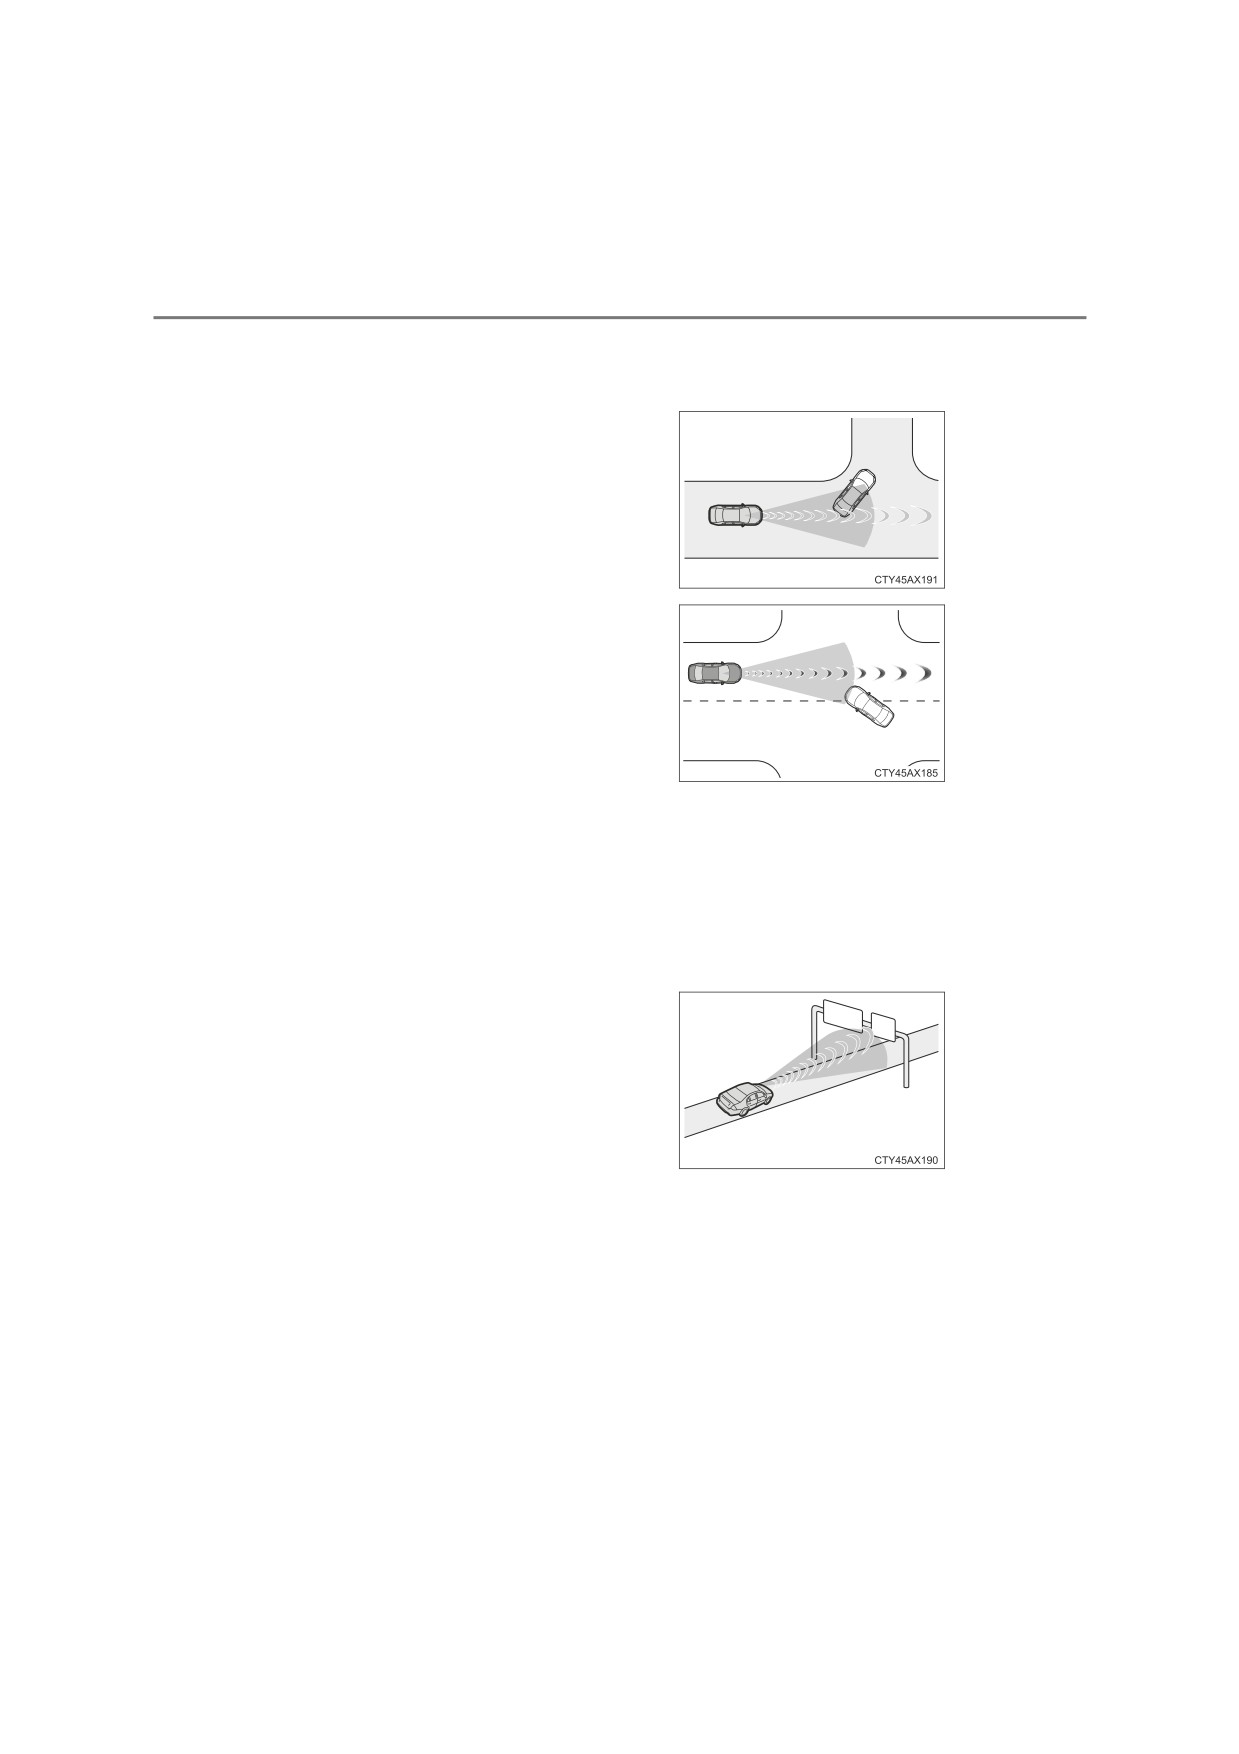
●In some situations such as the following, the system may determine that
there is a possibility of a frontal collision and operate.
• When passing a detectable object, etc.
• When changing lanes while overtaking a detectable object, etc.
• When approaching a detectable
object in an adjacent lane or on the
roadside, such as when changing the
course of travel or driving on a wind-
ing road
• When rapidly closing on a detectable object, etc.
• When approaching objects on the roadside, such as detectable objects,
guardrails, utility poles, trees, or walls
• When there is a detectable object or
other object by the roadside at the
entrance of a curve
278
4-5. Using the driving support systems
• When there are patterns or paint in front of your vehicle that may be mis-
taken for a detectable object
• When the front of your vehicle is hit by water, snow, dust, etc.
• When overtaking a detectable object
that is changing lanes or making a
right/left turn
• When passing a detectable object in
an oncoming lane that is stopped to
make a right/left turn
• When a detectable object approaches very close and then stops before
entering the path of your vehicle
• If the front of your vehicle is raised or lowered, such as when on an
uneven or undulating road surface
• When driving on a road surrounded by a structure, such as in a tunnel or
on an iron bridge
• When there is a metal object (manhole cover, steel plate, etc.), steps, or a
protrusion in front of your vehicle
• When passing under an object (road
sign, billboard, etc.)
• When approaching an electric toll gate barrier, parking area barrier, or
other barrier that opens and closes
• When using an automatic car wash
4-5. Using the driving support systems
279
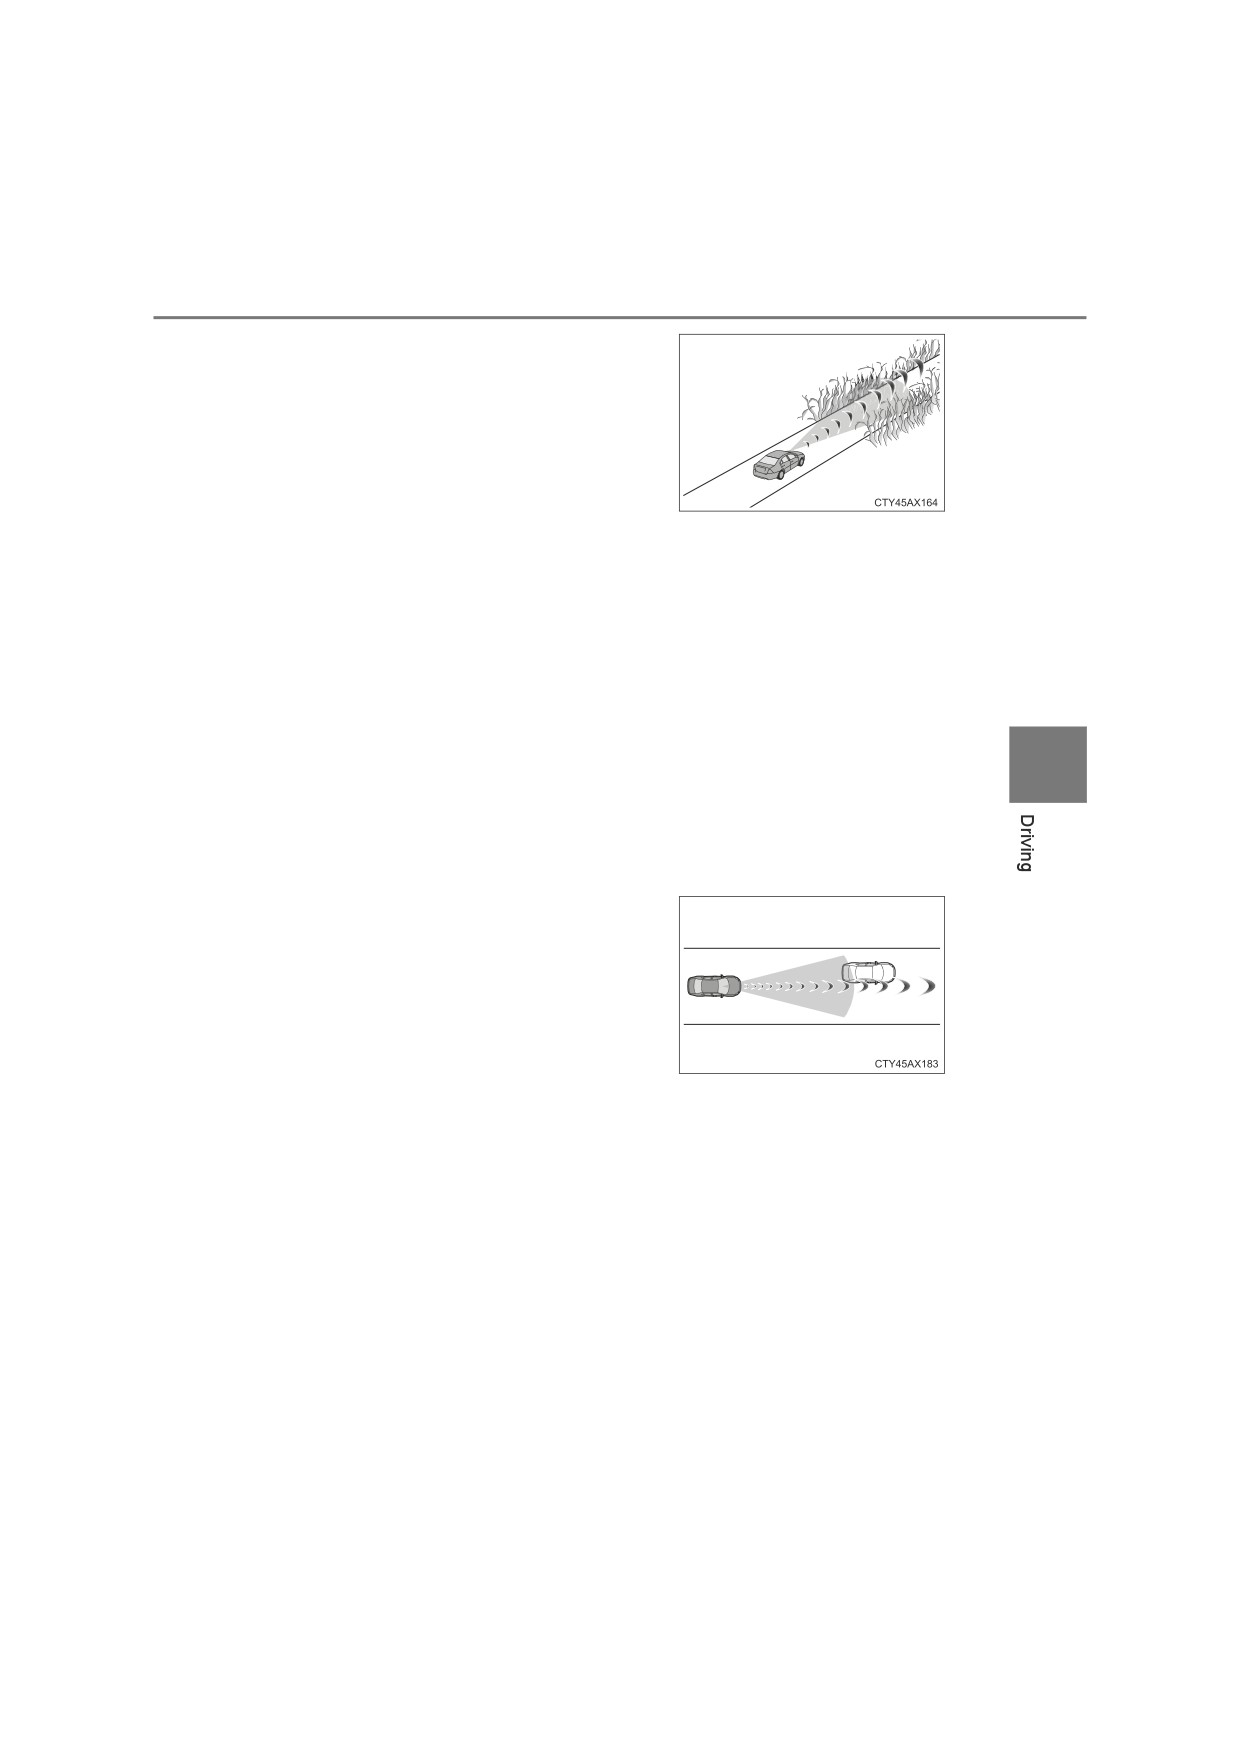
• When driving through or under
objects that may contact your vehicle,
such as thick grass, tree branches, or
a banner
• When driving through steam or smoke
• When driving near an object that reflects radio waves, such as a large
truck or guardrail
• When driving near a TV tower, broadcasting station, electric power plant,
or other location where strong radio waves or electrical noise may be
present
■ Situations in which the system may not operate properly
● In some situations such as the following, an object may not be detected by
the radar sensor and front camera, preventing the system from operating
properly:
4
• When a detectable object is approaching your vehicle
• When your vehicle or a detectable object is wobbling
• If a detectable object makes an abrupt maneuver (such as sudden swerv-
ing, acceleration or deceleration)
• When your vehicle approaches a detectable object rapidly
• When a detectable object is not
directly in front of your vehicle
• When a detectable object is near a wall, fence, guardrail, manhole cover,
vehicle, steel plate on the road, etc.
• When a detectable object is under a structure
• When part of a detectable object is hidden by an object, such as large
baggage, an umbrella, or guardrail
• When multiple detectable objects are close together
• If the sun or other light is shining directly on a detectable object
• When a detectable object is a shade of white and looks extremely bright
• When a detectable object appears to be nearly the same color or bright-
ness as its surroundings
• If a detectable object cuts or suddenly emerges in front of your vehicle
• When the front of your vehicle is hit by water, snow, dust, etc.
• When a very bright light ahead, such as the sun or the headlights of
oncoming traffic, shines directly into the front camera
• When approaching the side or front of a vehicle ahead
280
4-5. Using the driving support systems
• If a vehicle ahead is a motorcycle
• If a vehicle ahead is narrow, such as a personal mobility vehicle
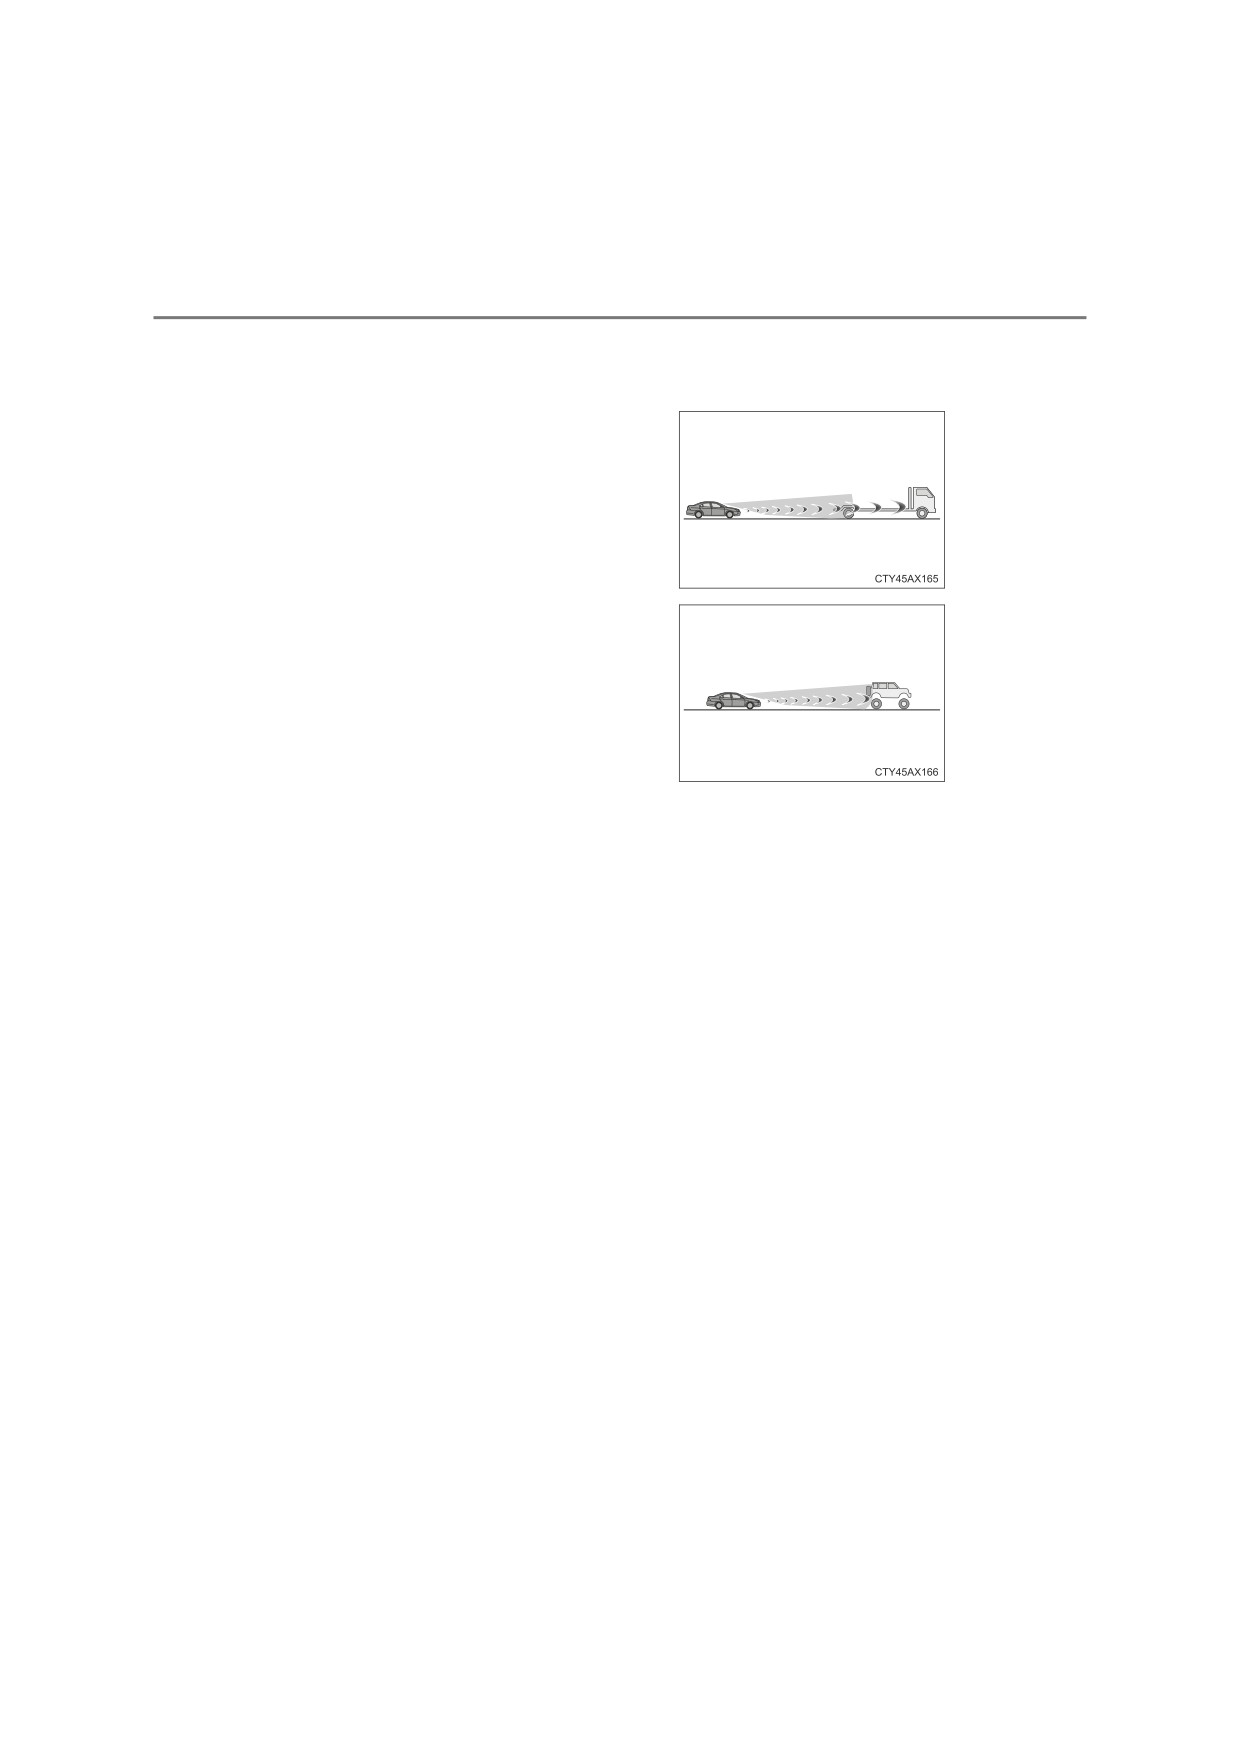
• If a preceding vehicle has a small rear end, such as an unloaded truck
• If a preceding vehicle has a low rear
end, such as a low bed trailer
• If a vehicle ahead has extremely high
ground clearance
• If a vehicle ahead is carrying a load which protrudes past its rear bumper
• If a vehicle ahead is irregularly shaped, such as a tractor or side car
• If a vehicle ahead is a child sized bicycle, a bicycle that is carrying a large
load, a bicycle ridden by more than one person, or a uniquely shaped
bicycle (bicycle with a child seat, tandem bicycle, etc.)
• If a pedestrian/or the riding height of a bicyclist ahead is shorter than
approximately 1 m (3.2 ft.) or taller than approximately 2 m (6.5 ft.)
• If a pedestrian/bicyclist is wearing oversized clothing (a rain coat, long
skirt, etc.), making their silhouette obscure
• If a pedestrian is bending forward or squatting or bicyclist is bending for-
ward
• If a pedestrian/bicyclist is moving fast
• If a pedestrian is pushing a stroller, wheelchair, bicycle or other vehicle
• When driving in inclement weather such as heavy rain, fog, snow or a
sandstorm
• When driving through steam or smoke
• When the surrounding area is dim, such as at dawn or dusk, or while at
night or in a tunnel, making a detectable object appear to be nearly the
same color as its surroundings
• When driving in a place where the surrounding brightness changes sud-
denly, such as at the entrance or exit of a tunnel
• After the engine has started the vehicle has not been driven for a certain
amount of time
• While making a left/right turn and for a few seconds after making a left/
right turn
• While driving on a curve and for a few seconds after driving on a curve
• If your vehicle is skidding

4-5. Using the driving support systems
281
• If the front of the vehicle is raised or
lowered
• If the wheels are misaligned
• If a wiper blade is blocking the front camera
• The vehicle is being driven at extremely high speeds
• When driving on a hill
• If the radar sensor or front camera is misaligned
●In some situations such as the following, sufficient braking force may not be
obtained, preventing the system from performing properly:
• If the braking functions cannot operate to their full extent, such as when
the brake parts are extremely cold, extremely hot, or wet
• If the vehicle is not properly maintained (brakes or tires are excessively
4
worn, improper tire inflation pressure, etc.)
• When the vehicle is being driven on a gravel road or other slippery sur-
face
■ If VSC is disabled
●If VSC is disabled (P. 357), the pre-collision brake assist and pre-collision
braking functions are also disabled.
●The PCS warning light will turn on and “VSC Turned Off Pre-Collision Brake
System Unavailable” will be displayed on the multi-information display.
282
4-5. Using the driving support systems
LDA (Lane Departure Alert With Yaw Assist
Function)
Summary of functions
When driving on a road with clear white (yellow) lane lines, this func-
tion alerts the driver when the vehicle might depart from its lane or
course* and provides assistance by applying a brake force to keep
the vehicle in its lane or course*.
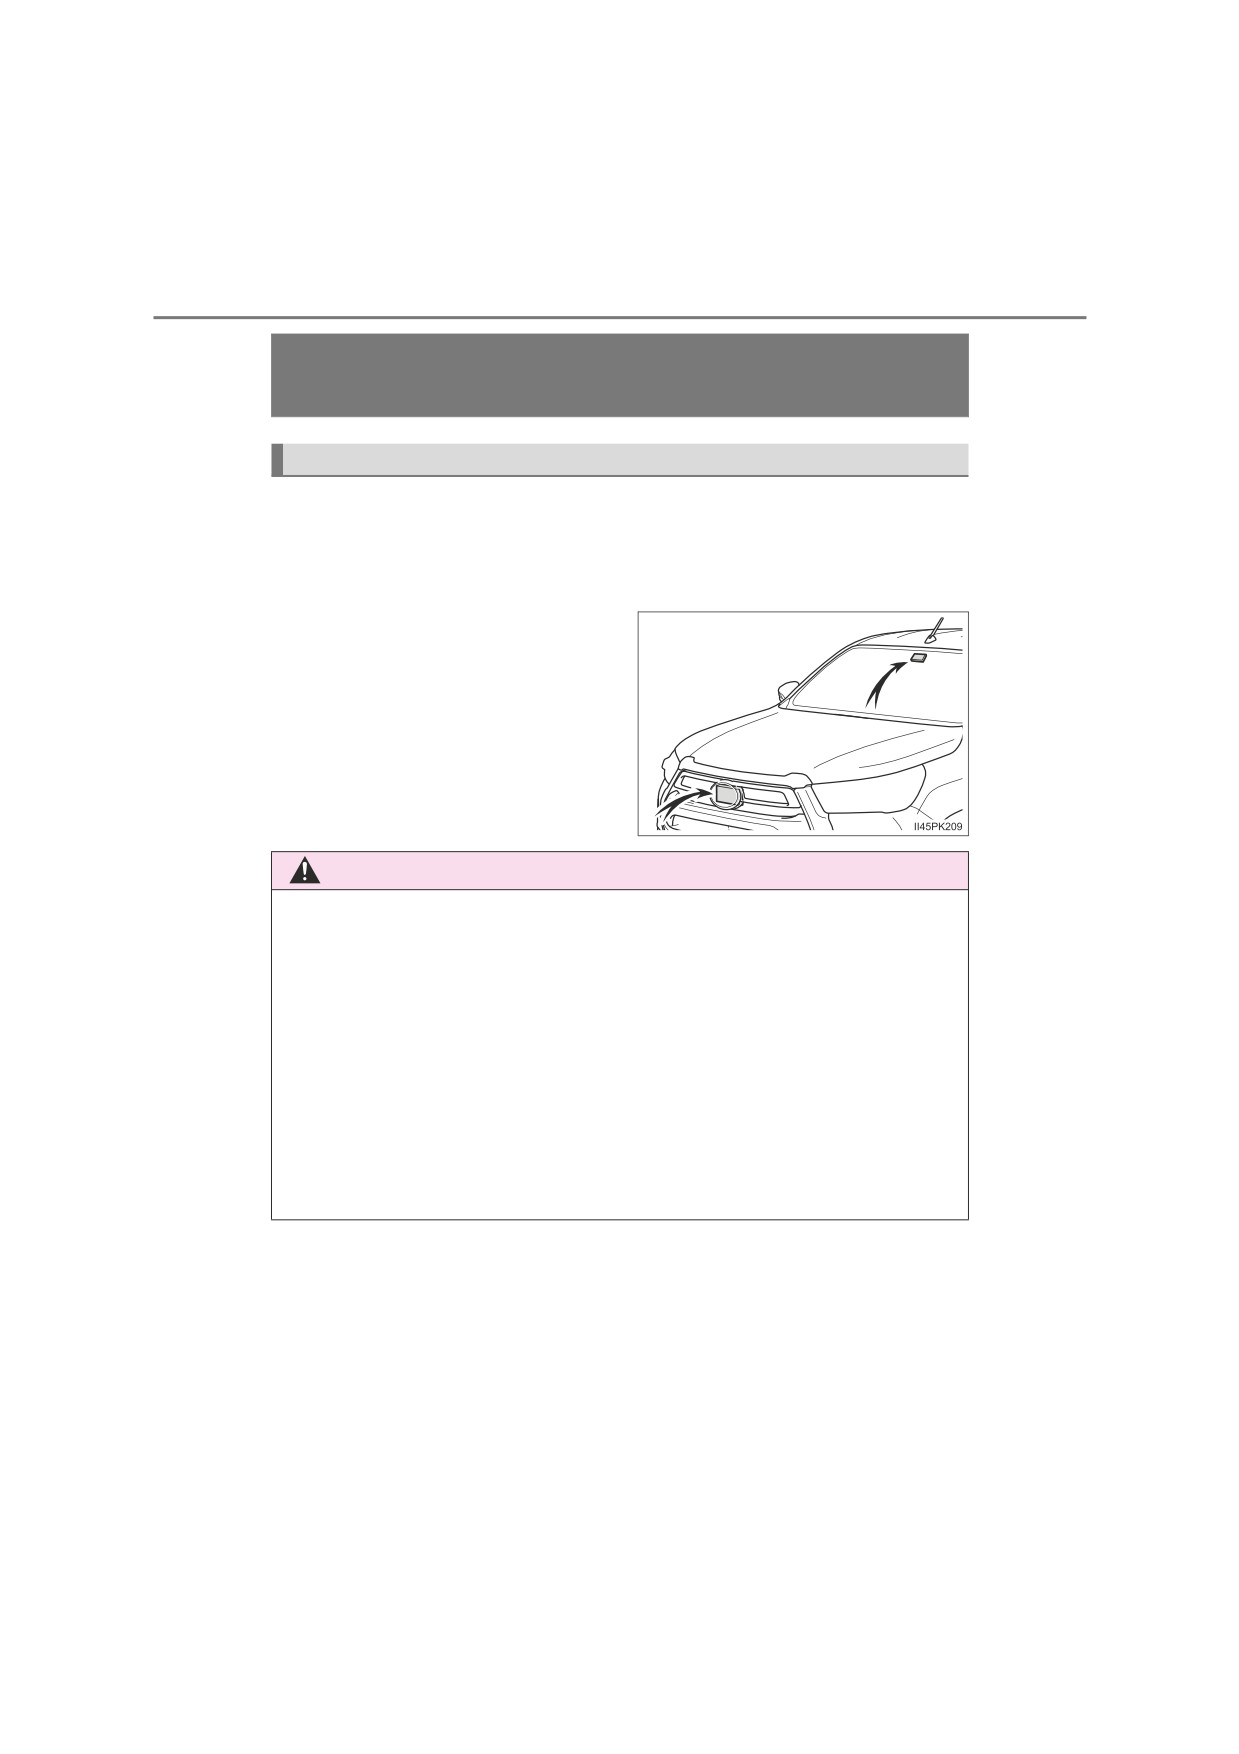
The LDA system recognizes white
(yellow) lane lines or a course*
using the front camera. Addition-
ally, it detects preceding vehicles
using the front camera and radar.
*: Boundary between asphalt and the
side of the road, such as grass,
soil, or a curb
WARNING
■ Before using LDA system
●Do not rely solely upon the LDA system. The LDA system does not auto-
matically drive the vehicle or reduce the amount of attention that must be
paid to the area in front of the vehicle. The driver must always assume full
responsibility for driving safely by paying careful attention to the surround-
ing conditions and operating the steering wheel to correct the path of the
vehicle. Also, the driver must take adequate breaks when fatigued, such
as from driving for a long period of time.
●Failure to perform appropriate driving operations and pay careful attention
may lead to an accident, resulting in death or serious injury.
● When not using the LDA system, use the LDA switch to turn the system
off.
: If equipped
4-5. Using the driving support systems
283
WARNING
■ Situations unsuitable for LDA system
In the following situations, use the LDA switch to turn the system off. Failure
to do so may lead to an accident, resulting in death or serious injury.
● Vehicle is driven on a road surface which is slippery due to rainy weather,
fallen snow, freezing, etc.
● Vehicle is driven on a snow-covered road.
●White (yellow) lines are difficult to see due to rain, snow, fog, dust, etc.
● A spare tire, tire chains, etc. are equipped.
● When the tires have been excessively worn, or when the tire inflation pres-
sure is low.
● When your vehicle is towing a trailer (with towing hitch) or during emer-
gency towing.
■ Preventing LDA system malfunctions and operations performed by
mistake
4
●Do not modify the headlights or place stickers, etc. on the surface of the
lights.
●Do not modify the suspension etc. If the suspension etc. needs to be
replaced, contact any authorized Toyota retailer or Toyota authorized
repairer, or any reliable repairer.
●Do not install or place anything on the hood or grille. Also, do not install a
grille guard (bull bars, kangaroo bar, etc.).
● If your windshield needs repairs, contact any authorized Toyota retailer or
Toyota authorized repairer, or any reliable repairer.
284
4-5. Using the driving support systems
WARNING
■ Conditions in which functions may not operate properly
In the following situations, the functions may not operate properly and the
vehicle may depart from its lane. Drive safely by always paying careful
attention to your surroundings and operate the steering wheel to correct the
path of the vehicle without relying solely on the functions.
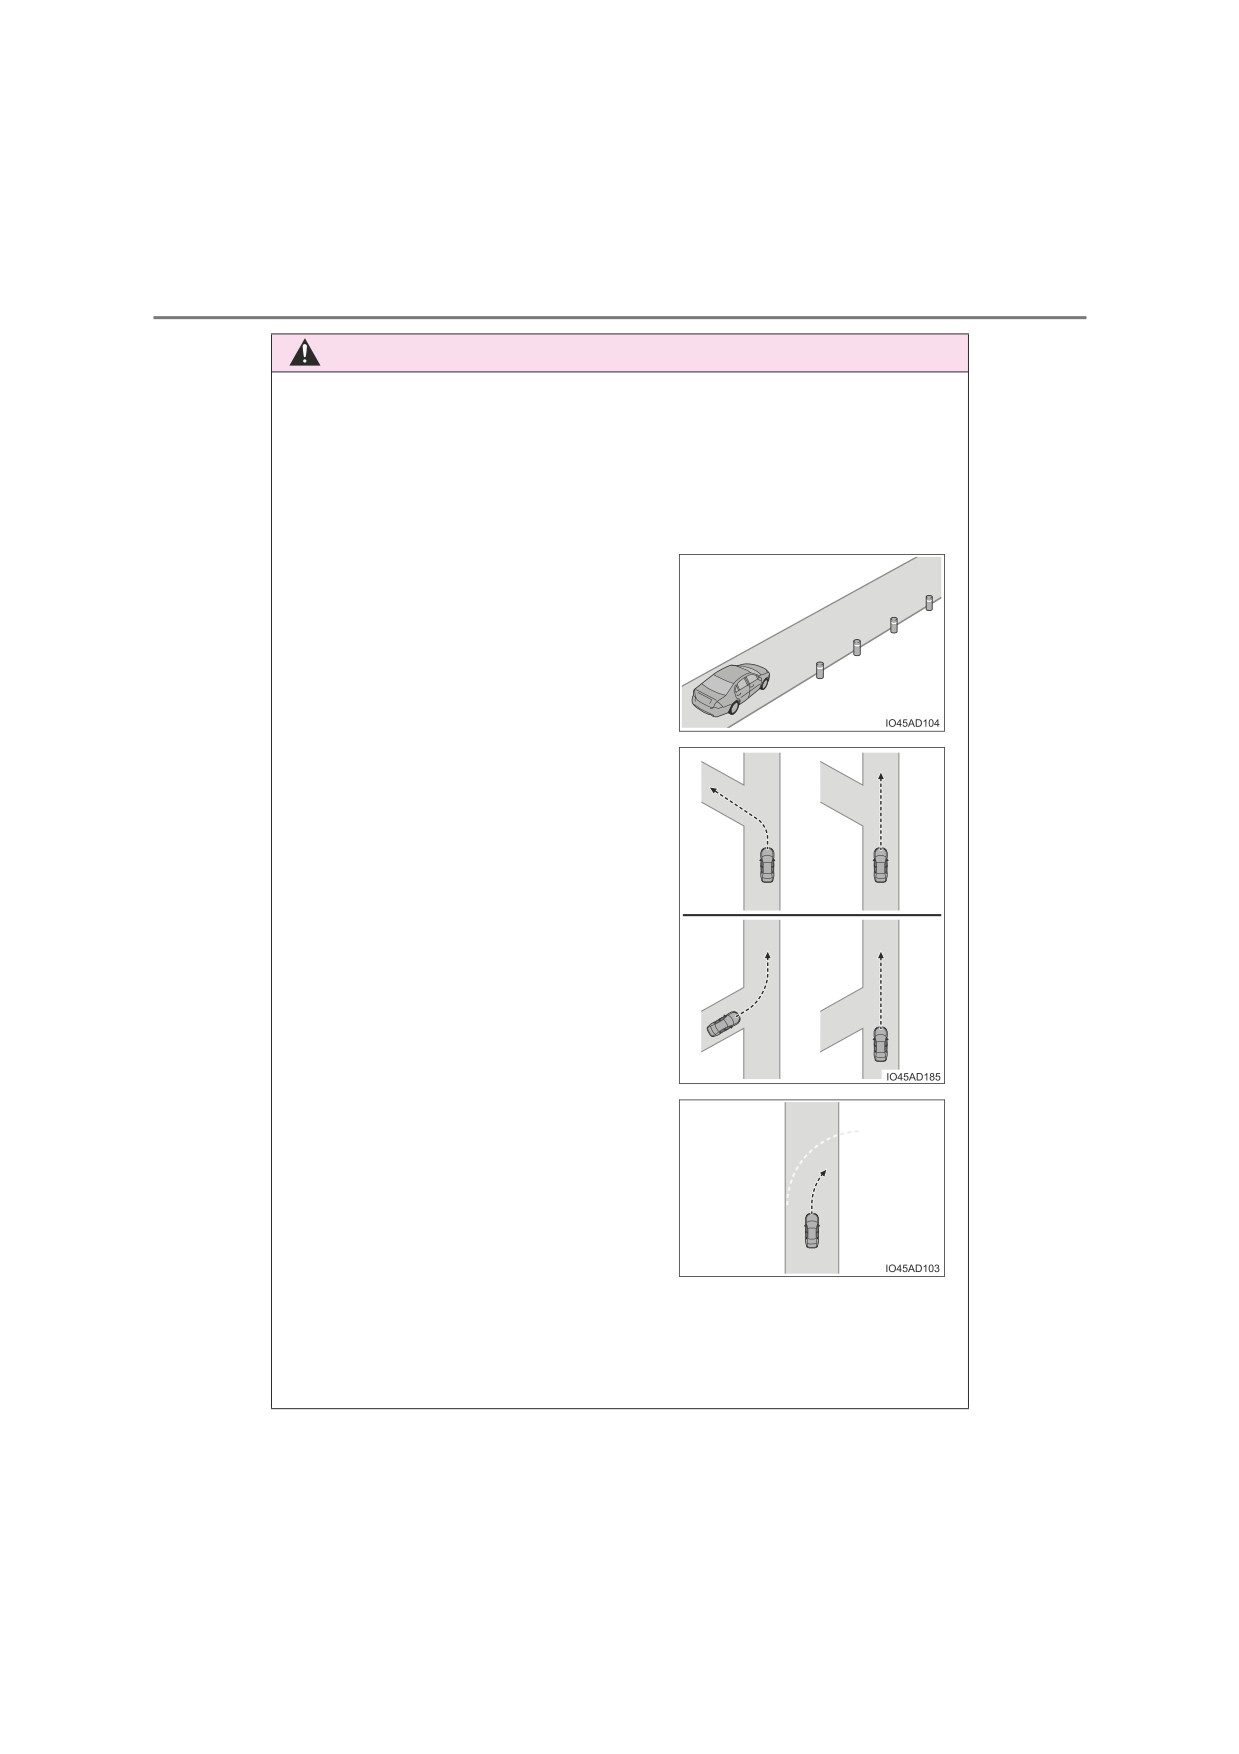
● Vehicle is being driven around a sharp curve.
●Objects or patterns that could be mis-
taken for white (yellow) lines are pres-
ent on the side of the road (guardrails,
reflective poles, etc.).
● Vehicle is driven where the road
diverges, merges, etc.
●Repair marks of asphalt, white (yellow)
lines, etc. are present due to road
repair.
●There are shadows on the road that run parallel with, or cover, the white
(yellow) lines.
●The vehicle is driven in an area without white (yellow) lines, such as in
front of a tollgate or checkpoint, or at an intersection, etc.
4-5. Using the driving support systems
285
WARNING
●The white (yellow) lines are cracked, “Raised pavement marker” or stones
are present.
●The white (yellow) lines cannot be seen or are difficult to see due to sand,
etc.
●The vehicle is driven on a road surface that is wet due to rain, puddles,
etc.
●The traffic lines are yellow (which may be more difficult to recognize than
lines that are white).
●The white (yellow) lines cross over a curb, etc.
●The vehicle is driven on a bright surface, such as concrete.
● If the edge of the road is not clear or straight.
●The vehicle is driven on a surface that is bright due to reflected light, etc.
●The vehicle is driven in an area where the brightness changes suddenly,
such as at the entrances and exits of tunnels, etc.
4
●Light from the headlights of an oncoming vehicle, the sun, etc. enters the
camera.
●The vehicle is driven on a slope.
●The vehicle is driven on a road which tilts left or right, or a winding road.
●The vehicle is driven on an unpaved or rough road.
●The traffic lane is excessively narrow or wide.
●The vehicle is extremely tilted due to carrying heavy luggage or having
improper tire pressure.
●The distance to the preceding vehicle is extremely short.
●The vehicle is moving up and down a large amount due to road conditions
during driving (poor roads or road seams).
●When driving in a tunnel or at night with the headlights off or when a head-
light is dim due to its lens being dirty or it being misaligned.
●The vehicle is struck by a crosswind.
●The vehicle has just changed lanes or crossed an intersection.
● Tires which differ by structure, manufacturer, brand or tread pattern are
used.
● When tires of a size other than specified are installed.
● Snow tires, etc. are equipped.
286
4-5. Using the driving support systems
Functions included in LDA system
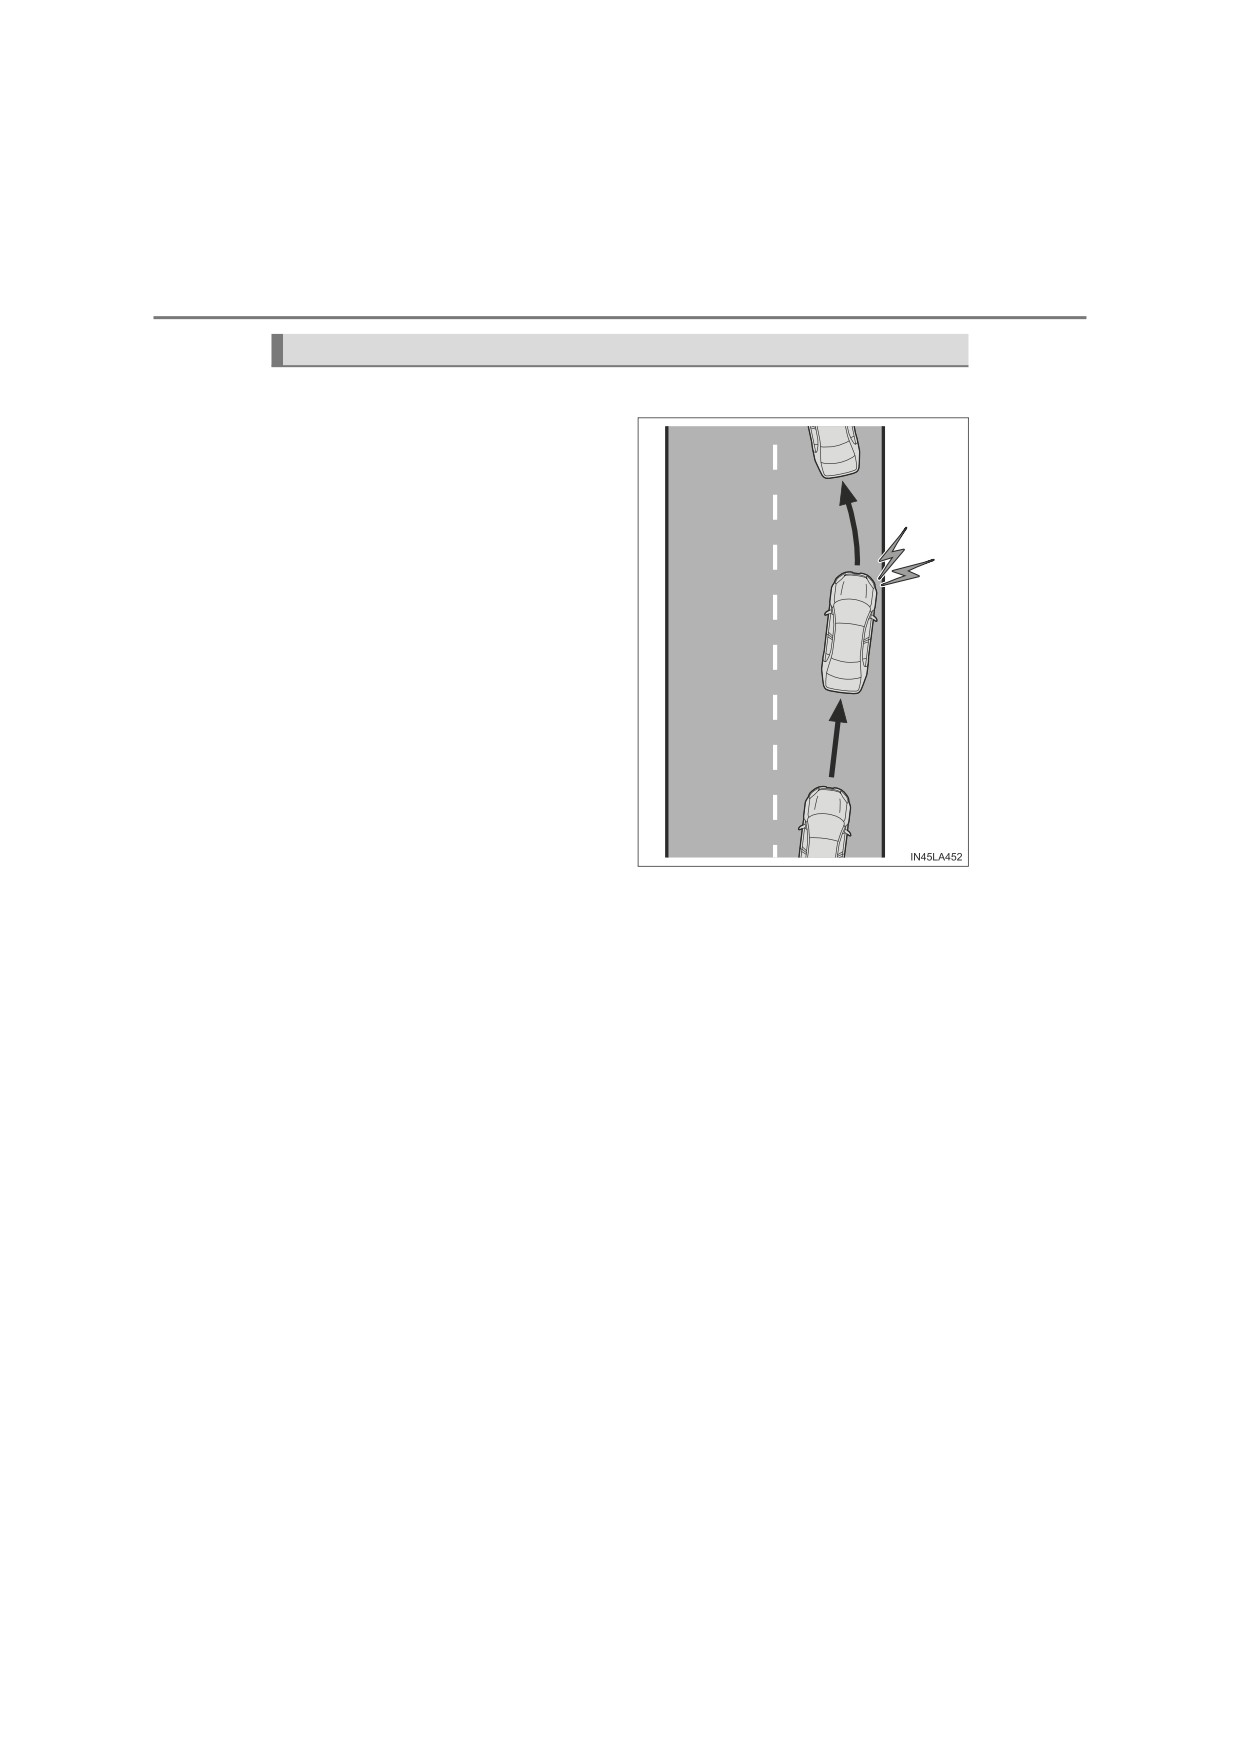
■ Lane departure alert function
When the system determines
that the vehicle might depart
from its lane or course*, a
warning is displayed on the
multi-information display, and a
warning buzzer will sound to
alert the driver.
When the warning buzzer
sounds, check the area around
your vehicle and carefully oper-
ate the steering wheel to move
the vehicle back to the center of
the lane.
*: Boundary between asphalt and the
side of the road, such as grass,
soil, or a curb