Citroen C4 (2023 year). Manual in english - page 6
4-1. Before driving
207
Guidance
Your vehicle will handle differently when towing a trailer. In order to
avoid accident death or serious injury, keep the following in mind
when towing:
■ Checking connections between trailer and lights
Stop the vehicle and check the operation of the connection between
the trailer and lights after driving for a brief period as well as before
starting off.
■ Practicing driving with a coupled trailer
● Get the feel for turning, stopping and reversing with the trailer
coupled by practicing in an area with no or light traffic.
● When reversing with a coupled trailer, hold the section of the
steering wheel nearest to you and rotate clockwise to turn the
trailer left or counterclockwise to turn it right. Always rotate a little
4
at a time to prevent steering error. Have someone guide you
when reversing to lessen the risk of accident.
■ Increasing vehicle-to-vehicle distance
At a speed of 10 km/h (6 mph), the distance to the vehicle running
ahead of you should be equivalent to or greater than the combined
length of your vehicle and trailer. Avoid sudden braking that may
cause skidding. Otherwise, the vehicle may spin out of control. This
is especially true when driving on wet or slippery road surfaces.
■ Sudden acceleration/steering input/cornering
Executing sharp turns when towing may result in the trailer colliding
with your vehicle. Decelerate well in advance when approaching
turns and take them slowly and carefully to avoid sudden braking.
■ Important points regarding turning
The wheels of the trailer will travel closer to the inside of the curve
than the wheels of the vehicle. To make allowance for this, take the
turns wider than you would normally do.
208
4-1. Before driving
■ Important points regarding stability
Vehicle movement resulting from uneven road surfaces and strong
crosswinds will affect handling. The vehicle may also be rocked by
passing buses or large trucks. Frequently check behind when mov-
ing alongside such vehicles. As soon as such vehicle movement
occurs, immediately start to decelerate smoothly by slowly applying
the brakes. Always steer the vehicle straight ahead while braking.
■ Passing other vehicles
Consider the total combined length of your vehicle and trailer and
ensure that the vehicle-to-vehicle distance is sufficient before exe-
cuting lane changes.
■ Transmission information
Vehicles with manual transmission: To maintain engine braking effi-
ciency when using engine braking, do not use 5th gear and 6th
gear.
Vehicles with automatic transmission: To maintain engine braking
efficiency when using engine braking, do not use the transmission
in D. Transmission shift range position must be in 4 or lower, in S
mode.
■ If the engine overheats
Towing a loaded trailer up a long, steep incline in temperatures
exceeding 30C (85F) may result in the engine overheating. If the
engine coolant temperature gauge indicates that the engine is over-
heating, turn the air conditioning off immediately, leave the road and
stop the vehicle in a safe place. (P. 608)
■ When parking the vehicle
Always place wheel chocks under the wheels of both the vehicle
and trailer. Firmly set the parking brake and shift the shift lever to P
for automatic transmissions, and 1 or R for manual transmissions.
4-1. Before driving
209
WARNING
Follow all the instructions described in this section. Failure to do so could
cause an accident resulting in death or serious injury.
■ Trailer towing precautions
When towing, make sure that none of the weight limits are exceeded.
(P. 210)
■ Vehicle speed in towing
Observe the legal maximum speeds for trailer towing.
■ Before descending hills or long declines
Reduce speed and downshift. However, never downshift suddenly while
descending steep or long down hill grades.
■ Operation of the brake pedal
Do not hold the brake pedal depressed often or for long periods of time.
Doing so may result in the brake overheating or reduce braking effects.
■ To avoid accident or injury
4
●The gross combination mass (sum of your vehicle mass plus its load and
the total trailer mass) must not exceed the following:
Single-cab models
6000 kg (13228 lb.): 4WD models
Smart-cab models
6200 kg (13669 lb.)
Double-cab models
6000 kg (13228 lb.): Pre Runner
6300 kg (13889 lb.): 4WD models for model code destination W*
*: See “Checking your vehicle’s model” if you are not sure of which model
your vehicle is. (P. 12)
●Do not use the following systems when trailer towing.
• Cruise control (if equipped)
• Dynamic radar cruise control (if equipped)
210
4-1. Before driving
Important points regarding trailer loads (4WD models for model
code destination Blank* [for Kazakhstan and Russia] and Pre
Runner)
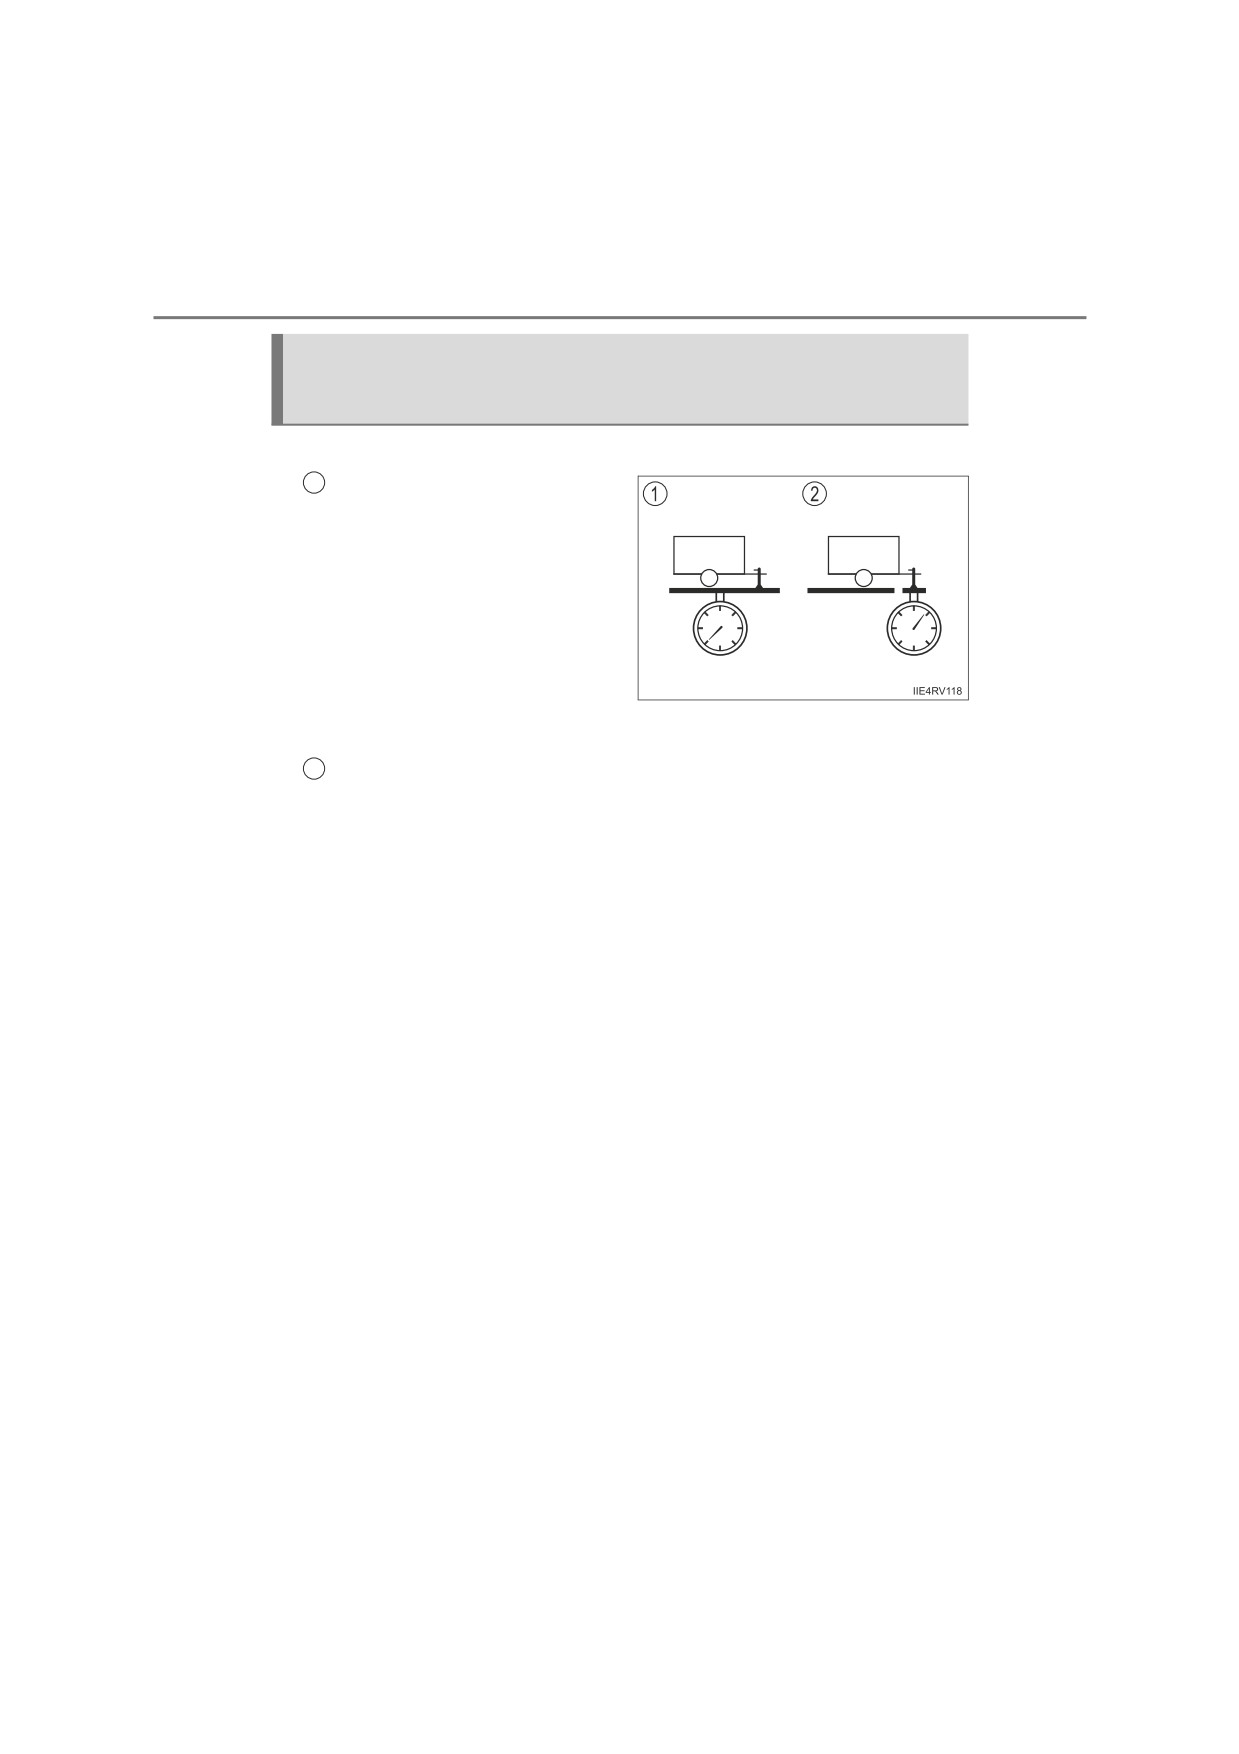
■ Total trailer weight and permissible drawbar load
1
Total trailer weight
Weight of the trailer itself plus
the trailer load should be within
the maximum towing capacity.
Exceeding this weight is danger-
ous. (P. 620)
When towing a trailer, use a fric-
tion coupler or friction stabilizer
(sway control device).
When the total trailer weight is over 2000 kg (4409 lb.), a friction stabi-
lizer (sway control device) is required.
Permissible drawbar load
2
Allocate the trailer load so that the drawbar load is greater than 25 kg
(55.1 lb.) or 4% of the towing capacity. Do not let the drawbar load
exceed the indicated weight. (P. 620)
*: See “Checking your vehicle’s model” if you are not sure of
which model your vehicle is. (P. 12)
4-1. Before driving
211
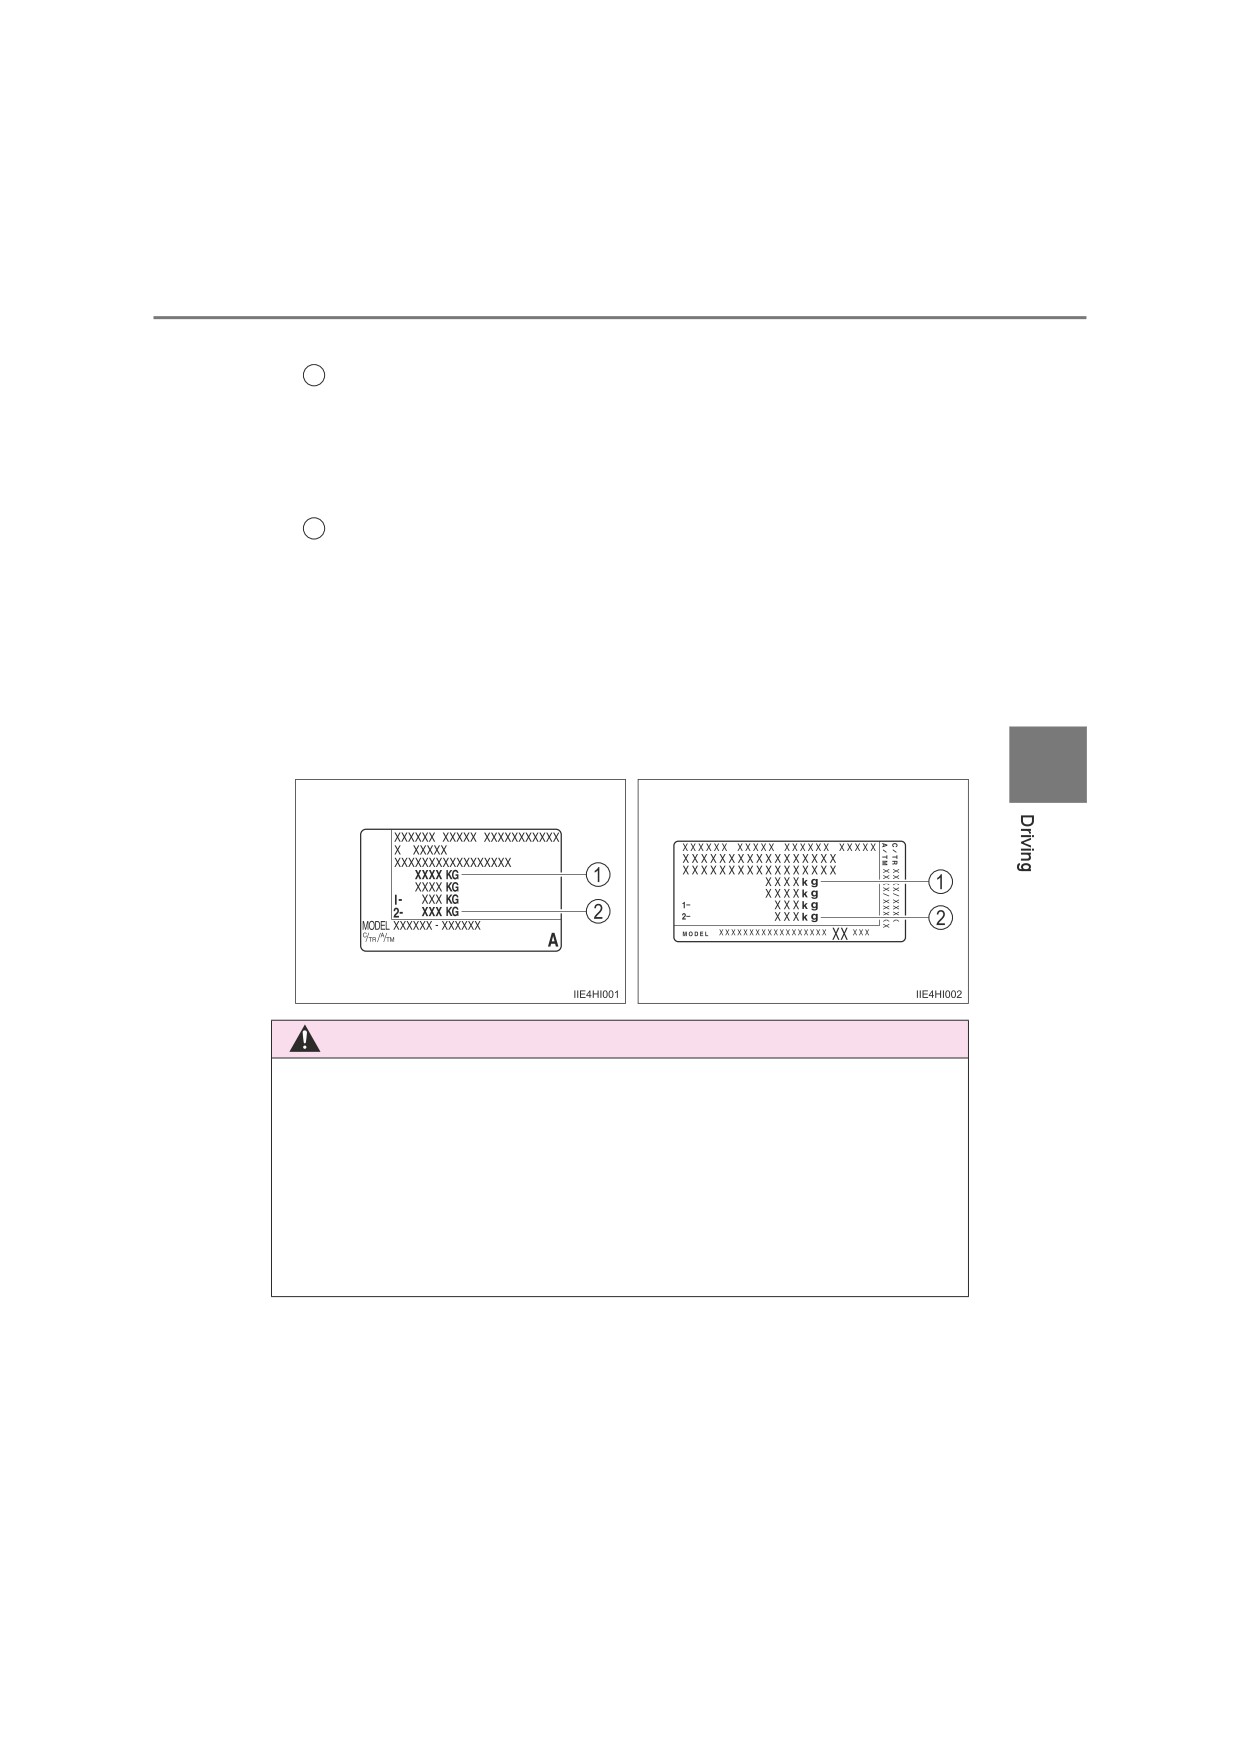
■ Information tag (manufacturer’s label)
1
Gross vehicle mass
The combined weight of the driver, passengers, luggage, towing
hitch, total curb mass and drawbar load should not exceed the
gross vehicle mass by more than 100 kg (220.5 lb.). Exceeding
this weight is dangerous.
Maximum permissible rear axle capacity
2
The weight borne by the rear axle should not exceed the maxi-
mum permissible rear axle capacity by 15% or more. Exceeding
this weight is dangerous.
The values for towing capacity were derived from testing con-
ducted at sea level. Take note that engine output and towing
capacity will be reduced at high altitudes.
Type A
Type B
4
WARNING
■ When the gross vehicle mass or maximum permissible axle capacity is
exceeded
Failing to observe this precaution may lead to an accident causing death or
serious injury.
●Add an additional 20.0 kPa (0.2 kgf/cm2 or bar, 3 psi) to the recommended
tire inflation pressure value. (P. 637)
●Do not exceed the established speed limit for towing a trailer in built-up
areas or 100 km/h (62 mph), whichever is lower.
212
4-1. Before driving
■ Tire information
● Increase the tire inflation pressure to 20.0 kPa (0.2 kgf/cm2 or bar, 3 psi)
greater than the recommended value when towing. (P. 637)
● Increase the air pressure of the trailer tires in accordance with the total
trailer weight and according to the values recommended by the manufac-
turer of your trailer.
■ Trailer lights
Check that the turn signal lights and stoplights are operating correctly every
time you hitch up the trailer. Directly wiring up to your vehicle may damage
the electrical system and stop the lights from functioning correctly.
■ When towing a trailer
Disable the following systems, as the systems may not operate properly.
● LDA (Lane Departure Alert With Yaw Assist Function) (If equipped)
(P. 282)
● Dynamic radar cruise control (If equipped) (P. 299)
● Cruise control (If equipped) (P. 315)
● Toyota parking assist-sensor (If equipped) (P. 319)
■ Break-in schedule
Toyota recommends that vehicles fitted with new power train components
should not be used for towing trailers for the first 800 km (500 miles).
■ Safety checks before towing
●Check that the maximum load limit for the towing hitch/bracket and hitch ball
is not exceeded. Bear in mind that the coupling weight of the trailer will add
to the load exerted on the vehicle. Also make sure that the total load exerted
on the vehicle is within the range of the weight limits. (P. 210)
● Ensure that the trailer load is secure.
● Supplementary outside rear view mirrors should be added to the vehicle if
the traffic behind cannot be clearly seen with standard mirrors. Adjust the
extending arms of these mirrors on both sides of the vehicle so that they
always provide maximum visibility of the road behind.
■Maintenance
● Maintenance must be performed more frequently when using the vehicle for
towing due to the greater weight burden placed on the vehicle compared to
normal driving.
● Retighten all bolts securing the hitching ball and bracket after towing for
approximately 1000 km (600 miles).
4-1. Before driving
213
■ If trailer sway occurs
One or more factors (crosswinds, passing vehicles, rough roads, etc.) can
adversely affect handling of your vehicle and trailer, causing instability.
● If trailer swaying occurs:
• Firmly grip the steering wheel. Steer straight ahead.
Do not try to control trailer swaying by turning the steering wheel.
• Begin releasing the accelerator pedal immediately but very gradually to
reduce speed.
Do not increase speed. Do not apply vehicle brakes.
If you make no extreme correction with the steering or brakes, your vehicle
and trailer should stabilize (if enabled, Trailer Sway Control can also help to
stabilize the vehicle and trailer.).
● After the trailer swaying has stopped:
• Stop in a safe place. Get all occupants out of the vehicle.
• Check the tires of the vehicle and the trailer.
• Check the load in the trailer.
Make sure the load has not shifted.
Make sure the tongue weight is appropriate, if possible.
4
• Check the load in the vehicle.
Make sure the vehicle is not overloaded after occupants get in.
If you cannot find any problems, the speed at which trailer swaying
occurred is beyond the limit of your particular vehicle-trailer combination.
Drive at a lower speed to prevent instability. Remember that swaying of the
towing vehicle-trailer increases as speed increases.
NOTICE
■ When the rear bumper strengthening material is aluminum
Ensure the steel bracket part does not come directly in contact with that
area.
When steel and aluminum come into contact, there is a reaction similar to
corrosion, which will weaken the section concerned and may result in dam-
age. Apply a rust inhibitor to parts that will come in contact when attaching a
steel bracket.
214
4-1. Before driving
Important points regarding trailer loads (4WD models for model
code destination W*)
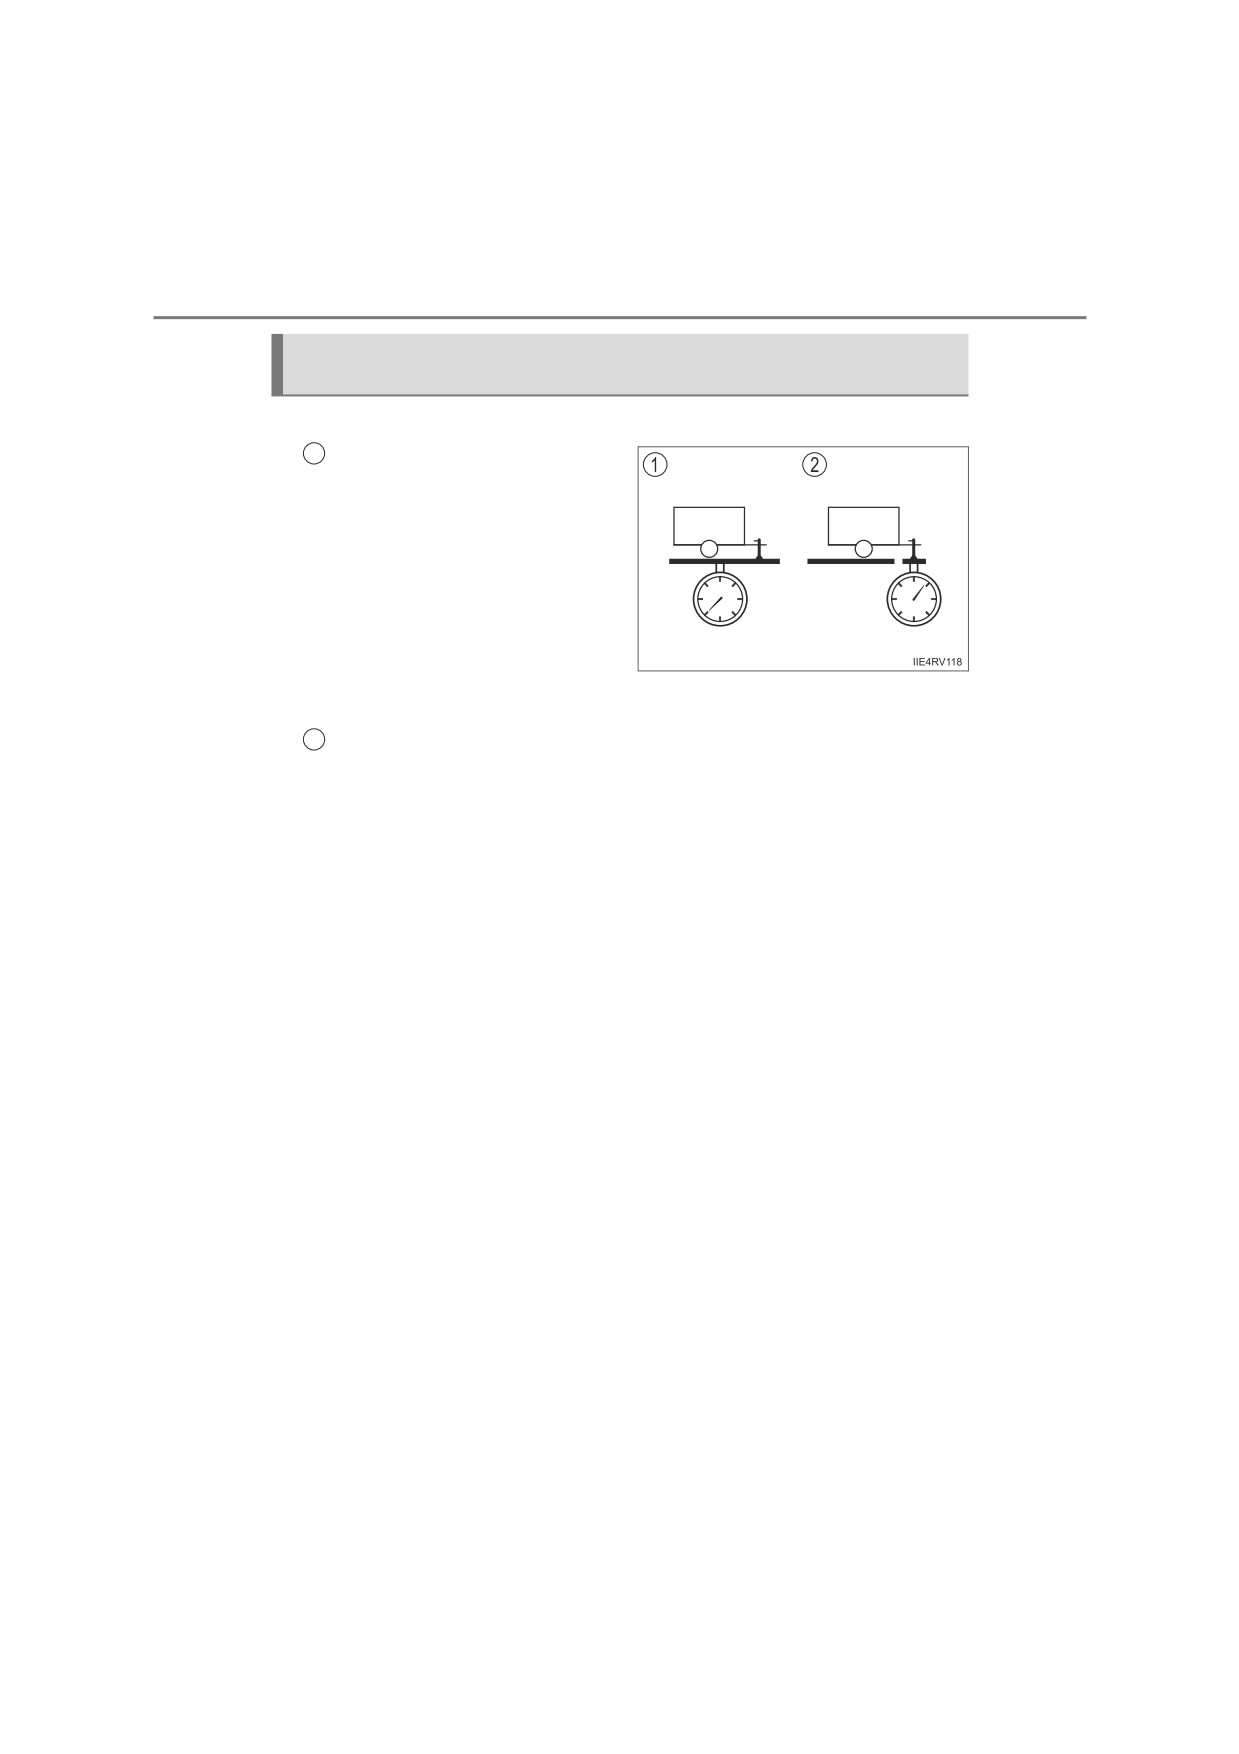
■ Total trailer weight and permissible drawbar load
1
Total trailer weight
Weight of the trailer itself plus
the trailer load should be within
the maximum towing capacity.
Exceeding this weight is danger-
ous. (P. 620)
When towing a trailer, use a fric-
tion coupler or friction stabilizer
(sway control device).
When the total trailer weight is over 2000 kg (4409 lb.), a friction stabi-
lizer (sway control device) is required.
Permissible drawbar load
2
Allocate the trailer load so that the drawbar load is greater than 25 kg
(55.1 lb.) or 4% of the towing capacity. Do not let the drawbar load
exceed the indicated weight. (P. 620)
*: See “Checking your vehicle’s model” if you are not sure of
which model your vehicle is. (P. 12)
4-1. Before driving
215
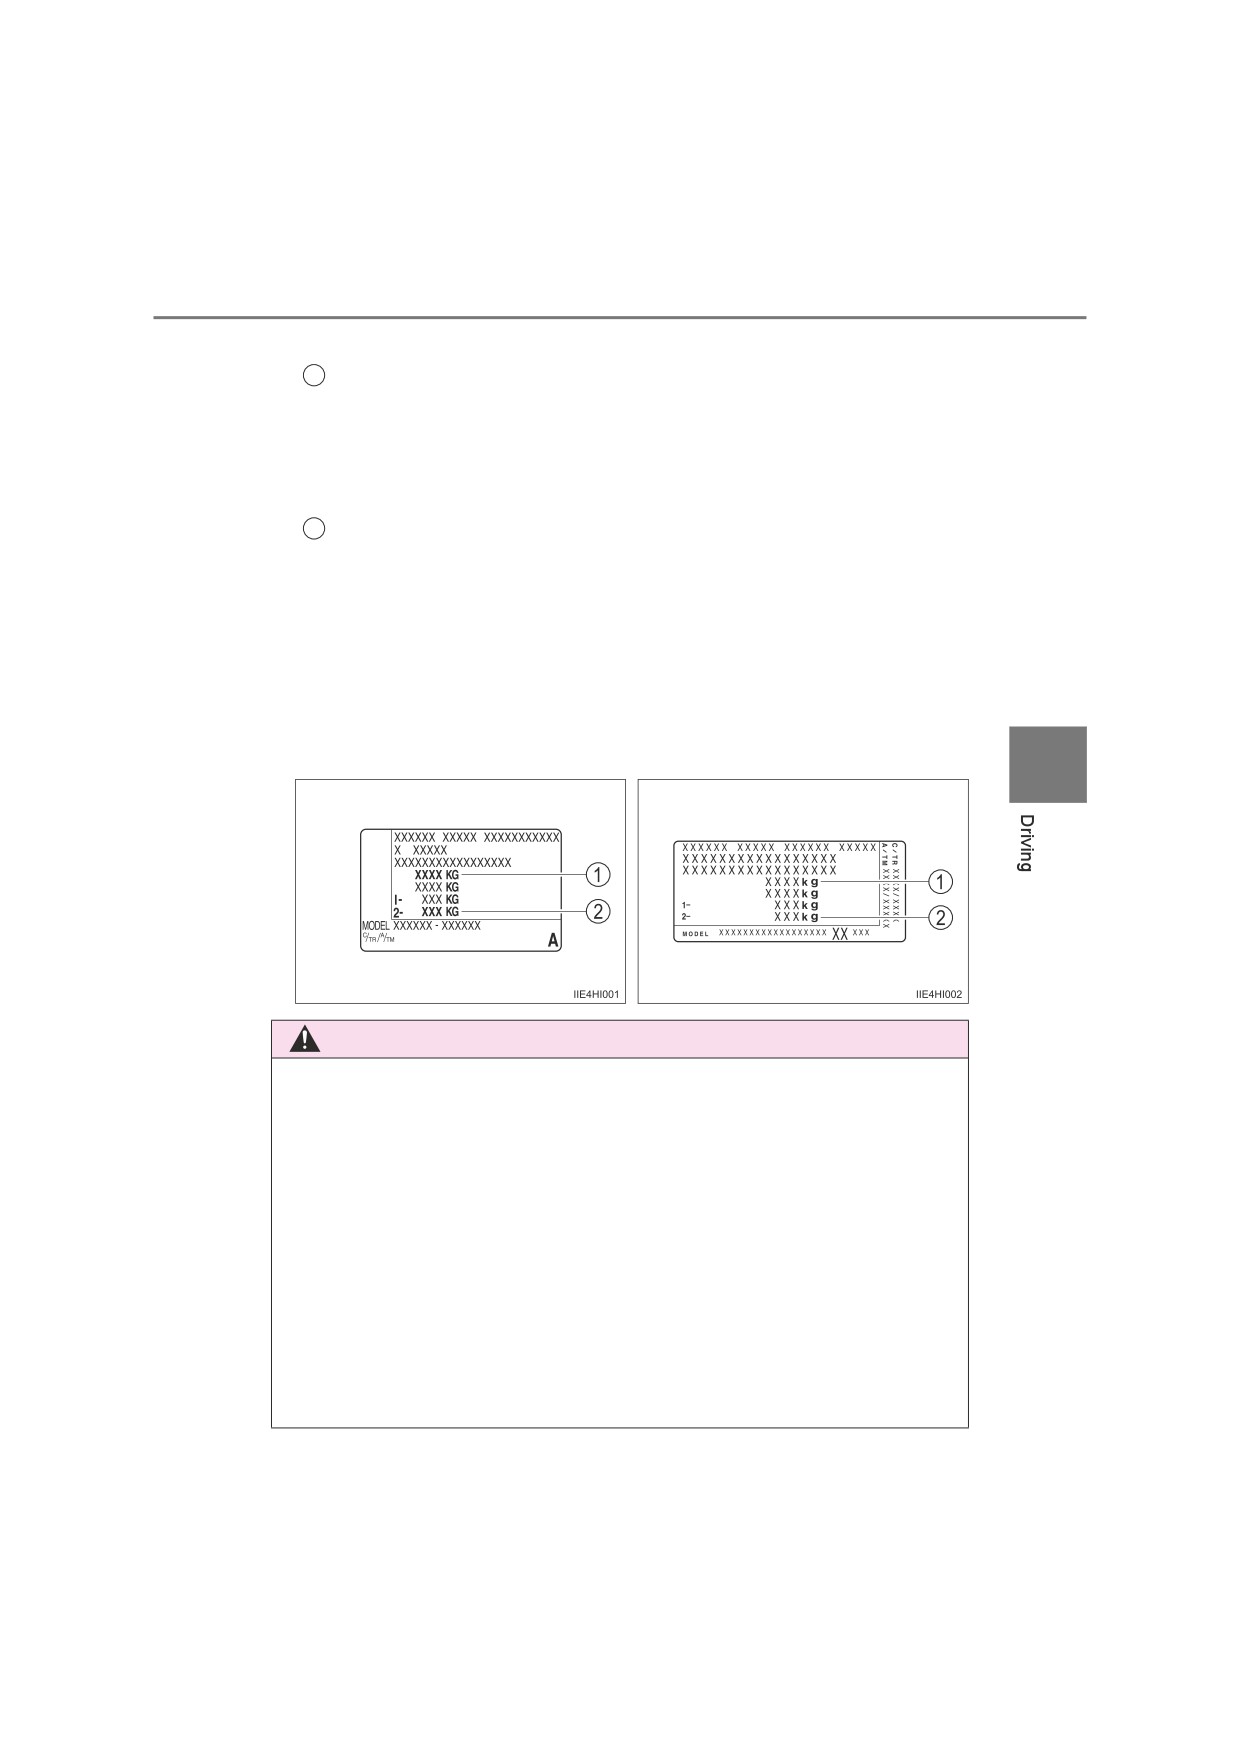
■ Information tag (manufacturer’s label)
1
Gross vehicle mass
The combined weight of the driver, passengers, luggage, towing
hitch, total curb mass and drawbar load should not exceed the
gross vehicle mass by more than 100 kg (220.5 lb.). Exceeding
this weight is dangerous.
Maximum permissible rear axle capacity
2
The weight borne by the rear axle should not exceed the maxi-
mum permissible rear axle capacity by 15% or more. Exceeding
this weight is dangerous.
The values for towing capacity were derived from testing con-
ducted at sea level. Take note that engine output and towing
capacity will be reduced at high altitudes.
Type A
Type B
4
WARNING
■ When the total trailer weight exceeds 3200kg (7055 lb.)
Do not exceed the legal speed limit for towing a trailer or 90 km/h (56 mph),
whichever is lower.
Failing to observe this precaution may lead to an accident causing death or
serious injury.
■ When the gross vehicle mass or maximum permissible axle capacity is
exceeded
Failing to observe this precaution may lead to an accident causing death or
serious injury.
●Add an additional 20.0 kPa (0.2 kgf/cm2 or bar, 3 psi) to the recommended
tire inflation pressure value. (P. 637)
●Do not exceed the established speed limit for towing a trailer in built-up
areas or 100 km/h (62 mph), whichever is lower.
216
4-1. Before driving
■ Tire information
● Increase the tire inflation pressure to 20.0 kPa (0.2 kgf/cm2 or bar, 3 psi)
greater than the recommended value when towing. (P. 637)
● Increase the air pressure of the trailer tires in accordance with the total
trailer weight and according to the values recommended by the manufac-
turer of your trailer.
■ Trailer lights
Check that the turn signal lights and stoplights are operating correctly every
time you hitch up the trailer. Directly wiring up to your vehicle may damage
the electrical system and stop the lights from functioning correctly.
■ When towing a trailer
Disable the following systems, as the systems may not operate properly.
● LDA (Lane Departure Alert With Yaw Assist Function) (If equipped)
(P. 282)
● Dynamic radar cruise control (If equipped) (P. 299)
● Cruise control (If equipped) (P. 315)
● Toyota parking assist-sensor (If equipped) (P. 319)
■ Break-in schedule
Toyota recommends that vehicles fitted with new power train components
should not be used for towing trailers for the first 800 km (500 miles).
■ Safety checks before towing
●Check that the maximum load limit for the towing hitch/bracket and hitch ball
is not exceeded. Bear in mind that the coupling weight of the trailer will add
to the load exerted on the vehicle. Also make sure that the total load exerted
on the vehicle is within the range of the weight limits. (P. 214)
● Ensure that the trailer load is secure.
● Supplementary outside rear view mirrors should be added to the vehicle if
the traffic behind cannot be clearly seen with standard mirrors. Adjust the
extending arms of these mirrors on both sides of the vehicle so that they
always provide maximum visibility of the road behind.
■Maintenance
● Maintenance must be performed more frequently when using the vehicle for
towing due to the greater weight burden placed on the vehicle compared to
normal driving.
● Retighten all bolts securing the hitching ball and bracket after towing for
approximately 1000 km (600 miles).
4-1. Before driving
217
■ If trailer sway occurs
One or more factors (crosswinds, passing vehicles, rough roads, etc.) can
adversely affect handling of your vehicle and trailer, causing instability.
● If trailer swaying occurs:
• Firmly grip the steering wheel. Steer straight ahead.
Do not try to control trailer swaying by turning the steering wheel.
• Begin releasing the accelerator pedal immediately but very gradually to
reduce speed.
Do not increase speed. Do not apply vehicle brakes.
If you make no extreme correction with the steering or brakes, your vehicle
and trailer should stabilize (if enabled, Trailer Sway Control can also help to
stabilize the vehicle and trailer.).
● After the trailer swaying has stopped:
• Stop in a safe place. Get all occupants out of the vehicle.
• Check the tires of the vehicle and the trailer.
• Check the load in the trailer.
Make sure the load has not shifted.
Make sure the tongue weight is appropriate, if possible.
4
• Check the load in the vehicle.
Make sure the vehicle is not overloaded after occupants get in.
If you cannot find any problems, the speed at which trailer swaying
occurred is beyond the limit of your particular vehicle-trailer combination.
Drive at a lower speed to prevent instability. Remember that swaying of the
towing vehicle-trailer increases as speed increases.
NOTICE
■ When the rear bumper strengthening material is aluminum
Ensure the steel bracket part does not come directly in contact with that
area.
When steel and aluminum come into contact, there is a reaction similar to
corrosion, which will weaken the section concerned and may result in dam-
age. Apply a rust inhibitor to parts that will come in contact when attaching a
steel bracket.

218
4-2. Driving procedures
Engine (ignition) switch (vehicles without
smart entry & start system)
Starting the engine
Automatic transmission (gasoline engine)
1
Check that the parking brake is set.
2
Check that the shift lever is set in P.
3
Firmly depress the brake pedal.
4
Turn the engine switch to the “START” position to start the engine.
Automatic transmission (diesel engine)
1
Check that the parking brake is set.
2
Check that the shift lever is set in P.
3
Firmly depress the brake pedal.
4
Turn the engine switch to the “ON” position.
The
indicator turns on.
5
After the
indicator light goes out, turn the engine switch to the
“START” position to start the engine.
Manual transmission (gasoline engine)
1
Check that the parking brake is set.
2
Check that the shift lever is set in N.
3
Firmly depress the clutch pedal.
4
Turn the engine switch to the “START” position to start the engine.
Manual transmission (diesel engine)
1
Check that the parking brake is set.
2
Check that the shift lever is set in N.
3
Firmly depress the clutch pedal.
4
Turn the engine switch to the “ON” position.
The
indicator turns on.
5
After the
indicator light goes out, turn the engine switch to the
“START” position to start the engine.
4-2. Driving procedures
219
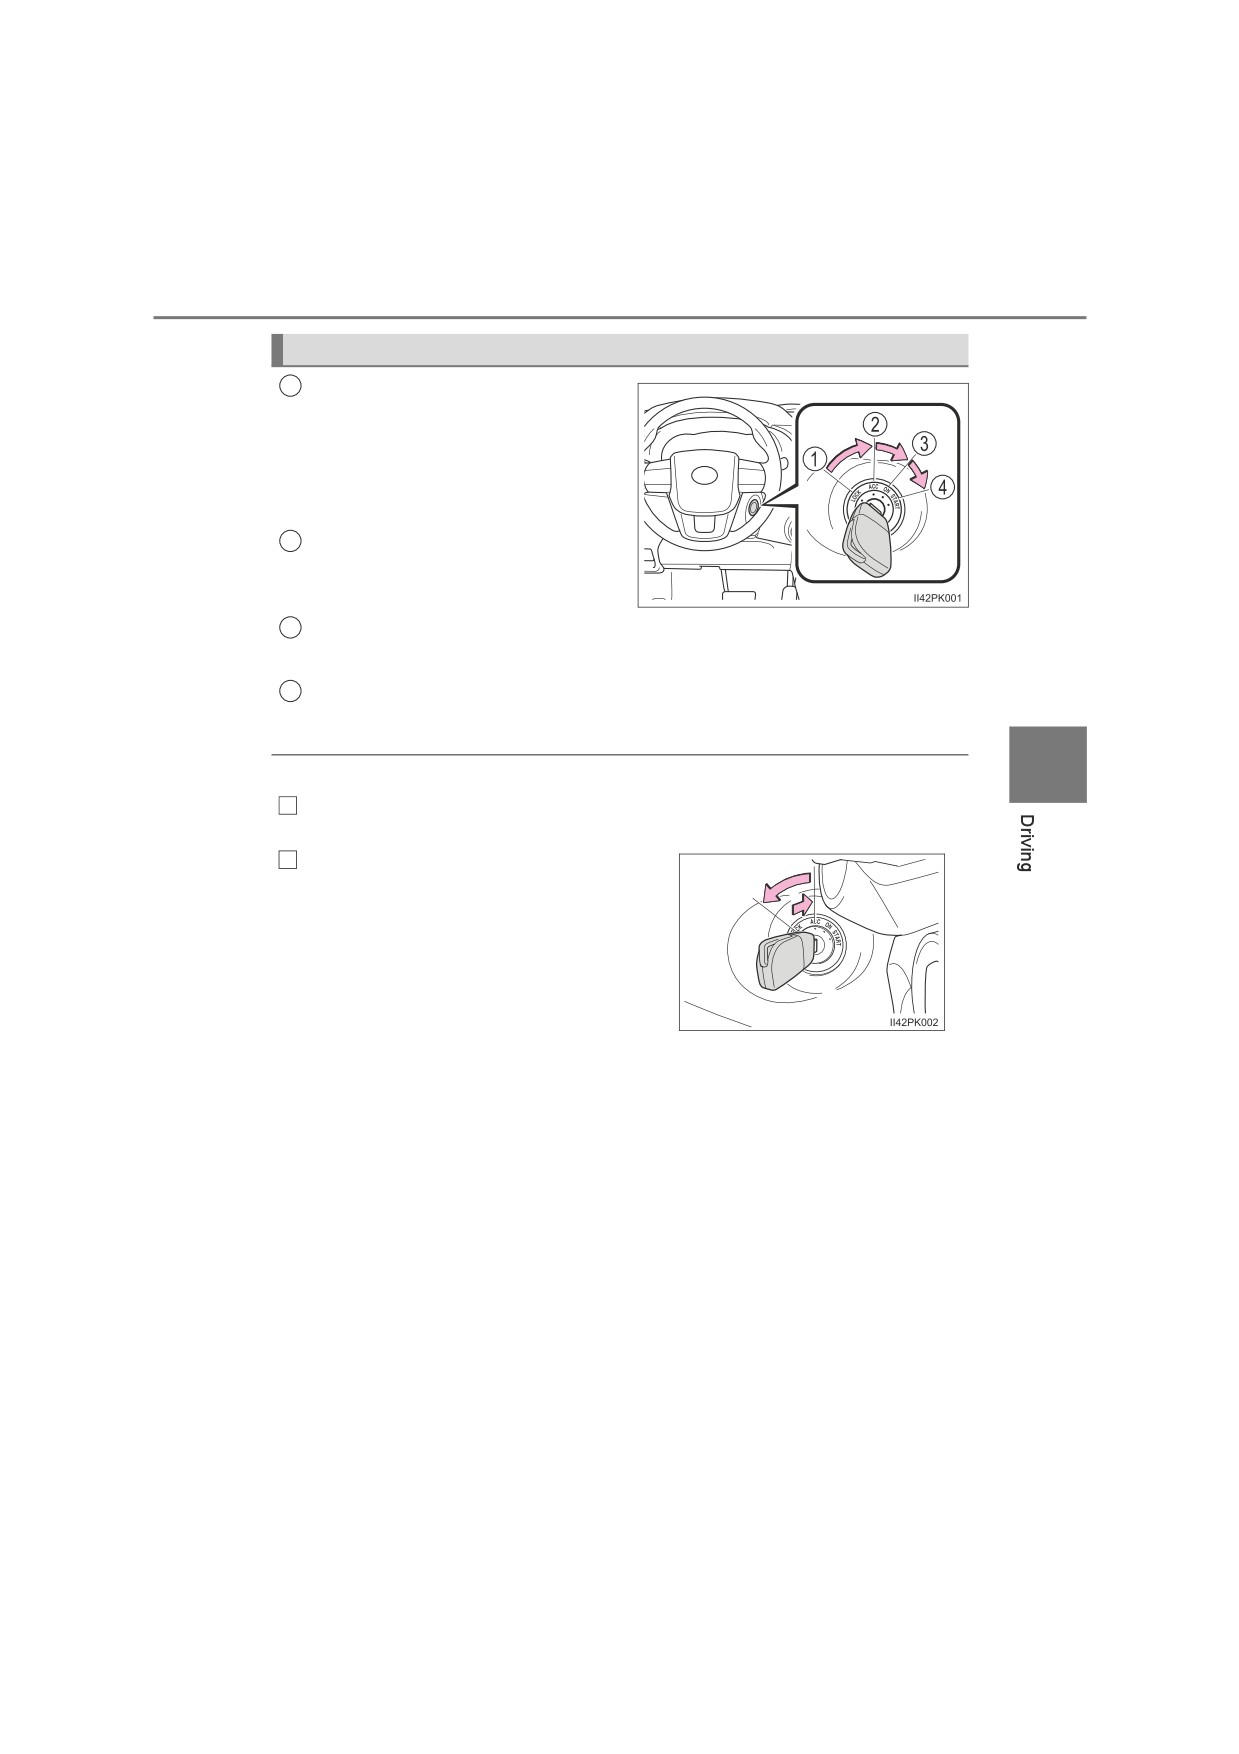
Changing the engine switch positions
1
“LOCK”
The steering wheel is locked and
the key can be removed. (Vehicles
with automatic transmission: The
key can be removed only when the
shift lever is in P.)
2
“ACC”
Some electrical components such
as the audio system can be used.
3
“ON”
All electrical components can be used.
4
“START”
For starting the engine.
4
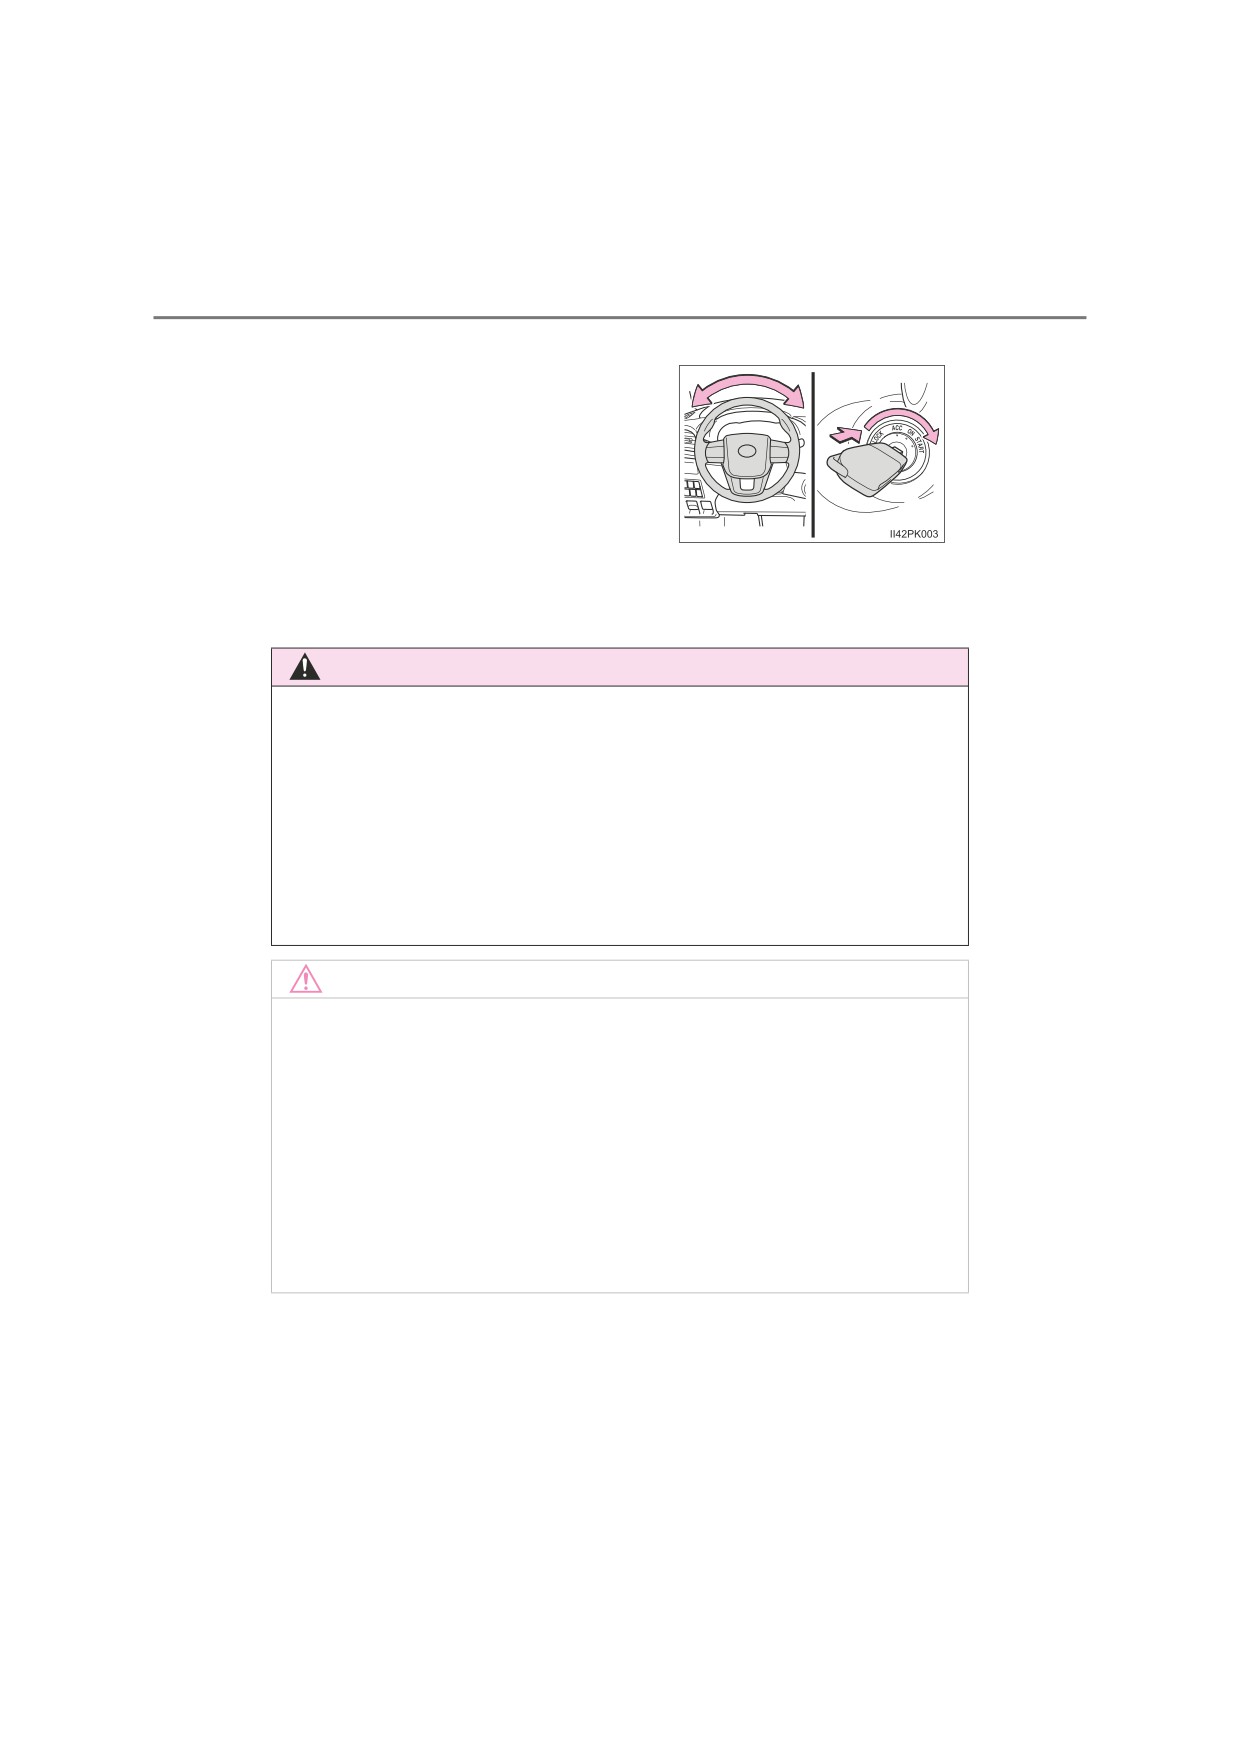
■ Turning the key from “ACC” to “LOCK”
1
Shift the shift lever to P (automatic transmission) or N (manual transmis-
sion). (P. 229, 237)
2
Push in the key and turn it to the
“LOCK” position.
■ If the engine does not start
The engine immobilizer system may not have been deactivated. (P. 113)
Contact any authorized Toyota retailer or Toyota authorized repairer, or any
reliable repairer.
220
4-2. Driving procedures
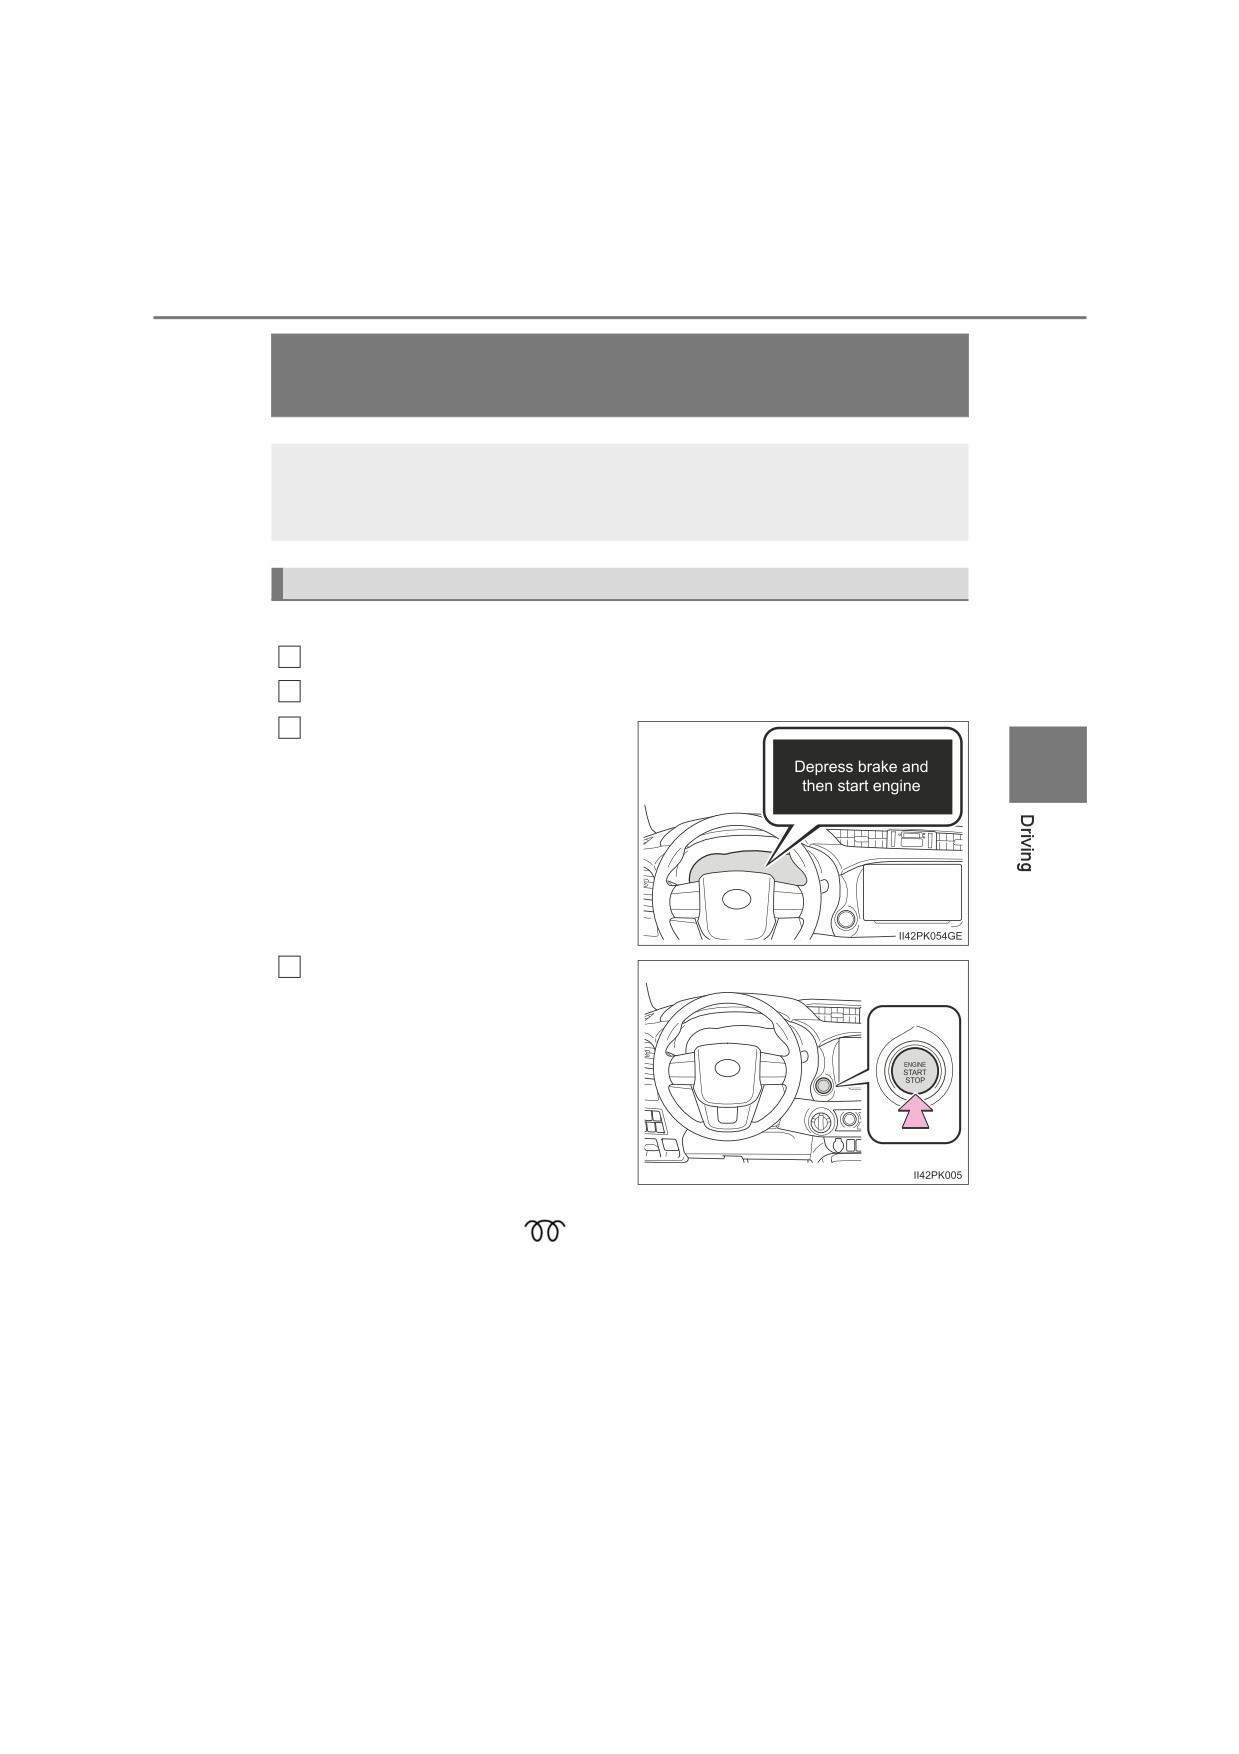
■ When the steering lock cannot be released
When starting the engine, the engine
switch may seem stuck in the “LOCK”
position. To free it, turn the key while turn-
ing the steering wheel slightly left and
right.
■ Key reminder function
A buzzer sounds if the driver’s door is opened while the engine switch is in
the “LOCK” or “ACC” position to remind you to remove the key.
WARNING
■ When starting the engine
Always start the engine while sitting in the driver’s seat. Do not depress the
accelerator pedal while starting the engine under any circumstances.
Doing so may cause an accident resulting in death or serious injury.
■ Caution when driving
Do not turn the engine switch to the “LOCK” position while driving.
If in an emergency, you must turn the engine off while the vehicle is moving,
turn the engine switch only to the “ACC” position to stop the engine. An
accident may result if the engine is stopped while driving. (P. 553)
NOTICE
■ To prevent battery discharge
Do not leave the engine switch in the “ACC” or “ON” position for long peri-
ods of time without the engine running.
■ When starting the engine
●Do not crank the engine for more than 30 seconds at a time. This may
overheat the starter and wiring system.
●Do not race a cold engine.
●If the engine becomes difficult to start or stalls frequently, have your vehi-
cle checked by any authorized Toyota retailer or Toyota authorized
repairer, or any reliable repairer immediately.
4-2. Driving procedures
221
Engine (ignition) switch (vehicles with
smart entry & start system)
Performing the following operations when carrying the elec-
tronic key on your person starts the engine or changes engine
switch modes.
Starting the engine
Automatic transmission
1
Check that the parking brake is set.
2
Check that the shift lever is set in P.
3
Firmly depress the brake pedal.
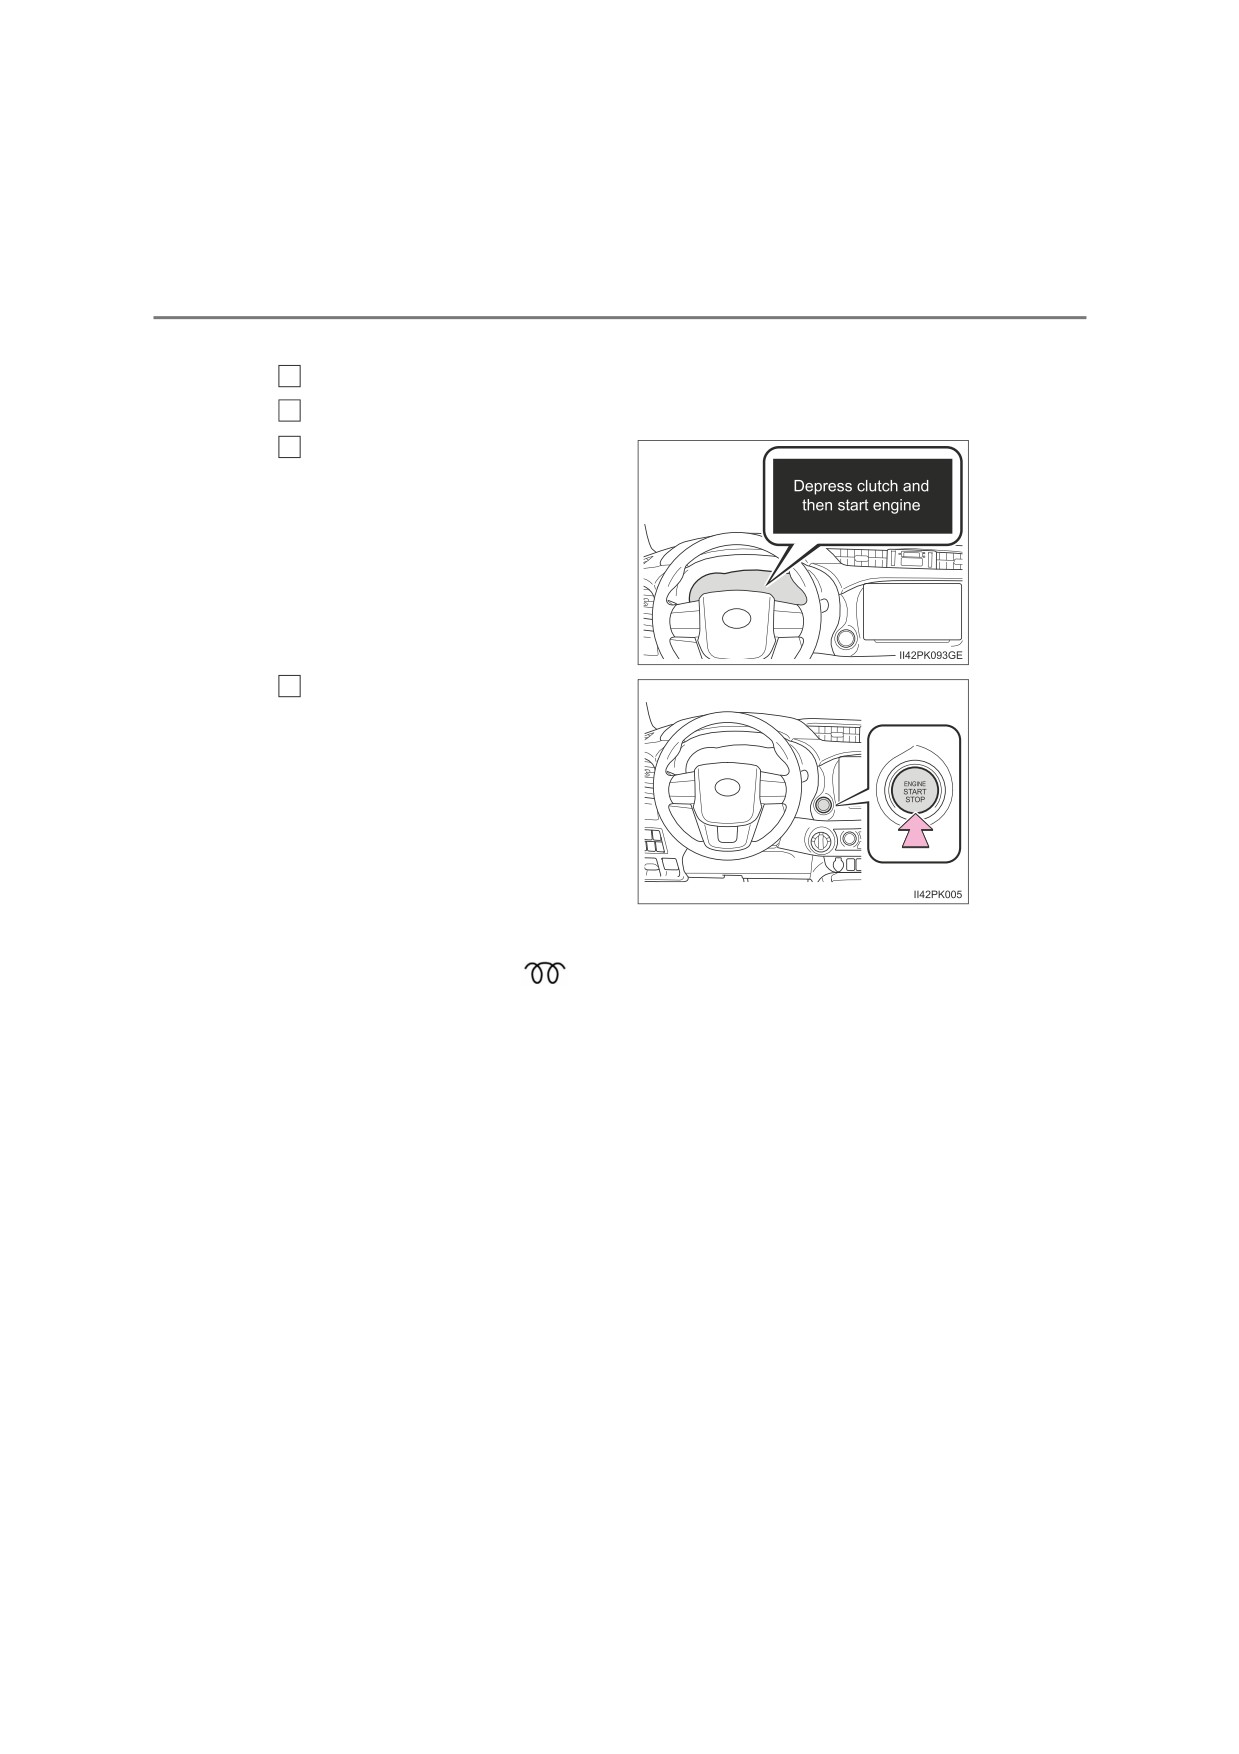
A message will be displayed on the
4
multi-information display. If it is not
displayed, the engine cannot be
started.
4
Press the engine switch shortly
and firmly.
When operating the engine switch,
one short, firm press is enough. It
is not necessary to press and hold
the switch.
The engine will crank until it starts
or for up to 30 seconds, whichever
is less.
Continue depressing the brake pedal until the engine is completely started.
Diesel engine only: the
indicator turns on. The engine will start after
the indicator light goes out.
The engine can be started from any engine switch mode.
222
4-2. Driving procedures
Manual transmission
1
Check that the parking brake is set.
2
Check that the shift lever is set in N.
3
Firmly depress the clutch pedal.
A message will be displayed on the
multi-information display. If it is not
displayed, the engine cannot be
started.
4
Press the engine switch shortly
and firmly.
When operating the engine switch,
one short, firm press is enough. It
is not necessary to press and hold
the switch.
The engine will crank until it starts
or for up to 30 seconds, whichever
is less.
Continue depressing the clutch pedal until the engine
is completely
started.
Diesel engine only: the
indicator turns on. The engine will start after
the indicator light goes out.
The engine can be started from any engine switch mode.
4-2. Driving procedures
223
Stopping the engine
Automatic transmission
1
Stop the vehicle.
2
Set the parking brake (P. 245), and shift the shift lever to P.
3
Press the engine switch.
4
Release the brake pedal and check that the display on the instru-
ment cluster is off.
Manual transmission
1
Stop the vehicle.
2
Shift the shift lever to N.
3
Set the parking brake. (P. 245)
4
Press the engine switch.
5
Release the brake pedal and check that the display on the instru-
4
ment cluster is off.
224
4-2. Driving procedures
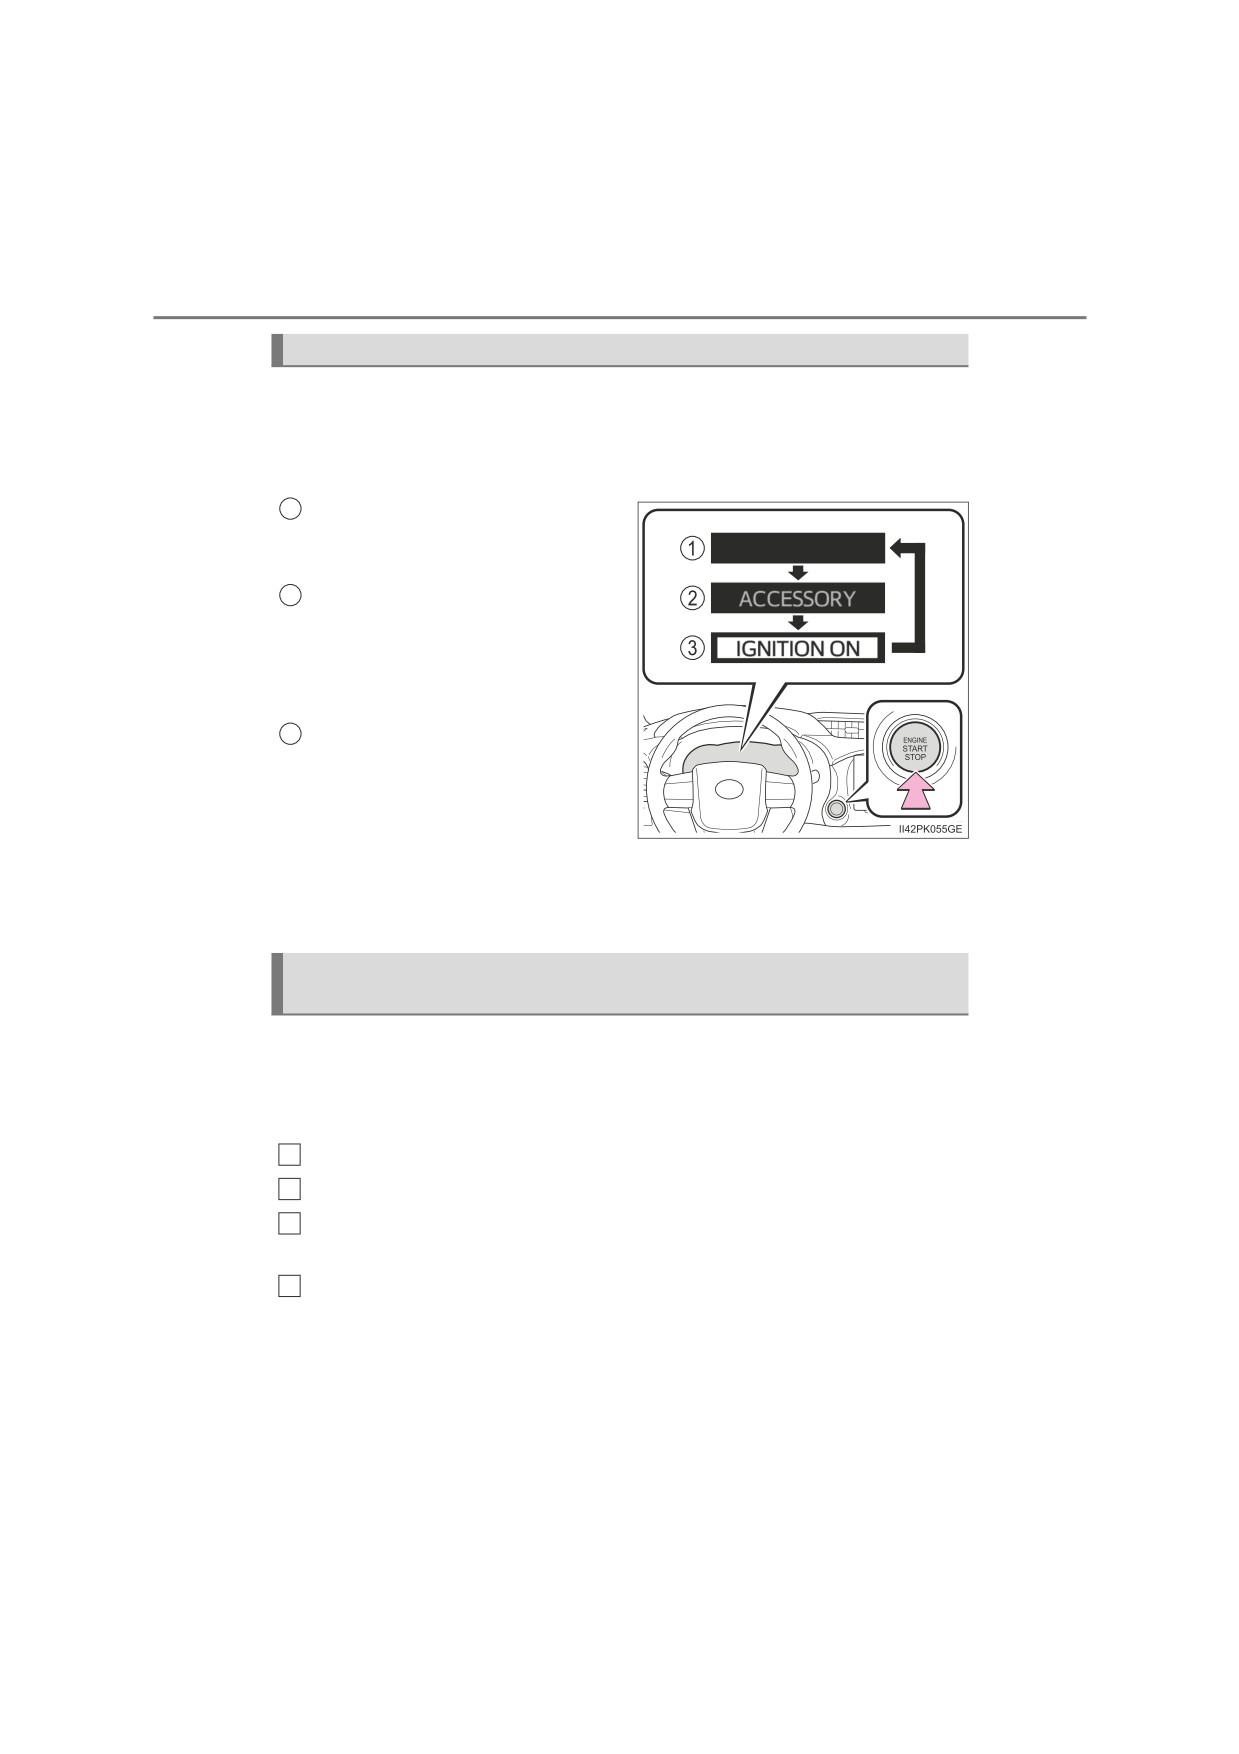
Changing engine switch modes
Modes can be changed by pressing the engine switch with brake
pedal (vehicles with automatic transmission) or clutch pedal (vehicles
with manual transmission) released. (The mode changes each time
the switch is pressed.)
1
Off*
The emergency flashers can be
used.
ACCESSORY mode
2
Some electrical components such
as the audio system can be used.
“ACCESSORY” will be displayed
on the multi-information display.
IGNITION ON mode
3
All electrical components can be
used.
“IGNITION ON” will be displayed
on the multi-information display.
*: If the shift lever is in a position other than P when turning off the engine,
the engine switch will be turned to ACCESSORY mode, not to off (vehicles
with automatic transmission only).
When stopping the engine with the shift lever in a position other
than P (vehicles with automatic transmission)
If the engine is stopped with the shift lever in a position other than P,
the engine switch will not be turned off but instead be turned to
ACCESSORY mode. Perform the following procedure to turn the
switch off:
1
Check that the parking brake is set.
2
Shift the shift lever to P.
3
Check that “Turn off vehicle” is displayed on the multi-information
display and then press the engine switch once.
Check that “Turn off vehicle” on the multi-information display is off.
4
4-2. Driving procedures
225
■ Note for the electronic key
Carry the electronic key on your person, for example in your pocket.
The smart entry & start system does not operate properly if the electronic key
is on the floor or the instrument panel, or in the door pockets, cup holders or
auxiliary boxes.
■ Auto power off function
Vehicles with automatic transmission
If the vehicle is left in ACCESSORY mode for more than 20 minutes or IGNI-
TION ON mode (the engine is not running) for more than an hour with the
shift lever in P, the engine switch will automatically turn off. However, this
function cannot entirely prevent battery discharge. Do not leave the vehicle
with the engine switch in ACCESSORY or IGNITION ON mode for long peri-
ods of time when the engine is not running.
Vehicles with manual transmission
If the vehicle is left in ACCESSORY mode for more than 20 minutes or IGNI-
TION ON mode (the engine is not running) for more than an hour, the engine
4
switch will automatically turn off. However, this function cannot entirely pre-
vent battery discharge. Do not leave the vehicle with the engine switch in
ACCESSORY or IGNITION ON mode for long periods of time when the
engine is not running.
■ Operation of the engine switch
If the switch is not pressed shortly and firmly, the engine switch mode may
not change or the engine may not start.
■ Electronic key battery depletion
P. 166
■ Conditions affecting operation
P. 164
■ Note for the entry function
P. 165
■ If the engine does not start
The engine immobilizer system may not have been deactivated. (P. 113)
Contact any authorized Toyota retailer or Toyota authorized repairer, or any
reliable repairer.
226
4-2. Driving procedures
■ Steering lock (vehicles with manual transmission)
After turning the engine switch off and opening and closing the doors, the
steering wheel will be locked due to the steering lock function. Operating the
engine switch again automatically cancels the steering lock.
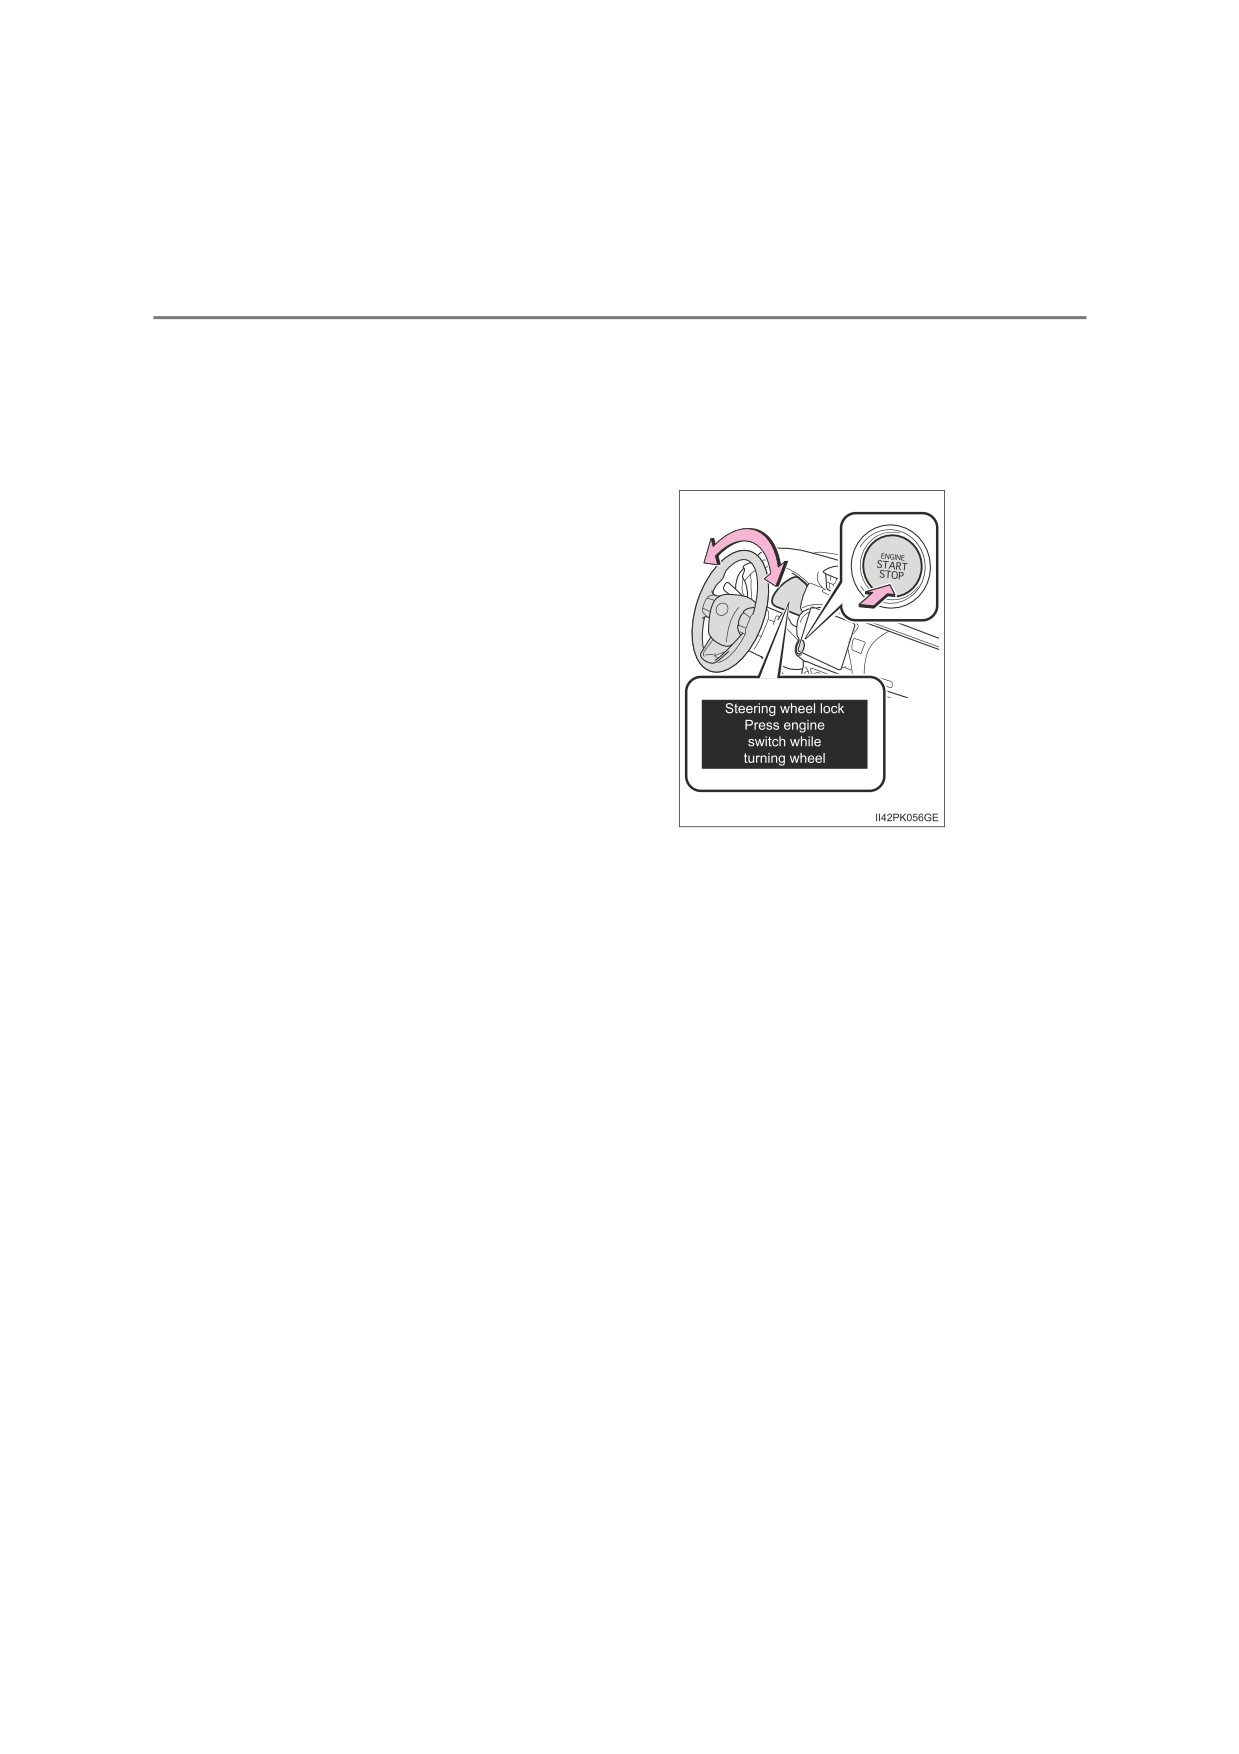
■ When the steering lock cannot be released (vehicles with manual trans-
mission)
A message will be displayed on the multi-
information display.
Press the engine switch while turning the
steering wheel left and right.
■ Steering lock motor overheating prevention (vehicles with manual trans-
mission)
To prevent the steering lock motor from overheating, the motor may be sus-
pended if the engine is turned on and off repeatedly in a short period of time.
In this case, refrain from running the engine. After about 10 seconds, the
steering lock motor will resume functioning.
■ If “Smart Entry & Start System malfunction See owner’s manual” is
shown on the multi-information display
The system may be malfunctioning. Have the vehicle inspected by any autho-
rized Toyota retailer or Toyota authorized repairer, or any reliable repairer
immediately.
■ If the electronic key battery is depleted
P. 514
■ If the smart entry & start system has been deactivated in a customized
setting
P. 598
4-2. Driving procedures
227
WARNING
■ When starting the engine
Always start the engine while sitting in the driver’s seat. Do not depress the
accelerator pedal while starting the engine under any circumstances.
Doing so may cause an accident resulting in death or serious injury.
■ Caution while driving (vehicles with manual transmission)
If engine failure occurs while the vehicle is moving, do not lock or open the
doors until the vehicle reaches a safe and complete stop. Activation of the
steering lock in this circumstance may lead to an accident, resulting in
death or serious injury.
■ Stopping the engine in an emergency
●If you want to stop the engine in an emergency while driving the vehicle,
press and hold the engine switch for more than 2 seconds, or press it
briefly 3 times or more in succession. (P. 553)
However, do not touch the engine switch while driving except in an emer-
gency. If the engine switch is pressed while the vehicle is moving, the
4
warning message “Push and hold engine switch for emergency stop” is
displayed on the multi-information display and a buzzer sounds. Turning
the engine off while driving will not cause loss of steering or braking con-
trol, but the power assist to these systems will be lost. This will make it
more difficult to steer and brake, so you should pull over and stop the vehi-
cle as soon as it is safe to do so.
● To restart the engine after turning off the engine while driving, shift the shift
lever to N (automatic transmission) or depress the clutch pedal (manual
transmission) and then press the engine switch.
228
4-2. Driving procedures
NOTICE
■ To prevent battery discharge
●Do not leave the engine switch in ACCESSORY or IGNITION ON mode
for long periods of time without the engine running.
●If “ACCESSORY” or “IGNITION ON” is displayed on the multi-information
display while the engine is not running, the engine switch is not off. Exit the
vehicle after turning the engine switch off.
●On vehicles with automatic transmission, do not stop the engine when the
shift lever is in a position other than P. If the engine is stopped in another
shift lever position, the engine switch will not be turned off but instead be
turned to ACCESSORY mode. If the vehicle is left in ACCESSORY mode,
battery discharge may occur.
■ When starting the engine
●Do not race a cold engine.
●If the engine becomes difficult to start or stalls frequently, have your vehi-
cle checked by any authorized Toyota retailer or Toyota authorized
repairer, or any reliable repairer immediately.
■ Symptoms indicating a malfunction with the engine switch
If the engine switch seems to be operating somewhat differently than usual,
such as the switch sticking slightly, there may be a malfunction. Contact any
authorized Toyota retailer or Toyota authorized repairer, or any reliable
repairer immediately.
4-2. Driving procedures
229
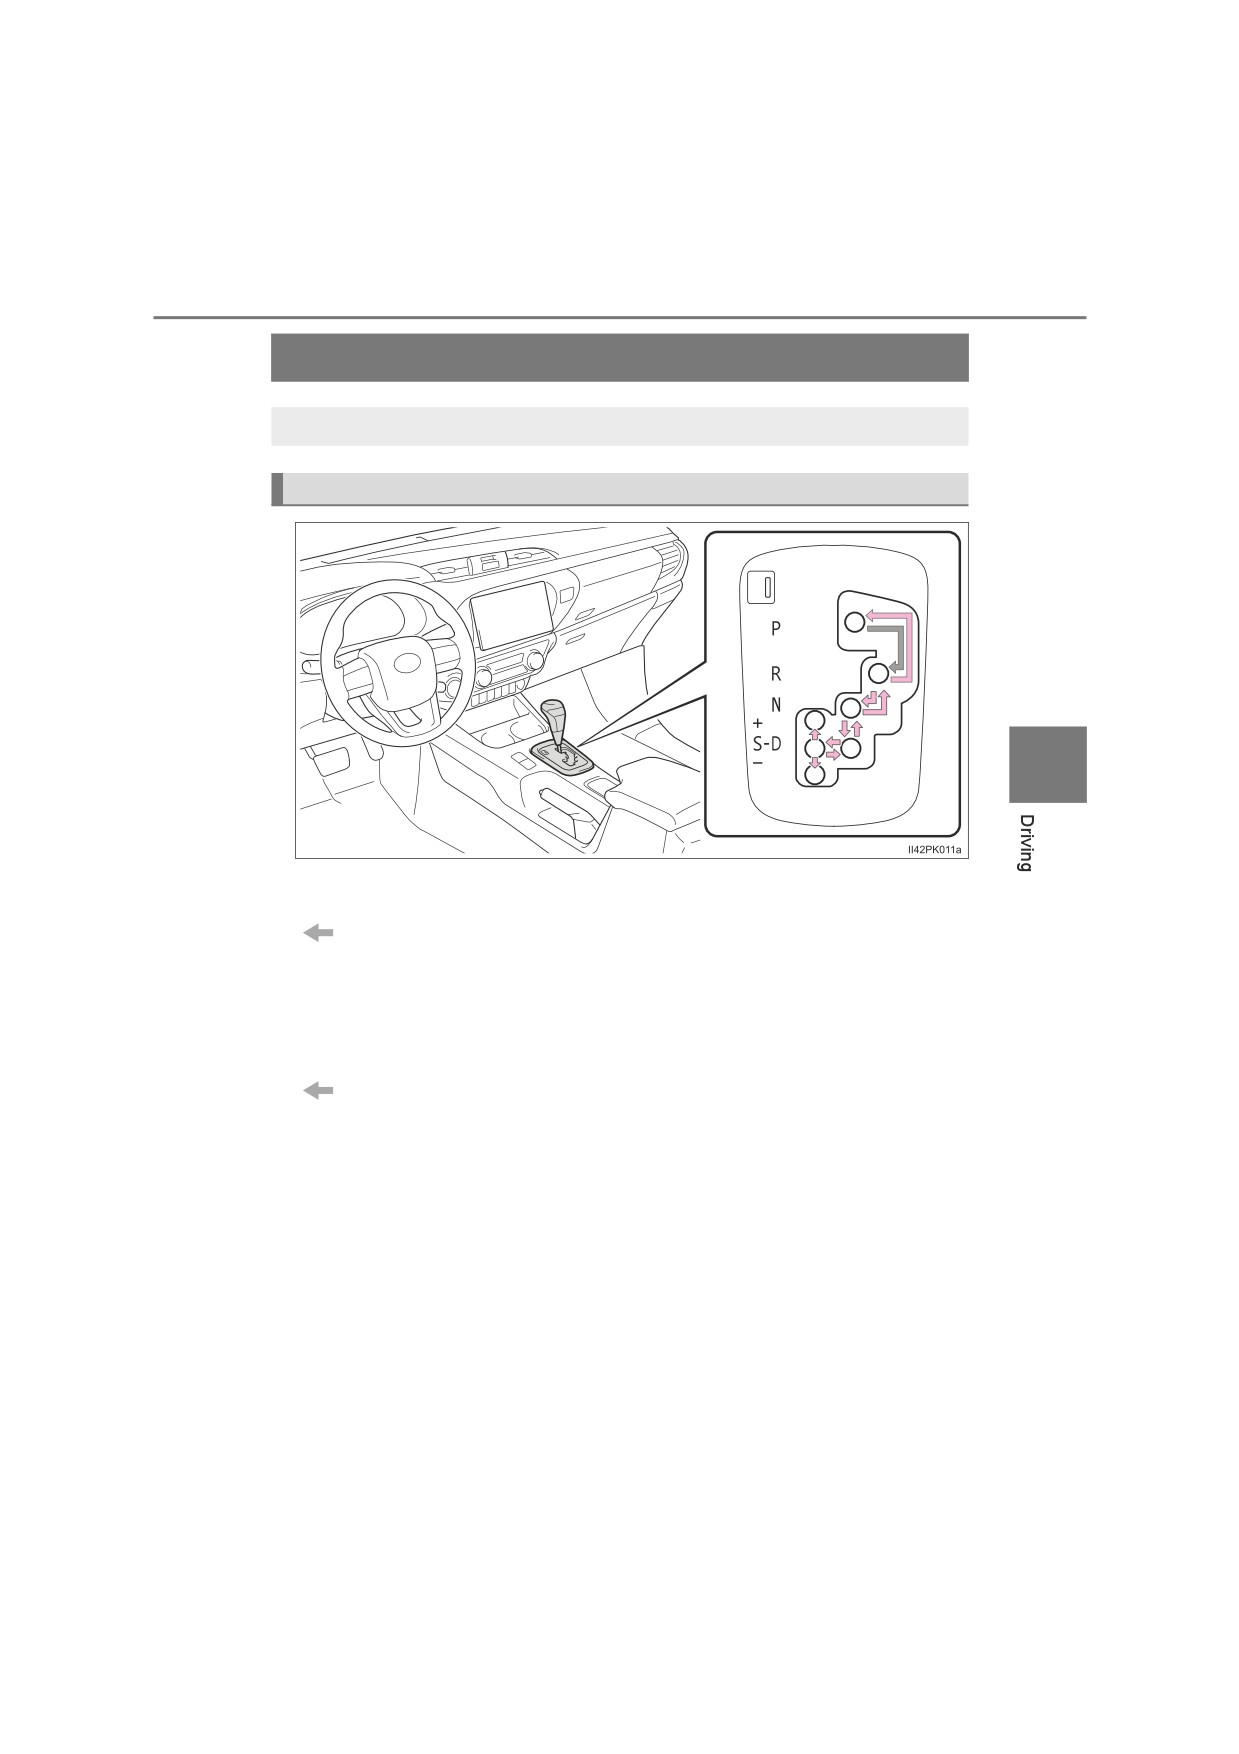
Automatic transmission
Select a shift position appropriate for the driving conditions.
Shifting the shift lever
4
Vehicles without smart entry & start system
While the engine switch is in the “ON” position, move the shift
lever with the brake pedal depressed.
When shifting the shift lever between P and D, make sure that the
vehicle is completely stopped.
Vehicles with smart entry & start system
While the engine switch is in IGNITION ON mode, move the
shift lever with the brake pedal depressed.
When shifting the shift lever between P and D, make sure that the
vehicle is completely stopped.
: If equipped

230
4-2. Driving procedures
Shift position purpose
Shift position
Function
P
Parking the vehicle/starting the engine
R
Reversing
Neutral
N
(Condition in which the power is not transmitted)
D
Normal driving*1
S
S mode driving*2 (P. 233)
*1: To improve fuel efficiency and reduce noises, set the shift lever in the D
position for normal driving.
*2: Selecting shift ranges using S mode restricts the upper limit of the possi-
ble gear ranges, controls engine braking force, and prevents unneces-
sary upshifting.
4-2. Driving procedures
231
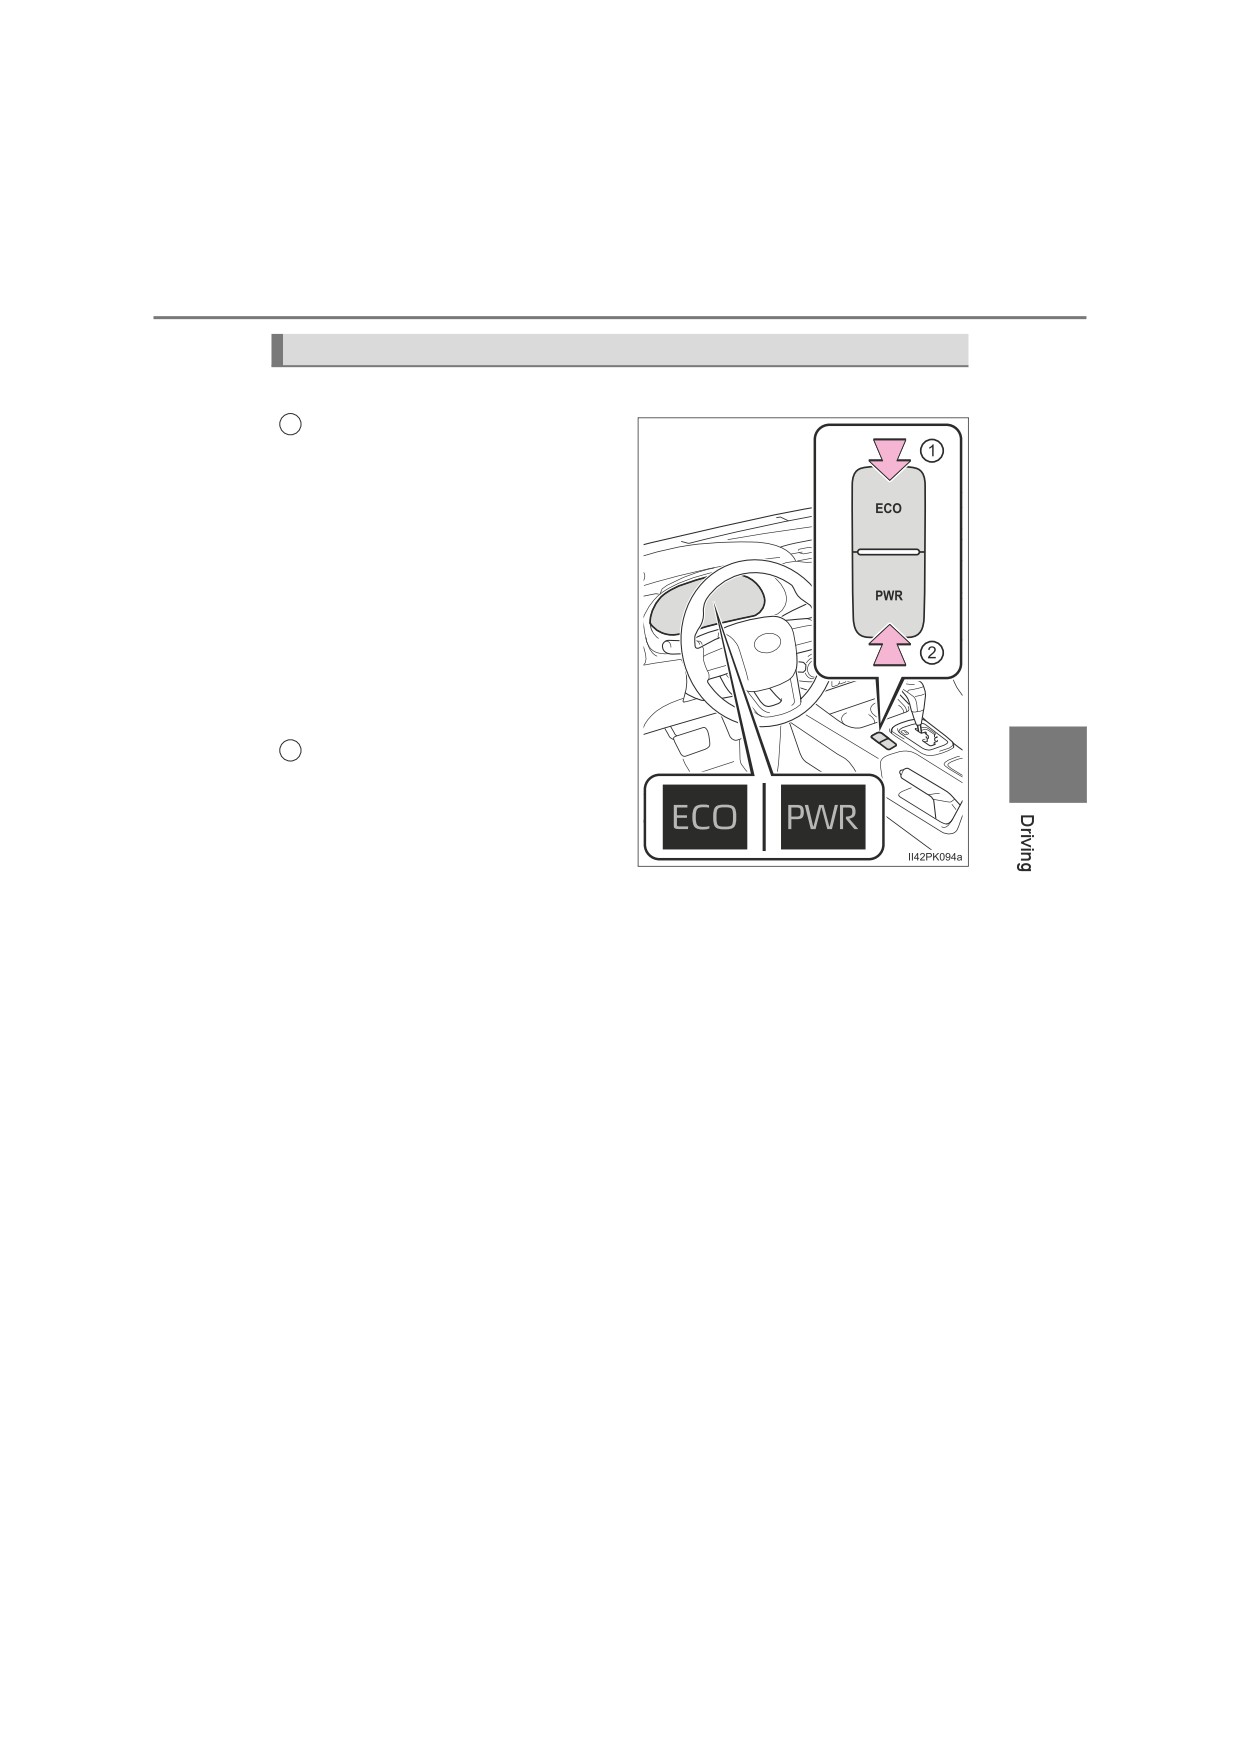
Selecting the driving mode
The driving modes can be selected to suit driving conditions.
1
Eco drive mode
Use Eco drive mode to help
achieve low fuel consumption
during trips that involve fre-
quent accelerating.
Press the “ECO” switch to select
Eco drive mode. The
“ECO”
indicator will come on.
Press the switch again to cancel
Eco drive mode, and then the
driving mode changes to normal
mode for normal driving.
2
Power mode
4
Use when high levels
of
response and feeling are desir-
able, such as when driving in
mountainous regions or when
overtaking.
Press the “PWR” switch to select power mode. The “PWR” indicator will
come on.
Press the switch again to cancel power mode, and then the driving
mode changes to normal mode for normal driving.
The driving modes cannot be selected when the front-wheel drive
control switch is in L4. (if equipped)
232
4-2. Driving procedures
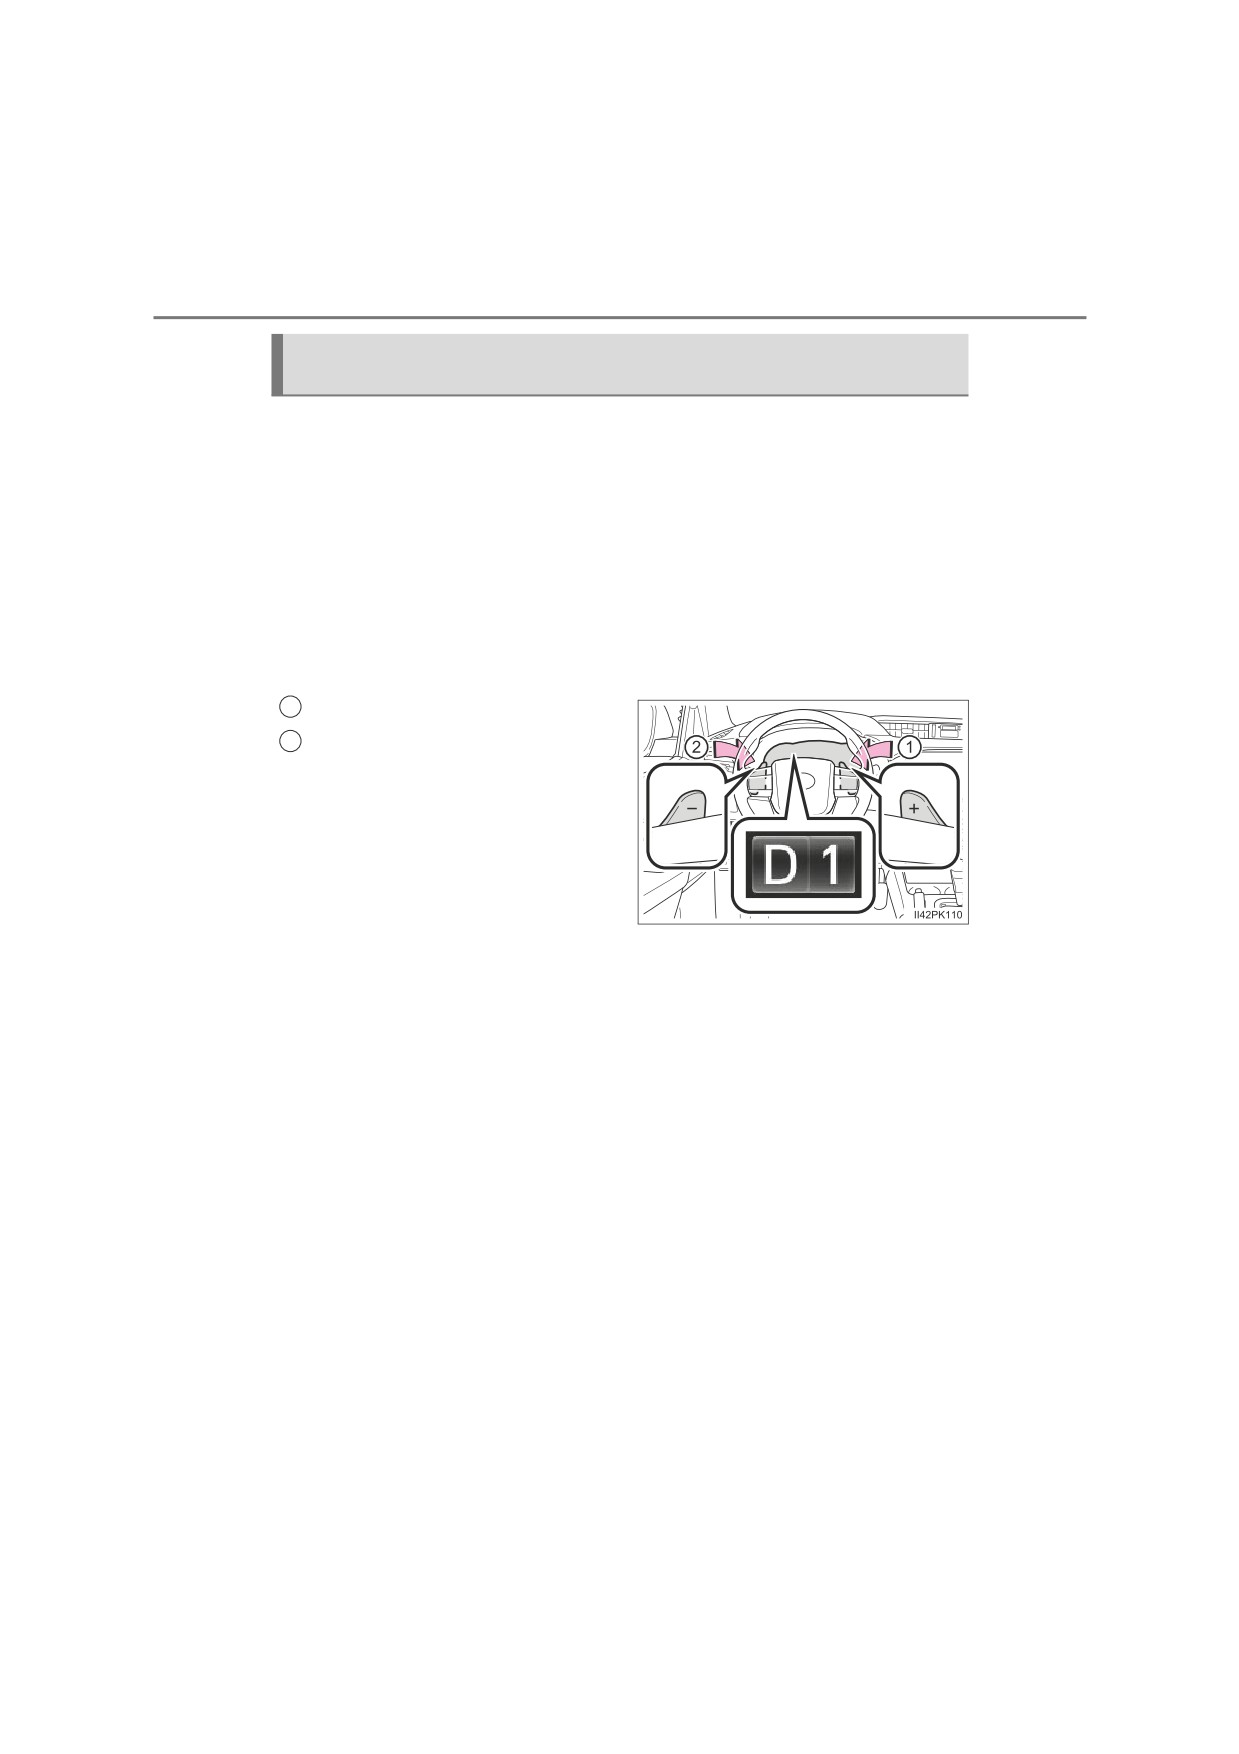
Selecting shift ranges in the D position (vehicles with paddle
shift switches)
To drive using temporary shift range selection, operate the “-” or “+”
paddle shift switch.
When the “-” paddle shift switch is operated, the shift range will be
downshifted to a range that enables engine braking force that is suit-
able to driving conditions. When the “+” paddle shift switch is oper-
ated, the shift range will be one gear upper than the gear in use during
normal D position driving.
Changing the shift range allows restriction of the highest gear, pre-
venting unnecessary upshifting and enabling the level of engine brak-
ing force to be selected.
1
Upshifting
2
Downshifting
The selected shift range, from 1 to
6, will be displayed in the meter.
To return to normal D position driv-
ing, the “+” paddle shift switch must
be held down for a period of time.
■ Shift ranges and their functions
● Automatically selecting shift ranges between 1 and 6 according
to vehicle speed and driving conditions. But the gear is limited
according to selected range.
● You can choose from 6 levels of engine braking force.
● A lower shift range will provide greater engine braking force than
a higher shift range, and the engine speed will also increase.
4-2. Driving procedures
233
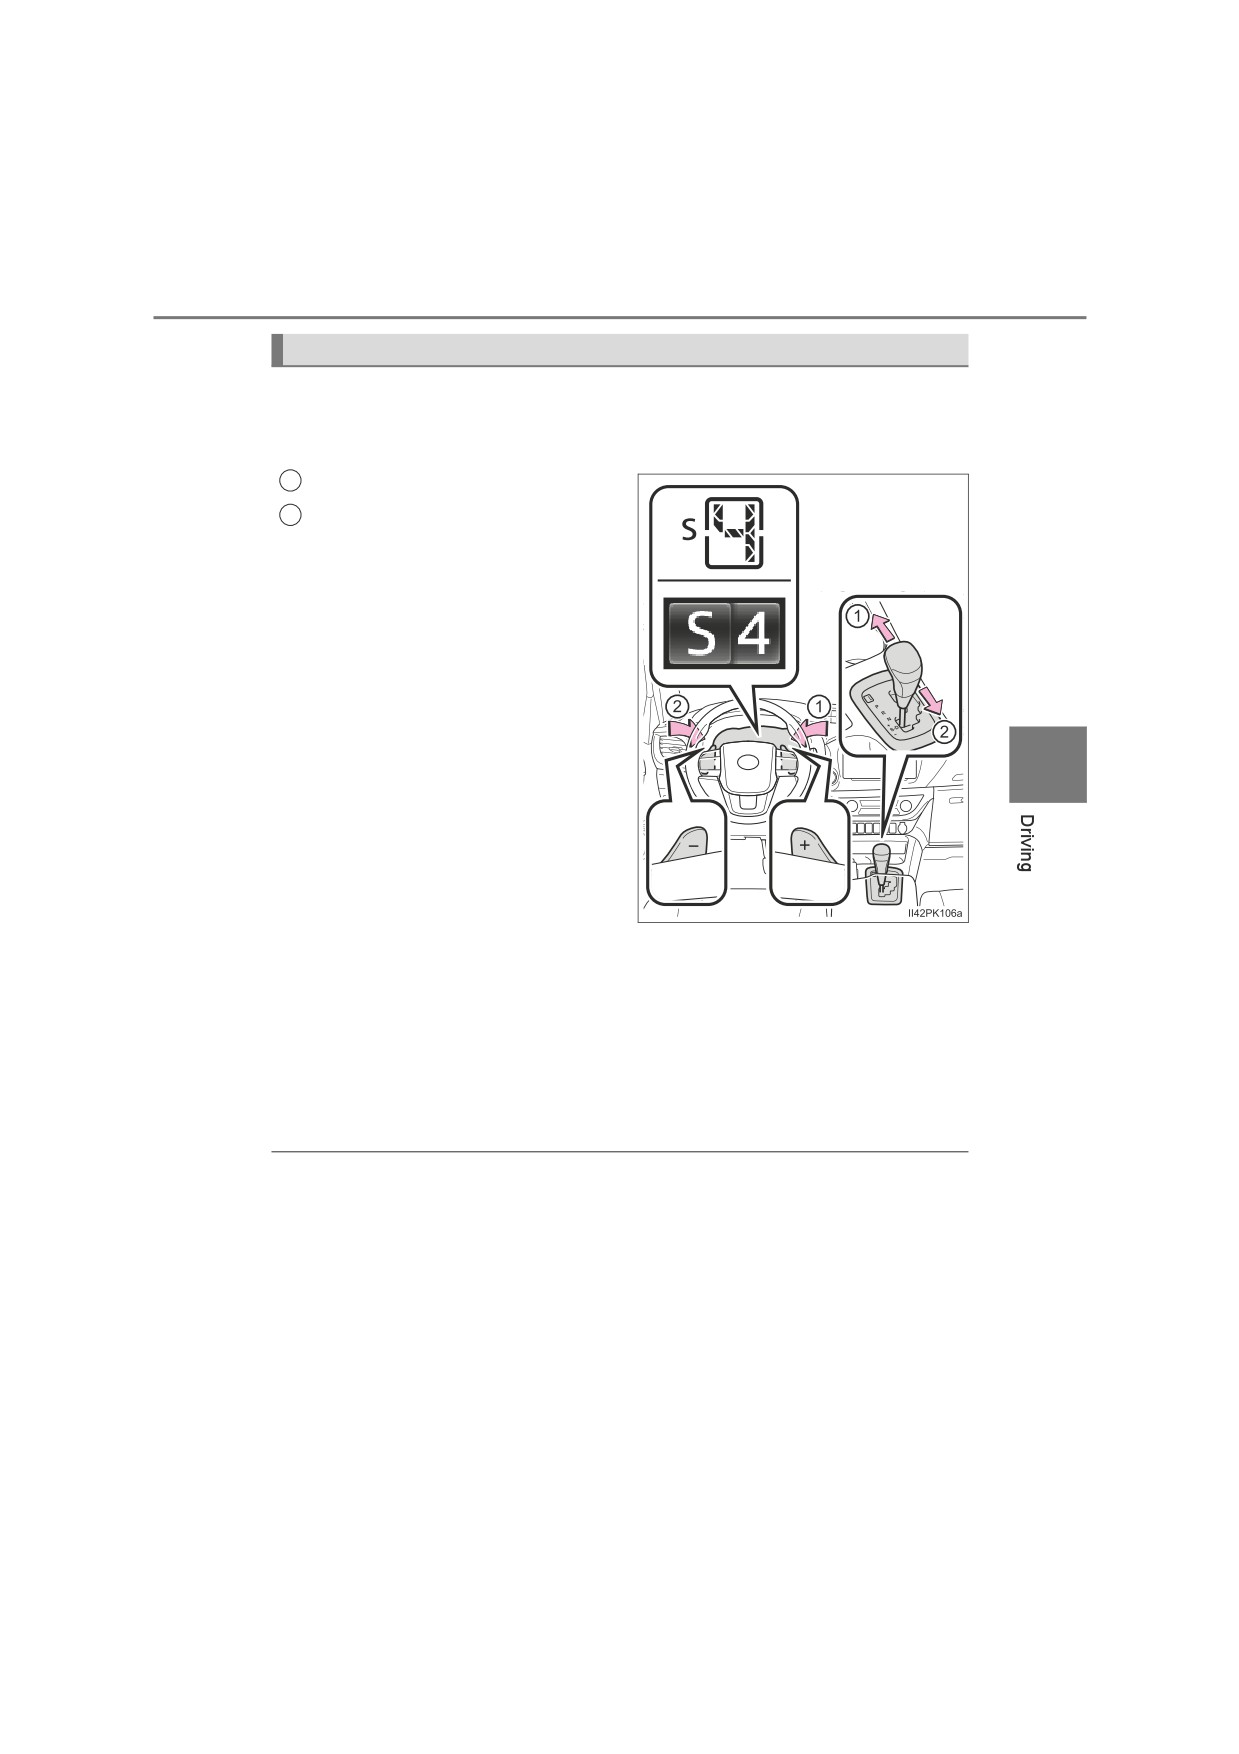
Selecting shift ranges in the S position
To enter S mode, shift the shift lever to S. Shift ranges can be selected
by operating the shift lever or paddle shift switches (if equipped),
allowing you to drive in the shift range of your choosing.
1
Upshifting
2
Downshifting
The selected shift range, from 1 to
6, will be displayed in the meter.
The initial shift range in S mode is
set automatically to 5 or 4 accord-
ing to vehicle speed. However, the
initial shift range may be set to 3 if
AI-SHIFT has operated while the
shift lever was in D. (P. 236)
4
■ Shift ranges and their functions
● Automatically selecting shift
ranges between 1 and 6 according
to vehicle speed and driving conditions. But the gear is limited
according to selected range.
● You can choose from 6 levels of engine braking force.
● A lower shift range will provide greater engine braking force than
a higher shift range, and the engine speed will also increase.
■ Automatic deactivation of shift range selection in the D position (vehi-
cles with paddle shift switches)
Shift range selection in the D position will be deactivated in the following situ-
ations:
● When the vehicle comes to a stop
● If the accelerator pedal is depressed for more than a certain period of time in
4 or higher without changing the shift range
● When the shift lever is shifted to other than D
234
4-2. Driving procedures
■S mode
When the shift range is 4 or lower, holding the shift lever toward “+” sets the
shift range to 6.
■ Downshifting restrictions warning buzzer
To help ensure safety and driving performance, downshifting operation may
sometimes be restricted. In some circumstances, downshifting may not be
possible even when the shift lever is operated. (A buzzer will sound twice.)
■ Operation of the air conditioning system in Eco drive mode (vehicles
with automatic air conditioning system)
Eco drive mode controls the heating/cooling operations and fan speed of the
air conditioning system to enhance fuel efficiency (P. 444). To improve air
conditioning performance, adjust the fan speed or turn off Eco drive mode.
■ Deactivation of the driving mode
● Eco drive mode will not be canceled until the “ECO” switch is pressed, even
if the engine is turned off after driving in Eco drive mode.
●Power mode will be canceled if the engine is turned off after driving in power
mode.
●Driving mode will be canceled if the transfer mode is shifted to L4 while the
driving mode is in other than normal mode. (if equipped)
■ When driving with cruise control or dynamic radar cruise control acti-
vated (if equipped)
Even when performing the following actions with the intent of enabling engine
braking, engine braking will not activate because cruise control or dynamic
radar cruise control will not be canceled.
● While driving in S mode, downshifting to 5 or 4. (P. 233)
● When switching the driving mode to power mode while driving in D.
(P. 231)
■ Restraining sudden start (Drive-Start Control) (vehicles with VSC sys-
tem)
P. 193
■ Shift lock system
The shift lock system is a system to prevent accidental operation of the shift
lever in starting.
The shift lever can be shifted from P only when the engine switch is in the
“ON” position (vehicles without smart entry & start system) or IGNITION ON
mode (vehicles with smart entry & start system) and the brake pedal is being
depressed.
4-2. Driving procedures
235
■ If the shift lever cannot be shifted from P
First, check whether the brake pedal is being depressed.
If the shift lever cannot be shifted with your foot on the brake pedal, there may
be a problem with the shift lock system. Have the vehicle inspected by any
authorized Toyota retailer or Toyota authorized repairer, or any reliable
repairer immediately.
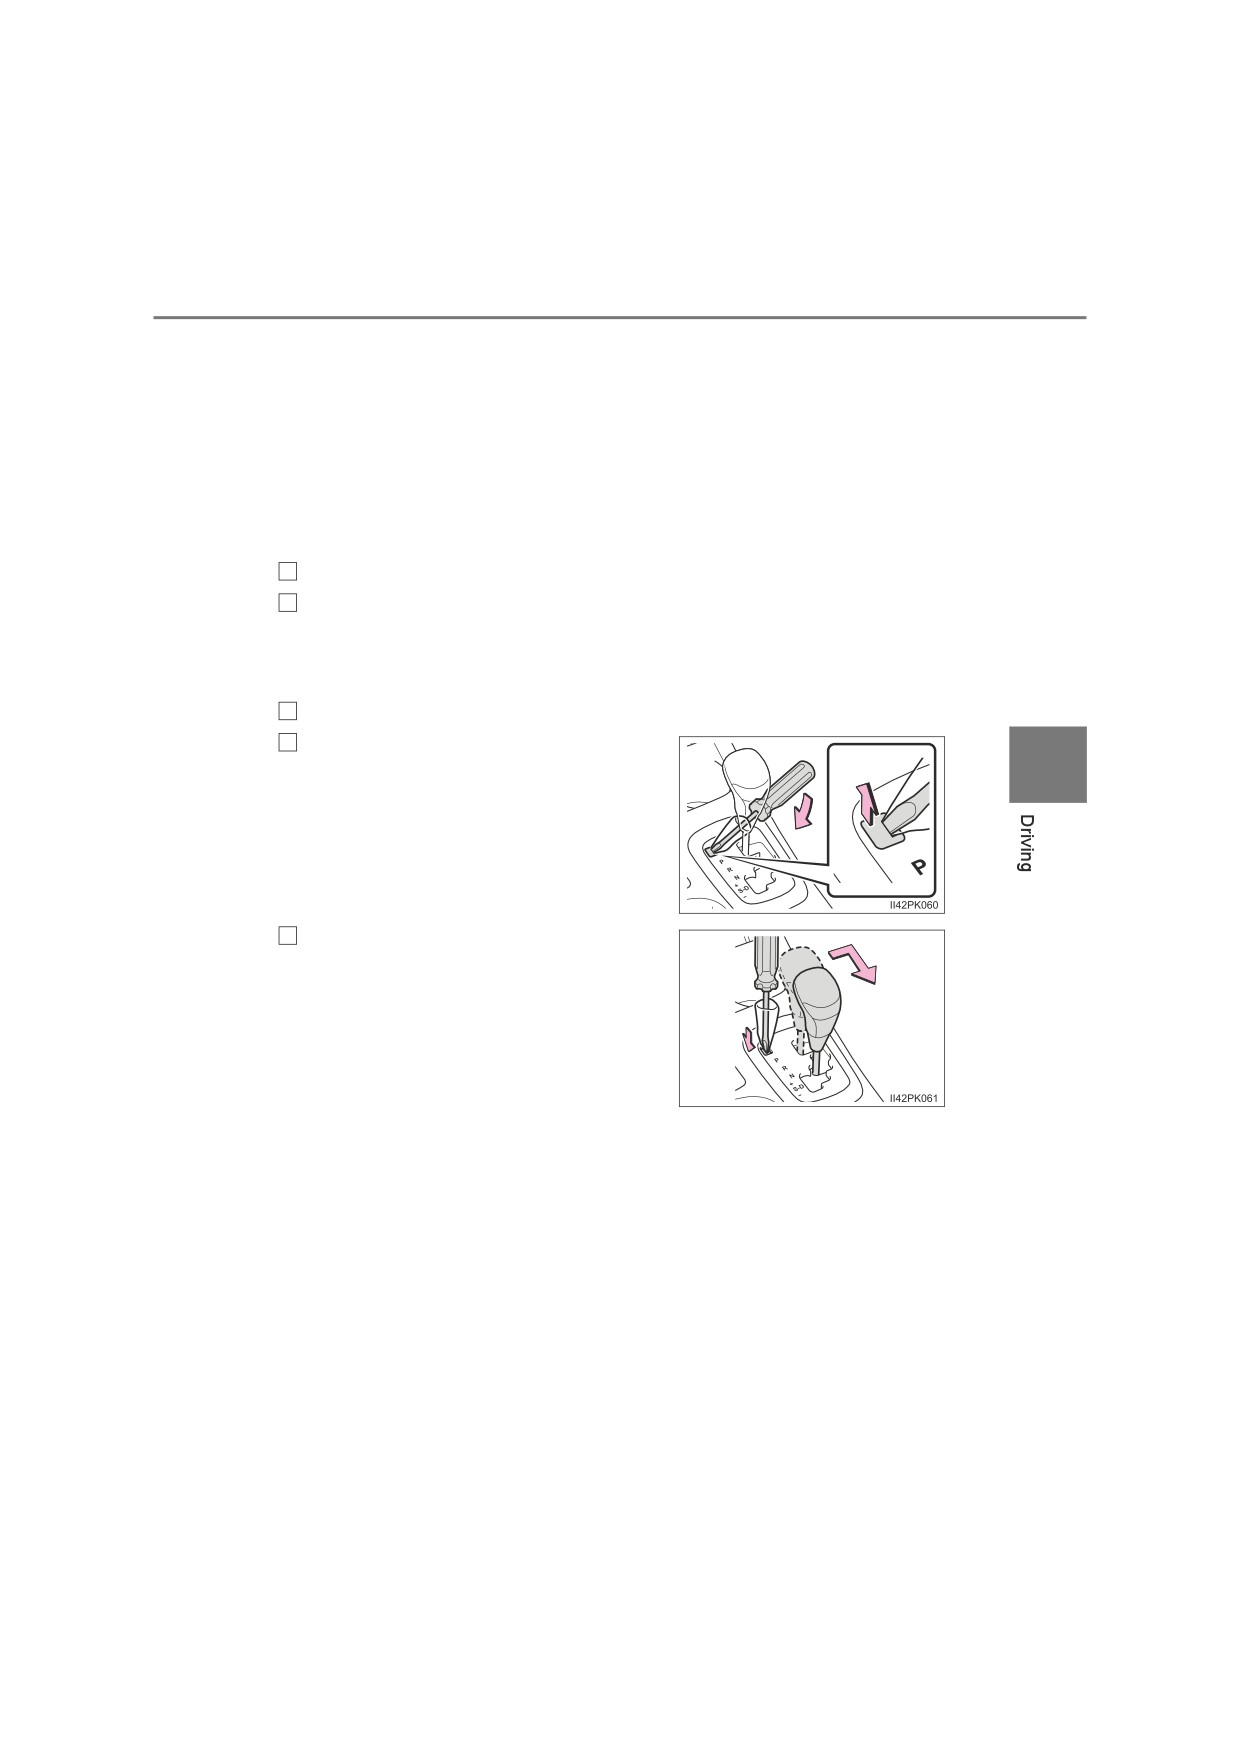
The following steps may be used as an emergency measure to ensure that
the shift lever can be shifted.
Releasing the shift lock:
1
Set the parking brake.
2
Vehicles without smart entry & start system:
Turn the engine switch to the “LOCK” position.
Vehicles with smart entry & start system:
Turn the engine switch off.
3
Depress the brake pedal.
4
Pry the cover up with a flathead screw-
4
driver or equivalent tool.
To prevent damage to the cover, cover
the tip of the screwdriver with a rag.
Press the shift lock override button.
5
The shift lever can be shifted while the
button is pressed.
■ If the “S” indicator does not come on or the “D” indicator is displayed
even after shifting the shift lever to S
This may indicate a malfunction in the automatic transmission system. Have
the vehicle inspected by any authorized Toyota retailer or Toyota authorized
repairer, or any reliable repairer immediately.
236
4-2. Driving procedures
■ Transmission protection function
If the tires spin continually when the vehicle becomes stuck in mud, dirt or
snow, or if the accelerator pedal is depressed and released repeatedly while
driving, the automatic transmission temperature may become too high and
the automatic transmission may be damaged.
To avoid damaging the automatic transmission, the system may temporarily
lock the gear.
If the automatic transmission temperature falls, the gear locking is canceled
and the automatic transmission is returned to the normal operation.
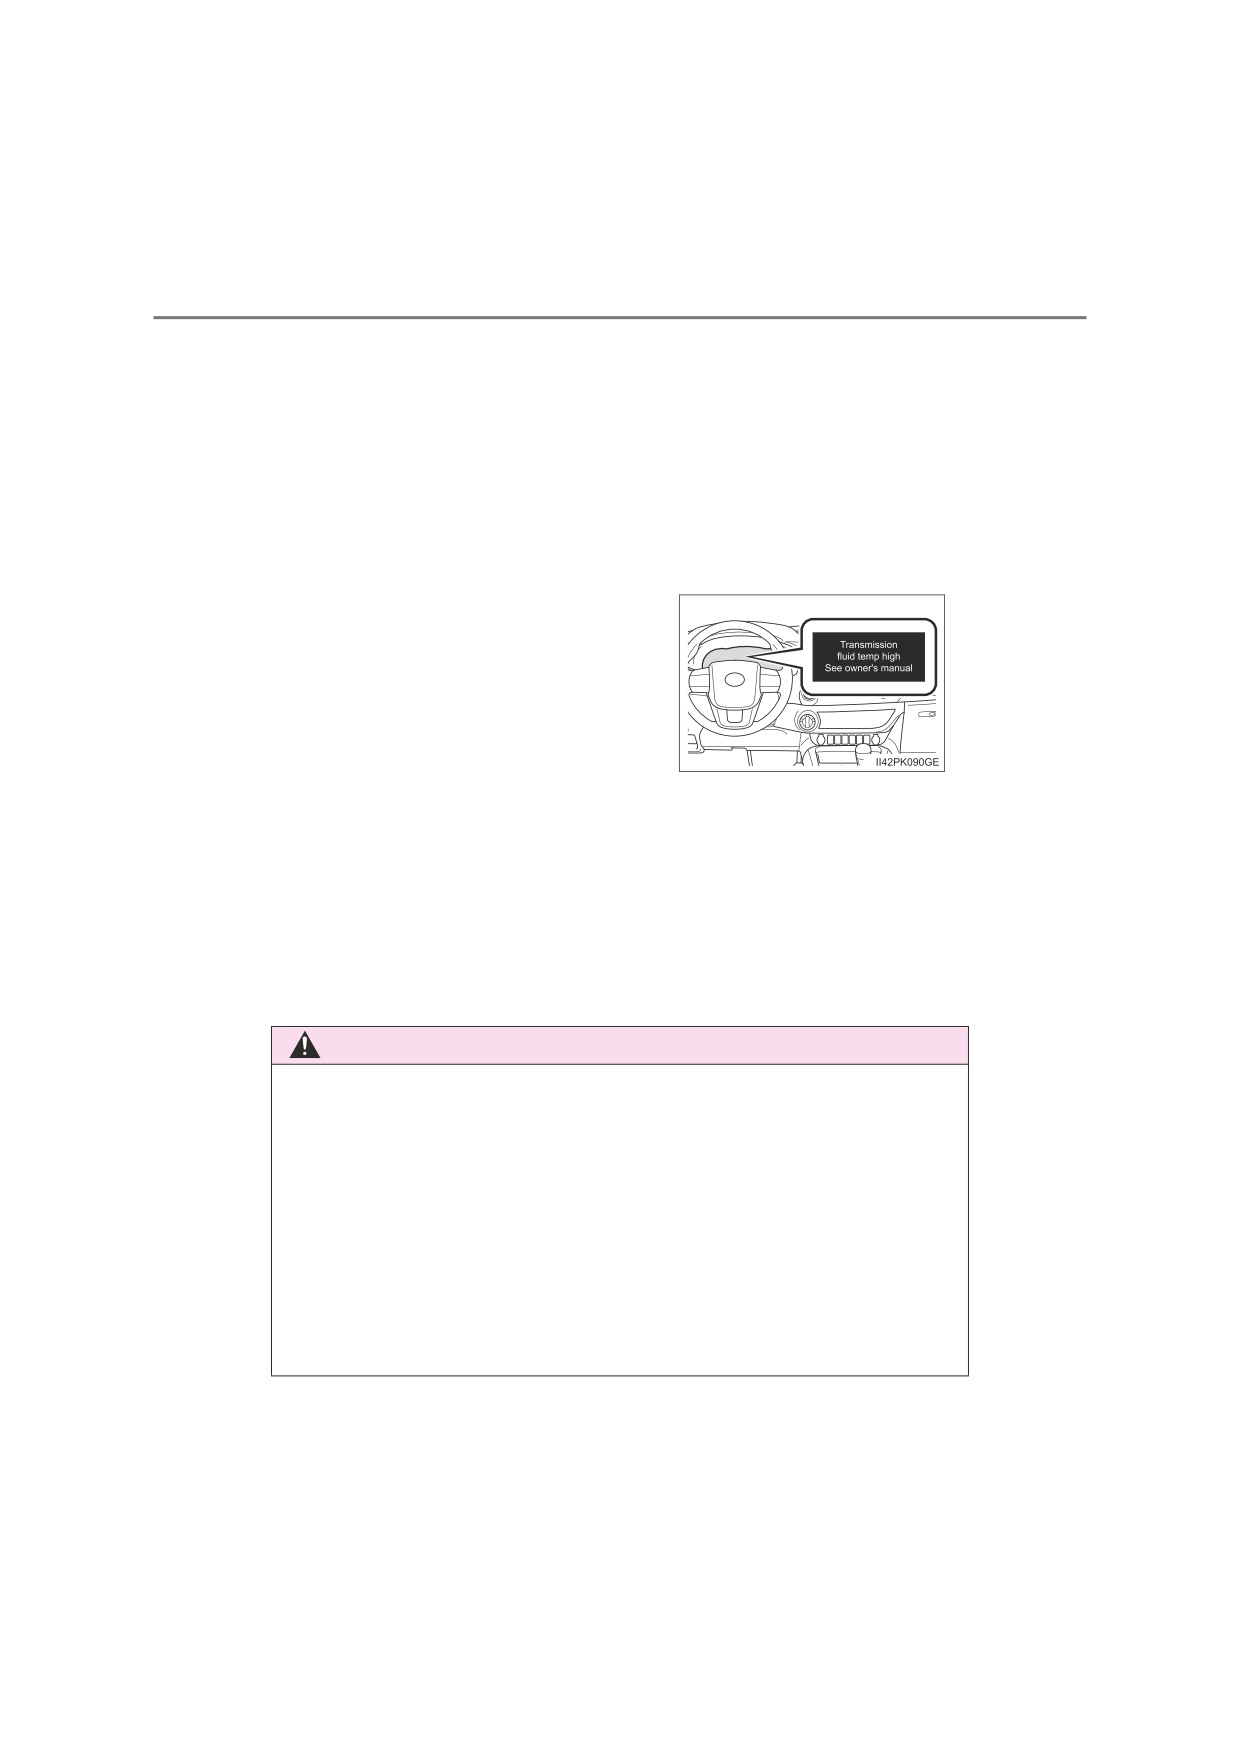
■ If the warning message is displayed
If the automatic transmission fluid tem-
perature warning message is displayed
while driving, make sure to return to D
position driving and reduce speed by eas-
ing off the accelerator pedal. Stop the
vehicle in a safe place, shift the shift lever
to P and let the engine idle until the warn-
ing message goes out.
When the warning message goes out, the vehicle can be driven again.
If the warning message does not go out after waiting a while, have your vehi-
cle inspected by any authorized Toyota retailer or Toyota authorized repairer,
or any reliable repairer.
■ AI-SHIFT
The AI-SHIFT automatically selects the suitable gear according to driver per-
formance and driving conditions.
The AI-SHIFT automatically operates when the shift lever is in D. (Shifting the
shift lever to S cancels the function.)
WARNING
■ When driving on slippery road surfaces
Do not accelerate or shift gears suddenly.
Sudden changes in engine braking may cause the vehicle to spin or skid,
resulting in an accident.
■ To prevent an accident when releasing the shift lock
Before pressing the shift lock override button, make sure to set the parking
brake and depress the brake pedal.
If the accelerator pedal is accidentally depressed instead of the brake pedal
when the shift lock override button is pressed and the shift lever is shifted
out of P, the vehicle may suddenly start, possibly leading to an accident
resulting in death or serious injury.
4-2. Driving procedures
237
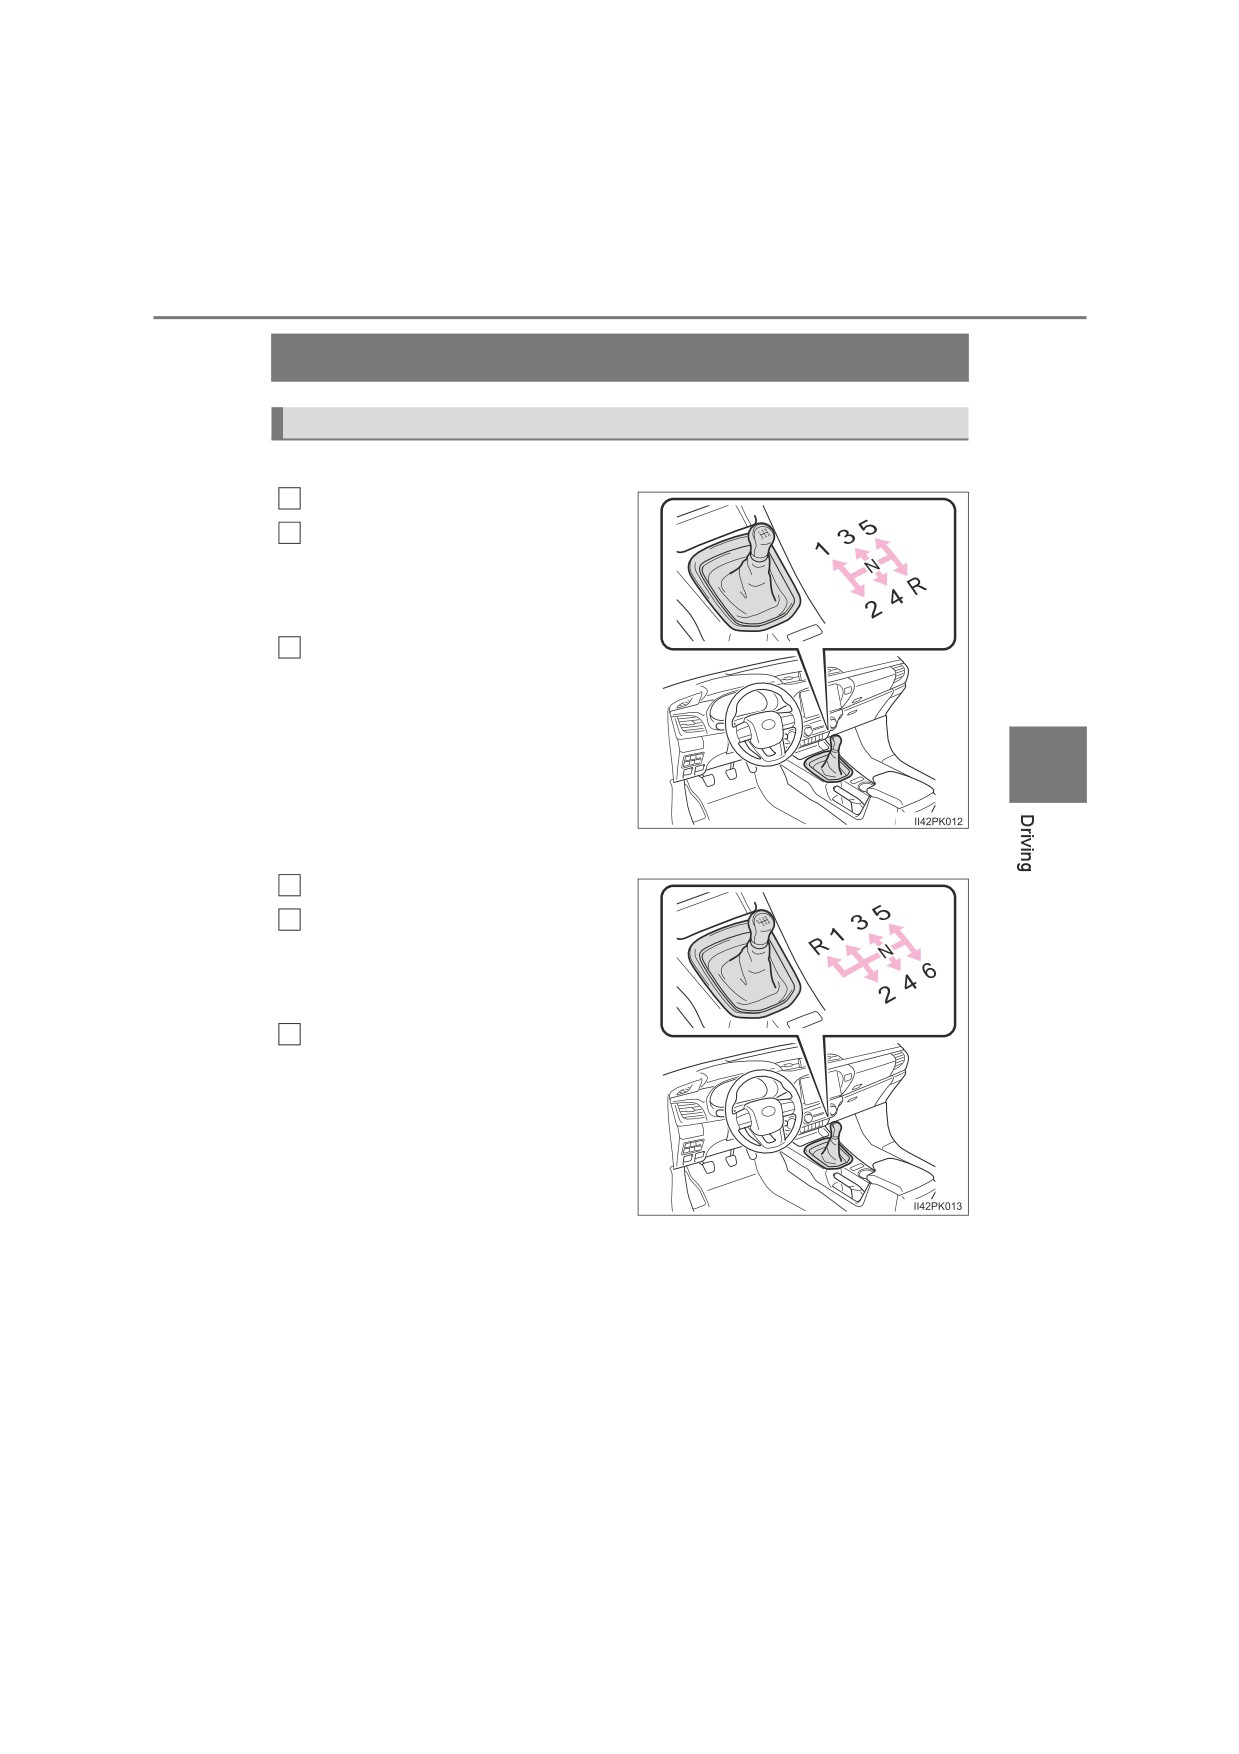
Manual transmission
Shifting the shift lever
5-speed transmission
1
Depress the clutch pedal firmly.
2
Shift the shift lever slowly and
securely.
Make sure to only shift gears
sequentially.
3
Gradually release the clutch
pedal.
If it is difficult to shift in R, shift the
shift lever to N, release the clutch
4
pedal momentarily, and then try
again.
6-speed transmission
1
Depress the clutch pedal firmly.
2
Shift the shift lever slowly and
securely.
Make sure to only shift gears
sequentially.
3
Gradually release the clutch
pedal.
: If equipped
238
4-2. Driving procedures
Selecting the driving mode (if equipped)
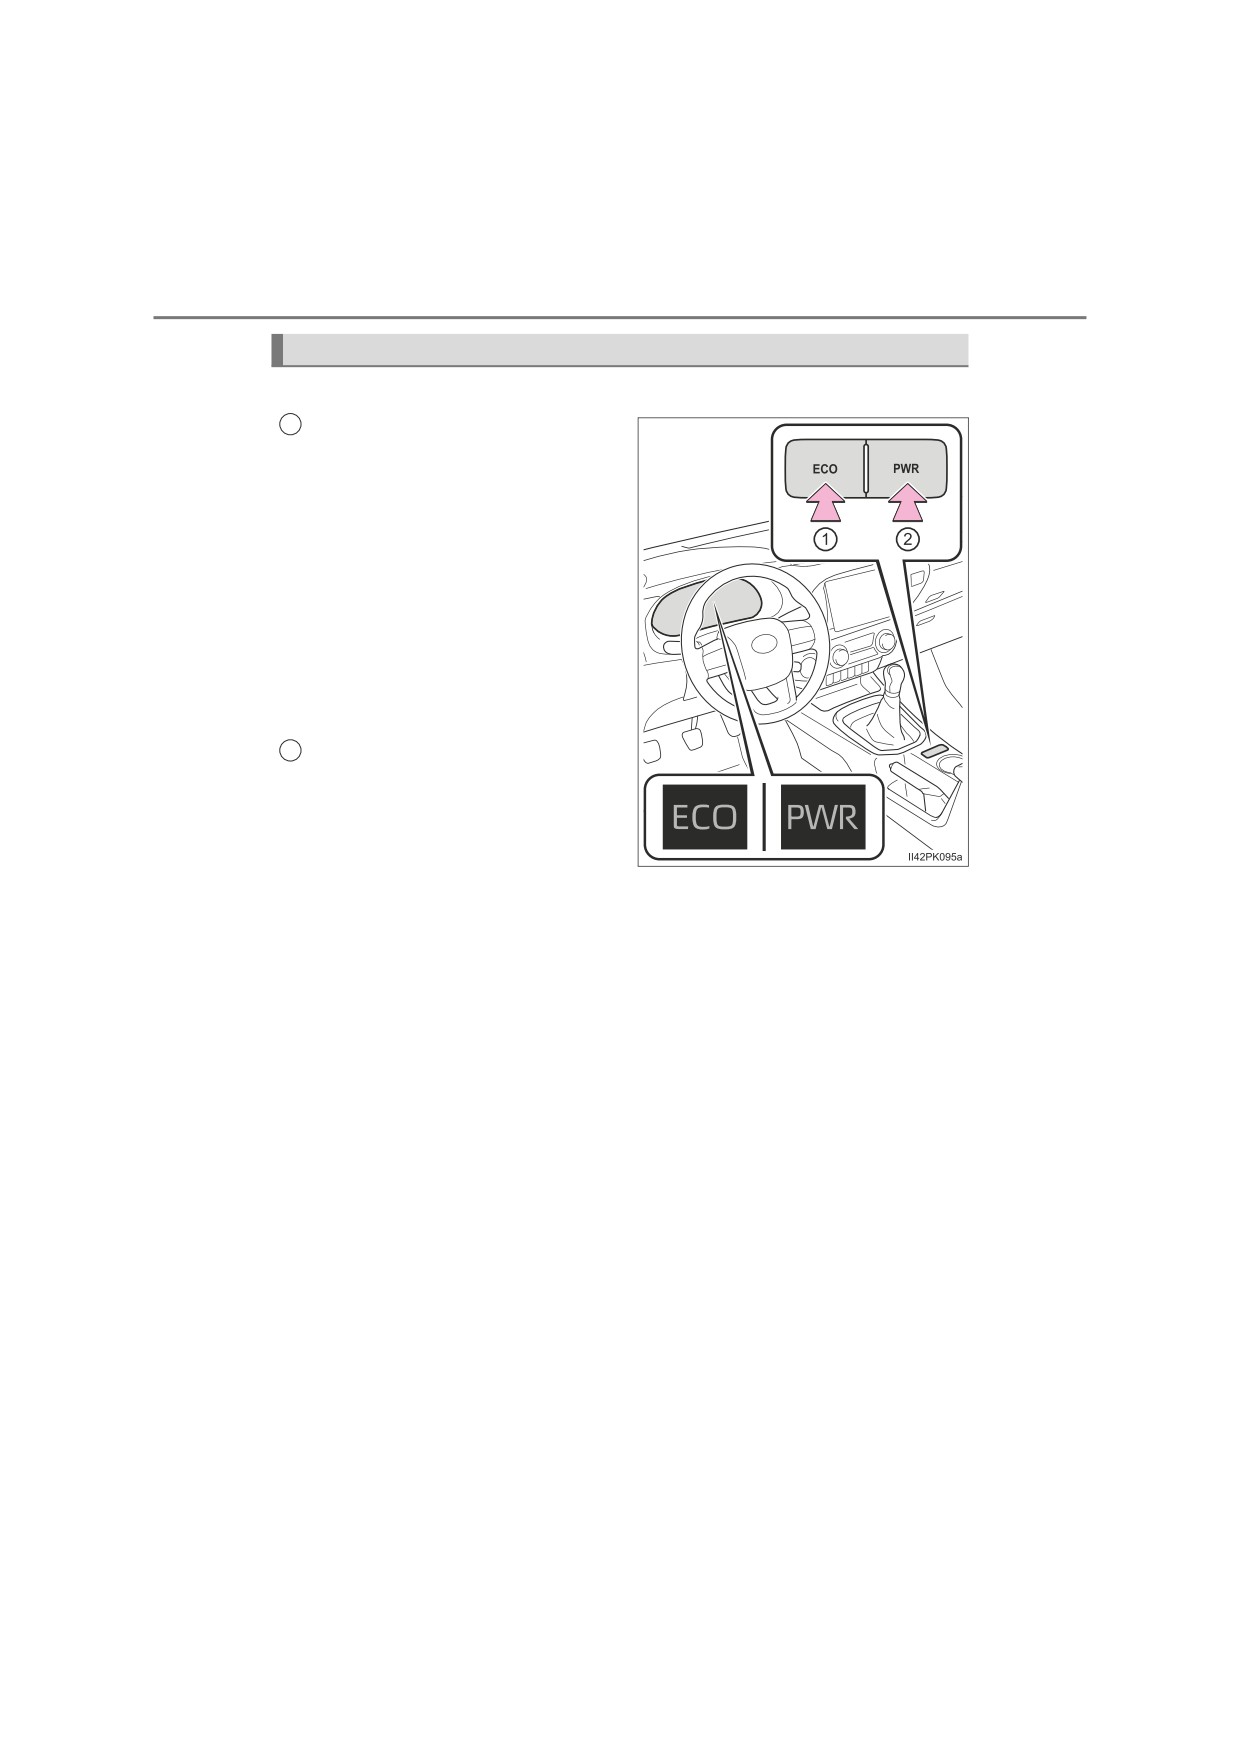
The driving modes can be selected to suit driving conditions.
1
Eco drive mode
Use Eco drive mode to help
achieve low fuel consumption
during trips that involve fre-
quent accelerating.
Press the “ECO” switch to select
Eco drive mode. The
“ECO”
indicator will come on.
Press the switch again to cancel
Eco drive mode, and then the
driving mode changes to normal
mode for normal driving.
2
Power mode
Use when high levels of
response and feeling are desir-
able, such as when driving in
mountainous regions or when
overtaking.
Press the “PWR” switch to select power mode. The “PWR” indicator will
come on.
Press the switch again to cancel power mode, and then the driving
mode changes to normal mode for normal driving.
The driving modes cannot be selected when the front-wheel drive
control switch is in L4. (if equipped)
4-2. Driving procedures
239
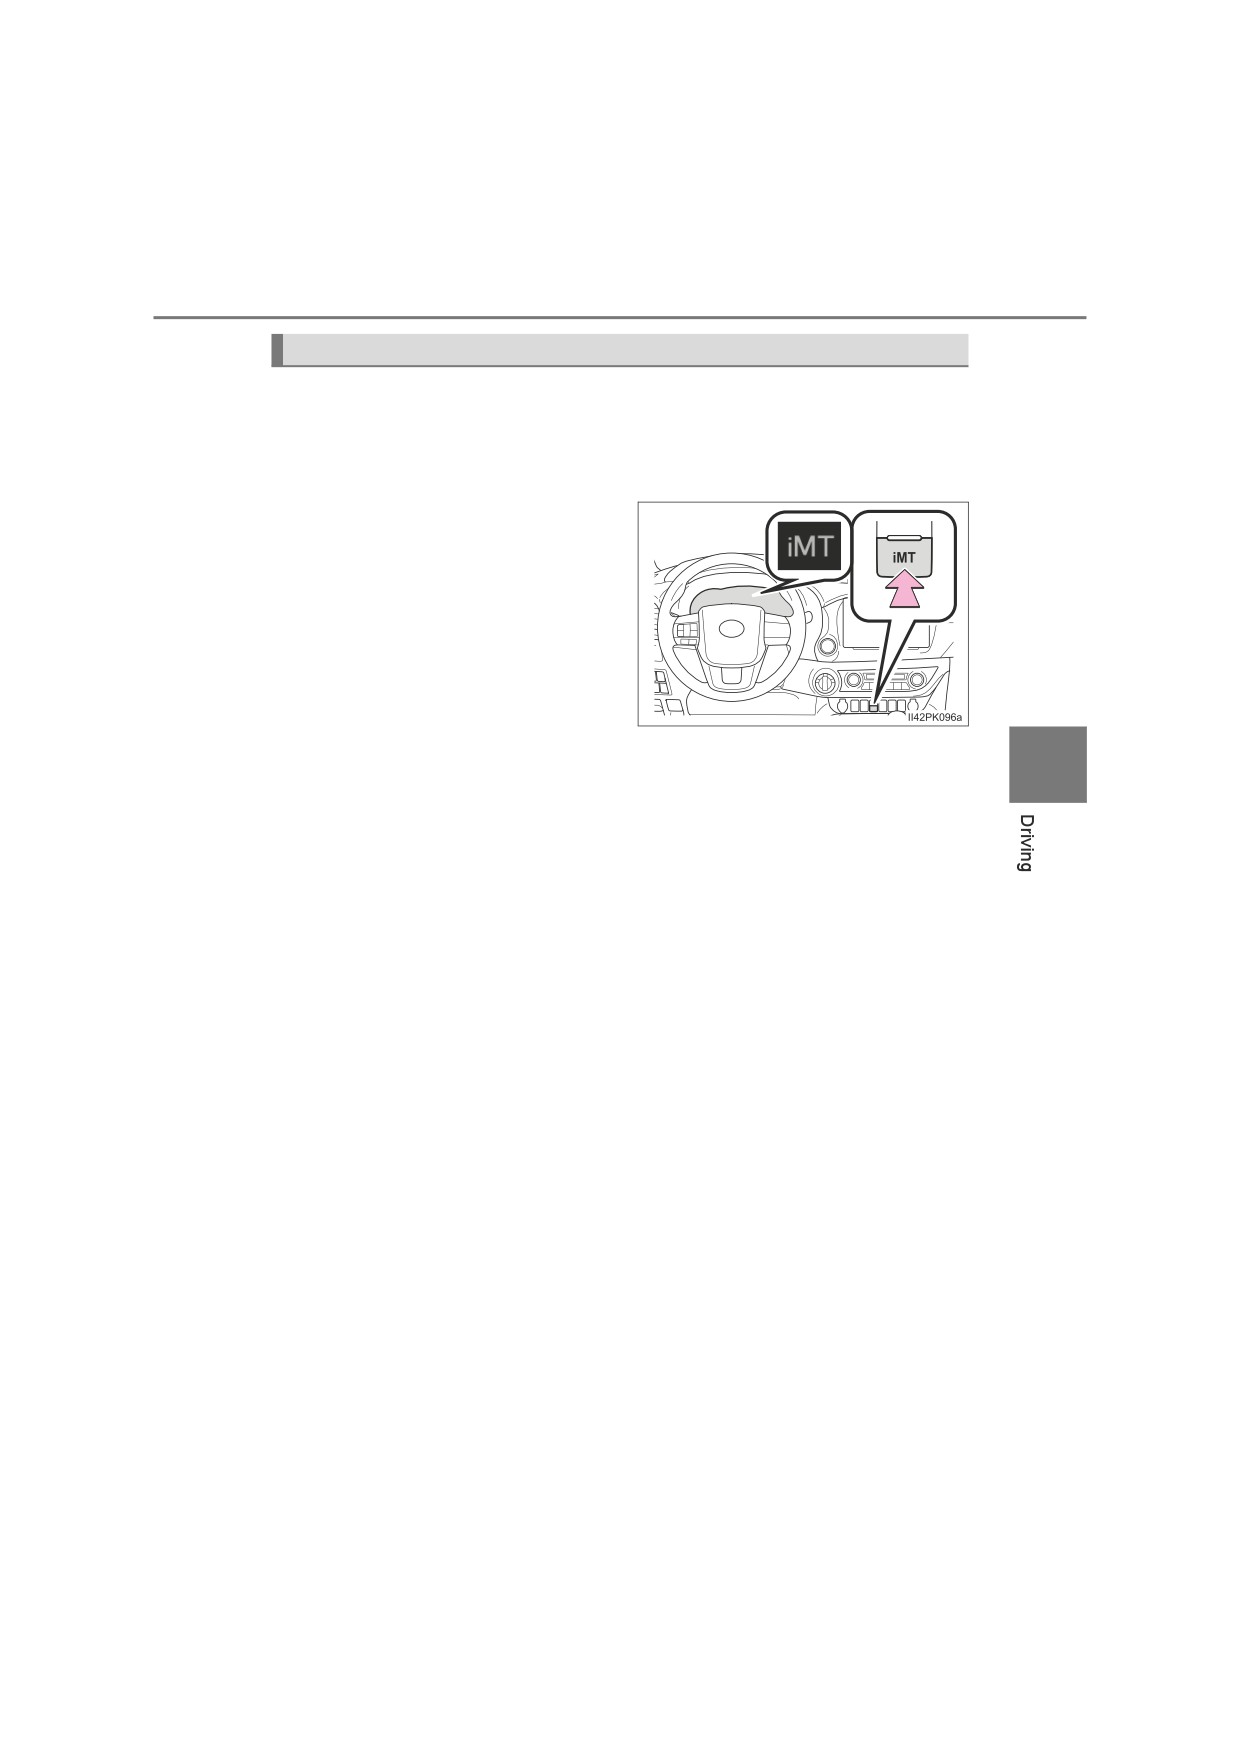
iMT (Intelligent Manual Transmission) (if equipped)
iMT detects clutch pedal and shift lever operations performed by the
driver. When the shift position is changed, iMT judges the optimal
engine speed and performs the appropriate control to help the driver
to change the shift position smoothly.
Press the “iMT” switch.
The “iMT” indicator will come on.
Press the switch again to cancel
iMT.
4

240
4-2. Driving procedures
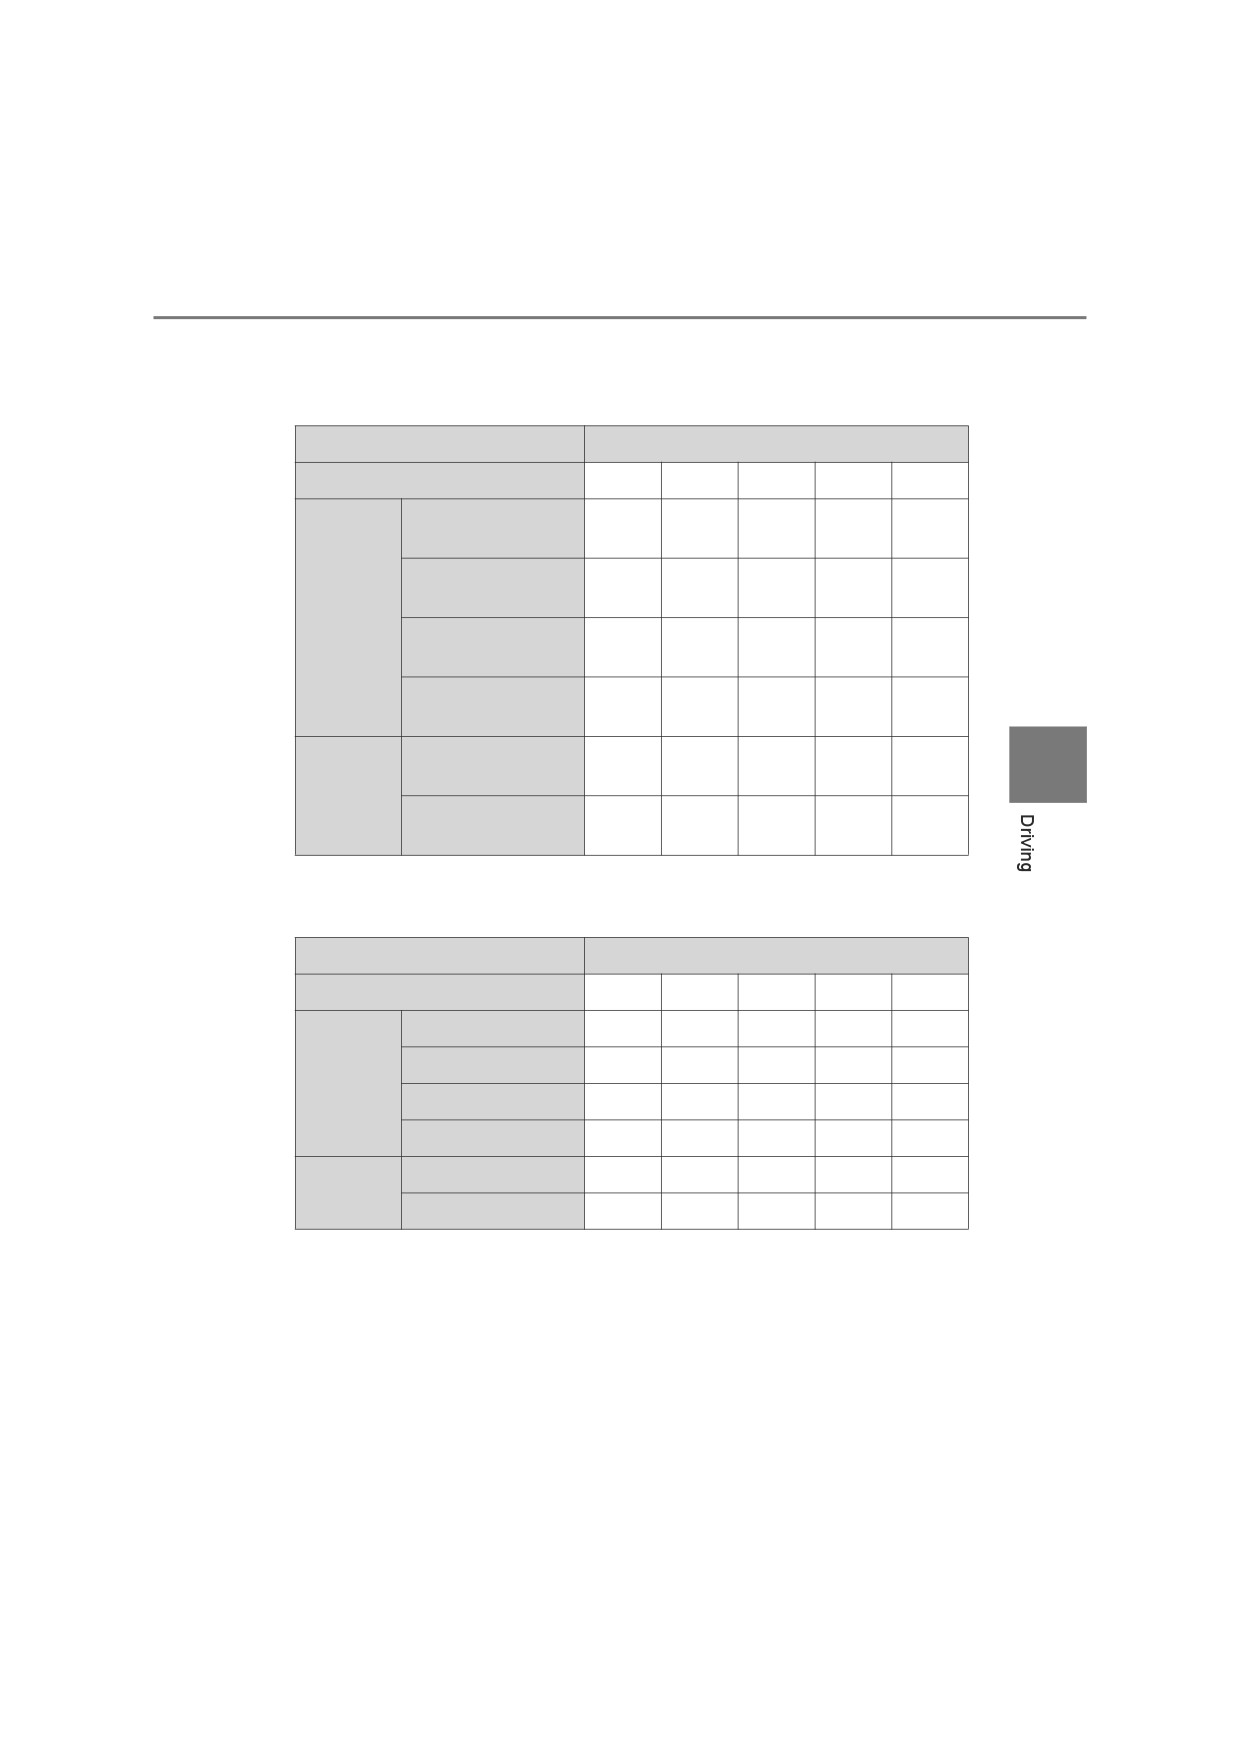
■ Maximum downshifting speeds
Observe the downshifting speeds in the following table to prevent over-rev-
ving the engine.
5-speed transmission
4WD models (front-wheel drive control switch in H2 or H4):
km/h (mph)
Maximum speed
Shift position
1
2
3
4
225/70R17C tires
38 (23)
71 (44)
114 (70)
164 (101)
265/65R17 tires
39 (24)
72 (44)
117 (72)
168 (104)
205R16C tires
37 (22)
69 (42)
112 (69)
160 (99)
4WD models (front-wheel drive control switch in L4):
km/h (mph)
Maximum speed
Shift position
1
2
3
4
225/70R17C tires
15 (9)
28 (17)
45 (27)
64 (39)
265/65R17 tires
15 (9)
28 (17)
46 (28)
65 (40)
205R16C tires
15 (9)
27 (16)
44 (27)
63 (39)
4-2. Driving procedures
241
6-speed transmission
4WD models (front-wheel drive control switch in H2 or H4):
km/h (mph)
Maximum speed
Shift position
1
2
3
4
5
113
163
170
205R16C tires
34 (21)
67 (41)
(70)
(101)
(105)
116
167
170
225/70R17C tires
35 (21)
69 (42)
(72)
(103)
(105)
2GD-FTV
engine
118
170
170
265/65R17 tires
36 (22)
70 (43)
(73)
(105)
(105)
118
170
170
265/60R18 tires
36 (22)
70 (43)
(73)
(105)
(105)
118
170
170
4
265/65R17 tires
36 (22)
70 (43)
(73)
(105)
(105)
1GD-FTV
engine
118
170
170
265/60R18 tires
36 (22)
70 (43)
(73)
(105)
(105)
4WD models (front-wheel drive control switch in L4):
km/h (mph)
Maximum speed
Shift position
1
2
3
4
5
205R16C tires
13 (8)
26 (16)
44 (27)
64 (39)
82 (50)
225/70R17C tires
14 (8)
27 (16)
45 (27)
65 (40)
84 (52)
2GD-FTV
engine
265/65R17 tires
14 (8)
27 (16)
46 (28)
67 (41)
86 (53)
265/60R18 tires
14 (8)
28 (17)
46 (28)
67 (41)
86 (53)
265/65R17 tires
14 (8)
27 (16)
46 (28)
67 (41)
86 (53)
1GD-FTV
engine
265/60R18 tires
14 (8)
28 (17)
46 (28)
67 (41)
86 (53)

242
4-2. Driving procedures
Pre Runner:
km/h (mph)
Maximum speed
Shift position
1
2
3
4
5
116
167
175
225/70R17C tires
35 (21)
69 (42)
(72)
(103)
(108)
118
171
175
265/60R18 tires
36 (22)
70 (43)
(73)
(106)
(108)
118
170
175
265/65R17 tires
36 (22)
70 (43)
(73)
(105)
(108)
■ Operation of the air conditioning system in Eco drive mode (vehicles
with automatic air conditioning system)
Eco drive mode controls the heating/cooling operations and fan speed of the
air conditioning system to enhance fuel efficiency (P. 444). To improve air
conditioning performance, adjust the fan speed or turn off Eco drive mode.
■ Deactivation of the driving mode
● Eco drive mode will not be canceled until the “ECO” button is pressed, even
if the engine is turned off after driving in Eco drive mode.
●Power mode will be canceled if the engine is turned off after driving in power
mode.
●Driving mode will be canceled if the transfer mode is shifted to L4 while the
driving mode is in other than normal mode. (if equipped)
■ Reverse warning buzzer (6-speed transmission)
A buzzer will sound to alert the driver if the shift lever is shifted to the R posi-
tion.
■ Operation of iMT
● When the clutch pedal is depressed and the shift lever is moved to a posi-
tion, iMT controls the engine speed to be optimal for changing the shift posi-
tion. However, iMT stops operating before the shift position is changed if the
clutch pedal is not released for a while, and the engine speed cannot be
controlled. To operate iMT again, depress the clutch pedal and operate the
shift lever.
● The engine speed may be increased when the clutch pedal is depressed,
however, this does not indicate a malfunction.
4-2. Driving procedures
243
■ When iMT does not operate
In the following situations, iMT may not operate. However, this does not indi-
cate a malfunction.
●The shift lever is not operated for a long time after the clutch pedal is
depressed.
● The vehicle moves for a while after the shift lever is shifted to N and the
clutch pedal is released, and then the clutch pedal is depressed and the
shift lever is moved to a position.
●The clutch pedal is not completely released and depressed again.
●The clutch pedal is not fully depressed.
■ If the warning message for iMT is shown on the multi-information dis-
play
iMT may be malfunctioning and the function is disabled. Have the vehicle
inspected at any authorized Toyota retailer or Toyota authorized repairer, or
any reliable repairer as soon as possible.
WARNING
4
■ Limitations of the iMT
iMT is not a system that prevents shift lever operation error or engine over-
revving. Depending on the situation, iMT may not operate normally and the
shift position may not be changed smoothly. Overly relying on iMT may
cause an unexpected accident.
NOTICE
■ To prevent damage to the vehicle
● Shift the shift lever to R only when the vehicle is stationary.
●Do not rest your hand on or hold the shift lever any time other than when
shifting.
● In order not to cause the engine to overrev, make sure to only shift gears
sequentially.
●Do not release the clutch pedal suddenly, as doing so may cause damage
to the clutch or transmission.
244
4-2. Driving procedures
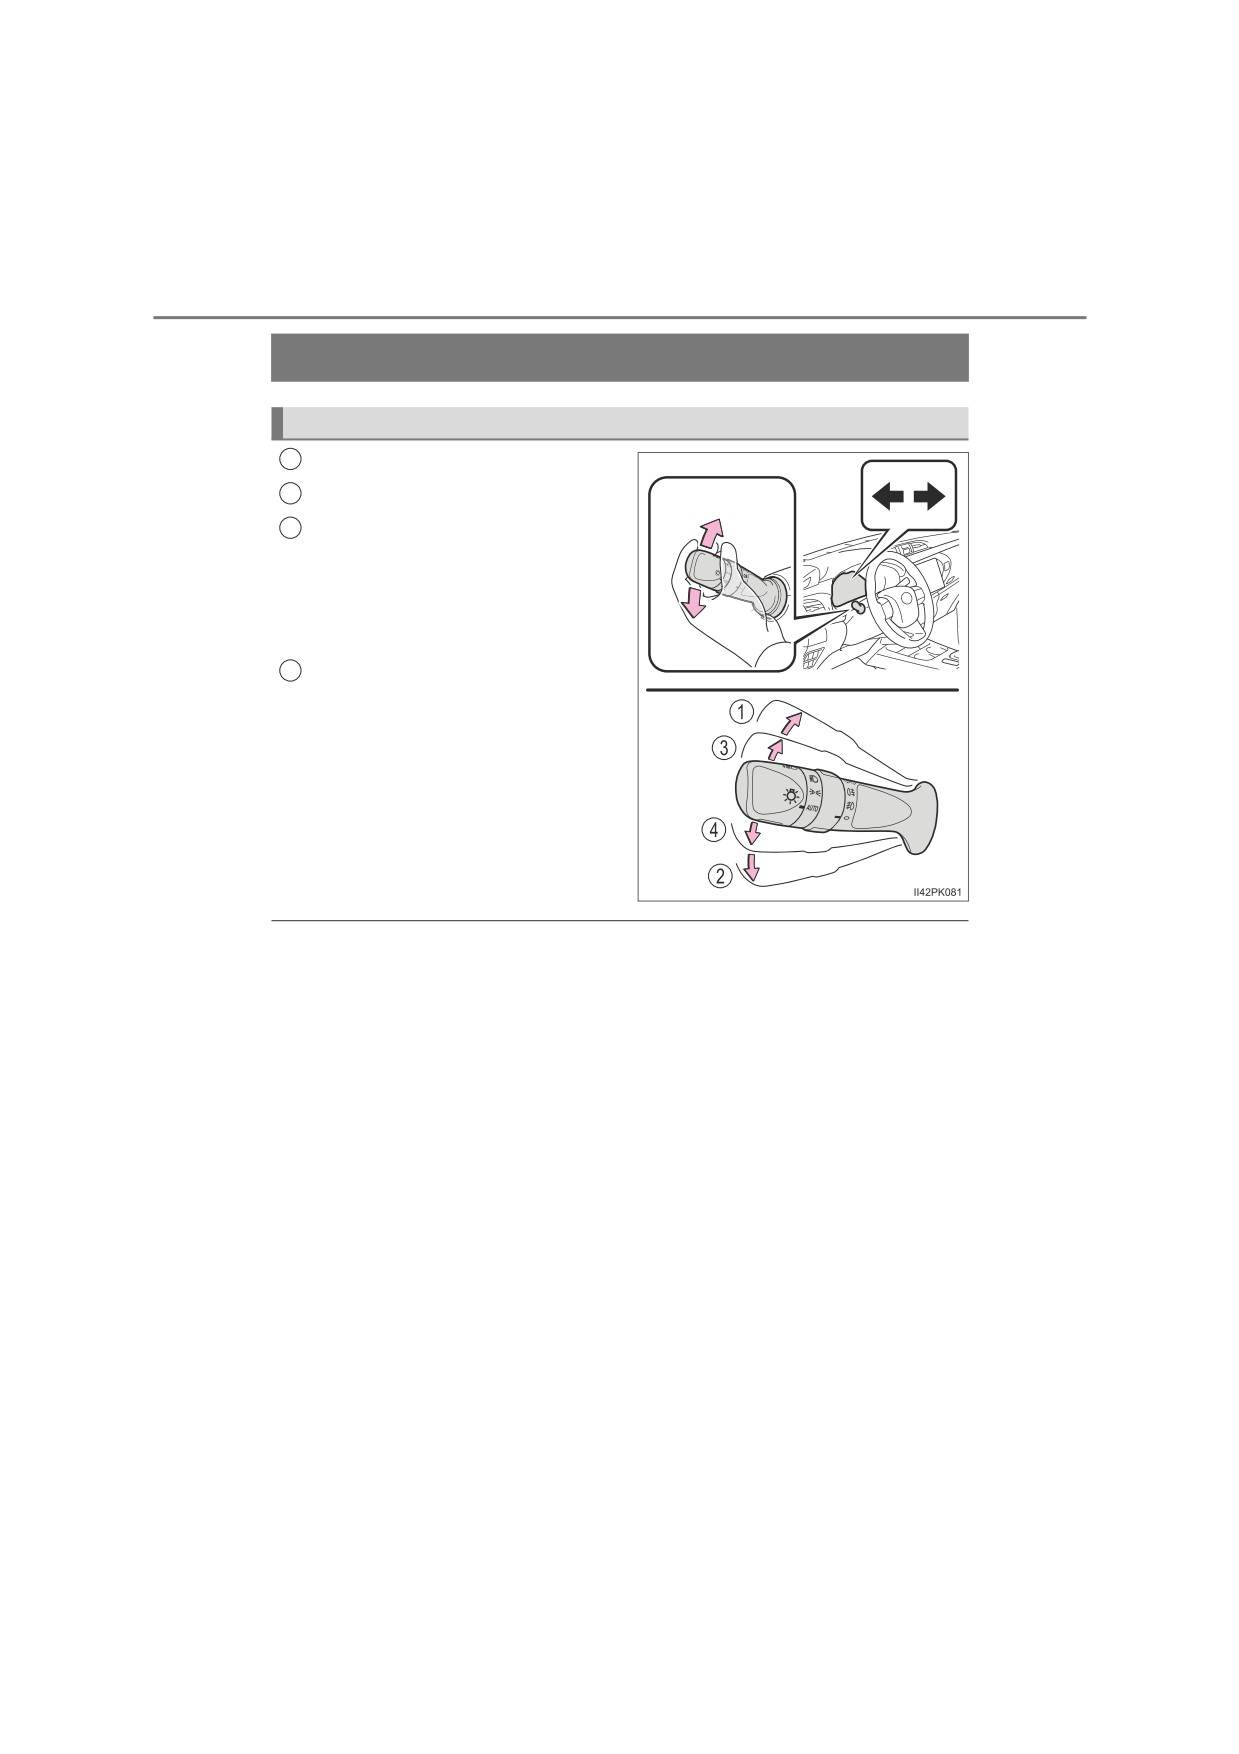
Turn signal lever
Operating instructions
1
Right turn
2
Left turn
3
Lane change to the right (move
the lever partway and release
it)
The right hand signals will flash 3
times.
4
Lane change to the left (move
the lever partway and release
it)
The left hand signals will flash 3
times.
■ Turn signals can be operated when
Vehicles without smart entry & start system
The engine switch is in the “ON” position.
Vehicles with smart entry & start system
The engine switch is in IGNITION ON mode.
■ If the indicator flashes faster than usual
Check that a light bulb in the front or rear turn signal lights has not burned
out.
■ If the turn signals stop flashing before a lane change has been per-
formed
Operate the lever again.
■ To discontinue flashing of the turn signals during a lane change
Operate the lever in the opposite direction.
■ Customization
The number of times the turn signals flash during a lane change can be
changed.
(Customizable features: P. 644)
4-2. Driving procedures
245
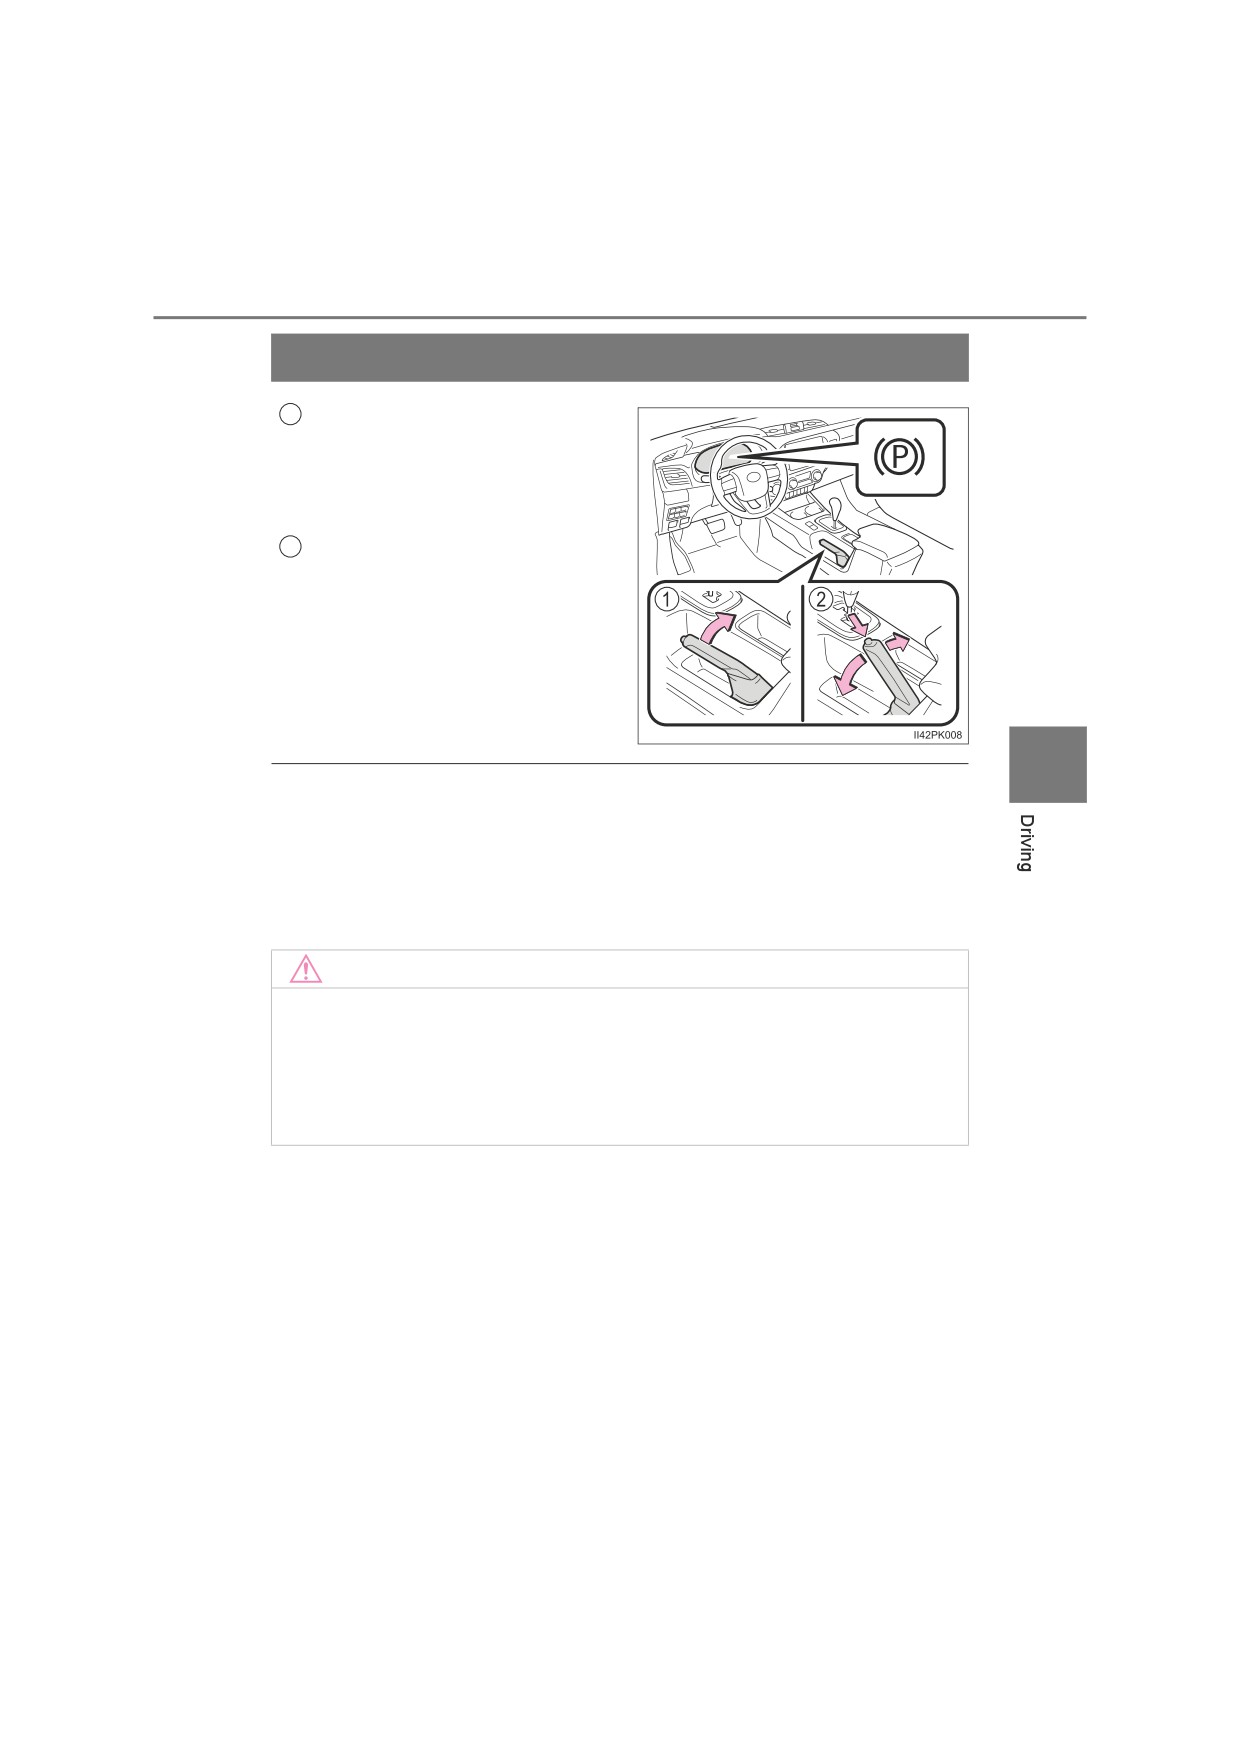
Parking brake
Sets the parking brake
1
Fully pull the parking brake while
depressing the brake pedal.
At this time, the parking brake indi-
cator light will come on.
Releases the parking brake
2
Slightly raise the lever and lower it
completely while pressing the but-
ton.
At this time, the parking brake indi-
cator light will go off.
4
■ Parking the vehicle
P. 191
■ Parking brake engaged warning buzzer
P. 569
■ Usage in winter time
P. 372
NOTICE
■ Before driving
Fully release the parking brake.
Driving the vehicle with the parking brake set will lead to brake components
overheating, which may affect braking performance and increase brake
wear.
246
4-3. Operating the lights and wipers
Headlight switch
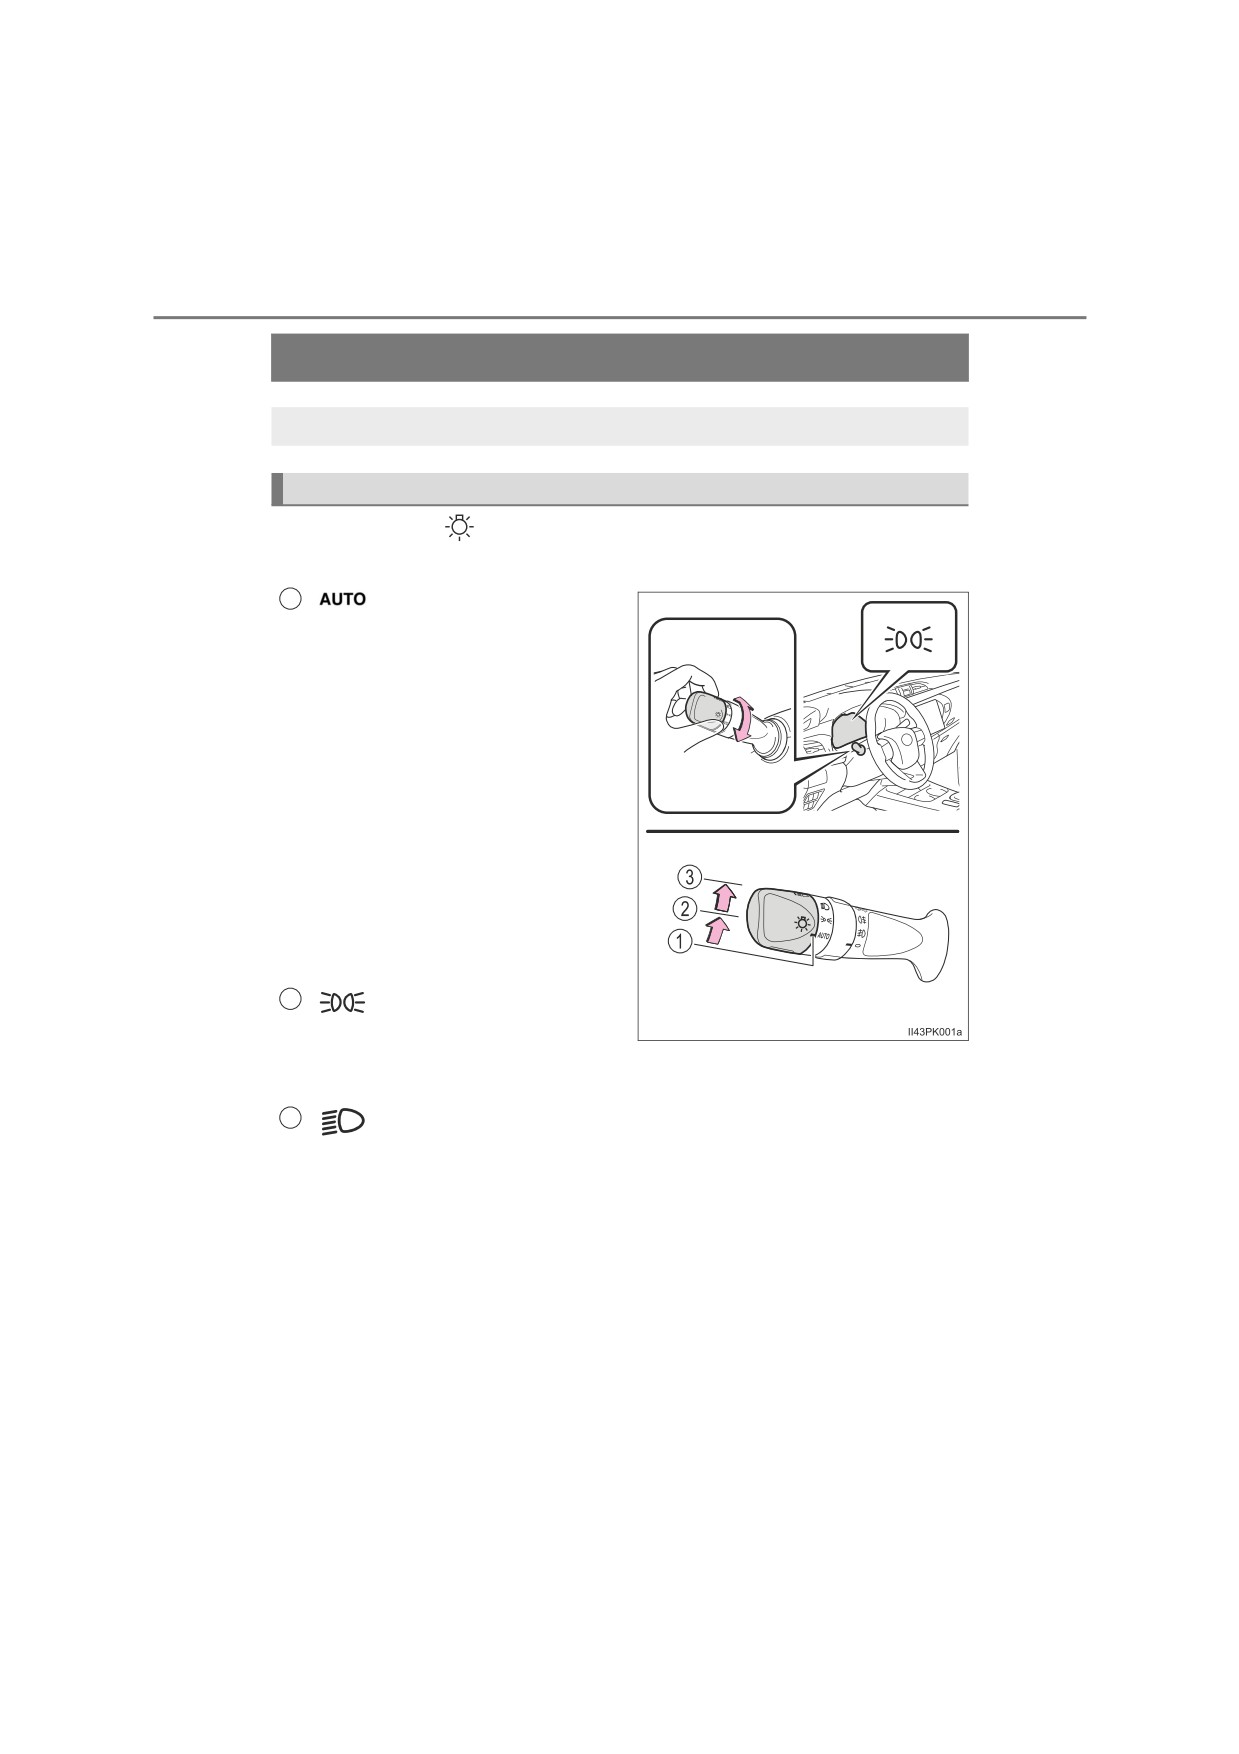
The headlights can be operated manually or automatically.
Operating instructions
Operating the
switch turns on the lights as follows:
Type A
1
The headlights, front posi-
tion, tail, license plate,
instrument panel lights,
and daytime running
lights
(if equipped) (P.
250) turn on and off auto-
matically
(when the
engine switch is in the
“ON” position
[vehicles
without smart
entry &
start system] or IGNI-
TION ON mode [vehicles
with smart entry & start
system]).
2
The front position, tail,
license plate and instru-
ment panel lights turn
on.
3
The headlights and all lights listed above turn on.