Citroen C4 Dag (2013 year). Manual - part 7
 

  Index      Citroen     Citroen C4 Dag - service manual 2013 year in english


Search            


Content   ..  5  6  7  8   ..


Citroen C4 Dag (2013 year). Manual - part 7


4

A C C E S S

95 

                     FUEL TANK 

  Capacity of the tank: approximately 

60 litres.  

  When the low fuel level in the 

tank is reached, this warning 

lamp comes on in the instru-

ment panel, accompanied by an 

audible warning and the display 

of an alert message. When it 

fi rst comes on,  around 6 litres  

of fuel remain in the tank. 

 Until suffi cient fuel has been added, 

every time the ignition is switched on, 

this warning lamp appears, accompa-

nied by an audible signal and an alert 

message. When driving, this audible 

signal and the display of this alert mes-

sage are repeated with increasing fre-

quency, as the level drops towards  0 . 
 You must refuel as soon as possible to 

avoid running out. 
 If you run out of fuel (Diesel), refer also 

to "Checks".  

  Low fuel level 

  Refuelling 

 Additions of fuel must be of at least 

5 litres to be registered by the fuel 

gauge. 
 Opening the fi ller cap may result in an 

inrush of air. This vacuum is entirely 

normal and results from the sealing of 

the fuel system. 

   If you have put in the wrong 

fuel for your vehicle, you must 

have   the tank drained and re-

fi lled with the correct fuel be-

fore you start the engine.    

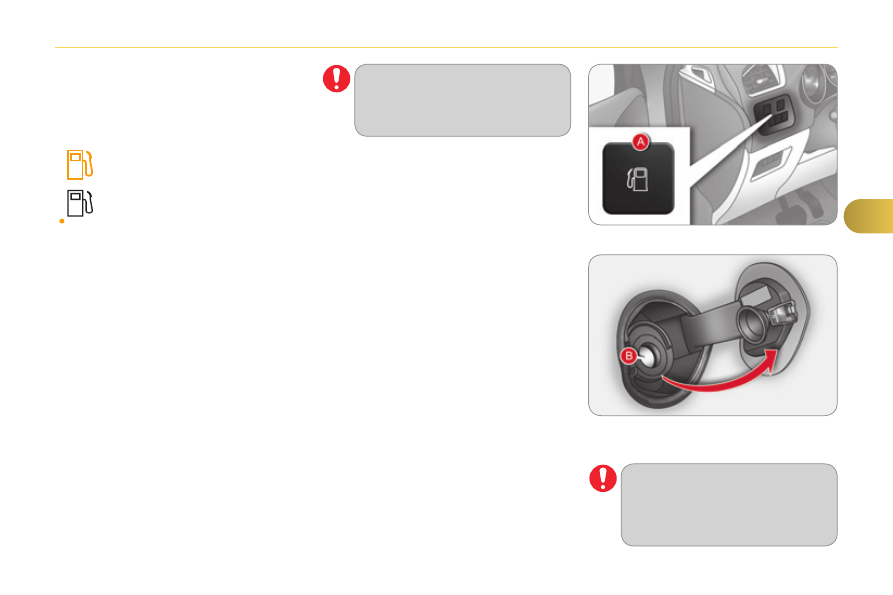
      Press control  A  until the automatic 

opening of the fuel fl ap is heard.  


This control remains active for a few 

minutes after switching off the igni-

tion. If necessary, switch the ignition 

on again to reactivate it. 

  If you are fi lling your tank to the top, 

do not persist after the third cut-off; 

this could cause your vehicle to mal-

function.  

     Take care to select the pump that 

delivers the correct fuel for your 

vehicle.  

       With Stop & Start, never refuel 

with the system in STOP mode; 

you must switch off the ignition 

with the key.  

      Introduce the nozzle so as to push 

in the metal non-return fl ap  B.  

     Make sure that the nozzle is pushed 

in as far as possible before starting 

to refuel (risk of blowback). 

     Maintain this position while refuelling. 
     Push the fuel fl ap to close it.  

4

A C C E S S

96 

           Quality of the fuel used for 

petrol engines 

  The petrol engines are perfectly com-

patible with E10 or E24 type petrol 

biofuels (containing 10 % or 24 % etha-

nol), conforming to European standards 

EN 228 and EN 15376. 
 E85 type fuels (containing up to 85 % 

ethanol) are reserved exclusively for 

vehicles marketed for the use of this 

type of fuel (BioFlex vehicles). The 

quality of the ethanol must comply with 

European standard EN 15293. 
 For Brazil only, special vehicles are 

marketed to run on fuels containing up 

to 100 % ethanol (E100 type).   

            Quality of the fuel used for 

Diesel engines 

  The Diesel engines are perfectly com-

patible with biofuels which conform to 

current and future European standards 

(Diesel fuel which complies with stan-

dard EN 590 mixed with a biofuel which 

complies with standard EN 14214) 

available at the pumps (containing up 

to 7 % Fatty Acid Methyl Ester). 
 The B30 biofuel can be used in certain 

Diesel engines; however, this use is sub-

ject to strict application of the special ser-

vicing conditions. Contact a CITROËN 

dealer or a qualifi ed workshop. 
 The use of any other type of (bio)fuel 

(vegetable or animal oils, pure or dilut-

ed, domestic fuel...) is strictly prohibited 

(risk of damage to the engine and fuel 

system).   

 The petrol or Diesel engine of your vehicle 

is fi tted with a catalytic converter, a device 

which helps to reduce the level of harmful 

emissions in the exhaust gases. 
  For petrol engines, the use of unleaded 

fuel is compulsory.  
 The  fi ller neck is narrower, admitting un-

leaded petrol nozzles only.   

  Fuel supply cut-off 

 Your vehicle is equipped with a safety 

device which cuts off the fuel supply in 

the event of a collision.  

4

A C C E S S

97 

                 MISFUEL PREVENTION 

(DIESEL) *  

 Mechanical device which prevents fi ll-

ing the tank of a Diesel vehicle with 

petrol. It avoids the risk of engine dam-

age that can result from fi lling with the 

wrong fuel. 
 Located in the fi ller neck, the misfuel 

prevention device appears when the 

fi ller cap is removed. 

  Operation 

 When a petrol fi ller nozzle is introduced 

into the fuel fi ller neck of your Diesel 

vehicle, it comes into contact with the 

fl ap. The system remains closed and 

prevents fi lling. 
  Do not persist but introduce a Diesel 

type fi ller nozzle.   

 It remains possible to use a fuel 

can to fi ll the tank.  
In order to ensure a good fl ow of 

fuel, do not place the nozzle of 

the fuel can in direct contact with 

the fl ap of the misfuel prevention 

device and pour slowly. 

  *   According to country of sale.  

   Travelling abroad 
 As Diesel fuel pump nozzles may 

be different in other countries, 

the presence of the misfuel pre-

vention device may make refuel-

ling impossible. 
 Before travelling abroad, we 

recommend that you check with 

the CITROËN dealer network, 

whether your vehicle is suitable 

for the fuel pumps in the country 

in which you want to travel.   

5

V I S I B I L I T Y

98 

               LIGHTING CONTROLS 

 System for selection and control of the 

various front and rear lamps providing 

the vehicle's lighting. 

  Main lighting 

 The various front and rear lamps of the 

vehicle are designed to adapt the driver's 

visibility progressively according to the 

climatic conditions: 
   -  

sidelamps, to be seen, 

  -   dipped beam headlamps to see 

without dazzling other drivers, 

  -  

main beam headlamps to see clear-

ly when the road is clear.   

  Additional lighting 

 Other lamps are provided to meet the 

requirements of particular driving con-

ditions: 
   -  rear 

foglamps, 

  -  

front foglamps with cornering lighting, 

  -   directional headlamps for improved 

visibility when cornering, 

  -   daytime running lamps to be more 

visible during the day, 

  -   guide-me-home and welcome light-

ing to facilitate access to the vehicle, 

  -   parking lamps as vehicle position 

markers.   

  Programming 

 The setting of some functions can be 

adjusted: 
   -  

daytime running lamps, 

  -  

automatic illumination of headlamps, 

  -  guide-me-home 

lighting, 

  -  welcome 

lighting, 

  -  directional 

lighting. 


 In some weather conditions (e.g. 

low temperature or humidity), the 

presence of misting on the inter-

nal surface of the glass of the 

headlamps and rear lamps is nor-

mal; it disappears after the lamps 

have been on for a few minutes.   

5

V I S I B I L I T Y

99 

   Model without AUTO lighting   

   Model with AUTO lighting   

  A.  Main lighting mode selection ring: 

turn it to position the symbol re-

quired facing the mark. 

  Manual controls 

 The lighting is controlled directly by the 

driver by means of the ring  A  and the 

stalk  B . 

 Lighting off / daytime running lamps.  
      Automatic illumination of head-

lamps. 

  B.   Stalk for switching headlamps: pull 

the stalk towards you to switch the 

lighting between dipped and main 

beam headlamps. 

 In the lamps off and sidelamps modes, 

the driver can switch on the main beam 

headlamps temporarily ("headlamp 

fl ash") by maintaining a pull on the stalk. 

 Sidelamps. 

 Dipped headlamps or main 

beam headlamps. 

  Displays 

 Illumination of the corresponding indica-

tor lamp in the instrument panel confi rms 

that the lighting selected is on.  

       Daytime running lamps 

 Daytime lighting, compulsory in certain 

countries, which comes on automati-

cally when the engine is started making 

the vehicle more visible to other users. 

  This function is assured: 
   -   in countries where it is imposed by 

regulations,  


by illumination of the dipped beam 

headlamps with the sidelamps and 

number plate lamps; this function 

cannot be deactivated. 

  -   for other countries where it is pro-

vided,  


by the use of dedicated lamps; this 

function can be activated or deac-

tivated via the vehicle confi guration 

menu.   

  The instruments and controls (instru-

ment panel, multifunction screen, air 

conditioning control panel, ...) are not 

illuminated, except in night mode with 

manual or automatic illumination of 

headlamps.   

5

V I S I B I L I T Y

100 

          C.   Foglamp selection ring. 
 The foglamps operate with the dipped 

and main beam headlamps. 

 They operates with the dipped beam 

headlamps and main beam headlamps. 
      To switch on the rear foglamps, turn 

the ring  C  forwards.  

      To switch off the rear foglamps, turn 

the ring  C  rearwards.  

 When automatic illumination of headlamps 

is on (with AUTO model), the dipped beam 

headlamps and sidelamps remain on while 

the rear foglamps are on.   

   Model with rear foglamps only 

 rear foglamps 

 Rotate and release the ring  C : 
     forwards a fi rst time to switch on the 

front foglamps, 

     forwards a second time to switch on 

the rear foglamps, 

    rearwards a fi rst time to switch off 

the rear foglamps, 

     rearwards a second time to switch 

of the front fog lamps.  

   Model with front and 

rear foglamps 

 front and rear foglamps 

 When the headlamps switch off with 

automatic illumination of headlamps 

(AUTO model) or when the dipped 

beam headlamps are switched off 

manually, the foglamps and sidelamps 

remain on. 
      Turn the ring rearwards to switch 

off the foglamps, the sidelamps will 

then switch off.    

 In good or rainy weather, by both 

day and night, the front foglamps 

and the rear foglamps are pro-

hibited. In these situations, the 

power of their beams may dazzle 

other drivers. They should only 

be used in fog or falling snow. 
 In these weather conditions, you 

should switch on the foglamps 

and dipped beam headlamps 

manually, as the sunshine sen-

sor may detect suffi cient light. 
 Do not forget to switch off the 

front and rear foglamps when 

they are no longer necessary.  

5

V I S I B I L I T Y

101 

                   Parking lamps 

 Side markers for the vehicle by illumi-

nation of the sidelamps on the traffi c 

side only. 

      Within one minute of switching off 

the ignition, operate the lighting con-

trol stalk up or down depending on 

the traffi c side (for example: when 

parking on the left; lighting control 

stalk upwards; the right hand side-

lamps are on).  

 This is confi rmed by an audible signal 

and illumination of the corresponding 

direction indicator warning lamp in the 

instrument panel. 
 To switch off the parking lamps, return 

the lighting control stalk to the central 

position.  

  Switching off the lighting when 

switching off the ignition 
 When the ignition is switched off, 

all of the lamps switch off immedi-

ately, except for the dipped beam 

headlamps if automatic guide-

me-home lighting is activated.  

       Manual guide-me-home lighting 

 The temporary illumination of the dipped 

beam headlamps after the vehicle's ignition 

has been switched off makes the driver's 

exit easier when the light is poor. 

  Switching on 
     With the ignition off, "fl ash"  the 

headlamps using the lighting stalk. 

     A further "headlamp fl ash" switches 

the function off.   

  Switching off 
 The manual guide-me-home lighting 

switches off automatically after a set 

time.   

  Switching on the lighting 

when switching on the ignition 
 To reactivate the lighting control 

stalk, turn the ring  A  to position  "0"  - 

lighting off, then to the position of 

your choice. 
 If the lighting is switched on manu-

ally after switching off the ignition, 

there is an audible signal when a 

front door is opened to warn the 

driver that they have forgotten to 

switch off the vehicle's lighting, with 

the ignition off. 
 They switch off automatically after a 

period which depends on the state 

of charge of the battery (entry to en-

ergy economy mode).   

5

V I S I B I L I T Y

102 

          Automatic illumination of 

headlamps 

 The sidelamps and dipped beam head-

lamps are switched on automatically, 

without any action on the part of the 

driver, when a low level of external light 

is detected or in certain cases of activa-

tion of the windscreen wipers. 
 As soon as the brightness returns to a 

suffi cient level or after the windscreen 

wipers are switched off, the lamps are 

switched off automatically. 

  Activation 
      Turn ring  A  to the  "AUTO"  position. 

The automatic illumination of head-

lamps is accompanied by a mes-

sage in the screen.   

  Deactivation 
     Turn ring  

A  to a position other 

than  

"AUTO" . Deactivation is ac-

companied by a message in the 

screen.   

  Coupling with the automatic "Guide-

me-home" lighting 
 Association with the automatic illumi-

nation of headlamps provides "guide-

me-home" lighting with the following 

additional options: 
   -   selection of the lighting duration to 

15, 30 or 60 seconds in the settings 

in the vehicle confi guration  menu 

(except in the case of the mono-

chrome screen A, for which the 

duration is set: 60 seconds), 

  -   automatic activation of "guide-me-

home" lighting when automatic illumi-

nation of headlamps is in operation.   

 In the event of a fault with the 

sunshine sensor, the lighting 

come on, this warning lamp is 

displayed on the instrument panel and/or a 

message appears in the screen, accompa-

nied by an audible signal. 
 Contact a CITROËN or a qualifi ed  work-

shop workshop. 

  Operating fault 

 In fog or snow, the sunshine 

sensor may detect suffi cient 

light. Therefore, the lighting will 

not come on automatically. 
 Do not cover the sunshine sen-

sor, coupled with the rain sensor 

and located in the centre of the 

windscreen behind the rear view 

mirror; the associated functions 

would no longer be controlled.   

5

V I S I B I L I T Y

103 

  Switching off 
 On the outside, the welcome lighting 

switches off automatically after a set 

time, when the ignition is switched on 

or on locking the vehicle. 
 On the inside, the welcome lighting 

switches off automatically after a pre-

determined time or on opening one of 

the doors.  

 On the inside, the footwell and courtesy 

lamps come on.  

             WELCOME LIGHTING 

  Switching on 

      Press the open padlock on 

the remote control; your ve-

hicle is unlocked.  

 The remote switching on of the pas-

senger compartment lighting makes 

your access to the vehicle easier in 

poor light. It is activated depending on 

the light level detected by the sunshine 

sensor. 

 On the outside, the sidelamps and 

dipped beam headlamps, as well as the 

side spotlamps, located under the door 

mirrors, come on. 

  Programming 

 Activation or deactivation, as 

well as the duration of the light-

ing duration for the exterior 

welcome lighting can be set via 

the vehicle confi guration menu.   

5

V I S I B I L I T Y

104 

  To avoid causing a nuisance to other 

road users, the height of the halogen 

headlamps should be adjusted accord-

ing to the load in the vehicle. 
  0.   1 or 2 people in the front seats. 
  -.  3 

people. 

  1.  5 people. 
  -.  Intermediate 

setting. 

  2.   5 people + maximum authorised load. 
  -.  Intermediate 

setting. 

  3.   Driver + maximum authorised load. 

       MANUAL ADJUSTMENT OF 

HALOGEN HEADLAMPS 

 The initial setting is position  "0" .  

            AUTOMATIC ADJUSTMENT OF 

XENON HEADLAMPS 

 This system adjusts the height of the xe-

non headlamp beams automatically and 

when stationary, according to the load in 

the vehicle, so as to avoid causing a nui-

sance to other road user. 

 If a malfunction occurs, this 

warning lamp is displayed 

in the instrument panel, ac-

companied by an audible signal and a 

message in the screen. 
 The system then places your headlam-

ps in the lowest position. 

 Do not touch the xenon bulbs. 
 Contact a CITROËN dealer or a 

qualifi ed workshop. 

5

V I S I B I L I T Y

105 

         DIRECTIONAL LIGHTING 

  Programming 

  with directional lighting  

  without directional lighting  

  When the dipped or main beam head-

lamps are on, this function, allows the 

light beams to better follow the road. 
 The use of this function, coupled with 

the xenon headlamps and the corner-

ing lighting, considerably improves the 

quality of your lighting round bends. 

  Operating fault 

 If a fault occurs, this warning 

lamp  fl ashes in the instrument 

panel, accompanied by a mes-

sage in the screen. 

 Contact a CITROËN dealer or a quali-

fi ed workshop.   

  This function is inactive: 
   -  

when stationary or at low speeds, 

  -  

when reverse is engaged.   

 The system is activated or de-

activated in the vehicle confi gu-

ration menu. 
  The system is activated by de-

fault. 

 The state of the system stays in memory 

on switching off the ignition.  

5

V I S I B I L I T Y

106 

         CORNERING LIGHTING 

  With dipped or main beams, this func-

tion makes use of the beam from a 

front foglamp to illuminate the inside 

of a bend, when the vehicle speed is 

below 25 mph (approximately 40 km/h) 

(urban driving, winding road, intersec-

tions, parking manouevres...). 

   with cornering lighting  

  without cornering lighting   

  Switching on 
 This function starts: 
   -   when the corresponding direction 

indicator is switched on,  

 or 
  -   from a certain angle of rotation of 

the steering wheel.   

  Switching off 
 The system does not operate: 
   -   below a certain angle of rotation of 

the steering wheel, 

  -  

above 25 mph (40 km/h), 

  -  

when reverse gear is engaged.   

  Programming 

 The system is activated or 

deactivated in the vehicle con-

fi guration menu.  

The system is activated by default.   

5

V I S I B I L I T Y

107 

         WIPER CONTROLS 

 System for selection and control of the 

various front and rear wiping modes for 

the elimination of rain and cleaning the 

screens. 
 The vehicle's front and rear wipers are 

designed to improve the driver's visibil-

ity according to the climatic conditions. 
 The wipers are controlled by means of 

stalk  A  for the front and the ring  B  for 

the rear. 

  Programming 

 Various automatic wiper control modes 

are also available depending on wheth-

er the following options are fi tted: 
   -  

automatic rain sensitive windscreen 

wipers, 

  -   rear wiping on engaging reverse 

gear.   

   Model without AUTO wiping   

   Model with AUTO wiping   

  Windscreen wiper 

   A.   Wiping speed control stalk: raise or 

lower the stalk to the desired position. 

 Fast wiping (heavy rain). 

 Normal wiping (moderate rain). 

 Intermittent wiping (proportional 

to the speed of the vehicle). 

 Park.   

 Single wipe (press downwards 

or pull the stalk briefl y  towards 

you, then release). 

  Automatic wiping (press 

down, then release). 
 Single wipe (pull the stalk 

briefl y towards you).  

      or 

5

V I S I B I L I T Y

108 

            Automatic rain sensitive 

windscreen wipers 

 The windscreen wipers operate automat-

ically, without any action on the part of 

the driver, if rain is detected (sensor be-

hind the rear view mirror), adapting their 

speed to the intensity of the rainfall. 

 Briefl 

y push stalk  

A  down-

wards. 
 The instruction is confi rmed by 

a wiping cycle, accompanied 

by illumination of this warning lamp in 

the instrument panel and an activation 

message.  

  Switching on 

  Switching off 

  Operating fault 
 If an automatic rain sensitive wiper mal-

function occurs, the wipers will operate 

in intermittent mode. 
 Contact a CITROËN dealer or a quali-

fi ed workshop. 

 Do not cover the rain sensor, 

linked with the sunshine sensor 

and located in the centre of the 

windscreen behind the rear view 

mirror. 
 Switch off the automatic rain 

sensitive wipers when using an 

automatic car wash. 
 In winter, it is advisable to wait 

until the windscreen is completely 

clear of ice before activating the 

automatic rain sensitive wipers.   

  The automatic rain sensitive 

windscreen wipers must be re-

activated if the ignition has been 

off for more than one minute.  

 Briefl y push stalk  A  downwards 

again. 
 The instruction is confi rmed by 

this warning lamp going off in 

the instrument panel and/or the display 

of a deactivation message.  

          Windscreen and headlamp 

wash 

   Low screenwash / headlamp wash 

fl uid level 
 On vehicle fi tted with headlamp wash-

ers, the low level of this fl uid is indicat-

ed by gauge in the reservoir fi ller neck 

under the bonnet. 
 Checking and topping up this fl uid  can 

should be done with the engine off. 
 The level of this fl uid should be checked 

regularly, particularly during winter. 
 Refer to "Checks - Screenwash / head-

lamp wash level" section for the proce-

dure on checking the level.   

      Pull the windscreen wiper stalk to-

wards you. The windscreen wash 

then the windscreen wipers operate 

for a fi xed period.  

 The headlamp washers only operate 

when  the dipped or main beam head-

lamps are on ,  with the vehicle moving . 

  To reduce the consumption of 

the fl uid by the headlamp wash-

ers, they operate only with every 

seventh use of the screenwash 

or every 25 miles (40 km) during 

a given journey.   

5

V I S I B I L I T Y

109 

  B.    Rear wiper selection ring: turn the 

ring to place the desired symbol 

against the marking. 

            Rear wiper 

  If a signifi cant accumulation of 

snow or ice is present, or when 

using a tailgate bicycle carrier, 

deactivate the automatic rear 

wiper via the vehicle confi gura-

tion menu. 

 Park. 

 Intermittent wipe. 

 Wash-wipe.  
 Turn the ring to its stop/the rear 

screen wash, then the rear wiper 

operates for a set duration.  

  Reverse gear 
 When reverse gear is engaged, the 

rear wiper will come into operation if the 

windscreen wipers are operating.  

 The function is activated or de-

activated via the vehicle confi gu-

ration menu. 
 This function is activated by de-

fault.   

  Programming 

          Special position of the 

windscreen wipers 

  To maintain the effectiveness 

of the "fl at-blade" type of wiper 

blades, it is advisable to: 
   -  

handle them with care, 

  -   clean them regularly using 

soapy water, 

  -   avoid using them to retain 

cardboard on the wind-

screen, 

  -  

replace them at the fi rst signs 

of wear.    

 This position permits release of the 

windscreen wiper blades. 
 It is used for cleaning or replacement 

of the blades. It can also be useful, in 

winter, to detach the blades from the 

windscreen. 

       Any action on the wiper stalk in the 

minute after switching off the igni-

tion places the blades vertically on 

the screen. 

     To park the blades again, switch on 

the ignition and operate the wiper 

stalk.   

5

V I S I B I L I T Y

110 

   1.    Front courtesy lamp  
  2.    Front map reading lamps  
  3.    Rear courtesy lamp  
  4.    Rear map reading lamps   

            COURTESY LAMPS 

   -  

when the vehicle is unlocked, 

  -   when the key is removed from the 

ignition, 

  -  

on opening a door, 

  -  

when the remote control locking but-

ton is used to locate your vehicle.  

  Front and rear courtesy lamps 

 In this position, the courtesy 

lamp comes on gradually: 

 It switches off gradually: 
   -  

when the vehicle is locked, 

  -  

when the ignition is switched on, 

  -   30 seconds after the last door is 

closed.  

To switch off the rear courtesy lamp, put 

it in the the "permanently off" position.  

 Permanently off. 

 Permanent lighting. 

 In permanent lighting mode, the 

lighting time varies according to 

the circumstances: 
   -   with the ignition off, approxi-

mately ten minutes, 

  -  

in energy economy mode, ap-

proximately thirty seconds, 

  -   with the engine running, un-

limited.  

 When the courtesy lamp is in 

the "permanent lighting" posi-

tion, the rear courtesy lamp also 

comes on, except if it is in the 

"permanently off" position.  

  Front and rear map reading 

lamps 

 Take care not to put anything in 

contact with the courtesy lamps. 

      With the ignition on, press 

the corresponding switch.   


Content   ..  5  6  7  8   ..