Citroen C4 Dag (2013 year). Manual - part 4
 

  Index      Citroen     Citroen C4 Dag - service manual 2013 year in english


Search            


Content   ..  2  3  4  5   ..


Citroen C4 Dag (2013 year). Manual - part 4


1

M O N I T O R I N G

47 

 System allowing certain screens to be 

switched off for night driving. 
 The instrument panel remains on with 

the vehicle speed, electronic or auto-

matic gearbox gear selected, cruise 

control or speed limiter information, if 

in use, and the low fuel alerts as ap-

propriate. 
 If there is an alert or a change in a 

function or to a setting, the black panel 

mode is interrupted. 

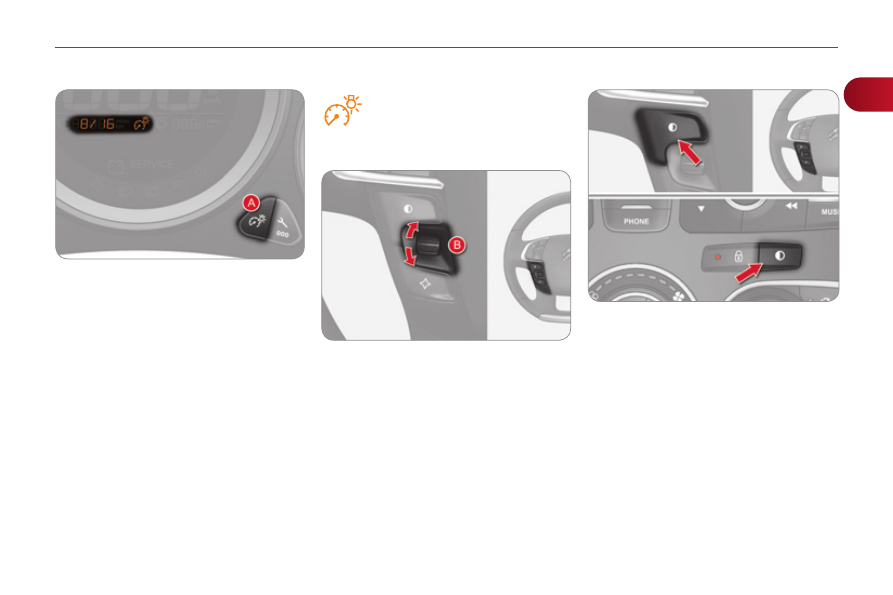
       Black panel (black screen) 

  Activation 
      With the vehicle lighting on, press 

this button again to activate the 

black panel. 

     Press once more to illuminate on 

the various screens again.    

 Permits manual adjustment of the bright-

ness of the instruments and controls in 

relation to the exterior brightness. Only 

operates when the vehicle lighting is on in 

night mode. 

          Lighting dimmer 

  Activation 
      Press button  A  to change the bright-

ness of the instruments and controls. 

     When the lighting reaches the mini-

mum setting, release the button, 

then press again to increase it.  

 or 
      When the lighting reaches the maxi-

mum setting, release the button, 

then press again to reduce it. 

     When the lighting reaches the level 

of brightness required, release the 

button.  

  Deactivation 
 When the vehicle lighting is off, or in 

day mode (daytime running lamps 

on), pressing the button or turning the 

thumb wheel does not have any effect.   

 You can also modify the level of lighting 

by turning the thumb wheel  B , located 

on the left of the steering wheel: 
      upwards; to reduce the level, 
     downwards; to increase the level.   

 This indicator and the lighting 

value appear in the middle of 

the instrument panel during 

adjustment to show the lighting 

level compared to the 16 levels avail-

able. 

1

M O N I T O R I N G

48 

 In the instrument panel, you can change 

the colour of its dials (button  A ) indepen-

dently from that of the screens (button  B ). 
 There are fi ve colour variants, from 

white to blue. 
     press the appropriate button as 

many times as needed to obtain the 

desired colour.   

 This menu allows you to choose a fam-

ily of polyphonic sounds from the four 

available. These sounds are grouped 

together in a family and are adapted 

to suit the situation and context (alert, 

confi rmation, rejection, direction indica-

tors, lighting left on, key in ignition...). 

       Customising the instrument 

panel colours 

       Customising the polyphonic 

sounds 

  For the customisable colour 

instrument panel with audio or 

navigation system 
      Press the  

"MENU"  button for ac-

cess to the main menu. 

    Select the "Personalisation-confi -

guration" menu and confi rm. 

     Select the "Choice of sounds" line 

and confi rm. 

     Select the desired family of sounds 

and confi rm. 

     Save the modifi cations by confi rm-

ing "OK".  

 For safety reasons, the driver 

must only carry out these opera-

tion when stationary.   

2

M U L T I F U N C T I O N   S C R E E N S

49 

                                MONOCHROME SCREEN A 

  Displays in the screen 

 This displays the following information: 
   -  time, 
  -  date, 
  -   ambient temperature (this fl ashes if 

there is a risk of ice), 

  -  

current audio source, 

  -  

trip computer (refer to the end of the 

section), 

  -  alert 

messages, 

  -   settings menus for the screen and 

the vehicle equipment.   

 From the control panel of your audio 

system, you can press: 
     the  

"MENU"  button for access to 

the  main menu , 

    the " 

 " or " 

 " buttons to scroll 

through the items on the screen, 

    the " 

 " or "  " buttons to change a 

setting value, 

    button  

A  to change the permanent 

application (trip computer, audio 

source...), 

    the  

"OK"  button to confi rm,  

 or 
    the  

"Back"  button to abandon the 

operation in progress.   

  Controls 

      Press the  

"MENU"  button for ac-

cess to the  main menu , then press 

the " 

 " or " 

 " buttons to scroll 

through the various menus: 

   -  "RADIO", 
  -  "MEDIA", 
  -  "TRIP COMPUTER", 
  -  "DATE 

AND TIME", 

  -  "LANGUAGES", 
  -  "VEHICLE PARAM", 


     Press the  "OK"  button to select the 

menu required.  

  Main menu 

  Radio / Media 
 With the audio system switched on, 

once the "RADIO" or "MEDIA" menu 

has been selected you can activate 

or deactivate the functions associated 

with use of the radio (RDS, Radio text) 

or select the media play mode (normal, 

random, repeat). 
 For more information on the "RADIO" or 

"MEDIA" application, refer to the "Audio 

and Telematics" section.  

2

M U L T I F U N C T I O N   S C R E E N S

50 

 Once the "TRIP COMPUTER" menu 

has been selected, you can start diag-

nostics of the status of the equipment 

(active, not active, faulty).  

  Trip computer 

  Date and time 
 Once the "DATE AND TIME" menu has 

been selected, you have access to the 

following settings: 
   -  year, 
  -  month, 
  -  day, 
  -  hours, 
  -  minutes, 
  -  

12 or 24 hour mode.  

      Once you have selected a setting, 

press the " 

 " or " 

 " buttons to 

change its value. 

    Press the " 

 " or " 

 " buttons to 

switch respectively to the previous 

or next setting. 

    Press the  

"OK"  button to record 

the change and return to the normal 

display or press the  "Back"  button 

to cancel.   

  Languages 
 Once the "LANGUAGES" menu has 

been selected, you can choose the lan-

guage used by the display, from a pre-

defi ned list.  

 For safety reasons, confi gura-

tion of the multifunction screen 

by the driver must only be 

done when stationary.  

  Vehicle parameters 

 Once the "VEHICLE PARAM" menu 

has been selected, you can activate or 

deactivate the following equipment: 
   -   "PARK BRAKE" (Automatic electric 

parking brake; refer to the "Driving" 

section). 

  -  "BEND LIGHTING" (Directional 

lighting; refer to the "Visibility" sec-

tion), 

  -   "AUTO HEADLAMPS" (Automatic 

illumination of headlamps; refer to 

the "Visibility" section), 

  -   "REAR WIPE ACT" (Rear wiper 

coupled with reverse gear; refer to 

the "Visibility" section), 

  -   "GUIDE LAMPS" (Guide-me-home 

lighting; refer to the "Visibility" sec-

tion), 

  -  "ELECTRIC BOOT" (Selective 

unlocking of the boot; refer to the 

"Access" section), 

  -   "CABIN SELECT" (Selective un-

locking; refer to the "Access" sec-

tion), 

  -   "DAY LAMPS" (Daytime running 

lamps; refer to the "Visibility" sec-

tion).   

2

M U L T I F U N C T I O N   S C R E E N S

51 

                                MONOCHROME SCREEN C 

  Displays in the screen 

 This displays the following information: 
   -  time, 
  -  date, 
  -   ambient temperature (this fl ashes if 

there is a risk of ice), 

  -  

parking sensor information, 

  -  

parking space measurement, 

  -  

current audio source, 

  -   telephone or Bluetooth system in-

formation, 

  -  

trip computer (refer to the end of the 

section), 

  -  alert 

messages, 

  -   settings menus for the screen and 

the vehicle equipment.   

 From the control panel of your audio 

system, you can press: 
     button  

A  to chooses between the 

display of audio information in full 

screen or the shared display of au-

dio and trip computer information, 

    the  

"MENU"  button for access to 

the  main menu , 

    the " 

 " or " 

 " buttons to scroll 

through the items on the screen, 

    the " 

 " or "  " buttons to change a 

setting value, 

    the  

"OK"  button to confi rm,  


 or 

     the  

"Back"  button to abandon the 

operation in progress.   

  Controls 

      Press the  

"MENU"  button for ac-

cess to the  main menu : 

   -  "Multimedia", 
  -  "Telephone", 
  -  "Trip computer", 
  -  "Bluetooth connection", 
  -  "Personalisation-confi guration",  

     Press the "  " or "  " button to se-

lect the menu required, then confi rm 

by pressing the  "OK"  button.   

  Main menu 

  "Multimedia" menu 

 With the audio system switched on, 

this menu allows you to activate or de-

activate the functions associated with 

use of the radio (RDS, DAB / FM auto 

tracking, RadioText (TXT) display) or to 

choose the media play mode (Normal, 

Random, Random all, Repeat). 
 For more information on the 

"Multimedia" application, refer to the 

"Audio and Telematics" section.  

2

M U L T I F U N C T I O N   S C R E E N S

52 

  Defi ne the vehicle parameters 
 This menu allows you to activate or de-

activate the following equipment, clas-

sifi ed in different categories: 
   -   "Access to the vehicle" (see the 

"Access" section): 

   ●  "Plip action" (Selective unlocking 

of the driver's door), 

  ●  "Unlocking boot only" (Selective 

unlocking of the boot).   

  "Telephone" menu 

 With the audio system switched on, this 

menu allows you to make a call or view 

the various telephone directories. 
 For more information on the "Telephone" 

application, refer to the "Audio and 

Telematics" section.  

 This menu allows you to view informa-

tion on the status of the vehicle. 

  Warning log 
 This summarises the status and warn-

ing messages for systems (active, not 

active or faulty), displaying them in suc-

cession in the multifunction screen. 
      Press the  

"MENU"  button for ac-

cess to the main menu. 

    Press the arrows, then the  

"OK"  

button to select the " Trip computer " 

menu. 

     In the " Trip computer " menu, se-

lect the "Warning log" line and con-

fi rm.    

  "Bluetooth connection" 

menu 

  "Trip computer" menu 

 Wit the audio system on, this menu al-

lows a Bluetooth device (telephone, 

media player) to be connected or dis-

connected and the connection mode to 

be defi ned (hands-free, playing audio 

fi les). 
 For more information on the "Bluetooth 

connection" application, refer to the 

"Audio and Telematics" section.  

  "Personalisation-

configuration" menu 

 This menu gives access to the following 

functions: 
   -  "Defi ne the vehicle parameters", 
  -  

"Choice of language", 

  -  "Display 

confi guration", 

  -  

"Choice of sounds".  

2

M U L T I F U N C T I O N   S C R E E N S

53 

     Press the "  " or "  " buttons to set 

the value required (15, 30 or 60 sec-

onds), then press the  "OK"  button 

to confi rm. 

    Press the " 

 " or " 

 " buttons, 

then the  "OK"  button to select the 

 "OK"  box and confi rm or press the 

 "Back"  button to cancel.   

 For example: setting of the duration of 

the "follow-me-home" lighting 
      Press the "  " or "  " buttons, to select 

the "Defi ne the vehicle parameters" 

menu, then the " OK " button. 

    Press the " 

 " or " 

 " buttons to 

select the "Interior lighting" line, 

then the  

"OK"  button; then follow 

the same procedure to select the 

"Follow-me-home headlamps" line. 

   -  "Driving 

assistance": 

   ●  "Parking brake automatic" (Auto-

matic electric parking brake; see 

the "Driving" section), 

  ●   "Rear wipe in reverse gear" (Rear 

wiper coupled to reverse gear; 

see the "Visibility" section), 

  ●  "Speeds memorised" (Memoris-

ing speeds; see the "Driving" sec-

tion).   

   -  

"Vehicle lighting" (see the "Visibility" 

section): 

   ●  "Directional headlamps" (Main / 

additional directional lighting), 

  ●   "Daytime lights" (Daytime running 

lamps).   

   -  

"Interior lighting" (see the "Visibility" 

section: 

   ●  "Follow-me-home 

headlamps" 

(Automatic operation of head-

lamps after switching off the igni-

tion), 

  ●  "Welcome lighting" (Exterior and 

interior welcome lighting).   

2

M U L T I F U N C T I O N   S C R E E N S

54 

  Choice of language 
 Once this menu has been selected, you 

can choose the language used by the 

display from a pre-defi ned list.  

 For safety reasons, confi gura-

tion of the multifunction screen 

by the driver must only be done 

when stationary. 

  Display confi guration 
 This menu gives access to the following 

settings: 
   -  

"Choice of units", 

  -  

"Date and time adjustment", 

  -  "Display 

parameters", 

  -  "Brightness". 


  Choice of sounds 
 This menu allows you to choose a fam-

ily of polyphonic sounds from the four 

available. These sounds are grouped 

together in a family and are adapted 

to suit the situation and context (alert, 

confi rmation, rejection, direction indica-

tors, lighting left on, key in ignition...).   

  Adjusting the date and time  
     Press the " 

 " or " 

 " button to 

display the "Display confi guration" 

menu, then press  "OK" . 

     Press the "  " or "  " button to se-

lect the "Date and time adjustment" 

button, then press  "OK" . 

     Press the "  " or "  " button to se-

lect the setting to modify. Confi rm 

by pressing  "OK" , then modify the 

setting and confi rm again to save 

the modifi cation. 

     Adjust the settings one by one, con-

fi rming with the  "OK"  button. 

     Press the "  " or "  " button, then 

the  "OK"  button to select the  "OK"  

box and confi rm or the  "Back"  but-

ton to cancel.   

2

M U L T I F U N C T I O N   S C R E E N S

55 

                       COLOUR SCREEN 

 From the navigation system control 

panel, to select one of the applications: 
     press the dedicated  

"RADIO" , 

 "MUSIC" ,  

"NAV" ,  

"TRAFFIC" , 

 "PHONE"  or  

"SETUP"  button for 

access to the corresponding menu, 

     turn the dial  A  to select a function, 

an item in a list, 

     press button  B  to confi rm the selec-

tion,  

 or 
     press the  

"Back"  button to aban-

don the current operation and return 

to the previous display.  

 With repeated presses on the  

C  

 "MODE"  button, the screen displays: 
   -  

"RADIO / MEDIA" * , 

  -  "TELEPHONE" 

* , 

  -  

"FULL SCREEN MAP" * , 

  -  

"MAP IN A WINDOW" * , 

  -  "TRIP 

COMPUTER". 


  Controls  

 "SETUP" menu 

       Press the  "SETUP"  button to open 

the confi guration menu: 

   -  "Sound choice", 
  -  "Display confi guration", 
  -   "Speech synthesis setting". 
  -  "Select language", 
  -  "Defi ne vehicle parameters", 
  -  "Alert log". 


 For safety reasons, confi gura-

tion of the multifunction screen 

by the driver must only be done 

when stationary.  

  Displays in the screen 

 Depending on the context, it displays 

the following information: 
   -  time, 
  -  date, 
  -  altitude, 
  -  

ambient temperature (the value dis-

played  fl ashes if there is a risk of 

ice), 

  -  

parking sensor information, 

  -  

parking space measurement, 

  -  audio 

functions, 

  -   directory and telephone informa-

tion, 

  -   satellite navigation system informa-

tion, 

  -  trip 

computer, 

  -  alert 

messages, 

  -   settings menus for the screen, the 

satellite navigation system and ve-

hicle systems.   

  *    For more information on these appli-

cations, refer to the "Audio and telem-

atics" section.  

2

M U L T I F U N C T I O N   S C R E E N S

56 

                          Choice of sounds 
 This menu allows you to choose a 

family of polyphonic sounds from four 

available. These sounds are grouped 

together in a family and are adapted 

to suit the situation and context (alert, 

confi rmation, rejection, direction indica-

tors, lighting left on, key in ignition...).  

  Display confi guration 
 This menu is used to select the col-

our scheme for the screen, adjust the 

brightness, set the date and time and 

to choose the units for distance (km 

or miles), fuel consumption (l/100 km, 

mpg or km/l) and temperature (°Celsius 

or °Fahrenheit). 

  Adjusting the voice synthesiser 
 This menu is used to adjust the volume 

setting for navigation instructions and 

to choose the type of voice (male or fe-

male).  

  Adjusting the date and time  
   -  

Press on  SETUP . 

  -   Select "Display confi guration"  and 

confi rm. 

  -   Select "Set date and time and con-

fi rm.  

 Select "Minute adjustment via GPS" so 

that the minutes are adjusted automati-

cally by satellite reception. 
   -  

Select the setting to modify. Confi rm 

by pressing on  OK , then modify the 

setting and confi rm again to save 

the modifi cation. 

  -  

Adjust the settings one by one. 

  -  Select 

OK " in the screen then con-

fi rm to save the setting.   

  Choice of language 
 This menu is used to choose the lan-

guage used by the screen from a de-

fi ned list.  

  Vehicle parameters 
 This menu is used to activate or deac-

tivate certain driving and comfort sys-

tems, classifi ed by category: 
   -  "Driver 

aid": 

   ●  "Electric brake * " (Automatic electric 

parking brake; see "Driving" sec-

tion), 

  ●   "Rear wiper" (Rear wiper coupled 

to reverse gear; see "Visibility" 

section), 

  ●   "Speed limits" (Memorising speed 

settings for the cruise control and 

speed limiter; see "Driving" sec-

tion).   

  Alert log 
 This lists the active alerts by displaying 

in turn the different messages associ-

ated with them.   

   -  

"Vehicle access" (see "Access" sec-

tion): 

   ●  

"Driver doors selectivity" (Se-

lective unlocking of the driver's 

door), 

  ●   "Rear doors selectivity" (Selective 

unlocking of the boot using the 

centre button on the remote con-

trol; see "Access section).   

   -   "Driving lights" (see "Visibility" sec-

tion): 

   ●  "Day  lights * " (Daytime running 

lamps), 

  ●  "Directional headlights" (Main / 

additional directional lighting).   

   -   "Comfort lighting" (see "Visibility" 

section): 

   ●  "Welcome lights" (Interior welcome 

lighting), 

  ●   "Running lights" (Automatic timed 

operation of headlamps).    

  *   Depending on country.  

2

M U L T I F U N C T I O N   S C R E E N S

57 

 TRIP COMPUTER 

       Monochrome screen A 

  Information displays 

The trip computer provides the follow-

ing information: 

   -  range, 

  -  

current fuel consumption, 

  -  

Stop & Start time counter, 

  -  distance 

travelled, 

  -  

average fuel consumption, 

  -  average 

speed. 


      Press the button, located at the end 

of the  

wiper stalk , to display the 

various items of trip computer infor-

mation in succession.  

  System that gives you information on 

the journey in progress (range, fuel 

consumption…).  

     Press the control for more than 

two seconds to reset to zero the 

distance travelled, the average 

fuel consumption and the average 

speed.    

  Zero reset 

     The next press then returns you to 

the normal display.   

2

M U L T I F U N C T I O N   S C R E E N S

58 

      Monochrome screen C 

 You can choose between two types of 

display by pressing button  A : 
   -  

the trip computer information appears 

temporarily above the audio informa-

tion, displayed permanently in full 

screen,  

 or 
  -   the trip computer and audio infor-

mation both appear permanently in 

a shared screen.  

  Information displays 

   -   the current information tab 

with: 

   ●  the range, 
  ●   the current fuel 

consumption, 

  ●   the Stop & Start time 

counter,   

   -  

the trip  "1"  tab with: 

   ●   the distance travelled, 
  ●   the average fuel 

consumption, 

  ●   the average speed,  
 for 

the 

fi rst trip.   

   -  

the trip  "2"  tab with: 

   ●   the distance travelled, 
  ●   the average fuel 

consumption, 

  ●   the average speed,  
  for the second trip.     

      Press the button, located at the end 

of the  

wiper stalk , to display the 

various trip computer tabs in suc-

cession. 

      When the trip required is displayed, 

press the button on the end of the wiper 

stalk for more than two seconds.  

 Trips  "1"  and  "2"  are independent but 

their use is identical. 
 For example, trip  "1"  can be used for 

daily  fi gures, and trip  "2"  for monthly 

fi gures.   

  Trip zero reset 

2

M U L T I F U N C T I O N   S C R E E N S

59 

         Colour screen 

  Display modes 

  Information display 
     Press this button, located on the 

end of the  wiper stalk , to display 

the following information in turn: 

   ●  current information, 
  ●  trip  "1" , 
  ●  trip  "2" ,   

   -   Current information is displayed in 

the screen, depending on the con-

text: 

   ●  the range, 
  ●   the current fuel consumption, 
  ●   Stop & Start time counter,  
 or 
  ●   the remaining distance to go.   

  Trip zero reset 

      When the required trip is displayed, 

press the button on the end of the 

 wiper stalk  for more than two sec-

onds.  

 Trips  "1"  and  "2"  are independent but 

their use is identical. 
 For example, trip  "1"  can be used for 

daily  fi gures and trip  

"2"  for monthly 

fi gures.   

      Press the button on the end of the 

 wiper stalk  to display the trip com-

puter information temporarily in a 

new window.  

      Press the button on the 

eMyWay front panel, 

to display continuously 

the trip computer infor-

mation.   

   -  

The trip  "1"  screen displays: 

   ●   the distance travelled, 
  ●   the average fuel consumption, 
  ●   the average speed,   
 for 

the 

fi rst trip.   

   -  

The trip  "2"  screen displays: 

   ●   the distance travelled, 
  ●   the average fuel consumption, 
  ●   the average speed,   
  for the second trip.    

2

M U L T I F U N C T I O N   S C R E E N S

60 

      A few definitions… 

 This value may vary following a 

change in the style of driving or 

the relief, resulting in a signifi -

cant change in the current fuel 

consumption. 

 If dashes are displayed continu-

ously while driving in place of the 

digits, contact a CITROËN dealer 

or a qualifi ed workshop.  

 This function is only displayed 

from 20 mph (30 km/h).  

  Range 
 (miles or km) 
 This indicates the distance 

which can still be travelled 

with the fuel remaining in the tank in 

relation to the average fuel consump-

tion over the last few miles (kilometres) 

travelled. 

 When the range falls below 20 miles

(30 km), dashes are displayed. After 

fi lling with at least 5 litres of fuel, the 

range is recalculated and is displayed 

when it exceeds 60 miles (100 km). 

  Current fuel consumption 
 (mpg or l/100 km or km/l) 
 This is the average fuel con-

sumption during the last few 

seconds. 

  Average fuel consumption 
 (mpg or l/100 km or km/l) 
   This is the average fuel con-

sumption since the last trip 

computer zero reset. 

  Average speed 
 (mph or km/h) 
 This is the average speed calcu-

lated since the last trip computer 

zero reset (ignition on).  

  Distance travelled 
 (miles or km) 
 This indicates the distance 

travelled since the last trip 

computer zero reset.   

        Stop & Start time counter 
 (minutes/seconds or hours/

minutes) 

 If your vehicle is fi tted with Stop & Start, 

a time counter calculates the time spent 

in STOP mode during a journey.   
It resets to zero every time the ignition 

is switched on with the key.   

 The fuel consumption of your 

vehicle will be higher than 

the offi cial  fi gures  obtained 

by CITROËN during the fi rst 

3 000 miles  (5 000 km)  of  the 

vehicle's life.  

3

C O M F O R T

61 

         VENTILATION 

  Air intake 

 The air circulating in the passenger com-

partment is fi ltered and originates either 

from the outside via the grille located at 

the base of the windscreen or from the 

inside in air recirculation mode.  

  Air treatment 

 The incoming air follows various routes 

depending on the controls selected by 

the driver: 
   -   direct arrival in the passenger com-

partment (air intake), 

  -   passage through a heating circuit 

(heating), 

  -   passage through a cooling circuit 

(air conditioning).   

  Control panel 

 The controls of this system are grouped 

together on control panel  A  on the centre 

console.  

  Air distribution 

   1.   Windscreen demisting-defrosting vents. 
  2.   Front side window demisting-defrost-

ing vents. 

  3.   Side adjustable air vents. 
  4.   Central adjustable air vents. 
  5.   Air outlets to the front footwells. 
  6.   Air nozzles to the front footwells. 
  7.   Air outlets to the rear footwells.   

3

C O M F O R T

62 

           RECOMMENDATIONS FOR VENTILATION AND AIR 

CONDITIONING 

 In order for these systems to be fully effective, follow the operation and 

maintenance guidelines below: 
      To obtain an even air distribution, take care not to obstruct the exterior 

air intake grilles located at the base of the windscreen, the nozzles, the 

vents and the air outlets, as well as the air extractor located in the boot. 

     Do not cover the sunshine sensor, located on the dashboard; this is 

used for regulation of the air conditioning system. 

     Operate the air conditioning system for at least 5 to 10 minutes, once or 

twice a month to keep it in perfect working order. 

     Ensure that the passenger compartment fi lter is in good condition and 

have the fi lter elements replaced regularly.  


We recommend the use of a combined passenger compartment fi lter. 

Thanks to its special active additive, it contributes to the purifi cation of 

the air breathed by the occupants and the cleanliness of the passenger 

compartment (reduction of allergic symptoms, bad odours and greasy 

deposits). 

     To ensure correct operation of the air conditioning system, you are also 

advised to have it checked regularly as recommended in the mainte-

nance and warranty guide. 

     If the system does not produce cold air, switch it off and contact a 

CITROËN dealer or a qualifi ed workshop.  

 When towing the maximum load on a steep gradient in high temperatures, 

switching off the air conditioning increases the available engine power and 

so improves the towing ability.  

  If after an extended stop in sun-

shine, the interior temperature is 

very high, fi rst ventilate the pas-

senger compartment for a few 

moments.  
Put the air fl ow control at a set-

ting high enough to quickly 

change the air in the passenger 

compartment. 
 The air conditioning system 

does not contain chlorine and 

does not present any danger to 

the ozone layer.  

  The condensation created by 

the air conditioning results in a 

discharge of water under the ve-

hicle which is perfectly normal.   

   Stop & Start 
 The heating and air conditioning systems only work when the engine is 

running. To maintain a comfortable temperature in the passenger compart-

ment, you can temporarily deactivate the Stop & Start system (see the 

corresponding section).   


Content   ..  2  3  4  5   ..