Citroen C4 Dag (2013 year). Manual - part 2
 

  Index      Citroen     Citroen C4 Dag - service manual 2013 year in english


Search            


Content   ..   1  2  3   ..


Citroen C4 Dag (2013 year). Manual - part 2


15 

F

AMILIARISA

TION

 S E E I N G   C L E A R L Y 

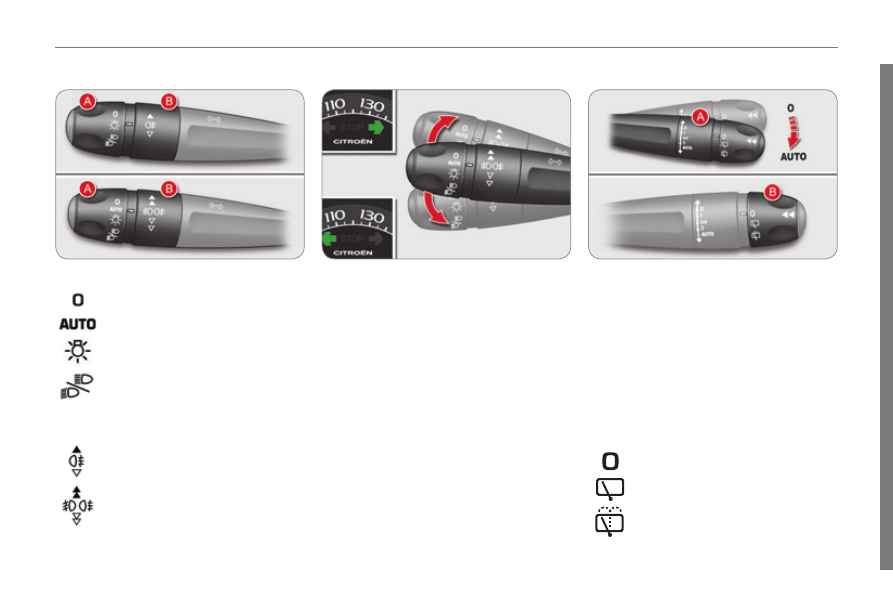
  Lighting 

  Ring A 

  Ring B 

  Direction indicators 

  Three fl ashes 
 Press the lighting stalk up or down 

once, without passing the point of re-

sistance; the corresponding direction 

indicators will fl ash three times. 
 This function can be used at any speed, 

but it is particularly useful when chang-

ing lane on high-speed roads. 

  Wipers 

  Stalk A: windscreen wipers 

  Switching "AUTO" on / off 
      Press the stalk downwards and re-

lease.  

  Ring B: rear wiper 

     99    

 Raise or lower the lighting stalk passing 

the point of resistance; the correspond-

ing direction indicators will fl ash for as 

long as the stalk remains in this position. 

     139    

     109    

 Lighting off. 

 Rear foglamp. 

 Park. 

 Automatic illumination of head-

lamps. 
 Sidelamps. 

 Dipped / main beam headlamps.  

 or 

 Front and rear foglamps. 

 Intermittent wipe. 

 Wash-wipe. 

     107   

     108   

16 

 V E N T I L A T I O N 

  Recommended interior settings 

  Digital air conditioning:  we recommend use of one of the three fully automatic modes by pressing the  "AUTO"  button.  

   I require...   

   Manual Air Conditioning   

   Air distribution   

   Air fl ow   

   Air recirculation /    

 Intake of outside air   

   Temperature   

   Manual A/C   

   HOT   


   COLD   


   DEMISTING    

 DEFROSTING   


17 

F

AMILIARISA

TION

 M O N I T O R I N G 

  Instrument panels 

  Warning lamps 

  Central switch panel 

   A.   With the ignition on, the bars indi-

cate the level of fuel remaining. 

  B.   With the engine running, its associ-

ated low level warning lamp should 

go off. 

  C.   With the ignition on, the oil level indi-

cator should show for a few seconds 

that the level is OK or correct, de-

pending on version.  

     28   

   1.   With the ignition on, the orange and 

red warning lamps come on. 

  2.  With the engine running, these 

warning lamps should go off.  

     32   

   A.   Make an emergency call.
    142, 233  
  B.   Access to CITROËN services.
    142, 233   

  C.  Hazard warning. 
     139  
  D.  Central locking. 
     86  
  E.   Black panel (black screen). 
     47   

 If the levels are not correct, top up the 

levels which are low. 

 If warning lamps remain on, refer to the 

page concerned. 

18 

 M O N I T O R I N G 

  Side switch panel 

  Multifunction steering wheel 

  Cruise control / speed limiter 

controls 
     178, 176   

  Optional function controls 
   1.   Black panel (black screen).
    47  
  2.   Dashboard lighting dimmer.
    47  
  3.   Courtesy lamp on / off.
    110    
 or 


Parking space sensors.

    180    

  Audio system controls 
     238, 291   

  Bluetooth system or telephone 

controls 
     238, 291    

 Illumination of the lamp indicates the 

state of the system. 
   A.  

Deactivation of the ESP/ASR 

system.

    141  
  B.   Deactivation of the parking sensors. 
    183  
  C.  Deactivation of the Stop & Start 

system.

    169  
  D.   Activation of the blind spot sensor 

system.

    172  
  E.  Activation of the lane departure 

warning system.

    171  
  F.   Deactivation of the volumetric alarm 

protection.

    88    

19 

F

AMILIARISA

TION

 P A S S E N G E R   S A F E T Y   -   S T A R T I N G 

  Passenger's front airbag 

  Seat belts and passenger's 

front airbag 

  Ignition switch 

   1.   Open the glove box. 
  2.   Insert the key. 
  3.   Select the position:  
  "OFF"  (deactivation), with "rear fac-

ing" child seat,  

  "ON"  (activation), with front pas-

senger or "forwards facing" child 

seat. 

  4.   Remove the key keeping the switch 

in the new position.  

     147   

   A.  Left hand front seat belt not fas-

tened / unfastened warning lamp. 

  B.   Right hand front seat belt not fas-

tened / unfastened warning lamp. 

  C.  Right hand rear seat belt unfas-

tened warning lamp. 

  D.  Centre rear seat belt unfastened 

warning lamp. 

  E.   Left hand rear seat belt unfastened 

warning lamp. 

  F.   Passenger's front airbag deactivat-

ed warning lamp. 

  G.  Passenger's front airbag activated 

warning lamp.  

     143, 147   

   1.    Stop  position. 
  2.    Ignition on  position. 
  3.    Starting  position.  

     82   

 When switching the ignition on and off, 

the speedometer needle and the rev 

counter and fuel gauge bars travel full 

sweep and return to 0. 

20 

 D R I V I N G   S A F E L Y 

  Electric parking brake 

  Manual application / release 

  Automatic application / release 

  Before leaving the ve-

hicle, check that the 

brake warning lamp in 

the instrument panel 

and the  P  warning lamp in the control 

lever  A  are  on fi xed (not fl ashing) . 

  Manual application  of the parking 

brake is possible by  pulling  the control 

lever  A . 
 With the ignition on,  manual release  of 

the parking brake is possible by  press-

ing the brake pedal  and  pulling then 

releasing  the control lever  A .  

 Press the accelerator pedal and let the 

clutch pedal up (manual gearbox), the 

parking brake is released automatically 

and progressively as you move off. 
 With the vehicle at rest, on switching off 

the engine the parking brake is applied 

automatically. 

     150    

 With the engine running, on 

opening the driver's door there 

is an audible warning; apply the 

parking brake manually. 
 Do not leave a child alone inside 

the vehicle with the ignition on; 

they might release the parking 

brake.  

 If you are towing a trailer or caravan 

or if the slope might vary (transport 

on a ferry, lorry, towing...) make a 

maximum manual application with 

a long pull on the control lever  A  to 

immobilise the vehicle. 

 If this warning lamp is on in the 

instrument panel, the  automat-

ic application / release  is  de-

activated ; apply and release 

the parking brake manually. 

21 

F

AMILIARISA

TION

 D R I V I N G   S A F E L Y 

  Electronic gearbox 

  Displays in the instrument panel 

  Moving off 

 This 6-speed gearbox offers a choice 

between the comfort of fully automatic 

operation or the pleasure of manual 

gear changing. 
   1.  Gear lever. 
  2.   Steering mounted  "-"  control paddle. 
  3.   Steering mounted  "+"  control paddle.    

 The gear engaged or the driving mode 

selected appears in the instrument pan-

el screen. 
  N.  Neutral. 
  R.  Reverse. 
  1 to 6.  Gears 

engaged. 

  AUTO.  Automated mode. 


     Select position  

N  and press the 

brake pedal fi rmly while starting the 

engine. 

    Engage fi rst gear by pulling the gear 

lever  1  towards position  A  or  M ,   

 or 


engage reverse by pushing the gear 

lever 1 towards position  R . 

     Release the parking brake. 
     Take your foot off the brake pedal 

then accelerate.  

     158    

22 

 D R I V I N G   S A F E L Y 

  Automatic gearbox 

  This six-speed gearbox offers the 

choice between the comfort of automat-

ic operation or the pleasure of manual 

gearchanging. 
   1.  Gear lever. 
  2.    "S"   (sport)  button. 
  3.     "   (snow)  button.   

  Displays in the instrument panel 

  Moving off 
      With your foot on the brake pedal, 

select position  P  or  N . 

     Start the engine. 
     Then select position  R ,  D  or  M . 
     Take your foot off the brake pedal, 

then accelerate away.  

     161    

  Hill start assist 

 The driving mode selected and/or the 

gear engaged appear in the left hand 

instrument panel screen. 
  P.  Park. 
  R.  Reverse. 
  N.  Neutral. 
  D.  

Drive (automatic operation). 

  S.  

 S  port  programme. 

    .  

 Snow  programme. 

  1 to 6.  Gear 

engaged. 

  -.  

 Invalid value in manual opera-

tion.  

 Your vehicle is fi tted with a system 

which holds your vehicle stationary mo-

mentarily, the time to move your foot 

from the brake to the accelerator, to 

help with moving off on a gradient. 
 This function is only active when: 
   -   the vehicle is completely station-

ary with your foot on the brake pedal, 

  -  

certain conditions of gradient are met, 

  -  

the driver's door is closed.  

     164   

 Do not get out of the vehicle dur-

ing the hill start assist temporary 

holding phase. 

23 

F

AMILIARISA

TION

 D R I V I N G   S A F E L Y 

  Stop & Start 

  Engine going into STOP mode 

  Engine going into START mode 

  Deactivation / Reactivation 

 In some circumstances the STOP mode 

may not be available; the  "ECO"  warn-

ing lamp fl ashes for a few seconds then 

goes off. 

   -  

 with a manual gearbox;  at speeds 

below 12 mph (20 km/h), when you 

put the gear lever into neutral and 

release the clutch pedal, 

  -  

 with an electronic gearbox;  at 

speeds below 5 mph (8 km/h), when 

you press the brake pedal or you 

put the gear lever in position  N .  

     168   

   -  

 with a manual gearbox;  when you 

fully depress the clutch pedal, 

  -  

 with an electronic gearbox;  

   ●  with the gear lever in position  A  

or  M , when you release the brake 

pedal, 

  ●  or gear lever in position  

N  and 

brake pedal released, when you 

change to position  A  or  M , 

  ●   or when you engage reverse.   

 In some circumstances, START mode 

may engage automatically; the  "ECO"  

warning lamp fl ashes then goes off. 

     169   

 You can deactivate the system at any 

time by pressing the  "ECO OFF"  button; 

the button's warning lamp comes on. 

     169    

 The  "ECO"  warning lamp goes 

off and the engine restarts au-

tomatically: 

 The  "ECO"  warning lamp comes on 

in the instrument panel and the engine 

is put into standby automatically: 

 The system is reactivated auto-

matically every time you start the 

engine with the key.  

  Before refuelling or doing any-

thing under the bonnet, you 

must switch off the ignition with 

the key. 

24 

 D R I V I N G   S A F E L Y 

  Blind spot sensors 

  Parking space sensors 

 One of these messages appears, to in-

dicate the level of diffi culty of the man-

ouevre: 

     Activate the function by pressing 

control switch  A ; the button's warn-

ing lamp comes on.  

 The warning lamp located in the door 

mirror comes on to warn you of the ar-

rival of a vehicle in the blind spot detec-

tion zone. 

     172   

     Select the function by pressing 

control switch  

B ; the correspond-

ing warning lamp comes on in the 

instrument panel. 

     Operate the direction indicators on 

the side with the space to be meas-

ured; a message appears to confi rm 

measurement is in progress. 

     Drive at a speed below 12 mph (20 km/h) 

during measurement.  

   -  

 Parking possible.  

  -  

 Parking diffi cult.  

  -  

 Parking not advised.   

     180   

25 

F

AMILIARISA

TION

 D R I V I N G   S A F E L Y 

  Speed limiter "LIMIT" 

  Cruise control "CRUISE" 

  Display in the instrument panel 

  Cruise control  

   1.   Limiter mode On / Off. 
  2.   Decrease the programmed value. 
  3.   Increase the programmed value. 
  4.   Speed limiter On / Off. 
  5.  Display the list of memorised 

speeds.

    175   

     176   

   1.   Cruise control mode On / Off. 
  2.   Programme a speed / Decrease the 

programmed value. 

  3.   Programme a speed / Increase the 

programmed value. 

  4.   Cruise control Off / Resume. 
  5.  Display the list of memorised 

speeds.

    175   

     178   

 The cruise control or speed limiter 

mode appears in the instrument panel 

when it is selected. 

 The values must be set with the engine 

running. 

 In order to be programmed or activated, 

the vehicle speed must be higher than 

25 mph (40 km/h), with at least fourth 

gear engaged on a manual gearbox 

(second gear for an electronic gearbox 

or automatic gearbox). 

  Speed limiter   

26 

 Eco-driving is a range of everyday practices that allow the motorist to optimise their fuel consumption and CO

2

 emissions. 

  Optimise the use of your 

gearbox 

  With a manual gearbox, move off gen-

tly and change up without waiting. 

During acceleration change up early.  

  With an automatic or electronic gear-

box, give preference to automatic mode 

and avoid pressing the accelerator

pedal heavily or suddenly.  

  Drive smoothly 

  Maintain a safe distance between ve-

hicles, use engine braking rather than 

the brake pedal, and press the accel-

erator progressively. These practices 

contribute towards a reduction in fuel 

consumption and CO

2

 emissions and 

also helps reduce the background traf-

fi c noise.  

  If your vehicle has cruise control, make 

use of the system at speeds above 

25 mph (40 km/h) when the traffi c  is 

fl owing well.   

  Control the use of your 

electrical equipment 

  Before moving off, if the passenger 

compartment is too warm, ventilate it 

by opening the windows and air vents 

before using the air conditioning. 
 Above 30 mph (50 km/h), close the 

windows and leave the air vents open. 
 Remember to make use of equipment 

that can help keep the temperature 

in the passenger compartment down 

(sunroof and window blinds...). 
 Switch off the air conditioning, unless 

it has automatic regulation, as soon as 

the desired temperature is attained. 
 Switch off the demisting and defrosting 

controls, if not automatic. 
 Switch off the heated seat as soon as 

possible.  

                                                E C O - D R I V I N G 

  The gear shift indicator invites you to 

change up: as soon as the indication 

to change up is displayed in the instru-

ment panel, follow it straight away. 
 With an electronic or automatic gear-

box, this indicator appears only in 

manual mode.   

27 

  Switch off the headlamps and front 

foglamps when the level of light does 

not require their use.  

  Avoid running the engine before moving 

off, particularly in winter; your vehicle 

will warm up much faster while driving.  

  As a passenger, if you avoid connecting 

your multimedia devices (fi lm,  music, 

video game...), you will contribute to-

wards limiting the consumption of elec-

trical energy, and so of fuel. 
 Disconnect your portable devices be-

fore leaving the vehicle.   

  Limit the causes of excess 

consumption 

  Spread loads throughout the vehicle; 

place the heaviest items in the bottom 

of the boot, as close as possible to the 

rear seats. 
 Limit the loads carried in the vehicle 

and reduce wind resistance (roof bars, 

roof rack, bicycle carrier, trailer...). Use 

a roof box in preference. 
 Remove roof bars and roof racks after 

use.  

  At the end of winter, remove snow 

tyres and refi t your summer tyres.   

  Observe the recommendations 

on maintenance 

  Check the tyre pressures regularly, 

when cold, referring to the label in the 

door aperture, driver's side. 
 Carry out this check in particular: 
   -  

before a long journey, 

  -  

at each change of season, 

  -  

after a long period out of use.  

 Don't forget the spare wheel and the 

tyres on any trailer or caravan.  

  Have your vehicle serviced regularly 

(engine oil, oil fi lter, air fi lter...) and ob-

serve the schedule of operations rec-

ommended by the manufacturer.    

  When refuelling, do not continue after 

the third cut-off of the nozzle to avoid 

any overfl ow.  

  At the wheel of your new vehicle, it is only 

after the fi rst 1 800 miles (3 000 kilometres) 

that you will see the fuel consumption set-

tle down to a consistent average.   

1

M O N I T O R I N G

28 

                  TWO-TONE INSTRUMENT PANEL WITHOUT AUDIO SYSTEM 

  Dials and screens 

   1.   Rev counter (x 1 000 rpm or tr/min). 
  2.   Gear shift indicator or gear selector 

lever position and gear for an elec-

tronic or automatic gearbox. 

  3.   Cruise control or speed limiter set-

ting. 

  4.   Digital speedometer (mph or km/h). 
  5.   Engine oil level indicator. 

  6.  Service indicator 


(miles or km) then,  


total mileage recorder.  


These two functions are displayed 

successively on switching on the ig-

nition.  


Lighting dimmer setting (when mak-

ing an adjustment). 

  7.   Trip mileage recorder (miles or km). 
  8.   Fuel gauge and associated low fuel 

level warning lamp ( a  or  b  accord-

ing to version). 

  9.  Time. 


  Control buttons 

   A.   Lighting dimmer (available in night 

mode). 

  B.   Reminder of servicing information  
 

Reset service indicator or trip mile-

age recorder.  

  A  and  B.    Setting the time and select-

ing units.  

1

M O N I T O R I N G

29 

             TWO-TONE INSTRUMENT PANEL WITH AUDIO SYSTEM 

  Dials and screens 

   A.   Lighting dimmer (available in night 

mode). 

  B.   Reminder of the servicing information  
 

Reset the service indicator or the 

trip mileage recorder.   

  7.  Service indicator 


(miles or km) then,  


total mileage recorder.  


These two functions are displayed 

successively on switching on the 

ignition.  


Lighting dimmer setting (when mak-

ing an adjustment). 

  8.   Trip mileage recorder (miles or km). 
  9.   Fuel gauge and associated low fuel 

level warning lamp ( a  or  b  accord-

ing to version). 

  10.  Range (miles or km).   

  Control buttons 

   1.   Rev counter (x 1 000 rpm or tr/min). 
  2.   Gear shift indicator or gear selector 

lever position and gear for an elec-

tronic or automatic gearbox. 

  3.   Analogue speedometer (mph or km/h). 
  4.  Cruise control or speed limiter 

setting. 

  5.   Digital speedometer (mph or km/h). 
  6.   Engine oil level indicator. 

1

M O N I T O R I N G

30 

             CUSTOMISABLE COLOUR INSTRUMENT PANEL WITH AUDIO SYSTEM OR NAVIGATION SYSTEM 

   1.   Rev counter (x 1 000 rpm or tr/min). 
  2.   Gear shift indicator or gear selector 

lever position and gear for an elec-

tronic or automatic gearbox. 

  3.   Analogue speedometer (mph or km/h). 
  4.  Cruise control or speed limiter 

setting. 

  5.   Digital speedometer (mph or km/h). 
  6.   Engine oil level indicator. 

   A.   Dial COLOUR: customisation of the 

background colour of the dials. 

  B.  Screen COLOUR: customisation 

of the background colour of the 

screens. 

  C.   Lighting dimmer (available in night 

mode). 

  D.   Reminder of the servicing information  
 

Reset the service indicator or the 

trip mileage recorder.   

  Dials and screens 

  7.  Service indicator 


(miles or km) then,  


total mileage recorder.  


These two functions are displayed 

successively on switching on the 

ignition.  


Lighting dimmer setting (when mak-

ing an adjustment). 

  8.   Trip mileage recorder (miles or km). 
  9.   Fuel gauge and associated low fuel 

level warning lamp. 

  10.  Range (miles or km).   

  Control buttons 


Content   ..   1  2  3   ..