Citroen C4 Picasso Dag (2009 year). Manual - part 21
 

  Index      Citroen     Citroen C4 Picasso Dag - service manual 2009 year in english


Search            


Content   ..  19  20  21  22   ..


Citroen C4 Picasso Dag (2009 year). Manual - part 21


287

1

1

2

2

2

2

1

1

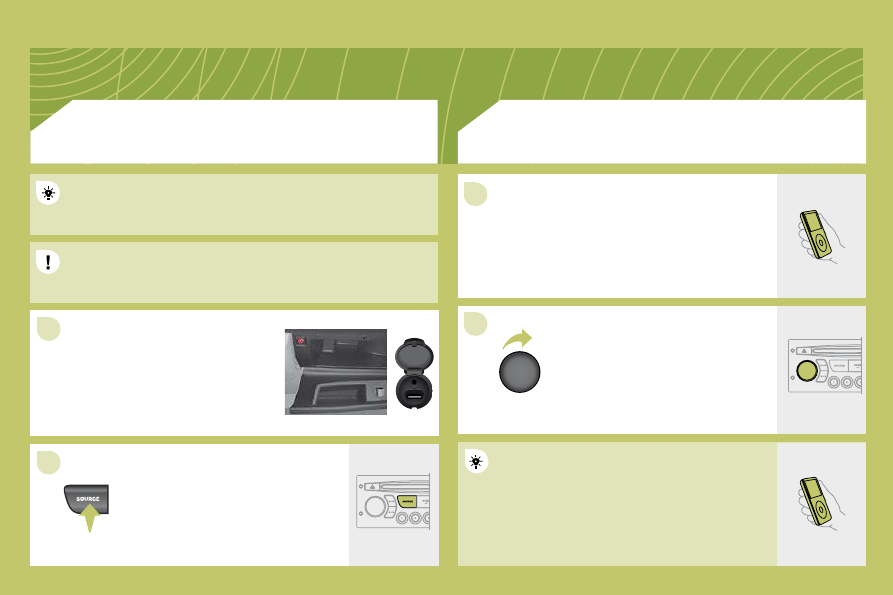
 The auxiliary input, JACK or RCA, permits the connection of portable 
equipment (MP3 player...). 

 Connect the portable equipment 
(MP3 player…) to the JACK socket or 
to the audio sockets (white and red, 

RCA type) using a suitable cable 
(not supplied). 

 Press the SOURCE button several 
times in succession and select AUX.  

         USING THE AUXILIARY INPUT (AUX) 

  JACK SOCKET OR RCA SOCKET (according to vehicle) 

 Do not connect a single piece of equipment via the USB port and the 
JACK socket at the same time. 

 The controls are displayed and managed via the 
portable equipment. 

 First adjust the volume of your portable equipment. 

 Then adjust the volume of your audio 
equipment. 

 ADJUSTING THE VOLUME
OF THE AUXILIARY SOURCE 

288

1

1

6

6

2

2

7

7

4

4

9

9

5

5

10

10

3

3

8

8

Saisir code authentiication

0

1

OK

Del

2 3 4 5 6 7 8 9

_

       BLUETOOTH FUNCTIONS 

 For reasons of safety and because they require prolonged attention 

on the part of the driver, the operations for pairing of the Bluetooth 
mobile telephone with the Bluetooth system of your audio equipment 

should only carried out with the vehicle stationary. The ignition must 
be on. 

 Activate the telephone's Bluetooth 
function. 

 A window is displayed with "Searching...". 

 Press the MENU button. 

 In the menu, select: 
   -   Bluetooth telephone function - Audio 

  -   Bluetooth confi guration 
  -   Perform a Bluetooth search  

 The services offered depend on the network, the SIM card and the 

compatibility of the Bluetooth equipment used. 
 Consult your telephone's manual and your operator to fi nd out which 
services are available to you. A list of mobile telephones which offer the 
best range of services is available from the network. 
Consult a CITROËN dealer. 

  BLUETOOTH TELEPHONE  

SCREEN C 

 The TELEPHONE menu gives access to the following functions in 

particular: Directory * , Call list, Pairing management. 

 The fi rst 4 telephones recognised are displayed in this window. 

 "Pairing of Name_telephone successful" appears on the screen. 

 The automatic connection authorised is only active after the 

telephone has been confi gured. 
 The directory and the call list can be accessed after the 
synchronisation period. 

OK 

  PAIRING A TELEPHONE 

 The pairing can also be initiated from the telephone.   

 A virtual keypad is displayed on the screen: 

enter a code with at least 4 digits. 

 Confi rm by pressing Ok. 

 Select the telephone to be connected from the list. Only one 
telephone can be connected at a time. 

 A message is displayed on the screen of the 

telephone chosen: to accept the pairing, enter 

the same code on the telephone, then confi rm by 

pressing Ok. 

 If pairing fails, the number of attempts is not limited. 

  *   if your telephone hardware is fully compatible.  

289

1

1

2

2

1

1

1

1

2

2

3

3

2

2

YES

  RECEIVING A CALL 

 An incoming call is announced by a ring and a superimposed display 
on the multifunction screen. 

 Initiate the pairing between the telephone and 

the vehicle. This pairing can be initiated from 
the vehicle's telephone function menu or via the 
telephone's keypad. See steps 1 to 10 on the 

previous pages. During the pairing phase, the vehicle 

must be stationary with the key in the ignition. 

 Select the telephone to be connected from the 
telephone function menu. 
 The audio system connects to a newly paired 
telephone automatically. 

 Select the YES tab on the display using 

the buttons and confi rm by pressing OK. 

 Press the steering wheel control OK to accept the call.  

 From the Bluetooth telephone function Audio menu, select Manage 
the telephone call then call, call list or directory. 

 Press the TEL steering wheel control for access to 
your directory. 
 Or 
 To dial a number, use your telephone's keypad, with 
the vehicle stationary.  

  MAKING A CALL 

      BLUETOOTH AUDIO STREAMING  
(AVAILABLE DURING THE YEAR) 

 Wireless transmission of the telephone's music fi les via the audio 

equipment. The telephone must be able to manage the appropriate 

bluetooth profi les (Profi les A2DP/AVRCP). 

  *   In certain cases, playing of the Audio fi les must be initiated from the keypad.  
  **   If the telephone supports the function.  

 Activate the streaming source by 

pressing the SOURCE button * . The 
tracks to be played can be controlled 
as usual via the buttons on the Radio 

control panel and the steering wheel 
controls ** . The contextual information 
can be displayed on the screen.  

290

06

4

1

2

3

5

1

2

3

4

5

2

1

  STEERING WHEEL CONTROLS 

1.  

Volume increase. 

  2.  

Volume decrease. 

3.  

Mute. 

  4.  

RADIO:   


selection of the previous or next stored station.  


CD/MP3/USB:  


selection of the previous or next directory. 

5. 

  RADIO: automatic search for a higher frequency.  


CD/MP3/USB:  


selection of the next track.  


CD/MP3:  


continuous press: fast forwards play.  

   1.  

Displays the main screen. 

2. 

  Selection of the type of information displayed on the right-

hand side of the screen for the monochrome screen A. 

  3. 

  Abandon the operation in progress  


and return to the previous display. 

  4. 

  Navigation through the menus. 

  5. 

  Confi rmation of the function selected.  


If your vehicle is fi tted with the Bluetooth system: pick up an 

incoming call or hang up a call which is in progress.   

 If your vehicle is fi tted with the Bluetooth system: 

   1. 

  Press: activation of telephone voice recognition

(if the telephone offers this function). 

  2.  

Press: displays the phone book, of the call list.  

291

5

5

6

6

7

7

8

8

1

1

2

2

3

3

4

4

07        CONFIGURATION 

 Press the MENU button. 

 Using the arrows, select 
the PERSONALISATION 
CONFIGURATION   function. 

 Press to confi rm the selection. 

 Using the arrows, select the DISPLAY 
CONFIGURATION function. 

 Press to confi rm the selection. 

 Press to confi rm the selection. 

 Using the arrows, select the ADJUST 
DATE AND TIME function. 

 Adjust the settings one by one 

confi rming by pressing the OK button. 
Next select the OK tab on the screen 

then confi rm.   

DISPLAY CONFIGURATION

ADJUST DATE AND TIME

OK

PERSONALISATION CONFIGURATION

  ADJUSTING THE DATE AND TIME 

  SCREEN C 

292

1

2

2

2

2

1

2

2

1

2

3

3

1

2

2

2

2

2

2

1

2

2

2

2

2

2

2

2

1

2

2

1

2

3

2

3

08

1

1

1

1

1

1

1

1

1

1

1

1

1

1

1

  RADIO-CD 

  DISPLAY ADJUST 

  YEAR  

  MONTH  

  DAY  

  HOUR  

  MINUTES  

  12 H/24 H MODE   

         SCREEN MENU MAP 

  MAIN FUNCTION 

  *   The parameters vary according to vehicle.  

  CHOICE A 

  Choice A1  
  Choice A2   

  CHOICE B...   

  LANGUAGES 

  FRANCAIS  

  ITALIANO  

  NEDERLANDS  

  PORTUGUES  

  PORTUGUES-BRASIL  

  DEUTSCH  

  ENGLISH  

  ESPANOL   

 Press the OK dial for access to short-

cut menus according to the display on 
the screen: 

 monochrome A 

         monochrome C 

  RADIO 

  activate/deactivate RDS  

  activate/deactivate REG mode  

  activate/deactivate radiotext   

  RANDOM PLAY   

  RDS SEARCH  

  REG MODE  

  CD REPEAT  

  VEHICLE CONFIG *  

  REV WIPE ACT  

  GUIDE LAMPS   

  OPTIONS 

  DIAGNOSTICS 

  consult  

  abandon    

  UNITS 

  TEMPERATURE: °CELSIUS/°FAHRENHEIT  

  FUEL CONSUMPTION: KM/L - L/100 - MPG   

  CD/MP3 CD 

  activate/deactivate Intro  

  activate/deactivate track repeat  

  Audio CD/Changer: the entire CD  

  MP3 CD/MP3 Changer: the entire current folder  

  activate/deactivate random play  

  Audio CD/Changer: the entire CD  

  MP3 CD: the entire current folder  

  MP3 Changer: all of the folders   

  USB 

  activate/deactivate track repeat  

  current folders/artist/genre/playlist  

  activate/deactivate random play  

  current folders/artist/genre/playlist   

292

1

2

2

2

2

1

2

2

1

2

3

3

1

2

2

2

2

2

2

1

2

2

2

2

2

2

2

2

1

2

2

1

2

3

2

3

08

1

1

1

1

1

1

1

1

1

1

1

1

1

1

1

  RADIO-CD 

  DISPLAY ADJUST 

  YEAR  

  MONTH  

  DAY  

  HOUR  

  MINUTES  

  12 H/24 H MODE   

         SCREEN MENU MAP 

  MAIN FUNCTION 

  *   The parameters vary according to vehicle.  

  CHOICE A 

  Choice A1  
  Choice A2   

  CHOICE B...   

  LANGUAGES 

  FRANCAIS  

  ITALIANO  

  NEDERLANDS  

  PORTUGUES  

  PORTUGUES-BRASIL  

  DEUTSCH  

  ENGLISH  

  ESPANOL   

 Press the OK dial for access to short-

cut menus according to the display on 
the screen: 

 monochrome A 

         monochrome C 

  RADIO 

  activate/deactivate RDS  

  activate/deactivate REG mode  

  activate/deactivate radiotext   

  RANDOM PLAY   

  RDS SEARCH  

  REG MODE  

  CD REPEAT  

  VEHICLE CONFIG *  

  REV WIPE ACT  

  GUIDE LAMPS   

  OPTIONS 

  DIAGNOSTICS 

  consult  

  abandon    

  UNITS 

  TEMPERATURE: °CELSIUS/°FAHRENHEIT  

  FUEL CONSUMPTION: KM/L - L/100 - MPG   

  CD/MP3 CD 

  activate/deactivate Intro  

  activate/deactivate track repeat  

  Audio CD/Changer: the entire CD  

  MP3 CD/MP3 Changer: the entire current folder  

  activate/deactivate random play  

  Audio CD/Changer: the entire CD  

  MP3 CD: the entire current folder  

  MP3 Changer: all of the folders   

  USB 

  activate/deactivate track repeat  

  current folders/artist/genre/playlist  

  activate/deactivate random play  

  current folders/artist/genre/playlist   

293

1

1

2

3

4

3

4

3

4

2

3

4

3

4

2

3

4

2

4

4

3

3

4

4

1

2

2

08

2

2

3

4

4

1

2

3

3

3

4

4

4

2

3

4

2

3

3

  PERSONALISATION-CONFIGURATION 

  AUDIO FUNCTIONS 

 SCREEN MENU MAP monochrome C   

  *   The parameters vary according to vehicle.  

  TRIP COMPUTER 

  FM BAND PREFERENCES 

  alternative frequencies (RDS)  

 activate/deactivate 

  regional mode (REG)  

 activate/deactivate 

  radio-text information (RDTXT)  

 activate/deactivate  

  PLAY MODES 

  album repeat (RPT)  

 activate/deactivate 

  track random play (RDM)  

 activate/deactivate   

  DEFINE THE VEHICLE PARAMETERS *   

  ENTER DISTANCE TO DESTINATION  

  WARNING LOG  

  STATUS OF FUNCTIONS   

  DISPLAY CONFIGURATION 

  video brightness adjustment  

 normal video 

 inverse video 

 brightness (- +) adjustment 

  date and time adjustment  

 day/month/year adjustment 

 hour/minute adjustment 

 choice of 12 h/24 h mode 

  choice of units  

 l/100 km - mpg - km/l 

 °Celsius/°Fahrenheit  

  CHOICE OF LANGUAGE   

  BLUETOOTH TELEPHONE 

  MANAGE THE TELEPHONE CALL 

Terminate the current call  

  Activate private mode    

  BLUETOOTH CONFIGURATION 

 Connect/Disconnect a device 

 Telephone function 

 Audio Streaming function 

Consult the paired device  

  Delete a paired device  

  Perform a Bluetooth search   

  CALL 

  Calls list  

 Directory  

294

 There is a difference in 
sound quality between 
the different audio 
sources (radio, CD...). 

 Check that the audio settings (Volume, Bass, 
Treble, Ambience, Loudness) are adapted to 
the sources listened to. It is advisable to set 
the AUDIO functions (Bass, Treble, Front-Rear 

Balance, Left-Right Balance) to the middle 
position, select the musical ambience "None" 
and set the loudness correction to the "Active" 
position in CD mode or to the "Inactive" position 
in radio mode. 

 For optimum sound quality, the audio settings (Volume, Bass, Treble, 
Ambience, Loudness) can be adapted to the different sound sources, 

which may result in audible differences when changing source
(radio, CD...). 

 The CD is ejected 
automatically or is not 
played by the player. 

   -   Check that the CD is inserted in the player the 

ri

ght way up. 

  -   Check the condition of the CD: the CD cannot 

be played if it is too damaged. 

  -   Check the content in the case of a recorded 

CD: consult the advice in the "Audio" section. 

  -   The audio equipment's CD player does not 

play DVDs. 

  -   Due to their quality level, certain writeable CDs 

will not be played by the audio system.  

 The CD is inserted upside down, is unplayable, does not contain any audio 
data or contains an audio format which the player cannot play. 

 The CD is protected by an anti-pirating protection system which is not 

recognised by the audio equipment. 

 The message "USB 
peripheral error" is 
displayed on the screen. 

 Recharge tha battery of the peripheral device. 

 The Bluetooth conecion is cut. 

 The battery of the peripheral may not be suffi ciently charged. 

 The USB memory stick is not recognised. 
 The memory stick may be corrupt. 

 Reformat the memory stick. 

 QUESTION 

 SOLUTION 

 ANSWER 

 FREQUENTLY ASKED QUESTIONS 

 The CD player sound 
is poor. 

 The CD used is scratched or of poor quality. 

 Insert good quality CDs and store them in 
suitable conditions. 

 The audio equipment settings (bass, treble, ambiences) are unsuitable. 

 Set the treble or bass level to 0, without selecting 
an ambience. 

295

 The traffi c announcement 
(TA) is displayed. I do 

not receive any traffi c 
information. 

 Tune to a radio station which broadcasts traffi c 
information. 

 The radio station is not part of the regional traffi c information network. 

 QUESTION 

 SOLUTION 

 ANSWER 

 The quality of reception 
of the radio station 

listened to gradually 
deteriorates or the 
stored stations do 
not function (no 

sound, 87.5 Mhz is 
displayed...). 

 The vehicle is too far from the transmitter used by the station listened to or 

there is no transmitter in the geographical area through which the vehicle 

is travelling. 

 The environment (hills, buildings, tunnels, basement car parks...) block 

reception, including in RDS mode. 

 The aerial is absent or has been damaged (for example when going 

through a car wash or into an underground car park). 

 Activate the RDS function to enable the system 
to check whether there is a more powerful 

transmitter in the geographical area. 

 This phenomenon is normal and does not 
indicate a failure of the audio equipment. 

 Have the aerial checked by a CITROËN dealer. 

 Sound cut-outs of 1 
to 2 seconds in radio 
mode. 

 During this brief sound cut-out, the RDS searches for any frequency 

permitting better reception of the station. 

 Deactivate the RDS function if the phenomenon 
is too frequent and always on the same route. 

 With the engine off, 
the audio equipment 
switches off after a few 
minutes of use. 

 When the engine is switched off, the audio equipment operating time 

depends on the battery charge. 
 The switch-off is normal: the audio equipment switches to economy mode 

and switches off to prevent discharging of the vehicle's battery. 

 Start the vehicle's engine to increase the battery 

charge. 

 The stored stations do 
not function (no sound, 

87.5 Mhz is displayed...). 

 An incorrect waveband is selected. 

 Press the BAND AST button to return to the 
waveband (AM, FM1, FM2, FMAST) on which the 
stations are stored. 

 The message "the audio 
system is overheated" 
appears on the display. 

 Switch the audio system off for a few minutes to 
allow the system to cool. 

 In order to protect the installation if the surrounding temperature is too high, 
the audio equipment switches to an automatic thermal protection mode 

leading to a reduction of the volume or stopping of the playing of the CD. 

297

     VIDEO PACK 

 For reasons of safety, the driver should only carry out 
operations which require prolonged attention while the 
vehicle is stationary. 
 The player is compatible with the following formats: DVD-R, 
DVD+R, DVD+RW, CD-R, CD-RW, VCD and SVCD. 
 By means of the AUX1 and AUX2 inputs, this pack permits 
the connection of auxiliary systems (camcorder, games 
console, etc.). 

 The audio equipment only plays audio fi les with the 
extension ".mp3" with a sampling rate of 32 KHz to 48 KHz. 


  CONTENTS 

       01 First steps  

p. 298

      02 Setup  

p. 300

      03 Basic functions  

p. 301

      04 Screen menu map  

p. 303

      05 Frequently asked questions  p. 304

  DVD/AUDIO CD/MP3 PLAYER 

 All of the functions of the video pack are described in the 
separate manual supplied with your vehicle.  

298

01

1

1

2

2

8

8

9

9

6

6

3

3

3

3

4

4

1

1

7

7

5

5

2

2

   1.  

Monitor positioning handles. 

  2.  

Folding and pivoting TFT/LCD screen. 

  3.  

Infra-red cell. 

  4.  

DVD/CD player opening provided for the disc. 

  5.  

On/Off.  


DVD/CD eject. 

  6.  

LED:  


Lit in green: player in operation.  


Flashing: receiving information or ejecting the disc. 

  7.  

AV1 AUDIO input. 

  8.  

AV2 AUDIO input. 

  9.  

VIDEO input.   

     FIRST STEPS 

   1.  

2 channel stereo. 

  2.  

On/Off. 

  3.  

Volume adjustment.  

 The headphones are supplied with the video pack. 
 The presence of an object between the infra-
red cell on the monitor and the headphones 
may result in a reduction in the sound quality. 

Supply: 2 batteries R03/AAA 1.5 V.  

  MONITORS AND DVD/CD PLAYER 

  INFRA-RED HEADPHONES 

 The monitors are located in the top of the front seats. 

 The DVD/CD player is located on the centre console. 

299

01

9

9

7

7

8

8

11

11

10

10

12

12

13

13

14

14

15

15

5

5

4

4

16

16

2

2

1

1

18

18

17

17

3

3

6

6

  REMOTE CONTROL 

     FIRST STEPS 

 Numeric keypad 

   1.  

Power On/Off, Eject. 

  2.  

Selection of the source from DVD, 
audio CD and AUX. 

3.  

Change screen. 

  4.  

DVD screen adjustments 
(brightness, contrast, …). 

  5. 

  Selection confi rmation. 

  6.  

Fast forward/backward.  


In the menus: move the cursor left/
right, up/down. 

  7.  

Volume increase/decrease. 

  8.  

Play/Pause. 

  9.  

Next chapter. 

10.   SHIFT: activation of the yellow buttons. 

  11.   Selection of the audio language.  
 

With SHIFT: selection of the subtitle 
language. 

  12.   Change chapter.  
 

With SHIFT: change title. 

  13.   Previous chapter. 

  14.   Stop play. 

  15.   RETURN:  
 

Short press: return to the previous 
menu.  


Long press: return to the main menu. 

  16.   Display the main DVD menu. 

  17.   ZOOM: Selection of different image 

formats. 

  18.   Display/mask the screen.  

Power: 2 batteries R03/AAA 1.5 V.  

300

02

1

2

2

3

3

4

4

3

3

2

2

1

1

5

5

  SETUP MENU 

     SETUP 

 Press the SETUP button. 

 The SETTINGS menu appears on 
the screen: VIDEO SETTINGS, 
LANGUAGES, USERS, DEFAULT 
SETTINGS. 

 Select the options using 
the    and    buttons. 

 Press the OK button to confi rm your 
choice.  

 Select the input required using
the  

 


  buttons. 

 The VIDEO SETTINGS 
menu appears on the screen: 
BRIGHTNESS, CONTRAST, 
COLOUR, BACK-LIGHTING. 

 Select the VIDEO SETTINGS menu 
using the    and    buttons. 

 Press the SETUP button. 
The SETTINGS menu appears 
on the screen. 

 Press the OK button to confi rm your 
choice.  
The setting is saved.  

  VIDEO SETTINGS 

301

1

1

2

2

3

3

03      BASIC FUNCTIONS 

 Unlock the table using the button 
and tilt it down. 

 Using the positioning handles, 
extract the monitor from the 
casing. 

 Pivot the monitor upwards until it is 
in contact with the upper part of the 
seat. 
 A notch locks it in position. 

The monitor is not a touch screen.

 Do not press directly on the surface of the monitor, this 
may damage the liquid crystal display.  

302

1

1

2

2

1

1

2

2

1

1

2

2

03

  VIDEO PACK ON/OFF 

 BASIC FUNCTIONS 

 To switch on the system, switch on the vehicle's 
ignition. 

 Press the POWER/EJECT button on the DVD/
CD player or on the remote control. 

 Play begins automatically. 

 To load a disc, insert it gently, printed 
face uppermost, until it is fully 
inserted. 

 Press the POWER/EJECT button on 
the DVD/CD player or remote control. 

 Remove the disc gently.  

  LOADING/EJECTING A DVD/CD 

 When the ignition is off, the video pack will switch off automatically 
after approximately ten minutes to avoid discharging the battery.  


Content   ..  19  20  21  22   ..