Citroen C4 Picasso Dag (2009 year). Manual - part 17
 

  Index      Citroen     Citroen C4 Picasso Dag - service manual 2009 year in english


Search            


Content   ..  15  16  17  18   ..


Citroen C4 Picasso Dag (2009 year). Manual - part 17


221

55

66

77

88

1

1

22

33

44

04

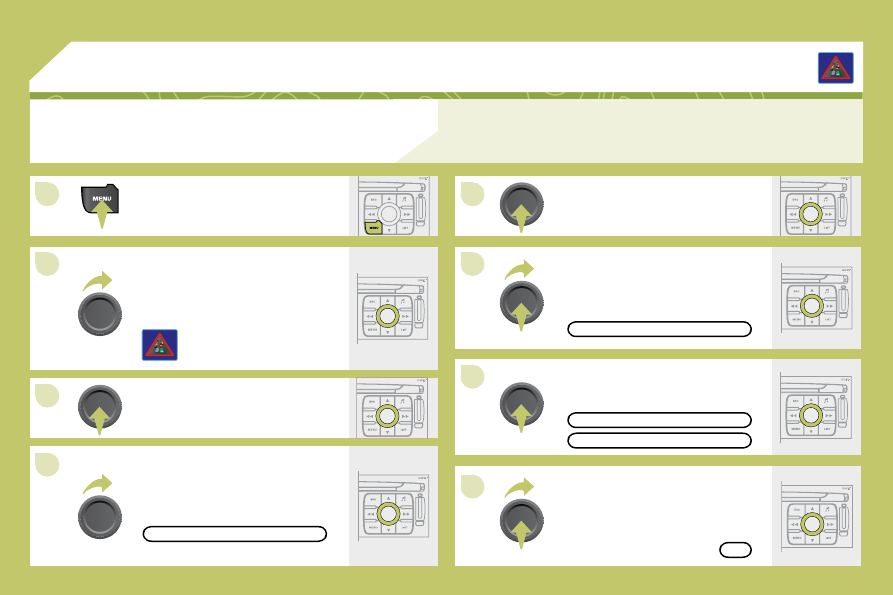
  ACTIVATING THE FILTER ON THE ROUTE 

 We recommend a fi lter on the route and a fi lter around the vehicle of: 
   -   3 miles (5 km) or 6 miles (10 km) for a region with heavy traffi c, 
  -   12 miles (20 km) for a region with a normal level of traffi c, 
  -   60 miles (100 km) for long journeys (motorway).  

 Press the MENU button. 

 Turn the dial and select the TRAFFIC 
INFORMATION function. 

 Press the dial to confi rm the selection. 

FILTER TRAFFIC INFORMATION

 Turn the dial and select the FILTER 
TRAFFIC INFORMATION function. 

       TRAFFIC INFORMATION 

 Press the dial to confi rm the 
selection. 

 Select the GEOGRAPHIC FILTER 

function and press the dial to confi rm. 

 Turn the dial and select the fi lter of 
your choice. 

 Select OK and press the dial to 

confi rm.  

GEOGRAPHIC FILTER

AROUND THE VEHICLE

ON ROUTE

OK

222

1

1

22

33

44

66

55

77

04

READ MESSAGES

NEW MESSAGE DISPLAY

OK

  CONFIGURING THE TMC MESSAGE 
ANNOUNCEMENTS 

 We recommend that you do not tick the NEW MESSAGE DISPLAY tab for regions with heavy traffi c. 

 Turn the dial and select the TRAFFIC 
INFORMATION function. 

 Press the dial to confi rm the selection. 

 Press the dial to confi rm the selection. 

 Turn the dial and select the 
CONFIGURE MESSAGE 
ANNOUNCEMENT function. 

 Select the READ MESSAGES tab. 

 The Traffi c Information Messages will 

be read by the voice synthesiser. 
 Select the NEW MESSAGE 

DISPLAY tab. 

 The traffi c information messages 

are extended to the fi lters selected 

(geographic...) and can also be 

displayed when guidance is not active. 

CONFIGURE MESSAGE ANNOUNCEMENT

 TRAFFIC INFORMATION 

 Select OK and press the dial

to confi rm.  

223

1

1

22

33

44

1

1

22

33

44

05

 RADIO 

 SELECTING A STATION 

 Press the SOURCE button several 
times in succession and select the 
RADIO. 

 Press the BAND button to select a 
waveband: FM1, FM2, FMast, AM. 

 Briefl y press one of the buttons to 
carry out an automatic search of the 
radio stations. 

 Press one of the buttons to carry out a 
manual search of the radio stations. 

 Press the LIST button to display the 
list of stations received locally

(60 maximum). 
 To update this list, press for more than 
two seconds. 

 The external environment (hills, buildings, tunnels, basement car parks, ...) may block reception, 
including in RDS mode. This is a normal effect of the way in which radio waves are transmitted and does 
not indicate any failure of the audio equipment. 

  RDS 

 Select ACTIVATE FREQUENCY 

FOLLOWING (RDS) then press OK. 
RDS appears on the display. 

 Select the FM WAVEBAND 
PREFERENCES function then 
press OK. 

 Select AUDIO FUNCTIONS then 
press OK. 

 Press the MENU button. 

 The RDS, if displayed, enables you to continue listening to the same 

station by automatic retuning to alternative fequencies. However, in 

certain conditions, coverage of an RDS station may not be assured 

throughout the country as radio stations do not cover 100 % of the 

territory. This explains the loss of reception of the station during a 
journey.  

FM WAVEBAND PREFERENCES

ACTIVATE FREQUENCY FOLLOWING (RDS)

224

1

1

22

05          AUDIO/VIDEO 

  INFORMATION AND ADVICE 

 The MP3 format, an abbreviation of MPEG 1.2 & 2.5 Audio Layer 3, 

is an audio compression standard which permits the recording of 

several tens of music fi les on a single disc. 

 In order to be able to play a recorded CDR/DVDR or CDRW/DVDRW, 

when recording it is preferable to select standards ISO 9660 level 1.2 
or Joliet. 
 If the disc is recorded in another format, it may not be played 
correctly. 

 It is recommended that the same recording standard is always used 

for an individual disc, with as low a speed as possible (4x maximum) 
for optimum sound quality. 
 In the particular case of a multi-session CD, the Joliet standard is 
recommended. 

 The audio equipment will only play audio fi les with the extension 

".mp3" with a sampling rate of 22.05 KHz or 44.1 KHz. No other type 

of fi le (.wma, .mp4, .m3u...) can be played. 

 It is advisable to restrict fi le names to 20 characters without using 

special characters (e.g.: " ? ; ù) to avoid any playing or displaying 
problems.   

   Insert circular compact discs only. Some anti-pirating 

systems, on original discs or CDs copied using 

a personal recorder, may generate malfunctions 

regardless of the quality of the original player. 
 Insert an audio CD or an MP3 compilation in the player, 

play begins automatically. 

 If the player already contains a disc, 
press the SOURCE button several 
times in succession and select CD to 
listen to it. 

 Press one of the buttons to select a 
track on the CD. 
 Press the LIST button to display 
the list of tracks on the CD or of the 
directories of the MP3 compilation. 

 The playing and displaying of an MP3 compilation may depend on 

the recording programme and/or the parameter settings used.

We recommend use of the ISO 9660 recording standard.  

  MP3 CD 

  PLAYING A CD OR AN MP3 COMPILATION 

 CD 

225

22

33

1

1

55

66

44

COPY CD TO JUKEBOX

COMPLETE CD

CREATE ALBUM

OK

AUDIO FUNCTIONS

 Select COPY CD TO JUKEBOX and 

press the dial to confi rm. 

 Select COMPLETE CD to copy 
the entire CD and press the dial to 

confi rm. 

 Select CREATE ALBUM and press 

the dial to confi rm. 

 The AUTO CREATION tab automatically copies the CD by default 
into an album of the type "album n°...". 

 The audio or MP3 CD is copied onto the hard disc. Copying may 

take approximately 20 minutes depending on the duration of the CD. 

During this copying phase, it is not possible to listen to the albums 
previously recorded on the hard disc or the CDs. 

 Select the letters one by one and select 

OK to confi rm. 

 If it is not an MP3 CD, the Jukebox automatically compresses 
the CD in MP3 format. The compression may take approximately 

20 minutes depending on the duration of the CD. During this 
compression phase, it is possible to listen to the CD or to albums 
previously recorded on the hard disk. 

 A long press on the SOURCE button starts the copying of the CD. 

 When copying an MP3 CD, the Jukebox only retains the last album 

level. It is not possible to copy fi les from the Jukebox to a CD. 

 The STOP THE CD COPY action does not delete the fi les which 
have already been transferred onto the jukebox hard disk. 

 Select AUDIO FUNCTIONS and press 

the dial to confi rm. 

 Insert a CD or an MP3 compilation 
and press the MENU button. 

     JUKEBOX FUNCTION 

 COPYING A CD ONTO THE HARD DISC 

226

22

1

1

3

44

55

22

33

1

1

USB

COPY USB TO JUKEBOX

COMPLETE DISC

 Select USB and press the dial to 

confi rm. 

 Select COPY USB TO JUKEBOX and 

press the dial to confi rm. 

 Select COMPLETE DISC to copy the 
entire USB stick and press the dial to 

confi rm. 

 Select AUDIO FUNCTIONS and press 

the dial to confi rm. 

 Insert a USB stick in the space 
provided and press the MENU button. 

     JUKEBOX FUNCTION 

 COPYING AN MP3 USB STICK ONTO
THE HARD DISK 

 If another source is being played, 
press the SOURCE button several 
times in succession and select USB 
to play it. 

 Press one of the buttons to select a 
track on the USB stick. 
 Press the LIST button to display the list 
of folders on the MP3 USB stick. 

 To eject the USB stick, press the MENU button, select AUDIO 
FUNCTIONS, USB, then select EJECT USB. 

 The playing and displaying of an MP3 compilation may depend on 

the programme settings used. 

 JUKEBOX FUNCTION 

 PLAYING AN MP3 USB STICK 

 Insert a USB stick in the space provided. 

ded. 

227

66

77

55

22

33

44

1

1

JUKEBOX

RENAME

JUKEBOX MANAGEMENT

 Press the MENU button. 

 Select AUDIO FUNCTIONS and 

press the dial to confi rm. 

 Select the JUKEBOX function and 

press the dial to confi rm. 

 Select the JUKEBOX MANAGEMENT 

function and press the dial to confi rm. 

 Select the album to be renamed and 

press the dial to confi rm. 

 Select the RENAME tab and press the 

dial to confi rm. 

 Turn the dial and select the letters of 

the album title one by one confi rming 

each time by pressing the dial. 

 Use the alphanumeric keypad to enter the letters of the album title 
one by one. 

 JUKEBOX FUNCTION 

  RENAMING AN ALBUM 

228

88

22

33

1

DELETE

OK

 Press the SOURCE button several 
times in succession and select the 
JUKEBOX function. 

 Press the LIST button. 

 Turn the dial to select the fi les. 

 Press the ESC button to return to the fi rst fi le level.  

JUKEBOX

 Select OK and press the dial to 

confi rm. 

 To rename the tracks of an album, follow the same procedure, 

selecting the tracks to be renamed. 
 Use the ESC button to exit from the list of tracks. 

 Select the DELETE function to delete an album or a 
track from the Jukebox.  

     JUKEBOX FUNCTION 

  LISTENING TO THE JUKEBOX 

229

1

1

22

 Press the MENU button then select the CONFIGURATION function, 

then SOUNDS, then ACTIVATE AUXILIARY SOURCE to activate 
the audio equipment auxiliary input. 

 Connect the portable equipment (MP3 

player…) to the JACK socket or to the 

audio sockets (white and red, RCA type) 

located in the glove box using a suitable 
cable. 

 Press the SOURCE button several 
times in succession and select AUX. 

 The displaying and management of the commands takes place via 
the portable equipment. 

 It is not possible to copy the fi les onto the hard disk from the auxiliary 
input.  

       USING THE AUXILIARY INPUT (AUX) 

  JACK/RCA AUDIO CABLE NOT SUPPLIED 

230

1

1

22

33

44

55

66

77

ACTIVATE VIDEO MODE

VIDEO PARAMETERS

 You can connect video equipment (camcorder, digital camera, DVD player...) to the three audio/video 
sockets, located in the glove box. 

 Turn the dial and select the VIDEO 
function. 

 After connecting the video equipment, 
press the MENU button. 

 Turn the dial and select the 
ACTIVATE VIDEO MODE function to 
activate/deactivate the video.

 Press the dial to confi rm the selection. 

  Press the dial to confi rm the selection. 

 Pressing the "SOURCE" button several times in succession permits 
the selection of an audio source other than that of the video. 

  Pressing the "DARK" button disconnects display of the video. 

 Turn the dial and select the VIDEO 
PARAMETERS function to set the 

display format, the brightness, the 
contrast and the colours. 

 Press the dial to confi rm the selection.

         VIDEO MENU 

 Videos can only be displayed when stationary. 

231

1

1

22

33

1

1

22

06      INTERNAL TELEPHONE 

  ENTERING THE PIN CODE 

 Open the slot by pressing the button 

using the tip of a pen. 

 Install the SIM card 
in the holder and 
then insert it in the 
slot. 

 To remove the SIM card, repeat step 1. 

 Your SIM card must be installed and removed with the NaviDrive 

audio and telematics system switched off and the ignition off.   

 Enter the PIN code on the keypad. 

 Confi rm the PIN code by pressing 
button #. 

PIN CODE

 When entering your PIN code, tick the STORE PIN tab for access 

to the telephone without having to enter this code when it is used 
subsequently.  

  INSTALLING YOUR SIM CARD 

  (NOT SUPPLIED) 

232

33

22

1

1

44

06

 The services offered by the telephone depend on the network, the SIM card and the compatibility of 

the Bluetooth equipment used. Refer to your telephone's manual and your operator to check which 
services you have access to. A list of mobile telephones which offer the best range of services is 
available from dealers. 

       BLUETOOTH TELEPHONE 

  CONNECTING A BLUETOOTH  
TELEPHONE 

 For reasons of safety, the driver should only carry out operations 

which require prolonged attention when the vehicle is stationary 

(pairing the Bluetooth mobile telephone to the hands-free kit). 

 Activate the telephone's Bluetooth function. 
 The last telephone connected is reconnected 
automatically. 

 Select BLUETOOTH ACTIVATION 
MODE, then ACTIVATED AND 

VISIBLE. Press the dial to confi rm 
each operation. 

 Press the MENU button, select 
TELEMATICS, then BLUETOOTH 
FUNCTIONS. Press the dial to 

confi rm each operation. 

 On your telephone, select the name of 
the CITROËN audio/telephone. Enter the 

 On your telephone, select the name of 

r telep

authentication code (0000 by default).  

 To fi nd and change the name of the CITROËN audio/telephone, 

 To fi nd and change the name of the CITROËN audio/telephone, 
repeat step 2 then select CHANGE AUDIO/TELEPHON

PHONE NAME. 

233

06

 The call list consists of calls made from the vehicle's 
audiotelephone only.  

 Once the telephone has been connected, the system can 
synchronise the address book and the call list. Repeat step 2 then 

select PHONE BOOK SYNCHRONISATION MODE. Select the 

synchronisation of your choice and press the dial to confi rm. 
 The synchronisation may take a few minutes. 

 To change the telephone connected, repeat step 2 then select LIST 

OF MATCHED TELEPHONES and press OK to confi rm. The list of 

previously connected telephones (10 maximum) appears. Select the 

telephone of your choice, confi rm, then select CONNECT and press 

the dial to confi rm. 

 To change the authentication code, repeat step 2 then select 
AUTHENTICATION CODE and save the code of your choice. 

     BLUETOOTH TELEPHONE 

  CONNECTING A BLUETOOTH   
TELEPHONE 

234

1

1

22

33

55

66

44

06  MAKING TELEPHONE CALLS 

  CALLING A CONTACT 

 Turn the dial and select the DIAL 
function. 

 Press the PICK UP button to display 
the telephone short-cut menu. 

 Press the dial to confi rm the selection. 

 Dial the telephone number of your 

contact using the alphanumeric 
keypad. 

 Press the PICK UP button to call the 
number dialled. 

 Press the HANG UP button to end 
the call.  

  ACCEPTING OR REFUSING A CALL 

 Press the PICK UP button to accept 
a call. 

 Press the HANG UP button to refuse 
a call. 

 You can also press and hold the steering wheel 
control TEL button to access the telephone menu: 

calls log, directory, voice mailbox.  

 To select the telephone used, press MENU, then select TELEMATICS, then BLUETOOTH 

FUNCTIONS, then BLUETOOTH ACTIVATION MODE. Then select: 

   -   DEACTIVATED: to use the internal telephone, 

  -   ACTIVATED AND VISIBLE: to use the bluetooth telephone, visible to all telephones, 

  -    ACTIVATED AND NOT VISIBLE: to use the bluetooth telephone, not visible to other telephones, it is 

not possible to match a new telephone.  

 Select CALL LIST or PHONE BOOK and press OK. Select the 

number required and confi rm to make the call. 

DIAL

235

 CITROËN ASSISTANCE 

 CUSTOMER CALL 

  *   These services and options are subject to conditions and availability.  

       CONSULTING THE SERVICES 

        EMERGENCY CALL 

 Press this button to gain access to the 

CITROËN services * . 

 Press this button to gain access to the 

 Press this button to gain access to the 

 Select "Customer call" to request 
any information about the CITROËN 
marque. 

 Select "CITROËN Assistance" to make 
a breakdown assistance call. 

 In an emergency, press the SOS 
button until a CONFIRMATION/
CANCELLATION screen is displayed. 

 A call is made *  directly to CITROËN 

CANCELLATION screen is displayed. 

isplaye

Emergency which receives locating 
information from the vehicle and 
can send a detailed alert to the 

appropriate emergency services. In 
countries where the call centre is 
not operational, or where the vehicle 
location service has been expressly 
refused, the call is directed to the 

national emergency services (112). 

 If the SIM card used was not supplied by CITROËN, we suggest 

that you check its compatibility by making a call to the CITROËN

 If the SIM card used was not supplied by CITROËN, we suggest 

 If the SIM card used was not supplied by CITROËN, we suggest 

Emergency Emergency team.  

  *    This service is subject to conditions and availability. 

Consult a CITROËN dealer.  

 If necessary, the internal telephone is activated automa

utomatically to 

make an emergency call. 

 In order for an emergency call to be made, a valid SIM card must be 

 In order for an emergency call to be made, a valid SIM card must be 
inserted. 

236

1

2

2

2

07

 Each press of the button, located at the end of the wiper stalk, 
displays the different trip computer information in succession, 

depending on the screen. 

 With the "vehicle" tab: 

       the range, the current fuel consumption and the distance remaining 

to the destination.  


 Zero reset 
 When the required route is displayed, press the button for 
more than two seconds. 

 TRIP COMPUTER 

 VEHICLE DIAGNOSTICS 

 VEHICLE DIAGNOSTICS 

 WARNINGS LOG 

 STATUS OF FUNCTIONS 

 TYRE UNDER-INFLATION DETECTOR ZERO RESET 

On-board computer

Route

km

860

Distance

km

l/100


Content   ..  15  16  17  18   ..