Citroen C4 Picasso Dag (2009 year). Manual - part 16
 

  Index      Citroen     Citroen C4 Picasso Dag - service manual 2009 year in english


Search            


Content   ..  14  15  16  17   ..


Citroen C4 Picasso Dag (2009 year). Manual - part 16


204 

XII

T E C H N I C A L   D A T A

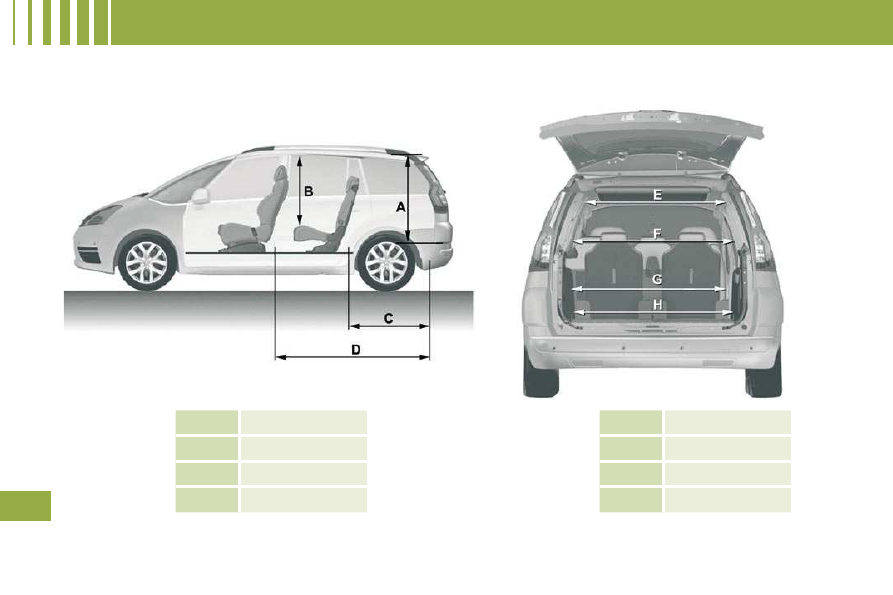
  Interior (CITROËN Grand C4 Picasso)  

   E   

  0.880  

   F   

  1.070  

   G   

  1.160  

   H   

  1.170  

   A   

  0.920  

   B   

  0.990/1.000  

   C   

  1.030/1.160  

   D   

  1.800/2.060  

205 

XII

T E C H N I C A L   D A T A

                 IDENTIFICATION MARKINGS 

 Various visible markings for identifi -

cation of the vehicle. 
 The vehicle type and the identifi ca-

tion  number  are  also  indicated  on 
the registration document. 
 All  CITROËN  original  replacement 
parts are available exclusively within 
the dealer network. 
 For your safety and in order to remain 
within the terms of the warranty, you 
are advised to use only CITROËN re-
placement parts 

  A. Manufacturer’s label 

 Located on the left-hand door centre 
pillar. 
   1.   EU type approval number. 
  2.

   Vehicle Identifi cation No. (VIN). 

  3.   Gross vehicle weight. 
  4.   Gross train weight. 
  5.   Maximum weight on front axle. 
  6.   Maximum weight on rear axle.   

  B.  Vehicle Identification 

No. (VIN) 

 Located  on  bodywork  and  behind 
windscreen.  

  C.  Paint colour code  

Tyre reference  
Tyre pressures 

 Located on the driver's door interior 
pillar.  

  Use  the  tyre  pressures  recom-
mended by CITROËN. 
 Check the tyre pressures when the 
tyres are cold, on a frequent basis. 
 Never reduce the pressure of a hot 
tyre. 
 If replacing your tyres, it is essential 
to use the tyre sizes that are recom-
mended for your vehicle.  

207

     NaviDrive 

  MULTIMEDIA AUDIO EQUIPMENT/TELEPHONE  

  JUKEBOX FUNCTION (  10 GB  )/GPS (EUROPE)  

 The NaviDrive is coded in such a way that it will only 
operate in your vehicle. If it is to be installed in another 

vehicle, contact a CITROËN dealer for confi guration of the 

operate in your vehicle. If it is to be installed in another 

le. If it i

system. 

 For safety reasons, the driver should only carry out 

operations which require prolonged attention only while 
the vehicle is stationary. 

 When the engine is switched off and to prevent 

discharging of the battery, the NaviDrive switches off 
after a few minutes. 

  CONTENTS 

       01 First steps  

p  .   208  

      02 Screen and general menu   p  .   209  

      03 GPS  

p  .   212  

      04 Traffi c information  

p  .   221  

      05 Audio/Video  

p  .   223  

      06 Telephone  

p  .   231  

      07 Trip computer  

p  .   236  

      08 Steering wheel controls   p  .   238  

      09 Confi guration  

p  .   240  

      10 Screen menu map  

p  .   241  

      Frequently asked questions   p  .   246    

208

2

8

16

18

17

7

11

14

3

5

9

4

15

12

13

6

1

10

01  FIRST STEPS 

1.   On/Off and Volume adjustment. 
  2.   Selection of the source: radio, Jukebox, CD and auxiliary 

(AUX, if activated on the Confi guration menu). 

Long press: CD copy to hard disk. 

  3.   Audio option adjustments: front/rear, left/right balance, 

loudness, sound ambiences. 

  4.   Display the list of local radio stations, of the tracks on the 

CD or of the MP3/USB/Jukebox directories.

Long press: update the local radio stations. 

5.   Automatic search for a lower/higher frequency. 

Selection of the previous/next CD, MP3, USB or Jukebox track.  


Long press: fast forward and backward play. 

  6.   Selection of wavebands FM1, FM2, FMast, AM. 

  7.   TA (Traffi c Announcement) function on/off.  


Long press: access to the PTY 

(radio Programme TYpes) mode. 

  8.   Ejection of the CD. 
  9.   SIM card slot. 
10.   Keypad for entering descriptions by successive presses. 
11.   Access to the "CITROËN" services menu. 
  12.   Selection and confi rmation. 
  13.   Selection of the previous/next MP3/USB/Jukebox directory. 
  14.   Cancellation of the current operation. 

Long press: return to the current application. 

15.   Display the general menu. 
16.   Modifi cation of the screen display. 

Long press: reinitialisation of the system. 

  17.   Selection of the display on the screen between modes: 

TRIP, TEL, NAV and AUDIO. 

  18.   Long press on the SOS button: emergency call.  

209

02

°

  > COLOUR SCREEN 

  This displays the following information, via the audio   control   panel  :  
   -   time, 
  -   date, 
  -   ambient temperature (if there is a risk of ice, you are warned by a 

message), 

  -   audio source displays (radio, CD, jukebox, ...), 

  -   telematic system displays (telephone, services, ...), 

  -   check of openings (doors, boot, ...), 

  -   warning messages (e.g.: "Fuel level low") and vehicle function status 

messages (e.g.: "Auto lighting activated") displayed temporarily, 

  -   trip computer information, 

  -   GPS (Europe) satellite navigation system information.  

 New 

 The system uses the complete and detailed NAVTEQ maps installed directly on the equipment's hard disk. There is no need to keep a mapping CD 
in the CD player. Updates of the maps of the UK and of the other European countries, offered by our partner NAVTEQ, will be available from the 
CITROËN network.  

in the CD player. Upd

he CD 

 Screen confi guration: refer to the section - Screen menu map. 

Telephone

Orange

Time:
Date: 

210

02  DISPLAY AND GENERAL MENU 

 MAP: 
orientation, details, display. 

AUDIO FUNCTIONS: 
radio, CD, Jukebox, options. 

 For cleaning the screen, the 
use of a soft, non-abrasive 

cloth (spectacles cloth) 
is recommended with no 
additional product. 

 TELEMATIC: 
telephone, directory, SMS. 

 CONFIGURATION: 
vehicle, screen, time, 

languages, voice, auxiliary 

socket (AUX) settings. 

socket (AUX) settings. 

 VIDEO: 

activation, settings. 

 VEHICLE DIAGNOSTICS: 

warnings log. 

 NAVIGATION GUIDANCE: 

GPS, stages, options. 

 TRAFFIC INFORMATION: 
TMC information, 

messages. 

211

1

1

1

1

1

1

1

1

1

1

1

1

1

1

1

1

1

1

1

1

1

1

1

1

1

1

1

1

1

1

1

1

1

1

1

1

1

1

1

02      DISPLAY AND GENERAL MENU 

 Press the OK dial to access short-cut 

menus according to the display on the 
screen. 

  INTERNAL TELEPHONE: 

  call list  

  dial  

  phone book  

  voice mail   

  NAVIGATION (IF NAVIGATION IS IN PROGRESS): 

  resume/stop guidance  

  divert route  

  route type  

  consult traffi c info  

  zoom/scroll   map   

  TRIP COMPUTER: 

  alert log  

  status of functions   

  BLUETOOTH TELEPHONE: 

  call list  

  call  

  phone book  

  private mode/hands-free mode  

  place call on hold/resume call   

  CD (MP3 OR AUDIO): 

  copy CD to JBX/stop copy  

  activate/deactivate Introscan  

  activate/deactivate random play  

  activate/deactivate repeat   

  RADIO: 

  enter a frequency  

  activate/deactivate RDS  

  activate/deactivate REG mode  

  hide  /display "Radio Text"   

  JUKEBOX: 

  select playlist  

  activate/deactivate Introscan  

  activate/deactivate random play  

  activate/deactivate repeat   

  USB: 

  copy USB to JBX/stop copy  

  eject USB  

  activate/deactivate Introscan  

  activate/deactivate random play  

  activate/deactivate repeat    

  DISPLAY ACCORDING TO THE CONTEXT 

  IN "ZOOM/SCROLL" MODE: 

  position info  

  select as destination  

  select as stage  

  store this position  

  exit map mode  

  guidance option   

212

1

1

22

33

55

77

44

66

88

03

  SELECTING A DESTINATION  

 Tip: for a detailed global view of the menus available, refer to the "Display fl ow charts" part of this 
section. 

 Press the MENU button. 

 Turn the dial and select the 
NAVIGATION GUIDANCE function. 

 Press the dial to confi rm the selection. 

 Turn the dial and select the 
DESTINATION CHOICE function. 

 Press the dial to confi rm the selection. 

 Press the dial to confi rm the selection. 

 Turn the dial and select the 
ENTER AN ADDRESS function. 

 When the country has been selected, 
turn the dial and select the TOWN 
function. 

TOWN

ENTER AN ADDRESS

DESTINATION CHOICE

         GPS 

213

99

11

11

12

12

13

13

15

15

10

10

14

14

 Press the dial to confi rm the selection. 

 Turn the dial and select the letters of 

the town one by one confi rming each 

time by pressing the dial. 

 Turn the dial and select OK. 

 Press the dial to confi rm the selection. 

 To speed up the process, the POST CODE can be 
entered instead of the name of the town. 
 Use the alphanumeric keypad to enter the letters and 

digits and "*" to correct. 

 Press the dial to confi rm the selection. 

 Select OK on the ENTER AN 

ADDRESS page. 

 Repeat steps 8 to 12 for the ROAD and N° functions. 

OK

OK

 Select the STORE function to record the address entered in a 

directory record and press the dial to confi rm the selection. 

 The points of interest (POI) indicate all of the service locations in the 

vicinity (hotels, various businesses, airports, ...). 

STORE

PARIS

POI

214

1

1

22

33

44

55

66

77

88

03

  GUIDANCE OPTIONS 

       GPS 

 The route presented depends directly on the guidance options. 
 Changing these options may completely change the route. 

 Press the MENU button. 

 Turn the dial and select the 
NAVIGATION GUIDANCE function. 

 Press the dial to confi rm the selection. 

 Turn the dial and select the 
GUIDANCE OPTIONS function. 

 Turn the dial and select the DEFINE 
CALCULATION CRITERIA function. 

 Press the dial to confi rm the selection. 

 Press the dial to confi rm the selection. 

GUIDANCE OPTIONS

DISTANCE/TIME

DEFINE CALCULATION CRITERIA

 Turn the dial and select, for example, 
the DISTANCE/TIME function. 

215

99

10

10

11

11

12

12

22

1

1

33

INFO function if you wish to receive 
the TRAFFIC INFO announcements. 

 Press the dial to confi rm the selection. 

 Select OK and press the dial to 

confi rm.  

TRAFFIC INFO

 Press the dial to confi rm the selection. 

 Tick this box for optimum operation of the traffi c information, 

diversions will be suggested. 

OK

 SETTING HAZARDOUS AREAS   
ALERT PARAMETERS 

 Turn the dial and select the 
SET HAZARDOUS AREAS 
PARAMETERS function, then press 

the dial to confi rm the warning 

message. Press the dial to confi rm 
the selection. 

 Select: 

   -   visual warnings, 

  -   audible warnings with an 

announcement duration (in seconds), 

  -   warn during guidance only, then 

select OK and press the dial to 

confi rm.  

 These functions are only available if the hazardous areas have 
been downloaded and installed on the system. 

 The hazardous areas are, in general, fi xed speed cameras, level 

crossings, dangerous uphill and downhill gradients. They may 

change on a regular basis.  

  Repeat steps 1 to 5 of the guidance option. 

OK

SET HAZARDOUS AREAS PARAMETERS

216

03

66

88

77

55

1

22

33

44

       GPS 

  GUIDANCE SPEECH SYNTHESIS 

 Press the dial to confi rm the selection. 

 During announcements, the volume of each speech synthesis 

function (guidance, traffi c information...) can be adjusted directly 

using the volume button. 

 Select the ADJUST SPEECH 

SYNTHESIS function and press the 

dial to confi rm. 

 Press the dial then adjust the volume 
of the speech synthesis or select the 
DEACTIVATE function and press the 

dial to confi rm.  

 Select OK and press the dial to 

confi rm. 

 Press the MENU button. 

 Turn the dial and select the 
NAVIGATION GUIDANCE function. 

 Press the dial to confi rm the selection. 

 Turn the dial and select the 
GUIDANCE OPTIONS function. 

GUIDANCE OPTIONS

ADJUST SPEECH SYNTHESIS

DEACTIVATE

OK

217

03

1

1

22

33

44

5

66

77

88

 Press the MENU button. 

 Turn the dial and select the MAP 
function. 

 Press the dial to confi rm the selection. 

 Turn the dial and select the
MAP DETAILS function. 
 Permits selection of the services 
which can be seen on the map 
(hotels, restaurants, hazardous 

areas...).  

  ACTIONS ON THE MAP 

MAP DETAILS

       GPS 

 Press the dial to confi rm the selection.

  Turn the dial and select the 
orientation of your choice. 

 Select OK and press the dial to 

confi rm.  

 Repeat steps 1 to 3 then turn the dial 
and select the MAP ORIENTATION 
function. 

  MAP ORIENTATION 

MAP ORIENTATION

3D VIEW

OK

NORTH ORIENTATION

VEHICLE ORIENTATION

 For improved visibility, beyond the scale of 6 miles (10 km), the map 
automatically switches to North Orientation. 

218

1

1

22

33

44

55

66

77

 Press the MENU button. 

 Press the dial to confi rm the selection. 

 Turn the dial and select the MAP 
function. 

 Turn the dial and select the MAP IN 
WINDOW or FULL SCREEN MAP 
tab. 

 Select OK   and press the dial to 

confi rm.  

 Press the dial to confi rm the selection. 

 Turn the dial and select the 

DISPLAY MAP function. 

  DISPLAYING THE MAP IN A WINDOW 
OR IN FULL SCREEN MODE 

 GPS 

DISPLAY MAP

FULL SCREEN MAP

OK

MAP IN WINDOW

219

03

  List of POI 

 GPS 

220

1

1

22

33

44

55

99

88

77

66

03

  ADDING A STAGE 

 During guidance, press the MENU 
button. 

 Turn the dial and select the 
NAVIGATION GUIDANCE function. 

 Press the dial to confi rm the selection. 

 Turn the dial and select the 

JOURNEY LEGS AND ROUTE 
function. 

JOURNEY LEGS AND ROUTE

 Select OK and press the dial to 

confi rm the order of the stages. 

 When the new address has been 
entered, select OK and press the dial 

to confi rm. 

 Enter for example a new address. 

 Select the ADD A STAGE function

(9 stages maximum) and press the 

dial to confi rm. 

 Press the dial to confi rm the selection. 

 Select STRICT (the stage must be completed in order to continue to 

the next destination) or PROXIMITY then press the dial to confi rm.  

ENTER AN ADRESS

ADD A STAGE

 GPS 


Content   ..  14  15  16  17   ..