Westfalia. Testing repair electrical manual - part 41
 

  Index      Westfalia     Westfalia (903.662) testing repair electrical manual in english


Search            copyright infringement  


Content   ..  39  40  41  42   ..


Westfalia. Testing repair electrical manual - part 41


AR86.60-D-0045A

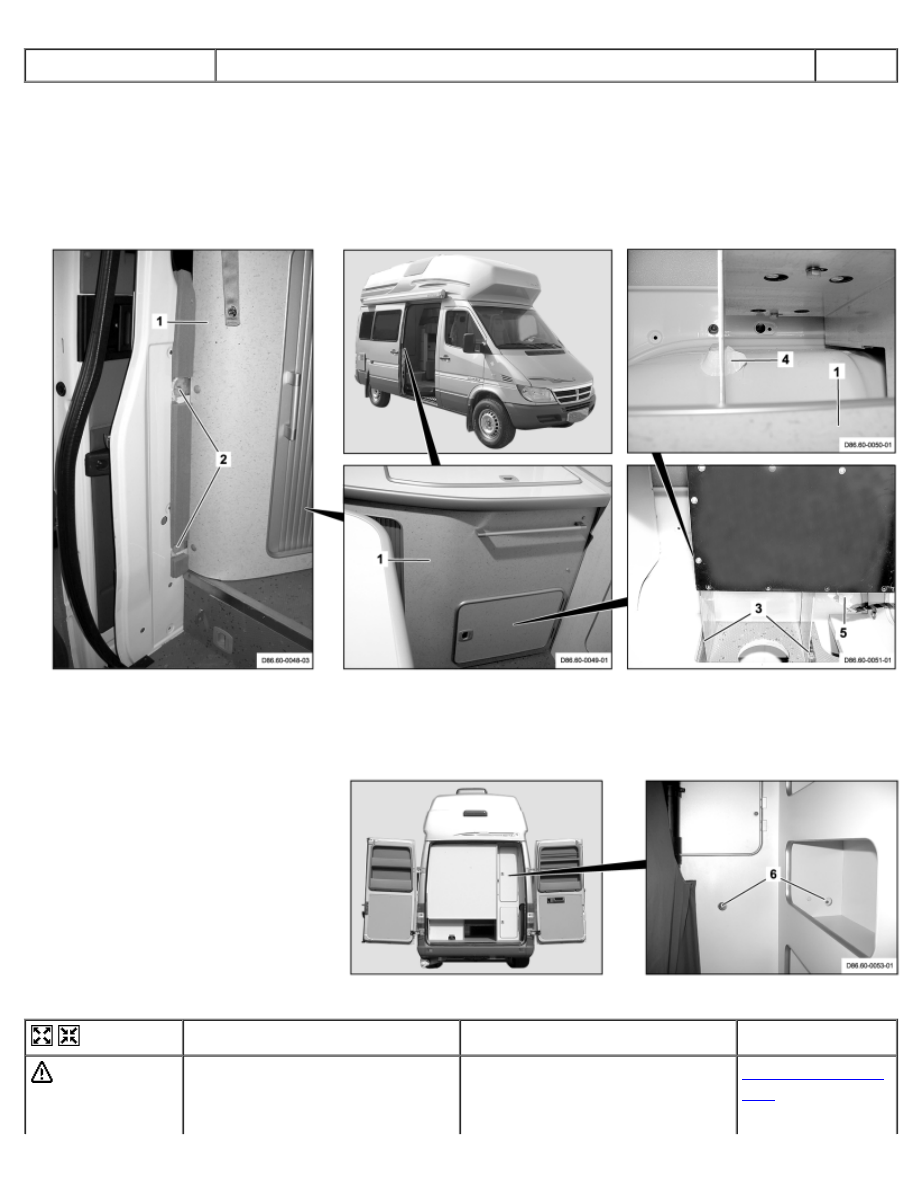
Remove/install stowage cabinet

12.5.04

MODEL  903.662


with CODE (ZU8) National version for USA


with CODE (Z29) "James Cook" touring camper, NAFTA


refrigerator box

D86.60-0052-09

1 Stowage cabinet 
2 Bolts


3 Bolts 
4 Adhesive


5 Electrical connector

6 Bolts


D86.60-0054-04


Remove/Install


 Danger!

Risk of injury caused by
scraping or cutting body parts on
sharp vehicle parts

Always wear protective gloves
when working on or near sharp
and non-deburred vehicle parts. 

AS00.00-Z-0017-
01B

Deburr repair panels.

 Danger!

Risk of injury caused by body
parts becoming jammed, pinched
or severed by doors, covers,
flaps or by loose components

Keep body parts well clear when
moving doors, covers, flaps and
components. Wear protective
gloves and protective shoes.

AS00.00-Z-0025-
01A

1

Switch off refrigerator box

 See Operator's Manual


2

Remove moldings from C-pillar

Right side

AR68.30-D-
4490A

3

Remove foam material seal in
area of bolts (2)

 Installation: Use new foam

material.


4

Unscrew bolts (2)


5

Remove refrigerator box cover


AR86.61-D-
1003A

6

Remove bolts (3)


7

Cut adhesive (4)

 Installation: Use suitable

adhesive


8

Disconnect electrical connector
(5) from refrigerator box


9

Unscrew bolts (6)


10

Remove stowage cabinet (1)

 Cover interior equipment to

prevent damaging the vehicle
interior equipment by the
stowage cabinet (1).


 Several helpers required


 Lift stowage compartment (1)

over kitchen cabinet


11

Install in the reverse order


12

Perform a function test

 Switch on refrigerator box

(see operating instructions)


AR86.60-D-0051A

Remove/install hanging cabinet

30.4.04

MODEL  903.662


with CODE (ZU8) National version for USA


with CODE (Z29) "James Cook" touring camper, NAFTA


lateral hanging cabinet

D86.60-0028-09

1 CO sensor 
2 Smoke sensor 
3 Operating console


4 Electrical connector 
5 Electrical connector 
6 Electrical connector


7 Vent grille 
8 Hanging cabinet 
9 Excrement tank fill level
indicator


Remove/Install


 Danger!

Risk of injury caused by body
parts becoming jammed, pinched
or severed by doors, covers,
flaps or by loose components

Keep body parts well clear when
moving doors, covers, flaps and
components. Wear protective
gloves and protective shoes.

AS00.00-Z-0025-
01A

 Danger!

Risk of death from coming into
contact with electrical parts of
the 110 V system Risk of injury
caused by burns, which can be
produced by electrical shocks or
by body parts coming in direct
contact with electrical currents.

Do not touch any conductive
parts of the 110 V system.

AS00.00-Z-0027-
01A

1

Switch off roof air conditioning

 See Operator's Manual


2

Remove CO sensor (1)


AR54.65-D-
0010A

3

Remove smoke sensor (2)


AR54.65-D-
0009A

4

Remove cover paneling in
hanging cabinet (8)

On right side

AR86.60-D-0051-
01A

5

Remove cover paneling in
hanging cabinet (8)

Right rear

AR86.60-D-0051-
01B

6

Remove control console (3)

Roof air conditioning

AR83.50-D-
6040A

7

Disconnect electrical connector
(4) from right interior illumination


8

Disconnect electrical connector
(15) from 110-V socket


9

Remove excrement tank fill level
indicator (9)


AR54.30-D-
6350A

10

Disconnect electrical connector
(6) from left interior illumination

 Through free opening in

excrement tank fill level indicator
(9).


11

Remove vent grille (7)

On lateral hanging cabinet

AR83.10-D-
0011A

12

Loosen hanging cabinet (8)

Lateral hanging cabinet

AR86.60-D-0051-
02A


 Helper required.


13

Remove all electrical lines from
lateral hanging cabinet (8)

 Helper required.


14

Completely lower lateral hanging
cabinet (8) at rear

 Helper required.


15

Remove hanging cabinet (8)

 Helper required.


 Avoid damage by canting

lateral hanging cabinet (8)


16

Install in the reverse order


17

Perform function check

 All electrical components on

lateral hanging cabinet (8).


AR86.60-D-0051B

Remove/install hanging cabinet

25.6.04

MODEL  903.662


with CODE (ZU8) National version for USA


with CODE (Z29) "James Cook" touring camper, NAFTA


Longitudinal hanging cabinet

D86.60-0119-09

1 Hanging cabinet 
2 Electrical connectors 
3 Range hood bleed hose


4 Nuts 
5 Screw 
6 Bracket


7 Bolts 
8 Hanging cabinet


Remove/Install


 Danger!

Injury hazard from doors,
covers, flaps or loose
components pinching or cutting
off extremities

No body parts should be within
the motion area when moving
doors, covers, flaps and
componentsAlways wear
protective gloves

AS00.00-Z-0025-
01A

 Danger!

Risk of death from coming into
contact with electrical parts of
the 110 V system Injury hazard
from burns caused by an electric
shock or direct power flow
through body parts

Do not touch voltage conducting
parts in the 110 V system.

AS00.00-Z-0027-
01A

1

Remove hanging cabinet (1)

Lateral hanging cabinet

AR86.60-D-

0051A

2

Remove floor in hanging cabinet
(8)


AR86.60-D-0050-
01A

3

Disconnect electrical connectors
(2).


4

Remove range hood bleed hose
(3)


5

Unscrew nuts (4)


6

Unscrew bolt (5) from bracket (6)  


7

Unscrew bolts (7).


8

Remove hanging cabinet (8)

 Helper required


9

Install in the reverse order


AR86.60-D-0061A

Remove/install wardrobe storage shelf

21.7.04

MODEL  903.662


with CODE (ZU8) National version for USA


with CODE (Z29) "James Cook" touring camper, NAFTA

D86.60-0156-09

1 Bolts


2 Storage shelf


3 Screw


Remove/Install


 Danger!

Injury hazard from doors,
covers, flaps or loose
components pinching or cutting
off extremities

No body parts should be within
the motion area when moving
doors, covers, flaps and
componentsAlways wear
protective gloves

AS00.00-Z-0025-
01A

1

Remove wardrobe flap

Front flap

AR86.60-D-
0062A

2

Remove clothes rail in wardrobe


AR86.60-D-
0063A

3

Remove caps from bolts (1)


4

Remove screws (1)


5

Remove wardrobe flap

Rear flap

AR86.60-D-
0062B

6

Remove bolt (3)


7

Mask frame of rear opening of
wardrobe with adhesive tape


8

Pull storage shelf (2) toward
center (arrow)


9

Tilt storage shelf (2)


10

Remove storage shelf (2) from
wardrobe


11

Install in the reverse order


Content   ..  39  40  41  42   ..