Westfalia. Testing repair electrical manual - part 25
 

  Index      Westfalia     Westfalia (903.662) testing repair electrical manual in english


Search            copyright infringement  


Content   ..  23  24  25  26   ..


Westfalia. Testing repair electrical manual - part 25


AR83.50-D-5120A

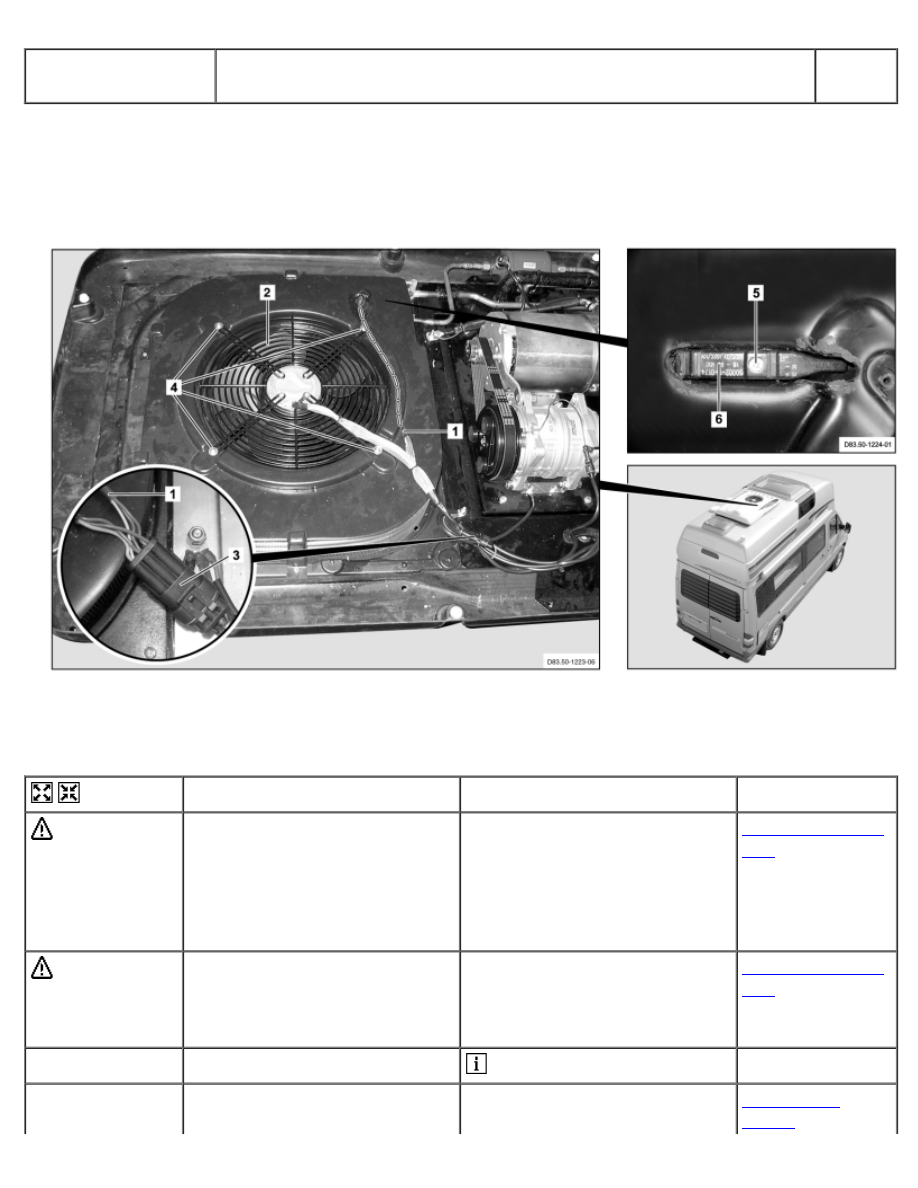
Remove/install condenser's temperature switch in the air
conditioning (roof equipment)

22.6.04

MODEL  903.662


with CODE (ZU8) National version for USA


with CODE (Z29) "James Cook" touring camper, NAFTA

D83.50-1225-09

1 Cable harness 
2 Condenser fan


3 Electrical connector 
4 Bolts


5 Screw 
6 Temperature switch


Remove/Install


Danger!

Risk of death caused by falling
from vehicle roof. Risk of injury
to other persons caused by
falling objects during work in roof
area.

Perform works on or in the area
of the vehicle roof only on
suitable auxiliary implements
(ladders, scaffolding, assembly
platforms). Secure working area
adequately.

AS65.00-Z-0002-
01B

Danger!

Risk of injury through leaking
refrigerant and through contact
with components of the
refrigerant system

Wear protective clothing, safety
gloves and safety glasses

AS86.61-Z-0002-
01A

1

Switch off roof air conditioning

 See Operating Instructions


2

Remove cover of roof air
conditioning on vehicle roof


AR83.30-D-
1010A

3

Remove tie strap

 Remove in area of wiring

harness (1) from temperature
switch (6) to electric coupling (3).


4

Disconnect electrical connector
(3)


5

Separate electrical lines from
wiring harness (1) of temperature
switch (6)

 Separate the electrical line

approx. 5 cm in front of the
electrical coupling (3).


 Installation: Connect

electrical lines of temperature
switch (6) with electrical coupling
(3) via solder connector.


6

Remove bolts (4).


7

Remove condenser fan (2)


8

Remove sealant from
temperature switch (6)


9

Remove bolt (5).


10

Remove temperature switch (6).

 In doing this, pull wiring

harness (1) of temperature
switch (6) out of housing of roof
air conditioning.


11

Install in the reverse order


12

Perform a function test

 Switch roof air conditioning

on, off (see operator's manual).


AR83.50-D-6020A

Remove/install control unit of air conditioning (roof equipment)

28.4.04

MODEL  903.662


with CODE (ZU8) National version for USA


with CODE (Z29) "James Cook" touring camper, NAFTA

1 Roof air conditioning control unit

2 Electrical connector 
3 Electrical connector 
4 Electrical connector


D83.50-1163-06


Remove/Install


1

Switch off roof air conditioning (8)

 See Operating Instructions


2

Disconnect electrical connector
(2)


3

Disconnect electrical connector
(3)


4

Disconnect electrical connector
(4)


5

Remove roof air conditioning
control unit (1)

 The roof air conditioning

control unit (1) is attached to the
vehicle floor with Velcro strip.


6

Install in the reverse order


7

Perform a function test

 Switch roof air conditioning

on/off (see operator's manual).


AR83.50-D-6030A

Remove/install the air conditioning relay (roof equipment)

28.4.04

MODEL  903.662


with CODE (ZU8) National version for USA


with CODE (Z29) "James Cook" touring camper, NAFTA


Roof air conditioning load relay at the switching power supply unit

D83.50-1160-09

1 Switching power supply unit
cover
 
2 Load relay 
3 Electrical line


4 Electrical line 
5 Electrical line 
6 Electrical line


7 Electrical line 
8 Nuts


Remove/Install


 Danger!

Risk of death from coming into
contact with electrical parts of
the 110 V system. Risk of injury
caused by burns, which can be
produced by electrical shocks or
by body parts coming in direct
contact with electrical currents.

Do not touch any conductive
parts of the 110 V system.

AS00.00-Z-0027-
01A

1

Switch off roof air conditioning

 See Operator's Manual


2

Disconnect external 110 V feed
line from the vehicle

 See Operator's Manual


3

Remove web-type fuse

Of the roof air conditioning in the

AR54.15-D-

engine compartment

2100B

4

Remove switching mode power
supply unit cover (1)


AR54.21-D-0030-
01A

5

Mark installation position of
electrical lines (3, 4, 5, 6, 7) on
load relay (2)

 Swapping the electrical lines

(3, 4, 5, 6, 7) may result in short
circuits and thus in the
destruction of electrical
components.


6

Unscrew nut at electrical line (3)


7

Detach electrical line (3) from
load relay (2)


8

Unscrew bolt at electrical line (4)


9

Detach electrical line (4) from
load relay (2)


10

Unscrew bolt at electrical line (5)


11

Detach electrical line (5) from
load relay (2)


12

Unscrew nut at electrical line (6)


13

Detach electrical line (6) from
load relay (2)


14

Unscrew nut at electrical line (7)


15

Detach electrical line (7) from
load relay (2)


16

Unscrew nuts (8).

 Installation: Replace self-

locking nuts (8).


17

Remove load relay (2)


18

Install in the reverse order


19

Perform a function test

 Switch roof air conditioning

on and off (see operator's
manual).


AR83.50-D-6030B

Remove/install the air conditioning relay (roof equipment)

28.4.04

MODEL  903.662


with CODE (ZU8) National version for USA


with CODE (Z29) "James Cook" touring camper, NAFTA


Roof air conditioning load relay at refrigerant compressor

D83.50-1155-08

1 Load relay 
2 Electrical line


3 Electrical line 
4 Electrical line


5 Electrical line 
6 Nuts


Remove/Install


 Danger!

Risk of death from coming into
contact with electrical parts of
the 110 V system. Risk of injury
caused by burns, which can be
produced by electrical shocks or
by body parts coming in direct
contact with electrical currents.

Do not touch any conductive
parts of the 110 V system.

AS00.00-Z-0027-
01A

 Danger!

Risk of death caused by falling
down from the roof of the
vehicle. Risk of injury to other
persons caused by falling objects
during work in the area of the
roof.

Work on or in the area of the
vehicle's roof may only be
performed on suitable equipment
(ladders, scaffolds, lifting
platforms). Sufficiently secure
the area to be worked in.

AS65.00-Z-0002-
01B

 Danger!

Risk of injury caused by exiting
refrigerant and by contact with
the components of the refrigerant
system

Wear protective clothing, safety
gloves and safety glasses

AS86.61-Z-0002-
01A

1

Switch off roof air conditioning


 See Operator's Manual

2

Disconnect external 110 V feed
line from the vehicle

 See Operator's Manual


3

Remove web-type fuse

Of the roof air conditioning in the
engine compartment

AR54.15-D-
2100B

4

Remove cover for roof air
conditioning on vehicle roof


AR83.30-D-
1010A

5

Mark installation positions of
electrical lines (2, 3, 4, 5) on load
relay (1)

 Swapping the electrical lines

(2, 3, 4, 5) may result in short
circuits and thus in the
destruction of electrical
components.


6

Unscrew nut at electrical line (2)


7

Detach electrical line (2) from
load relay (1)


8

Unscrew nut at electrical line (3)


9

Detach electrical line (3) from
load relay (1)


10

Unscrew bolt at electrical line (4)


11

Detach electrical line (4) from
load relay (1)


12

Unscrew bolt at electrical line (5)


13

Detach electrical line (5) from
load relay (1)


14

Screw off nuts (6)

 Installation: Replace self-

locking nuts (6).


15

Remove load relay (1)


16

Install in the reverse order


17

Perform a function test

 Switch roof air conditioning

on and off (see operator's
manual).


AR83.50-D-6040A

Remove/install air conditioning control console (roof equipment)

29.4.04

MODEL  903.662


with CODE (ZU8) National version for USA


with CODE (Z29) "James Cook" touring camper, NAFTA


Roof air conditioning

D83.50-1179-09

1 Electrical connector 
2 Electrical connector


3 Bolts 
4 Temperature sensor


5 Control console


Remove/Install


1

Switch off roof air conditioning
(8)

 See Operating Instructions


2

Remove wall cabinet cover panel

In right side of wall cabinet

AR86.60-D-0051-
01A

3

Remove wall cabinet cover panel

In right rear of wall cabinet

AR86.60-D-0051-
01B

4

Remove tie straps from electrical
lines of control console (5)

 Installation: use new tie

straps.


5

Disconnect electrical connector
(1)


6

Disconnect electrical connector
(2)


Content   ..  23  24  25  26   ..