Emergency War Surgery (2004) - page 3
Aeromedical Evacuation
Due to the complexity of the AE system, physicians must
identity points of contact (POCs) (local Flight Surgeons
[FSs], AELT, aeromedical staging elements, PMRC); verify
and test lines of communication; and rehearse patient
evacuation drills and procedures, before the actual need
arises.
Patient Stability. Patients validated for transport by AE must
be stabilized as well as possible (secure airway, controlled
hemorrhage, treated shock, and immobilized fractures).
ο Communicate the condition, AE category (ambulatory or
litter), and movement precedence (Table 4-1) of the patient
to the PMRC, as communications assets allow. See PMRC
contact information below.
Commercial
Military
PMRC
telephone number telephone number
Global-Scott AFB, IL
1-800-303-9301 or
DSN 779-4200 or 8184
1-800-874-8966
EUCOM Theater-
011-49-6371-47-2264
DSN 314-480-2264 or 2235
Ramstein Air Force
or 2235
Base, Germany
PACOM (Hickam AFB
808-448-8734
DSN 448-8734
Hawaii)
ο To ensure optimum care, communicate with the accepting
physician, and provide diagnosis, care rendered, and
subsequent medical care plan (next 24-48 h).
ο Ensure the patient has adequate quantities of supplies and
medications for duration of transfer (at least 72 h).
Local Flight Surgeon Responsibilities.
ο Authority for determining whether patients are physio-
logically ready for air transport.
ο Resource for AE system information, communication, and
coordination.
4.7
Emergency War Surgery
AE Process
Activity
Location at Which the Activity Occurs
Request for AE mission (see
Originating physician.
end of chapter for format).
Validation for Aeromedical
PMRC (establishes AE requirement).
Evacuation.
Clearance to move by air.
MTF (referring physician and local FS).
Request versus Requirement. AE requests and patient
movement requirements are different. Physicians at
originating MTFs submit requests for movement, timing,
destination, suggested support therapies, and so forth. Only
the validating Flight Surgeon (usually located at PMRC; not
the local FS) and the PMRC can validate those requests, which
then become AE requirements.
Validation versus Clearance for USAF AE.
ο Aeromedical evacuation clearance is a medical care event;
validation is a logistical event.
ο Clearance is a decision between the referring physician
and the local FS, addressing
♦ Description of the medical condition of the patient.
♦ Probability that patient can survive transit through an
aviation environment.
♦ What the patient needs to make the trip safely.
♦ Enroute medical capability requirements.
Key Steps for USAF AE Patient Request.
ο Contact local FS and AE liaison for clearance consultation.
ο Determine the patient’s AE category, based on diagnosis
and ability to self-help in an emergency during flight.
ο Determine need for CCATT (see below). The CCATT adds
an additional level of support to the AE system for
movement of stabilized patients who require a higher level
of medical therapy or have the potential to experience
significant deterioration during movement. The CCATT
physician is the clinical authority and, with the other team
members, is responsible for documenting and providing
4.8
Aeromedical Evacuation
care. CCATT members may be called on to consult and/
or assist in the care of other patients.
ο A four-person burn transport team can augment a CCATT
team as required for inhalation injury and/or severe burns.
ο Determine if special requirements exist for transport; eg,
CAR, and splinting.
ο Determine patient movement items (PMI) required (eg,
ventilators, pulse oximeters, among others). Flight surgeon
must verify that all items accompanying the patient are
cleared for in-flight use.
ο Determine the patient’s movement precedence.
ο Submit request.
Critical Care Air Transport Teams
Intensivist physician.
Capable of providing short term life-support, including advanced
airway management, ventilator management, and limited invasive
(nonoperative) procedures.
Trained in critical care medicine, anesthesiology, or emergency
medicine.
Critical care or emergency medicine nurse.
Experienced in managing patients requiring mechanical ventilation,
invasive monitoring, and hemodynamic support.
Cardiopulmonary technician.
Experienced in management of patients requiring mechanical
ventilation, and invasive monitoring.
Experienced in troubleshooting ventilatory support and monitoring
systems.
4.9
Chapter 5
Airway/Breathing
Introduction
Skillful, rapid, assessment and management of airway and
ventilation are critical to preventing morbidity and mortality.
Airway compromise can occur rapidly or slowly and may recur.
Frequent reassessment is necessary. Preventable causes of death
from airway problems in trauma include the following:
Failure to recognize the need for an airway.
Inability to establish an airway.
Failure to recognize the incorrect placement of an airway.
Displacement of a previously established airway.
Failure to recognize the need for ventilation.
Aspiration of the gastric contents.
Initial airway management at any level, but especially outside
of medical treatment facilities (MTFs).
Immediate goal: Move tongue, pharyngeal soft tissues, and
secretions out of airway. Until a formal airway is established,
place patients in the lateral or prone position (rescue position).
Chin-lift and head tilt: Place fingers under the tip of the
mandible to lift the chin outward from face.
Two-Handed Jaw Thrust: Place both hands behind the angles
of the mandible and displace forward. This method can be
used on the patient with cervical injury.
Oropharyngeal airway:
ο Insert oral airway upright if a tongue depressor is used
(preferred method).
ο Keep the airway inverted past the tongue then rotate 180°.
ο Too small an airway will not alleviate the obstruction.
Too long an airway may fold the epiglottis caudally,
worsening the obstruction.
ο Estimate airway size by distance from corner of mouth
to ear lobe.
ο Oral airways are not used in conscious patients.
5.1
Emergency War Surgery
Nasopharyngeal airway.
ο Pass lubricated nasal airway gently through one nostril.
ο Not used in suspected facial or basal skull injuries.
ο Is tolerated by conscious patients.
Field expedient.
ο Pull tongue forward and safety pin or suture it to corner
of mouth.
Cricothyrotomy.
Ventilation
Ventilate patient with bag valve mask (BVM).
ο Bring the face into the mask rather than pushing the
mask onto the face.
ο The chin-lift and head tilt are also employed during mask
ventilation unless they are contraindicated due to
cervical spine precautions.
Assess air movement during mask ventilation by observing
rise and fall of the chest, auscultation, absence of a mask
leak, compliant feel of self-inflating bag, and stable oxygen
saturation.
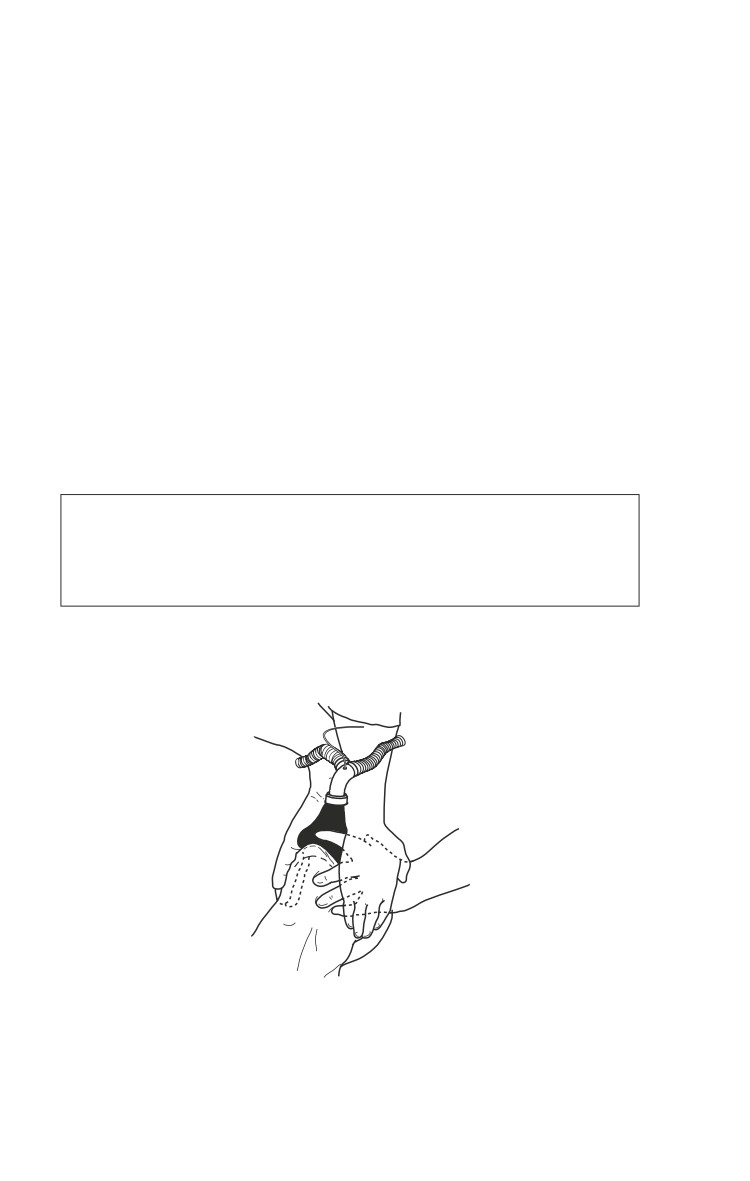
ο If air movement is not achieved, use two-person mask
ventilation (Fig. 5-1).
Fig. 5-1. Two-person mask ventilation.
5.2
Airway/Breathing
♦ One person lifts the jaw aggressively at the angles of the
mandible; the other holds the mask and ventilates.
Alternatively, one person may lift and hold the mandible
with both hands, while at the same time holding down
the mask on both sides. The other person ventilates the
patient.
♦ If air movement is still not present, obtain a definitive
airway.
ο Unsuccessful and aggressive attempts at ventilation may
result in inflation of the stomach, placing the patient at
increased risk for vomiting and aspiration.
Positive pressure ventilation can convert a simple
pneumothorax into a tension pneumothorax. Perform
frequent assessment and have equipment available for
needle chest decompression.
Orotracheal Intubation
Rapid Sequence Intubation (RSI)—7 steps.
1. Preoxygenate with 100% oxygen by mask.
2. Consider fentanyl—titrate to maintain adequate blood
pressure and effect (2.0-2.5 µg/kg).
3. Cricoid Pressure—Sellick maneuver until endotracheal tube
(ETT) placement is confirmed and balloon is inflated.
4. Induction Agent: etomidate 0.1-0.4 mg/kg IV push.
5. Muscle Relaxant: succinylcholine 1.0-1.5 mg/kg IV push.
6. Laryngoscopy and orotracheal intubation.
7. Verify tube placement.
Direct laryngoscopy technique.
ο Ensure optimal “sniffing” position is achieved unless
contraindicated by cervical spine injury.
ο Open the mouth by scissoring the right thumb and
middle finger.
ο Hold the laryngoscope in the left hand and insert the
blade along the right side of the mouth, slightly
displacing the tongue to the left.
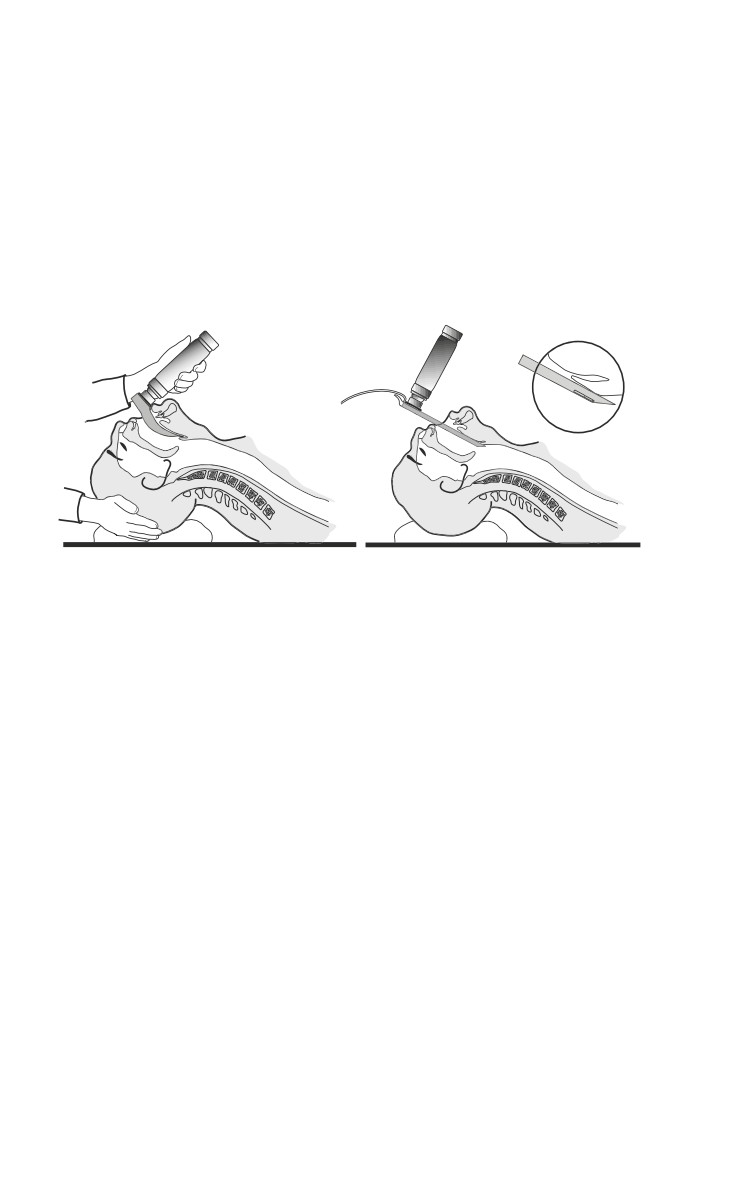
♦ Macintosh (curved) blade: Advance the tip of the blade
5.3
Emergency War Surgery
into the space between the base of the tongue and the
epiglottis (valecula). Apply force at a 30°-45° angle,
lifting the entire laryngoscope/blade, without rocking
it backward (Fig. 5-2).
♦ Miller (straight) blade: Advance the tip of the blade into
the posterior oropharynx, picking up the epiglottis and
tongue base anteriorly and laterally, and apply a force
vector like that of the Macintosh blade. Avoid rocking
the laryngoscope backward (Fig. 5-3).
Fig. 5-2. Use of curved blade
Fig. 5-3. Use of straight blade
laryngoscope.
laryngoscope.
ο Visualize the vocal cords.
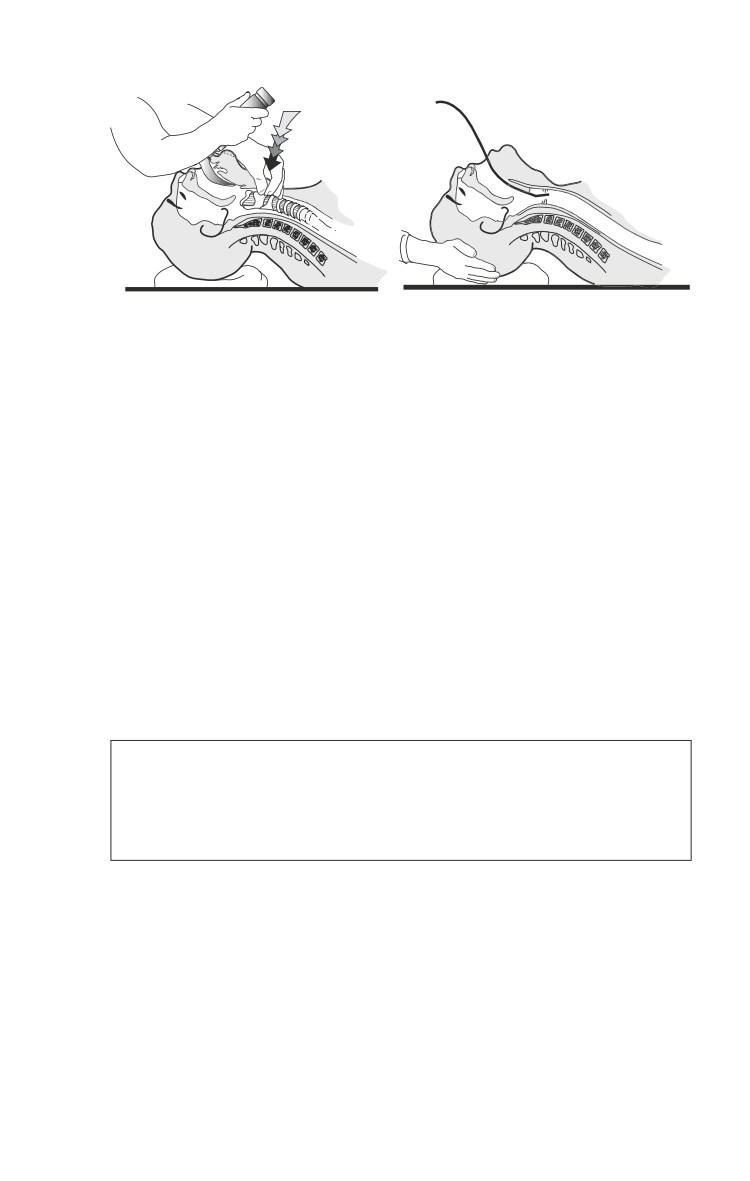
ο Consider the “BURP” maneuver when the laryngoscopic
view is poor (Fig. 5-4).
♦ “Backward-Upward-Rightward-Pressure” of the larynx,
also referred to as external laryngeal manipulation.
♦ Place the fingers of an assistant onto the larynx with
your right hand and manipulate the glottic opening into
the field of view.
♦ Assistant then holds the position for intubation.
Eschmann stylet or Gum Elastic Bougie (GEB) (Fig. 5-5).
♦ Blindly guide the tip of the stylet beneath the epiglottis,
then anteriorly through the vocal cords.
♦ Advance the bougie deeply. Placement into the trachea
results in the sensation of tracheal ring “clicks”, and
turning of the stylet as it passes airway bifurcations.
5.4
Airway/Breathing
Force Vector
Fig. 5-4. BURP maneuver.
Fig. 5-5. Eschmann stylet in place.
♦ The patient may cough as the stylet passes through the
airway.
♦ When passed beyond the trachea, the stylet will stop at
a terminal bronchus. If placed into the esophagus, it will
pass indefinitely into the stomach without any tactile
feedback.
♦ The ETT is guided over the stylet into the airway, and
tracheal intubation is confirmed.
o Advance the ETT between the vocal cords, withdraw
stylet, and advance the ETT to 20-21 cm at the teeth for
adult females, 22-23 cm for adult males. Deeper
placement may result in right mainstem intubation.
o Confirm placement of the ETT in the trachea.
o Auscultate over the axilla to ensure breath sounds are
equal.
Avoid making more than 3 attempts at direct laryngoscopy.
Excessive attempts may result in airway trauma and
swelling, potentially turning a “cannot intubate” urgency
into a “cannot intubate-cannot ventilate”emergency.
Difficult Airway
After three unsuccessful attempts at direct laryngoscopy,
abandon the technique and try alternatives.
Alternative intubation techniques.
ο Tactile intubation.
♦ Requires no instruments.
5.5
Emergency War Surgery
♦ No light use—good in light control situations.
♦ Slide hand closest to patient over tongue to hold it down.
♦ Lift epiglottis with first two fingers.
♦ Slide ETT along the “v” between the two fingers into
the airway.
ο
Lighted stylet or “light wand” intubation.
♦ Flexible wand, lighted at the tip, is placed through the
ETT.
♦ Wand is advanced by tactile guidance into t h e
trachea.
♦ Position in trachea is verified by transillumination.
♦ The ETT is advanced over the wand.
ο
Flexible fiberoptic oral or nasal intubation.
ο
Retrograde wire intubation.
ο
Rigid fiberoptic intubation (Bullard laryngoscope).
ο
Alternative Airways.
♦ May NOT be definitive airways.
♦ Allow for oxygenation and ventilation when standard
airways cannot be placed.
♦ “Fastrach” model laryngeal mask airway (LMA).
♦ Esophageal-tracheal combitube (ETC).
Perform a surgical airway.
Wake the patient up and attempt an awake technique if
possible.
Surgical Cricothyrotomy
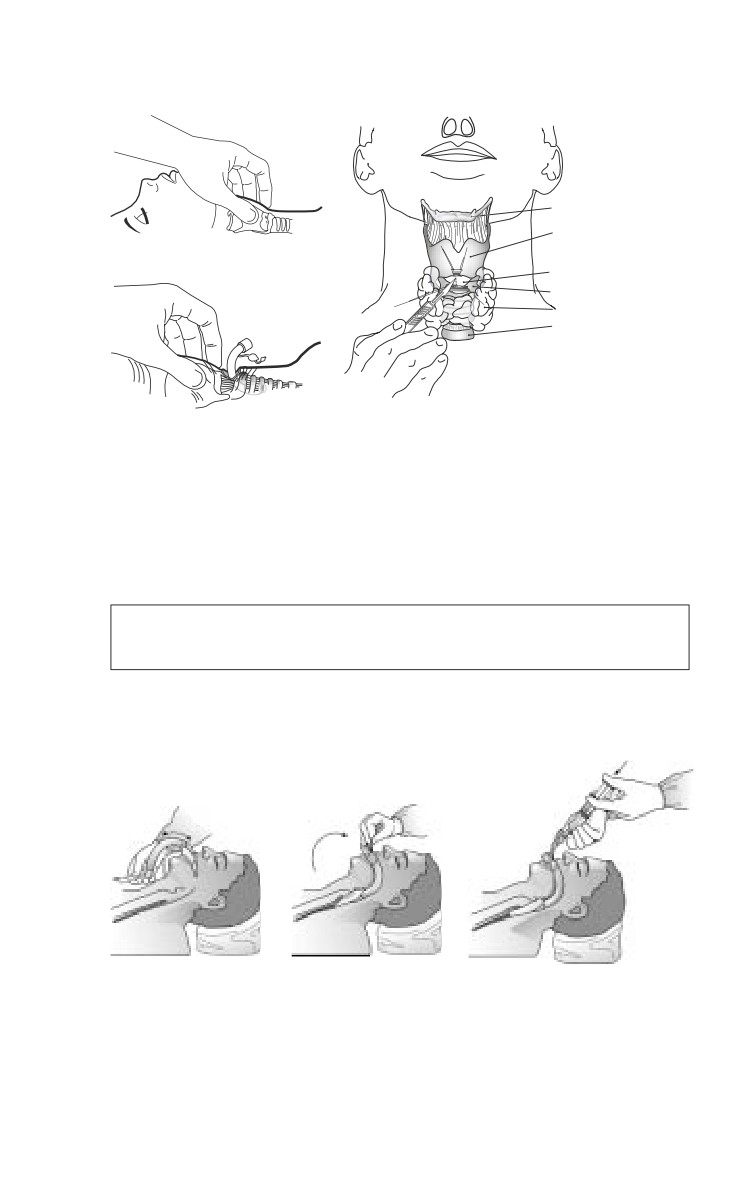
Identify cricothyroid membrane (between cricoid ring and
thyroid cartilage [Fig. 5-6a]).
Prep skin widely.
Grasp and hold trachea until airway is completely in place.
Make a vertical SKIN incision down to the cricothyroid
membrane (a No. 10 or 11 blade).
Bluntly dissect the tissues to expose the membrane.
Make a horizontal MEMBRANE incision (Fig. 5-6b).
Open the membrane with forceps or the scalpel handle.
Insert a small, cuffed ETT, 6.0-7.0 inner diameter (ID), to just
above the balloon (Fig. 5-6c).
Confirm tracheal intubation.
5.6
Airway/Breathing
a
b
Hyoid Bone
Thyroid Cartilage
c
Cricothyroid
Membrane
Cricoid cartilage
Thyroid gland
Trachea
Fig. 5-6 a,b,c. Steps of surgical cricothyrotomy.
Suture the ETT in place, and secure it with ties that pass
around the neck.
Laryngeal Mask Airway
Do NOT use in penetrating upper airway trauma or central
airway obstruction (foreign body).
Insert blindly without a laryngoscope. LMA rests over the
laryngeal inlet (Fig. 5-7).
a
b
c
Fig. 5-7 a,b,c. Fastrach laryngeal mask airway placement.
Illustration courtesy of LMA North America, Inc.
5.7
Emergency War Surgery
May be used alone or as a conduit to advance an ETT.
Compared to an ETT, the LMA supports less airway
pressures, and offers less aspiration protection.
Check LMA cuff, then deflate it until the down side (inner)
surface is smooth and flat; lubricate the pharyngeal (upper)
side of LMA.
The sniffing position works best, but LMA may be inserted
in different patient positions.
ο Insert LMA (3-4 for women, 4-5 for men) with upper
(pharyngeal) side gliding along the hard palate, down
and around into the posterior pharynx—this allows
proper direction and reduces the chance of cuff folding.
ο Do NOT push the LMA directly back into the mouth—
this folds the cuff and prohibits proper placement.
ο Inflate cuff with 20-30 cc of air via syringe—slight
upward movement of LMA tubing is seen.
ο Secure the LMA.
Blind nasal-tracheal intubation
Contraindications: Coagulopathy, midface trauma, basilar
skull fracture, and suspected elevated intracranial pressure.
Nasal-trachael intubation is better tolerated than orotracheal
techniques and requires less sedation and no paralysis.
Prepare the nasopharynx and larynx (as conditions allow).
ο Spray vasoconstrictor into the nostril that appears largest
and most patent.
ο Insert a nasal trumpet soaked in lidocaine gel and leave
in place for a brief period.
ο Apply Cetacaine spray to oropharynx.
ο Administer a transtracheal injection of 4 cc lidocaine via
cricothyroid membrane.
Insert an ETT (~ 7.0 ID for adults) slowly into the nostril,
perpendicular to the face.
Advance the ETT slowly past the nasal turbinates and around
the curve of the posterior nasopharynx.
Do not use excessive force!
5.8
Airway/Breathing
The ETT is advanced as breath sounds of increasing volume
are heard at the distal end of the tube.
The ETT is advanced beyond the vocal cords into the trachea.
If the tube fails to advance into the trachea, several maneuvers
can be employed.
ο Tilt the head.
ο Apply external, downward pressure to the larynx.
ο Inflate the ETT balloon to help center the tube, then deflate
and advance it once it is engaged in the glottic opening.
5.9
Chapter 6
Hemorrhage Control
“The hemorrhage that takes place when a main artery is divided is
usually so rapid and so copious that the wounded man dies before
help can reach him.” - COL H.M. Gray, 1919
Stop the Bleeding!
Hemorrhage is the leading cause of preventable death on the
battlefield.
ο 90% of combat fatalities occur forward of medical care.
ο Half of these casualties bleed to death, 1/5 from extremity
trauma (10%-15% of all deaths).
ο Although bleeding is a main cause of death, the vast
majority of wounds do not have life-threatening bleeding.
Under Fire
Get the patient out of the line of fire — prevent further injury.
Control obvious external bleeding once out from under fire.
If you must remain under fire, stop external bleeding with
use of a tourniquet.
Do not endanger the casualty or yourself with
unnecessary treatment.
Stay engaged in the firefight if necessary.
Keep Your Head Down
Sites of Hemorrhage
External.
ο Extremity injury (most common cause of massive external
blood loss in combat), scalp, and torso wounds.
ο Usually associated with an open fracture or amputation.
Direct Pressure Is Central to Treatment
Internal.
♦ Chest, abdomen, pelvis, and closed extremity fractures.
6.1
Emergency War Surgery
♦ High mortality if the casualty is not expeditiously
transported and salvage surgical procedures performed.
♦ Controlled (hypotensive) resuscitation may be
necessary.
Internal Torso Bleeding Requires Surgical Control
Treatment—First Responder
External hemorrhage from extremity wounds.
ο Direct pressure at site of injury is the most effective and
preferred method of hemorrhage control.
♦ If direct pressure fails to stop the hemorrhage, it signifies
deep, massive, or arterial injury, and will require surgery
or advanced hemostatic agents.
♦ Hold pressure for at least 5 minutes before looking to
see if it is effective.
♦ Impaled foreign bodies should not be removed because
profuse bleeding may occur.
Pitfall: A Bandage Does Not Equal Direct Pressure!
A bandage may wick blood from the wound without
stopping the bleeding.
A bandage hides ongoing bleeding.
Hemostatic bandages currently being developed may stop
bleeding.
♦ Elevation of the extremity will decrease most
bleeding—this is an under-appreciated technique.
♦ Point compression of the proximal artery.
Pitfalls of Blind Clamping
Blind clamping into the wound is more likely to cause
additional injury than to control bleeding.
Risk-Benefit Decision: Judgment that other measures are
not successful should be exercised before applying clamps
in a wound. Field wound exploration is not recommended.
6.2
Hemorrhage Control
◊ May help slow bleeding while attempting to gain
better control at the wound site.
◊ May require compression at the pressure point for
up to 20 minutes to provide hemostasis.
◊ Table 6-1 shows the recognized pressure points.
Table 6-1. Recognized pressure points.
Bleeding
Lower
Site
Hand
Forearm Arm Leg
Thigh
Artery Radial/Ulnar Brachial Axillary Popliteal Femoral
Pressure Wrist
Inner
Axilla Behind Below
Point
upper
knee
groin
arm
crease
Tourniquet May Be First Choice in Combat
♦ A tourniquet should be applied if previous techniques
fail.
◊ Use a tourniquet early, rather than allow ongoing
blood loss. Substitutes for issued tourniquet include
belt, torn cloth, gauze, and rope, among others.
◊ Rapid method to secure hemorrhage control.
◊ Does not require constant attention; allows first
responder to care for others — extends resources.
◊ Tourniquets should not be removed until the
hemorrhage can be reliably controlled by advanced
hemostatic agents or until arrival at surgery.
◊ Tourniquet placement on the forearm or leg may not
compress the vessels, which lie between the double
long bones. Tourniquets on the upper extremity
should be placed on the upper arm and if bleeding
from the lower extremity is not controlled by a
tourniquet on the leg, it should be moved to the thigh
where the vessel may be more easily compressed.
6.3
Emergency War Surgery
Pitfalls of Tourniquet
Application for more than 2 hours may increase limb loss.
Risk-benefit decision: Don’t avoid a tourniquet in order
to save a limb, and then lose a life! Use of tourniquet
does not always lead to limb loss.
♦ Clamping vessels: If there is continued bleeding and a
damaged vessel can be readily identified, a hemostat
may be used to clamp the vessel.
♦ Limb splints will decrease bleeding associated with
fractures and soft tissue injury by aligning, stabilizing,
and returning the limb to length.
♦ Military Anti-Shock Trousers (MAST) possible uses.
◊ Controls hemorrhage from massively injured/
mangled lower extremities.
◊ Provides temporary stabilization of pelvic fractures
to decrease hemorrhage.
◊ Splints fractures of lower extremities.
Pitfalls of MAST
Protracted MAST use leads to compartment syndrome and
ischemic limbs.
Respiratory compromise occurs due to diaphragmatic
elevation.
Increased torso bleeding.
Pressure changes within aircraft (caused by altitude
changes) affect inflation pressure.
Requires close monitoring in aircraft.
♦ Scalp bleeding: can be significant due to the rich
vasculature of the scalp.
◊ Responds to direct pressure.
◊ Compression dressings must be applied if you cannot
provide ongoing direct pressure.
◊ Difficult to apply and maintain direct pressure.
6.4
Hemorrhage Control
◊ Requires circumferential head application.
◊ Vertical mattress suture closure sometimes is
necessary to control bleeding scalp edges.
◊ A readily identified bleeding vessel can be clamped,
but the wound should generally not be explored.
◊ Avoid pushing fragments into brain when applying
pressure, but control hemorrhage even at the expense
of exposed brain.
◊ Protection of exposed brain with nonadherent gauze
or plastic can minimize injury.
♦ Internal bleeding.
◊ Blood loss into the abdomen or chest cannot be
controlled in the field and requires immediate
evacuation for salvage or definitive surgery.
◊ Stabilization of pelvic fracture with MAST garment,
or by wrapping the pelvis tightly with a wide strap
(such as a folded sheet), may reduce pelvic bleeding.
◊ Open torso injuries. If direct pressure does not stop
the hemorrhage, consider inserting a tamponade
with a balloon (Foley) catheter into the wound, and
then with balloon inflated pulling back to compress
the bleeding site.
Dressings, bandages, hemostatic agents, and controlled
hypotension. Dressings promote hemostasis, protect wounds
from mechanical injury and contamination, immobilize tissues,
and provide physical and psychological support to the patient.
Application of dressings and bandages.
ο Control all bleeding.
ο Assess neurologic status and circulation of extremity before
and after applying a dressing or bandage.
ο Immobilize suspected fractures.
ο Keep dressing as clean as possible.
ο Dressings should cover the entire wound.
ο Bandages should cover the entire dressing.
ο Avoid skin-to-skin contact.
ο Leave fingers and toes exposed.
6.5
Emergency War Surgery
ο Reinforcement.
♦ If at all possible, do not remove the first dressing.
♦ If the dressing becomes thoroughly saturated,
reevaluate the wound for a source of bleeding amenable
to direct pressure, and consider advanced hemostatic
agents or a proximal tourniquet. Blood loss into the
dressing can be estimated from Table 6-2.
Table 6-2. Blood loss.
Size designation
Small Medium
Large
ABD
Measurement (inch)
4 x 7
7.5 x 8
11.75 x 11.75
18 x 22
Saturation (mL)
300
750
1,000
2,500
ο
Coagulopathy. Blood loss, massive fluid resuscitation, and
drop in body temperature may lead to inability to form clot.
♦ Keep patient warm (above 34°C).
♦ Use warm fluids.
♦ Use crystalloid fluids sparingly.
♦ Transfuse with fresh whole blood (less than 24 h old).
ο
Hemostatic agents: new products and bandages are
available in several forms:
♦ Powders: placed in wound, then covered with a
dressing.
♦ Dressings: impregnated with hemostatic agents.
♦ Injectables.
◊ Intravenous: augment clotting cascade of body.
◊ Intracavitary: through wounds to control internal
bleeding.
♦ Two=component “glues”.
♦ If an advanced hemostatic agent is used after a
tourniquet has been placed, the tourniquet may be
carefully removed after the agent has achieved
hemostasis and the wound observed for hemorrhage.
If hemorrhage recurs, return to the tourniquet.
6.6
Hemorrhage Control
Hemostatic Agents
Product Source
Mechanism Advantages Disadvantages
Hem-
Shrimp
Sticks to
FDA approved,
Con
shell poly- blood
inexpensive
saccharide forming
& vinegar plug
Quik-
Volcanic
Acts as a
FDA approved, Thermal
Clot
rock
selective
inexpensive,
injury,
sponge for
easy to store,
requires
water/
long shelf life
removal
dehydrates
from wound
blood
Fibrin
Fibrinogen/ Activates
Natural
Not FDA
bandage thrombin clotting
clotting
approved,
mechanism mechanism
allergic
reactions
expensive
Two Field Hemostatic Agents
Two agents are recommended by the US Tactical
Combat Casualty Care Committee: 1) HemCon, 2)
QuikClot.
If standard measures such as elevation and pressure
dressings do not control bleeding, it is recommended
that tourniquet be used and that the first agent be
HemCon. If this dressing fails, it should be removed
and QuikClot used if the bleeding is life threatening.
If the bleeding is external and not at a site where a
tourniquet can be applied, HemCon and QuikClot can
be used if conventional pressure dressings fail.
Both products are to be used only on external sources
of hemorrhage.
HemCon dressing is a firm 4 x 4 inch dressing that is
sterile and individually packaged. It works by
adherence to the bleeding wound and has some
vasoconstrictive properties. The blood and clot in the
wound should be removed before application.
6.7
Emergency War Surgery
QuikClot is a granular zeolite that absorbs fluid and
causes hemostasis. It has handling properties similar
to sand. When applied it can generate significant heat
during the absorption process. Blood and clot should
be wiped out of the wound prior to application.
Remember, pressure must be applied for 3-5 minutes
at the bleeding site, after application of a hemostatic
dressing.
Field Hemostatic Dressings Considerations
Use should be delayed until after a trial of conventional
dressings.
Do not use on minor injuries.
Use on internal wounds is not yet recommended.
Must apply pressure to the bleeding site after application.
Risk of inadequate contact of HemCon to the bleeding
tissues in deep wounds.
Heat generation from QuikClot.
ο Controlled resuscitation (hypotensive resuscitation).
♦ Resuscitation as a method of hemorrhage control. The
needs of organ perfusion must be carefully balanced
against the risk of increased bleeding as blood pressure
rises. Excessive fluid resuscitation may increase
bleeding and rebleeding. Prior to definitive hemorrhage
control, a lower-than-normal blood pressure may be
accepted. Small volumes of resuscitation fluid are still
required in those casualties with decreased mentation
due to hypotension (ie, decreased or absent radial
pulse).
6.8
Chapter 7
Shock and Resuscitation
Introduction
The goal of fluid resuscitation is to maintain adequate perfusion.
Fluid resuscitation of the wounded combatant remains a
formidable challenge on the modern day battlefield. Routine
resuscitation using 2 L of crystalloid through two large bore
IVs is not appropriate in all situations and the vast majority of
the casualties do not need any IV resuscitation prior to arrival
at a forward medical treatment facility (MTF).
This chapter will briefly address shock, including recognition, class-
ification, treatment, definition, and basic pathophysiology. Initial
as well as sustained fluid resuscitation and a review of currently
available fluids and potential future products will be described.
Recognition and Classification of Shock
Shock is a clinical condition marked by inadequate organ
perfusion and tissue oxygenation, manifested by poor skin
turgor, pallor, cool extremities, capillary refill greater than 2
seconds, anxiety/confusion/obtundation, tachycardia, weak or
thready pulse, and hypotension. Lab findings include base
deficit > 2, and lactic acidosis > 2.5 mmol/L.
Hypovolemic shock: Diminished volume resulting in poor
perfusion as a result of hemorrhage, diarrhea, dehydration,
and burns (see Chapter 28, Burns). This is the most common
type of shock seen in combat soldiers (see Table 7-1).
Hypotension is a late finding in shock, after 30%-40%
lost blood volume. Earlier signs are tachycardia,
decreased pulse pressure, and mental status changes.
Tachycardia is often not reliable; however, and relative
bradycardia is common.
7.1
Emergency War Surgery
Table 7-1. Clinical Correlates in Hypovolemic Shock.
Central
Blood Vol. Heart
Respiratory Blood
Nervous
Lost*
Rate
Rate
Pressure
System
≤ 15%
Minimal
No change
No change
No change
tachycardia
15%-30%
Tachycardia
Tachypnea
Decreased
Anxiety or
pulse pressure
combativeness
30%-40%
Marked
Marked
Systolic
Depressed
tachycardia
tachypnea
hypotension
mental status
> 40% Marked
Marked
Severe
Comatose
tachycardia
tachypnea systolic
hypotension
*Blood volume is approximately 7%, so a 70 kg patient has a blood volume
of 4,900 mL.
Cardiogenic shock: Pump failure from intrinsic cardiac failure
or obstructive cardiac dysfunction from a tension pneumo-
thorax, or cardiac tamponade with distended neck veins, or
unilateral absence of breath sounds.
Distributive shock: Poor perfusion due to loss of vascular
tone; neurogenic shock: bradycardia with hypotension, seen
with spinal cord injury.
ο Treat hemorrhagic shock first.
ο Volume resuscitation to maintain systolic BP > 90 mm Hg.
ο Consider the addition of a vasopressor to address the loss
in vascular tone—phenylephrine (50-300 µg/min) or
dopamine (2-10 µg/kg/min).
Septic shock: Fever, hypotension, and warm extremities from
massive vasodilation, usually seen 5-7 days after initial trauma.
Treatment of Traumatic Shock—Control Bleeding!
The goal in the treatment of shock is to restore tissue perfusion
and oxygen delivery (dependent on hemoglobin, cardiac output,
and oxygenation).
Secure the airway and administer O2 for SaO
< 92%.
2
Diagnose and treat tension pneumothorax.
Control obvious bleeding and assess for occult hemorrhage.
Assess circulation and establish IV access.
7.2
Shock and Resuscitation
ο Consider cardiac tamponade even if no distended neck veins.
Administer IV fluids.
ο Hemorrhagic shock: Initially, any fluid available.
♦ LR: 1,000 mL expands intravascular volume by ~ 250 mL
within 1 hour after injection.
♦ 6% hetastarch: 500 mL expands intravascular volume
by ~ 800 mL in 1 hour, is functionally equivalent to 3
bags of LR, and is sustained for at least 8 hours.
♦ 7.5% hypertonic saline (HTS) results in the same physio-
logic response with 1/8th the volume of LR or saline. Two
infusions of 250 cc can be used. Although this recommen-
dation has been made by the Institute of Medicine
(Washington, DC) and two military consensus groups,
7.5% HTS is not commercially available. 3% and 5% HTS
can be used instead and are formulary stock items.
ο Nonhemorrhagic shock: Crystalloid is the fluid of choice.
♦ Within 1 hour, resuscitate to a mean arterial pressure of
> 60 mm Hg, a urine output of 0.5 cc/kg/h, and SaO
of
2
> 92%.
Based on response to fluids, casualties will fall into 3 groups:
ο Responders: Casualties with a sustained response to fluids
probably have had significant blood loss but have stopped
bleeding. However, they may still require definitive
surgery.
ο Transient and nonresponders are continuing to bleed.
They need immediate surgical intervention.
♦ Start blood transfusion as soon as possible.
♦ For nonresponders, fluids may be given to keep the
patient alive, but one should not attempt to restore
pressure to normal. Consideration should be taken into
account of the futility of the resuscitation depending
on the tactical scenario.
♦ Follow controlled resuscitation guidelines presented
below.
Exsanguinating hemorrhage is the cause of most
preventable deaths during war. Combat casualties in
shock should be assumed to have hemorrhagic shock
until proven otherwise.
7.3
Emergency War Surgery
Vasopressors have no role in the initial treatment of
hemorrhagic shock.
Fluid choices.
The ideal fluid for resuscitation is still debated despite decades
of research that began during WW I (see chart on next page).
Concept of Controlled (Hypotensive/Limited/Balanced)
Resuscitation
Raising the blood pressure with fluid resuscitation may
dislodge established clots leading to more blood loss. Prior
to establishing definitive hemorrhage control, use controlled
resuscitation to achieve and maintain adequate perfusion as
demonstrated by at least one of the following prioritized
goals:
ο Regains consciousness (follows commands).
ο Palpable radial pulse.
ο SBP ~90 mm Hg.
ο MAP of ~60 mm Hg.
Controlled resuscitation is NOT a substitute for definitive
surgical control. It is an attempt to keep a very sick
patient alive until he can get to definitive treatment.
Endpoints of resuscitation.
ο Following definitive hemorrhage control, more traditional
endpoints of resuscitation include
♦ Blood pressure: SBP > 120 mm Hg, MAP > 70 mm Hg.
♦ Urine output: > 0.5 mL/kg/h (approximately 30 mL/h).
♦ Correction of acidosis:
◊ base deficit < 2.
◊ serum lactate < 2.5 mmol/L.
♦ Hypothermia: It is important to maintain normal body
temperature. Fluids and patient care areas should be
warmed. This is often not possible in the deployed
environment. Patients frequently arrive at the facility
already hypothermic. Keep patients covered when on
litters, radiograph tables, and operating tables. External
warmers (such as contained forced warm air devices,
eg, Bair Hugger) should be employed in all patient care
7.4
Fluid/Initial Dose
Indication
Advantages
Cautions
*Not FDA approved
Crystalloids
Hypovolemia, dehydration,
Easy to store
Weight ratio - requires 3:1 for lost blood
Saline
hemorrhage, shock, burns
Inexpensive
Dilution, edema, coagulopathy
Ringer’s Lactate
Proven effectiveness
Isotonic
Hypertonic saline (HTS)
Hemorrhagic shock:
Lighter weight
> 500cc - Risk of hypernatremia, seizures
3%-5%
4cc/kg or 250 cc bolus,
Small volume = large effect
Do not use for dehydration from vomiting,
7.5%*
may repeat once
Increased cardiac contractility
diarrhea or sweating, or heat injuries
Hypertonic saline-
Burns—only one dose
Longer duration of effect than plain
Do not repeat without addition of other fluids
colloid combinations*
initially
HTS?
Must replace depleted extravascular fluid
HTS dextran*
HTS hetastarch*
Colloids
Hemorrhagic shock
Longer duration
Overuse may lead to “leak” into tissue
Albumin
250-500 mL bolus
1:1 replacement for blood
Binds immunoglobulins and Ca++
Artificial colloids
Burns? Third day
Raises plasma oncotic pressure
Must replace depleted extravascular fluid
Dextran
Recruits extravascular fluid
Artificial colloids:
6% hetastarch
Weight/cube better than crystalloids
Coagulopathy, allergic reaction, osmotic
(Hextend, Hespan)
diuresis, interferes with crossmatching
10% Pentastarch*
Hetastarch: ↑ fibrinolysis, ↑ Amylase
Gelatin-based colloids*
Max dose: 20 mL/kg/d (about 1.5 L)
Oral rehydration fluids
Dehydration controlled
Fluids of opportunity
Austere option in abdominal wounds and
hemorrhage
Nonsterile ingredients:
unconscious patients, but use with caution
Burns
4 tsp sugar, 1 tsp salt, 1 L water
Blood
Hemorrhage—Type O
Carries oxygen
Storage, type and cross-match
universal donor
Autotransfusion
Transfusion reactions, infection,
Walking blood bank
immunogenic
Artificial blood
Hemorrhage
Easy storage
Hemoglobin based
No type and cross matching
Experimental only, not yet available for use
Fluorocarbon based
Fluorocarbons require supplemental O2
Future option?
Emergency War Surgery
areas from initial emergency area through operating
room and ICU. Hypothermia is much easier to prevent
than it is to treat. See further discussion of hypothermia
in Chapter 12, Damage Control Surgery.
Transfusion Therapy
Blood transfusion.
Blood should be added to the resuscitation of patients who have
lost 30%-40% of their blood volume. Blood may also be
necessary in patients who have not reached this threshold but
have ongoing blood loss. Whole blood has a greater risk for
immunologic reactions than packed cells.
Blood products fielded with forward medical units (FST, CSH) are
predominantly group O packed red cells and FFP. Upon reaching
a stabilization phase of operations, type-specific packed cells and
platelets will be supplied through theater specific channels. Storage,
shelf-life, and availability of these products are outlined in Table 7-2.
Table 7-2. Blood Products Available to the Theater.
Blood Group
Unit of
Shelf Life for Echelon
Availability
Product Issue Storage Transfusion Availability O+/- A+/- B+/- AB+/-
Liquid
~250mL
35d
35d
Second &
100%
—
—
—
PRBCs
third (MASH)
Third (CSH)
50%
40%
10%
—
& fourth
Frozen/
~250mL
10y
3d (postwash) Third & fourth
100%
—
—
—
deglyc-
erolized
RBCs
FFP
~250mL
1y
24h (postthaw) Third & fourth
—
50%
25%
25%
Platelet
~60mL
5d
5d
Third & fourth
50%
50%
—*
—*
concen-
trate
* Will be provided by blood bank platoon and medical treatment facilities by in-theater blood collections.
CHS: combat support hospital; FFP: fresh frozen plasma; MASH: mobile army surgical hospital;
PRBCs: packed red blood cells; RBCs: red blood cells
Adapted from US Department of the Army. Planning for Health Service Support. Washington,
DC: Headquarters, DA; approved final draft January 1994. Field Manual 8-55: 8-6.
7.6
Shock and Resuscitation
Familiarity with transfusion technique, patient-donor unit
infusion connections, and walking blood bank connections, is
essential and should be practiced routinely. Most serious
transfusion reactions are the result of an error at the bedside,
not an error in typing and cross-matching (ie, transfusing “the
right unit to the wrong patient”).
Transfusion reactions may be difficult to recognize in
severely or multiply injured casualties. Hemolytic (ABO
mismatch) reactions present acutely (< 24 hours) with fever,
chills, back pain, dyspnea, and renal failure. Delayed reactions
may occur. Transfusion should be halted immediately in all
cases, except minor allergic reactions (urticaria, fever, +/-
mild bronchospasm), which are treated with diphen-
hydramine (25-50 mg IV or PO), H-2 blocker, methylpred-
nisolone, +/- epinephrine.
Field Management of a Transfusion Reaction
• Stop the infusion of blood. Continue to infuse normal
saline through the intravenous line.
• Examine the urine for hemoglobinuria. Examine plasma
for hemoglobinemia.
• Maintain blood pressure and urinary output with saline.
Consider administering mannitol or furosemide after
volume repletion if the patient is oliguric.
• Reexamine the donor unit for seal integrity, evidence
of hemolysis or infection, and recheck the transfusion
log for clerical error.
• Annotate the field medical card with a description of
the suspected reaction and the therapy provided.
Transfer the unit suspected of causing the reaction to
the next echelon of care with the casualty.
Clinical relevance of the Rh bloodgroup in female
casualties.
Women, military and civilian, are becoming more frequent
victims of conflict. Approximately 85% of the American
population is Rh positive. Serious consequences to Rh
incompatible blood are rare in men. Data predict that 10% of
7.7
Emergency War Surgery
group O blood transfusions will be of Rh positive units to Rh
negative female recipients. An Rh negative woman transfused
with Rh positive blood is very likely (approximately 80%) to
produce anti-D (Rh positive) antibodies. This seroconversion
can jeopardize a subsequent pregnancy when this Rh negative
mother, now sensitized by Rh positive transfusion, conceives
an Rh positive fetus. Chronic hemolytic disease of the
newborn may result.
Under no circumstances should a life-saving transfusion be
withheld because of Rh incompatibility; saving a life takes
precedence over Rh immunization.
Prevention: When the supply of group O blood permits, group
O Rh negative blood should be reserved for women.
Massive transfusions.
ο
Definition.
♦ >10 Units of PRBC’s in <24 hours.
♦ Whole body blood volume transfusion in a 24-hour
period.
ο
Consequences of massive blood loss.
♦ Shock.
♦ Hypothermia.
♦ Acidosis.
♦ Decrease of coagulation factors.
♦ Decrease of platelets.
ο
Consequences of massive blood transfusions.
♦ Dilution of coagulation factors.
♦ Dilution of platelets.
♦ Acidosis.
♦ Hypothermia.
♦ Hypocalcaemia (citrate toxicity) associated with rapid
transfusions.
ο
For every 10 units of PRBCs give:
♦ 4 units of FFP.
♦ 1 unit of platelets (6 pack of 1 aphresis unit).
♦ Consider 1 dose of cryoprecipitate (10 single units of Cryo).
ο
What blood to use?
7.8
Shock and Resuscitation
♦ Type specific if at all possible.
♦ O positive (preferred) in males and postreproductive
females.
♦ O negative (if available) in females of reproductive age.
♦ If still using O after 8 units, stick with O, even if blood
type is determined. Stick with O until the patient’s
forward and back typed appropriately.
ο Which FFP to use?
♦ There is no such thing as emergency release FFP.
♦ Type specific if at all possible.
♦ AB when in doubt.
♦ A as a second choice.
♦ Unless you KNOW that the patient is Type O blood,
DO NOT use Type O FFP.
Walking blood bank.
When standard blood component therapy is unavailable, the
use of fresh whole blood can be lifesaving. Because whole blood
contains clotting factors, it is effective for treating dilutional
coagulopathy associated with massive blood loss and fluid
resuscitation.
ο Equipment.
♦ Blood recipient set (bag), indirect Tx Y-type (NSN 6515
01 128 1407).
♦ Stopcock, IV therapy 3 way, with Luer lock (NSN 6515
00 864 8864).
ο Cautions.
♦ Field conditions increase the risk of bacterial contamination.
♦ Definitive testing of blood for transfusion virus diseases
is not available.
♦ “Dog tag” blood typing wrong 2%-11% of the time.
♦ Donor performance may be impaired by donation.
◊ Good for small numbers of patients—large numbers
lead to doubling of unit ineffectiveness.
◊ Should not be the “default” answer for standard
blood program planning.
◊ Donate only once a month.
◊ Avoid donation at high altitudes.
7.9
Emergency War Surgery
Even in an emergency, try to get regularly issued blood
products.
◊ Women—ideally on supplemental iron before/after
donation.
ο Planning.
♦ Predeployment.
◊ Develop a current prescreened donor roster.
Blood type and Rh.
Nonreactive transfusion transmissible disease
tests (if available).
♦ Onsite.
◊ Update prescreening donor roster.
Tent/cot location.
Duty location.
Emergency (no roster in place).
ο Establish blood types with local testing or previous donor
history.
ο Choose prior blood donors in preference to nondonors
because they have been tested for the infectious diseases
in the past.
ο Rely on “dog tags” only as a last resort.
ο Draw only type “O” universal donors in mass casualty
situations to reduce the confusion of handling.
ο Draw universal or type specific donors in case of single
patient incidents. (Type O donors are 46% of the US
population.)
Procedure for walking blood bank.
ο Clean donor’s arm with povidone iodine for at least 1
minute.
ο Draw the blood from an arm vein into an unexpired, intact
commercial blood bag.
ο The bag has a 600 ml capacity and contains 63 mL of CPD
or CPDA-1 anticoagulant.
ο Draw about 450 mL, a “pint,” so that the bag is almost full.
ο Draw tubes for typing, cross-matching, and transfusion
transmissible disease testing (if available).
7.10
Shock and Resuscitation
ο Send tubes to a supporting laboratory (if available). Even
after-the-fact testing is useful to provide reassurance of
safety or explanations of untoward events.
ο Label the bag clearly with blood type and donor
identification information.
Whole blood crossmatching.
ο The white tile method uses a drop of the donor blood
mixed with the recipient serum on a white ceramic tile
and is examined in 4 minutes.
ο If no agglutination occurs, the blood is suitable for
transfusion into that recipient. A hand lens may be useful.
Storage.
ο
Keep at room temperature no longer than 24 hours.
ο
Blood stored warm for more than 24 hours has a significant
risk of bacterial growth and clotting factors will be lost. If
the blood has been kept at room temperature for less than
8 hours, it can be kept in a refrigerator or on wet ice for up
to 3 weeks.
ο
Although RBCs remain viable, platelets may become
inactive in whole blood stored cold (1°C-10°C) for greater
than 24 hours, losing one of the main benefits of fresh
whole blood.
ο
Ensure that anesthetist/anesthesiologist and surgeon are
aware that this is an emergency-drawn unit and tell them
the history of the unit.
ο
After 24 hours, destroy warm-stored, whole-blood units.
(Stateside hospitals would do so after exceeding 10°C for
30 minutes.) They are no longer safe or fresh. You may
save cold-stored units until a regular supply of tested blood
is reestablished.
ο
Keep a record of donors and patients transfused so they
can be tested on return to stateside.
ο
Keep a record of number of units transfused, donor names,
and outcome.
Autotransfusion.
ο Blood collected into sterile containers (eg, suction, chest
tube, among others) may be returned to the patient through
a blood filter.
7.11
Emergency War Surgery
ο Blood from sterile cavities, such as the chest or abdomen
without visceral injuries is preferred.
ο Blood from contaminated abdominal wounds can be used
at an increased risk of systemic infection.
ο Blood may be filtered through sterile gauze as a field
expedient method.
The Future
Because the definition of shock is inadequate oxygenation at
the cellular level, the most ideal fluid would provide volume
expansion and oxygen-carrying capacity. For this fluid to be
useful in deployed settings it needs to be stable at a variety of
temperatures and have a low-risk profile. Hemoglobin based
oxygen carrying compounds (HBOCs) currently under
investigation may be such fluids. There are HBOCs derived from
either bovine or human sources that require no refrigeration,
have a shelf life of up to 3 years, are disease free, and require no
crossmatching.
7.12
Chapter 8
Vascular Access
Introduction
Vascular access is a critical early step in the management of
trauma. Peripheral access should be attempted first; if
unsuccessful, additional percutaneous central access locations
include the subclavian vein, the internal and external jugular
veins, and the common femoral veins. Cutdowns for the
saphenous vein at ankle or femoral sites are alternative options.
Basic Equipment.
ο Tourniquet.
ο 1%-2% Lidocaine.
ο Sterile prep solution, drape, gloves, and 4 x 4 gauze pads.
ο 3mL syringe with 25-gauge needle.
ο Scalpel, hemostat, 11 blade scalpel and fine scissors.
ο Vein introducer or “vein pick”.
ο IV catheter; IV tubing (modified with distal connector cut
off), and 8 F NG tube are field expedients.
ο 3-0 or 4-0 silk ties to secure catheter in vein.
ο 2-0 or 3-0 suture to secure catheter to skin.
ο Central catheter kit (for central lines) or intraosseous device
for intraosseous insertion.
Subclavian Vein Access or Internal Jugular Venipuncture
Place the patient supine in Trendelenburg (15° head down).
Prep and drape subclavian/jugular area. Sterile gloves should
be worn.
ο Subclavian line.
♦ With an index finger placed at the sternal notch, the
thumb is placed at the junction of the medial and middle
third of the clavicle.
♦ 1% lidocaine is infiltrated into the skin, subcutaneous
tissue and periosteum of the clavicle.
8.1
Emergency War Surgery
♦ Introduce a large caliber needle with attached 5 mL
syringe. Insert with the bevel of the needle up, directing
the needle towards the contralateral clavicular head.
Keep the needle horizontal to avoid a pneumothorax.
♦ While aspirating, slowly advance the needle underneath
the clavicle.
ο
Jugular vein line.
♦ Turn the patient’s head 45° toward the contralateral side
to expose the neck.
♦ Identify the apex of the anterior cervical triangle formed
by the heads of the sternocleidomastoid muscle to locate
the carotid artery.
♦ Palpate the carotid artery and stay lateral with your
venipuncture.
♦ Introduce a large-bore needle on 10mL syringe at a 45°
angle into the apex of the triangle, lateral to the carotid
pulse.
♦ Carotid Puncture: Immediately withdraw the needle
and place pressure on site for a minimum of 5 minutes.
♦ Advance the needle caudally, parallel to the sagittal
plane and at a 30° posterior angle (eg, toward the
ipsilateral nipple).
♦ When free flow of venous blood appears, advance the
needle an additional 4 mm (the length of the needle
bevel), then remove the syringe and quickly cover the
hub of the needle to prevent air embolism.
◊ If air or arterial blood appears, stop immediately.
Withdraw needle immediately and place pressure at
the site for at least 5 minutes.
♦ If no venous blood return after advancing 5 cm, slowly
withdraw the needle while aspirating. If this fails,
redirect the needle.
ο
Subclavian vein or internal jugular vein catheter insertion.
♦ Once the needle is in the vein, introduce the “J” wire
through the needle (Seldinger technique). The wire
should pass with minimal resistance. If wire does not
pass easily, withdraw the entire apparatus and
reattempt line placement.
♦ Remove the needle.
8.2
Vascular Access
♦ Enlarge the puncture site with a scalpel and dilator.
♦ Pass the catheter over the wire while holding the wire in
place, to a depth of 18 cm on the left and 15 cm on the right
for subclavian, and to a depth of 9 cm on the right and 12
cm on the left for jugular vein, then remove the wire.
♦ Aspirate from all ports, flush all ports, suture in place,
apply antibiotic ointment, dress area, secure tubing, and
label date of insertion.
♦ Chest radiograph to ensure line position and rule out
pneumothorax.
Greater Saphenous Vein Cutdowns
Contraindications.
ο Deep vein thrombosis (DVT) or severe ipsilateral lower
extremity trauma.
Procedure.
ο
Expose, prep, and drape ankle or femoral site.
ο
For ankle, administer local anesthetic proximal to the
medial malleolus.
ο
Make a superficial transverse incision through the skin
over the entire width of the flat tibial edge (~3cm) in the
area of the saphenous vein.
ο
Using a curved hemostat, isolate the greater saphenous
vein from the nerve and underlying bone.
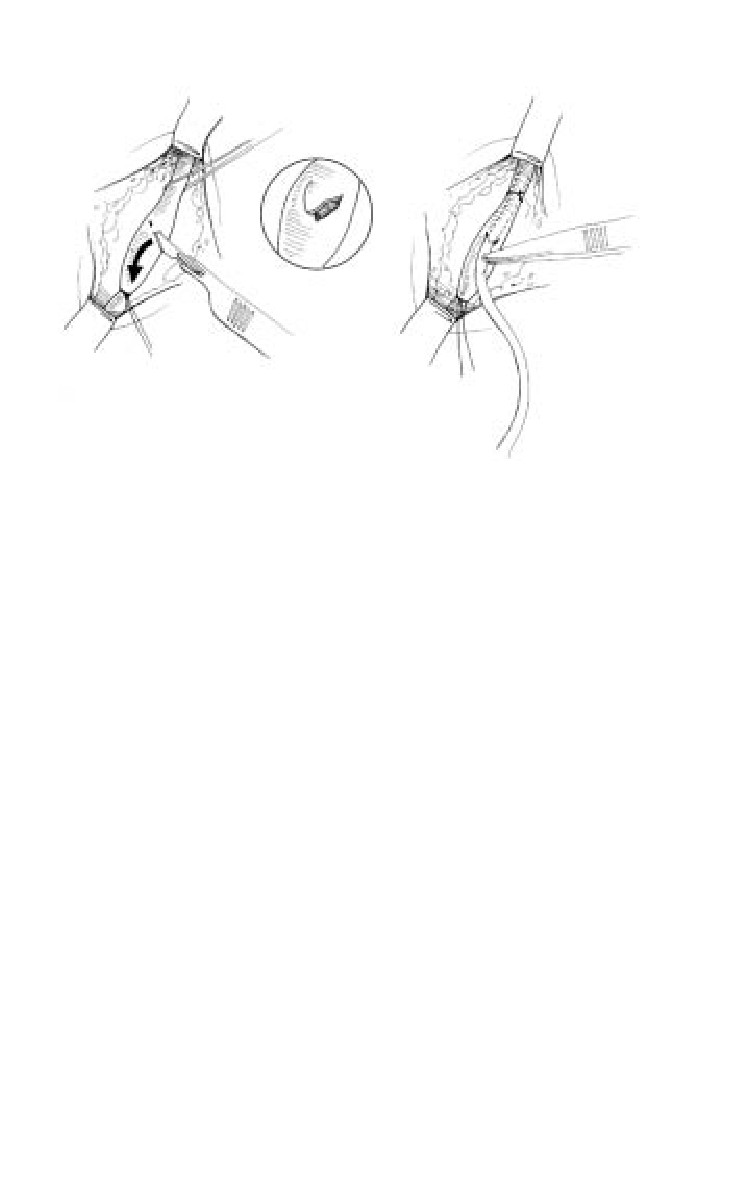
ο
Using the open hemostat as a platform, cut a 1-2 mm
venotomy in the anterior surface of the vein with a number
11 blade (Fig. 8-1a).
ο
Place the intravenous tubing (previously beveled) or
angiocatheter at least 4 cm into the vein (may require use
of a vein introducer) (Fig. 8-1b).
ο
Secure the catheter with a proximal silk ligature, and tie
off the distal vein.
ο
Secure the catheter with a suture.
ο
Apply a clean dressing.
ο
Femoral procedure is essentially the same, with site being
a handbreadth below the inguinal ligament, medial to the
midline of the thigh. After skin incision, finger bluntly
dissects through the fat to the fascia. Hook the finger and
lift, and the vein comes up with it.
8.3
Emergency War Surgery
a
b
Fig. 8-1a,b. Saphenous vein cutdown.
Cutdown can also be performed on the common femoral
veins, the jugular veins, and on veins of the forearm.
IO Infusion
Contraindications.
ο Trauma or infection at insertion site.
ο Recent IO device at the same site.
ο Fracture of insertion bone.
ο Recent sternotomy.
Devices/ Procedure.
ο F.A.S.T. 1, BIG, SurFast, Jamshidi Needle, VidaPort.
ο Procedures vary based on model; all IV fluids acceptable
except possibly hypertonic solutions.
ο BIG, SurFast, and Jamshidi may be placed in proximal
medial tibia, distal medial tibia, or the radius.
ο F.A.S.T. 1 is designed for sternal placement, 1.5 cm below
the sternal notch.
ο Pediatric: Insert a bone-marrow aspiration needle or 14-
19-gauge spinal needle, directing it caudally through the
outer cortex. Common sites: tibia, distal femur.
ο Aspirate to confirm placement.
8.4
Chapter 9
Anesthesia
Introduction
Battlefield anesthesia primarily describes a state of balanced
anesthesia using adequate amounts of anesthetic agents to
minimize cardiovascular instability, amnesia, analgesia, and a
quiescent surgical field in a technologically austere environment.
Adapting anesthetic techniques to battlefield conditions requires
flexibility and a reliance on fundamental clinical skills. While
modern monitors provide a wealth of data, the stethoscope may
be the only tool available in an austere environment. Thus, the
value of crisp heart sounds and clear breath sounds when caring
for an injured service member should not be underestimated.
In addition, close collaboration and communication with the
surgeon is essential.
Airway
Many methods for securing a compromised airway exist,
depending on the condition of the airway, the comorbid state of
the patient, and the environment in which care is being rendered.
When a definitive airway is required, it is generally best secured
with direct laryngoscopy and an endotracheal tube (ETT), firmly
secured in the trachea.
Indications for a Definitive Airway
Apnea/airway obstruction/hypercarbia.
Impending airway obstruction: facial fractures, retrophar-
yngeal hematoma, and inhalation injury.
Excessive work of breathing.
Shock (bp < 80 mm Hg systolic).
Glasgow Coma Scale (GCS) < 8. (See Appendix 2.)
Persistent hypoxia (SaO
< 90%).
2
9.1
Emergency War Surgery
Secondary Airway Compromise Can Result From
Failure to recognize the need for an airway.
Inability to establish an airway.
Failure to recognize an incorrectly placed airway.
Displacement of a previously established airway.
Failure to recognize the need for ventilation.
Induction of General Anesthesia
The Anesthesia Provider Must Evaluate the Patient for
Concurrent illness and current state of resuscitation.
Airway — facial trauma, dentition, hyoid-to-mandibular
symphysis length, extent of mouth opening.
Cervical spine mobility (preexistent and trauma related).
Additional difficult airway indicators.
ο Immobilization.
ο Children.
ο Short neck/receding mandible.
ο Prominent upper incisors.
Rapid Sequence Intubation Checklist
Equipment.
ο Laryngoscope, blades, and batteries (tested daily).
ο Suction, O2 setup.
ο Endotracheal tubes and stylet.
ο Alternative tubes (oro, nasopharyngeal, LMA [laryngeal
mask airway]).
ο IV access items.
ο Monitors — pulse ox, ECG, BP, end-tidal CO2.
ο Positive pressure ventilation (Ambu bag or anesthesia
machine).
Drugs.
ο Narcotics.
ο Muscle relaxants.
ο Anxiolytics and amnestics.
ο Induction agents and sedatives.
ο Inhalation agents.
Narcotics.
ο Fentanyl, 2.0-2.5 µg/kg IV bolus, then titrate to effect.
9.2
Anesthesia
ο Morphine, 5-10 mg IV bolus to load, then 2 mg q5min to
effect.
o Dilaudid (Hydromorhone), 1-2 mg IV to load, then 0.5
mg q5min to effect.
Muscle relaxants.
ο Depolarizing.
♦ Succinylcholine.
◊
1.0-1.5 mg/kg.
◊ Onset 30-60 sec.
◊ Duration 5-10 min.
◊ Can cause bradycardia, fasciculations, elevated
intragastric pressure, elevated ICP, elevated intra-
cranial pressure, potassium release (especially in
“chronic” burn or immobile patients).
◊ Potent trigger of malignant hyperthermia (MH).
Succinylcholine should be NOT be used in patients
with burns or crush injuries > 24 hours old or chronic
neuromuscular disorders due to risk for hyperkalemia
— rocuronium is the next best choice.
ο Nondepolarizing.
♦ Vecuronium: induction dose of 0.1 mg/kg with an onset
of 2-3 minutes and duration of action of 30-40 minutes.
♦ Rocuronium: induction dose of 0.6 mg/kg with an onset
of 1.5-2.5 minutes and duration of action of 35-50
minutes. At 1.2 mg/kg onset similar to succinyl-choline,
but, unfortunately, a duration of action that can exceed
60-90 minutes.
♦ Pancuronium: induction dose of 0.15 mg/kg with an
onset of 3.5-6 minutes and duration of action of 70-120
minutes.
Anxiolytics and amnestics.
ο Versed (midazolam), 1-2 mg IV slowly (over 2 min).
ο Scopolamine, 0.4 mg IV.
Induction agents and sedatives (Table 9-1).
9.3