UD Trucks. Owner’s Manual (2011-2013) - page 15


  Главная      Manuals     UD Trucks. Owner’s Manual (VEHICLE SERVICE AND MAINTENANCE) (2011-2013)


Search            copyright infringement  


Content      ..     13      14      15      16     ..


UD Trucks. Owner’s Manual (2011-2013) - page 15


-------------------------------------------------------------------------------------------------------------------------------------------------------------
IN CASE OF EMERGENCY/TROUBLE-SHOOTING
edly to discharge air from the tank
Changing tires
CAUTION
and air spring till the vehicle height
<Removing a tire>
cannot be returned to the normal
z Do not allow any person to
1.Park on a level ground. Stop the
position.
stay in the vehicle while it is on
engine and set the parking brake.
After that, turn the ignition key to the
the jack.
Turn on the hazard warning
OFF position and start the jack-up
z Remove oil and grease, if any,
flasher.
operation.
before using the jack.
2.Place chocks at both the front and
z Place the jack directly under
back of the tire diagonally opposite
the jack-up point.
CAUTION
the tire to be replaced.
z If leaving the vehicle jacked up
3.Place the jack(s) directly beneath
for a considerable time, sup-
z If the jack-up operation is con-
the axle or other main structured
port the vehicle with wooden
ducted without discharging air,
members. Do not attempt to raise
blocks or stands for safety.
the vehicle height may change
the vehicle by the bumper.
during the operation. It is dan-
Jacking up the vehicle with air sus-
gerous.
4.Using the wheel nut wrench,
pension
loosen but do not remove the
wheel nuts (or the outer wheel nuts
if working on a dual wheel) of the
wheel to be removed.
<Before jacking up>
While the engine stops, operate the
air suspension dump switch repeat-
12 - 7

-------------------------------------------------------------------------------------------------------------------------------------------------------------

IN CASE OF EMERGENCY/TROUBLE-SHOOTING
not use molybdenum grease for
NOTE:
this purpose.
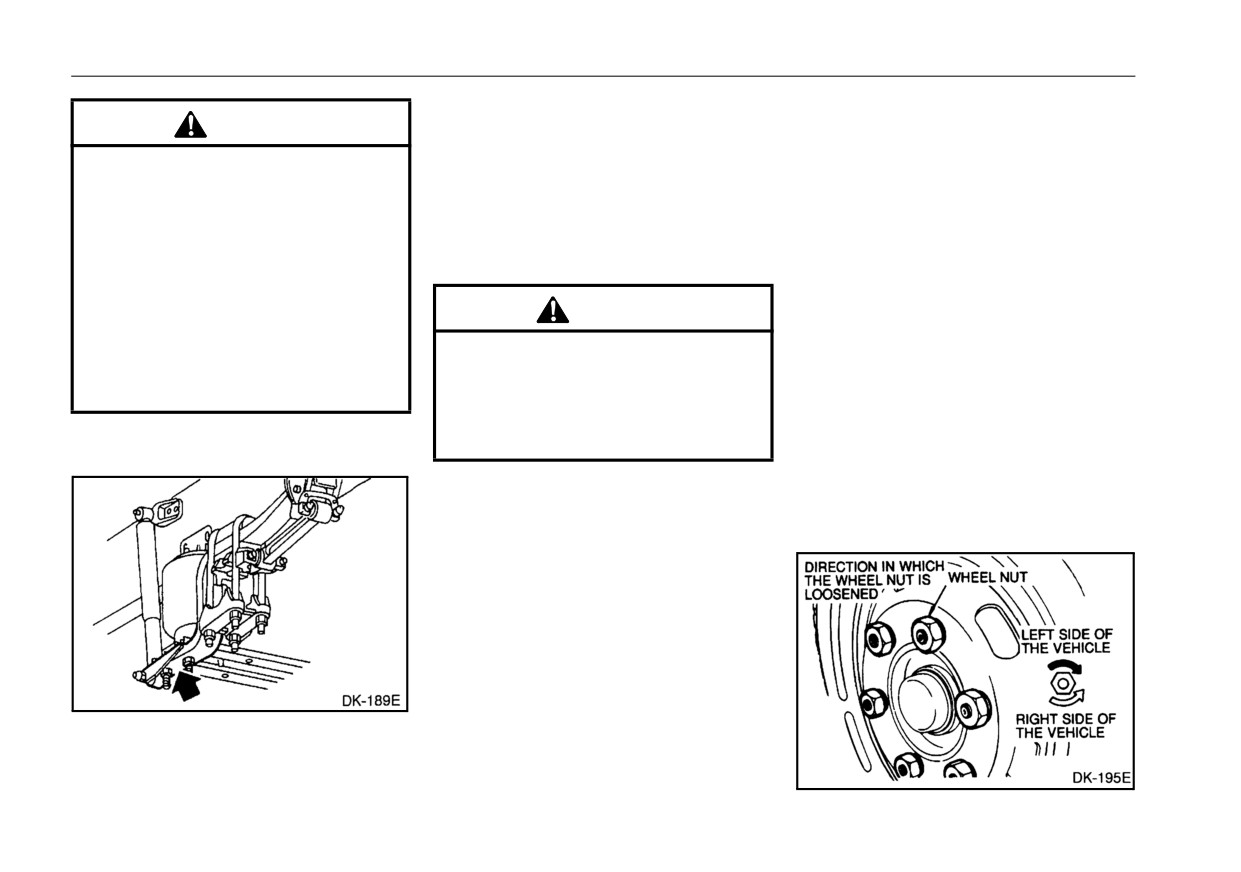
z The wheel nuts on the right side
z Make sure that the nut spherical
of the vehicle have right-handed
surface faces the wheel disc.
threading; the left side wheel
nuts have left-handed threading.
1.Using a lever, raise and fit the
wheel to the hub by aligning the
5.Raise the vehicle to the height
wheel disc bolt holes to the hub
where an inflated tire will just clear
bolts.
the surface.
2.Position the wheel so that the hub
6.Remove the wheel nuts (or the
bolts are in the middle of the bolt
outer wheel nuts) and wheel. If
<Installing a tire>
holes, and then tighten the wheel
replacing an inside dual wheel:
NOTE:
nuts temporarily.
a) Lower the axle and loosen the
z
Replace the hub bolts and nuts
3.Loosen the jack and lower the
inner wheel nuts.
b) Raise the vehicle again to the
or wheel disc if the threads are
wheels slowly.
damaged or deformed or the
height where an inflated tire will
4.Tighten the wheel nuts a little at a
wheel disc is deformed or
clear the surface.
time in the numerical sequence
cracked.
c) Remove the inner wheel nuts
shown below to the specified
z
Clean the wheel mounting sur-
and inner wheel.
torque.
faces with a wire brush and
UD1800 and UD2000
clean waste cloth. Dirty mount-
273 to 310 ft·lb
(370 to
420
ing surfaces may cause the
N·m) (38 to 43 kgf·m)
wheel nut to loosen.
UD2300, UD2600 and UD3300
z
Before reinstalling the wheel,
398 to 435 ft·lb
(540 to
590
apply a small amount of engine
N·m) (55 to 60 kgf·m)
oil or grease to the threaded
portions of the hub bolts and
wheel nuts and the spherical
surfaces of the ball seats. Do
12 - 8

-------------------------------------------------------------------------------------------------------------------------------------------------------------

IN CASE OF EMERGENCY/TROUBLE-SHOOTING
(UD1800 and UD2000)
(UD2600 and UD3300)
TOWING
WARNING
z When towing your vehicle,
observe all state and local laws
and regulations.
NOTE:
z Turn signals do not work when
the hazard warning flasher
(UD2300)
NOTE:
switch is operating.
z
When replacing both dual
wheels, make sure that the inner
Towing the vehicle
wheel nuts are securely tight-
If there is a need to tow your vehicle:
ened before installing the out-
1.Unload your vehicle.
side wheel.
2.Turn the ignition key to the OFF
z
When installing the outside
position.
wheel, place its air valve 180°
3.Release the parking brake.
apart from the inside wheel.
4.Shift the transmission to the NEU-
z
After changing the wheels, drive
TRAL position.
the vehicle a distance of 30 to 60
5.Use a qualified towing service with
miles (50 to 100 km) to settle the
a suitable lift and towing equip-
wheel disc with hub, and then
ment.
retighten the wheel nuts to the
6.When possible, tow the vehicle
specified torque.
from the front.
12 - 9

-------------------------------------------------------------------------------------------------------------------------------------------------------------

IN CASE OF EMERGENCY/TROUBLE-SHOOTING
be removed or the rear wheels must
CAUTION
CAUTION
be raised.
z
Do not raise the vehicle by its
z Do not attempt to secure the
Releasing parking brake
bumpers. Always use towing
tow chains to the bumper. Lift-
(With spring-activated rear wheel
chains or jacks. When using
ing or towing by the bumper
parking brake vehicles)
towing chains, attach the
could result in the vehicle
In case of an emergency when the
chains to a main structural
breaking loose and vehicle
air pressure cannot be restored and
member. When using a jack or
runaway. Attach the chains to
the vehicle must be towed the park-
jacks, place directly under a
the main structural members
ing brakes must be released manu-
main structural member.
of the vehicle and use a bum-
ally as follows:
z
When towing the automatic
per protector bar.
transmission model, raise the
rear wheels or remove the
Towing with rear axle off ground
WARNING
drive shaft.
To tow the vehicle from the rear,
z
To avoid serious injury or
secure the steering wheel so that the
property damage, be sure to
Towing with front axle off ground or
front wheels are straight. If this can-
block the wheels so that the
with all wheels on ground.
not be done, do not tow the vehicle
vehicle cannot move when the
To tow the vehicle from the front,
from the rear. If the vehicle is
brakes are manually released.
remove either the propeller shaft or
equipped with the manual transmis-
For towing, make sure the
the rear axle shafts. If the rear axle
sion, drain about 1.1 US pt (0.5 liter)
vehicle is securely connected
shafts are removed, drain lubricant
of oil from the transmission so that it
to the tow vehicle before
to prevent it from leaking from the
does not enter the clutch housing.
releasing the parking brakes.
rear axle housing. Cover both ends
Attach the chains to or place a jack
z
Do not operate the vehicle
of the rear axle housing to keep out
or jacks directly under the main
when the parking brake acti-
dirt. Attach the chains to or place a
structural member of the vehicle.
vates automatically.
jack or jacks directly under the main
To tow a vehicle with an inoperative
Have the brake system
structural members of the vehicle.
rear axle, it is necessary to raise the
checked and repaired by an
rear wheels. If the transmission is
authorized UD Trucks dealer or
inoperative, the propeller shaft must
a qualified brake repair facility.
12 - 10

-------------------------------------------------------------------------------------------------------------------------------------------------------------

IN CASE OF EMERGENCY/TROUBLE-SHOOTING
NOTE:
z If the air pressure drops to
CAUTION
approximately 40 psi (275 kPa)
z Do not apply excessive force
(2.8 kgf/cm2) in both front and
to the clevis. Doing so may
rear brake system, the parking
damage the wheel cylinder.
brake will automatically be
applied.
[UD2300 and UD2600]
[UD1800 and UD2000]
Manual Release Procedure
1.Block the wheels to prevent the
Manual Release Procedure
UD2600
vehicle from moving.
1.Block the wheels to prevent the
2.Loosen the lock nut. (See figure
vehicle from moving.
below.)
[UD3300]
2.Loosen the lock nuts. (See figure
3.Turn the release nut to extend the
Manual Release Procedure
below.)
push rod until the brake shoes are
3.Turn the turnbuckle to extend the
released from the drum.
push rod until the brake shoes are
released from the drum.
1.Block the wheels to prevent the
UD2300
vehicle from moving.
12 - 11

-------------------------------------------------------------------------------------------------------------------------------------------------------------

IN CASE OF EMERGENCY/TROUBLE-SHOOTING
2.Release the release nut by turning
it counterclockwise by the speci-
fied release amount (Do not use
impact wrench).
3.To ensure the compression spring
is fully caged, the stud length
should be approximately 2.95 in
(75 mm).
CAUTION
z The release nut is secured on
the release bolt with the knock
pin. Do not remove the knock
pin for securing. If it is
removed, the spring brake can-
not be released.
12 - 12

-------------------------------------------------------------------------------------------------------------------------------------------------------------

IN CASE OF EMERGENCY/TROUBLE-SHOOTING
TROUBLESHOOTING
The information in the following charts may be helpful in identifying the cause and corrective action to be taken when
a problem arises.
Engine starting problems
Problem
Possible Cause
Cause Correction
Battery discharged
Charge or replace
Starter does
not turn, or
Battery terminals disconnected, loose, or corroded
Connect securely and remove corrosion
turns at low
Ground is disconnected
Secure ground connection
speed
Improper viscosity engine oil used
Replace with proper engine oil
No fuel
Add fuel
Engine does
not turn
Insufficient preheating time
Operate intake air heater until light goes out
Starter turns,
Fuel filter is clogged
Replace fuel filter element
but engine
does not start
Fuel is frozen
Warm fuel line with hot water
Air in fuel system
Bleed air from fuel system
Air cleaner is clogged
Replace air cleaner element
Warm-up
Problem
Possible Cause
Cause Correction
Low idling speed
Adjust with throttle control knob
Engine stops immediately
No fuel
Add fuel
after starting
Fuel filter clogged
Replace fuel filter element
Air cleaner clogged
Replace air cleaner element
12 - 13

-------------------------------------------------------------------------------------------------------------------------------------------------------------

IN CASE OF EMERGENCY/TROUBLE-SHOOTING
Operation
Problem
Possible Cause
Cause Correction
Release parking brake completely if problem per-
Parking brake is not completely released
sists, consult an authorized UD Trucks dealer or
other qualified service facility
Fuel filter clogged
Replace fuel filter element
Air cleaner clogged
Replace air cleaner element
Engine lacks power
Have brakes checked and adjusted by an autho-
Brakes are dragging
rized UD Trucks dealer or other qualified service
facility
Have clutch checked and adjusted by an autho-
Clutch slipping
rized UD Trucks dealer or other qualified service
facility
Replace at an authorized UD Trucks dealer or
Fan clutch malfunctioning
other qualified service facility
Radiator front is clogged with insects and debris
Clean
Radiator is clogged with scale
Clean
Engine overheats
Insufficient coolant solution
Add coolant solution
Drive belt loose
Adjust belt tension or replace belts
Check at an authorized UD Trucks dealer or other
Defective thermostat
qualified service facility
12 - 14

-------------------------------------------------------------------------------------------------------------------------------------------------------------

IN CASE OF EMERGENCY/TROUBLE-SHOOTING
Operation (Cont’d)
Problem
Possible Cause
Cause Correction
Check fuel system and tighten connections if
Fuel leaks
loose
Air cleaner clogged
Replace air cleaner element
Tire air pressure low
Adjust to proper pressure
Excessive fuel consumption
Have brakes checked and adjusted by an autho-
Brakes are dragging
rized UD Trucks dealer or other qualified service
facility
Have clutch checked and adjusted by an autho-
Clutch slipping
rized UD Trucks dealer or other qualified service
facility
Improper grade or viscosity engine oil used
Replace with proper engine oil
Excessive engine oil con-
Too much engine oil
Adjust engine oil level properly
sumption
Check lubrication system and tighten connections
Oil leaks
as necessary
Steering wheel does not
Insufficient lubrication of steering system
Lubricate steering system
return smoothly
Tire air pressure low
Adjust the air pressure
Steering wheel is heavy
Lack of power steering fluid
Add fluid up to normal level
Wheel nuts loose
Tighten to specified torque
Tire air pressure low or uneven
Adjust to normal air pressure
Tires partially worn
Replace tires
Excessive steering wheel
vibration
Check and adjust at an authorized UD Trucks
Improperly adjusted wheel balance
dealer or other qualified service facility
Check and adjust at an authorized UD Trucks
Excessive steering wheel play
dealer or other qualified service facility
12 - 15

-------------------------------------------------------------------------------------------------------------------------------------------------------------

IN CASE OF EMERGENCY/TROUBLE-SHOOTING
Operation (Cont’d)
Problem
Possible Cause
Cause Correction
Bolts and nuts connecting propeller shafts loose
Tighten
Check at an authorized UD Trucks dealer or other
Excessive propeller shaft deflection
qualified service facility
Vehicle vibrates excessively
Check and adjust at an authorized UD Trucks
Wheel balance out of adjustment
dealer or other qualified service facility
Replace at an authorized UD Trucks dealer or
Loose propeller shaft universal joints
other qualified service facility
Bleed air from brake system at an authorized UD
Air in brake system
Trucks dealer or other qualified brake service
facility
Worn linings
Adjust or replace at an authorized UD Trucks
Poor braking action
Incorrect shoe clearance
dealer or other qualified brake service facility
Tighten loose connections. If still leaking, check
Brake system leaks air or fluid
and repair at an authorized UD Trucks dealer or
other qualified brake service facility
Uneven tire pressure
Adjust air pressure
Brakes on one side operate
Tires partially worn
Replace tires
more than on other
Adjust at an authorized UD Trucks dealer or other
Incorrect shoe clearance
qualified brake service facility
Adjust at an authorized UD Trucks dealer or other
Incorrect shoe clearance
qualified brake service facility
Brakes drag
Wheel cylinder returns improperly. Broken return
Check at an authorized UD Trucks dealer or other
spring
qualified brake service facility
12 - 16

-------------------------------------------------------------------------------------------------------------------------------------------------------------

IN CASE OF EMERGENCY/TROUBLE-SHOOTING
Operation (Cont’d)
Problem
Possible Cause
Cause Correction
Tighten loose connections. If still leaking, check
Loss of brake fluid
Brake system leaks fluid
and adjust at an authorized UD Trucks dealer or
other qualified brake service facility
Battery terminals disconnected, loose, or corroded
Connect securely and remove corrosion
Insufficient battery fluid
Add fluid
Battery runs down
Battery life has expired
Replace battery
Loose or slipping drive belt
Adjust belt tension or replace belts
Light or electrical device left on
Turn off switch
Other
Problem
Possible Cause
Cause Correction
Bulb burned out
Replace bulb
Lights do not come on
Fuse blown
Replace fuse
Loose connection at system ground
Clean and tighten ground terminal
12 - 17

-------------------------------------------------------------------------------------------------------------------------------------------------------------

SERVICE DATA
SERVICE DATA
MAINTENANCE STANDARD
Items
Maintenance Standard
Remarks
Intake
0.012 - 0.016 in (0.30 - 0.40 mm)
Valve clearance
While cold
Exhaust
0.018 - 0.020in (0.45 - 0.50 mm)
Auto adjusting
Fan belt deflection
Engine
Drive belt tension
See page 11-47.
Air conditioner belt tension
Engine low idling speed
550 rpm
Engine high idling speed
2,750 rpm
0.39 - 1.57 in (10 - 40 mm)
UD1800, UD2000 and UD2300
Steering wheel free play
1.18 - 1.97 in (30 - 50 mm)
UD2600 and UD3300
0 - 0.08 in (0 - 2 mm)
UD1800, UD2000 and UD2300
Toe-in
0 in (0 mm)
UD2600 and UD3300
Wheel alignment
1.5°
UD1800, UD2000 and UD2300
Chassis
Camber
1°
UD2600 and UD3300
Caster
3°20
Brake pedal play
0.12 - 0.28 in (3 - 7 mm)
Clearance between service brake
Auto adjusting
drum and lining
13 - 1

-------------------------------------------------------------------------------------------------------------------------------------------------------------

SERVICE DATA
WARNING
z Automatic brake slack adjusters should not be manually adjusted in an effort to correct excessive push-
rod chamber stroke.
This condition indicates that a problem exists with the automatic brake slack adjuster, the installation of
the adjuster, or with the related foundation brake components, which manual adjustment will not cor-
rect. The manual adjustment of automatic brake slack adjusters is a dangerous practice that could have
serious consequences, because it gives the vehicle operator a false sense of security about the brake
effectiveness, which may likely go out of adjustment again.
MAINTENANCE STANDARD (CONT’D)
Items
Maintenance Standard
Remarks
Tire tread groove depth
More than 0.063 in (1.6 mm)
Chassis
Clutch pedal free play
1.18 - 1.97 in (30 - 50 mm)
Clutch outer lever free play
0.177 - 0.217 in (4.5 - 5.5 mm)
13 - 2

-------------------------------------------------------------------------------------------------------------------------------------------------------------

SERVICE DATA
TIGHTENING TORQUE
Maintenance
Items
Standard
Remarks
Maintenance
ft·lbf (N·m) (kgf·m)
Items
Standard
Remarks
ft·lbf (N·m) (kgf·m)
8.6
- 10.1
Air compressor inlet
Engine
(11.7
- 13.7)
40 - 44
pipe mounting bolt
Oil pan drain plug
(1.2
- 1.4)
(54 - 59) (5.5 - 6.0)
UD1800,
9.4
- 16.7
155 - 170
UD2000 and
Oil filter drain plug
(12.8
- 22.6)
Steering gear body
(210 - 230) (21 - 24)
UD2300
(1.3
- 2.3)
mounting bolt
251 - 288
UD2600 and
Valve
Rocker
18 (25) (2.5)
(340 - 390) (35 - 40)
UD3300
clear-
arm
ance
Differential drain and
95 - 108
Cross-
filler plug
(128 - 147) (13 - 15)
adjust
18 (25) (2.5)
head
screw nut
UD1800,
103 - 111
8.6
- 10.1
Chassis
UD2000 and
Valve cover mount-
Axle shaft mounting
(140 - 150) (14 - 15)
(11.7
- 13.7)
UD2300
ing bolt
bolt
(1.2
- 1.4)
111 - 118
UD2600 and
26 - 29
(150 - 160) (15 - 16)
UD3300
Engine
Fuel filter case
(35 - 40) (3.6 - 4.1)
273 - 310
UD1800 and
Primary fuel filter
26 - 29
(370 - 420) (38 - 43)
UD2000
case
(35 - 40) (3.6 - 4.1)
Wheel nut
UD2300,
398 - 435
1.7
- 2.5
UD2600 and
Primary fuel filter
(540 - 590) (55 - 60)
(2.3
- 3.4)
UD3300
fuel inlet plug
(0.2
- 0.3)
Air conditioner com-
22.4
- 28.9
pressor tension pul-
(30.4
- 39.2)
ley lock nut
(3.1
- 4.0)
15 - 18
DEF filter cover
(20 - 25) (2.0 - 2.5)
Crankcase ventila-
8.6
- 10.1
tion pipe mounting
(11.7
- 13.7)
bolt
(1.2 - 1.4)
13 - 3

-------------------------------------------------------------------------------------------------------------------------------------------------------------

SERVICE DATA
TIGHTENING TORQUE (Cont’d)
Maintenance
Items
Standard
Remarks
Maintenance
ft·lbf (N·m) (kgf·m)
Items
Standard
Remarks
ft·lbf (N·m) (kgf·m)
Allison 1000,
2200 and 2500
UD1800,
22 - 30
174 - 203
series
UD2000 and
(30 - 40) (3.1 - 4.1)
(235 - 275) (24 - 28)
UD1800 thru
Front
UD2300
Automatic trans-
UD3300
mission drain plug
362 - 398
UD2600 and
Allison 3000
(490 - 539) (50 - 55)
UD3300
18.5
- 23.6
series
Chassis
UD1800,
(25 - 32) (2.5 - 3.3)
UD2600 and
195 - 239
spring U-
UD2000 and
UD3300
(265 - 324) (27 - 33)
bolt nut
UD2300
Allison 3000
Automatic trans-
362 - 398
UD2600 and
37.6
- 45.0
series
Rear
mission filter cover
(490 - 539) (50 - 55)
UD3300
(51 - 61) (5.2 - 6.2)
UD2600 and
mounting bolt
UD3300
UD2600 and
406 - 455
Chassis
UD3300 with
UD1800
(550 - 617) (56 - 63)
65 - 80
air suspension
UD2000 and
Chassis
(88 - 108) (9 - 11)
Propeller shaft
UD2300
UD1800,
35 - 53
UD2000 and
mounting bolt
156 - 177
Front spring cen-
(47 - 72) (4.8 - 7.3)
UD2600 and
UD2300
(211 - 240)
ter bolt
UD3300
(21.5
- 24.5)
80 - 94
UD2600 and
(108 - 127) (11 - 13)
UD3300
Fuel tank drain
36 - 51
plug
(49 - 69) (5 - 7)
Rear spring center
80 - 94
bolt
(108 - 127) (11 - 13)
25 - 33
UD1800 and
(34 - 45) (3.5 - 4.6)
UD2000
MLS63
72 - 89
Actuator lock nut
UD1800 thru
90 - 105
Manual transmis-
(98 - 120) (10 - 12)
UD2300 and
UD3300
(122 - 142)
sion drain and filler
UD2600
(12.4
- 14.5)
plug
MPS63
87 - 101
UD2600 and
(118 - 137) (12- 14)
UD3300
13 - 4

-------------------------------------------------------------------------------------------------------------------------------------------------------------

SERVICE DATA
BULBS
RECOMMENDED LUBRICANTS
Wattage
Trade
Lubricant/Fluid
Specifications
Remarks
Items
(W)
No.
Engine oil
VDS-4
See page 11-31
Headlight (Halogen)
60/55
HB2
Manual
API :GL-4
Refer to "RECOM-
Front turn signal light
21
-
Gear
transmission
#80W/90
MENDED SAE VIS-
Front side turn signal light
21
-
oil
COSITY CHART" on
API
MIL-
Front clearance light
5
168
Differential
page 13-6.
GL-5
L2105B
Front identification light
5
168
See the Allison
Rear combination light
Tail & stop light
8/27
1157
automatic
Rear turn signal light
27
1156
Automatic transmis-
transmission
UD1800 thru UD3300
sion fluid
fluid recommen-
License plate light
8
67
dations next
Back-up light
27
1156
page.
Room light
10
-
DEXRON® II or
Power steering fluid
GM ATF type
higher grade
Apply grease
NLGI No. 1
Grease
Lubricate with a
NLGI No. 2 or
Lithium soap base
grease gun
NLGI No. 3
US FMVSS
Brake and clutch fluid
DOT 3
No. 116
Antifreeze
-
(1)
Remarks:
(1) UDXtra Long Life Diesel Engine Antifreeze/Coolant
13 - 5

-------------------------------------------------------------------------------------------------------------------------------------------------------------

SERVICE DATA
Allison automatic transmission fluid recommenda-
RECOMMENDED SAE VISCOSITY CHART
tions
Hydraulic fluids used in the transmission are important
influences on transmission reliability and durability.
Allison TranSynd fluids or TES-295 approved fluids are
recommended.
This vehicle is factory filled with TranSynd fluid.
Synthetic Lubrication
Synthetic oils are offered by some oil suppliers as an
alternative to the traditional, petroleum based oils for
engines. These oils may be used in UD TRUCKS
engines, provided UDXtra and VDS-4 they meet the
quality levels specified in “Oil Quality”.
The use of synthetic oils does not permit the extension of
the recommended oil change intervals. It is the contami-
nation rate, i.e., soot, and the depletion of additives,
rather than base oil quality that determines the useful
engine oil life and therefore the oil change intervals.
13 - 6

-------------------------------------------------------------------------------------------------------------------------------------------------------------

SERVICE DATA
REFILL CAPACITIES
(Cont’d)
US
US
Item
Liter
Remarks
Item
Liter
Remarks
measure
measure
With oil filter
18.4 qt
17.4
UD1800, UD2000
6.9 qt
6.5
and UD2300LP
Engine oil
Without oil
18.0 qt
17.0
filter
Differential gear oil
9.5 qt
9
UD2300DH
Power steering fluid
5.9 qt
5.5
UD2600 and
13.8 qt
13
UD3300
UD1800
Without
7.2 qt
6.8
PTO
UD1800 and
thru
MLS63
32.8 gal
124
Manual
UD2000
UD3300
transmis-
With PTO
7.8 qt
7.3
32.8 gal
124
UD2300
sion gear
Without
UD2600
8.3 qt
7.8
Fuel tank
oil
PTO
Optional for
and
MPS63
48.9 gal
185
UD2300DH only
UD3300
With PTO
8.8 qt
8.3
UD2600 and
Allison
48.9 gal
185
UD3300
1000,
UD1800 thru
16.3 qt
15.4
2200 and
Windshield washer fluid
4.3 qt
4
UD3300
Automatic transmis-
2500
With manual
series
6.9 gal
26
sion fluid (system total)
transmission
Allison
UD2600 and
With Allison 1000,
31.6 qt
29.9
3000
UD3300
Cooling system solution
6.6 gal
25
2200 and 2500
series
series
With Allison 3000
7.9 gal
30
series
NOTE:
z Quantities listed
are approximate. When filling,
observe the specified level.
13 - 7

-------------------------------------------------------------------------------------------------------------------------------------------------------------

SERVICE DATA
CONVERSION FACTORS
Length
1 inch (in) = 25.40 millimeters (mm)
Pressure
1 kilopascal (kPa)
= 0.1450 pound/square-inch (psi)
= 0.01020 kilogram/square-centimeter (kgf/cm2)
Torque
1 newton-meter (N·m)
= 0.7375 feet-pound (ft·lbf)
= 0.1020 kilogram-meter (kgf·m)
Weight
1 pound (lb) = 0.4536 kilogram (kg)
Volume
1 US pint (US pt) = 0.4732 liter
1 US quart (US qt) = 0.9463 liter
1 US gallon (US gal) = 3.785 liter
Temperature
degrees Fahrenheit (°F)
= 1.8 x degrees Celsius (°C) + 32
13 - 8

-------------------------------------------------------------------------------------------------------------------------------------------------------------

REPORTING SAFETY DEFECTS
REPORTING SAFETY
DEFECTS
If you believe that your vehicle has a defect which could
cause a crash or could cause injury or death, you should
immediately inform the National Highway Traffic Safety
Administration
(NHTSA) in addition to notifying UD
Trucks North America, Inc. If NHTSA receives similar
complaints, it may open an investigation, and if it finds
that a safety defect exists in a group of vehicles, it may
order a recall and remedy campaign. However, NHTSA
cannot become involved in individual problems between
you, your dealer, or UD Trucks North America, Inc.
To contact NHTSA, you may either call the Auto Safety
Hotline toll-free at
1-800-424-9393
(or
366-0123 in
Washington, D.C. area) or write to: NHTSA, U.S. Depart-
ment of Transportation, Washington, D.C. 20590. You
can also obtain other information about motor vehicle
safety from the Hotline.
14 - 1


Content      ..     13      14      15      16     ..