UD Trucks. Owner’s Manual (2011-2013) - page 11


  Главная      Manuals     UD Trucks. Owner’s Manual (VEHICLE SERVICE AND MAINTENANCE) (2011-2013)


Search            copyright infringement  


Content      ..     9      10      11      12     ..


UD Trucks. Owner’s Manual (2011-2013) - page 11


-------------------------------------------------------------------------------------------------------------------------------------------------------------
VEHICLE SERVICE AND MAINTENANCE
UD2300
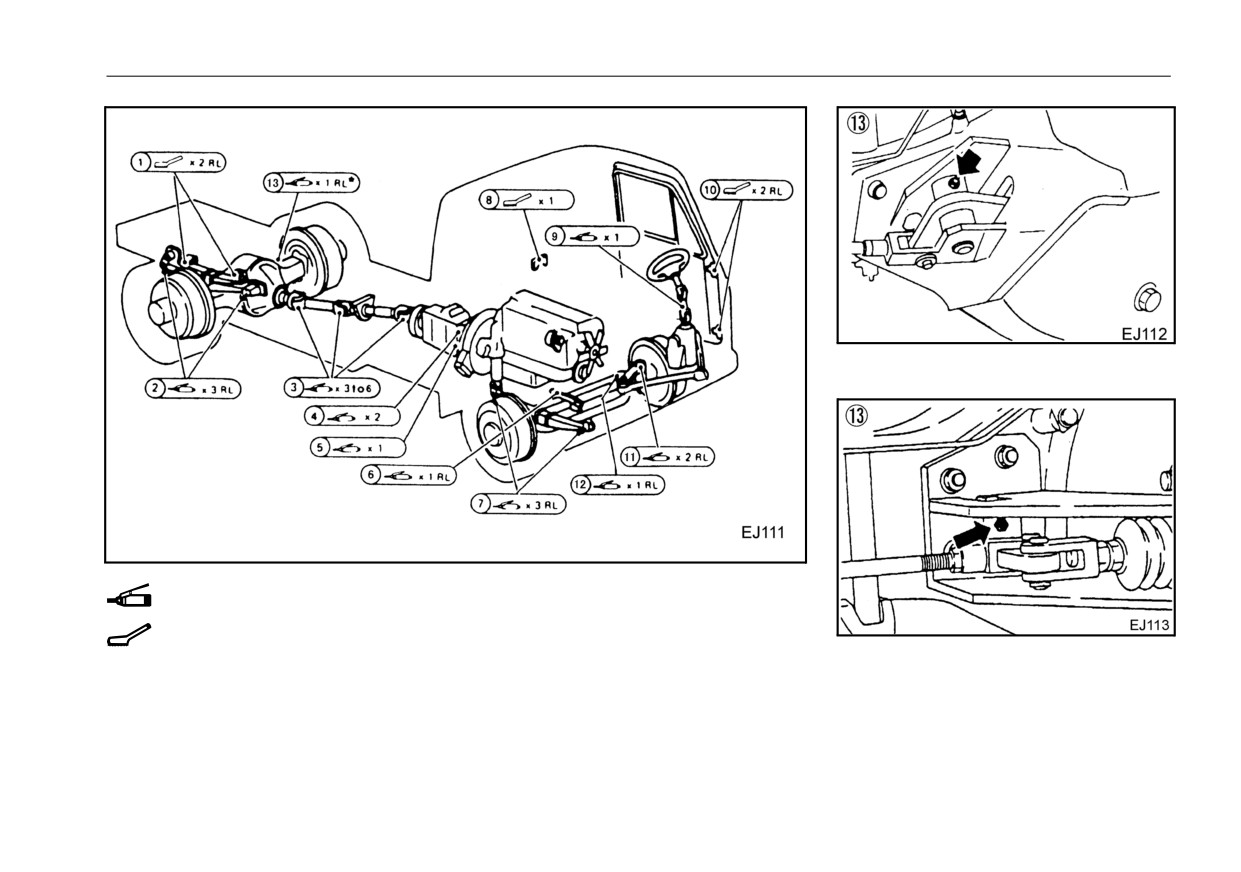
: Lubricate with a grease gun.
: Apply grease manually with a stick. Do not apply with finger or hand.
RL
: Lubrication points located on both left and right sides of vehicle.
UD2600
x 2
: Number of grease nipples or points.
*
: Refer to enlarged view.
11 - 17

-------------------------------------------------------------------------------------------------------------------------------------------------------------

VEHICLE SERVICE AND MAINTENANCE
UD3300
UD3300
11 - 18

-------------------------------------------------------------------------------------------------------------------------------------------------------------

VEHICLE SERVICE AND MAINTENANCE
BEFORE PERFORMING
z Shift the transmission to the NEU-
Used oil, coolant, fuel, etc.
MAINTENANCE
TRAL position (Manual transmis-
It is illegal and harmful to the envi-
sion) or P
(Park) or N (Neutral)
ronment to dispose of used oil or
position (Automatic transmission).
coolant, fuel, etc., by pouring it on
WARNING
z Apply the parking brake and chock
the ground, into sewers, or into bod-
ies of water. Only use authorized
the wheels.
z Incomplete or improper ser-
recycling facilities that may be pro-
z Allow the engine to cool before
vice or repair could cause
vided by the local government or a
attempting to service the vehicle.
vehicle malfunction resulting
service facility. If any doubt, contact
in serious injury or vehicle
z Whenever possible, perform
local government authorities or your
damage.
inspections with the engine off and
authorized UD Trucks dealer or qual-
z If you must work under the
cooled.
ified service facility.
vehicle while it is jacked up,
use safety stands and wheel
WARNING
chocks.
When you must inspect or ser-
vice a part or system with the
Use care when inspecting, servicing
engine running:
or repairing the vehicle. Heed the
z Remove neckties,
rings,
warnings and follow the instructions
watches, other jewelry and
given on the labels and in this man-
loose articles.
ual.
z Keep articles, hands, clothes,
If you have any questions, contact
hair and tools away from the
your authorized UD Trucks dealer or
drive belts and fan.
qualified service facility before pro-
z Avoid shorting the battery ter-
ceeding. Assure that the service or
minals.
repair has been completed properly.
z Be sure that sufficient ventila-
Before performing any service or
tion is available.
maintenance on your UD Trucks
z Avoid contact with hot sur-
vehicle;
faces.
z Park the vehicle on a level ground.
11 - 19

-------------------------------------------------------------------------------------------------------------------------------------------------------------

VEHICLE SERVICE AND MAINTENANCE
CAB
Opening the front lid
1.Pull the lever located near the
Opening and closing the front lid
underside of the left front pillar to
release the front lid lock.
CAUTION
z Crush hazard. Turn off wipers
before servicing.
z Before opening the front lid,
set the wiper arms to their nor-
mal positions. If the front lid is
3.When opening the front lid, be sure
opened with the wiper arms
to set the lever into the hole that is
tilted forward, the front lid will
contact the wiper arms. This
indicated with the mark located on
could damage the wiper arms
the front lid.
and front lid.
2.Disengage the front lid hook. Push
z
Before driving, make sure the
up the front lid and secure it with
front lid is securely locked.
the rod.
11 - 20

-------------------------------------------------------------------------------------------------------------------------------------------------------------

VEHICLE SERVICE AND MAINTENANCE
Closing the front lid
Tilting the cab
1.Put away the rod.
Your UD Trucks vehicle provides
2.Lower the front lid slowly.
easy access for routine service and
3.Push down the front lid until it
maintenance. Many inspection and
clicks into place.
maintenance procedures can be per-
4.Make sure that the front lid is
formed without tilting the cab. For
locked.
those that require tilting, the cab of
your UD Trucks vehicle can be lifted
with one person. The torsional spring
WARNING
lifting system raises the cab auto-
matically after it is released with little
z
When opening the front lid, be
or no upward pressure from the
1.Stop the vehicle on a level ground.
sure to set the lever into the
operator.
hole that is indicated with the
2.Shift the transmission to the neu-
mark located on the front lid.
Before tilting the cab
tral position and apply the parking
If the lever is placed on other
Before tilting the cab indoors, make
brake.
locations, the lever may disen-
sure that there is sufficient clearance
3.Make sure the engine is not run-
gage and the front lid may then
above the cab (height clearance; H)
ning.
close. This may cause an
and in front of the cab
(advance
4.Chock the wheels as necessary.
injury.
clearance; F). The vehicle requires
5.Remove loose or heavy articles
minimum clearances of 13.1 ft (4 m)
from the cab.
in height and 4.9 ft (1.5 m) forward of
6.Close the cab doors.
CAUTION
the cab.
z
To prevent possible damage,
before washing inside the front
lid, close the heater air inlet to
protect it from water.
11 - 21

-------------------------------------------------------------------------------------------------------------------------------------------------------------

VEHICLE SERVICE AND MAINTENANCE
Tilting the cab
cab frame. The torsional springs
will cause the cab to raise slightly.
WARNING
z Do not stand in front of or
under the cab while tilting or
lowering the cab. Put the
safety pin into the pin hole
immediately after tilting to
avoid accidental lowering of
the cab.
4.Tilt the cab all the way forward until
the tilt strut is straight and insert
1.Remove the lock pin from the tilt
3.While holding the grip (located on
the safety pin into the pin hole on
lock lever.
the lower left side of the cab) on
the side of the tilt strut.
the cab, pull the sub hook lever out
all the way. When the sub hook
lever is fully extended, the cab will
float up. If the cab does not float
up, push the cab body up manu-
ally.
2.Pull the tilt lock lever out all the
way. This releases the main hook
which holds the cab body to the
11 - 22

-------------------------------------------------------------------------------------------------------------------------------------------------------------

VEHICLE SERVICE AND MAINTENANCE
Lower the cab
3.While supporting the cab with your
WARNING
hand on the grip, under the left
1.Check that no cloth, gloves, or
side of the cab, pull the tilt strut
To avoid the chance of serious
tools are left on or around the
injury and/or property damage
rearward and lower the cab.
engine, the exhaust manifold or
when working on engine with the
other hot surfaces.
cab tilted:
z
Make sure that the parking
CAUTION
brake is firmly applied, the
wheels are blocked, and the
z Tools left in the engine com-
transmission shift lever is in N
partment can damage the vehi-
(Neutral),
before
starting
cle.
engine.
z Flammable materials left on or
z
Be careful not to touch the
near hot surfaces can be a fire
transmission control cable
hazard.
when the engine is running.
Otherwise, the transmission
2.Remove the safety pin from the pin
gears could engage and the
hole and store it in the storage
WARNING
vehicle could move suddenly.
hole on the tilt strut.
z
Keep yourself, your clothing
z When the tilt strut is
pulled
and your tools away from mov-
rearward, the weight of the cab
ing parts such as the cooling
may cause it to lower. Maintain
fan and drive belts when the
your secure grip on the grip
engine is running.
and lower the cab in a con-
trolled manner.
NOTE:
z Cover the air cleaner opening to
4.Lower the cab all the way to its
prevent dust or rainwater from
normal position.
entering when leaving the cab
5.Check to be sure that the main
tilted for a long time.
hook on the rear center portion of
11 - 23

-------------------------------------------------------------------------------------------------------------------------------------------------------------

VEHICLE SERVICE AND MAINTENANCE
the cab firmly engages the main
ENGINE COOLING SYSTEM
WARNING
hook pin, located at the center of
the cab mounting bracket.
z
If the cab has not been com-
pletely locked, when the igni-
The engine cooling system was filled
tion key is turned ON, the
at the factory with UDXtra Long Life
warning light will come on and
Diesel Engine Antifreeze/Coolant
the warning buzzer will sound
with a
50/50 antifreeze/water mix-
at the same time. Relock the
ture. UDXtra Long Life Diesel Engine
cab.
Antifreeze/Coolant contains rust and
z
Do not operate the vehicle
corrosion inhibitors. UDXtra Long
without engaging the lock pin
Life Diesel Engine Antifreeze/Cool-
in the tilt lock lever. If the lock
ant provides protection against
pin cannot be inserted, then
freezing to approximately -31°F (-
the main hook is not engaged
35°C). UDXtra Long Life Diesel
with the main hook pin. If not
Engine Antifreeze/Coolant must
properly engaged, then the cab
remain in the system within 4 years
6.Replace the lock pin in the tilt lock
could rise accidentally while
or
320,000 miles (500,000 km) to
lever.
the vehicle is moving which
provide protection against freezing,
could cause loss of vehicle
boiling, rust and corrosion. Do not
control and serious injury.
use additional cooling system addi-
tives or inhibitors. They may interfere
with the proper operation of the cool-
ing system.
Check the engine, radiator, hoses
and pipes daily. Repair any leaks.
Replace swollen and worn hoses
and tighten loose clamps.
Check the ENGINE COOLANT
LEVEL warning light daily. If the
warning light comes on, follow the
11 - 24

-------------------------------------------------------------------------------------------------------------------------------------------------------------

VEHICLE SERVICE AND MAINTENANCE
instructions in the “INSTRUMENTS
AND CONTROLS” of this manual.
WARNING
z
Never drink Long Life Coolant,
Checking engine coolant level
as it is toxic.
If you drink it by mistake,
immediately induce vomiting
and then consult with your
WARNING
doctor.
To avoid serious injury from hot
z
If the coolant gets into the eye,
immediately rinse it away with
coolant or steam release:
fresh water and take medical
z
Do not open the radiator filler
treatment promptly.
cap while the engine cooling
NOTE:
z
Wash the coolant off with
system is hot; wait until it
z Coolant will automatically be
clean water and then with soap
cools.
supplied from the reservoir tank
immediately when the coolant
z
Be extremely careful when
gets on to your skin or cloth.
to the radiator. Do not remove
opening the radiator filler cap.
z
Tighten the coolant container
the radiator filler cap.
Place a thick cloth on the cap
cap and store it out of the
and slowly loosen it to allow a
reach of children.
Long Life Coolant
reduction in pressure in the
For the coolant, use UDXtra Long
cooling system.
Open the front lid.
Life Diesel Engine Antifreeze/Cool-
Check the engine coolant level daily
ant that has been diluted 50% year
only when the engine is cool. Check
round. The LLC has an additive for
the coolant level in the coolant reser-
rust prevention and anti-freezing. It
voir tank located behind the front lid.
is not necessary to add commercially
The coolant level should be between
available antifreeze or rustproof
the MAX and MIN lines. If the cool-
agent.
ant level is below the MIN line, add
the proper coolant solution to the
Precautions for use of LLC
MAX line.
z The service period of LLC is 4
years or
320,000 miles
11 - 25

-------------------------------------------------------------------------------------------------------------------------------------------------------------

VEHICLE SERVICE AND MAINTENANCE
(500,000 km). After the service
CAUTION
CAUTION
period, clean the cooling sys-
tem completely and replace the
z
Antifreeze made with methoxy
z If the coolant should get
propanol or propylene glycol
extremely low and the engine
coolant.
is not recommended for use
very hot, let the engine cool
z When the engine coolant level
before adding coolant; then,
with UD Trucks engines. These
has dropped due to natural
with the engine running, add
types of antifreeze can damage
water dissipation while using
coolant slowly. Adding cold
engine internal seals and cool-
coolant to a hot engine may
Long Life Coolant, add genuine
ant hoses and create a poten-
crack the cylinder head or cyl-
Long Life Coolant that has been
tial fire hazard due to lower
inder block. Never use water
diluted 50%.
flash points than ethylene gly-
alone.
col type antifreeze.
Dilution Water
z
Use only municipally supplied
Checking and cleaning radiator
Dilution water for the cooling system
water in the cooling system.
should be clean, free from deposit
River, well or other water pro-
To maintain cooling system effi-
and scale forming materials, and
duces scale in the cooling sys-
ciency and keep the engine from
corrosive chemicals.
tem, which may cause damage
overheating, always keep the front
to the engine or cooling sys-
surface of the radiator core clean.
tem.
Remove insects, dirt and other
z
Do not add water without add-
debris by directing pressurized air at
ing ethylene glycol antifreeze
the rear surface of the radiator core.
to the engine cooling system,
except in an emergency. If
plain water is added in an
emergency, restore the proper
mixture of antifreeze and water
as soon as possible.
11 - 26

-------------------------------------------------------------------------------------------------------------------------------------------------------------

VEHICLE SERVICE AND MAINTENANCE
When mud, debris, etc., becomes
Cooling fan and fan shroud
CAUTION
attached to the front of the core, the
Check the cooling fan and fan
z Do not direct pressurized air to
passage of cooling air is impaired, so
shroud for proper installation, cracks
the front surface of the radiator
it is recommended that this material
or damage. Replace or repair faulty
(that is, with the air hose
should be removed completely by
parts or damage.
pointed toward the engine).
washing with a non corrosive deter-
Doing so will force insects, dirt
gent and water solution. (Refer to
and other debris into the radia-
instructions on the detergent con-
tor core and possibly cause
tainer.)
engine overheating.
Deformed fins also can impair cool-
ing, and should be repaired.
Clean charge air cooler body
Clean the inside by blowing with air
when changing charge air cooler
hoses.
CAUTION
Precautions when washing near
the alternator.
z Using a moist alternator brush
may shorten the life of the
alternator. Use an alternator
that has been sufficiently dried
by using an item such as an
air-blower.
The charge air cooler is used to cool
the overheated intake air charged by
NOTE:
the turbocharger, and is installed at
z Do not use water to clean the
the front of the radiator.
inside of the charge air cooler
body. Using water will impair
cooling due to corrosion.
11 - 27

-------------------------------------------------------------------------------------------------------------------------------------------------------------

VEHICLE SERVICE AND MAINTENANCE
Changing coolant
WARNING
z
To prevent hand injury, never
WARNING
get your hand near the fan
To avoid serious injury from hot
when the engine is running. If
coolant or steam release:
vehicle has an automatic fan
z
Do not open the radiator filler
clutch, the fan may slow when
cap and drain cocks while the
the coolant is cool, but it can
engine cooling system is hot;
still cause hand injury.
wait until it cools.
z
Be extremely careful when
opening the radiator filler cap.
CAUTION
Place a thick cloth on the cap
z
Do not modify the crankshaft
and slowly loosen to allow a
or fan pulleys to increase the
reduction in pressure in the
rated speed of the engine or
cooling system.
fan. Doing so may cause the
z
Be careful not to spill coolant
cooling fan blades to break
over the hot exhaust system
possibly resulting in injury.
which can cause fire, serious
Also, such modification consti-
injury and/or property damage.
tutes tampering with the noise
control system.
Every
4 years or
320,000 miles
(500,000 km) the UDXtra Long Life
Diesel Engine Antifreeze/Coolant or
its equivalent in the cooling system
should be drained and thoroughly
flushed.
11 - 28

-------------------------------------------------------------------------------------------------------------------------------------------------------------

VEHICLE SERVICE AND MAINTENANCE
WARNING
z
Never drink Long Life Coolant,
as it is toxic.
If you drink it by mistake,
immediately induce vomiting
and then consult with your
doctor.
z
If the coolant gets into the eye,
immediately rinse it away with
fresh water and take medical
treatment promptly.
Unless the cooling system is treated
z
Wash the coolant off with
with corrosion preventive, rust and
clean water and then with soap
scale will eventually clog up pas-
immediately when the coolant
gets on to your skin or cloth.
sages in the radiator and water jack-
z
Tighten the coolant container
ets. This condition is aggravated in
cap and store it out of the
some localities by formation of insol-
reach of children.
uble salts from the water used.
CAUTION
To clean the cooling system
1.Open the radiator filler cap.
z Do not use chemical mixtures
2.Place containers under the radia-
to stop radiator leaks except in
tor drain cock and the cylinder
an emergency. Never use such
block drain cock.
solutions in place of needed
radiator repair.
Except for Allison 3000 series
specification vehicles
11 - 29

-------------------------------------------------------------------------------------------------------------------------------------------------------------

VEHICLE SERVICE AND MAINTENANCE
4.Drain all coolant solution from the
Start the engine and run it at a
system into the containers.
moderate speed in the same man-
For Allison 3000 series specifica-
ner as described in step 6.
tion vehicles, drain coolant from
9.Stop the engine. Open the drain
two drain cocks: one is located on
cocks and drain the rinsing water.
the oil cooler coolant hose and the
10.Repeat the rinsing procedure 2 or
other is located under the radiator.
3 times until the discharged rinsing
5.Shut the drain cocks. Fill the cool-
water appears clean.
ing system with a proper mixture of
11.Close the drain cocks.
water and a good quality cooling
To fill up the cooling system (With
Allison 3000 series specification
system detergent.
(Refer to the
coolant)
vehicles
additional instructions on the
Use the following refill procedure to
detergent container)
remove air from the system and pro-
3.Open the radiator drain cock and
6.Start the engine and run it at a high
vide proper engine coolant level.
the cylinder block drain cock.
idling speed until the indicator
1.Fill the radiator slowly with the
NOTE:
points to the middle region of the
proper coolant solution up to the
z The radiator drain cock has a
engine
coolant
temperature
filler opening. Add coolant solution
specified turning direction and
up to the MAX level of the coolant
gauge. Maintaining the above
must be turned to the position
reservoir tank. Capacities are
engine coolant temperature with
directly below the mark when
the thermostat open, run the
shown below.
draining water.
engine and allow the detergent to
z Drain water by turning the radia-
circulate throughout the cooling
tor drain cock round approxi-
system for at least 15 minutes.
mately 7 to 8 times.
Be careful not turn the radiator
7.Stop the engine. Open the drain
drain cock round more than 9
cocks and completely drain the
times. Doing so may cause the
detergent from the system.
drain cock to fall off.
8.Shut the drain cocks and fill the
cooling system with plain water.
11 - 30

-------------------------------------------------------------------------------------------------------------------------------------------------------------

VEHICLE SERVICE AND MAINTENANCE
US
4.Check the engine coolant level in
ENGINE OIL AND OIL FILTERS
mea-
Liters
the coolant reservoir tank. If the
sure
level is between the MIN and MAX
Engine oil recommendations
With manual transmission
6.9 gal
26
lines, it is normal. If it is below the
Except for
To extend the lubrication perfor-
Allison
6.6 gal
25
MIN level, add coolant solution up
With auto-
mance of your engine
“UDXtra
3000 series
matic trans-
to the MAX level.
mission
Engine oil” or equivalent is available,
Allison
7.9 gal
30
5.If the added coolant solution is
3000 series
which has been specifically tested
more than 16.9 US fl oz (500 milli
and approved for UD Trucks
Then properly close the radiator
liter), check and correct for any
engines.
filler cap and the reservoir tank
sign of leakage, then repeat steps
Please contact an authorized UD
cap.
1 to 4.
Trucks dealer for further details
6.Check the drain cock for leaks.
about “UDXtra Engine oil”.
2.Operate the engine at a slightly
Please consult the following instruc-
higher than normal idling speed
tions to select and use the proper
with the throttle control knob until
lubricant from a reliable supplier to
the engine coolant temperature
enhance trouble-free operation and
indicator points the middle region
service life of the engine.
of the gauge. Run the engine an
additional 10 minutes to allow the
Oil grade: VDS-4
air to escape from the engine cool-
Oil quality
ing system.
UD TRUCKS North America recog-
3.Stop the engine. After the engine
nizes engine oils that meet or
has completely cooled down,
exceed the standards given by
remove the radiator filler cap and
American Petroleum Institute (API)
check the engine coolant level in
for the oil classifications listed in this
manual.
the radiator. If low, add coolant to
Only oils licensed to carry the API
the radiator filler opening.
symbol should be used. Lubricants
Reinstall the radiator filler cap.
meeting API standards have pro-
11 - 31

-------------------------------------------------------------------------------------------------------------------------------------------------------------

VEHICLE SERVICE AND MAINTENANCE
vided maximum engine life when
is not fully defined until both the API
used together with the recom-
quality classification and the viscos-
mended oil and oil filter change inter-
ity grade are specified.
vals.
Choose the viscosity grade for the
UDXtra (or VDS-4) diesel engine oil
typical ambient air temperature
is mandatory for use in all
2010
(AAT) for the application.
emission compliant engine.
Multi grade oils have a broad range
UDXtra (or VDS-4) oils exceed the
that suit operation in changing tem-
API CJ-4.
perature.
For a complete list of approved oils,
The standard oil weight for UD
see your UD TRUCKS dealer.
TRUCKS engines is 10W/30.
Also, refer to Technical Bulletin EN-
UD TRUCKS recommends the vis-
42, Approved Oils, UDNA.
cosities shown in the viscosity/ tem-
CAUTION
perature table for UD TRUCKS
NOTE:
z
Use of diesel fuel other than
engines.
z UD Trucks recommends using
ULSD (Ultra Low Sulfur Diesel
the engine oil designated above
NOTE:
fuel) and engines oils other
for the proper function of the
z
Select the oil viscosity accord-
than UDXtra
(or VDS-4), will
DPF system, and also use ultra
ing to the next diagram, basing
adversely affect performance,
low sulfur diesel fuel (0.0015%
your selection on the maximum
efficiency and durability of the
[15 ppm] by weight) only and
and the minimum ambient air
Aftertreatment DPF system
low-ash fuel must be less than
temperatures.
and the engine may not run at
1% in weight.
all.
z
Manufacture’s warranties can
Oil viscosity and relation between
also be rendered void due to
viscosity and temperature:
usage of improper fuel.
The viscosity grade defines the
Unapproved fuel additives
thickness of the oil. The oil must be
(including engine oil) are NOT
thin enough at low temperatures for
permitted.
easy cold starts and thick enough to
protect at high temperatures. An oil
11 - 32

-------------------------------------------------------------------------------------------------------------------------------------------------------------

VEHICLE SERVICE AND MAINTENANCE
7.Light duty in city operations
Checking engine oil level
8.Annually mileage up to
65,000
z DO NOT add extra oil addi-
miles (100,000 km)
tives. Additives such as break-
WARNING
in oils, top oils, graphitizes,
and friction - reducing liquids
Type 2
z To avoid serious injury from
are not necessary and can
1.Light long duty distance transport
hot engine and engine oil, only
harm the engine.
check engine oil level and per-
2.Mainly on motor ways and express
form maintenance after engine
highways
Periodic service interval
has cooled.
3.Annually mileage over
65,000
miles (100,000 km)
Check the engine oil level before
Type of
UDXtra
*Non-UDXtra
4.Paved and flat road operations
operation
Engine oil
Engine oil
driving your vehicle each day. Check
24,000 mile
15,000 mile
the oil level with the engine off.
Type 1
(40,000 km)
(25,000 km)
When checking the oil level after
30,000 mile
20,000 mile
stopping the engine, wait at least 30
Type 2
(48,000 km)
(32,000 km)
minutes to allow the oil to return to
the oil pan.
*Non-UDXtra engine oil refer to page
11-31.
To check the engine oil level
1.Park the vehicle on a level ground.
Type of operation
2.Remove the oil level gauge (dip-
stick) located on the left hand side
Type 1
of the engine. Wipe the gauge
1.Unpaved road
clean with an oil rag and reinsert it.
2.Dusty road
Remove the gauge and check the
3.Heavy long distance transport
oil level. Maintain the engine oil
4.Mountain road operations
level between the MAX and MIN
5.Sort-haul distribution operations
6.Construction operations (off-road)
11 - 33

-------------------------------------------------------------------------------------------------------------------------------------------------------------

VEHICLE SERVICE AND MAINTENANCE
marks on the engine oil level
CAUTION
gauge.
z Do not drive the vehicle with
the engine oil level below the
LOW mark on the engine oil
level gauge. An insufficient
quantity of engine oil can
cause engine seizure.
z Use care to keep dirt and
debris from entering the crank-
case through the oil filler port
when adding engine oil.
WARNING
Changing engine oil
3.If oil level is low, add engine oil of
z
Be careful not to spill oil. Do
not add oil if engine or exhaust
the proper viscosity for the antici-
system are hot. Spilling oil on
pated temperature range during
WARNING
hot parts can result in a fire.
the service interval through the oil
z
To avoid serious injury from
filler port located on the valve
4.Change the oil if it shows signs of
hot engine and engine oil, only
cover on top of the engine. Do not
contamination such as discolor-
change oil after engine has
add oil above the MAX mark on
cooled.
ation and changes in oil texture.
the engine oil level gauge.
See the instructions under the cap-
tion "Changing engine oil"on page
CAUTION
11-34.
z
Try to avoid direct skin contact
5.After adding oil, wait at least
10
with used oil. If skin contact is
minutes, then recheck the oil level.
made, wash thoroughly with
6.After checking, securely insert the
soap or hand cleaner as soon
engine oil level gauge.
as possible.
11 - 34

-------------------------------------------------------------------------------------------------------------------------------------------------------------

VEHICLE SERVICE AND MAINTENANCE
Engine oil capacity
plug in the drain hole and tighten
the drain plug.
Replace washer with new ones for
US
Liter
measure
each remove the drain plug.
With oil filter
18.4 qt
17.4
Tightening torque:
Without
40 to 44 ft·lbf (54 to 59 N·m)
18.0 qt
17.0
oil filter
(5.5 to 6.0 kgf·m)
5.Replace the oil filter. Refer to "Oil
The engine oil change interval varies
filter"on page 11-36 for the instruc-
with the type of engine oil used and
tions.
vehicle driving conditions. If the vehi-
6.Add engine oil through the oil filler
cle is driven for extended periods of
3.Place a container under the drain
port.
time at high or low speeds, in dusty
areas, with frequent idling or carrying
plug in the bottom of the oil pan.
7.After refilling the engine oil, wait for
heavy loads, engine oil will deterio-
Remove the plug and drain the oil
at least 10 minutes, then using the
rate faster and require more frequent
into the container.
oil level gauge (dipstick) check the
changing.
oil level. If the engine oil level is
As the temperature rises, the engine
low, add additional oil. Wait
10
oil’s viscosity decreases, reducing its
minutes, then recheck the oil level.
lubricating effect. To choose an oil
Repeat this procedure until the
with the proper viscosity for the
engine oil reading on the engine oil
anticipated ambient air temperature
level gauge is between MAX and
range, refer to "Oil viscosity and rela-
MIN.
tion between viscosity and tempera-
ture:"on page 11-32.
To change the engine oil
1.Park the vehicle on level ground.
2.Remove the oil filler cap.
4.When all the oil has been drained
from the oil pan, replace the drain
11 - 35

-------------------------------------------------------------------------------------------------------------------------------------------------------------

VEHICLE SERVICE AND MAINTENANCE
Oil filter
To replace the filter
2.The oil will drain within approxi-
mately 5 minutes and the cartridge
can then be removed.
CAUTION
CAUTION
3.Tighten the drain plug.
Tightening torque:
z Do not handle hot oil filter
z Just after driving, the engine
without hand protection. Fail-
oil is still hot and can burn
9.4 to 16.7 ft·lbf (12.8 to 22.6 N·m)
ure to do so may result in burn
you. Before changing or
(1.3 to 2.3 kgf·m)
injury.
checking the oil, let it cool
4.Place a new cartridge, turn it 3/4 to
down until you can touch the
1 time after the seal contacts.
oil without getting burned.
NOTE:
NOTE:
z Use genuine UD Trucks filter or
z Make sure the oil drain plug is
As oil is full in the cartridge after an
equivalent in quality and design.
tightened to the listed specifica-
engine stops, it is needed to drain
Use of an inferior filter could
tion prior to the installation of
the oil. The following is an outline of
diminish operation of the engine
the new cartridge.
the procedure.
and emission controls.
z Always replace the oil filter at
5.Add approximately of engine oil
1.Remove the air draining plug, and
the same time that the engine oil
and install the filler cap tightly.
loosen the drain plug until it spins
is replaced.
free.
US
Liter
measure
With oil filter
18.4 qt
17.4
Without
18.0 qt
17.0
oil filter
6.Start the engine and check for oil
leaks.
11 - 36


Content      ..     9      10      11      12     ..