Takeuchi Compact Excavator TB014 (11410001~), TB016 (11610001~). Operators Manual - page 6
OPTIONS
Radio (for EU)
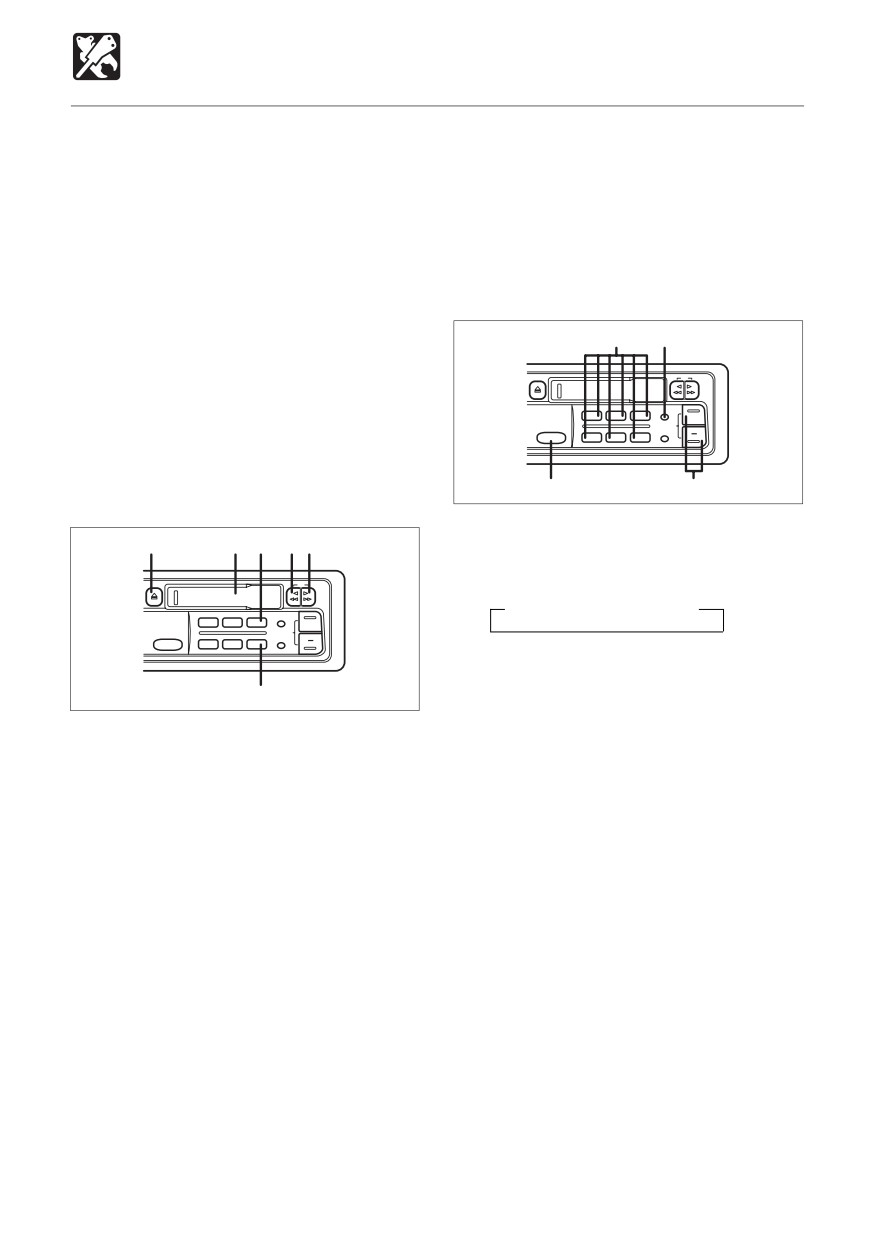
To cancel the beep tones
1, 7, 8
Ejecting the tape
4
The unit emits a beep tone to confirm that a
Press the EJECT button 4 to eject a tape.
function button has been pressed. To cancel
The system will return to the audio source
the function, follow the procedures below.
selected last.
1 Turn off the power by depressing the ON/
OFF button 1.
Radio operation
2 With ACC on, press the ATP button 7
and the preset button 6 8 simultaneously
3
4
until the display lights. The beep tones
DIR
are cancelled and boF F
is displayed.
3 To turn the beep tones on again, repeat
ATP
1
2
3
ʔP.SCAN
TUNE/SEEK
steps 1 and 2 and b-on is displayed.
CLOCK
BAND
4
5
6
1
2
C4C032
Tape operation
Selecting radio mode
4
1
6
3
2
Each time the BAND button is pressed, the
selected band changes as shown below.
DIR
→ FM1 → FM2 → MW
1
2
3
ATP
ʔP.SCAN
TUNE/SEEKCLOCK
BAND
4
5
6
Radio tuning
2
¡ Automatic tuning
5
C4C031
Press the TUNE/SEEK + or - button 2
Selecting tape mode
for more than 2 seconds.
Insert a cassette into the tape slot 1 and
When the button is released, the system
the tape player will start.
will start automatic tuning and stop at the
next receivable station.
Switching the tape direction
2, 3
Press BUTTONS 2 and 3 simultaneously.
¡ Manual tuning
¡ When the tape reaches the end of one
To select higher frequency stations, press
side, the unit will automatically switch to
the + button for less than 0.5 seconds.
the opposite side of the tape.
To select lower frequency stations, press
the - button for less than 0.5 seconds.
Fast forward and rewind
2, 3
To quickly scan up or down in frequency,
Press button 2 to fast-forward; press button
press and hold the + or - button.
3 to rewind the tape. To stop fast forwarding
Release the button when the display
or rewinding, lightly press the opposite button
approaches the desired frequency, then
2 or 3 to return to the play mode.
press and release the button repeatedly
During fast forward and rewind, the radio
until the desired frequency is displayed.
monitor is activated. The unit receives the
A flashing decimal point in the frequency
station selected last.
display indicates that the system is
receiving a station 50 kHz higher than the
displayed frequency.
201
OPTIONS
Radio (for EU)
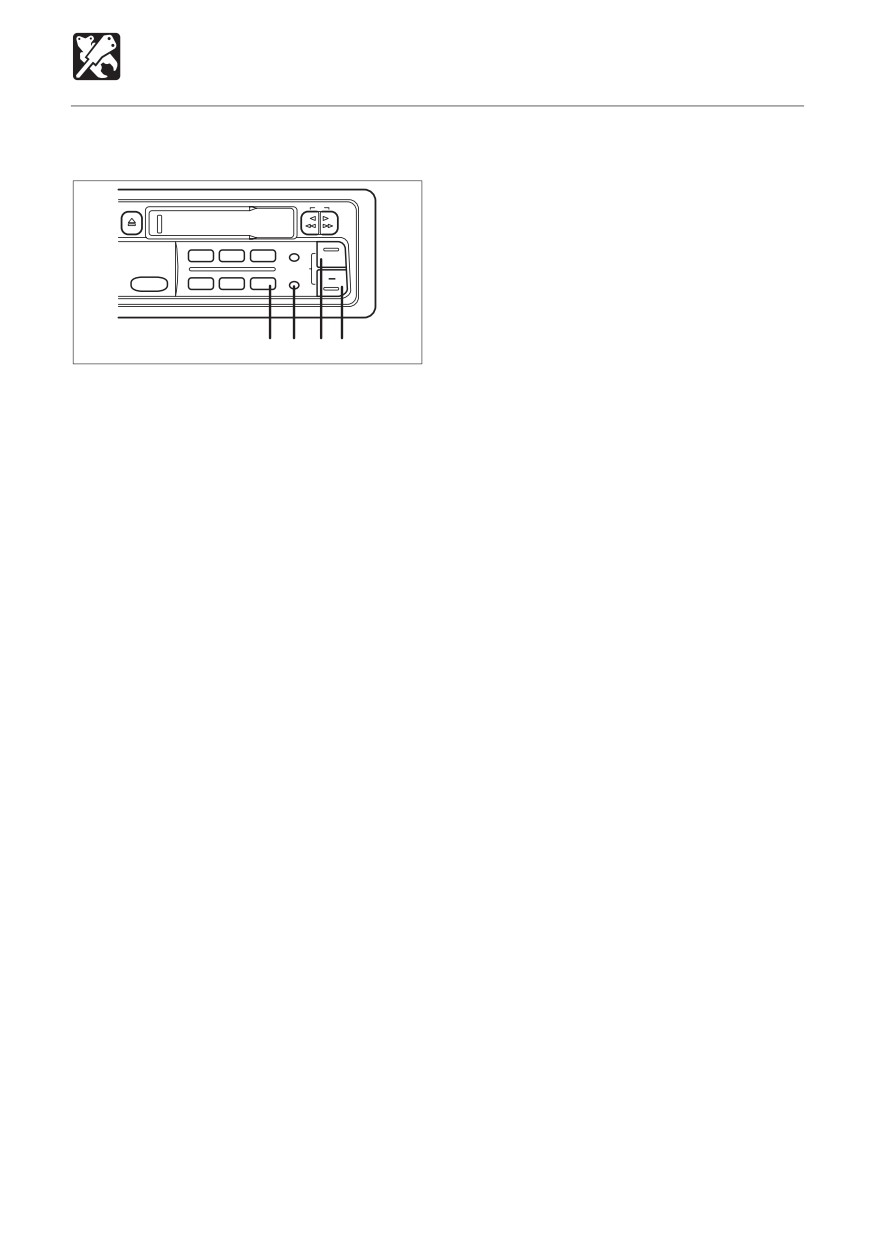
Storing preset stations
3
¡ To scan programmed stations
The preset buttons 3 can be used to store
See “Preset-Scan-Button operation”.
6 stations in each band (FM1, FM2, and MW)
Supplement: If no station can be received,
for convenient access to your favorite
“- - -” appears in the display.
stations.
If fewer than 6 stations can be received, the
¡ Programming stations
system will memorize as many stations as
1 Select the desired band, then tune in
possible, then select the one memorized first.
the station you want to store in
memory.
Preset-Scan-Button operation
1, 4
2 Press and hold one of the preset
This function scans each of the preset
buttons for more than 2 seconds.
stations stored in the selected band (both
Repeat steps 1 and 2 to program
manual preset and auto travel presets).
additional stations.
1
Select the desired band or ATP mode.
¡ Quick tuning
Press the BAND/P.SCAN button 1 for
Select the desired band, then press one
FM1, FM2 or MW, or press the ATP
of the six preset buttons.
button 4 for less than 0.5 seconds to
select the ATP mode.
ATP (Auto Travel Preset) operation
4
2
Press the BAND/P.SCAN button 1 for
The Auto Travel Preset function searches for
more than 2 seconds. The system will
and memorizes the 6 strongest stations in
select and receive each preset station for
one of the two bands (FM, MW) in order of
5 seconds.
signal strength.
3
To stop scanning and retain the station
This feature is useful when you are driving
currently selected, press the BAND/
in an unfamiliar location and want to
P.SCAN button 1 again during this five-
memorize local stations without changing the
second period.
standard preset stations.
A total of 12 stations (6 FM and 6 MW) can
be programmed.
¡ To set the stations
1 Select the desired band.
2 Press and hold the ATP button 4 for
more than 2 seconds, “ATP” appears
in the display.
When the stations have been
memorized, scanning stops and the
strongest station is selected.
Quick Tuning of ATP Stations
• Select the desired band.
• Press the ATP button if the “ATP”
indicator dose not appear in the display.
• Press the ATP button for less than 1
second to select the ATP presets in
sequence. If a total of six stations
cannot be preset “- - -” will be displayed
for the empty channels.
202
OPTIONS
Radio (for EU)
Clock
DIR
ATP
1
2
3
TUNE/SEEK
ʔP.SCAN
CLOCK
BAND
4
5
6
4
1
2
3
C4C033
Display mode change
1
The display on the unit can be changed by
pushing the button 1. Pushing button 1
alternates the display between time and
radio/tape. Press the CLOCK button 1 to
switch between the clock and audio display.
When a radio or tape function is performed
while the time display is selected, the audio
display will appear for 10 seconds, then the
display will return to the time mode.
Adjusting the time
1, 2, 3
To adjust the time, press the TUNE/SEEK
+2 or -3 button while pressing the
CLOCK button 1.
To adjust the hour, press the + button.
To adjust the minutes, press the - button.
To advance the time rapidly, hold the - or
+ button continuously.
Clock reset
1, 4
Press preset button 6 4 while holding the
CLOCK button to skip to the nearest half-
hour as follows:
Example: 3:00 ~ 3:29 → 3:00
3:30 ~ 3:59 → 4:00
Supplement: This unit uses a 12-hour clock.
The clock function and radio presets are
retained in memory when the audio is
switched off.
203
OPTIONS
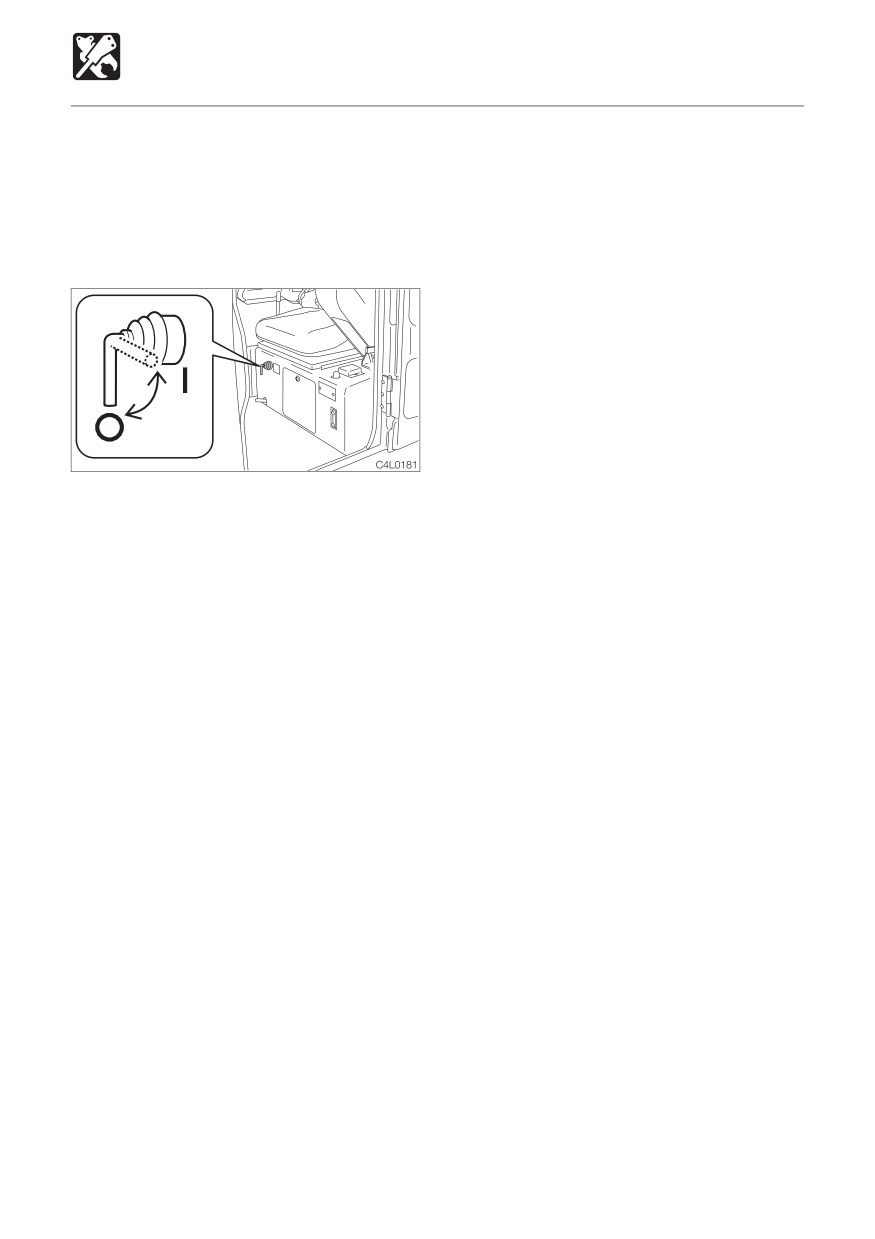
Battery Switch
IMPORTANT: Never set this switch to the
OFF (O) position while the engine is
running.
Doing so might cause damage to the
electrical system.
OFF (O) .. Switches off the electrical circuit.
Be sure to set this switch to the
OFF (O) position when storing the
machine for a long period, or
when performing maintenance of
the electrical system.
ON ( I )
Connects the electrical system.
Check that this switch is in the
ON ( I ) position before starting
the engine.
Supplement: Setting this switch to the
OFF (O) position will shut down all of the
electrical circuits and the memory of the radio
preset tuning buttons will be deleted.
204
First Published May 1998
No. 23105
Twenty-second Published April 2006
OPERATOR’S MANUAL
TB014
Compact Excavator
TB016
Edited and issued by TAKEUCHI MFG. CO., LTD.
Printed in Japan by STATION M Co., Ltd.