Takeuchi Hydraulic Excavator TB175 (No. 17512105~). Operator's Manual (2007) - page 5
 

  Index      Manuals     Takeuchi Hydraulic Excavator TB175 (No. 17512105~). Operator's Manual (2007)


Search            copyright infringement  


Content      ..     3      4      5      6     ..


Takeuchi Hydraulic Excavator TB175 (No. 17512105~). Operator's Manual (2007) - page 5


64

OPERATION

Before Starting Operation

Walk-Around Inspection

Perform the walk-around inspections before
starting the engine the first time that day.
Perform the inspections as described under
“Maintenance - Walk-Around Inspection”
(pages 105 and 106).

Daily Inspection

Perform the daily inspections once a day
before starting the engine the first time that
day.
Perform the inspections as described under
“Maintenance - Daily Inspection” (pages
107 to 111).

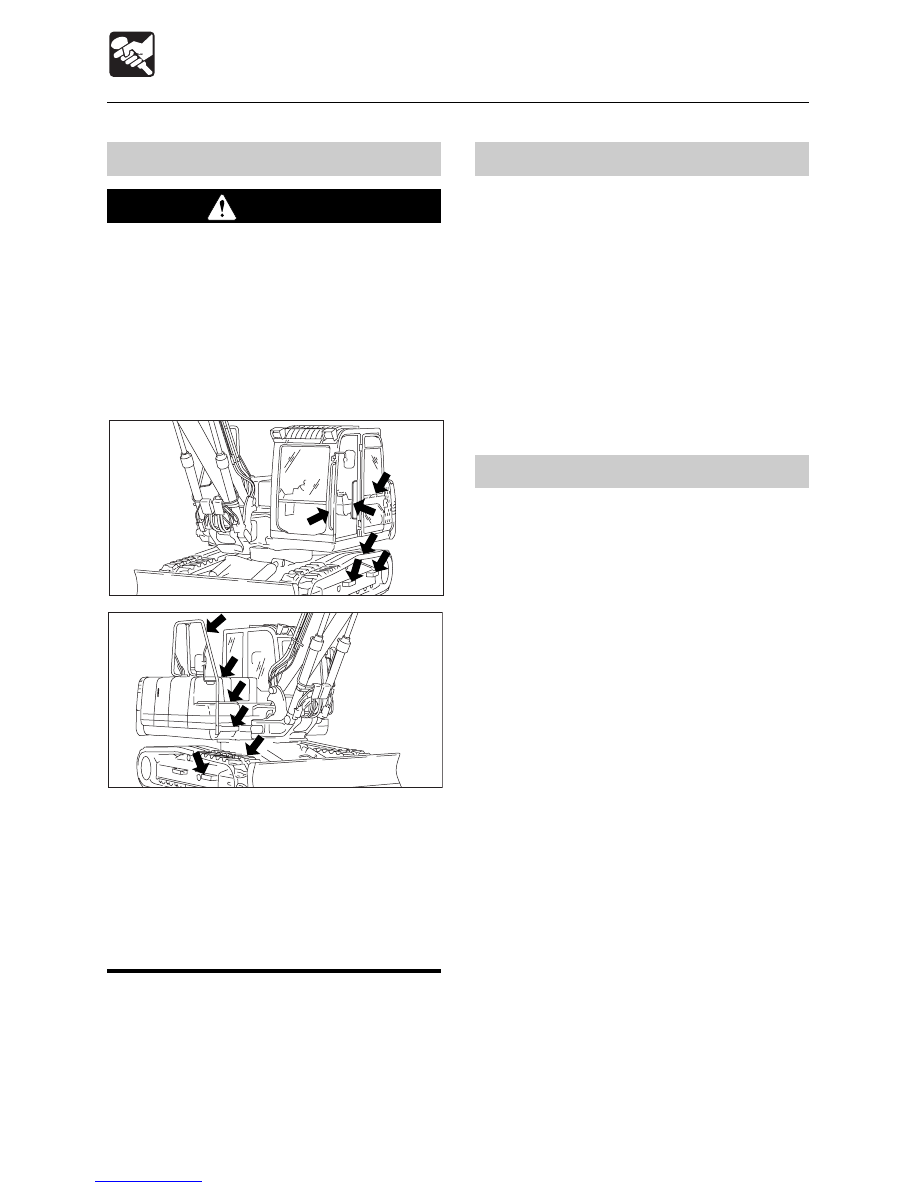
Mounting and Dismounting

 WARNING

¡

¡

¡

¡

¡

Do not jump on or off the machine.
Never attempt to mount or dismount a
moving machine.

¡

¡

¡

¡

¡

When mounting and dismounting the
cab, first open the door fully to the
locked position and check that it does
not move.

¡

¡

¡

¡

¡

Always face the access system and
maintain a three point contact with the
recommended handrails and steps
while getting on and off the machine.
Keep steps and platform clean.

¡

¡

¡

¡

¡

Never use the safety lock lever or
control levers as hand holds.

N0D001

N0D002


65

OPERATION

Starting and Stopping the Engine

IMPORTANT: Do  not start the engine
before the power mode lamp (L) lights.

¡

Check that the power mode lamp (L) is
lit.

¡

All the warning lamps flash and an
alarm is sounded for 2 seconds.  The
meters also start functioning. After 2
seconds, only the battery charge
warning lamp (4) and engine oil
pressure / coolant level warning lamp
(2) flash, and the other lamps turn off.

¡

Turn the light switch to check that the
boom light, front light, side lights, tail
lights and meter light turn on.

¡

Check the fuel level.

If a lamp does not light or the alarm is not
sounded, the bulb may be burnt out or a wire
may be damaged. Contact a Takeuchi sales
or service outlet for repairs.

Before Starting the Engine

1. Adjust the seat for a comfortable operating

position.

2. Fasten the seat belt.

3. Check that the safety lock lever is in the

locked position.

4. Check that all the levers and pedals are

in the neutral position.

5. Insert the key into the starter switch, turn

it to the ON position, then perform the
following inspection:

L3B030

C4D006

OFF

ON

START

L3D001

FC

H

4

2

L3D002

L


66

OPERATION

Starting and Stopping the Engine

Starting in Cold Weather

1. Make sure that the glow lamp (8) is lit.

(The glow lamp lights for 15 seconds when
coolant temperature is at –10

°

C (14F

°

).

2. After the glow lamp (8) turns off, then turn

the key to the START position and start
the engine.

3. Once the engine starts, release the key.

The key automatically returns to the ON
position.

4. Check that the warning lamps are off.
5. Warm up the engine.

Refer to page 67 “Warming Up the
Engine”.

Starting the Engine

 WARNING

¡

¡

¡

¡

¡

Clear the area  of  all persons.

¡

¡

¡

¡

¡

Sound horn to alert everyone around
the machine.

IMPORTANT: Do not run the starter motor
for more than 15 consecutive seconds. If
the engine fails to start, wait for 30
seconds to protect the battery, and then
try again to start the engine.

Normal Starting

1. Turn the key to the START position and

start the engine.

2. Once the engine starts, release the key.

The key automatically returns to the ON
position.

3. Check that the warning lamps are off.
4. Warm up the engine.

Refer to page 67 “Warming Up the
Engine”.

OFF

ON

START

L3D003

8

L3D004

OFF

ON

START

L3D003


67

OPERATION

Starting and Stopping the Engine

Stopping the Engine

IMPORTANT: Do  not stop the engine
suddenly when operating with heavy
loads or at maximum speed. Doing so
may cause the engine to overheat or
seize. Never bring the engine to a sudden
stop except in the case of emergency.

1. Press the decel. button.
2. Idle the engine for about 5 minutes to

gradually let it cool.

3. Turn the key to the OFF position to stop

the engine.

Warming Up the Engine

IMPORTANT: Avoid racing the engine
until it is warmed up.
Do not warm up the engine for long
periods of time (20 minutes or more).

1. Make sure that the power mode lamp (L)

ligts, then idle the engine and run it for
about 5 minutes with no load.

FC

H

L3D005

L

L3B0471

FC

H

L

OFF

ON

START

L3D007


68

OPERATION

Machine Operation

Lever Pattern (ISO Pattern)

 WARNING

¡

¡

¡

¡

¡

Be careful to check which pattern of lever control arrangement you are operating
with before beginning operations.

¡

¡

¡

¡

¡

The explanations in this manual are for the ISO pattern.

C4D006

〈〈〈〈〈

ISO

〉〉〉〉〉

Left Crawler Forward

Left Crawler Reverse

Arm Out

Arm In

Upperstructure Slew Left

Upperstructure Slew Right

Right Crawler Forward

Right Crawler Reverse

Boom Lower

Boom Raise

Bucket Load

Bucket Dump

Dozer Blade Lower

Dozer Blade Raise

Boom Swing Right

Intermediate Boom Lower

Boom Swing Left

Intermediate Boom Raise


69

OPERATION

Machine Operation

Lever Pattern (JCB Pattern)

 WARNING

¡

¡

¡

¡

¡

Be careful to check which pattern of lever control arrangement you are operating
with before beginning operations.

¡

¡

¡

¡

¡

The explanations in this manual are for the ISO pattern.

C4D013

〈〈〈〈〈

JCB

〉〉〉〉〉

Left Crawler Forward

Left Crawler Reverse

Boom Lower

Boom Raise

Upperstructure Slew Left

Upperstructure Slew Right

Right Crawler Forward

Right Crawler Reverse

Arm Out

Arm In

Bucket Load

Bucket Dump

Dozer Blade Lower

Dozer Blade Raise

Boom Swing Left

Intermediate Boom Raise

Boom Swing Right

Intermediate Boom Lower


70

OPERATION

Machine Operation

Warming Up the Machine
(Hydraulic Oil)

 WARNING

Operating the working equipment without
warming up the machine (hydraulic oil)
is dangerous, as response will be slow
and the equipment may move in
unexpected ways and safety devices may
not operate properly. Be sure to
sufficiently warm up the machine.

IMPORTANT: Do not operate the levers
suddenly when the hydraulic oil
temperature is below 20

°

C (68

°

F).  The

proper hydraulic oil temperature during
operation is 50 to 80

°

C (122 to 176

°

F), but

if operations must be performed at lower
temperatures, heat up the hydraulic oil
to at least 20

°

C (68

°

F).

Normal Warm-up

1. Run the engine at medium speed (FC

mode) for about 5 minutes with no load.

2. Fully lower the safety lock lever to

disengage the lock and lift the bucket from
the ground.

3. Extend and retract each of the cylinders

several times with no load.

4. Slew slowly left and right several times.

L

H

L3D008

FC

L3D009

G4D005


71

OPERATION

Machine Operation

Inspection After Warm-up

After warming up the engine and hydraulic
oil, perform the checks and inspections
described below, and repair if there is a
problem.

1. Check that the warning lamps and meters

are as follows:

¡

Are all the warning lamps off?

¡

Is the water temperature gauge’s
needle within the green range?

2. Check that there are no irregularities in

the exhaust color, sound and vibrations.

3. Raise the safety lock lever to engage the

lock and check that the boom swing pedal,
operating and travel levers are locked.

E4D011

L

FC

H

L3D010

L3B030

5. Travel slowly forward and backward

several times.

Warming Up in Cold Weather
1. Perform the normal warm-up procedure.

2. Set the bucket cylinder at the stroke end

and keep it there.
Do not do this for more than 30 seconds.

3. Repeat step 2 until the bucket operating

speed is normal.


72

OPERATION

Machine Operation

2. Fully lower the safety lock lever to

disengage the lock.

3. Fold the hoe attachment and lower it to

30 to 40 cm(12 to 16 in.) above the ground.

4. Lift the dozer blade.
5. Operate the left and right travel levers as

described below.

When the dozer blade is in front of the
operator’s seat:

a

To move forward:
Tilt the levers forward.

e

To move backward:
Tilt the levers backward.

Operating the Travel Levers

 WARNING

¡

¡

¡

¡

¡

Never allow anyone to enter the
slewing (swing) radius and machine
path.

¡

¡

¡

¡

¡

Signal your intention to move by
sounding the horn.

¡

¡

¡

¡

¡

There are blind spots to the rear of the
machine.
If necessary, swing the cab around
before backing up to check that the
area is safe and clear.

¡

¡

¡

¡

¡

Before operating the travel levers,
check to make sure that the dozer blade
is to the front of the operator’s seat.
BE AWARE that when the dozer blade
is to the rear of the operator’s seat, the
travel levers operate in the opposite
direction to when the dozer blade is in
the front.

¡

¡

¡

¡

¡

Remove any obstacles in the
machine’s path.

Traveling Forward and Backward

1. Increase the engine speed.

Neutral

Neutral

L

FC

L3D011

H

L3D009

30~40cm

E4D014

E4D015


73

OPERATION

Machine Operation

When the dozer blade is behind the
operator’s seat:

a

To move forward:
Tilt the levers backward.

e

To move backward:
Tilt the levers forward.

Traveling in 2nd (High) Speed

 WARNING

When a load greater than a set value is
applied during 2nd speed (high speed)
travel, the speed will automatically slow
down by switching to 1st speed (low
speed). Thereafter, when the load
becomes lighter, the speed will increase
by returning to 2nd speed (high speed).
Exercise due caution since the travel
speed changes automatically.

Press the travel speed switch on the right
travel lever to switch to 2nd (high) speed,
and press it again to return to 1st speed (low
speed).

Neutral

Neutral

Neutral

Pivot Turn

 WARNING

Note that when the bucket is operated
while making a right pivot turn (i.e., when
only the left crawler is turning), the speed
of the pivot turn may suddenly increase.

Turning to the left when stopped:

a

To turn forward to the left:
Tilt the right lever forward.

e

To turn backward to the left:
Tilt the right lever backward.

To turn to the right, operate the left lever in
the same way.

Turning to the left while traveling:

a

To turn left while traveling forward:
Set the left lever to neutral.

e

To turn left while traveling backward:
Set the left lever to neutral.

To turn to the right while traveling, operate
the right lever in the same way.

Neutral

E4D016

E4D017

E4D018


74

OPERATION

Machine Operation

Stopping Travel

 WARNING

¡

¡

¡

¡

¡

Park the machine on firm, level ground
and apply the parking device. If you
must park on a slope or incline, block
the machine securely to prevent
movement.

¡

¡

¡

¡

¡

If any controls should be touched
accidentally when the safety lock lever
is lowered, the machine will move
suddenly, and cause serious injury or
death.

¡

¡

¡

¡

¡

Note that the dozer blade control is not
locked, even when the safety lock lever
is set to the lock position. Do not touch
this control accidentally.

 CAUTION

Never bring the machine to a sudden stop
except in the case of a true emergency.
Stop as gently as possible.

1. Slowly set the left and right travel levers

to the neutral position.  The machine stops.

Neutral

Neutral

Spin Turn

a

To spin left:
Tilt the left lever backward and the right
lever forward.

e

To spin right:
Tilt the right lever backward and the left
lever forward.

Neutral

E4D019

E4D020


75

OPERATION

Machine Operation

Slewing

 WARNING

Check the surrounding area for safety
before slewing.

a

To slew left:
Tilt the left operating lever to the left.

e

To slew right:
Tilt the left operating lever to the right.

Operating the Boom

a

To lower the boom:
Tilt the right operating lever forward.

e

To raise the boom:
Tilt the right operating lever backward.

Operating the Working
Equipment

 WARNING

¡

¡

¡

¡

¡

Be careful to check which pattern of
lever control arrangement you are
operating with before beginning
operations.

¡

¡

¡

¡

¡

The explanations in this manual are for
the ISO pattern.

Use the right operating lever to operate the
boom and bucket.
Use the left operating lever to operate the
arm and for slewing.
Return the operating levers to the neutral
position to stop the hoe attachments.

1. Set the safety lock lever to the released

position.

2. Set the pedal lock to the released position.

C4D006

E4D021

E4D022


76

OPERATION

Machine Operation

Operating the Boom Swing

a

To swing left:
Press the left side of the pedal.

e

To swing right:
Press the right side of the pedal.

Operating the Dozer Blade

a

To lower the dozer blade:
Tilt the lever forward.

e

To raise the dozer blade:
Tilt the lever backward.

Operating the Arm

a

To contract the arm:
Tilt the left operating lever backward.

e

To extend the arm:
Tilt the left operating lever forward.

Operating the Bucket

a

To dig:
Tilt the right operating lever to the left.

e

To dump:
Tilt the right operating lever to the right.

Operating the Intermediate Boom

a

To lower the intermediate boom:
Press the selector button and step on the
right side of the pedal.

e

To raise the intermediate boom:
Press the selector button and step on the
left side of the pedal.

E4D023

C4D008

E4D024

E4D026

L3D012


77

OPERATION

Machine Operation

Operating the First Auxiliary
Hydraulics

Use this to operate a breaker, crusher or
other attachment.
Two methods of operation are permitted:
operation with the auxiliary hydraulic buttons
and operation with the slider switch
(proportional control).

Operating With the Slider Switch
(Proportional Control)

a

To deliver hydraulic oil to port (a):
Move the switch to the left (A).

e

To deliver hydraulic oil to port (b):
Move the switch to the right (B).

Operating With the Auxiliary Hydraulic
Buttons

a

To deliver hydraulic oil to port (a):
Press (A).

e

To deliver hydraulic oil to port (b):
Press (B).

L3C0012

b

a

S

O

A

B

L3L021

L3L035

B

A


78

OPERATION

Operating Procedures

Be Gentle on the Hydraulic Cylinders

Do not extend the hydraulic cylinders to the
stroke ends.  Operate them with leeway.

Do not support the machine body with the
hoe attachment as it is lowering with the arm
cylinder fully extended. Doing so
concentrates the load on the arm cylinder
and could damage the arm cylinder.

Do not Drive Piles with the Bucket or
Dig with it Using Shock Force

Doing so will shorten the service life of the
hoe attachment. Use hydraulic force to dig.

Prohibited Operations

 WARNING

¡

¡

¡

¡

¡

Do not operate on base rock (hard or
soft).

¡

¡

¡

¡

¡

Do not slew (swing) while traveling. If
you must operate the hoe attachment
while traveling, operate at speeds slow
enough so you have complete control
at all times.

Do not perform breaking or leveling
operations using slew force

Do not break down walls or level ground
using slew force.  Also, do not dig the bucket
teeth into the ground during slewing. Doing
so will damage the hoe attachment.

Do not Dig while Traveling

Do not dig the bucket into the ground and
use the traveling force to dig.

E4D029

E4D030

E4D031

E4D032


79

OPERATION

Operating Procedures

Do not Perform Operations Using the
Machine’s Dropping Force

Putting excessive strain on the machine will
shorten its service life. Use the hydraulic
force of the cylinders and always dig with
shallow, long strokes.

Digging Base Rock

For hard base rock, break the rock up into
small pieces with a breaker, etc., before
digging. This prevents damage to the
machine and is thus more economical in the
end.

Caution on Exposing the Dozer Blade to
Shocks

Hitting the dozer blade against rocks, etc.,
could damage the dozer blade or the blade
cylinder.

Caution on Folding the Hoe Attachment

Be careful not to hit the bucket or dozer blade
when folding the hoe attachment.

Do not use the Dozer Blade as an Outrigger

E4D033

E4D034

E4D040

E4D041

N0D009


Content      ..     3      4      5      6     ..