Takeuchi Mini excavator TB225 (No.122500005~). Operator's Manual (2019) - page 5
MAINTENANCE
SERVICE DATA
SERVICE DATA
FUEL AND LUBRICANT TABLE
Select the appropriate fuel, lubricant and grease according to the temperature by referring to
the table below.
• Regardless of the specified time, change the oil if it becomes too dirty or degraded.
• When refilling, never mix oils of different brands. If a brand is to be changed, replace the
whole fuel/oil.
Fuel
Diesel fuel specifications
Diesel fuel should comply with the following specifications. The table lists several worldwide
specifications for diesel fuels.
Diesel fuel specification
Area
Diesel fuel specification
Area
ASTM D975
No.1-D S15
No.2-D S15
USA
ISO 8217DMX
International
Bio-diesel fuel
Canada
Biodiesel blends up to B7
ASTM D6751
EN590: 2009
Bio-diesel fuel
European union BS2869-A1 or A2
United kingdom
Biodiesel blends up to B7
EN14214
5-4
MAINTENANCE
SERVICE DATA
To maintain the performance and service life of the engine,
always use clean and high-quality fuel.
• To avoid freezing in cold climates, use a diesel fuel that still
functions when the temperature is at least 12°C (21.6°F) below
the lowest expected ambient temperature.
• Use a diesel fuel that has a cetane number of 45 or higher.
When operating at a very low temperature or at a high altitude,
a higher cetane number fuel will be required.
• Use fuel with sulfur content of less than 0.5 % by volume.
Especially in the U.S.A. and Canada, ultra-low sulfur fuel
should be used.
Fuel tank
Diesel fuel
A higher sulfur content fuel may cause sulfuric acid corrosion
in the cylinders of the engines.
• Never mix kerosene, used engine oil, or residual fuel with the
diesel fuel. Use of kerosene is prohibited.
• Poor quality fuel can reduce engine performance and / or
cause engine damage.
• Fuel additives are not recommended. Some fuel additives may
cause poor engine performance.
Precautions when using bio-diesel fuel
The warranty of the engine manufacturer may be voided by
using a bio-diesel fuel that does not meet the standard or that is
deteriorated.
5-5
MAINTENANCE
SERVICE DATA
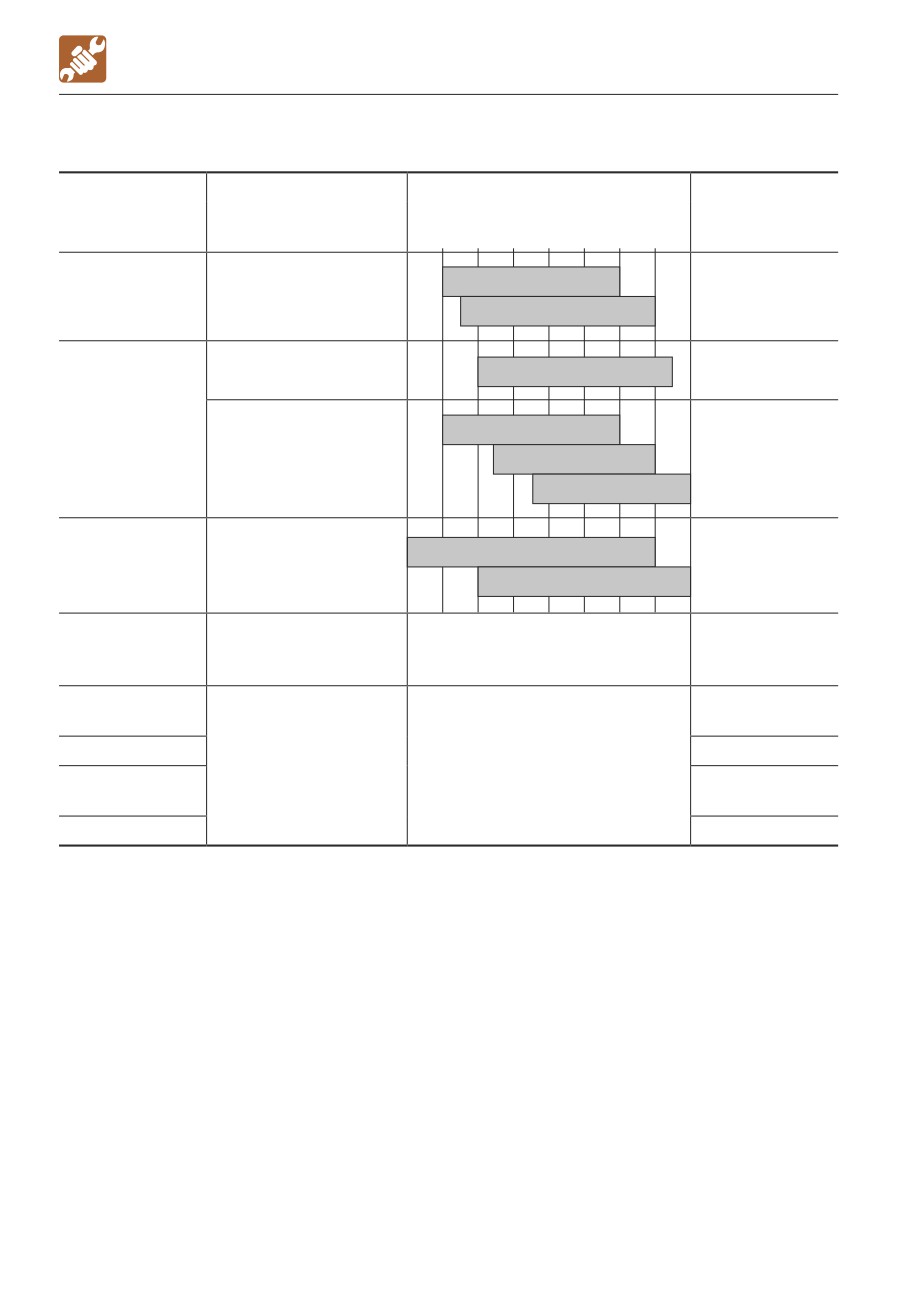
Lubricant
Type by air temperature
Location
Type
-4
14
32
50
68
86 104°F
When to replace
-20 -10
0
10
20
30 40°C
Diesel engine oil
SAE 10W-30
Engine oil pan
API: CD class
Every 250 hrs.
SAE 15W-40
ACEA: E-3, E-4 or E-5
Takeuchi genuine
Every 4000
ISO VG46
hydraulic oil 46
hrs.***
Hydraulic oil
ISO VG32
tank
Every 2000
Anti-wear hydraulic oil
ISO VG46
hrs.***
ISOVG68
Every 2000 hrs.
Cooling water (water +
Engine cooling
Mixture of 50% coolant
or every two
coolant)**
system
Mixture of 30% coolant
years (whichever
SAE: J814C or J1034
comes first)
Every 1000 hrs
Travel reduction
Gear oil
SAE 90
after the initial
gear
API: GL-4
250 hrs*.
Slew motor
Every 50 hrs.
pinion
Lithium based grease
Slew bearing
Every 50 hrs.
EP-2
—
Working
Daily or every
NLGI No.2
equipment
10 hrs.
Levers
When required
* : If the ratio of traveling time to total operating time is high, replace the gear oil earlier than
the specified time.
** : For water, use tap water (soft). Do not use well or river water. When the ambient
temperature drops below 0°C (32°F), add coolant (antifreeze). Follow the coolant
manufacturer’s instructions to determine the mixture ratio.
*** :The hydraulic oil replacement interval depends on the type of hydraulic oil being used. New
machine are delivered with Takeuchi genuine hydraulic oil 46, and the hydraulic oil
replacement intervals indicated in this manual assume that Takeuchi genuine hydraulic oil
46 is being used. When using conventional antiwear hydraulic oil, the hydraulic oil should
be replaced every 2000 hours.
API standard: American Petroleum Institute
ACEA standard: Association des Constructeurs Européens d’Automobiles
SAE standard: Society of Automotive Engineers
5-6

MAINTENANCE
SERVICE DATA
Volume
Engine cooling
Hydraulic oil
Travel reduction
Engine oil pan
Fuel tank
system
tank
gear
Upper limit
4.3 L (4.5 US qt.)
System
Level capacity
0.33L X 2
3.6 L (3.8 US qt.)
36 L (9.5 US gal.)
30.5 L (8.1 US gal.)
(0.35 US qt.) X 2
Lower limit
Tank
2.4 L (2.5 US qt.)
26 L (6.9 US gal.)
5-7
MAINTENANCE
SERVICE DATA
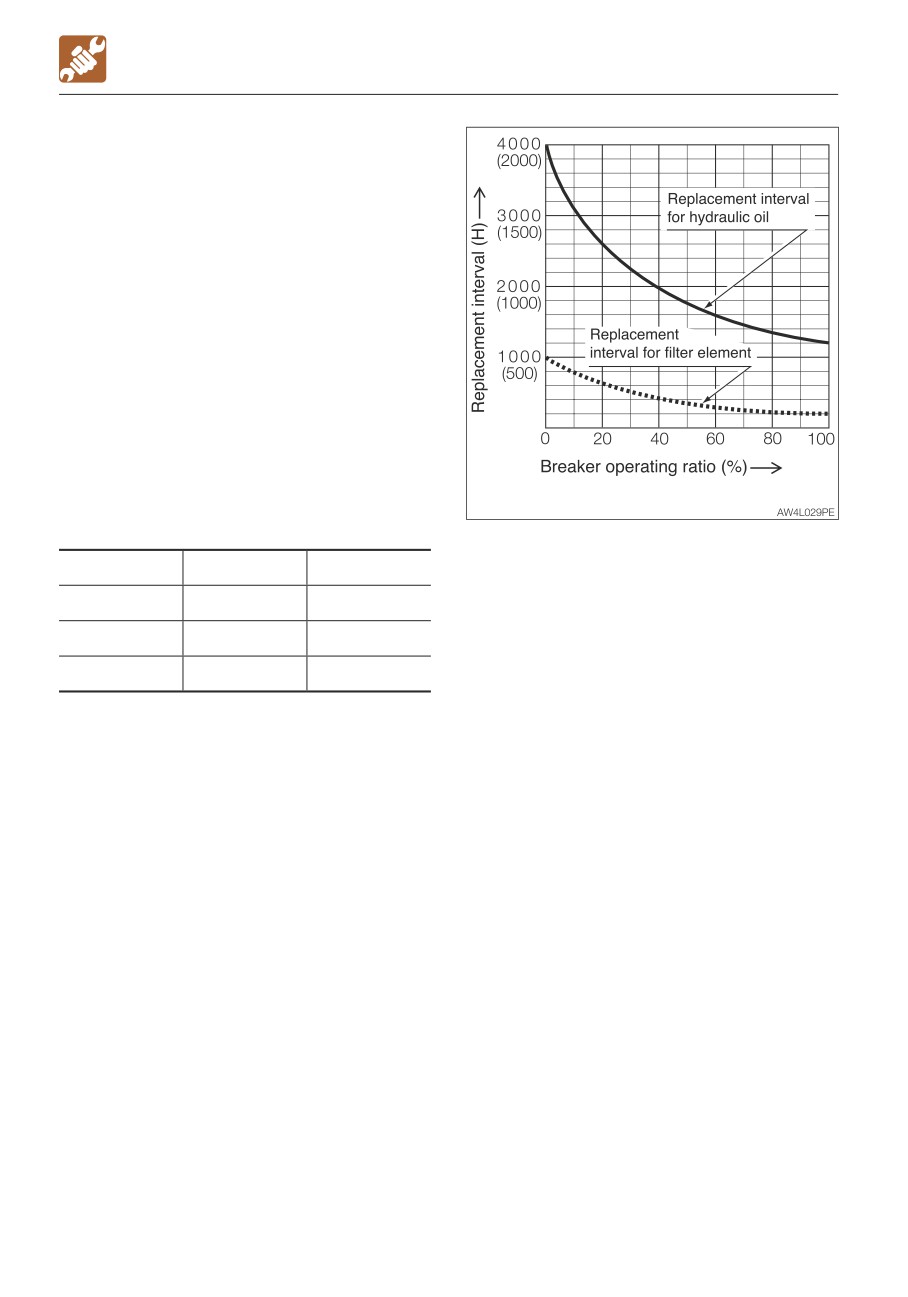
REGULARLY REPLACE THE HYDRAULIC
OIL
When a hydraulic breaker is used, the oil
deteriorates more quickly than that used for
a usual excavation operation. Be sure to
replace the hydraulic oil and the return filter
elements.
• Failure to replace these in time can lead to
damage to the machine and the breaker
hydraulic system. To prolong the service life
of the hydraulic devices, properly replace
the hydraulic oil and the return filter
elements according to the table below.
• When replacing the hydraulic oil, clean the
suction strainer.
Replacement interval (hours)
( ):
When a conventional antiwear hydraulic
oil is used.
Item
Hydraulic oil
Filter element
1st time
—
25
2nd time
—
100
Periodically
1200 (600)
200
When the breaker operating ratio is 100%.
Refer to “Hydraulic breaker” on page 8-6.
5-8
MAINTENANCE
SERVICE DATA
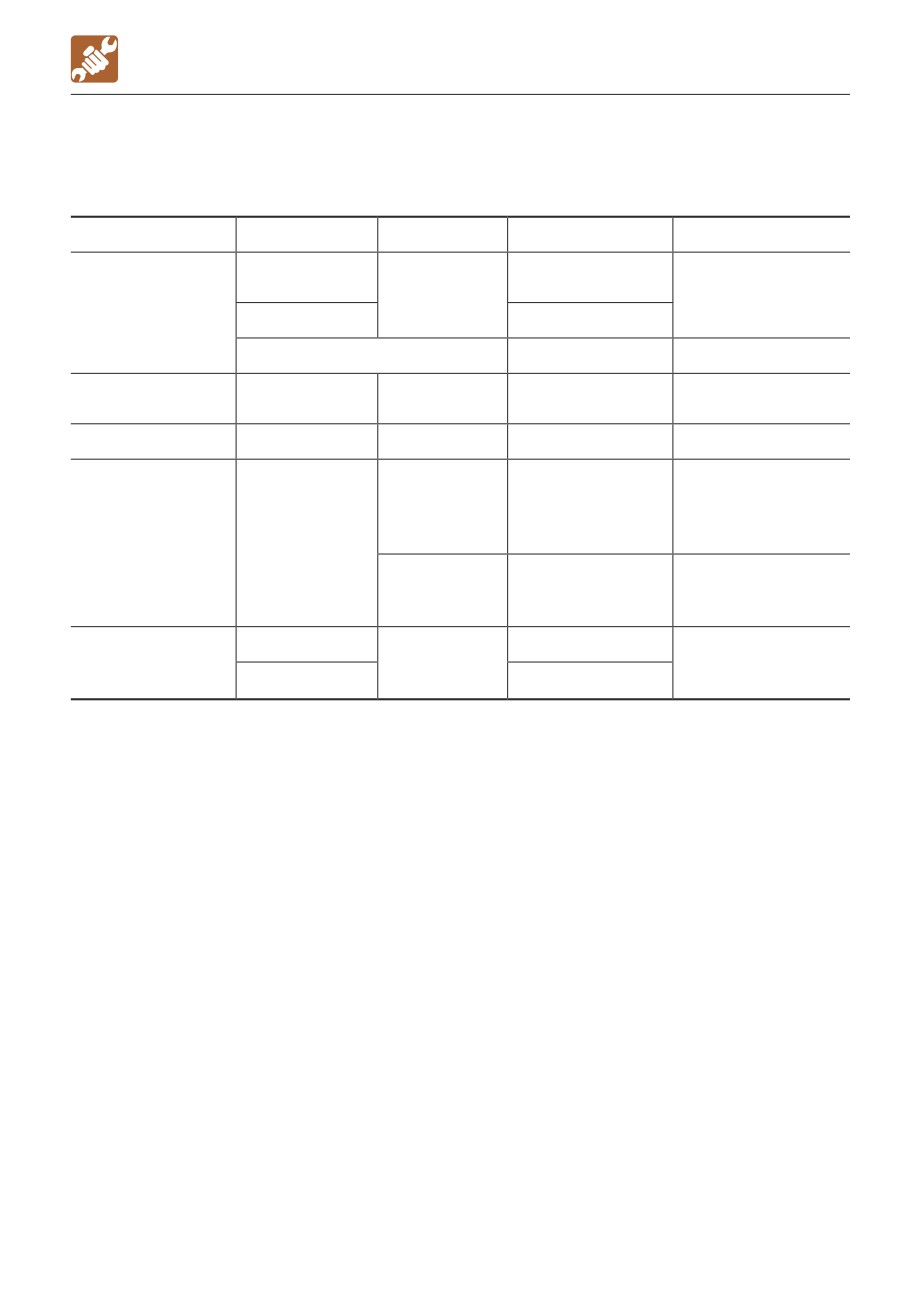
LIST OF CONSUMABLES
Periodically replace consumables such as filters and elements according to the table below.
System
Item
Part name
Part No.
When to replace
Hydraulic oil
15511-04300
Every 1000 hrs
return filter
Element
after the initial 250
Hydraulic system
hrs.
Pilot line filter
15512-00703
Air breather (if equipped)
15520-03000
Every 1000 hrs.
Engine lubrication
Engine oil filter
Cartridge
Y129150-35153
Every 250 hrs.
system
Fuel system
Fuel filter
Cartridge
Y119802-55801
Every 500 hrs.
Every 1000 hrs. or
Primary
after 6 cleanings
(Outer)
Y119808-12520
(whichever comes
element
Air cleaner system
Air cleaner
first)
Secondary
When the primary
(Inner)
19111-02772
elements are
element
replaced.
Ventilation filter
03445-00034
Once a year or if
Heater system
Element
clogging remains
Circulation filter
03445-00021
after cleaning
5-9
MAINTENANCE
SERVICE DATA
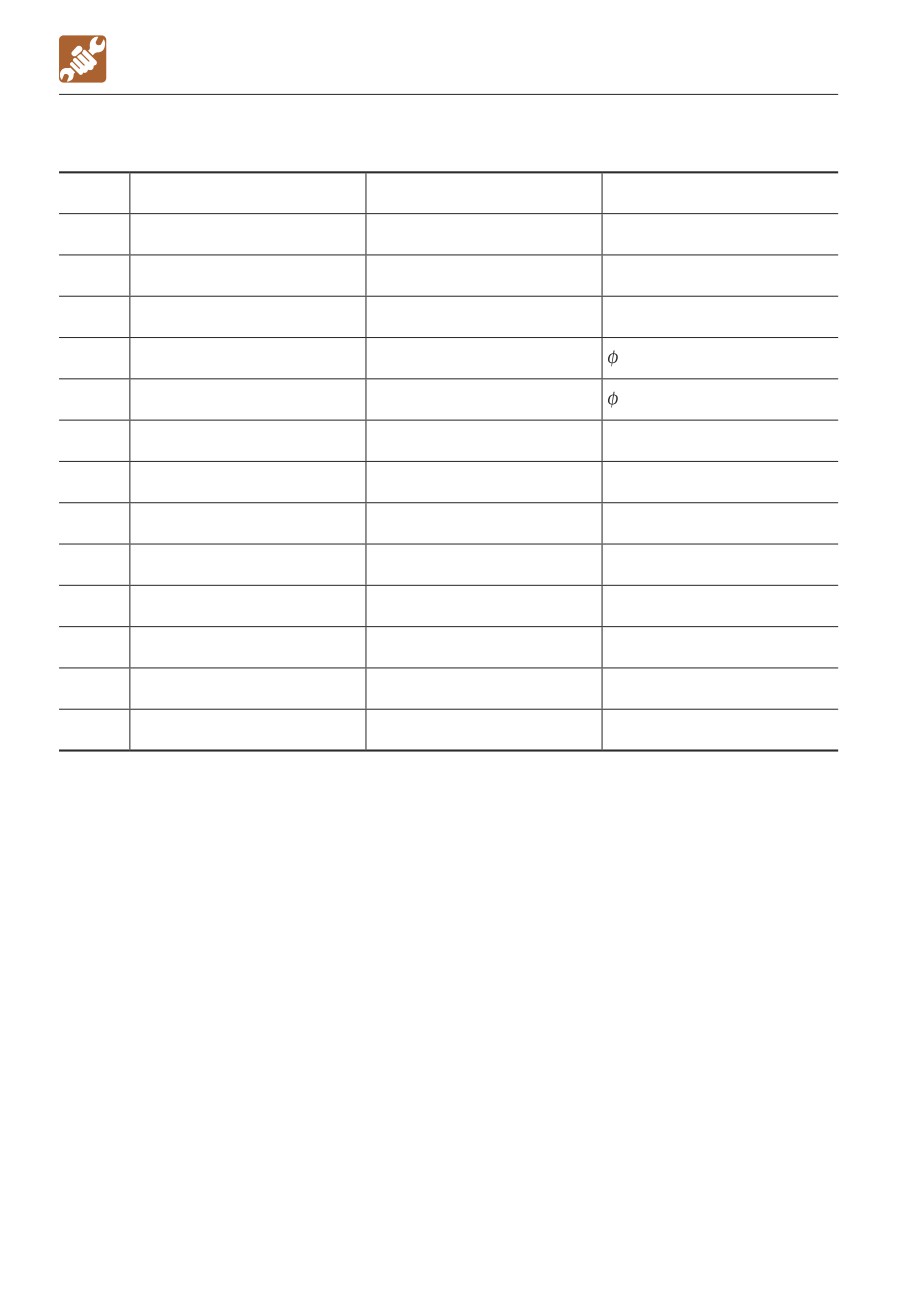
LIST OF TOOLS
Code
Part name
Part No.
Remarks
1
Spanner
19100-47081
10 - 12
2
Spanner
19100-47082
14 - 17
3
Screwdriver
19100-06112
(+) (-) replaceable shank
4
Filter wrench
19100-65081
80
5
Filter wrench
19104-01082
90
6
Monkey wrench
16904-00250
250 mm
7
Pliers
16905-00200
200 mm
8
Spanner
16901-00013
13
9
Spanner
16909-00019
19
10
Spanner
16900-01922
19 - 22
11
Tool case
16914-00005
12
Grease gun
16910-60600
600 cc
13
Drain connector
15545-12201
5-10
MAINTENANCE
SERVICE DATA
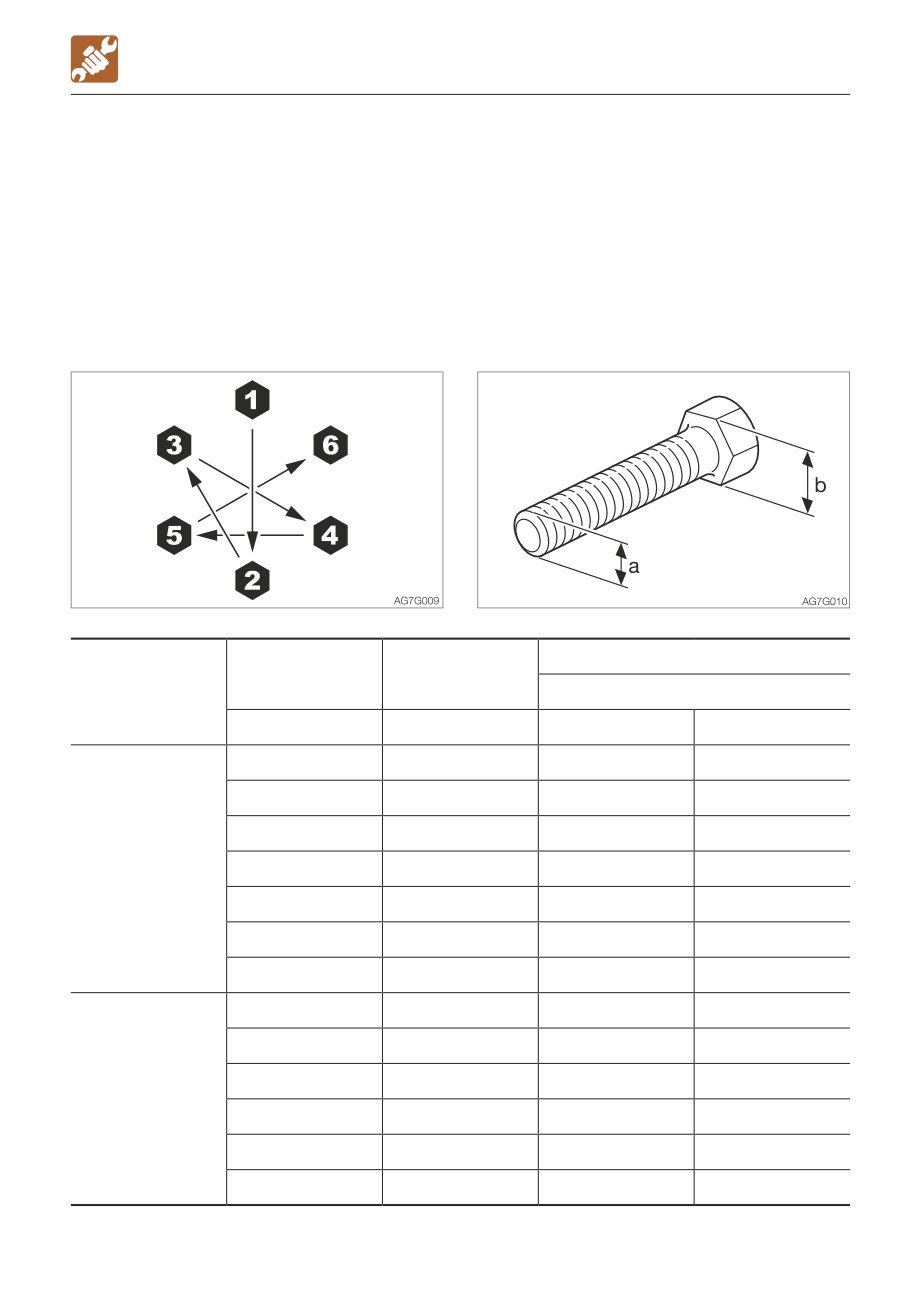
LIST OF TIGHTENING TORQUES
Nuts and Bolts (for ISO strength category 10.9)
Tighten nuts and bolts at the torques shown on the table below, unless otherwise specified.
• The tightening torques used for the mounted plastic covers are not listed in the table below.
Consult your sales or service dealer for details. They will be damaged if over tightened.
• When replacing nuts and bolts, replace them with nuts and bolts of the same size and
standards.
• Tighten nuts and bolts alternately (top, bottom, left then right) or in 2 or 3 times so that they
are evenly tightened.
Tightening torque
Head width (b)
Size (a) x pitch
Classification
General connection points
mm
mm
N·m
ft-lb
10
M6 x 1.0
9.8±0.8
7.2±0.6
12, 13
M8 x 1.25
23±1.8
17±1.4
14, 17
M10 x 1.5
47±3.8
35±2.8
Coarse
17, 19
M12 x 1.75
83±6.6
62±5
19, 22
M14 x 2.0
134±10.7
99±7.9
22, 24
M16 x 2.0
208±16.6
153±12.2
27, 30
M20 x 2.5
411±32.9
303±24.2
12, 13
M8 x 1.0
25±2
18±1.4
14, 17
M10 x 1.25
50±4
37±3
17, 19
M12 x 1.5
87±7
64±5.1
Fine
19, 22
M14 x 1.5
135±10.8
100±8
22, 24
M16 x 1.5
221±17.7
163±13
27, 30
M20 x 1.5
452±36.2
333±26.6
5-11
MAINTENANCE
SAFETY-CRITICAL PARTS
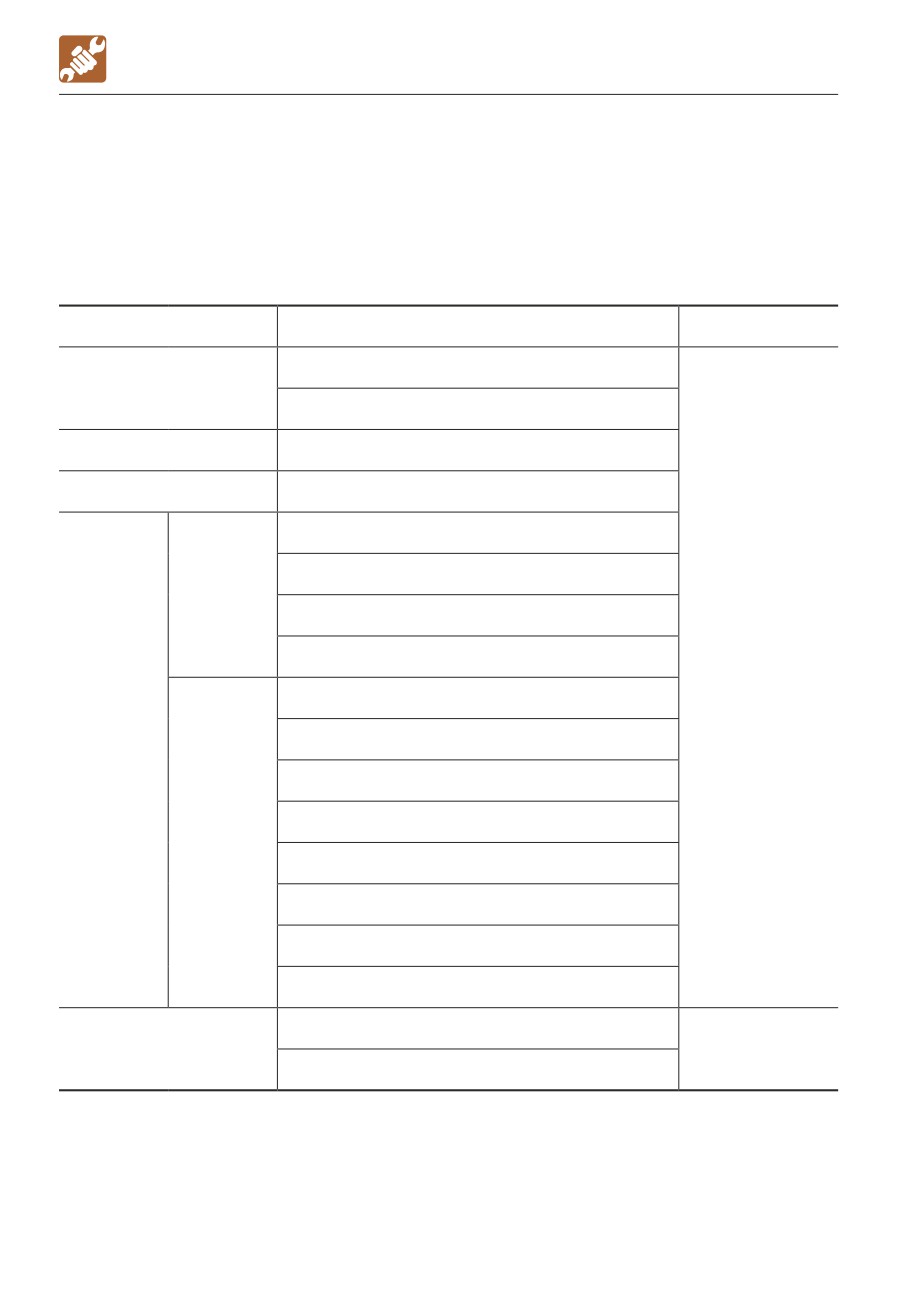
SAFETY-CRITICAL PARTS
To use the machine safely, periodically perform inspection and maintenance. The safety-critical
parts listed below must be periodically replaced for an increased safety.
Serious injury or a fire could result if they are worn or damaged.
List of safety-critical parts
Unit
Safety-critical parts to be replaced periodically
When to replace
Fuel hoses
Fuel system
Packing on fuel filler cap
Heater
Heater hoses
Cooling system
Rubber hoses
Hydraulic hoses (pump - delivery)
Hydraulic hoses (pump - suction)
Main body
Hydraulic hoses (slew motor)
Hydraulic hoses (travel motor)
Every 2 years
Hydraulic hoses (boom cylinder piping)
Hydraulic hoses (arm cylinder piping)
Hydraulic
system
Hydraulic hoses (bucket cylinder piping)
Hydraulic hoses (swing cylinder)
Working
equipment
Hydraulic hoses (blade cylinder)
Hydraulic hoses (span cylinder)
Hydraulic hoses (pilot valve)
Hydraulic hoses (auxiliary piping)
Seat belt
Every 3 years
Non-slip sheet
5-12
MAINTENANCE
SAFETY-CRITICAL PARTS
The material of the safety-critical part listed above tends to change over time and cause wear
or deterioration. It is difficult to determine the degree of deterioration at the periodic inspection,
and thus they need to be replaced with new ones after a certain time to maintain their proper
performance even if they appear in good condition. Note that regardless of the replacement
schedule, replacement must be performed immediately if a symptom of wear is found. If a
hose clamp is deformed or cracked, replace it together with the hose immediately. When
replacing the safety-critical parts, ask your sales or service dealer.
In addition to the safety-critical parts, inspect the hydraulic hoses and retighten or replace as
necessary. When replacing the hydraulic hoses, replace the O-rings and seals at the same
time.
Check the fuel and hydraulic hoses according to the periodic schedule described below.
Refer to “Maintenance”.
Type of inspection
Inspection item
Leakage from the connecting parts of hydraulic or fuel hoses
Daily inspection
Damage to cab or canopy - replace*
Leakage from the connecting parts of hydraulic or fuel hoses
Monthly inspection
Damaged hydraulic or fuel hoses (cracks, wear and tear)
Leakage from the connecting parts of hydraulic or fuel hoses
Annual inspection
Deteriorated, twisted, damaged hydraulic or fuel hoses (cracks, wear
and tear) or hoses in contact with other parts of the machine
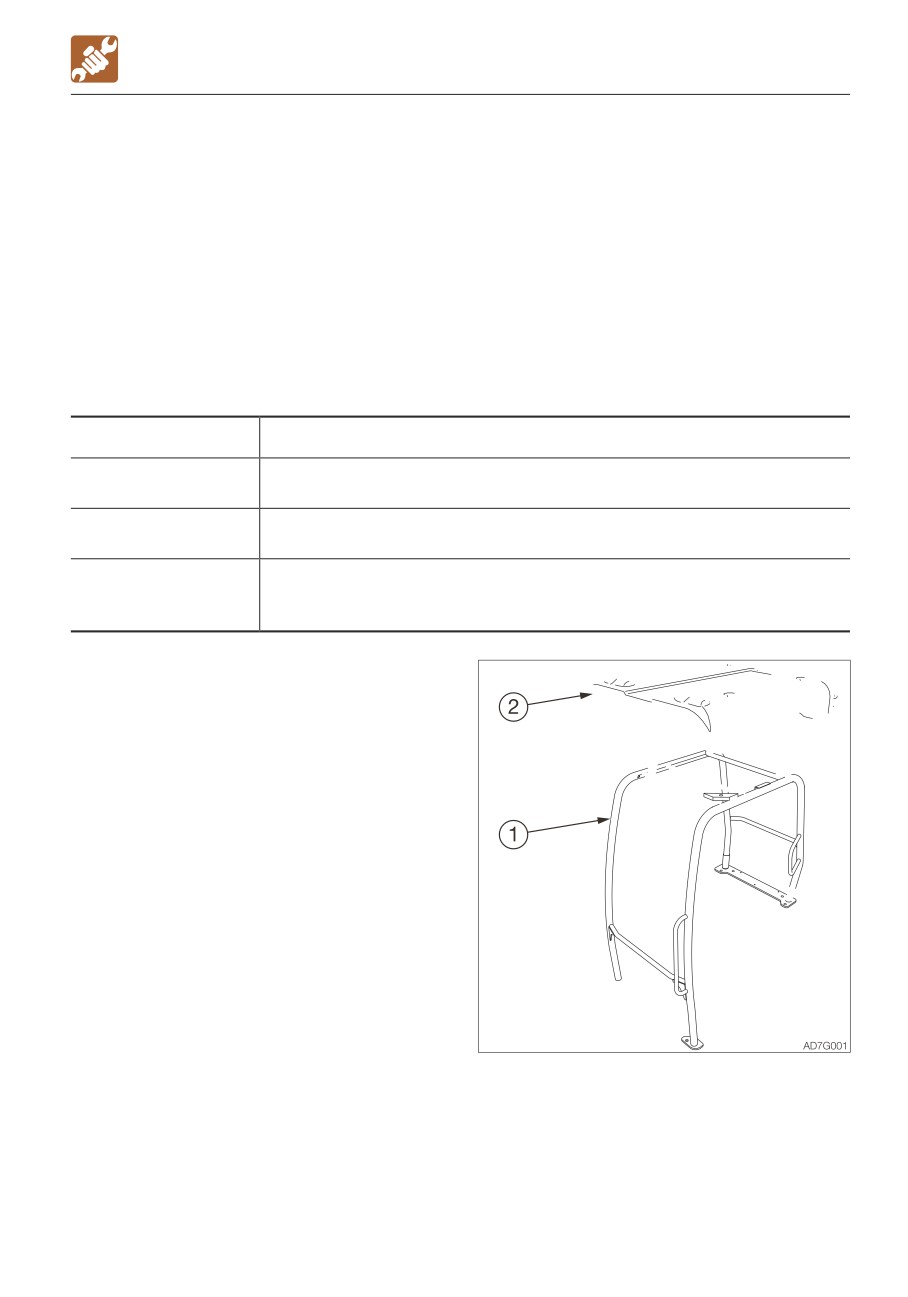
*: Cab parts No. 03486-00028
*: Canopy parts No.(1) 03484-00003
*: Canopy parts No.(2) 03484-00027
5-13
MAINTENANCE
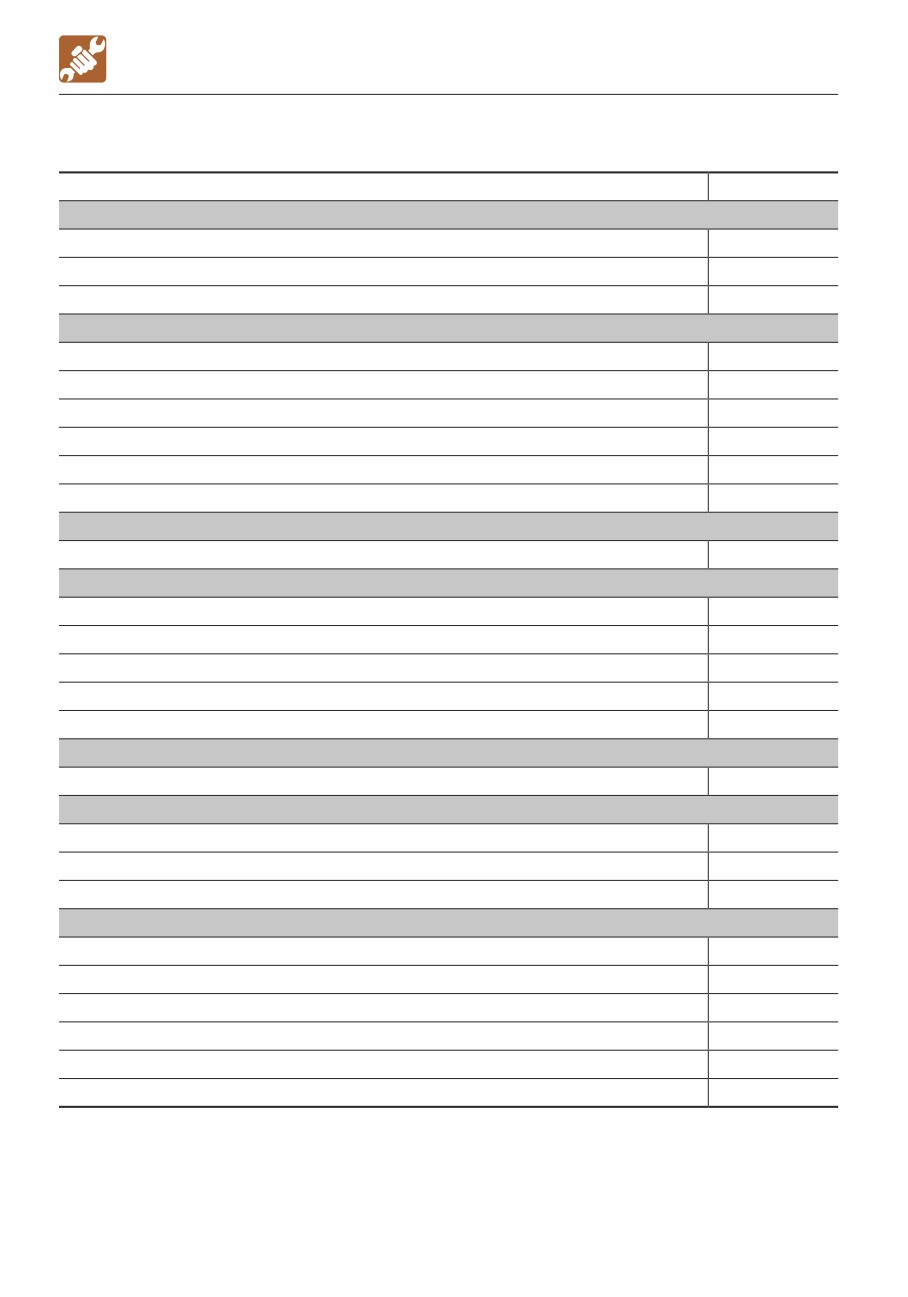
MAINTENANCE LIST
MAINTENANCE LIST
Inspection and maintenance item
Page
Walk-around inspection
Inspecting by opening the engine hood and covers
5-16
Inspecting by walking around the machine
5-17
Inspecting while sitting in the operator’s seat
5-17
Daily inspection (every 10 hours)
Inspecting and replenishing the coolant
5-18
Inspecting and replenishing the engine oil
5-19
Inspecting the water separator
5-20
Inspecting the fuel level
5-20
Inspecting the hydraulic oil tank level and replenishing
5-21
Lubricating the working equipment
5-22
After the initial 50 hours (only for new machines)
Inspecting and adjusting the fan belt
5-24
Every 50 hours
Inspecting and adjusting the crawler tension
5-26
Lubricating the slew bearing
5-28
Lubricating the slew motor pinion
5-28
Draining the water from the fuel tank
5-29
Inspecting the battery fluid level and replenishing
5-30
Every 100 hours
Cleaning the water separator
5-32
After the initial 250 hours (only for new machines)
Replacing the hydraulic oil return filter
5-33
Replacing the pilot line filter
5-34
Replacing the travel motor gear oil*
5-35
Every 250 hours
Inspecting and adjusting the fan belt
5-36
Replacing the engine oil and the oil filter
5-36
Cleaning the air cleaner
5-38
Inspecting the throttle control system
5-39
Cleaning the radiator fins and the oil cooler fins
5-40
Cleaning the air filters
5-41
*: If the percentage of the traveling time within the total operating time is high, replace the gear
oil earlier than the specified time.
5-14
MAINTENANCE
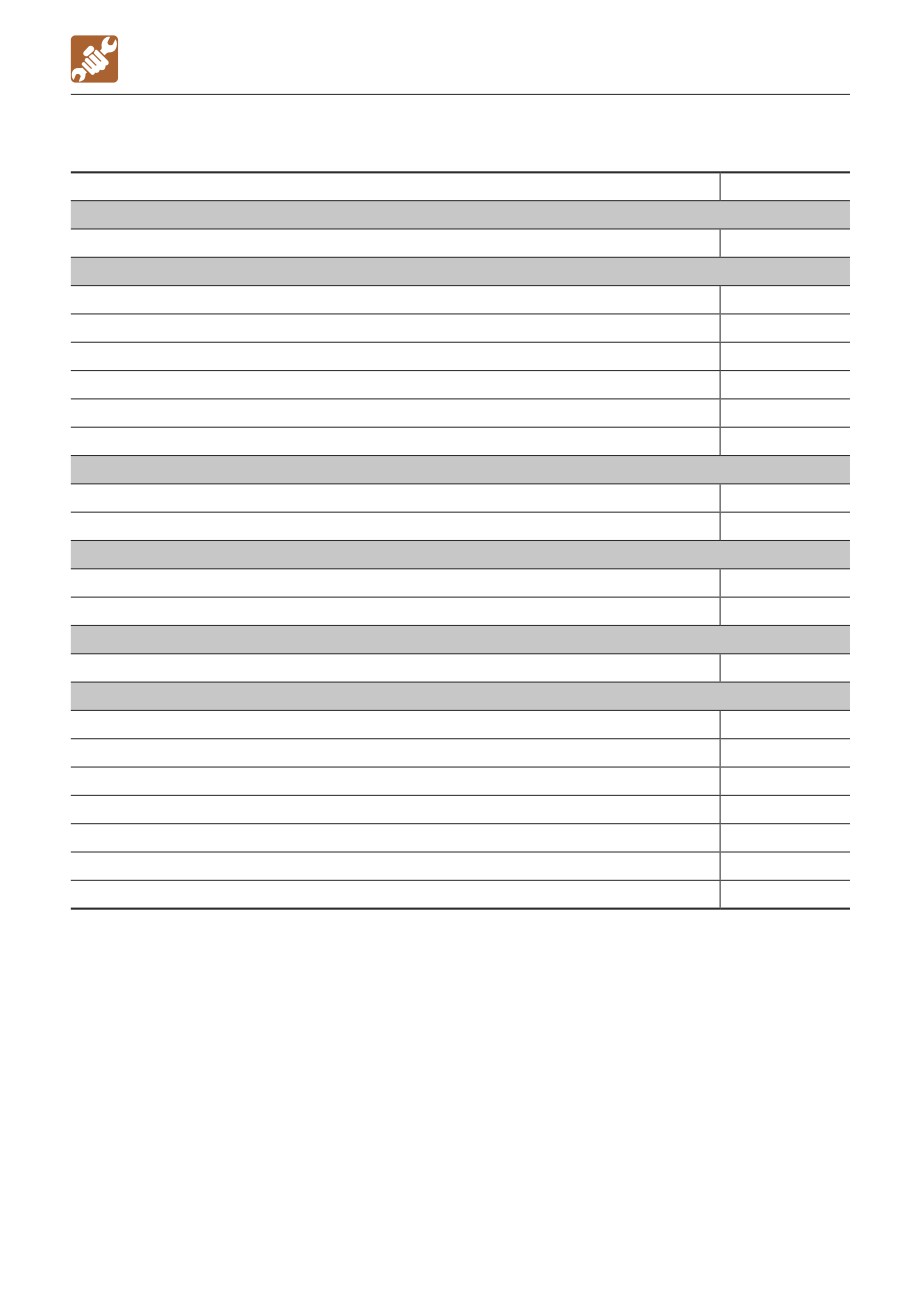
MAINTENANCE LIST
Inspection and maintenance item
Page
Every 500 hours
Replacing the fuel filter
5-42
Every 1000 hours
Replacing the hydraulic oil return filter
5-44
Replacing the travel motor gear oil*
5-44
Replacing the air cleaner element
5-44
Replacing the air breather
5-45
Inspecting and adjusting the engine valve clearance
5-46
Replacing the pilot line filter
5-46
Every 1500 hours
Inspecting and cleaning the engine fuel injectors
5-47
Inspecting the crankcase breather system
5-47
Every 2000 hours
Cleaning the engine cooling system
5-48
Lapping the engine valve seats
5-49
Every 4000 hours
Replacing the hydraulic oil and cleaning the suction strainer
5-50
When required
Replacing the bucket teeth and the side cutters
5-53
Replacing the bucket
5-56
Adjusting the gap between the bucket and arm (If equipped)
5-58
Lubricating the levers and pedals
5-60
Inspecting the rubber crawlers
5-61
Replacing the rubber crawlers
5-62
Inspecting and replenishing the windshield washer fluid
5-63
*: If the percentage of the traveling time within the total operating time is high, replace the gear
oil earlier than the specified time.
5-15
MAINTENANCE
WALK-AROUND INSPECTION
WALK-AROUND INSPECTION
Perform the following inspections every day before starting the engine for the first time.
• Before operating, perform the walk-around inspections and make repairs immediately
where necessary.
• Be sure to secure the engine hood or cover before working the inside. Do not keep the
hood or cover open on a windy day or if the machine is parked on a slope.
Before starting the engine, look around the machine and clean any combustibles from the
surroundings of the engine. Also, inspect if oil or water is leaking and any nuts, bolts or electric
wiring are loosened or damaged.
INSPECTING BY OPENING THE ENGINE
3. Check for oil leakage from the hydraulic oil
HOOD AND COVERS
tank, hydraulic devices, hoses or
connections.
1. Check for any twigs, leaves, oil or other
combustible materials around the engine
and battery.
2. Check for oil or engine coolant water
leakage around the engine.
5-16
MAINTENANCE
WALK-AROUND INSPECTION
INSPECTING BY WALKING AROUND THE
INSPECTING WHILE SITTING IN THE
MACHINE
OPERATOR’S SEAT
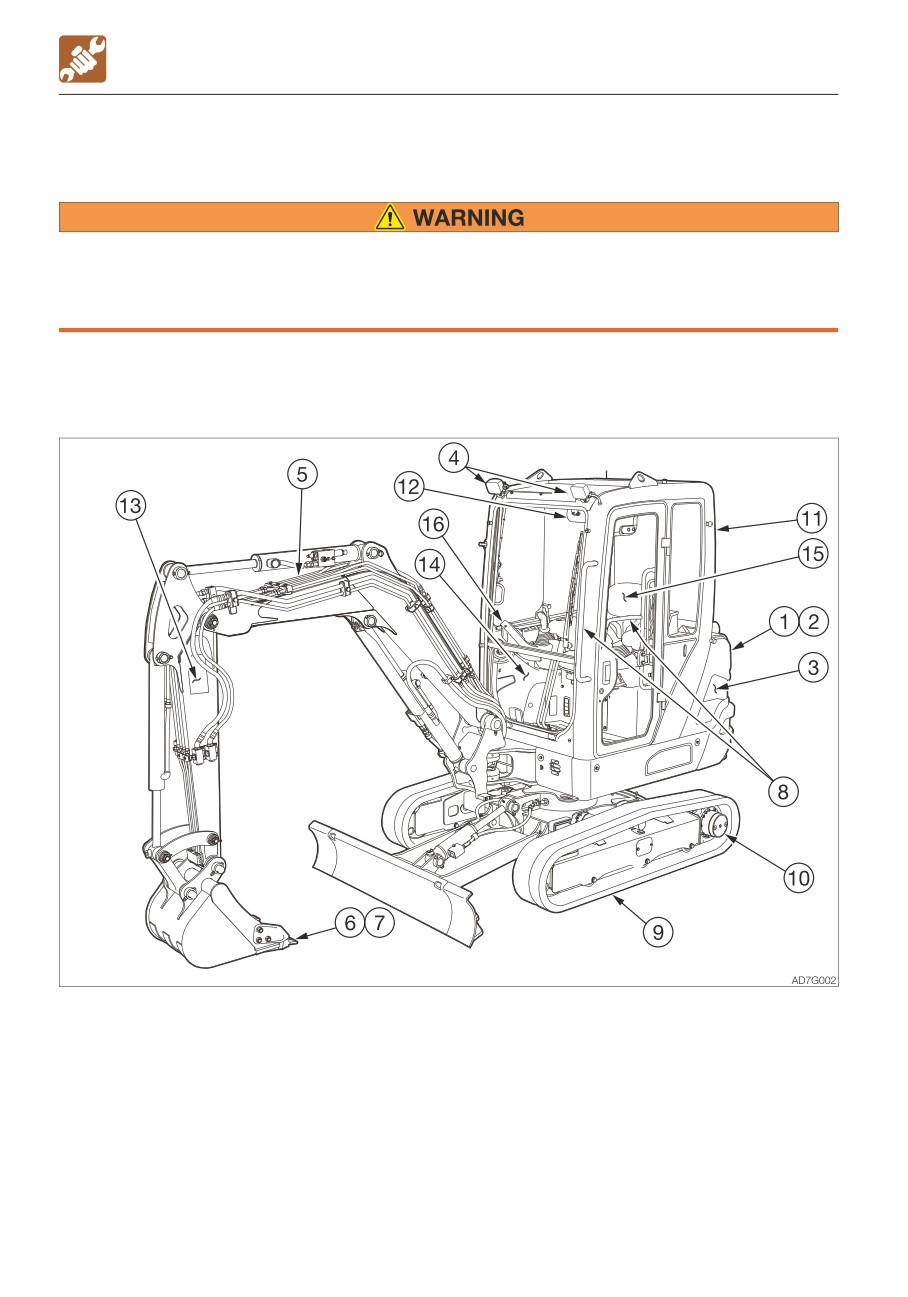
4. Check lights for dirt, damage and burnt
14. Check the windshield for dirt or damage.
out bulbs.
15. Check the seat and seat belt for dirt or
5. Check attachments and hoses for
damage.
damage.
Check the operator’s seat for dirt, oil or
6. Check the bucket, bucket teeth and side
other combustible materials.
cutter for wear, damage and looseness.
16. Check the monitor, instruments and
7. Check the hook, slip stopper and hook
switches for dirt or damage.
mount of buckets with hooks for damage.
(Option)
8. Check the handrail, the steps and the
slip-resistant surfaces for damage and
loose bolts.
9. Check the crawlers, shoe slides, track
rollers, idlers and sprockets for damage,
wear and loose bolts.
10. Check for oil leakage from the travel
motor.
11. Check the canopy/cab and guard for
damage and the nuts and bolts for
looseness.
12. Check the rearview mirror and the interior
rearview mirror for dirt or damage, and
adjust them if necessary.
13. Check the labels for dirt and damage.
5-17
MAINTENANCE
DAILY INSPECTION (EVERY 10 HOURS)
INSPECTING AND REPLENISHING THE
DAILY INSPECTION
COOLANT
(EVERY 10 HOURS)
Perform the following inspections every day
before starting the engine for the first time.
• Do not remove the radiator cap or the
drain plug when the cooling water is
hot. Stop the engine and wait until the
• Before operating, perform the daily
engine and the radiator cool before
inspections and make repairs
slowly loosening the radiator cap and
immediately where necessary.
the drain plug to remove them.
• Be sure to secure the engine hood or
• Always wear the protective goggle and
cover before working the inside. Do not
gloves when handling coolant
keep the hood or cover open on a windy
(antifreeze). If any coolant (antifreeze)
day or if the machine is parked on a
comes in contact with eyes or skin,
slope.
wash it off with clean water. Otherwise,
it could result in injures.
Inspection
1. Open the engine hood.
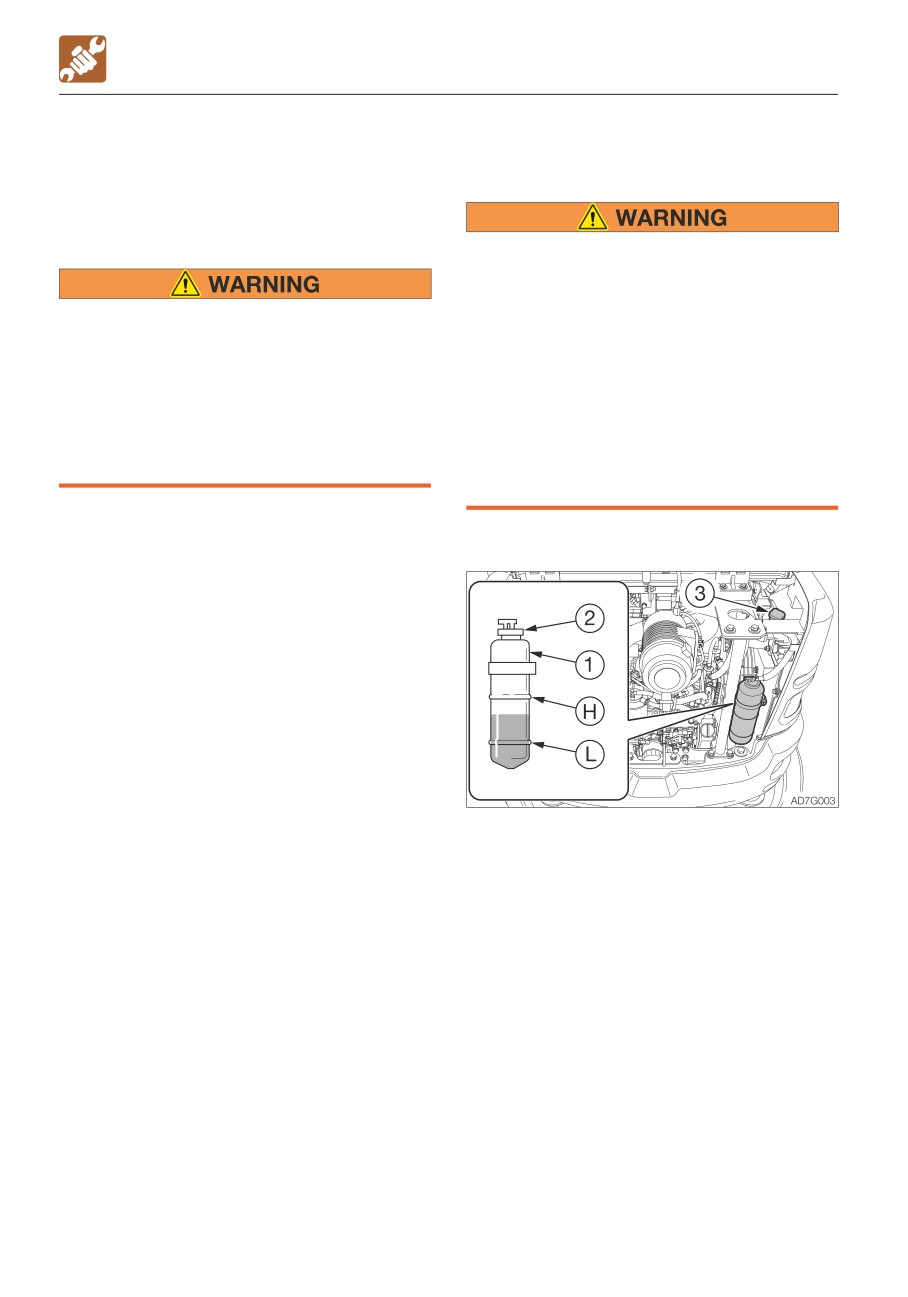
2. Inspect the cooling water level in the
reserve tank (1).
The level should be between the upper
limit (H) and the lower limit (L).
If it is below the lower limit (L), replenish.
Replenishing
1. Remove the cap (2) of the reserve tank (1).
2. Add cooling water up to the upper limit (H)
of the reserve tank (1).
If the reserve tank (1) is found empty at the
inspection, check for water leakage and
then the water level in the radiator (3). Add
water to the radiator (3) as required, and
then to the reserve tank (1).
3. Install the cap (2).
5-18
MAINTENANCE
DAILY INSPECTION (EVERY 10 HOURS)
Note: Use only clean water (soft water) to
INSPECTING AND REPLENISHING THE
replenish the cooling water loss due to
ENGINE OIL
evaporation. Use coolant (antifreeze) and
clean water (soft water) of the specified
mixing ratio to replenish the cooling water
loss due to leaking.
Stop the engine and allow the machine to
cool down before performing
maintenance.
Inspection
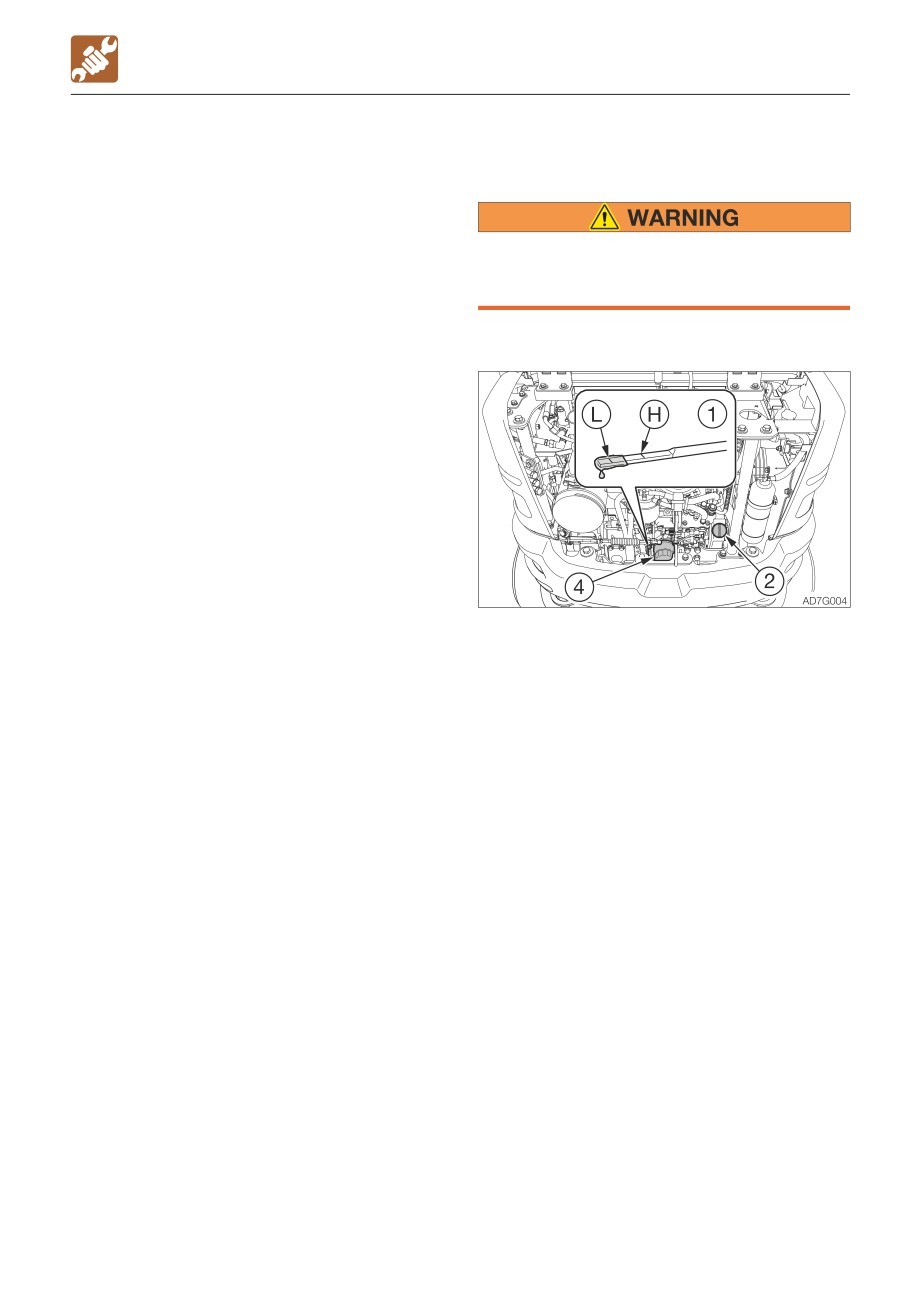
1. Open the engine hood.
2. Take out the dipstick (1) and wipe the oil
off with a rag.
3. Fully reinsert the dipstick (1), and then pull
it back out.
4. Check the oil on the dipstick (1).
The level should be between the upper
limit (H) and the lower limit (L).
If it is below the lower limit (L), replenish.
Replenishing
1. Remove the oil filler cap (2).
2. Add oil up to between the upper limit (H)
and the lower limit (L) of the dipstick (1).
Problems could arise if the oil level is either
too low or too high.
3. Tighten the oil filler cap (2).
4. Start the engine, run it at low idle for about
5 minutes, then stop it.
5. After about 10 minutes, inspect the oil
level.
5-19
MAINTENANCE
DAILY INSPECTION (EVERY 10 HOURS)
INSPECTING THE WATER SEPARATOR
INSPECTING THE FUEL LEVEL
• Do not smoke or permit open flames
• Do not smoke or permit open flames
while handling fuel or working on the
while handling fuel or working on the
fuel system.
fuel system.
• Stop the engine in a well-ventilated
• Never remove the fuel cap or add fuel
place and allow it to cool down before
when the engine is running or still hot.
performing maintenance.
Do not spill fuel on the hot surface of
• Clean up spilled fuel immediately.
the machine.
• Fill the fuel tank in a well ventilated
place.
• Clean up spilled fuel immediately.
• Do not fill the fuel tank to capacity.
Allow room for oil expansion.
• Securely tighten the fuel filler cap.
• Use the correct grade of fuel for the
operating season.
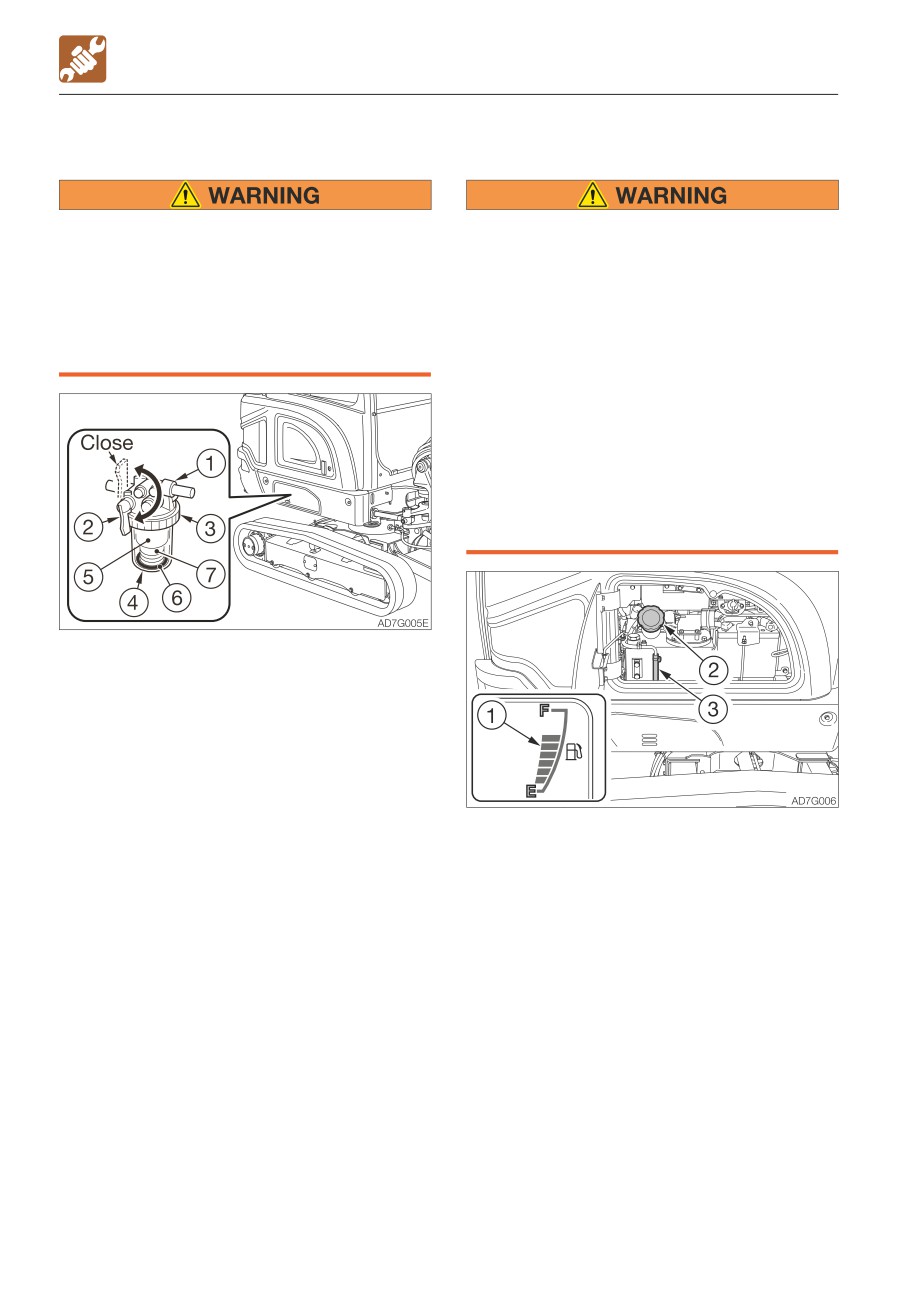
1. Inspect the water separator (1).
If the red indicator ring (6) is sunk to the
bottom of case (4), no water is mixed in.
If the red indicator ring (6) is floating, there
is water up to the ring. Drain the water
and clean.
Refer to “Cleaning the water separator” on
page 5-32.
Refer to “Bleeding air from the fuel
1. Check the fuel level using the fuel gauge
system” on page 6-9.
(1).
F: Tank is full.
E: Tank is empty.
2. If the fuel level is low, open the side cover.
3. Add fuel from the fuel filler port (2) while
watching the sight gauge (3).
Use this gauge (3) to check the full state
when adding fuel. For checking the
remaining amount, use the gauge in the
instrument cluster.
Refer to “Fuel filler port” on page 2-7.
5-20
MAINTENANCE
DAILY INSPECTION (EVERY 10 HOURS)
INSPECTING THE HYDRAULIC OIL TANK
Replenishing
LEVEL AND REPLENISHING
Oil may spurt out if caps or filters are
removed or pipes are disconnected
before releasing the pressure in the
hydraulic system.
• Gradually loosen the vent plug to relieve
tank pressure.
Inspection
The oil level changes with the oil
IMPORTANT: Do not fill up to the level
temperature. Inspect the oil by maintaining
higher than the upper limit (H). It will
the machine at posture shown in the figure at
damage the hydraulic circuits or result in
the next.
oil spurting. If accidentally done, stop the
• Machine posture for inspecting the
engine and wait the hydraulic oil to cool,
hydraulic oil level
and then let the excessive oil to drain
from the drain plug.
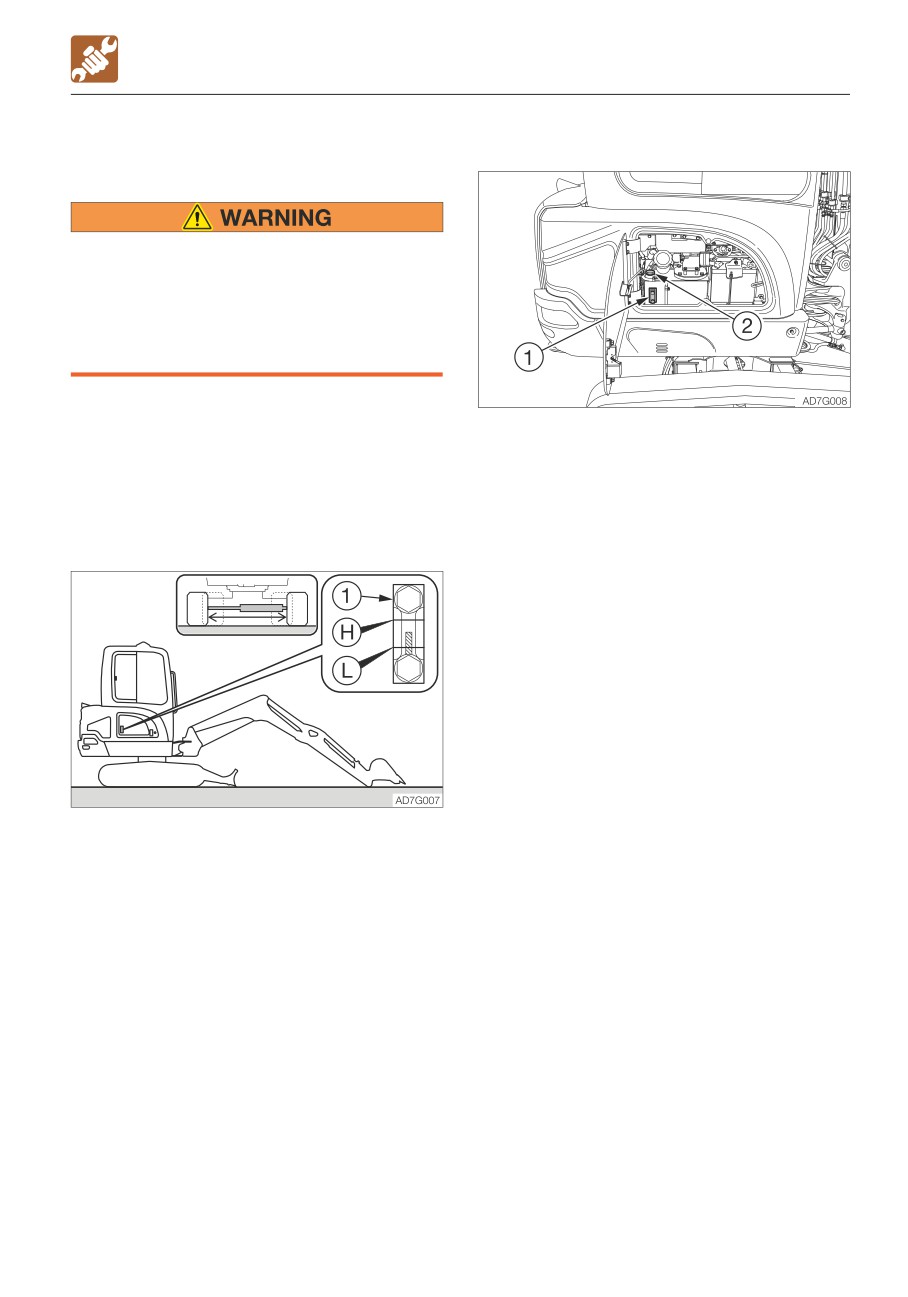
1. Open the side cover.
2. Slowly loosen the plug (2) to relieve the
internal pressure, and then remove the
plug.
3. Add the hydraulic oil up to the middle of
the sight gauge (1).
4. Tighten the plug (2).
1. Start the engine and run it at low speed.
2. Fully extend the crawler width.
3. Fully retract the cylinders (arm and
bucket), and lower the bucket to the
ground.
4. Lower the dozer blade, and then stop the
engine.
5. Inspect the oil level using the sight gauge
(1).
· When the oil temperature is about 20°C
(68°F):
The level should be between the upper
limit (H) and the lower limit (L).
If it is below the lower limit (L), replenish.
· When the oil temperature is about 50 to
80°C (122 to 176°F):
The level should be slightly below the
upper limit (H).
5-21
MAINTENANCE
DAILY INSPECTION (EVERY 10 HOURS)
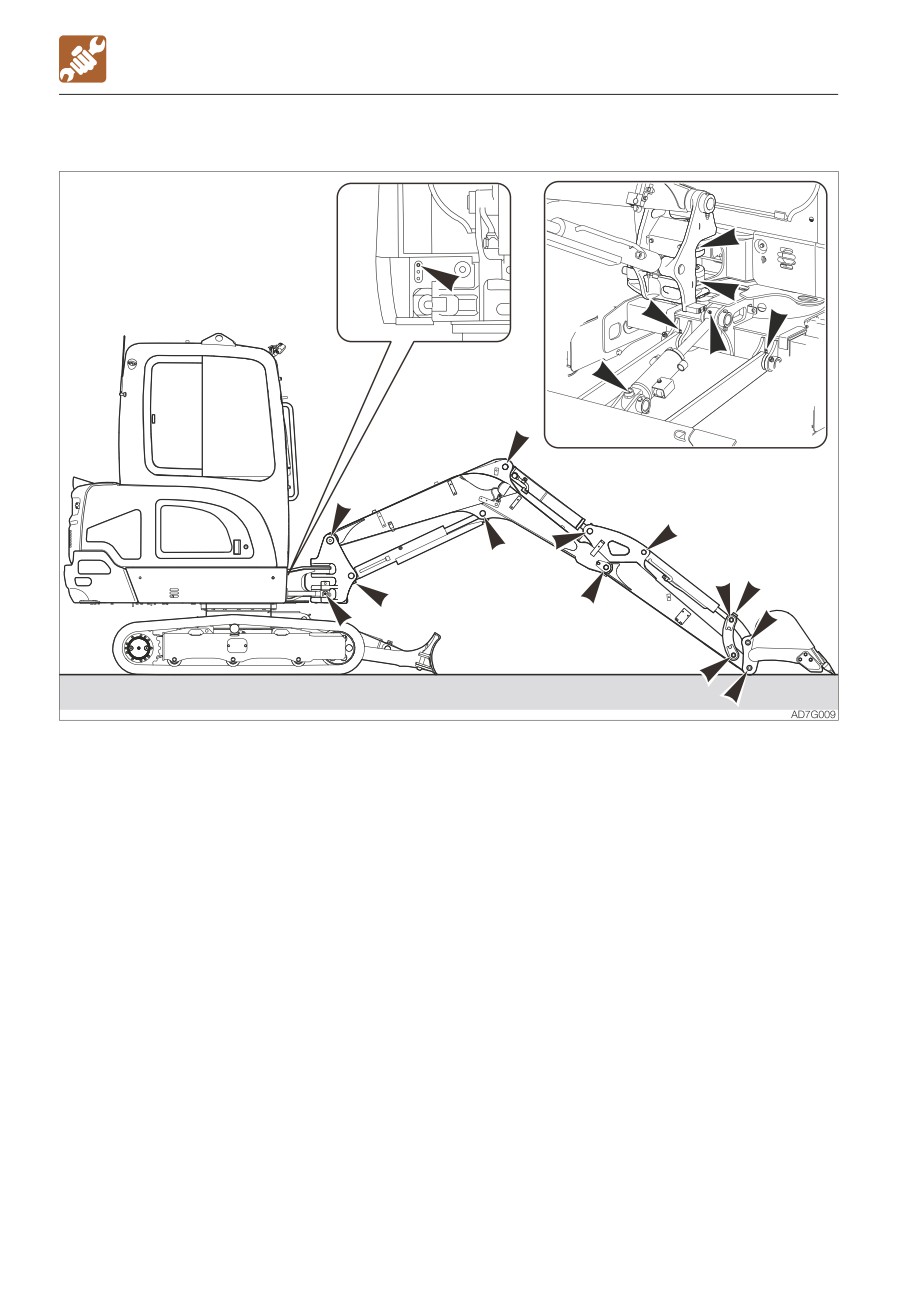
LUBRICATING THE WORKING EQUIPMENT
1. Keep the machine configuration as shown in the diagram above, lower the working
equipment to the ground, and then stop the engine.
2. Use the grease gun to lubricate the grease fittings.
3. Wipe off the excess grease.
5-22
MAINTENANCE
AFTER THE INITIAL 50 HOURS (ONLY FOR NEW MACHINES)
Inspection
AFTER THE INITIAL 50 HOURS
(ONLY FOR NEW MACHINES)
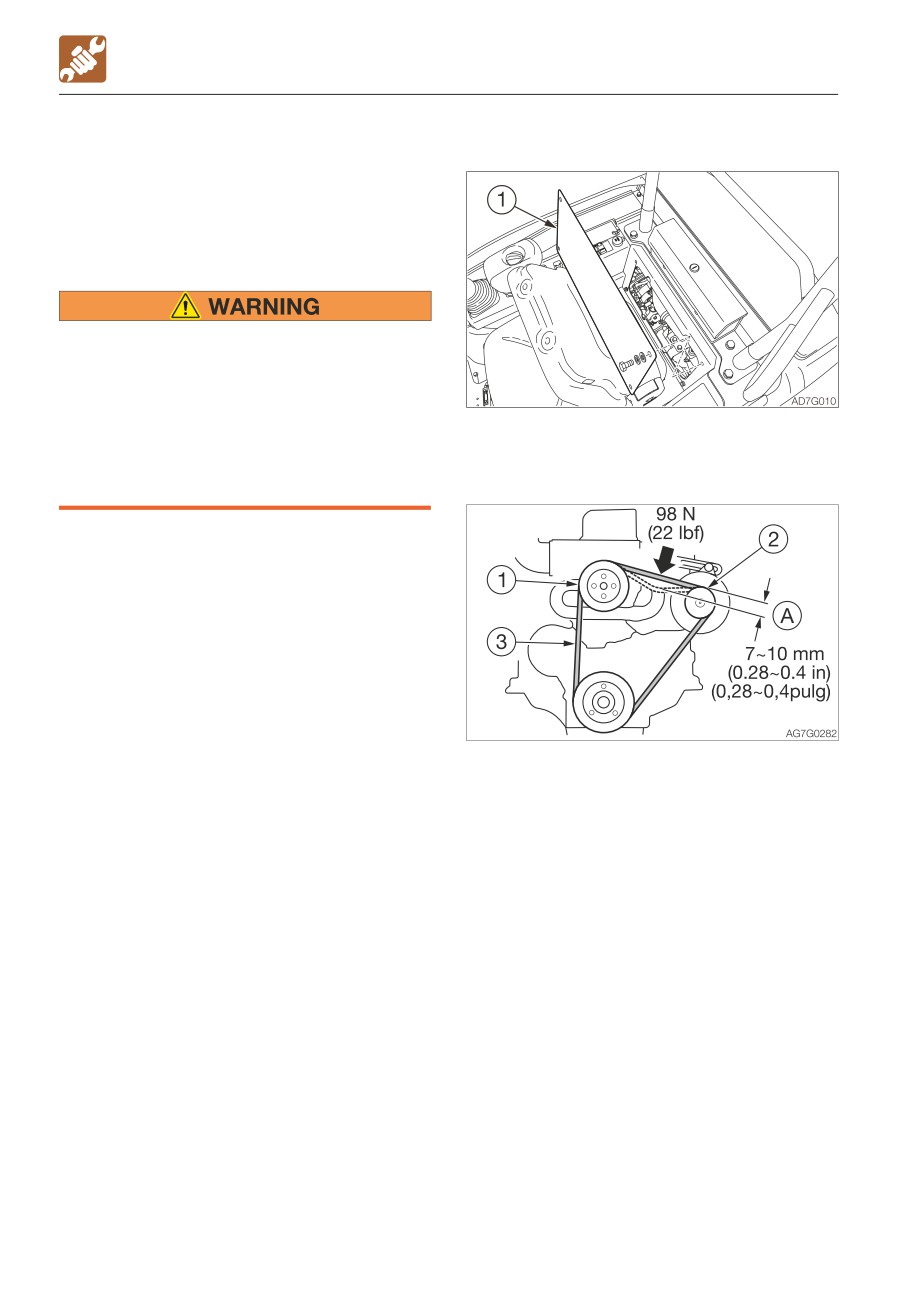
INSPECTING AND ADJUSTING THE FAN
BELT
Stop the engine and allow the machine to
cool down before performing
maintenance.
• The engine, muffler, radiator, hydraulic
lines, sliding parts and many other parts
1. Move the sheet all the way forward.
of the machine are hot immediately after
2. Take out four bolts and remove the cover
the engine is stopped. Touching these
(1).
parts will cause burns.
IMPORTANT: The loose belts could result
in bad battery charge, overheat of engine
or early wear of belt. Too tight belts could
damage the water pump or bearing and
belt used to drive the alternator.
IMPORTANT: Do not let any oil or grease
get on the belt.
3. Press at the center of the fan pulley (1)
and alternator pulley (2) to check the
tension (approx. 98 N or 22 lbf).
The slack (A) should be 7 to 10 mm (0.28
to 0.4 in).
4. Inspect the fan belt (3) and replace if it is
as follows.
· There are cuts or cracks.
· The belt is worn and touches the bottom
of the V groove in the pulley.
· The belt stretched too loose to be
adjusted.
5-24
MAINTENANCE
AFTER THE INITIAL 50 HOURS (ONLY FOR NEW MACHINES)
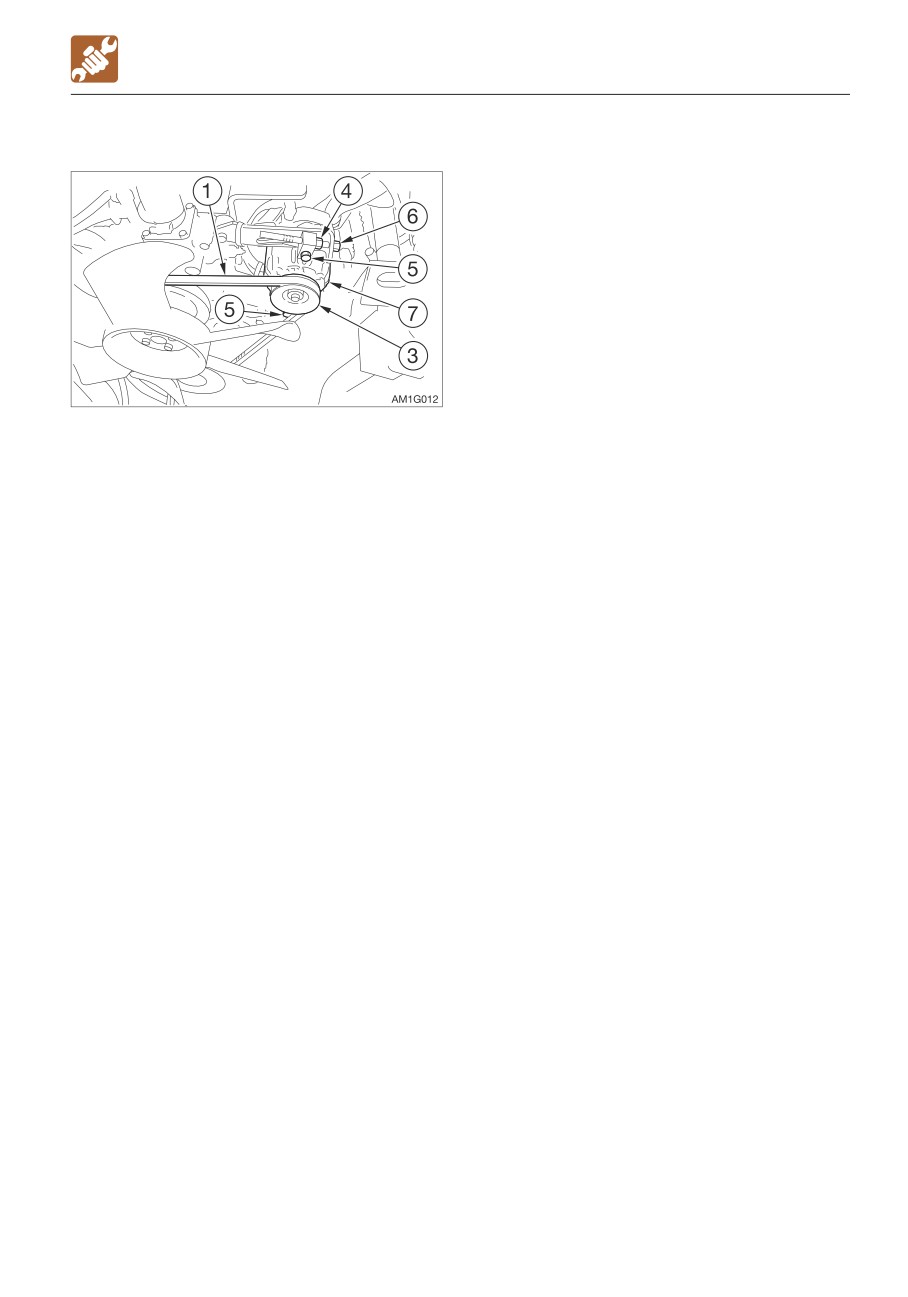
Adjustment
1. Loosen the bolt (5) and locking nut (4).
2. Turn the adjustment bolt (6) to move the
alternator (7) and to adjust the tension of
the fan belt (1).
· Tighten: Clockwise
· Loosen: Counterclockwise
3. Tighten the bolt (5) and locking nut (4).
Note: When replacing with a new belt, run
the engine at low idle speed for about 3 to 5
minutes to break in the new belt, before
adjusting the tension.
5-25
MAINTENANCE
EVERY 50 HOURS
Inspection
EVERY 50 HOURS
INSPECTING AND ADJUSTING THE
CRAWLER TENSION
• If you must work beneath the raised
machine or working equipment, always
use wood blocks, jack-stands or other
rigid and stable supports. Never get
under the machine or working
equipment if they are not sufficiently
supported. This procedure is especially
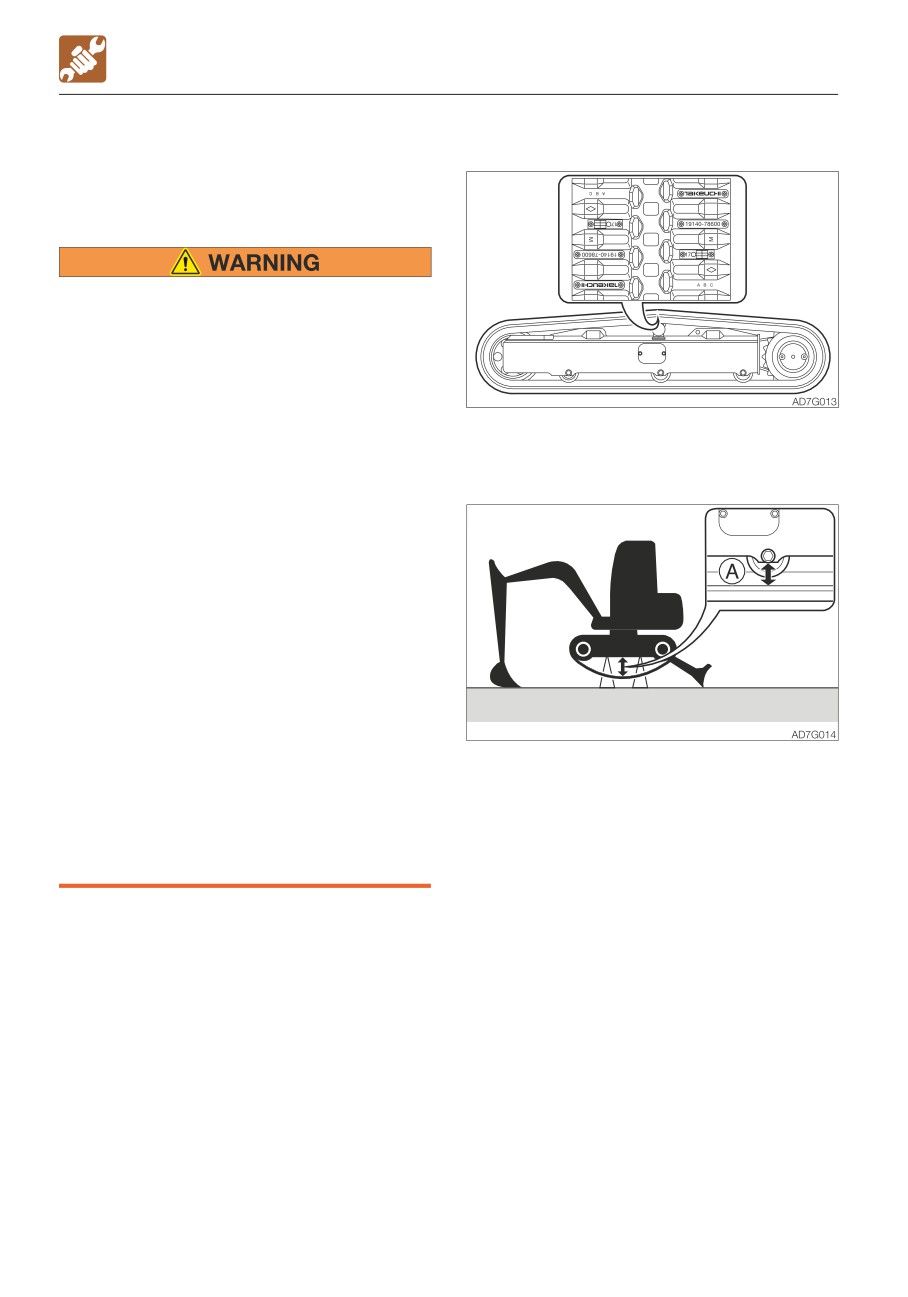
1. For rubber crawlers, move the machine so
important when working on hydraulic
that the “M” mark at the joint is at the top
cylinders.
center of the crawler frame.
• Be careful with the high-pressure grease
In the track adjuster, the grease has
been injected under high pressure. If the
tension is adjusted without following the
prescribed procedure, the grease
discharge valve may fly off, resulting in
injury.
· Never loosen the grease fitting.
· Loosen the grease discharge valve
slowly. Do not turn it more than one
turns.
· Do not put your face, arms, legs or
body in front of the grease discharge
2. Use the working equipment to lift the
valve.
machine body. Operate the levers slowly.
· If grease does not come out when the
grease discharge valve is loosened,
the valve is faulty. Ask a Takeuchi
service agent for repair.
5-26
MAINTENANCE
EVERY 50 HOURS
Adjustment
Increasing the tension
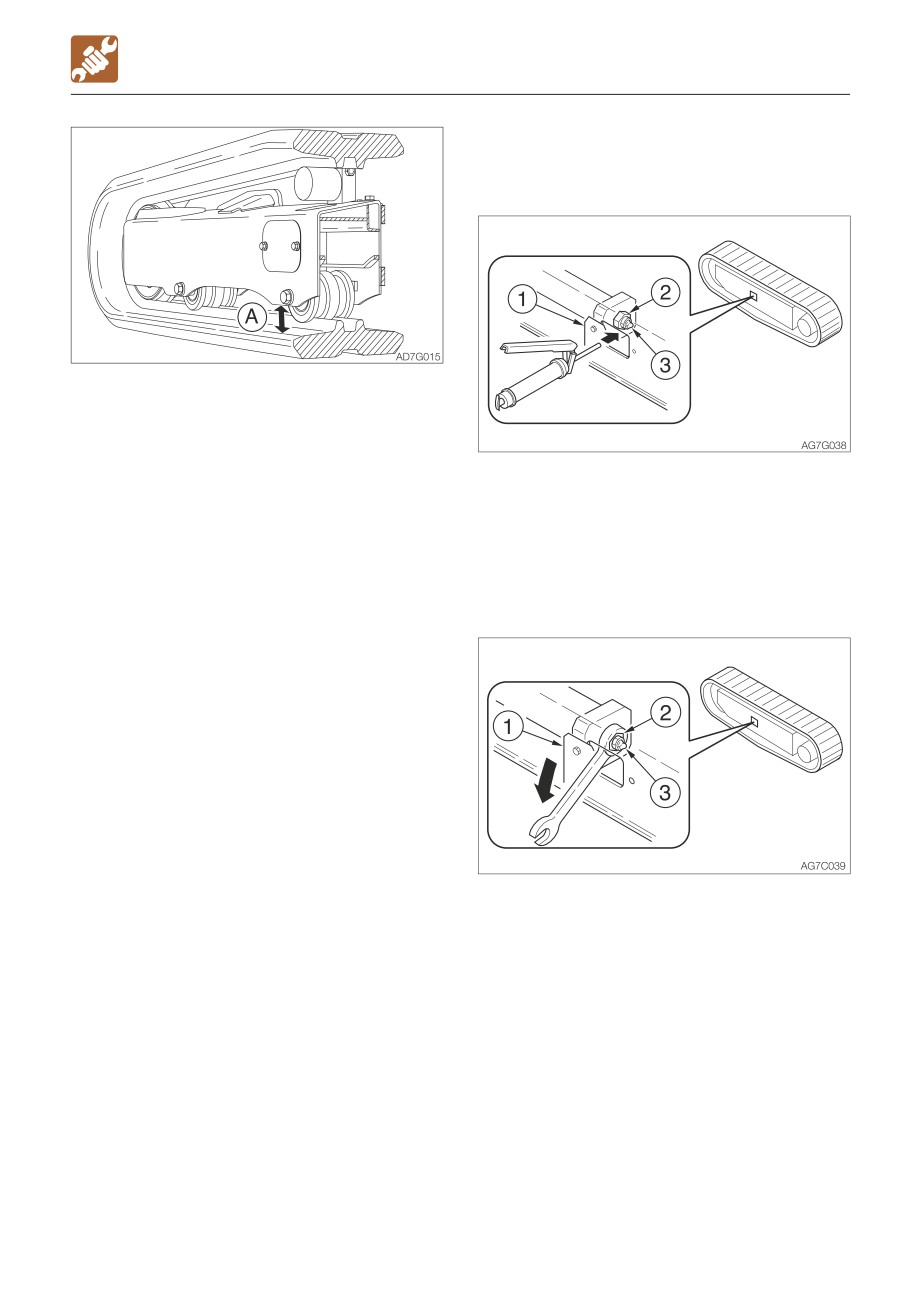
3. Inspect the gap (A) between the bottom
surface of the frame at the center of the
crawler frame and the top surface of the
crawler.
The gap (A) must be within the following
1. Remove the cover (1).
range:
2. Inject grease through the grease fitting (3)
of the grease discharge valve (2) with a
(A) Rubber crawler
grease gun.
55 to 60 mm (2.2 to 2.4 in.)
3. Inspect the crawler tension.
Decreasing the tension
1. Remove the cover (1).
2. Slowly loosen (one turn) the grease
discharge valve (2) with a spanner to
discharge grease. If grease does not
come out well, move the machine back-
and-forth.
3. Tighten the grease discharge valve (2).
· Tightening torque:
59 to 88 N·m (43.5 to 64.9 ft-lb.)
5-27
MAINTENANCE
EVERY 50 HOURS
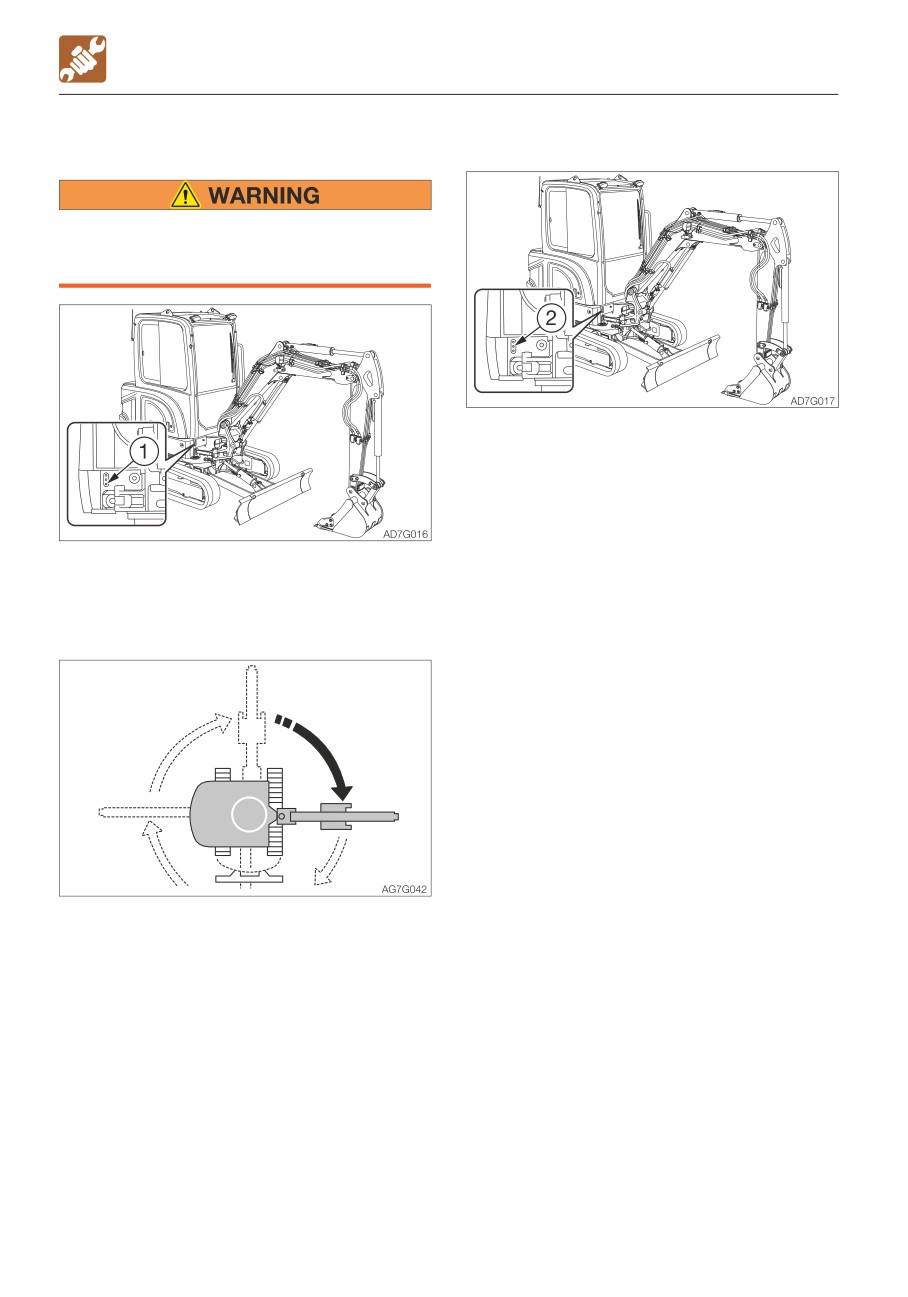
LUBRICATING THE SLEW BEARING
LUBRICATING THE SLEW MOTOR PINION
Do not slew while lubricating. Doing so is
dangerous, as you may get caught in the
machine.
1. Use the grease gun to lubricate the grease
fitting (2).
2. Wipe off the excess grease.
1. Stop the engine with the machine in the
posture shown on the figure above.
2. Use the grease gun to grease the grease
fitting (1).
3. Start the engine, lift the bucket and slew
clockwise 90°.
4. Lower the bucket to the ground, and then
stop the engine.
5. Repeat the steps 2 to 4 above three
times.
6. Wipe off the grease expelled from the slew
bearing and grease fitting.
5-28
MAINTENANCE
EVERY 50 HOURS
DRAINING THE WATER FROM THE FUEL
TANK
• Do not smoke or permit open flames
while handling fuel or working on the
fuel system.
• Never remove the fuel cap or add fuel
when the engine is running or still hot.
Do not spill fuel on the hot surface of
the machine.
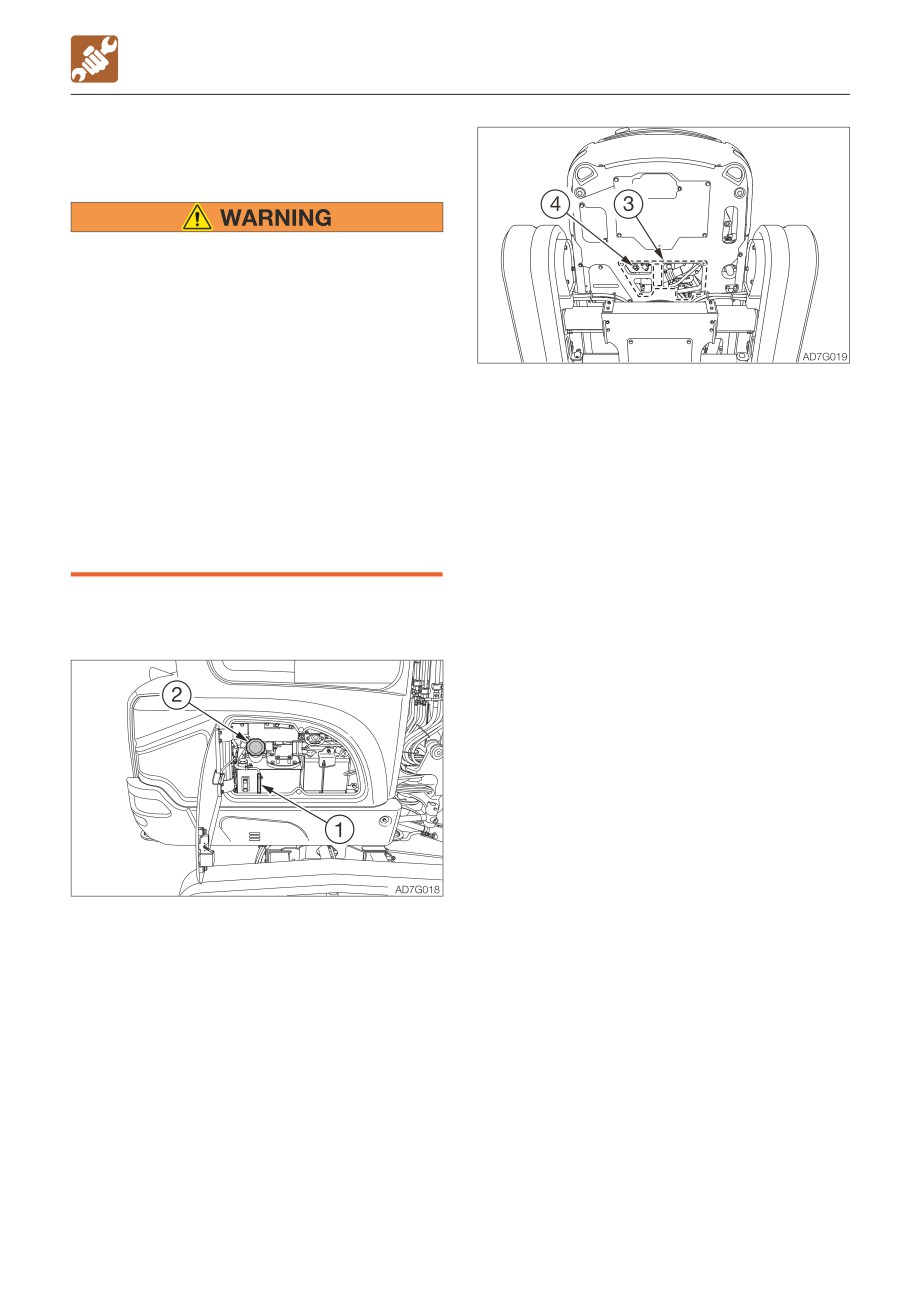
3. Loosen the bolts and remove the under
• Fill the fuel tank in a well ventilated
cover (3).
place.
4. Place a pan under the drain plug (4).
• Do not fill the fuel tank to capacity.
5. Loosen the drain plug (4) to drain water
Allow room for oil expansion.
and sediment buildup in the bottom of the
• Clean up spilled fuel immediately.
tank.
• Securely tighten the fuel filler cap.
6. Tighten the drain plug (4).
• Use the correct grade of fuel for the
7. Install the under cover (3).
operating season.
8. Add fuel while watching the sight gauge
(1).
Do the draining operation before starting the
9. Tighten the fuel filler cap (2).
machine.
10. Close the side cover and lock it with the
key.
11. Bleed air.
Bleeding air from the fuel system
Refer to “Bleeding air from the fuel system”
on page 6-9.
Note: Air in the fuel system causes the
engine to fail to start or to have problems.
Bleed air when the fuel tank is emptied,
using the same procedure above.
1. Open the side cover.
2. Remove the fuel filler cap (2).
5-29
MAINTENANCE
EVERY 50 HOURS
INSPECTING THE BATTERY FLUID LEVEL
AND REPLENISHING
• Wear protective goggle and clothing
when working with batteries.
• Do not add the distilled water above the
• Do not use the battery when the fluid
upper level limit. Doing so could cause
level is below the lower level limit. Doing
the fluid to leak. This fluid can cause
so will hasten the deterioration of the
skin damage if contacted, or can cause
internal portions of the battery and
the machine components to corrode.
shorten the battery life. It also can
• Batteries contain sulfuric acid which will
cause rupturing (explosion).
damage eyes or skin if contacted.
• Batteries generate flammable hydrogen
· If eye contact occurs, flush
gas which may explode. Keep away
immediately with clean water and get
from flame, sparks, fire or lighted
prompt medical attention.
cigarettes.
· If accidentally swallowed, drink large
• Use a dampened cloth to clean above
quantities of water or milk and call a
the fluid level line and check the fluid
physician immediately.
level. Do not clean with a dry cloth;
· If acid contacts skin or clothing, wash
otherwise it can cause static electricity
off immediately with a lot of water.
to build up, resulting in ignition or
explosion.
Inspection
• Do not use the cable if it’s connecting
terminal is loose or corroded. If used,
IMPORTANT: Check the fluid level of all
ignition or explosion may occur.
cells following the steps below, even
• Do not block the exhaust hole of the
when the fluid level can be checked using
battery. An explosion could result, if
the indicator.
blocked.
Note: Under normal operating conditions,
the maintenance-free battery does not
require addition of water because of the
special plate designed to minimize fluid loss.
However, for those machines that are heavily
used or operated under severe conditions
(for example, in high ambient temperature),
the fluid level often becomes low. If that is
the case, check the fluid level of the
maintenance-free battery and add water as
needed.
Note: The warranty will be void if the label on
the battery is removed during the warranty
period. If the indicator displays “Insufficient
battery fluid” during the warranty period,
contact your sales or service dealer without
doing anything to the battery.
5-30
MAINTENANCE
EVERY 50 HOURS
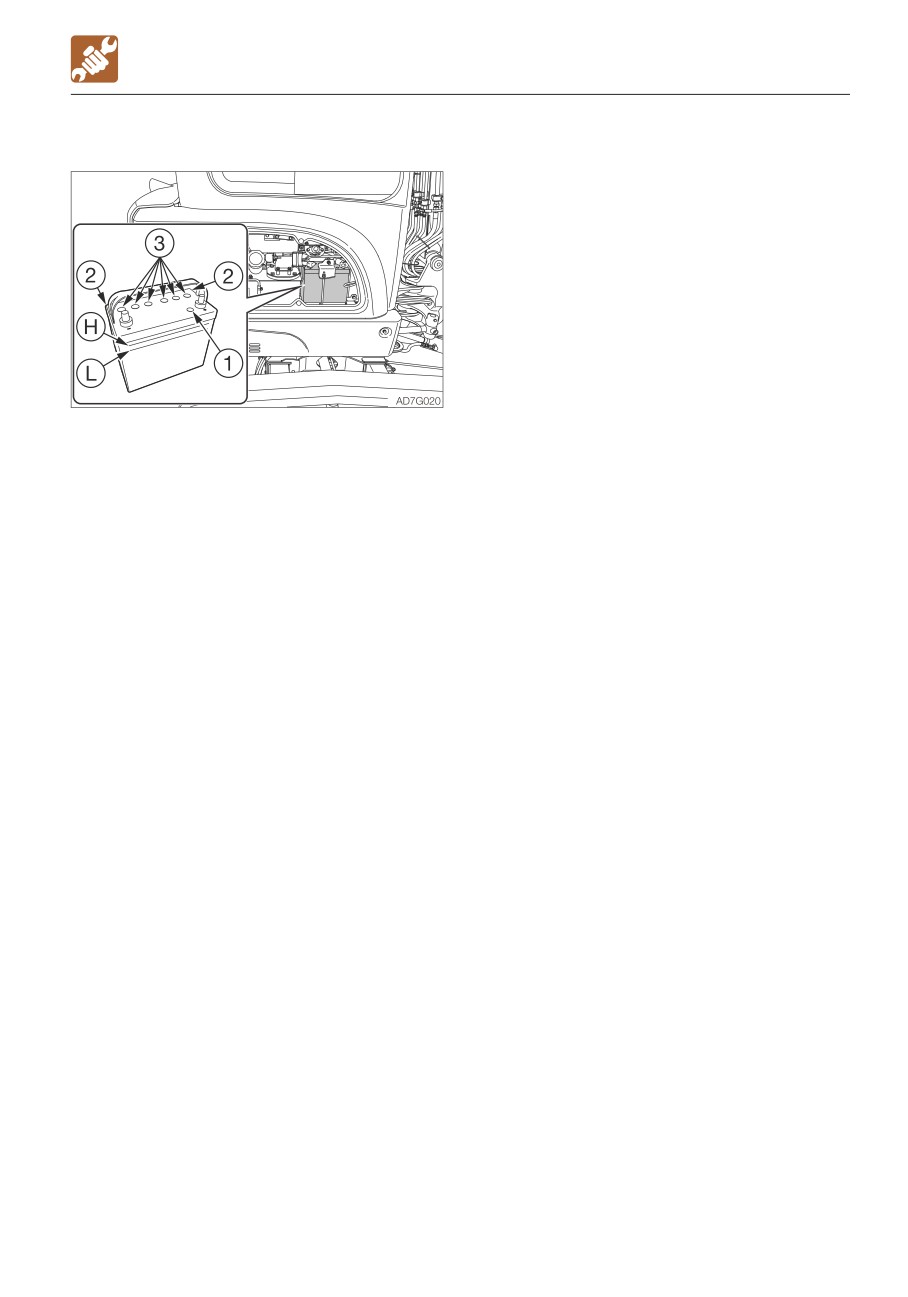
1. Open the side cover.
2. Inspect the indicator (1).
· Blue: Good
· White: Charging needed
· Red: Insufficient battery fluid
3. Inspect the fluid level.
The fluid level must be between the upper
level line (H) and lower level line (L). If not,
add distilled water up to the line (H).
4. Check the battery terminal for looseness,
dirt and corrosion.
5. Check the exhaust holes (2) for dirt.
Replenishing
When adding distilled water, do so before
starting operations in order to prevent
freezing.
1. Upon expiration of the warranty period,
remove the label from the sealing plugs
(3).
2. Loosen the sealing plugs (3) and add
distilled water up to the highest level line
(H).
3. Check that the indicator (1) turns blue.
4. Securely tighten the sealing plugs (3).
Note: For the replacement battery, a semi-
sealed type is recommended.
5-31
MAINTENANCE
EVERY 100 HOURS
EVERY 100 HOURS
CLEANING THE WATER SEPARATOR
• Do not smoke or permit open flames
while handling fuel or working on the
fuel system.
• Stop the engine in a well-ventilated
place and allow it to cool down before
performing maintenance.
• Clean up spilled fuel immediately.
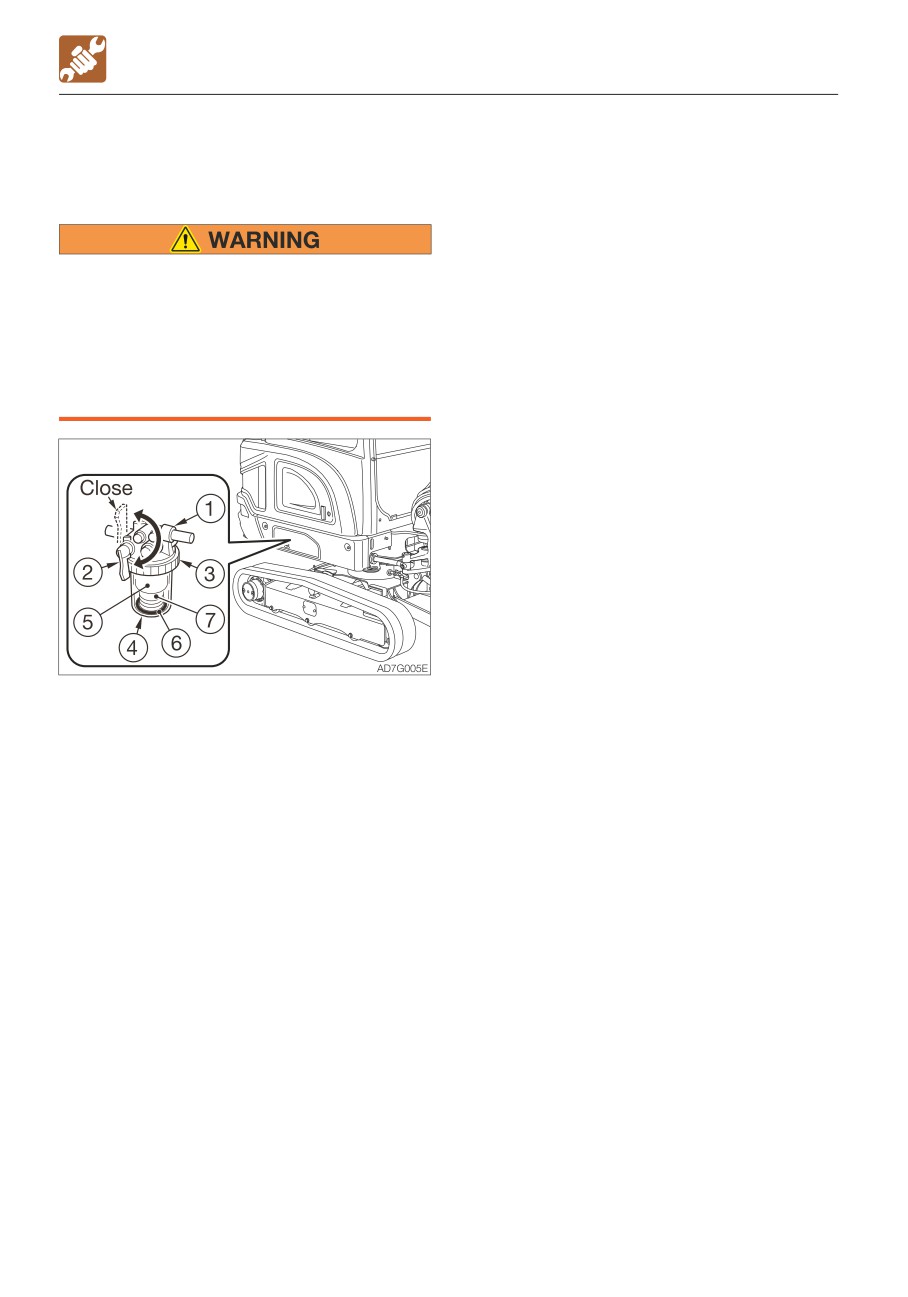
1. Close the valve (2).
2. Loosen the ring (3), and then remove and
clean the case (4), element (5) indicator
ring (6) and spring (7).
3. Inspect the O-ring and the element (5). If
there are any scratches or other
irregularities, replace them.
4. Install the indicator ring (6), spring (7),
element (5) and case (4), and then tighten
the ring (3).
5. Open the valve (2) to bleed air.
Refer to “Bleeding air from the fuel
system” on page 6-9.
5-32
MAINTENANCE
AFTER THE INITIAL 250 HOURS (ONLY FOR NEW MACHINES)
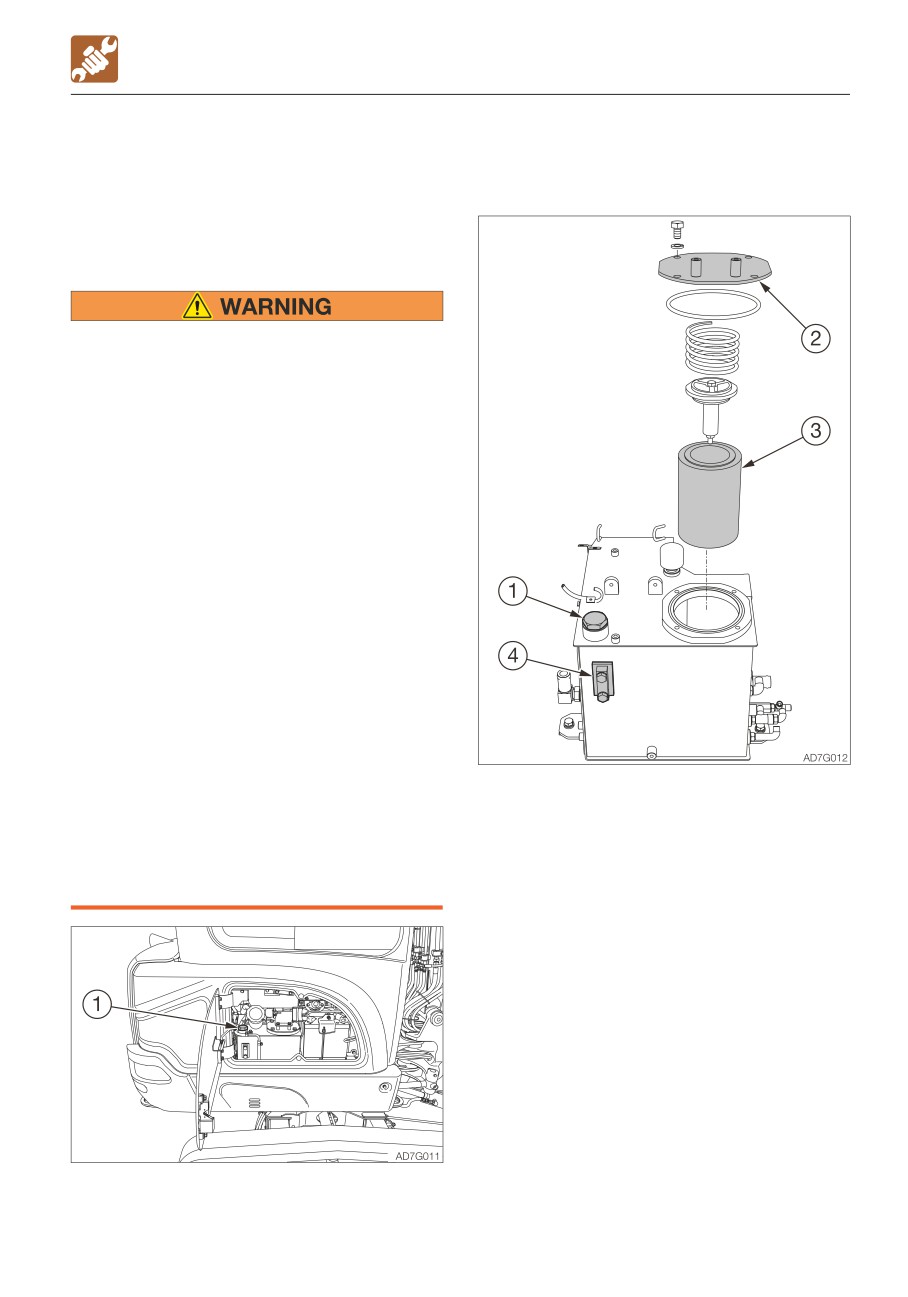
2. Slowly loosen the air bleeding plug (1) to
AFTER THE INITIAL 250 HOURS
relieve the internal pressure, and then
remove the plug.
(ONLY FOR NEW MACHINES)
REPLACING THE HYDRAULIC OIL
RETURN FILTER
• Stop the engine and allow the machine
to cool down before performing
maintenance.
· The engine and the hydraulic system
and many other parts of the machine
are hot immediately after the engine is
stopped. Touching these parts will
cause burns.
· The hydraulic oil is also hot and under
high pressure.
Be careful not to touch the hydraulic
oil when loosening the cap or plug.
Working on the machine under these
conditions could result in burns or
injuries due to the hot oil spurting out.
• Oil may spurt out if caps or filters are
removed or pipes are disconnected
before releasing the pressure in the
hydraulic system.
· Gradually loosen the vent plug to
relieve tank pressure.
3. Loosen the bolts to take out the flange (2).
· When removing plugs or screws, or
4. Remove the return filter (3).
when disconnecting hoses, stand to
5. Install a new return filter.
the side and loosen them slowly to
6. Reinstall the flange (2) on its original
gradually release the internal pressure
position.
before removing.
7. Inspect the level with the sight gauge (4),
and replenish if the level is too low.
Refer to “Inspecting the hydraulic oil tank
level and replenishing” on page 5-21.
1. Open the side cover.
5-33
MAINTENANCE
AFTER THE INITIAL 250 HOURS (ONLY FOR NEW MACHINES)
REPLACING THE PILOT LINE FILTER
• Stop the engine and allow each part of
the machine to cool down before
performing maintenance.
· The engine, the hydraulic system and
many other parts of the machine are
hot immediately after the engine is
stopped. Touching these parts will
cause burns.
3. Open the engine hood.
· The hydraulic oil is also hot and under
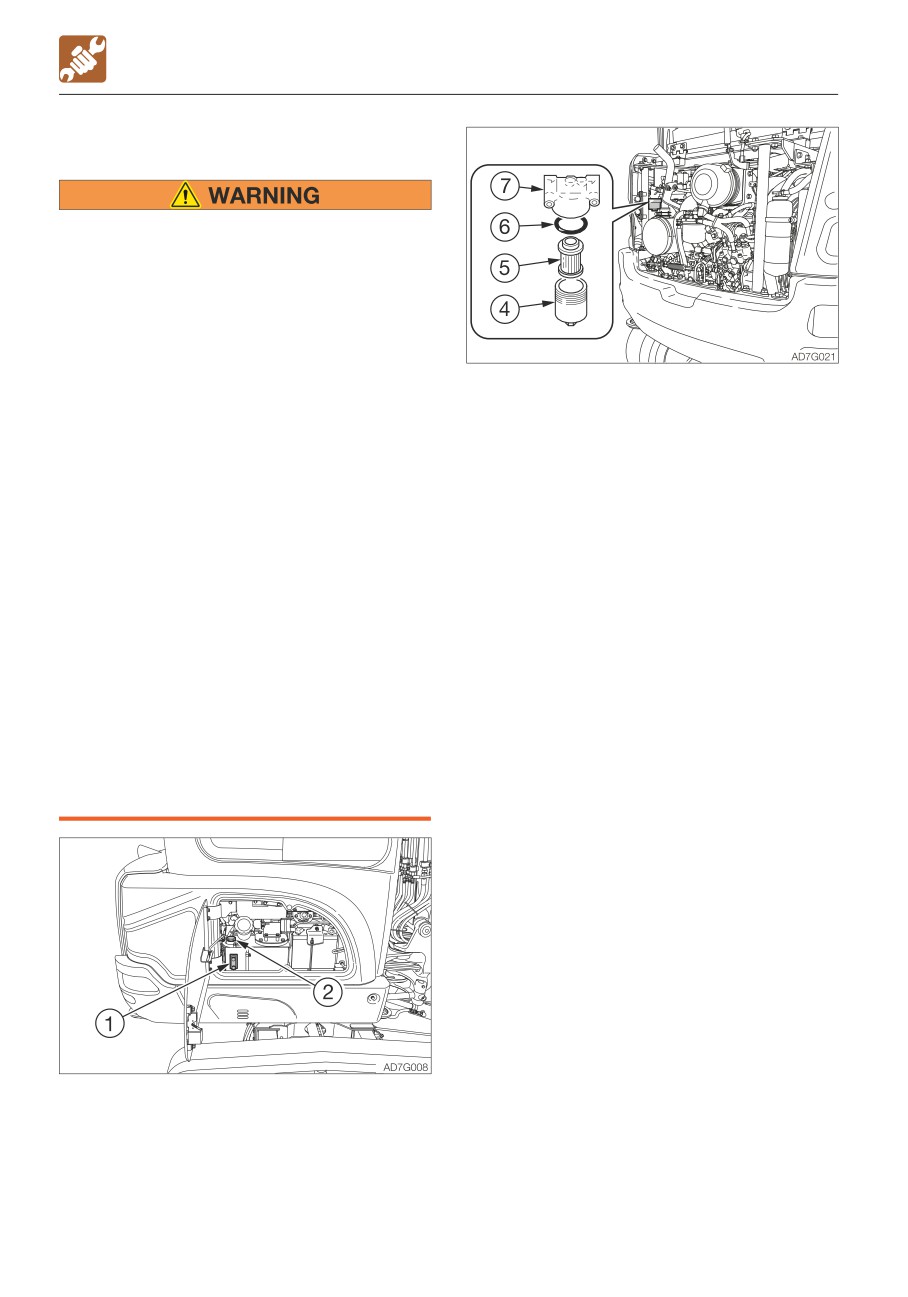
4. Turn the case (4) counterclockwise and
high pressure immediately after the
remove it.
engine is stopped.
5. Remove the element (5) and O-ring (6).
Be careful not to touch the oil when
6. Clean the inside of the case (4).
loosening the cap or plug. Working on
7. Apply a thin layer of oil on the O-ring of the
the machine under these conditions
new filter.
could result in burns or injuries due to
8. Install the new element on the filter stand
the hot oil spurting out.
(7).
• Oil may spurt out if caps or filters are
9. Apply a thin layer of oil on the new O-ring
removed or pipes are disconnected
(6).
before releasing the pressure in the
10. Install the new O-ring (6) and the case (4)
hydraulic system.
on the filter stand (7).
· Gradually loosen the vent plug to
· Case (4) tightening torque: 25 to 35 N·m
relieve tank pressure.
(18.4 to 25.8 ft-lb)
· When removing plugs or screws, or
11. Inspect the level with the sight gauge (1)
when disconnecting hoses, stand to
and replenish if the level is too low.
the side and loosen them slowly to
Refer to “Inspecting the hydraulic oil tank
gradually release the internal pressure
level and replenishing” on page 5-21.
before removing.
1. Open the side cover.
2. Slowly turn the vent plug (2) to relieve tank
pressure, then remove.
5-34
MAINTENANCE
AFTER THE INITIAL 250 HOURS (ONLY FOR NEW MACHINES)
REPLACING THE TRAVEL MOTOR GEAR
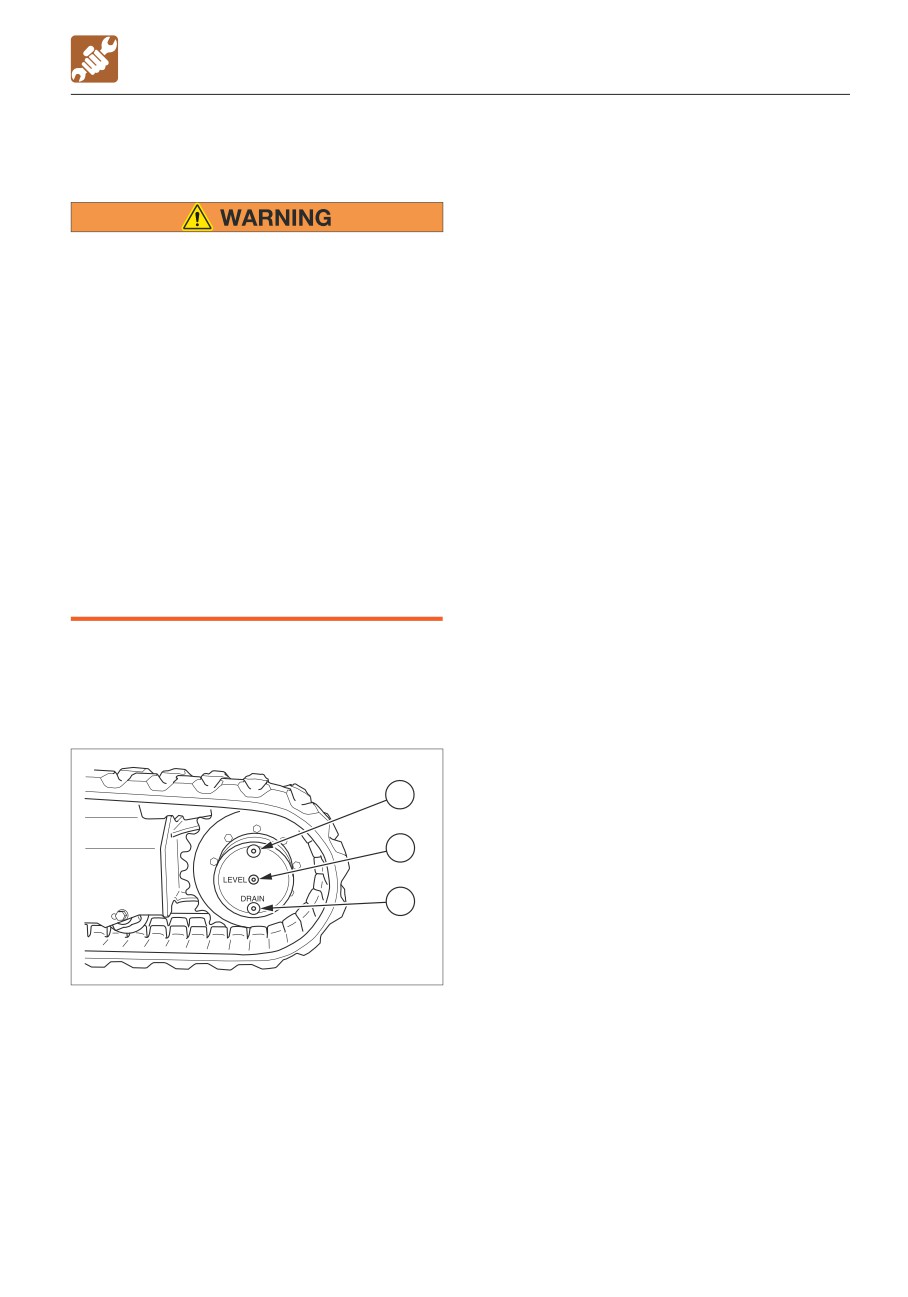
6. Add oil through the hole of the plug (3)
OIL
until oil flows out of the hole of the plug
(2).
7. Tighten the plugs (2) and (3).
·
Plug (2) tightening torque: 12 to 18 N·m
• Stop the engine and allow the machine
(8.8 to 13.3 ft-lb)
to cool down before performing
·
Plug (3) tightening torque: 46 to 51 N·m
maintenance.
(34 to 37.6 ft-lb)
· The travel motor is hot immediately
after the engine is stopped. Touching
it will cause burns.
· The gear oil is also hot and under high
pressure immediately after the engine
is stopped.
Be careful when loosening the plugs.
Working on the machine under these
conditions could result in burns or
injuries.
• The pressure in the reduction gear case
of travel motor may cause oil or the plug
to fly out. Loosen the plug slowly to
release the pressure.
IMPORTANT: If the percentage of the
traveling time within the total operating
time is high, replace the gear oil earlier
than the specified time.
3
2
1
AG7G051
1. Set the travel motor so that plug (1) is at
the very bottom.
2. Place a pan under the plug (1).
3. Remove the plugs (1), (2) and (3) and drain
the oil.
4. Rewrap the plugs with new sealing tape.
5. Tighten the plug (1).
· Plug (1) tightening torque: 46 to 51 N·m
(34 to 37.6 ft-lb)
5-35
MAINTENANCE
EVERY 250 HOURS
REPLACING THE ENGINE OIL AND THE
EVERY 250 HOURS
OIL FILTER
INSPECTING AND ADJUSTING THE FAN
BELT
Refer to “Inspecting and adjusting the fan
Stop the engine and allow the machine to
belt” on page 5-24.
cool down before performing
maintenance.
• The engine, muffler, radiator, hydraulic
lines, sliding parts and many other parts
of the machine are hot immediately after
the engine is stopped. Touching these
parts will cause burns.
• The engine oil is also hot.
Be careful not to touch the hydraulic oil
when loosening the cap or plug.
Working on the machine under these
conditions could result in burns or
injuries.
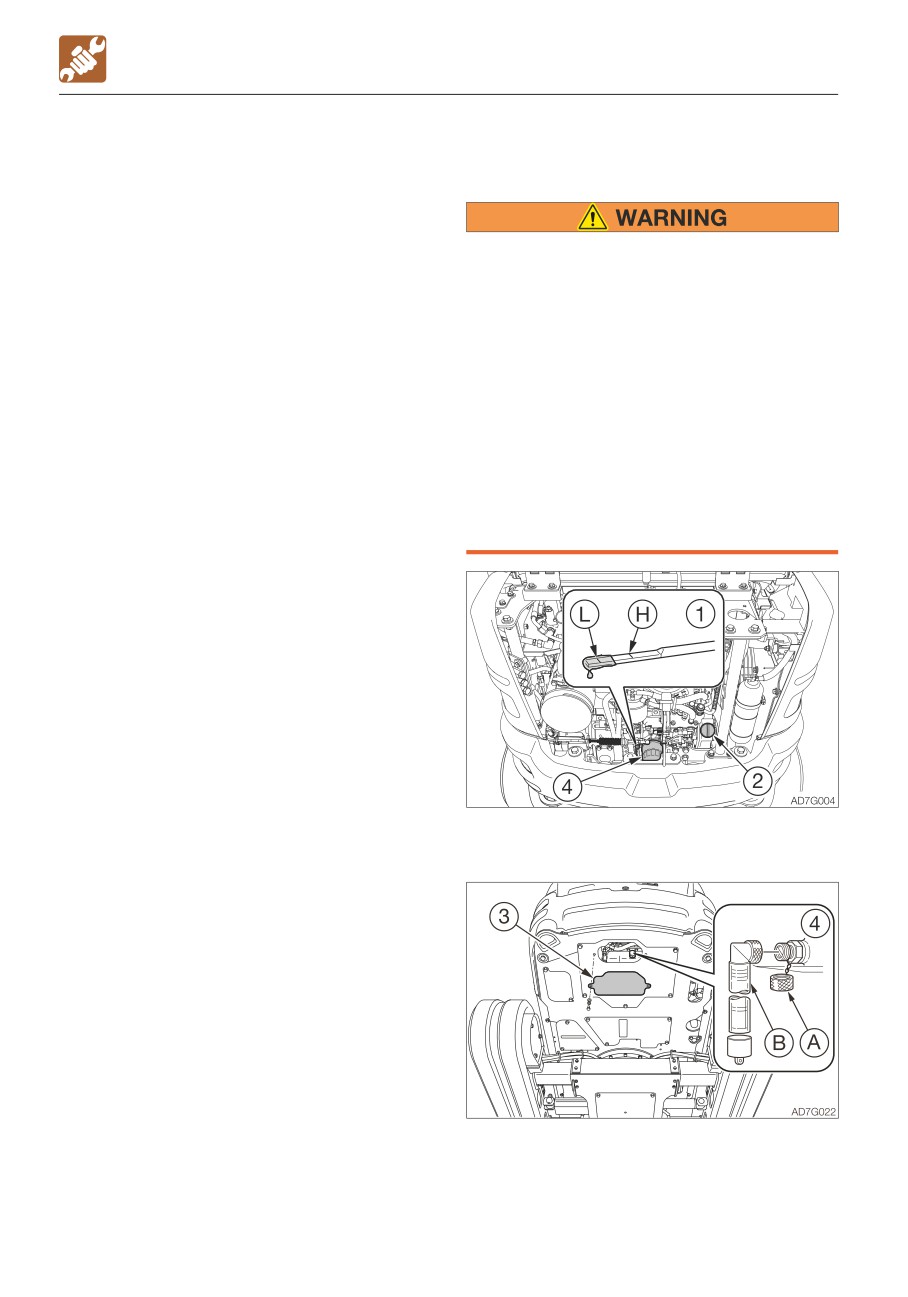
1. Open the engine hood and remove the oil
filler cap (2).
2. Loosen the bolts and remove the under
cover (3).
3. Place a pan for catching the waste oil
under the drain plug (4).
5-36
MAINTENANCE
EVERY 250 HOURS
4. Remove the cap (A), install connector (B)
and drain the oil. (The oil comes out when
the screw is tightened.)
5. Remove the connector (B) and install the
cap (A).
IMPORTANT: Check the waste oil for
metal powder. If it contains large amounts
of metal powder, consult your sales or
service dealer.
6. Turn the filter (4) counterclockwise with the
filter wrench and remove it.
7. Clean the surface of installation of the filter
stand.
8. Apply a thin layer of oil on the packing of
the new filter.
9. Install the new filter by hand.
10. Tighten one more turn (with the filter
wrench) after the filter packing comes in
contact with the surface of installation.
(Torque when tightening with filter
wrench: 19.6 to 23.5 N·m or14 to 17
ft-lb)
11. Add oil up to between the upper limit (H)
and the lower limit (L) of the dipstick (1).
Problems could arise if the oil level is
either too low or too high.
12. Tighten the oil filler cap (2).
13. Start the engine, run it at low idle for
about 5 minutes, then stop it.
14. After about 10 minutes, inspect the oil
level.
5-37
MAINTENANCE
EVERY 250 HOURS
CLEANING THE AIR CLEANER
• Stop the engine and allow the machine
to cool down before performing
maintenance.
· The engine, muffler, radiator and many
other parts of the machine are hot
immediately after the engine is
stopped. Touching it will cause burns.
• Wear required appropriate equipment
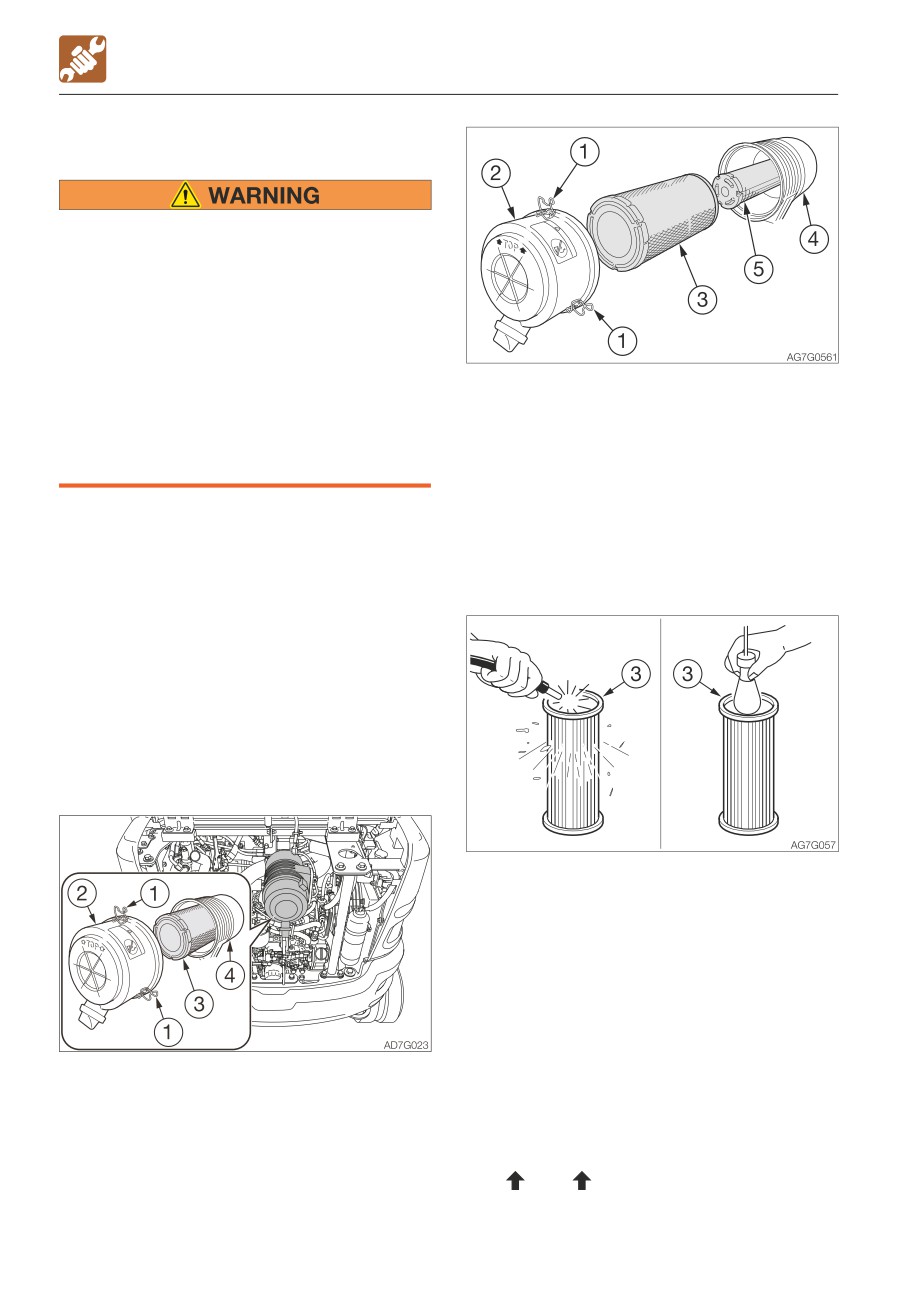
3. Clean the inside of the dust cup (2).
such as protective goggle and filter
4. Remove the primary element (3).
mask when using compressed air, as
5. Cover the intake hole at the back of the
metal fragments or other objects can fly
body (4) with cloth or tape to prevent dirt
and cause serious injury.
from getting in.
<If equipped with the secondary element>
IMPORTANT: Be careful not to scratch the
To prevent dirt from getting inside the
element. Do not use an element if it is
engine, do not remove the secondary
damaged.
element (5).
IMPORTANT: When operating the
6. Clean the inside of the body (4).
machine in very dusty places, perform
inspection and maintenance operations
every day.
IMPORTANT: Be sure to install the
element and dust cap securely. If not,
dust could be drawn into the cylinder,
damaging the engine.
1. Open the engine hood.
7. Clean the primary element (3) with dried
compressed air (294 to 490 kPa or 43 to
71 psi).
First blow the air from the inside of the
element along the pleats. Then blow the
air from the outside and finally from the
inside again.
8. Light up the inside of the primary element
(3) with a light bulb, inspect it, and replace
2. Loosen the clamps (1) and remove the
it if there are small holes or thin spots.
dust cup (2).
9. Remove the cloth or tape applied in step
5.
10. Install the primary element (3).
11. Install the dust cup (2) with its
“ TOP
” mark facing up, and then
fasten it with the clamps (1).
5-38
MAINTENANCE
EVERY 250 HOURS
INSPECTING THE THROTTLE CONTROL
SYSTEM
Operate the throttle controller to check for
stretch in the wire and looseness of it at the
fixing portion.
If the wire is stretched or loosened at the
fixing portion, malfunction could result.
The operation of wire replacement or
adjustment requires experience. Ask your
sales or service dealer for it.
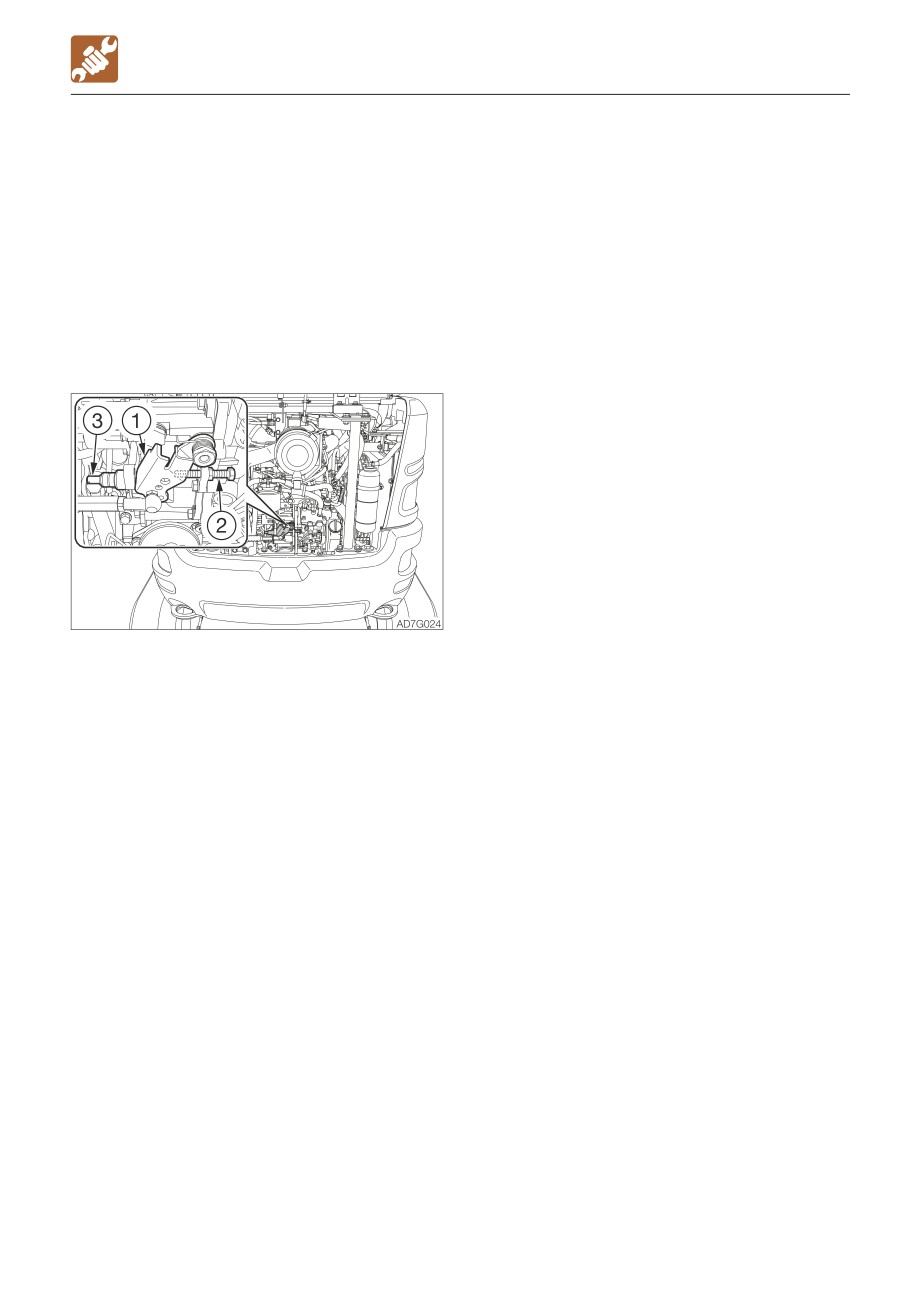
1. Turn the starter switch to the ON position.
Check that the governor lever (1) is
contacting the low-speed limit bolt (2).
2. Press the Deceleration button to cancel
the deceleration mode. Turn the throttle
controller to the maximum speed position,
and check that the governor lever (1) is
contacting the high-speed limit bolt (3).
If the governor lever is not contacting
either the limit bolt (1) or (2), contact your
sales or service dealer for help.
5-39
MAINTENANCE
EVERY 250 HOURS
CLEANING THE RADIATOR FINS AND
THE OIL COOLER FINS
Wear required appropriate equipment
such as protective goggle and filter mask
when using compressed air, as metal
fragments or other objects can fly and
cause serious injury.
IMPORTANT: Be careful not to damage
the fins when cleaning.
• When using compressed air or
pressurized water, make sure the
pressure is no higher than 200 kPa (28
psi) and hold the nozzle sufficiently
away from the fins.
IMPORTANT: When using water, cover the
electrical system to prevent water from
getting in.
IMPORTANT: When operating the
machine in very dusty places, perform
inspection and maintenance operations
every day.
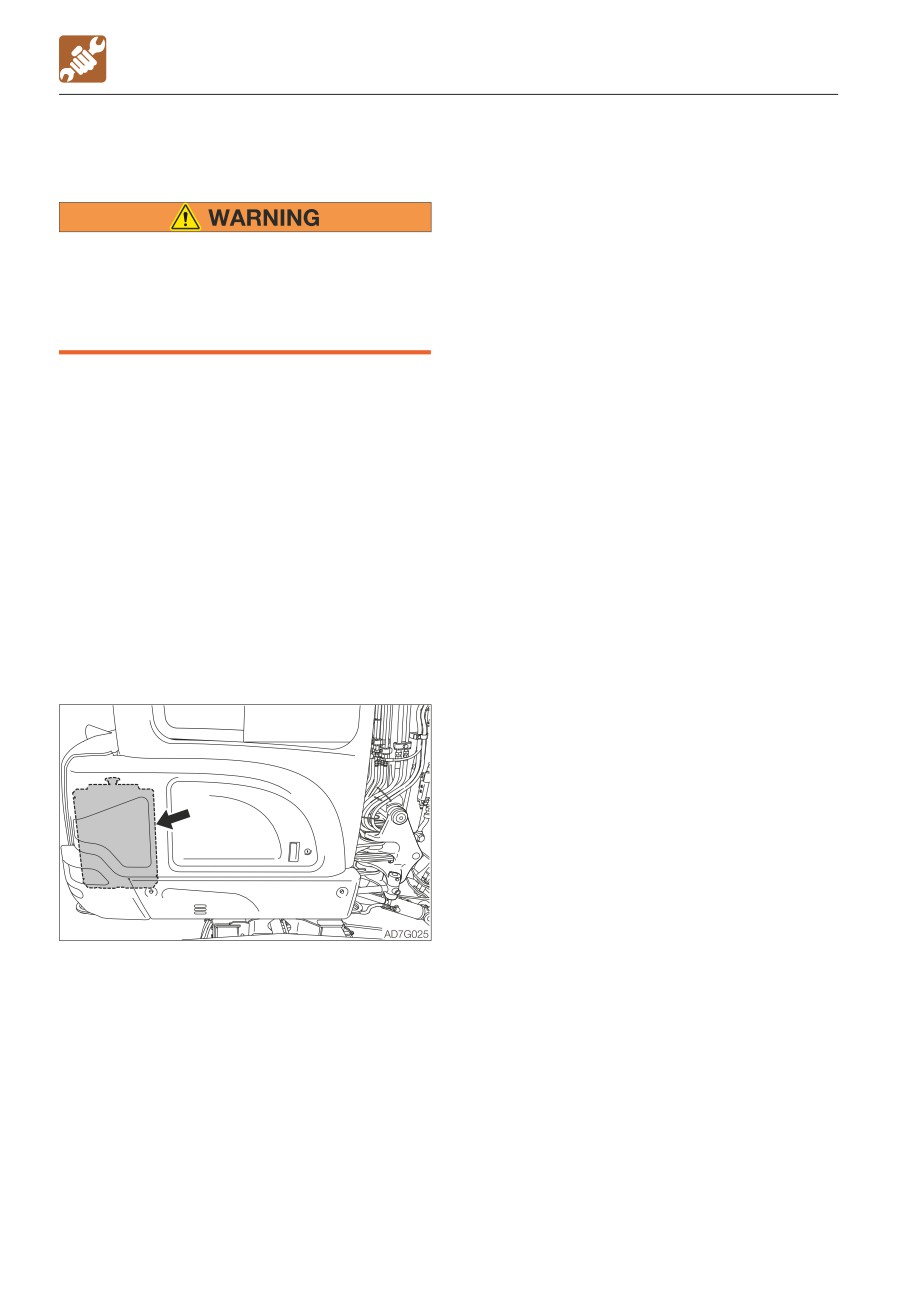
Blow compressed air on the fins to remove
mud and dirt stuck on them.
5-40
MAINTENANCE
EVERY 250 HOURS
CLEANING THE AIR FILTERS
Cleaning
1. Blow dry, compressed air (138 kPa or 20
psi or less) directly on the filters from the
inside, moving up and down along the
Wear required appropriate equipment
pleats.
such as protective goggle and filter mask
Be sure to keep the nozzle at an adequate
when using compressed air, as metal
distance from the filters.
fragments or other objects can fly and
2. Wash the filter with neutral detergent if it is
cause serious injury.
very dirty. Dry the filter completely after
washing it.
Clean the filters immediately after operating
in dusty places.
Replacing
If the filters are clogged, the air flow is
Replace the filter with a new one once a year
reduced and a booming sound is heard from
or if it is still clogged after blow-drying with
the air conditioner unit.
compressed air and washing.
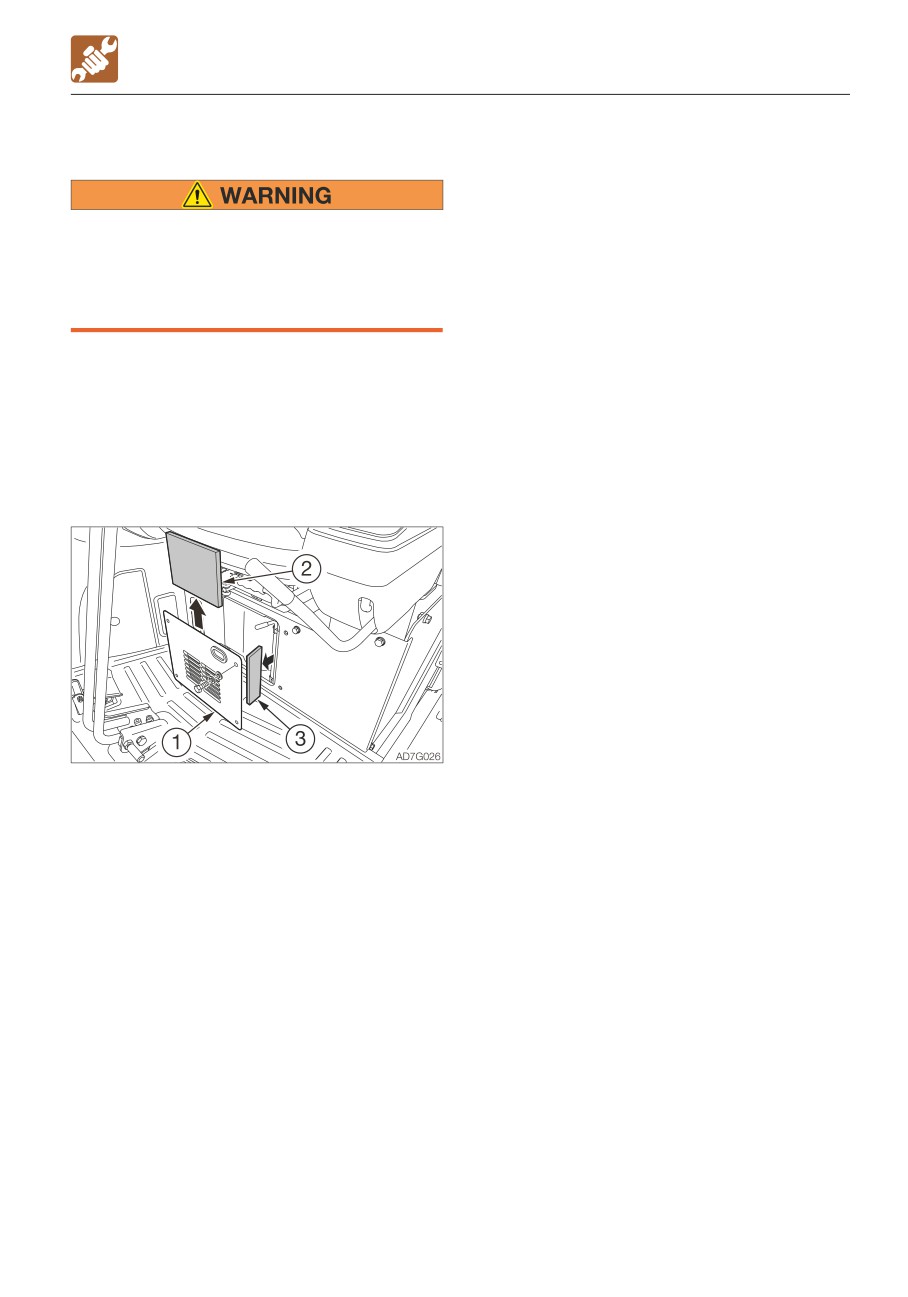
Removing the filters
1. Take out two screws and open the cover
(1).
2. Remove the air filters (2) and (3).
Air filter (2): Part No. 03445-00021
Air filter (3): Part No. 03445-00034
3. Use compressed air or water to clean
each filter, depending on how dirty it is.
5-41
MAINTENANCE
EVERY 500 HOURS
EVERY 500 HOURS
REPLACING THE FUEL FILTER
• Do not smoke or permit open flames
while handling fuel or working on the
fuel system.
• Stop the engine in a well-ventilated
place and allow it to cool down before
performing maintenance.
• Clean up spilled fuel immediately.
1
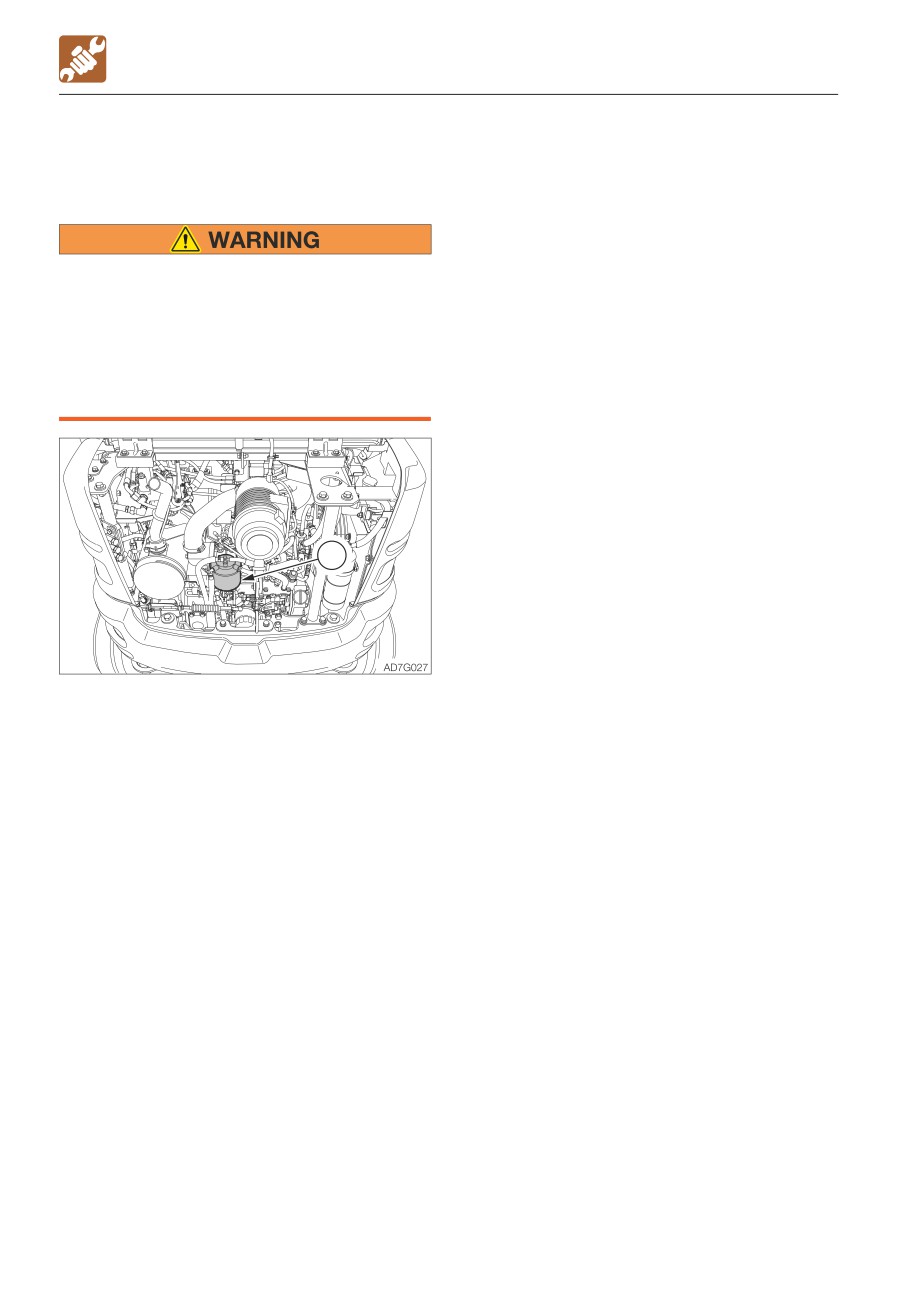
1. Open the engine hood.
2. Turn the filter (1) counterclockwise with the
filter wrench and remove it.
3. Clean the surface of installation of the filter
stand.
4. Apply a thin layer of oil on the packing of
the new filter.
5. Install the new filter by hand.
6. Tighten one more turn after the filter
packing comes in contact with the surface
of installation. (Torque when tightening
with filter wrench: 20 to 24 N·m or 15 to
18 ft-lb.)
7. Bleed the air.
Refer to “Bleeding air from the fuel
system” on page 6-9.
5-42
MAINTENANCE
EVERY 1000 HOURS
REPLACING THE AIR CLEANER ELEMENT
EVERY 1000 HOURS
REPLACING THE HYDRAULIC OIL
RETURN FILTER
Stop the engine and allow the machine to
Refer to “Replacing the hydraulic oil return
cool down before performing
filter” on page 5-33.
maintenance.
• The engine, muffler, radiator and many
other parts of the machine are hot
REPLACING THE TRAVEL MOTOR GEAR
immediately after the engine is stopped.
OIL
Touching these parts will cause burns.
Refer to “Replacing the travel motor gear oil”
IMPORTANT: Do not use an element if its
on page 5-35.
pleats, gaskets or seals are damaged.
IMPORTANT: Be sure to install the
element and dust cap securely. If not,
dust could be drain into the cylinder,
damaging the engine.
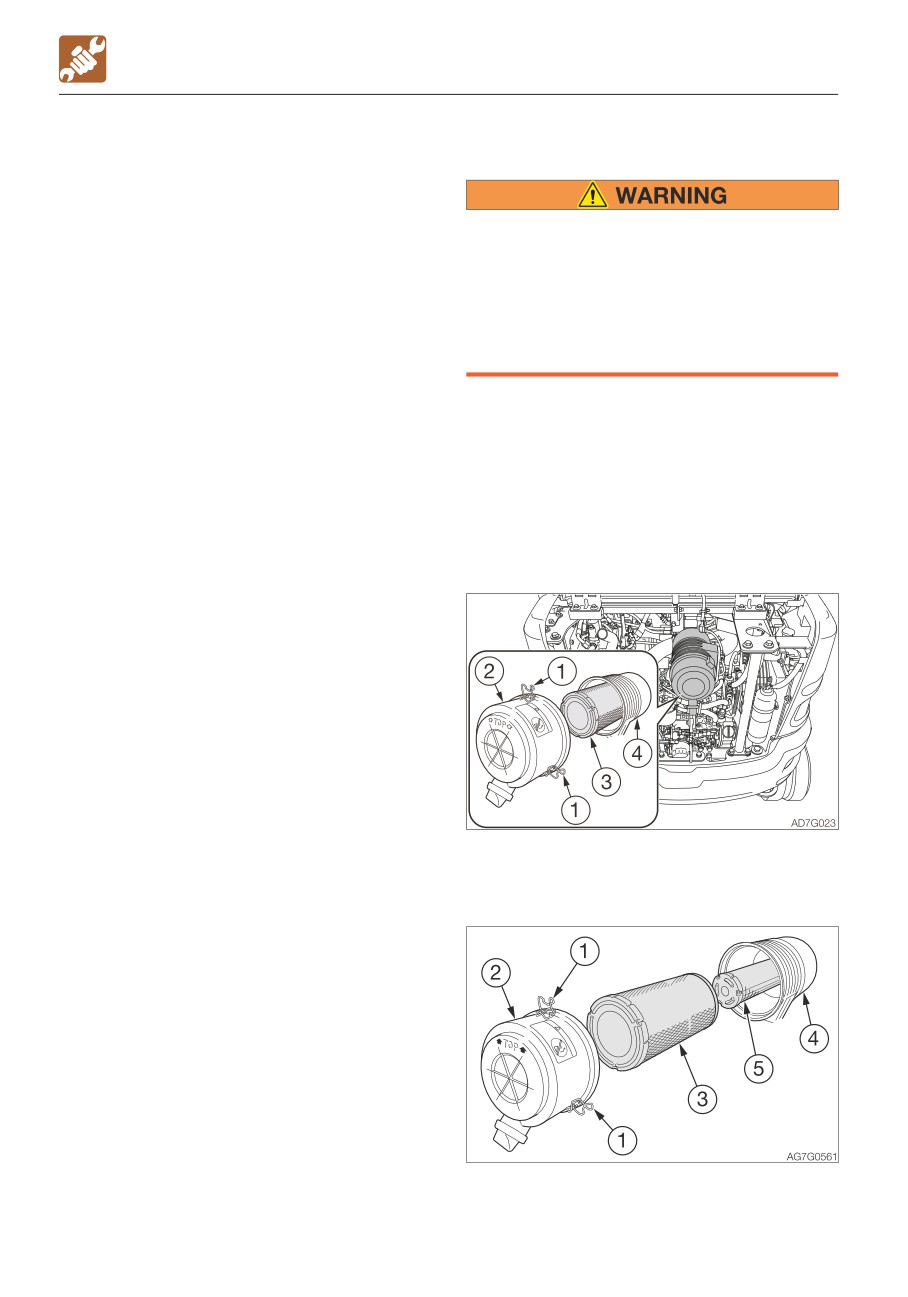
1. Open the engine hood.
2. Loosen the clamps (1) and remove the
dust cup (2).
3. Clean the inside of the dust cup (2).
4. Remove the primary element (3).
5-44
MAINTENANCE
EVERY 1000 HOURS
5. Cover the intake hole at the back of the
REPLACING THE AIR BREATHER
body (4) with cloth or tape to prevent dirt
from getting in.
<If equipped with the secondary element>
Do not yet remove the secondary element
Oil may spurt out if caps or filters are
(5).
removed or pipes are disconnected
6. Clean the inside of the body (4).
before releasing the pressure in the
7. Remove the cloth or tape applied in step
hydraulic system.
5.
• Gradually loosen the vent plug to relieve
<If equipped with the secondary element>
tank pressure.
Remove the secondary element (5).
8. Install the new elements.
9. Install the dust cup (2) with its “ TOP
”
mark facing up, and then fasten it with the
clamps (1).
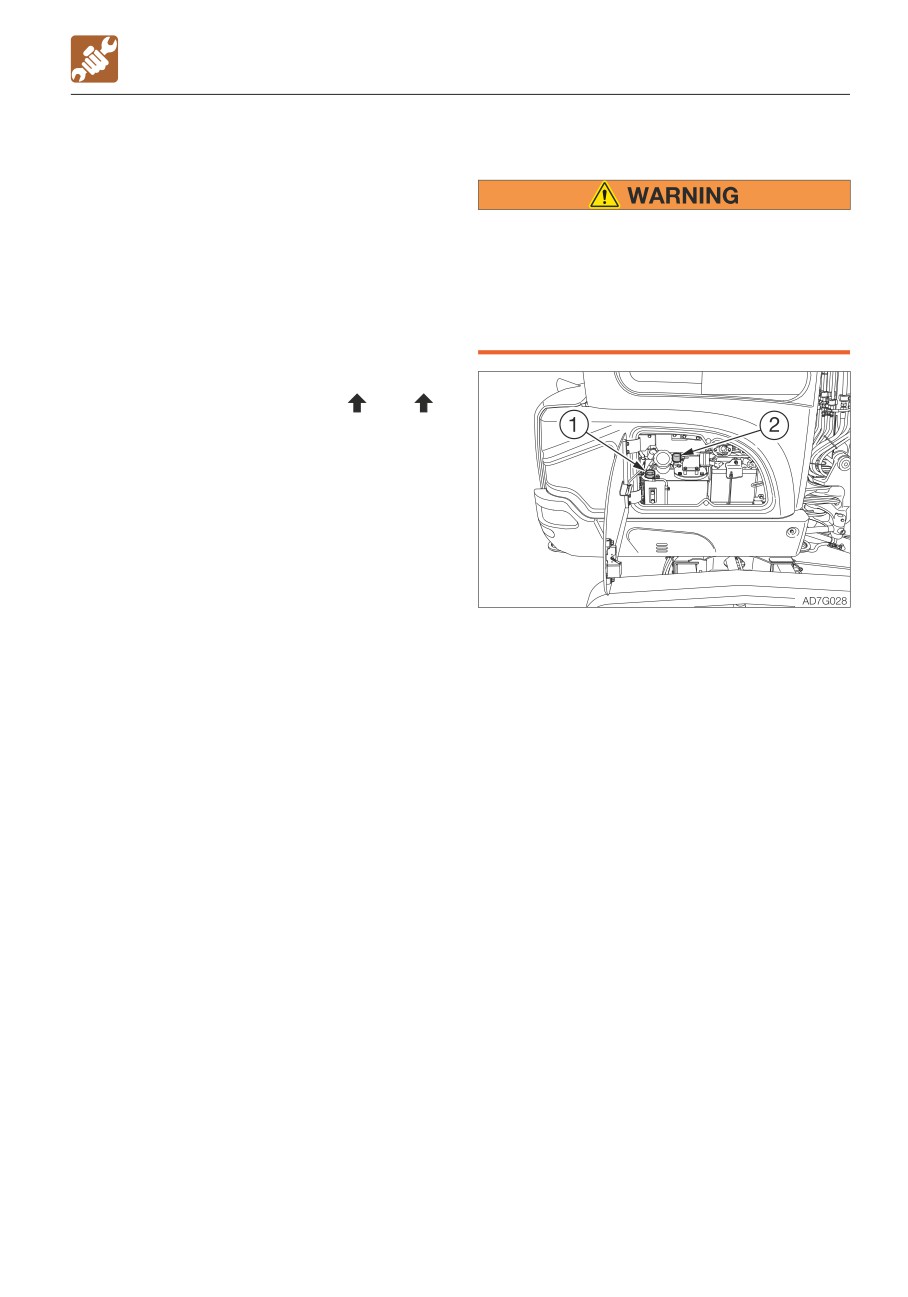
1. Open the engine hood.
2. Slowly loosen the air bleeding plug (1) to
relieve the internal pressure, and then
remove the plug.
3. Turn the air breather (2) counterclockwise
by hand or with the wrench and remove it.
4. Apply a thin layer of oil on the packing of
the new air breather.
5. Install the new air breather by hand.
· Tightening torque: Max. 5 N·m (3.7 ft-lb)
5-45