New Holland TD 60D, TD 70D, TD 80D, TD 90D, TD 95D Tractor. OPERATOR’S MANUAL - page 2
SECTION 2 -- CONTROLS, INSTRUMENTS AND OPERATION
DOORS
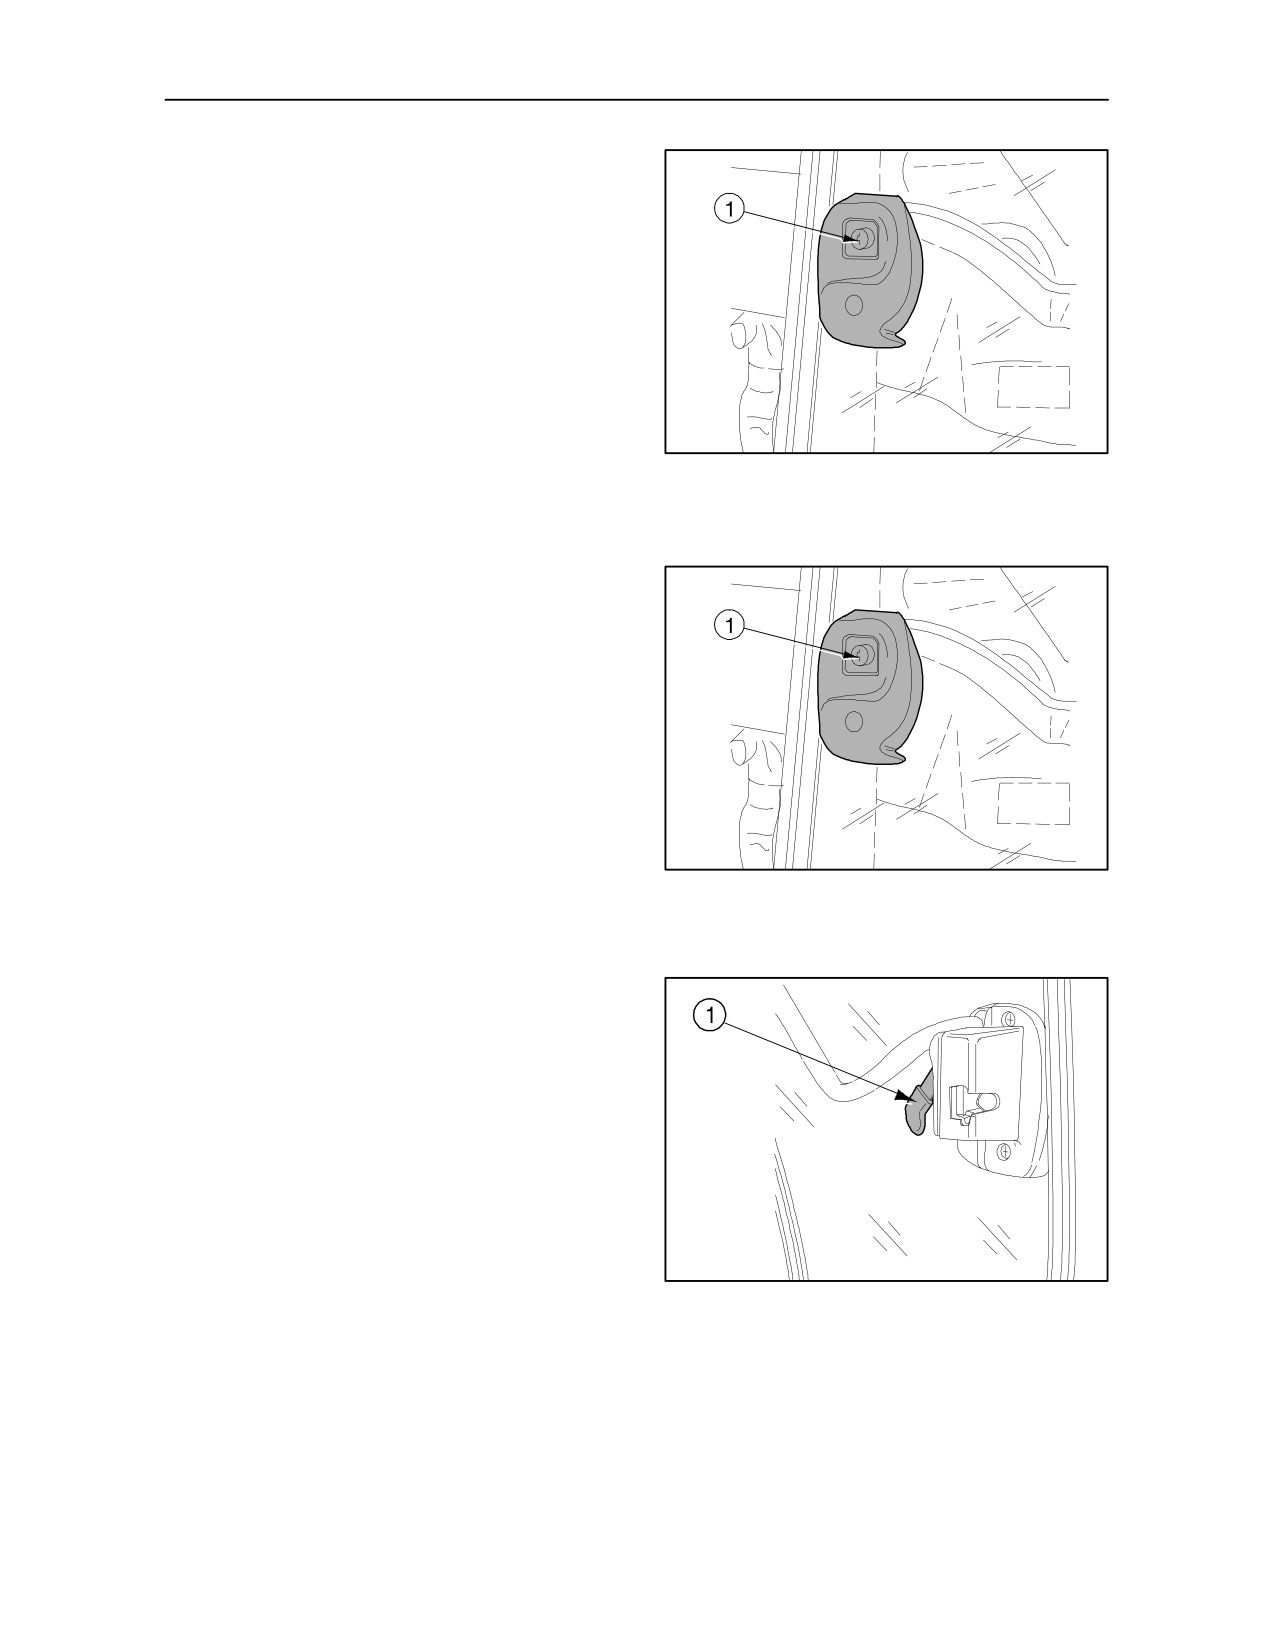
Opening the door from outside -- Fig. 40
With the door unlocked, press button (1) and pull the
door towards you.
26421
40
Locking the door from outside -- Fig. 41
The doors both have locks, which can be locked with
a key, and the cab can therefore be closed from
either the left or the right hand side.
26421
41
Opening the door from the inside -- Fig. 42
Pull lever (1) upwards.
26420
42
2--20
SECTION 2 -- CONTROLS, INSTRUMENTS AND OPERATION
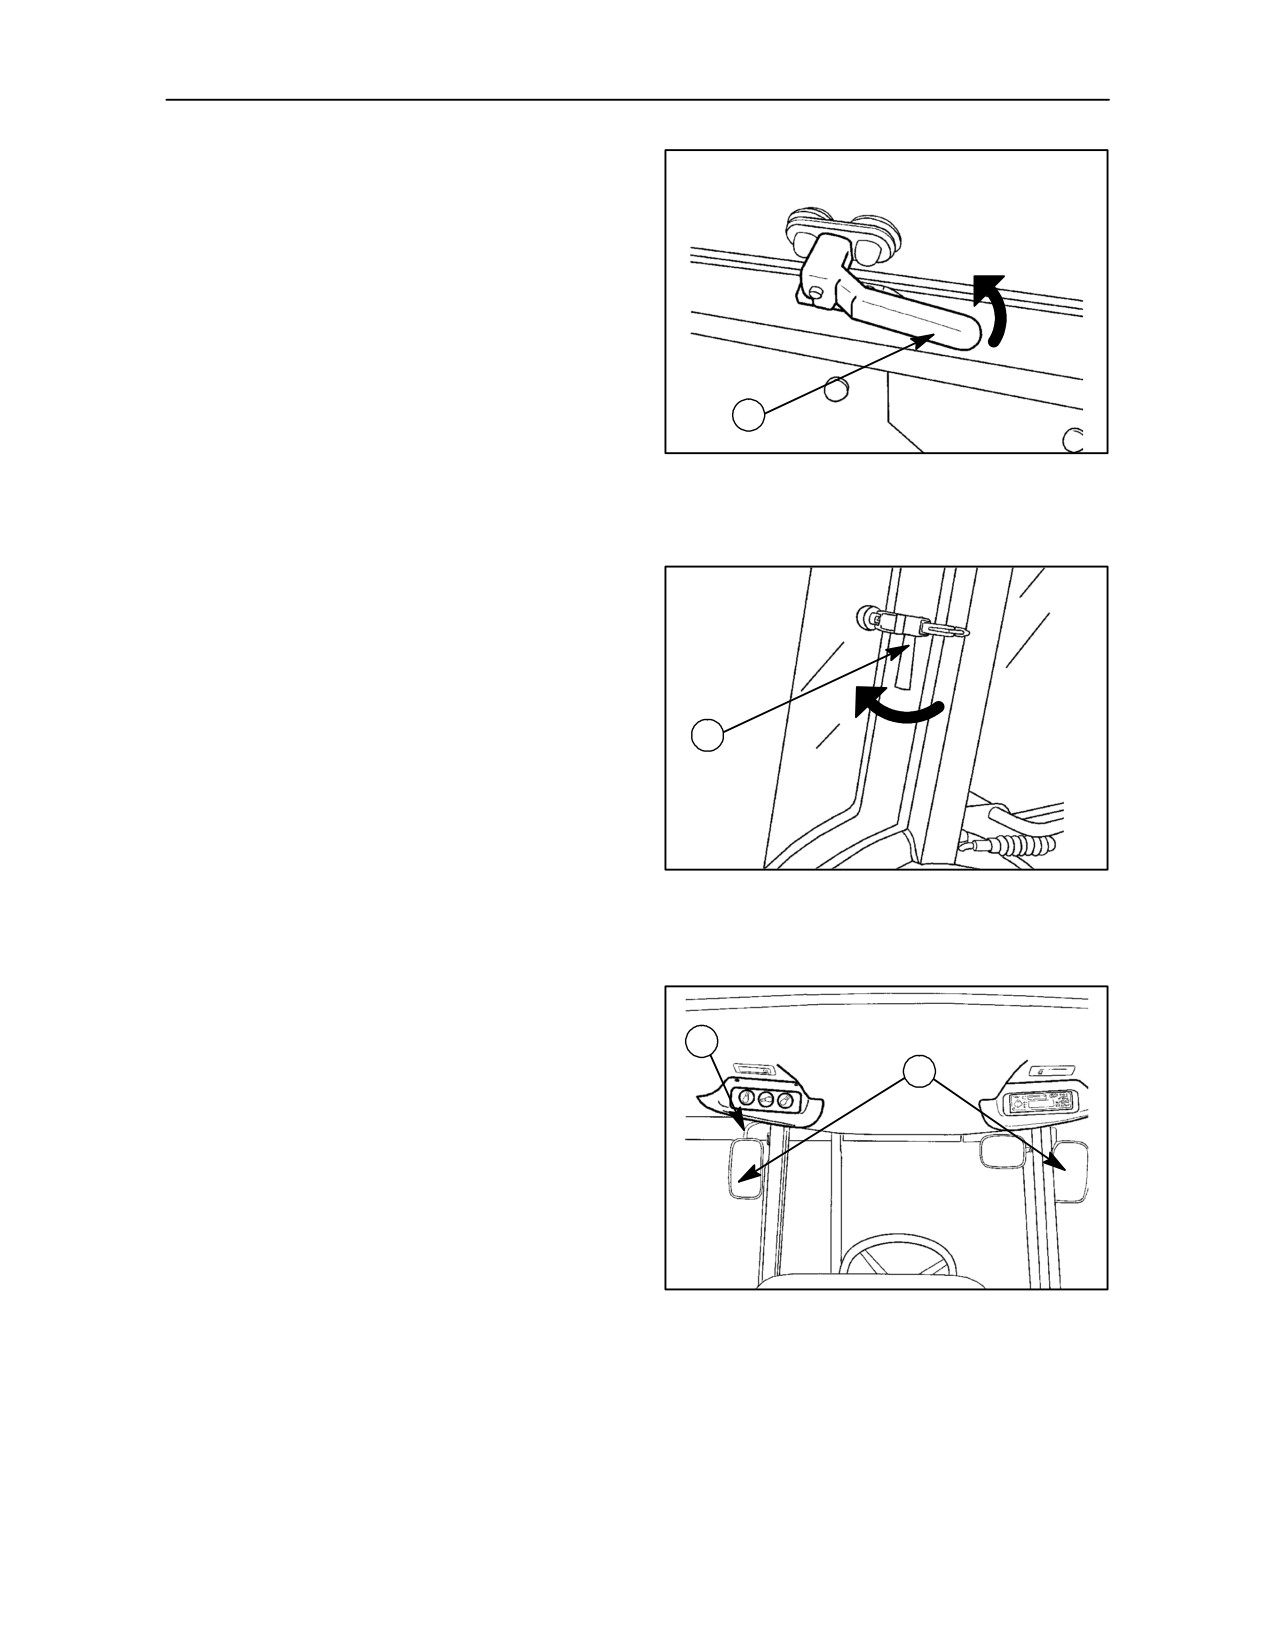
REAR WINDOW -- Fig. 43
To open, pull handle (1) upwards and push forward.
The window is held open by gas struts. Alternatively,
the window can be held slightly open by locating the
tang on the lever (1) in the slot provided in the lower
frame.
1
TRE0052A
43
SIDE WINDOWS -- Fig. 44
To open side window, first pull handle (1) towards you
and then push forward, to secure the window in the
open position, as shown.
1
TRE0043A
44
EXTERNAL REAR VIEW MIRROR -- Fig. 45
2
To adjust the mirror (1), turn the support arm (2) to
adjust the angle of vision.
1
NOTE: The mirror (1) can be adjusted to any
required angle.
TRE0077B
45
2--21
SECTION 2 -- CONTROLS, INSTRUMENTS AND OPERATION
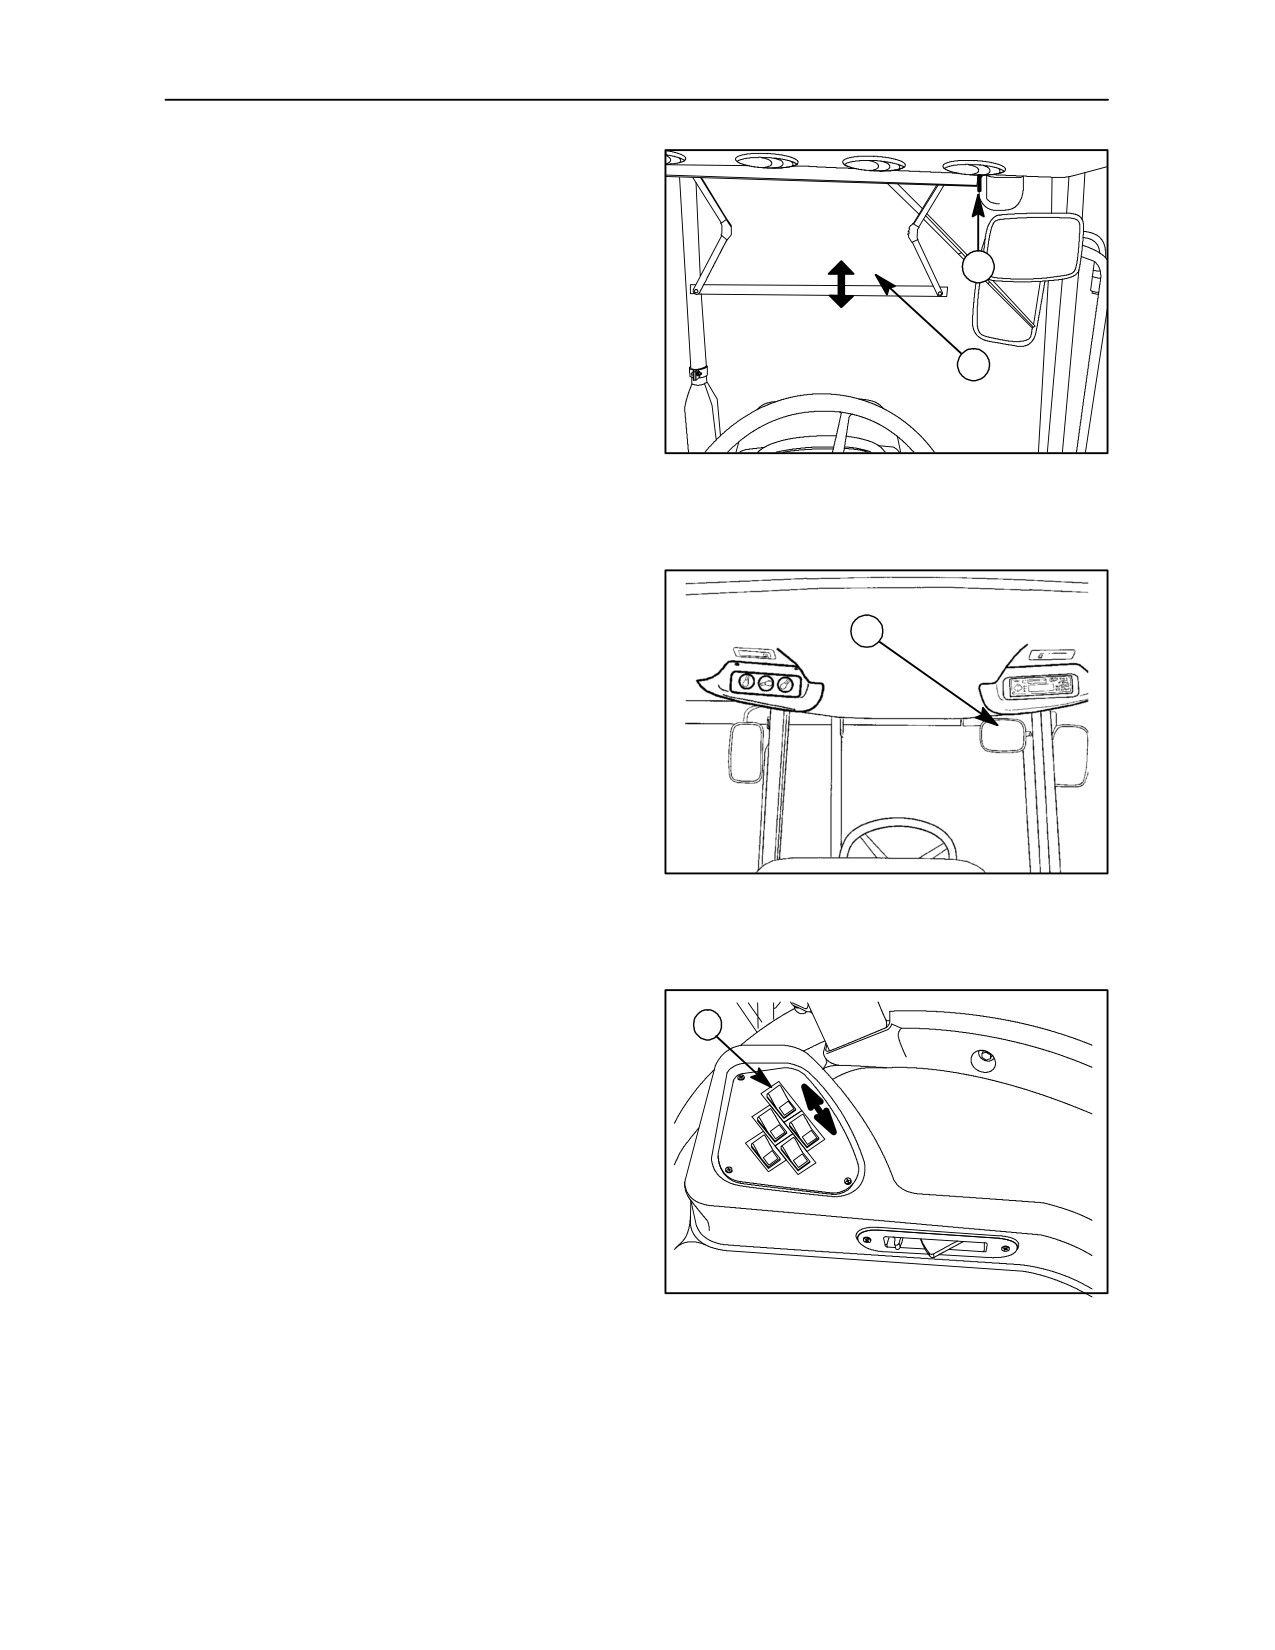
SUN VISOR (1) -- Fig. 46
To use the sun visor, pull downwards as shown by the
arrow in the illustration.
2
Push the visor up, when not required by pressing the
button (2).
1
TRE0805A
46
INTERNAL REAR VIEW MIRROR -- Fig. 47
The mirror can be adjusted by rotating it on its
1
support bracket.
TRE0077B
47
FRONT WORK LIGHTS -- Fig. 48
1
1. Front work lights ON/OFF rocker switch.
B
Position A:
OFF
Position B:
ON
A
48
2--22
SECTION 2 -- CONTROLS, INSTRUMENTS AND OPERATION
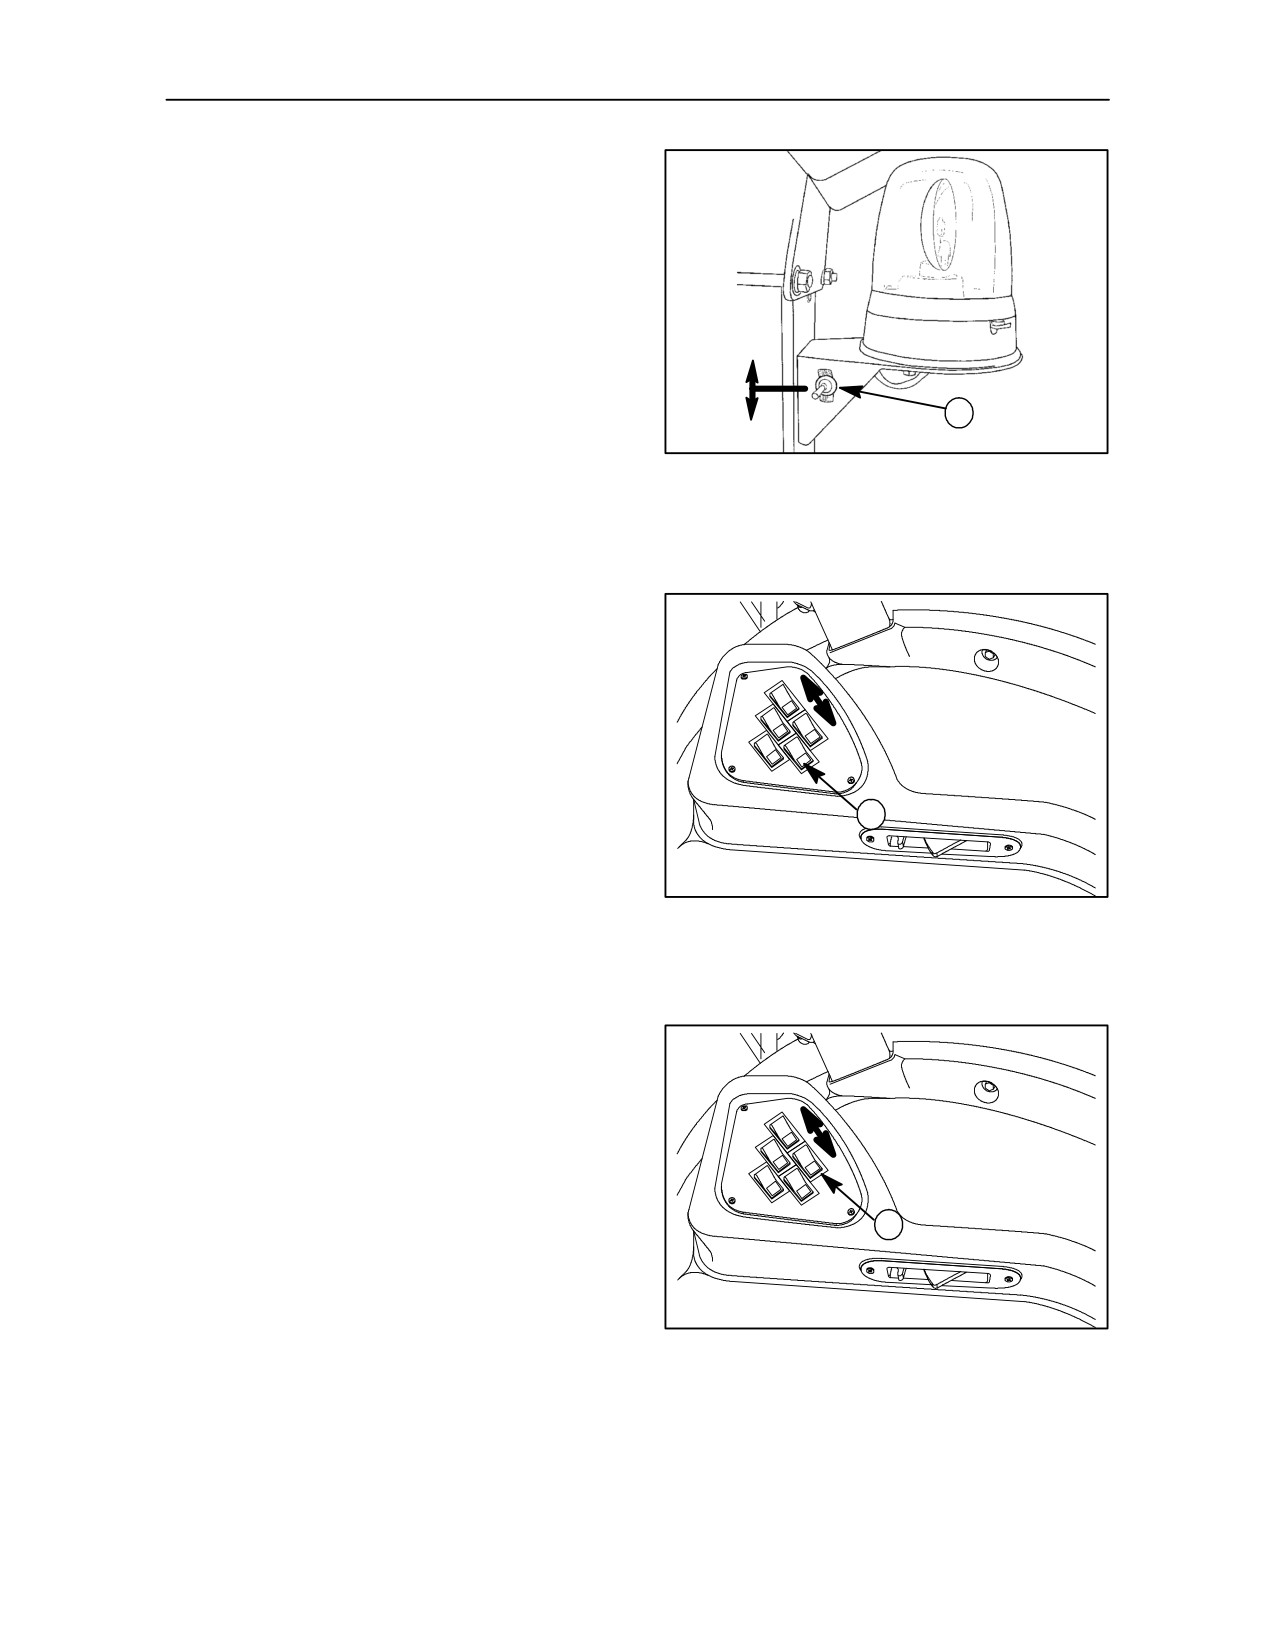
BEACON LAMP (WITHOUT CAB)
(OPTIONAL)-- Fig. 49
1. Beacon lamp ON/OFF rocker switch.
Position A:
ON
Position B:
OFF
A
1
B
TRE0020A
49
BEACON LAMP (WITH CAB) (OPTIONAL)--
Fig. 50
B
1. Beacon lamp ON/OFF rocker switch.
Position A:
OFF
A
Position B:
ON
1
50
REAR WORKING LIGHTS -- Fig. 51
1. Rear working lights ON/OFF rocker switch.
B
Position A:
OFF
A
Position B:
ON
1
51
2--23
SECTION 2 -- CONTROLS, INSTRUMENTS AND OPERATION
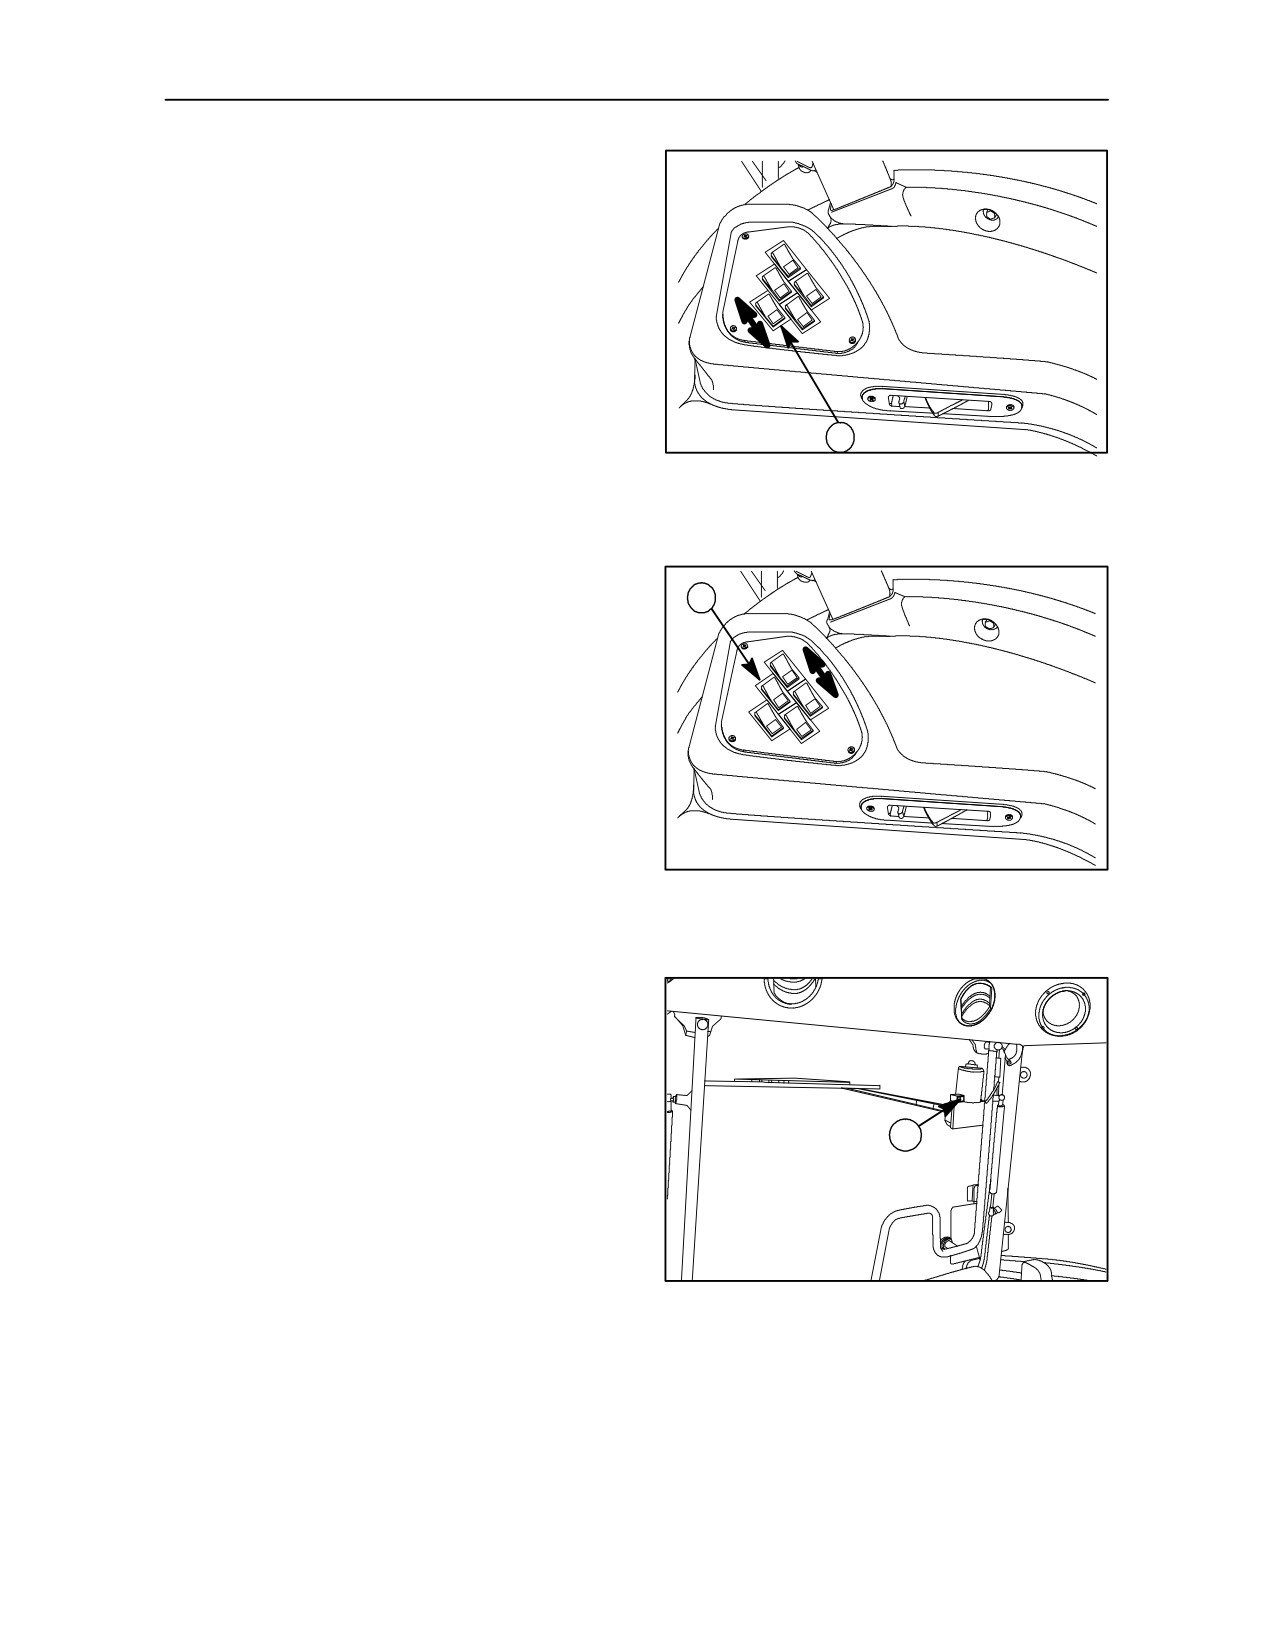
FRONT WINDSCREEN WASHER -- Fig. 52
1. Front windscreen washer rocker switch.
Position B:
ON
B
(The switch is spring--loaded. For continuous
washing, hold the switch down)
C
A
Position A:
OFF
1
52
FRONT WINDSCREEN WIPER -- Fig. 53
1
1. Front windscreen wiper switch.
B
Position A:
OFF
A
Central position: ON--STANDARD SPEED
Position B:
FAST SPEED
53
REAR WINDSCREEN WASHER--WIPER
Fig. 54 (OPTIONAL)
To operate the rear windscreen wiper press the
switch (1) Fig. 54.
Washer switch (1) Fig. 52. has 3 positions:
1
Position B:
FRONT WASHER OPERATES
Position C:
OFF
Position A:
REAR WASHER OPERATES
TRE0806A
54
2--24
SECTION 2 -- CONTROLS, INSTRUMENTS AND OPERATION
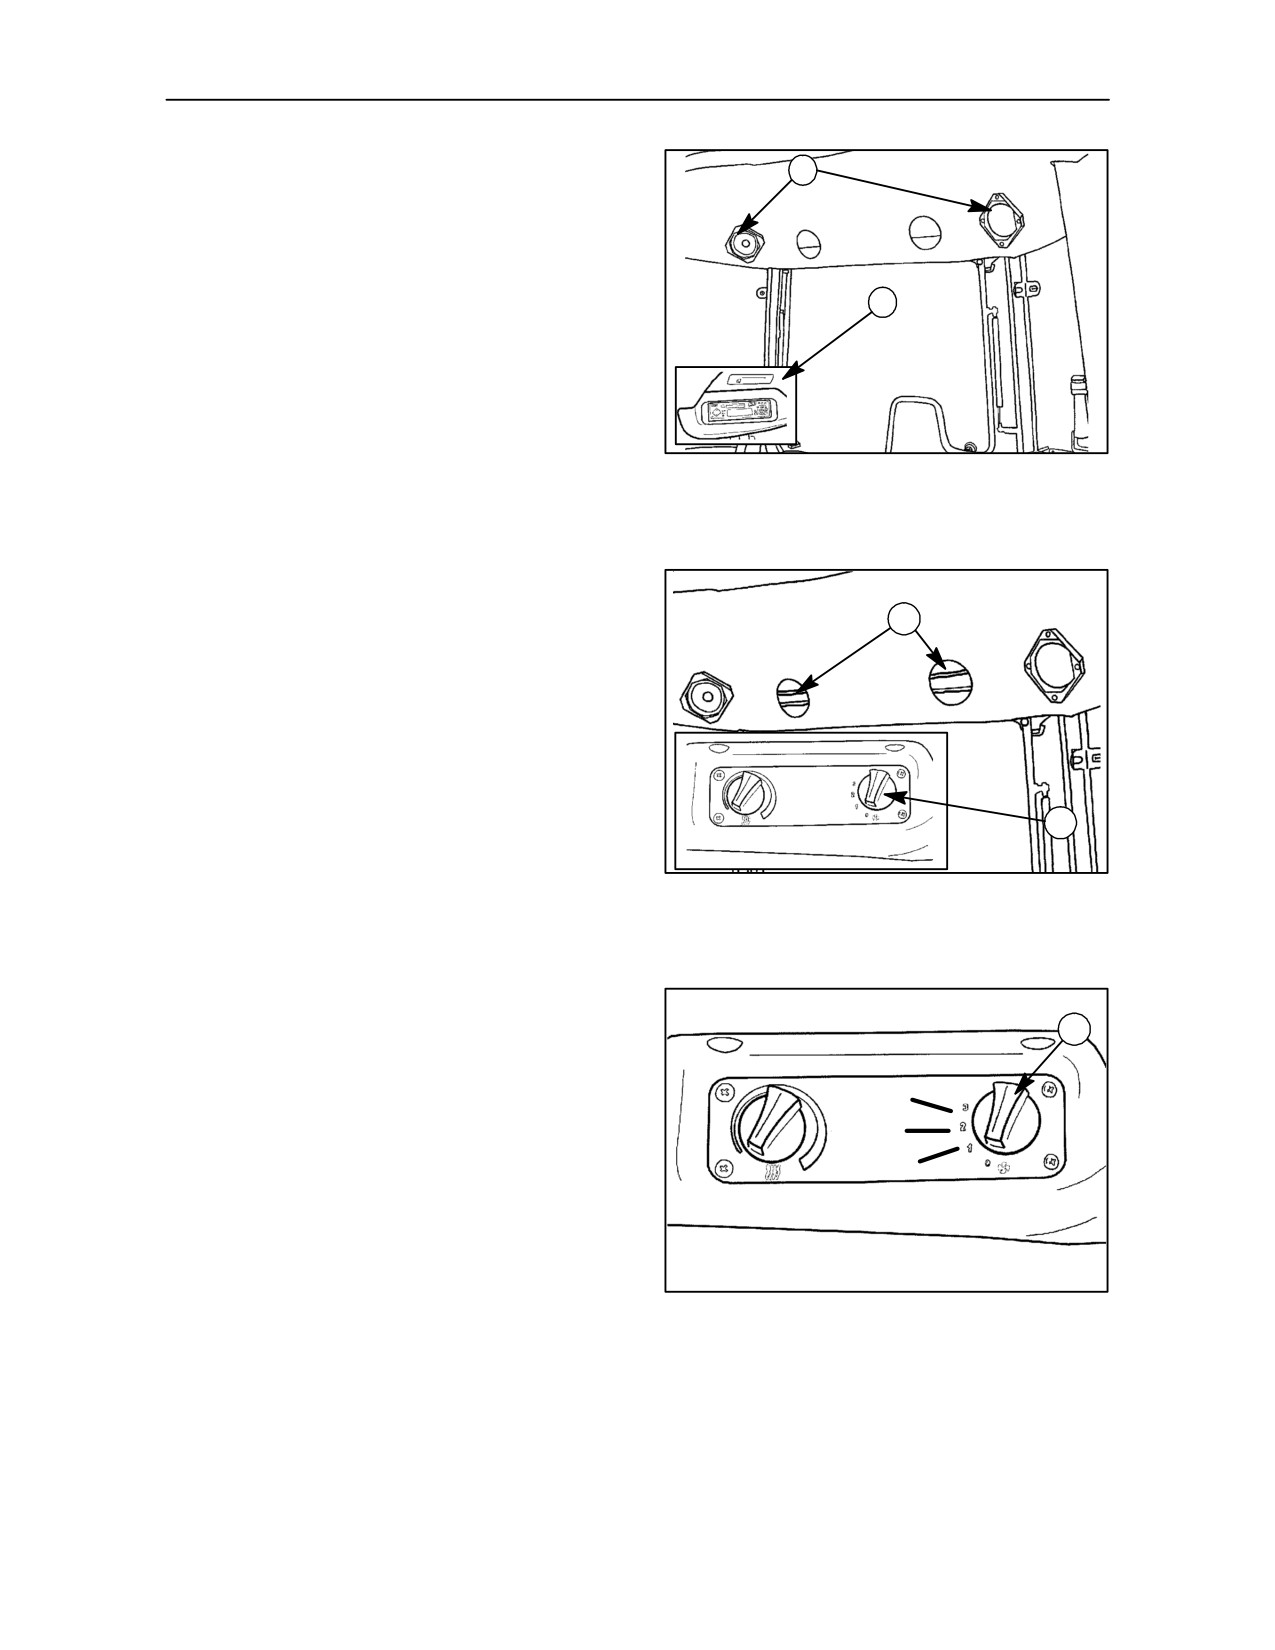
RADIO / CASSETTE PLAYER -- Fig. 55
1
(OPTIONAL)
To add to driver comfort, the cab can be equipped
ready for radio installation.
2
The equipment comprises:
--
two stereo speakers (1);
--
housing (2) for the radio;
TRE0021A
--
aerial and the relative connections.
55
VENTILATION -- Fig. 56
2
Actuate the ventilation with switch (1) and direct the
air flow by adjusting the rear swivel vents (2) and the
front swivel vents (3) fig.
58.
When the electric fan is operating, and with the doors
and windows closed, air can only enter the cab via
the filters mounted either side of the roof.
Consequently, the pressure inside the cab is higher
than that outside, which will help reduce the amount
1
of unwanted dust and other pollutants that might
TRE0021B
enter the cab.
56
ELECTRIC FAN -- Fig. 57
1
The electric fan switch (1) figs. 56 and 57 will only
operate when the ignition key (fig 17) is in position B
page 2--11. The switch, shown in the off position, has
3
three further settings:
2
1. Low speed.
1
2. Medium speed.
3. High speed.
TRE0024A
57
2--25
SECTION 2 -- CONTROLS, INSTRUMENTS AND OPERATION
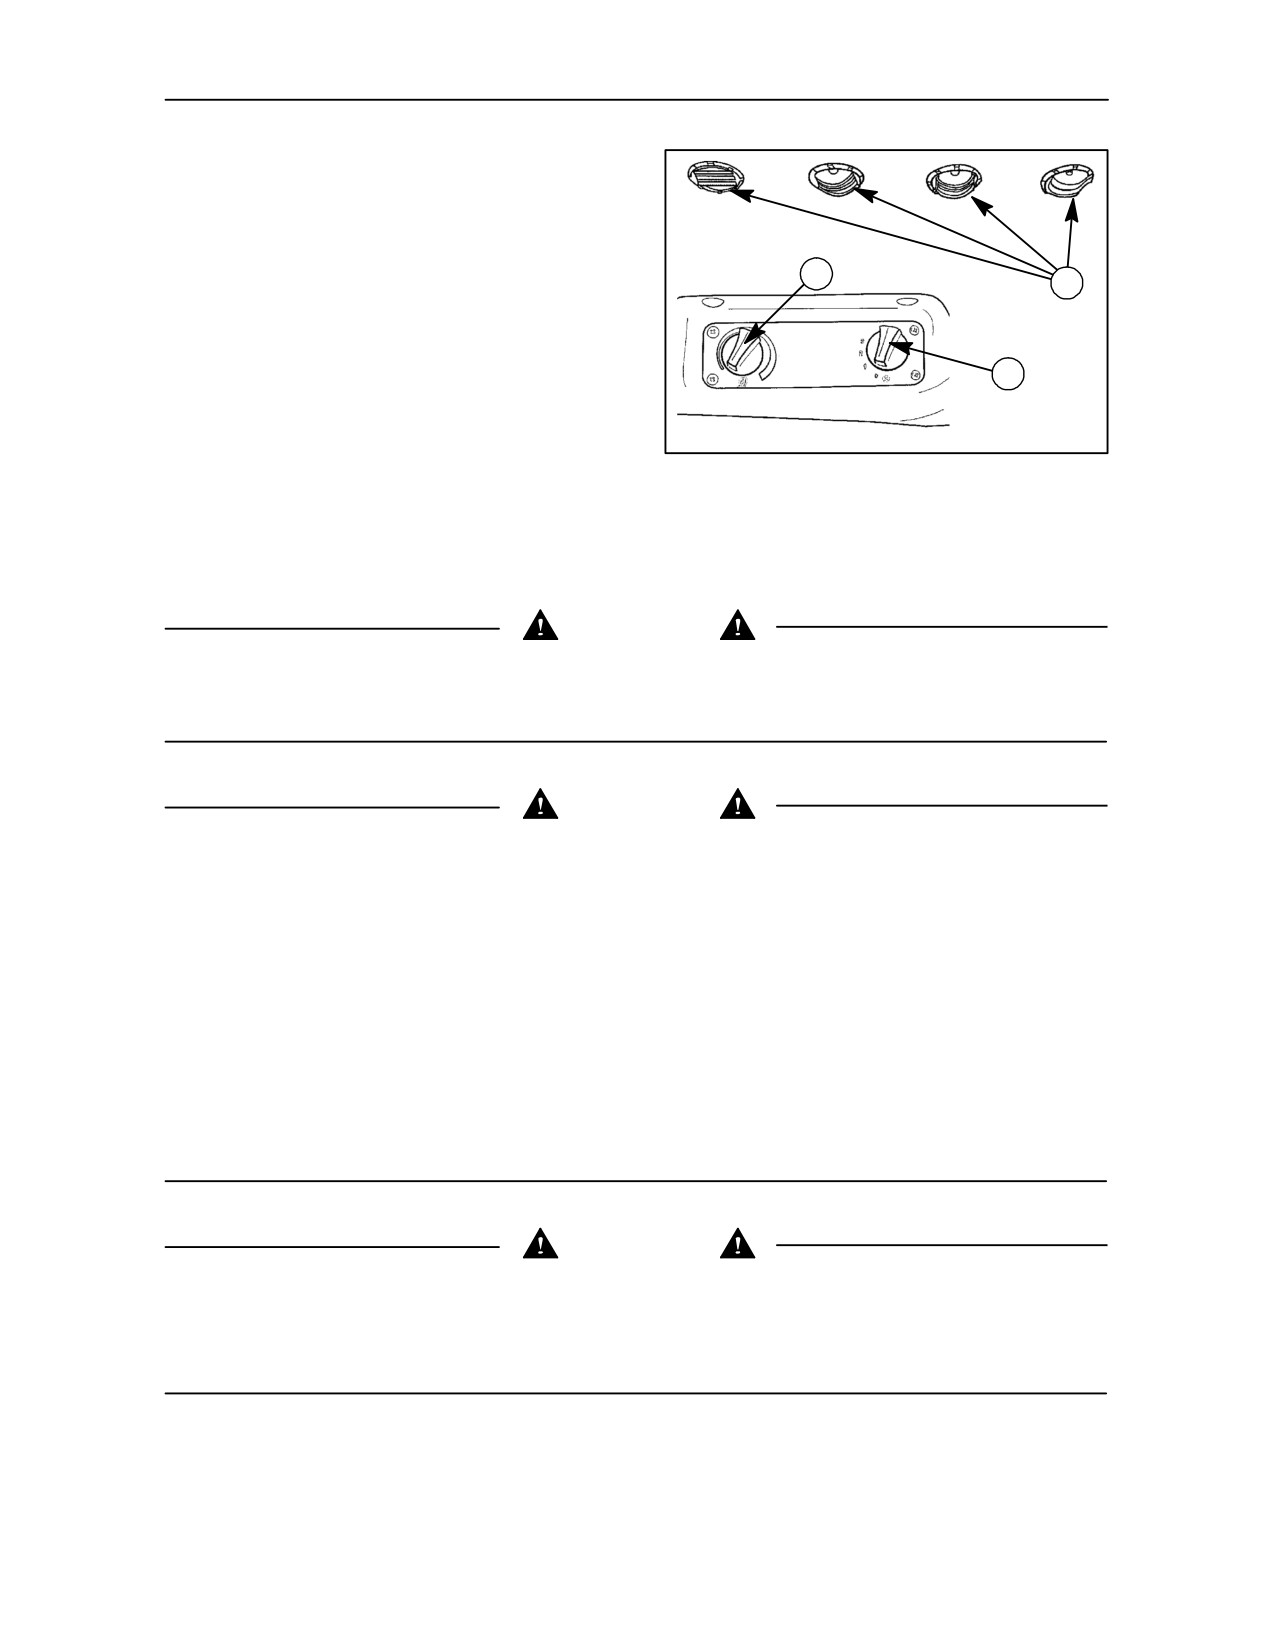
HEATING -- Fig. 58
Adjust the air temperature using control (1) to reduce
or increase the circulation of coolant from the engine.
TRE0011B
With the electric fan control (2) you can change the
volume of air entering the cab through front vents (3)
1
and the rear vents (2) fig.
56.
3
To adjust the air temperature use the control knob (1).
Turn the control to the left (counter--clockwise) to
reduce the temperature of the air circulating in the
2
cab.
Temperature control knob
TRE0024A
--
Fully counter--clockwise = minimum temperature.
58
--
Fully clockwise = maximum temperature.
AIR FILTERS
ATTENTION
Remember that the cab air filters do not generally protect against pesticides. Total protection against these
substances can therefore only be ensured by taking the necessary precautions according to the properties of
individual products. The cab air filter is designed to remove dust from the air but may not exclude chemical vapour.
Follow the chemical manufacturer’s directions regarding protection from hazardous chemicals.
ATTENTION
For greater safety you can fit active carbon filters, which provide greater protection against the harmful effects
of pesticides.
However, using these filters does not exempt anyone from not observing the personal precautions
recommended for using each single product.
These filters should only be fitted when working with pesticides and replaced with the normal paper filters at the
end of work.
Do not use these filters during other work, as they will quickly become clogged with dust.
When replacing the active carbon filters at the end of spraying work, return them to the original packaging,
making sure they are carefully sealed.
If the instructions on the package are observed, the filters last for approximately 60 hours of work.
They must, however, be replaced each year.
If, when working with pesticides, toxic odours are noted, stop work immediately and check the condition of the
filters, replacing them if necessary.
These filters must never be washed or cleaned with compressed air.
Discarded filters must not be thrown away. Take old filters to authorised collection points.
ATTENTION
Active carbon air filters do not provide total protection against pesticides in general.
These specific filters only reduce the harmful effects of these products.
Consequently, use of these filters does not release you from the obligation to observe the recommended safety
regulations for the individual products.
2--26
SECTION 2 -- CONTROLS, INSTRUMENTS AND OPERATION
CAB AIR CONDITIONING SYSTEM
This section of the Manual describes the operation
and use of the Supercomfort cab, which is fitted with
an air conditioning system.
This system, in addition to ensuring optimum
temperatures inside the cab, reduces the air
humidity, which might otherwise be a nuisance to the
operator, compromising tractor handling safety.
The cab is also fitted with windows, which reduce the
effects of the sun beams inside the cab -- something
which, in hot weather, creates particularly
unpleasant conditions for the operator.
24145
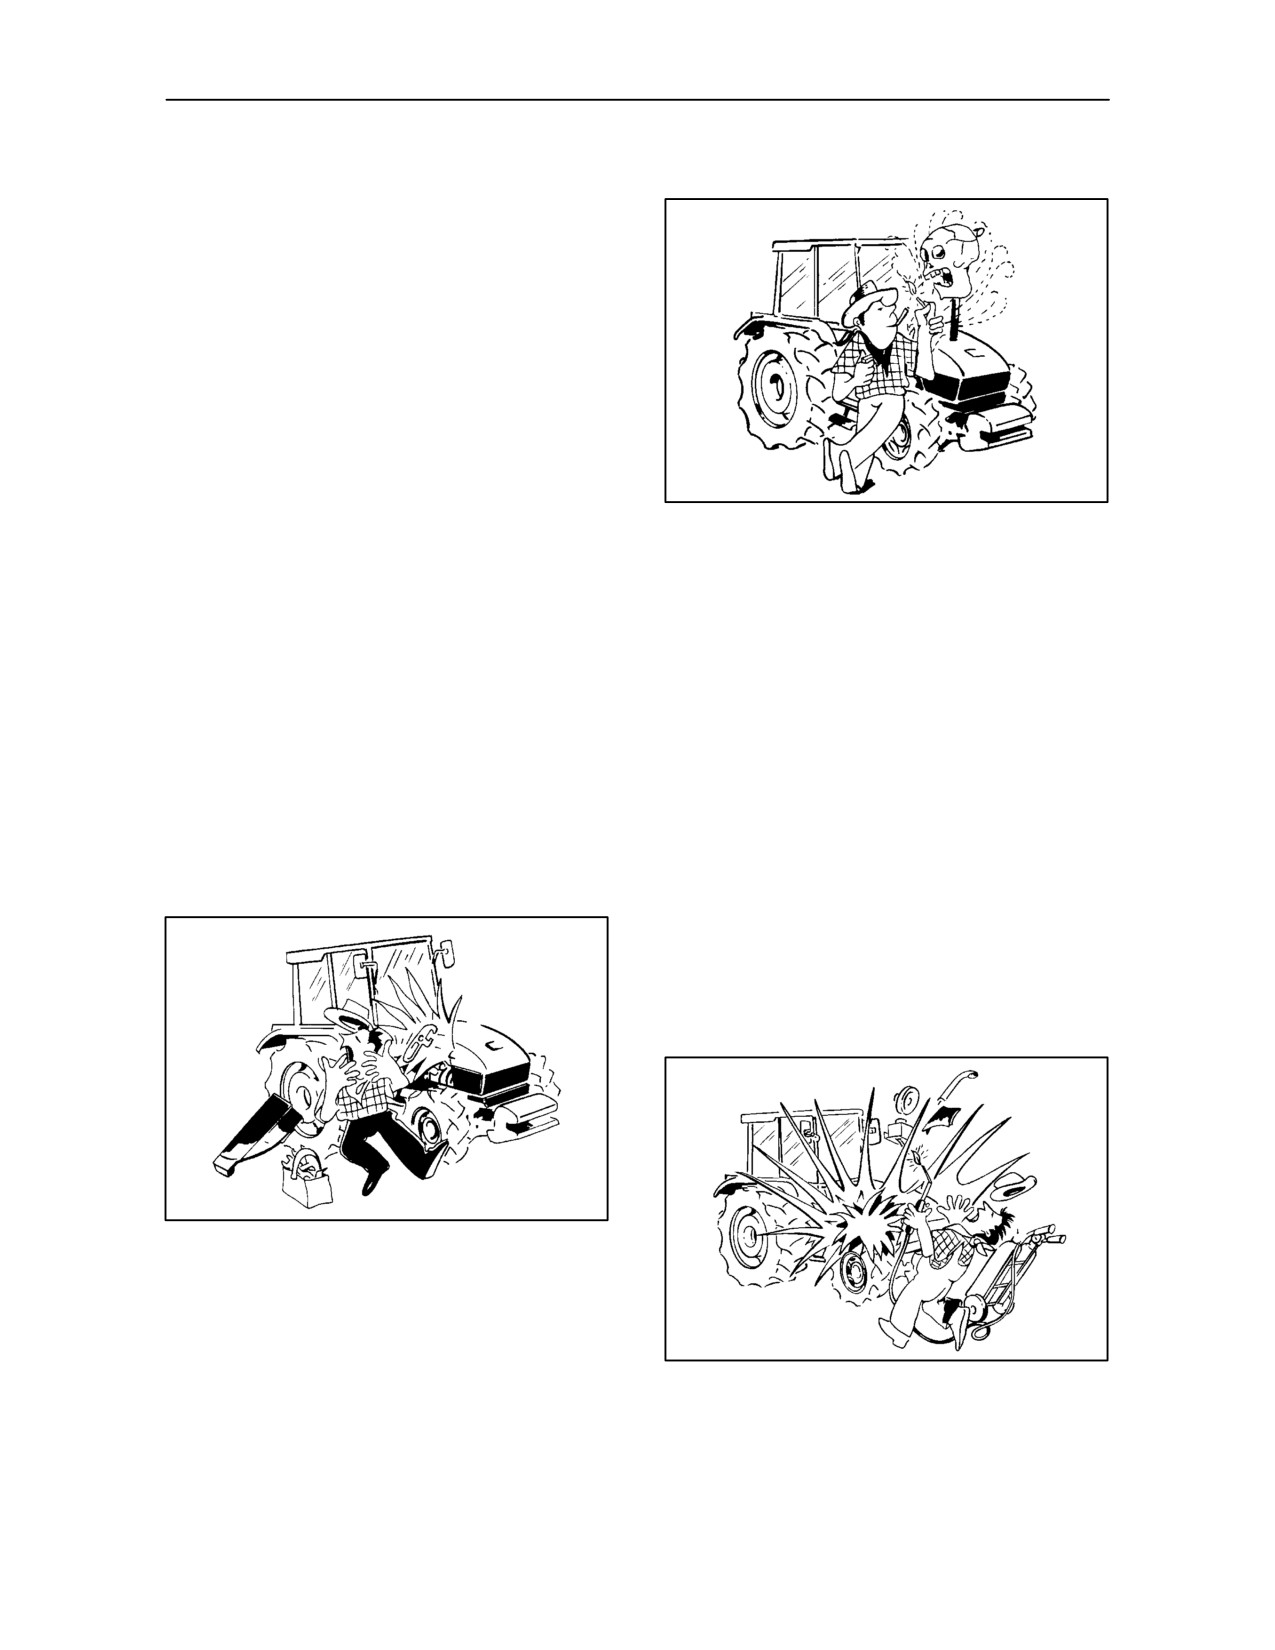
SAFETY RULES
60
The air conditioning system is safe and can be used
• The refrigerant can freeze the skin and
continuously without any risk. However, it is important
especially the eyes, and also cause permanent
to observe a few simple precautions, listed below, to
serious injuries.
avoid any risk of accident.
If an accident should occur, proceed as follows:
• We recommend that you should never personally
--
if refrigerant splashes into the eyes, wash
attempt to adjust the system; any work should
immediately with a few drops of mineral oil, then
instead be carried out by the highly experienced
continue to wash thoroughly with a solution of
Company service network.
boric acid and water (one teaspoon of acid in1/4
of a cup of water) and consult a doctor
• Never allow naked flames near the air
immediately;
conditioning system. If the refrigerant is leaking,
a lethal gas --phosgene-- could be produced.
--
the freezing caused by the refrigerant can be
treated by gradually unfreezing the damaged
area with cold water and then apply an oily
cream.
Consult a doctor promptly.
• Do not let the air conditioning system approach
any heat source too closely in order to prevent
any risk of explosion.
24146
59
• The oil and refrigerant mixture is pressurised
inside the air conditioning system. The loosening
of any connections or handling of tubing is
24147
therefore strictly forbidden. For the same reason,
never unscrew the compressor oil level
61
inspection cap for any reason.
2--27
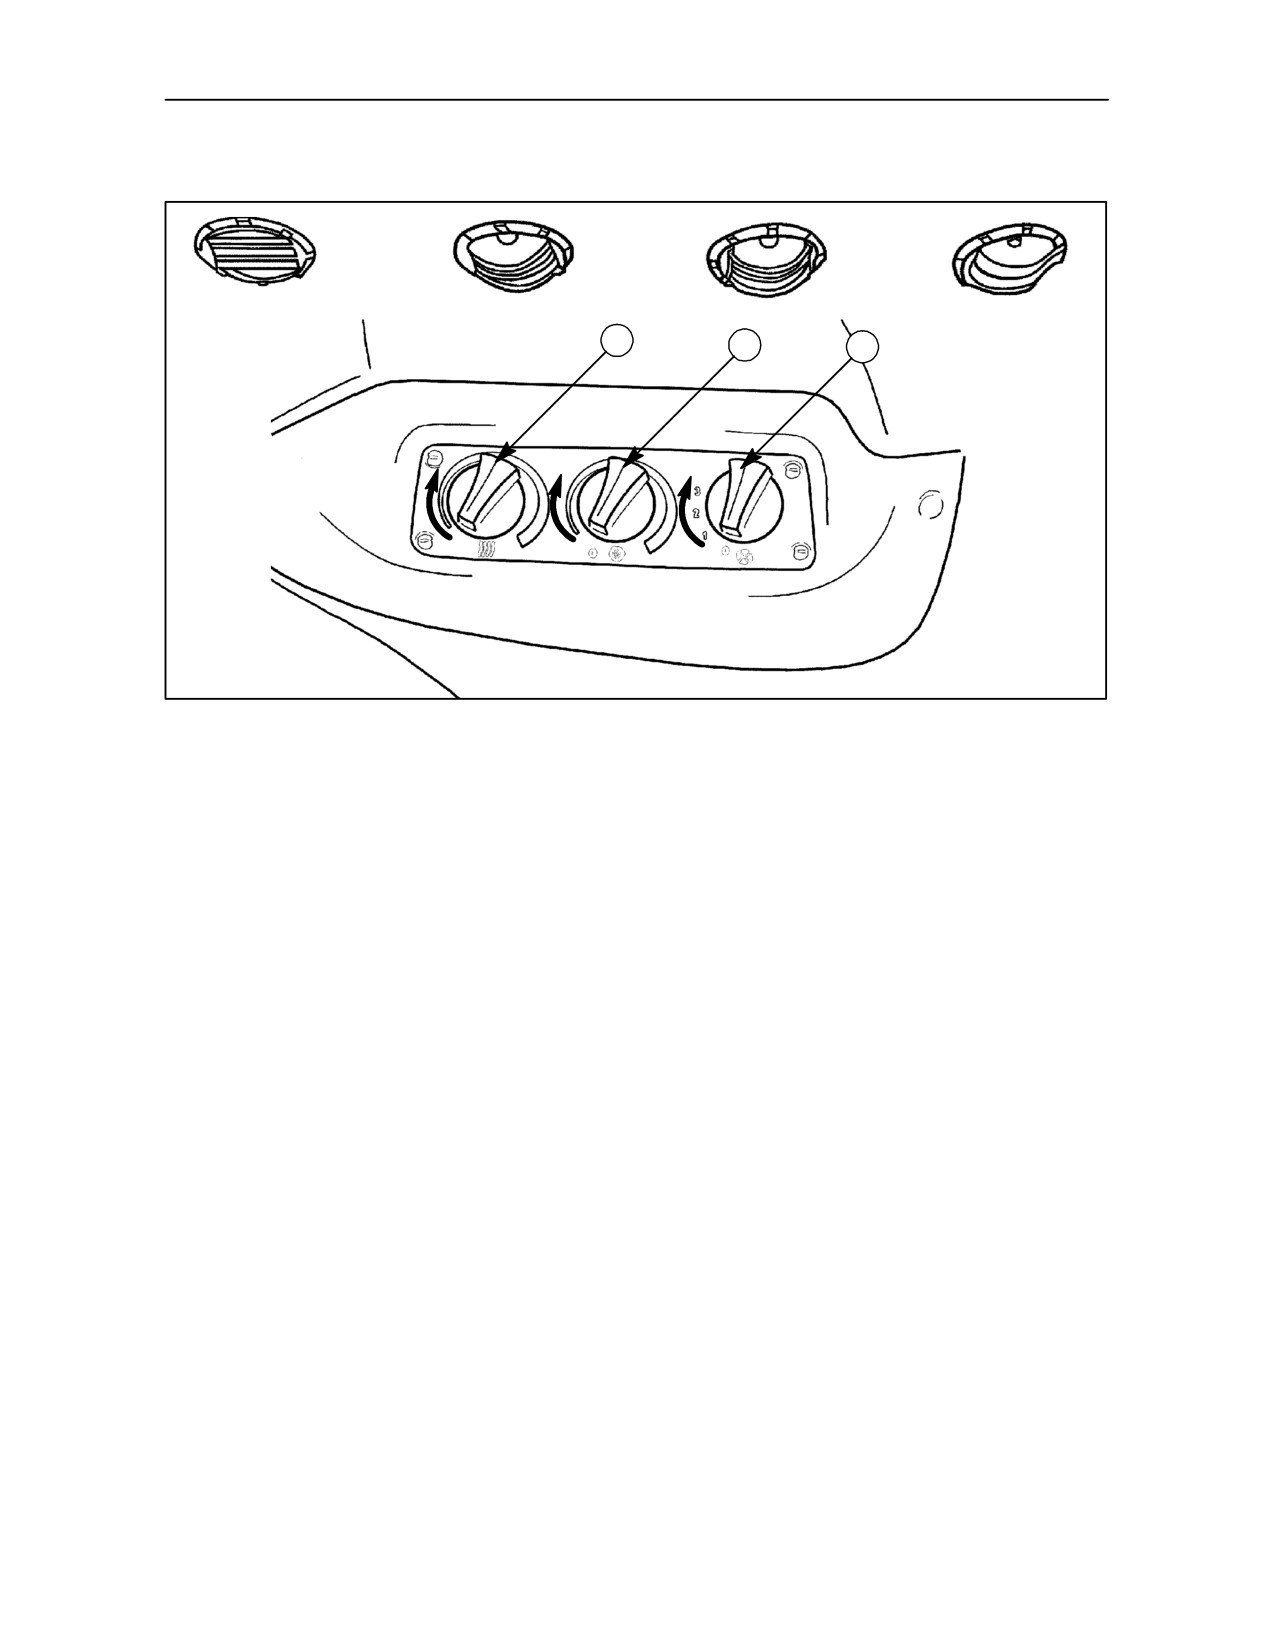
SECTION 2 -- CONTROLS, INSTRUMENTS AND OPERATION
CAB AIR CONDITIONING SYSTEM
TRE0011B
3
2
1
TRE0012A
62
AIR CONDITIONING AND TEMPERATURE
CONTROL -- Fig 60
Three--speed electric fan control (1)
Air conditioner control (2)
The fan operates with the ignition key in the starting
The system operates with the ignition key switched
position.
on.
1. Low speed.
With the fan control (1) in positions 1 - 2 or 3, turn the
2. Medium speed.
control (2) to switch on the air conditioner.
3. High speed.
Heater control (3)
NOTE: For cab pressurisation see the heading
With control
(3) in the fully counter--clockwise
Ventilation on page 2--25 in this section.
position the heater is turned off.
2--28
SECTION 2 -- CONTROLS, INSTRUMENTS AND OPERATION
AIR CONDITIONING SYSTEM -- INSTRUCTIONS FOR USE
The air conditioning system provides dehumidified
CAUTION
cool air or dehumidified hot air.
Before starting the engine, check that the air
It is operated as follows:
conditioning is off.
CAUTION
When the engine is not running the air conditioner will
not work because the compressor is driven by the
ADJUSTMENT
engine.
NOTE: When working in a very dusty environment,
the cab pressure may have to be increased, by
STARTING
increasing fan speed to prevent dust from entering
the cab. Doors and windows should be kept closed.
With the engine running and the electric fan on, turn
the control knob (2) fig 62 to start the air conditioning
system.
Under certain conditions, it may be desirable to
CAUTION
operate both the air conditioner and heater together,
e.g. to demist the windscreen and side windows on
Always switch the electric fan on before the air
a cold morning. (The air conditioner, as well as
conditioning.
cooling, also removes humidity from the cab air).
The air conditioning cannot work when the electric
Run the engine to normal operating temperature,
fan is off.
turn the heater control (3) fig. 62 and fan control (1)
to the maximum settings (fully clockwise). Adjust the
swivelling air vents to direct the airflows, as required.
CAUTION
If the air conditioner has been out of use for more
To restore the temperature in the cab after a
than 30 days, run the engine at idle speed for at least
prolonged halt in the sun, start the tractor, switch on
3 m inutes after switching on the air conditioner.
the air conditioning and after about a minute open the
rear window to let the hot air escape.
After for a few minutes, the inspection glass on the
STOPPING
top of the dryer filter should be clear and not contain
any bubbles. If this is not the case, stop the system
Before stopping the engine, always switch off the air
and contact your dealer.
conditioning system by turning the knob (2) fig. 62
and moving fan control (1) to the off position.
2--29
SECTION 2 -- CONTROLS, INSTRUMENTS AND OPERATION
REGULAR INSPECTIONS
GENERAL CAB MAINTENANCE
(ALL MODELS)
At least once every three months :
After completing external cab maintenance, carry
--
remove any foreign matter from the condenser
out the following inspections :
and evaporator fins;
1. Check from time to time that there is no leftover
--
check the tension of the compressor belt;
water in areas covered with mats or padding.
2. Protect the hinges and locks on the doors and
--
run the engine at 1500 rpm speed and check the
opening windows with lubricants and
dryer filter inspection glass: it should be
water--repellents.
transparent and not contain any air bubbles or
white liquid;
3. Use suitable detergents or, if
necessary,
sulphuric ether to clean the windows.
--
check the condition of the tubing, connections
and mounting of brackets;
4. Remove the windscreen wiper blade and
sprinkle talc on the rubber.
--
check that the discharge pipes are working
properly and remove any condensation from the
5. Leave the doors or side windows partially open.
evaporator;
--
check that the pulley and compressor retaining
screws and nuts are correctly tightened.
SPECIFICATIONS
MAINTENANCE
Refrigerant
HFC134a
During long periods of inactivity, run the air
--
Quantity
1.6 kg
conditioning system for a few minutes every month
to circulate the oil in the system and keep the seals
Compressor
SANDEN SD 7H15
in good condition.
--
Capacity
155 cc/rev
Run the system only when the engine is warm and
the temperature inside the cab has reached 20_C.
--
Oil type
SANDEN PAG SP--20
ANNUAL MAINTENANCE
--
Oil quantity
185 cc
At the beginning of the working season, have the
Cooling capacity at 22° C -- 49° C (75° F -- 120° F)
following operations carried out by your authorised
ambient temperature :
3873 kcal/h
dealer:
(Actual capacity dependent on system control
operator setting)
--
check the oil level in the compressor, fill--up if
necessary;
Airflow with electric fan on speed 3
8.3 m3/min
--
check the sealing on the system with a leakage
detector, fill--up with HFC 134a gas, or:
--
replace the dryer filter, only if absolutely
necessary;
--
a functional check of the overall system.
2--30
SECTION 2 -- CONTROLS, INSTRUMENTS AND OPERATION
TRANSMISSION WITH RANGE GEAR -- 30 km/h (19 mph)
(12 FORWARD GEARS + 4 REVERSE GEARS -- SYNCROMESH)
(NOT AVAILABLE IN ALL MARKETS)
CAUTION
1
With the engine running and with just one gear lever
in neutral, the tractor could be started accidentally if
the lever is knocked, with consequent accident risk.
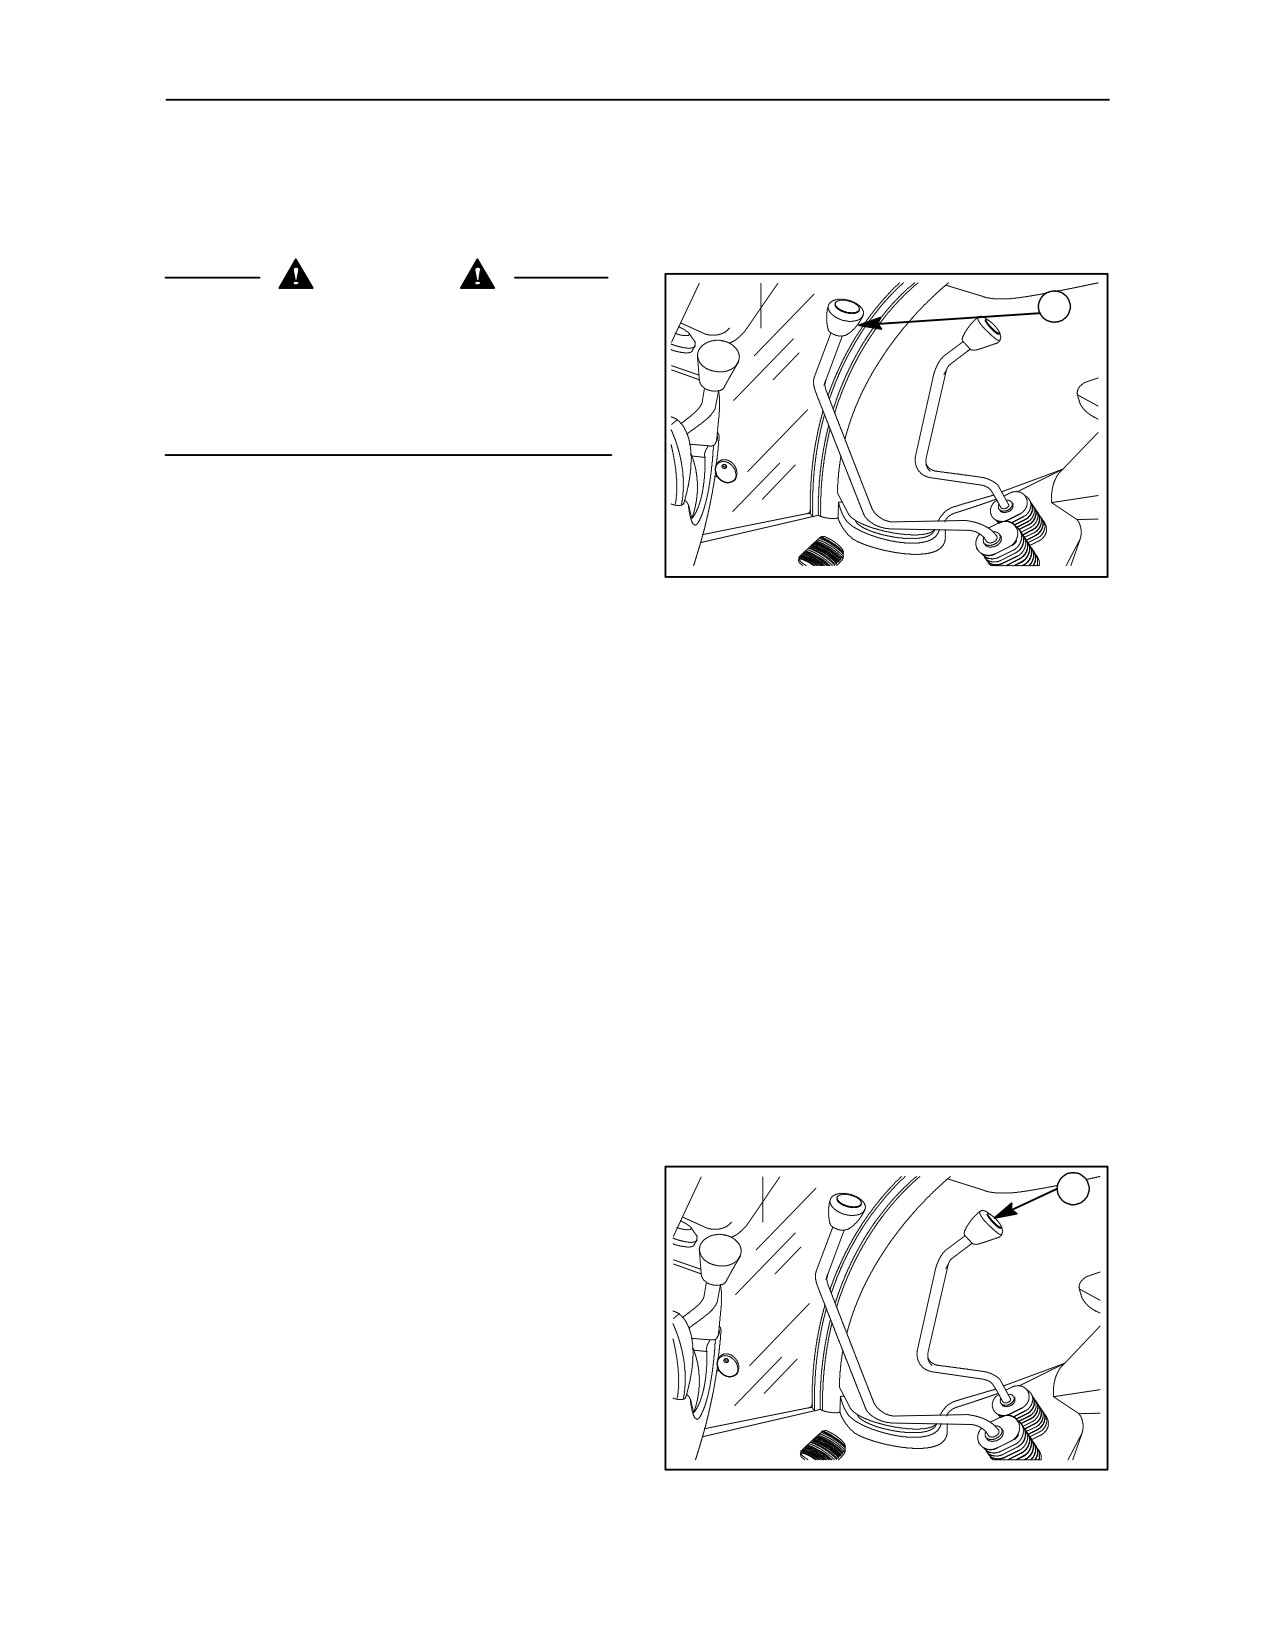
To prevent this happening, move both levers fig. 63
to neutral, lower any attached equipment and stop
the engine before leaving the tractor.
The transmission and range gears are controlled by
two separate levers.
63
The main shift lever (1) fig. 63 selects four gear ratios
(1, 2, 3, 4).
The range lever (1) fig. 64 provides three forward
gear ranges and one reverse range R for each gear
ratio.
There are twelve forward and four reverse gears.
To change from a medium gear to a lower or higher
one, stop the tractor, move the range lever to the right
and shift it forward for lower gears or backward for
higher gears.
To engage reverse R, stop the tractor and move the
range lever to the left and then shift back.
To change from one speed to another in the same
range, shift the main shift lever after releasing the
clutch. (The tractor does not have to be halted as the
gears are Synchro--engaged).
Range lever positions -- Fig. 64
1
--
I = low
--
II = medium
--
III = high
--
R = reverse
64
2--31
SECTION 2 -- CONTROLS, INSTRUMENTS AND OPERATION
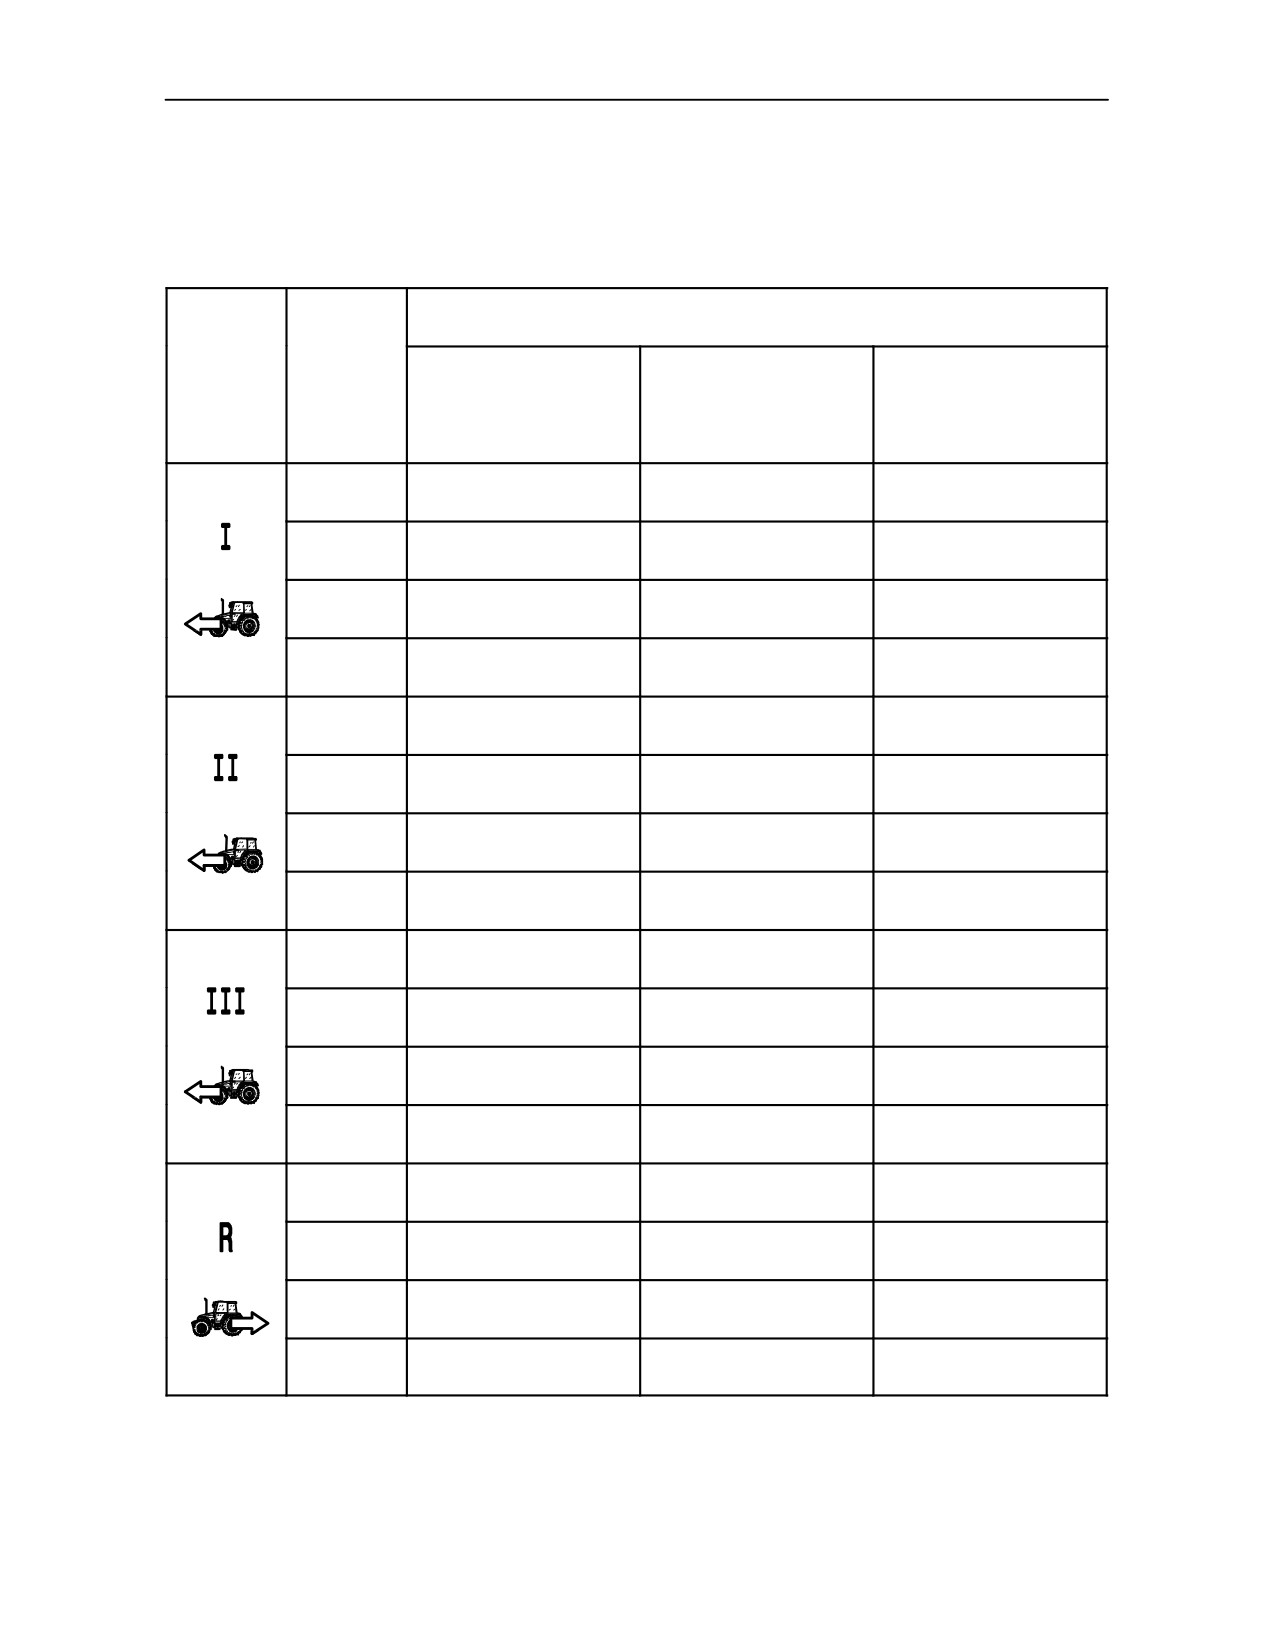
SPEEDS AT MAXIMUM POWER
Transmission and range gear 30 km/h (19 mph) version
(12 forward gears + 4 reverse gears -- Synchromesh)
REAR TYRES km/h (mph)
RANGE
GEAR
TD 60D
TD 70D
TD 80D
14.9--28
14.9--30
16.9--30
(RI:640)
(RI:665)
(RI:695)
1
1.6
(1.0)
1.7
(1.1)
1.7
(1.1)
2
2.5
(1.6)
2.6
(1.6)
2.5
(1.6)
3
3.1
(1.9)
3.2
(2.0)
3.1
(1.9)
4
4.9
(3.0)
5.1
(3.2)
5.0
(3.1)
1
3.8
(2.4)
4.0
(2.5)
3.9
(2.4)
2
5.9
(3.7)
6.1
(3.8)
5.9
(3.7)
3
7.2
(4.5)
7.5
(4.7)
7.3
(4.5)
4
11.5
(7.2)
12.0
(7.5)
11.6
(7.2)
1
9.0
(5.6)
9.4
(5.8)
9.1
(5.7)
2
13.9
(8.6)
14.5
(9.0)
14.0
(8.7)
3
17.1
(10.6)
17.7
(11.0)
17.1
(10.6)
4
27.1
(16.8)
28.2
(17.5)
27.3
(17.0)
1
4.2
(2.6)
4.4
(2.7)
4.3
(2.7)
2
6.5
(4.0)
6.8
(4.2)
6.6
(4.1)
3
8.0
(5.0)
8.3
(5.2)
8.1
(5.0)
4
12.8
(8.0)
13.3
(8.3)
12.8
(8.0)
2--32
SECTION 2 -- CONTROLS, INSTRUMENTS AND OPERATION
TRANSMISSION WITH RANGE GEAR AND SHUTTLE -- 30 km/h (19 mp/h)
(12 FORWARD GEARS + 12 REVERSE GEARS -- SYNCHRO SHUTTLE)
CAUTION
1
With the engine running and with just one gear lever
in neutral, the tractor could be started accidentally if
the lever is knocked, with consequent accident risk.
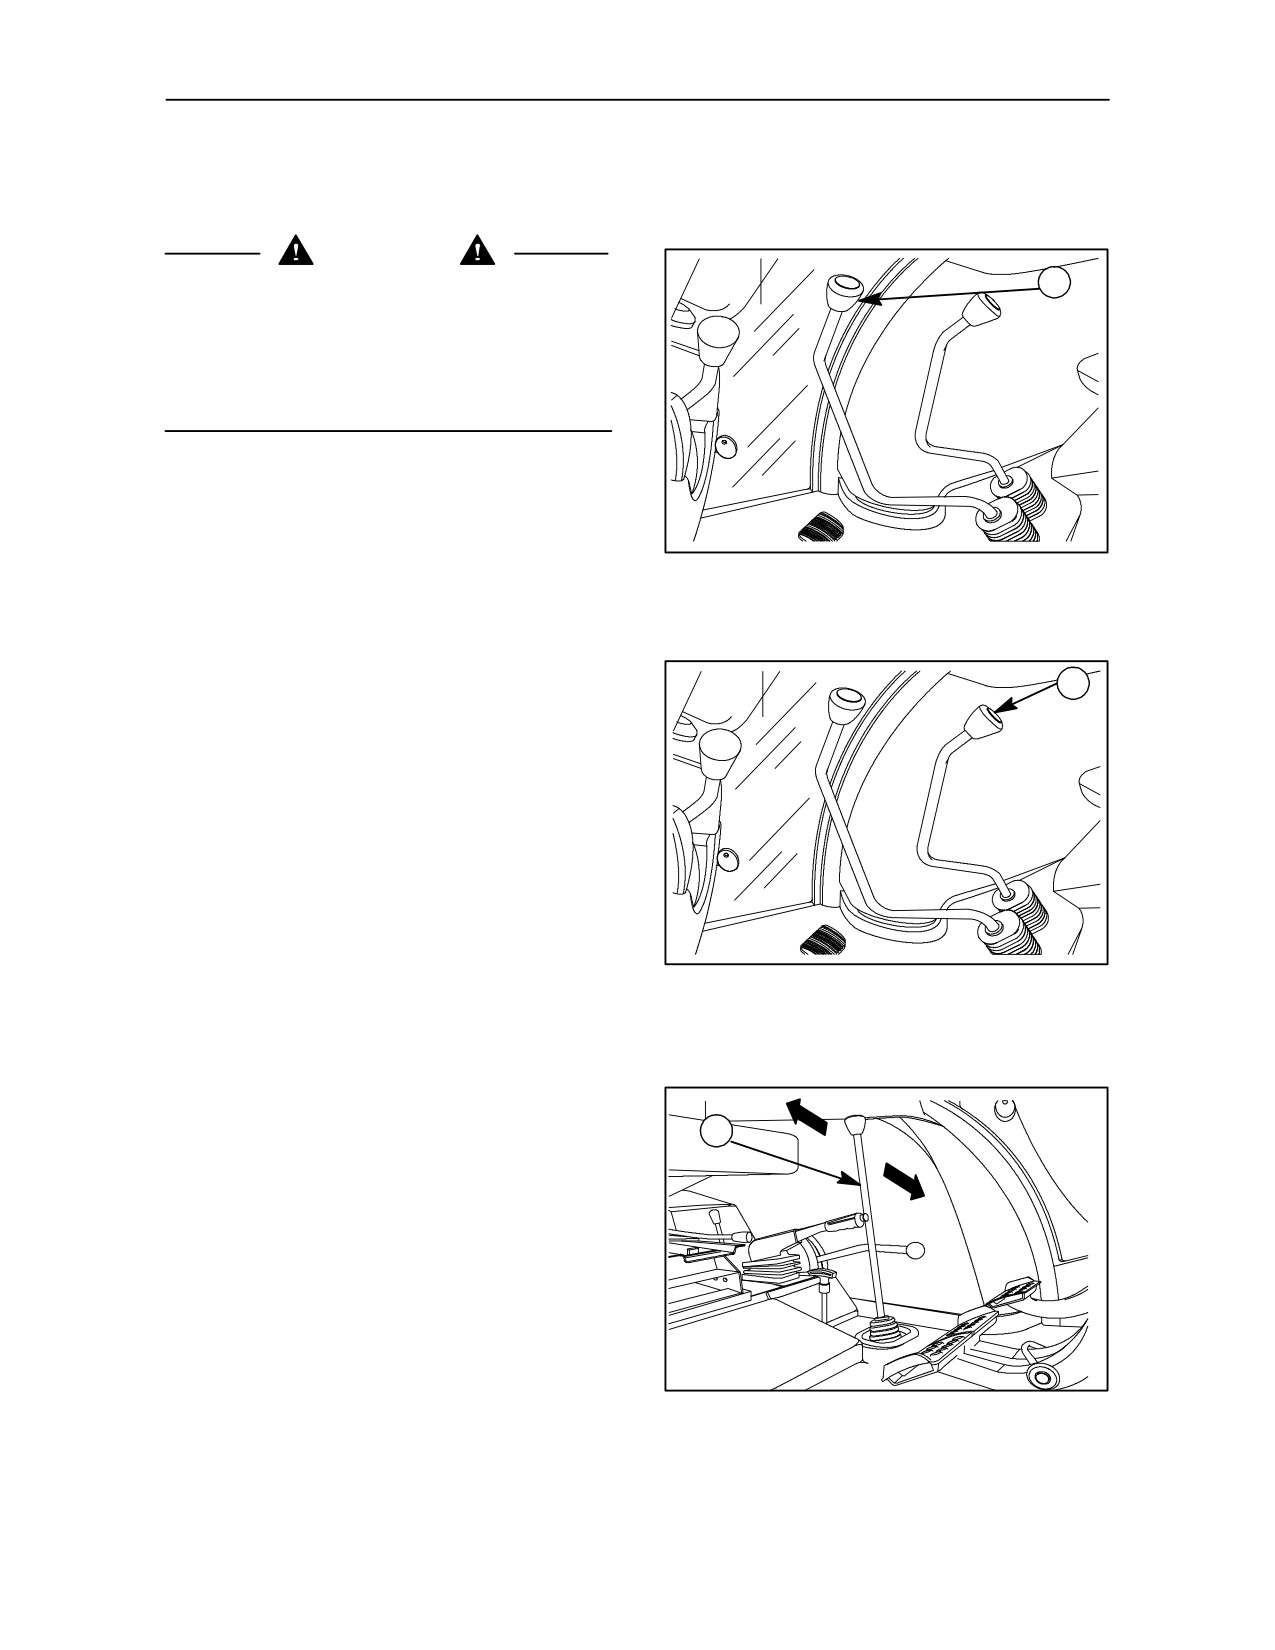
To prevent this happening, move both levers (fig. 65)
to neutral, lower any attached equipment and stop
the engine before leaving the tractor.
The transmission, range gear and shuttle are
independently controlled by three levers.
65
The main shift lever (1) fig. 65 selects four speed
ratios (1, 2, 3, 4).
The range lever (1) fig. 66 provides three forward
1
ranges:
--
I = low
--
II = medium
--
III = high
There are twelve forward and twelve reverse gears.
To change from a medium gear to a lower or higher
one, stop the tractor, move the range lever to the right
66
and shift it forward for lower gears or backward for
higher gears.
To change from one speed to another in the same
A
range (including reverse), shift the main shift lever
1
after disengaging the clutch (the tractor does not
have to be halted as the gears are Synchro--
engaged).
B
To reverse the direction of travel, slow the tractor
almost to a halt, move the shuttle lever (1) fig. 67
rearward, to position (A) to obtain reverse gears or
forward (B) to disengage the shuttle and obtain forward
gears. (The tractor does not have to be halted as the
gears are Synchro--engaged).
67
2--33
SECTION 2 -- CONTROLS, INSTRUMENTS AND OPERATION
SPEED AT MAXIMUM POWER
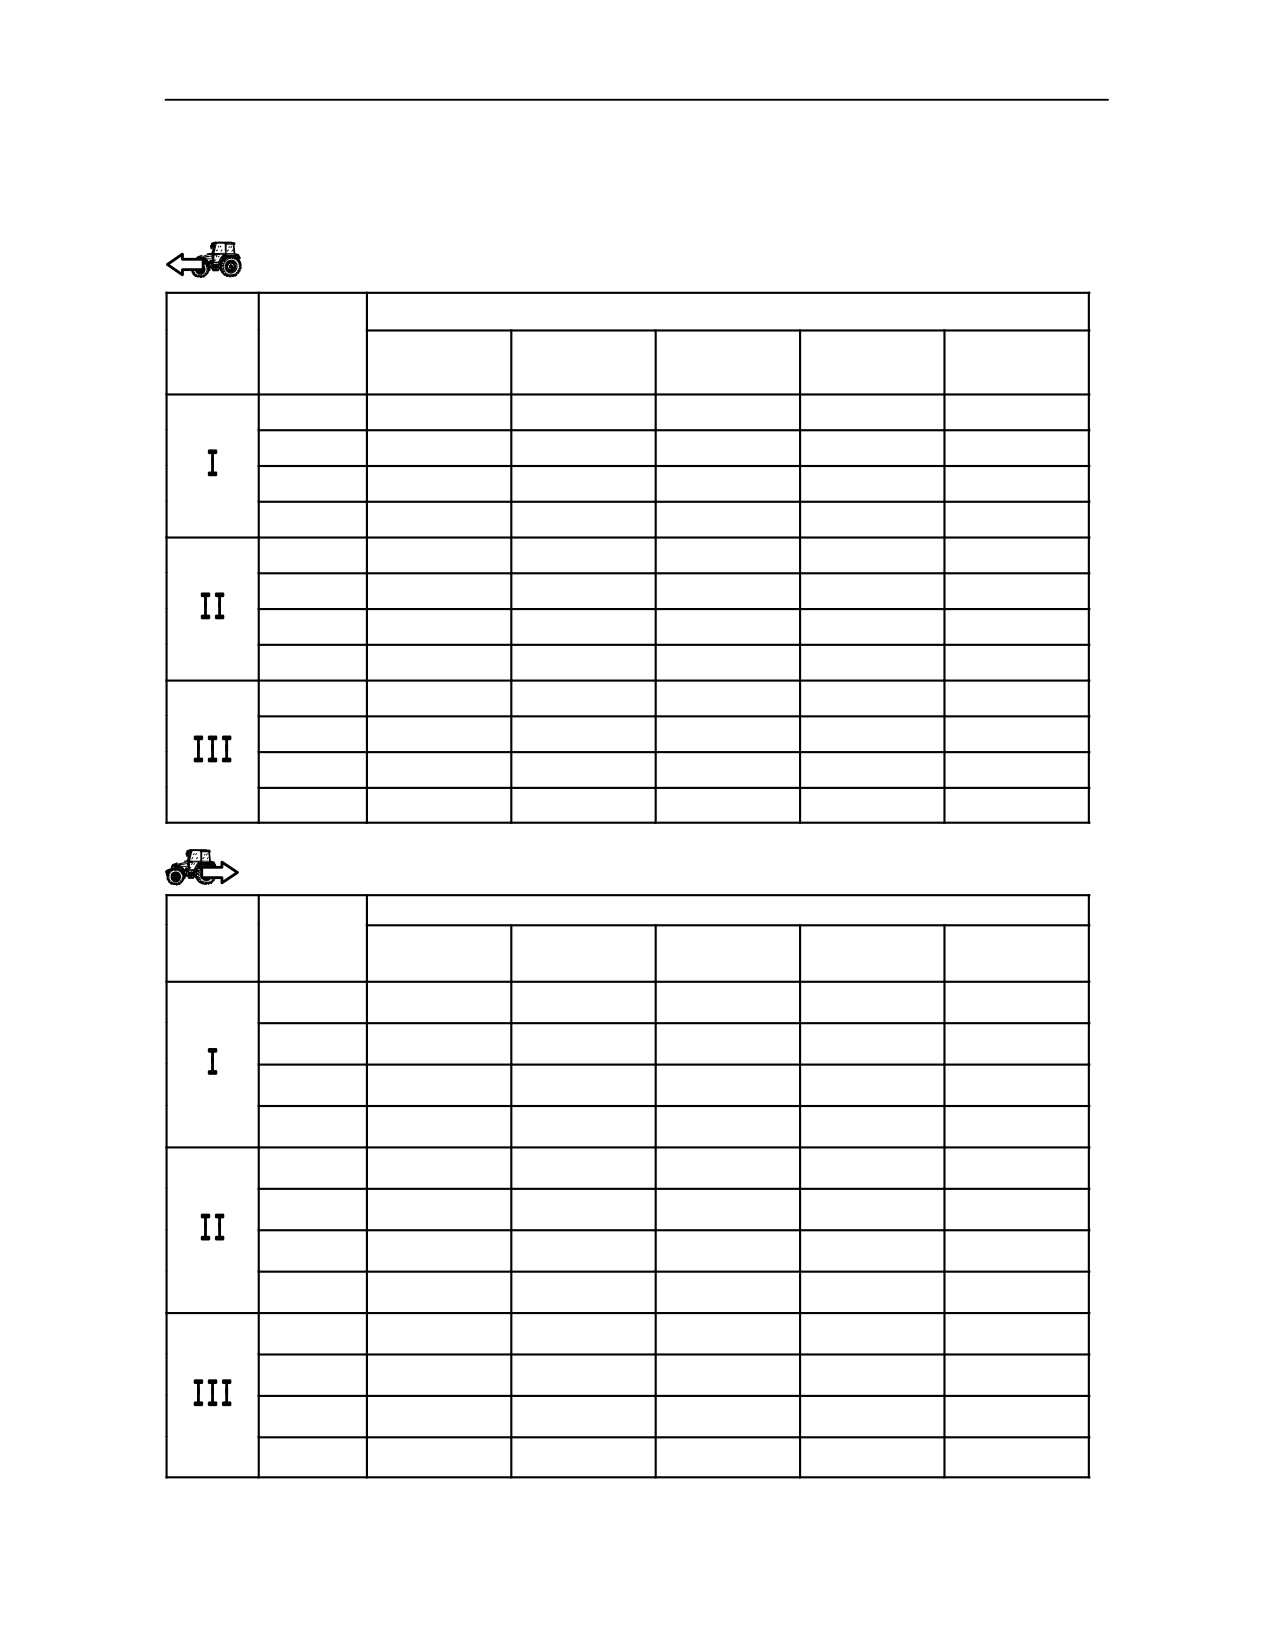
Shuttle transmission 30 km/h (19 mph) version (12 forward gears + 12 reverse gears -- Synchro Shuttle)
Forward gears
REAR TYRES km/h (mph)
RANGE
GEAR
TD 60D
TD 70D
TD 80D
TD 90D
TD 95D
14.9--28
14.9--30
16.9--30
18.4--30
18.4--34
1
1.6
(1.0)
1.7
(1.1)
1.7
(1.1)
1.7
(1.1)
1.8
(1.1)
2
2.5
(1.6)
2.6
(1.6)
2.5
(1.6)
2.6
(1.6)
2.6
(1.6)
3
3.4
(2.1)
3.6
(2.2)
3.5
(2.2)
3.6
(2.2)
3.8
(2.4)
4
4.9
(3.1)
5.1
(3.2)
5.0
(3.1)
5.1
(3.2)
5.4
(3.4)
1
3.8
(2.4)
4.0
(2.5)
3.9
(2.4)
4.0
(2.5)
4.2
(2.6)
2
5.9
(3.7)
6.1
(3.8)
5.9
(3.7)
6.2
(3.9)
6.1
(3.8)
3
8.0
(5.0)
8.4
(5.2)
8.1
(5.0)
8.4
(5.2)
8.8
(5.5)
4
11.5
(7.2)
12.0
(7.5)
11.6
(7.2)
12.0
(7.5)
12.6
(7.8)
1
9.0
(5.6)
9.4
(5.9)
9.1
(5.7)
9.4
(5.9)
9.9
(6.2)
2
13.9
(8.7)
14.5
(9.0)
14.0
(8.7)
14.5
(9.0)
14.4
(9.0)
3
18.9
(11.8)
19.7
(12.2)
19.0
(11.8)
19.7
(12.2)
20.8
(12.9)
4
27.1
(16.9)
28.3
(17.6)
27.3
(17.0)
28.3
(17.6)
29.8
(18.5)
Reverse gears
REAR TYRES km/h (mph)
RANGE
GEAR
TD 60D
TD 70D
TD 80D
TD 90D
TD 95D
14.9--28
14.9--30
16.9--30
18.4--30
18.4--34
1
1.6
(1.0)
1.7
(1.1)
1.7
(1.1)
1.8
(1.1)
1.8
(1.1)
2
2.5
(1.6)
2.6
(1.6)
2.5
(1.6)
2.6
(1.6)
2.6
(1.6)
3
3.4
(2.1)
3.6
(2.2)
3.5
(2.2)
3.6
(2.2)
3.8
(2.4)
4
4.9
(3.1)
5.1
(3.2)
5.0
(3.1)
5.1
(3.2)
5.4
(3.4)
1
3.8
(2.4)
4.0
(2.5)
3.9
(2.4)
4.0
(2.5)
4.2
(2.6)
2
5.9
(3.7)
6.1
(3.8)
5.9
(3.7)
6.2
(3.9)
6.1
(3.8)
3
8.0
(5.0)
8.4
(5.2)
8.1
(5.0)
8.4
(5.2)
8.8
(5.5)
4
11.5
(7.2)
12.0
(7.5)
11.6
(7.2)
12.0
(7.5)
12.6
(7.8)
1
9.0
(5.6)
9.4
(5.9)
9.1
(5.7)
9.4
(5.9)
9.9
(6.2)
2
13.9
(8.7)
14.5
(9.0)
14.0
(8.7)
14.5
(9.0)
14.4
(9.0)
3
19.0
(11.8)
19.8
(12.3)
19.1
(11.8)
19.8
(12.3)
20.9
(13.0)
4
27.2
(16.9)
28.4
(17.6)
27.4
(17.0)
28.4
(17.6)
29.9
(18.6)
2--34
SECTION 2 -- CONTROLS, INSTRUMENTS AND OPERATION
SPEED AT MAXIMUM POWER
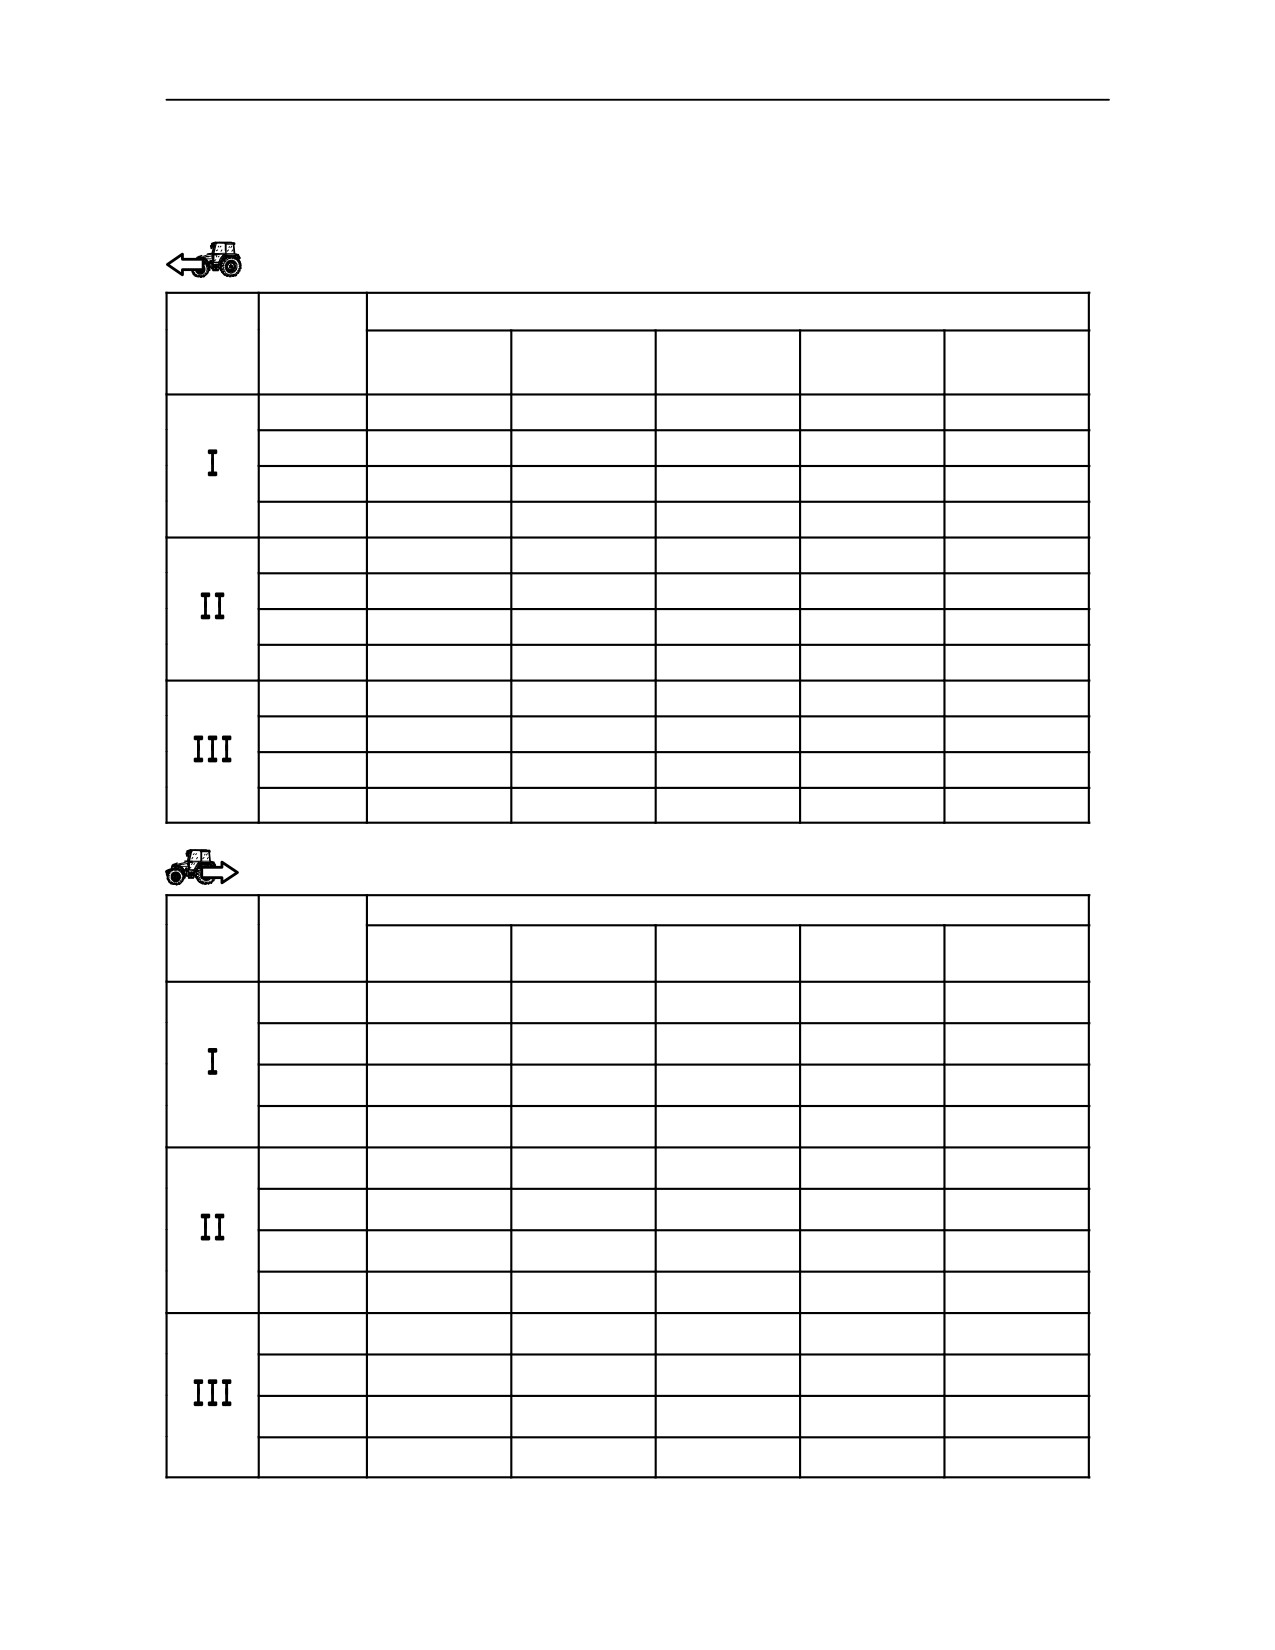
Shuttle transmission 40 km/h (25 mph) version (12 forward gears + 12 reverse gears -- Synchro Shuttle)
Forward gears
REAR TYRES km/h (mph)
RANGE
GEAR
TD 60D
TD 70D
TD 80D
TD 90D
TD 95D
14.9--28
14.9--30
16.9--30
18.4--30
18.4--34
1
2.0
(1.2)
2.1
(1.3)
2.0
(1.2)
2.1
(1.3)
2.2
(1.4)
2
3.1
(1.9)
3.2
(2.0)
3.1
(1.9)
3.2
(2.0)
3.2
(2.0)
3
4.2
(2.6)
4.4
(2.7)
4.2
(2.6)
4.4
(2.7)
4.6
(2.9)
4
6.0
(3.7)
6.3
(3.9)
6.1
(3.8)
6.3
(3.9)
6.6
(4.1)
1
4.7
(2.9)
4.9
(3.0)
4.7
(2.9)
4.9
(3.0)
5.1
(3.2)
2
7.2
(4.5)
7.5
(4.7)
7.3
(4.6)
7.5
(4.7)
7.5
(4.7)
3
9.8
(6.1)
10.2
(6.4)
9.9
(6.1)
10.2
(6.4)
10.8
(6.7)
4
14.1
(8.8)
14.6
(9.1)
14.2
(8.8)
14.7
(9.1)
15.5
(9.6)
1
11.1
(6.9)
11.5
(7.1)
11.1
(6.9)
11.5
(7.1)
12.1
(7.5)
2
17.0
(10.6)
17.7
(11.0)
17.1
(10.6)
17.7
(11.0)
17.6
(10.9)
3
23.2
(14.4)
24.1
(14.9)
23.3
(14.5)
24.1
(15.0)
25.4
(15.8)
4
33.2
(20.6)
34.5
(21.4)
33.3
(20.7)
34.5
(21.5)
36.4
(22.6)
Reverse gears
REAR TYRES km/h (mph)
RANGE
GEAR
TD 60D
TD 70D
TD 80D
TD 90D
TD 95D
14.9--28
14.9--30
16.9--30
18.4--30
18.4--34
1
2.0
(1.2)
2.1
(1.3)
2.0
(1.2)
2.1
(1.3)
2.2
(1.4)
2
3.1
(1.9)
3.2
(2.0)
3.1
(1.9)
3.2
(2.0)
3.2
(2.0)
3
4.2
(2.6)
4.4
(2.7)
4.2
(2.6)
4.4
(2.7)
4.6
(2.9)
4
6.0
(3.7)
6.3
(3.9)
6.1
(3.8)
6.3
(3.9)
6.6
(4.1)
1
4.7
(2.9)
4.9
(3.0)
4.7
(2.9)
4.9
(3.0)
5.1
(3.2)
2
7.2
(4.5)
7.5
(4.7)
7.3
(4.6)
7.5
(4.7)
7.5
(4.7)
3
9.8
(6.1)
10.2
(6.4)
9.9
(6.1)
10.2
(6.4)
10.8
(6.7)
4
14.1
(8.8)
14.6
(9.1)
14.2
(8.8)
14.7
(9.1)
15.5
(9.6)
1
11.1
(6.9)
11.5
(7.1)
11.1
(6.9)
11.5
(7.1)
12.1
(7.5)
2
17.1
(10.6)
17.8
(11.0)
17.2
(10.7)
17.8
(11.0)
17.7
(11.0)
3
23.3
(14.5)
24.2
(15.0)
23.4
(14.5)
24.2
(15.0)
25.5
(15.8)
4
33.3
(20.7)
34.6
(21.5)
33.4
(20.8)
34.6
(21.5)
36.5
(22.7)
2--35
SECTION 2 -- CONTROLS, INSTRUMENTS AND OPERATION
TRANSMISSION WITH CREEPER AND SHUTTLE -- 30 km/h (19 mph)
(20 FORWARD GEARS + 12 REVERSE GEARS -- SYNCHRO SHUTTLE)
CAUTION
With the engine running and with just one gear lever
in neutral, the tractor could be started accidentally if
the lever is knocked, with consequent accident risk.
To prevent this happening, move both levers (fig. 68)
to neutral, lower any attached equipment and stop
the engine before leaving the tractor.
The main shift, range gear (1) fig. 68 and shuttle
1
levers are identical in operation to the shuttle
transmission described on page 2--33.
An additional creeper lever (1) fig. 69 is used to
select the creeper gear which is effective in the low
and medium ranges to provide 8 additional forward
speeds. The creeper operates only in low (I) fig. 68
and medium (II) ranges.
There is a mechanical interlock preventing creeper
lever (1) fig. 69 engagement in position C with the
range lever (1) fig. 68 in position (III) (high range) and
vice versa.
68
CREEPER LEVER -- Fig. 69
By moving the lever upwards to position D or
downwards to position C, the creeper lever (1) fig. 69
selects between normal gears and creeper gears.
Combined use of the two levers (1) figs. 68 and 69
provides 20 forward and 12 reverse gears.
Creeper lever positions
--
Lever 1 downwards (position C) = creeper gear
engaged and effective in low or medium ranges.
1
--
Lever 1 upwards (position D) = creeper gear
disengaged, allowing selection of low, medium or
high ranges.
D
WARNING
C
TRE00040B
Before engaging the creeper, lever (1) fig 69 in
69
position C, ensure that the range lever (1) fig. 68 is
not in position (III).
2--36
SECTION 2 -- CONTROLS, INSTRUMENTS AND OPERATION
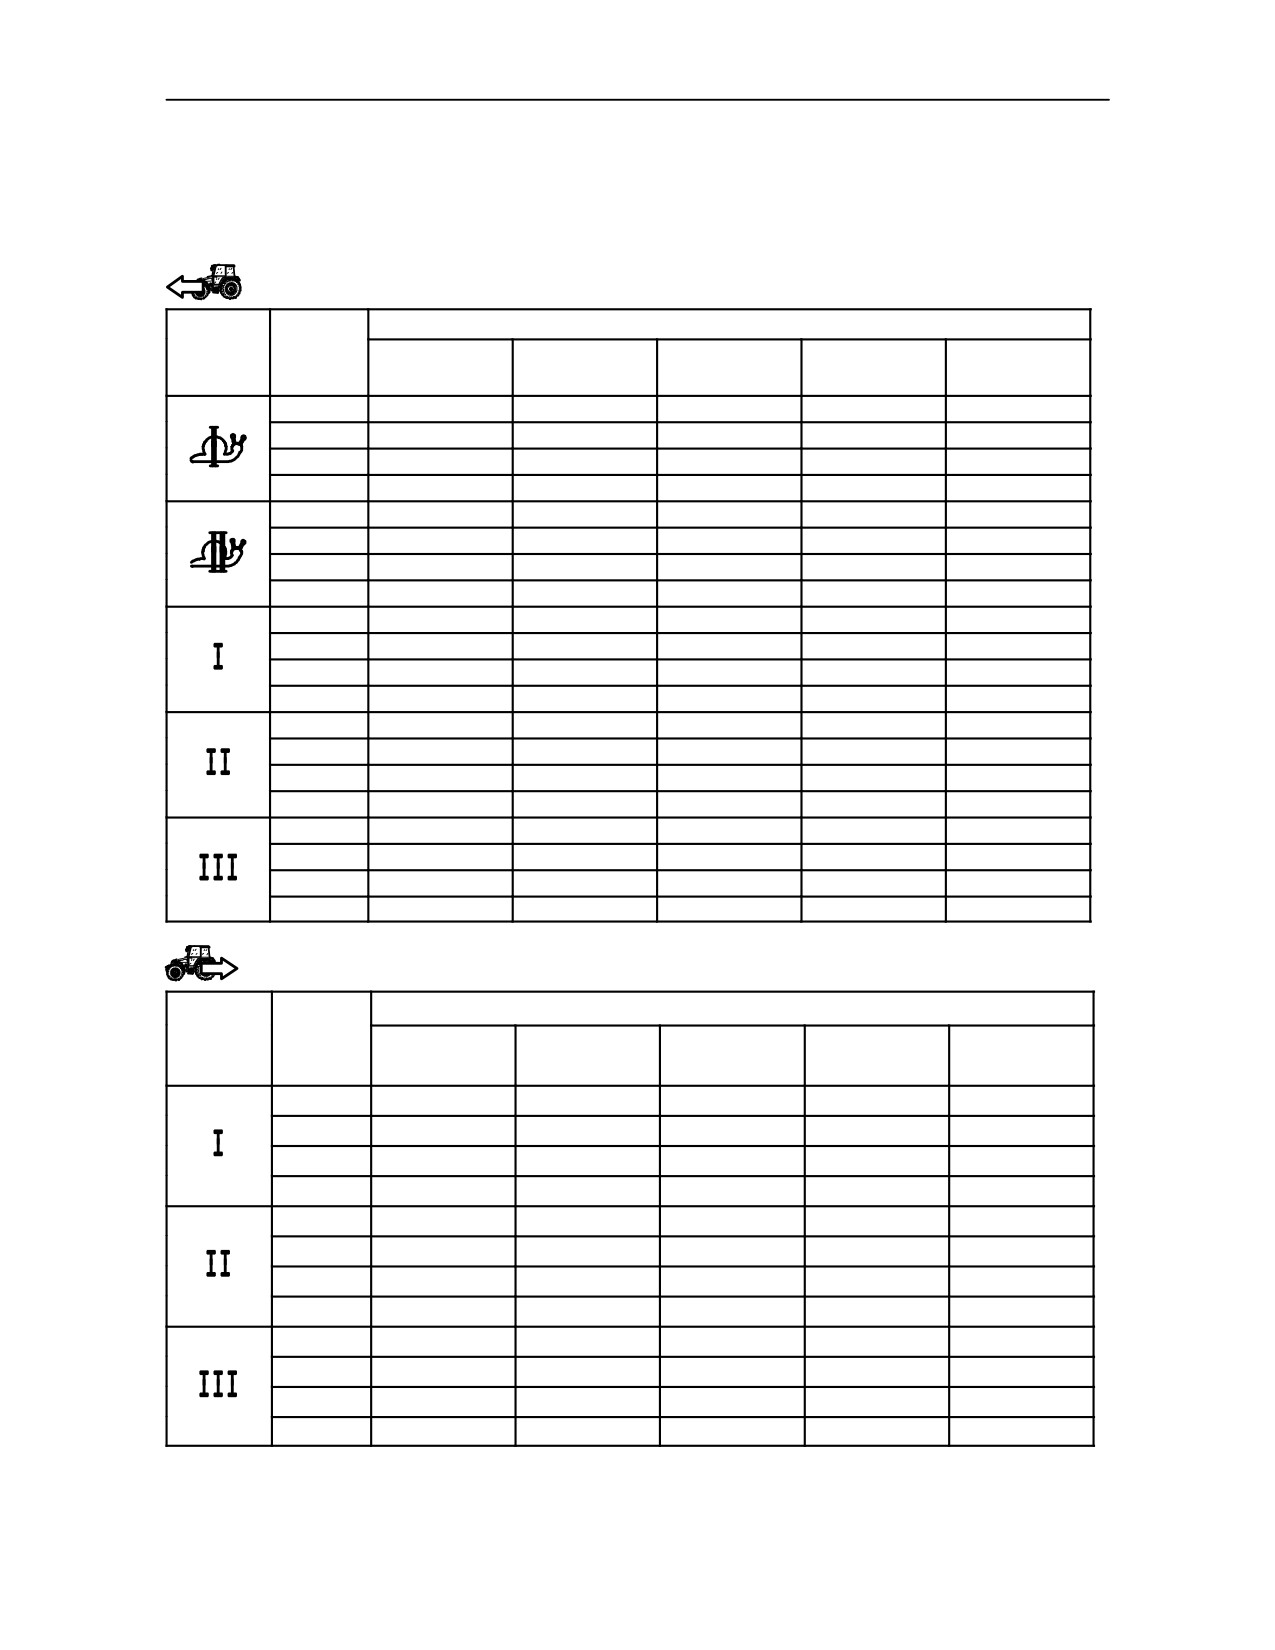
SPEED AT MAXIMUM POWER
Creeper transmission 30 km/h (19 mph) version
(20 forward gears + 12 reverse gears -- Synchro Shuttle)
Forward gears
REAR TYRES km/h (mph)
RANGE
GEAR
TD 60D
TD 70D
TD 80D
TD 90D
TD 95D
14.9--28
14.9--30
16.9--30
18.4--30
18.4--34
1
0.3
(0.2)
0.3
(0.2)
0.3
(0.2)
0.3
(0.2)
0.3
(0.2)
2
0.5
(0.3)
0.5
(0.3)
0.5
(0.3)
0.5
(0.3)
0.5
(0.3)
3
0.6
(0.4)
0.6
(0.4)
0.6
(0.4)
0.6
(0.4)
0.7
(0.4)
4
0.9
(0.6)
0.9
(0.6)
0.9
(0.6)
0.9
(0.6)
1.0
(0.6)
1
0.7
(0.4)
0.7
(0.4)
0.7
(0.4)
0.7
(0.4)
0.8
(0.4)
2
1.1
(0.7)
1.1
(0.7)
1.1
(0.7)
1.1
(0.7)
1.2
(0.6)
3
1.5
(0.9)
1.5
(0.9)
1.5
(0.9)
1.5
(0.9)
1.6
(0.9)
4
2.1
(1.3)
2.2
(1.4)
2.1
(1.3)
2.2
(1.4)
2.3
(1.4)
1
1.6
(1.0)
1.7
(1.1)
1.7
(1.1)
1.7
(1.1)
1.8
(1.1)
2
2.5
(1.6)
2.6
(1.6)
2.5
(1.6)
2.6
(1.6)
2.8
(1.7)
3
3.4
(2.1)
3.6
(2.2)
3.5
(2.2)
3.6
(2.2)
3.8
(2.4)
4
4.9
(3.1)
5.1
(3.2)
5.0
(3.1)
5.1
(3.2)
5.4
(3.4)
1
3.8
(2.4)
4.0
(2.5)
3.9
(2.6)
4.0
(2.5)
4.2
(2.6)
2
5.9
(3.7)
6.1
(3.8)
5.9
(3.7)
6.2
(3.9)
6.5
(4.0)
3
8.0
(5.0)
8.4
(5.2)
8.1
(5.0)
8.4
(5.2)
8.8
(5.5)
4
11.5
(7.2)
12.0
(7.5)
11.6
(7.2)
12.0
(7.5)
12.6
(7.8)
1
9.0
(5.6)
9.4
(5.8)
9.1
(5.7)
9.4
(5.8)
9.9
(6.2)
2
13.9
(8.7)
14.5
(9.0)
14.0
(8.7)
14.5
(9.0)
15.3
(9.5)
3
18.9
(11.8)
19.7
(12.2)
19.0
(11.8)
19.7
(12.2)
20.8
(12.9)
4
27.1(16.9)
28.2
(17.5)
27.3
(17.0)
28.3
(17.6)
29.8
(18.5)
Reverse gears
REAR TYRES km/h (mph)
RANGE
GEAR
TD 60D
TD 70D
TD 80D
TD 90D
TD 95D
14.9--28
14.9--30
16.9--30
18.4--30
18.4--34
1
1.5
(0.9)
1.6
(1.0)
1.6
(1.0)
1.6
(1.0)
1.7
(1.1)
2
2.4
(1.5)
2.5
(1.6)
2.4
(1.5)
2.5
(1.6)
2.7
(1.7)
3
3.2
(2.0)
3.4
(2.1)
3.3
(2.1)
3.4
(2.1)
3.6
(2.2)
4
4.7
(2.9)
4.9
(3.1)
4.8
(2.9)
4.9
(3.0)
5.1
(3.2)
1
3.6
(2.3)
3.8
(2.4)
3.7
(2.3)
3.8
(2.4)
4.0
(2.5)
2
5.6
(3.5)
5.8
(3.6)
5.6
(3.5)
5.9
(3.7)
6.2
(3.8)
3
7.6
(4.7)
8.0
(5.0)
7.7
(4.8)
8.0
(5.0)
8.4
(5.2)
4
10.9
(6.8)
11.4
(7.1)
11.0
(6.9)
11.4
(7.1)
12.0
(7.5)
1
8.6
(5.3)
8.9
(5.6)
8.7
(5.4)
8.9
(5.6)
9.4
(5.8)
2
13.2
(8.2)
13.8
(8.6)
13.3
(8.3)
13.8
(8.6)
14.5
(9.0)
3
18.0
(11.2)
18.7(11.6)
18.1
(11.2)
18.7
(11.6)
19.8
(12.3)
4
25.8
(16.0)
26.8(16.7)
25.9
(16.1)
26.9
(16.7)
28.3
(17.6)
2--37
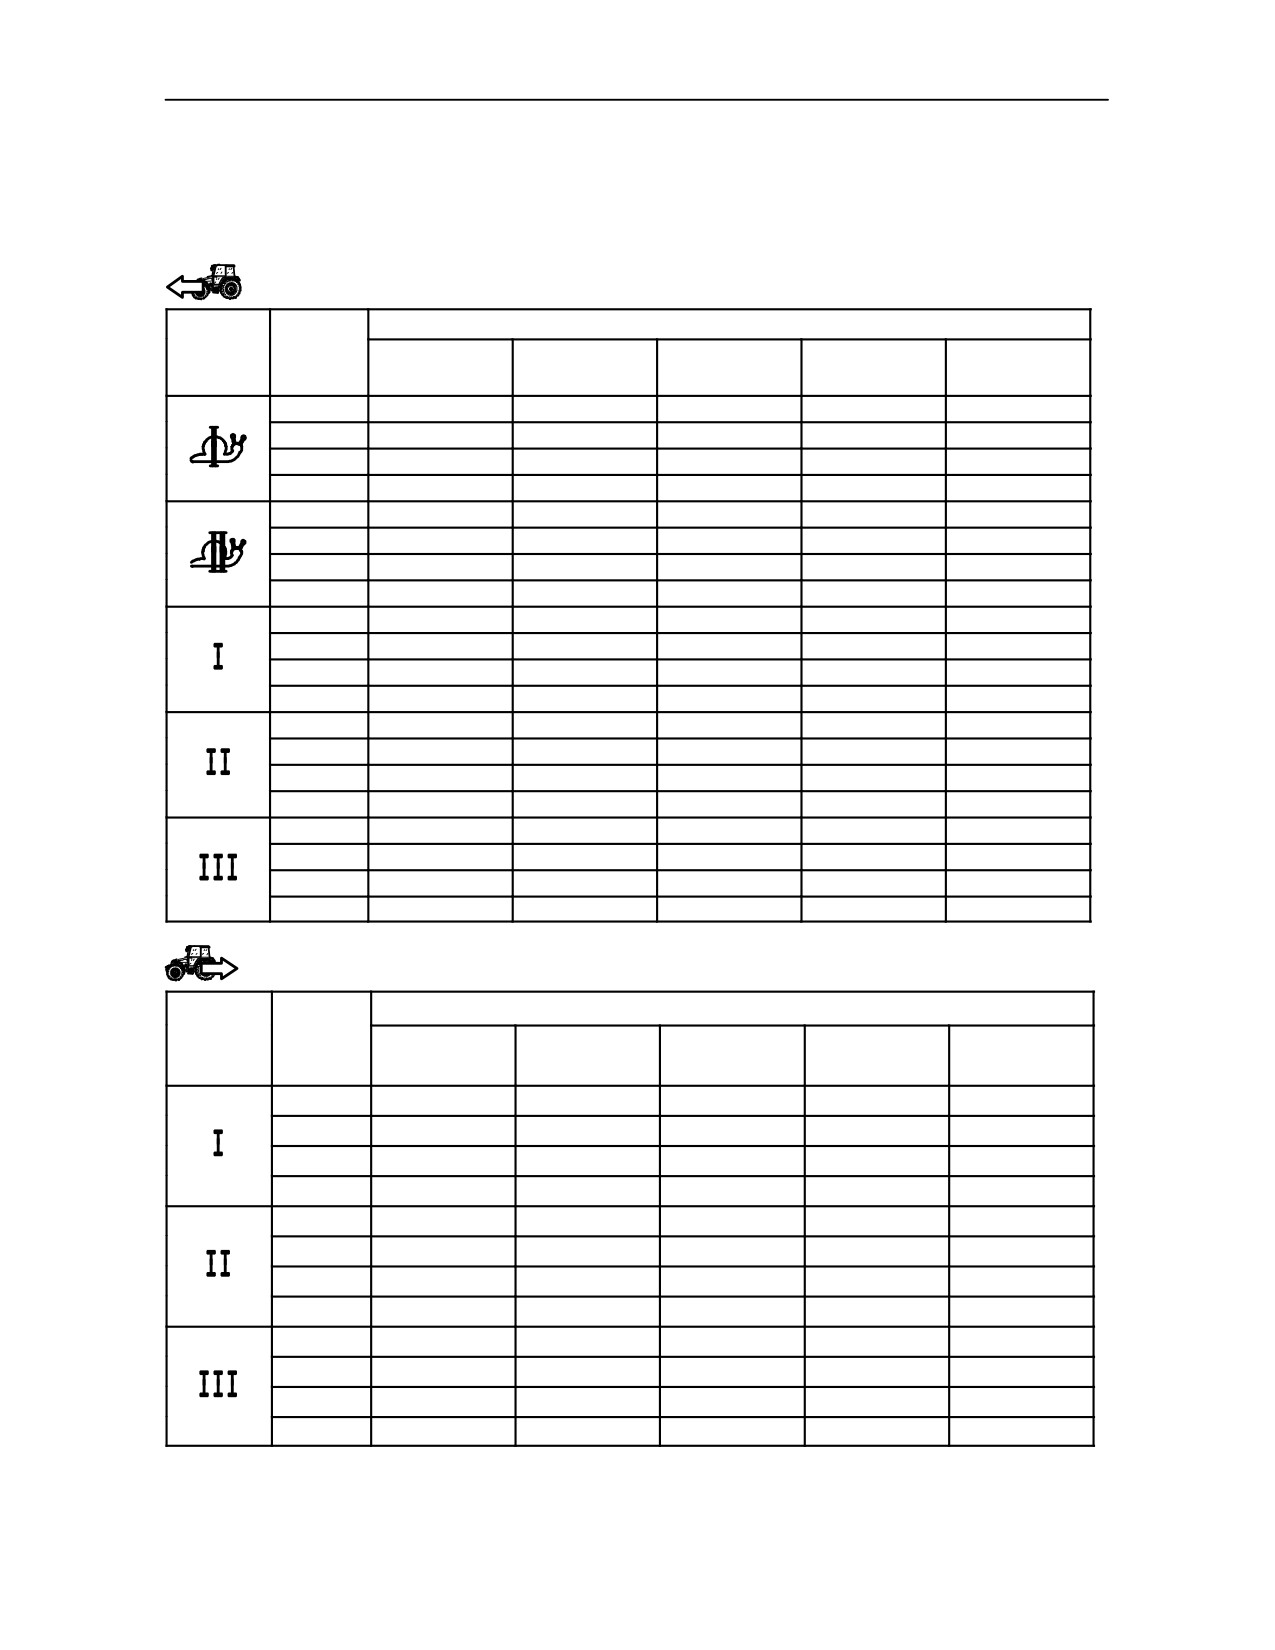
SECTION 2 -- CONTROLS, INSTRUMENTS AND OPERATION
SPEED AT MAXIMUM POWER
Creeper transmission 40 km/h (25 mph) version
(20 forward gears + 12 reverse gears -- Synchro Shuttle)
Forward gears
REAR TYRES km/h (mph)
RANGE
GEAR
TD 60D
TD 70D
TD 80D
TD 90D
TD 95D
14.9--28
14.9--30
16.9--30
18.4--30
18.4--34
1
0.4
(0.2)
0.4
(0.2)
0.4
(0.2)
0.4
(0.2)
0.4
(0.2)
2
0.6
(0.4)
0.6
(0.4)
0.6
(0.4)
0.6
(0.4)
0.6
(0.4)
3
0.8
(0.5)
0.8
(0.5)
0.8
(0.5)
0.8
(0.5)
0.8
(0.5)
4
1.1
(0.7)
1.1
(0.7)
1.1
(0.7)
1.1
(0.7)
1.2
(0.7)
1
0.8
(0.5)
0.9
(0.5)
0.9
(0.5)
0.9
(0.5)
0.9
(0.5)
2
1.3
(0.8)
1.4
(0.9)
1.3
(0.8)
1.4
(0.9)
1.4
(0.9)
3
1.8
(1.1)
1.9
(1.1)
1.8
(1.1)
1.9
(1.1)
2.0
(1.2)
4
2.6
(1.6)
2.7
(1.6)
2.6
(1.6)
2.7
(1.6)
2.8
(1.7)
1
2.0
(1.2)
2.1
(1.1)
2.0
(1.2)
2.1
(1.1)
2.2
(1.4)
2
3.1
(1.9)
3.2
(2.0)
3.1
(1.9)
3.2
(2.0)
3.4
(2.1)
3
4.2
(2.6)
4.4
(2.7)
4.2
(2.6)
4.4
(2.7)
4.6
(2.9)
4
6.0
(3.7)
6.3
(3.9)
6.1
(3.8)
6.3
(3.9)
6.6
(4.1)
1
4.7
(2.9)
4.9
(3.0)
4.7
(2.9)
4.9
(3.0)
5.1
(3.2)
2
7.2
(4.5)
7.5
(4.7)
7.3
(4.5)
7.5
(4.7)
7.9
(4.9)
3
9.8
(6.1)
10.2
(6.3)
9.9
(6.1)
10.2
(6.3)
10.8
(6.7)
4
14.1
(8.8)
14.6
(9.1)
14.2
(8.8)
14.7
(9.1)
15.5
(9.6)
1
11.1
(6.9)
11.5
(7.1)
11.1
(6.9)
11.5
(7.1)
12.1
(7.5)
2
17.0
(10.6)
17.7
(11.0)
17.1
(10.6)
17.7
(11.0)
18.7
(11.6)
3
23.2(14.4)
24.1
(14.9)
23.3
(14.5)
24.1
(14.9)
25.4
(15.8)
4
33.2
(20.6)
34.5
(21.4)
33.3
(20.7)
34.5
(21.4)
36.4
(22.6)
Reverse gears
REAR TYRES km/h (mph)
RANGE
GEAR
TD 60D
TD 70D
TD 80D
TD 90D
TD 95D
14.9--28
14.9--30
16.9--30
18.4--30
18.4--34
1
1.9
(1.2)
2.0
(1.2)
1.9
(1.2)
2.0
(1.2)
2.1
(1.3)
2
3.0
(1.8)
3.0
(1.9)
3.0
(1.8)
3.0
(1.9)
3.2
(2.0)
3
4.0
(2.5)
4.2
(2.6)
4.0
(2.5)
4.2
(2.6)
4.4
(2.7)
4
5.7
(3.5)
6.0
(3.7)
5.8
(3.6)
6.0
(3.7)
6.3
(3.9)
1
4.5
(2.8)
4.7
(2.9)
4.5
(2.8)
4.7
(2.9)
4.9
(3.0)
2
6.8
(4.3)
7.1
(4.4)
6.9
(4.3)
7.1
(4.4)
7.5
(4.7)
3
9.3
(5.8)
9.7
(6.0)
9.4
(5.8)
9.7
(6.0)
10.3
(6.4)
4
13.4
(8.3)
13.9
(8.6)
13.5
(8.4)
14.0
(8.7)
14.7
(9.2)
1
10.6
(6.6)
10.9
(6.8)
10.6
(6.6)
10.9
(6.8)
11.5
(7.1)
2
16.2
(10.0)
16.8
(10.5)
16.3
(10.1)
16.8
(10.5)
17.8
(11.0)
3
22.0
(13.7)
22.9
(14.2)
22.1
(13.8)
22.9
(14.2)
24.1
(15.0)
4
31.5
(19.6)
32.8
(20.4)
31.6
(19.7)
32.8
(20.4)
34.6
(21.5)
2--38
SECTION 2 -- CONTROLS, INSTRUMENTS AND OPERATION
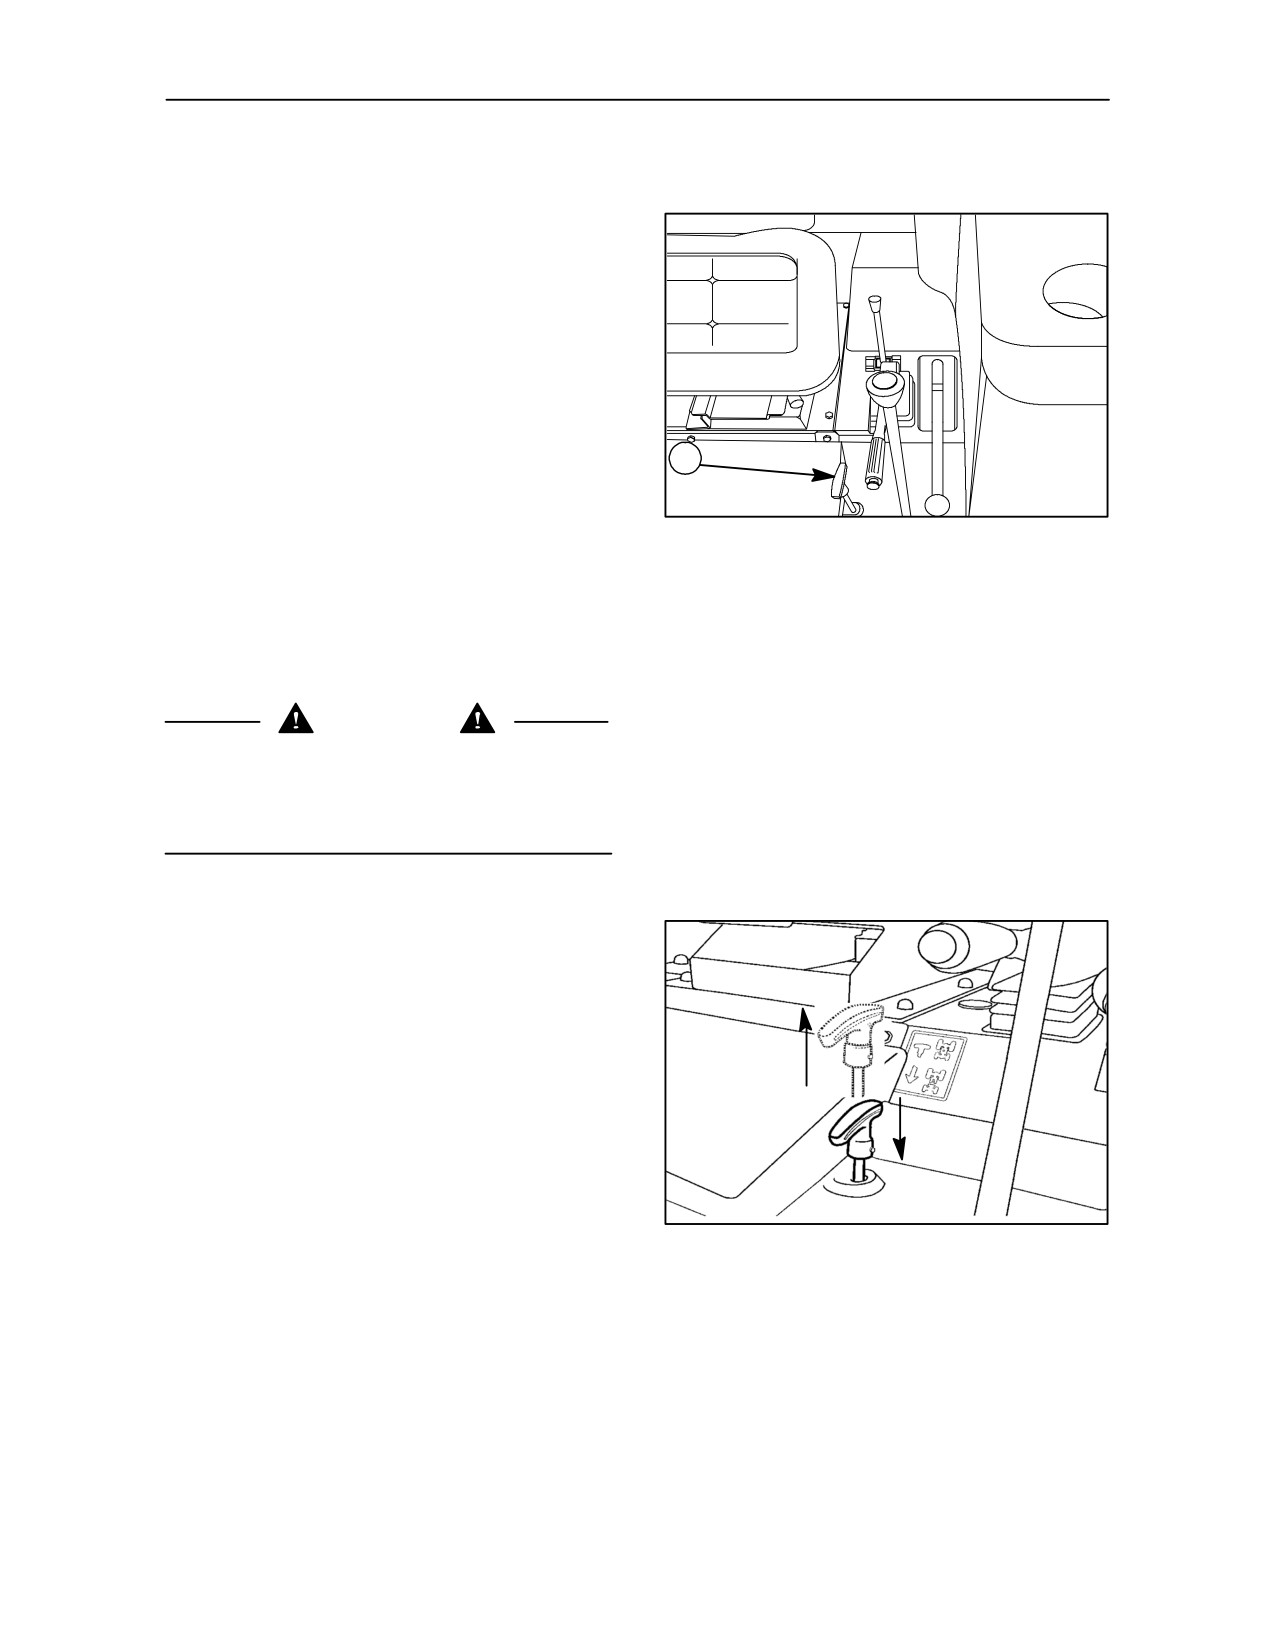
MECHANICALLY CONTROLLED FOUR--WHEEL DRIVE
USING FOUR--WHEEL DRIVE
Front--wheel drive can increase the tractor’s grip on
the surface; the benefits of this are particularly
noticeable when working on uneven, muddy or
slippery surfaces, on ploughed ground or in difficult
conditions.
Front--wheel drive engagement / disengagement is
carried out by means of lever (1) fig. 68 when the
tractor moving slowly and preferably at the low
1
speeds of the engine.
Avoid carrying out this operation under stress. If the
70
maneouvre proves to be difficult with the tractor
moving in a straight line, keeping the lever in
engaged position, slightly turn the steering wheel in
both directions until the control mechanism engaged.
CAUTION
Do not use front wheel drive on hard surfaces to
prevent premature wear to the front tyres. Abnormal
tyre wear can also be caused by incorrect tyre
pressures.
To engage front--wheel drive pull the lever (1) fig. 70
upwards fig. 71
In this position, the front--wheel drive will stay
permanently on.
4 WD
To disengage it, push the lever downwards fig. 71
2 WD
71
2--39
SECTION 2 -- CONTROLS, INSTRUMENTS AND OPERATION
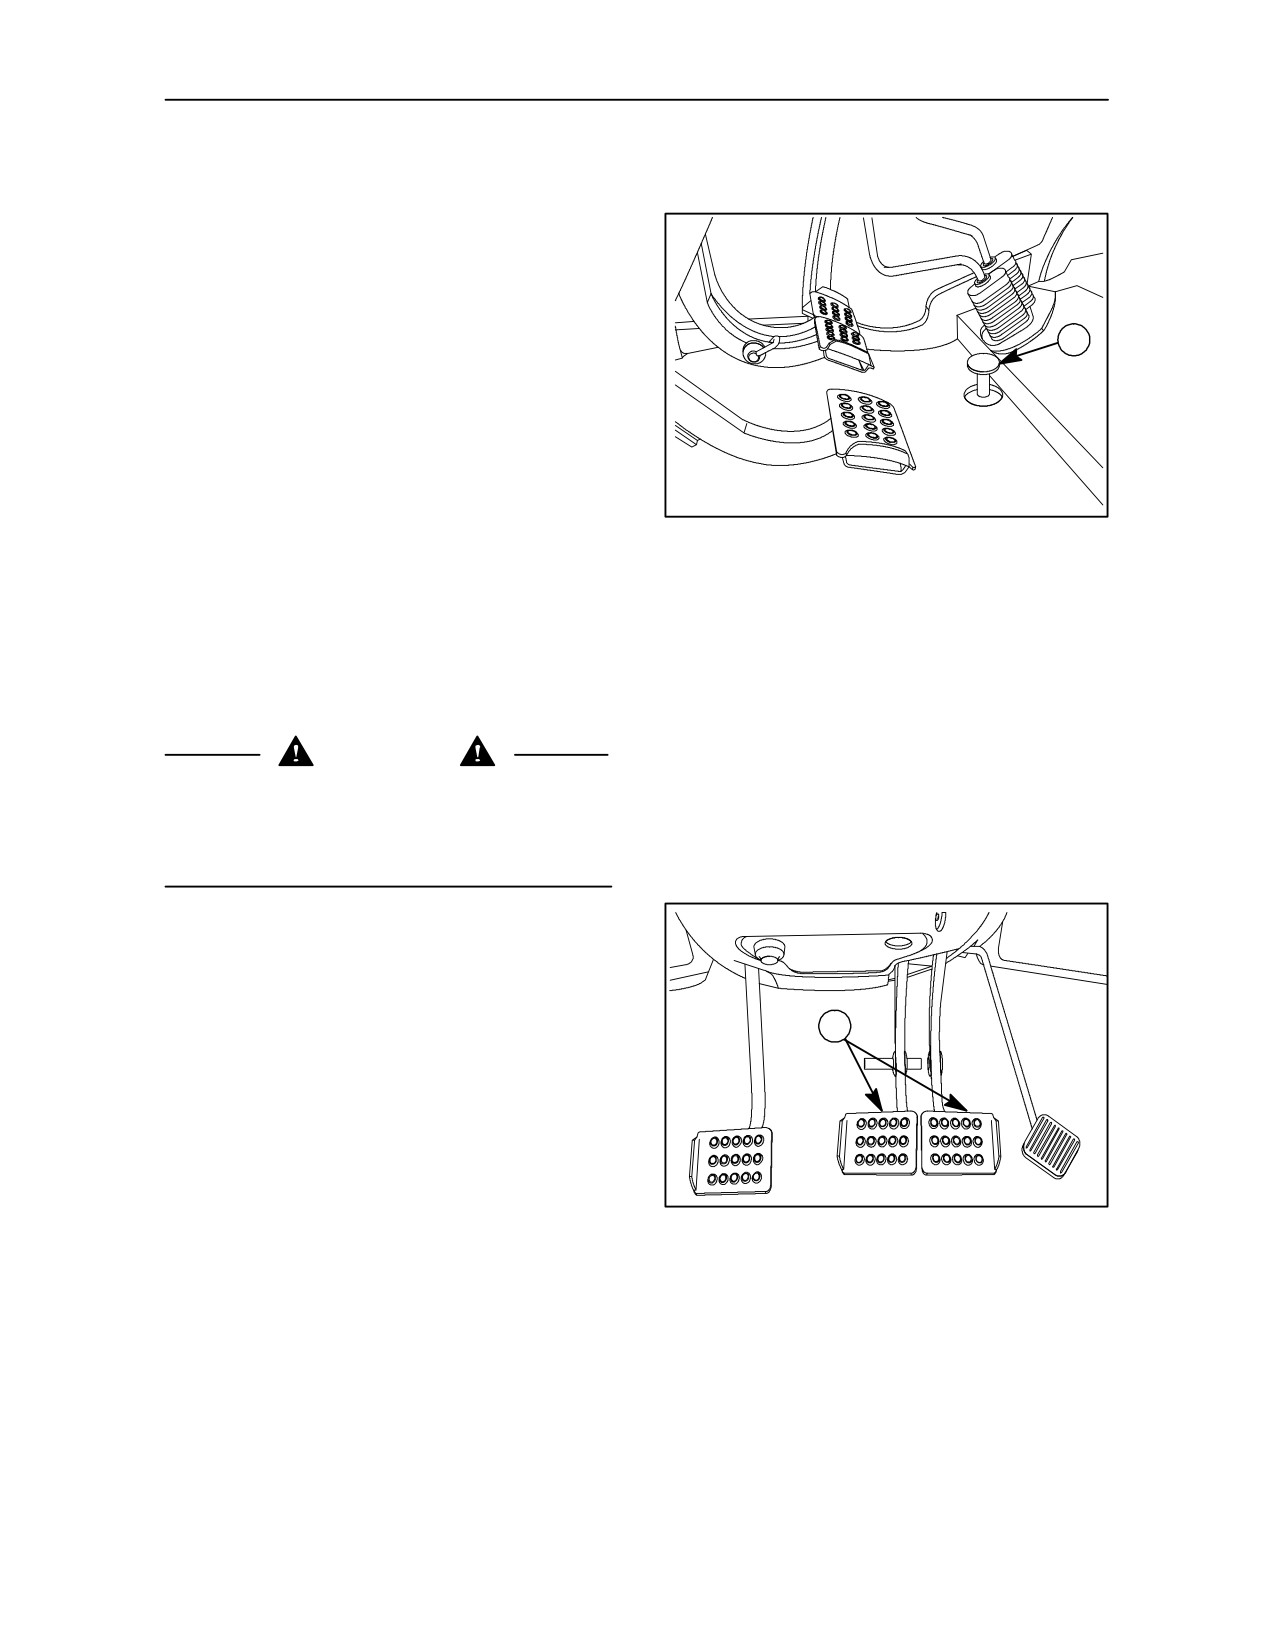
MECHANICALLY CONTROLLED DIFFERENTIAL LOCK
DIFFERENTIAL LOCK CONTROL -- fig. 70
The differential allows the drive wheels to rotate at
different speeds when the tractor is turning.
1
The differential has a locking device, controlled by a
foot pedal (1) fig. 72. It is advisable to lock the
differential in the following situations:
--
in ploughed fields, to prevent the wheel which is
out of the furrow from slipping.
--
if one of the drive wheels is on uneven, muddy or
slippy ground, and tends to skid.
72
To lock the differential, reduce tractor speed and
press pedal (1) fig. 72. The differential will remain
locked.
Press one of the brake pedals (1) to release the lock
fig.
73.
CAUTION
Do not keep the differential locked unnecessarily as
this wastes power and can cause damaging stresses
in the transmission system, tyre wear and steering
problems.
1
73
2--40
SECTION 2 -- CONTROLS, INSTRUMENTS AND OPERATION
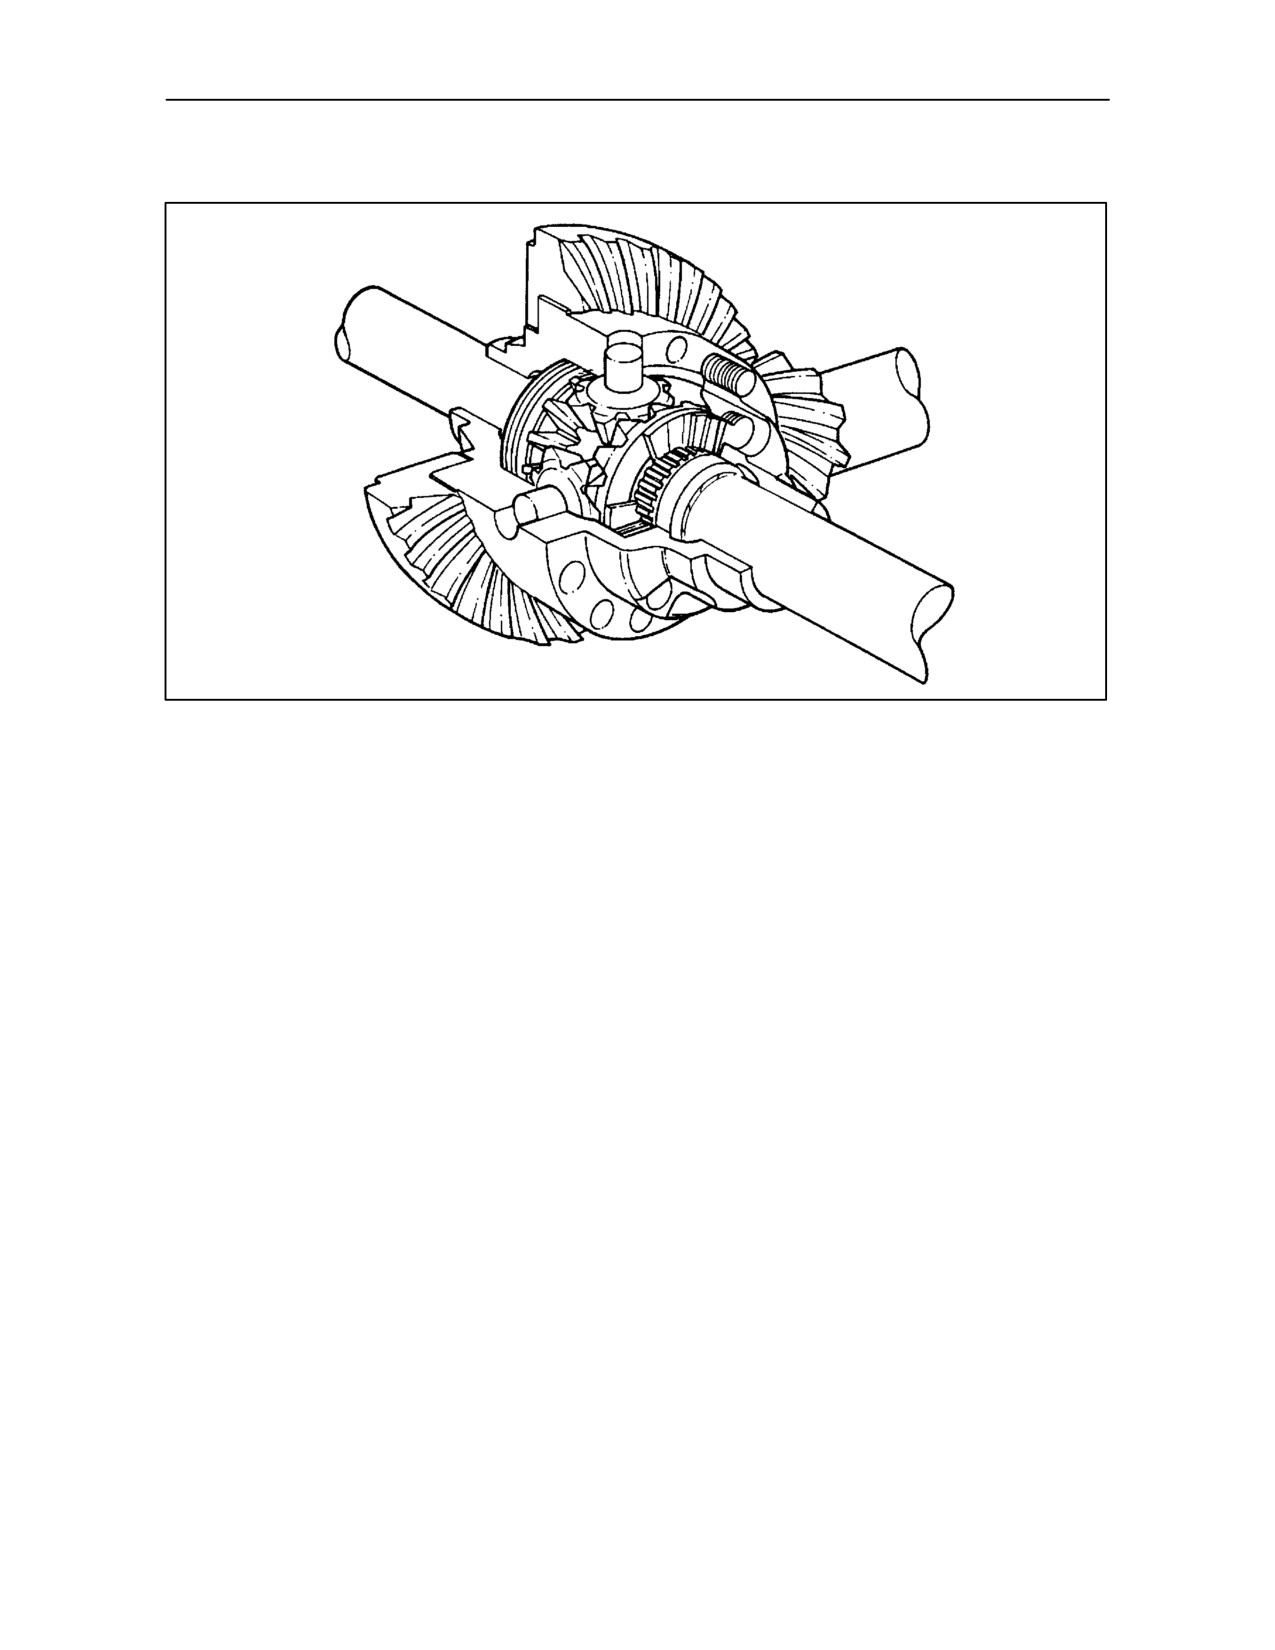
LIM--SLIP DIFFERENTIAL LOCK (OPTIONAL)
TRE0071A
74
The limited slip differential lock (LIM--SLIP) is a two
to slip as a result of grip loss, is obstructed by the
planetery pinion type, complete with two multi--disc
clutch blocks that are compressed by axial thrust
clutch blocks fitted between the planetery pinions
from the torque transmitted to the planetary pinions
and the differential box.
by the bevel gear pairs, by means of the teeth on the
two planetary pinions.
This differential lock device is totally automatic,
requires no manual operation and notably reduces
The torque may differ according to the condition of te
(without completely eliminating) wheel slipping that
ground, thereby proportionally varying the axial
may result fom tractor grip loss.
thrust on the clutch blocks, consolidating the
planetary pinions with the differential box which
The difference in revolutions between the planetary
results in the axle being able to successfully
pinions and the differential box, when a wheel begins
overcome the difficult ground conditions.
2--41
SECTION 2 -- CONTROLS, INSTRUMENTS AND OPERATION
TOWING THE TRACTOR
TOWING THE TRACTOR
To avoid damaging the transmission or other
components that turn but are not lubricated during
towing, observe the following:
NOTE: The tractor must only be towed for short
distances, for example from inside a building to the
outside. It must never be towed for long distances on
1. Only tow for short distances.
the road in heavy traffic.
2. Keep the speed below 8 km/h (5 mph).
NOTE: For transport purposes, haul the tractor with
3. If possible, run the engine to provide lubrication
all four wheels on a flat bed trailer or truck.
and power steering.
WARNING
Never use ropes or cables to tow the tractor. If a
cable or rope breaks or slips, it may cause serious
injury.
Use a strong chain when towing the tractor. Tow the
When using a chain, connect the hook with the open
tractor from the rear using only the drawbar, rear tow
end upwards so that in the event of the hook slipping,
hitch or the three--point hitch.
it will drop down instead of flying up.
Tow the tractor from the front using the tow pin on the
front support.
Have an operator to steer and brake the tractor.
CAUTION
Do not tow the tractor faster than 8 km/h (5 mph).
Steering is much slower and steering wheel effort is
much greater without the engine running.
LOADING THE TRACTOR ONTO A TRANSPORTER
TRANSPORTING THE TRACTOR
WARNING
Do not hook or connect chains around the front axle
Load the tractor complete with all four wheels onto
transmission shaft, the power steering cylinders, the
the vehicle or trailer platform.
front axle itself or other parts of the tractor which
could be damaged either by the chains or excessive
strain.
Secure the tractor on the transporter with suitable
chains.
WARNING
Use the towing hook fitted on the front of the tractor
On models TD 70D, TD 90 D and TD 95D cover the
for this purpose.
silencer outlet to prevent the turbocharger from
turning in the wind and damaging the bearings.
Use the towbar or its supports for the rear hitch point
The turbocharger turbine must be prevented from
on the tractor.
rotating freely with the engine off, as the shaft
bearings will not be lubricated.
2--42
SECTION 2 -- CONTROLS, INSTRUMENTS AND OPERATION
CHECKS BEFORE USING THE TRACTOR
Before using the tractor, check that you are familiar
3. Signs of leaks or damaged components
with the position and function of all the tractor
connected to pressure tubes, sleeves and
controls.
connectors.
4. Damaged tyres.
Ensure that the maintenance and lubrication
operations described in Section 3 of this Manual are
5. Loose fasteners.
fully carried out.
6. Accumulation of dirt on, or leaks from, the
After daily maintenance, carry out a visual inspection
hydraulic pump and connected parts.
of the outside of the tractor, paying particular
attention to the following points :
Always carry out any necessary repairs before using
the tractor again.
1. Signs of cracking on the fan belt.
2. Accumulation of dirt around the engine.
2--43
SECTION 3
FIELD OPERATION
BEFORE USING THE TRACTOR
Read this section of the Operator’s Manual carefully
If you have any doubts about any functional aspect
before using the tractor. This is particularly important
of the tractor, contact your dealer.
if the tractor is to be used correctly as it contains all
the information required on the layout and use of the
tractor controls.
Particular attention needs to be paid to the tractor’s
running--in period, to obtain the best operating
reliability and service life for which it is designed and
Even if you already have experience in using other
built.
makes of tractor, this section of the Manual
especially must be studied carefully and thoroughly.
With regard to the reliability and service life of your
tractor, study section 4 carefully.
After reading this section in full, ensure that you are
fully familiar with the layout and use of the controls.
Ensure too that you know the specifications of the
tractors in question.
Section 4 contains details of all the lubrication and
general maintenance operations to be carried out on
the tractor.
Never start the engine and tractor if you have not
already familiarised yourself with all the controls.
Tractor data and specifications are noted in Section 8.
Finding out once the tractor is moving may be too
late.
3--1
SECTION 3 -- FIELD OPERATIONS
OPERATION
CAUTION
STARTING THE ENGINE
Before starting the engine and moving the tractor,
a. If the tractor has not been used for some time, or
follow the instructions written below.
if started up for the first time at a low surrounding
temperature, actuate the fuel pump starting lever
around twenty times.
• Do not start or operate the tractor in an enclosed
area.
b. Ensure that both gear levers are in neutral
position.
• Before starting the engine, check that all controls
are in neutral.
c. Move the throttle lever to around the half way
position.
• All controls must be actuated only from the
driver’s seat.
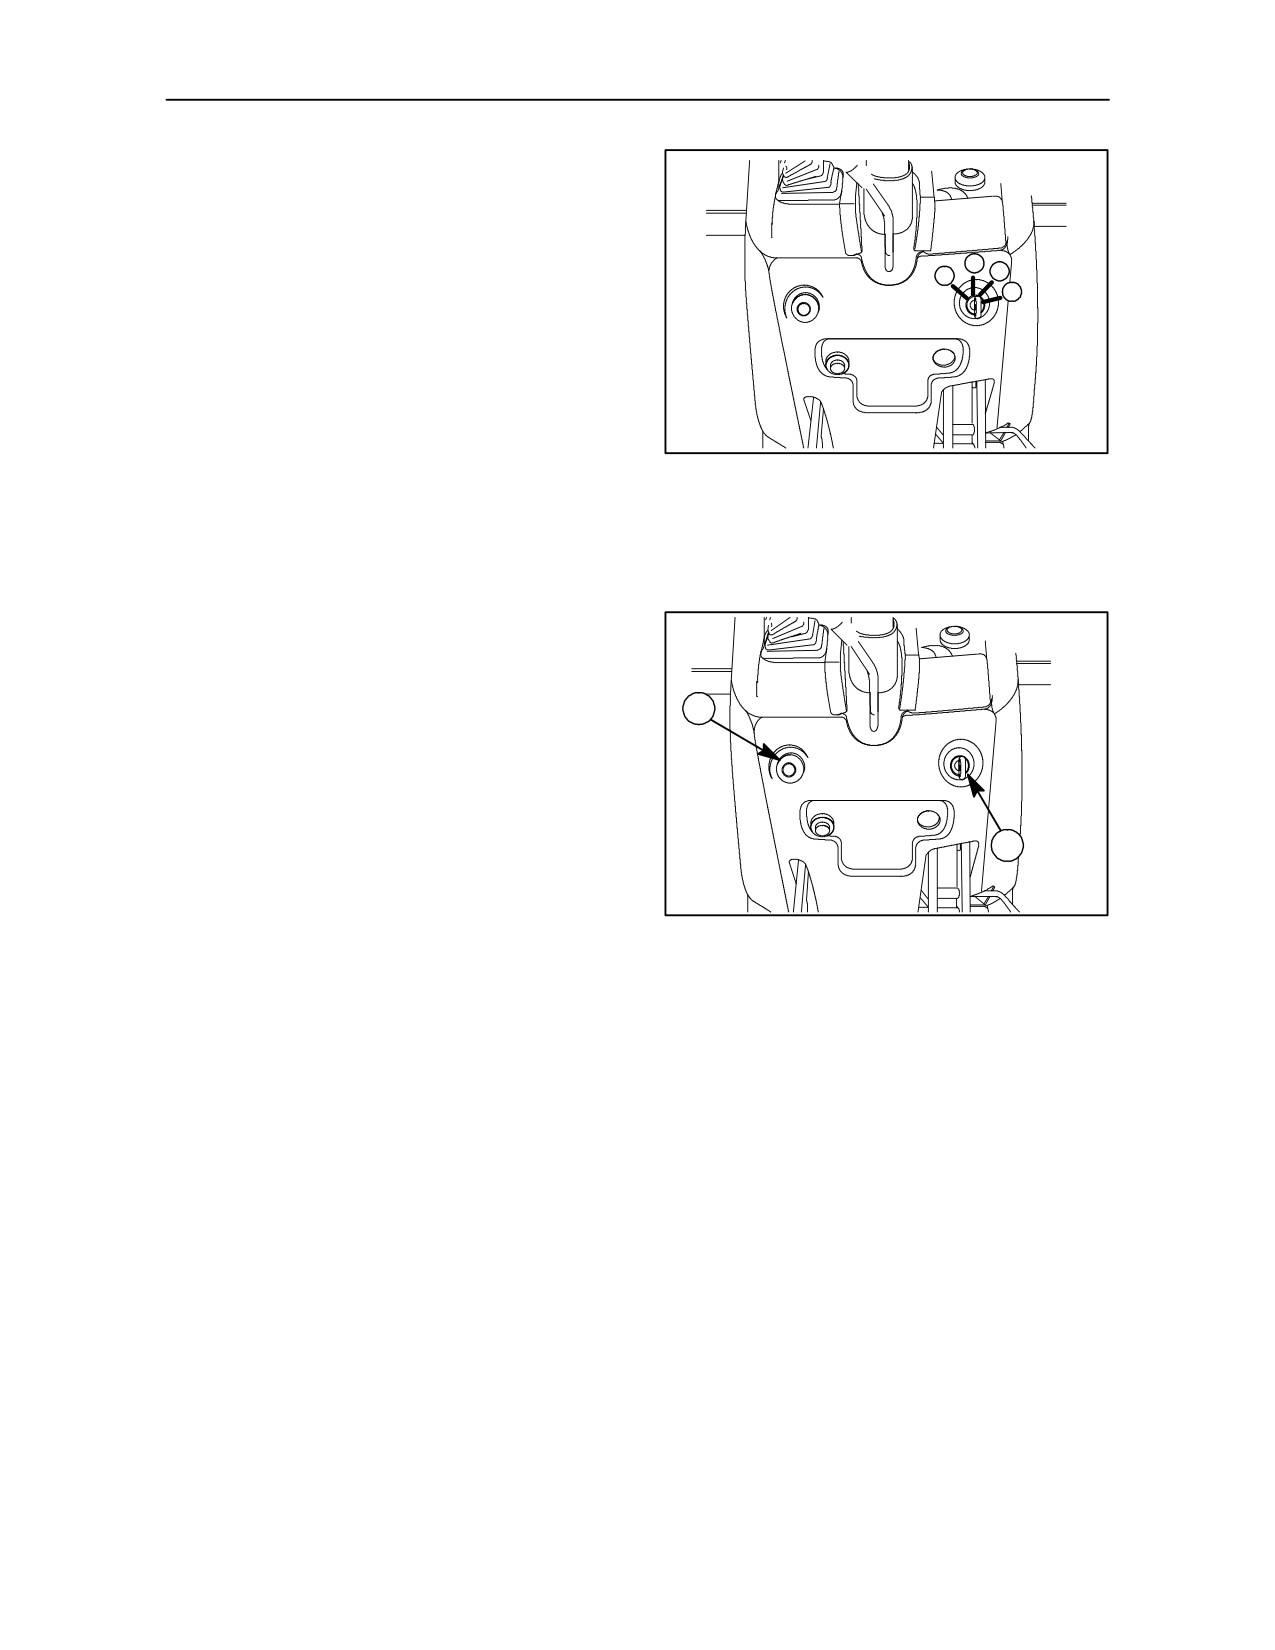
d. Turn the ignition key to position C, fig. 1. Release
the key as soon as the engine starts.
• Stop the engine before carrying out any service
or maintenance operations on the tractor.
• Use the steps provided for entering and leaving
the tractor.
• Keep the guards properly fitted.
• When moving on the roads, signal your intention
to stop, turn or slow down.
• Use the appropriate warning devices to indicate
a slow--moving vehicle.
HOW TO START AND STOP
STARTING IN A LOW EXTERNAL
— Any single engine starting attempt should not last
TEMPERATURE
longer than 15 seconds. If, however, the engine fires
but does not start, repeat up to a maximum time of
30 seconds.
WARNING
When the external temperature is low and the engine
— Wait at least one minute between attempts to start
is cold, cover the radiator before starting so that the
the engine.
engine coolant can quickly reach operating
temperature.
— It is advisable not to make more than six attempts
Then remove the cover. Note the following warnings:
to start the engine to avoid excessive battery
run--down.
3--2
SECTION 3 -- FIELD OPERATIONS
STARTING WITH THERMOSTART
Start as follows:
--
carry out the operations a, b, c as previously
A
P
B
described.
C
--
turn the ignition key to position B (1) fig. 1.
--
activate the thermostart by pressing switch (2)
fig. 2 and keep it pressed for 25 seconds.
--
move the ignition key to position
(C) while
1
continuing to hold down switch (2) fig. 2 until the
engine starts.
--
when the engine starts, release both the key and
the thermostart switch. If, after two or three
attempts, the engine has not started and you
notice black smoke coming from the exhaust,
start the engine without using the thermostart.
2
1
2
3--3

SECTION 3 -- FIELD OPERATIONS
CAUTION
--
Accelerate the engine as necessary.
When starting the engine after the tractor has been
--
Release the handbrake lever and engage the
out of use for some time, avoid using the hydraulic
clutch, releasing the pedal slowly.
system immediately, as all the moving parts need to
be lubricated properly before they are subjected to
full load, especially when the external temperature
WARNING
approaches 0°C. Run the engine at 1300 --1500
To extend the service life of the tyres and the
speed for around 5 minutes to bring the oil in the rear
transmission components, it is advisable not to use
transmission up to working temperature.
the tractor continuously at full power when working
at speeds of less than 7 km/h (4.35 mph), particularly
when the tractor is excessively ballasted.
It is not advisable to ballast the tractor too heavily
CAUTION
when towing heavy loads and travelling at low
Before accelerating or starting TD 70D, TD 90D and
speeds. Follow the instructions given in this chapter
TD 95D turbocharged tractor models, let the engine
on ballast and hitch components.
idle at 1000 speed for 30 seconds to ensure that the
turbocharger is fully lubricated.
CAUTION
STOPPING THE TRACTOR
If one of the warning lights illuminates to signal a
fault, stop the engine and investigate the problem.
--
Reduce engine speed.
If the warning light continues to signal a fault, have
the machine checked by your authorised dealer.
--
Depress the transmission clutch pedal and
brake.
CAUTION
With the tractor stationary, move the main shift and
range gear levers to neutral, release the clutch pedal
To prevent separation of the paraffin components in
and engage the handbrake.
the diesel fuel, when the external temperature falls
below freezing -- leading to a reduction in fluidity and
consequent fuel supply problems (especially when
starting the engine), use only Winter grade diesel
or mix the diesel with a proprietary cold weather
STOPPING THE ENGINE
additive in the proportions stated on the container.
Winter additive must be mixed with the diesel fuel
CAUTION
before there is any sign of paraffin separation; adding
it later will have no effect on an engine if the cold has
On models TD 70D, TD 90D and TD 95D, before
already caused the engine to stop running or prevent
stopping the engine, let it idle at 1000 speed for at
it being started.
least three minutes.
Put the additive in the tank first, followed by the diesel
fuel.
The additive will ensure that there is an optimum fuel
--
Turn the ignition key to the STOP position (A)
supply to the engine without reducing performance,
fig. 1.
even when the external temperature drops below
--20_C.
STARTING THE TRACTOR
--
Press the clutch pedal and move the main gear
lever and creeper lever to the desired settings
(see pages 2--31, 2--33 and 2--36).
3--4
SECTION 3 -- FIELD OPERATIONS
POWER TAKE--OFF
GENERAL INSTRUCTIONS
2
1
The power take--off fitted on your tractor is used to
transfer power from the engine directly to the
implement. It can be controlled directly from the
engine, or by the tractor’s transmission drive gears.
All tractors are fitted as standard with a power
take--off at 540 rev/min.
TRE0016A
The power take--off comes in 3 versions :
3
--
standard single--speed -- 540 rev/min;
--
optional two--speed -- 540/750 (540E) rev/min;
--
optional two speed -- 540/1000 rev/min.
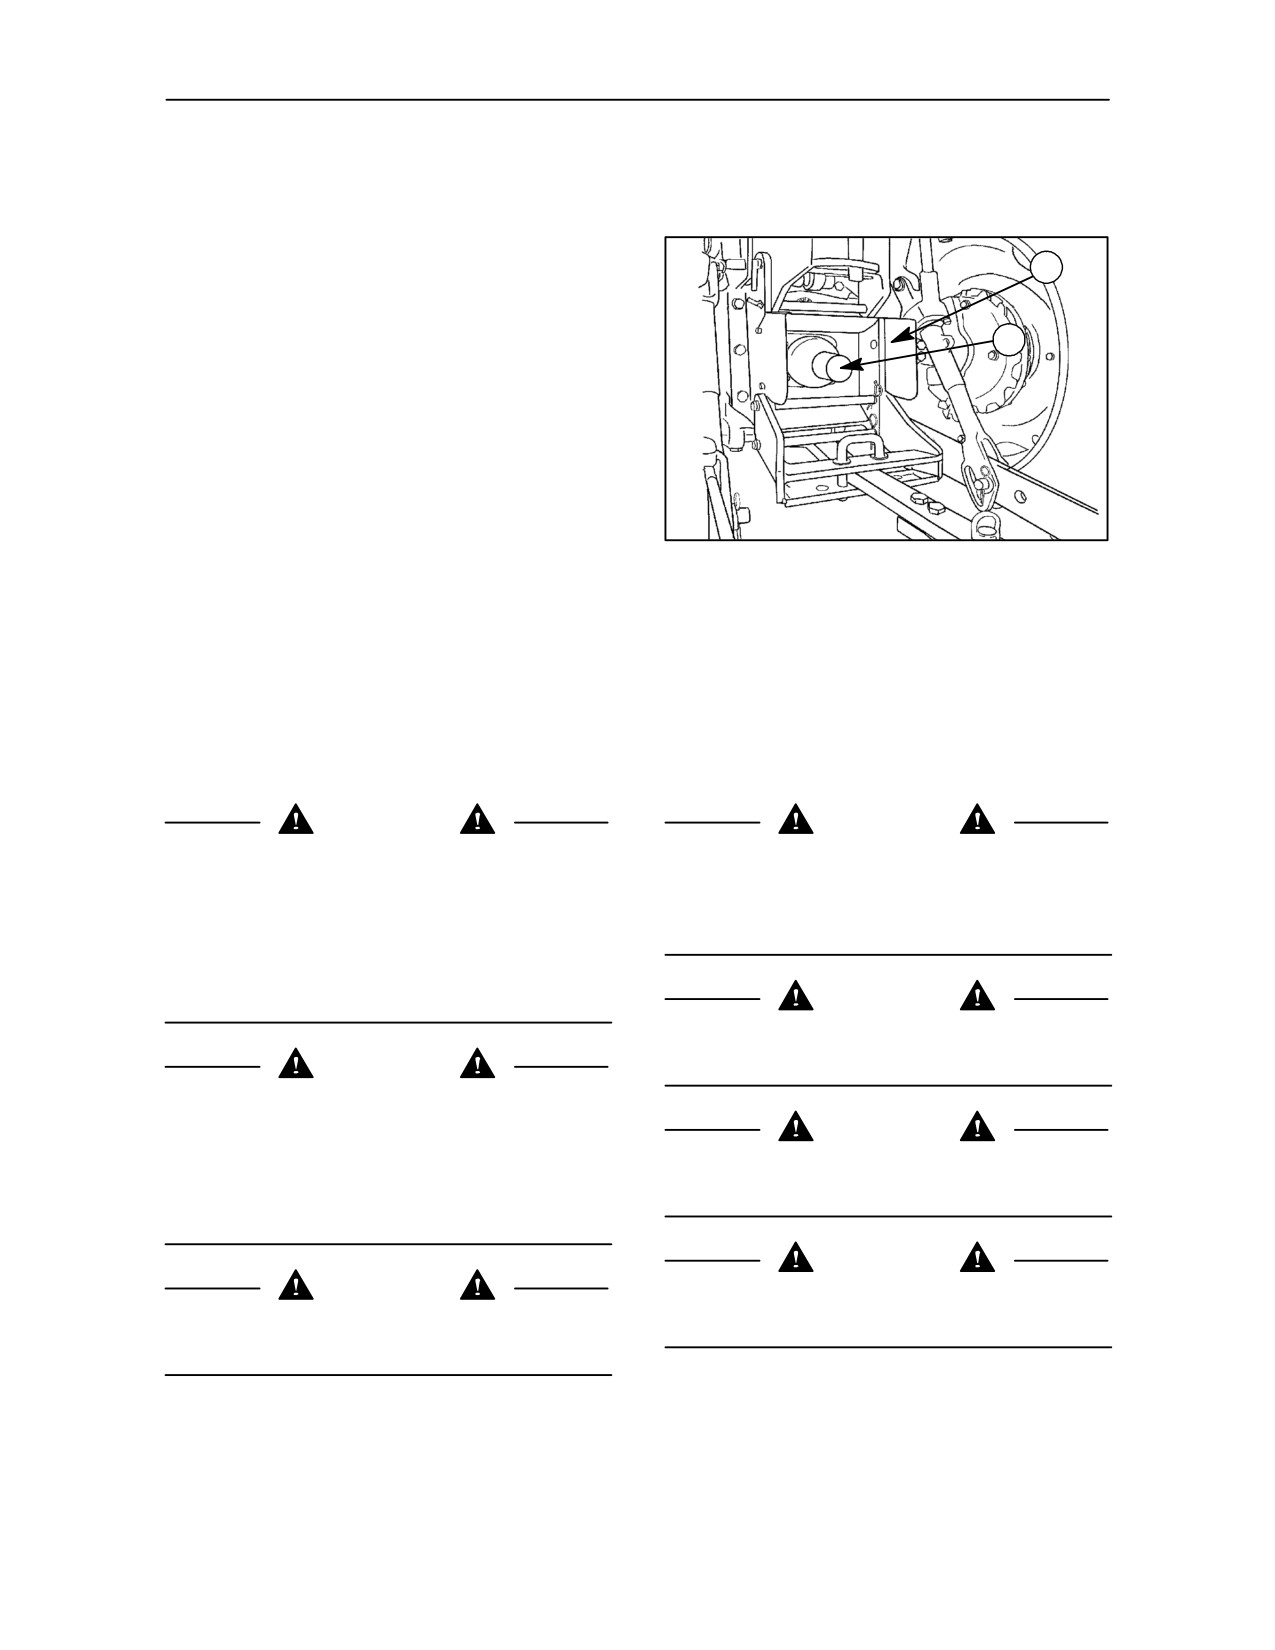
When not using the power take--off, always keep
safety cover (1) fig.
3 fitted over the splined output
shaft.
CAUTION
CAUTION
When the power take--off is not being used or when,
Before operating any implement driven by the power
with an implement connected to the power take--off
take--off, check that the safety clutch (if fitted) on the
shaft, it has been switched off by means of the
machine transmission shaft is working properly, i.e.:
selection lever, ensure that the control lever or the
it slips if overloaded.
control knob are disengaged. When the power
take--off is not connected to an implement, keep the
control handle in the disengaged position.
CAUTION
Never operate any implement connected to the
power take--off at a higher speed than that specified.
CAUTION
When you are not using the power take--off and
particularly when changing from one speed to
DANGER
another, always check that the shaft fitted on the
tractor is the right one for the speed selected.
Always check that the plastic guards on the drive
When using any implement requiring a speed of 540
shaft are in perfect condition.
rev/min, never select 1000 rev/min, and vice versa.
DANGER
DANGER
Always shut off the engine when working on an
Never stand on the guard (2) fig. 3 when the power
implement connected to the power take--off.
take--off is operating.
3--5
SECTION 3 -- FIELD OPERATIONS
POWER TAKE--OFF OPERATION
INDEPENDENT POWER TAKE--OFF --
Figs. 4 and 5
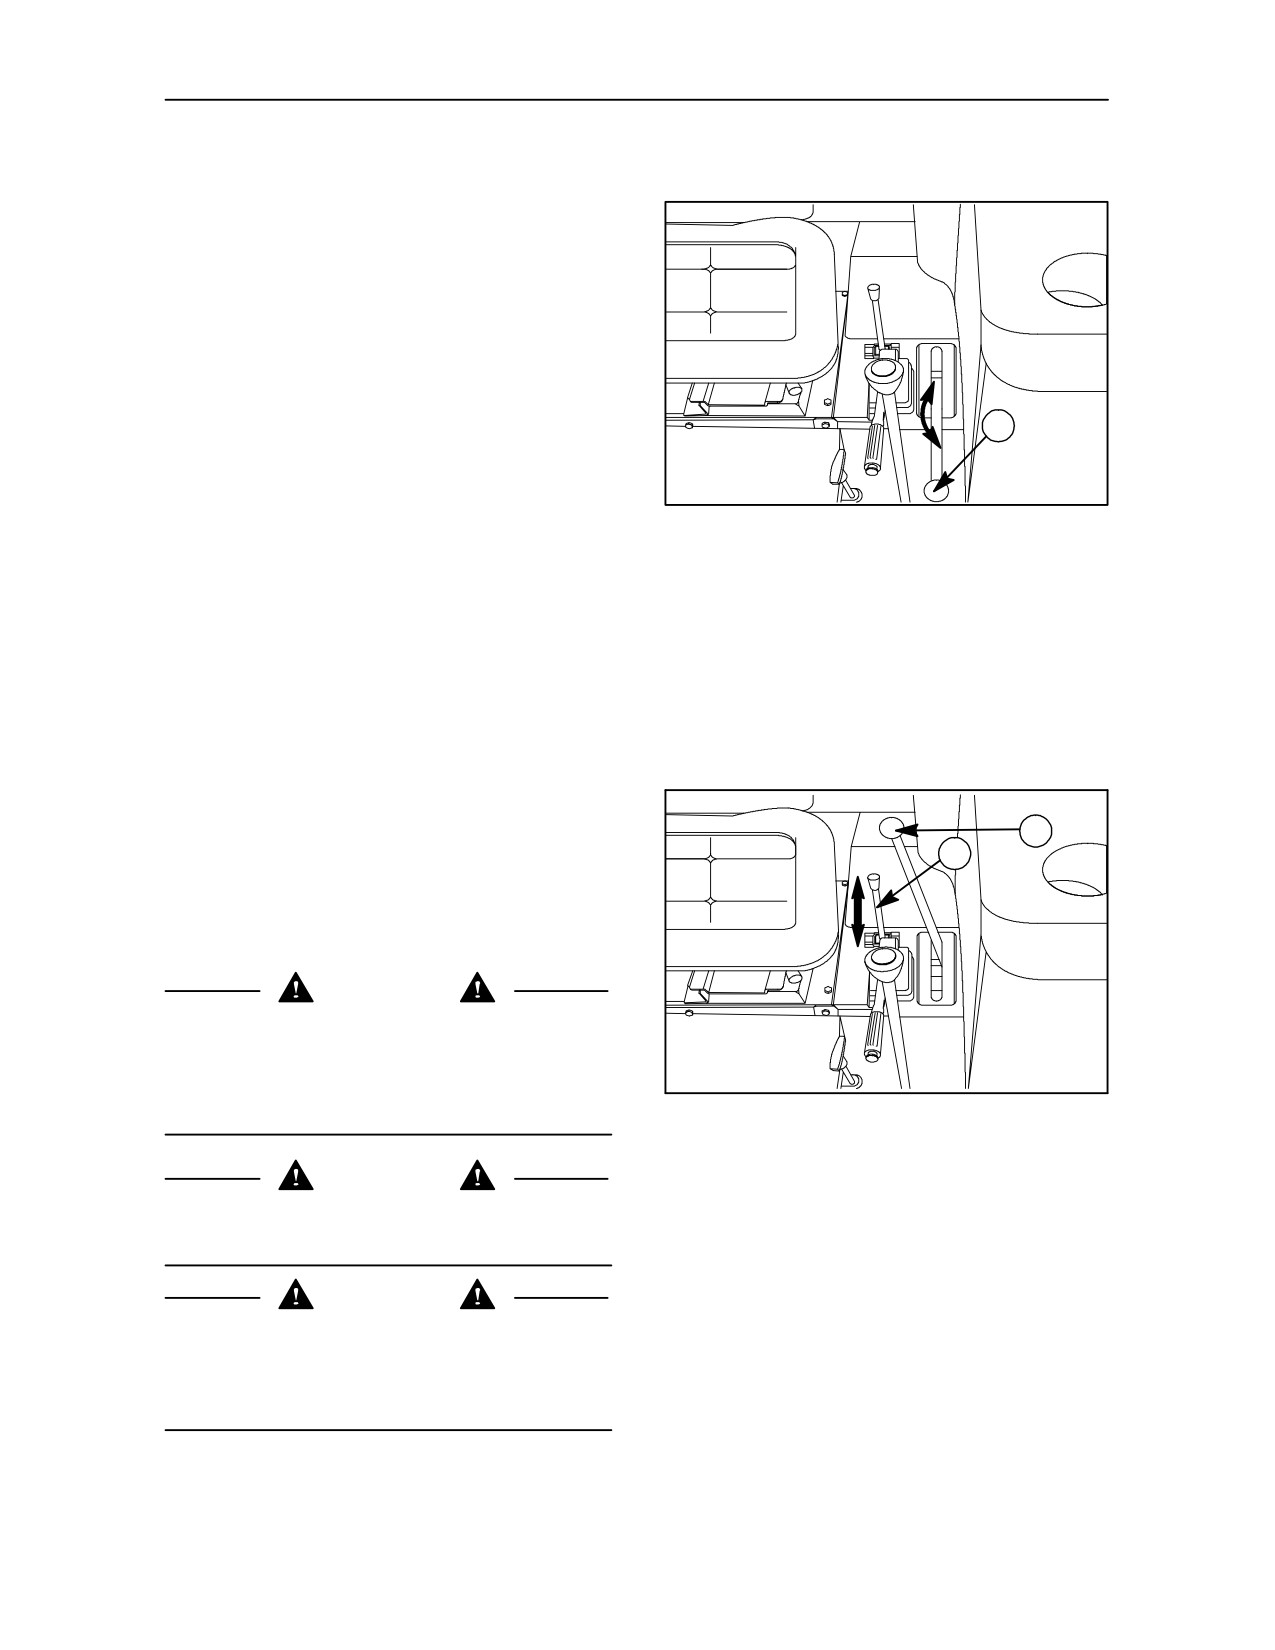
To operate the power take--off, proceed as follows:
--
disengage the power take--off clutch by moving
the lever (1) fig.
4 to the DOWN position;
--
move operation selector lever (1) fig. 5 rearward
1
to position B;
--
engage the clutch slowly by moving lever (2)
fig. 5 to the UP position so as to start the splined
4
output shaft turning.
In this case, operation is totally independent of the
tractor ground speed, and you can therefore:
--
stop the tractor without stopping the power
take--off;
--
stop the power take--off without stopping the
tractor
(by disengaging the power take--off
clutch).
2
The shaft rotates clockwise, as seen from the rear of
1
B
the tractor.
To disengage the power take--off, move the clutch
control lever (1) fig. 4 to the DOWN position.
A
WARNING
When the power take--off is not in use, with an
implement connected, the selector lever (1) fig. 5
should be in NEUTRAL position and the clutch
control lever (1) fig. 4 should be in the disengaged
position (DOWN).
5
DANGER
Always check that the plastic guards on the drive
shaft are in perfect condition.
IMPORTANT
To prolong release bearing life RAISE the PTO clutch
control lever (1), fig.
4, and move the selection lever
(1) fig.
5 to the NEUTRAL position when the PTO
will not be used for long periods of time .
3--6
SECTION 3 -- FIELD OPERATIONS
SINGLE LEVER POWER TAKE--OFF --
(OPTIONAL) (NOT AVAILABLE FOR ALL
MARKETS) Figs. 6 and 7
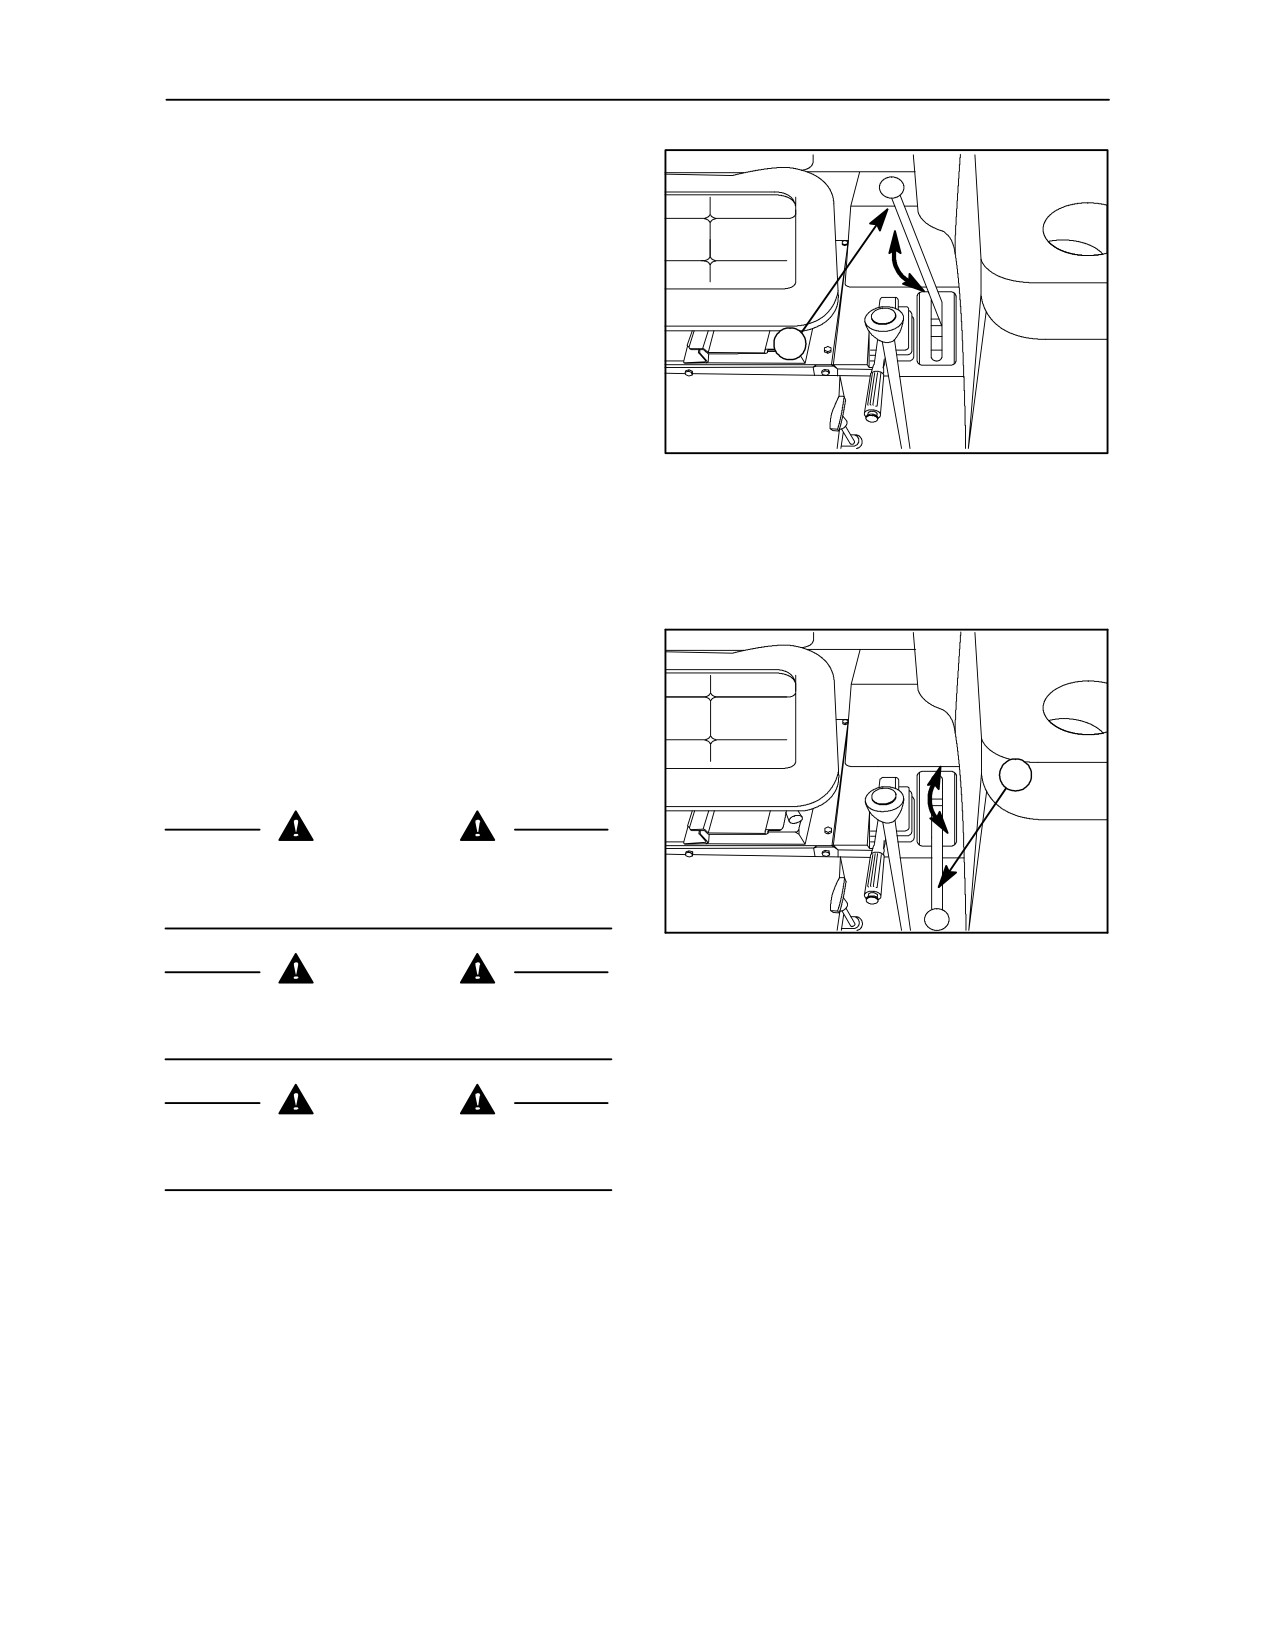
To operate the power take--off, proceed as follows:
--
disengage the power take--off clutch by moving
the lever (1) fig.
6 to the UP position;
1
--
engage the clutch slowly by moving lever (1)
fig. 7 to DOWN position so as to start the splined
output shaft turning.
In this case, operation is totally independent of the
tractor ground speed, and you can therefore:
6
--
stop the tractor without stopping the power
take--off;
--
stop the power take--off without stopping the
tractor
(by disengaging the power take--off
clutch).
The shaft rotates clockwise, as seen from the rear of
the tractor.
To disengage the power take--off, move the clutch
1
control lever (1) fig. 6 to the UP position.
WARNING
When the power take--off is not in use, the clutch
control lever (1) fig. 6 should be in the disengaged
position (UP).
7
DANGER
Always check that the plastic guards on the drive
shaft are in perfect condition.
IMPORTANT
To prolong bearing life RAISE the PTO clutch control
lever (1), fig.
6, when the PTO will not be used.
3--7
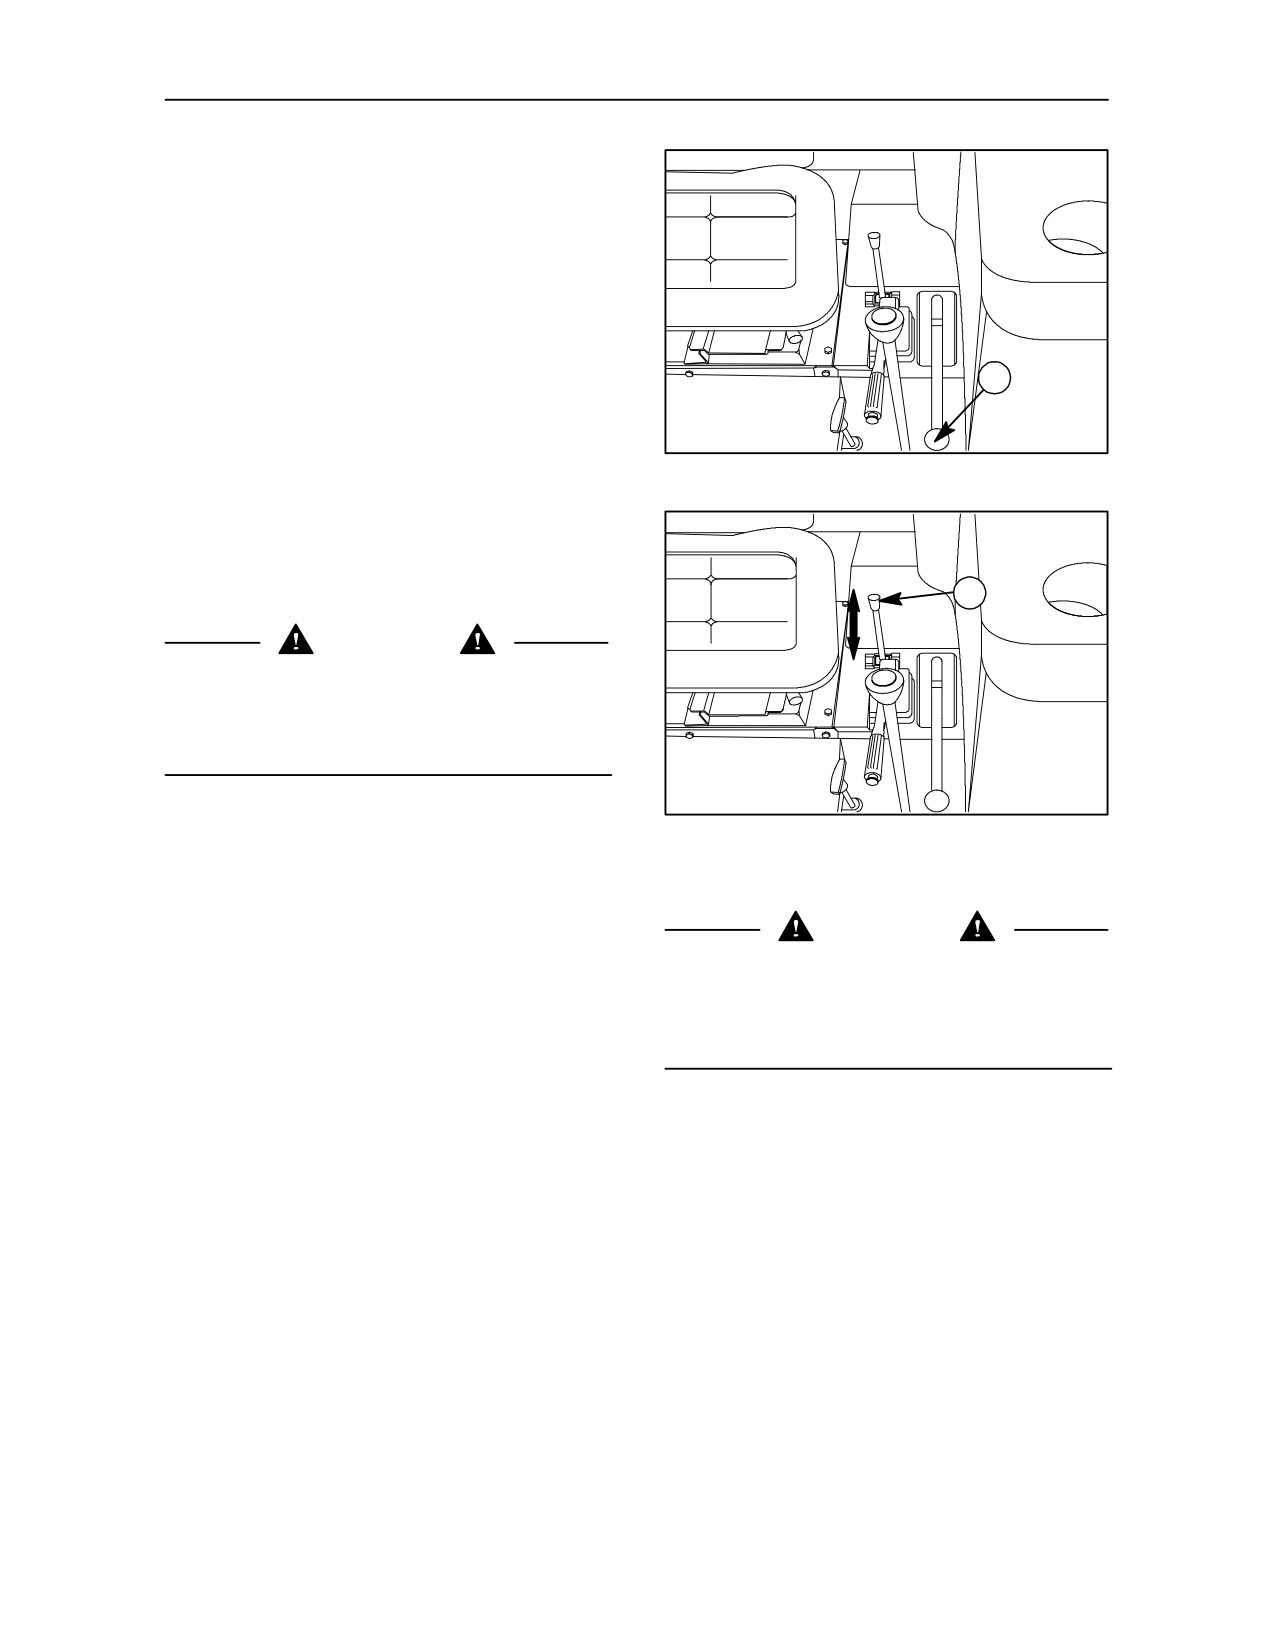
SECTION 3 -- FIELD OPERATIONS
GROUND SPEED POWER TAKE--OFF
(OPTIONAL) -- FIGS. 8 AND 9
Proceed as follows to operate the power take--off:
--
move the clutch control lever (1) fig. 8 to the
DOWN position;
--
fully depress the clutch pedal;
1
--
after a few seconds, move the selector lever (1)
fig. 9 forward to position A and release the clutch
pedal.
8
In this case, the power take--off receives power
directly from the transmission. When the tractor is
stationary, ground speed power take--off does not
turn. Reverse the direction of rotation of the output
B
1
shaft by moving from forward gear to reverse.
CAUTION
A
Do not engage the ground speed power take--off
when the tractor is moving.
When using a trailer with a drive axle, it is advised to
select the 1000 rev/min power take--off.
In any gear, the number of revolutions of the splined
9
output shaft for one revolution of the rear wheels
is as follows:
540 rev/min power take--off:
WARNING
When the power take--off is not in
use,
with
an
--
TD 60D and TD 70D models
implement connected, the selector lever (1) fig. 9
30 km/h (19 mph)
8.2
should be
in NEUTRAL position and the clutch
control lever (1) fig. 8 should be in the disengaged
4WD 40 km/h (25 mph)
6.73
position (DOWN).
--
TD 80D, TD 90D and TD 95D models
30 km/h (19 mph)
8.9
4WD 40 km/h (25 mph)
7.25
750
(540E) rev/min power take--off:
1000 rev/min power take--off:
--
TD 60D and TD 70D models
--
TD 60D and TD 70D models
30 km/h (19 mph)
10.51
30 km/h (19 mph)
14.1
4WD 40 km/h (25 mph)
8.59
4WD 40 km/h (25 mph)
11.51
--
TD 80D, TD 90D and TD 95D models
--
TD 80D, TD 90D and TD 95D models
30 km/h (19 mph)
11.4
30 km/h (19 mph)
15.3
4WD 40 km/h (25 mph)
9.36
4WD 40 km/h (25 mph)
12.4
3--8
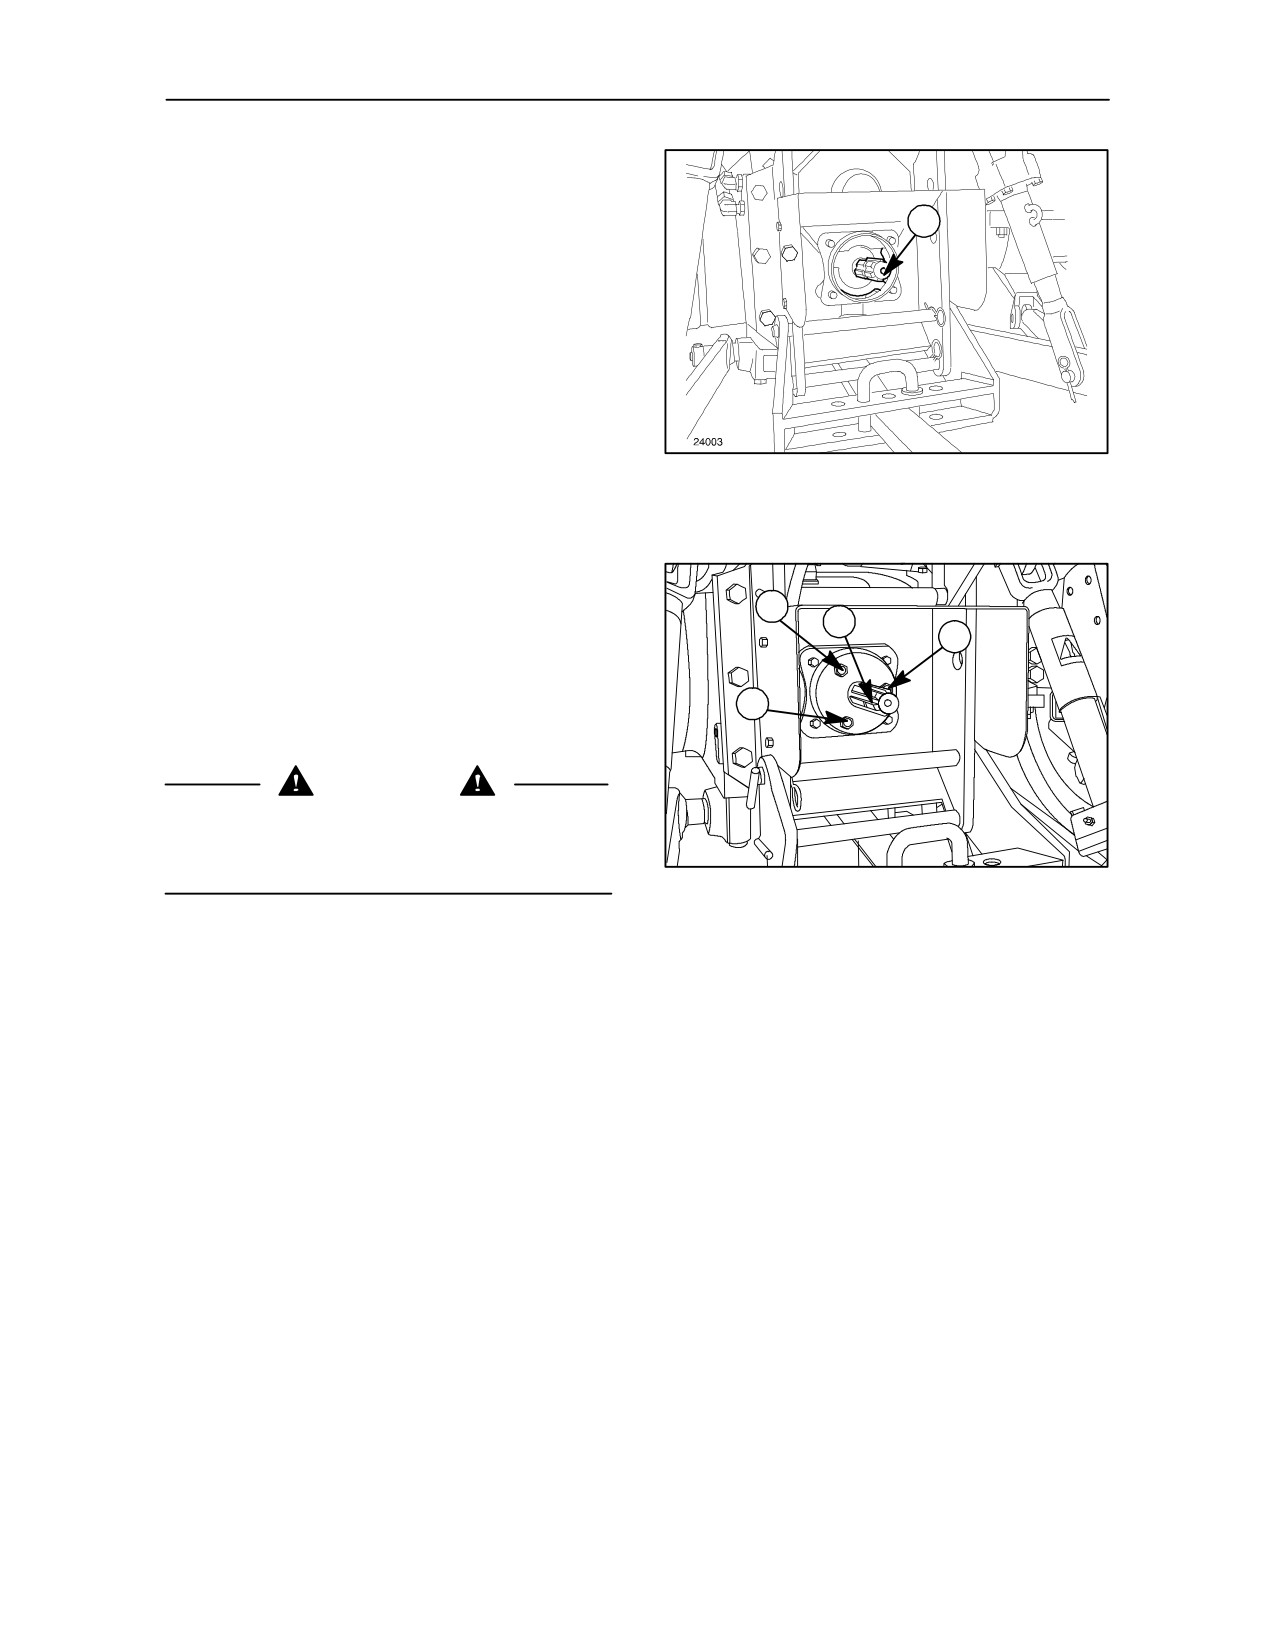
SECTION 3 -- FIELD OPERATIONS
POWER TAKE--OFF SPEED
540 rev/min power take--off
1
The 540 rev/min power take--off is equipped with a
six--splined 13/8 in. output shaft (1) fig. 10 (standard).
540/750 rev/min power take--off
This version is available as an option.
The six--splined output shaft (1) fig. 3 is 13/8 in. in
diameter, the same as for
540 rev/min power
take--off.
10
To obtain a speed of 540 or 750 rev/min, use the
speed selector lever (1) fig. 12.
540/750/1000 rev/min power take--off
1
It has two interchangeable output shafts (2) fig. 9:
2
1
one 13/8 in. diameter with six splines for speeds of
540 and 750 rev/min and one 13/8 in. diameter with
twenty--one splines for speeds of 1000 rev/min. To
1
change the output shaft, remove the bolts (1) fig. 11
for power take--off.
CAUTION
Use the power take--off at 1000 rev/min only after
fitting the appropriate 13/8 in. diameter, 21--splined
TRE0809A
output shaft from the accessories kit.
11
Power take--off speeds:
NOTE: With the power take--off speed selector lever
set to 750 rev/min, 540 rev/min can also be obtained
on the output shaft with the engine at 1715 rev/min.
--
540 rev/min with engine at:
2199 rpm
--
614 rev/min with engine at:
2500 rpm
--
750 rev/min with engine at:
2380 rpm
--
787 rev/min with engine at:
2500 rpm
--
540E rev/min with engine at:
1715 rpm
--
1000 rev/min with engine at:
2380 rpm
--
1050 rev/min with engine at:
2500 rpm
3--9
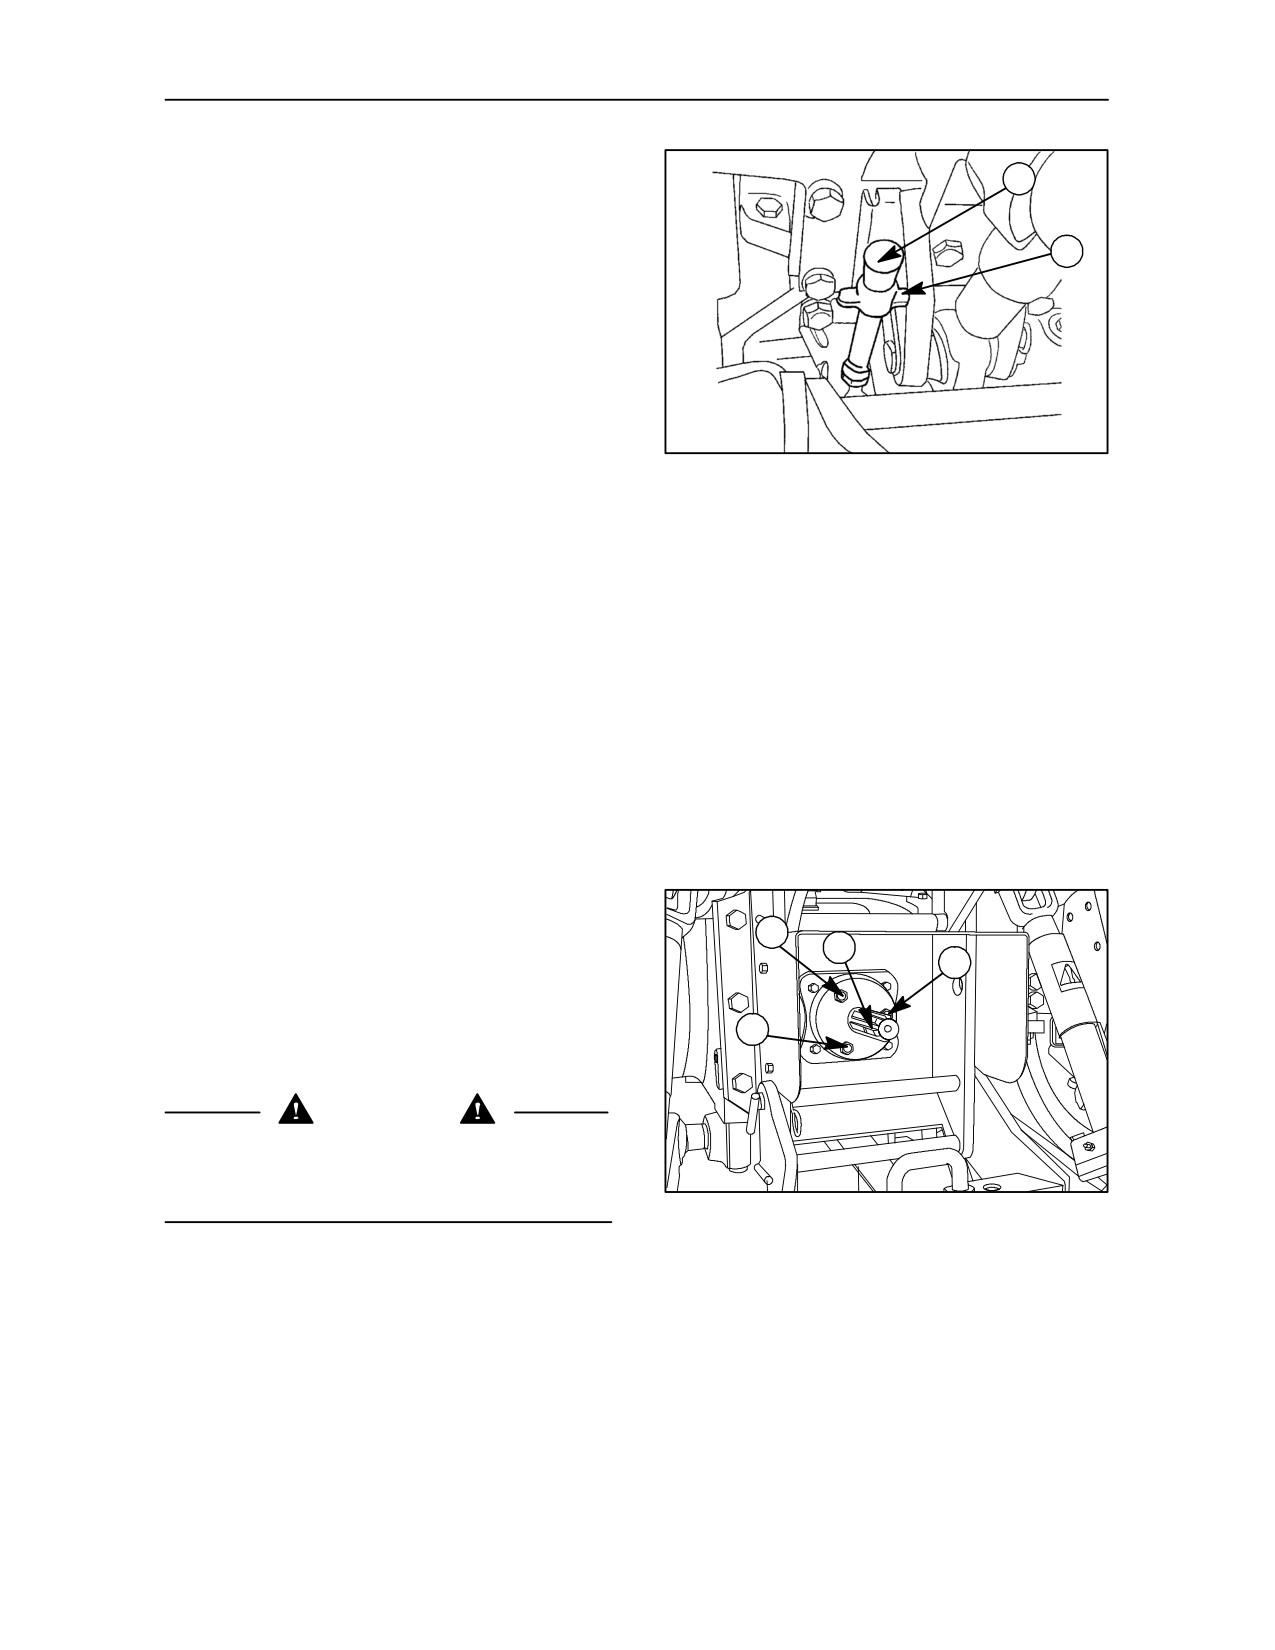
SECTION 3 -- FIELD OPERATIONS
POWER TAKE--OFF SPEED SELECTION
1
To select power take--off speeds, proceed as
described below:
2
--
lift the spring--loaded collar (2) fig. 12 upward;
--
position the lever
(1) fig. 12
to the required
TRE0002C
speed, as indicated by the decal at the base of
12
the lever. Release the spring--loaded collar.
2--SPEED POWER TAKE--OFF
(OPTIONAL)
For 540/1000 rev/min versions an interchangeable
PTO shaft is supplied.
The speed can be selected simply by replacing
splined output shaft (2) fig. 13.
1
To replace splined output shaft fig. 13 remove the
2
1
bolts (1) and fit the 13/8 in. diameter six--splined shaft
for a speed of 540 rev/min, or the 13/8 in. diameter
21--splined shaft for a speed of 1000 rev/min.
1
CAUTION
Use the power take--off at 1000 rev/min only after
fitting the appropriate 13/8 in. 21--splined output shaft
TRE0809A
from the accessories kit.
13
3--10
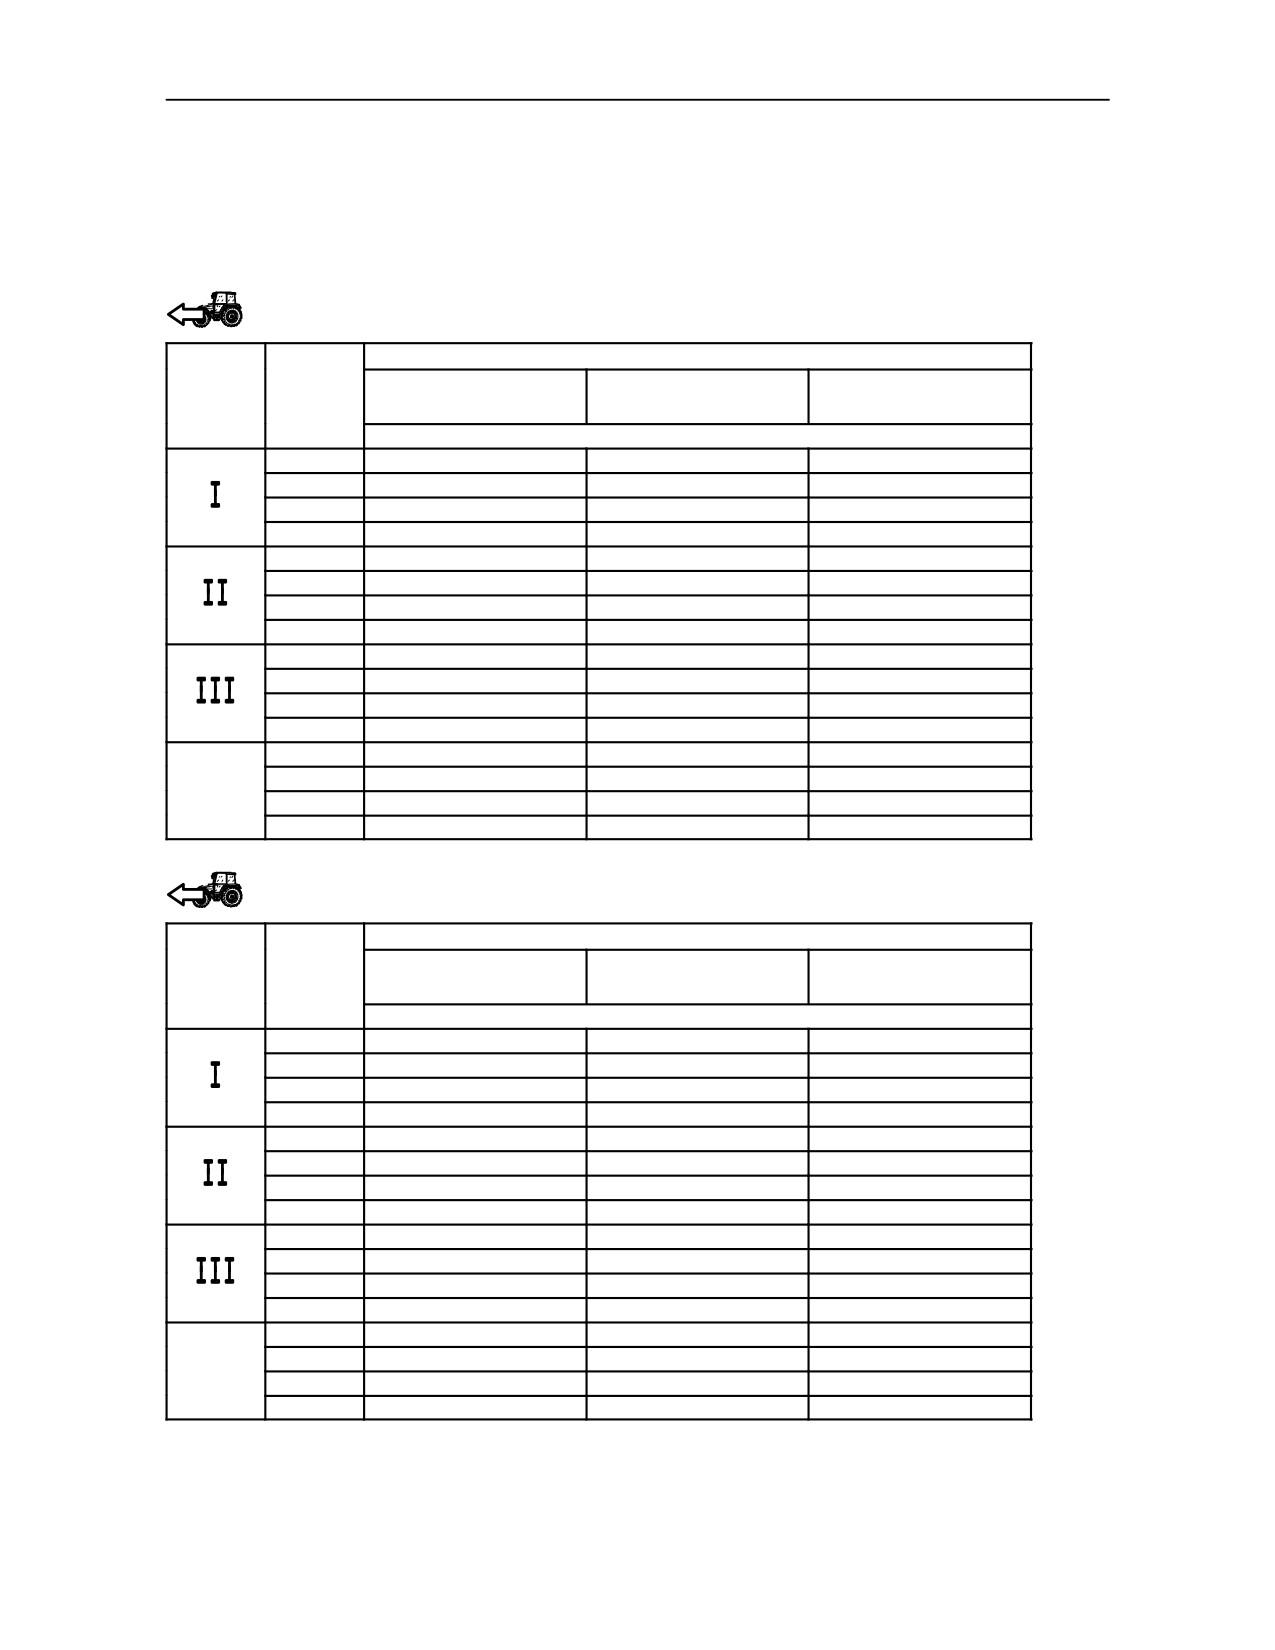
SECTION 3 -- FIELD OPERATIONS
TD 60D, TD 70D and TD 80D MODELS
TRACTOR SPEED IN km/h WITH POWER TAKE--OFF RUNNING AT STANDARD SPEEDS
Transmission and range gear 30 km/h (19 mph) version in forward gear
(12 forward gears + 4 reverse gears)
Power take--off at 540 rev/min, with engine at 2199 rev/min.
REAR TYRES km/h (mph)
TD 60D
TD 70D
TD 80D
RANGE
GEAR
14.9--28
14.9--30
16.9--30
540 rev/min
1
1.4
(0.9)
1.5
(0.9)
1.5
(0.9)
2
2.2
(1.4)
2.3
(1.4)
2.2
(1.4)
3
3.0
(1.9)
3.2
(2.0)
3.0
(1.9)
4
4.3
(2.7)
4.5
(2.8)
4.4
(2.7)
1
3.4
(2.1)
3.5
(2.2)
3.4
(2.1)
2
5.2
(3.2)
5.4
(3.4)
5.2
(3.2)
3
7.1
(4.4)
7.4
(4.6)
7.1
(4.4)
4
10.1
(6.3)
10.5
(6.5)
10.2
(6.3)
1
8.0
(5.0)
8.3
(5.2)
8.0
(5.0)
2
12.3
(7.6)
12.7
(7.9)
12.3
(7.6)
3
16.7
(10.4)
17.3
(10.8)
16.8
(10.4)
4
23.9
(14.9)
24.8
(15.4)
24.0
(14.9)
1
3.7
(2.3)
3.9
(2.4)
3.8
(2.4)
2
5.8
(3.6)
6.0
(3.7)
5.8
(3.6)
R
3
7.8
(4.8)
8.1
(5.0)
7.9
(4.9)
4
11.2
(7.0)
11.7
(7.3)
11.3
(7.0)
Power take--off at 750/1000 rev/min, with engine at 2380 rev/min.
REAR TYRES km/h (mph)
TD 60D
TD 70D
TD 80D
RANGE
GEAR
14.9--28
14.9--30
16.9--30
750/1000 rev/min
1
1.6
(1.0)
1.6
(1.0)
1.6
(1.0)
2
2.4
(1.5)
2.5
(1.6)
2.4
(1.5)
3
3.3
(2.1)
3.4
(2.1)
3.3
(2.1)
4
4.7
(2.9)
4.9
(3.1)
4.7
(2.9)
1
3.7
(2.3)
3.8
(2.4)
3.7
(2.3)
2
5.6
(3.5)
5.9
(3.7)
5.7
(3.5)
3
7.7
(4.8)
8.0
(5.0)
7.7
(4.8)
4
11.0
(6.8)
11.4
(7.1)
11.0
(6.8)
1
8.6
(5.3)
8.9
(5.5)
8.6
(5.3)
2
13.3
(8.3)
13.8
(8.6)
13.3
(8.3)
3
18.0
(11.2)
18.7
(11.6)
18.1
(11.2)
4
25.8
(16.0)
26.8
(16.7)
26.0
(16.2)
1
4.0
(2.5)
4.2
(2.6)
4.1
(2.5)
2
6.2
(3.9)
6.5
(4.0)
6.3
(3.9)
R
3
8.5
(5.3)
8.8
(5.5)
8.5
(5.3)
4
12.1
(7.5)
12.6
(7.8)
12.2
(7.6)
3--11
SECTION 3 -- FIELD OPERATIONS
TD 60D, TD 70D, TD 80D, TD 90D and TD 95D MODELS
TRACTOR SPEED IN km/h WITH POWER TAKE--OFF RUNNING AT STANDARD SPEEDS
Transmission and range gear 30 km/h (19 mph) version in forward gear
(12 forward gears + 12 reverse gears -- synchro command)
Power take--off at 540 rev/min, with engine at 2199 rev/min.
REAR TYRES km/h (mph)
TD 60D
TD 70D
TD 80D
TD 90D
TD 95D
RANGE
GEAR
14.9--28
14.9--30
16.9--30
18.4--30
18.4.34
540 rev/min
1
1.4
(0.9)
1.5
(0.9)
1.5
(0.9)
1.5
(0.9)
1.6
(1.0)
2
2.2
(1.4)
2.3
(1.4)
2.2
(1.4)
2.3
(1.4)
2.3
(1.4)
3
3.0
(1.9)
3.2
(2.0)
3.0
(1.9)
3.2
(2.0)
3.3
(2.1)
4
4.3
(2.7)
4.5
(2.8)
4.4
(2.7)
4.5
(2.8)
4.8
(3.0)
1
3.4
(2.1)
3.5
(2.2)
3.4
(2.1)
3.5
(2.2)
3.7
(2.3)
2
5.2
(3.2)
5.4
(3.4)
5.2
(3.2)
5.4
(3.4)
5.4
(3.4)
3
7.1
(4.4)
7.4
(4.6)
7.1
(4.4)
7.4
(4.6)
7.8
(4.9)
4
10.1
(6.3)
10.5
(6.5)
10.2
(6.3)
10.6
(6.6)
11.1
(6.9)
1
8.0
(5.0)
8.3
(5.2)
8.0
(5.0)
8.3
(5.2)
8.7
(5.4)
2
12.3
(7.7)
12.7
(7.9)
12.3
(7.7)
12.8
(8.0)
12.7
(7.9)
3
16.7
(10.4)
17.3
(10.8)
16.8
(10.4)
17.4
(10.8)
18.3
(11.4)
4
23.9
(14.9)
24.8
(15.4)
24.0
(14.9)
24.9
(15.5)
26.2
(16.3)
Power take--off at 750/1000 rev/min, with engine at 2380 rev/min.
REAR TYRES km/h (mph)
TD 60D
TD 70D
TD 80D
TD 90D
TD 95D
RANGE
GEAR
14.9--28
14.9--30
16.9--30
18.4--30
18.4.34
750/1000 rev/min
1
1.6
(1.0)
1.6
(1.0)
1.6
(1.0)
1.6
(1.0)
1.7
(1.1)
2
2.4
(1.5)
2.5
(1.6)
2.4
(1.5)
2.5
(1.6)
2.5
(1.6)
3
3.3
(2.1)
3.4
(2.1)
3.3
(2.1)
3.4
(2.1)
3.6
(2.2)
4
4.7
(2.9)
4.9
(3.1)
4.7
(2.9)
4.9
(3.1)
5.2
(3.2)
1
3.7
(2.3)
3.8
(2.4)
3.7
(2.3)
3.8
(2.4)
4.0
(2.5)
2
5.6
(3.5)
5.9
(3.7)
5.7
(3.5)
5.9
(3.7)
5.8
(3.6)
3
7.7
(4.8)
8.0
(5.0)
7.7
(4.8)
8.0
(5.0)
8.4
(5.2)
4
11.0
(6.8)
11.4
(7.1)
11.0
(6.8)
11.4
(7.1)
12.0
(7.5)
1
8.6
(5.3)
8.9
(5.5)
8.6
(5.3)
9.0
(5.6)
9.4
(5.8)
2
13.3
(8.3)
13.8
(8.6)
13.3
(8.3)
13.8
(8.6)
13.7
(8.5)
3
18.0
(11.2)
18.7
(11.6)
18.1
(11.3)
18.8
(11.7)
19.8
(12.3)
4
25.8
(16.0)
26.8
(16.7)
26.0
(16.2)
26.9
(16.7)
28.3
(17.6)
3--12
SECTION 3 -- FIELD OPERATIONS
TD 60D, TD 70D, TD 80D, TD 90D and TD 95D MODELS
TRACTOR SPEED IN km/h WITH POWER TAKE--OFF RUNNING AT STANDARD SPEEDS
Transmission and range gear 40 km/h (25 mph) version in forward gear
(12 forward gears + 12 reverse gears -- synchro command)
Power take--off at 540 rev/min, with engine at 2199 rev/min.
REAR TYRES km/h (mph)
TD 60D
TD 70D
TD 80D
TD 90D
TD 95D
RANGE
GEAR
14.9--28
14.9--30
16.9--30
18.4--30
18.4.34
540 rev/min
1
1.8
(1.1)
1.8
(1.1)
1.8
(1.1)
1.8
(1.1)
1.9
(1.2)
2
2.7
(1.7)
2.8
(1.7)
2.7
(1.7)
2.8
(1.7)
2.8
(1.7)
3
3.7
(2.3)
3.9
(2.4)
3.7
(2.3)
3.9
(2.4)
4.1
(2.6)
4
5.3
(3.3)
5.5
(3.4)
5.3
(3.3)
5.5
(3.4)
5.8
(3.6)
1
4.1
(2.6)
4.3
(2.7)
4.2
(2.6)
4.3
(2.7)
4.5
(2.8)
2
6.4
(4.0)
6.6
(4.1)
6.4
(4.0)
6.6
(4.1)
6.6
(4.1)
3
8.7
(5.4)
9.0
(5.6)
8.7
(5.4)
9.0
(5.6)
9.5
(5.9)
4
12.4
(7.7)
12.9
(8.0)
12.5
(7.8)
12.9
(8.0)
13.6
(8.5)
1
9.7
(6.0)
10.1
(6.3)
9.8
(6.1)
10.1
(6.3)
10.7
(6.7)
2
15.0
(9.3)
15.6
(9.7)
15.1
(9.4)
15.6
(9.7)
15.5
(9.6)
3
20.4
(12.7)
21.2
(13.2)
20.5
(12.7)
21.2
(13.2)
22.4
(13.9)
4
29.2
(18.1)
30.3
(18.8)
29.3
(18.2)
30.4
(18.9)
32.0
(19.9)
Power take--off at 750/1000 rev/min, with engine at 2380 rev/min.
REAR TYRES km/h (mph)
TD 60D
TD 70D
TD 80D
TD 90D
TD 95D
RANGE
GEAR
14.9--28
14.9--30
16.9--30
18.4--30
18.4.34
750/1000 rev/min
1
1.9
(1.2)
2.0
(1.2)
1.9
(1.2)
2.0
(1.2)
2.1
(1.3)
2
2.9
(1.8)
3.1
(1.9)
3.0
(1.9)
3.1
(1.9)
3.1
(1.9)
3
4.0
(2.5)
4.2
(2.6)
4.0
(2.5)
4.2
(2.6)
4.4
(2.7)
4
5.7
(3.5)
6.0
(3.7)
5.8
(3.6)
6.0
(3.7)
6.3
(3.9)
1
4.5
(2.8)
4.6
(2.9)
4.5
(2.8)
4.7
(2.9)
4.9
(3.0)
2
6.9
(4.3)
7.2
(4.5)
6.9
(4.3)
7.2
(4.5)
7.1
(4.4)
3
9.4
(5.8)
9.7
(6.0)
9.4
(5.8)
9.7
(6.0)
10.3
(6.4)
4
13.4
(8.3)
13.9
(8.6)
13.5
(8.4)
14.0
(8.7)
14.7
(9.1)
1
10.5
(6.5)
10.9
(6.8)
10.6
(6.6)
11.0
(6.8)
11.5
(7.1)
2
16.2
(10.1)
16.8
(10.4)
16.3
(10.1)
16.9
(10.5)
16.8
(10.4)
3
22.0
(13.7)
22.9
(14.2)
22.1
(13.7)
22.9
(14.2)
24.2
(15.0)
4
31.6
(19.6)
32.8
(20.4)
31.7
(19.7)
32.9
(20.4)
34.6
(21.5)
3--13
SECTION 3 -- FIELD OPERATIONS
TD 60D, TD 70D, TD 80D, TD 90D and TD 95D MODELS TRACTOR SPEED IN km/h WITH
POWER TAKE--OFF RUNNING AT STANDARD SPEEDS
Creeper transmission 30 km/h (19 mph) version
(20 forward gears + 12 reverse gears -- Synchro Shuttle)
Forward gears
REAR TYRES km/h (mph)
TD 60D
TD 70D
TD 80D
TD 90D
TD 95D
RANGE
GEAR
14.9--28
14.9--30
16.9--30
18.4--30
18.4--34
540 rev/min
1
0.3
(0.2)
0.3
(0.2)
0.3
(0.2)
0.3
(0.2)
0.3
(0.2)
2
0.4
(0.2)
0.4
(0.2)
0.4
(0.2)
0.4
(0.2)
0.4
(0.2)
3
0.5
(0.3)
0.6
(0.4)
0.6
(0.4)
0.6
(0.4)
0.6
(0.4)
4
0.8
(0.5)
0.8
(0.5)
0.8
(0.5)
0.8
(0.5)
0.8
(0.5)
1
0.6
(0.4)
0.6
(0.4)
0.6
(0.4)
0.6
(0.4)
0.7
(0.4)
2
0.9
(0.6)
1.0
(0.6)
0.9
(0.6)
1.0
(0.6)
1.0
(0.6)
3
1.3
(0.8)
1.3
(0.8)
1.3
(0.8)
1.3
(0.8)
1.4
(0.9)
4
1.8
(1.1)
1.9
(1.2)
1.8
(1.1)
1.9
(1.2)
2.0
(1.2)
1
1.4
(0.9)
1.5
(0.9)
1.5
(0.9)
1.5
(0.9)
1.6
(1.0)
2
2.2
(1.4)
2.3
(1.4)
2.2
(1.4)
2.3
(1.4)
2.3
(1.4)
3
3.0
(1.9)
3.2
(2.0)
3.0
(1.9)
3.2
(2.0)
3.3
(2.1)
4
4.3
(2.7)
4.5
(2.8)
4.4
(2.7)
4.5
(2.8)
4.8
(3.0)
1
3.4
(2.1)
3.5
(2.2)
3.4
(2.1)
3.5
(2.2)
3.7
(2.3)
2
5.2
(3.2)
5.4
(3.4)
5.2
(3.2)
5.4
(3.4)
5.4
(3.4)
3
7.1
(4.4)
7.4
(4.6)
7.1
(4.4)
7.4
(4.6)
7.8
(4.9)
4
10.1
(6.3)
10.5
(6.5)
10.2
(6.3)
10.6
(6.6)
11.1
(6.9)
1
8.0
(5.0)
8.3
(5.2)
8.0
(5.0)
8.3
(5.2)
8.7
(5.4)
2
12.3
(7.6)
12.7
(7.9)
12.3
(7.6)
12.8
(8.0)
12.7
(7.9)
3
16.7
(10.4)
17.3
(10.8)
16.8
(10.4)
17.4
(10.8)
18.3
(11.4)
4
23.0
(14.3)
24.8
(15.4)
24.0
(14.9)
24.9
(15.5)
26.2
(16.3)
Reverse gears
REAR TYRES km/h (mph)
TD 60D
TD 70D
TD 80D
TD 90D
TD 95D
RANGE
GEAR
14.9--28
14.9--30
16.9--30
18.4--30
18.4--34
540 rev/min
1
1.4
(0.9)
1.4
(0.9)
1.4
(0.9)
1.4
(0.9)
1.5
(0.9)
2
2.1
(1.3)
2.2
(1.4)
2.1
(1.3)
2.2
(1.4)
2.2
(1.4)
3
2.9
(1.8)
3.0
(1.9)
2.9
(1.8)
3.0
(1.9)
3.2
(2.0)
4
4.1
(2.5)
4.3
(2.7)
4.1
(2.5)
4.3
(2.7)
4.5
(2.8)
1
3.2
(2.0)
3.3
(2.1)
3.2
(2.0)
3.3
(2.1)
3.5
(2.2)
2
4.9
(3.0)
5.1
(3.2)
5.0
(3.1)
5.1
(3.2)
5.1
(3.2)
3
6.7
(4.2)
7.0
(4.4)
6.8
(4.2)
7.0
(4.4)
7.4
(4.6)
4
9.6
(6.0)
10.0
(6.2)
9.7
(6.0)
10.0
(6.2)
10.6
(6.6)
1
7.6
(4.7)
7.9
(4.9)
7.6
(4.7)
7.9
(4.9)
8.3
(5.2)
2
11.6
(7.2)
12.1
(7.5)
11.7
(7.3)
12.1
(7.5)
12.1
(7.5)
3
15.8
(9.8)
16.5
(10.3)
15.9
(9.9)
16.5
(10.3)
17.4
(10.8)
4
22.7
(14.1)
23.6
(14.7)
22.8
(14.2)
23.6
(14.7)
24.9
(15.5)
3--14
SECTION 3 -- FIELD OPERATIONS
TD 60D, TD 70D, TD 80D, TD 90D and TD 95D MODELS TRACTOR SPEED IN km/h WITH
POWER TAKE--OFF RUNNING AT STANDARD SPEEDS (continued)
Creeper transmission 30 km/h (19 mph) version
(20 forward gears + 12 reverse gears -- Synchro Shuttle)
Forward gears
REAR TYRES km/h (mph)
TD 60D
TD 70D
TD 80D
TD 90D
TD 95D
RANGE
GEAR
14.9--28
14.9--30
16.9--30
18.4--30
18.4--34
750/1000 rev/min
1
0.3
(0.2)
0.3
(0.2)
0.3
(0.2)
0.3
(0.2)
0.3
(0.2)
2
0.4
(0.2)
0.5
(0.3)
0.4
(0.2)
0.5
(0.3)
0.5
(0.3)
3
0.6
(0.4)
0.6
(0.4)
0.6
(0.4)
0.6
(0.4)
0.7
(0.4)
4
0.9
(0.6)
0.9
(0.6)
0.9
(0.6)
0.9
(0.6)
0.9
(0.6)
1
0.7
(0.4)
0.7
(0.4)
0.7
(0.4)
0.7
(0.4)
0.7
(0.4)
2
1.0
(0.6)
1.1
(0.7)
1.0
(0.6)
1.1
(0.7)
1.1
(0.7)
3
1.4
(0.9)
1.4
(0.9)
1.4
(0.9)
1.4
(0.9)
1.5
(0.9)
4
2.0
(1.2)
2.1
(1.3)
2.0
(1.2)
2.1
(1.3)
2.2
(1.4)
1
1.6
(1.0)
1.6
(1.0)
1.6
(1.0)
1.6
(1.0)
1.7
(1.1)
2
2.4
(1.5)
2.5
(1.6)
2.4
(1.5)
2.5
(1.6)
2.5
(1.6)
3
3.3
(2.1)
3.4
(2.1)
3.3
(2.1)
3.4
(2.1)
3.6
(2.2)
4
4.7
(2.9)
4.9
(3.0)
4.7
(2.9)
4.9
(3.0)
5.2
(3.2)
1
3.7
(2.3)
3.8
(2.4)
3.7
(2.3)
3.8
(2.4)
4.0
(2.5)
2
5.6
(3.5)
5.9
(3.7)
5.7
(3.5)
5.9
(3.7)
5.8
(3.6)
3
7.7
(4.8)
8.0
(5.0)
7.7
(4.8)
8.0
(5.0)
8.4
(5.2)
4
11.0
(6.8)
11.4
(7.1)
11.0
(6.8)
11.4
(7.1)
12.0
(7.5)
1
8.6
(5.3)
8.9
(5.5)
8.6
(5.3)
9.0
(5.6)
9.4
(5.8)
2
13.3
(8.3)
13.8
(8.6)
13.3
(8.3)
13.8
(8.6)
13.7
(8.5)
3
18.0
(11.2)
18.7
(11.6)
18.1
(11.2)
18.8
(11.7)
19.8
(12.3)
4
25.8
(16.0)
26.8
(16.7)
26.0
(16.2)
26.9
(16.7)
28.3
(17.6)
Reverse gears
REAR TYRES km/h (mph)
TD 60D
TD 70D
TD 80D
TD 90D
TD 95D
RANGE
GEAR
14.9--28
14.9--30
16.9--30
18.4--30
18.4--34
750/1000 rev/min
1
1.5
(0.9)
1.5
(0.9)
1.5
(0.9)
1.5
(0.9)
1.6
(1.0)
2
2.3
(1.4)
2.4
(1.5)
2.3
(1.4)
2.4
(1.5)
2.4
(1.5)
3
3.1
(1.9)
3.2
(2.0)
3.1
(1.9)
3.2
(2.0)
3.4
(2.1)
4
4.5
(2.8)
4.6
(2.9)
4.5
(2.8)
4.6
(2.9)
4.9
(3.0)
1
3.5
(2.2)
3.6
(2.2)
3.5
(5.4)
3.6
(2.2)
3.8
(6.1)
2
5.4
(3.4)
5.6
(3.5)
5.4
(3.4)
5.6
(3.5)
5.5
(3.4)
3
7.3
(4.5)
7.6
(4.7)
7.3
(4.5)
7.6
(4.7)
8.0
(5.0)
4
10.4
(6.5)
10.8
(6.7)
10.5
(6.5)
10.9
(6.8)
11.4
(7.1)
1
8.2
(5.1)
8.5
(5.3)
8.2
(5.1)
8.5
(5.3)
9.0
(5.6)
2
12.6
(7.8)
13.1
(8.1)
12.7
(7.9)
13.1
(8.1)
13.0
(8.1)
3
17.1
(10.6)
17.8
(11.1)
17.2
(10.7)
17.8
(11.1)
18.8
(11.7)
4
24.5
(15.2)
25.5
(15.8)
24.7
(15.3)
25.5
(15.8)
26.9
(16.7)
3--15
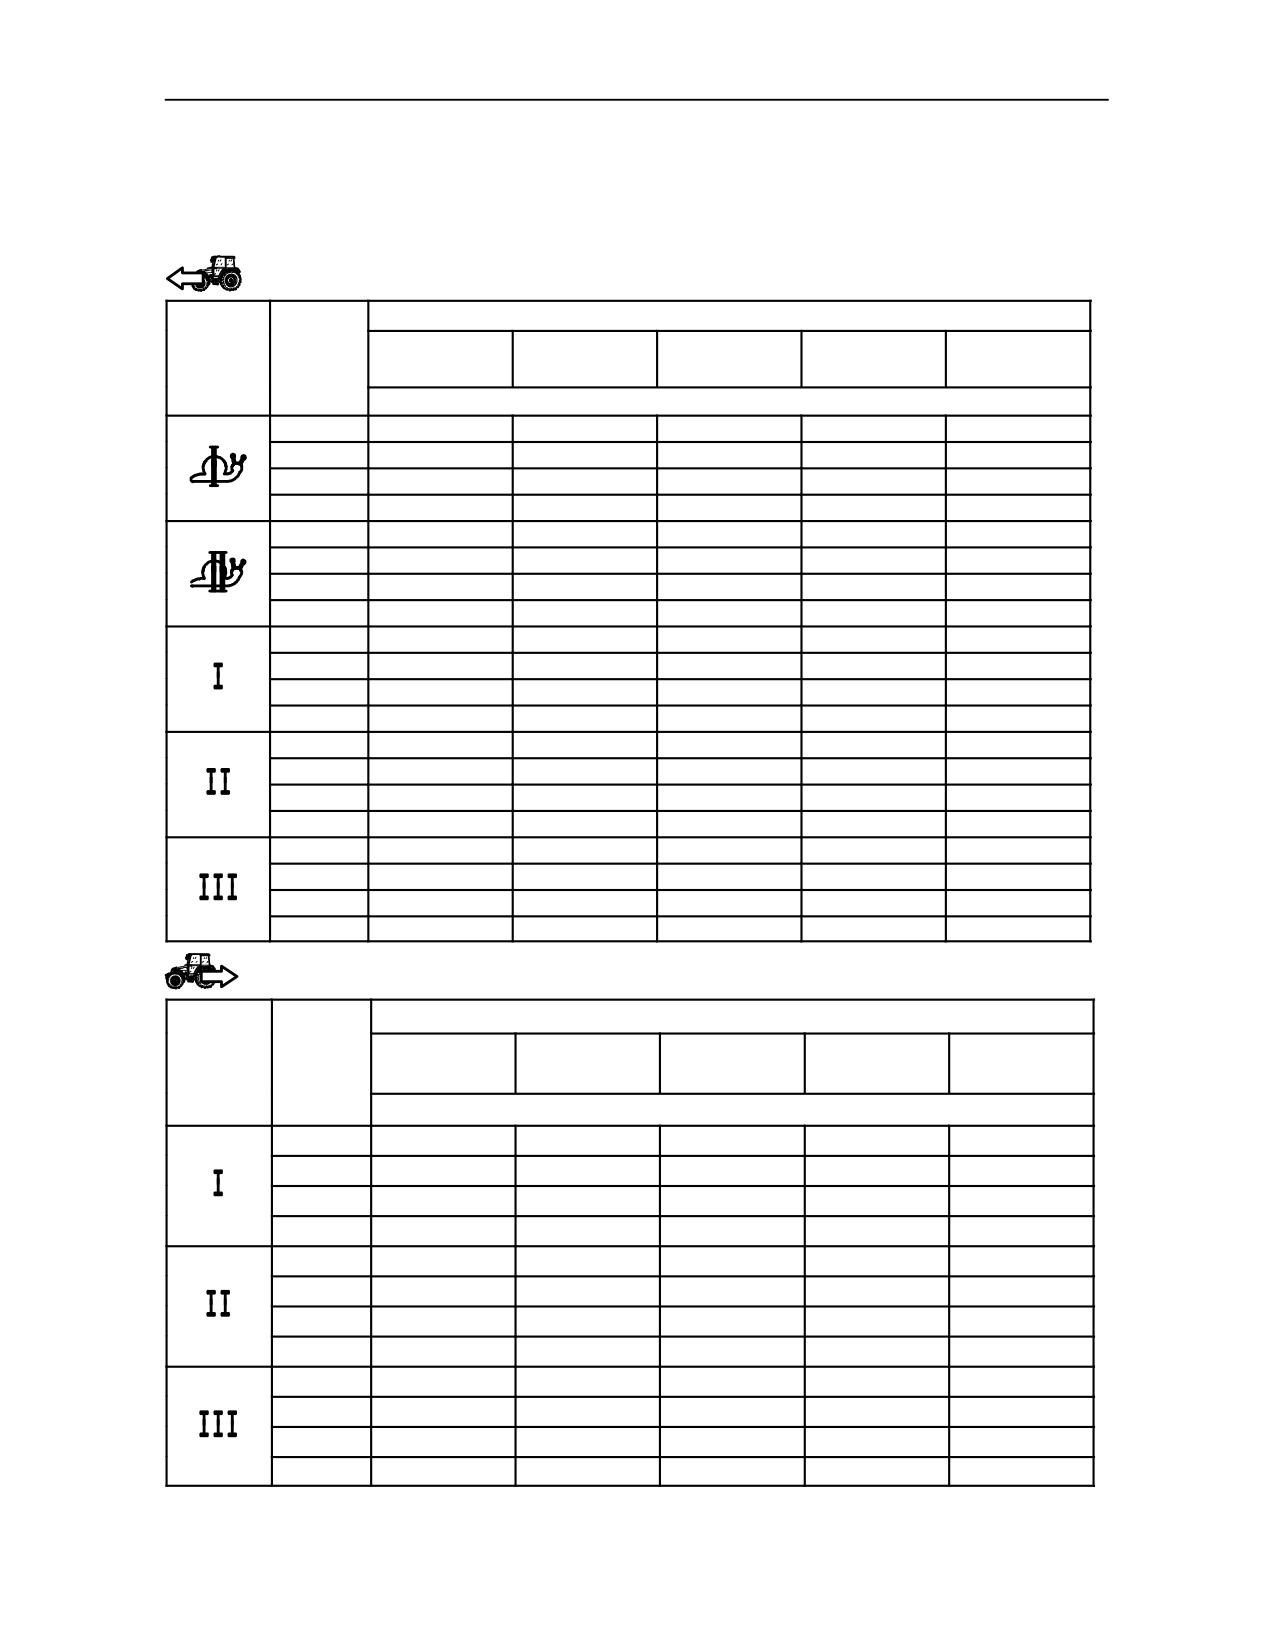
SECTION 3 -- FIELD OPERATIONS
TD 60D, TD 70D, TD 80D, TD 90D and TD 95D MODELS TRACTOR SPEED IN km/h WITH
POWER TAKE--OFF RUNNING AT STANDARD SPEEDS
Creeper transmission 40
km/h (25
mph) version (20 forward gears + 12 reverse gears -- Synchro
Shuttle)
Forward gears
REAR TYRES km/h (mph)
TD 60D
TD 70D
TD 80D
TD 90D
TD 95D
RANGE
GEAR
14.9--28
14.9--30
16.9--30
18.4--30
18.4--34
540 rev/min
1
0.3
(0.2)
0.3
(0.2)
0.3
(0.2)
0.3
(0.2)
0.4
(0.2)
2
0.5
(0.3)
0.5
(0.3)
0.5
(0.3)
0.5
(0.3)
0.5
(0.3)
3
0.7
(0.4)
0.7
(0.4)
0.7
(0.4)
0.7
(0.4)
0.7
(0.4)
4
1.0
(0.6)
1.0
(0.6)
1.0
(0.6)
1.0
(0.6)
1.1
(0.7)
1
0.7
(0.4)
0.8
(0.5)
0.8
(0.5)
0.8
(0.5)
0.8
(0.5)
2
1.2
(0.7)
1.2
(0.7)
1.2
(0.7)
1.2
(0.7)
1.2
(0.7)
3
1.6
(1.0)
1.6
(1.0)
1.6
(1.0)
1.6
(1.0)
1.7
(1.1)
4
2.2
(1.4)
2.3
(1.4)
2.3
(1.4)
2.3
(1.4)
2.5
(1.6)
1
1.8
(1.1)
1.8
(1.1)
1.8
(1.1)
1.8
(1.1)
1.9
(1.2)
2
2.7
(1.7)
2.8
(1.7)
2.7
(1.7)
2.8
(1.7)
2.8
(1.7)
3
3.7
(2.3)
3.9
(2.4)
3.7
(2.3)
3.9
(2.4)
4.1
(2.6)
4
5.3
(3.3)
5.5
(3.4)
5.3
(3.3)
5.5
(3.4)
5.8
(3.6)
1
4.1
(2.5)
4.3
(2.7)
4.2
(2.6)
4.3
(2.7)
4.5
(2.8)
2
6.4
(4.0)
6.6
(4.1)
6.4
(4.0)
6.6
(4.1)
6.6
(4.1)
3
8.7
(5.4)
9.0
(5.6)
8.7
(5.4)
9.0
(5.6)
9.5
(5.9)
4
12.4
(7.7)
12.9
(8.0)
12.5
(7.8)
12.9
(8.0)
13.6
(8.5)
1
9.7
(6.0)
10.1
(6.3)
9.8
(6.1)
10.1
(6.3)
10.7
(6.7)
2
15.0
(9.3)
15.6
(9.7)
15.1
(9.4)
15.6
(9.7)
15.5
(9.6)
3
20.4
(12.7)
21.2
(13.2)
20.5
(12.7)
21.2
(13.2)
22.4
(13.9)
4
29.2
(18.1)
30.3
(18.8)
29.3
(18.2)
30.4
(18.9)
32.0
(19.9)
Reverse gears
REAR TYRES km/h (mph)
TD 60D
TD 70D
TD 80D
TD 90D
TD 95D
RANGE
GEAR
14.9--28
14.9--30
16.9--30
18.4--30
18.4--34
540 rev/min
1
1.7
(1.1)
1.7
(1.1)
1.7
(1.1)
1.7
(1.1)
1.8
(1.1)
2
2.6
(1.6)
2.7
(1.7)
2.6
(1.6)
2.7
(1.7)
2.7
(1.7)
3
3.5
(2.2)
3.7
(2.3)
3.5
(2.2)
3.7
(2.3)
3.9
(2.4)
4
5.0
(3.1)
5.2
(3.2)
5.1
(3.2)
5.2
(3.2)
5.5
(3.4)
1
3.9
(2.4)
4.1
(2.5)
3.9
(2.4)
4.1
(2.5)
4.3
(2.7)
2
6.0
(3.7)
6.3
(3.9)
6.1
(3.8)
6.3
(3.9)
6.3
(3.9)
3
8.2
(5.1)
8.5
(5.3)
8.3
(5.2)
8.6
(5.3)
9.0
(5.6)
4
11.8
(7.3)
12.2
(7.6)
11.8
(7.3)
12.3
(7.6)
12.9
(8.0)
1
9.2
(5.7)
9.6
(6.0)
9.3
(5.8)
9.6
(6.0)
10.1
(6.3)
2
14.2
(8.8)
14.8
(9.2)
14.3
(8.9)
14.8
(9.2)
14.7
(9.1)
3
19.4
(12.1)
20.1
(12.5)
19.5
(12.1)
20.2
(12.6)
21.2
(13.2)
4
27.7(17.2)
28.8
(17.9)
27.9
(17.3)
28.9
(18.0)
30.4
(18.9)
3--16