DYNAPAC Vibratory roller CA2500/2800/3500/4000. Instruction manual (2019) - page 4
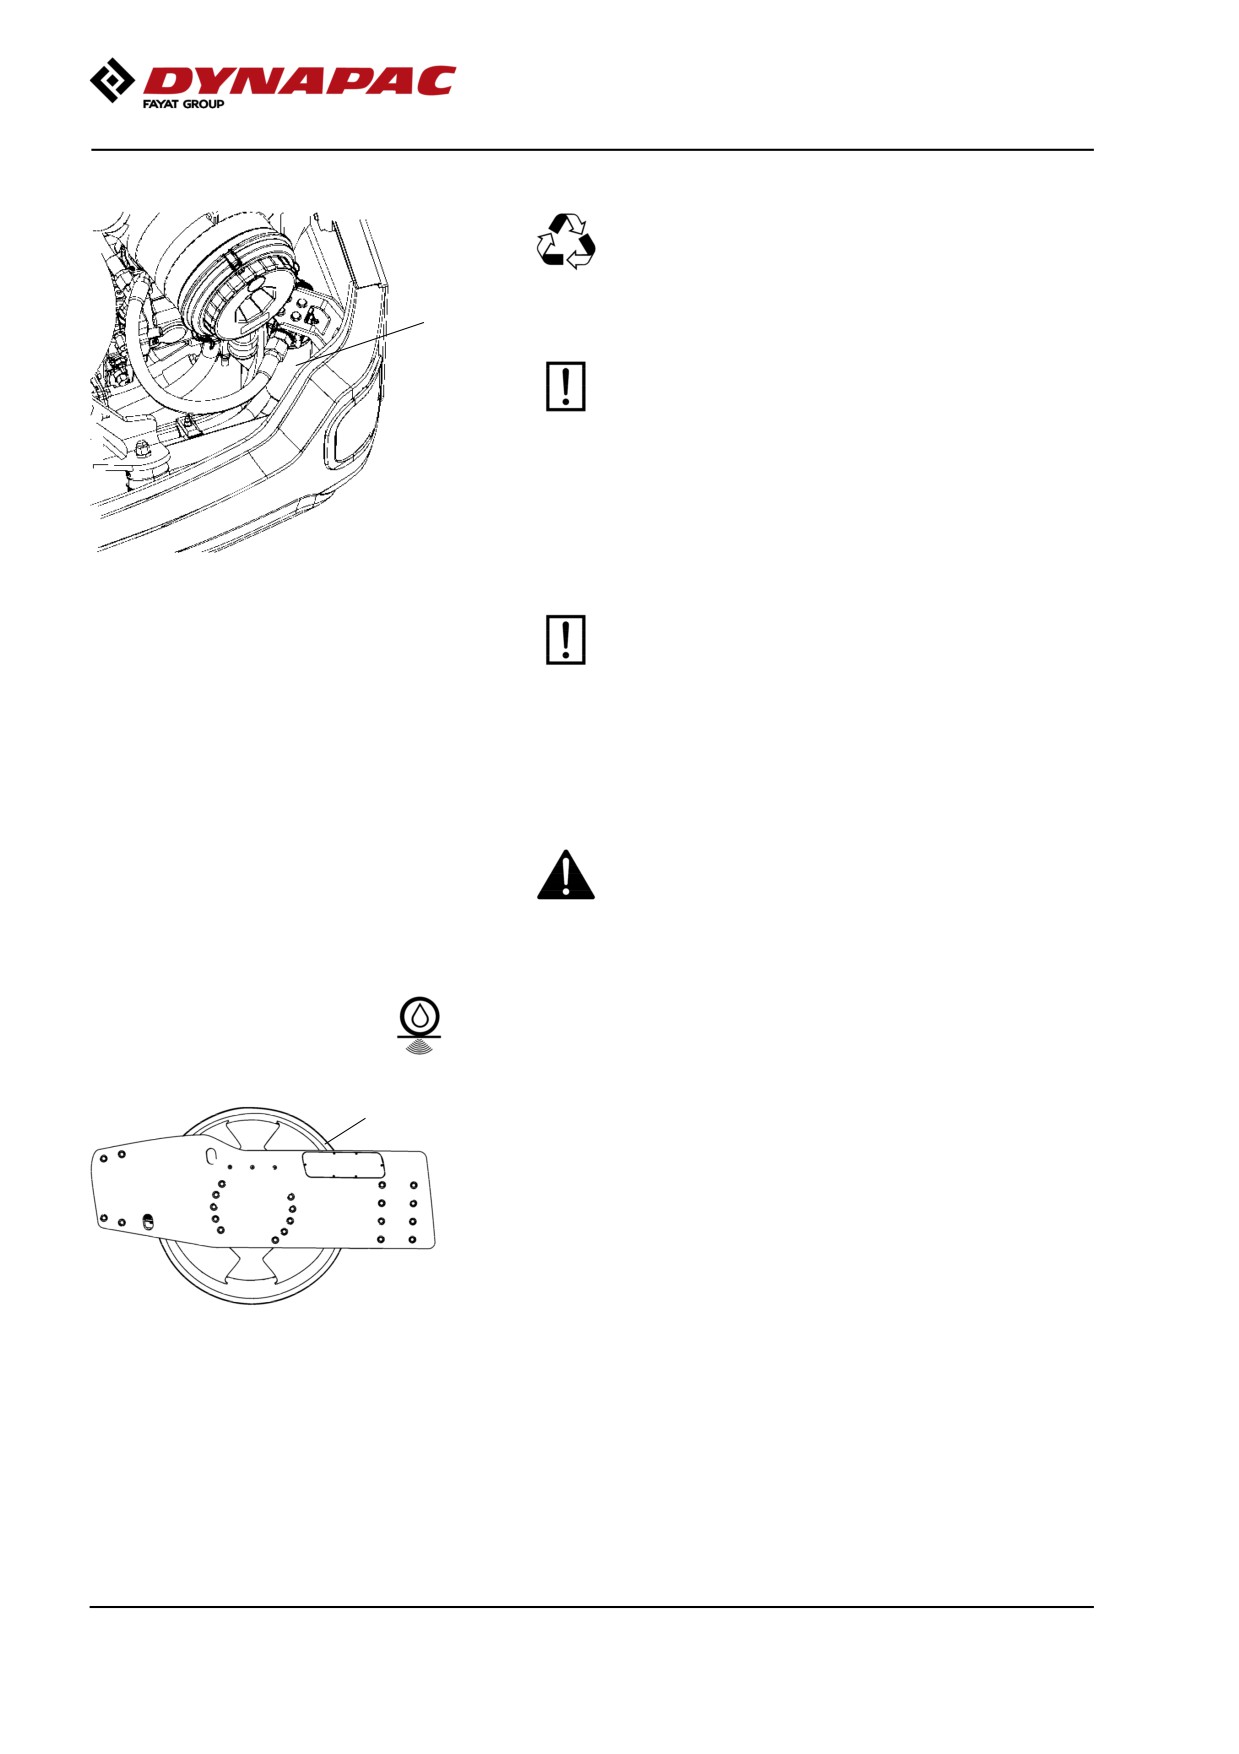
Maintenance, first 50h
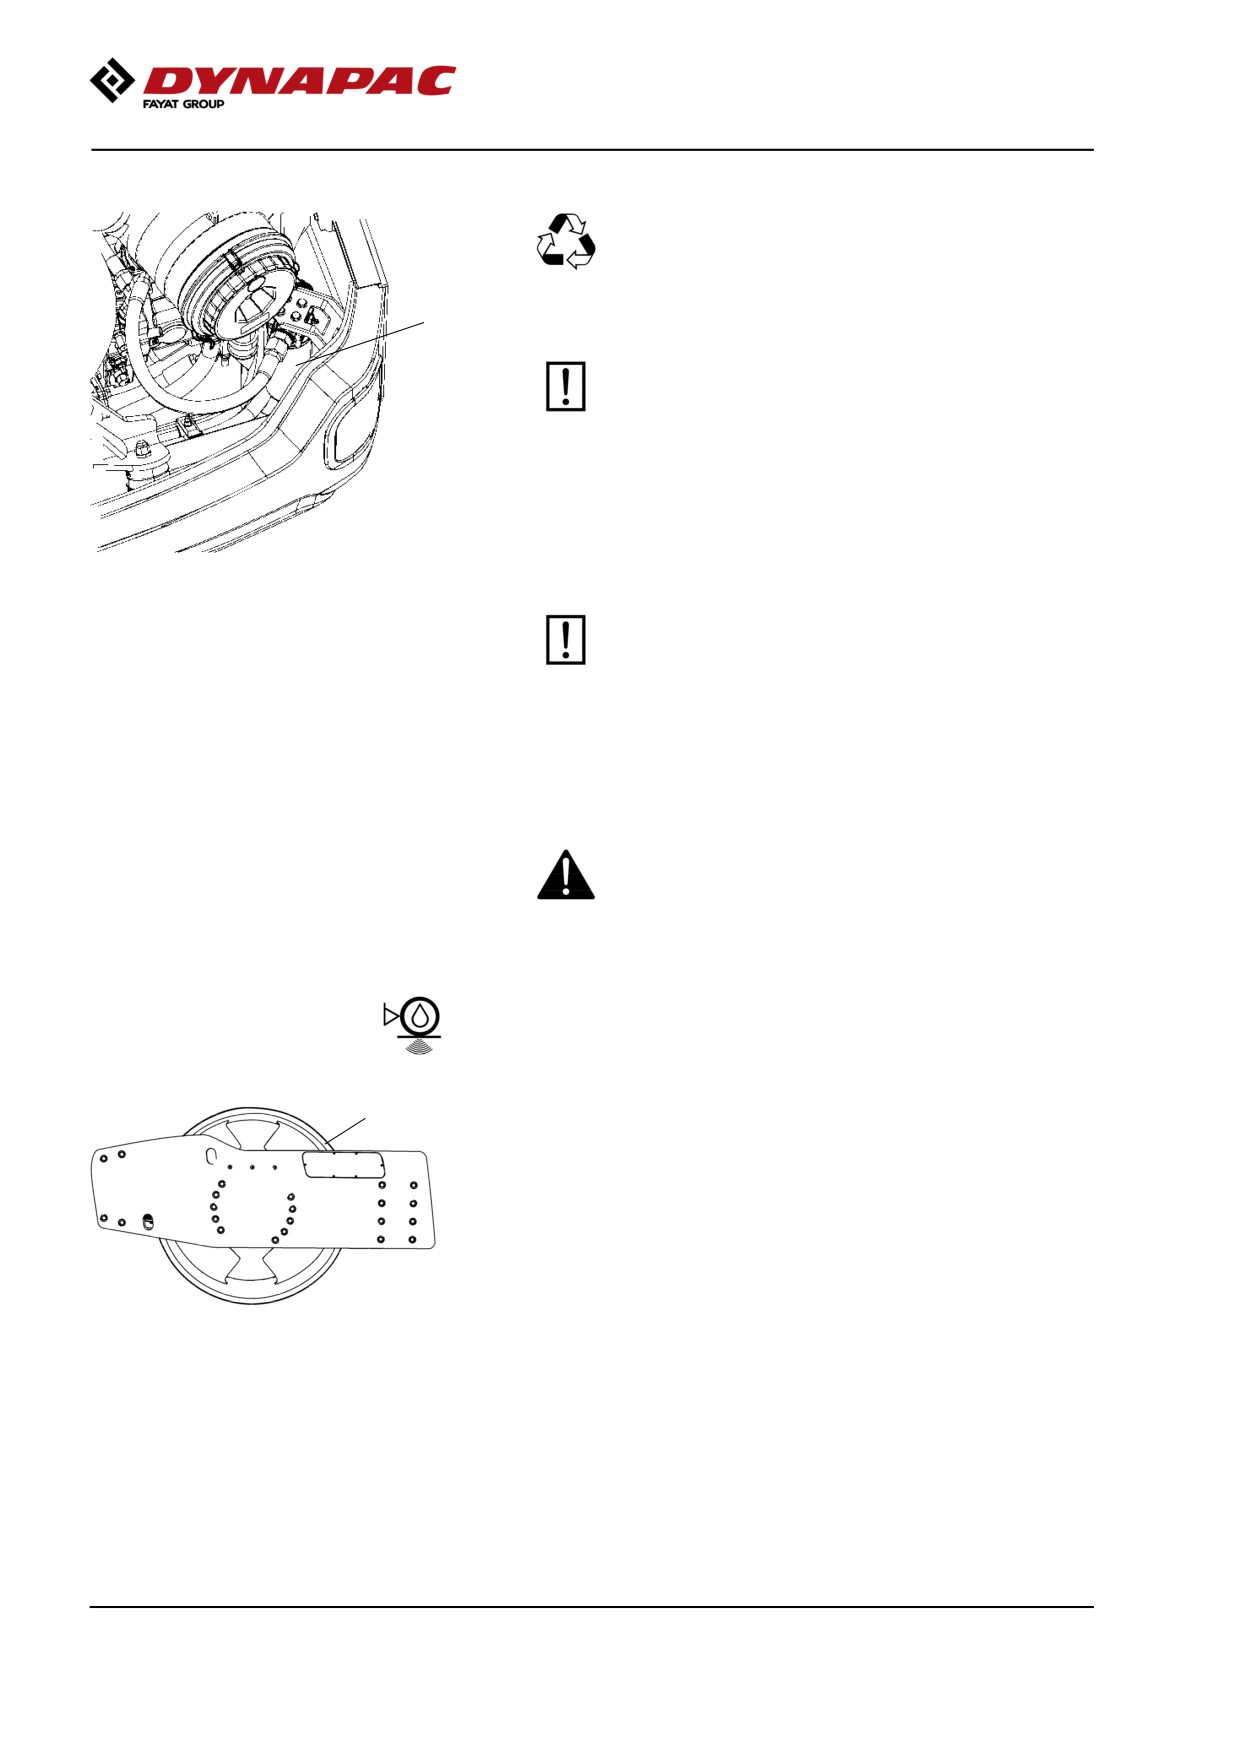
Clean thoroughly around the oil filter.
Remove the oil filter (1) and hand in to an
environment-friendly waste disposal station. This
is a single-use filter and cannot be cleaned.
1
Make sure that the old sealing ring is not left on
the filter holder, Otherwise, this could cause
leakage between the new seal and the old one.
Thoroughly clean the filter holder's sealing surfaces.
Fig. Engine compartment
Apply a thin coat of fresh hydraulic fluid on the new
1. Hydraulic fluid filter (x1).
filter seal. Screw tight the filter by hand.
First tighten the filter until its seal is in contact
with the filter attachment. Then turn an additional
half revolution. Do not tighten the filter too hard
as this could damage the gasket.
Start the engine and check that there is no leakage of
hydraulic fluid from the filter. Check level of fluid in the
sight glass (3) and top up as required.
Ensue that there is good ventilation (air extraction)
if the engine is run indoors. Risk of carbon
monoxide poisoning.
Drum cartridge - Oil change
1
Position the roller on a flat surface with the groove (1)
on the inside of the drum aligned with the top of the
drum frame.
Fig. Left drum side
1. Groove
2019-11-05
110
Maintenance, first 50h
1
Place a receptacle for about 5 liters (1.32 gal)
underneath the drain plug (2).
Observe care when draining drum oil/hot drum oil.
Wear protective gloves and goggles.
Save the oil and hand in to an
3
environment-friendly waste disposal station.
2
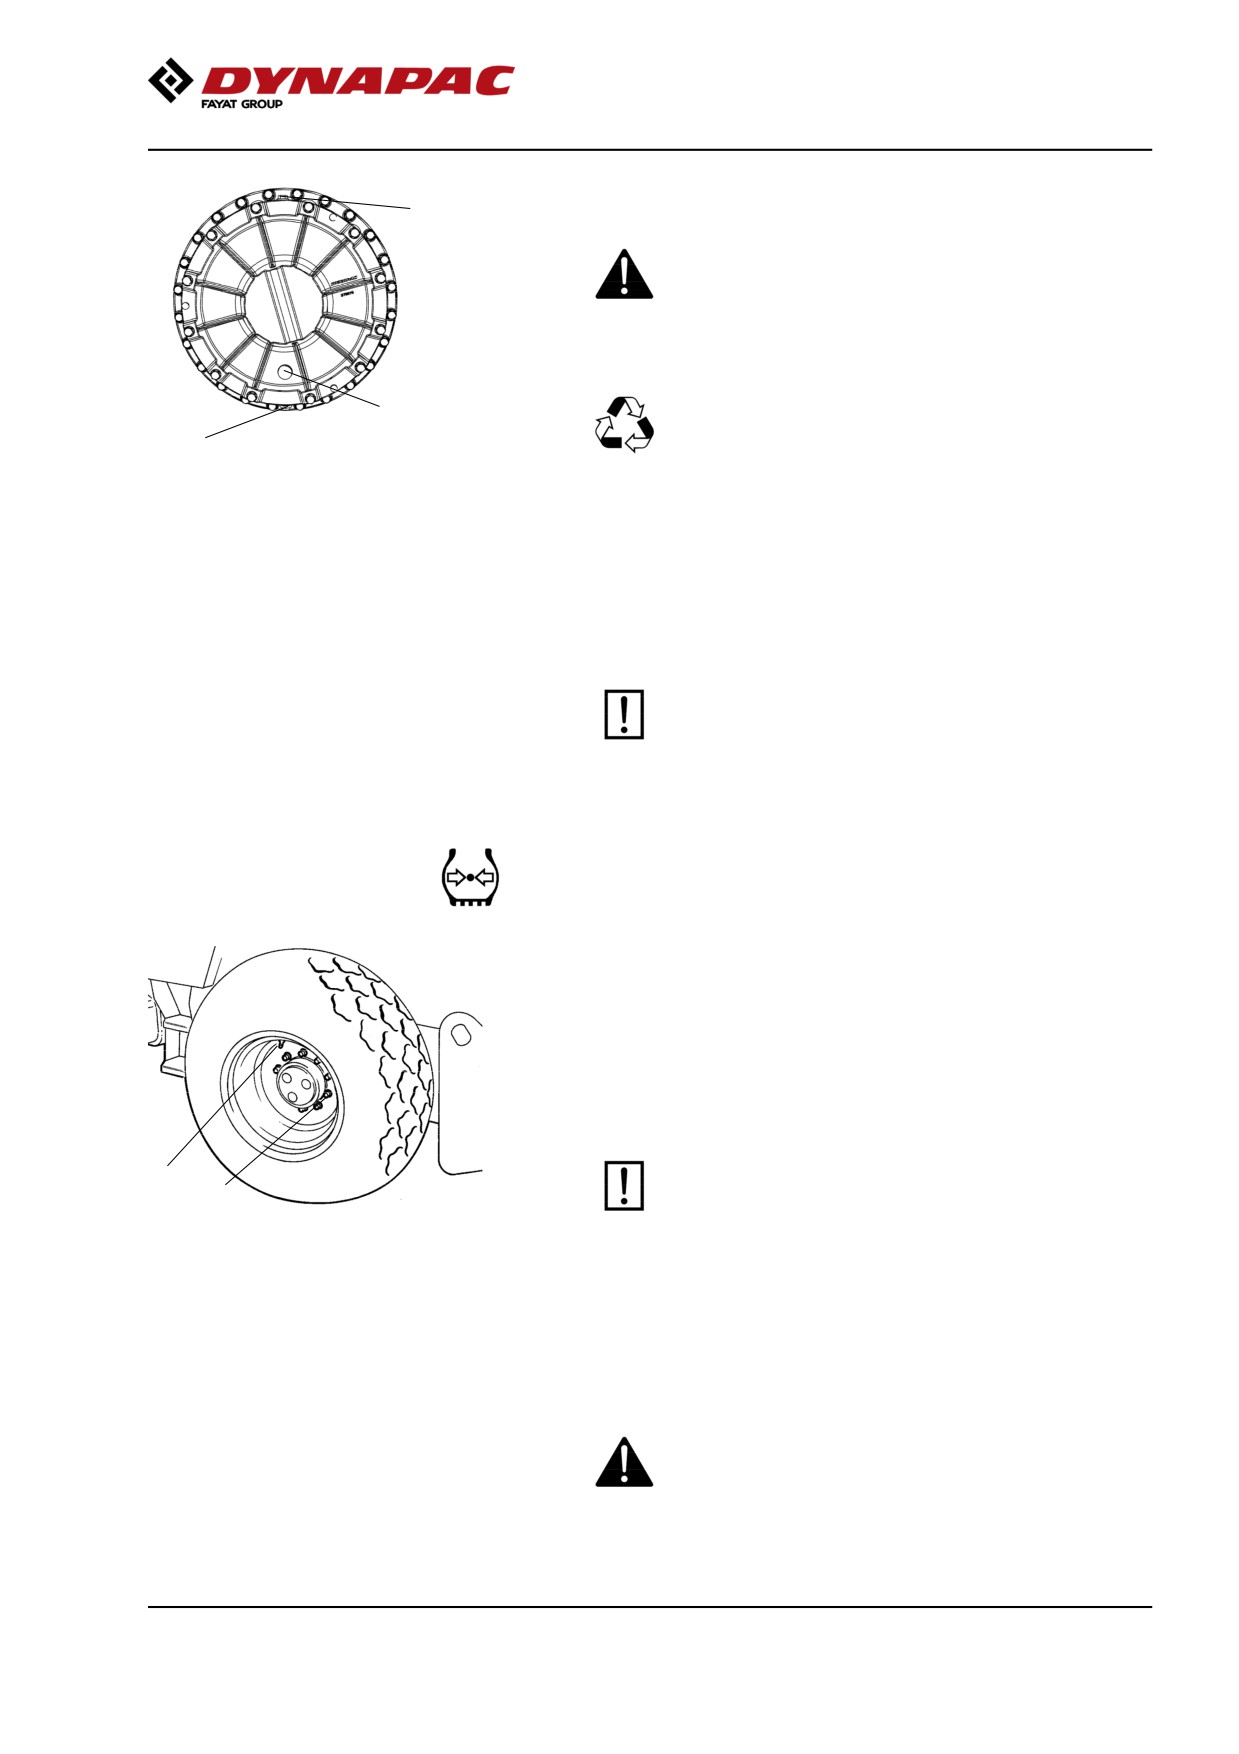
Fig. Left drum side
1. Filler plug
2. Drain plug
Clean and unscrew the filler plug (1) and the drain
3. Sight glass
plug (2).
Allow all the oil to run out. Fit the drain plug and fill
with new synthetic oil in accordance with the
instructions under "Drum cartridge - checking the oil
level".
Ensure that only Dynapac Drum Oil 1000 is used
in the cartridges.
Repeat the procedure on the opposite side.
Tires - Air pressure - Wheel nuts - Tightening
Check the tire pressures using a pressure gauge.
If the tires are filled with fluid, the air valve (1) must be
in the "12 o'clock" position during pumping.
Recommended pressure: See Technical
Specifications.
Check the tire pressure.
1
When changing the tires it is important that both
2
of them have the same rolling radius. This is
necessary to ensure proper functioning of the
Fig. Wheels
anti-slip in the rear axle.
1. Air valve
2. Wheel nut
Check the tightening torque of the wheel nuts (2) at
630 Nm (465 lbf.ft).
Check both wheels and all nuts. (This only applies to a
new machine or newly fitted wheels).
Check the safety manual that accompanies the
roller before filling the tires with air.
2019-11-05
111
Maintenance, first 50h
Rear axle differential - Oil change
Never work under the roller when the engine is
running. Park on a level surface. Block the wheels
1
securely.
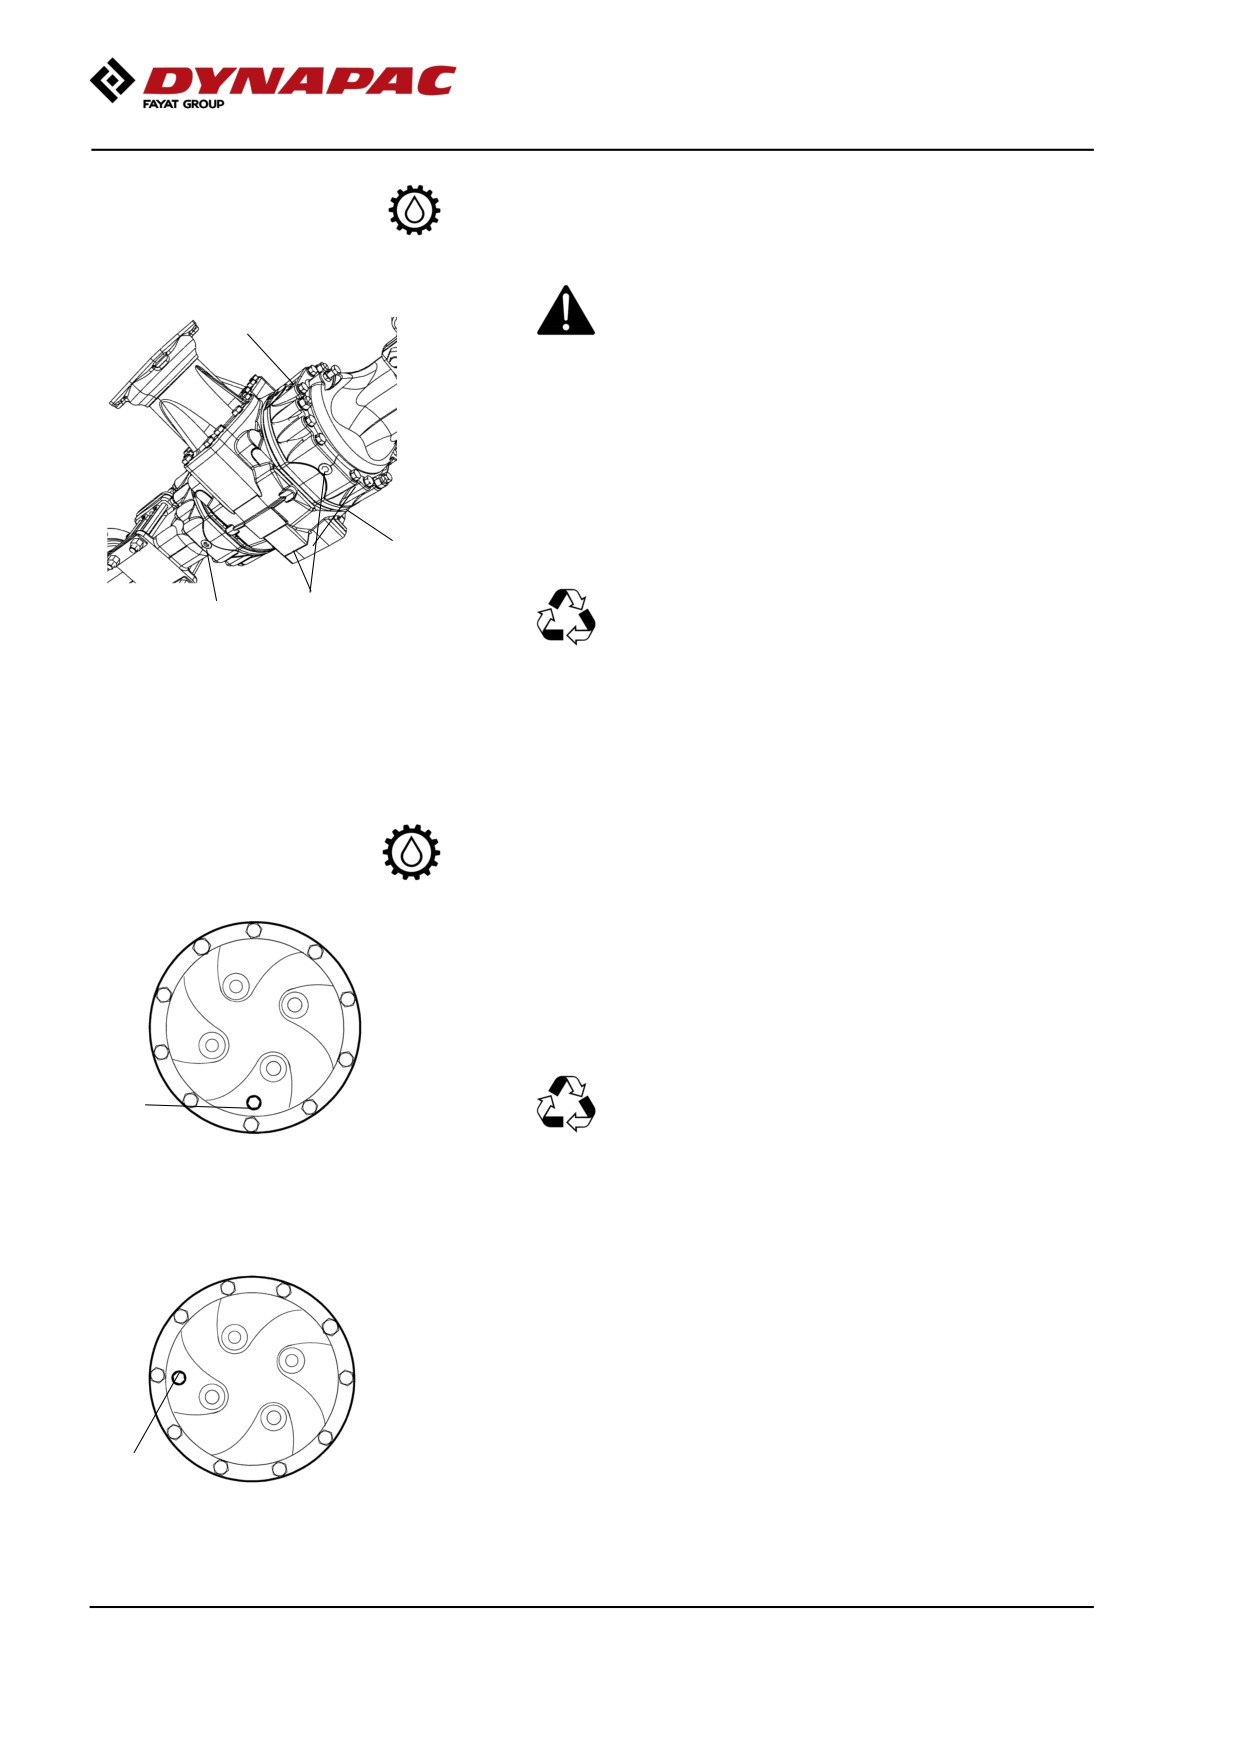
Wipe clean and remove the three level/filler plugs (1)
and (3) and all three drain plugs (2). The level/filler
plugs are located on the front and rear of the axle, and
the drain plugs are located on the underside and rear.
3
Drain the oil into a container. The volume is approx.
12.5 litres (13.2 qts).
Deliver the drain oil to environmentally correct
2
2
handling.
Fig. Rear axle, underside
1. Level/Filler plugs (x 3)
2. Drain plugs (x 3)
3. Filler plugs (x x)
Refit the drainage plugs and top up with fresh oil until
the correct level is reached. Refit the level/filler plugs.
Use transmission oil, see Lubricant Specification.
Rear axle planetary gear - Oil change
Position the roller with the plug (1) at its lowest
position.
Wipe clean, unscrew the plug (1) and drain the oil into
a suitable receptacle. The volume is approximately
1.85 liters (1.95 qts).
Oil should be taken to your local waste disposal
1
station.
Fig. Planetary gear/drainage position
1. Plug
Position the roller so that the plug (1) in the planetary
gear is at "9 o'clock" or "3 o'clock".
Fill with oil to lower edge of level hole. Use
transmission oil. See the lubrication specification.
Clean and refit the plug.
1
Check the fluid level in the same way on the rear
Fig. Planetary gear/filling position
axle's other planetary gear.
1. Plug
2019-11-05
112
Maintenance, first 50h
Drum gearbox - Oil change
2
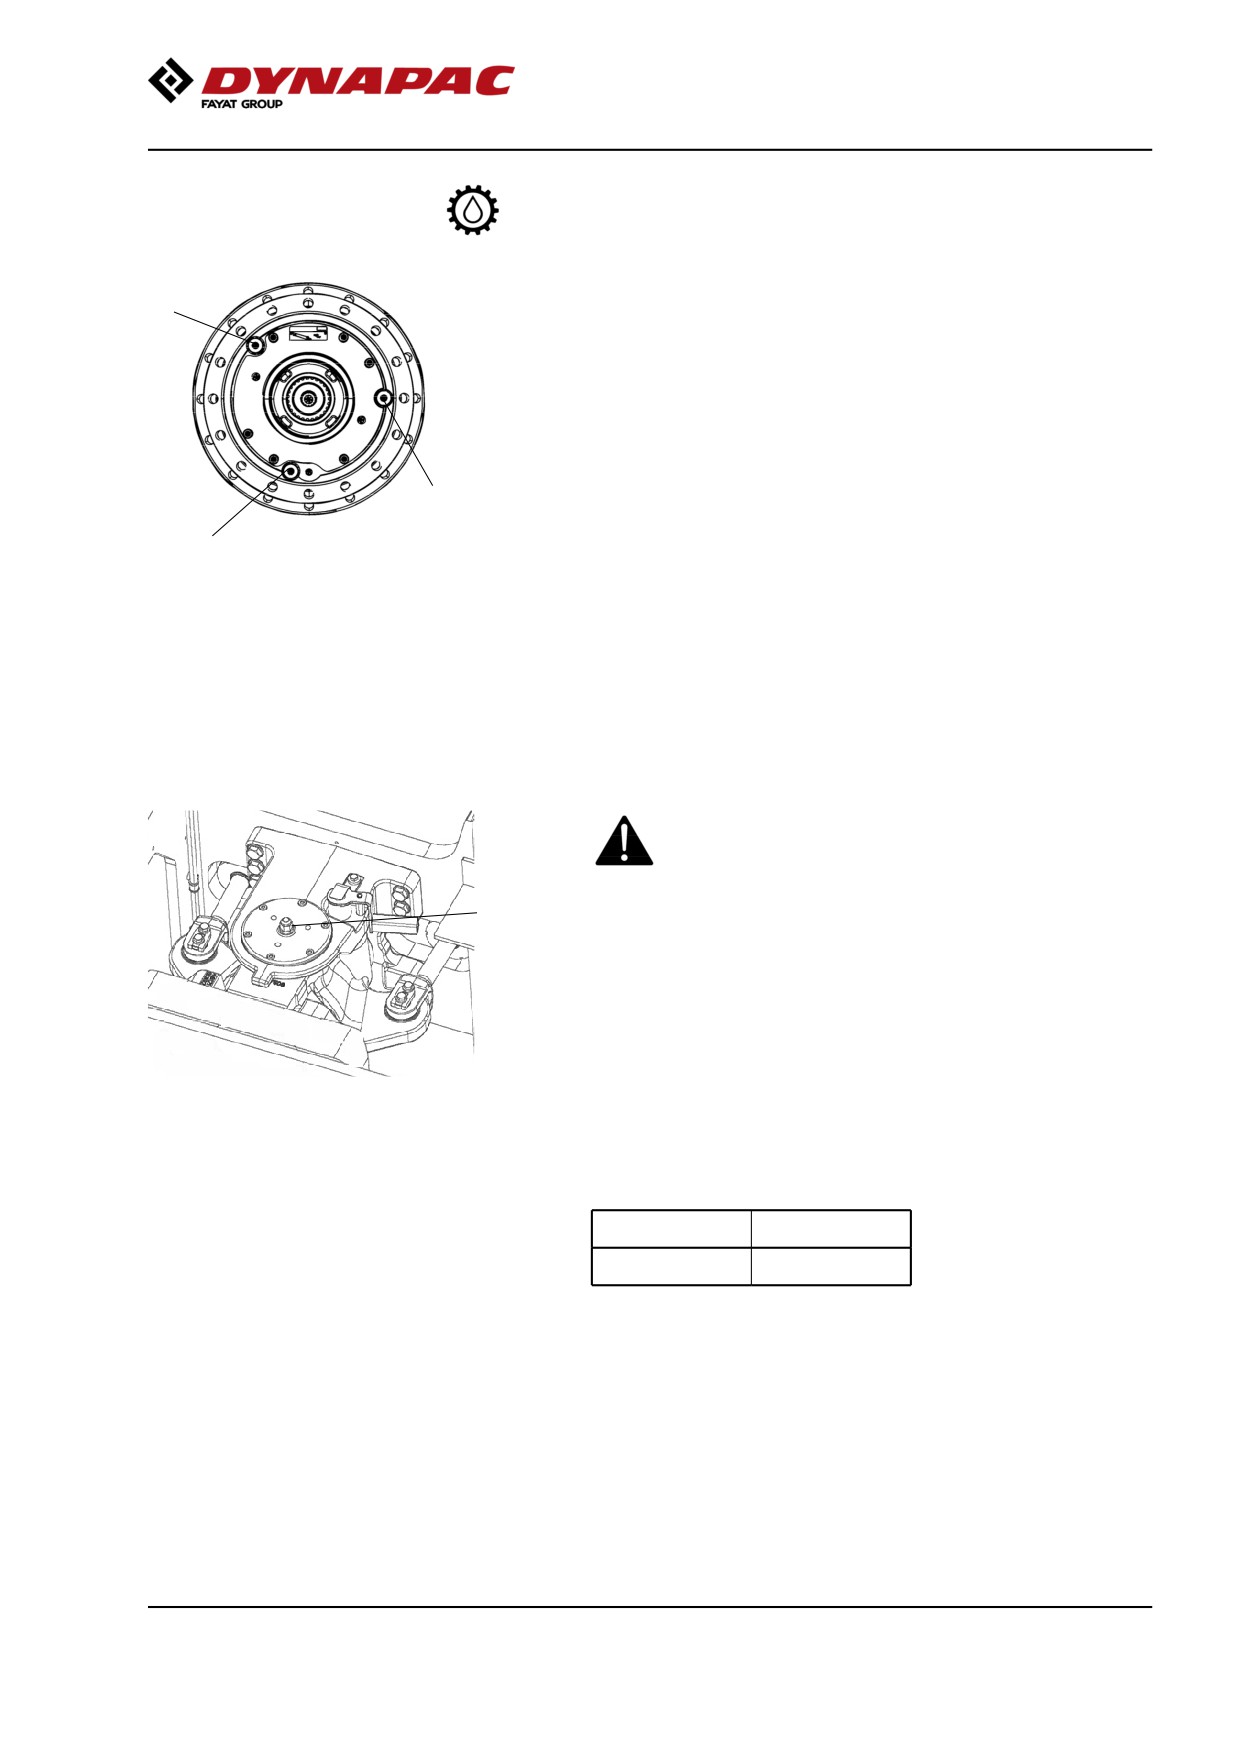
Wipe clean, unscrew the plugs (1, 2 and 3) and drain
the oil into a suitable receptacle, capacity about 5.0
liters (5,3 qts.).
Refit the drain plug (1) and fill with oil up to the level
plug (3), according to "Drum gearbox - Checking the
oil level".
Use transmission oil according to the lubricant
3
specification.
1
Clean and refit the level plug (3) and filler plug (2).
Fig. Drum gearbox
1. Drain plug
2. Filler plug
3. Level plug
Steering hitch - Tightening
Nobody must be allowed near the steering joint
when the engine is running. Risk of being
crushed when the steering is operated. Switch
off the engine and activate the parking brake
1
before lubricating.
The easiest way to identify if you have this type of
steering hitch is that it has a new type of nut (1) at the
top, as shown.
Fig. Steering hitch
1. Nut
Actual torque (Nm) should be when the machine's
position is straight ahead.
M14
174 Nm
M16
270 Nm
2019-11-05
113
Maintenance, first 50h
2019-11-05
114
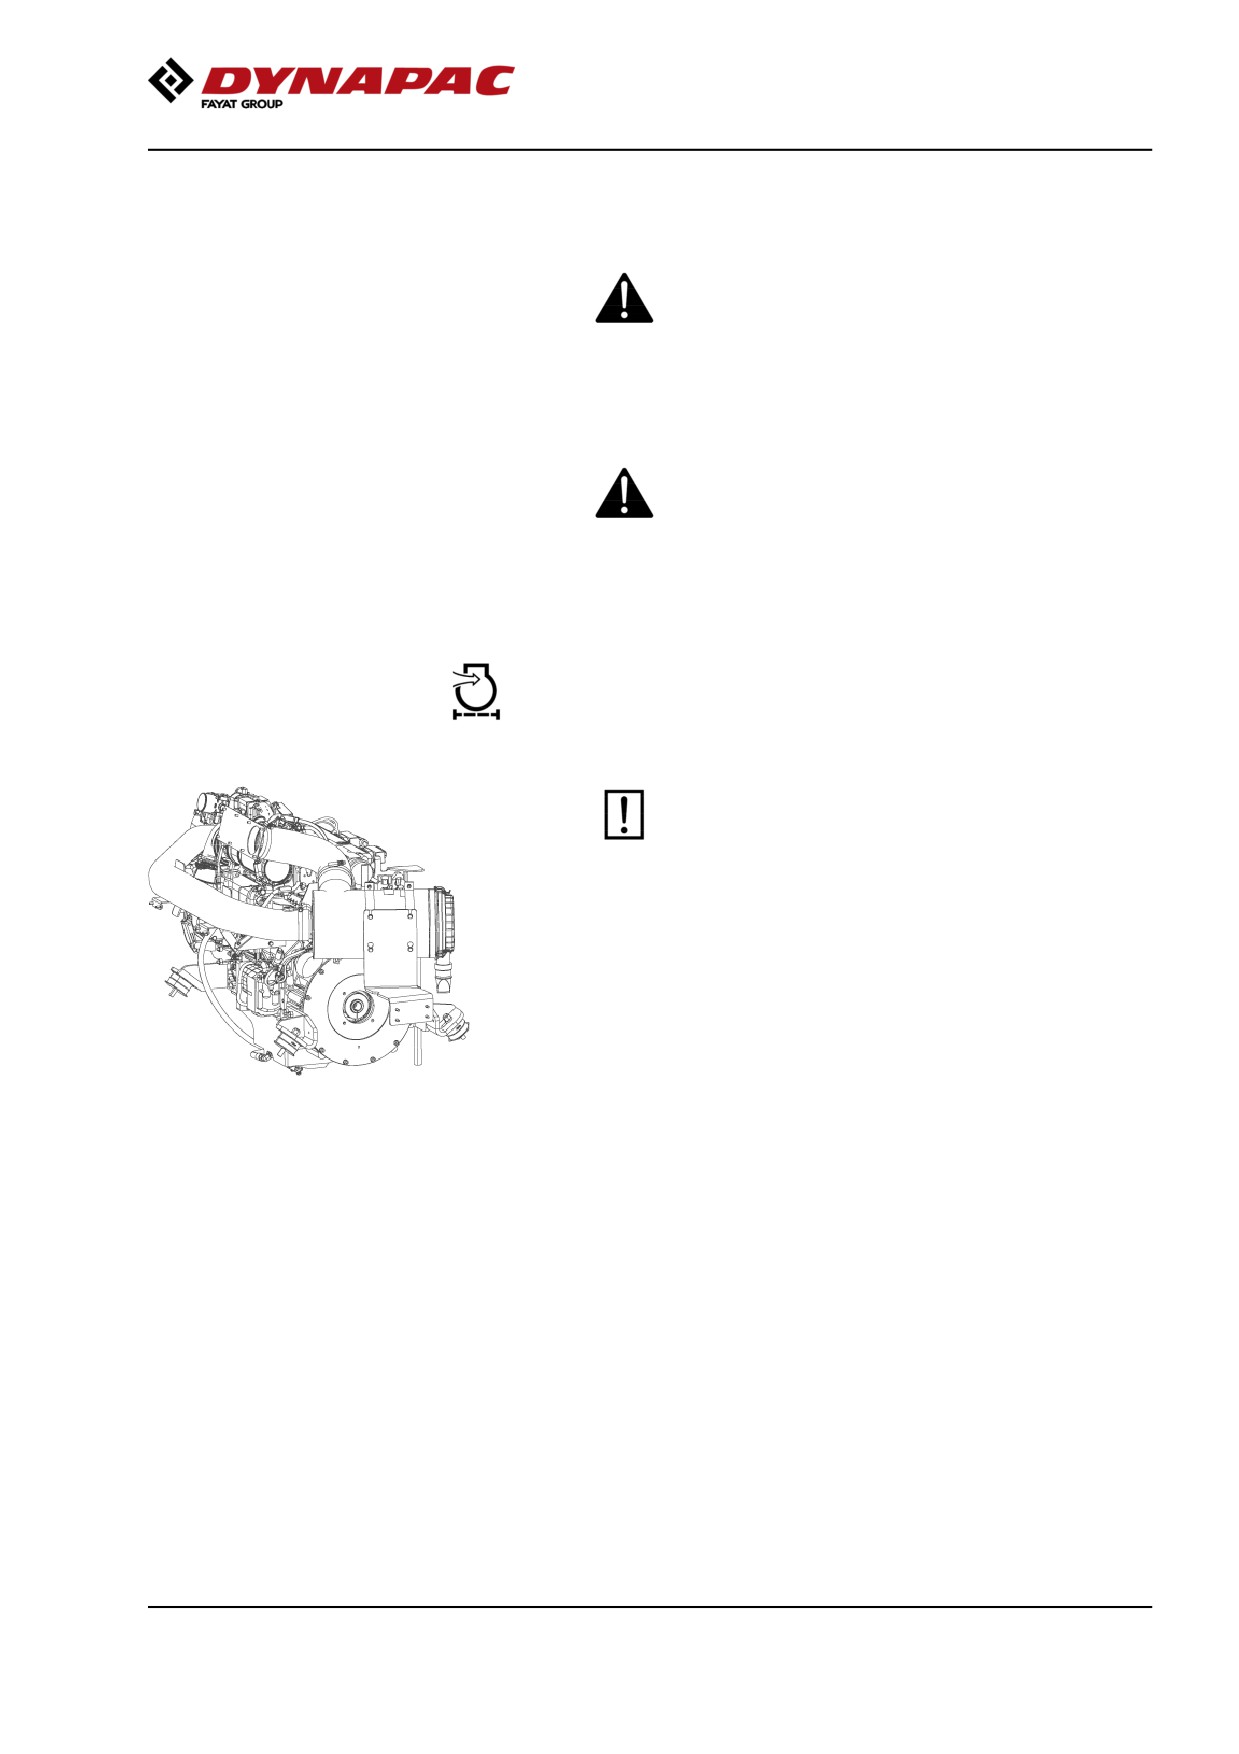
Maintenance - 50h
Maintenance - 50h
Every 50 hours of operation (Weekly)
Park the roller on a level surface.
The engine must be switched off and the
parking brake activated when checking or
adjusting the roller, unless otherwise specified.
Ensure that there is good ventilation (air
extraction) if the engine is run indoors. Risk of
carbon monoxide poisoning.
Air cleaner
- Check hoses and connections
Check that the hose clamps between the filter
housing and the suction hose are tight and that
the hoses are intact. Inspect the entire hose
system, all the way to the engine.
Replace if necessary, as damage to hoses/hose
clamps can seriously damage the engine
2019-11-05
115
Maintenance - 50h
2019-11-05
116
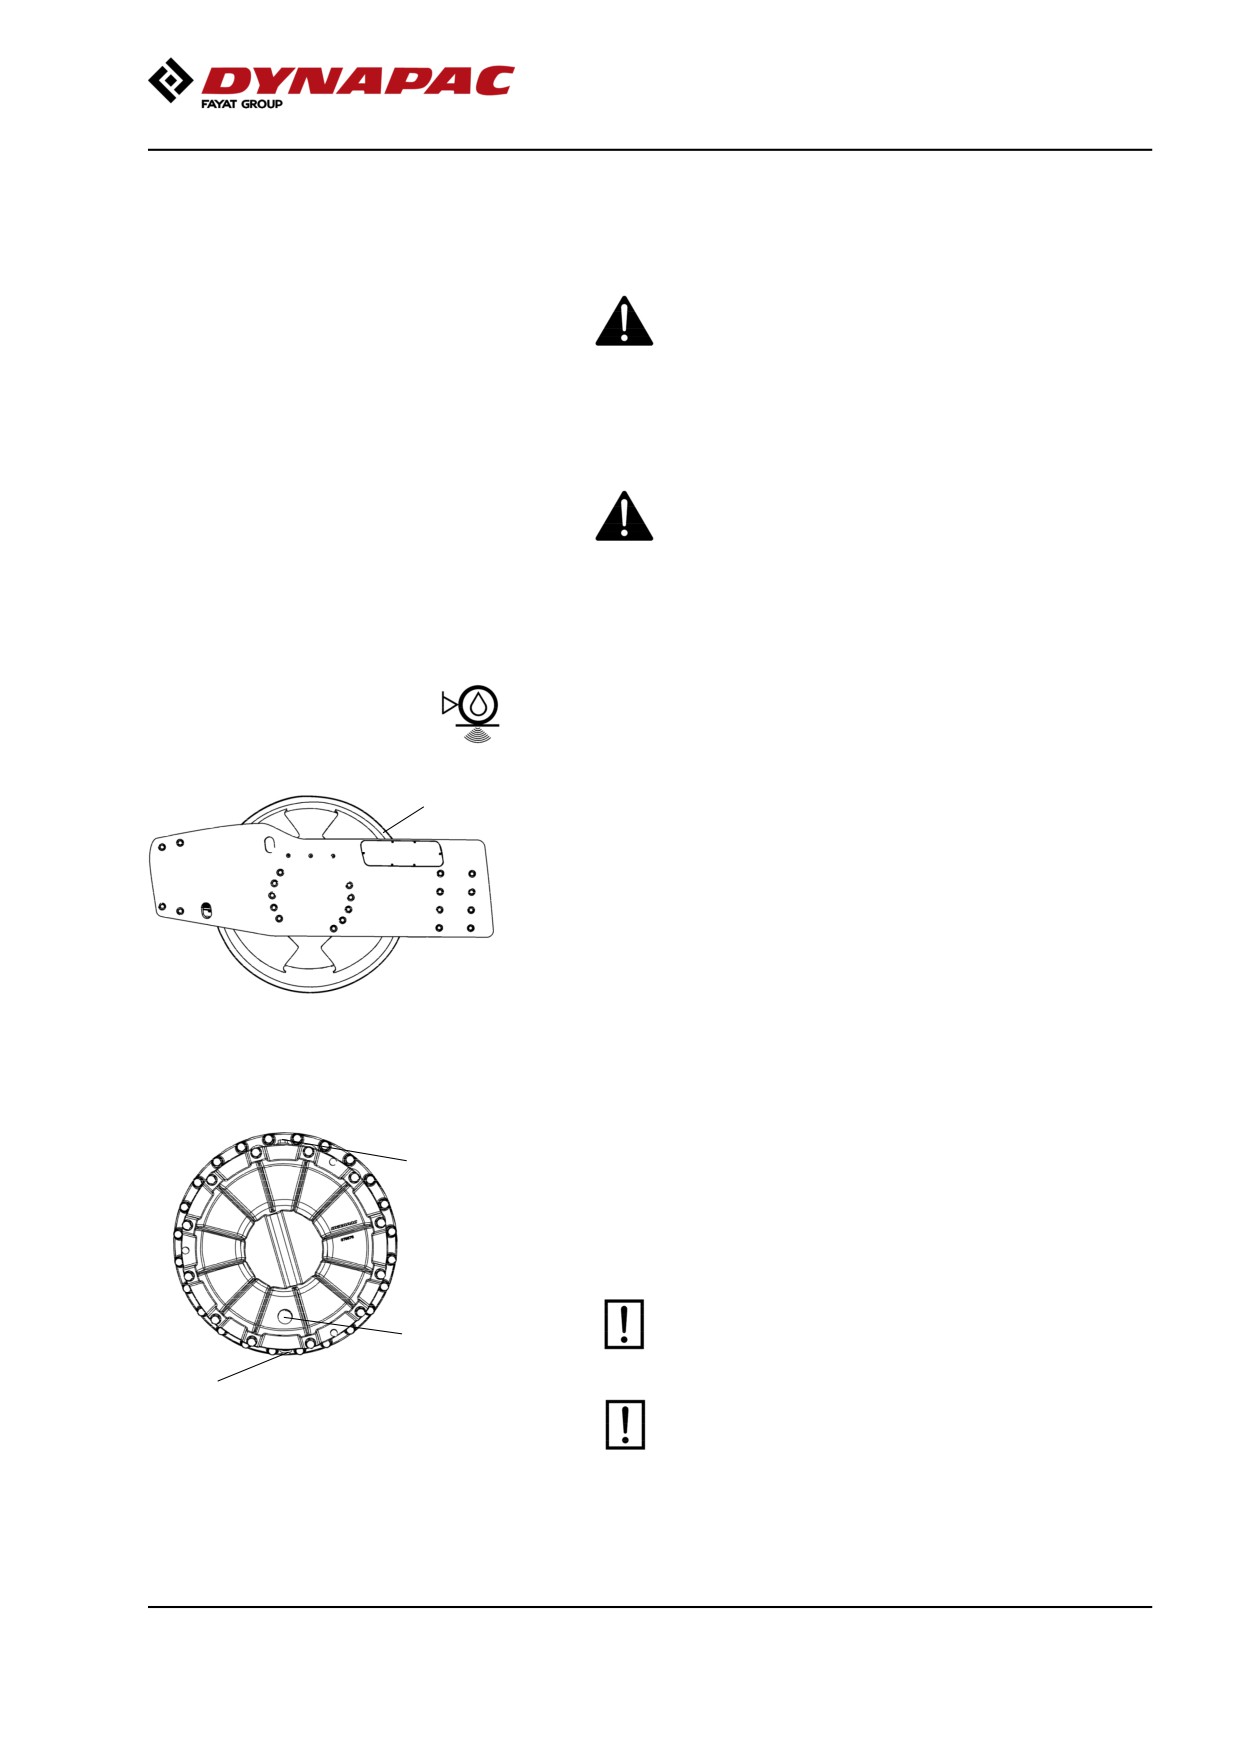
Maintenance measures - 250 h
Maintenance measures - 250 h
Every 250/750/1250/1750
hours of operation (every
3 months)
Park the roller on a level surface.
The engine must be switched off and the
parking brake activated when checking or
adjusting the roller, unless otherwise specified.
Ensure that there is good ventilation (air
extraction) if the engine is run indoors. Risk of
carbon monoxide poisoning.
Drum cartridge - Checking the oil level
1
Position the roller on a flat surface with the groove (1)
on the inside of the drum aligned with the top of the
drum frame.
Fig. Left drum side
1. Groove
The oil should now come up to the sight glass (3).
1
If necessary, release the filler plug (1) and fill to half
the sight glass (3).
Clean the magnetic filler plug (1) of any metallic
residue, before refitting the plug.
Ensure that only Dynapac Drum Oil 1000 is used
3
in the cartridges.
2
Do not overfill with oil - risk for overheating.
Fig. Left drum side
1. Filler plug
2. Drain plug
3. Sight glass
Now repeat the procedure on the opposite side of the
drum.
2019-11-05
117
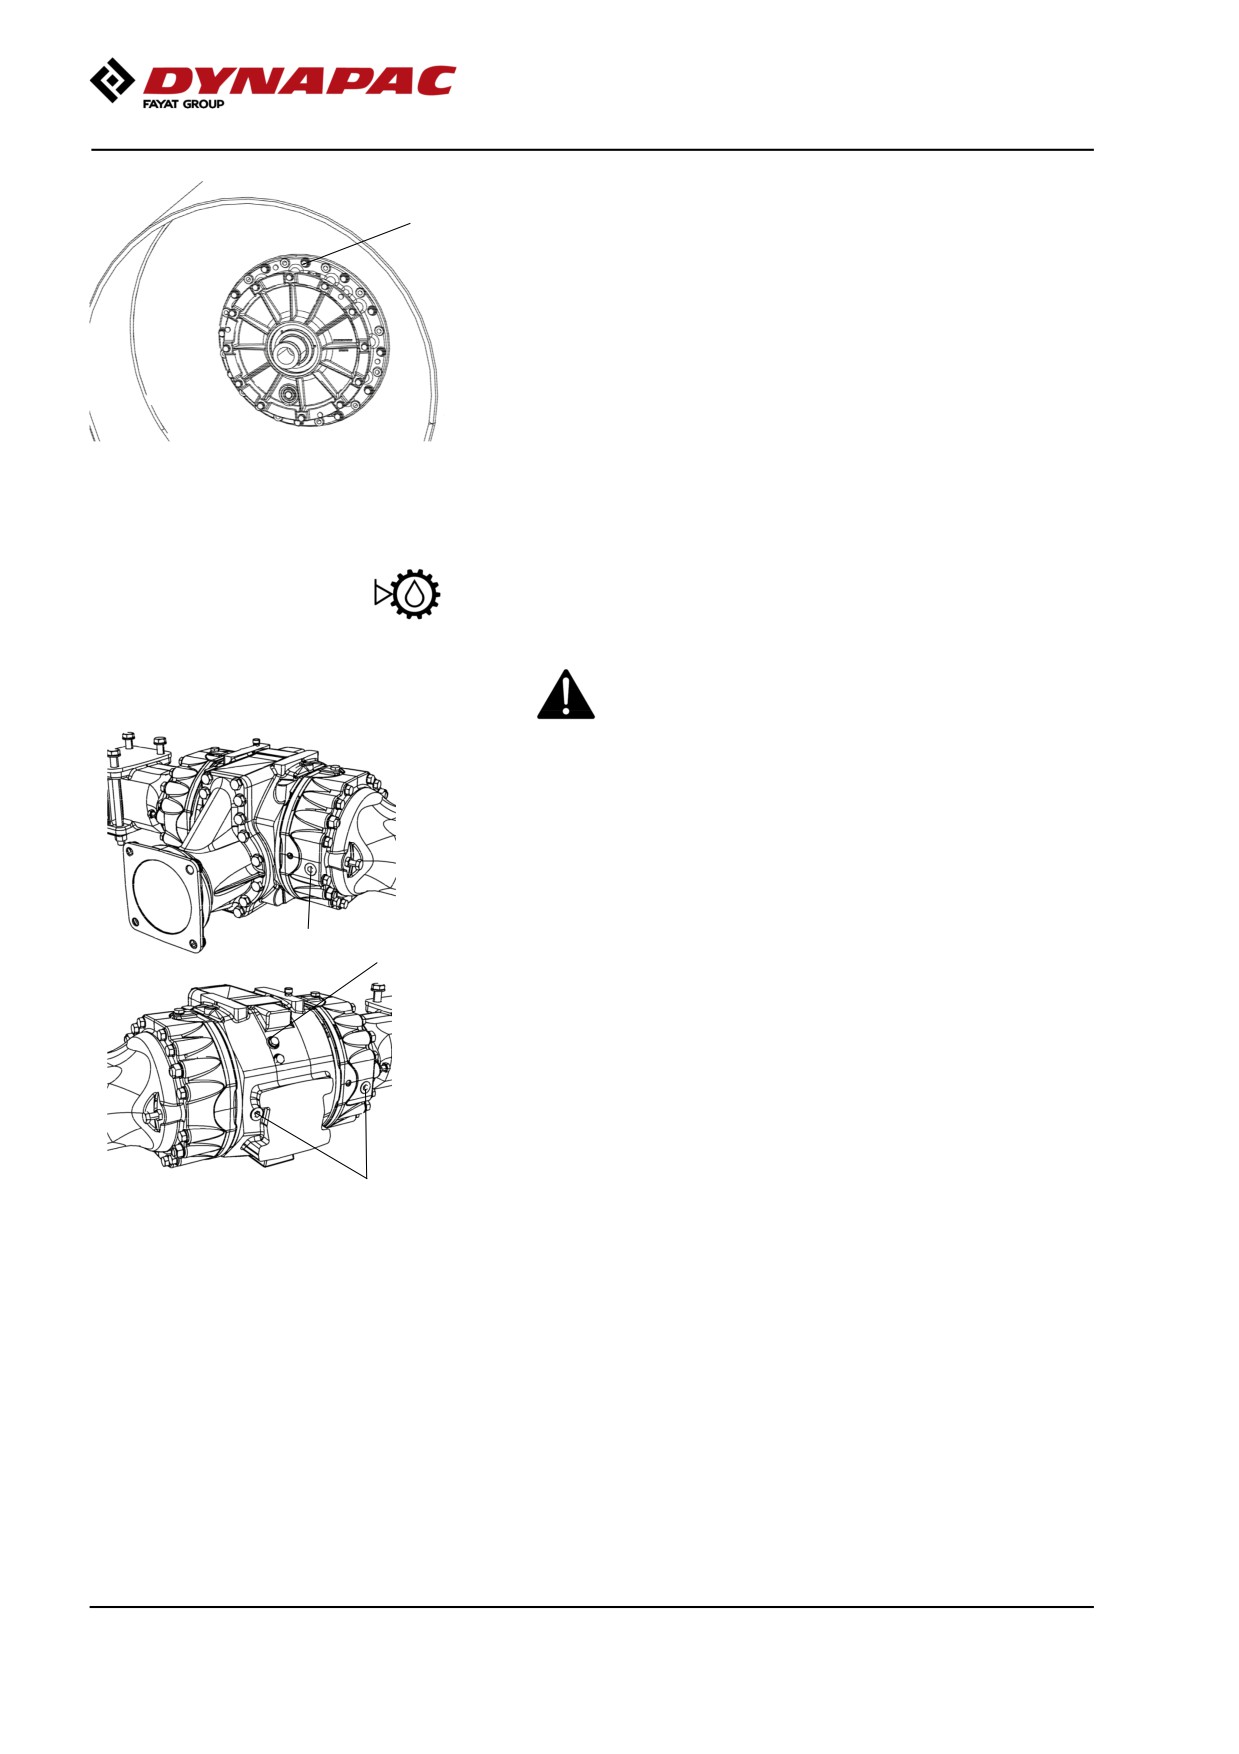
Maintenance measures - 250 h
1
Drum cartridge - Cleaning the ventilation screw
Clean the drum's ventilation hole and ventilation screw
(1). The hole is required to eliminate excess pressure
inside the drum.
Fig. Drum
1. Ventilation screw
Rear axle differential - Check oil level
Never work under the roller when the engine is
running. Park on a level surface. Block the wheels
securely.
Wipe clean and remove the level plugs (1) and check
that the oil level reaches the lower edge of the plug
holes. The plugs can be found at the front or rear of
the rear axle.
1
2
At a low level, remove the filler plug (2) and top up
with oil to the correct level. Use transmission oil, see
lubricant specifications.
Clean and refit the plug.
1
Fig. Level control - differential housing
1. Level plugs (x 3)
2. Filler plug
2019-11-05
118
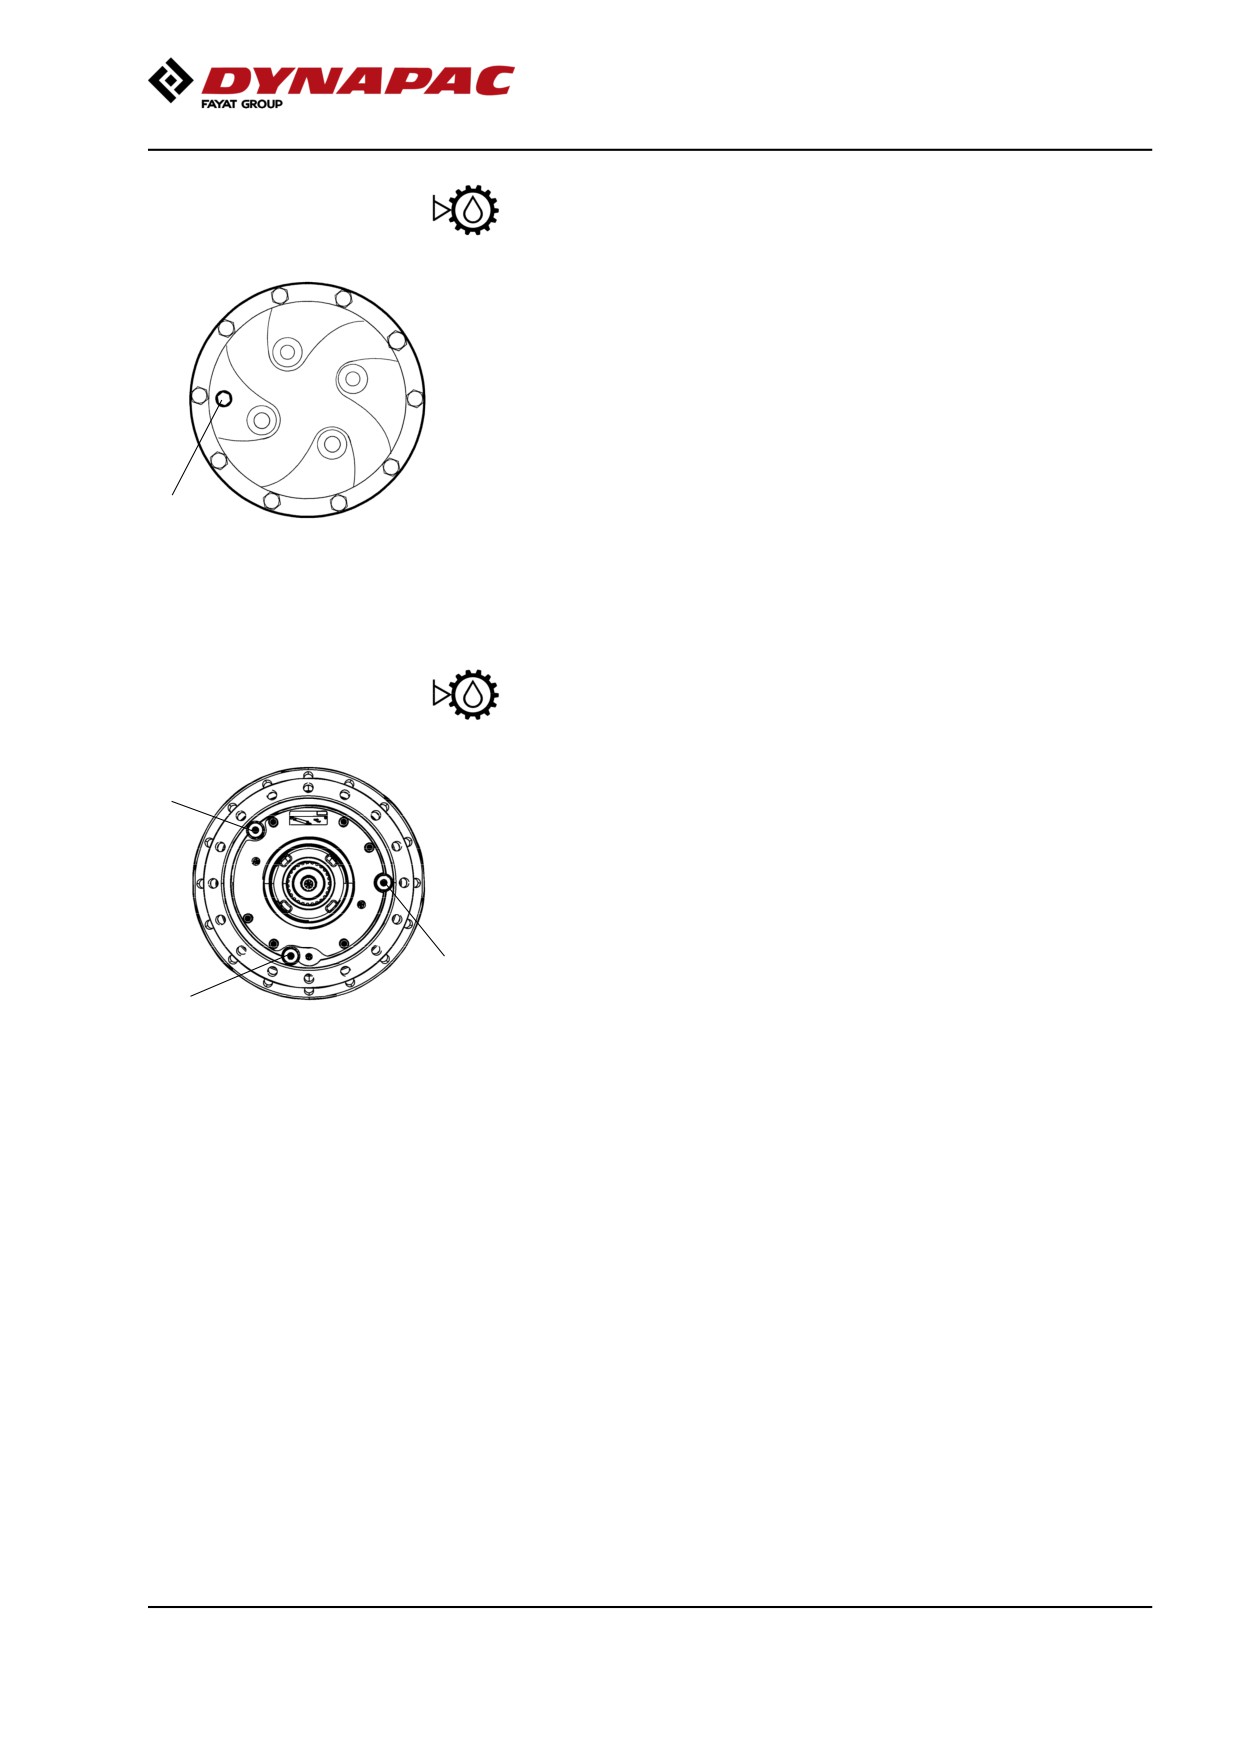
Maintenance measures - 250 h
Rear axle planetary gears - Check oil level
Position the roller so that the level plug (1) in the
planetary gear is at "9 o'clock" or "3 o'clock".
Wipe clean and remove the level plug (1) and check
that the oil level reaches the lower edge of the plug
hole. Top off with oil to the right level if the level is low.
Use transmission oil. See lubrication specification.
Clean and refit the plug.
1
Check the fluid level in the same way on the rear
Fig. Level check - planetary gear
axle's other planetary gear.
1. Level/Filler plug
Drum gearbox - Checking the oil level
Wipe clean the area around the level plug (1) and then
2
undo the plug.
Ensure that the oil level reaches up to the lower edge
of the plug hole.
Top off with oil to the right level if the level is low. Use
transmission oil according to the lubricant specification.
1
Clean and refit the plugs.
3
Fig. Oil level check - drum gearbox
1. Level plug
2. Filler plug
3. Drain plug
2019-11-05
119
Maintenance measures - 250 h
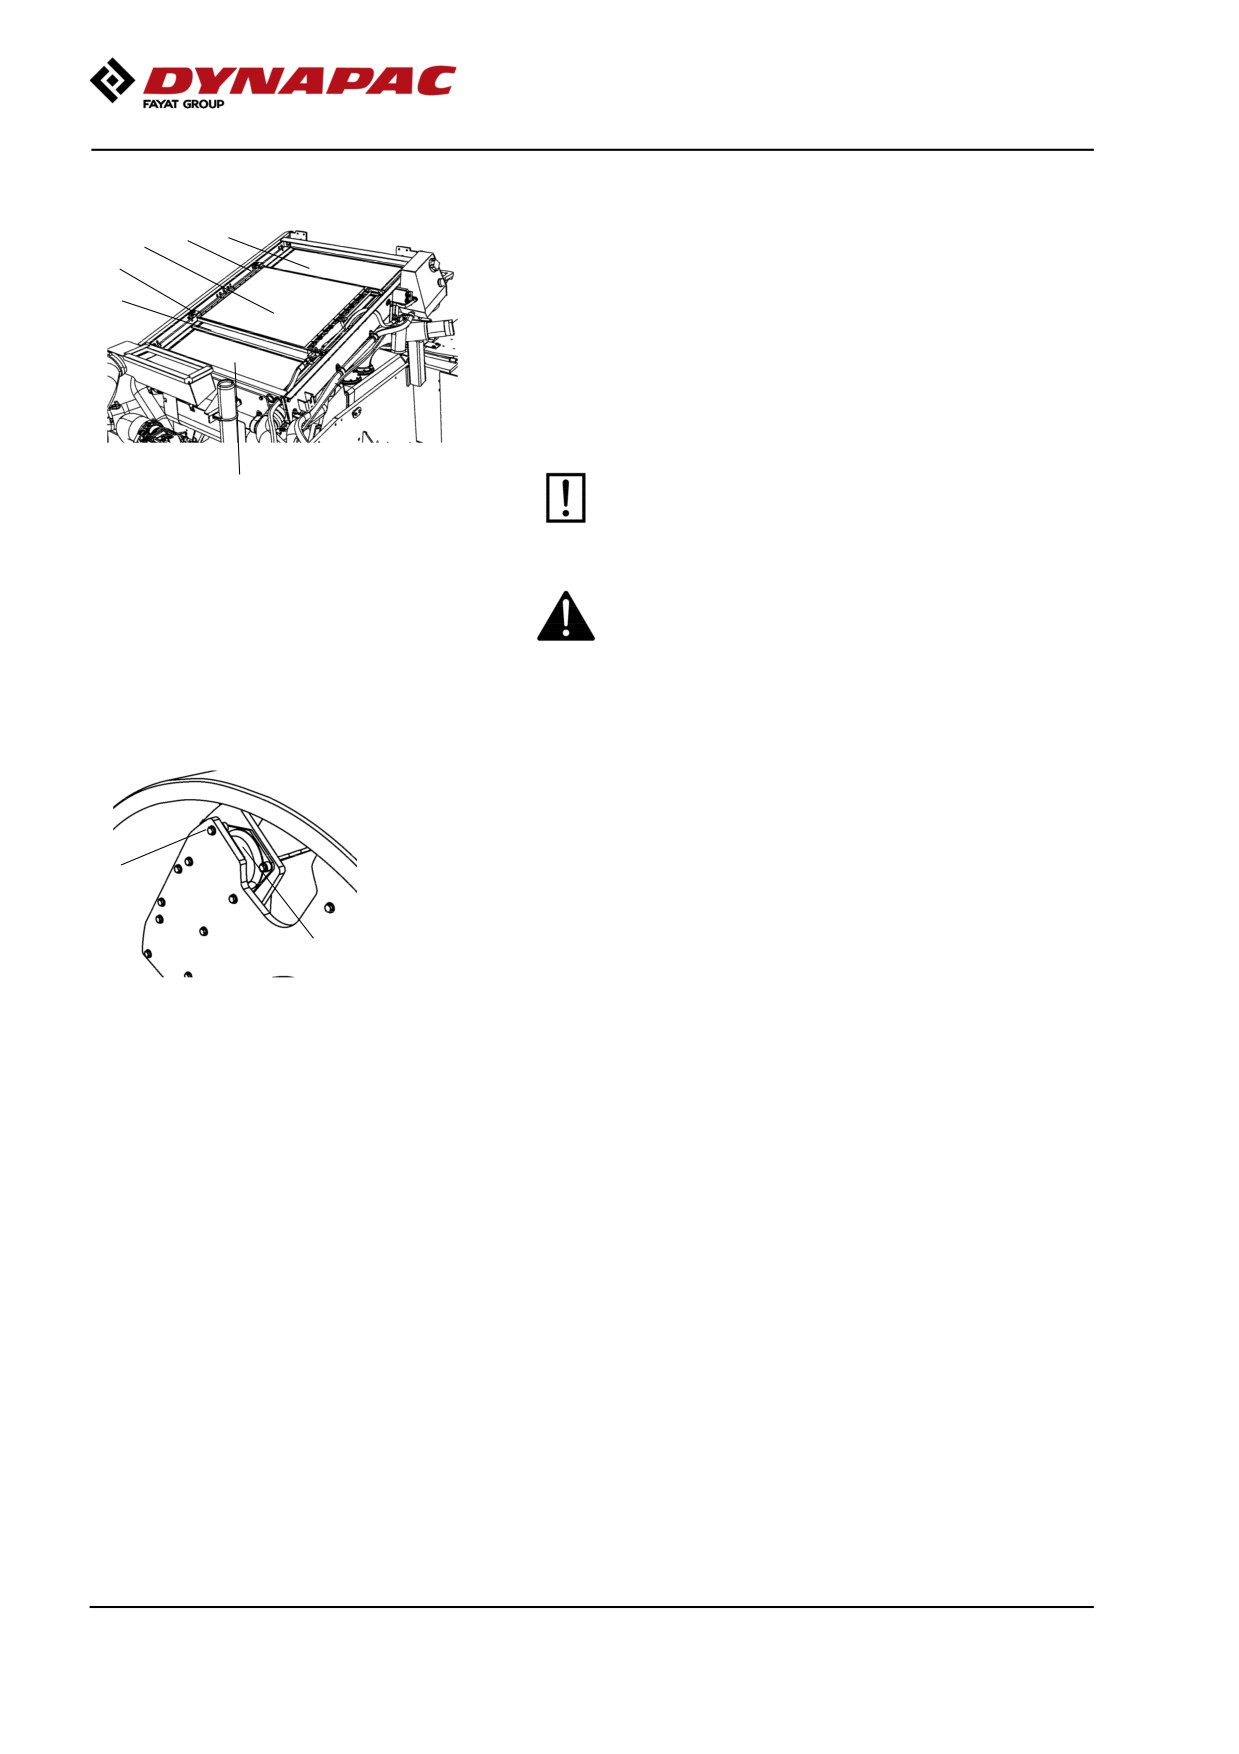
Radiator - Check/Cleaning
5
3
4
Check that air can pass unobstructed through the
5
radiators (1), (2) and (3).
1
Clean a dirty radiator using compressed air or a
high-pressure water jet.
Undo the two screws (5) and tilt the condenser
element upwards.
Blow air or direct water through the cooler in the
opposite direction to that of the cooling air.
Be careful when using a high-pressure washer -
2
do not place the nozzle too close to the radiator.
Fig. Engine compartment
1. Water cooler
2. Charge air cooler
3. Hydraulic fluid cooler
Wear protective goggles when working with
4. Condenser element AC (Optional)
compressed air or high-pressure water jets.
5. Screws (x 2)
Rubber elements and fastening screws - Check
Check all rubber elements (1), replace all of the
elements if more than 25% of them on one side of the
drum are cracked deeper than 10-15 mm (0.4-0.6 in).
2
Check using a knife blade or pointed object.
Check also that the screw fasteners (2) are tightened.
1
Fig. Drum, drive side
1. Rubber element
2. Attachment screws
2019-11-05
120
Maintenance measures - 250 h
Battery
- Check condition
The batteries are sealed and maintenance-free.
Make sure there is no open flame in the vicinity
when checking the electrolyte level. Explosive gas
is formed when the alternator charges the battery.
When disconnecting the battery, always
disconnect the negative cable first. When
connecting the battery, always connect the
positive cable first.
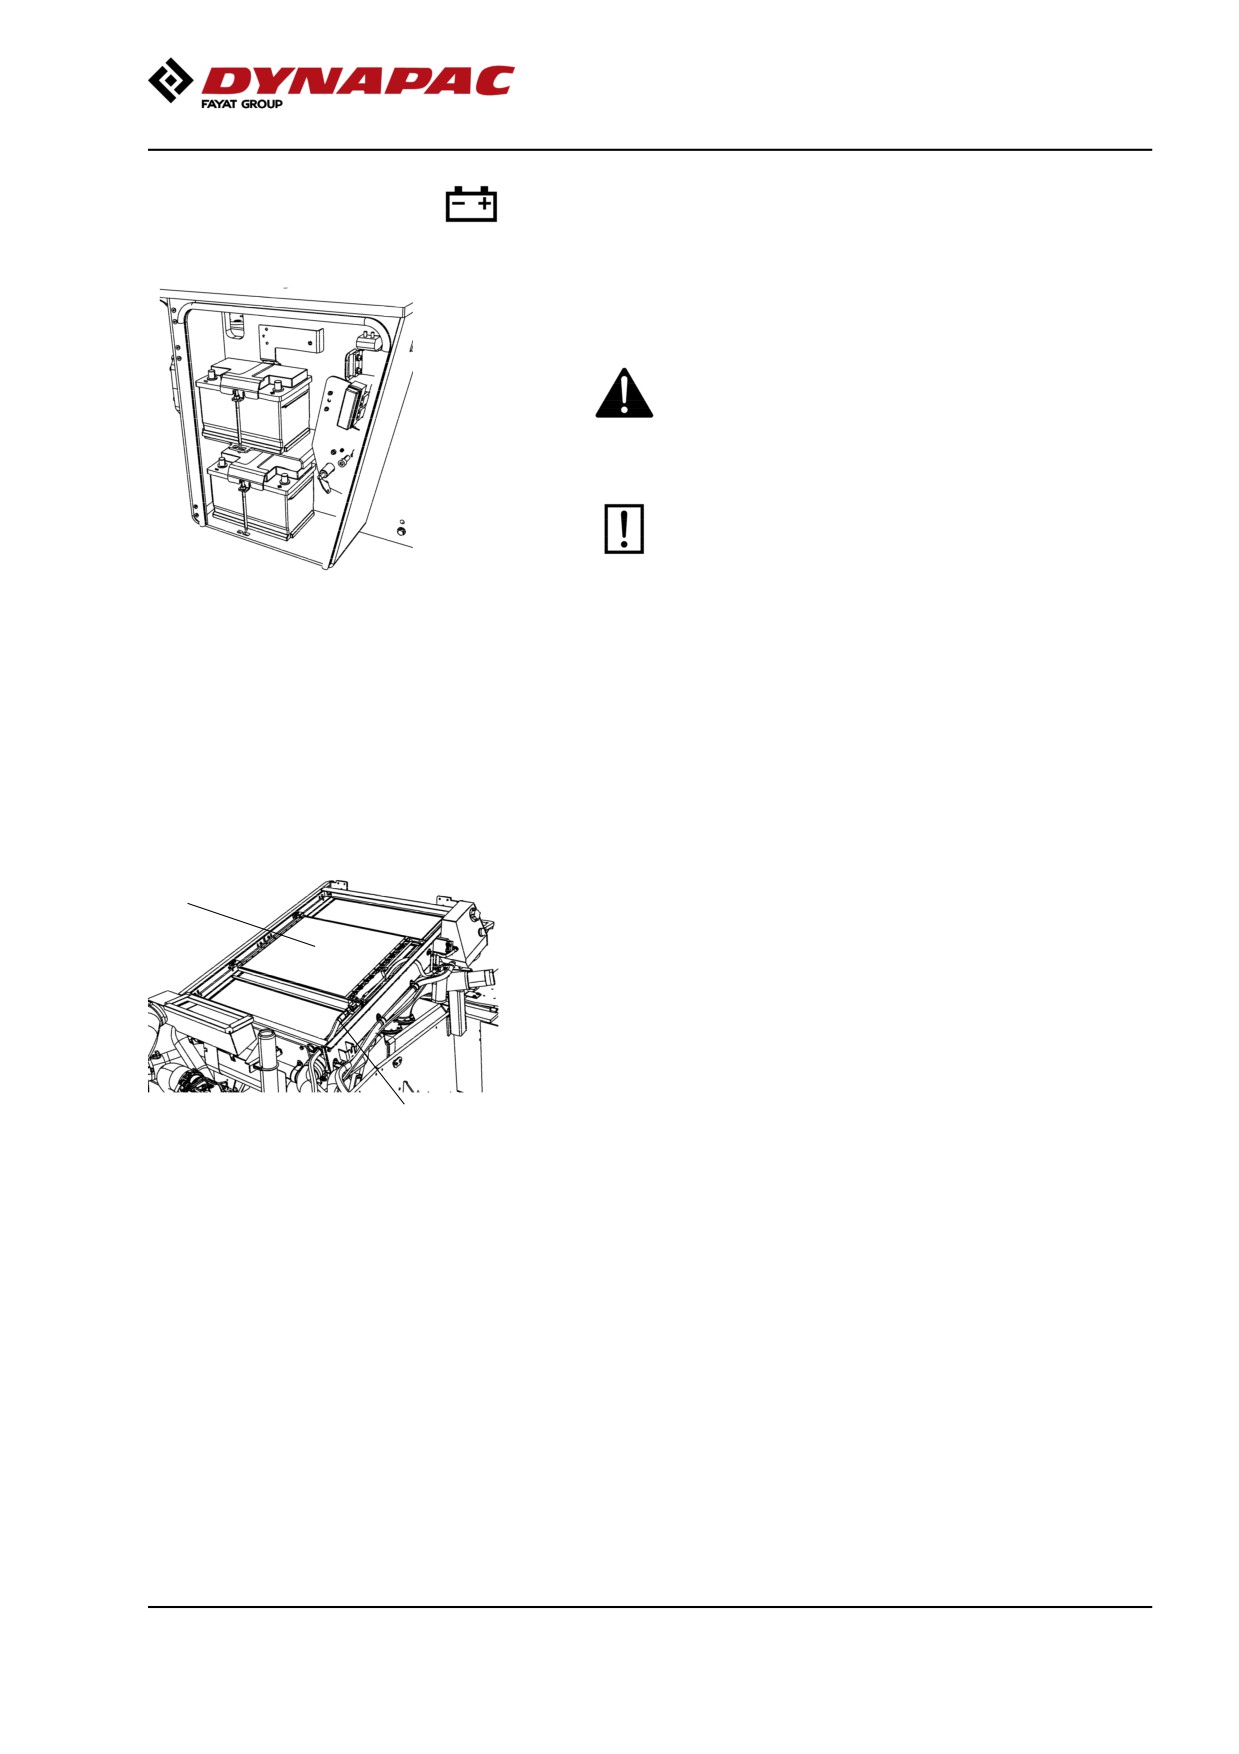
Figure. Batteries
The cable shoes should be clean and tightened.
Corroded cable shoes should be cleaned and greased
with acid-proof Vaseline.
Wipe the top of the battery.
Air conditioning (Optional)
- Inspection
2
Inspect refrigerant hoses and connections and make
sure that there are no signs of an oil film that can
indicate a refrigerant leakage.
The refrigerant contains tracing liquid, which makes it
possible to detect leaks with the aid of a UV lamp. If
the areas around the connections are strongly
coloured, this is an indication of a leak.
1
Fig. Air conditioning
1. Refrigerant hoses
2. Condensor element
2019-11-05
121
Maintenance measures - 250 h
Automatic Climate Control (Optional) -
Inspection
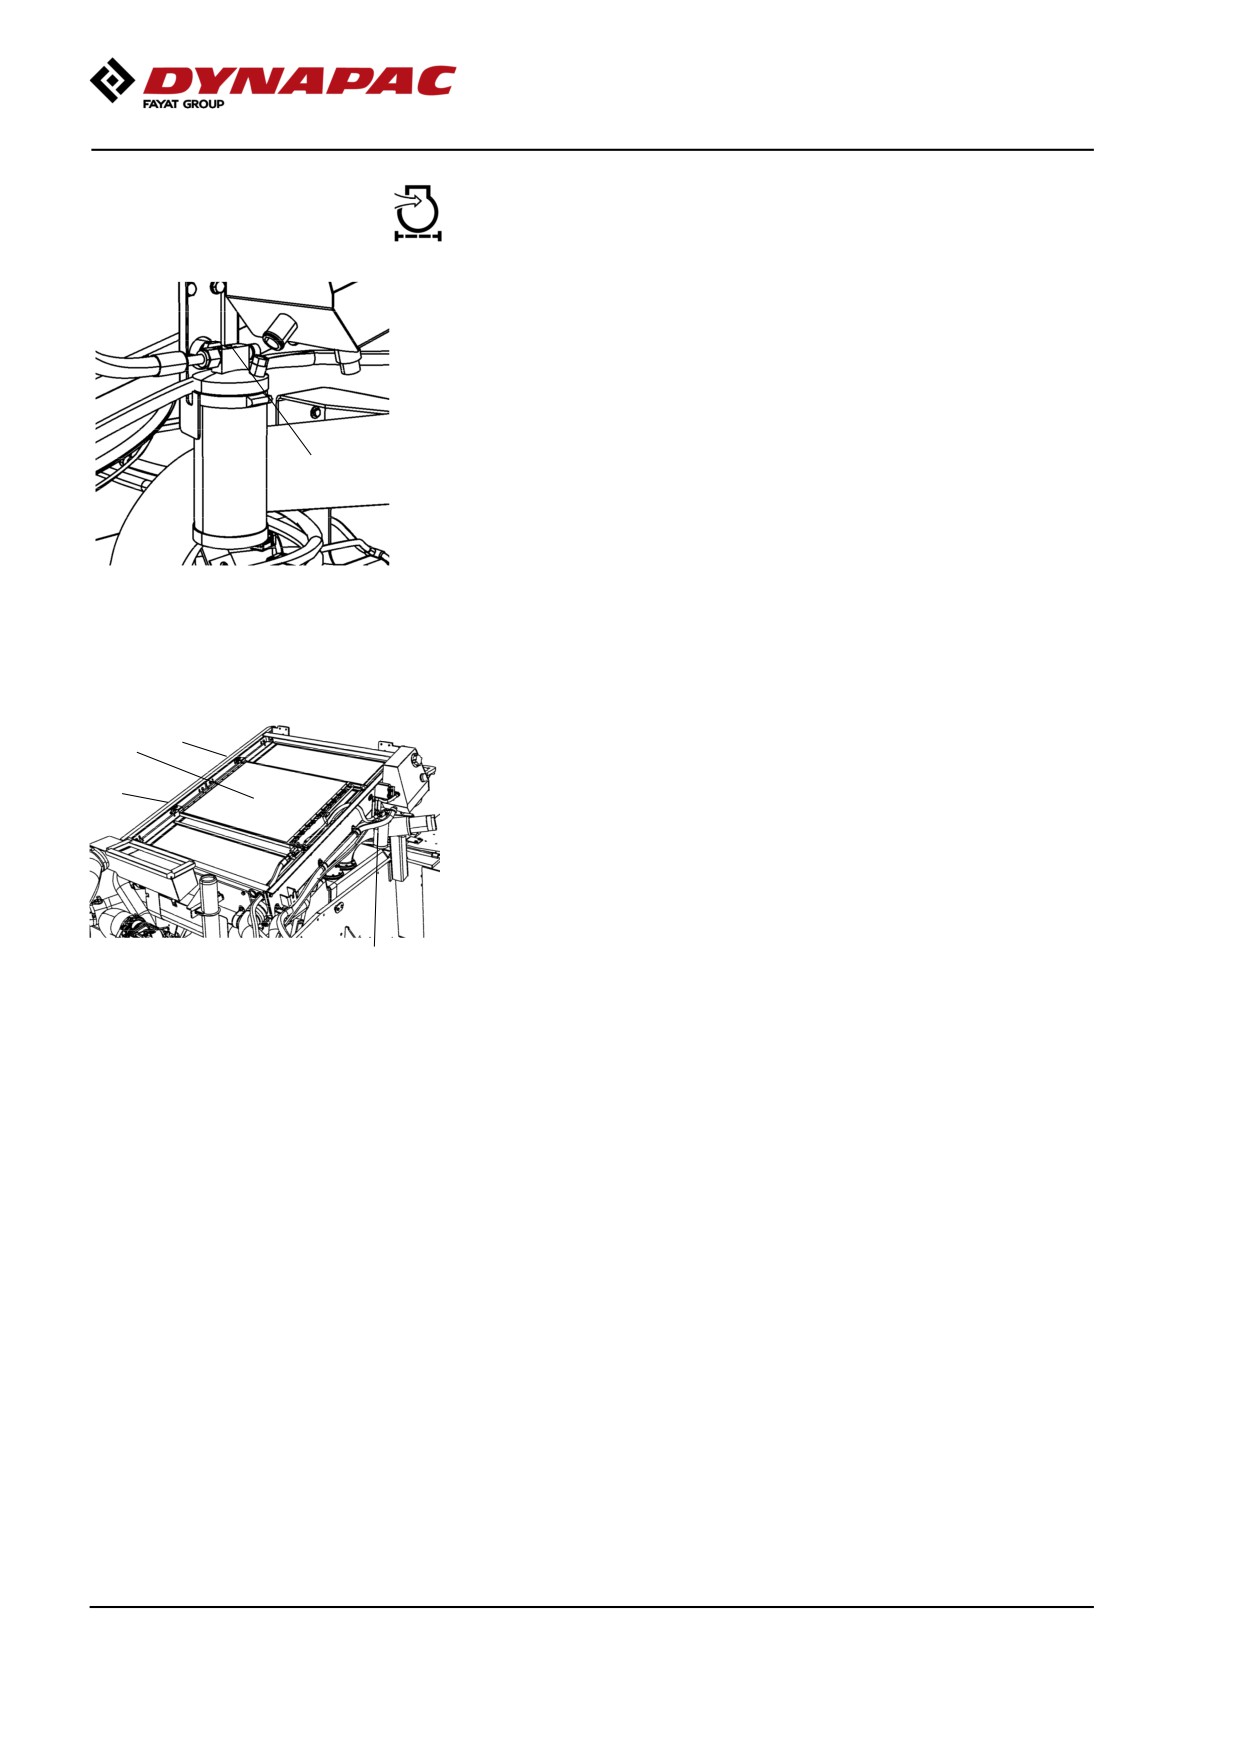
With the unit in operation, open the engine hood and
check using the sight glass (1) that bubbles are not
visible on the drying filter.
The filter is located on the right-hand side at the front
edge of the engine compartment. If bubbles are visible
through the sight glass, this is a sign that the
refrigerant level is too low. If so, stop the unit. The unit
1
may be damaged if it is run with insufficient refrigerant.
Fig. Drying filter
1. Sight glass
3
1
If there is a significant loss of cooling capacity, clean
the condenser element (1) located above the coolers
3
in the engine compartment.
Undo the two screws (3) and tilt the condenser
element (1) upwards.
Also clean the cooling unit in the cab. See under the
heading 2000 hours, air conditioning - overhaul.
2
Fig. Engine compartment
1. Condenser element
2. Drying filter
3. Screws (x 2)
2019-11-05
122
Maintenance measures - 500 h
Maintenance measures - 500 h
Every 500/1500
hours of operation (every six
months)
Park the roller on a level surface.
The engine must be switched off and the
parking brake activated when checking or
adjusting the roller, unless otherwise specified.
Ensure that there is good ventilation (air
extraction) if the engine is run indoors. Risk of
carbon monoxide poisoning.
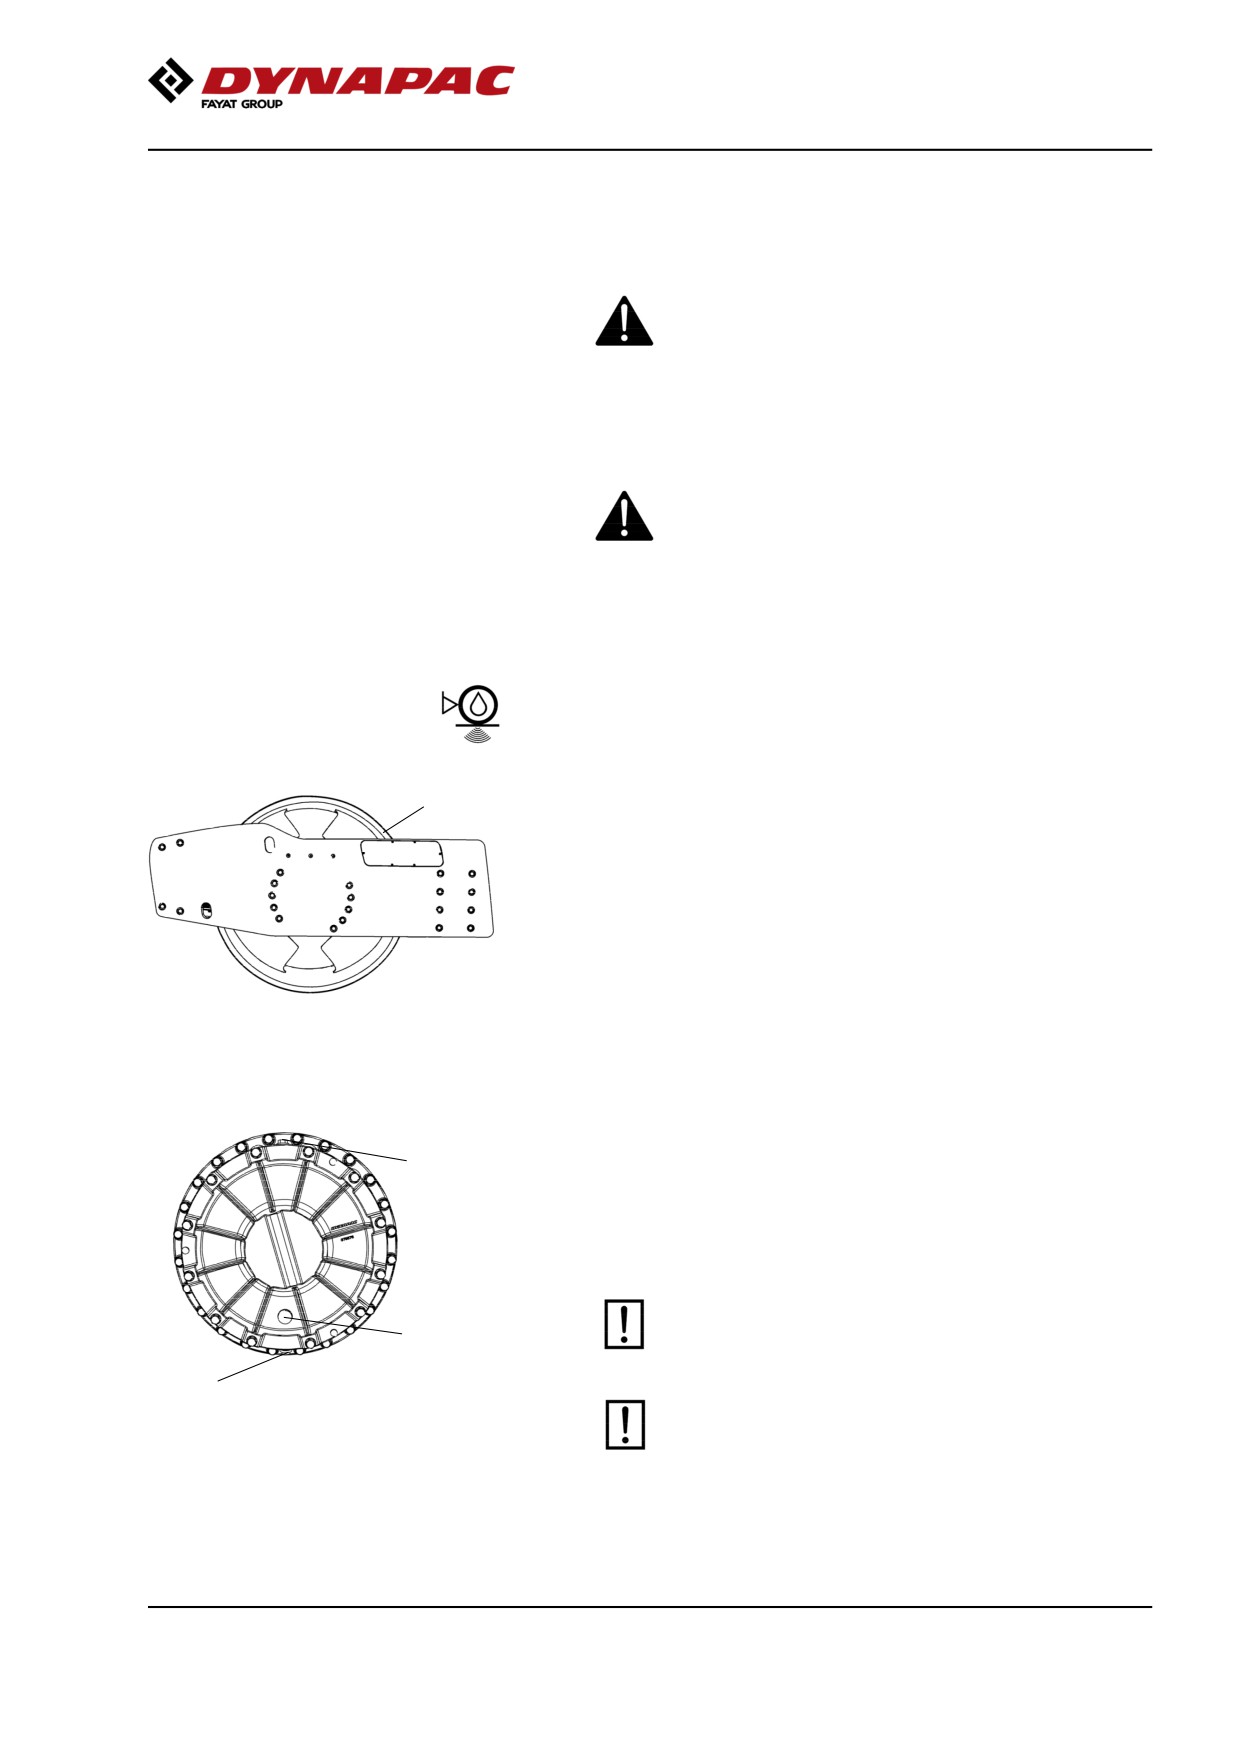
Drum cartridge - Checking the oil level
1
Position the roller on a flat surface with the groove (1)
on the inside of the drum aligned with the top of the
drum frame.
Fig. Left drum side
1. Groove
The oil should now come up to the sight glass (3).
1
If necessary, release the filler plug (1) and fill to half
the sight glass (3).
Clean the magnetic filler plug (1) of any metallic
residue, before refitting the plug.
Ensure that only Dynapac Drum Oil 1000 is used
3
in the cartridges.
2
Do not overfill with oil - risk for overheating.
Fig. Left drum side
1. Filler plug
2. Drain plug
3. Sight glass
Now repeat the procedure on the opposite side of the
drum.
2019-11-05
123
Maintenance measures - 500 h
1
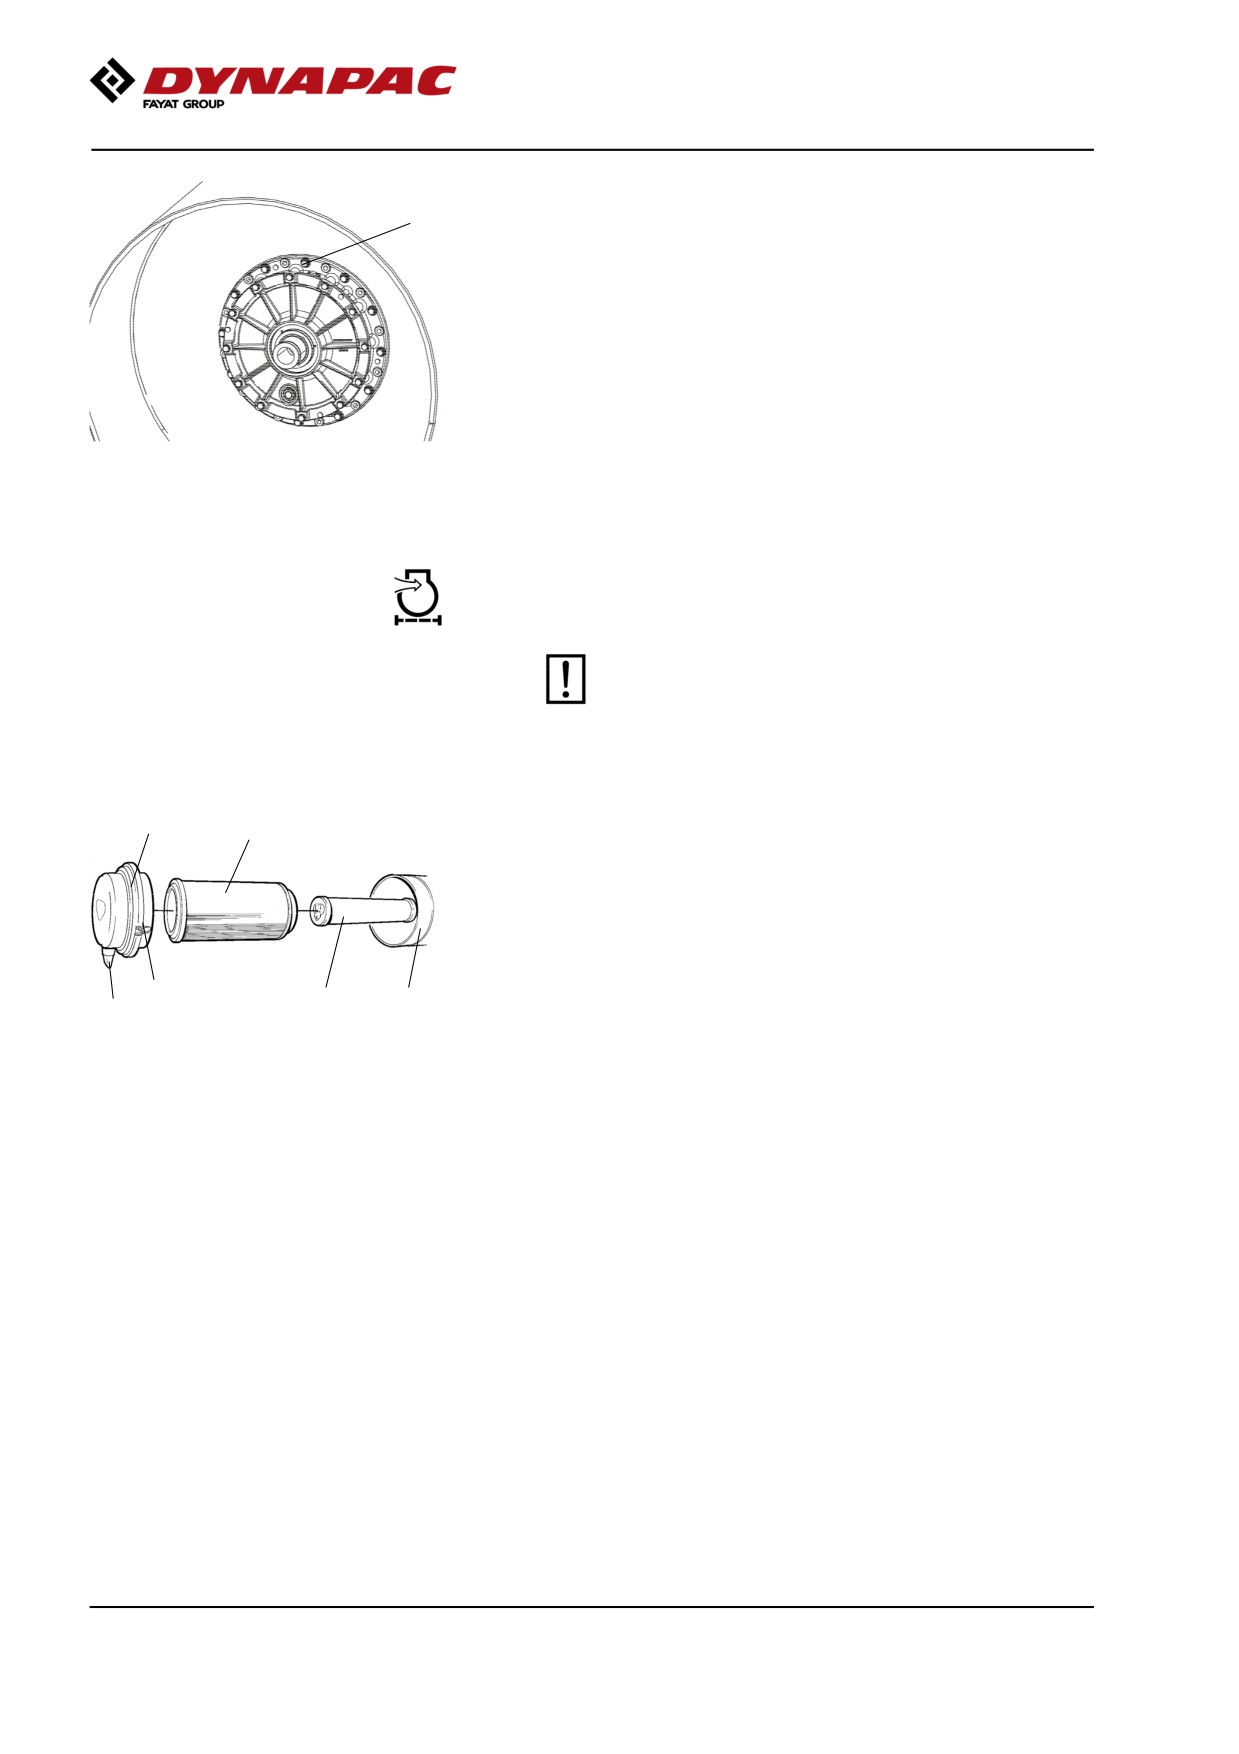
Drum cartridge - Cleaning the ventilation screw
Clean the drum's ventilation hole and ventilation screw
(1). The hole is required to eliminate excess pressure
inside the drum.
Fig. Drum
1. Ventilation screw
Air cleaner
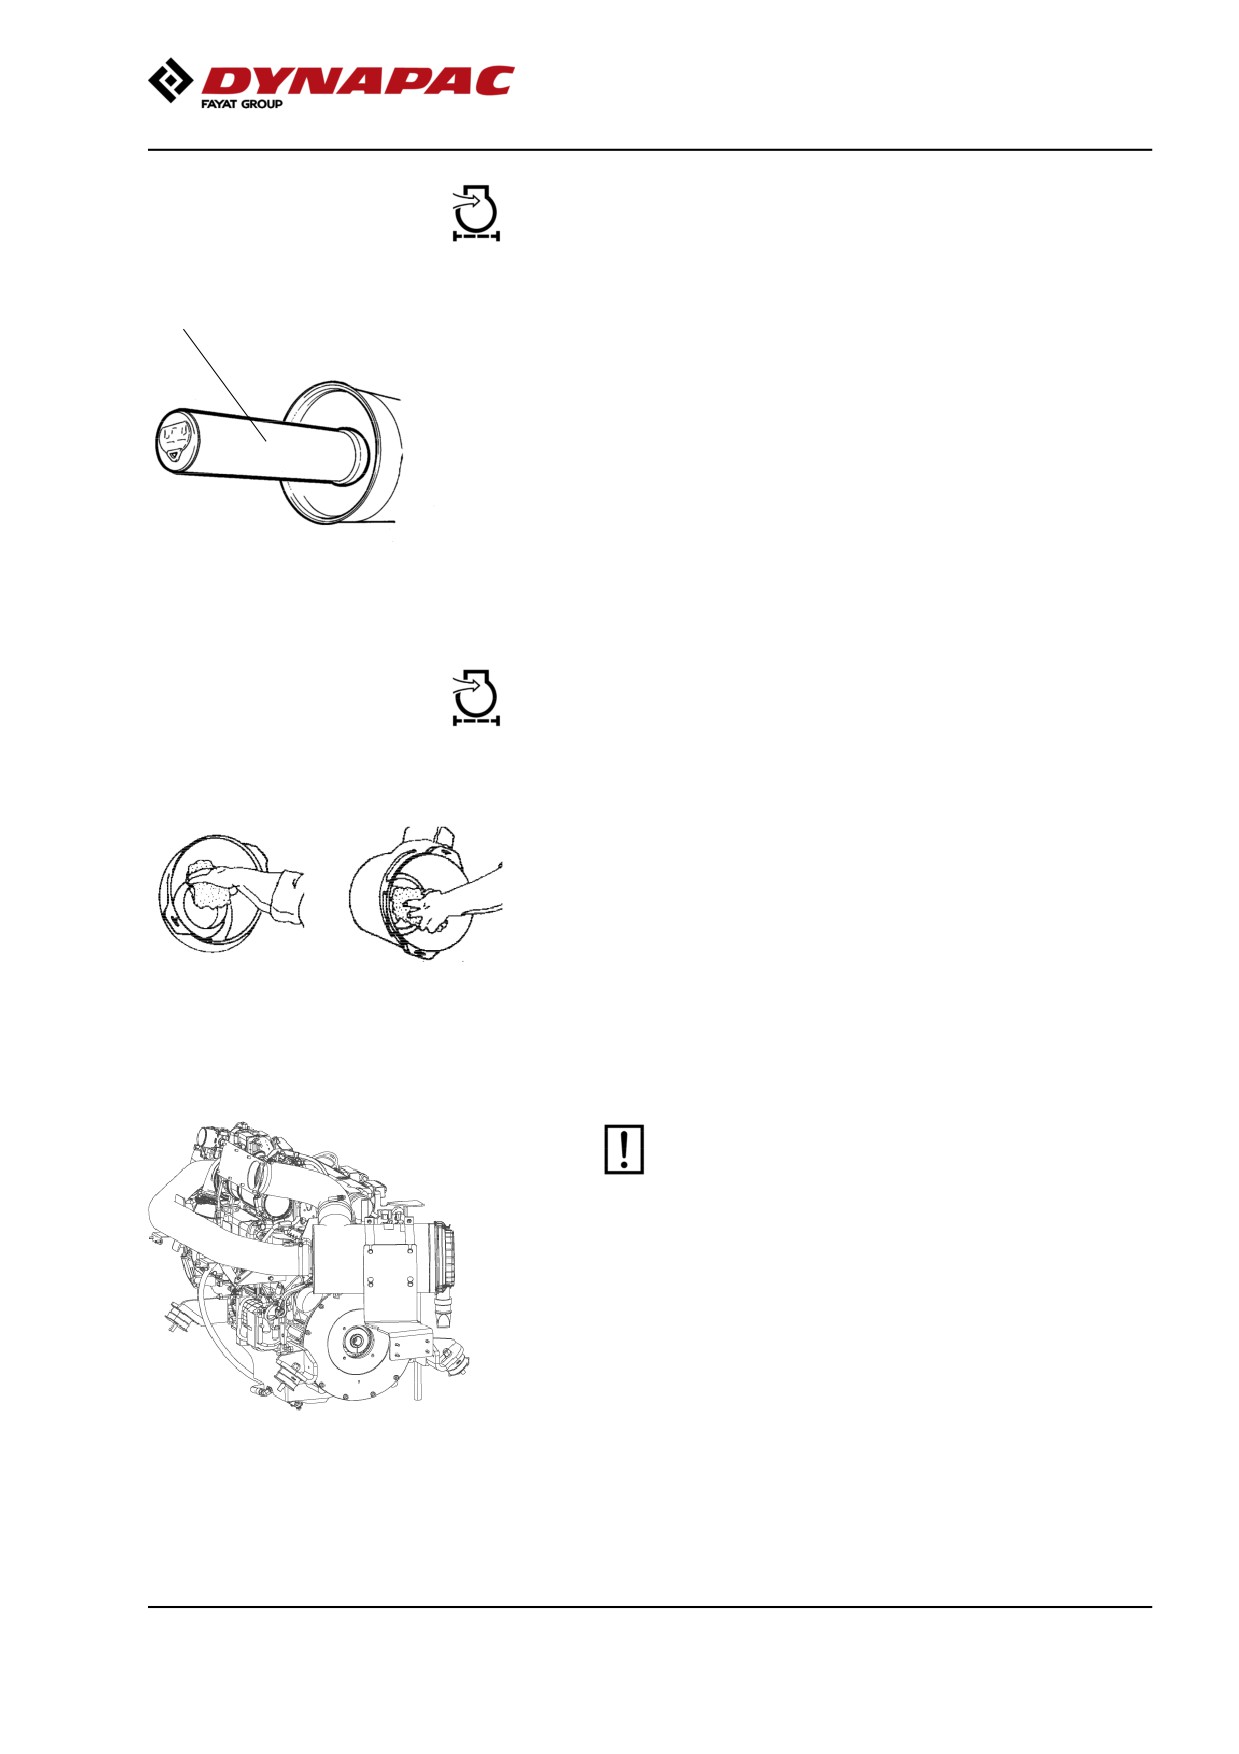
Checking - Change the main air filter
Change the air cleaner's main filter when the
warning lamp on the display lights when the
diesel engine is operating at full speed.
2
3
Release the clips (1), pull off the cover (2), and pull out
the main filter (3).
Do not remove the backup filter (4).
Clean the air cleaner if necessary, see section Air
cleaner - Cleaning.
When replacing the main filter (3), insert a new filter
1
4
5
6
and refit the air cleaner in the reverse order.
Fig. Air cleaner
Check the condition of the dust valve (6); replace if
1. Clips
necessary.
2. Cover
3. Main filter
4. Backup filter
When refitting the cover, make sure that the dust valve
5. Filter housing
is positioned downwards.
6. Dust valve
2019-11-05
124
Maintenance measures - 500 h
Backup filter - Change
1
Change the backup filter with a new filter after every
second replacement of the main filter.
To change the backup filter (1), pull the old filter out of
its holder, insert a new filter and reassemble the air
cleaner in the reverse order.
Clean the air cleaner if necessary, see section Air
cleaner - Cleaning.
Fig. Air filter
1. Backup filter
Air cleaner
- Cleaning
Wipe clean on both sides of the outlet
pipe.
Wipe clean the inside of the cover (2) and the filter
housing (5). See the previous illustration.
Wipe also both surfaces for the outlet pipe; see
adjacent figure.
Inner edge of
Outer edge of outlet
outlet pipe.
pipe.
Check that the hose clamps between the filter
housing and the suction hose are tight and that
the hoses are intact. Inspect the entire hose
system, all the way to the engine.
2019-11-05
125
Maintenance measures - 500 h
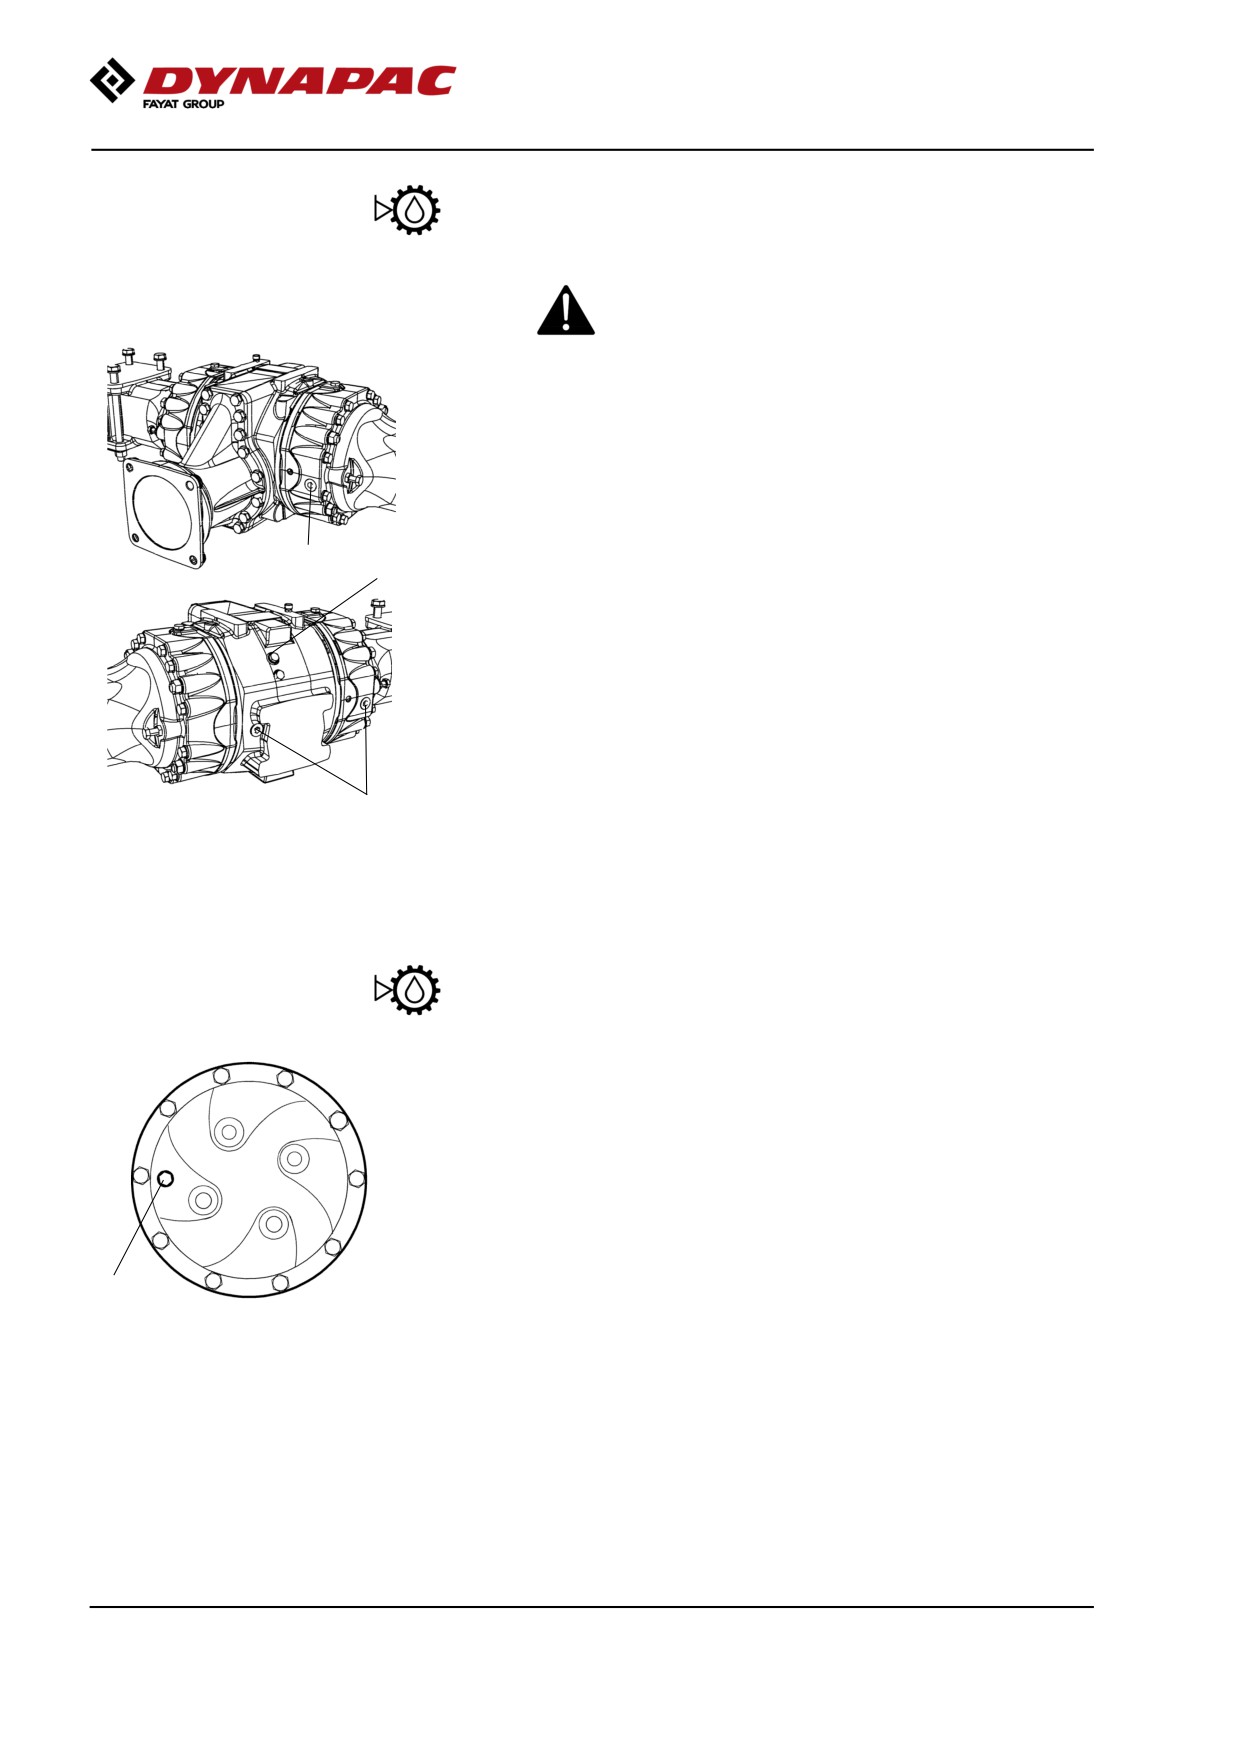
Rear axle differential - Check oil level
Never work under the roller when the engine is
running. Park on a level surface. Block the wheels
securely.
Wipe clean and remove the level plugs (1) and check
that the oil level reaches the lower edge of the plug
holes. The plugs can be found at the front or rear of
the rear axle.
1
2
At a low level, remove the filler plug (2) and top up
with oil to the correct level. Use transmission oil, see
lubricant specifications.
Clean and refit the plug.
1
Fig. Level control - differential housing
1. Level plugs (x 3)
2. Filler plug
Rear axle planetary gears - Check oil level
Position the roller so that the level plug (1) in the
planetary gear is at "9 o'clock" or "3 o'clock".
Wipe clean and remove the level plug (1) and check
that the oil level reaches the lower edge of the plug
hole. Top off with oil to the right level if the level is low.
Use transmission oil. See lubrication specification.
Clean and refit the plug.
1
Check the fluid level in the same way on the rear
Fig. Level check - planetary gear
axle's other planetary gear.
1. Level/Filler plug
2019-11-05
126
Maintenance measures - 500 h
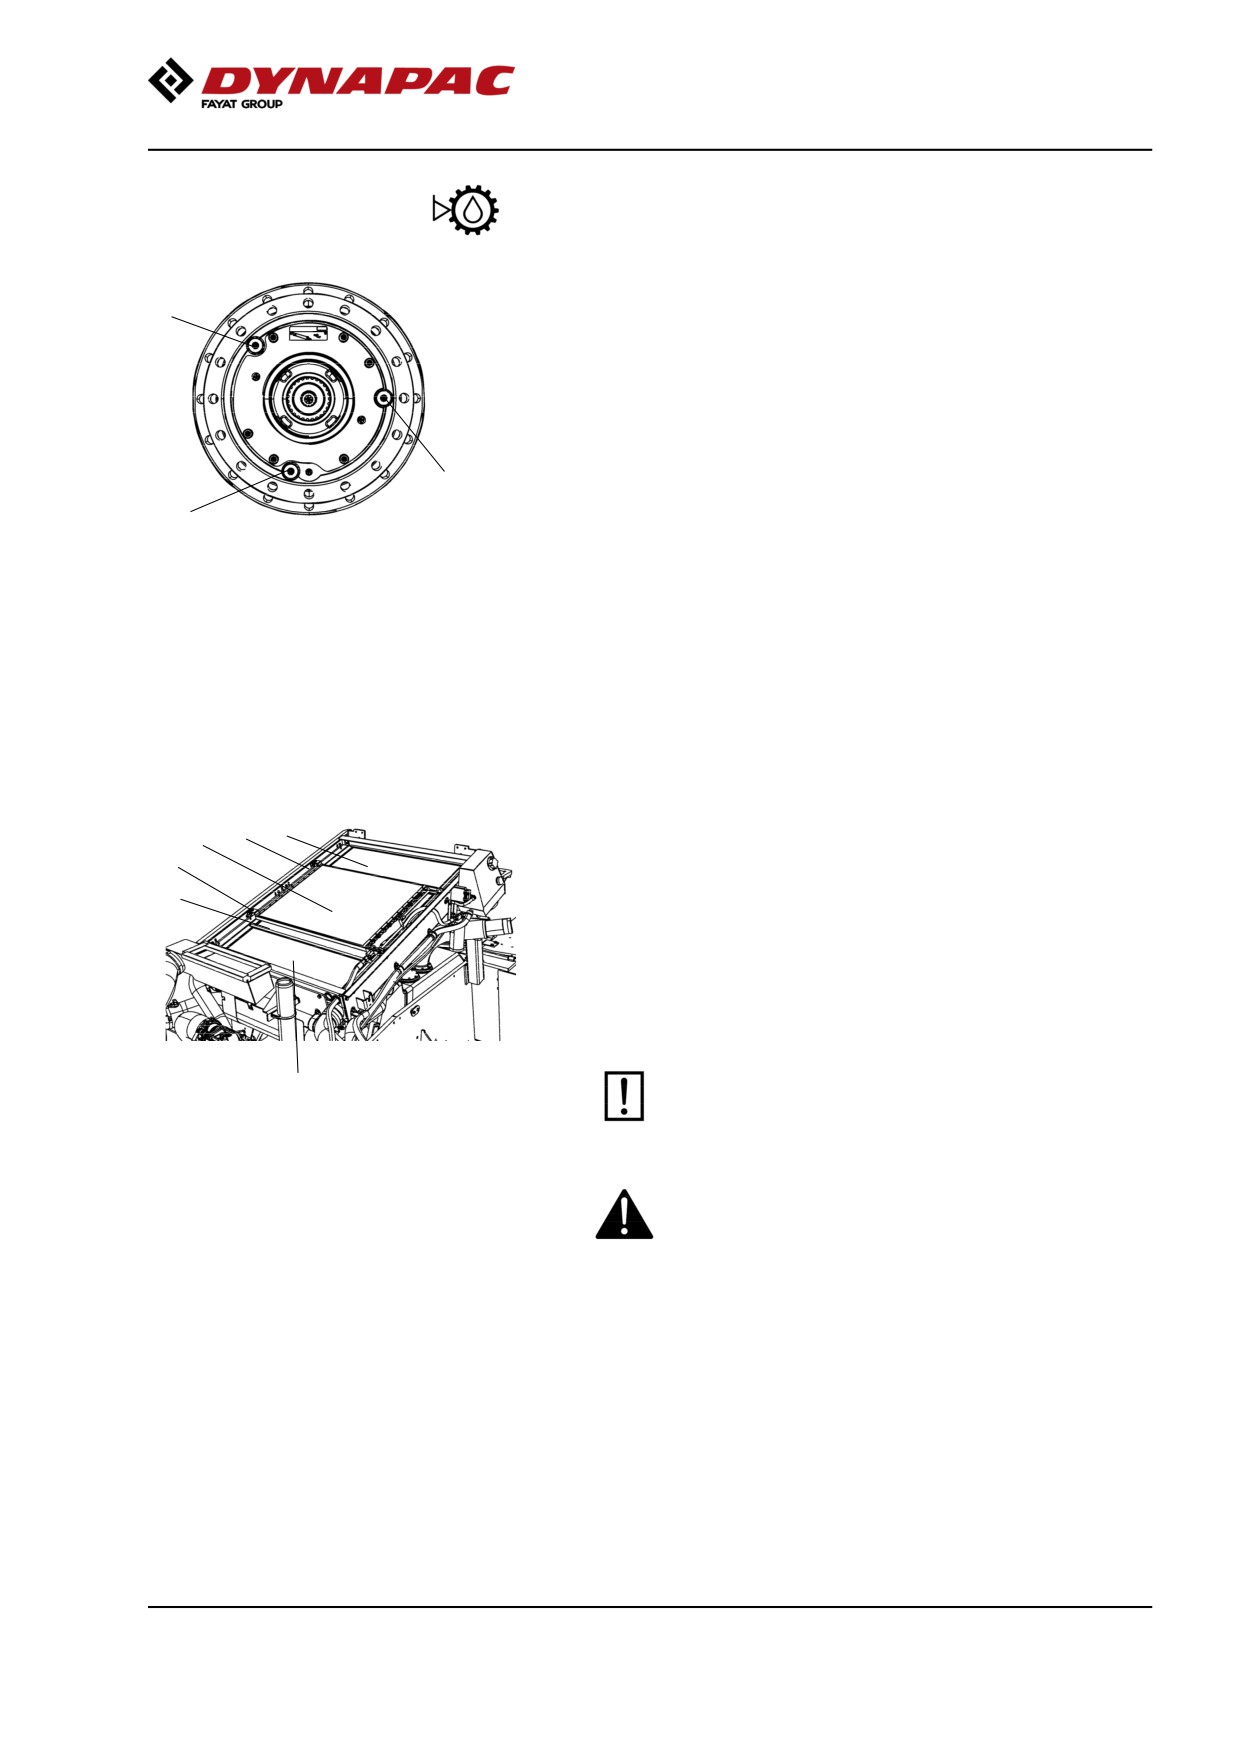
Drum gearbox - Checking the oil level
Wipe clean the area around the level plug (1) and then
2
undo the plug.
Ensure that the oil level reaches up to the lower edge
of the plug hole.
Top off with oil to the right level if the level is low. Use
transmission oil according to the lubricant specification.
1
Clean and refit the plugs.
3
Fig. Oil level check - drum gearbox
1. Level plug
2. Filler plug
3. Drain plug
Radiator - Check/Cleaning
5
3
4
Check that air can pass unobstructed through the
5
radiators (1), (2) and (3).
1
Clean a dirty radiator using compressed air or a
high-pressure water jet.
Undo the two screws (5) and tilt the condenser
element upwards.
Blow air or direct water through the cooler in the
opposite direction to that of the cooling air.
Be careful when using a high-pressure washer -
2
do not place the nozzle too close to the radiator.
Fig. Engine compartment
1. Water cooler
2. Charge air cooler
3. Hydraulic fluid cooler
Wear protective goggles when working with
4. Condenser element AC (Optional)
compressed air or high-pressure water jets.
5. Screws (x 2)
2019-11-05
127
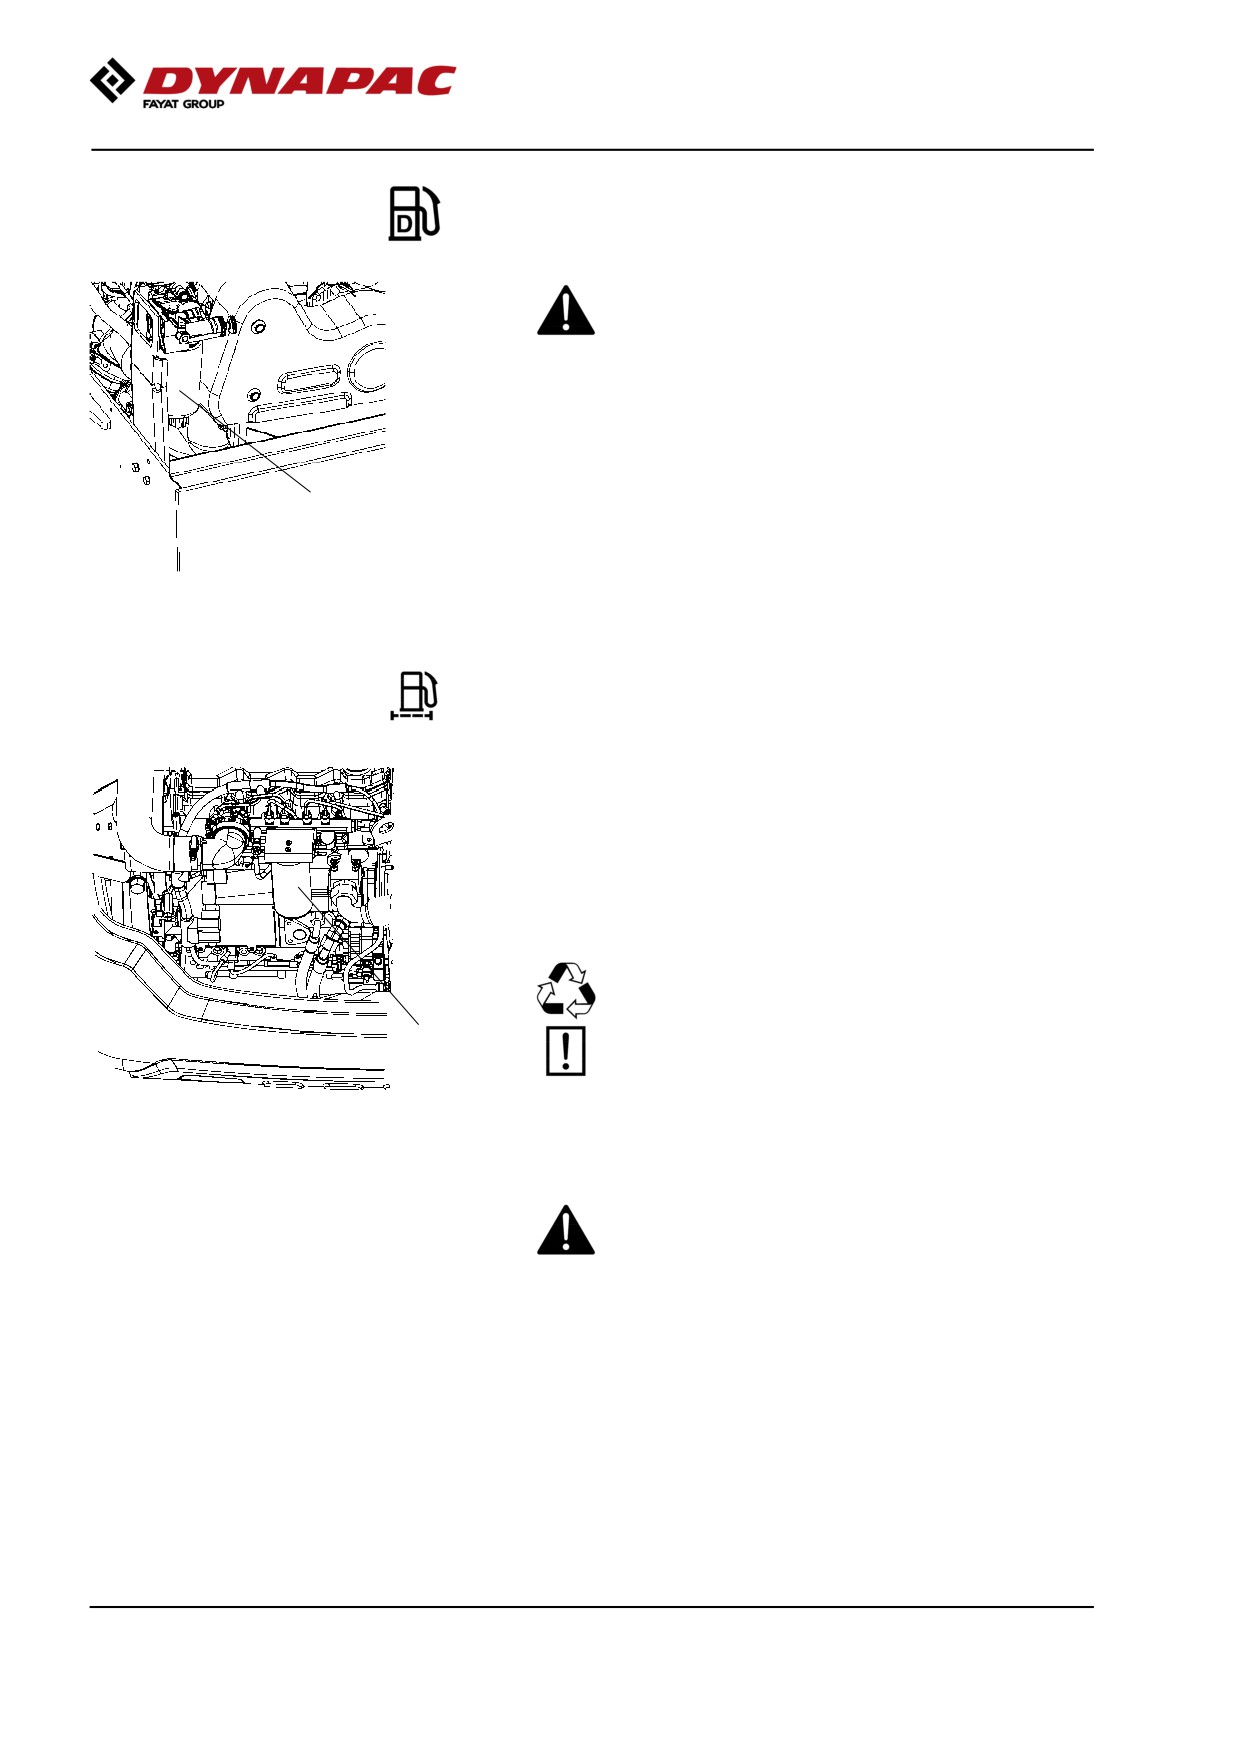
Maintenance measures - 500 h
Fuel pre-filter - Replacement
Ensure good ventilation (air extraction) if the
diesel engine is run indoors. Risk of carbon
monoxide poisoning.
See the engine's instruction manual for filter
replacement, in the Fuel system chapter.
1
Fig. Engine compartment
1. Fuel prefilter
Replacing the fuel filter
Place a container underneath to collect fuel that runs
out when the filter is released.
Screw off the fuel filter (1). The filter is of the
disposable type and cannot be cleaned. Han in to
environment-friendly station.
Deliver the drain oil to environmentally correct
handling.
1
Refer to the engine manual for detailed
instructions when replacing the fuel filter.
Fig. Engine compartment
1. Fuel filter
Start the engine and check that the fuel filter is tight.
Ensure good ventilation (air extraction) if the
diesel engine is run indoors. Risk of carbon
monoxide poisoning.
NOTE! The new fuel filters must not under any
circumstances be pre-filled with fuel due to the purity
requirements of the fuel system.
2019-11-05
128
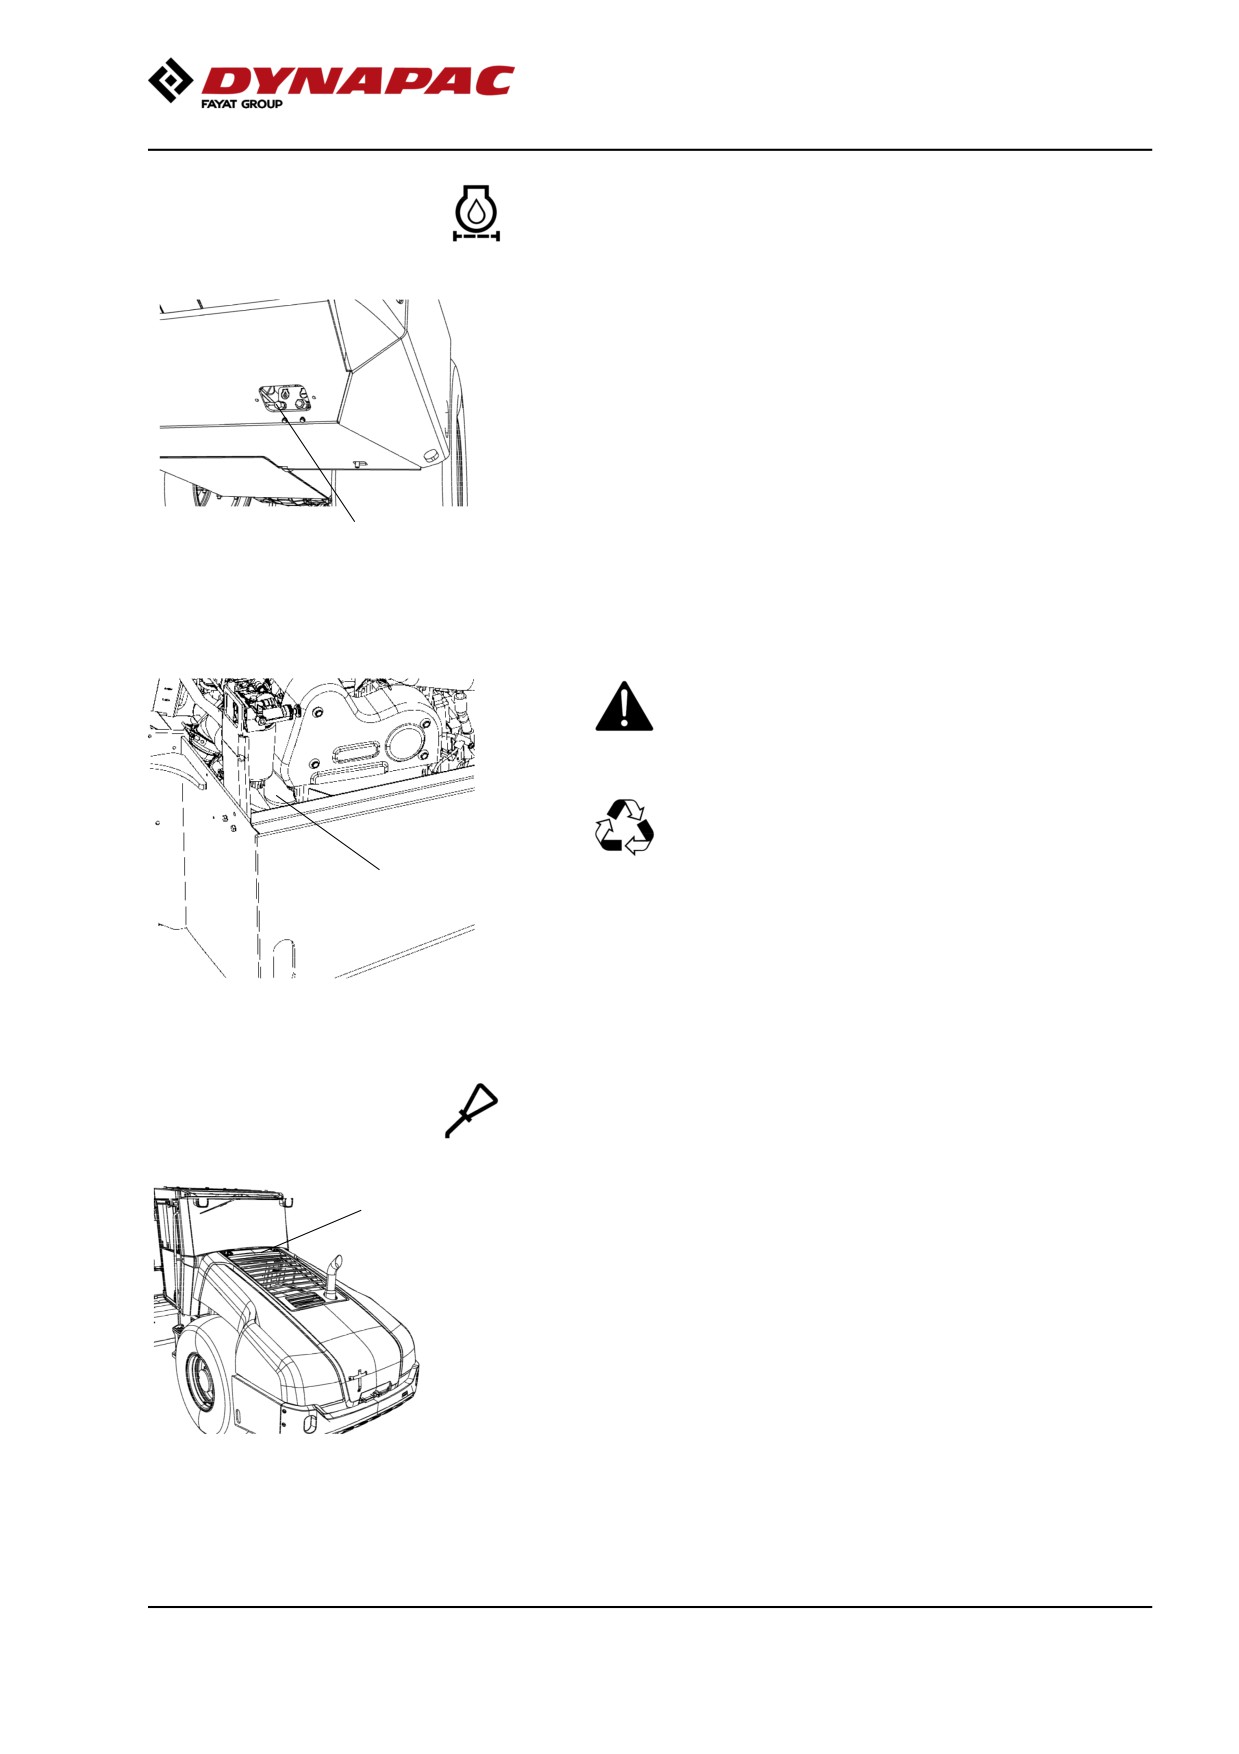
Maintenance measures - 500 h
Diesel engine - Oil and Filter change
The oil drain plug (1) can be accessed most easily
from the right rear underside of the tractor frame, and
is installed with a hose in the engine.
Drain the oil when the engine is warm. Place a
receptacle that holds 19 liters (5 gal) under the drain
plug.
Replace the engine oil filter (2) at the same time. Refer
to the engine manual.
1
Fig. Tractor frame
1. Drain plug
Take great care when draining warm fluid and oil.
Wear protective gloves and goggles.
Hand in the drained oil and filter to an
environment-friendly waste disposal station.
2
Fig. Engine compartment
2. Oil filter
Hood, hinges - Lubrication
1
Lubricate engine hood hinges (1) and the slide rails of
the operator's seat with grease, other joints and
controls with oil. Lubricate the cab hinges with grease.
See the lubrication specification.
Fig. Hood
1. Hinge
2019-11-05
129
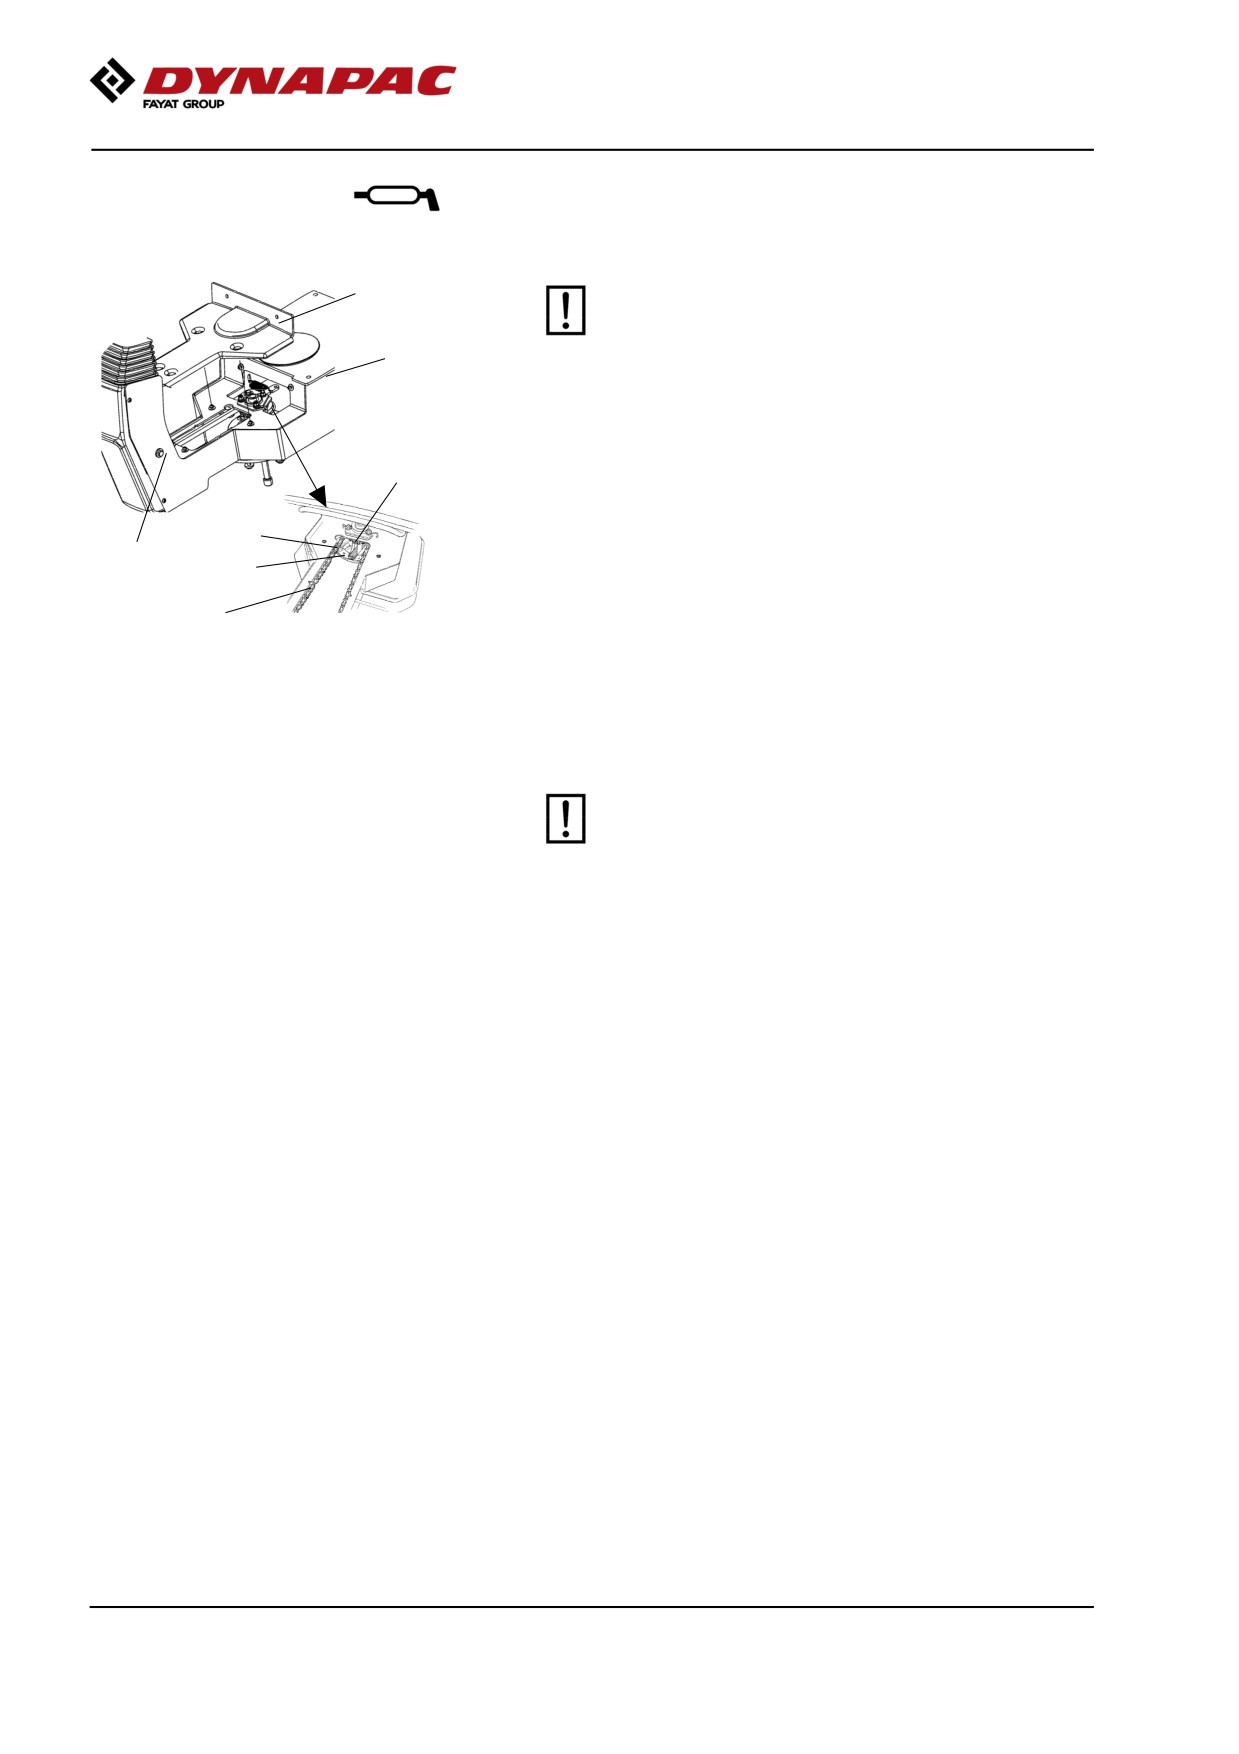
Maintenance measures - 500 h
Seat bearing - Lubrication
5
Keep in mind that the chain is a vital part of the
steering mechanism.
6
Remove the cover (5) to access the lubrication nipple
(1). Lubricate the operator seat slew bearing with three
2
strokes of a hand-operated grease gun.
Clean and grease the chain (3) between the seat and
3
the steering column.
4
1
Also grease the seat slide rails (6).
7
If the chain is slack on the sprocket (2), loosen the
Figure. Seat bearing
screws (4) and move the steering column forward.
1. Grease nipple
Tighten the screws and check chain tension.
2. Gearwheel
3. Steering chain
No not tension the chain too tightly. It should be
4. Adjusting screw
possible to move the chain about 10 mm (0.4 in) to the
5. Cover
side with a forefinger/thumb at the marking (7) in seat
6. Slide rails
7. Marking
frame. Fit the chain lock at the bottom.
If the seat starts to be stiff when adjusting, it
should be lubricated more often than specified
here.
2019-11-05
130
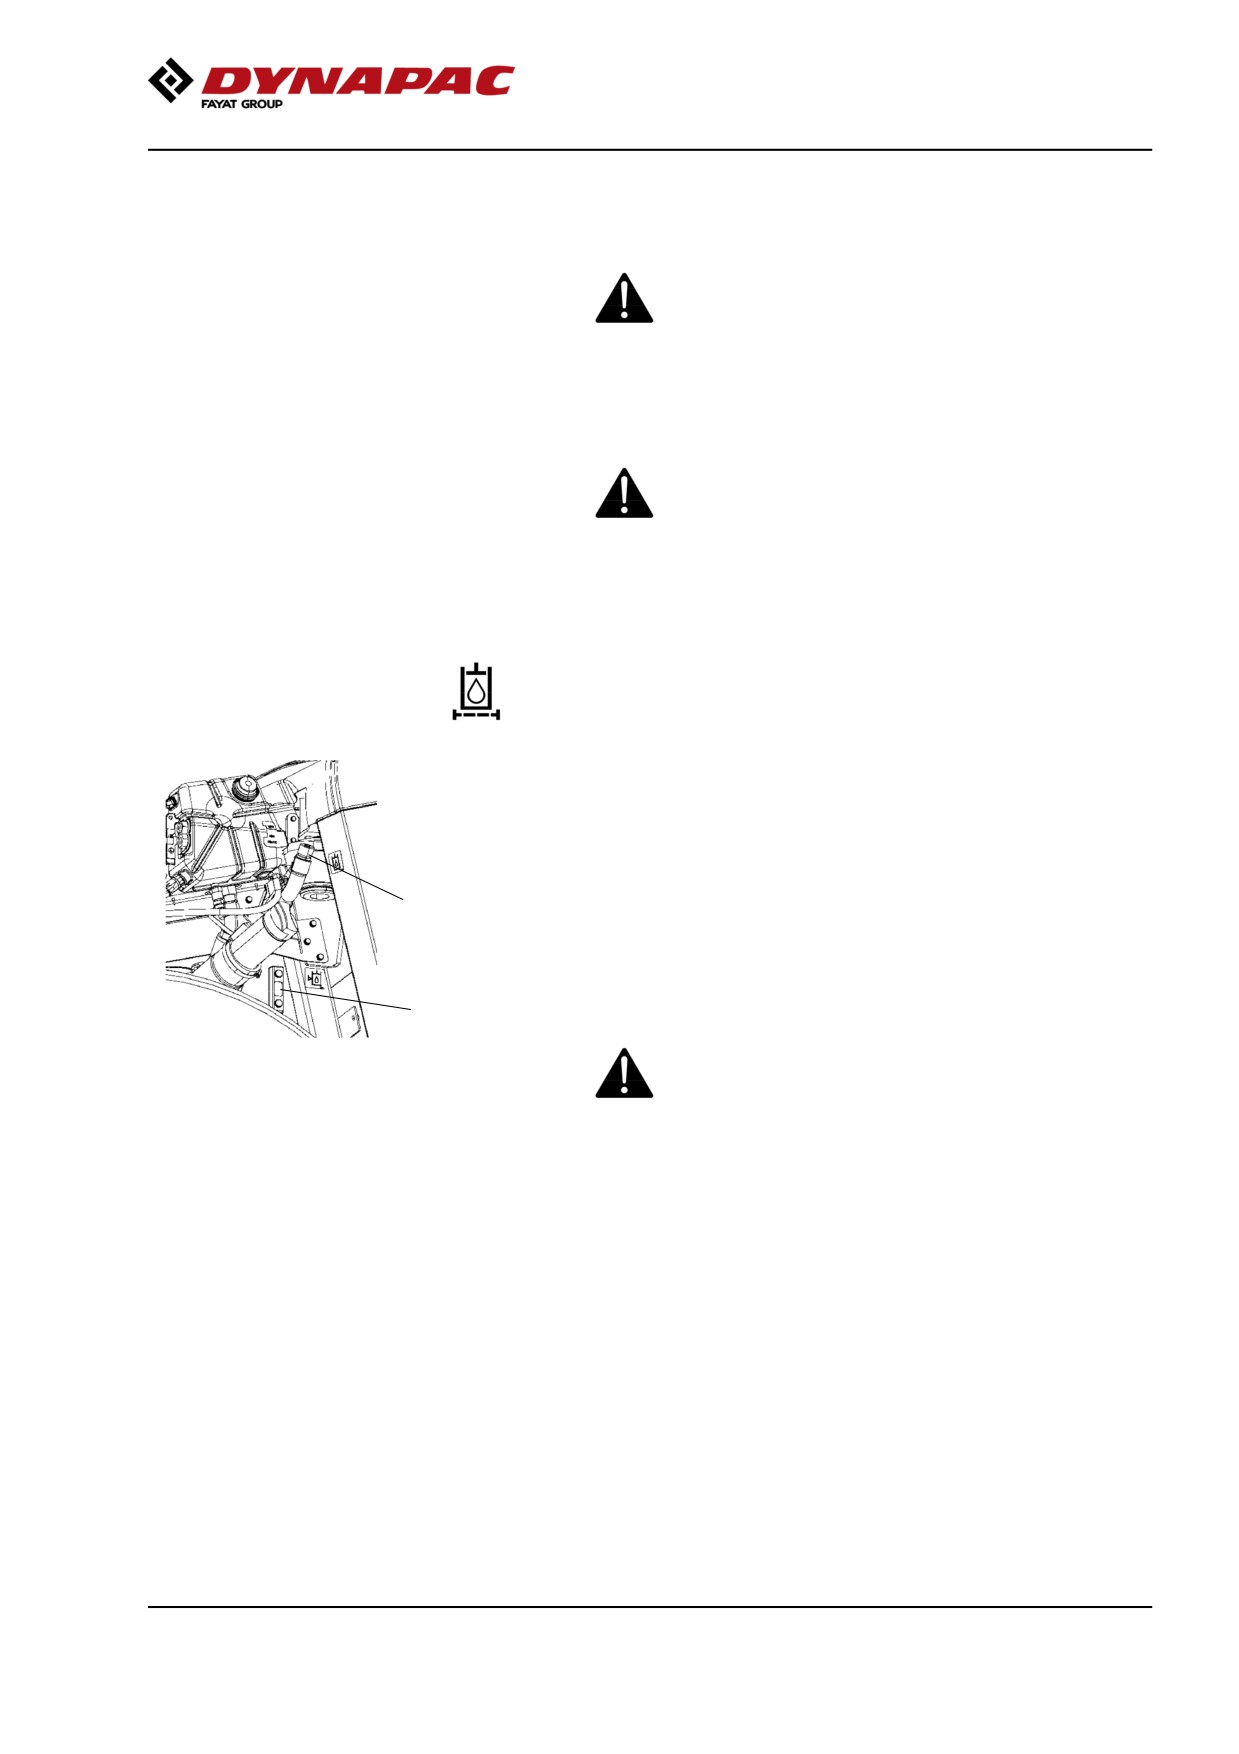
Maintenance - 1000h
Maintenance - 1000h
Performed after 1000 operating hours (each year)
Park the roller on a level surface.
The engine must be switched off and the
parking brake activated when checking or
adjusting the roller, unless otherwise specified.
Ensure that there is good ventilation (air
extraction) if the engine is run indoors. Risk of
carbon monoxide poisoning.
Hydraulic filter - Replacement
Undo the filler cap/bleeder filter (2) on top of the
reservoir so that over-pressure inside the reservoir can
be eliminated.
Make sure that the bleeding filter (2) is not clogged, air
must have unobstructed passage through the cap in
2
both directions.
If passage in either direction is blocked, clean the filter
with a little diesel oil and blow through with
3
compressed air until the block is removed, or replace
the cap with a new one.
Wear protective goggles when working with
Fig. Hydraulic reservoir
compressed air.
2. Filler cap/Bleeding filter
3. Sight glass
2019-11-05
131
Maintenance - 1000h
Clean thoroughly around the oil filter.
Remove the oil filter (1) and hand in to an
environment-friendly waste disposal station. This
is a single-use filter and cannot be cleaned.
1
Make sure that the old sealing ring is not left on
the filter holder, Otherwise, this could cause
leakage between the new seal and the old one.
Thoroughly clean the filter holder's sealing surfaces.
Fig. Engine compartment
Apply a thin coat of fresh hydraulic fluid on the new
1. Hydraulic fluid filter (x1).
filter seal. Screw tight the filter by hand.
First tighten the filter until its seal is in contact
with the filter attachment. Then turn an additional
half revolution. Do not tighten the filter too hard
as this could damage the gasket.
Start the engine and check that there is no leakage of
hydraulic fluid from the filter. Check level of fluid in the
sight glass (3) and top up as required.
Ensue that there is good ventilation (air extraction)
if the engine is run indoors. Risk of carbon
monoxide poisoning.
Drum cartridge - Checking the oil level
1
Position the roller on a flat surface with the groove (1)
on the inside of the drum aligned with the top of the
drum frame.
Fig. Left drum side
1. Groove
2019-11-05
132
Maintenance - 1000h
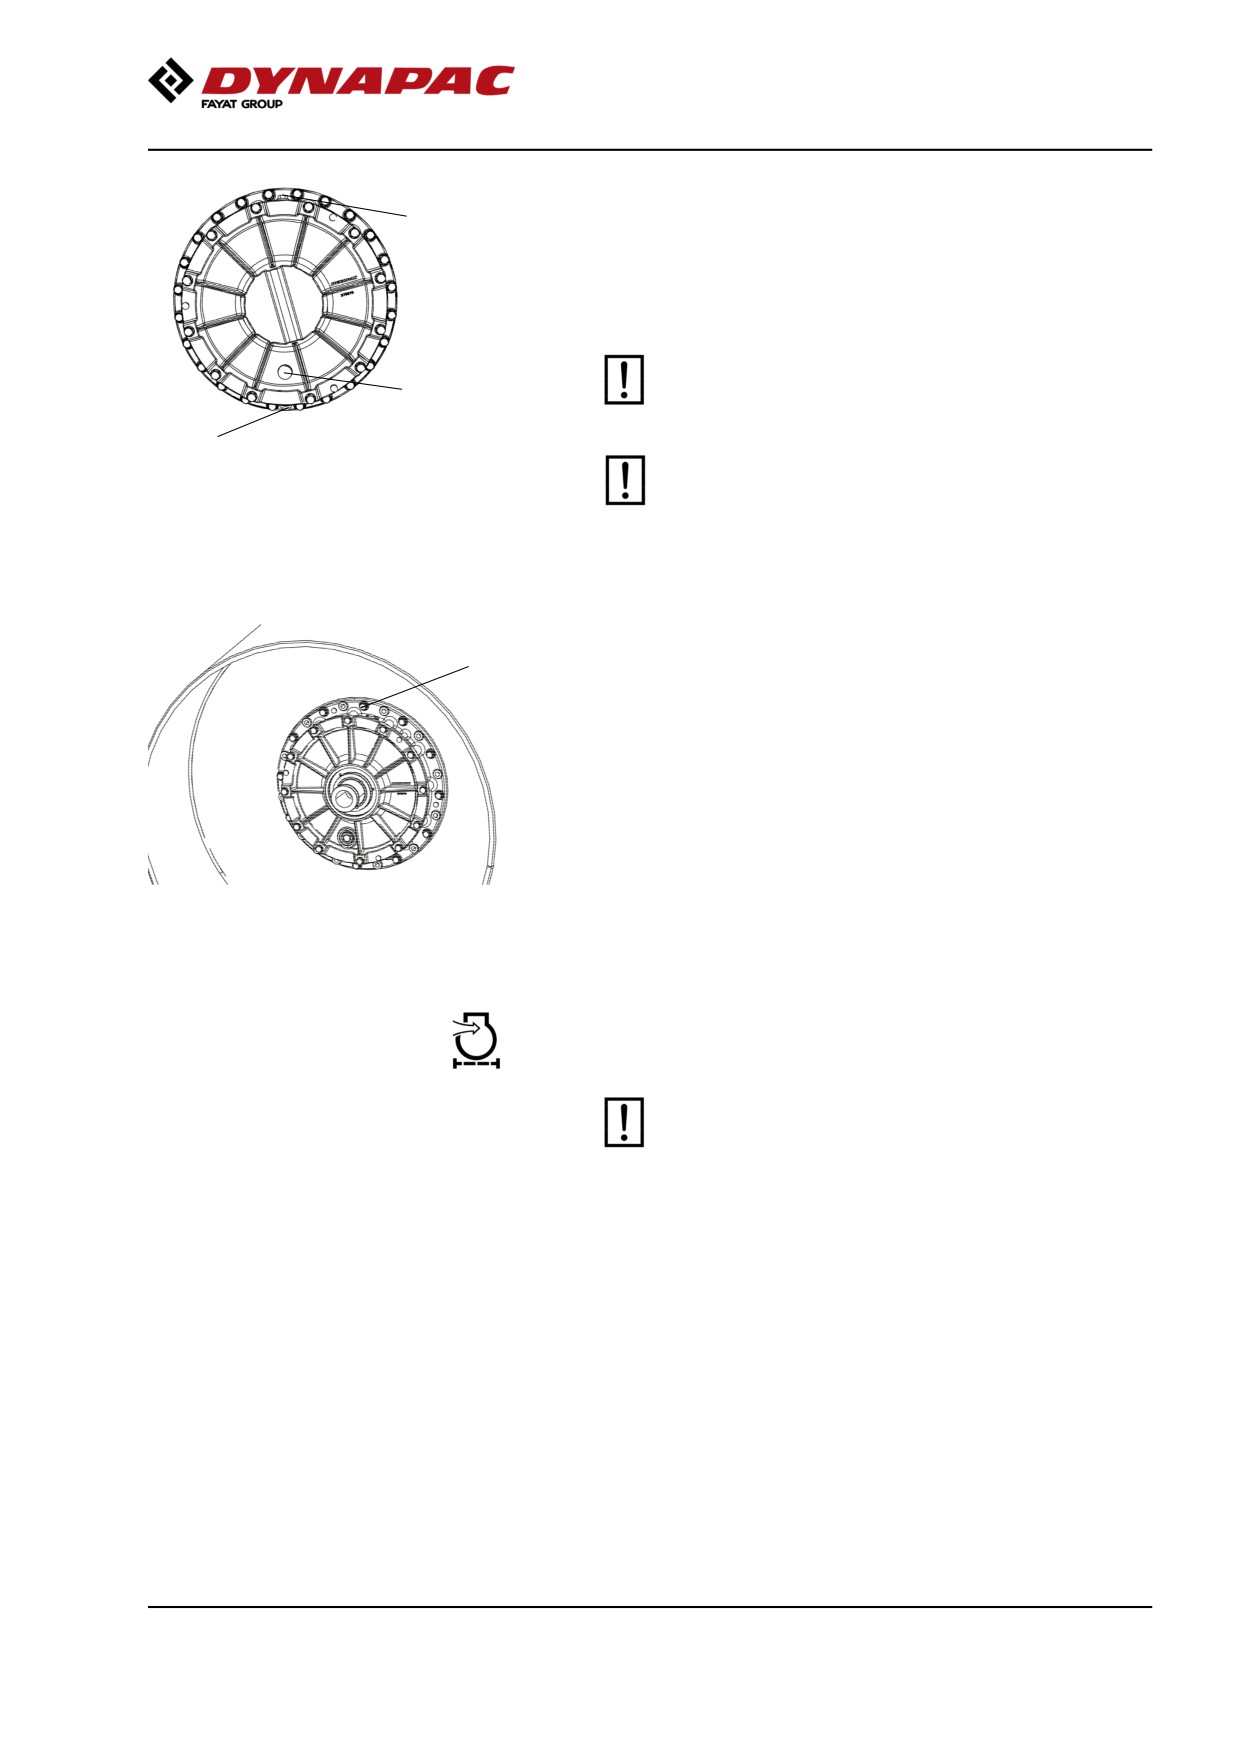
The oil should now come up to the sight glass (3).
1
If necessary, release the filler plug (1) and fill to half
the sight glass (3).
Clean the magnetic filler plug (1) of any metallic
residue, before refitting the plug.
Ensure that only Dynapac Drum Oil 1000 is used
3
in the cartridges.
2
Do not overfill with oil - risk for overheating.
Fig. Left drum side
1. Filler plug
2. Drain plug
3. Sight glass
Now repeat the procedure on the opposite side of the
drum.
1
Drum cartridge - Cleaning the ventilation screw
Clean the drum's ventilation hole and ventilation screw
(1). The hole is required to eliminate excess pressure
inside the drum.
Fig. Drum
1. Ventilation screw
Air cleaner
Checking - Change the main air filter
Change the air cleaner's main filter when the
warning lamp on the display lights when the
diesel engine is operating at full speed.
2019-11-05
133
Maintenance - 1000h
2
3
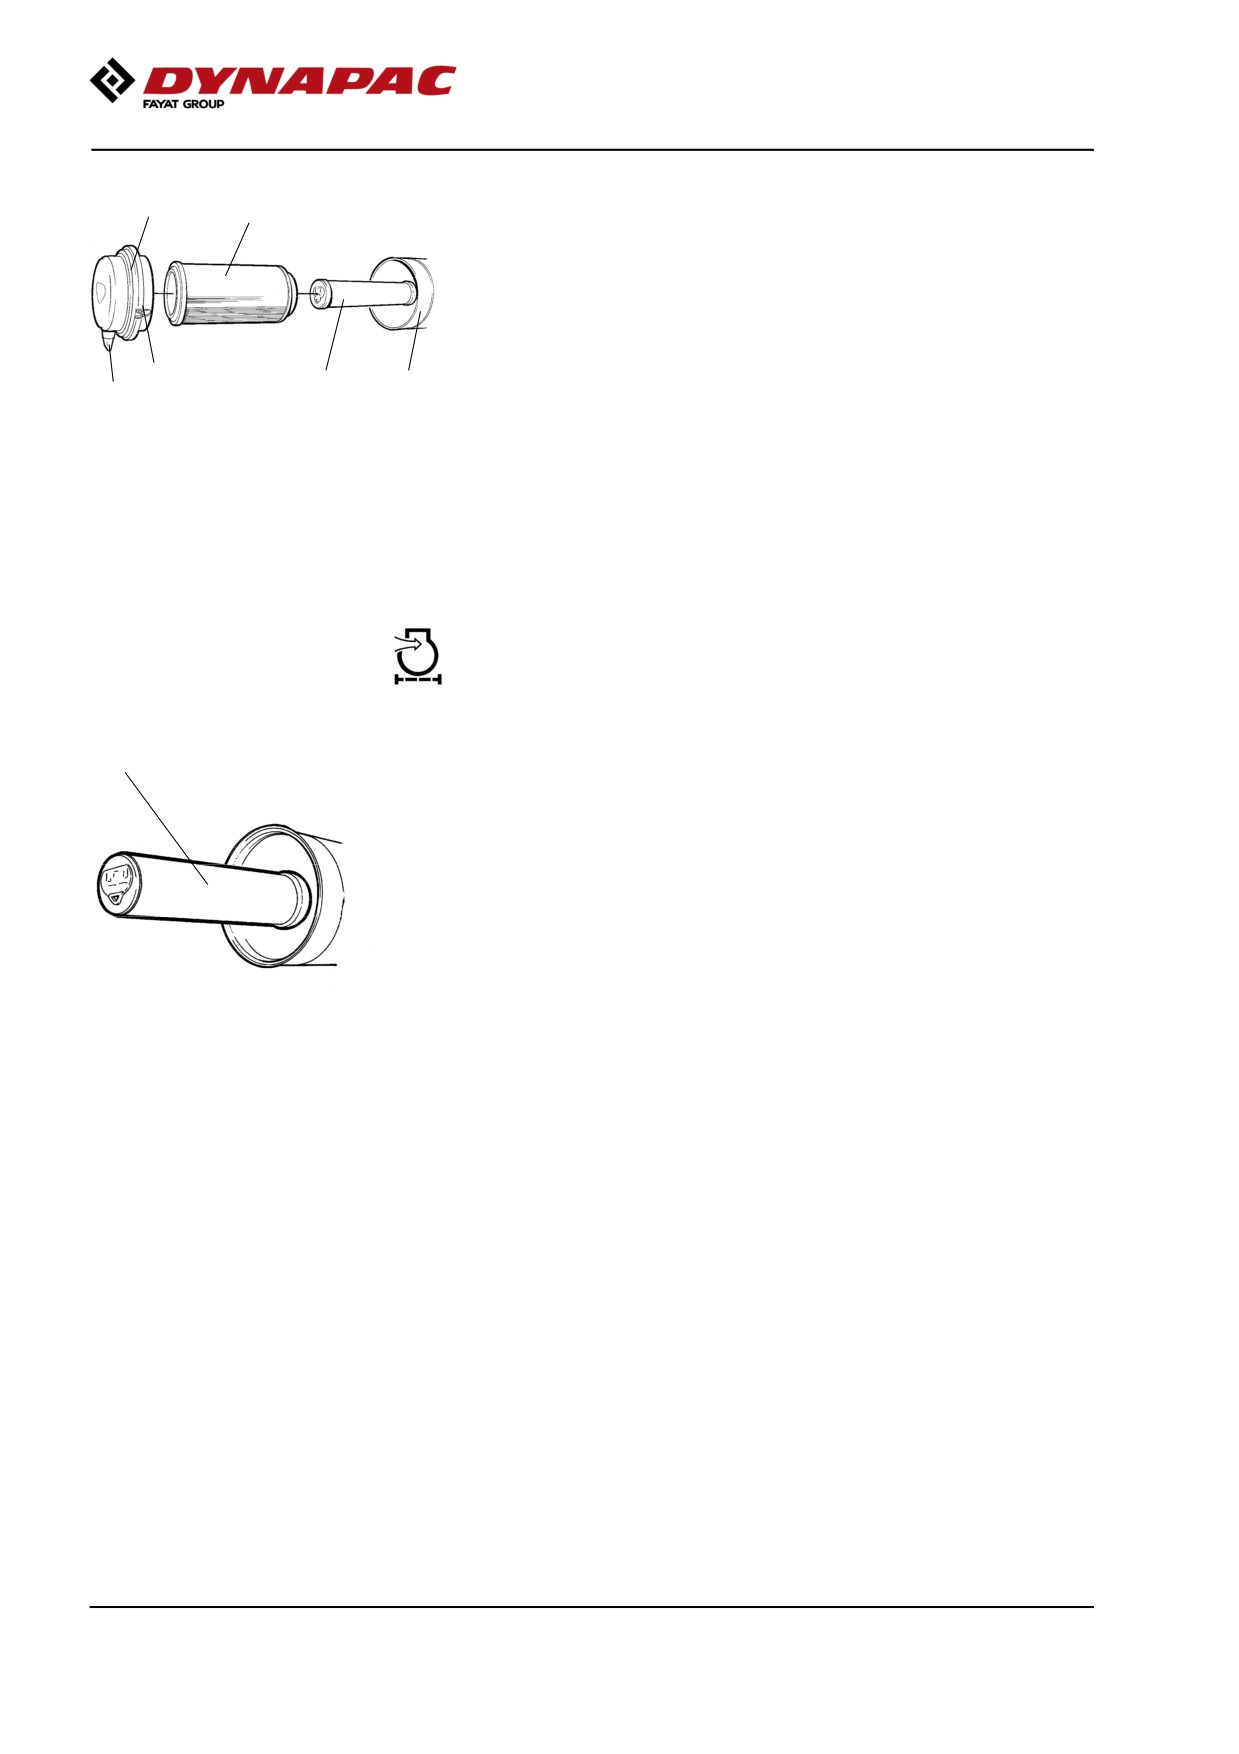
Release the clips (1), pull off the cover (2), and pull out
the main filter (3).
Do not remove the backup filter (4).
Clean the air cleaner if necessary, see section Air
cleaner - Cleaning.
When replacing the main filter (3), insert a new filter
1
4
5
6
and refit the air cleaner in the reverse order.
Fig. Air cleaner
Check the condition of the dust valve (6); replace if
1. Clips
necessary.
2. Cover
3. Main filter
4. Backup filter
When refitting the cover, make sure that the dust valve
5. Filter housing
is positioned downwards.
6. Dust valve
Backup filter - Change
1
Change the backup filter with a new filter after every
second replacement of the main filter.
To change the backup filter (1), pull the old filter out of
its holder, insert a new filter and reassemble the air
cleaner in the reverse order.
Clean the air cleaner if necessary, see section Air
cleaner - Cleaning.
Fig. Air filter
1. Backup filter
2019-11-05
134
Maintenance - 1000h
Air cleaner
- Cleaning
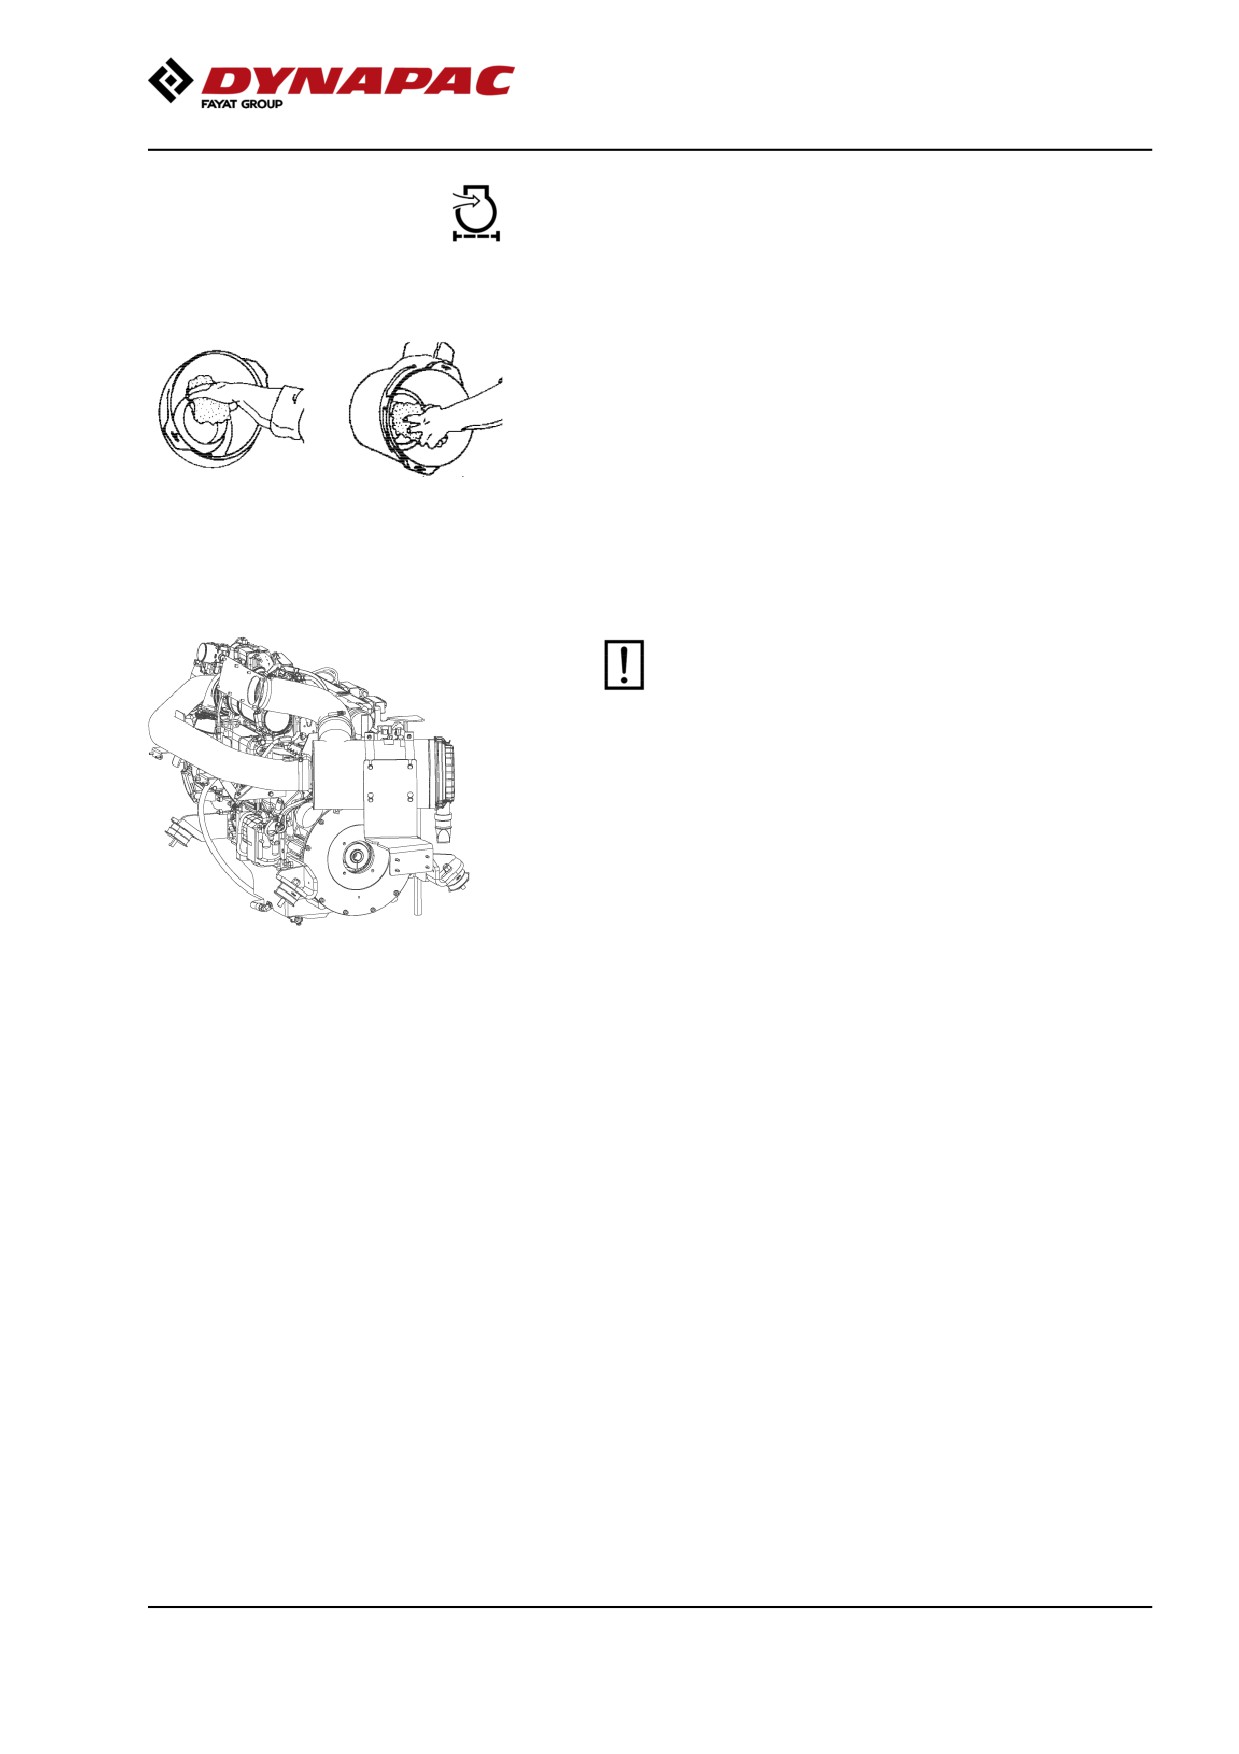
Wipe clean on both sides of the outlet
pipe.
Wipe clean the inside of the cover (2) and the filter
housing (5). See the previous illustration.
Wipe also both surfaces for the outlet pipe; see
adjacent figure.
Inner edge of
Outer edge of outlet
outlet pipe.
pipe.
Check that the hose clamps between the filter
housing and the suction hose are tight and that
the hoses are intact. Inspect the entire hose
system, all the way to the engine.
2019-11-05
135
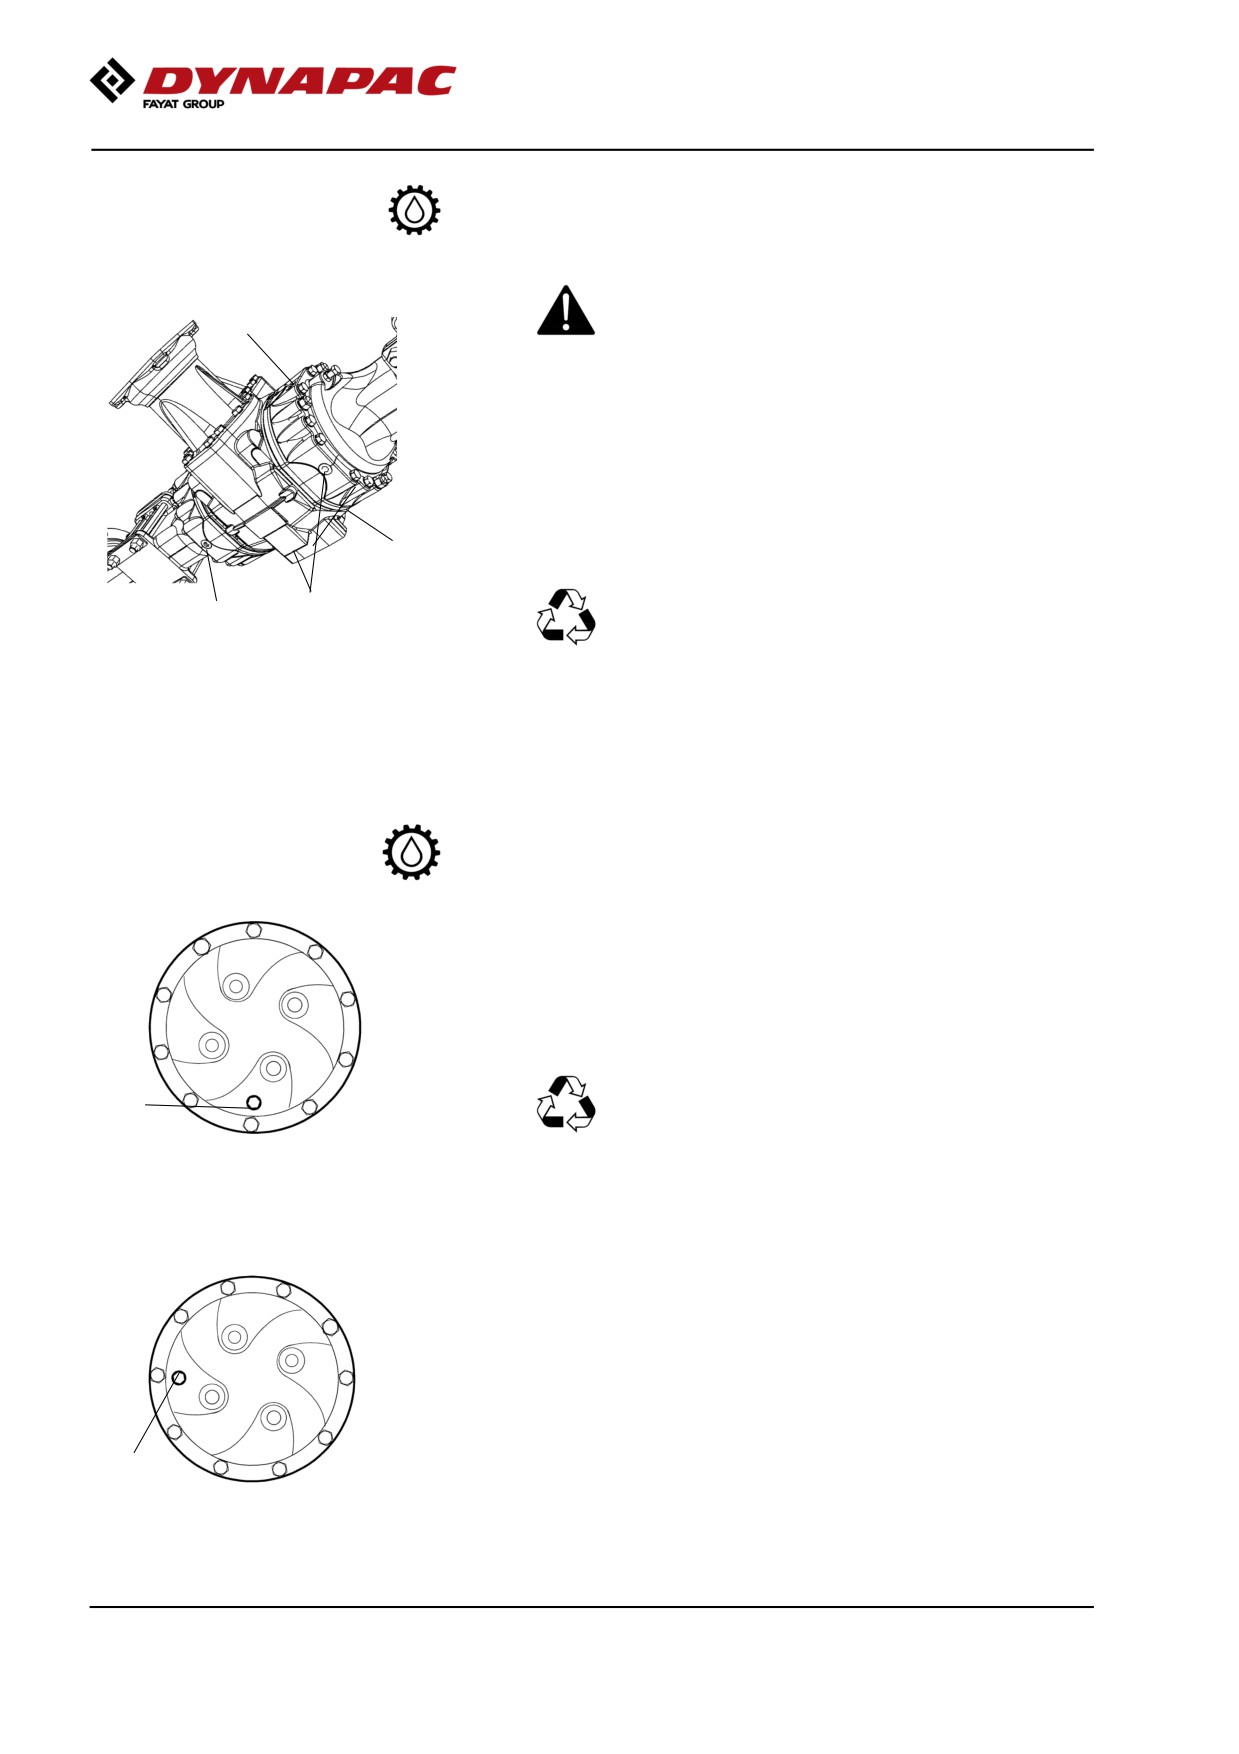
Maintenance - 1000h
Rear axle differential - Oil change
Never work under the roller when the engine is
running. Park on a level surface. Block the wheels
1
securely.
Wipe clean and remove the three level/filler plugs (1)
and (3) and all three drain plugs (2). The level/filler
plugs are located on the front and rear of the axle, and
the drain plugs are located on the underside and rear.
3
Drain the oil into a container. The volume is approx.
12.5 litres (13.2 qts).
Deliver the drain oil to environmentally correct
2
2
handling.
Fig. Rear axle, underside
1. Level/Filler plugs (x 3)
2. Drain plugs (x 3)
3. Filler plugs (x x)
Refit the drainage plugs and top up with fresh oil until
the correct level is reached. Refit the level/filler plugs.
Use transmission oil, see Lubricant Specification.
Rear axle planetary gear - Oil change
Position the roller with the plug (1) at its lowest
position.
Wipe clean, unscrew the plug (1) and drain the oil into
a suitable receptacle. The volume is approximately
1.85 liters (1.95 qts).
Oil should be taken to your local waste disposal
1
station.
Fig. Planetary gear/drainage position
1. Plug
Position the roller so that the plug (1) in the planetary
gear is at "9 o'clock" or "3 o'clock".
Fill with oil to lower edge of level hole. Use
transmission oil. See the lubrication specification.
Clean and refit the plug.
1
Check the fluid level in the same way on the rear
Fig. Planetary gear/filling position
axle's other planetary gear.
1. Plug
2019-11-05
136
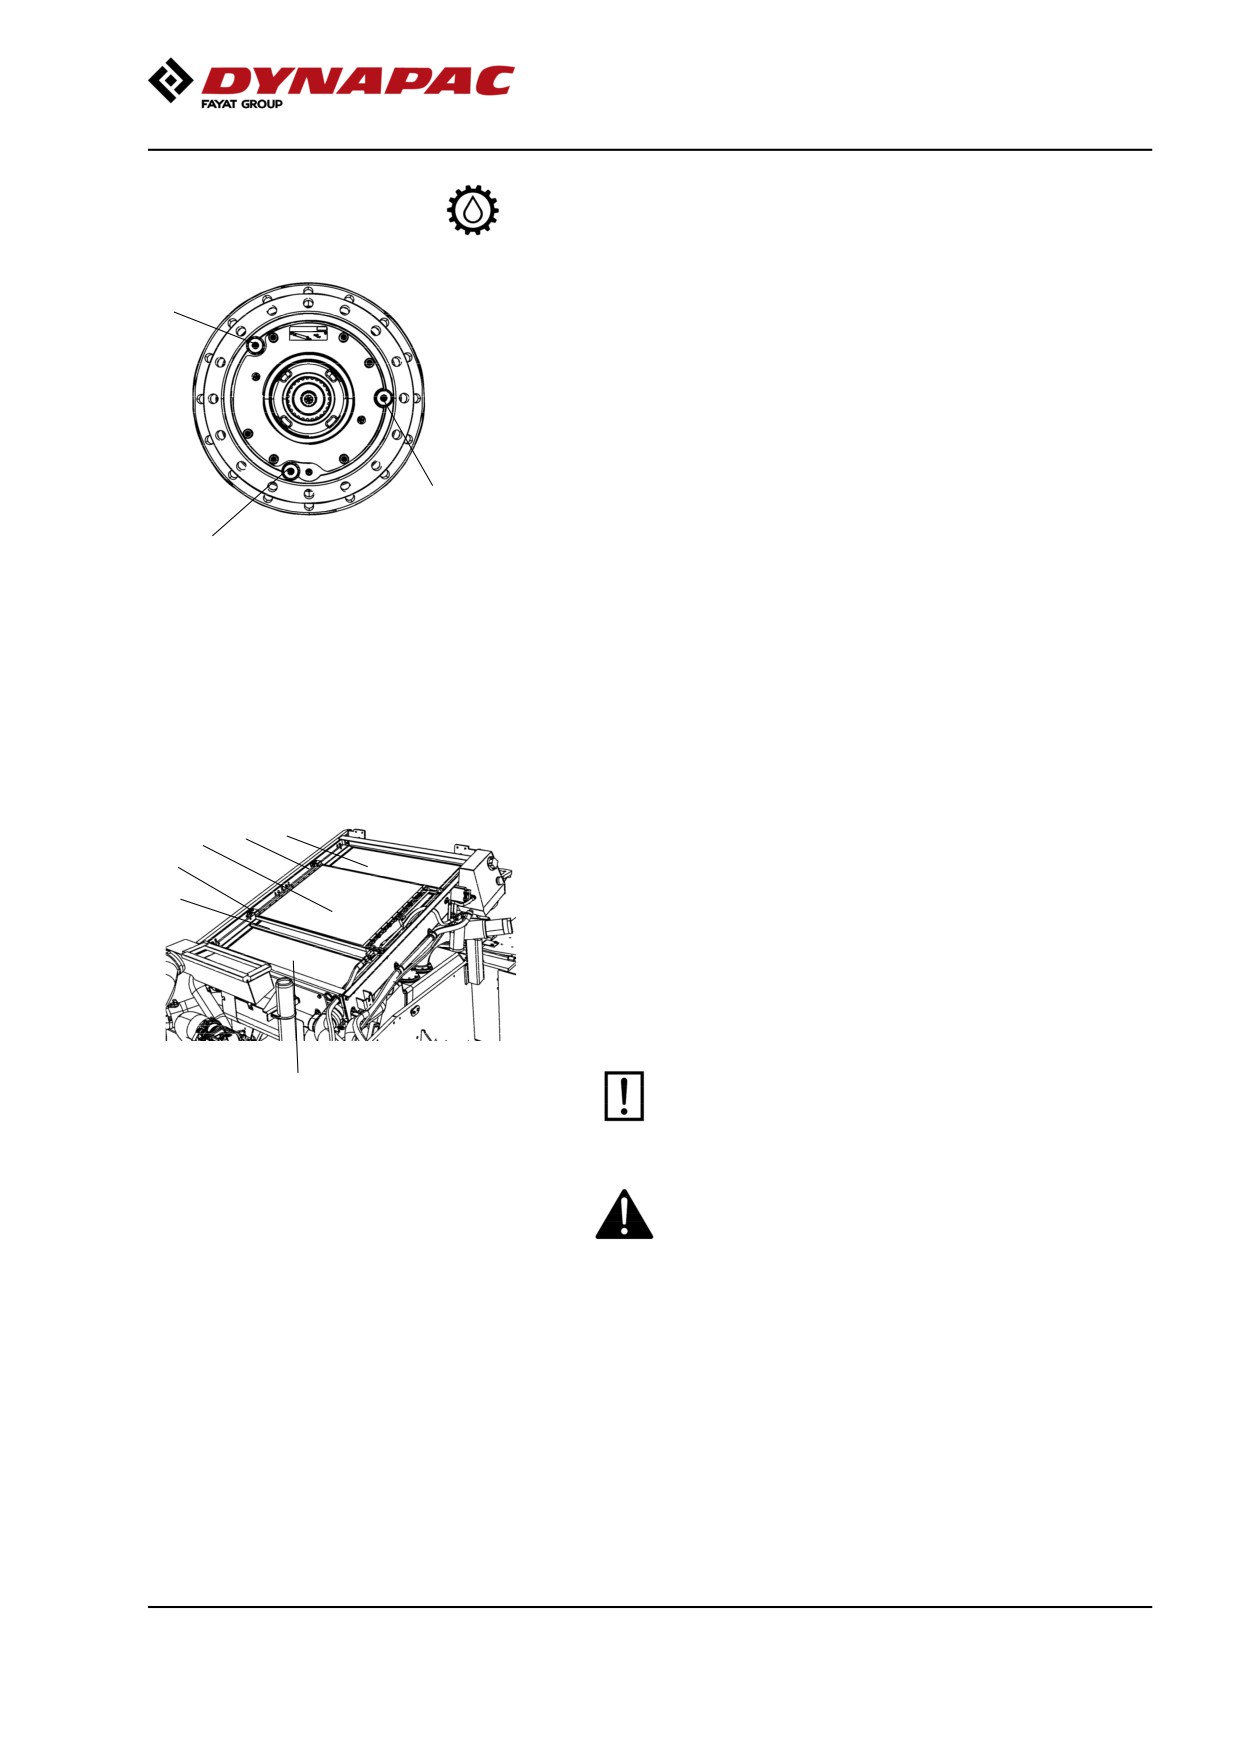
Maintenance - 1000h
Drum gearbox - Oil change
2
Wipe clean, unscrew the plugs (1, 2 and 3) and drain
the oil into a suitable receptacle, capacity about 5.0
liters (5,3 qts.).
Refit the drain plug (1) and fill with oil up to the level
plug (3), according to "Drum gearbox - Checking the
oil level".
Use transmission oil according to the lubricant
3
specification.
1
Clean and refit the level plug (3) and filler plug (2).
Fig. Drum gearbox
1. Drain plug
2. Filler plug
3. Level plug
Radiator - Check/Cleaning
5
3
4
Check that air can pass unobstructed through the
5
radiators (1), (2) and (3).
1
Clean a dirty radiator using compressed air or a
high-pressure water jet.
Undo the two screws (5) and tilt the condenser
element upwards.
Blow air or direct water through the cooler in the
opposite direction to that of the cooling air.
Be careful when using a high-pressure washer -
2
do not place the nozzle too close to the radiator.
Fig. Engine compartment
1. Water cooler
2. Charge air cooler
3. Hydraulic fluid cooler
Wear protective goggles when working with
4. Condenser element AC (Optional)
compressed air or high-pressure water jets.
5. Screws (x 2)
2019-11-05
137
Maintenance - 1000h
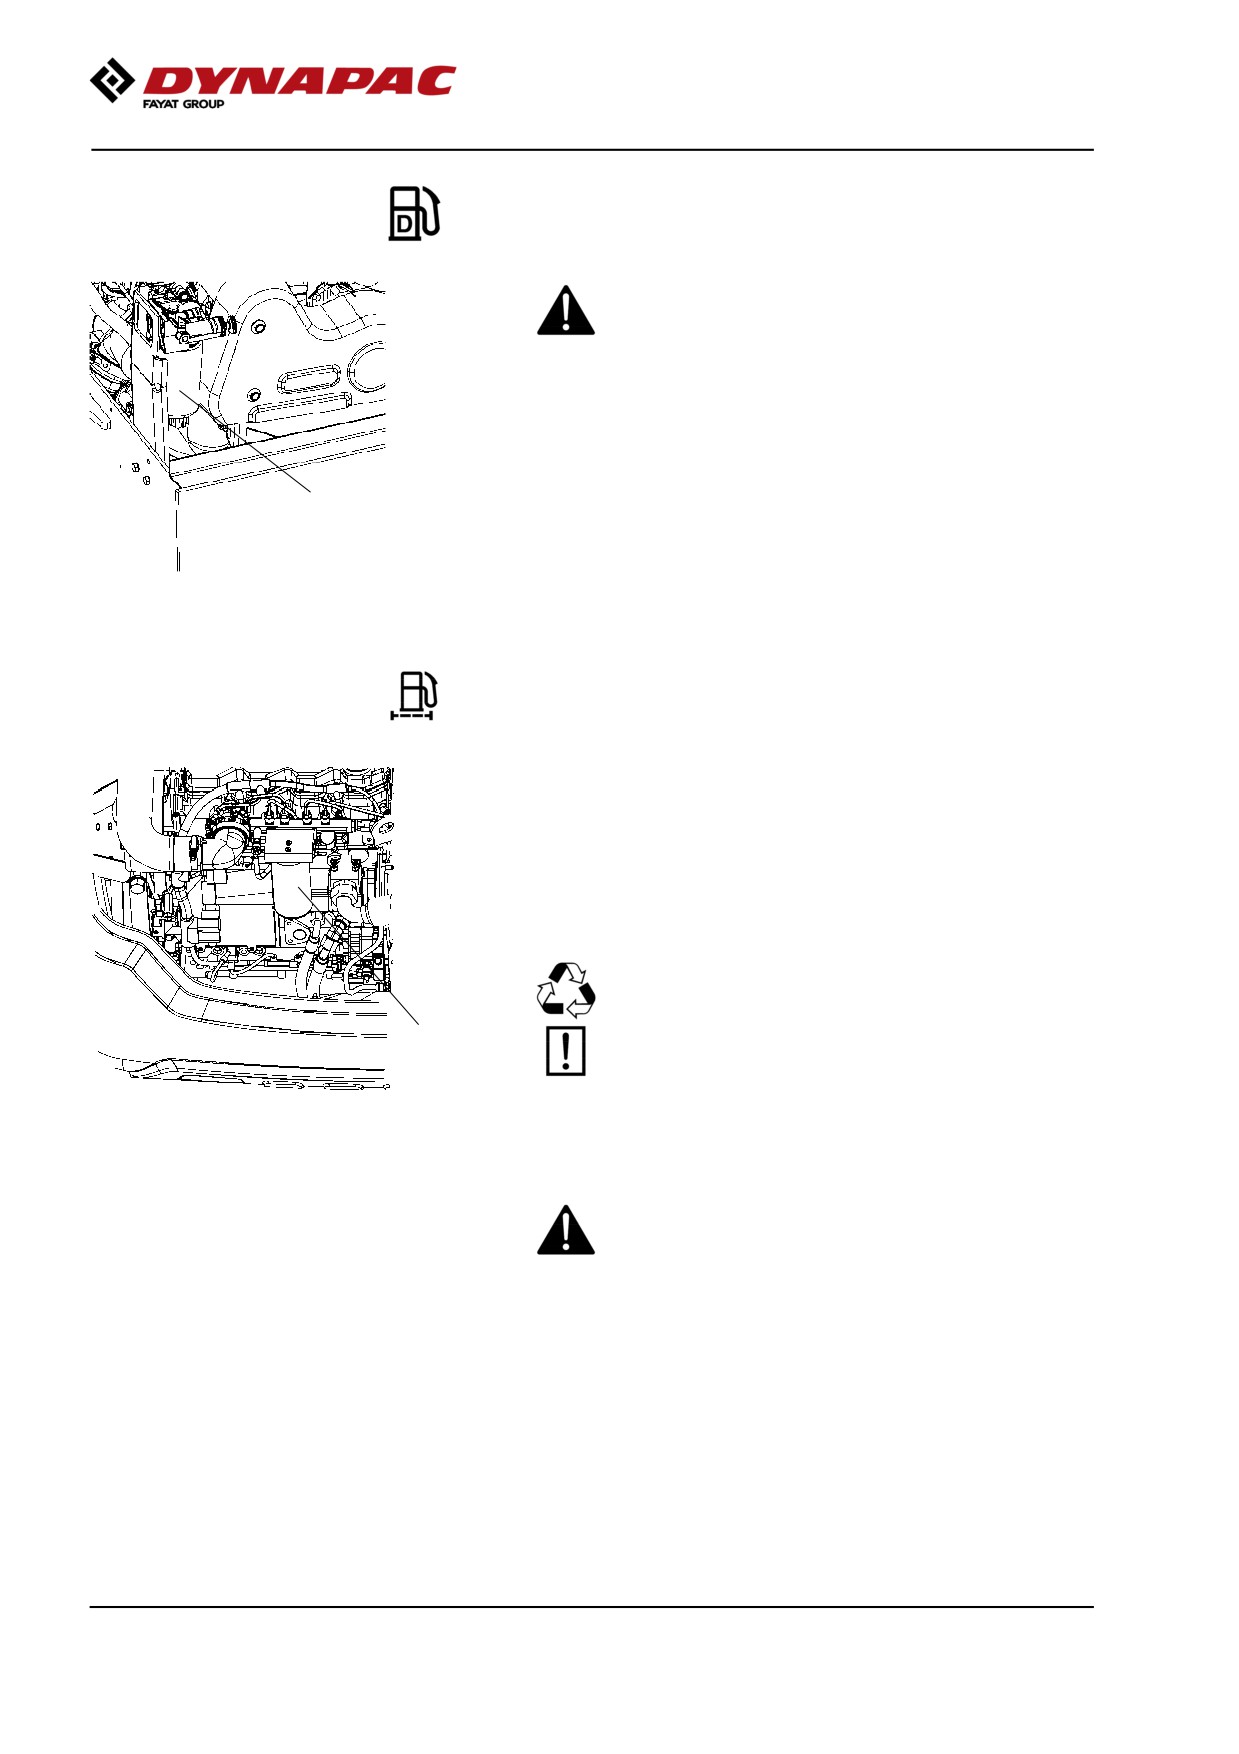
Fuel pre-filter - Replacement
Ensure good ventilation (air extraction) if the
diesel engine is run indoors. Risk of carbon
monoxide poisoning.
See the engine's instruction manual for filter
replacement, in the Fuel system chapter.
1
Fig. Engine compartment
1. Fuel prefilter
Replacing the fuel filter
Place a container underneath to collect fuel that runs
out when the filter is released.
Screw off the fuel filter (1). The filter is of the
disposable type and cannot be cleaned. Han in to
environment-friendly station.
Deliver the drain oil to environmentally correct
handling.
1
Refer to the engine manual for detailed
instructions when replacing the fuel filter.
Fig. Engine compartment
1. Fuel filter
Start the engine and check that the fuel filter is tight.
Ensure good ventilation (air extraction) if the
diesel engine is run indoors. Risk of carbon
monoxide poisoning.
NOTE! The new fuel filters must not under any
circumstances be pre-filled with fuel due to the purity
requirements of the fuel system.
2019-11-05
138
Maintenance - 1000h
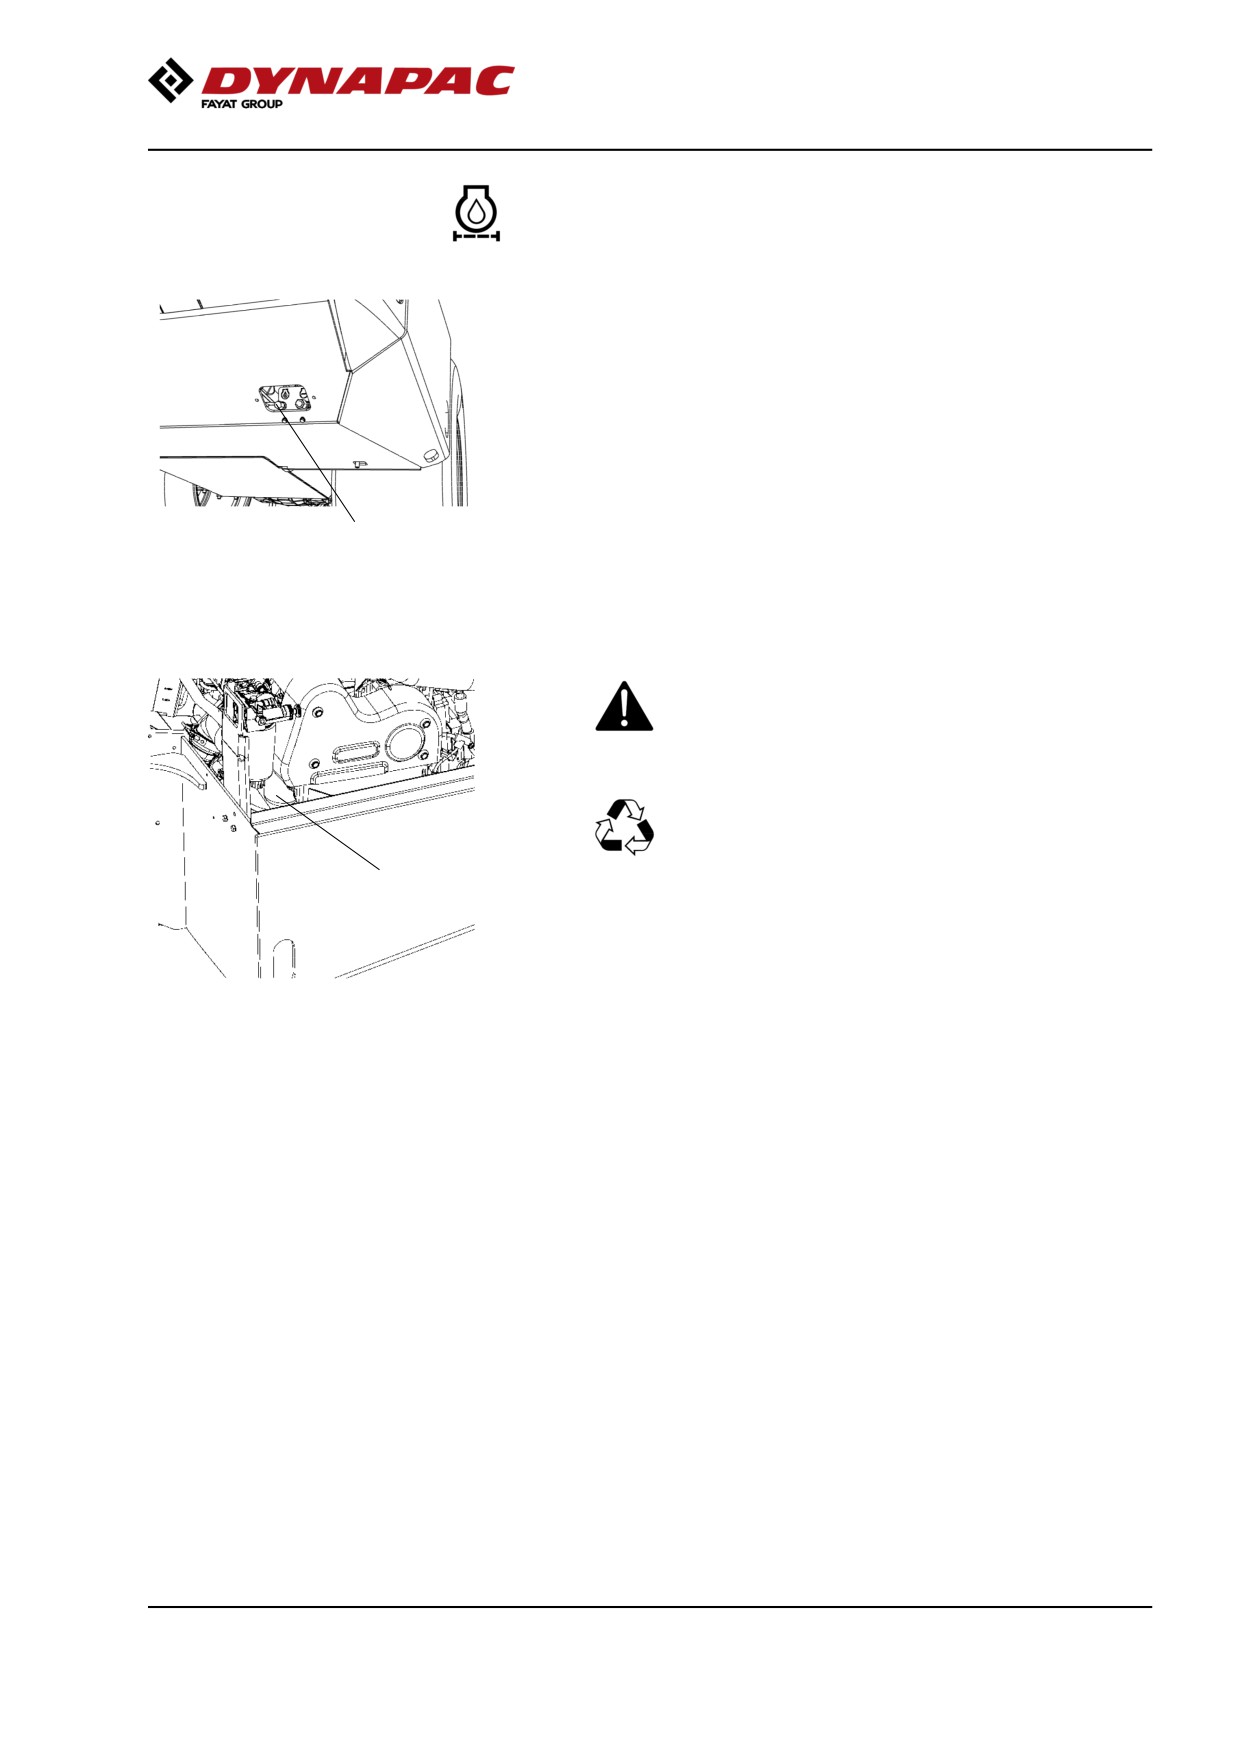
Diesel engine - Oil and Filter change
The oil drain plug (1) can be accessed most easily
from the right rear underside of the tractor frame, and
is installed with a hose in the engine.
Drain the oil when the engine is warm. Place a
receptacle that holds 19 liters (5 gal) under the drain
plug.
Replace the engine oil filter (2) at the same time. Refer
to the engine manual.
1
Fig. Tractor frame
1. Drain plug
Take great care when draining warm fluid and oil.
Wear protective gloves and goggles.
Hand in the drained oil and filter to an
environment-friendly waste disposal station.
2
Fig. Engine compartment
2. Oil filter
2019-11-05
139
Maintenance - 1000h
Seat bearing - Lubrication
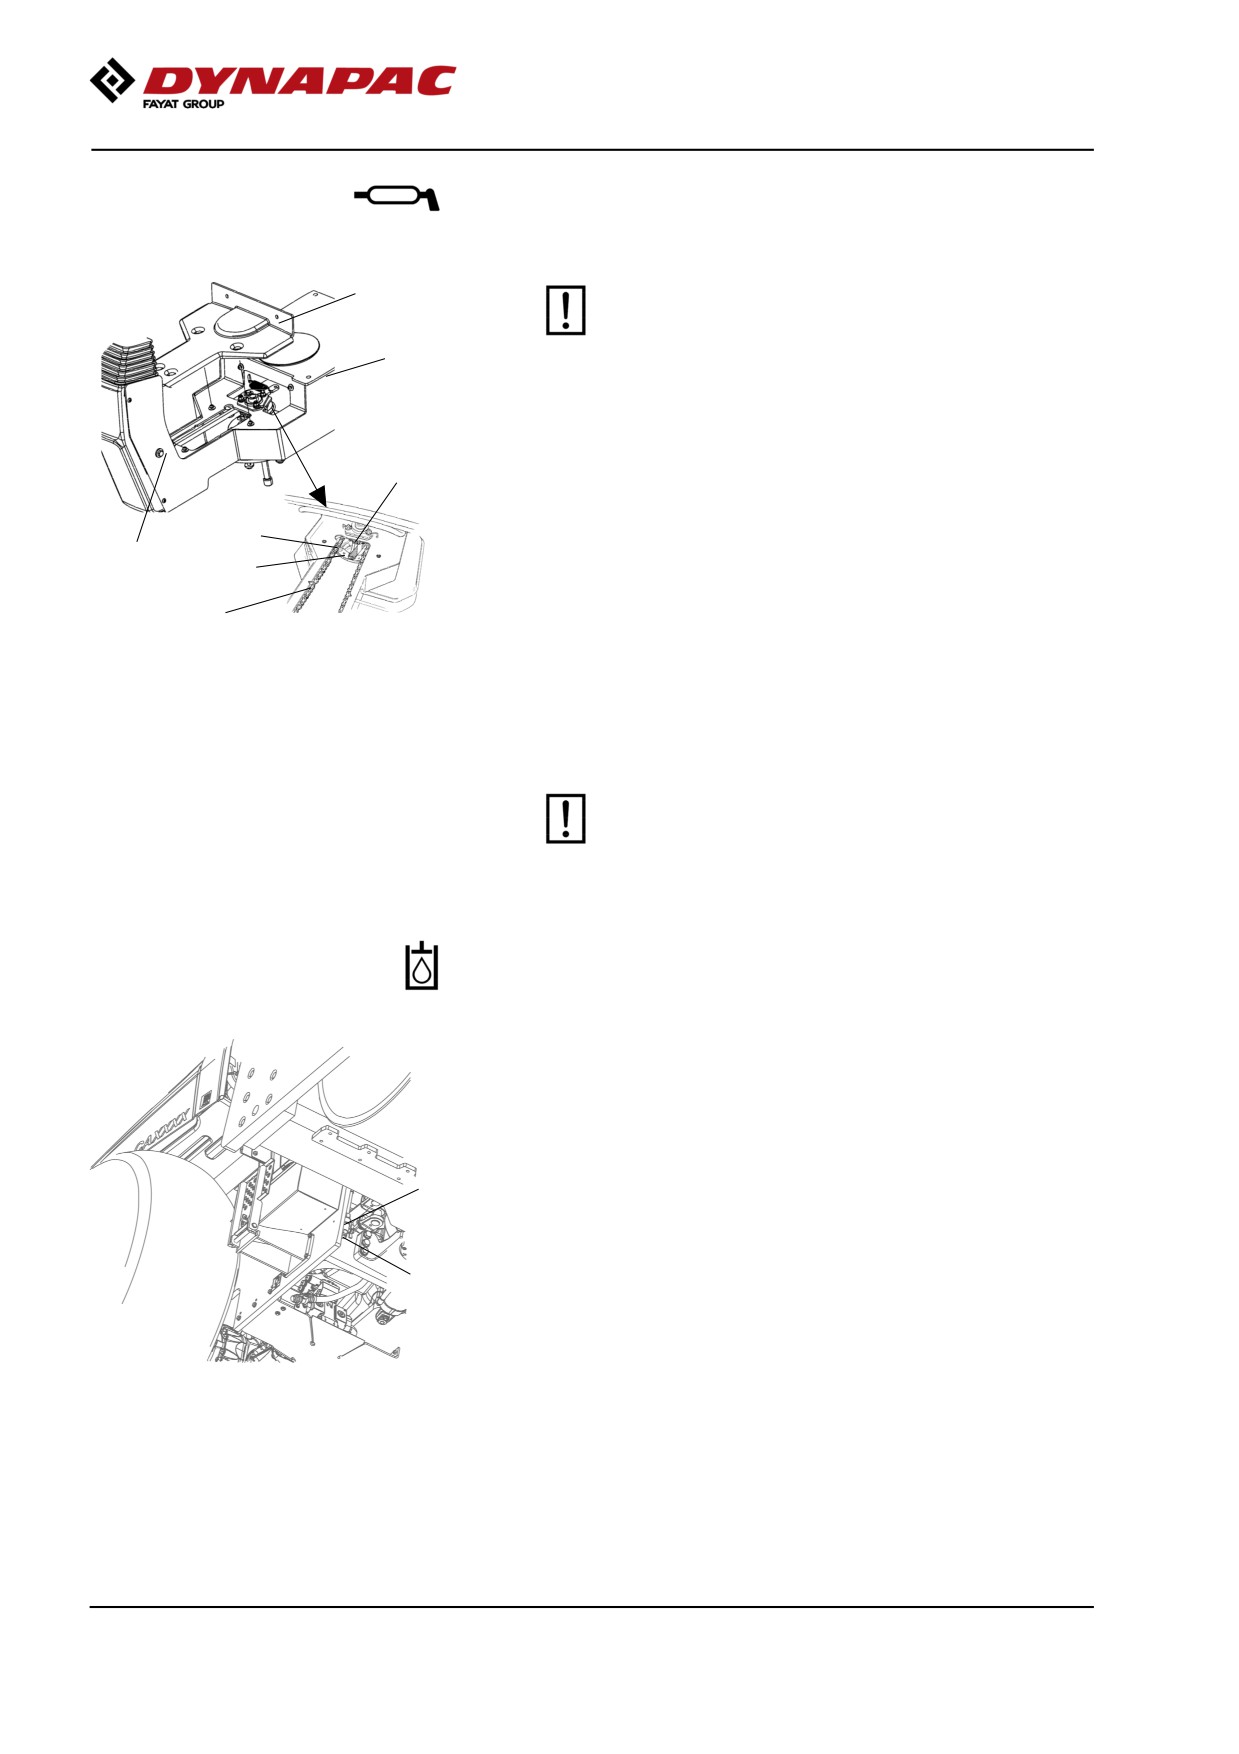
5
Keep in mind that the chain is a vital part of the
steering mechanism.
6
Remove the cover (5) to access the lubrication nipple
(1). Lubricate the operator seat slew bearing with three
2
strokes of a hand-operated grease gun.
Clean and grease the chain (3) between the seat and
3
the steering column.
4
1
Also grease the seat slide rails (6).
7
If the chain is slack on the sprocket (2), loosen the
Figure. Seat bearing
screws (4) and move the steering column forward.
1. Grease nipple
Tighten the screws and check chain tension.
2. Gearwheel
3. Steering chain
No not tension the chain too tightly. It should be
4. Adjusting screw
possible to move the chain about 10 mm (0.4 in) to the
5. Cover
side with a forefinger/thumb at the marking (7) in seat
6. Slide rails
7. Marking
frame. Fit the chain lock at the bottom.
If the seat starts to be stiff when adjusting, it
should be lubricated more often than specified
here.
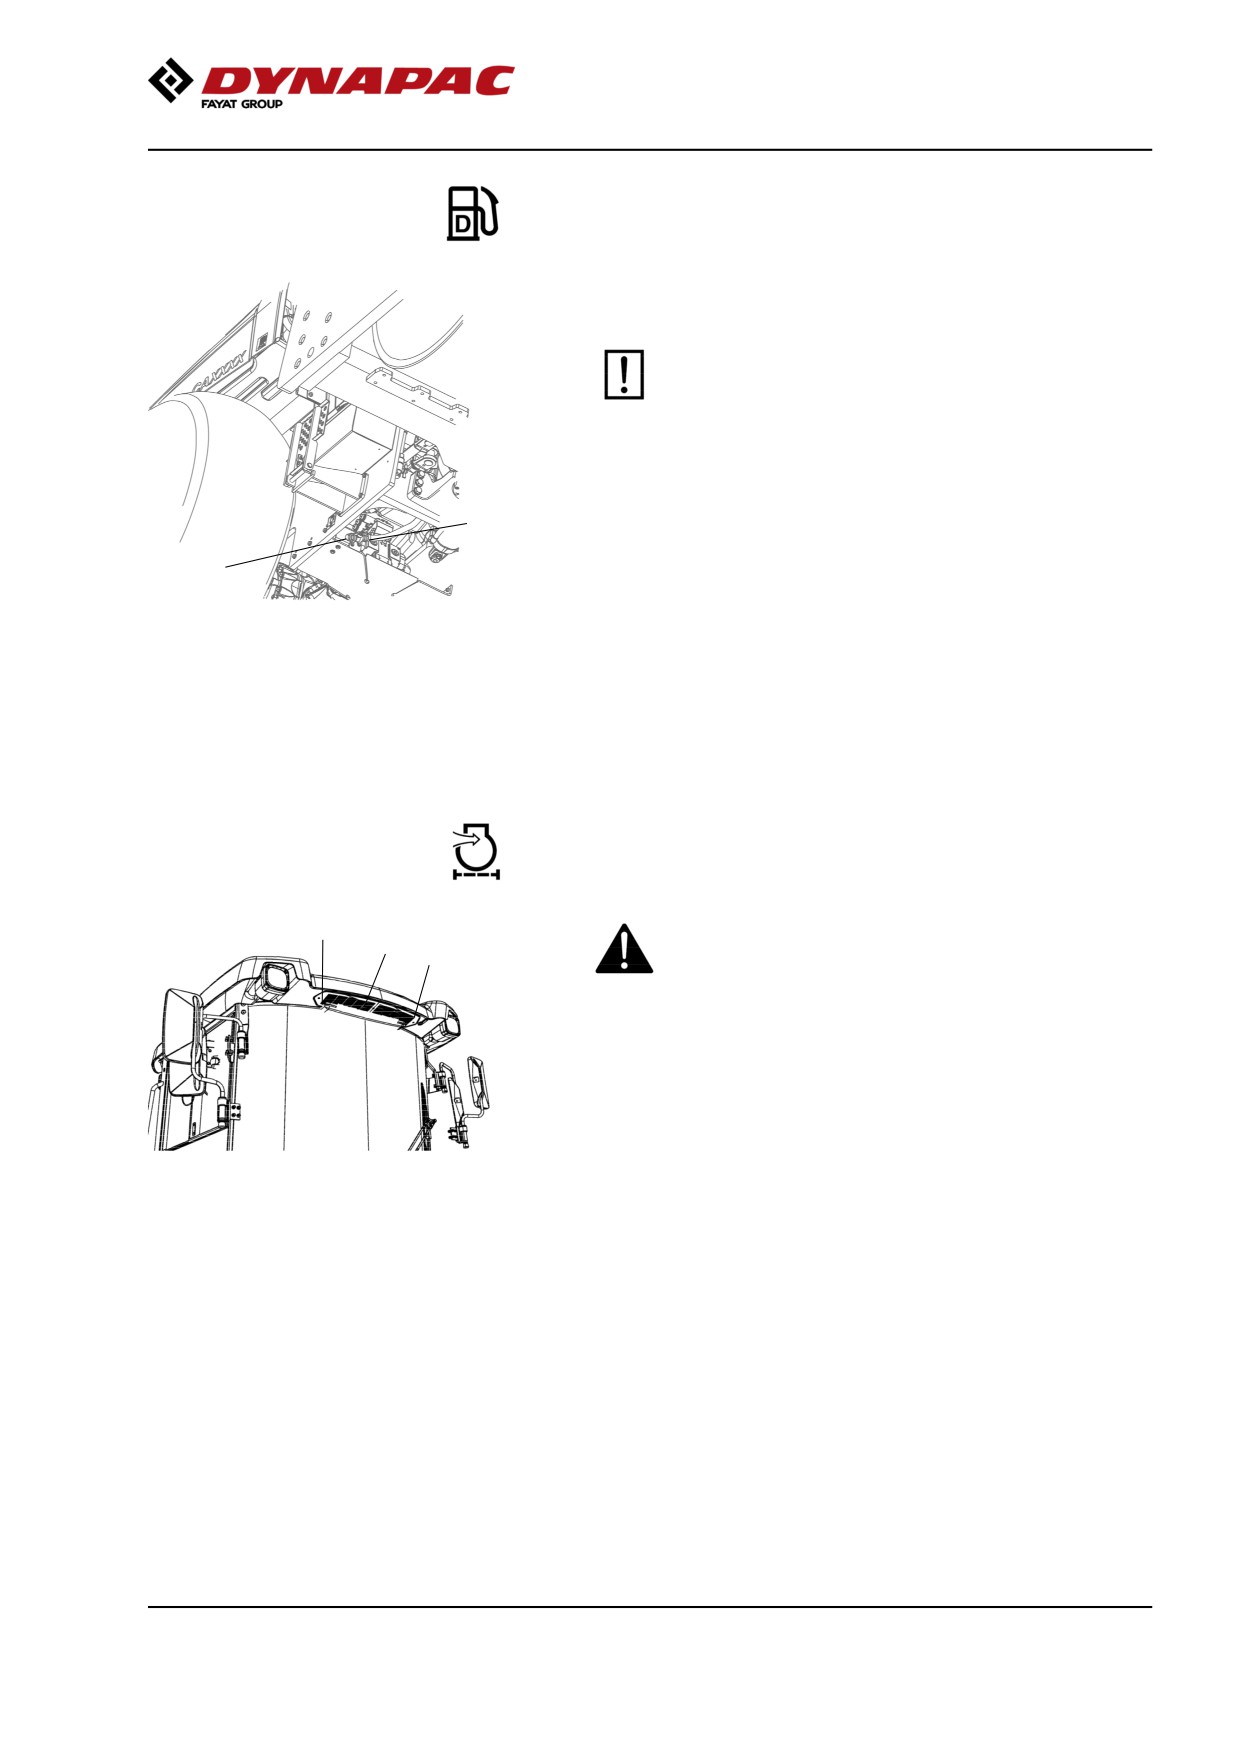
Hydraulic reservoir - Draining
The condensate from the hydraulic reservoir is drained
through the drainage tap (1).
Drain the roller after it has been stationary for a long
time, e.g. after standing overnight. Drain as follows:
2
Remove the plug (2).
Place a container under the tap.
1
Open the tap (1) and let any trapped condensate run
out.
Shut the drainage tap.
Fig. Machine's right underside
Refit the plug.
1. Drain cock
2. Plug
2019-11-05
140
Maintenance - 1000h
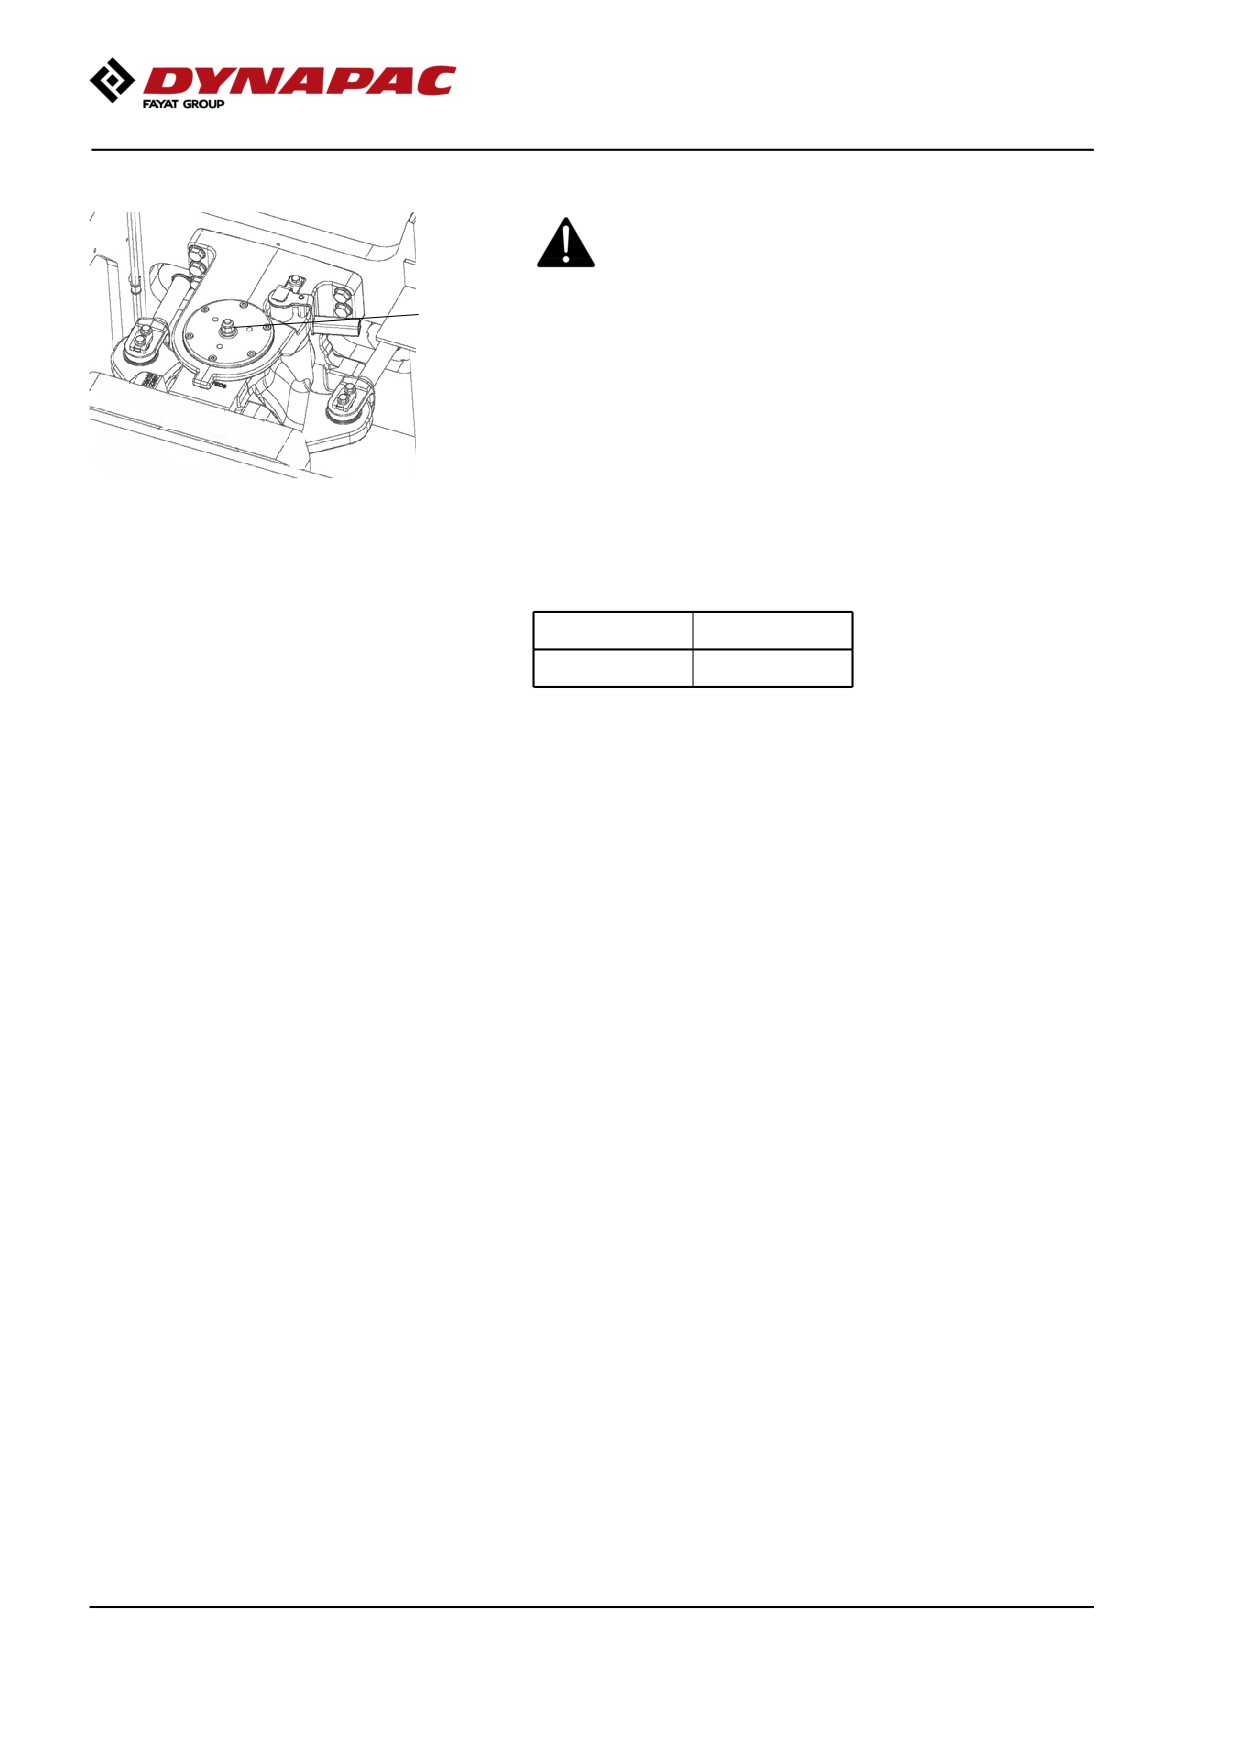
Fuel tank - Draining (Optional)
Water and sediment in the fuel tank are removed via
the drainage plug in the bottom of the fuel tank.
Be very careful during draining. Do not drop the
plug or else all the fuel will flow out.
Drain the roller after it has been stationary for a long
2
time, e.g. after standing overnight. The fuel level
should be as low as possible.
1
The roller should preferably have been standing with
Fig. Machine's right underside
this side somewhat lower, so that water and sediment
1. Drain plug
2. Drain cock
will gather near the drainage plug (1). Drain as follows:
Place a container under the plug (1).
Loosen the drain plug (1). Then open the drain cock
(2) and drain out water and sediment until only pure
diesel fuel emerges at the plug. Close the drain cock
and screw in the plug again.
Air conditioning (Optional)
Fresh air filter - Change
2
Use a step ladder to reach the filter (1). The filter
1
2
can also be accessed via the right cab window.
There is a fresh air filter (1), located at the front of the
cab.
Undo the three screws (2) and remove the protective
cover.
Fig. Cab
1. Fresh air filter (x 2)
Remove the two air filter inserts and replace with new
2. Screws (x 3)
ones.
It may be necessary to change the filters more often if
the machine is working in a dusty environment.
2019-11-05
141
Maintenance - 1000h
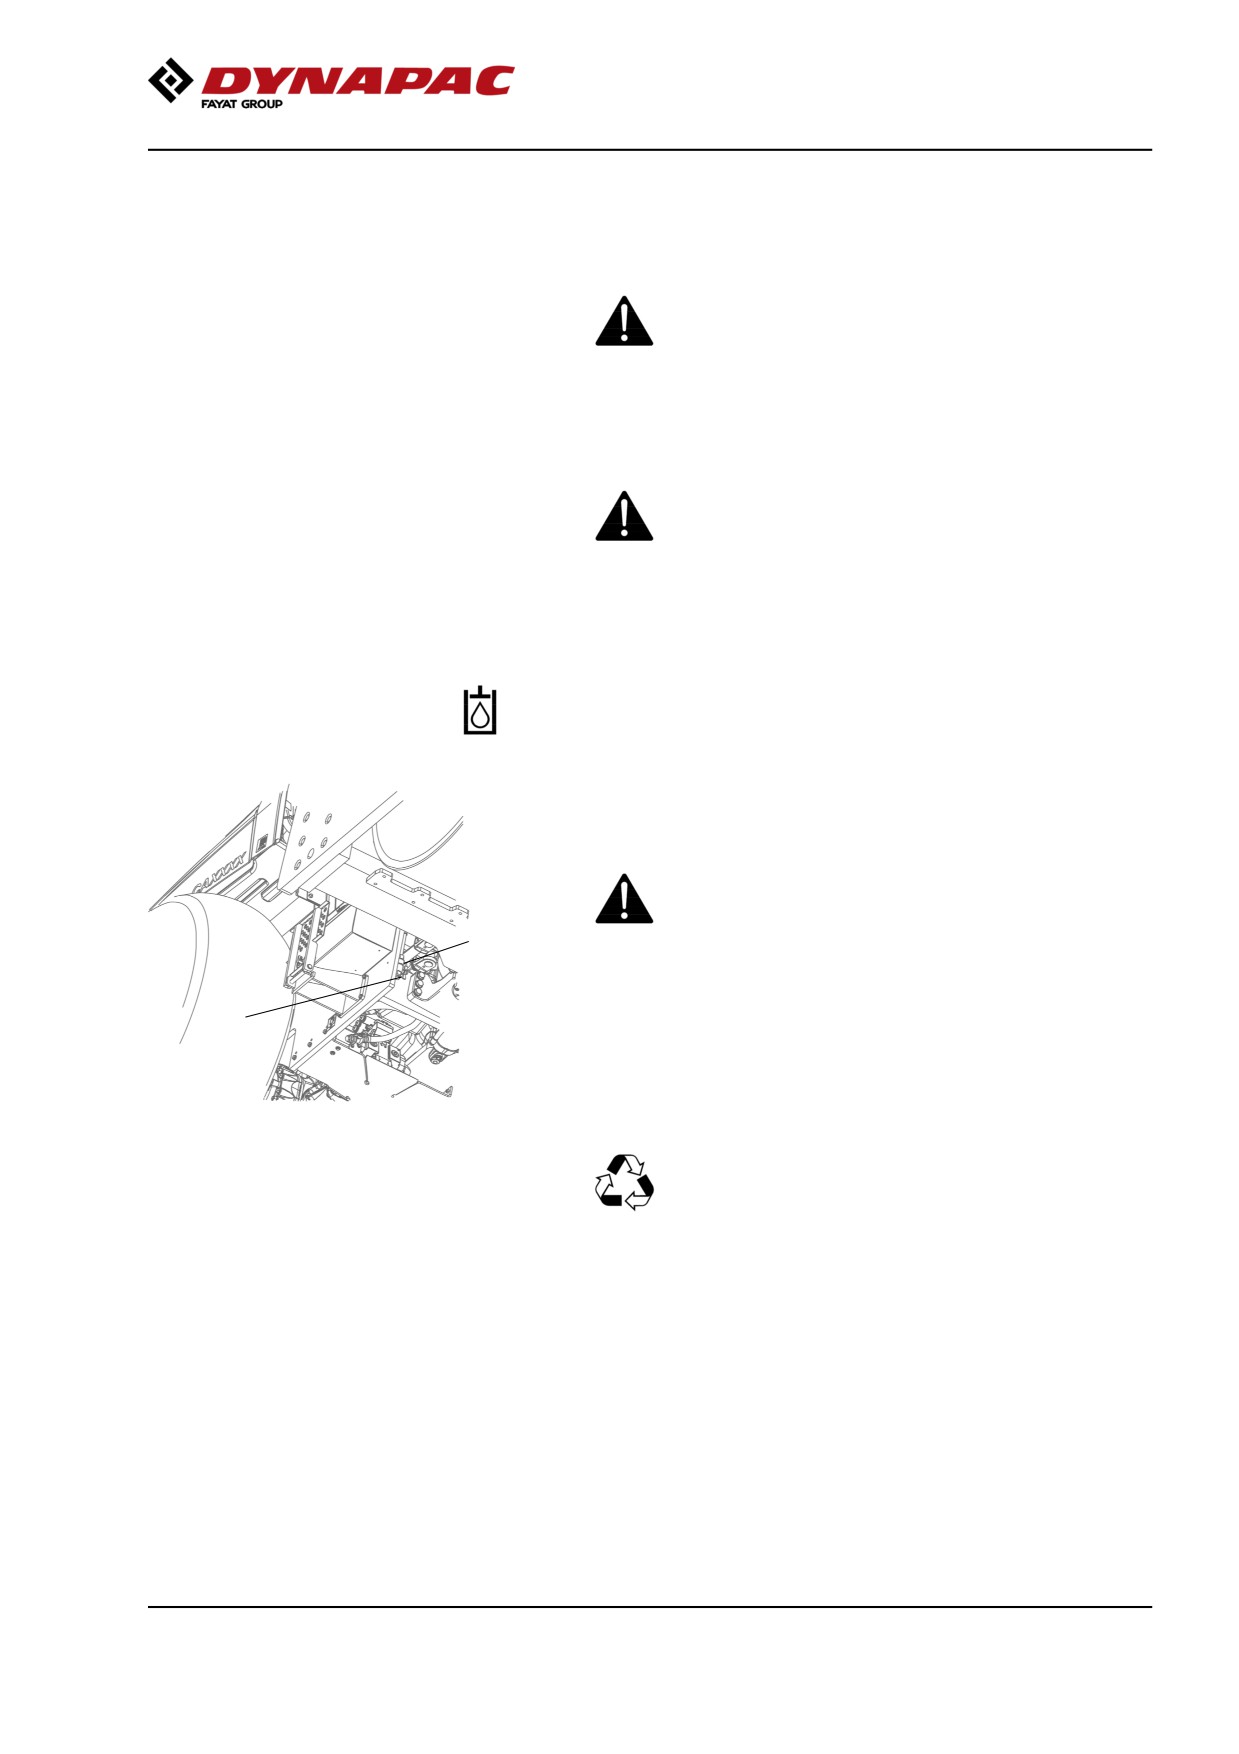
Steering hitch - Tightening
Nobody must be allowed near the steering joint
when the engine is running. Risk of being
crushed when the steering is operated. Switch
off the engine and activate the parking brake
1
before lubricating.
The easiest way to identify if you have this type of
steering hitch is that it has a new type of nut (1) at the
top, as shown.
Fig. Steering hitch
1. Nut
Actual torque (Nm) should be when the machine's
position is straight ahead.
M14
174 Nm
M16
270 Nm
2019-11-05
142
Maintenance - 2000h
Maintenance - 2000h
Performed after 2000 operating hours (every two
years)
Park the roller on a level surface.
The engine must be switched off and the
parking brake activated when checking or
adjusting the roller, unless otherwise specified.
Ensure that there is good ventilation (air
extraction) if the engine is run indoors. Risk of
carbon monoxide poisoning.
Hydraulic reservoir - Oil change
Obtain a container for collecting the used fluid. The
container should be able to hold at least 60 liters (16
gal).
Observe care when draining hot hydraulic fluid.
Wear protective gloves and goggles.
2
1
A suitable receptacle may be an empty oil drum or
similar item which is placed beside the roller. The oil
then runs from the drain cock (1) to the receptacle,
after the plug (2) has been removed and the cock
Fig. Machine's right underside
1. Drain cock
opened.
2. Plug
Save the oil and hand in to an
environment-friendly waste disposal station.
Fill up with fresh hydraulic fluid as per the instructions
under the heading "Hydraulic reservoir - Check fluid
level". Replace the hydraulic fluid filters at the same
time.
Start the diesel engine and operate the various
hydraulic functions.
Check the fluid level and top up if necessary.
2019-11-05
143
Maintenance - 2000h
Hydraulic filter - Replacement
Undo the filler cap/bleeder filter (2) on top of the
reservoir so that over-pressure inside the reservoir can
be eliminated.
Make sure that the bleeding filter (2) is not clogged, air
must have unobstructed passage through the cap in
2
both directions.
If passage in either direction is blocked, clean the filter
with a little diesel oil and blow through with
compressed air until the block is removed, or replace
3
the cap with a new one.
Wear protective goggles when working with
Fig. Hydraulic reservoir
compressed air.
2. Filler cap/Bleeding filter
3. Sight glass
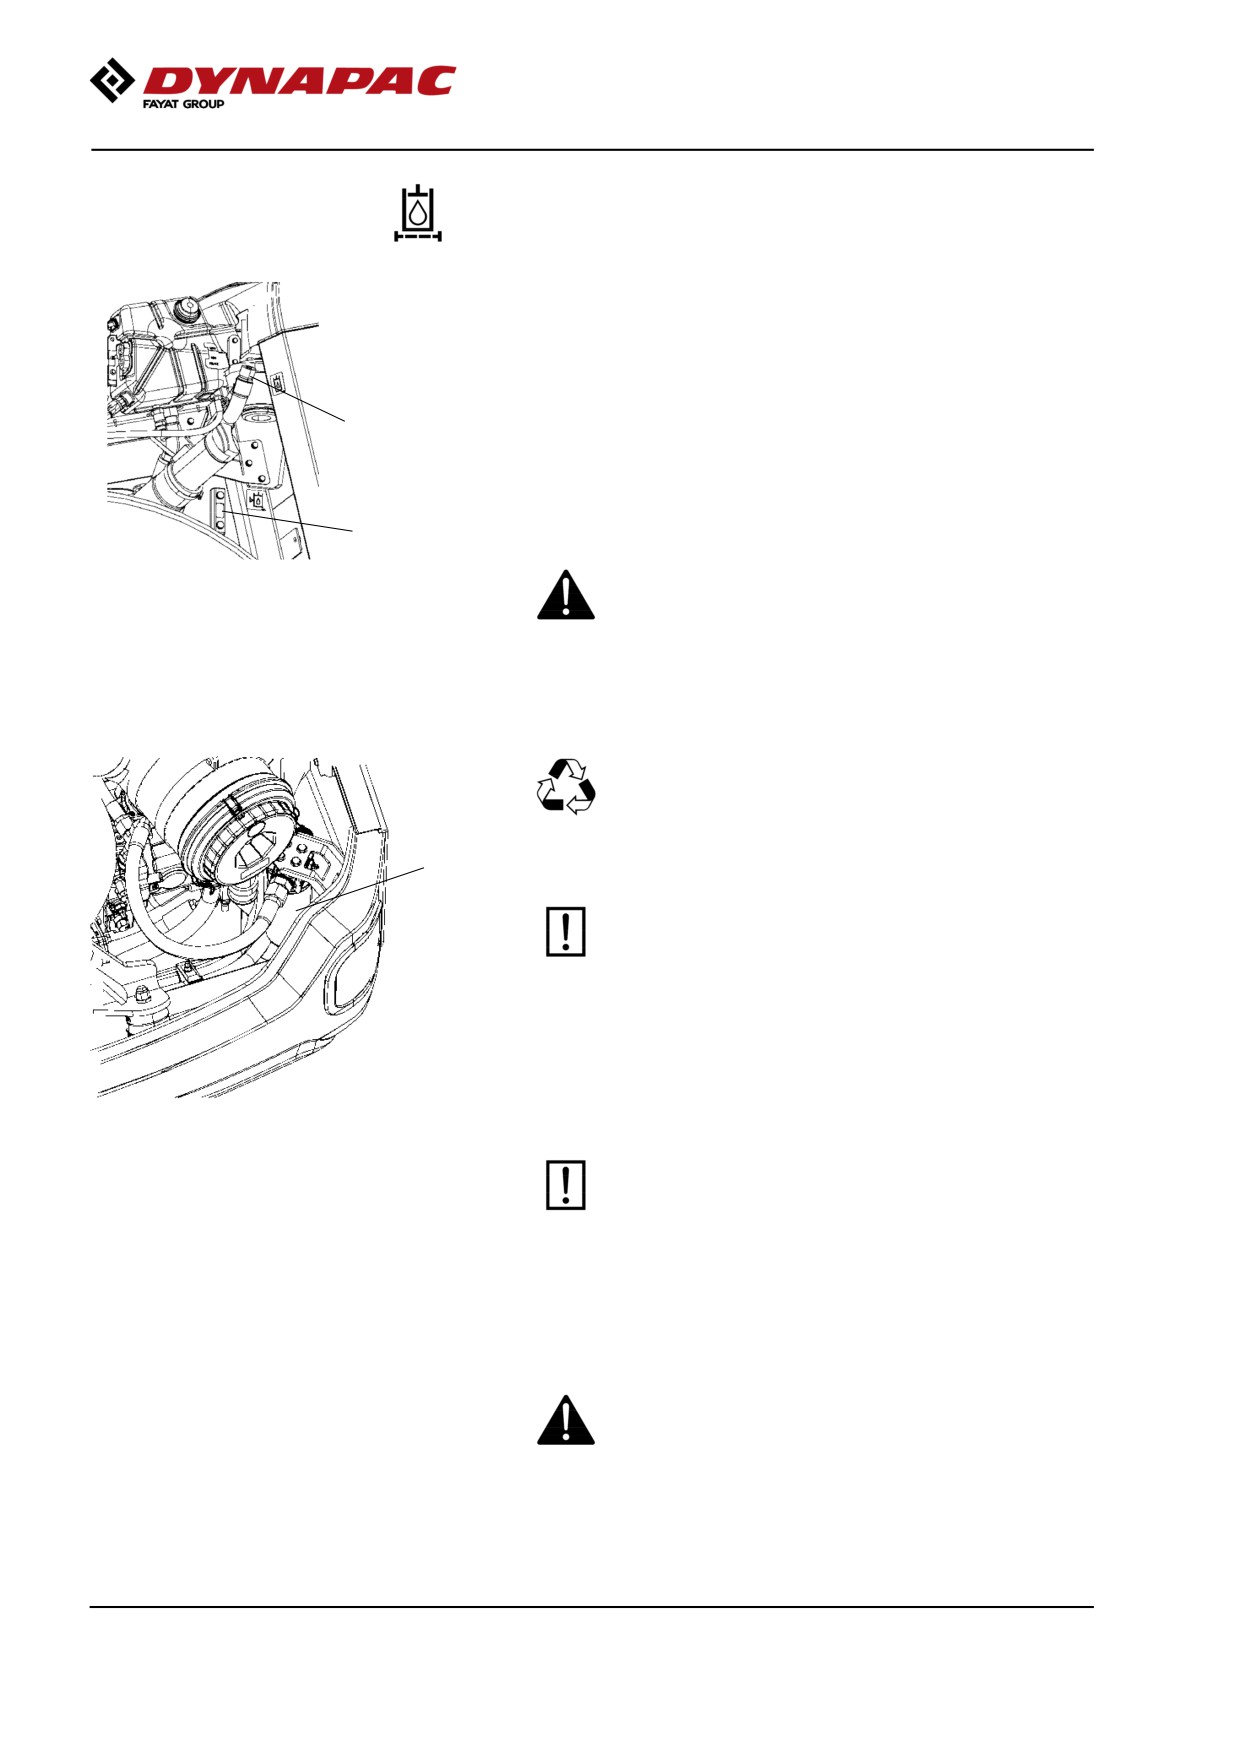
Clean thoroughly around the oil filter.
Remove the oil filter (1) and hand in to an
environment-friendly waste disposal station. This
is a single-use filter and cannot be cleaned.
1
Make sure that the old sealing ring is not left on
the filter holder, Otherwise, this could cause
leakage between the new seal and the old one.
Thoroughly clean the filter holder's sealing surfaces.
Fig. Engine compartment
Apply a thin coat of fresh hydraulic fluid on the new
1. Hydraulic fluid filter (x1).
filter seal. Screw tight the filter by hand.
First tighten the filter until its seal is in contact
with the filter attachment. Then turn an additional
half revolution. Do not tighten the filter too hard
as this could damage the gasket.
Start the engine and check that there is no leakage of
hydraulic fluid from the filter. Check level of fluid in the
sight glass (3) and top up as required.
Ensue that there is good ventilation (air extraction)
if the engine is run indoors. Risk of carbon
monoxide poisoning.
2019-11-05
144
Maintenance - 2000h
Drum cartridge - Oil change
1
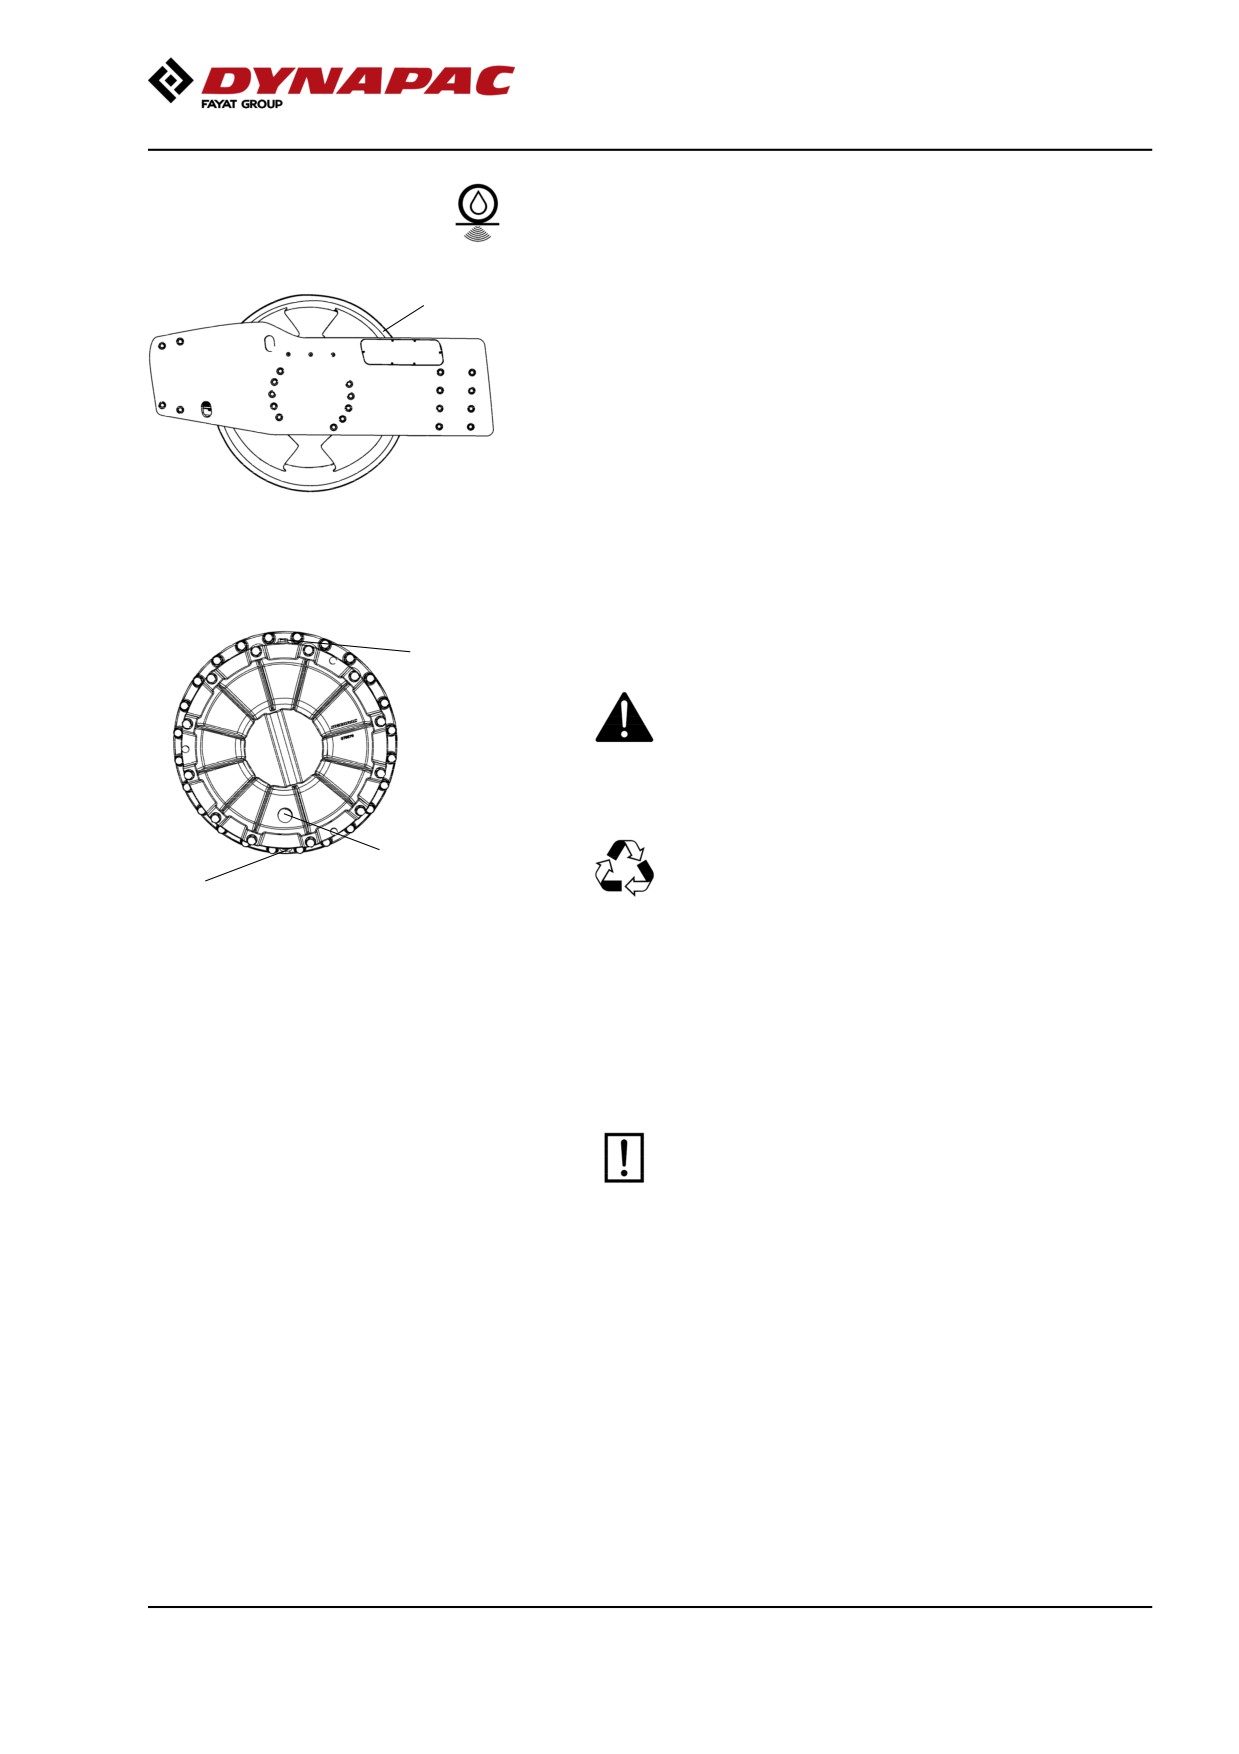
Position the roller on a flat surface with the groove (1)
on the inside of the drum aligned with the top of the
drum frame.
Fig. Left drum side
1. Groove
1
Place a receptacle for about 5 liters (1.32 gal)
underneath the drain plug (2).
Observe care when draining drum oil/hot drum oil.
Wear protective gloves and goggles.
3
Save the oil and hand in to an
environment-friendly waste disposal station.
2
Fig. Left drum side
1. Filler plug
2. Drain plug
Clean and unscrew the filler plug (1) and the drain
3. Sight glass
plug (2).
Allow all the oil to run out. Fit the drain plug and fill
with new synthetic oil in accordance with the
instructions under "Drum cartridge - checking the oil
level".
Ensure that only Dynapac Drum Oil 1000 is used
in the cartridges.
Repeat the procedure on the opposite side.
2019-11-05
145
Maintenance - 2000h
1
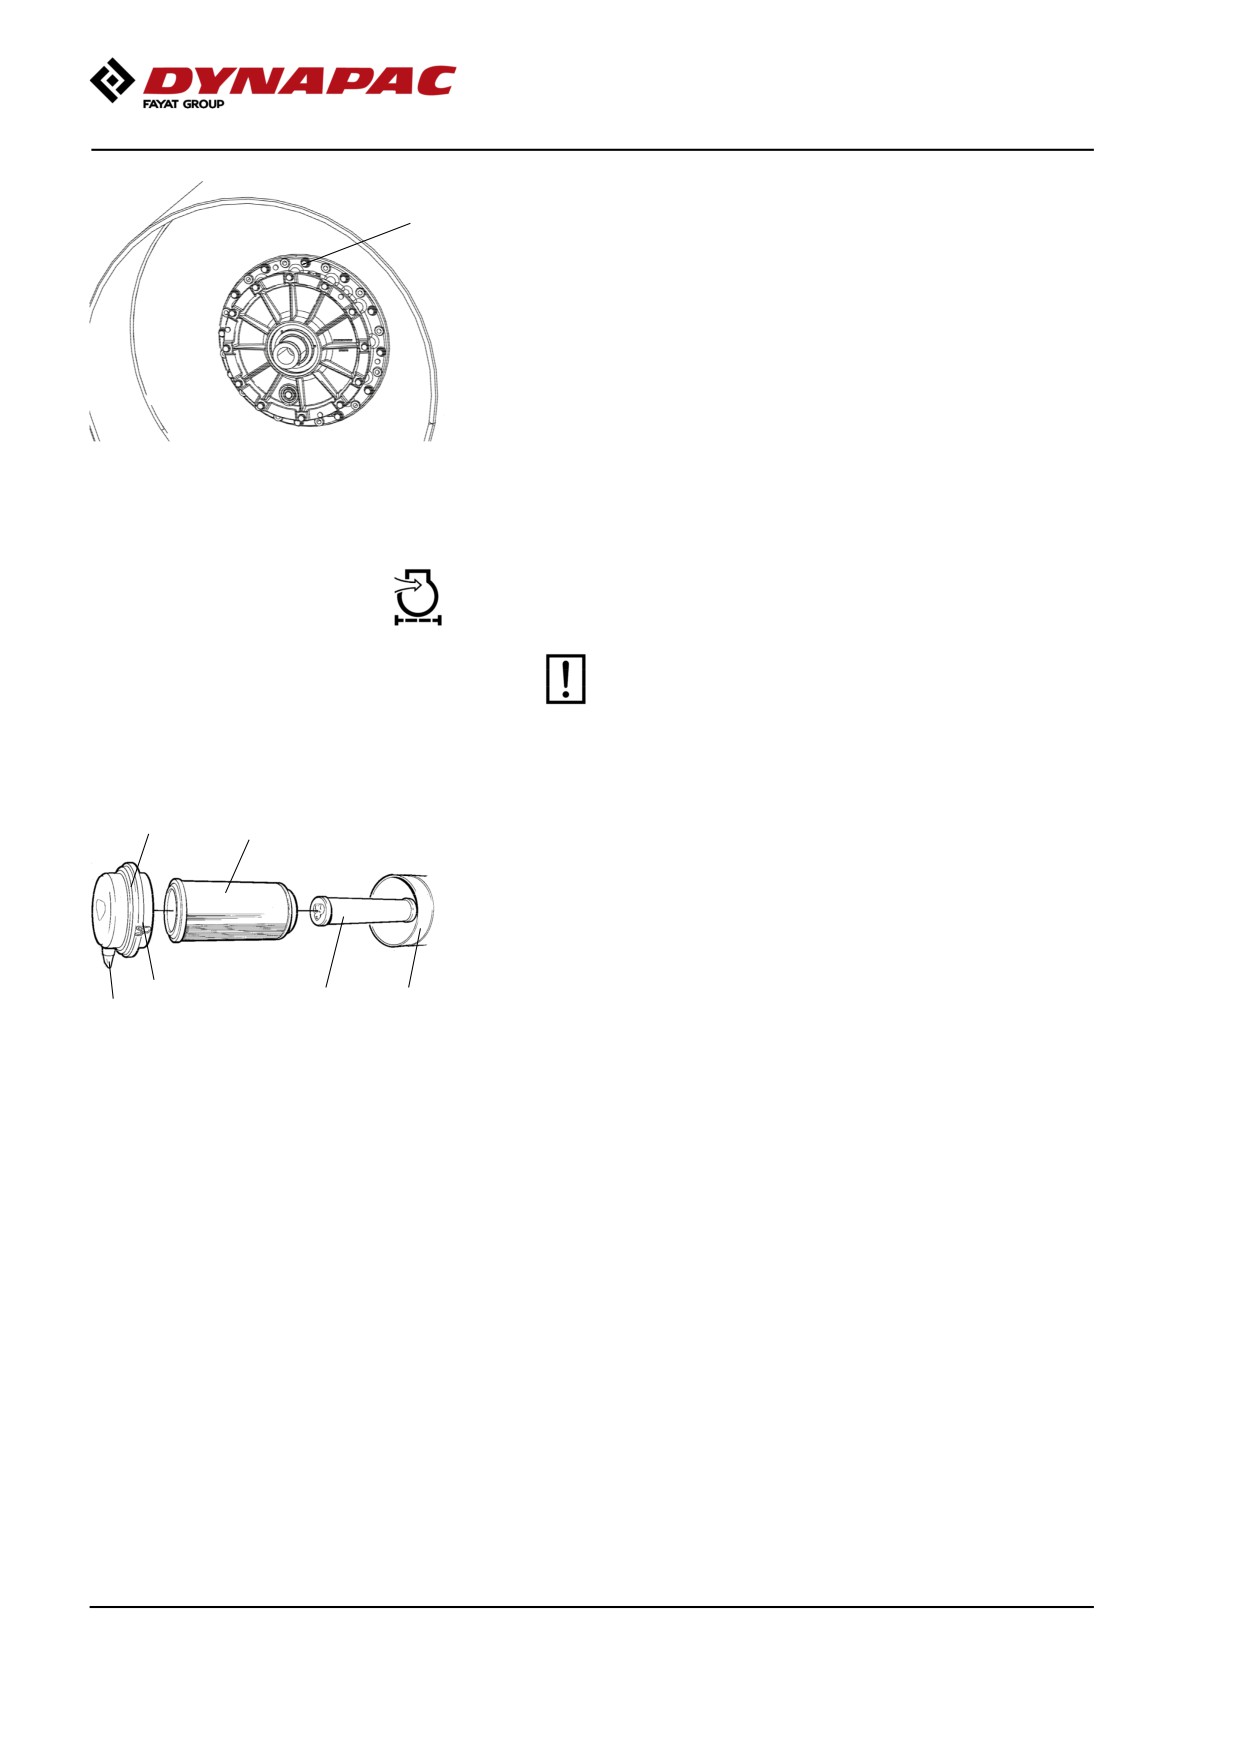
Drum cartridge - Cleaning the ventilation screw
Clean the drum's ventilation hole and ventilation screw
(1). The hole is required to eliminate excess pressure
inside the drum.
Fig. Drum
1. Ventilation screw
Air cleaner
Checking - Change the main air filter
Change the air cleaner's main filter when the
warning lamp on the display lights when the
diesel engine is operating at full speed.
2
3
Release the clips (1), pull off the cover (2), and pull out
the main filter (3).
Do not remove the backup filter (4).
Clean the air cleaner if necessary, see section Air
cleaner - Cleaning.
When replacing the main filter (3), insert a new filter
1
4
5
6
and refit the air cleaner in the reverse order.
Fig. Air cleaner
Check the condition of the dust valve (6); replace if
1. Clips
necessary.
2. Cover
3. Main filter
4. Backup filter
When refitting the cover, make sure that the dust valve
5. Filter housing
is positioned downwards.
6. Dust valve
2019-11-05
146
Maintenance - 2000h
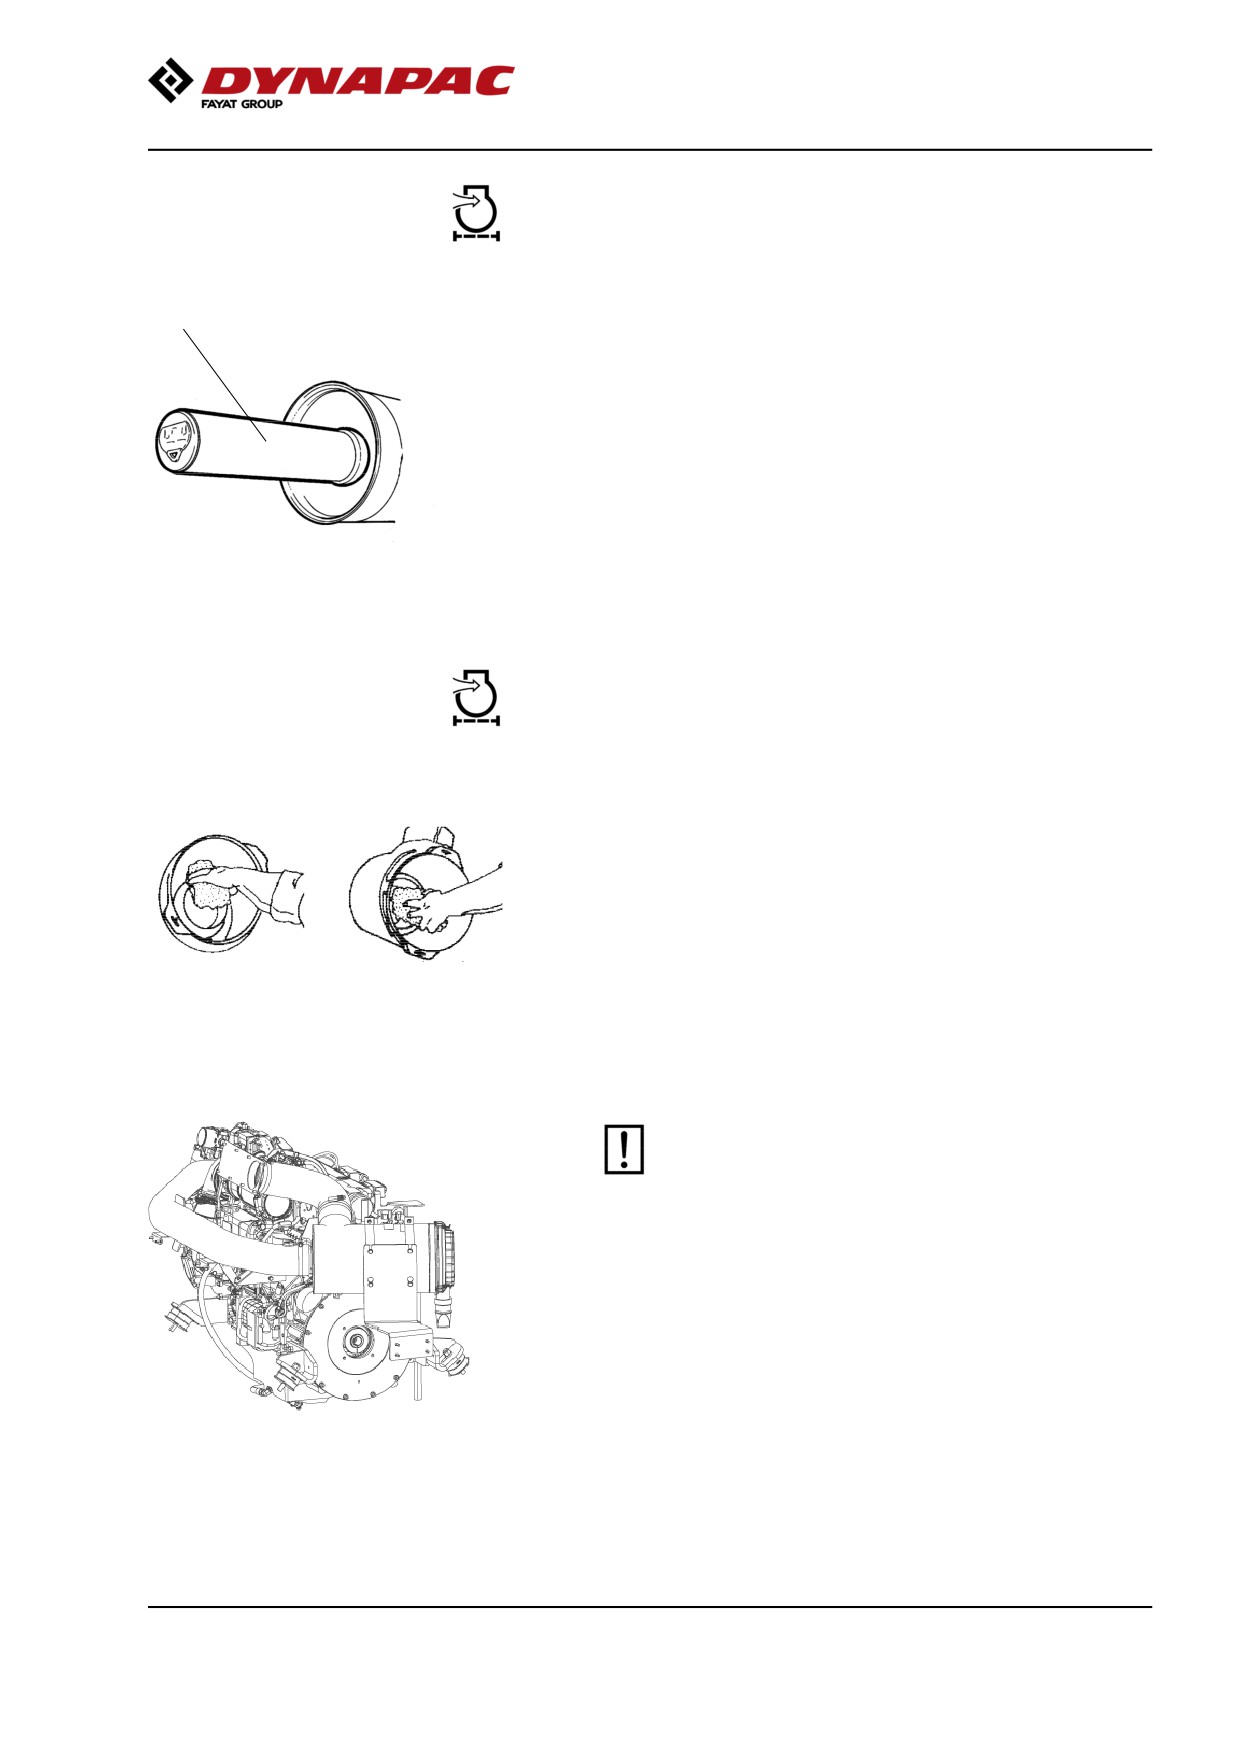
Backup filter - Change
1
Change the backup filter with a new filter after every
second replacement of the main filter.
To change the backup filter (1), pull the old filter out of
its holder, insert a new filter and reassemble the air
cleaner in the reverse order.
Clean the air cleaner if necessary, see section Air
cleaner - Cleaning.
Fig. Air filter
1. Backup filter
Air cleaner
- Cleaning
Wipe clean on both sides of the outlet
pipe.
Wipe clean the inside of the cover (2) and the filter
housing (5). See the previous illustration.
Wipe also both surfaces for the outlet pipe; see
adjacent figure.
Inner edge of
Outer edge of outlet
outlet pipe.
pipe.
Check that the hose clamps between the filter
housing and the suction hose are tight and that
the hoses are intact. Inspect the entire hose
system, all the way to the engine.
2019-11-05
147
Maintenance - 2000h
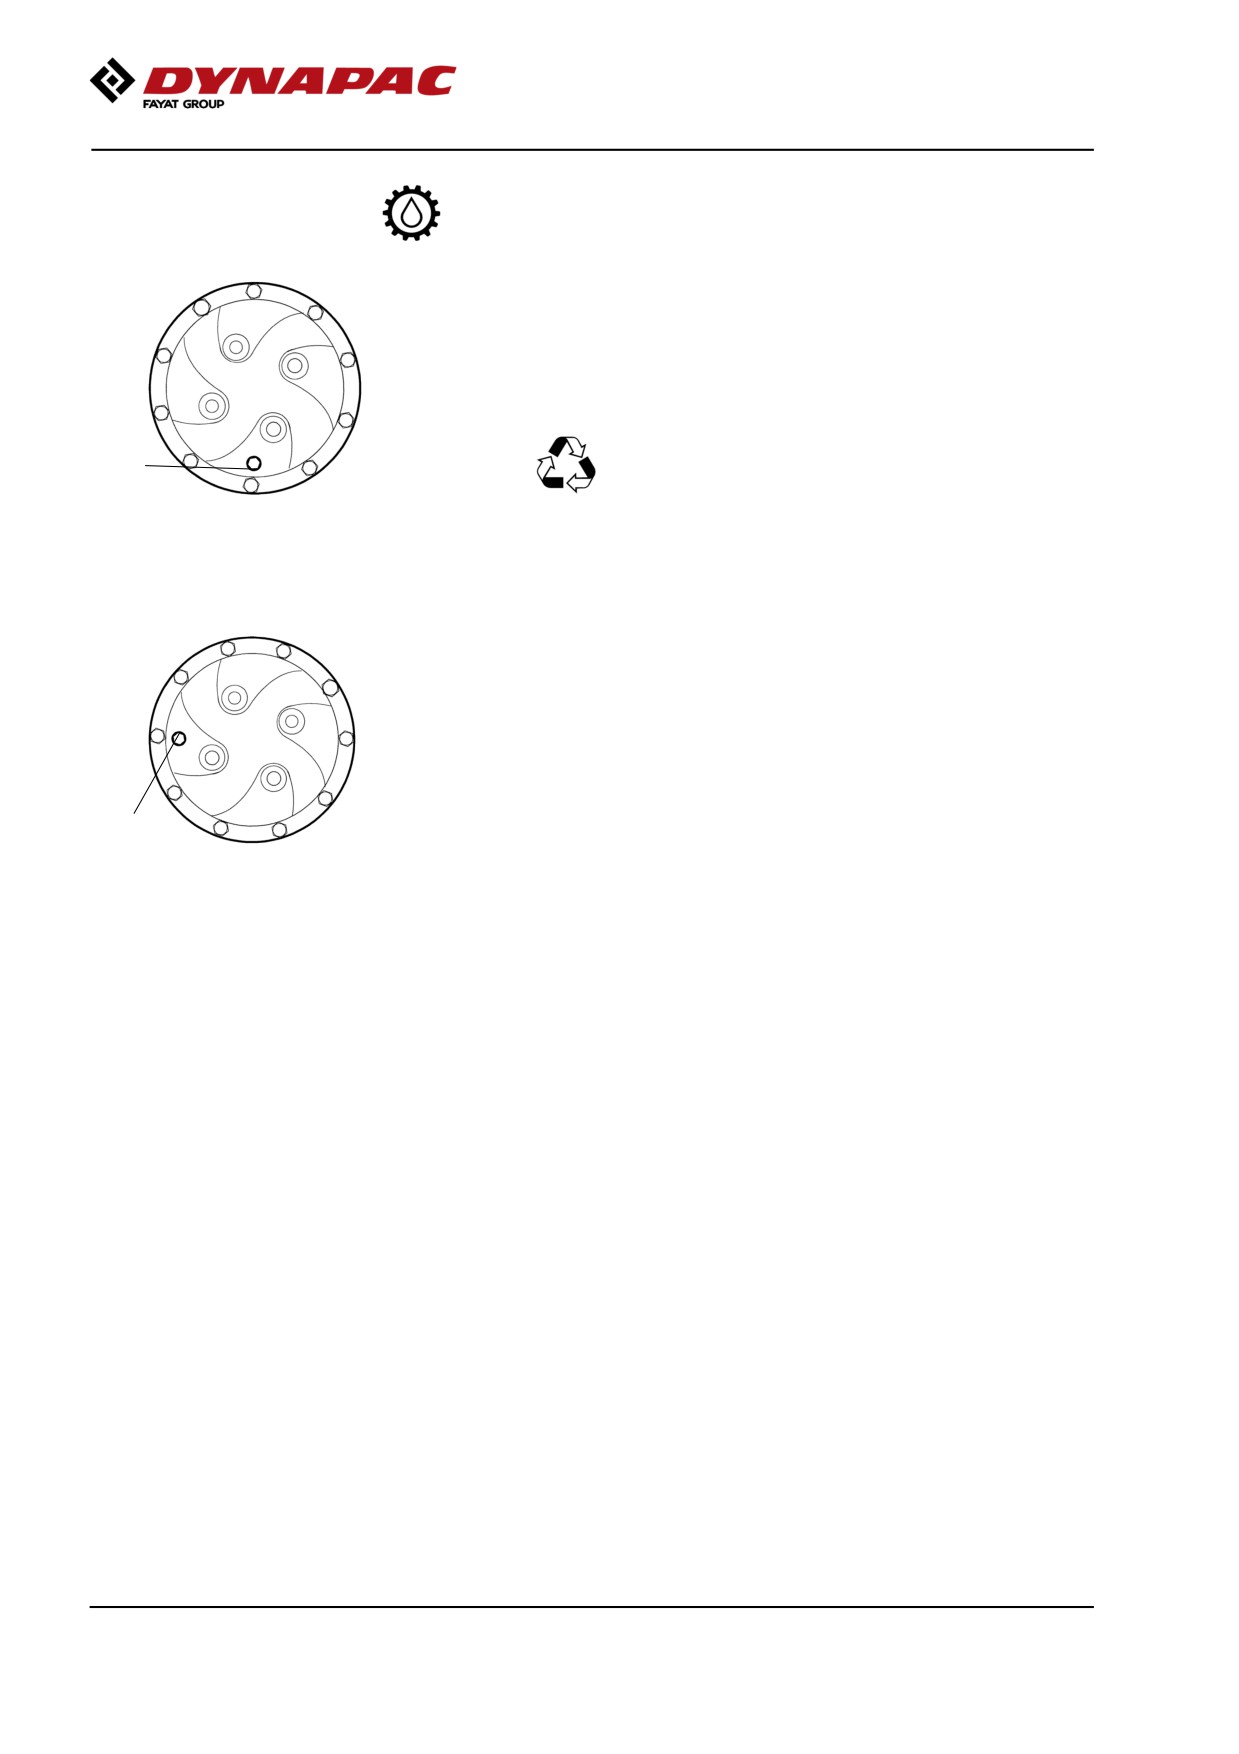
Rear axle planetary gear - Oil change
Position the roller with the plug (1) at its lowest
position.
Wipe clean, unscrew the plug (1) and drain the oil into
a suitable receptacle. The volume is approximately
1.85 liters (1.95 qts).
Oil should be taken to your local waste disposal
1
station.
Fig. Planetary gear/drainage position
1. Plug
Position the roller so that the plug (1) in the planetary
gear is at "9 o'clock" or "3 o'clock".
Fill with oil to lower edge of level hole. Use
transmission oil. See the lubrication specification.
Clean and refit the plug.
1
Check the fluid level in the same way on the rear
Fig. Planetary gear/filling position
axle's other planetary gear.
1. Plug
2019-11-05
148
Maintenance - 2000h
Rear axle differential - Oil change
Never work under the roller when the engine is
running. Park on a level surface. Block the wheels
1
securely.
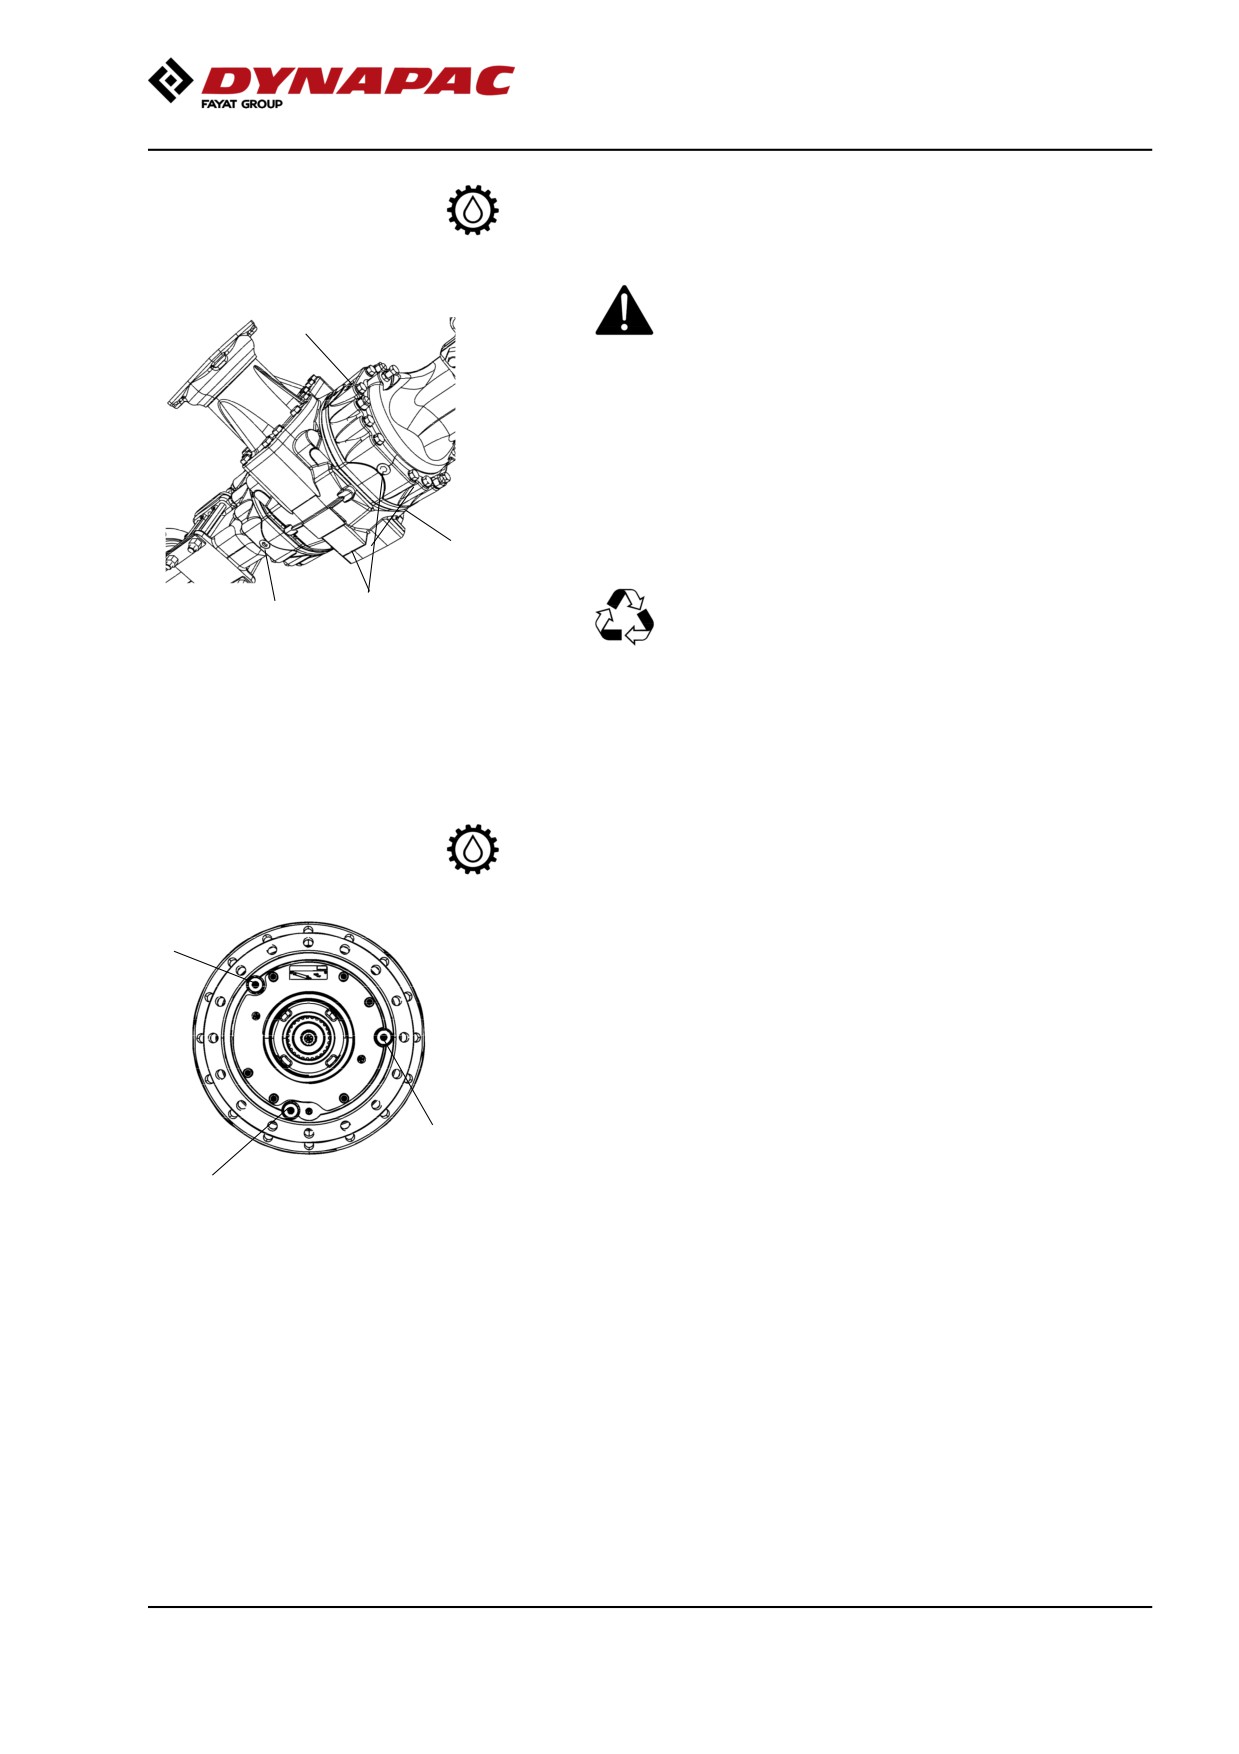
Wipe clean and remove the three level/filler plugs (1)
and (3) and all three drain plugs (2). The level/filler
plugs are located on the front and rear of the axle, and
the drain plugs are located on the underside and rear.
3
Drain the oil into a container. The volume is approx.
12.5 litres (13.2 qts).
Deliver the drain oil to environmentally correct
2
2
handling.
Fig. Rear axle, underside
1. Level/Filler plugs (x 3)
2. Drain plugs (x 3)
3. Filler plugs (x x)
Refit the drainage plugs and top up with fresh oil until
the correct level is reached. Refit the level/filler plugs.
Use transmission oil, see Lubricant Specification.
Drum gearbox - Oil change
Wipe clean, unscrew the plugs (1, 2 and 3) and drain
2
the oil into a suitable receptacle, capacity about 5.0
liters (5,3 qts.).
Refit the drain plug (1) and fill with oil up to the level
plug (3), according to "Drum gearbox - Checking the
oil level".
Use transmission oil according to the lubricant
3
specification.
1
Clean and refit the level plug (3) and filler plug (2).
Fig. Drum gearbox
1. Drain plug
2. Filler plug
3. Level plug
2019-11-05
149